To manage all aspects of the input and display language settings on your Windows 11 PC, use the following methods.
To switch the keyboard layout you’re using, press and hold the Windows key and then repeatedly press the Spacebar to cycle through all your installed keyboards. (If this doesn’t do anything, it means you have only one installed.)
You can also select the language abbreviation in your taskbar then choose the language or input method you want to use.
Note: In the input field, press the Windows logo key + period (.) to access the Emoji & more keyboard, if your language supports it.
If you can’t find the keyboard layout you want, you may have to add a new keyboard.
Adding an input language lets you set a language-preference order for websites and apps, as well as change your keyboard language.
-
Select the Start > Settings > Time & language > Language & region.
-
Select the language that has the keyboard you want, then select Options.
-
Select Add a keyboard and choose the keyboard you want to add. If you don’t see the keyboard you want, you may have to add a new language to get additional options. If this is the case, go on to step 4.
-
Return to the Language settings page, go to Preferred languages, then select Add a language.
-
Choose the language you want to use from the list, then select Next.
-
Review any language features you want to set up or install, and select Install.
«Add a keyboard» shortcut
The display language you select changes the default language used by Windows features like Settings and File Explorer.
-
Select Start > Settings > Time & language > Language & region.
-
Choose a language from the Windows display language menu.
«Change your display language» shortcut
If a language is listed under Preferred languages but doesn’t appear on the Windows display language list, you’ll first need to install its language pack (if it’s available).
-
Select Start > Settings > Time & language > Language & region.
-
In Preferred languages, select Add a language, enter the language you want, then select Next.
-
Select Download from the Download language pack option.
-
After the language pack is installed, select Back.
-
Choose a language from the Windows display language menu.
«Install a language pack» shortcut
If you receive an «Only one language pack allowed» or «Your Windows license supports only one display language» message, you have a single language edition of Windows 10. Here’s how to check your Windows 10 language edition:
-
Select Start > Settings > About, and then go to the Windows specification section.
-
If you see Windows 11 Home Single Language next to Edition, you have a single language edition of Window 11, and you can’t add a new language unless you purchase an upgrade to either Windows 11 Home or Windows 11 Pro.
Upgrade to Windows 11 Home or Windows 11 Pro
-
Select Start > Settings > Time & language > Language & region.
-
Under Preferred languages, select the language you want to remove, and then select Remove.
-
To remove an individual keyboard, select the language (see step 2), select Options, scroll down to the Keyboards section, select the keyboard you want to remove, and select Remove.
To manage all aspects of the input and display language settings on your Windows 10 device, use the following methods.
To switch the keyboard layout you’re using in Windows 10, press and hold the Windows key and then repeatedly press the Spacebar to cycle through all your installed keyboards. (If this doesn’t do anything, it means you have only one installed.)
You can also select the language abbreviation on the far right of the taskbar and then choose the language or input method you want to use.
Note: In the input field, press Windows +period (.) to access the emoji keyboard, if your language supports this.
If you can’t find the keyboard layout you want, you may have to add a new keyboard.
Adding an input language lets you set a language-preference order for websites and apps, as well as change your keyboard language.
-
Select the Start button, then select Settings > Time & Language > Language.
-
Under Preferred languages, select the language that contains the keyboard you want, and then select Options.
-
Select Add a keyboard and choose the keyboard you want to add. If you don’t see the keyboard you want, you may have to add a new language to get additional options. If this is the case, go on to step 4.
-
Return to the Language settings page, and select Add a language.
-
Choose the language you want to use from the list, and then select Next.
-
Review any language features you want to set up or install, and select Install.
«Add a keyboard» shortcut
Some languages require additional language features
For some languages to work properly, you need an admin on your PC to install the language features. Here’s a list of the languages that are affected:
-
Microsoft IME – Primary keyboard of Japanese
-
Microsoft Pinyin – Primary keyboard of Chinese (Simplified, China), Primary keyboard of Chinese (Simplified, Singapore)
-
Microsoft Wubi – Secondary keyboard of Chinese (Simplified, China), Secondary keyboard of Chinese (Simplified, Singapore)
-
Microsoft Bopomofo – Primary keyboard of Chinese (Traditional, Taiwan), Secondary keyboard of Chinese (Traditional, Hong Kong SAR), Secondary keyboard of Chinese (Traditional, Macao SAR)
-
Microsoft ChangJie – Secondary keyboard of Chinese (Traditional, Taiwan), Secondary keyboard of Chinese (Traditional, Hong Kong SAR), Secondary keyboard of Chinese (Traditional, Macao SAR)
-
Microsoft Quick – Secondary keyboard of Chinese (Traditional, Taiwan), Primary keyboard of Chinese (Traditional, Hong Kong SAR), Primary keyboard of Chinese (Traditional, Macao SAR)
-
Bangla Phonetic – Secondary keyboard of Bengali (India)
-
Gujarati Phonetic – Secondary keyboard of Gujarati
-
Hindi Phonetic – Secondary keyboard of Hindi
-
Kannada Phonetic – Secondary keyboard of Kannada
-
Malayalam Phonetic – Secondary keyboard of Malayalam
-
Marathi Phonetic – Secondary keyboard of Marathi
-
Odia Phonetic – Secondary keyboard of Odia
-
Punjabi Phonetic – Secondary keyboard of Punjabi (Gurmukhi)
-
Tamil Phonetic – Secondary keyboard of Tamil (India)
-
Telugu Phonetic – Secondary keyboard of Telugu
The display language you select changes the default language used by Windows features like Settings and File Explorer.
-
Select the Start button, then select Settings > Time & Language > Language.
-
Choose a language from the Windows display language menu.
«Change your display language» shortcut
If a language is listed under Preferred languages but doesn’t appear on the Windows display language list, you’ll first need to install its language pack (if it’s available).
-
Select the Start button, then select Settings > Time & Language > Language.
-
Choose a language from the Add a language list under Preferred languages, and then select Options.
-
Select Download from the Download language pack option.
-
After the language pack is installed, select Back .
-
Choose a language from the Windows display language menu.
«Install a language pack» shortcut
If you receive an «Only one language pack allowed» or «Your Windows license supports only one display language» message, you have a single language edition of Windows 10. Here’s how to check your Windows 10 language edition:
-
Select the Start button, select Settings > About, and then scroll down to the Windows specification section.
-
If you see Windows 10 Home Single Language next to Edition, you have a single language edition of Window 10, and you can’t add a new language unless you purchase an upgrade to either Windows 10 Home or Windows 10 Pro.
Upgrade to Windows 10 Home or Windows 10 Pro
-
Select the Start button, then select Settings > Time & Language > Language.
-
Under Preferred languages, select the language you want to remove, and then click Remove.
-
To remove an individual keyboard, select the language in question (see step 2), select Options, scroll down to the Keyboards section, select the keyboard you want to remove, and click Remove.
Need more help?
Want more options?
Explore subscription benefits, browse training courses, learn how to secure your device, and more.
Communities help you ask and answer questions, give feedback, and hear from experts with rich knowledge.
Find solutions to common problems or get help from a support agent.
(Image credit: Windows Central)
Although Windows 10 will help you configure the default language during the initial setup, if you didn’t select the correct option or use a computer already configured with a different language, you don’t have to struggle when your requirements are different.
If you have to change the device’s default language settings, you can complete this task using the Settings app without reinstalling Windows 10.
In this Windows 10 guide, we will walk you through the steps to change the system default language on your computer.
How to change default system language on Windows 10
If you happen to be using the incorrect language on Windows 10, you can adjust the system settings to configure the correct language without reinstallation.
Disable language sync
On Windows 10, when using a Microsoft account, some of your preferences (including language) will sync across the device. If you only plan to change the settings on the computer, you should disable the option to sync your language settings to prevent changing the same settings on other devices.
To disable language preference sync on Windows 10, use these steps:
- Open Settings.
- Click on Accounts.
- Click on Sync your settings.
- Under the «Individual sync settings» section, turn off the Language preferences toggle switch.
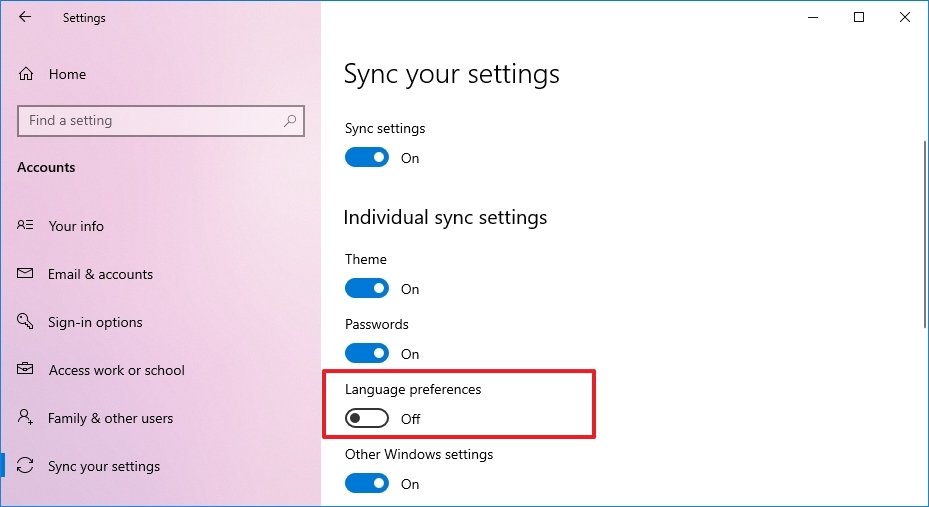
Once you complete the steps, you can change the language settings without affecting the other devices connected with the same Microsoft account.
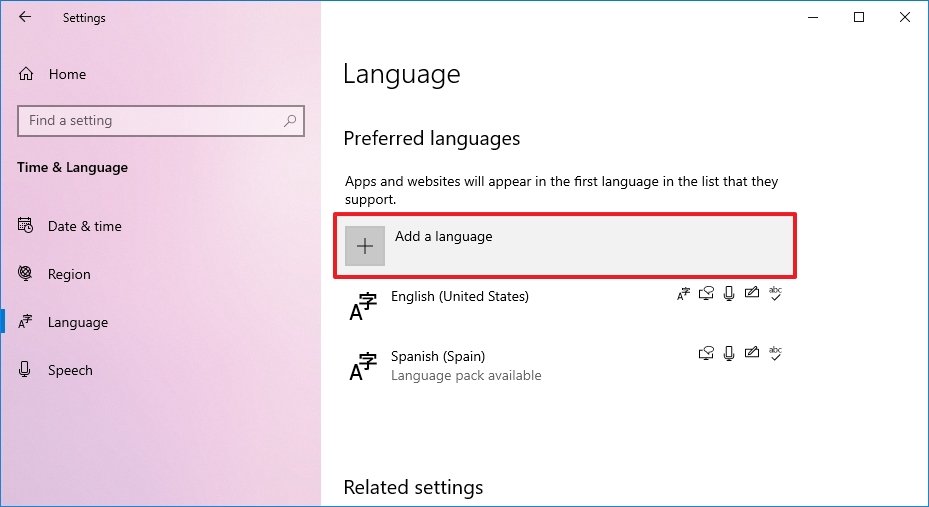
Change system language settings
To change the system default language, close your apps, and use these steps:
- Open Settings.
- Click on Time & Language.
- Click on Language.
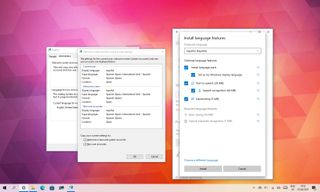
- Under the «Preferred languages» section, click the Add a language button.
- Search for the new language using the language or country name.
- Select the package from the result.
- Click the Next button.
- Check the Install language pack option.
- Check the Set as my Windows display language option.
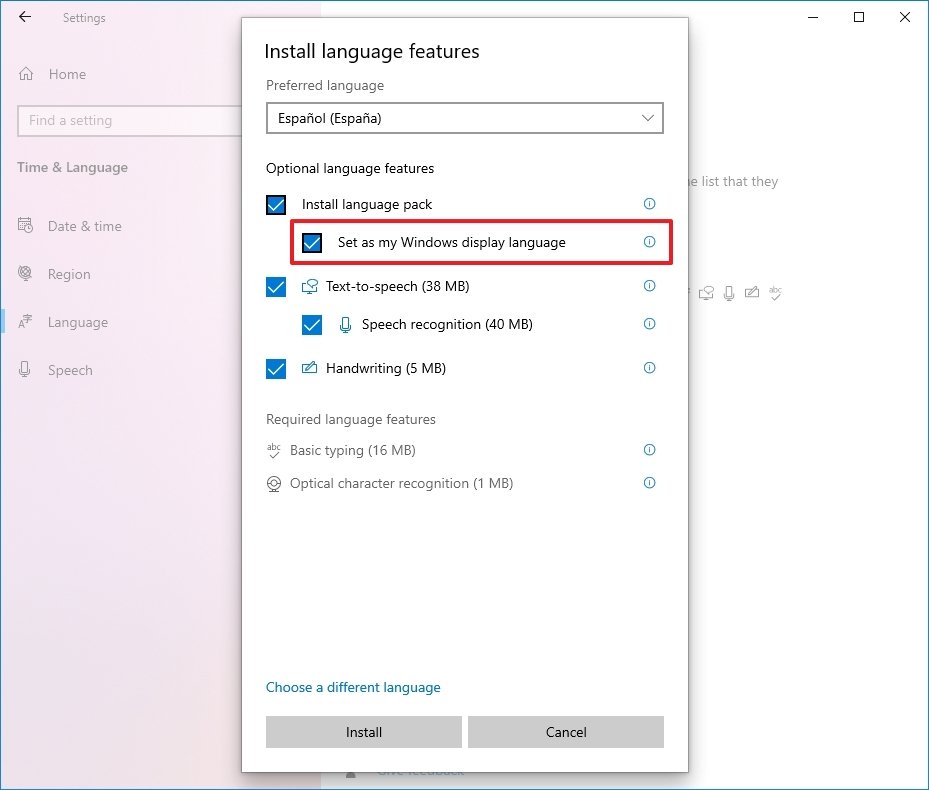
- Check the additional features as needed — for example, «Text-to-speech» and «Handwriting.»
- Click the Install button.
- Click the Yes, sign out now button.
- Sign back into the account.
After you complete the steps, the Windows 10 language will change across the experience, including the Sign-in screen, Settings app, File Explorer, Desktop, apps, browser, and websites you visit.
Change system region settings
You will also have to change the region settings if you need to adjust the language settings because you are in a different region.
To change the local region settings on Windows 10, use these steps:
- Open Settings.
- Click on Time & Language.
- Click on Region.
- Under the «Region» section, select the current location with the «Country or region» drop-down menu (if applicable).
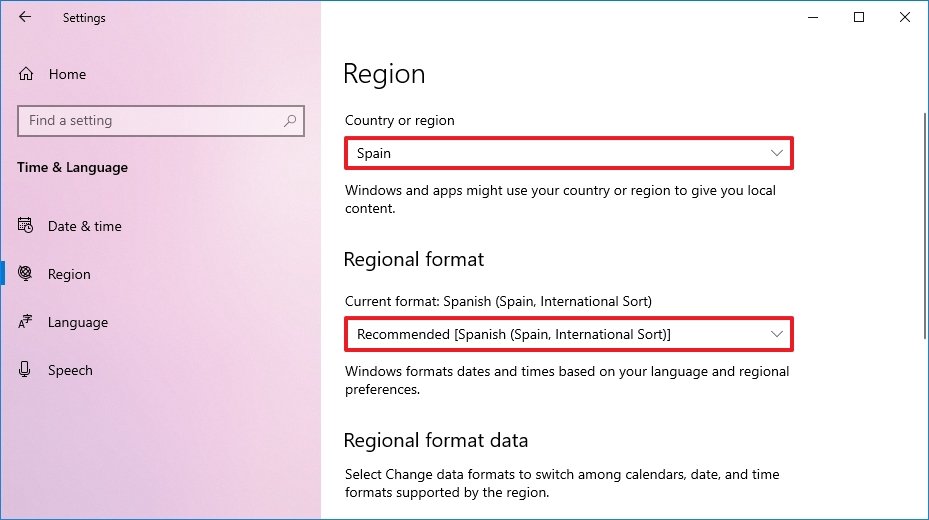
- Under the «Regional format» section, select the formats for the region’s date and time with the «Current format» drop-down menu (if applicable).
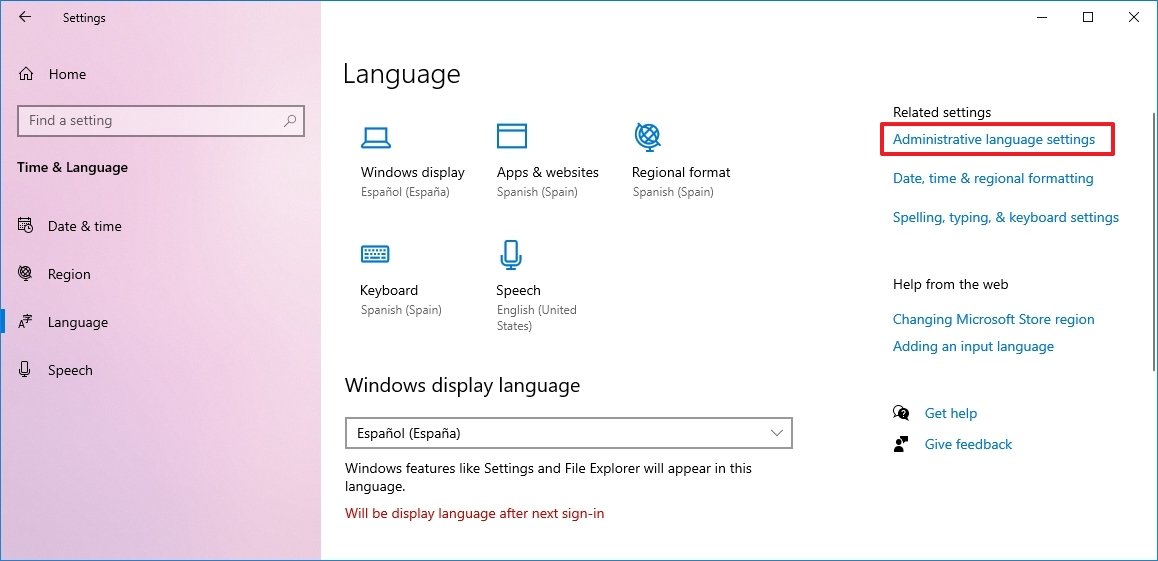
- Click on Language.
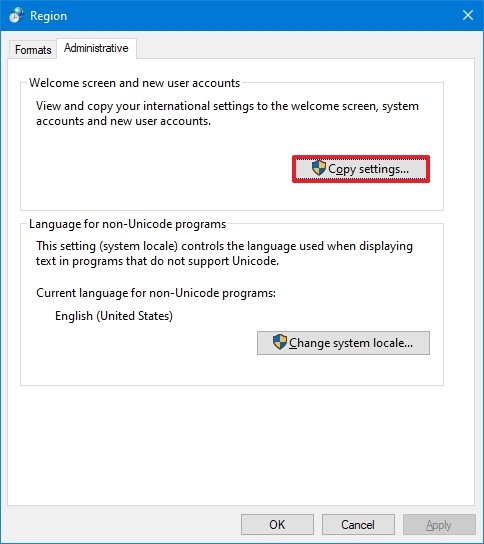
- Under the «Related settings» section, click the Administrative language settings option.
- Click the Administrative tab.
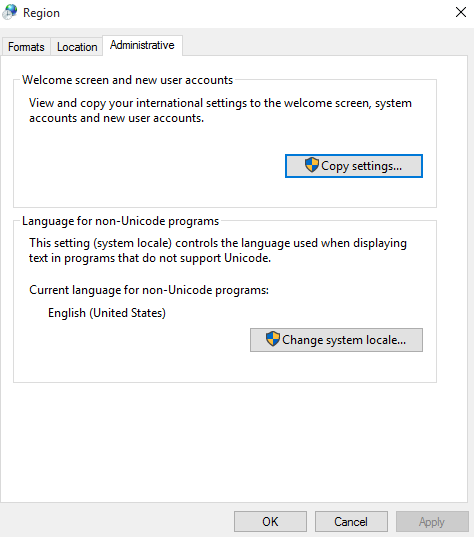
- Under the «Language for non-Unicode programs» section, click the Change system locale button.
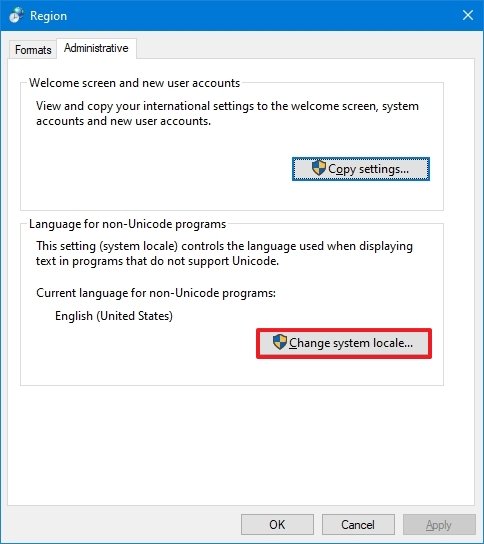
- Select the new system locale language with the «Current system locale» drop-down menu.

- Click the OK button.
- Click the Copy settings button in the «Administrative» tab.
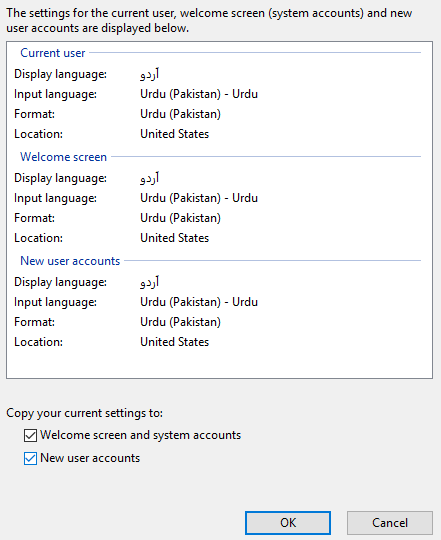
- Under the «Copy your current settings to» section, check the Welcome screen and system accounts and New user accounts options.
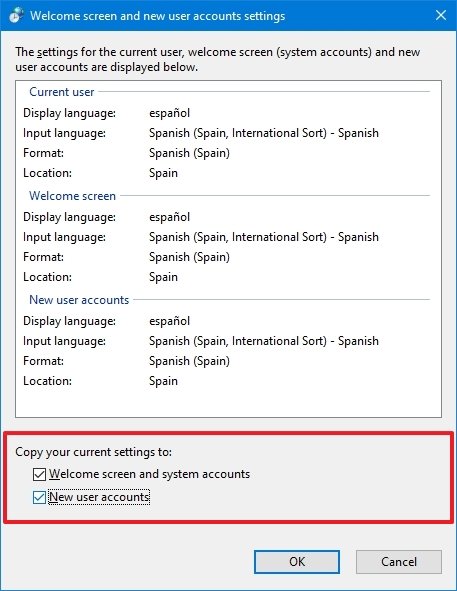
- Click the OK button.
- Click the OK button again.
- Click the Restart now button.
Once you complete the steps, the settings will apply, and the computer will now use the correct region settings.
Usually, you rarely have to change or install additional languages on Windows 10. However, changing these settings may come in handy in organizations working with people who need to use different preferences. It’s also a helpful feature to match the locale settings if you relocate to another region or when buying a new device that ships from a different country.
The only caveat with changing the region settings is that it will also change the settings for the Microsoft Store, which may block access to certain apps and services, depending on the location. In the same way, you can change the region settings to access an application from the Microsoft Store that is only available in a specific region. If you happen to be one of the remaining users using Cortana, consider changing the region settings that may prevent you from accessing the digital assistant.
More Windows resources
For more helpful articles, coverage, and answers to common questions about Windows 10 and Windows 11, visit the following resources:
- Windows 11 on Windows Central — All you need to know
- Windows 11 help, tips, and tricks
- Windows 10 on Windows Central — All you need to know
All the latest news, reviews, and guides for Windows and Xbox diehards.
Mauro Huculak is technical writer for WindowsCentral.com. His primary focus is to write comprehensive how-tos to help users get the most out of Windows 10 and its many related technologies. He has an IT background with professional certifications from Microsoft, Cisco, and CompTIA, and he’s a recognized member of the Microsoft MVP community.
You can change the default display language of your Windows 10 from English to any other language. This is useful in scenarios where multiple users are accessing the same system and they understand different languages.
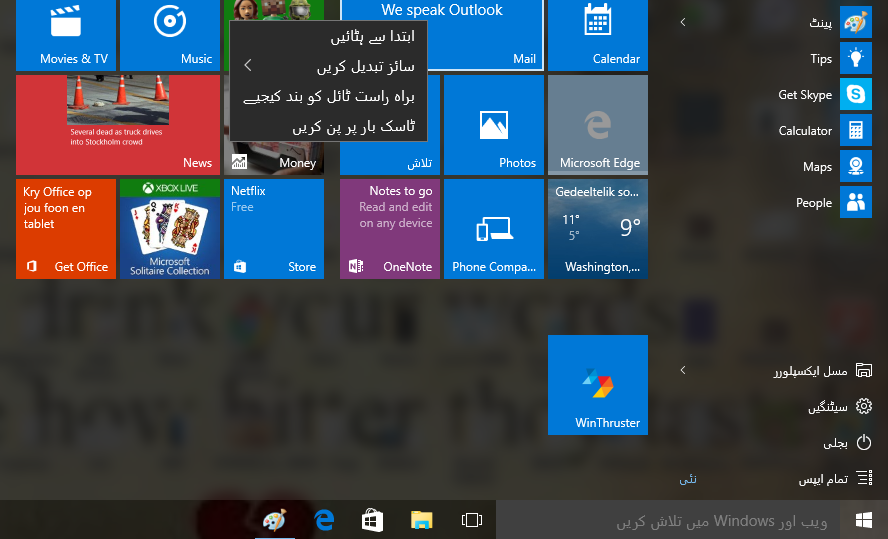
In this guide, I will walk through to change the default English language to Urdu (you can change it to Spanish, French or German etc. :)) If you like to change the Cortana voice language, have a look here.
Step 1. Press Windows key + I on the keyboard to open the settings window.
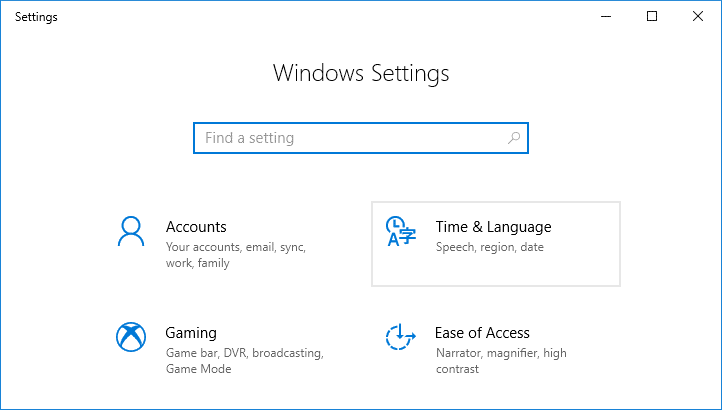
Step 2. Click Time and language.
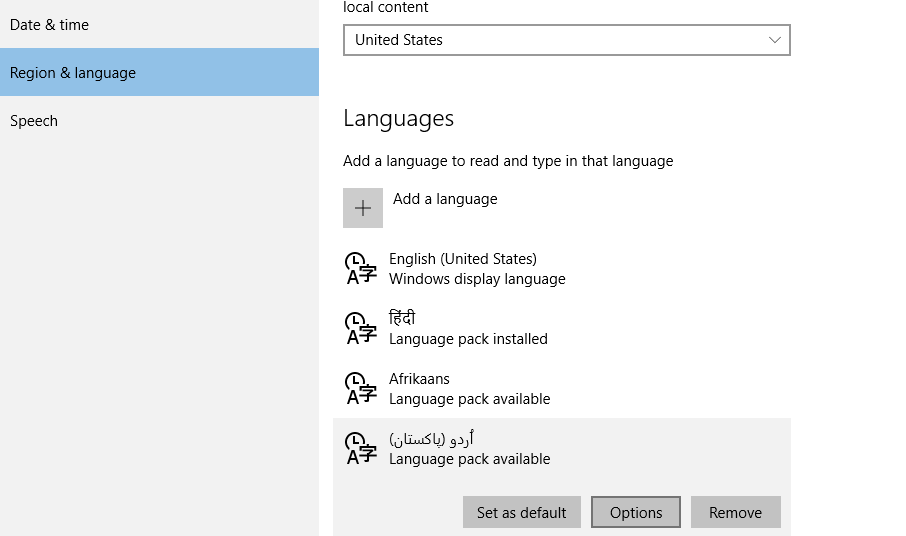
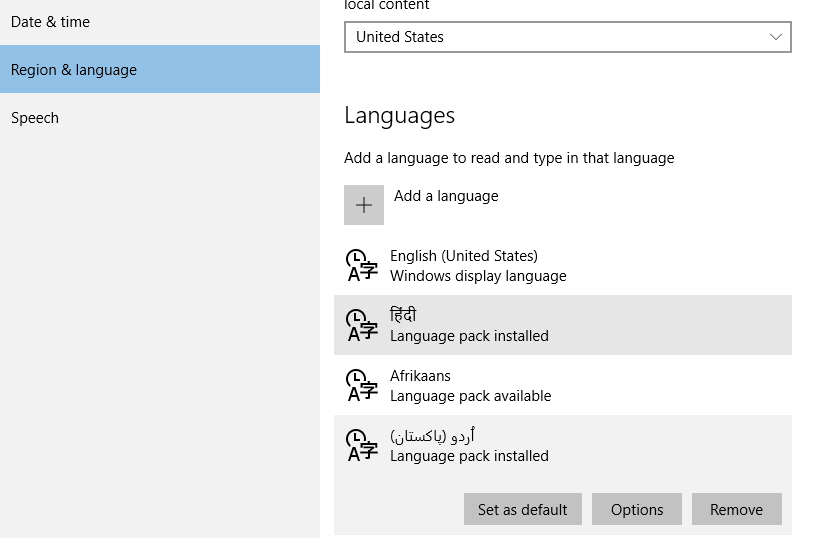
Step 3. Click Region and Language.
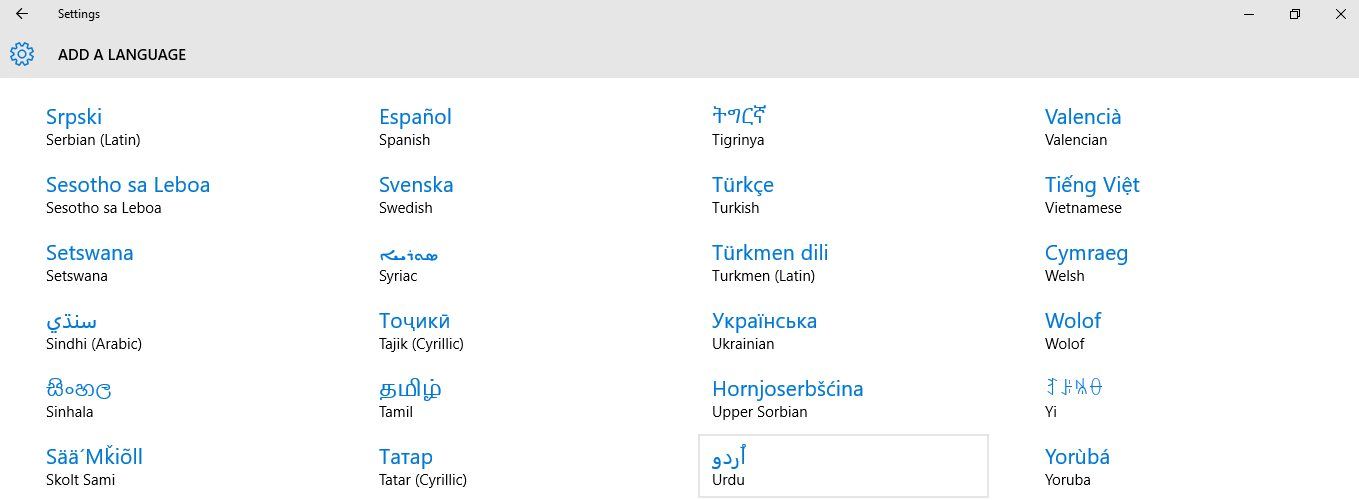
Step 4. Click Add a language.

Step 5. Select your desired language and its variation (if applicable) by clicking on the language name.
Step 6. Select the new language and click Options.
Step 7. Download the language pack.
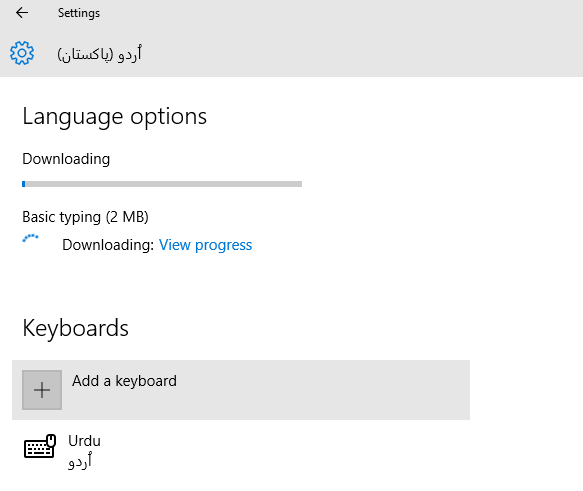
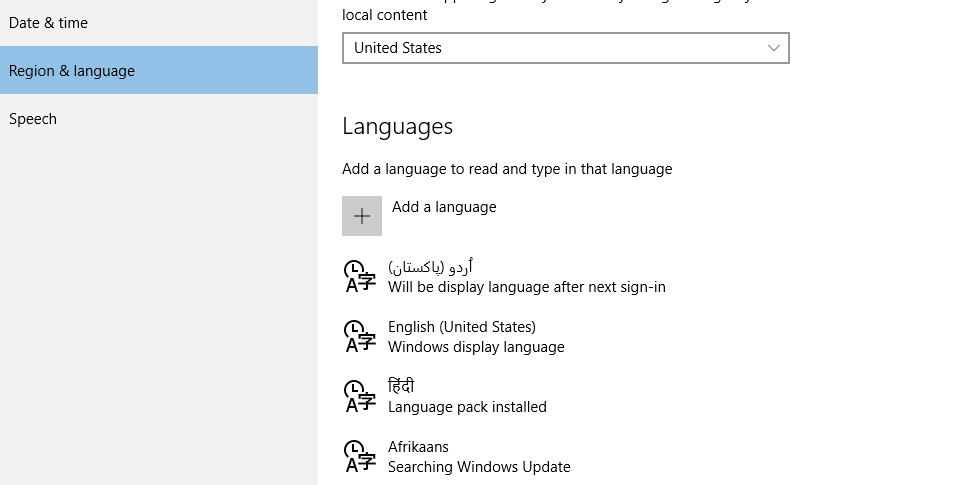
Step 8. Select the new language and click Set as default.
Step 9. Your new language will be displayed after next sign-in (See below screen shot).
Step 10. Press Windows key + X from the keyboard, scroll the power menu and click Control Panel.
Step 11. Click Add a language.
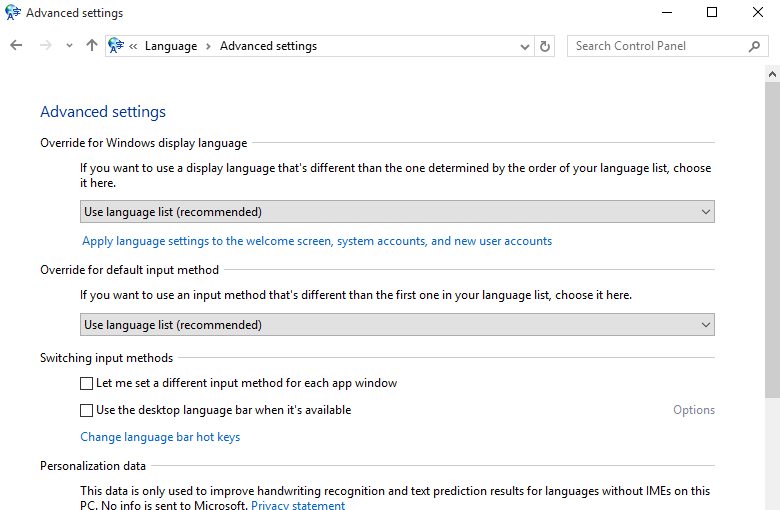
Step 12. Click Advanced Settings in the left pane.
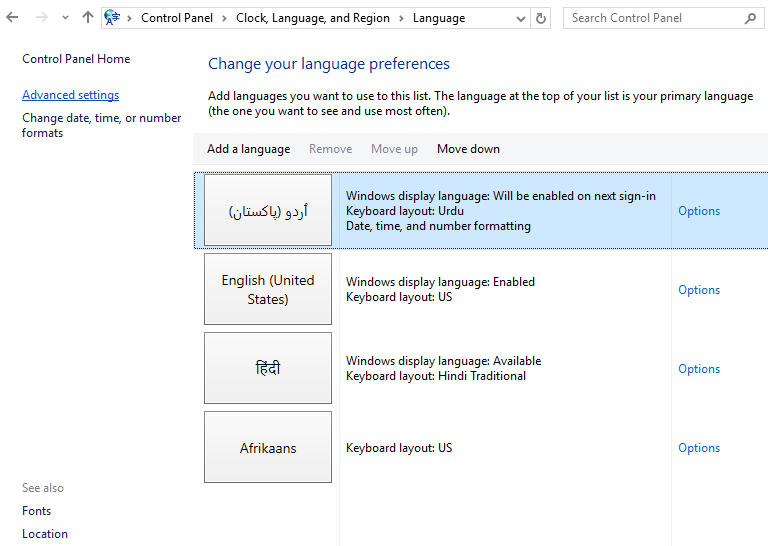
Step 13. Click «Apply language settings to the Welcome screen, system accounts, and new user accounts.».
Step 14. Open Administrative tab and click Copy settings.
Step 15. Check both «Welcome screen and system accounts» and «New user accounts» options. Click OK.
Step 16. Click Restart now and let your system reboot so changes may take effect.
When the system reboots successfully, everything will be displayed in the new language.
When installing Windows, you are asked to select the default language for your PC. But if you prefer to change this language later? Or multiple users access the PC; you might want to change default language without reinstalling Windows. Right?
In this guide, we will discuss simple ways to easily change language settings on Windows 10, including new and existing accounts.
How To Change Default System Language Windows 10
If you are moving to another region or have selected incorrect language while configuring Windows, follow the steps to change the language to English or your preferred language on Windows 10.
Note: To apply changes, sign in to Windows 10, and use an administrative account.
- Disable Language Sync
- Installing Language in Windows 10
- Change System Language
- Change Regional Settings, Welcome Screen and New User Accounts
- Adding New Keyboard
Additional Information
- Removing Language from Windows 10
- Uninstalling Language Pack
Disable Language Sync
Language settings on Windows 10 sync across devices; therefore, before making any changes, let’s learn how to disable language settings on Windows 10. Once you do so, the system language will be changed for only one PC.
1. To disable language sync on Windows 10, follow the steps below:
2. Press Windows + I to open Windows Settings.
Click Accounts > Sync your settings from the left pane.


Note: Make sure you are signed into Microsoft account; otherwise, all the options will be greyed out like in the screenshot.
3. Next, under “Individual sync settings” section, disable “Language preferences.”

4. You are now all set to make language setting changes.
Installing Language in Windows 10
To install language on Windows 10, you’ll need to log in using an administrative account. Once signed in, follow the steps below to install language in Windows 10:
1. Press Windows + I to open the Settings window
2. Hit Time & Language option

3. Choose language > Add a preferred language.

4. Look for the language you want to add, select it, and click Next.

5. Make sure the Install language pack box is checked. Alongside, if you want to set it as display language, select Set as my display language.

6. Once all settings are set, click Install. Wait for the action to finish.

7. When done, you will see the installed language
 8. To add this language as default app language, use the up-arrow key

9. This will make the selected language the default input, app language.
10. The changes will be applied after you restart the PC and sign in.
Change System Language
To alter system language on Windows 10, close running application, and follow the steps given below:
- Press Windows + I
- Click Time & Language > Add a preferred language.
- Select the language you want to add > Next
- Check the box next to Set as display language > Install
- This will make selected language default system language as the next reboot and Sign-in.
Change Regional Settings, Welcome Screen and New User Accounts
If you are relocating and want to change system language, you’ll need to update region settings.
To change regional settings on Windows 10, follow the steps below:
1. Open Windows Settings by pressing Windows + I key
2. Press Time & Language > Region
3. Click the down arrow to select a Country or region.

4. To change Regional format, click the down arrow.
5. Next, click the Language option present in the left pane.

6. Here, click Administrative language settings.

7. Hit the Administrative tab in the new window and click Copy settings.

8. Next, checkmark the box next to Welcome screen and system accounts & New user accounts > Ok > Ok.

9. Click Restart now button.
Afterward, you will see changed region settings according to the physical location you selected. Use the same steps when you want to change display language settings for complete Windows 10.
Adding New Keyboard
When language in Windows 10 is changed, a standard keyboard for that language is also added. To add another keyboard head to Settings (Windows + I) > Time & Language > Language. Select the language for which you want to add the keyboard > Options.
On the following screen, click Add a keyboard > choose the keyboard from the list.


Once done, you will see the selected keyboard under keyboards.
Note: When more than one input method is added, you see the selected keyboard in the system tray (the one with time and date). Either press Win + space bar or click the language to change input methods. If you press Windows key + spacebar do not leave Windows key until the language is selected

Additional Information
How to Remove a Language from Windows 10
If you have added a language to Windows 10 for a guest and now since the guest has left, would like to remove it. Follow the steps below:
- Open Windows Settings by pressing Windows + I keys
- Click Time & Language > Language
- Here, in the right pane, you will see all the installed languages.
- Select the language you want to delete and click Remove button

This will uninstall selected language from the Windows 10 operating system.
Note: If you have only one language pack installed you will not see a language indicator in the system tray
Manually Uninstalling Language Packs from Windows 10
If you don’t want to follow so many steps, you can uninstall the language pack using a simple command. To use it, follow the steps below:
Press Windows + R keys
This will open the Run window here enter Lpksetup /u
This will launch the Install or uninstall display languages box. Select the language you wish to uninstall and click Next.

The progress bar will tell about successful command completion. Once done restart Windows, the selected language pack will now be uninstalled from Windows 10.
Hope now you have understood how to change system language settings on Windows 110. You can follow these simple steps, whether you need to change display language settings, keyboard, or default system language settings.
If all this language change seemed exciting, check out the best language learning apps.
How to Change the System Language in Windows 10: When you install Windows 10 Operating System, it asks you to choose the language. If you choose the particular language of your choice and later decide to change it, you have the option to change the system language. For that, you do not need to re-install the Windows 10 on your system. It could be possible that you are not comfortable with the current system language and want to change it. However, you need to make sure that you always first check your current system language, which is by default set while you install Windows 10 Operating system.

Why Would You Change the System Language in Windows 10?
Before we jump into the instructions of changing the system language, we need to gauge some reasons for changing it. Why would anyone change the default system language?
1 – If your friends or relatives coming to your place are not familiar with the current system language of your system, you can instantly change the language so that they can easily work on it.
2 – If you bought a used PC from a shop and found that you do not understand the current system language. This is the second situation when you need to change the system language.
Make sure to create a restore point just in case something goes wrong.
You have complete authority and freedom to change the system languages.
Note: If you are using Microsoft account, it syncs your settings changes in all devices connected with that account. Therefore, if you want to change the language of only one particular system, it is recommended you need to first disable the syncing option.
Step 1 – Navigate to Settings > Accounts > Tap On Sync your settings
Step 2 – Turn off the Language preferences toggle switch.

Once you are done with this, you can proceed to change the language setting of your system.
1.Press Windows Key + I to open Settings.
2.Tap on Time & Language option. This is the section where you will find out the settings related to language change.
3.Navigate to Region & Language.
4.Here under the language setting, you need to click on Add a Language button.

5.You can search the language that you want to use in the search box. You need to make sure that you type the language in the search box and choose the one that you want to install in your system.

6.Select the language and click “Next”.

7.Select “Set as my Windows display language option” option
8.You will get an additional feature option to install such as Speech & Handwriting. Click on the Install option.

9.You need to cross-check whether the selected language has been set properly or not. You need to check under “Windows display language”, make sure that the new language is set.
10.In case, your language is not matching with the country, you can check under “Country or region” option and matches the language location.
11.To make the language setting for the entire system, you need to click on “Administrative Language Settings” option on the right panel of the screen.

12.Here you need to click on “Copy Settings” button.

13.– Once you will click on Copy Settings, here you need to checkmark “Welcome screen and system accounts” and “New User Accounts“. This will make the changes in all sections to ensure that your system’s by default language is changed to your required setting.

14.– Finally Click on the OK option to save changes.
Once you will complete the above-mentioned steps, everything on your device will be changed into the new language – welcome screen, settings, explorer and apps.
This is how you can easily Change the System Language in Windows 10. However, you need to understand that Cortana feature is not available in some region, so you may lose it while changing the system language to a region which Cortana does not support.
You do not need to stick with the default settings when you want to customize the settings for better use of your system. These steps will make sure that whenever you want, you can make the desired changes in the system. If you want to revert the changes, you just need to follow the same instructions. All you need to keep in mind is the previously configured system language so that you can choose it properly.
Recommended:
- Sync Multiple Google Drive Accounts In Windows 10
- How to View Saved Password in Chrome
- Create Fillable Forms in Microsoft Word
- Use Chrome Components to Update Individual Components
I hope the above steps were helpful and now you can easily Change the System Language in Windows 10, but if you still have any questions regarding this tutorial then feel free to ask them in the comment’s section.