 Контроль учетных записей или UAC в Windows 10 уведомляет вас при запуске программ или выполнении действий, которые требуют права администратора на компьютере (что обычно означает, что программа или действие приведет к изменению системных настроек или файлов). Сделано это с целью защитить вас от потенциально опасных действий и запуска ПО, которое может нанести вред компьютеру.
По умолчанию UAC включен и требует подтверждения для любых действий, могущих оказать влияние на операционную систему, однако вы можете отключить UAC или настроить его уведомления удобным для себя способом. В конце инструкции также имеется видео, где показаны оба способа отключения контроля учетных записей Windows 10. Примечание: если даже при отключенном контроле учетных записей какая-то из программ не запускается с сообщением, что администратор заблокировал выполнение этого приложения, должна помочь эта инструкция: Приложение заблокировано в целях защиты в Windows 10.
- Отключение контроля учетных записей в панели управления Windows 10
- Изменение параметров UAC в редакторе реестра
- Отключение UAC в командной строке
- Как отключить контроль учетных записей в редакторе локальной групповой политики
- Видео инструкция
Как отключить контроль учетных записей в панели управления Windows 10
Первый способ — использовать соответствующий пункт в панели управления Windows 10 для изменения настроек контроля учетных записей. Прежде чем приступить, учитывайте, что для отключения UAC вам требуется наличие прав администратора. Если их нет, но вы хотите установить или запустить программу, может сработать способ из инструкции Как установить программу без прав администратора.
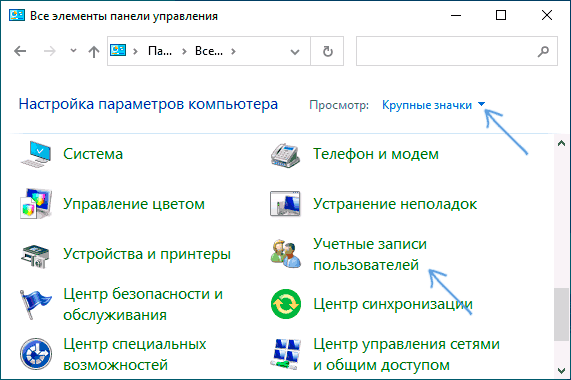
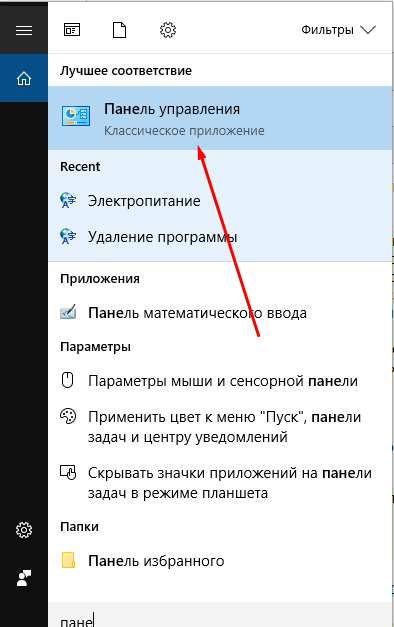
- Откройте панель управления, для этого можно использовать поиск в панели задач или нажать клавиши Win+R, ввести control и нажать Enter. А можно сразу перейти к 4-му шагу, нажав Win+R и введя UserAccountControlSettings
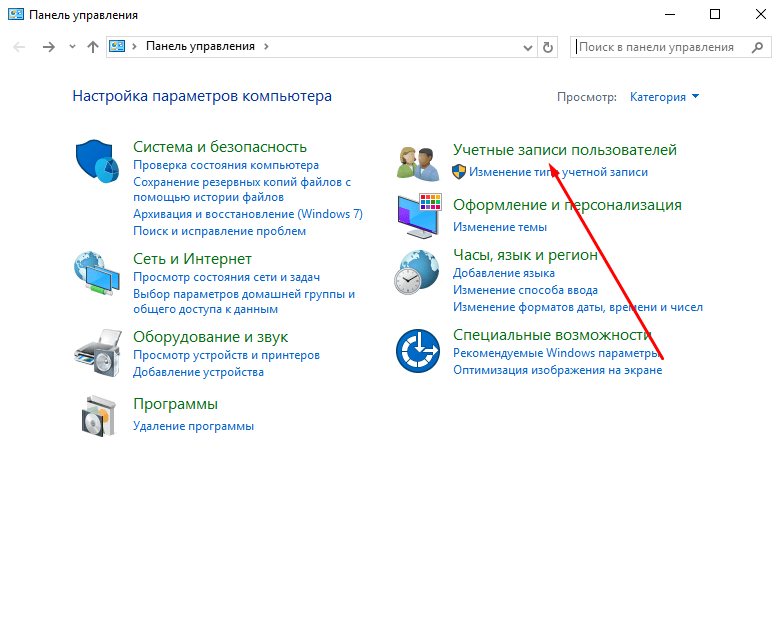
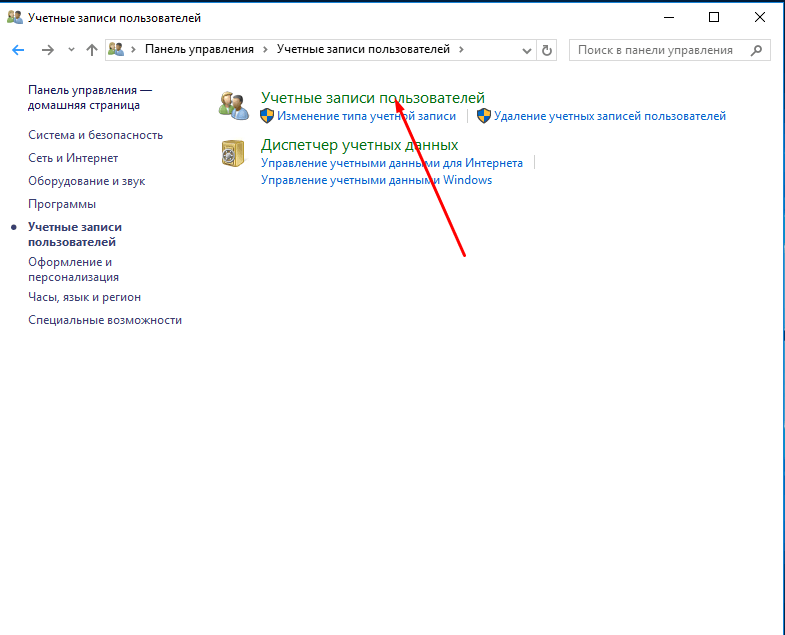
- В панели управления вверху справа в поле «Просмотр» вместо «Категории» установите «Значки», а затем откройте пункт «Учетные записи пользователей».

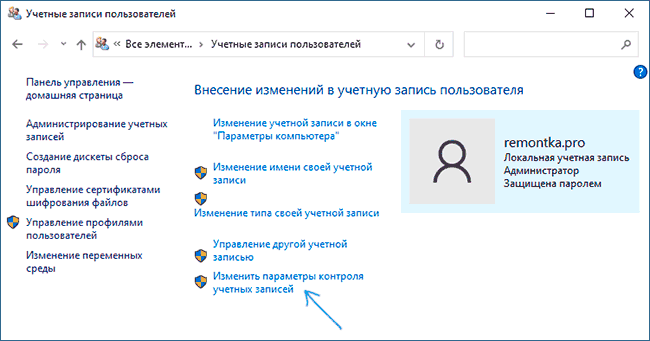
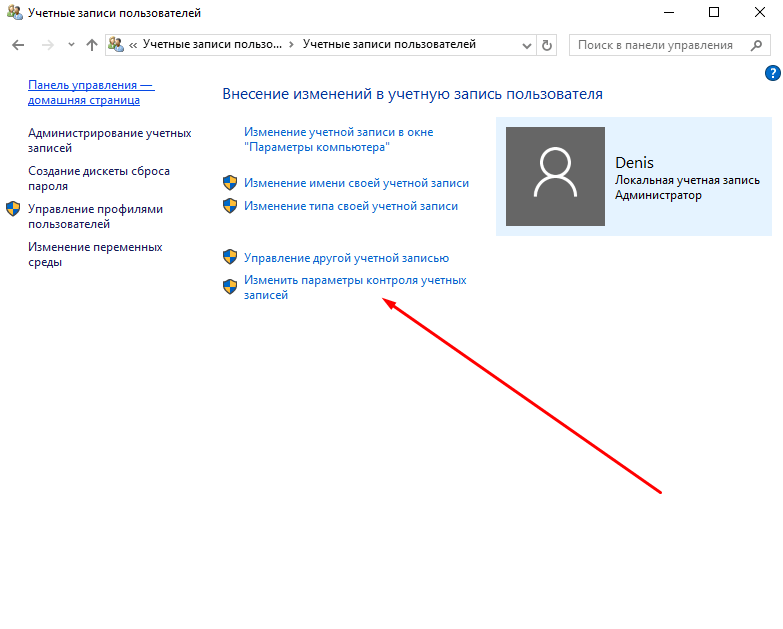
- В следующем окне нажмите «Изменить параметры контроля учетных записей».

- Далее вы можете вручную задать параметры UAC или отключить контроль учетных записей Windows 10, достаточно выбрать один из вариантов настроек работы UAC, каждый из которых пояснён далее.

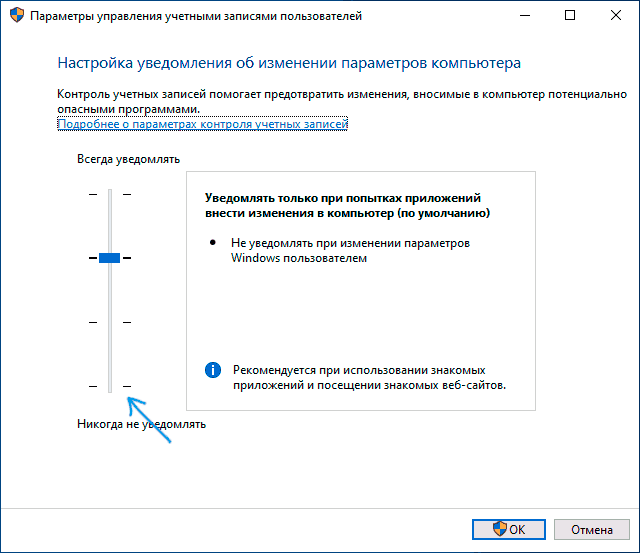
Возможные варианты настроек контроля учетных записей в панели управления от верхнего к нижнему:
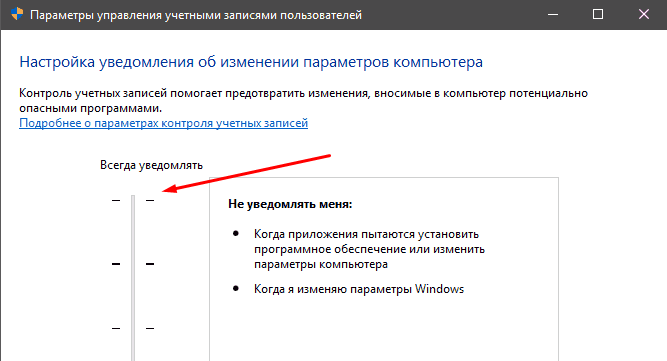
- Всегда уведомлять, когда приложения пытаются установить программное обеспечение или при изменении параметров компьютера — самый безопасный вариант, при любом своем действии, которое может что-то изменить, а также при действиях сторонних программ вы будете получать уведомление об этом. Обычные пользователи (не администраторы) должны будут ввести пароль для подтверждения действия.
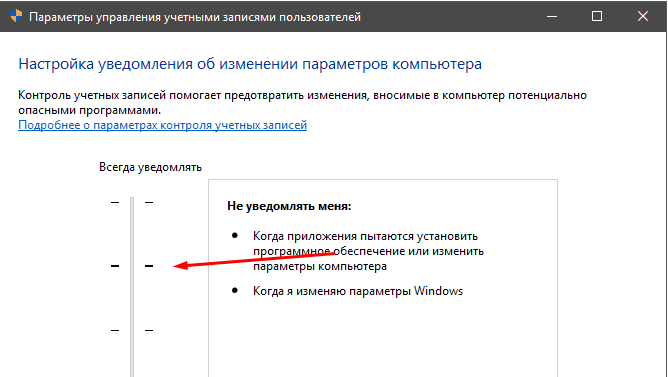
- Уведомлять только при попытках приложений внести изменения в компьютер — этот параметр установлен в Windows 10 по умолчанию. Он означает, что контролируются только действия программ, но не действия пользователя.
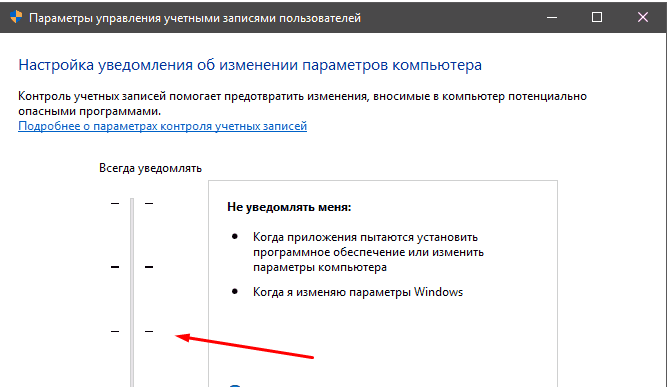
- Уведомлять только при попытках приложений внести изменения в компьютер (не затемнять рабочий стол). Отличие от предыдущего пункта в том, что рабочий стол не затемняется и не блокируется, что в некоторых случаях (вирусы, трояны) может быть угрозой безопасности.
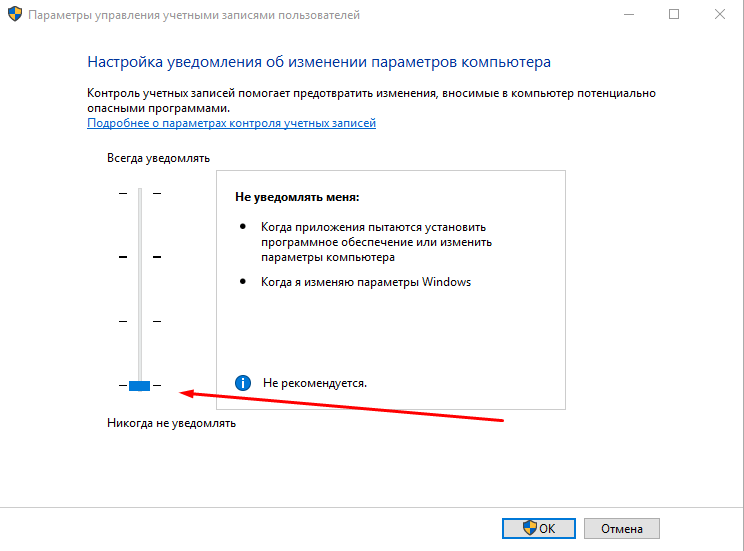
- Не уведомлять меня — UAC отключен и не уведомляет о каких-либо изменениях в параметрах компьютера, инициированных вами или программами.
Если вы решили отключить контроль учетных записей Windows 10, что является совсем не безопасной практикой, в дальнейшем следует быть очень внимательным, поскольку все программы будут иметь к системе тот же доступ, что и вы, в то время как контроль учетных записей не сообщит, если какая-то из них может повлиять на работу системы. Иными словами, если причина отключения UAC только в том, что он «мешает», я настойчиво рекомендую включить его обратно.
Изменение параметров контроля учетных записей в редакторе реестра
Отключение UAC и выбор любого из четырех вариантов работы контроля учетных записей Windows 10 возможен и с помощью редактора реестра (чтобы запустить его нажмите Win+R на клавиатуре и введите regedit).
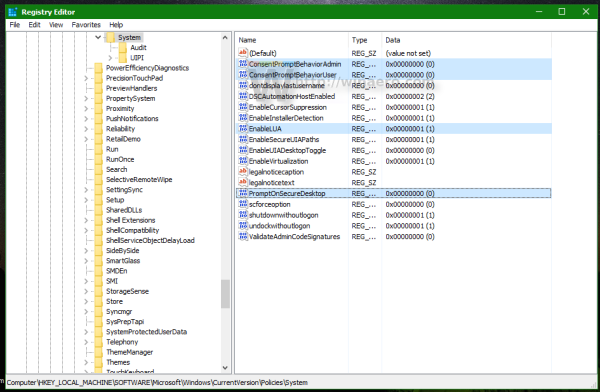
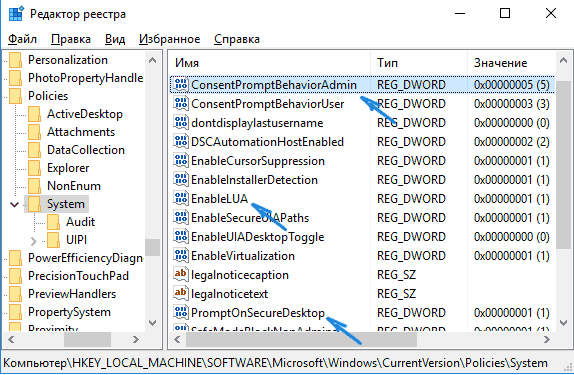
Параметры работы UAC определяются тремя ключами реестра, находящимися в разделе
HKEY_LOCAL_MACHINE\SOFTWARE\Microsoft\Windows\CurrentVersion\Policies\System
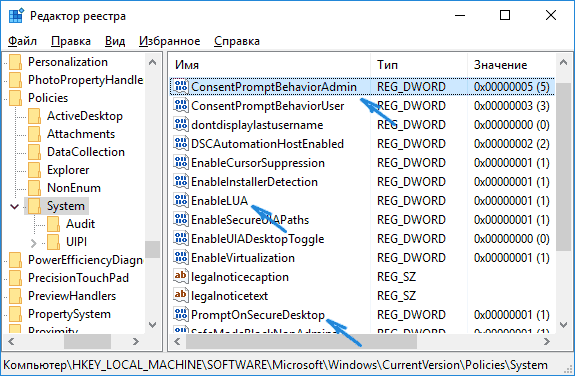
Перейдите в этот раздел и найдите следующие параметры DWORD в правой части окна: PromptOnSecureDesktop, EnableLUA, ConsentPromptBehaviorAdmin. Для полного отключения контроля учетных записей достаточно изменить значение параметра EnableLUA на 0 (ноль), закрыть редактор реестра и перезагрузить компьютер.
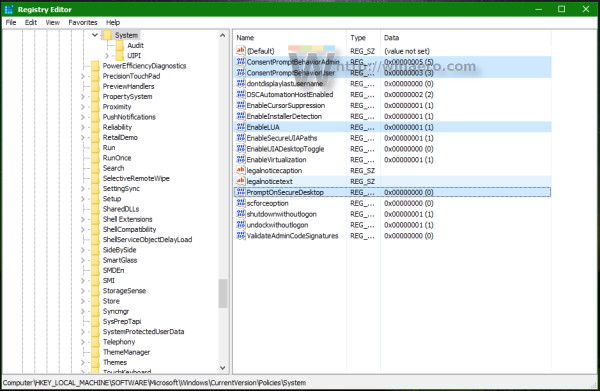
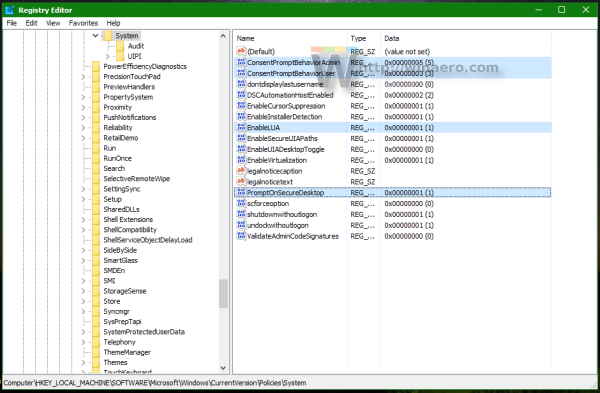
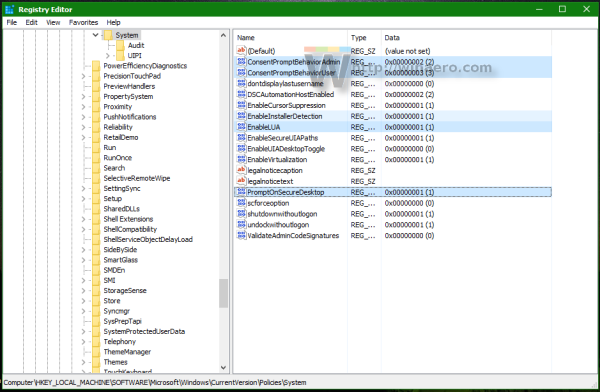
Однако, когда вы меняете параметры UAC в панели управления, сама Windows 10 оперирует тремя параметрами одновременно и делает это несколько иначе (хотя предыдущий метод проще и быстрее). Далее привожу значения каждого из ключей PromptOnSecureDesktop, EnableLUA, ConsentPromptBehaviorAdmin в том порядке, как они указаны для разных вариантов оповещений контроля учетных записей.
- Всегда уведомлять — 1, 1, 2 соответственно.
- Уведомлять при попытках приложений изменить параметры (значения по умолчанию) — 1, 1, 5.
- Уведомлять без затемнения экрана — 0, 1, 5.
- Отключить UAC и не уведомлять — 0, 1, 0.
Отключение UAC в командной строке
Быстрый способ полностью отключить контроль учетных записей — использовать командную строку, для этого:
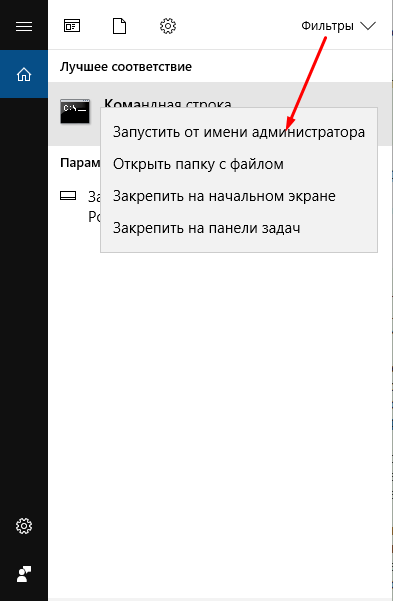
- Запустите командную строку от имени администратора, в Windows 10 для этого можно начать вводить «Командная строка» в поиск на панели задач, а когда найдется нужный результат — либо нажать по нему правой кнопкой мыши и выбрать нужный пункт меню, либо выбрать «Запуск от имени администратора» в панели справа.
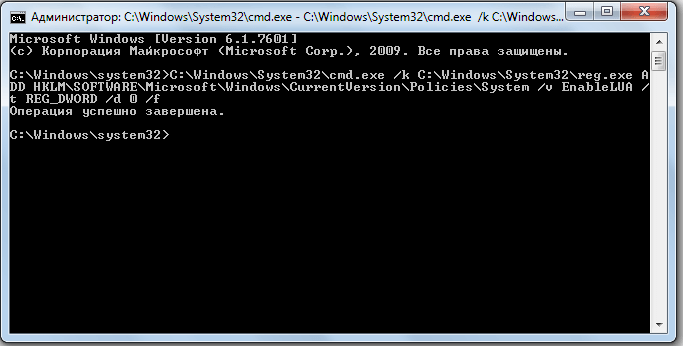
- Введите команду (нажав Enter после ввода)
reg ADD HKLM\SOFTWARE\Microsoft\Windows\CurrentVersion\Policies\System /v EnableLUA /t REG_DWORD /d 0 /f
- Закройте командную строку и перезапустите компьютер или ноутбук.
По своей сути этот метод является вариантом способа с редактором реестра, который описан выше: просто нужный параметр изменяется с помощью указанной команды.
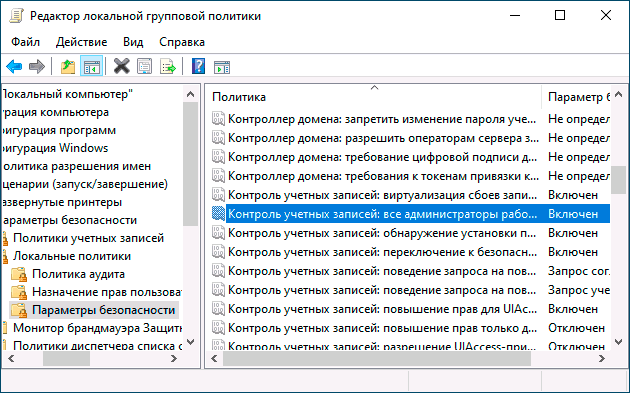
Как отключить контроль учетных записей UAC в редакторе локальной групповой политики Windows 10
Этот метод подойдёт для Windows 10 Pro и Enterprise, где присутствует редактор локальной групповой политики. Шаги будут следующими:
- Нажмите клавиши Win+R на клавиатуре, введите gpedit.msc и нажмите Enter.
- В редакторе перейдите к разделу «Конфигурация компьютера» — «Конфигурация Windows» — «Параметры Безопасности» — «Локальные политики» — «Параметры безопасности».
- В правой панели найдите параметр «Контроль учетных записей: все администраторы работают в режиме одобрения администратором» и дважды нажмите по нему.

- Установите параметр в значение «Отключен» и нажмите «Ок».

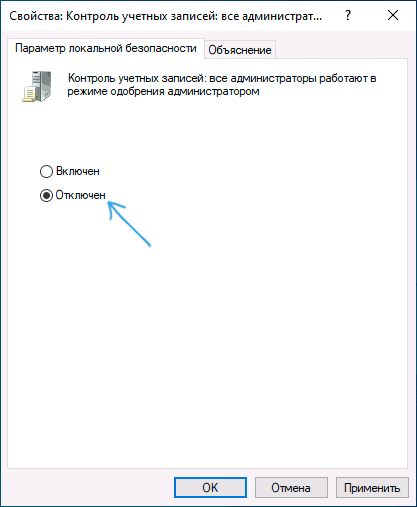
Перезагрузка компьютера обычно не требуется.
Видео
В завершение еще раз напомню: я не рекомендую отключать контроль учетных записей ни в Windows 10 ни в других версиях ОС, если только вы абсолютно точно не знаете, для чего вам это нужно, а также являетесь достаточно опытным пользователем.
- To change the UAC on Windows 10, open Control Panel > System and Security > Change User Account Control settings.
- Select the appropriate UAC setting, such as “Never notify,” to disable the feature.
- The options will vary depending on whether you use a Standard or Administrator account.
On Windows 10, User Account Control (UAC) is a security feature that blocks apps from making unwanted system changes, helps users to prevent accidental settings changes, and stops malware from getting into your system without your knowledge.
When UAC is enabled, if an app tries to make changes, Windows 10 will pop a security warning which the user must approve to allow the app to perform the task. If the user uses a standard account, they’ll need to enter administrative credentials to run a particular task requiring higher privileges.
In short, User Account Control allows users to work in a more secure environment. However, there are some situations where you may want to disable or configure the feature differently. For example, when you use legacy apps not designed to work in this environment, or you know exactly what you’re doing and prefer to run Windows 10 without this feature.
If you want to make changes or disable UAC completely, Windows 10 offers the necessary settings to prevent the User Access Control dialog from appearing every time a task needs elevation.
This guide will teach you the steps to manage the User Account Control (UAC) settings on Windows 10.
To change User Account Control settings, your account must have administrator privileges. Otherwise, you’ll need to provide an administrator password to adjust the settings.
To change the UAC settings on Windows 10, use these steps:
-
Open Control Panel.
-
Click on System and Security.
-
Click the “Change User Account Control settings” option.

-
On a Standard user account, you’ll see the four levels, but you can only change two of them:
- Always notify me when: This is the default option on every standard user account, and it pops the UAC dialog when apps try to install another software or make changes to the system and when you try to change settings.
- Always notify me (and do not dim my desktop): This option blocks apps and users’ system changes just like “Always notify me when,” but with the difference that you can still have access to the desktop to continue working on other tasks.
- Notify me only when apps try to make changes to my computer (don’t dim my desktop), and Never notify me when (which disables UAC) are not options that can be configured on a Standard account.
-
On an Administrator user account, you’ll see the four levels, and you can select any one of them:
- Always notify me when: This option pops the UAC dialog when apps try to install another software or make changes to the system and when you try to change settings.
- Notify me only when apps try to make changes to my computer: This is the default level for every administrator account, and it doesn’t notify you when making settings changes.
- Notify me only when apps try to make changes to my computer (do not dim my desktop): Using this option, you won’t get notifications when making changes, but with the difference that you can still have access to the desktop to continue working on other tasks.
- Never notify me when: This option disables UAC completely on Windows 10.

-
Click the OK button.


Once you complete the steps, restart your computer to apply the settings on Windows 10.
While it’s possible to change the User Account Control (UAC) settings on Windows 10, it’s always recommended to leave the default configuration for better security.
It’s important to note that there are ways to disable UAC using the Registry, but Standard users will experience unwanted behaviors. As such, it’s not recommended to go that route.
If you want to disable the User Account Control feature (not recommended), you’ll need to change the account type to Administrator and then follow the steps to select the “Never notify me when” option using the slider.
We may earn commission for purchases using our links to help keep offering the free content. Privacy policy info.
All content on this site is provided with no warranties, express or implied. Use any information at your own risk. Always backup of your device and files before making any changes. Privacy policy info.
Since Windows Vista, Microsoft added a new security feature called User Account Control (UAC). It tries to prevent malicious apps from doing potentially harmful things on your PC. Before the administrator-level (elevated) action is allowed, UAC asks permission from the user to go ahead with it, or cancel the request. UAC has some settings which can affect its behavior. In this article we will look how to change those settings in Windows 10.
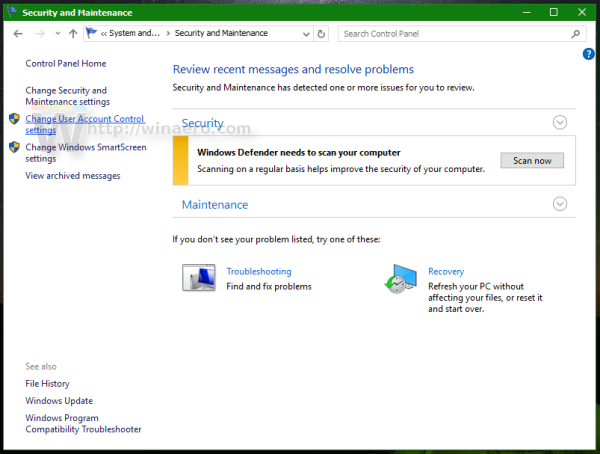
UAC settings are located in the ‘classic’ Control panel in Windows 10. Open the Control panel and go to the category:
Control Panel\System and Security\Security and Maintenance
Click the Change User Account Control settings link on the left:
 The User Account Control Settings window will appear on the screen:
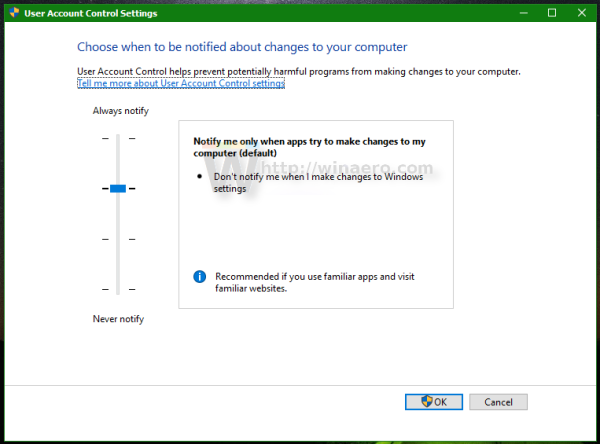 On the left, you will see a vertical slider, which controls UAC settings. It has four predefined positions:
- Never Notify
- Notify me only when apps try to make changes to my computer (don’t dim my desktop)
- Notify me only when apps try to make changes to my computer (default)
- Always notify me
These settings change the UAC behavior in different ways.
Never Notify (disables UAC)
The ‘Never notify’ option disables UAC and turns off security warnings. UAC will not track apps. I do not recommend you to use this UAC level unless you understand perfectly why you need to disable UAC. It is the most insecure option. Please read the following article: How to turn off and disable UAC in Windows 10.
Notify me only when apps try to make changes to my computer (don’t dim my desktop)
This setting is almost like the default one. When some app requests system-level changes, you will see the appropriate security warning, however, the screen will not turn dark behind the warning dialog. Because the screen is not dimmed, malicious apps can interact with the UAC security dialog and try to automatically click Yes to continue the action. So turning off the Secure Desktop is a potential security hole, as some app may confirm the request for you and damage your OS and data.
If you are working in limited/standard user account and using this UAC level, then you might need to provide administrator account credentials (user name and password) to elevate.
Notify me only when apps try to make changes to my computer (default)
This setting is set by default in Windows 8.1. When some app requests permission to complete a potentially harmful action, you will see the appropriate security warning and the entire screen will be dimmed behind the UAC confirmation dialog. When the screen is dimmed, no other apps can access that dialog, so only the user can interact with it to confirm or deny the request.
Always notify me
This setting is the most secure (and most annoying). When it is enabled, UAC shows notifications every time some app tries to make system-wide changes to OS settings, or even when the user tries to configure Windows settings which require administrator permissions. Besides the UAC prompt, the whole screen will be dimmed. If you are working in a limited user account, you might need to provide administrative account credentials.
How to tweak UAC settings via Registry
UAC settings are stored in the following registry key:
HKEY_LOCAL_MACHINE\SOFTWARE\Microsoft\Windows\CurrentVersion\Policies\System
There you need to adjust the following four DWORD values:
- ConsentPromptBehaviorAdmin
- ConsentPromptBehaviorUser
- EnableLUA
- PromptOnSecureDesktop
For ‘Never Notify’ setting, set them as follows:
- ConsentPromptBehaviorAdmin=0
- ConsentPromptBehaviorUser=0
- EnableLUA=1
- PromptOnSecureDesktop=0

For ‘Notify me …’ without screen dimming, the values should be as follows:
- ConsentPromptBehaviorAdmin=5
- ConsentPromptBehaviorUser=3
- EnableLUA=1
- PromptOnSecureDesktop=0

For ‘Notify me …’ with screen dimming, the values should be as follows:
- ConsentPromptBehaviorAdmin=5
- ConsentPromptBehaviorUser=3
- EnableLUA=1
- PromptOnSecureDesktop=1

For ‘Always notify me’, set the following values:
- ConsentPromptBehaviorAdmin=2
- ConsentPromptBehaviorUser=3
- EnableLUA=1
- PromptOnSecureDesktop=1
After you change these values, you must restart Windows for the changes to take the effect. That’s it. This tutorial is also applicable to Windows 8 and Windows 8.1.
Support us
Winaero greatly relies on your support. You can help the site keep bringing you interesting and useful content and software by using these options:
If you like this article, please share it using the buttons below. It won’t take a lot from you, but it will help us grow. Thanks for your support!
The UAC (User Account Control) is a Windows security component that works to prevent any authorized changes to your computer system. Whether a genuine application, user or malicious malware and viruses start these changes, the UAC ensures that critical system changes are made with the knowledge and consent of the system administrator.
How Does User Account Control Works?
When the User Account Control feature is active (enabled), Windows will display a consent prompt whenever an application or a process attempts to make changes to the operating system. Depending on your UAC settings, the prompt may run in a “secure desktop”, which freezes the desktop and other active applications until the user accepts or denies the approval. When using a standard user account, Windows 10 will display a credential prompt that requires the user to provide Admin credentials to approve the changes.

If the user declines to approve consent request, Windows will abort the changes and remain unchanged. UAC, is therefore, a central Windows security tool that helps prevent malicious processes or software installs or runs quietly, mitigating the risk of malware and viruses.
Types of Users in Windows 10
There are two major user account types in a Windows
10.
- Administrator account
- Standard user account
Administrator Account
Windows by default will assign you as an administrator if you are the only user on your computer. In such a case or when you create additional admin accounts, it will have the highest privileges on your computer. For example, admin user can do any actions on the system like installing or deleting apps. In most cases, admin needs to simply enter the password to unlock system settings.
Standard User Account
On other hand, standard users will have limited access
to the computer. Windows will not allow standard users to make changes to the
hard drive or system files and ask for administrator permission. However,
standard users can still use the computer for browsing the internet, sending
and receiving emails, playing games, using apps, etc.
Adding or Deleting User Accounts in Windows 10
As an administrator you can add, change or delete
users on your computer.
Adding User Account
- Press “Win + I” shortcut keys and open Windows Settings app and click on the “Accounts” section.
- Navigate to “Family and other people” section and click on “Add someone else to this PC” option.

- Next, click
on the link that says, “I don’t have this person’s sign in information”.

- On the next screen, click on “Add a
user without a Microsoft account” link.

- Enter username, password and security
questions/answers then click next.

- Now you can see the new user has been
successfully added. By Default Windows adds a new account as a standard user
with limited privileges.
Change User Account
Follow the below instructions in order to change an account from your computer.
- Click on the user account you want
to delete or modify under the “Family and other people” section. - In order to change account type
click on change account type and select “Standard User” or “Administrator” from
the drop down menu.

Delete User Account
To remove a user account you just need to:
- Click on the account you want to
delete and select remove. - Click on delete account and data.

- Windows will delete the account
along with all associated data to that account.
Disable / Enable the User Account Control in Windows 10
The user
can enable or disable the UAC feature, as well as set a preferred notification
level depending on their security requirements.
- Ensure that you are signed in to an administrator account or have the admin credentials to access administrator elevation token.
- Click the Start button and type “Account Control” in the search box. Select “Change User Control…” from the result.

- On the UAC settings window, you can disable the feature by selecting the lowest level “Never Notify” and click “Ok” at the bottom of the window.

- To enable the UAC feature, slide
the bar to any of the other three upper levels depending on your preferred
security settings. The three notification levels are:- “Notify
me only when applications try to make changes to my computer (do not dim my
desktop)”- Windows will show the elevation prompt but not on secure desktop
mode, only when an application attempts to make changes.
- “Default”
Level – The default Windows 10 UAC setup.
- “Always
Notify” – A high-security level that monitors changes from applications or
users.
- “Notify
Note: after
clicking “Ok” Windows will show the UAC consent request for the user to approve
or deny the changes.
Related: How to fix blue screen of death in Windows 10?
How to Secure UAC Elevation Prompt with Security Policy
Settings?
Windows 10
further secures the consent/credential UAC prompts by using the secure desktop
mode. The secure desktop mode dims the PC desktop and freezes other open apps,
displaying only the UAC elevation prompt. Once the user accepts or declines the
request, it switches back to normal. You can enhance your PC security by
setting the UAC to always display in secure desktop.
- Click the Start button and type “Local Security” in the Cortana and open the “Local Security Policy” editor.

- Expand the “Local Policies” and then click the “Security Options” folder to display the policies on the right panel.
- Scroll down to find the “User Account Control” policies.

- Double click the “Switch to secure desktop..” policy, check the “Enable” option on the resulting pop-up and click “Ok”.
- You can also adjust the “Behavior of the elevation prompt…” and configure it to request credentials for both admin and standard user. Double click the policy, choose your preferred behavior and click “Ok” to save. This will prevent actions by any malware masquerading the secure desktop.

- You can customize other UAC
settings by double-clicking the policy, modify the settings and click “Ok” to
implement the changes. - For instance, you can enable the
Virtualization and installer controls from the security policy settings.
Managing the UAC Settings with the Registry Editor?
You can also customize User Account Controls by editing the registry.
- Open the Registry editor and use the path, “Computer\HKEY_LOCAL_MACHINE\SOFTWARE\Microsoft\Windows\CurrentVersion\Policies\System” to access the UAC keys.

- On the right side panel, double click the key for the setting you want to change.
- Edit the “Value data” field appropriately and click “Ok”.

Conclusion
The User Account Control is a very important feature that adds another security layer to your computer system. The tool prompts for approval for any action attempt to make changes to the computer, thus preventing malicious changes that can result from malware. Besides, UAC also prevents users from making unauthorized or accidental changes to your computer system keeping it functional at all times. You can enable and set UAC notification and elevation prompt levels from the UAC settings. However, if you want a strong control, you can customize User Accounts Controls from the registry editor or the policy editor.
Практически во всех версиях Windows 10 есть специальная услуга — контроль за учётными записями (КУЗ или UAC). Столкнуться с ней можно в тот момент, когда вы попытаетесь начать выполнение некоторого действия, которое потребует от вас прав администратора. То есть, в этот момент вы увидите уведомление «Для выполнения данной операции необходимо наличие прав администратора. Продолжить операцию?». Эти сообщения можно очень просто отключить, но нужно ли это делать — разберёмся в следующем разделе.
Стоит ли выключать контроль учётных записей?
Суть в том, что контроль учётных записей (КУЗ) существует с той целью, чтобы предотвратить случайное вмешательство пользователя в важные задачи и системные процессы. Права администратора спрашиваются исключительно в том случае, если задача, которую вы собираетесь назначить или изменить, может вмешаться в работу или процессы операционной системы. Поэтому решайте сами: если вы деактивируете КУЗ, то у вас перестанет появляться надоедливое уведомление, но при этом шанс запуска чего-то опасного или случайного редактирования того, что трогать не стоит, очень возрастает.
Активация, деактивация и настройка контроля происходит практически одним и тем же путём, поэтому рассмотрим эти действие вместе.
Существует несколько способов проведения операции по активации, деактивации и настройки UAC. Все они будут описаны ниже в статье и вы можете выбирать из них тот, что покажется вам наиболее удобным.
Настройка КУЗ через панель управления
- Используя поисковую строку, найдите панель управления.

Откройте панель управления - Разверните раздел «Учётные записи пользователя».

Перйдите к разделу «Учётные записи пользователей» - Повторите действие.

Повторно пейдите к этому разделу - В запущенном окошке нажмите на самый нижний вариант. Заметьте, что для перехода к этому разделу вам понадобятся права администратора, о чём говорит соответствующий значок в виде разноцветного щита.

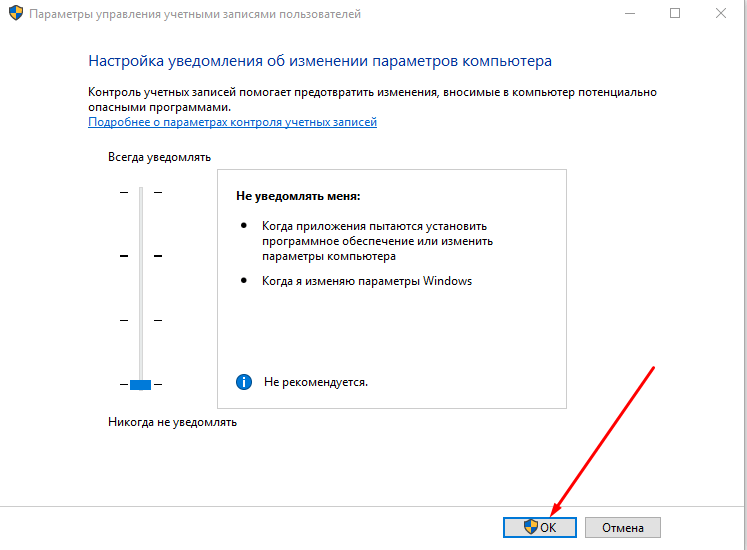
Нажмите кнопку «Изменить параметры контроля учётных записей» - Перегоните ползунок до самого низа линии, чтобы выбрать вариант «Никогда не уведомлять». Выбранный вариант полностью деактивирует UAC.

Перегоните ползунок вниз - В том случае, если вам необходимо увеличить безопасность своей системы, то выберите самый верхний вариант. Если вы поставите этот параметр, то предупреждения будут появляться при любом малейшем шансе внесения изменений в работу системы. Также, если пользователь зайдёт под другой учётной записью, то есть не имея прав администратора, при появлении соответствующего уведомления от UAC ему придётся ввести логин и пароль от аккаунта администратора.

Выберите вариант «Всегда уведомлять» - Поставив второй параметр сверху, который обычно выбран по умолчанию, оповещения от КУЗ будут появляться, только если изменения в систему попробует ввести какая-либо сторонняя программа.

Выберите параметр по умолчанию - Предпоследний режим работы включает тот же вариант исполнения обязанностей UAC, как и предыдущий, но имеет одно отличие — уведомления, присланные КУЗ, не будут затемнять экран и препятствовать работе запущенных приложений.

Выберите вариант «Уведомлять только при попытках приложений внести изменения в компьютер» - После завершения выполнения настроек, кликнете по кнопке «ОК» в нижней части окошка, чтобы изменения сохранились. Иногда, чтобы КУЗ сменил режим работы, нужно перезапустить компьютер.

Подтвердите внесённые изменения
Путь через реестр
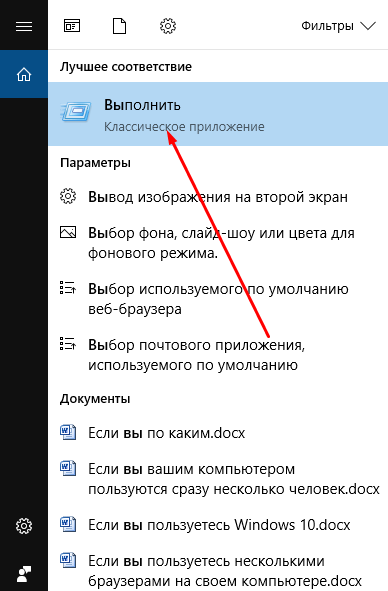
- Запустите утилиту «Выполнить».

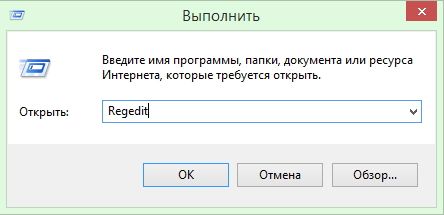
Откройте программу «Выполнить» - Используйте команду «regedit», чтобы перейти к редактору реестра.

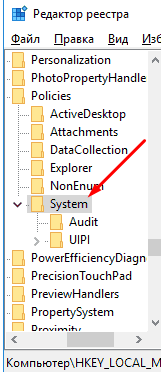
Выполните команду regedit - Переходя по дереву папок, находящемуся в левой части окошка реестра, пройдите по пути «HKEY_LOCAL_MACHINE\ SOFTWARE\ Microsoft\ Windows\ CurrentVersion\ Policies\ System».

Перейдите в папку System - В конечной папке поочерёдно раскройте CоnsetPromptBehaviorАdmin, EnableLUА, PromptОnSecureDеsktоp и отредактируйте находящиеся в них значения (расшифровка необходимых значений описана и ниже).

Откройте файлы и измените параметры
Чтобы выставить определённый режим, вставляйте нижеприведённые цифры:
- Всегда уведомлять — PromptOnSecureDesktop=1, EnableLUA=1, ConsentPromptBehaviorAdmin=2. Остальные параметры будут идти в том же порядке.
- Уведомлять при попытках приложений изменить параметры (значения по умолчанию) — 1, 1, 5.
- Уведомлять без затемнения экрана — 0, 1, 5.
- Отключить UAC и не уведомлять — 0, 1, 0.
Как включить или отключить UAC через командную строку
Настроить режим UAC можно только через вышеописанные способы, но активировать и деактивировать его можно и через командную строку:
- Через поиск программ откройте командную строку, кликнув по ней правой кнопкой мыши и выбрав «Запустить от имени администратора».

Откройте командную строку от имени администратора - Пропишите команду «C:\Windows\System32\cmd.exe /k C:\Windows\System32\reg.exe ADD HKLM\SOFTWARE\Microsoft\Windows\CurrentVersion\Policies\System/v EnableLUA
/t REG_DWORD /d 0 /f» и нажмите Enter на клавиатуре. После перезагрузите компьютер
Введите команду отключения и перезагрузите компьютер - Чтобы вернуть к действию функцию UAC, введите в командную строку ту же самую команду, но в её конце замените значение с 0 на 1.

Включите UAC
Как полностью выключить UAC через PowerShell
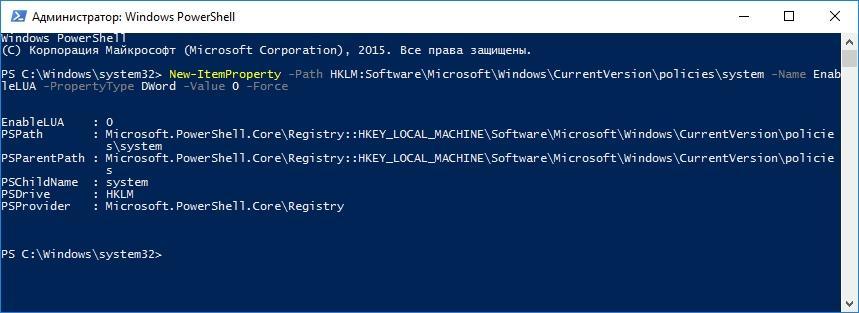
- Используя поиск Windows, откройте консоль PowerShell, прибегнув к использованию прав администратора.

Откройте консоль Powershell - В открывшемся окне пропишите и выполните команду «New-ItemProperty -Path HKLM:Software\Microsoft\Windows\CurrentVersion\policies\system -Name EnableLUA -PropertyType DWord -Value 0 -Force».

Введите команду отключения UAC - После перезагрузите компьютер.

Видео: как отключить UAC
Отключение режима User Account Control может привести к тому, что вы случайно запустите процесс, который внесёт изменения в работу системы и приведёт к её поломке. Поэтому, если отключите UAC, будьте предельно осторожны в своих действиях: не запускайте программы, которые кажутся подозрительными и не редактируйте безрассудно различные папки и файлы, находящиеся на диске с операционной системой.
- Распечатать
Оцените статью:
- 5
- 4
- 3
- 2
- 1
(2 голоса, среднее: 2.5 из 5)
Поделитесь с друзьями!