Introduction
If you are using Windows 10 and need to change the system locale, you have come to the right place. In this guide, we will show you how to change the system locale on Windows 10. System locale is the language used by Windows to display text in programs that do not support Unicode. It is important to set the system locale correctly, as it affects the way programs display text. We will walk you through the steps to change the system locale on Windows 10.
Step-by-Step Guide to Changing System Locale on Windows 10
Changing the system locale on Windows 10 is a simple process that can be completed in a few steps. This guide will walk you through the process.
1. Open the Control Panel. To do this, press the Windows key + R to open the Run dialog box. Type “control” and press Enter.
2. In the Control Panel, select “Clock, Language, and Region”.
3. Select “Region”.
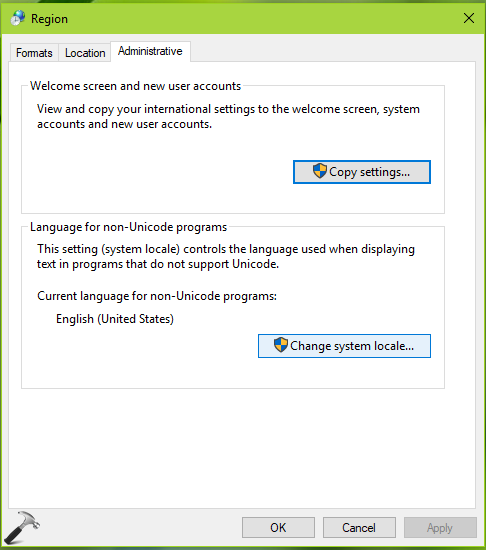
4. In the Region window, select the “Administrative” tab.
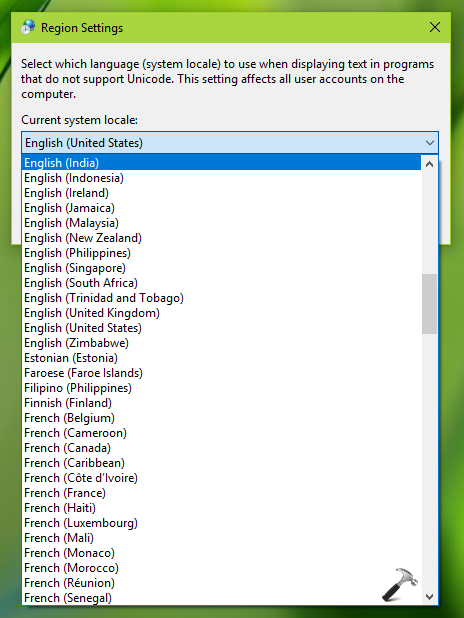
5. Under the “Language for non-Unicode programs” section, select the desired system locale from the drop-down menu.
6. Click “OK” to save the changes.
7. Restart your computer for the changes to take effect.
That’s it! You have successfully changed the system locale on your Windows 10 computer.
How to Easily Change System Locale Settings on Windows 10
Windows 10 allows users to customize their system locale settings to suit their language preferences. This article will provide a step-by-step guide on how to easily change system locale settings on Windows 10.
1. Open the Start menu and type “Region” in the search bar.
2. Select “Region & language” from the list of results.
3. In the “Region & language” window, select the “Administrative” tab.
4. Under the “Administrative” tab, click the “Change system locale” button.
5. In the “Regional Options” window, select the language you want to use from the drop-down menu.
6. Click “OK” to save your changes.
7. Restart your computer for the changes to take effect.
By following these steps, you can easily change system locale settings on Windows 10. It is important to note that some applications may not be compatible with the new language settings, so you may need to reinstall them after changing the system locale.
Exploring the Benefits of Changing System Locale on Windows 10
Windows 10 is a powerful operating system that allows users to customize their experience in a variety of ways. One of the most useful features is the ability to change the system locale. This setting determines the language and regional settings used by the operating system, including the format of dates, times, and numbers. By changing the system locale, users can ensure that their computer is configured to their specific needs.
Changing the system locale can be beneficial in a number of ways. First, it allows users to view their computer in their native language. This can be especially helpful for those who are not fluent in English, as it allows them to more easily navigate the operating system. Additionally, changing the system locale can help ensure that dates, times, and numbers are displayed in the correct format. This can be especially useful for those who work with international clients or customers, as it ensures that all information is accurately displayed.
In addition to the benefits mentioned above, changing the system locale can also help improve the performance of certain applications. For example, some applications may run more efficiently when the system locale is set to the language of the application. Additionally, some applications may require a specific system locale in order to function properly.
Changing the system locale on Windows 10 is a relatively simple process. To begin, users should open the Control Panel and select the “Region” option. From there, they can select the language and region they wish to use. Once the desired settings have been selected, users should click “Apply” to save the changes.
In conclusion, changing the system locale on Windows 10 can be a beneficial process for users. It allows them to view their computer in their native language, ensures that dates, times, and numbers are displayed in the correct format, and can even improve the performance of certain applications. With a few simple steps, users can easily customize their Windows 10 experience to meet their specific needs.
Troubleshooting Tips for Changing System Locale on Windows 10
1. Check the Language Settings: Before attempting to change the system locale, it is important to check the language settings in the Control Panel. To do this, open the Control Panel and select “Clock, Language, and Region”. Under the “Region” tab, check the “Format” setting to ensure that the desired language is selected.
2. Check the System Locale: If the language settings are correct, the next step is to check the system locale. To do this, open the Control Panel and select “Clock, Language, and Region”. Under the “Administrative” tab, select “Change system locale” and check the current setting.
3. Change the System Locale: If the system locale is not set to the desired language, it can be changed by selecting “Change system locale” and selecting the desired language from the drop-down menu. Once the language is selected, click “OK” to save the changes.
4. Restart the Computer: After changing the system locale, it is important to restart the computer for the changes to take effect.
5. Check the Language Settings Again: After restarting the computer, it is important to check the language settings again to ensure that the desired language is selected.
6. Check the System Locale Again: After restarting the computer, it is also important to check the system locale again to ensure that the desired language is selected.
7. Troubleshoot: If the language settings and system locale are still not set to the desired language, it may be necessary to troubleshoot the issue. This can be done by checking for any updates that may be available for the language settings or system locale, or by running a system scan to check for any errors.
Understanding the Impact of Changing System Locale on Windows 10
Windows 10 is a powerful operating system that allows users to customize their system locale settings. System locale settings determine the language and regional settings used by the operating system, including the language used for menus, dialog boxes, and other user interface elements. Changing the system locale can have a significant impact on the user experience, and it is important to understand the implications of making such changes.
When the system locale is changed, the language and regional settings used by the operating system are also changed. This can affect the display of text, dates, times, and currency values. For example, if the system locale is changed from English (United States) to French (France), the date format will change from MM/DD/YYYY to DD/MM/YYYY. Similarly, currency values will be displayed using the Euro instead of the US Dollar.
In addition to affecting the display of text, dates, times, and currency values, changing the system locale can also affect the behavior of certain applications. For example, some applications may not be able to recognize the new system locale and may not function properly. Additionally, some applications may not be able to recognize the new language and may display text in the wrong language.
Finally, changing the system locale can also affect the performance of the operating system. If the system locale is changed to a language that is not supported by the operating system, the operating system may become unstable and may experience performance issues.
In conclusion, it is important to understand the implications of changing the system locale on Windows 10. Changing the system locale can affect the display of text, dates, times, and currency values, as well as the behavior of certain applications. Additionally, it can affect the performance of the operating system. Therefore, it is important to consider the potential impacts of changing the system locale before making any changes.
How to Change System Locale on Windows 10 for Different Languages
Changing the system locale on Windows 10 is a simple process that can be completed in a few steps. System locale is the language used to display text in programs that do not support Unicode. It is important to note that changing the system locale will not change the language of the Windows operating system.
To change the system locale on Windows 10, follow these steps:
1. Open the Control Panel.
2. Select “Clock, Language, and Region”.
3. Select “Region”.
4. Select the “Administrative” tab.
5. Select “Change system locale”.
6. Select the language you wish to use from the drop-down menu.
7. Click “OK”.
8. Restart your computer for the changes to take effect.
It is important to note that some programs may not support the new system locale. If this is the case, you may need to reinstall the program or find an alternative that supports the new language. Additionally, some programs may require you to manually change the language settings within the program itself.
By following these steps, you can easily change the system locale on Windows 10 for different languages.
Skip to content
As you may already know from previous articles, Windows 10 supports changing the display language using language packs. If you are working in a localized user account in Windows 10 which is your native language, you might be interested in learning what language is used for older apps that doesn’t support Unicode and how to change it.
![]()
Windows 10 supports language packs. By installing one or several language packs, you can switch your Windows display language on-the-fly. It is also possible to have a different display language for each user account.
There are plenty of apps that don’t support Unicode. Most of them are apps that have been created for previous Windows versions.
The option that specifies the default language to use for non-Unicode programs is called System Locale. The system locale defines the bitmap fonts and code pages (ANSI or DOS) that are used on the system by default. The system locale setting affects only ANSI (non-Unicode) applications. The language for non-Unicode programs is a per-system setting.
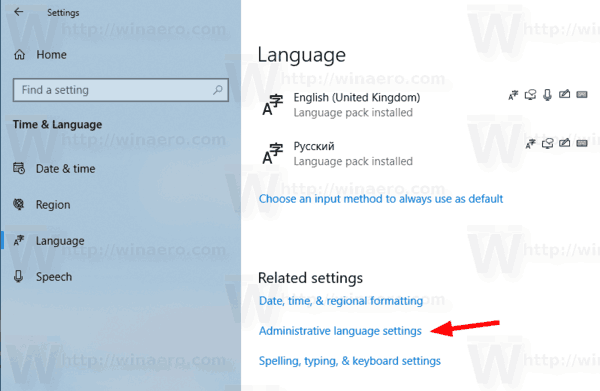
To change the System Locale in Windows 10, do the following.
- Open Settings.

- Go to Time & Language.
- On the left, click on Language.
- In the right pane, click on the Administrative language settings link.

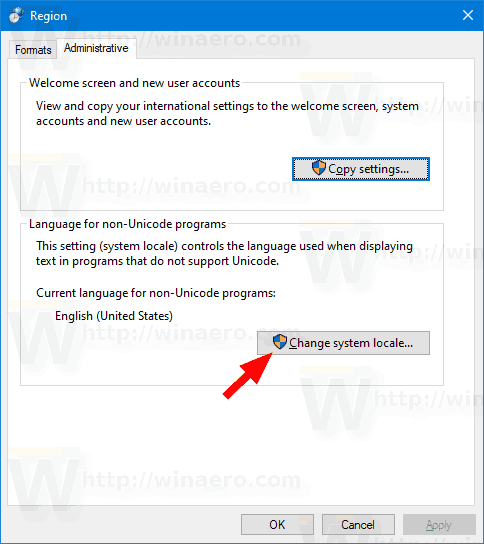
- In the Region dialog, click on the Administrative tab.
- Under the Language for non-Unicode programs section, click on the Change system locale button.

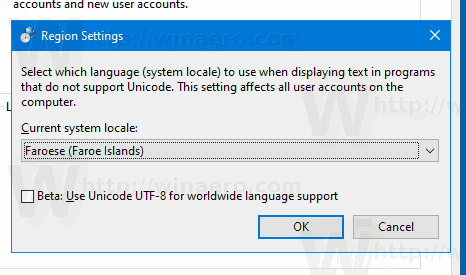
- Select the language you want from the drop down list in the next dialog. Do not enable the BETA: Use Unicode UTF-8 for worldwide language support checkbox unless you know what you are doing.

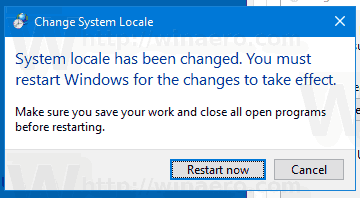
- Restart Windows 10 when prompted.


Note: The language you’ve set for the system locale will be automatically added to the list of installed languages in Windows 10.
Alternatively, you can access the same option with the classic Control Panel app. Open the classic Control Panel and navigate to Control Panel\Clock and Region. Click on Region and switch to the Administrative tab.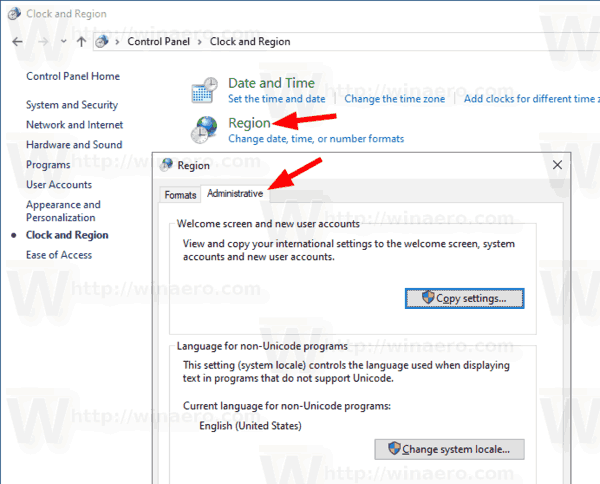
That’s it.
Related articles.
- Force System UI Language as Display Language in Windows 10
- Create Text Services and Input Languages Shortcut in Windows 10
- Enable Language Bar in Windows 10 (classic Language Icon)
- Find Default System Language in Windows 10
- How to Copy Region and Language Settings in Windows 10
- How To Change Display Language in Windows 10
- How To Add a Language in Windows 10
- Change Hotkeys to Switch Keyboard Layout in Windows 10
Support us
Winaero greatly relies on your support. You can help the site keep bringing you interesting and useful content and software by using these options:
If you like this article, please share it using the buttons below. It won’t take a lot from you, but it will help us grow. Thanks for your support!
February 16, 2017 updated by
Leave a reply »
The system locale allows you to use the specified language for non-Unicode programs. If your Windows system uses a default en-US locale, the Japanese text in a game won’t display correctly. In this tutorial we’ll show you how to change system locale in Windows 10, using Control Panel or Command Prompt.
Note: You must log into Windows 10 as administrator to set a different system locale. Changing system locale doesn’t affect the language in menus & dialog boxes for Windows or other programs that do use Unicode.
Method 1: Change System Locale in Windows 10 Using Control Panel
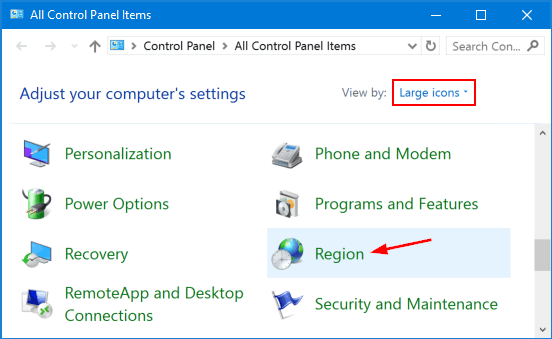
- Open the Control Panel in Large icons view, click Region.

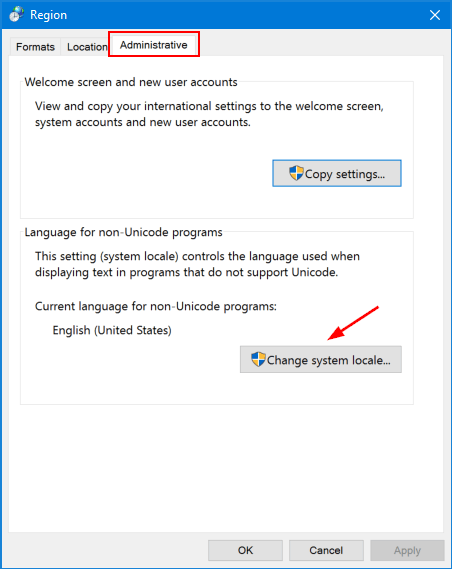
- In the Region dialog that opens, select the Administrative tab and then click Change system locale.

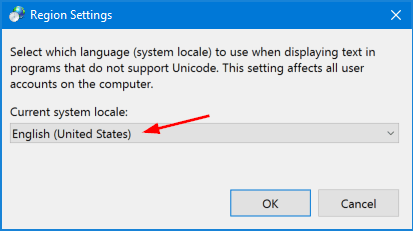
- Select the desired language from the Current system locale drop-down list, and click OK.

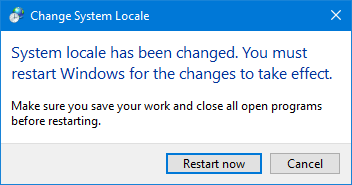
- Restart your computer for the changes to take effect.

Method 2: Change System Locale in Windows 10 Using Command Prompt
-
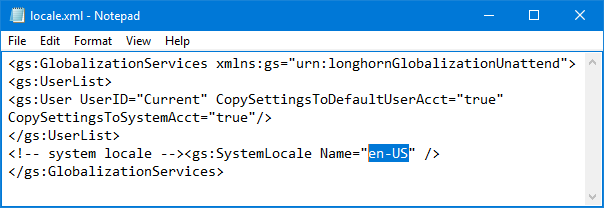
Open Notepad (or any other text editor), then copy and paste the following text into it. Replace en-US with the language tag for your desired system locale. To see all supported language tags in Windows, please refer to this article.
<gs:GlobalizationServices xmlns:gs="urn:longhornGlobalizationUnattend">

<gs:UserList>

<gs:User UserID="Current" CopySettingsToDefaultUserAcct="true" CopySettingsToSystemAcct="true"/>

</gs:UserList>

<!-- system locale --><gs:SystemLocale Name="en-US" />

</gs:GlobalizationServices>
- After editing, save the file as a .xml file. Let’s say D:\locale.xml.
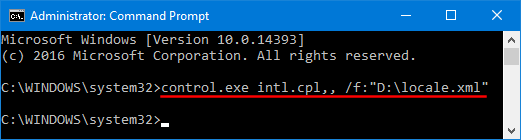
- Open the Command Prompt in administrator mode. Copy and paste the following command line and press Enter.
control.exe intl.cpl,, /f:"D:\locale.xml"
- Reboot your computer to apply the new system locale settings.
- Previous Post: Fix Error: “Windows cannot Change the Password” in Windows 10 / 8 / 7
- Next Post: Fix: System Cooling Policy Missing in Power Options
Generally, locale refers to language and region along with any special variant preference that a user suppose to see in the user interface. In Windows, system locale is there, which specifies the default language that will be used in non-unicode programs. Non-unicode programs uses American National Standards Institute (ANSI) Application Program Interface (API). This implies that any string Windows passes to such programs is a sequence of bytes and not of the unicode characters.
System locale defines which code pages and system fonts are to be used by default. Note the system locale is different than user locale. User locale setting is referred to time/date format, number currency and calendar settings. Hence, not be confused between these two locale terms.
Okay, so when you need to change system locale settings in Windows? Well under following situation, an user will need to change system locale setting:
- If the non-unicode program/application not working correctly in current system locale setting
- When you’ve to use different code pages other than default ones
Now let’s see how to actually change system locale settings in Windows 10.
How To Change System Locale In Windows 10
1. Right click Start Button or press  + X keys and select Settings.
2. In the Settings app, navigate to Time & Language > Date & time.
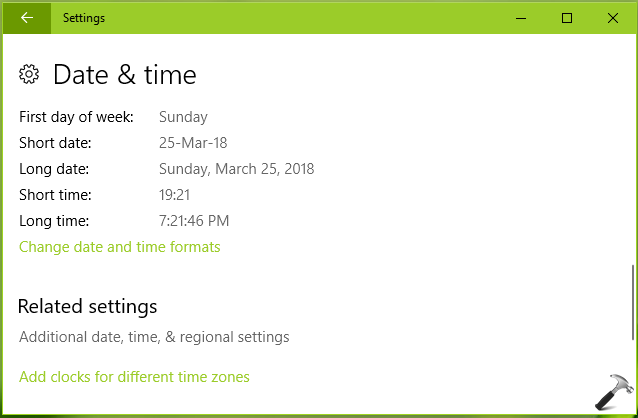
3. Next, click on Additional date, time & regional settings link. Then in Control Panel window so open, click Change date, time, or number formats link under Region.
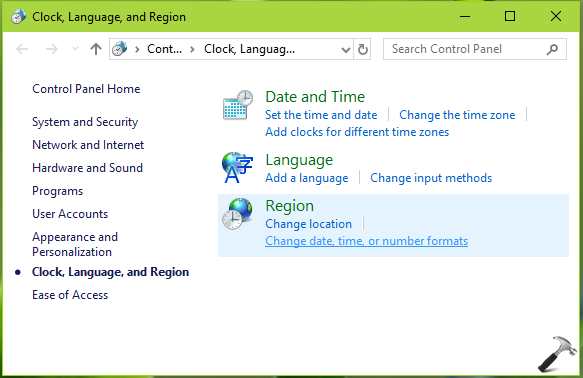
4. Moving on, in the Region window, switch to Administrative tab. Click Change system locale button. If you’re prompted for credentials, provide them.
5. Finally, in the Region Settings window, change the locale to that one, which you want to use. Click OK and then click Apply followed by OK in above shown window.
Though you may not be prompted to reboot, but still you must reboot at your end. After restarting the machine, new system locale settings should be in effect.
That’s it!
READ THESE ARTICLES NEXT
- Microsoft released Windows 10 Version 22H2
- Differences between Windows 10 and Windows 11
- Run programs in Compatibility Mode in Windows 11/10
- How to Manage & Free Up Storage on Windows
- Fix: Recycle Bin Not Refreshing in Windows 11/10
- Fix: Location Settings Greyed Out in Windows 11/10
- Fix: Location Tab Missing in Properties on Windows 11/10
- Enable or Disable Memory Compression in Windows 11/10
- How to Schedule Automatic Shutdown in Windows 11/10
- How To Enable Hyper-V In Windows 11/10