To manage all aspects of the input and display language settings on your Windows 11 PC, use the following methods.
To switch the keyboard layout you’re using, press and hold the Windows key and then repeatedly press the Spacebar to cycle through all your installed keyboards. (If this doesn’t do anything, it means you have only one installed.)
You can also select the language abbreviation in your taskbar then choose the language or input method you want to use.
Note: In the input field, press the Windows logo key + period (.) to access the Emoji & more keyboard, if your language supports it.
If you can’t find the keyboard layout you want, you may have to add a new keyboard.
Adding an input language lets you set a language-preference order for websites and apps, as well as change your keyboard language.
-
Select the Start > Settings > Time & language > Language & region.
-
Select the language that has the keyboard you want, then select Options.
-
Select Add a keyboard and choose the keyboard you want to add. If you don’t see the keyboard you want, you may have to add a new language to get additional options. If this is the case, go on to step 4.
-
Return to the Language settings page, go to Preferred languages, then select Add a language.
-
Choose the language you want to use from the list, then select Next.
-
Review any language features you want to set up or install, and select Install.
«Add a keyboard» shortcut
The display language you select changes the default language used by Windows features like Settings and File Explorer.
-
Select Start > Settings > Time & language > Language & region.
-
Choose a language from the Windows display language menu.
«Change your display language» shortcut
If a language is listed under Preferred languages but doesn’t appear on the Windows display language list, you’ll first need to install its language pack (if it’s available).
-
Select Start > Settings > Time & language > Language & region.
-
In Preferred languages, select Add a language, enter the language you want, then select Next.
-
Select Download from the Download language pack option.
-
After the language pack is installed, select Back.
-
Choose a language from the Windows display language menu.
«Install a language pack» shortcut
If you receive an «Only one language pack allowed» or «Your Windows license supports only one display language» message, you have a single language edition of Windows 10. Here’s how to check your Windows 10 language edition:
-
Select Start > Settings > About, and then go to the Windows specification section.
-
If you see Windows 11 Home Single Language next to Edition, you have a single language edition of Window 11, and you can’t add a new language unless you purchase an upgrade to either Windows 11 Home or Windows 11 Pro.
Upgrade to Windows 11 Home or Windows 11 Pro
-
Select Start > Settings > Time & language > Language & region.
-
Under Preferred languages, select the language you want to remove, and then select Remove.
-
To remove an individual keyboard, select the language (see step 2), select Options, scroll down to the Keyboards section, select the keyboard you want to remove, and select Remove.
To manage all aspects of the input and display language settings on your Windows 10 device, use the following methods.
To switch the keyboard layout you’re using in Windows 10, press and hold the Windows key and then repeatedly press the Spacebar to cycle through all your installed keyboards. (If this doesn’t do anything, it means you have only one installed.)
You can also select the language abbreviation on the far right of the taskbar and then choose the language or input method you want to use.
Note: In the input field, press Windows +period (.) to access the emoji keyboard, if your language supports this.
If you can’t find the keyboard layout you want, you may have to add a new keyboard.
Adding an input language lets you set a language-preference order for websites and apps, as well as change your keyboard language.
-
Select the Start button, then select Settings > Time & Language > Language.
-
Under Preferred languages, select the language that contains the keyboard you want, and then select Options.
-
Select Add a keyboard and choose the keyboard you want to add. If you don’t see the keyboard you want, you may have to add a new language to get additional options. If this is the case, go on to step 4.
-
Return to the Language settings page, and select Add a language.
-
Choose the language you want to use from the list, and then select Next.
-
Review any language features you want to set up or install, and select Install.
«Add a keyboard» shortcut
Some languages require additional language features
For some languages to work properly, you need an admin on your PC to install the language features. Here’s a list of the languages that are affected:
-
Microsoft IME – Primary keyboard of Japanese
-
Microsoft Pinyin – Primary keyboard of Chinese (Simplified, China), Primary keyboard of Chinese (Simplified, Singapore)
-
Microsoft Wubi – Secondary keyboard of Chinese (Simplified, China), Secondary keyboard of Chinese (Simplified, Singapore)
-
Microsoft Bopomofo – Primary keyboard of Chinese (Traditional, Taiwan), Secondary keyboard of Chinese (Traditional, Hong Kong SAR), Secondary keyboard of Chinese (Traditional, Macao SAR)
-
Microsoft ChangJie – Secondary keyboard of Chinese (Traditional, Taiwan), Secondary keyboard of Chinese (Traditional, Hong Kong SAR), Secondary keyboard of Chinese (Traditional, Macao SAR)
-
Microsoft Quick – Secondary keyboard of Chinese (Traditional, Taiwan), Primary keyboard of Chinese (Traditional, Hong Kong SAR), Primary keyboard of Chinese (Traditional, Macao SAR)
-
Bangla Phonetic – Secondary keyboard of Bengali (India)
-
Gujarati Phonetic – Secondary keyboard of Gujarati
-
Hindi Phonetic – Secondary keyboard of Hindi
-
Kannada Phonetic – Secondary keyboard of Kannada
-
Malayalam Phonetic – Secondary keyboard of Malayalam
-
Marathi Phonetic – Secondary keyboard of Marathi
-
Odia Phonetic – Secondary keyboard of Odia
-
Punjabi Phonetic – Secondary keyboard of Punjabi (Gurmukhi)
-
Tamil Phonetic – Secondary keyboard of Tamil (India)
-
Telugu Phonetic – Secondary keyboard of Telugu
The display language you select changes the default language used by Windows features like Settings and File Explorer.
-
Select the Start button, then select Settings > Time & Language > Language.
-
Choose a language from the Windows display language menu.
«Change your display language» shortcut
If a language is listed under Preferred languages but doesn’t appear on the Windows display language list, you’ll first need to install its language pack (if it’s available).
-
Select the Start button, then select Settings > Time & Language > Language.
-
Choose a language from the Add a language list under Preferred languages, and then select Options.
-
Select Download from the Download language pack option.
-
After the language pack is installed, select Back .
-
Choose a language from the Windows display language menu.
«Install a language pack» shortcut
If you receive an «Only one language pack allowed» or «Your Windows license supports only one display language» message, you have a single language edition of Windows 10. Here’s how to check your Windows 10 language edition:
-
Select the Start button, select Settings > About, and then scroll down to the Windows specification section.
-
If you see Windows 10 Home Single Language next to Edition, you have a single language edition of Window 10, and you can’t add a new language unless you purchase an upgrade to either Windows 10 Home or Windows 10 Pro.
Upgrade to Windows 10 Home or Windows 10 Pro
-
Select the Start button, then select Settings > Time & Language > Language.
-
Under Preferred languages, select the language you want to remove, and then click Remove.
-
To remove an individual keyboard, select the language in question (see step 2), select Options, scroll down to the Keyboards section, select the keyboard you want to remove, and click Remove.
Need more help?
Want more options?
Explore subscription benefits, browse training courses, learn how to secure your device, and more.
Communities help you ask and answer questions, give feedback, and hear from experts with rich knowledge.
Find solutions to common problems or get help from a support agent.
Worked for me:
-
Download package (see links below), name it lp.cab and place it to your
C:drive -
Run the following commands as Administrator:
2.1 installing new language
dism /Online /Add-Package /PackagePath:C:\lp.cab
2.2 get installed packages
dism /Online /Get-Packages
2.3 remove original package
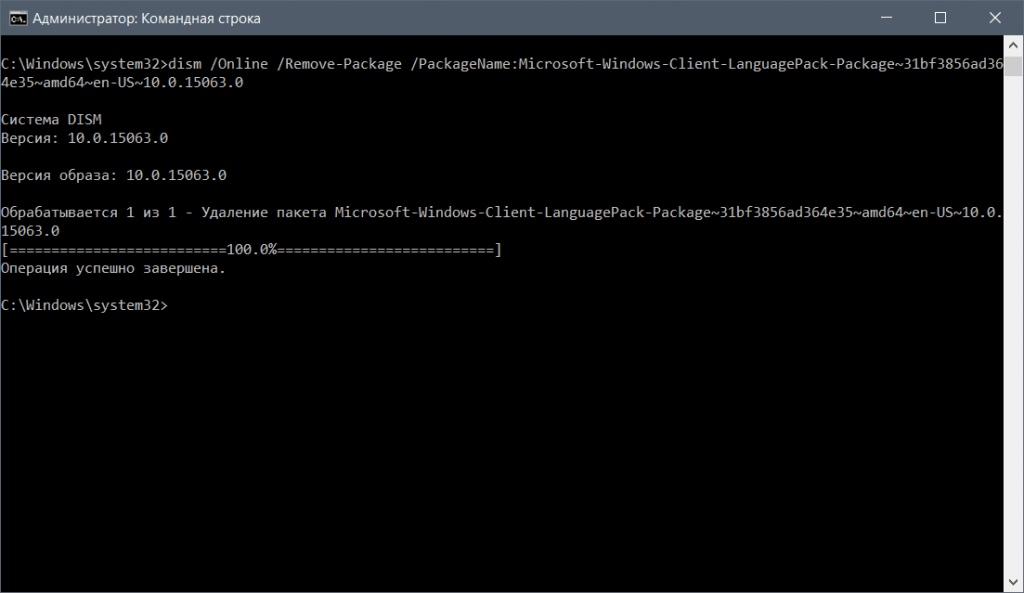
dism /Online /Remove-Package
/PackageName:Microsoft-Windows-Client-LanguagePack-Package~31bf3856ad364e35~amd64~ru-RU~10.0.10240.16384
If you don’t know which is your original package you can check your installed packages with this line
dism /Online /Get-Packages | findstr /c:»LanguagePack»
- Enjoy your new system language
List of MUI for Windows 10:
For LPs for Windows 10 version 1607 build 14393, follow this link.
Windows 10 x64 (Build 10240):
zh-CN: Chinese download.windowsupdate.com/d/msdownload/update/software/updt/2015/07/lp_9949b0581789e2fc205f0eb005606ad1df12745b.cab
hr-HR: Croatian download.windowsupdate.com/d/msdownload/update/software/updt/2015/07/lp_c3bde55e2405874ec8eeaf6dc15a295c183b071f.cab
cs-CZ: Czech download.windowsupdate.com/d/msdownload/update/software/updt/2015/07/lp_d0b2a69faa33d1ea1edc0789fdbb581f5a35ce2d.cab
da-DK: Danish download.windowsupdate.com/d/msdownload/update/software/updt/2015/07/lp_15e50641cef50330959c89c2629de30ef8fd2ef6.cab
nl-NL: Dutch download.windowsupdate.com/d/msdownload/update/software/updt/2015/07/lp_8658b909525f49ab9f3ea9386a0914563ffc762d.cab
en-us: English download.windowsupdate.com/d/msdownload/update/software/updt/2015/07/lp_75d67444a5fc444dbef8ace5fed4cfa4fb3602f0.cab
fr-FR: French download.windowsupdate.com/d/msdownload/update/software/updt/2015/07/lp_206d29867210e84c4ea1ff4d2a2c3851b91b7274.cab
de-DE: German download.windowsupdate.com/d/msdownload/update/software/updt/2015/07/lp_3bb20dd5abc8df218b4146db73f21da05678cf44.cab
hi-IN: Hindi download.windowsupdate.com/d/msdownload/update/software/updt/2015/07/lp_e9deaa6a8d8f9dfab3cb90986d320ff24ab7431f.cab
it-IT: Italian download.windowsupdate.com/d/msdownload/update/software/updt/2015/07/lp_42c622dc6957875eab4be9d57f25e20e297227d1.cab
ja-JP: Japanese download.windowsupdate.com/d/msdownload/update/software/updt/2015/07/lp_adc2ec900dd1c5e94fc0dbd8e010f9baabae665f.cab
kk-KZ: Kazakh download.windowsupdate.com/d/msdownload/update/software/updt/2015/07/lp_a03ed475983edadd3eb73069c4873966c6b65daf.cab
ko-KR: Korean download.windowsupdate.com/d/msdownload/update/software/updt/2015/07/lp_24411100afa82ede1521337a07485c65d1a14c1d.cab
pt-BR: Portuguese download.windowsupdate.com/d/msdownload/update/software/updt/2015/07/lp_894199ed72fdf98e4564833f117380e45b31d19f.cab
ru-RU: Russian download.windowsupdate.com/d/msdownload/update/software/updt/2015/07/lp_d85bb9f00b5ee0b1ea3256b6e05c9ec4029398f0.cab
es-ES: Spanish download.windowsupdate.com/c/msdownload/update/software/updt/2015/07/lp_7b21648a1df6476b39e02476c2319d21fb708c7d.cab
uk-UA: Ukrainian download.windowsupdate.com/d/msdownload/update/software/updt/2015/07/lp_131991188afe0ef668d77c8a9a568cb71b57f09f.cab
Windows 10 x86 (Build 10240):
zh-CN: Chinese download.windowsupdate.com/d/msdownload/update/software/updt/2015/07/lp_e7d13432345bcf589877cd3f0b0dad4479785f60.cab
hr-HR: Croatian download.windowsupdate.com/d/msdownload/update/software/updt/2015/07/lp_60856d8b4d643835b30d8524f467d4d352395204.cab
cs-CZ: Czech download.windowsupdate.com/d/msdownload/update/software/updt/2015/07/lp_dfa71b93a76b4500578b67fd3bf6b9f10bf5beaa.cab
da-DK: Danish download.windowsupdate.com/d/msdownload/update/software/updt/2015/07/lp_af0ea4318f43d9cb30bcfa5ce7279647f10bc3b3.cab
nl-NL: Dutch download.windowsupdate.com/d/msdownload/update/software/updt/2015/07/lp_cbcdf4818eac2a15cfda81e37595f8ffeb037fd7.cab
en-us: English download.windowsupdate.com/d/msdownload/update/software/updt/2015/07/lp_41877260829bb5f57a52d3310e326c6828d8ce8f.cab
fr-FR: French download.windowsupdate.com/d/msdownload/update/software/updt/2015/07/lp_80fa697f051a3a949258797a0635a4313a448c29.cab
de-DE: German download.windowsupdate.com/d/msdownload/update/software/updt/2015/07/lp_7ea2648033099f99f87642e47e6d959172c6cab8.cab
hi-IN: Hindi download.windowsupdate.com/d/msdownload/update/software/updt/2015/07/lp_78a11997f4e4bf73bbdb1da8011ebfb218bd1bac.cab
it-IT: Italian download.windowsupdate.com/d/msdownload/update/software/updt/2015/07/lp_9e62d9a8b141e0eb6434af5a44c4f9468b60a075.cab
ja-JP: Japanese download.windowsupdate.com/d/msdownload/update/software/updt/2015/07/lp_79bd099ac811cb1771e6d9b03d640e5eca636b23.cab
kk-KZ: Kazakh download.windowsupdate.com/d/msdownload/update/software/updt/2015/07/lp_59e690df497799cacb96ab579a706250e5a0c8b6.cab
ko-KR: Korean download.windowsupdate.com/d/msdownload/update/software/updt/2015/07/lp_a88379b0461479ab8b5b47f65c4c3241ef048c04.cab
pt-BR: Portuguese download.windowsupdate.com/d/msdownload/update/software/updt/2015/07/lp_bb9f192068fe42fde8787591197a53c174dce880.cab
ru-RU: Russian download.windowsupdate.com/d/msdownload/update/software/updt/2015/07/lp_280bf97bbe34cec1b0da620fa1b2dfe5bdb3ea07.cab
es-ES: Spanish download.windowsupdate.com/c/msdownload/update/software/updt/2015/07/lp_31400c38ffea2f0a44bb2dfbd80086aa3cad54a9.cab
uk-UA: Ukrainian download.windowsupdate.com/d/msdownload/update/software/updt/2015/07/lp_41cd48aa22d21f09fbcedc69197609c1f05f433d.cab
How to change the language on a system with a Single Language license?
Some Windows PCs are sold with a «Single Language» License. This means that by default only one language can be used and it cannot be modified. This is probably a marketing choice made by Microsoft, to avoid the exchange of computers bought in different countries, at a lower price, that could be sold abroad.
In any case, I researched for a working solution, here it is.
Table of contents
- The solution
- Install a new language
- Removing a language
- Errors while removing packages
The solution
First of all, I was using a Windows 10 Home Single Language version 19044.2311.
To check your version, open a Command prompt (cmd) and at the first line you will see something like this:
Microsoft Windows [Version 10.0.19044.2311]That said:
- Let’s install the language we need
- Let’s remove the other language(s)
Install a new language
Important: on recent versions of Windows, the «.cab» language packs are not valid anymore. You might have found some other sources (StackOverflow for example) talking about cab files. You can still follow those guides if you have a less recent version of Windows 10, in the other case you will get some errors.
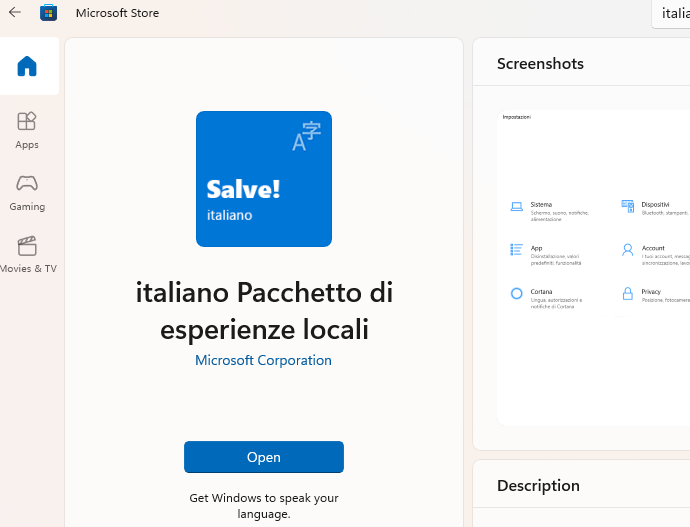
Languages can be installed directly from the Microsoft Store: Let’s open it and search for our language, for example «Italian». Let’s install the language as in the following screenshot:
Removing a language
For this operation, you can use the command prompt or the Powershell, i will use the latter, in any case you need to start them as administrator (right click > run as administrator).
Before removing a language, make sure you already installed the new language, it need to be listed as explained below here.
First of all we check what languages are installed with this command:
dism /online /get-packages | findstr /c:"LanguagePack"You might need to change /c: with the disk unit where your system is installed, for example /d:, this command will return us the list of packages installed for the languages.
Example:
Package Identity : Microsoft-Windows-Client-LanguagePack-Package~31bf3856ad364e35~amd64~en-US~10.0.22000.1098
Package Identity : Microsoft-Windows-Client-LanguagePack-Package~31bf3856ad364e35~amd64~en-US~10.0.22000.1219
Package Identity : Microsoft-Windows-Client-LanguagePack-Package~31bf3856ad364e35~amd64~it-IT~10.0.22000.1098
Package Identity : Microsoft-Windows-Client-LanguagePack-Package~31bf3856ad364e35~amd64~it-IT~10.0.22000.1219Now, let’s remove the most recent one (where numbers are greater) with this command, for the language we want to remove, English in this case. You can copy paste the name of the package.
dism /online /remove-package /packagename:"Microsoft-Windows-Client-LanguagePack-Package~31bf3856ad364e35~amd64~en-US~10.0.22000.1219"Double check that the name of the package is correct and that there are no empty spaces. You can also try removing the double quotes if needed.
If everything went well, you can see the language is being removed, it might take a minute. At the end, the system will ask you to restart the PC. You can remove other languages if you want, or just restart now.
Errors while removing packages
If you get an error like «invalid package», please verify that the name you wrote in the «remove-package» command was correct and double check that the same name is installed when using /get-packages.
You can also run the same command dism /online /get-packages to get the status of all packages: the language you are trying to remove must have a status of «Installed».
I’m working on a computer which has Windows 10 Home Single Language.
The language cannot normally be changed on Settings since its Single Language version.
So how do I change the interface language for Windows without reinstalling Windows?
Ramhound
42k35 gold badges103 silver badges131 bronze badges
asked Mar 31, 2020 at 10:29
Okay this is how I handle this situation.
First you should setup the language pack of the desired language to use.
-
If you haven’t done already, download your desired language pack. This usually can be done from Windows 10 Settings > Time & Language > Language tab and then clicking on Add language.
-
Check the language packs on your computer to confirm it was installed. Press
Win+Rand typecmd, then pressCtrl+Shift+Enterto open Command Prompt with Administrator rights. -
Type
dism /online /get-packagesand pressEnter.
We are looking for Microsoft-Windows-Client-LanguagePack-Package as a start for Package Identity. And its State should be Installed
Check screenshot
You can see next 5 characters after ~ for understand which language it is. In this example, we are seeing tr-TR. If you are looking for English for example, you should look for en-US. -
If you found the desired language in the step above, skip this step. Otherwise, continue reading.
You will have to manually download and install the language pack you want. To do that, go to this link for Windows 10 1909 (UPDATE: Go to this link for Windows 10 2004). Then select language pack you want to download. Then go to Command Prompt (Admin rights) again and typeDism /online /Add-Package /PackagePath:C:\lp.cab. Don’t forget to changePackagePathto your downloaded .cab file’s path before you type! Then pressEnterto install downloaded language pack -
Press
Win+Rand typeregedit, then pressCtrl+Shift+Enterto open Regedit with Administrator rights. Then go to\HKEY_LOCAL_MACHINE\SYSTEM\CurrentControlSet\Control\Nls\Language
Default entry shows that language id of your system. Check this link to look your desired language id from list. Copy the part after 0x part. For example for en-US, get 0409 Check screenshot -
Double click to Default (In some cases you might need to change InstallLanguage‘s id as well) to edit this entry and paste the language id you copied. Save and restart your computer.
answered Mar 31, 2020 at 11:17
tatolinetatoline
6131 gold badge6 silver badges11 bronze badges
6
While the accepted answer can work, it’s also possible that the .cab file listed in those links doesn’t work for your version of Win10. If that happens, you can find the language pack for your version by:
- Visiting https://uupdump.ml/
- Searching for keywords of your Win10 build. For example, System Information showed my Win10 was at version 10.0.18363, build 18363, so I entered «18363 amd64»
- Clicking on a Cumulative update of your build in the search results
- In Search files, search for «languagepack»
- Downloading the .esd file of the language pack you wish to use
- Converting the .esd file into a .cab file. You can use this tool for example https://github.com/abbodi1406/WHD/blob/master/scripts/ESD2CAB-CAB2ESD.zip . It has a readme explaining how to use it
- Then following steps 4, 5 and 6 of the accepted answer
It might be a bit longer, but it’s what I ended up doing since the .cab files listed there were not compatible with my build
answered Oct 31, 2020 at 18:44
EricmoirEricmoir
911 silver badge1 bronze badge
3
You must log in to answer this question.
Not the answer you’re looking for? Browse other questions tagged
.
Not the answer you’re looking for? Browse other questions tagged
.
Компания Microsoft выпустила несколько вариантов операционной системы Виндовс десятой серии. В некоторых присутствуют встроенные настройки, не всегда устраивающие пользователя. Например, может возникнуть вопрос, как сменить предустановленный язык интерфейса вариации Windows 10 Single Language. Существует определенная инструкция, ознакомиться с которой лучше заблаговременно.
Зачем нужна Windows 10 «Домашняя для одного языка» и как ее установить
Данный вариант операционки создавался для персональных компьютеров (портативных и стационарных) с небольшим объемом встроенной памяти. Дополнительные языковые пакеты занимают достаточно большое пространство, что затрудняло работу на подобных устройствах.
Внимание! Других отличий операционки Виндовс на один язык нет. Функциональный набор стандартный, подходит для использования в домашних условиях (просмотр видео, работа с пакетом программ Microsoft).
Чтобы установить нужную версию, нужно выполнить несколько шагов:
- перейти на официальную страницу компании-разработчика;
- в поисковой строке ввести наименование нужной ОС (на английском языке);
- выбрать подходящий вариант из списка на мониторе;
- скачать и активировать необходимые файлы.
Процедура несложная, подойдет начинающим юзерам. Важно использовать только официальные источники для скачивания, чтобы не заразить ПК вирусами.
Как изменить языка интерфейса в Windows 10 Single Language
Указанная ОС работает только с англоязычным вариантом, что становится понятно из названия. Чтобы русифицировать операционку, нужно выполнить следующие шаги:
- перейти на сайт Windows;
- выбрать разрядность действующего компа (64 или 32) и необходимый языковой пакет – в данном случае может стоять RU или Russian;
- изменить название на lp.cab, переместить в корень жесткого накопителя;
- вызвать Командную строку и запустить команду «dism /Online /Add-Package /PackagePath:C: \lp\lp.cab»;
- дождаться завершения процедуры (несколько секунд).
После этого необходимо перезагрузить персональный компьютер в принудительном порядке, установить необходимый для операционной системы язык.
Если на ПК установлена ОС «Виндовс домашняя для одного языка», использование может быть затруднено. Чтобы сменить настройки на нужный вариант, нужно скачать дополнительный языковой пакет и установить. Инструкции несложные, подойдут начинающим пользователям.
Вам помогло? Поделитесь с друзьями — помогите и нам!
