While you may be using Windows 10 for a while, this doesn’t mean you’ve discovered all the operating system’s features. Windows 10 is still new to many users, and most of its features remain undiscovered.
On Windows 10, you don’t need to install screen recording software to record your screen. A built-in feature allows you to record your entire Windows 10 screen-free.
Not only that, but you can also use VLC Media Player to record your desktop screen in easy steps. So, if you are looking for ways to record screens in Windows 10 without installing any software, you are reading the right guide.
Below, we have shared the two best ways to record screen in Windows 10/11. Both of the methods were free and require no additional app installation. So, let’s get started.
Record Windows 10 screen via Game Bar
Xbox Game bar is a gaming feature of Windows 10 that provides you an option to record your screen. While the feature is designed to record gameplay videos, it can also record your desktop screen. Here’s how to record the screen via the Xbox Game bar.
1. First, in your Windows 10, click on the Start button and type Xbox. Next, open the Xbox Game Bar app.
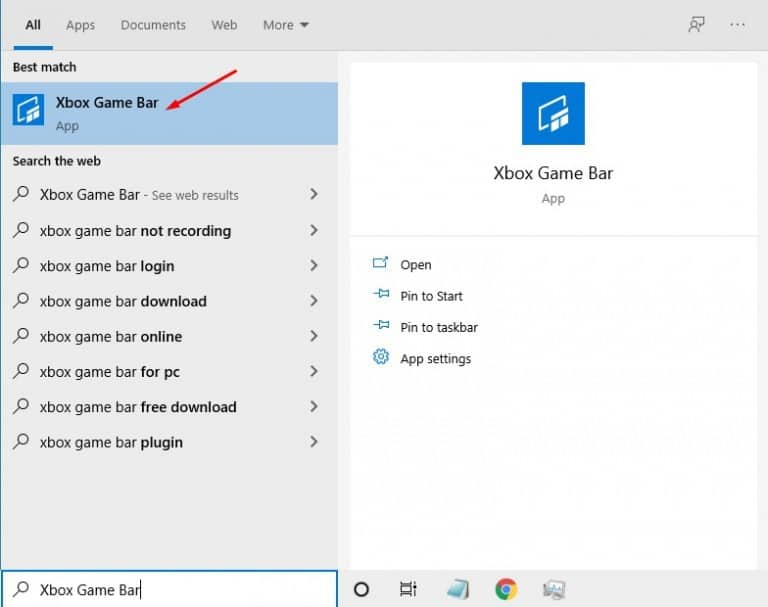
2. Now, you have to press Windows Key + G button on the screen you want to record.
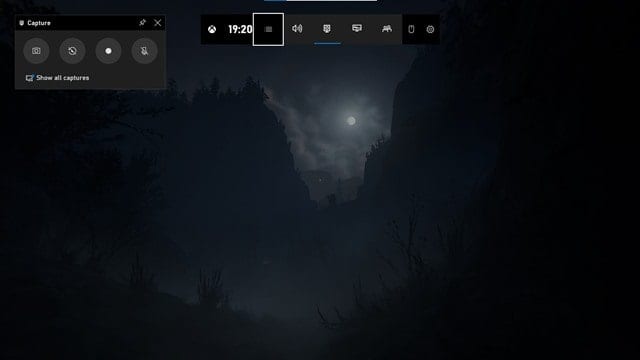
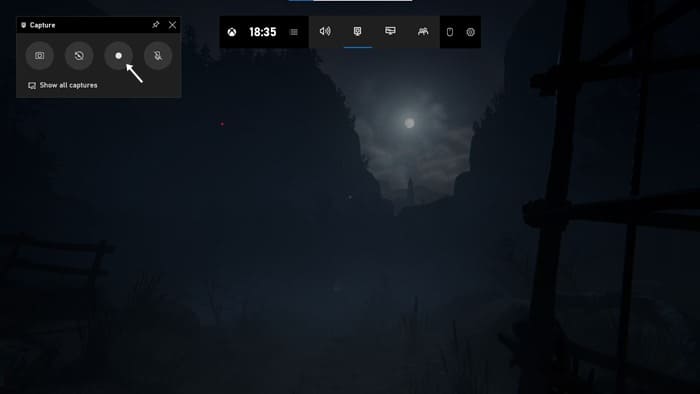
3. Now, you will see many options. You need to click on the Recording button on the Capture widget. This will start the screen recording.
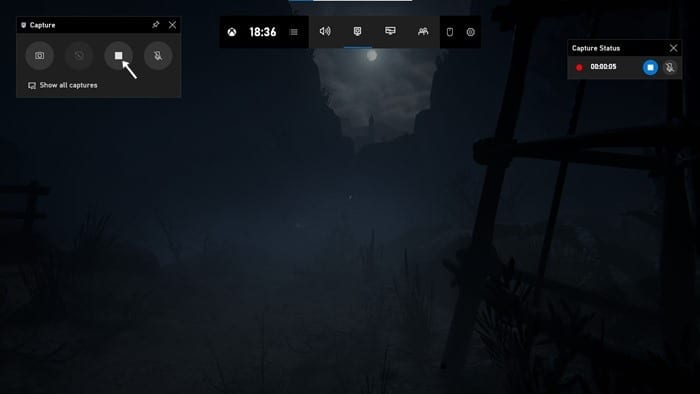
4. To stop the screen recording, click on the Stop button on the same widget.
By default, all your recordings get saved to the folder
“C/Users/Videos/Captures“.
That’s it! You can easily record the screen with the Xbox Game bar on Windows 10. You can also capture screenshots with the same tool.
Using VLC Media Player
With the VLC Media player, you can record the screen easily. You can use this method in Windows 7, 8, 10, and even Windows 11. Here’s how to record your Windows 10 screen using VLC Media Player.
1. First, download and install VLC Media Player on your Windows computer if you don’t have one.
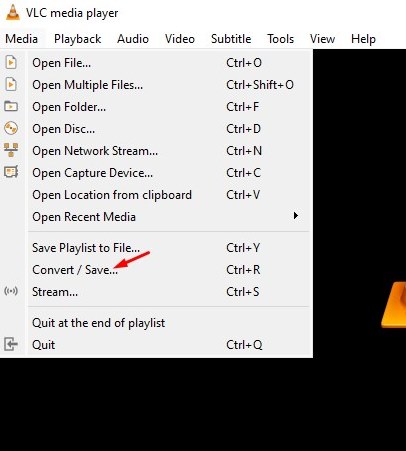
2. Next, click on the Media tab and select the Convert / Save option.
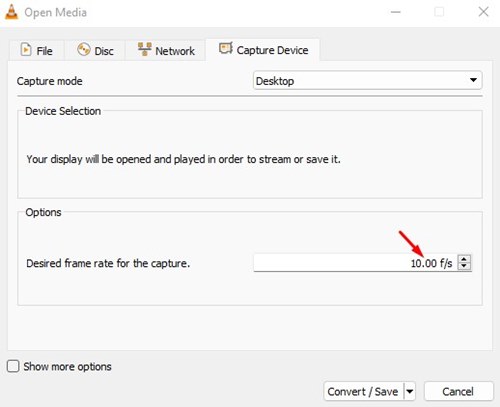
3. Now switch to the Capture Device and select Desktop on the Capture mode.

4. On the Desired frame rate for the capture, set your desired frame rate. 10f/s is recommended.
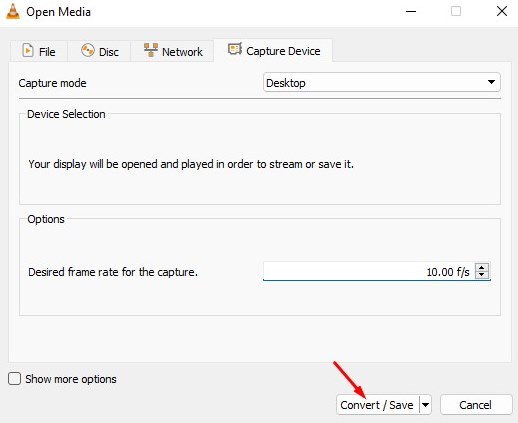
5. Once done, click on the Convert / Save button at the bottom of the Window.
6. On the Convert Window, click the browse button, select the filename, and set the location.
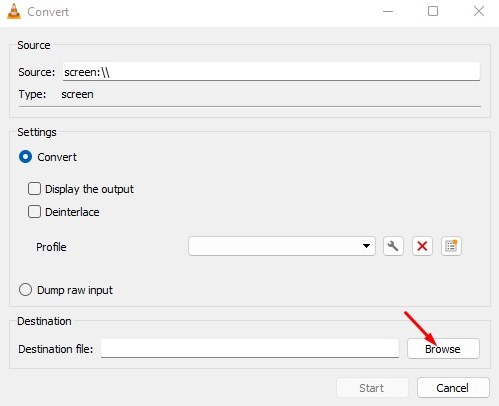
7. Once done, click on the Start button.

That’s it! You are done. Now the screen recording will start. You can now control the screen recording from the VLC’s interface.
That’s it! You are done. This VLC media player method works with every Windows version. You don’t need any additional software to record your desktop screen.
So, this is all about Windows 10 screen recording. We have shared the two best methods to record Windows 10 screen. If you don’t want to go through all hassle and want a straightforward way to record Windows 10 screen, you need to check our article Best Screen Recording Software.
How to make a screen recording
Clipchamp for personal accounts Clipchamp for work accounts More…Less
In Clipchamp, you can either record your screen or you can record both your screen and webcam together to produce training videos, react videos, presentations, gaming streams, and much more.
When you record screen and camera together, the recordings are captured simultaneously but they can be adjusted in the editing timeline separately. This means each video can be resized and placed however you like.
For the ideal outcome, recordings will align if you place them on top of each other on the timeline. The webcam recording can then be altered using freehand editing to place it over the screen recording to give a picture-in-picture appearance.
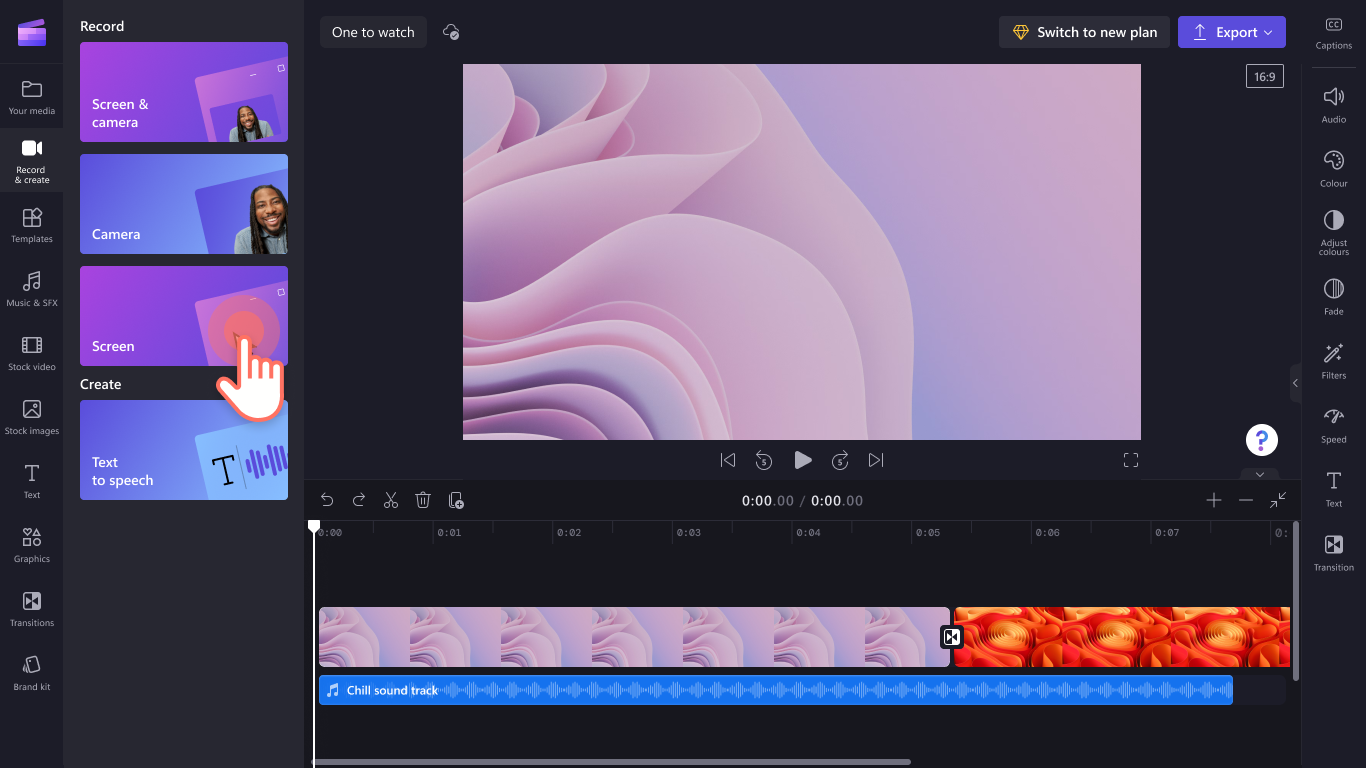
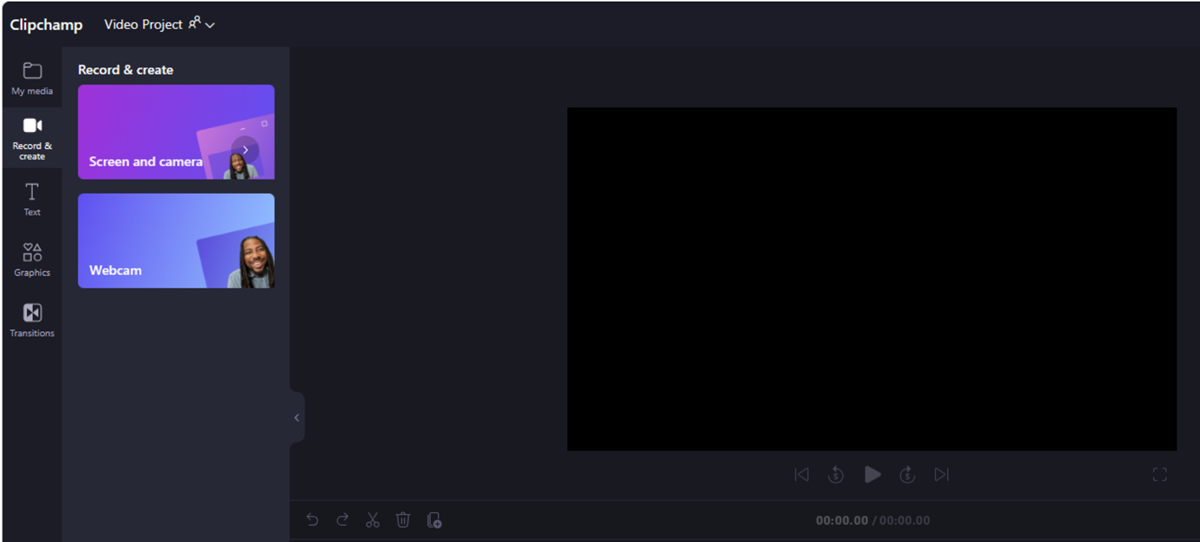
In Clipchamp’s video editor for personal accounts, to take a recording, go to the Record & create tab on the left toolbar.
Next, select either the screen or screen & camera option. Audio will also get recorded through your computer’s microphone, for example, if you want to talk while showing your screen (unless you turn audio recording off).
Note: The screenshots in this article show the screen recorder option. The same steps apply to screen & camera after choosing this option in the initial step.
To begin, open the «Record & create» tab
In this menu, you’ll see the options Screen & camera, Camera, Screen, and Text-to-speech. Select the Screen option.
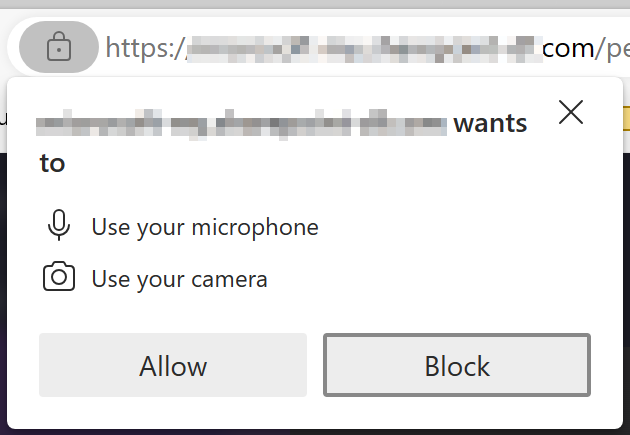
Allow camera & mic access, start the screen recording
A popup will appear at the top of your screen.
Allow Clipchamp access to use your camera & microphone. If you gave permission to access one or both devices before, the message on the popup can look different to our example screenshot.
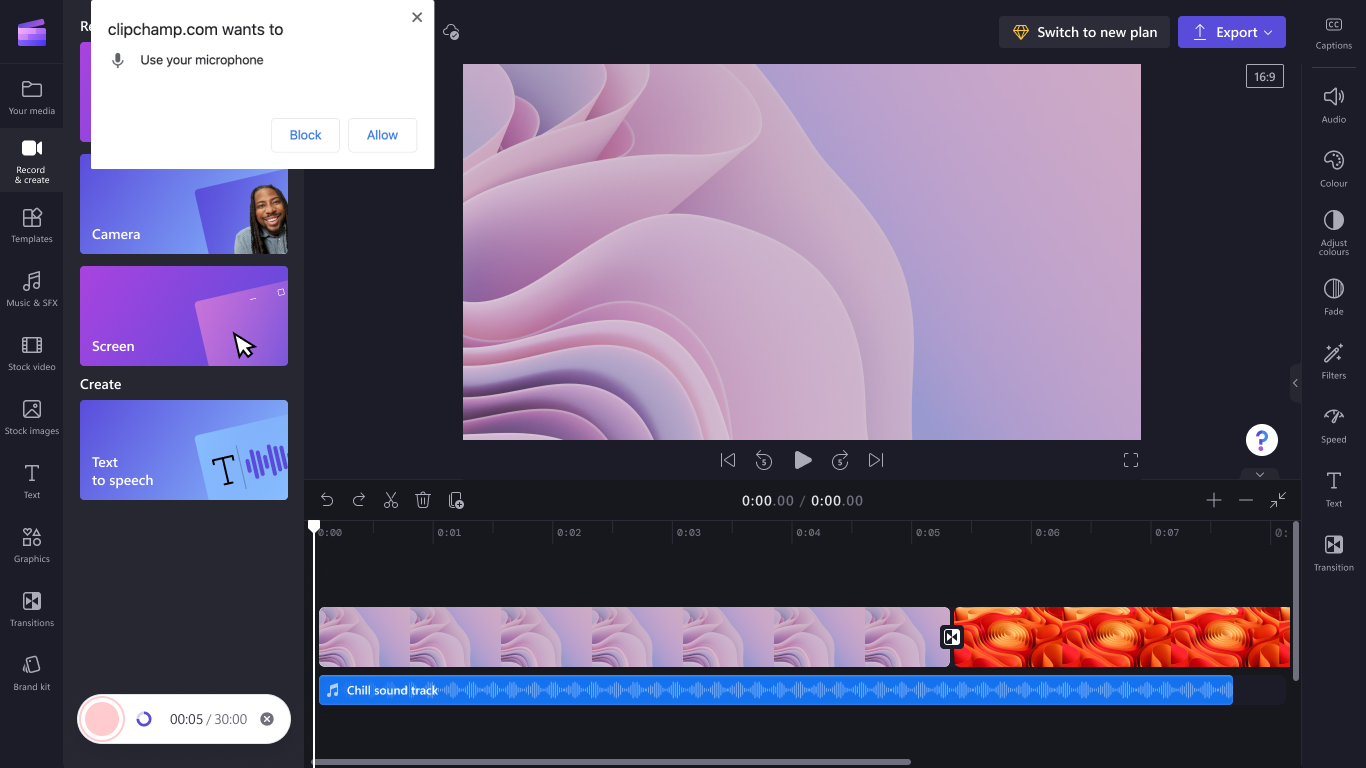
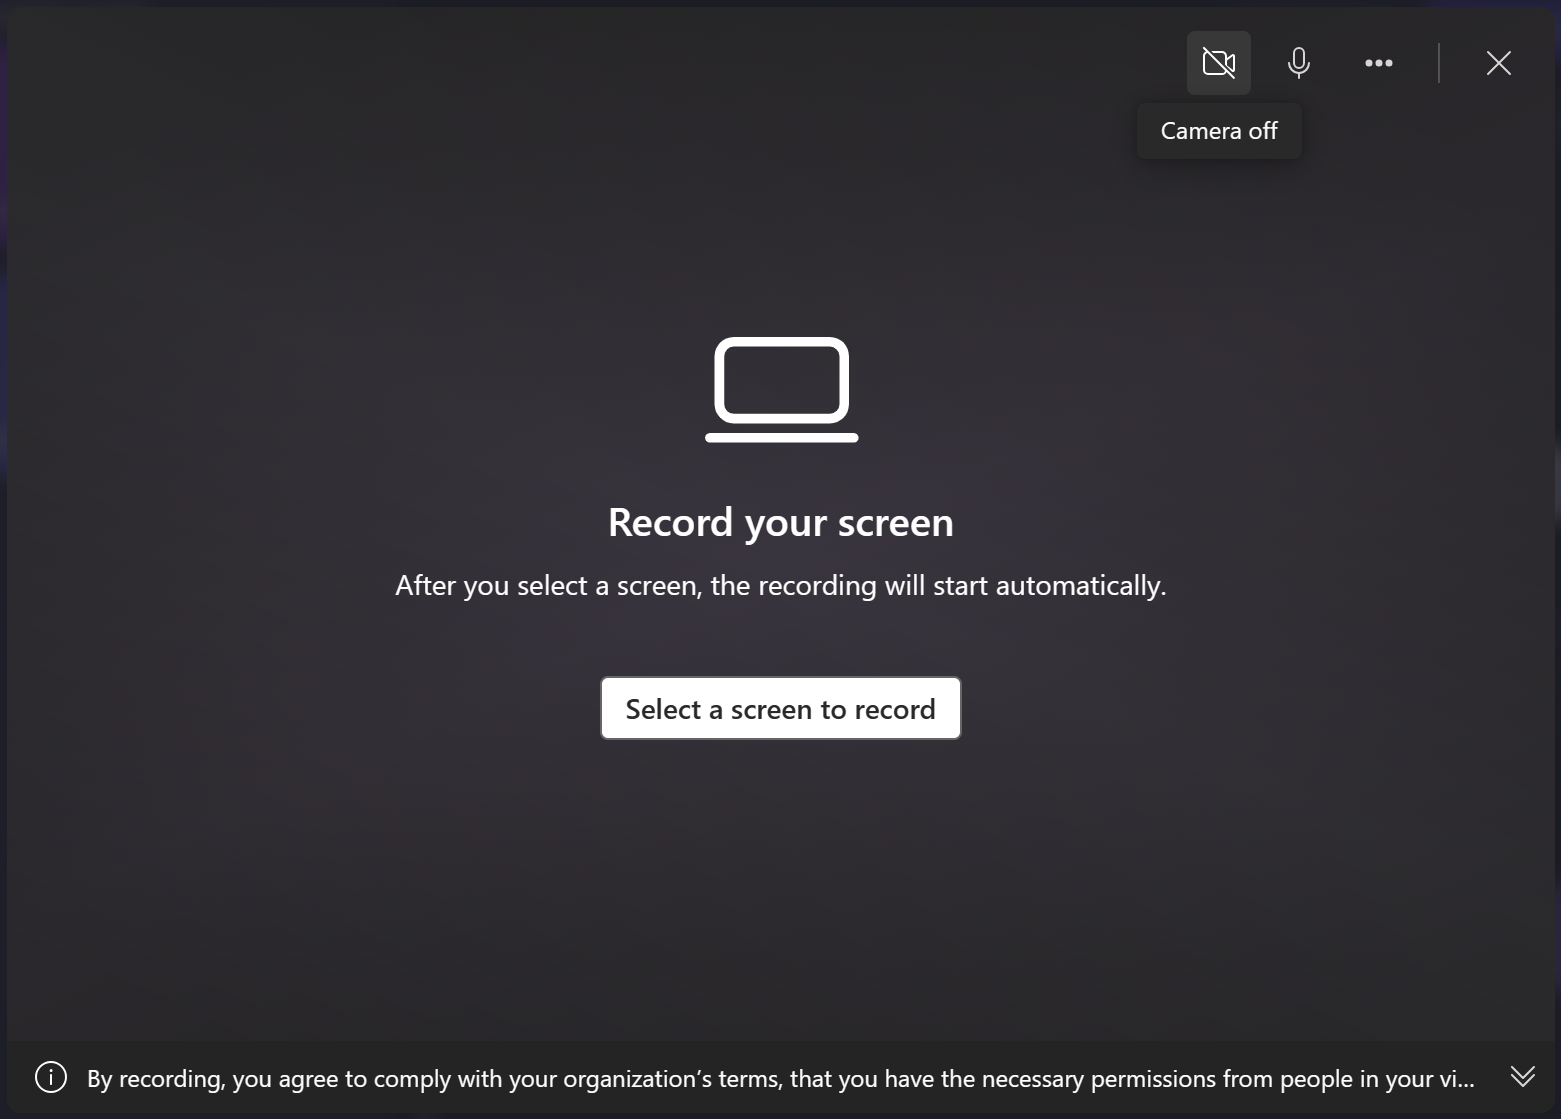
Next, start recording your screen by selecting the big red button at the bottom left.
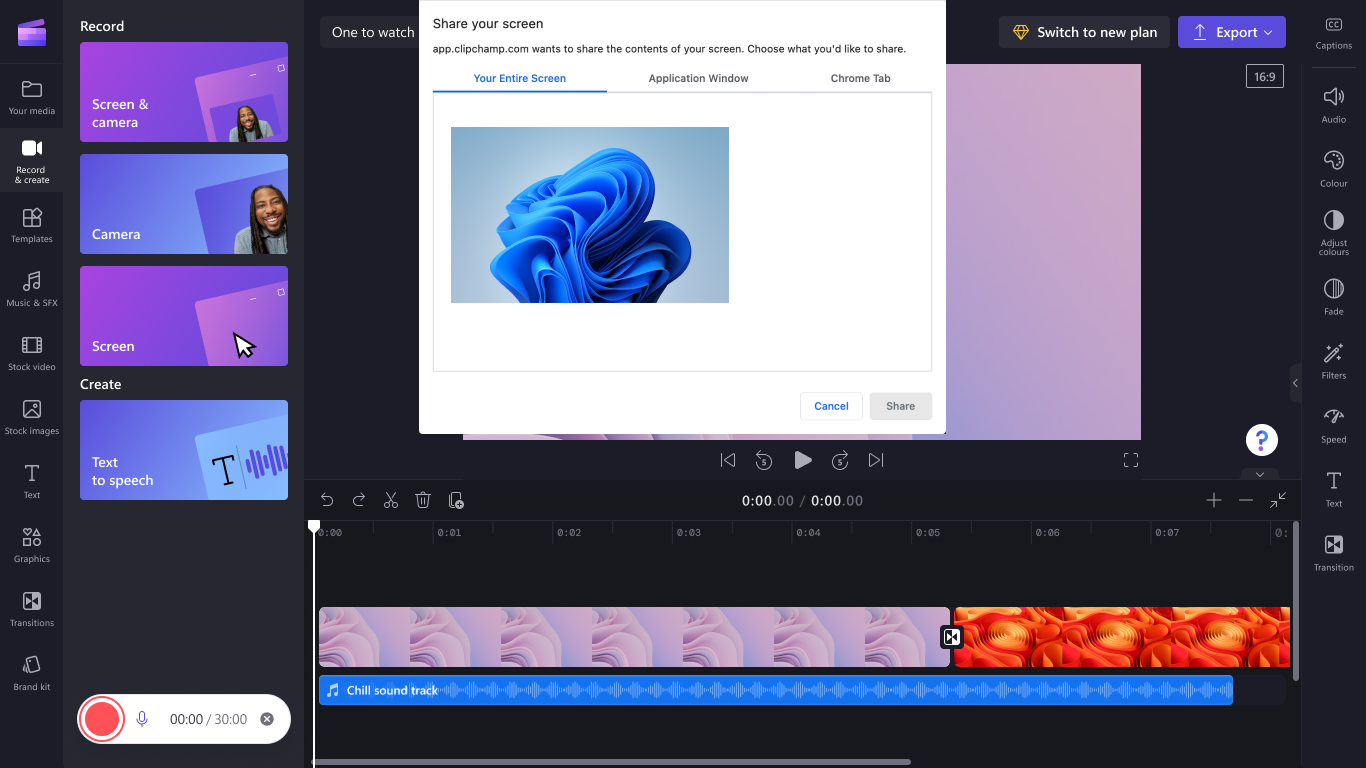
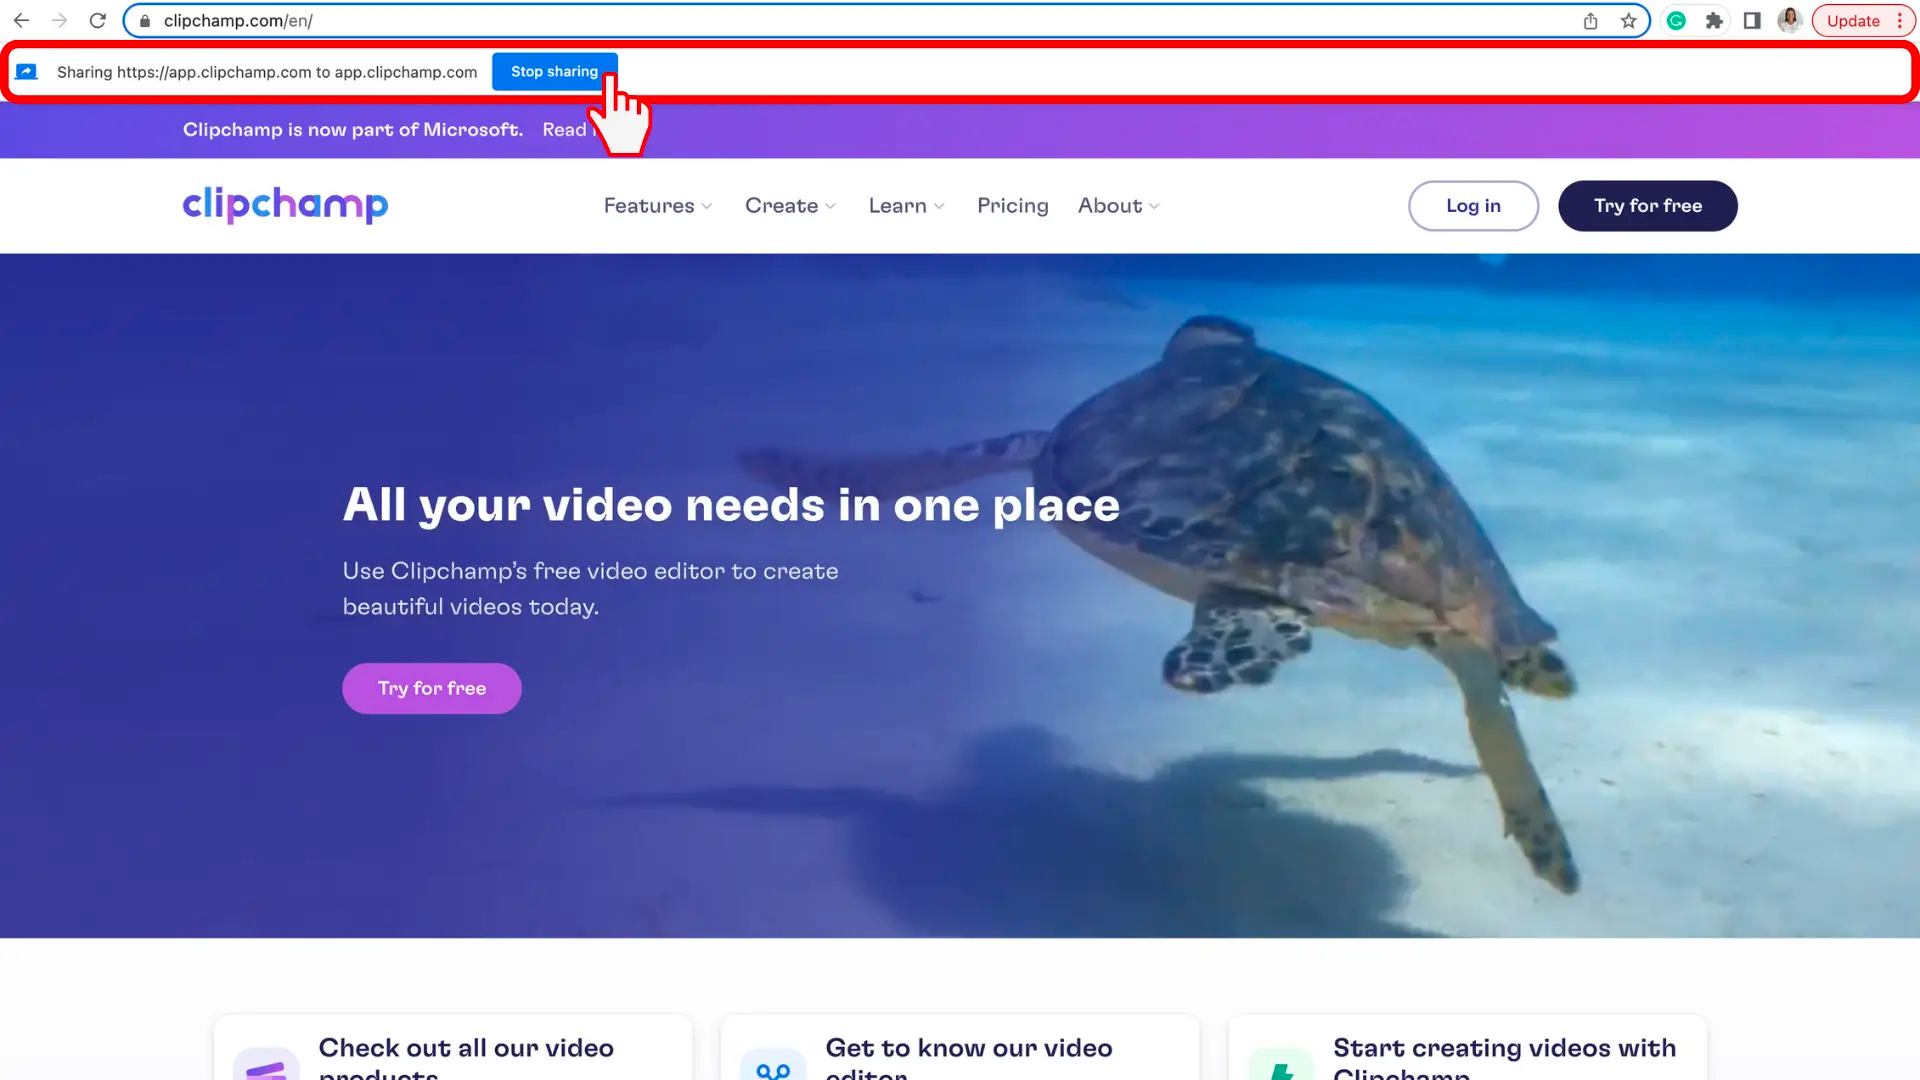
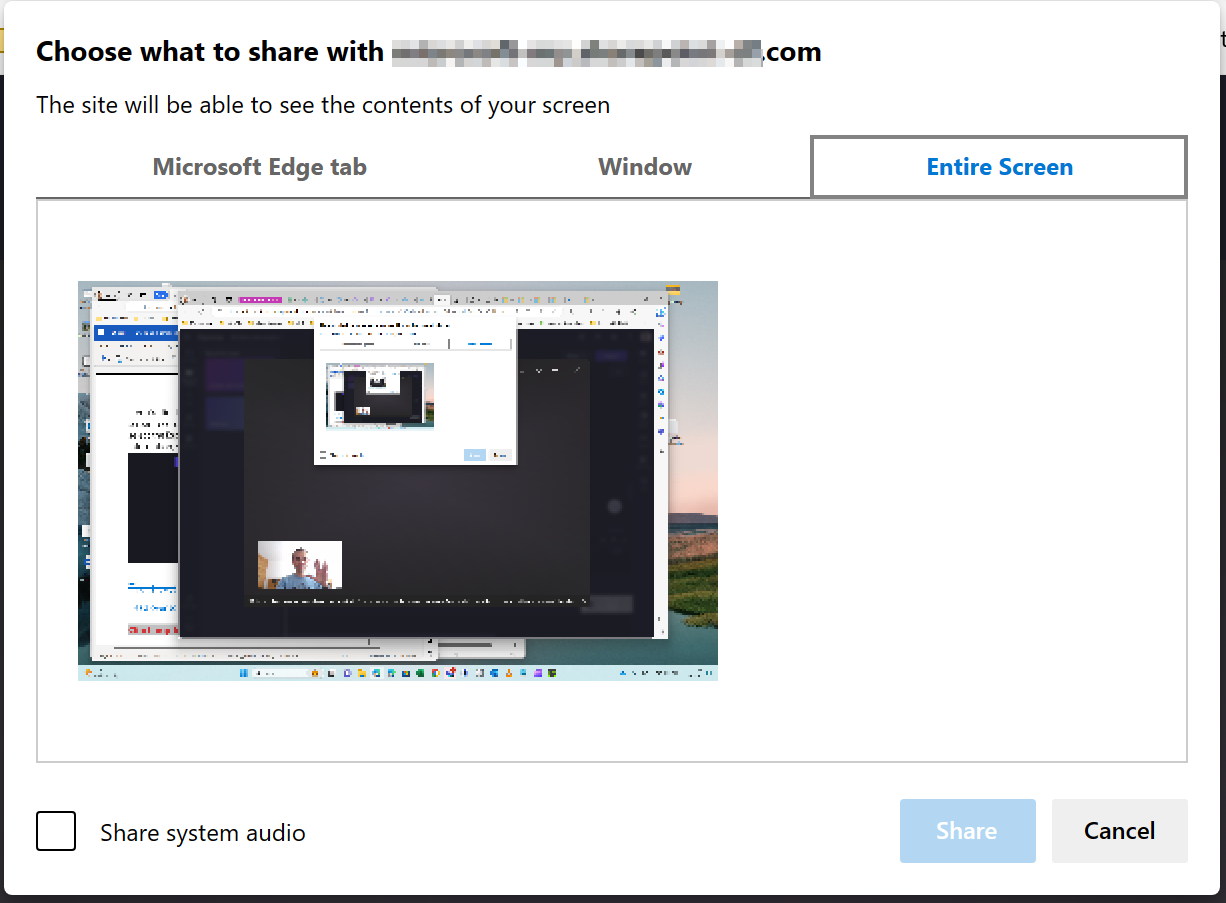
Another popup window will appear with screen recording options. Either record your entire screen, an application window, or a browser tab. We opted to screen record a Chrome tab for this tutorial. Select the tab of your choice, then select Share.
Important: In the Clipchamp Windows app, you will be able to select browser tabs from Microsoft Edge due to the way the Windows app works. To record a Chrome tab, open Clipchamp in Chrome and start a screen recording there.
You will be brought to the Chrome tab you have selected to screen record. Your screen is now actively recording. Your audio will automatically start recording when you select Share. Your built-in microphone will pick up on your voice, computer or mouse clicking, and any noise around you. To stop recording your screen, select Stop sharing.
TIP: If you want to record for longer than the maximum time (shown to the right of the elapsed time), try taking several shorter recordings and combining them in the editor later.
Download the raw recording, add it to the editing timeline
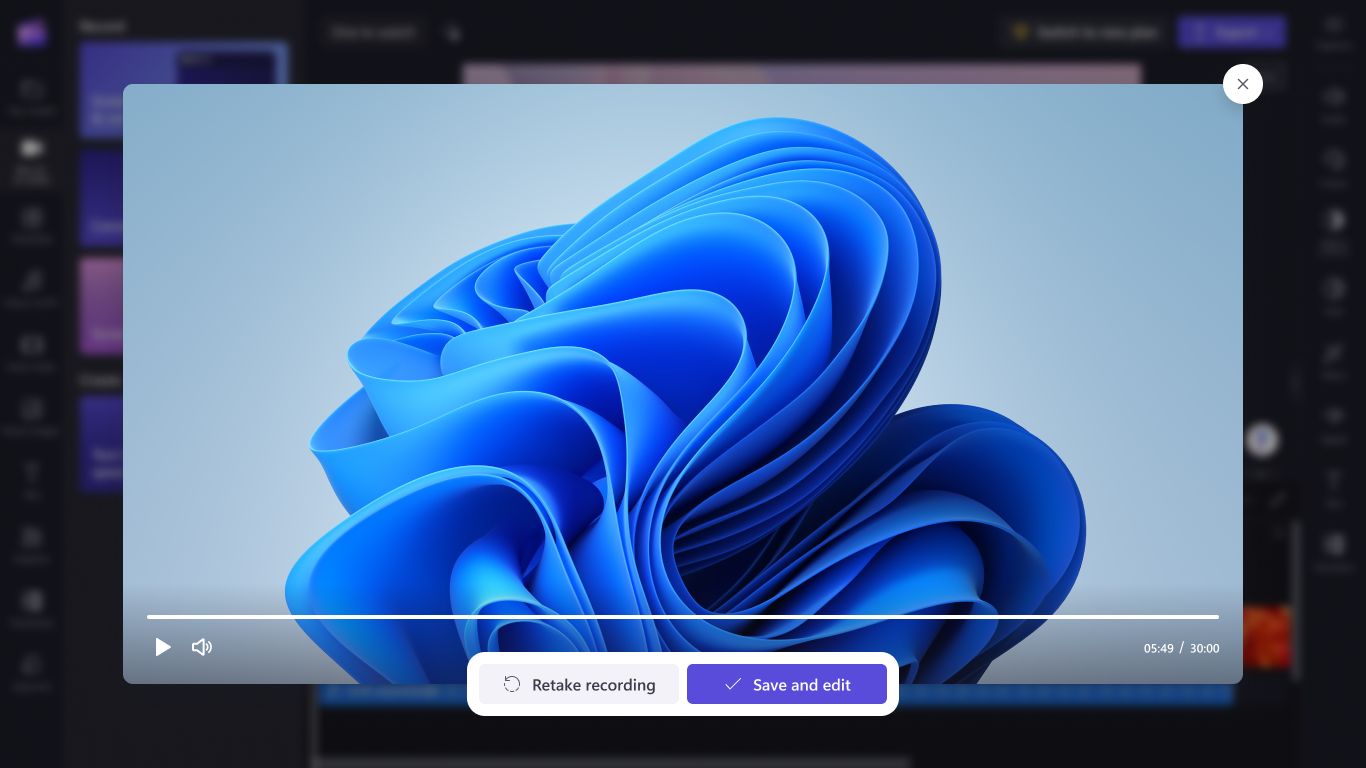
After you’ve selected Stop sharing, return to the editor. You can now preview your screen recording with audio. If you’re unhappy with the screen-recorded video, select Retake recording. If you want to use your video, select Save and edit.
A copy of the recording (in WebM format) will download to your computer, depending on the default settings in place, you can either select a folder to save it in or it will get stored in the Downloads folder automatically.
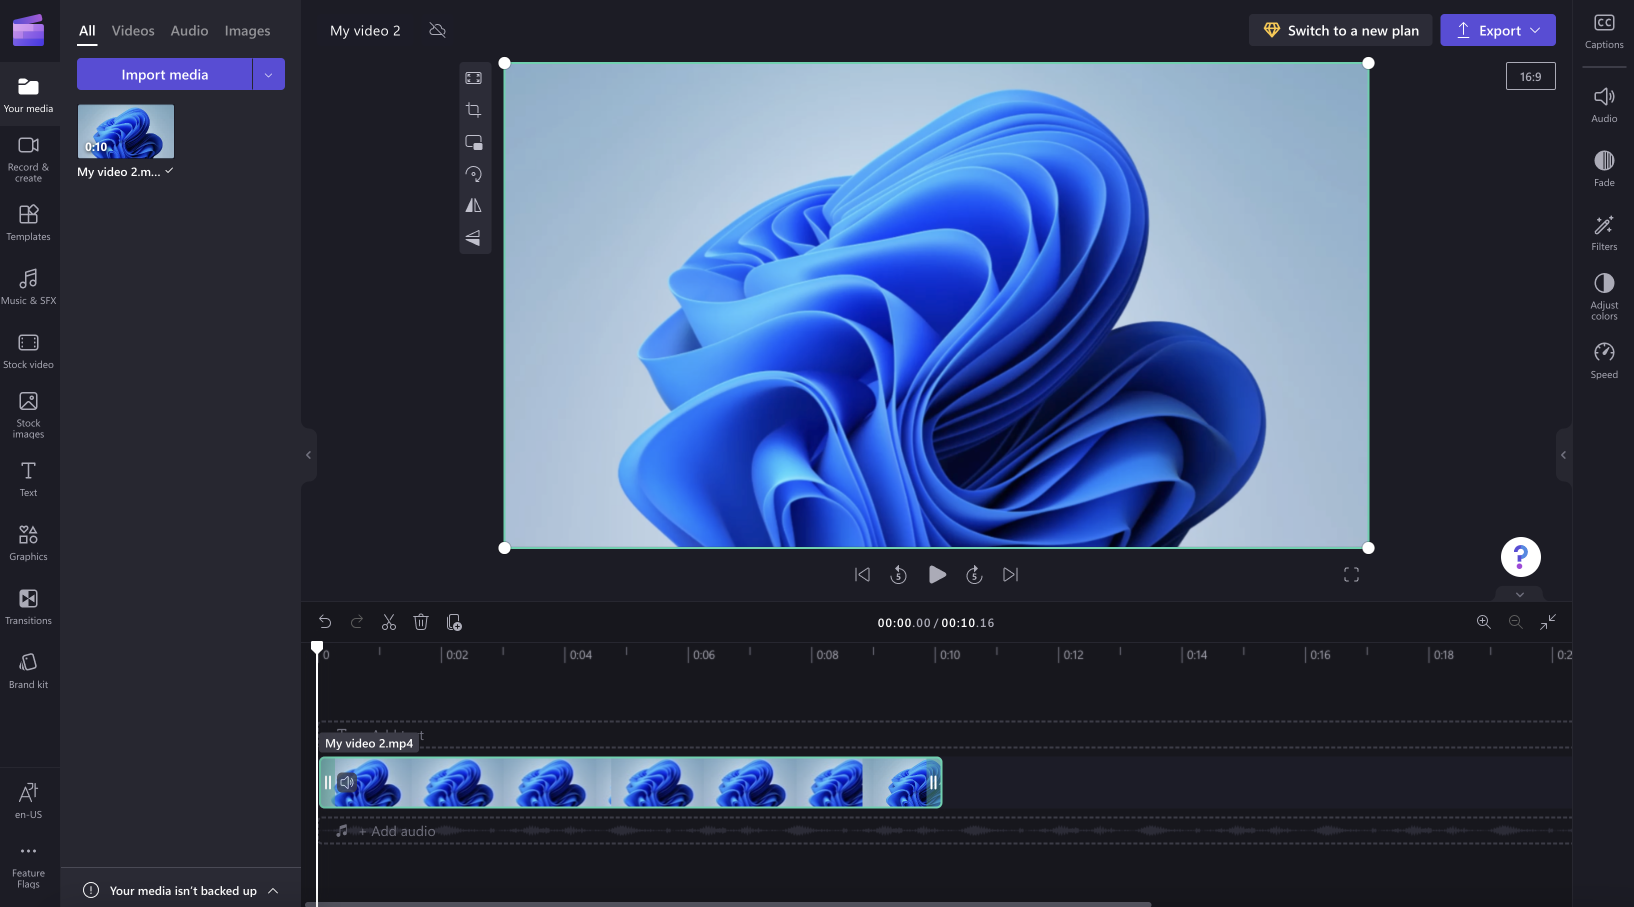
The clip will also get loaded into the editing project and will automatically be added to the timeline. To add more than one copy to the timeline, select the Your media tab to find the screen recording file. Note that the audio track of the recording is part of the video.
Edit your screen recording audio
You can mute your screen recording audio by clicking on the microphone icon on the clip on the timeline. You can also detach the audio track to edit it separately.

In addition, you can edit the video further, for instance by trimming unwanted parts off the start or end or splitting it to cut out segments.
If the recording doesn’t fit the dimensions of your project (e.g. you see black bars on either side of it) you can crop it to fit the project’s aspect ratio.
For more information on Clipchamp’s editing tools, see the How to edit a video article.
Export the video
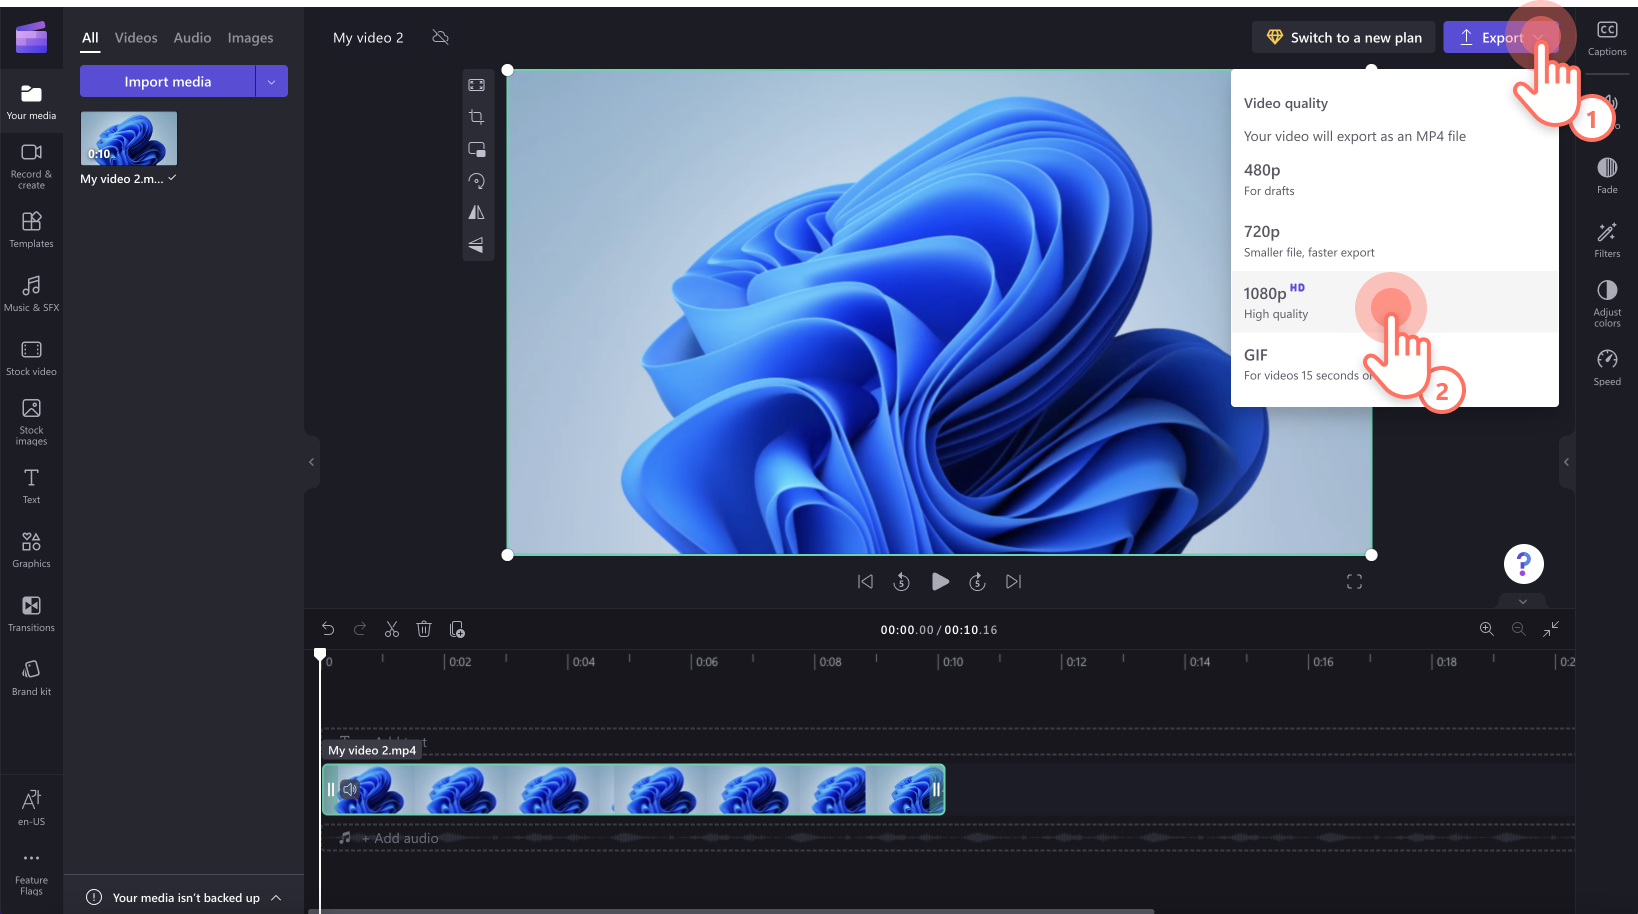
If you’re finished editing and would like to save the screen recording including edits as an MP4 video to your computer, select the Export button in the top right and follow the prompts.
In Clipchamp’s video editor for work accounts, to take a screen recording, go to the Record & create tab in the left toolbar of the editor. Next, select the Screen and camera option.
Audio will also be recorded through your computer’s microphone. For example, you could talk while showing your screen (unless you turn audio recording off).
To begin, open the «Record & create» tab
Select Record & create on the toolbar, then select Screen and camera.
Allow camera & microphone access, start the recording
Important: When you use Clipchamp in Edge, you can select browser tabs from Microsoft Edge to record. To record a Chrome tab, open Clipchamp in Chrome and start a screen recording there.
When you start a recording for the first time, you’ll see a popup next to the browser address bar asking for permission to access your camera and microphone.
Allow access, otherwise the screen and camera recording won’t work.
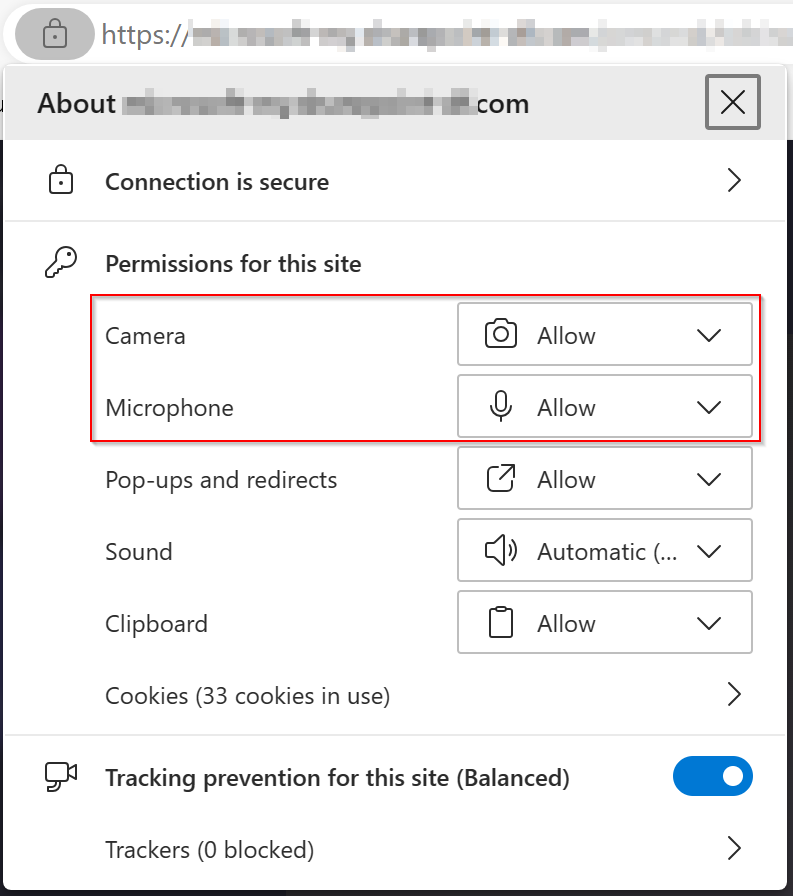
To check the permissions you’ve given Clipchamp, select the Lock icon and make sure you’ve allowed Clipchamp access to use your webcam and microphone.
In the popup window, toggle your webcam on or off to either include or exclude the camera from the recording session, then click Select a screen to record.
Select a screen, window or browser tab, also decide if you’d like to include the system audio, then select Share.
You will be brought to the screen, window or browser tab you selected to record. After a countdown of beeps, your screen starts actively recording. The computer’s microphone will pick up on your voice, computer sounds or mouse clicking, and any noise around you.
To stop recording your screen, select Stop sharing in the horizontal toolbar that appeared when the recording started.
TIP: If you want to record for longer than the maximum time, try taking several shorter recordings and combining them in the editor later.
Save your screen recording
After you’ve selected Stop sharing, return to the editor. You can now preview your screen recording with audio. If you’re unhappy with the screen-recorded video, select Retake recording. If you want to use your video, select Save and edit.
Note: If you recorded both screen and camera, there will be 2 files available, one for the screen recording and one for the webcam recording. If you only recorded your screen, there will be one file.
A copy of the recording (in WebM format) will download to your computer, depending on the default settings in place, you can either select a folder to save it in or it will get stored in the Downloads folder automatically.
The clip(s) will also get loaded into the editing project and will automatically be added to the timeline. The audio track of the recording is part of the video.
If there is a screen recording and a camera recording, the 2 files are added to the timeline as a group. You can ungroup them by right clicking on the media on the timeline, then selecting ungroup.
Edit the recording and audio
You can mute your screen recording audio by clicking on the microphone icon on the clip on the timeline. You can also detach the audio track to edit it separately.
In addition, you can edit the video further, for instance by trimming unwanted parts off the start or end or splitting it to cut out segments.
If the recording doesn’t fit the dimensions of your project (e.g. you see black bars on either side of it) you can crop it to fit the project’s aspect ratio. You can also add text and titles.
For more information on Clipchamp’s editing tools, see the How to edit a video article.
Adjust the layout
If your recording includes a webcam clip that appears as a separate item on the timeline, you can edit the layout of the video by freely moving your webcam recording around the screen. To do so, drag and drop the camera clip around the preview window in the editor.
You can also use the editing features on the media’s property panel. These include fit, crop, picture-in-picture, rotate, flip horizontal, and flip vertical.
Export your video
If you’re finished editing and would like to save the edited project to your computer as an MP4 video, select the Export button in the top right and follow the prompts.
Need more help?
Want more options?
Explore subscription benefits, browse training courses, learn how to secure your device, and more.
Communities help you ask and answer questions, give feedback, and hear from experts with rich knowledge.

-
Как записать видео происходящего на мониторе в Windows 10 без установки сторонних программ
-
Как записать видео в любом окне Windows 10
Запись происходящего на экране компьютера или ноутбука в видеоклип уже давно стала обыденностью и с каждым днем набирает свою актуальность для все большего количества пользователей. Кто-то записывает игры, кто-то делает видео-инструкции для себя или для других, а кому-то приходят в голову другие идеи, требующие захват происходящего на мониторе и последующего сохранения в фильм.
В общем, не зависимо от цели, средства, для записи видео с экрана используются одни. Мы рассмотрим 2 варианта записи на видео, всего происходящего на экране компьютера или ноутбука:
- Первый вариант не будет требовать установки каких-либо программ и даст возможность записать видео, использую только встроенные возможности Windows 10
- А во втором случае, мы воспользуемся установкой удобной и, что немаловажно, бесплатной программой для захвата видео с экрана.
.
Запись видео с монитора, без установки дополнительного софта, встроенной функцией Windows 10
Способ интересен в первую очередь тем, что вам не придется ничего искать и устанавливать, но подойдет не для всех целей.
Дело в том, что встроенная утилита Windows 10, для захвата видео, после начала записи, будет записывать только ту игру или программу, в которой была начата запись и не умеет записывать просто рабочий стол, проводник, или другие элементы Windows.
Теперь подробнее:
- Помним, что встроенное средство записи будет работать только внутри нужной вам игры или программы.
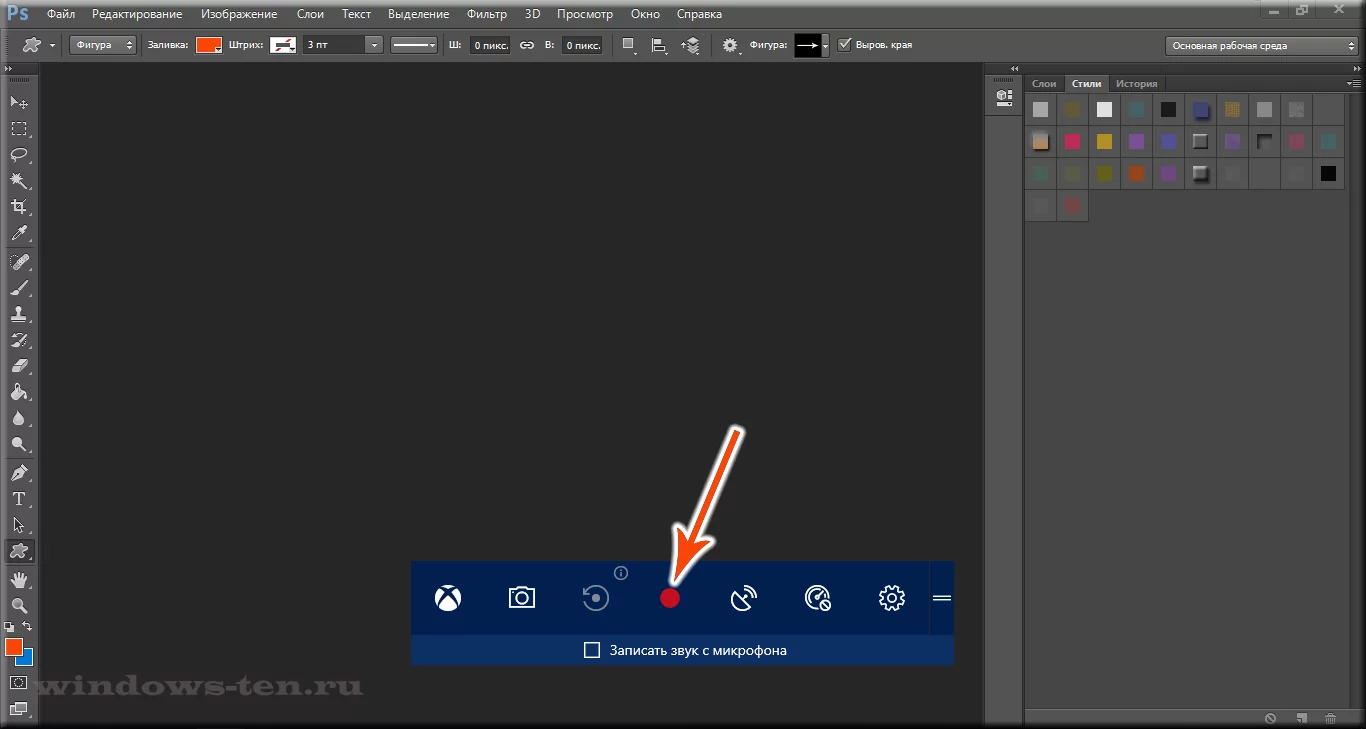
В нашем примере, мы будем записывать на видео работу в Photoshop. - Запускаем, браузер, или любую другую программу, происходящее в которой нужно записать на видео, и нажимаем комбинацию клавиш Win + G (то есть — зажимаете клавишу «win», и, не отпуская ее, один раз нажимаете клавишу «G»)

. - После чего, на экране появится небольшое окно, в котором нужно поставить флажок напротив записи «да, это игра»

. - Как только мы установим отметку, окошко исчезнет, а, для вызова панели управления записью видео, нужно будет еще раз нажать комбинацию клавиш Win + G (то есть — зажимаете клавишу «win», и, не отпуская ее, один раз нажимаете клавишу «G»)
- На появившейся панели управления останется лишь нажать круглую кнопку красного цвета для начала записи.

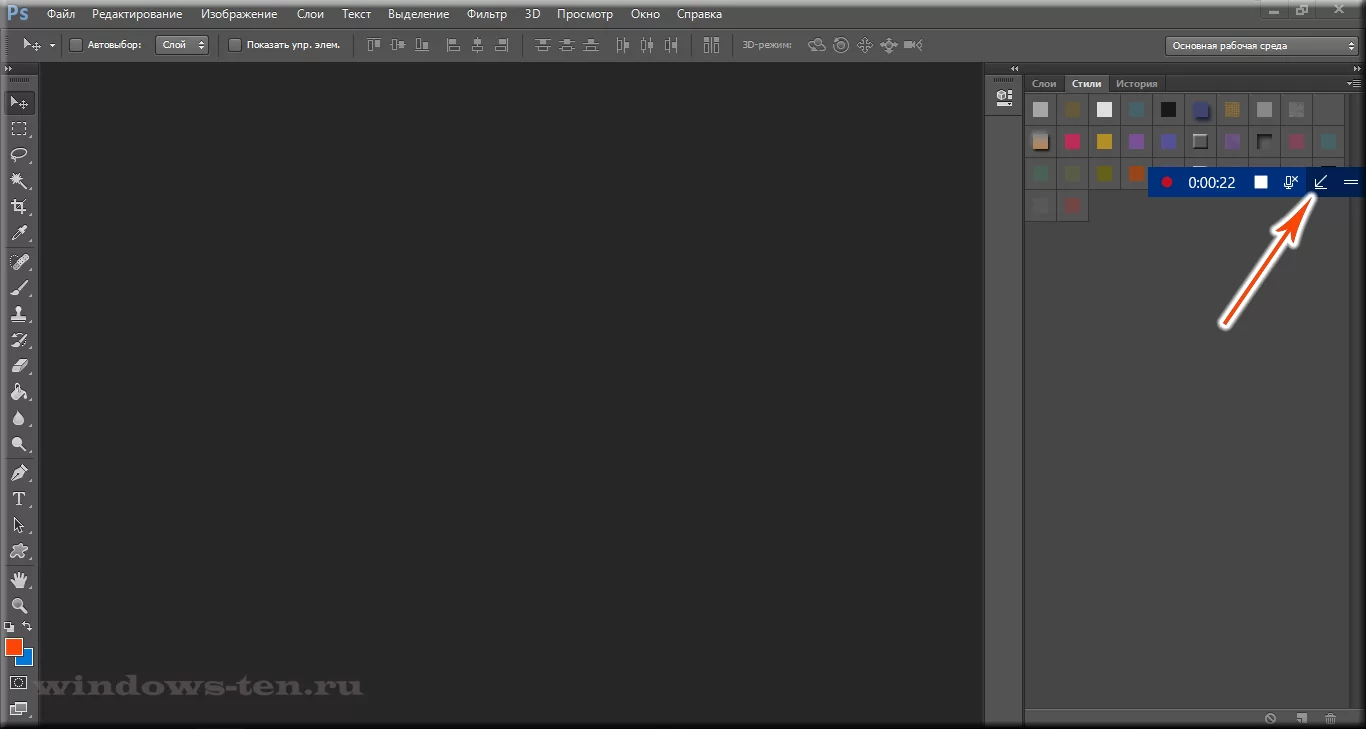
. - В правой части экрана будет отображаться мини-панель, знаменуя процесс записи и дающая возможность мгновенного включения/отключения микрофона или остановки записи видео.
Если эта мини-панель будет вам мешать, ее можно скрыть нажатием кнопки со стрелкой. (Видео, при этом, будет записываться дальше)
. - А, для возврата панели записи видео с экрана Windows, снова нажмите комбинацию клавиш Win + G

. - Завершить запись видеоролика можно нажатием все той же красной кнопки, или просто свернуть игру программу либо приложение, в котором велась запись.
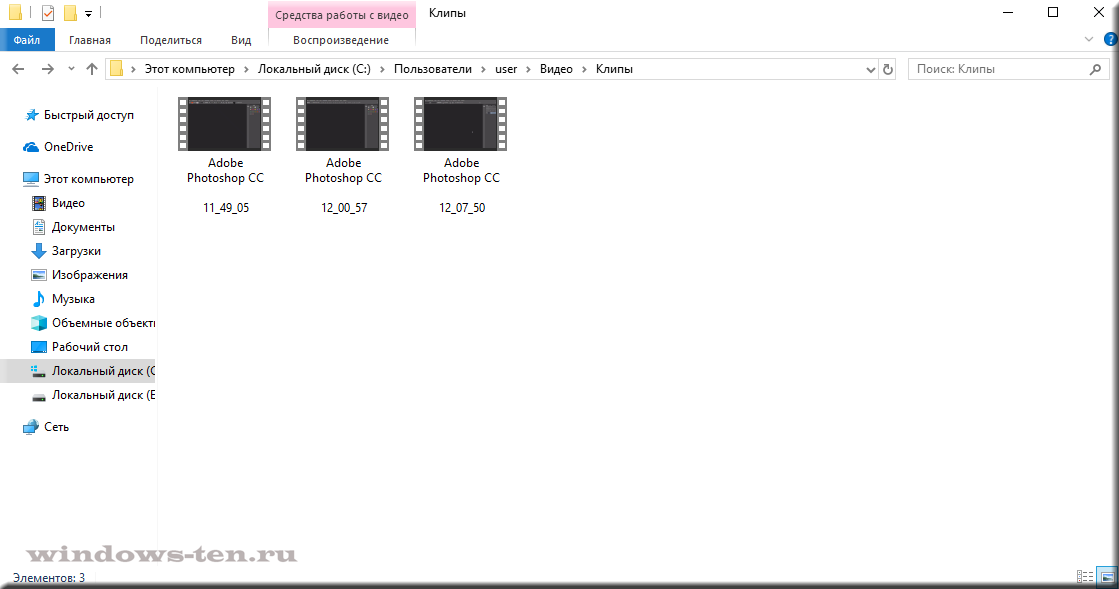
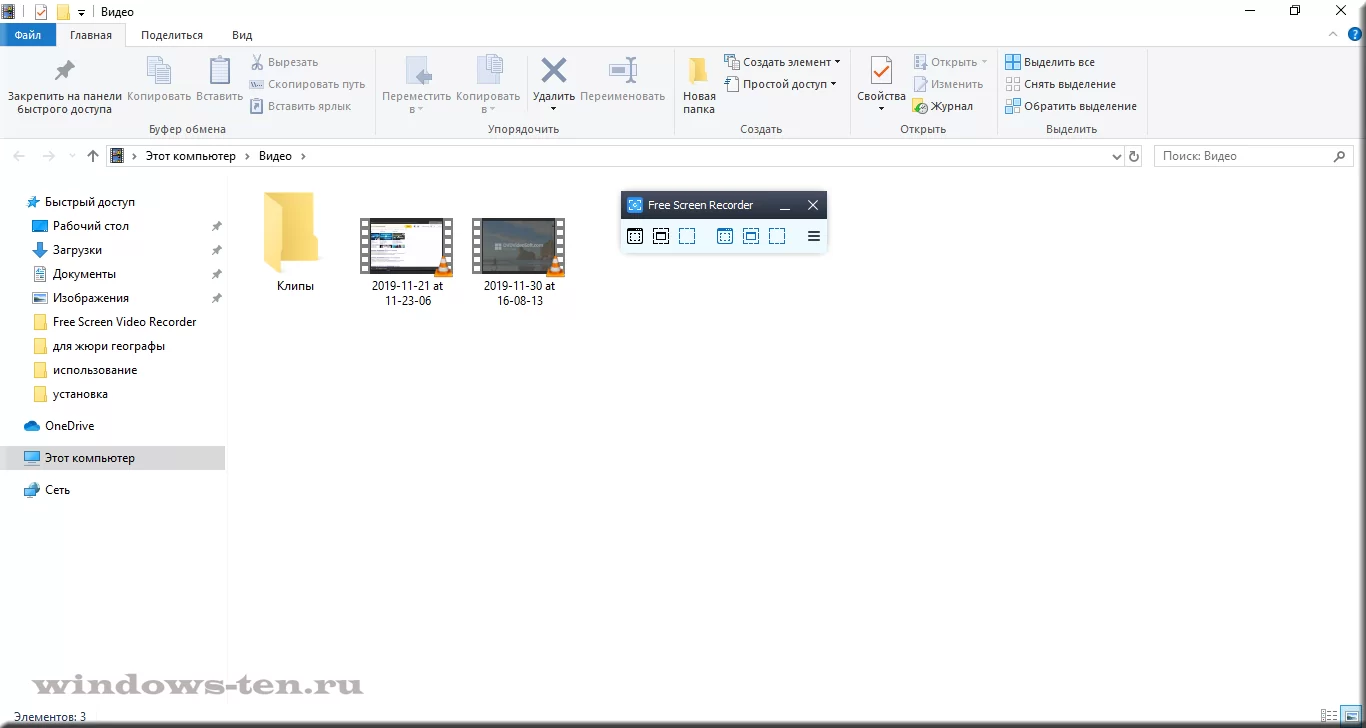
Записанное же видео, будет автоматически сохранено в папке видеоклипы, находящейся по адресу » диск С -> папка «пользователи»-> папка с «именем пользователя» -> папка «Видео» -> «Клипы».
.


Как создать видеоклип всего происходящего на мониторе компьютера или ноутбука.
Встроенная функция записи видео в Windows 10 отлично подходит для создания роликов в играх или программах.
Однако, когда нужна запись всего, что происходит на мониторе, рабочего стола, переключения между окнами и/или запущенными программами, играми и так далее, потребуется установка дополнительного софта.
Лучше всего, для захвата видео с экрана подходит бесплатная программа Free Screen Video Recorder.
Скачиваем ее ЗДЕСЬ.
(если процесс установки вызовет какие-то сложности, можно обратиться к подробной инструкции по установке Free screen video recorder)
После установки запускаем Video Recorder и видим небольшое окно примерно по середине экрана
.
Рабочее окно программы минимализировано с целью закрытия собой как можно меньшей части экрана, для того, чтобы пользователь мог свободно ориентироваться, какое окно или какую область ему нужно выделить для видеозаписи.
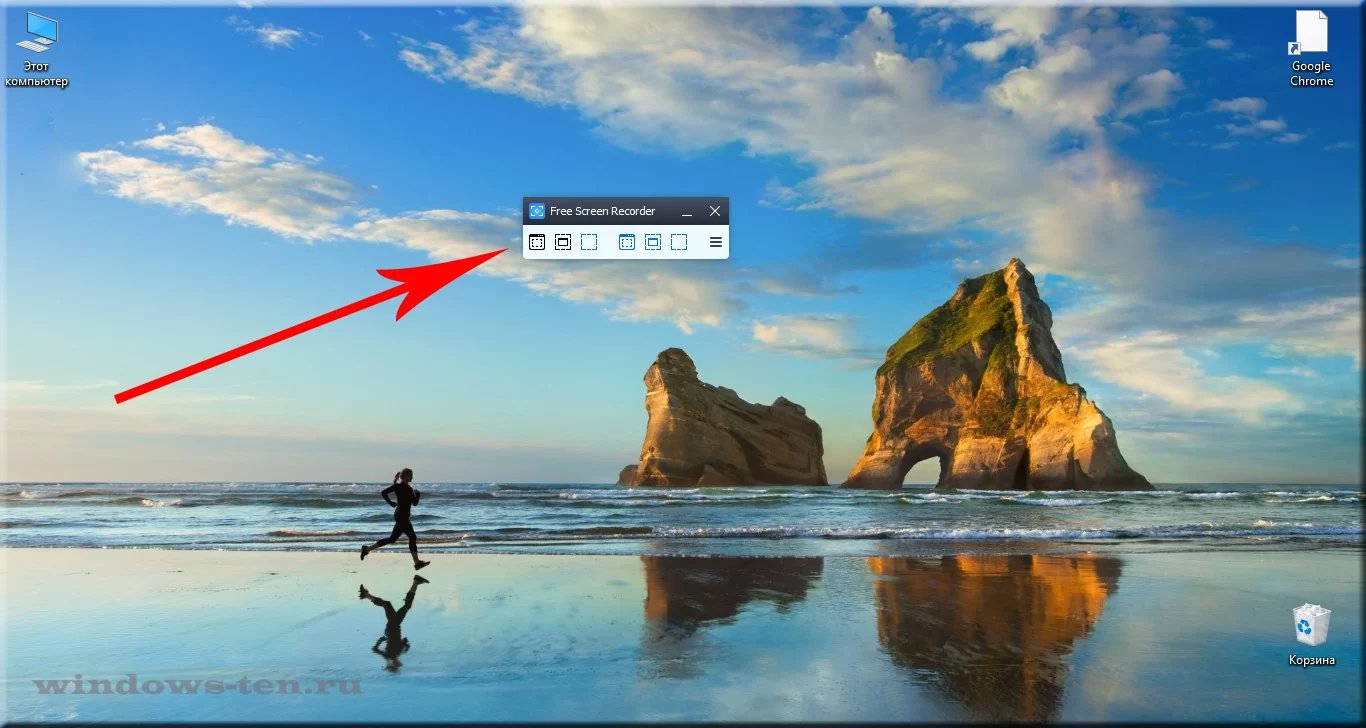
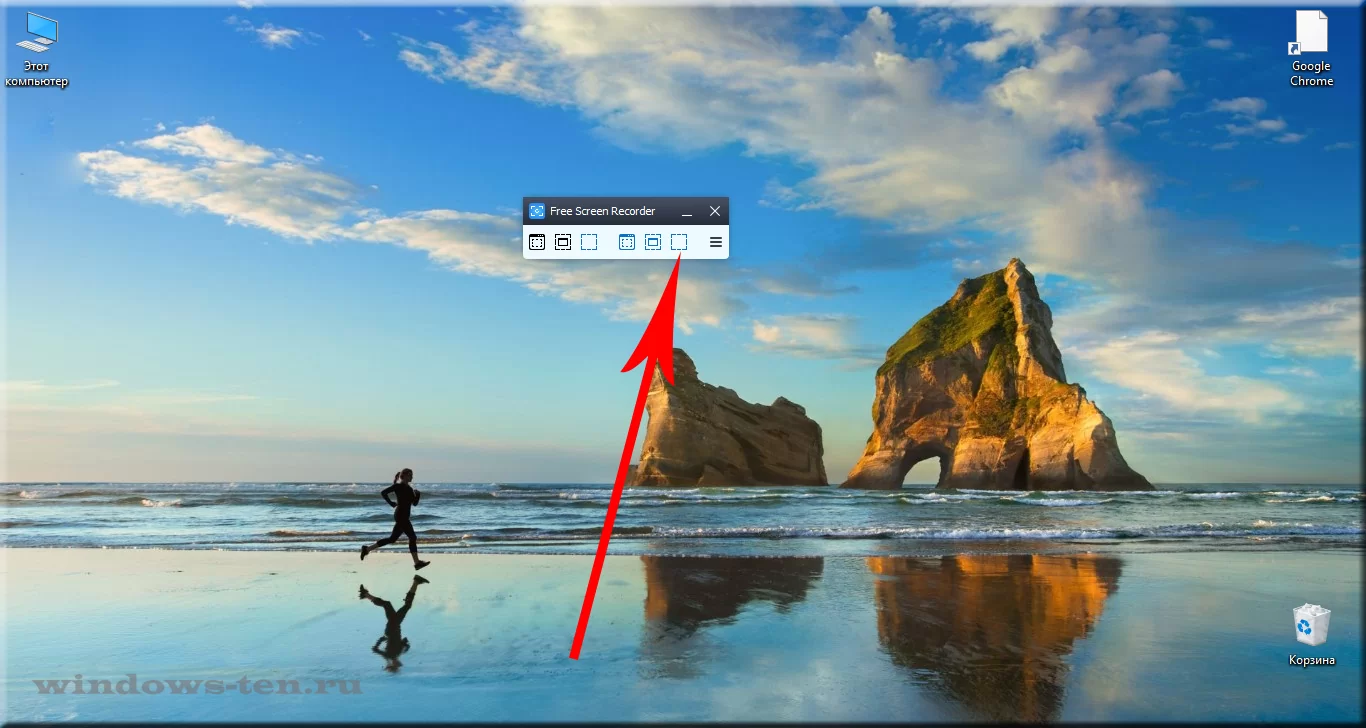
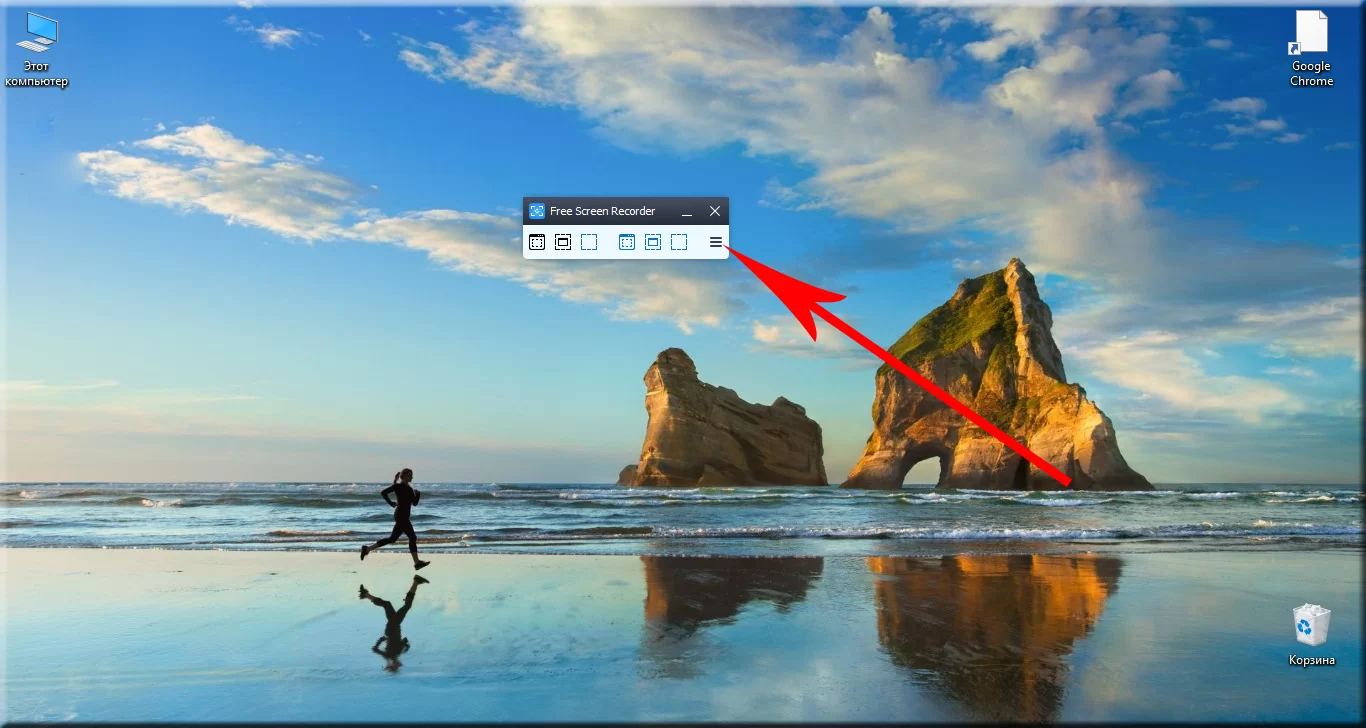
На этой небольшой панели есть шесть основных кнопок, каждая из них говорит о своем назначении, если навести на нее курсор мыши.
Для начала записи видео, нажимаем на одну из трех кнопок справа.
Тут нам предлагается:
- Запись на видео всего, что происходит на экране — «Запись видео с рабочего стола»
- Запись видео происходящего в определенном окне или программе — «Запись видео с окна»
- И возможность записывать все, что происходит в определенной области экрана, которую нам будет предложено предварительно выделить — «Запись видео с области»
Для примера, мы выберем «Запись видео с области» и нажмем соответствующую кнопку на панели Free Screen Video Recorder
.
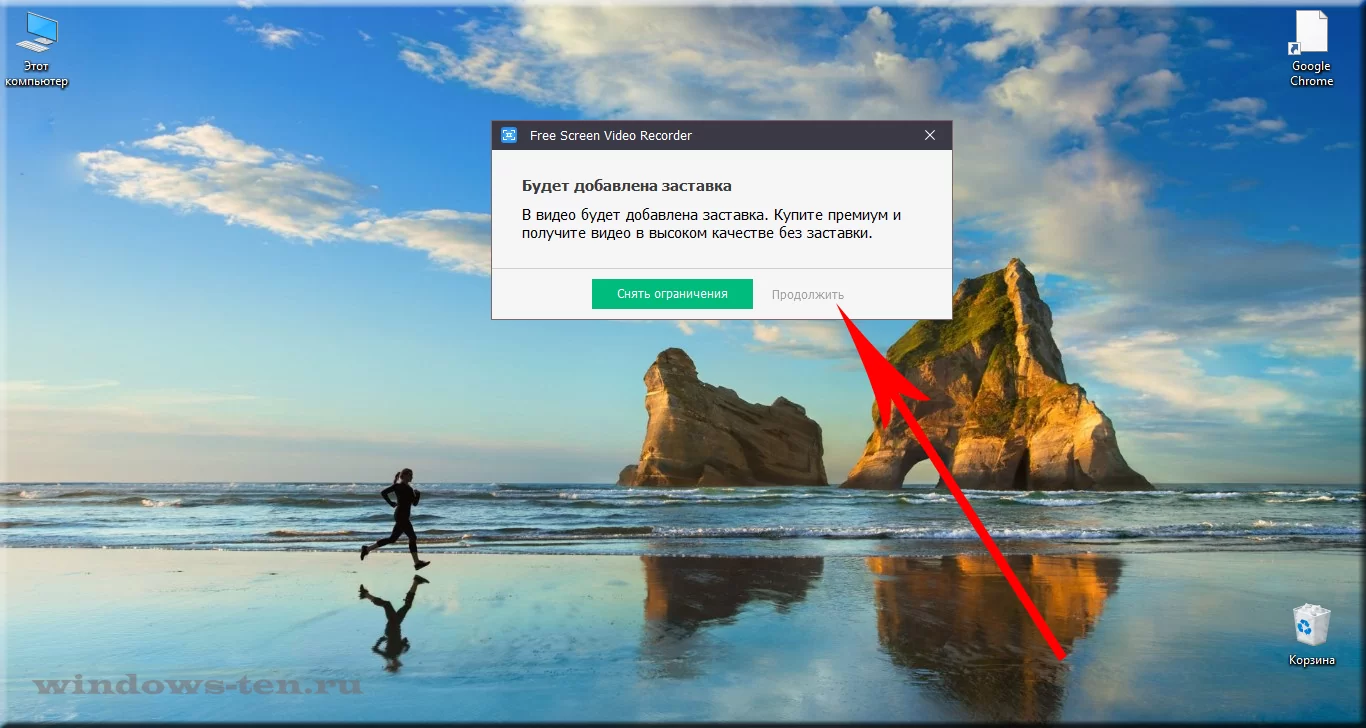
После чего, нажимаем кнопку «Продолжить», чтобы пользоваться программой бесплатно
.
И выделяем нужную для записи видео область, зажав левую кнопку мыши

.
После того, как вы отпустите кнопку мыши, выделенная часть зафиксируется, как окно для записи видео, а под ним появится панель основных команд, для начала записи в котором, нужно нажать на кнопку в виде красного кружка.

.
Рамка вокруг области записи начнет мигать, что будет означать начало записи экрана.
Под ней появится 2 кнопки — «пауза» остановка записи видео с возможность дальнейшего продолжения клипа, и «остановить» — завершение записи видеоролика.
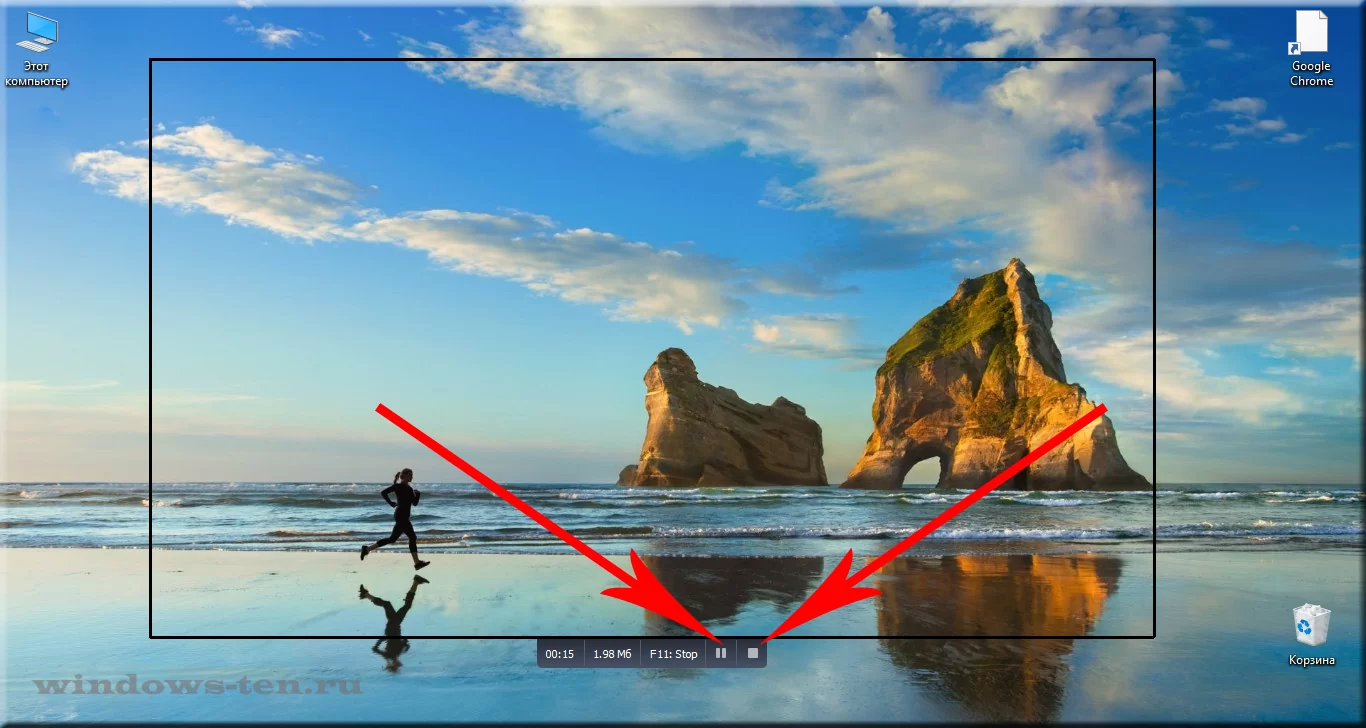
.
После нажатия кнопки остановить, запись экрана свернется, и перед нами снова появится основная панель Free Screen Video Recorder.
Для того, чтобы просмотреть записанный видеоролик, кликаем на значок в виде решетки справа
.
И выбираем пункт «открыть папку видео»
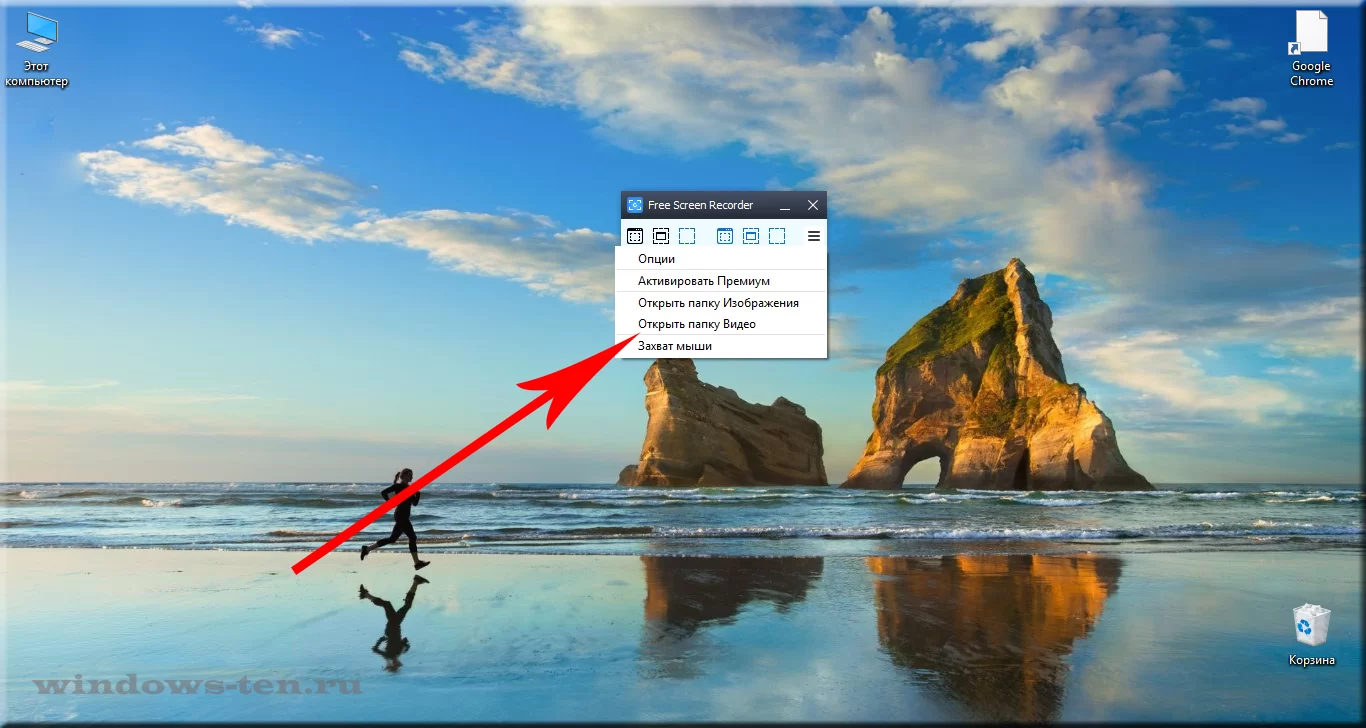
.
В результате чего, программа откроет директорию, в которой сохраняются все сделанные в ней видеозаписи
![]() Загрузка…
Загрузка…
Screen recording is a nifty feature that’s useful for a number of things, especially when it comes to creating tutorials. If a screenshot is worth a thousand words, then screen recording goes several steps further.
Not just that, we will also show you how you can turn your screen recordings into professional videos using InVideo’s online editor.
In this article, we’ll show you
1. How to screen record on Windows 10?
2. How to record video on any Windows 10 or other PCs?
3. Bonus: How to turn your screen recordings into professional videos in minutes?
1. How to screen record on Windows 10?
On Windows 10, you can record your screen using the built-in tool — Game Bar. It was designed essentially to capture PC and Xbox gaming sessions, but it can also be used to record other apps and activities.
First, enable Game Mode on your system:
Step 1: Click on the start menu and then select settings

Step 2: From the Settings window, Click on Gaming.

Step 3: Go to Game Mode and enable Game Mode

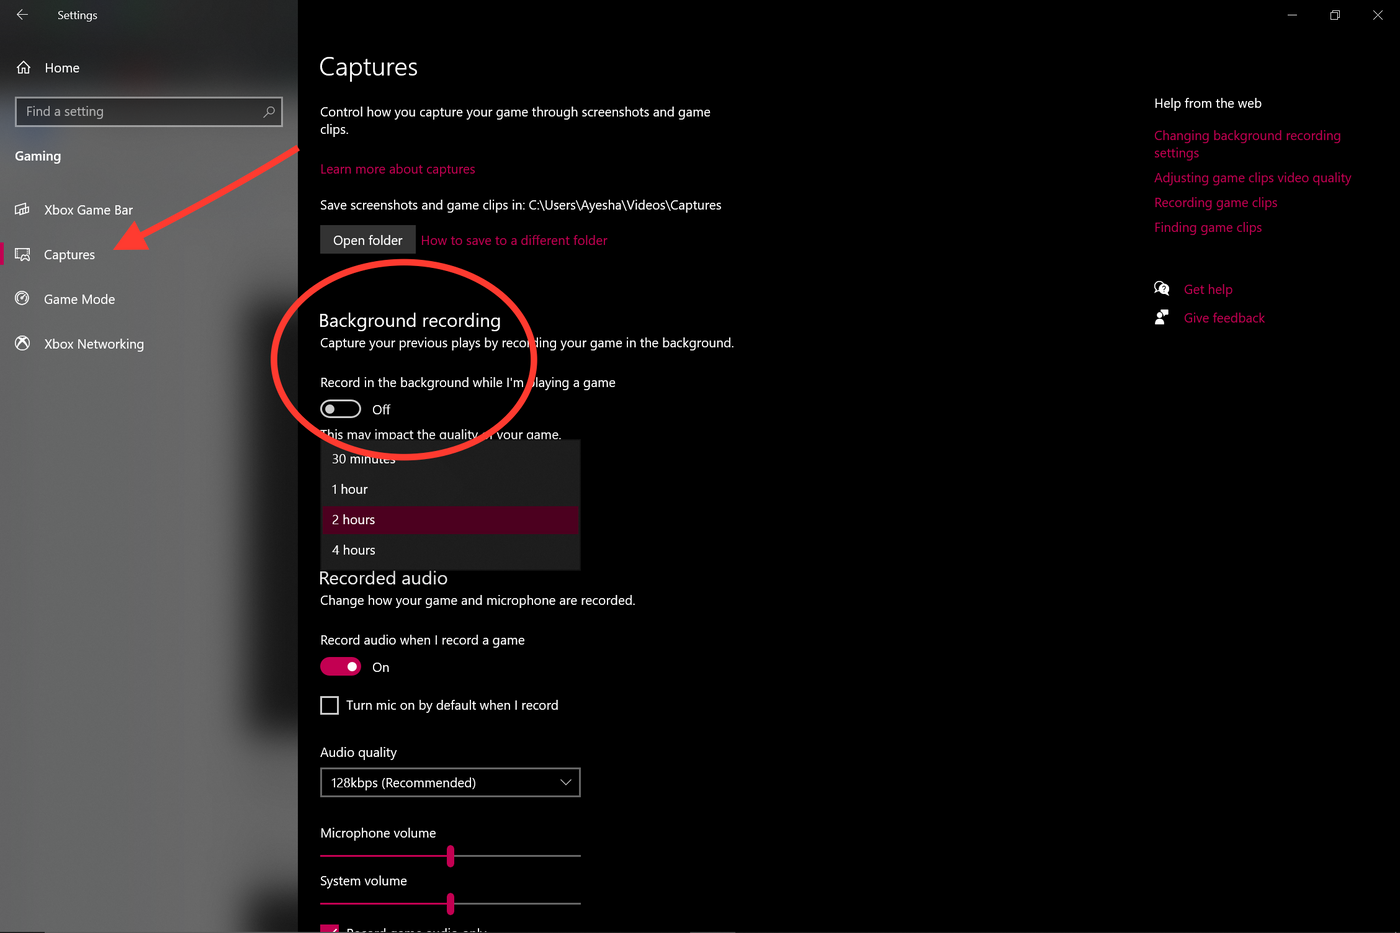
Note: To check the maximum duration of how long a screen recording can be, head over to Game Bar’s settings. Click on the Start menu and hit Settings. Click on Gaming. Under Captures will be the option for Background Recording. Select from the maximum recording time drop-down from 30 minutes to 4 hours.
Now you’re all set to record your screen. Windows 10 Game Bar can only support screen recording of one application at a time. This means, you can’t switch to recording another window or ALT + TAB your way after you’ve started recording. Also note that you cannot record your Desktop or File Explorer or Maps.
With that, let’s get down to the steps you can use to record your screen using the Game Bar.
Step 1: Open the app you want to record. Close other windows and make sure there’s no unwanted audio that will sneak its way into your recording.
Step 2: Press the Windows + G on your keyboard. This should open up the Game Bar.

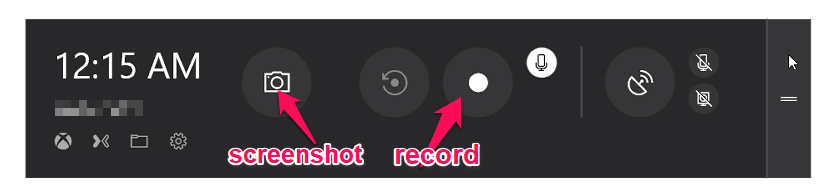
Step 3: In the ‘Capture’ window, click on the Camera icon to take a screenshot. To start recording your screen, click on the circle with the dot (or press Windows + Alt + R).
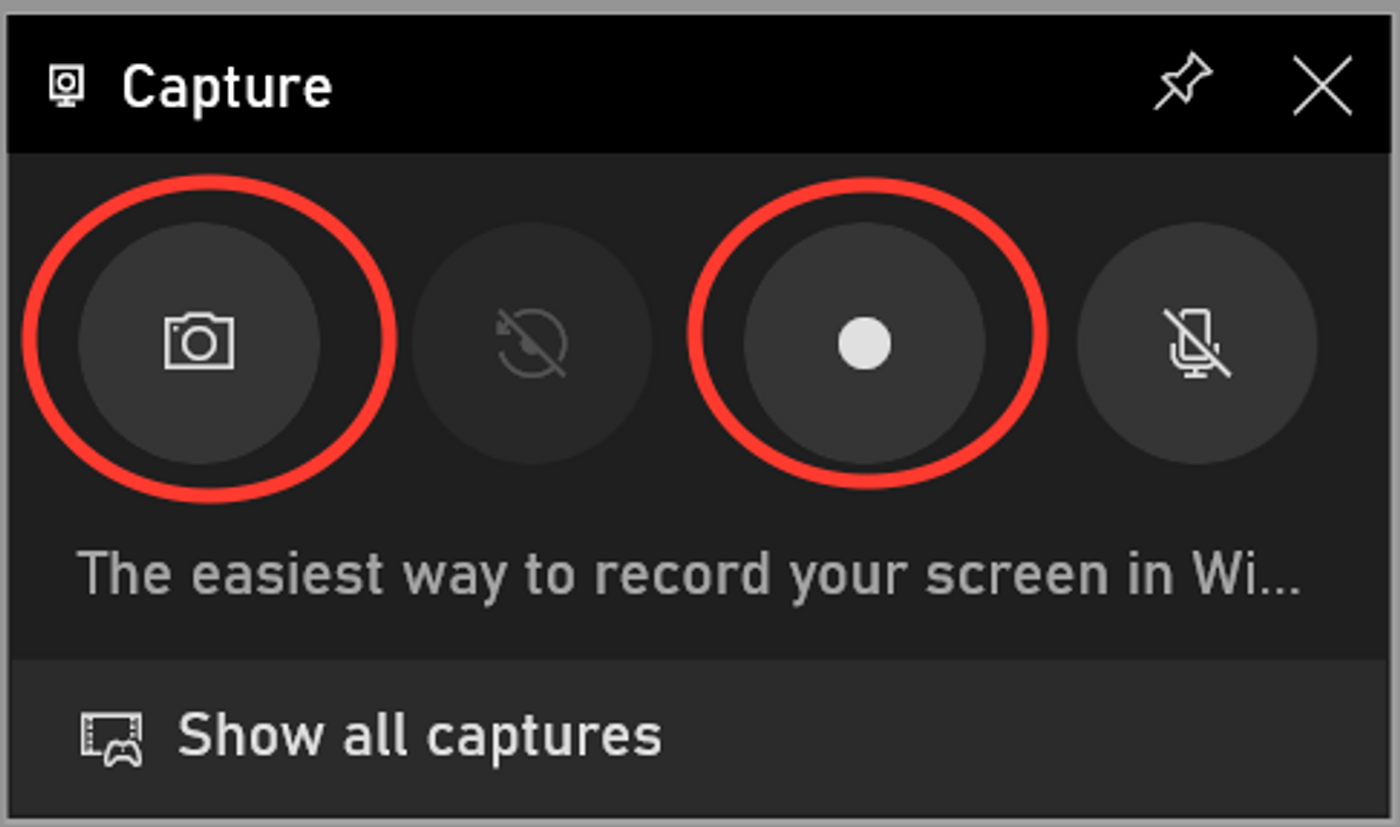
Step 4: Once you start recording, a capture status with a timer, recording controls and a microphone will appear. The mic is to switch on and off external sounds to record commentary. Internal sounds will be recorded by default.
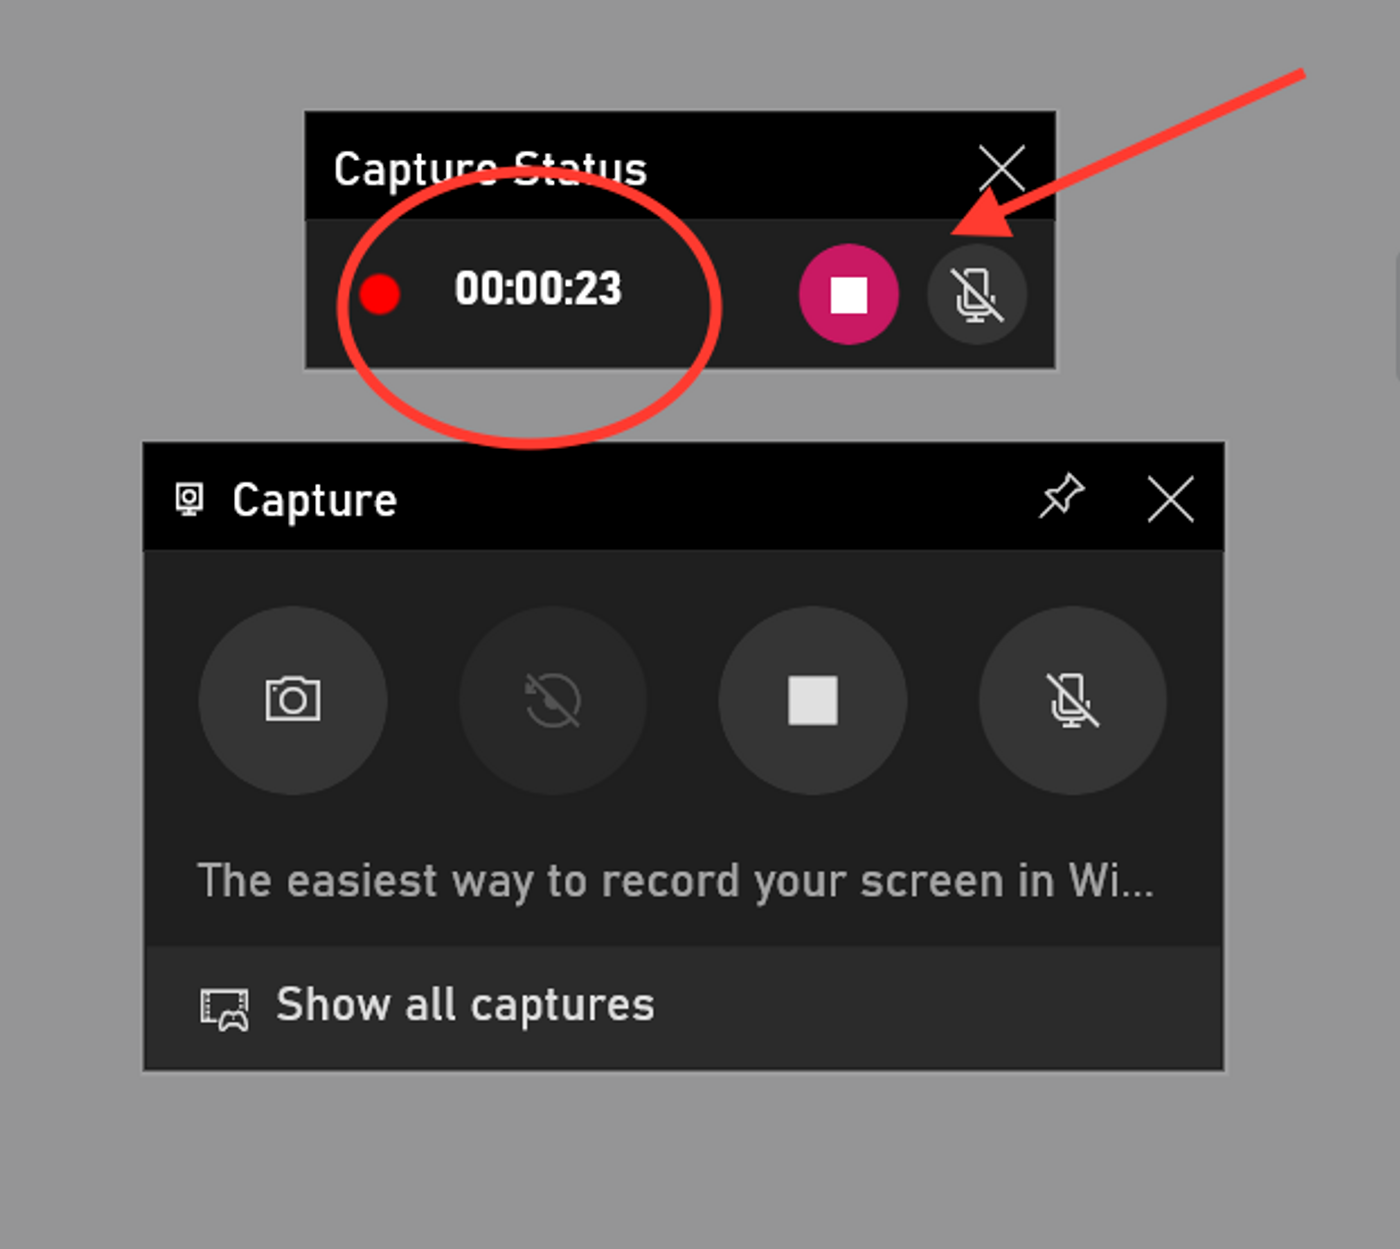
Step 5: Click on the stop button or press Windows + Alt + R again to stop recording.
Step 6: A pop up will appear on the right side saying ‘Game clip recorded’. Click on the pop-up to see that your screen recording is saved in the ‘Captures’ folder in File Explorer.

2. How to record video on Windows 10 or any PC?
Now that we’ve covered screen recording on Windows 10, let’s see how you can record videos on Windows 10 or any other PC.
Just follow these simple steps:
Step1: Hit that start menu and launch the ‘Camera’ app which is also available under the list of All Apps.
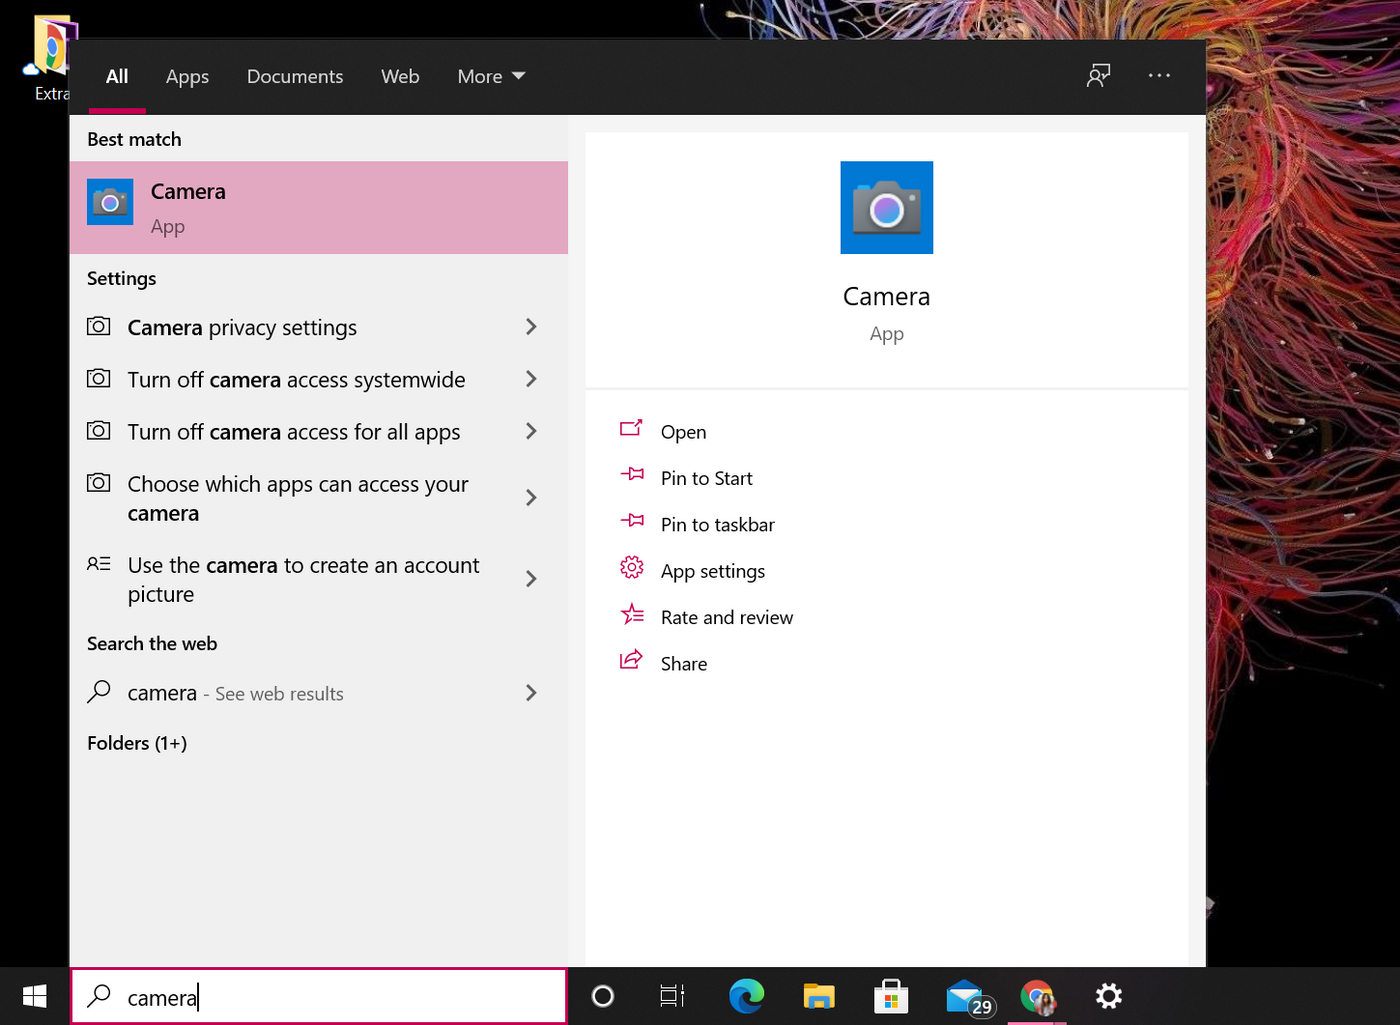
Step 2: Once the camera is opened, there are options on the right to choose from, photo or video mode. The app will allow you to record a maximum of three hours.

Step 3: Once you have finished recording your video, they are saved by default to the Camera Roll folder.

If you’re using a PC to record videos without an in-built camera, you will need to connect a webcam to your PC. Here’s a super easy tutorial to help you screen record and take a video at the same time.
And for better quality and more freedom in terms of video recording duration, a third-party app will be required. Head on over here to see InVideo’s curation of the best webcam recording softwares available right now.
3. BONUS: How to turn your screen recordings into professional videos in minutes?
You’ve got your recording and the screen capture. Now, If you want to make an impact and go the extra mile, you’d want to turn your screen-recordings into fully-edited videos with music and text. That’s where an online video editor like InVideo can come in handy. You can easily create professional-quality videos in minutes even if you’ve never edited a video before.
Here’s how you can use InVideo to make all the difference:
Step 1: Sign-up for an InVideo account if you haven’t already. Click on “Blank Canvas”, select a dimension, then click “Make a Video” to get started.

Step 2: You’ll now be taken to the InVideo editor. Click on the “Upload Media” button or drag and drop your files to the centre to the editor

Step 3: Once uploaded, drag your video to the center in the workspace to begin making your changes. A pop up will ask you if you want to trim your video. Make any changes you want to or use the full version. And now your visuals are all set.
Step 4: Once done, it’s time to pick from InVideo’s in-built collection of music across moods, genres, sfx and more from the music icon located on the left of the screen. Alternatively, if you’d like to add your own music to this project, simply click on the Upload music option on the right of the search bar to upload files from your system.

Step 5: Drag and adjust the timeline — to sync the music to your text and visual elements.

Step 6: Once you’re done tinkering, click on the Download & Share button, select your video’s quality, then hit “Export”.

Step 7: If you’d like to add text to your video, simply click on the text tab from the row of options on the left hand side. Select a from a collection of fonts and typographies.

Step 8: And you’re done! Download the video or share it directly on your social media platforms.

Wrapping up —
There you have it, you’ve learned how to screen record on Windows 10 and you’ve also figured out how to record videos on Windows 10 and other PCs, and you also know how to turn your screen recordings into professional videos using InVideo’s online editor. If you want to further deep-dive into what are the best webcam recording softwares of 2022, check out this post where we cover exactly that.
And if you have any other questions or want to continue the conversation, hop on over to the IV community where you’ll be able to collaborate and learn from 25K other creators and marketers just like you.
FAQs
1. How do I record my screen on Windows 10 for free?
You can record your screen on Windows 10 for free using the in-built tool Game Bar. You can screen record up to 4 hours and a single application at a time. You cannot screen record your desktop or file explorer.
2. Where do screen recordings go in Windows 10?
Your screen recordings are all stored by default in the Captures folder. Head to Gaming from settings. Click on Captures from the options available on the left. All your screenshots and screen recordings are stored here.
3. How long can windows screen record?
With Game Bar, you can record your screen for up to 4 hours at a time.
4. How do I record video and audio on my laptop?
If you’re using a Windows 10 laptop, your machine features the in-built universal app, ‘Camera’ which allows you to record audio and video on a PC. The in-built camera will automatically record all audio while recording.
Print Screen has its own dedicated keyboard button on most Windows computers, but what about when a still image doesn’t cut it? After all, it would be really hard to make a tutorial, stream a game, or film a lesson if you couldn’t capture a screen recording.
Using an external camera is clunky and difficult, so instead, we have compiled a list of built-in methods and available third-party software that will do the trick instead. It may not be as simple as pressing the print screen key (PrtSc), but these tools are more than capable of doing the job.
Here’s a quick summary of our top methods:
| Method | Cost | Requirements | Best for |
| Windows Game Bar | Free | Intel Quick Sync H.260, Nvidia NVENC, or AMD VCE graphics | Simple recordings without special edits |
| MS Powerpoint | Varies | Office 2013 or later | Use in presentations, simple recordings |
| OBS Studio | Free | Download a software | Streaming |
| FlashBack Express/Pro | Freemium | Download a software | Recording & Editing |
| APowerSoft Online Screen Recorder | Freemium | Download a small launcher | Quick and convenient recordings |
Using an Apple Mac computer? Also read: How to Record Screen on Mac
Table of Contents
- Method 1: Windows Game Bar
- Method 2: Microsoft Powerpoint
- Method 3: OBS Studio
- Method 4: FlashBack Express
- Method 5: APowerSoft Online Screen Recorder
- Alternative Methods That Also Work
- 6. YouTube Live Streaming
- 7. Filmora Scrn
- 8. Camtasia
- 9. Snagit
- 10. CamStudio
- Conclusion
Method 1: Windows Game Bar
Windows 10 has a built-in screen recorder you can use without installing anything extra. However, it’s only available if you have a graphics card with Intel Quick Sync H.260 (2011 models or later), Nvidia NVENC (2012 models or later), or AMD VCE (2012 models or later except Oland), so if you’re having trouble, make sure your computer is up to spec.
For those who do have the proper hardware, here’s how to do it. Now, this feature is meant for gamers, but it can be used with any screen material.
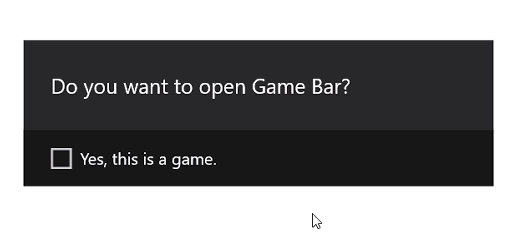
First, press the WINDOWS and G keys. Then, in the pop up choose “Yes, this is a game”.
From there, recording is simple. You can use the red button on the bar to start and stop a recording, or use the settings menu to set an automatic cut off time for your recording.
Once you’re done, the file will be saved as an MP4 in your Videos\Captures folder. For more information on using the Game Bar for screen recording, you can check out this youtube video:
Method 2: Microsoft Powerpoint
Happen to have Office PowerPoint on your computer? Then you can use the program to create screencasts, not just presentations. Normally, this will embed the screen recording on a slide, but you can also choose to save it as a file. Here’s how to do it.
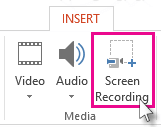
First, open Microsoft PowerPoint. Then choose the Insert tab and Screen Recording.
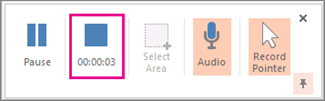
Next, choose which part of your screen you want to record with the Select Area tool. If you’re using Office 2016 or later, you can also use the hotkey WINDOWS + SHIFT + A. Click and drag the cross hairs to select your recording area. If you do not want to record audio, press WINDOWS + SHIFT + U to toggle it.
Once you’re ready, press the Record button.
The small control panel will disappear unless pinned, but you can make it reappear by moving your mouse to the top edge of the screen.
After you’re done, press the Record button again. The video will be automatically embedded in your slide, and you can choose FILE > SAVE AS to save your presentation. If you only want to save the video, choose FILE > SAVE MEDIA AS and then choose the destination folder and video name.
Note: If you are using PowerPoint 2013, you’ll need to follow some special instructions for recording and saving your video. You can find the official tutorial here.
Method 3: OBS Studio
If you’re not a fan of PowerPoint or want a dedicated tool for regular screen recording, OBS Studio is one of the best screen recording software. It’s open-source, doesn’t watermark or place time limits on your content, and offers many powerful editing features as well. It also supports live streaming at 60FPS and is a popular choice for this as well.
Before you get started, you’ll need to download OBS Studio from their website here. Since this is a very full-featured program, you’re going to want to run through some basic setup and settings before you get started.
This means you should check out all the settings such as enable/disable automatic recording, streaming setup, bitrate, audio sampling rate, hotkeys, and file naming format among others. What you choose for these will depend on where you plan to show your videos and the capabilities of your computer.
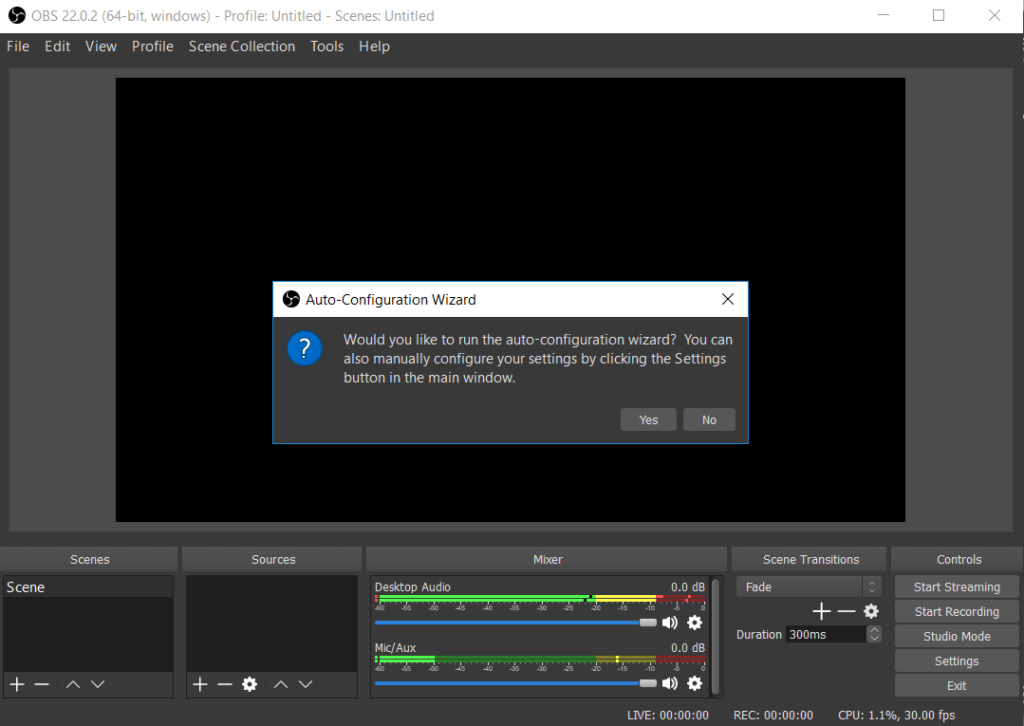
Alternatively, OBS studio does offer an auto-setup wizard that can choose some things for you.
After all the setup, you can get started with a basic screen capture. First, put OBS in “Studio Mode” so that the left side says ‘preview’ and the right side says ‘live’.

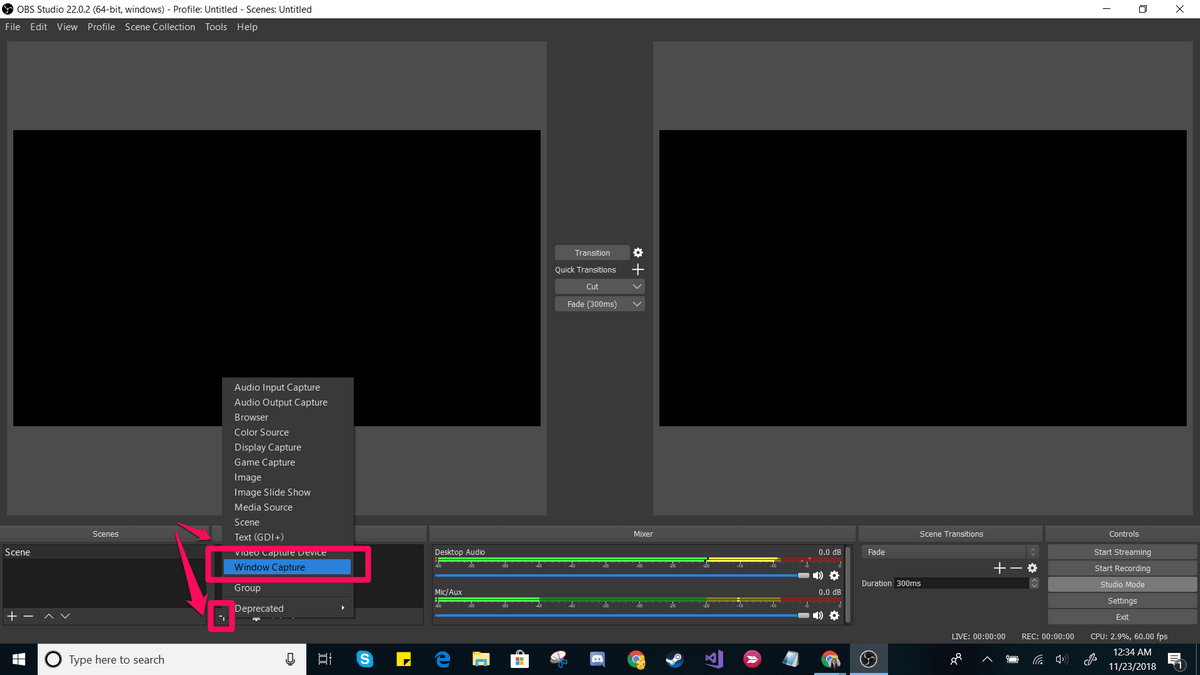
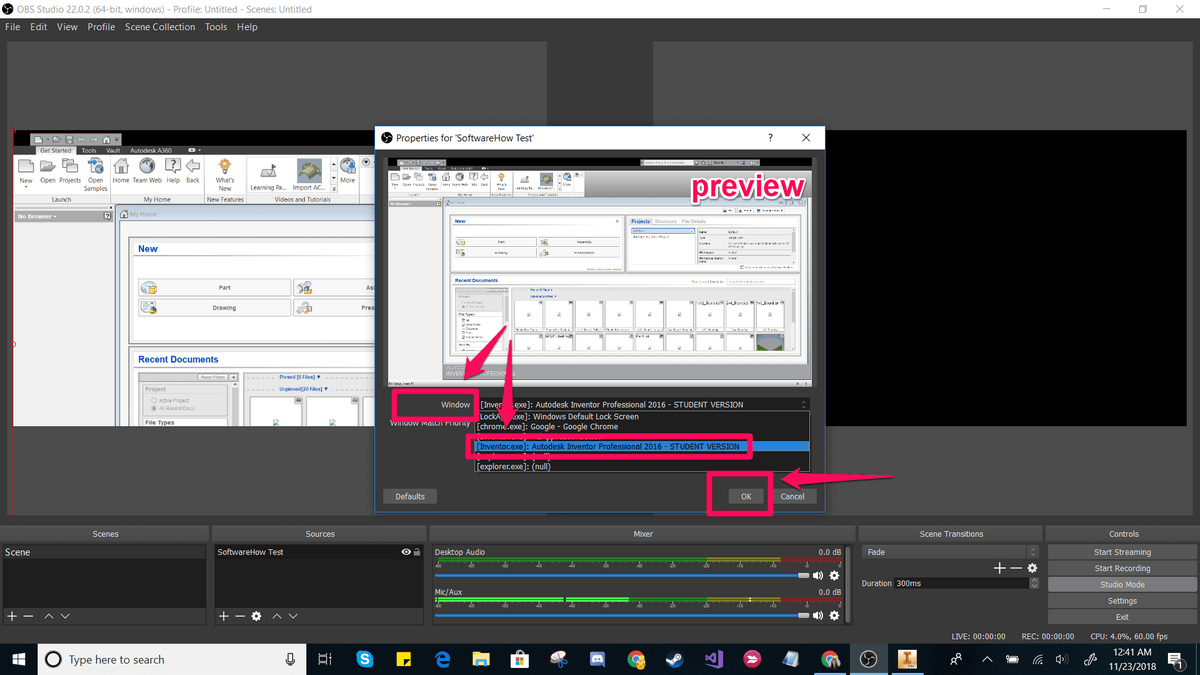
To set up a screen capture, choose Sources > + > Window Capture > Create New. In the drop down list that appears, choose the window you want to record.
This should place your window in the ‘preview’ panel. If it looks the way you want it to, click transition in the center of the screen. If it doesn’t, drag the red corners until the preview is adjusted to the size you would like.
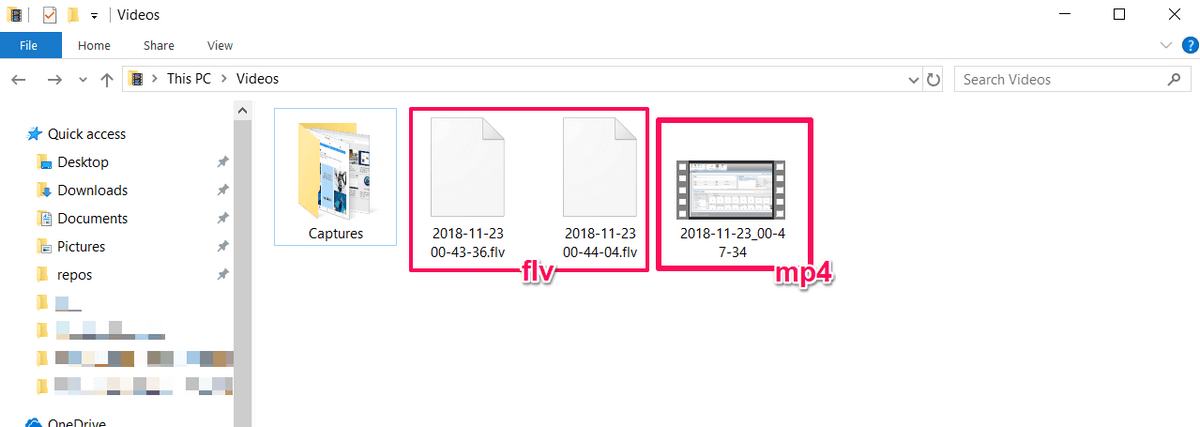
Then, click Start Recording and Stop Recording to create your video. By default, these are saved as flv files in the user/videos folder, but you can alter this path and save type in the settings.
OBS Studio is a very powerful software, and perhaps one of the best free programs for creating screen recordings or streaming. Its features extend far beyond the simple setup shown here.
Unfortunately, it doesn’t come with a lot of tutorial materials so you’re going to need to find most of your resources from the online community. Streamers may find that a good place to start is this tutorial from Youtube.
Method 4: FlashBack Express
If you’re looking for a dedicated software that can do both the recording and the editing, FlashBack might be a good choice. You can use their free version just for doing basic captures, but the paid option will allow you to make use of editing tools, save in a variety of formats, and add special content to your videos.
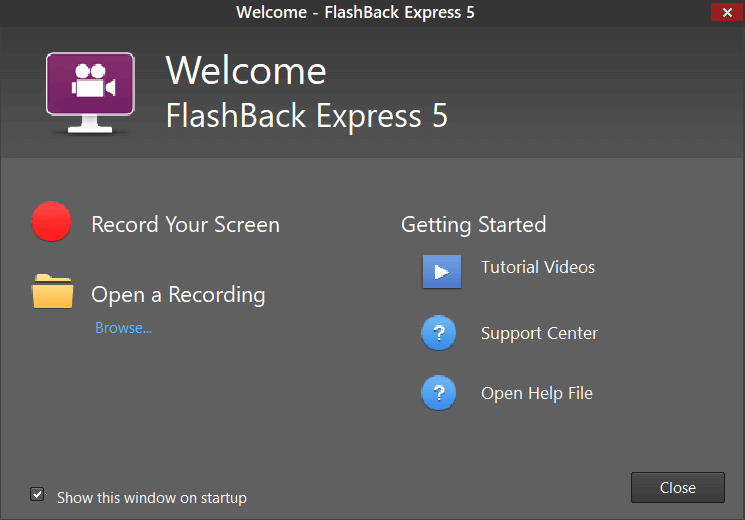
Here’s how to get started with FlashBack. First, download FlashBack from their site (choose “Express” if you want to start for free).
This will download an exe file. If this makes you uncomfortable, consider a different software. Next, click through the installation process. When you reach this startup screen, choose “Record Your Screen”.
You’ll then have the option to change some settings for your recording, such as the audio source and capture size.
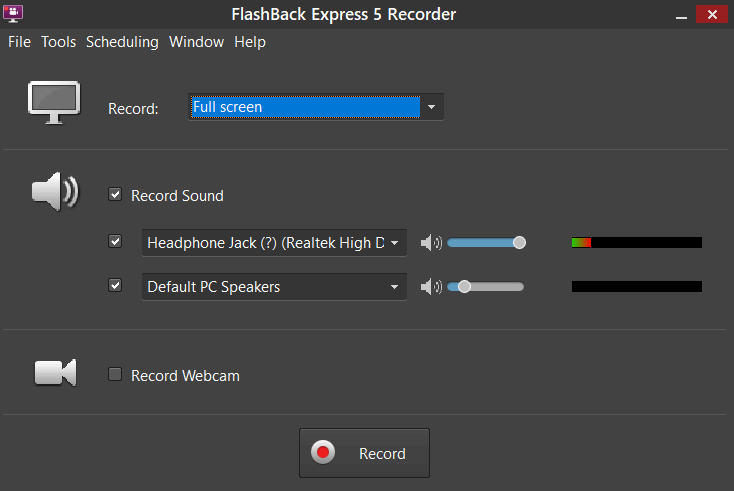
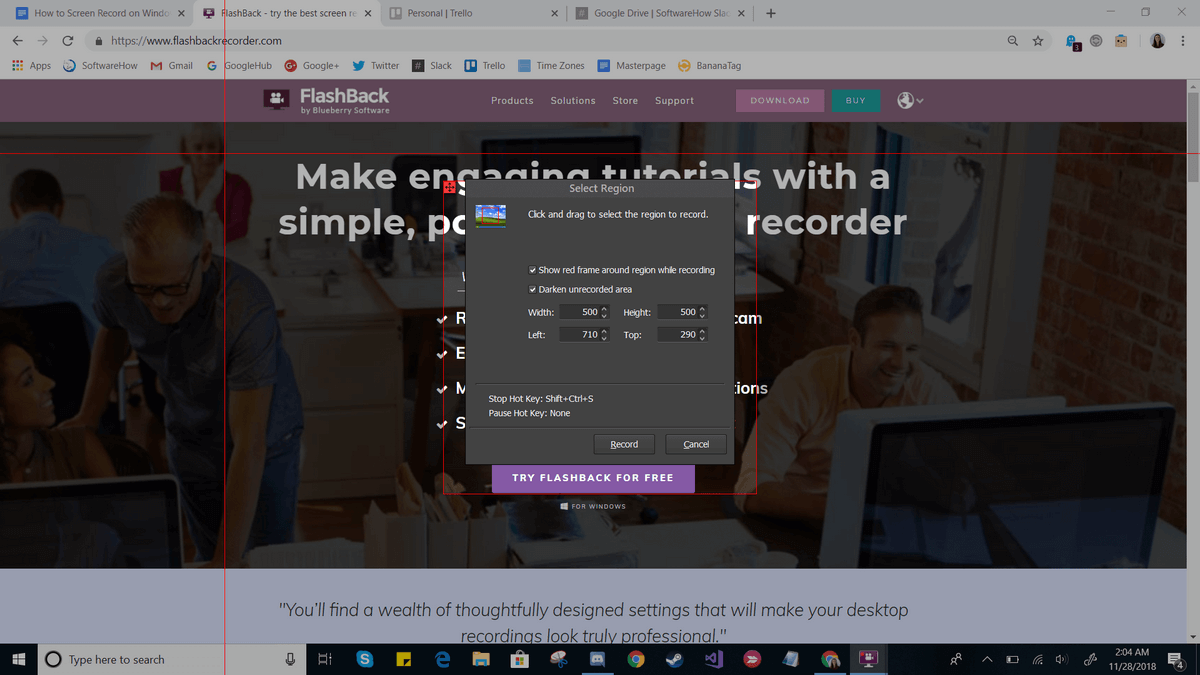
You can also decide whether to capture a window, a region, or the entire screen. If you select region, you’ll see some red cross hairs that you can drag to create a selection.
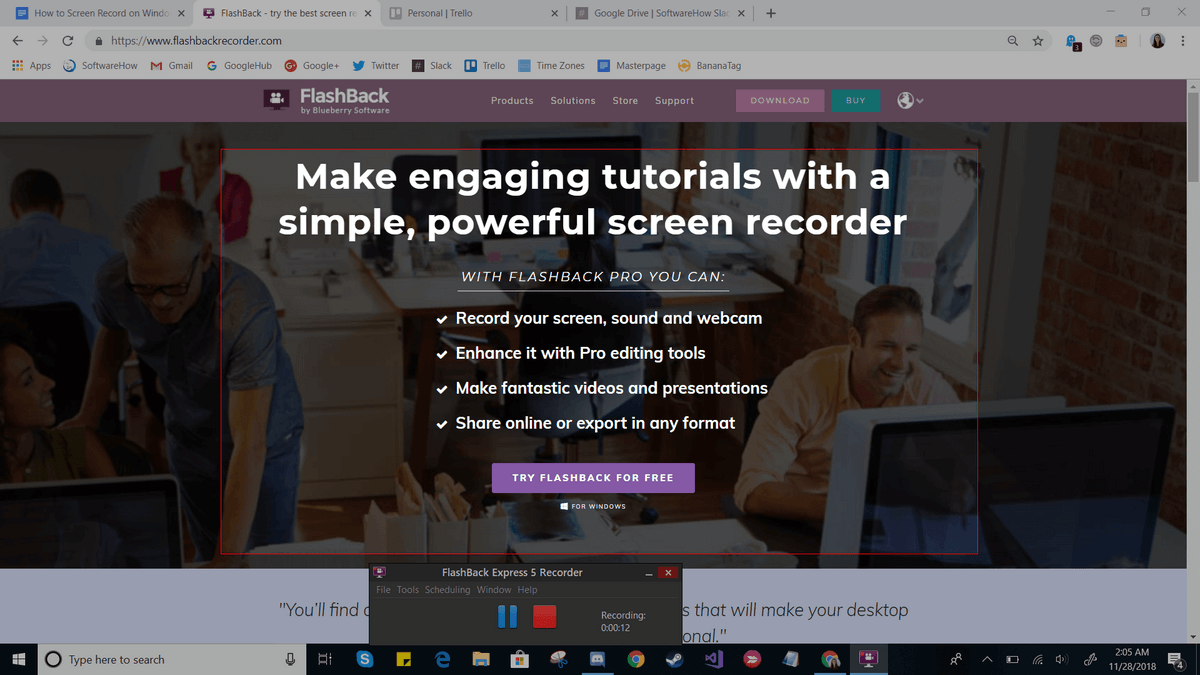
Then, press “Record” and do everything you need to. While recording, you should see a small bar on the bottom with “pause” and “stop” buttons. This bar can be hidden or shown at will.
Once you’re done, you’ll be asked to either review, discard, or save your recording. In Express, you will see a limited editor that will allow you to trim and crop the video as needed. Pro users will have a more full-featured video editor.
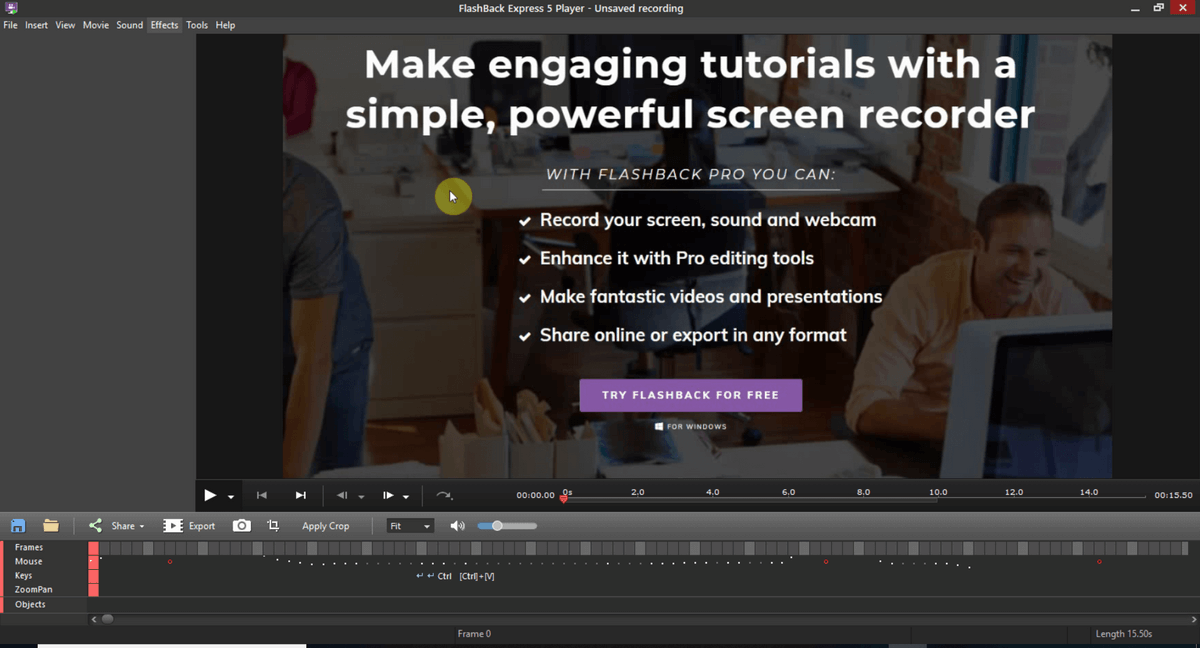
When you’re done editing, you can use the “Save” feature to save your video in a program-specific format. Or, you can use the export feature to save it as a normal file.
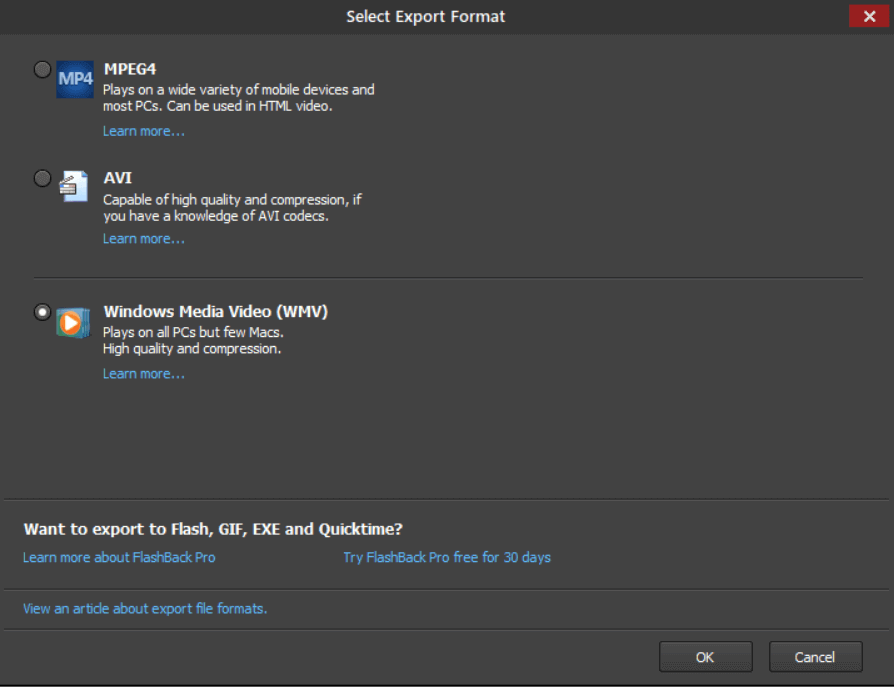
There are quite a few options, such as WMV, AVI, and MPEG4. Additionally, you can choose to export directly to YouTube instead by going to File > Share.
FlashBack Express is a simple solution with a lot of potential for screen recording and editing. It’s very easy to get started, and if you want to get more out of it you can buy a pro license just once (there’s no monthly subscription).
Method 5: APowerSoft Online Screen Recorder
If you prefer a web-based solution, APowerSoft offers an online recorder. The name though, appears to be a bit misleading – when attempting to try the software, we found that it does ask you to download a small package. However, the functionality comes completely from the website.
To use this tool, you’ll need to go to the APowerSoft Screen Recorder website. Then, just click the “Start Recording” button in the middle of the screen.
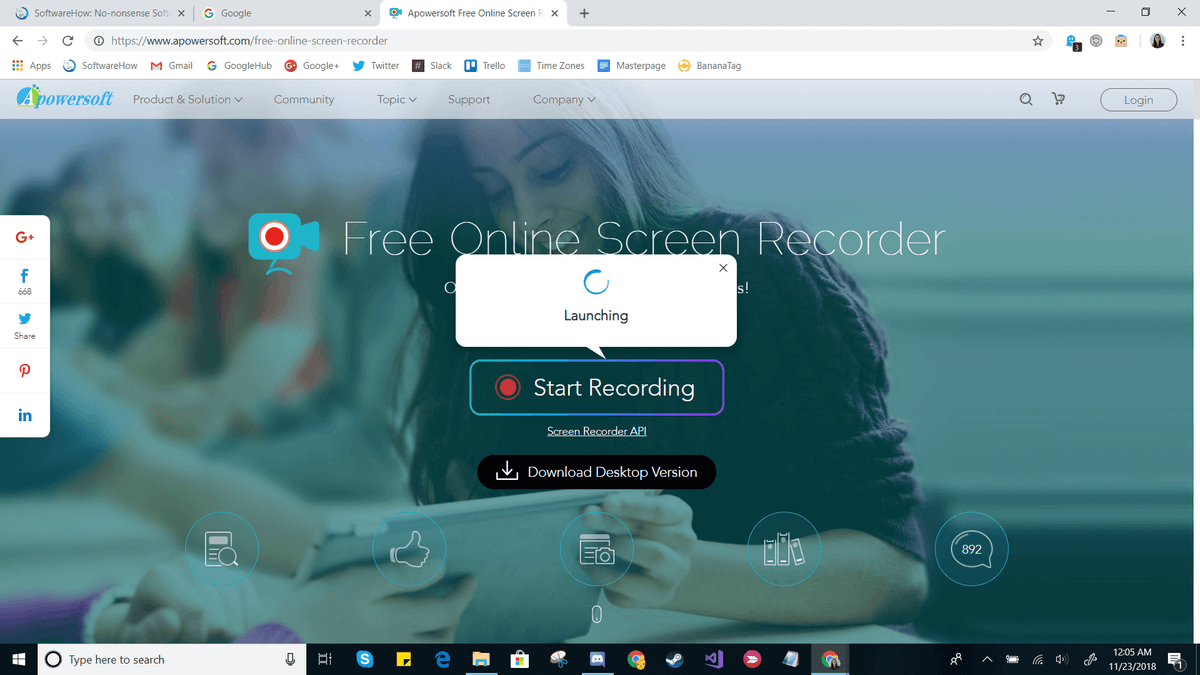
Agree to any prompts that appear, such as “Open APowerSoft Online Launcher”. If you choose not to create an account, you’ll also see the following warning before you get started:
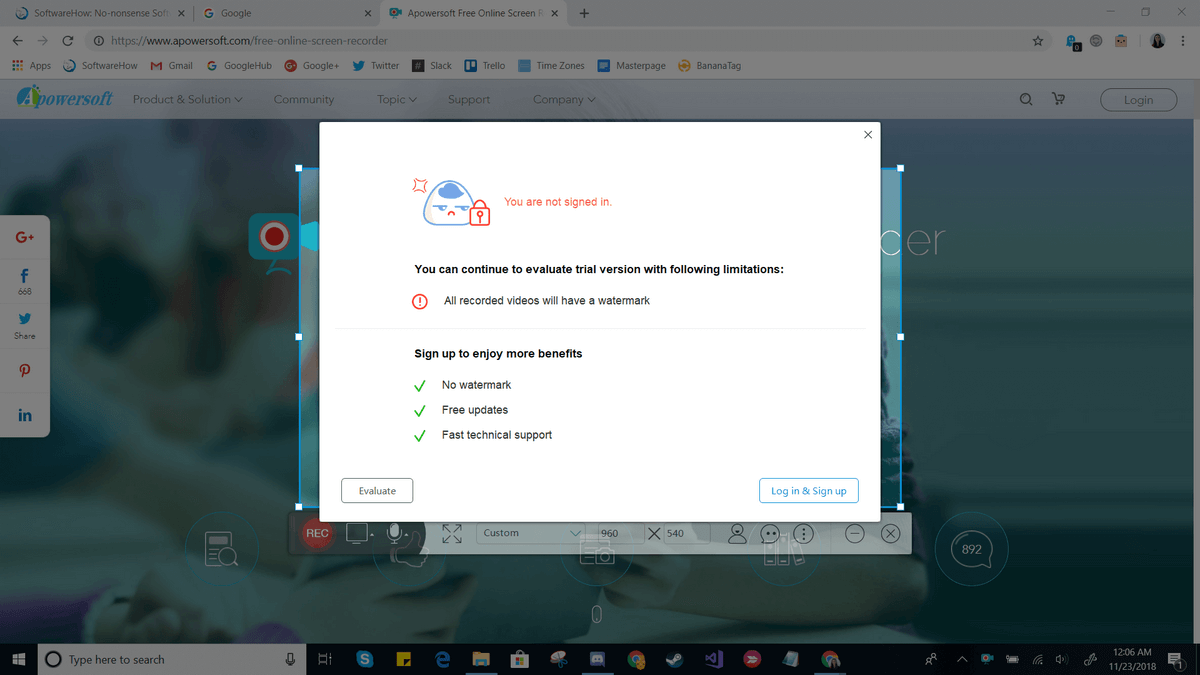
Creating an account is simple enough if you want to remove the watermark, but you can get started without one. Just click the “x” in the top right and you’ll see a new recording window appear. From here, you can resize your capture zone, move it around, or adjust special settings such as hide/show the toolbar, hotkeys, and etc.
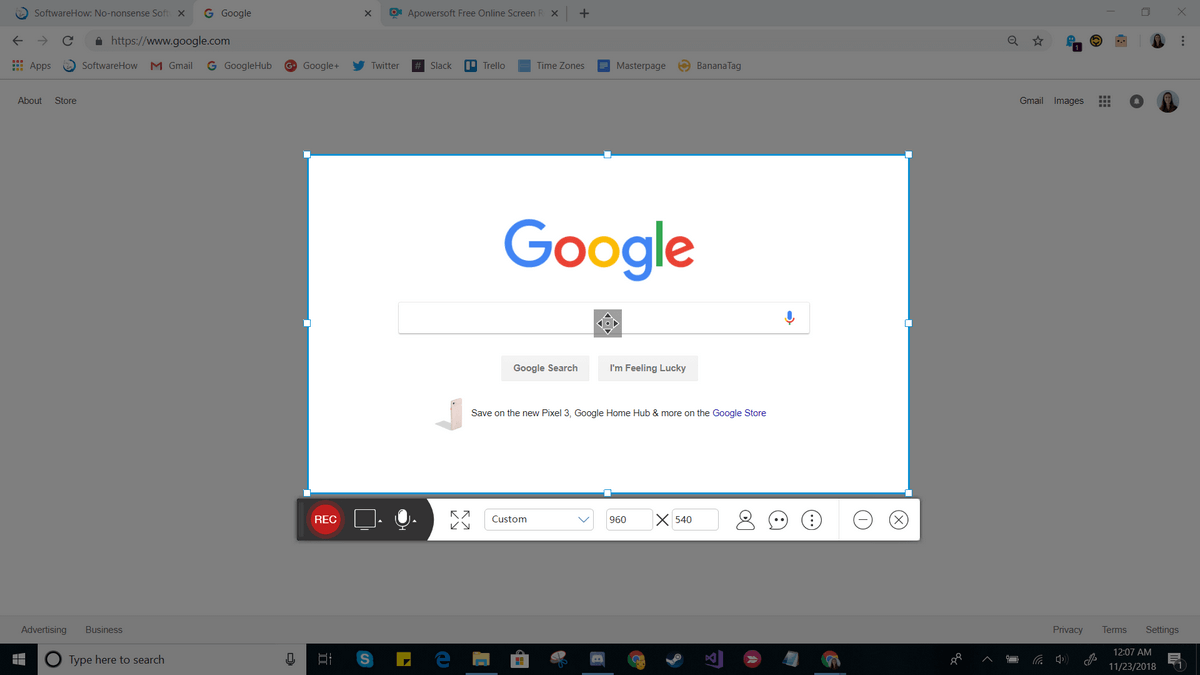
To start and stop recording, just press the red button. When you’re done, you’ll be shown your video clip.
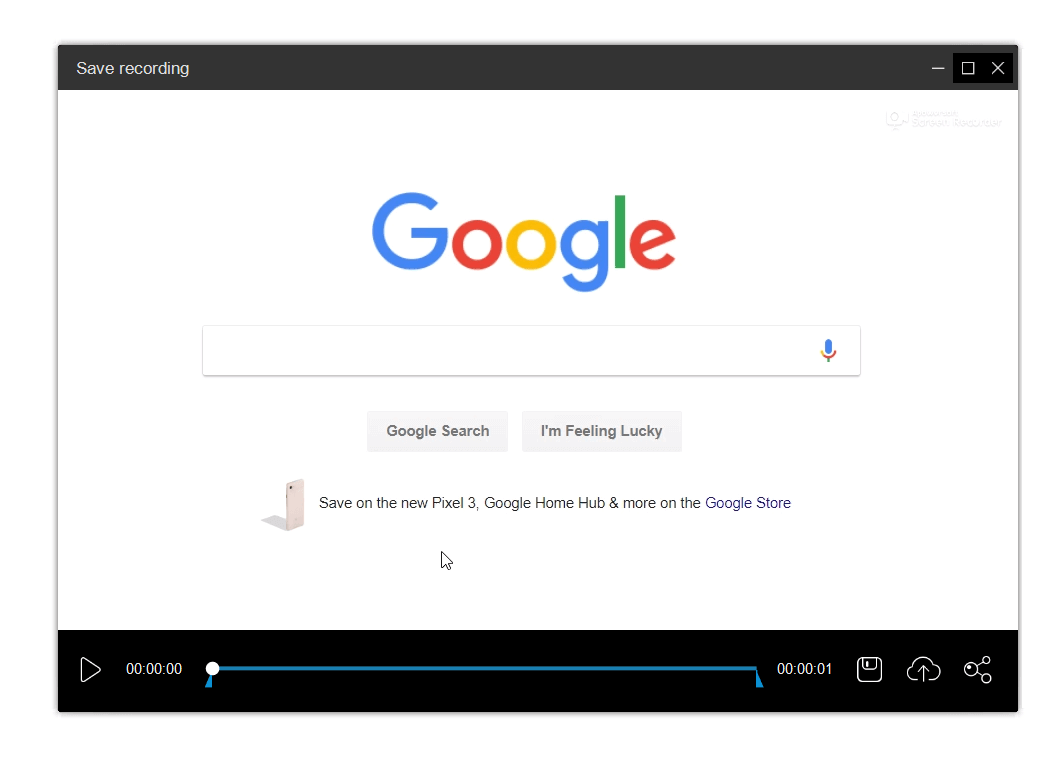
You can use the save icon to save your screencast as a video file or as a GIF, or use the share icon to upload it to YouTube, Vimeo, Drive, or Dropbox.
APowerSoft is a very lightweight program. It does give you some flexibility – for example, you can capture audio from the system, microphone, both or neither – but it is limited as far as editing capabilities unless you buy the paid version. You’d need to use a separate program on your computer if you plan to do any kind of edits.
On the other hand, the tool is very quick to use and could be great in a pinch or if you don’t need to make any fancy changes before sharing them.
Alternative Methods That Also Work
6. YouTube Live Streaming
If you have a YouTube channel, you can take advantage of the YouTube Creator Studio to film a screen recording. This requires using the live stream feature, so it’s not a great fit for everyone, but it could work out in some cases.
To get started with using YouTube for screencasting, check out this tutorial.
7. Filmora Scrn
Filmora Scrn is a dedicated screen recording software made by Wondershare. It offers dual camera recording (screen and webcam), plenty of export options, and editing tools.
Some people prefer it because the interface is a lot cleaner than some competing applications, but as this isn’t a free software, it’s not quite as accessible as some of the other methods listed here.
However, if you’re interested in an easy-to-use and specialized screen recording software, you can check out Filmora here.
8. Camtasia
Unlike many of the more specialized programs, Camtasia is a full-featured video editor first and a screen recording software second.
It offers the most editing and production capabilities, which makes it a great choice if you want to do more than just record your screen or plan to produce several kinds of videos. The interface is very clean and easy to use.
9. Snagit
Snagit is a program made by TechSmith, the same company that makes Camtasia. However, Snagit is not an all-in-one tool and instead is only meant for screen recording.
It offers some interesting features such as a magic selection tool that can automatically detect areas to record as well as an editing panel that will let you annotate your final videos.
10. CamStudio
CamStudio is a free software, but it’s an older and less well supported software compared to some alternatives.
The program is maintained primarily by one individual and definitely has a few bugs that are still being worked out, but if you’re interested in trying it’s worth giving a shot.
CamStudio may not be as “shiny” as some alternatives, but it is free and you should be interested in it.
Conclusion
That wraps up this guide. Whether you’re making videos for a small classroom, thousands of subscribers, or for your own enjoyment, learning how to record screens on Windows 10 can make a huge difference.
Depending on what features are important to you, there’s a variety of options that can meet your needs and no reason why you shouldn’t succeed in making a great video.
Any other methods that work but we didn’t cover here? Share your experience or tips below.
Also Read
- How to Make Google Chrome Your Default Browser on Mac
- Why Can’t I Clear My History on Safari Mac
- How to Uninstall Safari on Mac
- How to Fix It When MacBook Air Won’t Turn On
- Can You Get Hacked Through Instagram DM?
- Can Someone Hack You Through Facebook Messenger?