Ошибка Cache Manager – одна из самых распространенных проблем, с которой могут столкнуться пользователи операционной системы Windows 10. Она может возникнуть по разным причинам и может стать причиной зависаний, ошибок в работе программ и даже полного отказа компьютера.
Данная ошибка обычно возникает из-за проблем с кэш-памятью операционной системы. Кэш-память – это разновидность оперативной памяти, которая используется для временного хранения данных, чтобы обеспечить более быстрый доступ к ним. Когда возникает ошибка Cache Manager, происходит конфликт или повреждение кэш-памяти, что приводит к нестабильной работе системы.
Однако не стоит паниковать – ошибка Cache Manager в большинстве случаев может быть легко устранена. В этой статье мы подробно рассмотрим несколько простых методов и рекомендаций, которые помогут вам решить эту проблему и вернуть вашу операционную систему в нормальное состояние.
Содержание
- Простые методы для решения ошибки Cache Manager в Windows 10
- Удаление временных файлов кэша
- Рекомендации по решению ошибки Cache Manager в Windows 10
- Обновление драйверов устройств
Простые методы для решения ошибки Cache Manager в Windows 10
Ошибка Cache Manager может возникнуть на компьютере под управлением операционной системы Windows 10 и привести к замедлению работы системы, периодическим зависаниям или даже синему экрану смерти. Если вы столкнулись с этой проблемой, воспользуйтесь следующими простыми методами для ее решения.
- Перезагрузите компьютер. Это может показаться очевидным, но часто простая перезагрузка может устранить множество проблем, включая ошибку Cache Manager.
- Проверьте диск на наличие ошибок. Возможно, на вашем жестком диске есть поврежденные секторы, которые могут вызывать ошибку Cache Manager. Чтобы проверить диск, откройте Проводник, щелкните правой кнопкой мыши на диске C: (или другом диске, где установлена операционная система), выберите «Свойства», затем перейдите на вкладку «Инструменты» и нажмите кнопку «Проверить».
- Обновите драйверы устройств. Устаревшие или несовместимые драйверы могут вызывать ошибку Cache Manager. Чтобы обновить драйверы, откройте Диспетчер устройств, найдите устройство с проблемным драйвером (обычно обозначено символом желтого восклицательного знака), щелкните правой кнопкой мыши и выберите «Обновить драйвер».
- Выполните проверку системных файлов. Некоторые поврежденные системные файлы могут быть причиной ошибки Cache Manager. Чтобы проверить файлы системы, откройте командную строку от имени администратора и введите команду «sfc /scannow». После завершения процесса проверки, перезагрузите компьютер.
- Отключите антивирусное программное обеспечение. В некоторых случаях антивирусное программное обеспечение может приводить к ошибке Cache Manager. Попробуйте временно отключить антивирусную программу и проверить, пропадает ли ошибка.
- Обновите операционную систему. Microsoft регулярно выпускает обновления для Windows 10, которые исправляют различные ошибки и проблемы, включая ошибку Cache Manager. Убедитесь, что у вас установлены последние обновления, открыв Центр обновления Windows и нажав кнопку «Проверить наличие обновлений».
Если ни один из вышеуказанных методов не помог в решении проблемы, рекомендуется обратиться к специалисту или заняться более глубокими настройками системы.
Следуйте этим простым методам для решения ошибки Cache Manager в Windows 10 и восстановите нормальную работу вашего компьютера.
Удаление временных файлов кэша
Временные файлы кэша могут накапливаться на вашем компьютере и занимать драгоценное место на жестком диске. Это может привести к возникновению ошибок, включая ошибку Cache Manager в Windows 10. Удаление временных файлов кэша может помочь решить проблему. Вот несколько способов, которые вы можете использовать для удаления временных файлов кэша.
- Очистка временных файлов через Диспетчер задач:
- Откройте Диспетчер задач, нажав комбинацию клавиш Ctrl + Shift + Esc.
- Перейдите на вкладку «Подробности».
- Найдите процесс «explorer.exe» и выделите его.
- Нажмите на кнопку «Остановить задачу» на нижней панели.
- Откройте новое окно Диспетчера задач, нажав комбинацию клавиш Ctrl + Shift + Esc.
- Перейдите на вкладку «Подробности».
- Найдите процесс «explorer.exe» и нажмите на кнопку «Конец процесса».
- Перейдите на вкладку «Приложения» и нажмите на кнопку «Новое задание».
- Введите команду cleanmgr, чтобы открыть встроенную утилиту очистки диска.
- Выберите диск, на котором необходимо выполнить очистку, и нажмите «ОК».
- Отметьте необходимые категории файлов, которые вы хотите удалить, и нажмите «ОК».
- Очистка временных файлов через настройки:
- Откройте «Настройки» в меню «Пуск».
- Перейдите в раздел «Система».
- Выберите вкладку «Хранение».
- Нажмите на кнопку «Очистить сейчас» в разделе «Очистить временные файлы».
- Отметьте необходимые категории файлов, которые вы хотите удалить, и нажмите «Удалить файлы».
- Очистка временных файлов через командную строку:
- Откройте командную строку, нажав клавишу Win + X и выбрав «Командная строка» или «Windows PowerShell».
- Введите команду cleanmgr и нажмите Enter.
- Выберите диск, на котором необходимо выполнить очистку, и нажмите «ОК».
- Отметьте необходимые категории файлов, которые вы хотите удалить, и нажмите «ОК».
После выполнения указанных выше действий временные файлы кэша должны быть удалены, что может помочь исправить ошибку Cache Manager в Windows 10. Если ошибка все еще возникает, рекомендуется обратиться за помощью к опытному пользователю или специалисту технической поддержки.
Рекомендации по решению ошибки Cache Manager в Windows 10
Ошибка Cache Manager в Windows 10 может возникнуть из-за различных проблем, связанных с кэшем операционной системы. Проблемы с кэшем могу быть вызваны поврежденными файлами, конфликтующими программами или неправильными настройками системы.
Для решения проблемы с ошибкой Cache Manager в Windows 10 рекомендуется выполнять следующие действия:
- Перезагрузите компьютер. Иногда перезагрузка просто помогает временно устранить ошибки в кэше и восстановить нормальную работу системы.
- Проверьте наличие обновлений для операционной системы. Microsoft регулярно выпускает обновления, которые включают исправления для известных проблем, включая ошибки в кэше.
- Запустите инструмент проверки системных файлов. Введите команду «sfc /scannow» в командной строке и дождитесь, пока система выполнит проверку и восстановление поврежденных системных файлов.
- Проверьте ваше антивирусное ПО. Иногда проблема может быть связана с вирусами или вредоносным ПО, которые могут повлиять на работу кэша операционной системы. Обновите ваше антивирусное программное обеспечение и проведите полное сканирование системы.
- Отключите или обновите конфликтующие программы. Некоторые программы могут несовместимы с Windows 10 и вызывать ошибку Cache Manager. Попробуйте временно отключить или обновить эти программы и проверить, решает ли это проблему.
- Проведите диагностику системы. Windows 10 имеет встроенный инструмент для диагностики и решения проблемы с ошибкой Cache Manager. Введите «Диагностика» в поисковой строке и запустите инструмент для поиска и исправления проблем с системой.
Если после выполнения всех указанных рекомендаций ошибка Cache Manager все еще не устранена, рекомендуется обратиться к специалисту или службе поддержки Microsoft для получения дополнительной помощи.
Обновление драйверов устройств
Одной из основных причин возникновения ошибки «Cache Manager» в Windows 10 может быть устаревший или несовместимый драйвер устройства. Чтобы решить проблему, рекомендуется обновить драйверы всех устройств компьютера.
Для обновления драйверов устройств в Windows 10 можно воспользоваться несколькими методами:
- Использование менеджера устройств
- Загрузка драйверов с официального сайта производителя
- Использование специализированных программ для обновления драйверов
Метод №1: Использование менеджера устройств
- Нажмите Win + X и выберите всплывающее меню пункт «Менеджер устройств».
- Разверните раздел нужного устройства, щелкнув на стрелку рядом с его названием.
- Щелкните правой кнопкой мыши на устройстве и выберите пункт «Обновить драйвер».
- Выберите опцию «Автоматический поиск обновленных драйверов» и дождитесь завершения процесса.
Метод №2: Загрузка драйверов с официального сайта производителя
- Определите модель устройства, для которого требуется обновление драйвера.
- Перейдите на официальный сайт производителя устройства и найдите раздел «Поддержка» или «Драйверы».
- Введите модель вашего устройства и загрузите последнюю версию драйвера, совместимую с вашей операционной системой.
- Установите скачанный драйвер, следуя инструкциям установщика.
Метод №3: Использование специализированных программ для обновления драйверов
На рынке существует множество программ, предназначенных для автоматического обновления драйверов в Windows 10. Вам следует выбрать одну из них и следовать инструкциям по ее установке и использованию.
Помните, что обновление драйверов может решить проблемы, связанные с ошибкой «Cache Manager» в Windows 10. Если после обновления драйверов проблема не исчезает, рекомендуется обратиться за помощью к специалистам или провести диагностику вашего компьютера.
Summary: If you’re getting a CACHE_MANAGER error code with a blue screen on booting your system, learn how to fix this bug code in this blog. We’ve covered all the possible causes behind this error with the best solutions. Moreover, we’ve provided powerful data recovery software to retrieve data from crashed PCs.

Contents
- What causes CACHE MANAGER error in Windows 10/11?
- How can I fix the CACHE MANAGER error in Windows 10/11?
When a hectic day begins, you may want to check your emails on the computer first, but sometimes instead of the normal desktop, you see a cache manager BSOD. Well, it’s not uncommon for PCs to show these crash screens.
Your device may experience Blue Screen of Death (BSOD) difficulties for several causes, including bad memory, damaged hardware, corrupt system drivers, overheated components, and many more.
Thankfully, you may quickly fix this problem by using a few workarounds. There are a few tools in Windows that may be used to resolve the problem. In this article, we’ll show you where to find these repair tools so you may utilize them to solve the problem.
What causes CACHE MANAGER error in Windows 10/11?
The memory manager and the Cache Manager work together to enable data caching for all Windows file system drivers. The Cache Manager is a collection of kernel-mode operations and system threads.
Common issues like outdated drivers, antivirus issues, or complex memory malfunctions may be the root of this problem. Another thing that may be the reason for this bug check, according to Microsoft, is a memory shortage.
How can I fix the CACHE MANAGER error in Windows 10/11?
1. Run chkdsk
As previously stated, mainly bad memory causes the stop code Cache Manager to occur. Therefore, the first step on your how-to list should be to run memory-related troubleshooters. A tool called CHKDSK (check disk) checks your hard drive for file system issues on Windows operating systems. Utilizing the CHKDSK application keeps your system data organized while checking for and fixing hard disk issues.
- In the Start menu, search the Command Prompt, right-click the best result, and choose Run as Administrator.

- Type in chkdsk /f /r C: and press Enter.

- You must carry out this Scan for each hard drive partition, so be sure to replace C with a hard drive letter that corresponds.
2. Use memory diagnostics
It is time to test your RAM. You should make use of a program called Memory Diagnostics to do this. This tool works by writing data to each RAM sector of your computer and reading it back one sector at a time. The tool will read a different value if it detects a problem with your RAM. This will let you know if there is anything wrong with your RAM.
- Press Windows Key + R, type mdsched.exe, and hit Enter.

- Click Restart now and check for problems (recommended).

Note: To run the test, you must restart your computer. You can’t use your computer while the test takes place. Make sure first to save your work. When you select “Restart now and check for problems (recommended),” your computer will restart immediately.
3. Run SFC
Running SFC scan is also necessary as this tool checks all the system files and ensures everything is in place. You should also run DISM after this utility to repair any damaged file in your system file folder.
- Use the Windows search by opening the start menu and typing Command Prompt. Right-click on the best result and Run as an administrator.
- Press Enter after entering the line sfc/scannow in the Command Prompt.

- Restart your computer after the procedure.
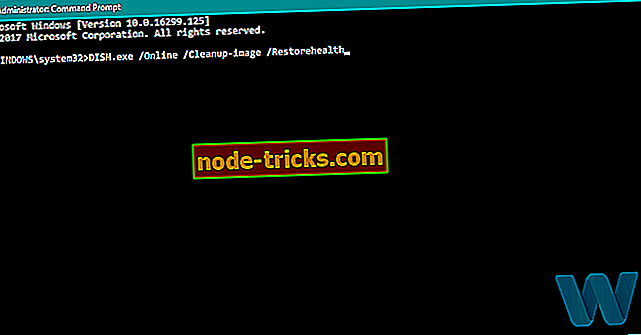
4. Run DISM
- Once again, launch the Command Prompt as an administrator.
- This time type DISM /Online /Cleanup-Image /restorehealth.

- Restart your computer.
5. Uninstall third-party antivirus
Another method to fix BSOD issues like CACHE MANAGER is to identify the troublesome program and uninstall it. Note that the issue can also be related to a newly installed hardware, which we will discuss in the next method.
Moreover, if the problem starts occurring after installing an application, it is recommended to uninstall it. In some cases, the antivirus is to blame. Thus, you should temporarily uninstall it to resolve this issue.
It is worth noting that outdated antivirus or firewall can also cause various BSOD errors. So, make sure you remove any antivirus software you have installed besides Windows Defender.
It’s been reported by a few users that the CACHE MANAGER problem persisted even after deleting certain antivirus software. It’s mainly because leftover antivirus files and registry entries likely cause this and using specialized uninstaller programs is the only way to remove antivirus software entirely.
You may download and utilize the uninstaller tools hosted by most antivirus firms for free on their websites.
6. Check your hardware
As we mentioned earlier, the newly installed hardware could also be the cause of the error. For example, your motherboard may not be completely compatible with the recently added components.
We advise you to check your RAM if you haven’t installed any new hardware recently. Additionally, check that your hard drive is correctly connected to your computer because it can also result in the CACHE MANAGER BSOD error.
What would the technician do if you sought professional help?
The technician will most likely use special tools and software to pinpoint the source of the problem, but if none of the above fixes worked for you, the technician will reinstall Windows or replace the damaged component in your PC. In either case, you risk losing all of your data. To avoid this, we recommend using Stellar Data Recovery Professional to recover your files before seeking professional assistance.
The software can recover your data even if your PC cannot boot due to a BSOD error.
- Connect the USB drive to another operational PC. It would help if you had a USB of at least 1GB size.
- Launch Stellar Data Recovery Professional after downloading and installing it from the official website.
- In the main window of the Select What to Recover screen, select Waffle Menu.

- Choose Create Recovery Drive.

- In the Create Recovery Drive dialog box, go to the drop-down menu to select the USB drive you want to use as bootable media.
- Now select Create Recovery Drive and click OK.
- A new Activation window appears where you need to enter an activation key. After purchasing the product, enter the Key you received via email into the box and press the Activate button.
- Attach the mentioned USB media to your Windows computer that won’t boot.
- Turn on your computer, then rapidly press the F12 or Bios Key to view any connected bootable USB media.
- Select the bootable data recovery media using the arrow keys, then press Enter to boot the computer.
- You will see the Stellar Data Recovery Professional software interface once the computer has booted from USB media.
- From the Select What to Recover screen, select the files you wish to recover and press Next.
- Click Scan after selecting the desired drive.

- Click Recover to save the files that you have selected from the preview menu.

No cache issues anymore!
CACHE MANAGER BSOD errors can be frustrating, but you can easily resolve them using some solutions. If the problem is software-related and you are dealing with system file corruption, the above solutions will work.
In the worst-case scenario, you may have to replace your hard drive or see if it works on another computer. But don’t worry; even if your hard drive is damaged, you can use Stellar Data Recovery Professional to recover your data and clone your hard drive and then attempt to replace your faulty storage.
FAQ
- What is the cause of the Blue Screen of Death error?
Blue Screen of Death usually indicates something is wrong with the system, and Windows can’t solve the issue by itself or operate while the problem is active. The reason behind BSoD can be as simple as an incompatible gadget recently attached to the PC or as complicated as corrupted Windows files.
- Can I access BIOS if my PC won’t boot?
BIOS can be accessed as soon as you turn the computer on. Before the PC boots into Windows, you should be able to enter BIOS by pressing the BIOS key (often F12). So, you can access BIOS even if your PC can’t boot.
- Do I need to boot my computer up to use Stellar Data Recovery Professional?
No, you can create a bootable media on a USB stick and use it to access the software on your unbootable PC without running Windows or booting it up.
About The Author
Farhad Pashaei
As a technophile, Farhad has spent the last decade getting hands-on experience with a variety of electronic devices, including smartphones, accessories, laptops, wearables, printers, and so on. When he isn’t writing, you can bet he’s devouring information on products making their market foray, demonstrating his unquenchable thirst for technology.
Ошибки Blue Screen of Death могут быть довольно проблематичными, поскольку они часто перезагружают ваш компьютер. Эти ошибки могут повлиять на любую операционную систему, и Windows 10 не является исключением. Так как ошибки BSoD могут быть проблематичными, сегодня мы покажем вам, как исправить ошибку BSACH CACHE_MANAGER.
Оглавление:
- Регулярно обновляйте Windows 10
- Обновите ваши драйверы
- Запустите средство устранения неполадок BSOD
- Запустите сканирование SFC
- Запустите DISM
- Удалить проблемное программное обеспечение / антивирус
- Запустить chkdsk
- Проверьте ваше оборудование
Исправлено — ошибка CACHE MANAGER в Windows 10
Решение 1. Регулярно обновляйте Windows 10
Microsoft всегда работает над Windows 10 и выпускает новые функции через Центр обновления Windows. В дополнение к новым функциям выпущено много исправлений безопасности и ошибок, и многие из этих обновлений исправляют различные проблемы совместимости. Поскольку CACHE_MANAGER BSoD может быть вызван устаревшим или несовместимым оборудованием, всегда полезно регулярно обновлять Windows 10 до последних версий. Регулярно загружая обновления Windows, вы уменьшите вероятность возникновения проблем несовместимости и ошибок BSoD, поэтому мы настоятельно рекомендуем вам обновлять Windows 10 как можно чаще.
Решение 2. Обновите драйверы
Многие ошибки BSoD вызваны устаревшими драйверами, которые не полностью совместимы с Windows 10. Многие пользователи сообщили, что после обновления драйверов Realtek ошибка CACHE MANAGER была устранена, поэтому, если вы используете вышеупомянутые драйверы, обязательно обновите их с помощью Последняя версия.
Стоит отметить, что почти любой устаревший драйвер может вызвать появление этой ошибки, поэтому рекомендуется обновить как можно больше драйверов. Обновление драйверов относительно просто, и для обновления драйвера просто посетите веб-сайт производителя оборудования и загрузите последние версии драйверов для вашего устройства. В некоторых случаях достаточно установить драйверы, которые вы получили на компакт-диске вместе с вашим оборудованием.
Обновлять драйверы автоматически
Поиск драйверов самостоятельно может занять много времени. Поэтому мы советуем вам использовать инструмент, который сделает это автоматически. Использование автоматического обновления драйверов, безусловно, избавит вас от необходимости искать драйверы вручную и всегда будет поддерживать вашу систему в курсе последних версий драйверов.
Модуль обновления драйверов Tweakbit (одобрен Microsoft и Norton Antivirus) поможет вам автоматически обновлять драйверы и предотвратить повреждение ПК, вызванное установкой неправильных версий драйверов. После нескольких тестов наша команда пришла к выводу, что это лучшее автоматизированное решение.
Вот краткое руководство о том, как его использовать:
- Загрузите и установите программу обновления драйверов TweakBit

- После установки программа начнет сканирование вашего компьютера на наличие устаревших драйверов автоматически. Driver Updater проверит установленные вами версии драйверов по своей облачной базе данных последних версий и порекомендует правильные обновления. Все, что вам нужно сделать, это дождаться завершения сканирования.
- По завершении сканирования вы получите отчет обо всех проблемных драйверах, найденных на вашем ПК. Просмотрите список и посмотрите, хотите ли вы обновить каждый драйвер по отдельности или все сразу. Чтобы обновить один драйвер за раз, нажмите ссылку «Обновить драйвер» рядом с именем драйвера. Или просто нажмите кнопку «Обновить все» внизу, чтобы автоматически установить все рекомендуемые обновления.
Примечание. Некоторые драйверы необходимо устанавливать в несколько этапов, поэтому вам придется нажимать кнопку «Обновить» несколько раз, пока не будут установлены все его компоненты.

Решение 3 — Запустите средство устранения неполадок BSOD
Если обновление драйверов не устранило ошибку CACHE_MANAGER BSoD, мы попробуем воспользоваться инструментом устранения неполадок. В Windows 10 имеется удобное встроенное средство устранения неполадок, которое может помочь вам в решении различных проблем, в том числе ошибок BSOD. Итак, мы можем попробовать и посмотреть, повезет ли нам.
Вот как запустить средство устранения неполадок Windows 10:
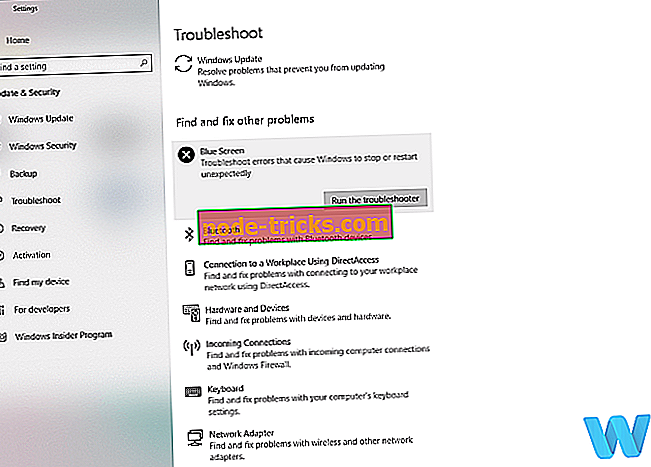
- Откройте приложение «Настройки» и перейдите в раздел « Обновление и безопасность ».
- Выберите « Устранение неполадок» в меню слева.
- Выберите BSOD на правой панели и нажмите Запустить средство устранения неполадок .
- Следуйте инструкциям на экране для устранения неполадок.
Решение 4 — Запустите сканирование SFC
Сканирование SFC — это еще один инструмент для устранения неполадок, который мы собираемся попробовать. Это средство сканирования из командной строки, которое сканирует ваш компьютер на наличие потенциальных проблем и устраняет их по пути. Многие пользователи сообщают, что сканирование SFC может быть полезно при работе с проблемами BSOD в Windows 10.
Вот как запустить сканирование SFC в Windows 10:
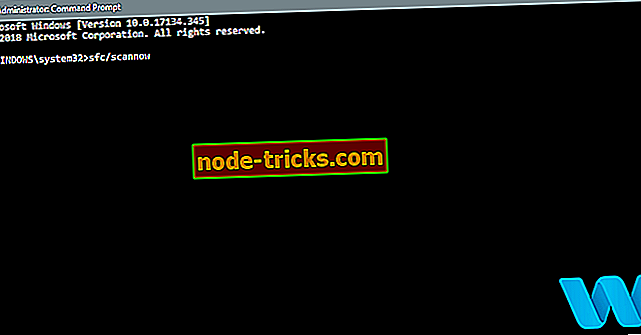
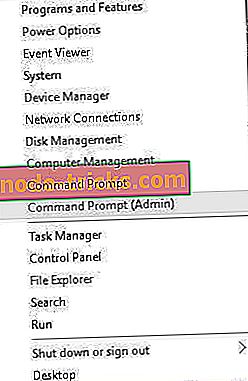
- Щелкните правой кнопкой мыши кнопку «Пуск» и откройте командную строку (Admin).
- Введите следующую строку и нажмите Enter: SFC / SCANNOW
- Подождите, пока процесс не будет завершен (это может занять некоторое время).
- Если решение найдено, оно будет применено автоматически.
- Теперь закройте командную строку и перезагрузите компьютер.
Решение 5 — Запустите DISM
И последний инструмент для устранения неполадок, который мы собираемся попробовать, это DISM. Это, пожалуй, самый мощный инструмент устранения неполадок, поскольку он развертывает образ системы снова и снова.
Мы расскажем вам как о стандартной, так и о процедуре, которая использует установочный носитель ниже:
- Стандартный способ
- Щелкните правой кнопкой мыши Пуск и откройте командную строку (Admin).
- Вставьте следующую команду и нажмите Enter:
-
- DISM / Online / Cleanup-Image / RestoreHealth
- DISM / Online / Cleanup-Image / RestoreHealth
-
- Подождите, пока сканирование не закончится.
- Перезагрузите компьютер и попробуйте обновить снова.
- С установочного носителя Windows
- Вставьте установочный носитель Windows.
- Щелкните правой кнопкой мыши меню «Пуск» и выберите в меню «Командная строка» («Администратор»).
- В командной строке введите следующие команды и нажмите Enter после каждого:
- dism / online / cleanup-image / scanhealth
- dism / online / cleanup-image / restorehealth
- Теперь введите следующую команду и нажмите Enter:
- DISM / Online / Cleanup-Image / RestoreHealth /source:WIM:X:SourcesInstall.wim:1 / LimitAccess
- Обязательно измените значение X с буквой подключенного диска при установке Windows 10.
- После завершения процедуры перезагрузите компьютер.
Решение 6 — Удалить проблемное программное обеспечение / антивирус
Ошибки BSoD, такие как CACHE_MANAGER, могут быть вызваны как программным, так и аппаратным обеспечением, и для исправления этих ошибок рекомендуется найти проблемное программное обеспечение и удалить его. Если эта ошибка появилась недавно, вы можете удалить любое недавно установленное программное обеспечение, чтобы исправить ее.
Ваш антивирус и брандмауэр могут быть наиболее распространенной причиной ошибки BSoD, поэтому для решения этой проблемы рекомендуется временно удалить антивирусное программное обеспечение. Практически любая антивирусная программа может вызывать ошибки такого типа, поэтому обязательно удалите все антивирусные программы, которые вы установили, кроме Защитника Windows.
Немногие пользователи сообщили, что даже после удаления некоторых антивирусных программ ошибка CACHE_MANAGER не была исправлена. Вероятно, это связано с сохранением антивирусных файлов и записей в реестре, а для полного удаления антивирусного программного обеспечения необходимо использовать специальные инструменты удаления. Большинство антивирусных компаний размещают инструменты удаления на своих веб-сайтах, и вы можете скачать и использовать их бесплатно.
Решение 7 — Запустите chkdsk
CACHE_MANAGER Ошибка BSoD может быть вызвана вашим жестким диском, поэтому рекомендуется выполнить сканирование chkdsk. Чтобы выполнить сканирование chkdsk, выполните следующие действия:
- Нажмите Windows Key + X, чтобы открыть меню Power User. Выберите Командная строка (Администратор) .
- Когда запустится командная строка, введите chkdsk / f / r C: и нажмите Enter, чтобы запустить ее. Мы должны упомянуть, что вам придется выполнять это сканирование для каждого раздела жесткого диска, поэтому обязательно замените C на соответствующую букву жесткого диска.
Количество пользователей сообщило, что они даже не могут получить доступ к Windows 10 из-за ошибки CACHE_MANAGER, и если это так, вы можете выполнить сканирование chkdsk, выполнив следующие действия:
- Перезагрузите компьютер во время загрузки Windows 10. Вам придется повторить этот шаг несколько раз, прежде чем начнется автоматическое восстановление.
- Выберите « Устранение неполадок»> «Дополнительные параметры»> «Командная строка» .
- После запуска командной строки введите chkdsk / f / r C: и дождитесь завершения сканирования. Не забудьте выполнить сканирование для всех других разделов, изменив букву C на соответствующую букву.
Решение 8 — Проверьте ваше оборудование
Если вы недавно установили новое оборудование, убедитесь, что вы удалили его или заменили. Вновь установленное оборудование может быть не полностью совместимо с вашей материнской платой, и это может быть причиной ошибки CACHE_MANAGER. Если вы не устанавливали какое-либо новое оборудование в последнее время, мы рекомендуем вам проверить вашу RAM, так как это наиболее распространенная причина ошибок BSoD.
Для проверки вашей оперативной памяти вам нужно использовать такие инструменты, как MemTest86 +. Просто поместите инструмент на USB-накопитель и загрузите с него компьютер. Позвольте MemTest86 + работать в течение пары часов. Если у вас установлено более одного модуля ОЗУ, вы можете проверить их один за другим, пока не найдете неисправный.
Помимо неисправного ОЗУ, ваш жесткий диск также может вызвать ошибку CACHE_MANAGER BSoD, поэтому убедитесь, что ваш жесткий диск правильно подключен. В худшем случае вам, возможно, придется заменить жесткий диск или попробовать, если ваш жесткий диск работает на другом компьютере. Если оперативная память и жесткий диск работают правильно, убедитесь, что другое оборудование работает правильно.
Если у вас все еще есть проблемы с вашим оборудованием или вы просто хотите избежать их в будущем, мы настоятельно рекомендуем вам загрузить этот инструмент (на 100% безопасный и протестированный нами), чтобы исправить различные проблемы с ПК, такие как сбой оборудования, но также потеря файлов и вредоносных программ.
Ошибки типа «синий экран смерти», такие как ошибка CACHE_MANAGER BSoD, могут быть неприятными, но вы можете легко исправить это, используя некоторые из наших решений.
Примечание редактора: этот пост был первоначально опубликован в июне 2016 года и с тех пор был полностью переработан и обновлен для обеспечения свежести, точности и полноты.
Stuck with the Blue Screen error up on Startup? Well, it’s quite common. Blue screen of Death (BSOD) errors can occur on your device due to a variety of reasons that include corrupt system drivers, hardware malfunction, faulty memory, overheated components, and many other issues. The Cache Manager error also appears on the Blue Screen at the time of Startup. Fortunately, you can easily get past this issue by following a few workarounds:

In this post, we have several listed solutions to fix the Cache Manager error on Windows 10 by making a few tweaks in Windows settings.
Let’s get started.
Also read: BSOD Kernel Security Check Failure on Windows 10
What Causes Cache Manager Error on Windows 10?
Here are a couple of reasons why you may get stuck with the Cache Manager error on your Windows device.
- Outdated/corrupt system drivers.
- Lack of Storage space.
- Hardware Incompatibility.
- Outdated Windows version.
- BSOD issues.
- Presence of virus or malware.
How to Fix the Cache Manager Error on Windows
Let’s quickly learn how to resolve the Cache Manager Blue Screen error and get your Windows device up and running again within no time.
#1 Run the BSOD Troubleshooter
Windows 10 comes with a myriad of built-in security features that allow you to fix common errors and bugs. To run the BSOD Troubleshooter on Windows 10, follow these quick steps:
Press the Windows icon, tap the gear-shaped icon to open Settings.
In the Windows Settings, select “Update and Security”.

Switch to the “Troubleshoot” option from the left menu pane. Scroll down and look for the “Find and Fix problems” section.
Tap the “Run the Troubleshooter” button placed beneath “Blue Screen”.

Follow the on-screen instructions on the wizard to run the BSOD Troubleshooter.
Once the Troubleshooter is done with its job, reboot your device to check if the issue persists.
Also read: Critical Process Died on Windows 10 – How to Fix This BSOD Error
#2 Update System Drivers
Is your device running on outdated/corrupt system drivers? If yes, then it may trigger the Cache Manager error on the Windows device. There are two simple ways to update system drivers, one is the manual method where you update drivers in Windows Device Manager. An alternative method for updating system drivers is via a third-party tool that automatically fetches the latest update of drivers and saves you a lot of time and effort.
Update System Drivers Manually:
Press the Windows + R key combination to open the Run dialog box. Type “Devmgmt.msc” in the textbox, hit Enter.

In the Device Manager window, right-click on the outdated driver, select the “Update Driver” option.

Follow the on-screen instructions to complete the process.
Reboot your machine and check if the issue persists.
Download Smart Driver Care


Manually updating every system driver is a tedious job. Isn’t it? Download Smart Driver Care utility tool that automatically scans your entire device for outdated/corrupt system drivers and software and fetches their latest update. It allows you to automatically update all outdated drivers in just one click.
Also read: 9 Best Driver Updater Software For Windows 10, 8, 7 PC
#3 Run the SFC Scan
System File Checker is another Windows utility tool that allows you to scan and fix hardware errors, replace corrupt system files, and removes discrepancies. The SFC Scan is executed on the Command Prompt shell, here’s what you need to do:
Launch the Start menu search, type “Command Prompt”, right-click on its icon, and select “Run as Administrator”.

In the Command Prompt shell, type the following command and hit Enter.

sfc/scannow
Wait for a few minutes until a complete scan is performed on your device. Once the scan is completed, reboot your device if you’re still experiencing the Cache Manager error on Windows 10 PC.
Also read: SFC Scan Stops Working on Windows 10? Here’s the Fix!
#4 Use the DISM Command
The DISM (Deployment Image Servicing and Management) command can be used to fix common BSOD errors on Windows 10 devices. DISM is typically a command-line tool that loads Windows in a Recovery environment. To run the DISM command on Windows, follow these steps:
Open Command Prompt shell.
Type the following command and hit Enter to execute it:

DISM /Online /Cleanup-Image /RestoreHealth
Once the scan is completed, reboot your machine if you’re still facing any technical difficulties at the time of Startup.
Also read: 5 Ways to Resolve the Dism.exe 1392 Error on Windows 10
#5 Scan your Device for Viruses and Malware
Tried the above-mentioned workarounds and still no luck? Well, there’s a slight possibility that your device may be infected with a virus or malware. Is your device installed with a strong antivirus suite? If not, then we recommend you install Systweak Antivirus for Windows PC that offers real-time protection against viruses, malware, spyware, trojans, adware, and Ransomware attacks.
Download Systweak Antivirus
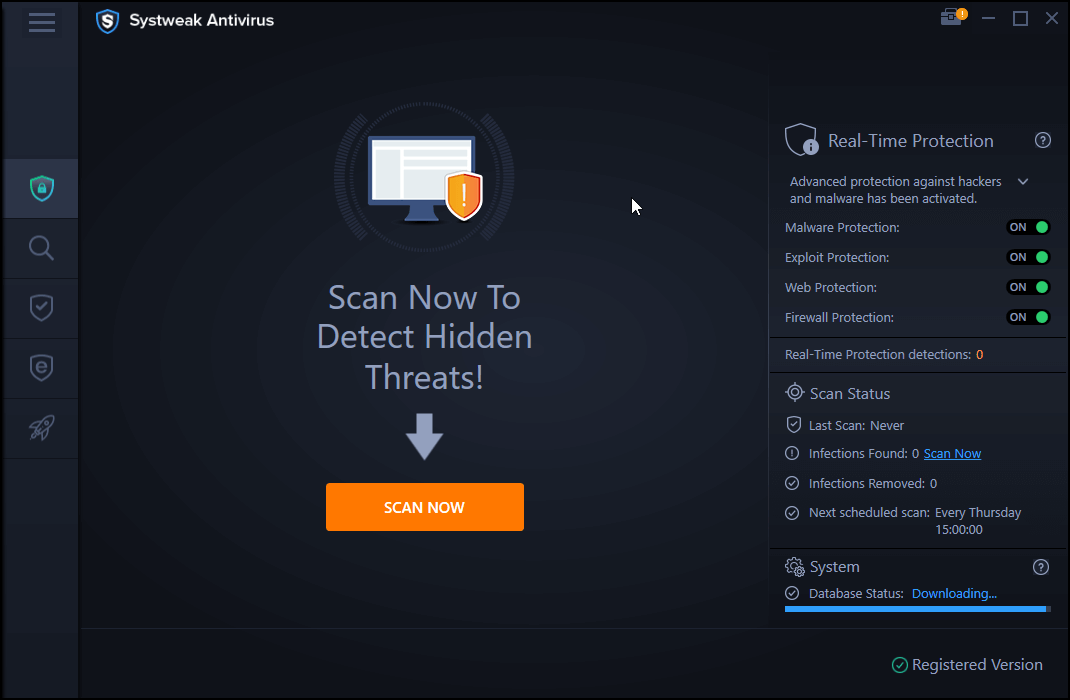
Systweak Antivirus protects your device from malicious threats, zero-day vulnerabilities, and exploits. Apart from offering complete secure protection from cyber threats, Systweak Antivirus also enhances the speed and performance of your PC by cleaning unwanted/malicious startup items.
Also read: 8 Best Free Startup Manager Tools For Windows PC
Conclusion
Here are a few solutions that will allow you to fix the Cache Manager error on Windows 10 devices. Do let us know which solution worked out the best for resolving the Blue Screen error. For any other assistance, feel free to drop your queries in the comments space!
Many Windows users encounter the cache manager BSOD crashing error. What is cache manager? How to fix the error? If you are also trying to figure them out, this post of MiniTool is what you need.
BSOD, also known as Blue Screen of Death and Stop code, is one of the most common system crashing errors on Windows. This problem can cause a computer to restart frequently and even data loss. Moreover, the BSOD screen is often accompanied by different error codes such as Critical Process Died, Win32k power watchdog timeout, and the one discussed in this post.
Here’s a true example from the answersmicrosoft.com forum. He encountered the cache manager BSOD error on Windows 10. What is cache manager? How to fix the error? Let’s start exploring the answers.
Dear, since I installed Windows 10, I got the Blue Screen Crash CACHE_MANAGER problem, it turns into a blue screen, and then my PC restart! I think it`s caused by a driver issue but I can`t fix it!!! Can someone help me???
https://answers.microsoft.com/en-us/windows/forum/all/blue-screen-crash-cachemanager/e5591cdf-eb6f-47e8-8483-976d2cacaf47

What Is Cache Manager
What is cache manager? It is a set of kernel-mode data structures and system threads that work with the memory manager. It’s mainly used to interact with other elements of the operating system and provide data caching for all Windows file system drivers.
However, many users reported that their computer restarts suddenly and throws the cache manager BSOD error. Don’t worry. We will analyze the possible causes of the error and provides corresponding fixes.
What Causes the Cache Manager BSOD Error
As the error message suggests, the stop code cache manager BSOD can be caused by issues with your hardware components like hard disk and memory. In addition, outdated device drivers, corrupted system files, outdated OS, and even virus infection are also responsible for the BSOD error.
Important Thing! Back Up Your Computer As Soon As Possible
According to user reports, the cache manager blue screen error often occurs with frequent shutdowns, causing data loss. So, we highly recommend that you back up all important data as soon as possible before you fix the error.
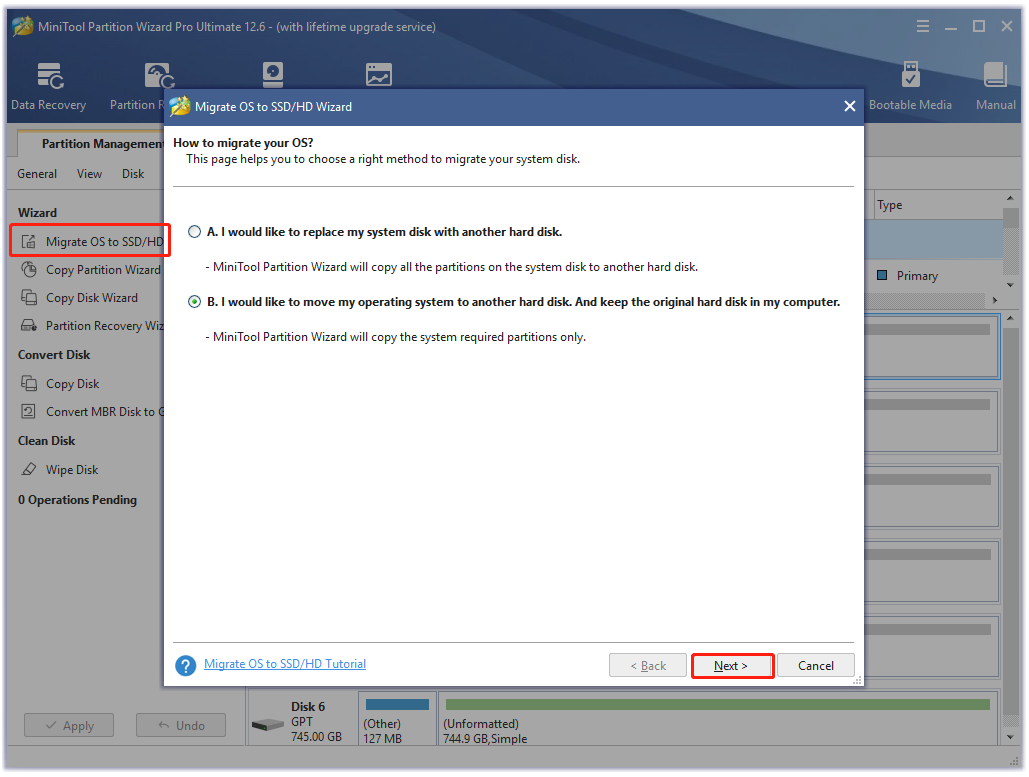
How to back up your computer safely and quickly? MiniTool Partition Wizard is a good choice that can migrate OS and even copy the whole hard disk without reinstalling. Here you can use the tool to make a backup first and fix the error via the following solutions.
MiniTool Partition Wizard DemoClick to Download100%Clean & Safe
How to Fix the Cache Manager BSOD Error on Windows
There are 9 feasible ways to fix the blue screen crash cache manager on Windows 10/11 PCs. We recommend you try them in order until the problem gets solved.
# 1. Run the Blue Screen Troubleshooter
The Blue Screen troubleshooter is a Windows built-in diagnostic tool that can be used to scan and repair BSOD errors. Here you can use the troubleshooter to fix the blue screen crash cache manager error.
Step 1. Press the Win + I keys to open the Settings app and select Update & Security.
Step 2. Click on Troubleshoot from the left pane, and then scroll down to find the Blue Screen and click on the Run the troubleshooter button.
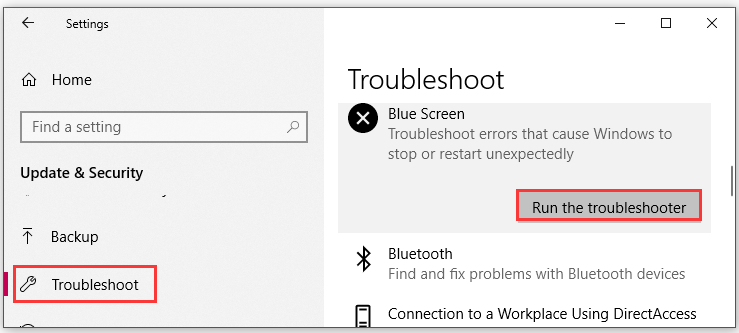
Step 3. Wait for the troubleshooter to detect the BSOD error. If any issues related to the BSOD error are detected, click on Apply this fix and follow the on-screen prompts to complete the repair.
# 2. Install the Latest Windows Updates for Your Computer
If you have never updated your operating system, your computer may interfere with some bugs or viruses, which can trigger the stop code cache manager. So, it’s highly recommended that you keep the Windows system up to date.
Step 1. Open the Settings app again and select Update & Security.
Step 2. With the Windows Update option selected from the left panel, click on the Check for updates button from the right panel if available. If the option is not here, you can Download and install it under the latest updates.

After you installed the latest Windows updates, reboot your computer and check if the blue screen cache_manager error disappears.
# 3. Update Your Device Drivers
Some users from the answers.microsoft.com forum reported that the BSOD cache manager error can be fixed by updating the chipset driver. Here you may have a try.
Step 1. Right-click the Start menu and select Device Manager from the context menu.
Step 2. In the pop-up window, expand the Processors category, right-click the chipset driver that you want to update, and select Update driver.
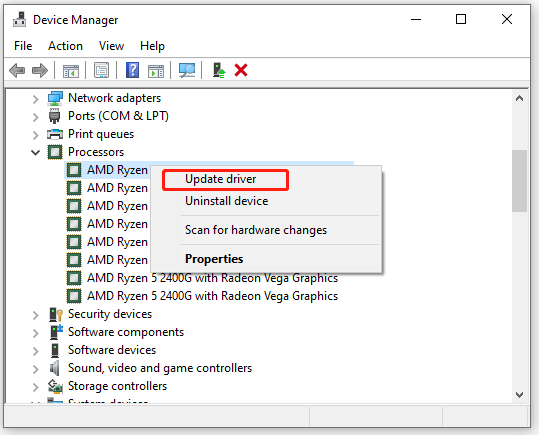
Step 3. Select the Search automatically for drivers option and follow the on-screen instructions to complete the update. Then you can refer to the same process to update other device drivers like GPU driver, storage driver, etc.

# 4. Scan Your Computer for Virus
In addition, the BSOD cache manager crashing error can be caused by a virus or malware infection. So, you’d better perform a full virus scan of your computer using Windows Security or third-party antivirus software.
Step 1. Type virus in the search box and click the Virus & threat protection app from the top result.
Step 2. Inside the Windows Defender Security Centre, click the Scan options option on the right panel.
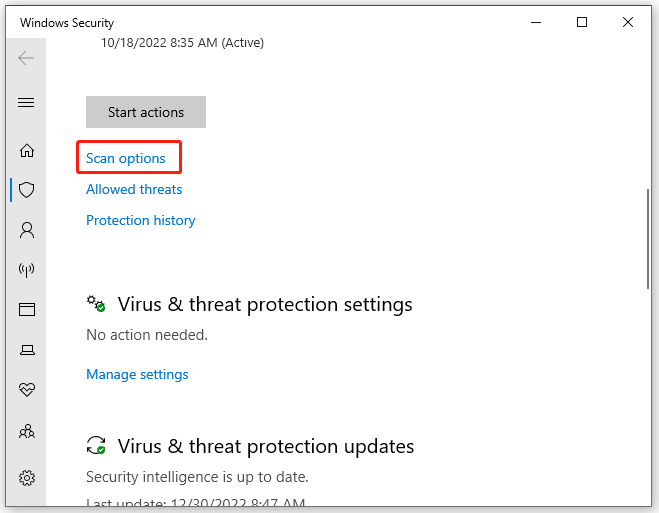
Step 3. Select Full scan and tap on Scan now to start the full virus scan. Then you need to wait a while until the scan completes.

Wait for the scan to complete and reboot your computer to see if the blue screen cache_manager error disappears.
# 5. Check Your Hard Disk for Errors
The Windows 10 cache_manager BSOD error usually indicates there is an issue with your hardware components like hard disk. To rule out this factor, you’d better check your hard drive for errors.
How to check hard drive errors on Windows 10/11? The CHKDSK command is often used to check hard drive errors, but sometimes this tool may run into various issues like CHKDSK write-protected and CHKDSK not working. In this case, MiniTool Partition Wizard is a better choice. It can help you check bad sectors on the hard drive easily.
MiniTool Partition Wizard FreeClick to Download100%Clean & Safe
Step 1. Launch the MiniTool software to get its main interface, and then select the problematic hard disk and click on Surface Test from the left pane.
Step 2. Click on the Start Now button in the pop-up window. After that, this tool will scan the whole disk immediately and show you the test result.
Tips:
You can also select Check File System from the left action panel and elect Check & fix detected errors and click on the Start button to repair the file system errors on the hard disk.

Step 3. If any blocks are marked with red color, it indicates that your hard drive is getting failing. In this case, you can use this bad sector repair guide or consider replacing the hard disk with a new one.
Once repaired, you can restart your computer and check if the BSOD cache manager error is gone.
# 6. Check the System File Corruption
If some system files get corrupted or broken, you may encounter the Windows 10 cache_manager BSOD error. In this case, you can scan and repair the system files using the System File Checker or DISM tool.
Step 1. Type cmd in the Search box, and then right-click the Command Prompt app and select Run as administrator. Then click on Yes to confirm this operation.
Step 2. Type the sfc /scannow command in the elevated command prompt and hit Enter. This process may take some time to complete. Don’t interrupt this process until it is complete.

Step 3. If the SFC tool fails to work, you can try using the DISM tool. Type the following commands in the elevated Command Prompt window in order and hit Enter after each one.
- DISM.exe /Online /Cleanup-image /Scanhealth
- DISM.exe /Online /Cleanup-image /Restorehealth
- DISM.exe /online /cleanup-image /startcomponentcleanup
# 7. Disable BIOS Memory
Some users from the Microsoft forum reported that the cache manager blue screen is gone after disabling the BIOS memory option. It may seem strange but worth trying. To do this work, you just need to enter BIOS, navigate to the Advanced tab, and set the Cache Memory option to Disabled. Also, you can refer to this guide to know more details.
# 8. Check Your System Memory
Some users reported that the stop code cache manager BSOD error can be caused by broken system memory or insufficient memory. To rule out this factor, we recommend you perform a memory test or add more memory to the computer.
Step 1. Type Windows Memory Diagnostic in the search box and double-click this program under Best match.
Step 2. You will receive a message saying Check your computer for memory problems. Here are 2 options for you to perform a RAM test. It is recommended that you click Restart now and check for problems.

Step 3. Then wait for this diagnostic process to finish. If the RAM gets broken, you may consider replacing it with a new one. You can refer to this post “How to Get More RAM on Laptop—Free up RAM or Upgrade RAM” to know more details.
# 9. Wipe Your Hard Drive and Reinstall Windows
If none of the above methods get rids of the cache manager blue screen error, you may consider wiping the hard drive and reinstalling Windows. This process will delete all data on your hard drive and revert your system to its original status, so make sure you have backed up all important data in advance. This method has been proven by many people to be useful. You may have a try.
Are you troubled by the cache manager BSOD crashing error? Now, you come to the right place. Here are several effective troubleshooting methods.Click to Tweet
Bottom Line
This post focuses on how to fix the cache manager BSOD error on Windows. You can try the given 9 methods to fix the error. If you have better solutions, please share them with us in the following comment zone. In addition, you can contact us via [email protected] if you have any questions about MiniTool Partition Wizard.