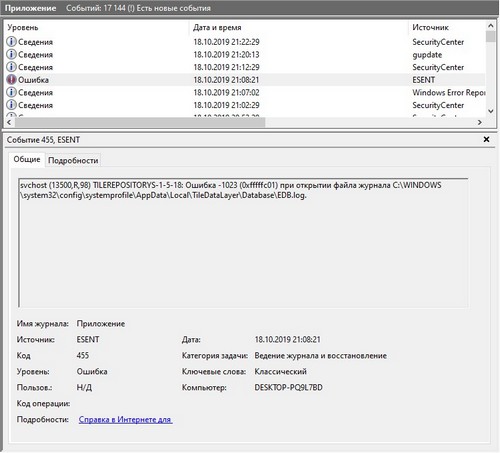
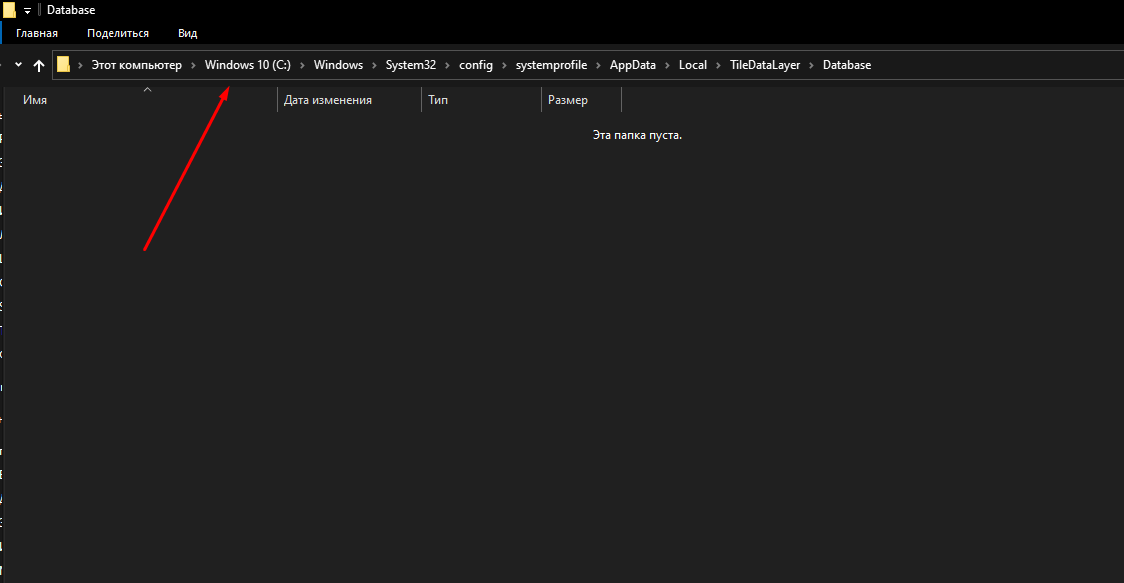
Если у вас в «Журнале Windows» в разделе «Приложение» появилась куча ошибки причиной которой стал ESENT с приблизительно таким содержанием: «svchost (13500,R,98) TILEREPOSITORYS-1-5-18: Ошибка -1023 (0xfffffc01) при открытии файла журнала C:\WINDOWS\system32\config\systemprofile\AppData\Local\TileDataLayer\Database\EDB.log», то особо беспокоиться об этом особе не стоит, на работоспособности компьютера и операционной системы это никоим образом не скажется. На самом деле это предупреждение от базы данных используемых Windows в своих целях, что она не может создать или открыть файл, куда записывается лог операций. Обратите внимание, ошибка должна быть связана именно с невозможностью открыть файла EDB.log.

Вся проблема в одном из обновлений Windows 10, была включено или добавлено логирование операций ESENT. Вот только разработчики забыли создать или прописать создание папки, если её нет, где эти самые файлы хранятся. Если быть совсем точными то отсутствую две папки «TileDataLayer» и «Database».
Вы можете пойти двумя путями, оставить все как есть, просто игнорировать эти ошибки, или создать отсутствующие папки вручную. Если вы остановились на втором пункте, то это можно сделать с помощью «Проводника» он же Explorer в английской версии, дав разрешение создавать папки в директориях связанных с Windows, защищенных от изменения со стороны обычных пользователей, то есть ответить «Да» в появившемся окне. Как вариант, использовать командную строку, которую нужно запустить с правами администратора, и поочередно ввести:
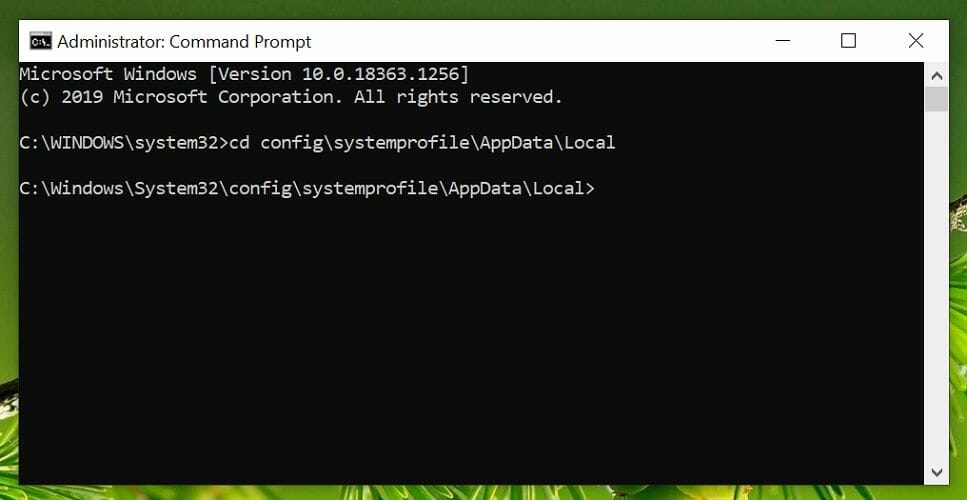
cd C:\WINDOWS\system32\config\systemprofile\AppData\Local
mkdir TileDataLayer
cd TileDataLayer
mkdir Database
Учтите «C:» это диск, на который у вас установлена Windows, если у вас операционная система установлена на другой диск, то поменяйте на нужную букву.
В операционной системе Windows 10 очень часто возникают различного рода ошибки, но некоторые из них незаметны пользователю. Вся информация о них хранится в «Журнале событий», который просто так не открывается. Но если его открыть, количество может поразить нерадивого юзера – у меня, например, такого рода ошибок насчитано около 55 000 с лишним. Сегодня я расскажу об одной из них, с источником ESENT и кодом 455, ее происхождении и исправлении.
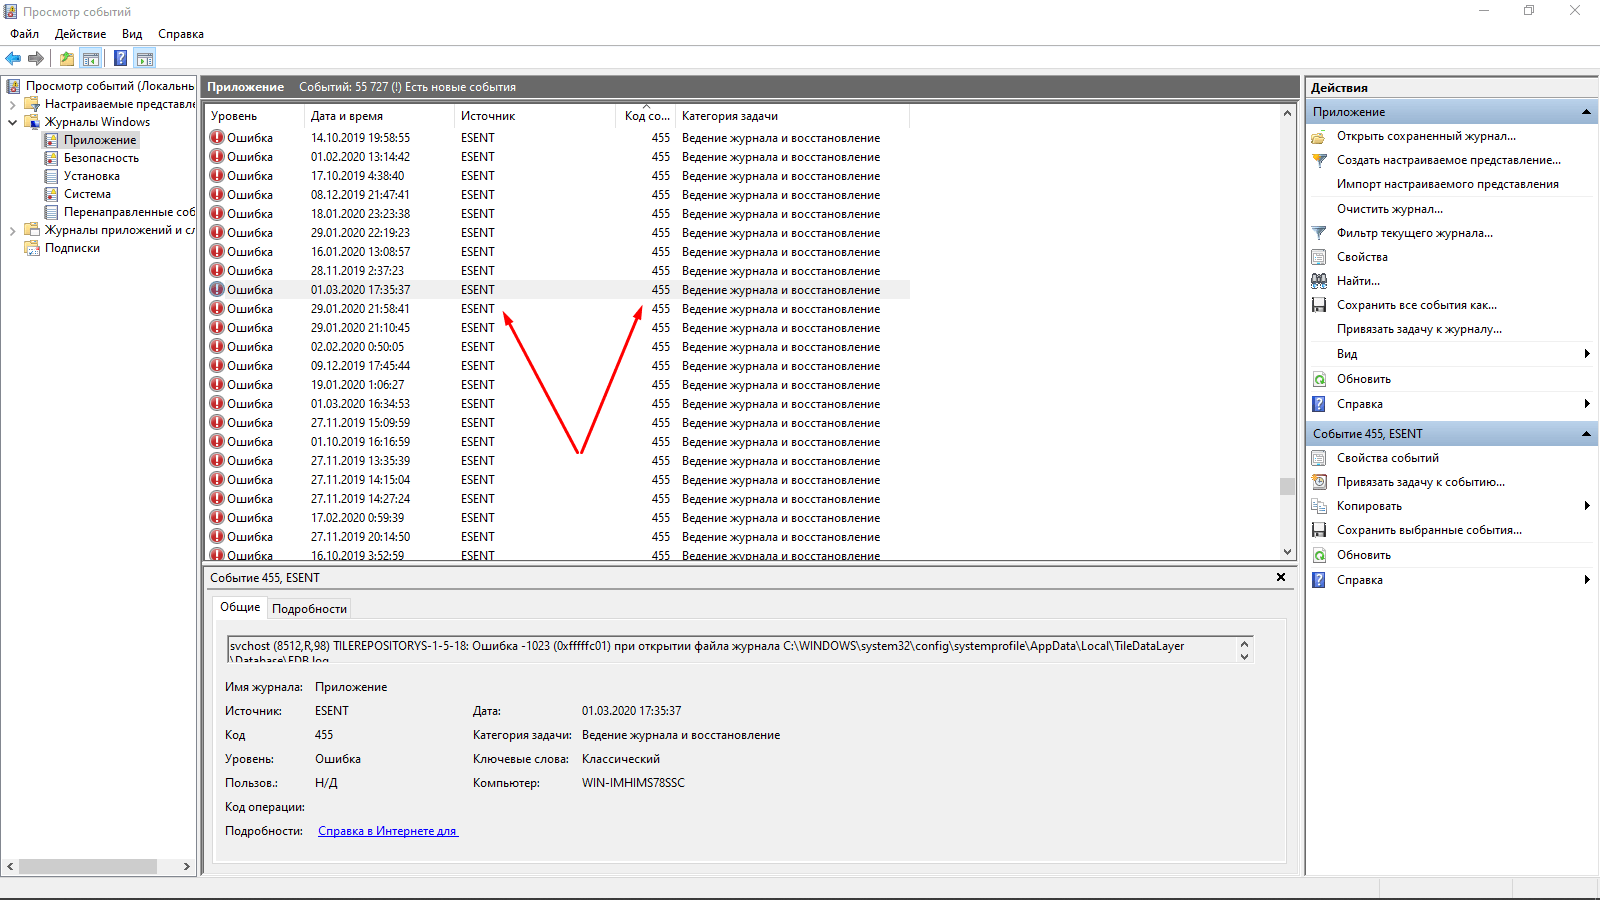
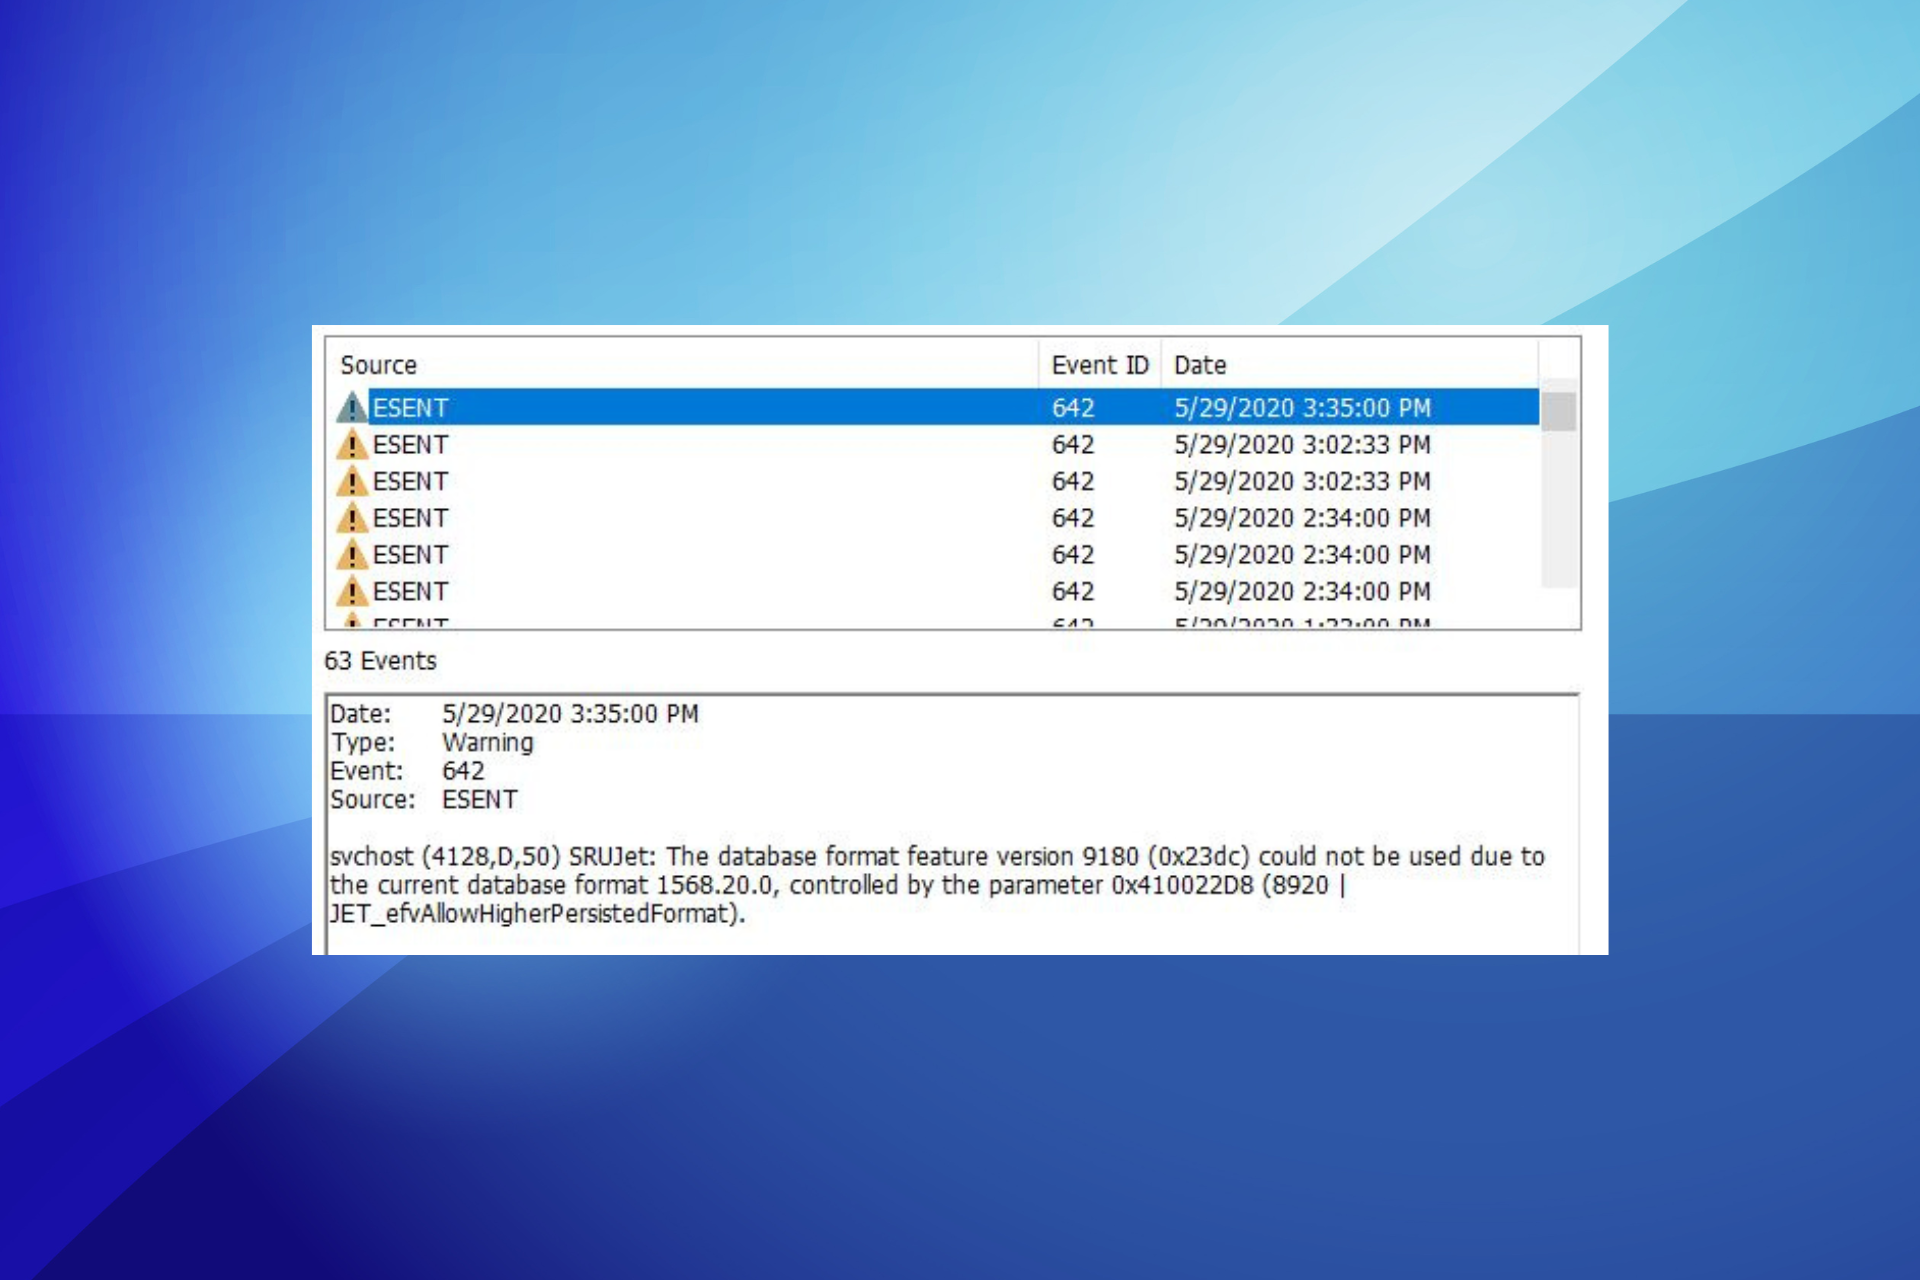
В моем журнале ошибок ESENT с кодом 455 оказалось не мало, я выделила ту, что появилась совсем недавно
Ошибка ESENT с кодом 455 в «Журнале событий» появляется только в тех случаях, когда система хочет произвести какую-то запись, но при этом не может найти указанный лог. Найти ее можно во вкладке «Журналы Windows» и перейдя в раздел «Приложение».
Лог — это системный файл, в который записывается информация о действиях пользователя или программы.
Путь указывается в описании, у меня это C:\WINDOWS\system32\config\systemprofile\AppData\Local\TileDataLayer\Database\EDB.log, но он может отличаться. Я вручную открывала указанные папки и дошла до TileDataLayer – в папке Local ее просто нет, даже при включении отображения скрытых защищенных файлов системы я не могу ее найти. Соответственно, ее не существует.
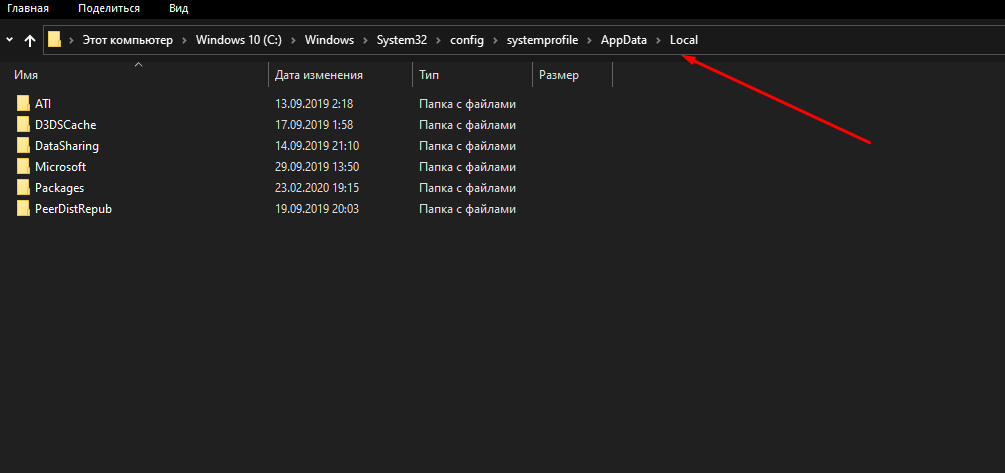
Я вручную открывала указанные в пути файлы и дошла только до папки «Local»
Ввести, к примеру, этот путь в адресной строке «Проводника Windows», дать подтверждение запроса, но в результате он ничего найти не сможет.
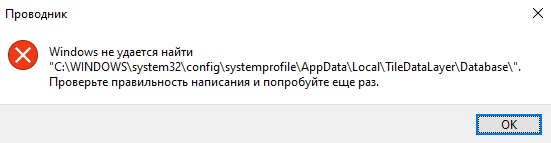
Вот такое сообщение выходит при вводе адреса, на котором должен храниться указанный лог. Но это только в «Проводнике Windows», остальные приложения по этому поводу молчат
Правда, опасаться не стоит, ошибка с кодом 455 никак не угрожает нормальной работе системы. Система просто не может найти лог, зарегистрированный в реестре, от этого она не тормозит и не работает хуже – все остается на своих местах.
Как исправить неполадку
Можно оставить все как есть, так как, я уже говорила об этом выше, данный код безвреден для системы. Если же данный пункт не дает покоя, можно попробовать исправить проблему.
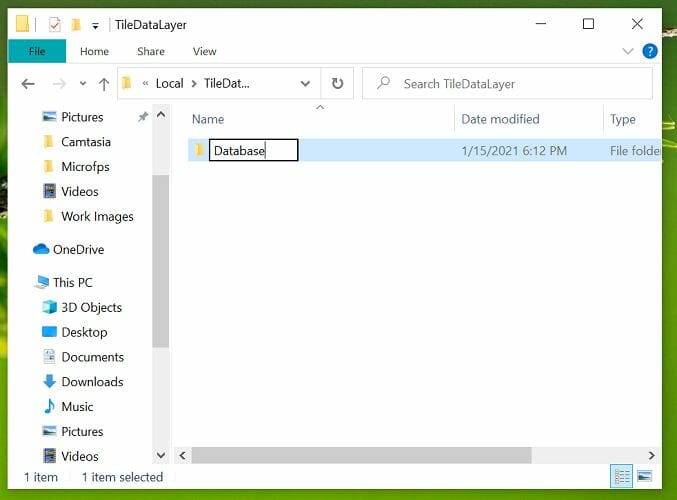
Есть один хороший способ исправить ошибку ESENT с кодом 455 в Windows 10 – это создать недостающие каталоги. В моем случае просто перехожу по пути C:\WINDOWS\system32\config\systemprofile\AppData\Local и создаю в нем новую папку с названием TileDataLayer. Но это не конец, следом нужно открыть ее и создать в ней еще одну папку – Database.
С логом ничего делать не нужно, дальше система уже сама справится с данной операцией, если, конечно, появится необходимость записи данных в дальнейшем.
Я создала недостающие папки, но с логом, увы, ничего не могу поделать. При необходимости требующая служба автоматически создаст его, так что можно не волноваться
Есть также другие рекомендации – предоставить доступ к указанной папке от указанной в описании учетной записи. Возможно, что сей файл блокируется другим процессом, чаще всего антивирусом. В моем же случае отсутствовали две подпапки и сам лог, а процесс запускала служба svchost (при просмотре вкладки «Подробности» это можно увидеть).
После того, как я перезагрузила компьютер, в журнале данная ошибка больше не числится. При открытии той самой папки я не обнаружила в ней ничего, но и лога никакого там не было.
Заключение
Ошибка ESENT с кодом 455 в Windows 10 абсолютно безвредна. Некоторые службы по каким-то причинам могут потребовать конкретный лог, но его не окажется в системе, поэтому такая неполадка и появляется. В любом случае, на работе каких-то программ это сказаться не должно. А если и появляется что-то из ряда вон выходящее, можно создать недостающие папки, а затем проверить, появляется ли данная проблема в «Журнале событий».
Post Views: 4 453
The Esent error is also known as Event ID 455
by Tashreef Shareef
Tashreef Shareef is a software developer turned tech writer. He discovered his interest in technology after reading a tech magazine accidentally. Now he writes about everything tech from… read more
Updated on
- The Esent Event ID 455 in Windows can result in freezing and crashing issues.
- This error usually occurs due to missing directories that are required by Windows 10 to create log files.
- The Windows error Event ID 455 Esent issue can be resolved efficiently by using the Command line.
- Make sure to check the reliability history and the Event Viewer to diagnose the issue.
XINSTALL BY CLICKING THE DOWNLOAD
FILE
The Esent Event ID 455 has reportedly been appearing in the Event Viewer for many users on Windows 10. The error seems to be frequently occurring after updating to the latest version of Windows 10.
The error can trigger several computer issues, including freezing when playing CPU and GPU-intensive tasks like games. At times, it may also lead to loud noise blasting through the speakers.
What is an Esent error?
When an issue occurs, Windows saves error details in logs to help the user identify issues if required. The main reason behind the Esent error also seems to be due to a missing log EDB.log file in the following location:
C:\WINDOWS\system32\config\systemprofile\AppData\Local\TileDataLayer\Database\EDB.logIf you are also troubled by this error, here is how to fix the Windows 10 error Event ID 455 Esent for good.
How can I fix the Esent Event ID 455 error?
- What is an Esent error?
- How can I fix the Esent Event ID 455 error?
- 1. Create missing folders
- 2. Create required folders using Command Prompt
1. Create missing folders

NOTE
If you are having trouble accessing the folders, grant the required permissions, and things should be good to go.
- Open File Explorer and navigate to the following location:
C:\WINDOWS\system32\config\systemprofile\AppData\Local - Once in the folder, right-click on any empty place and select New, and click on Folder.
- Rename the folder as TileDataLayer (if the folder already exists, move to the next step).
- Open the TileDataLayer folder, and create a new folder named Database.
Leave the newly created folder for a few minutes. Upon opening the folder, you will see the EDB.log file and other log files now exist in the folder.
This should also fix the Esent Event ID 455 error message in Event Viewer. If the issue persists, restart your computer and try again to see if the error or freezing problems are resolved.
- Microsoft Paint Cocreator: A complete guide on the new AI tool
- Windows 11 adds more apps to the share links feature
- How to Make a Program Available to All Users on Windows 11
- How to Quickly Turn Off Accents on Keyboard in Windows 11
2. Create required folders using Command Prompt
- Press Windows + S to open Search, type cmd, and click on Run as administrator.
- Type the following command one by one and hit Enter to execute:
cd config\systemprofile\AppData\Local
mkdir TileDataLayer
cd TileDataLayer
mkdir Database - The above command will create folders named TileDatalayer and Database.
- Once done, restart the computer, and verify if things are up and running.
In most cases, the Esent Event ID 455 does not always lead to errors and affects normal Windows operations. However, in rare instances, it may lead to Windows crashing and freezing problems.
To fix the error, all you need to do is create a few missing directories allowing Windows to create and save the EDB.log files.
Once you are done fixing the error, find out how to make Windows faster than before.
If the issue persists, begin by checking the reliability history and then move to the Event Viewer to diagnose the issue.
![]()
Esent is a database engine that is part of the Windows operating system, it is safe and not a security risk. It has many uses in Windows including Desktop searches and indexing your media catalog in Windows 10.
Esent error 490 windows 10 is one of the irritating errors that appears when users try to update their Windows 10 system to version 18362.86. Some Windows users encounter this error inside Event Viewer.
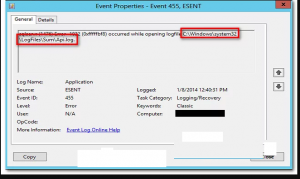
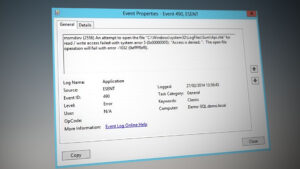
When this error occurs, you will see in the event log the following error description:
svchost (15692,R,98) TILEREPOSITORYS-1-5-18: Error -1023 (0xfffffc01) occurred while opening logfile
C:\WINDOWS\system32\config\systemprofile\AppData\Local\TileDataLayer\Database\EDB.log.
So, down here, in this article you will learn about the different techniques to get rid of this problem with ease.
Method 1: Complete the Corrected Path: In most cases, you will encounter this issue due to bad path that doesn’t exist in reality. In this case, you can manually repair the problematic path.
If you want to give this potential risk a try then go ahead and look at the error inside Event Viewer and see if there is some kind of mention of broken location like C:\WINDOWS\system32\config\systemprofile\AppData\Local\TileDataLayer\Database\EDB.log
Once done, open File Explorer and try to naturally navigate through the location. From the list, if any folders are missing correct the path and create a blank file so the scan can reach it.
Just after that, restart your system and see if these errors are still appearing.
Moreover, you can directly do this from elevated CMD prompt:
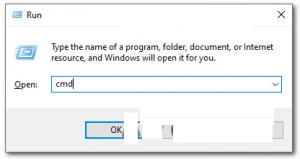
Press Win + R > type cmd > press Ctrl + Shift + Enter to open elevated Command Prompt. Once done, click Yes to grant admin access.
Inside it, enter the following commands and press Enter to ensure that path to TileDataLayer is complete:
cd config\systemprofile\AppData\Local
mkdir TileDataLayer
cd TileDataLayer
mkdir Database
After finishing, reboot your PC and see if the issue is fixed.
Solution 2: Run SFC and DISM scan: There is a possibility that this error occur due to corrupted or damaged system files. in such situation, you are advised to execute SFC and DISM scans. To perform SFC scan , follow below steps:
Go to Windows Search Cortana and type cmd
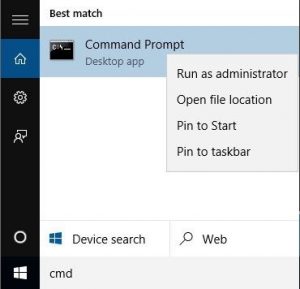
Right-click on Command Prompt and select Run as administrator
Inside it, type sfc/scannow and press enter to run this command
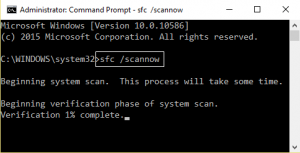
It will take time to scan the entire system files and fix the damage files.
After this, it is also suggested to run DISM command:
In Command Prompt, type DISM/Online/Cleanup-image/RestoreHealth and press Enter
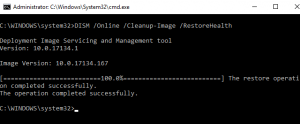
DISM command will also take more than 20 minutes to finish
After running these both command, you should check for the error that if it is still appearing.
Solution 3: Reset Windows Update Components: According to some affected users, you can expect to see this error due to some types of system file corruption that is affecting either Windows Update or Windows Firewall and ends up creating lots of different listings inside Event Viewer. To reset Windows Update components, follow below mentioned instructions:
Open the Command Prompt with admin privilege. To do this, press the Windows + X key and select Command Prompt (Admin) from the list
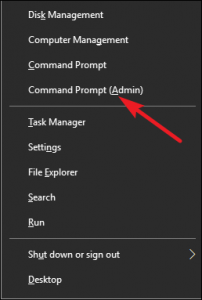
Inside the Command Prompt, type the below given commands. These will stop the BITS, Cryptographic, MSI Installer, and Windows Update Services:
net stop wuauserv
net stop cryptSvc
net stop bits
net stop msiserver
after it, type below given command as this will rename the Software Distribution and Catroot2 folder:
ren C:\\Windows\\SoftwareDistribution SoftwareDistribution.old
ren C:\\Windows\\System32\\catroot2 Catroot2.old
after the two folders have been renamed, run the following commands in order to re-enable the services that you previously disabled:
net start wuauserv
net start cryptSvc
net start bits
net start msiserver
Exit from the command prompt, type exit and press Enter
After completing these steps, repeat the WU action that was previously triggering the Event errors and see if the new events have stopped occurring.
Method 4: Installing Windows 10 Hotfix: Remember that Microsoft already aware of this issue and has released a fix that will take this particular issue. To implement it, you will simply need to install every pending update from the Windows Updates screen. Follow the below steps:
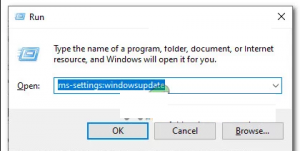
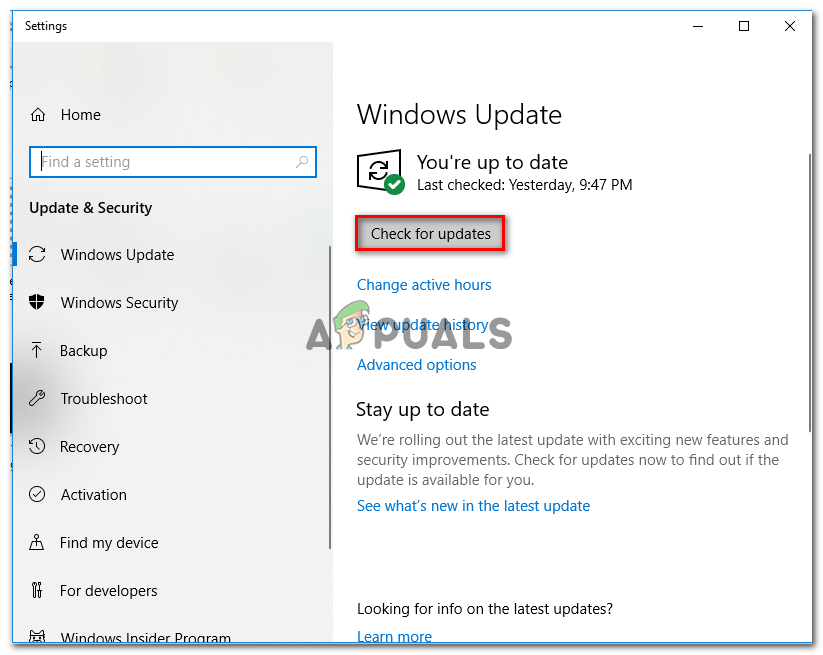
Press Win + R > type ms-settings:windowsupdate and press Enter to open up the Windows Update tab of Setting tab
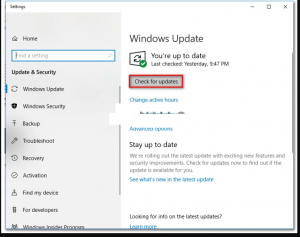
After that, go ahead and click on Check for Updates. Next, follow on-screen instructions to install every Windows update that is currently pending
Once every pending update is installed, reboot your PC and see the Event Viewer to see if the new instances of esent error 490 have stopped occurring.
Alternative Solution to fix esent error 490 windows 10
If none of the above mentioned manual solutions worked for you, then go for an easy solution, try the PC Repair Tool. This tool is able to fix the PC internal issues and hence it might also help you to fix the esent error 490 windows 10. Besides this, this tool also fixes the DLL errors, game errors, corrupted registry, repairs damaged system files and much more.
Some Windows users are reporting that they discovered a lot of ESENT 490 errors inside Event Viewer. In most cases, this issue is reported to occur after Windows 10 was updated to version 18362.86.
After investigating this issue, it turns out that there are several different underlying causes that are known to produce this error code. Here’s a list of methods that are known to cause this error code on Windows 10:
- Windows 10 hotfix is not installed – Keep in mind that Microsoft is already aware of this issue with build 18362.86and has already released a fix that will take this particular issue. TO enforce it, you’ll simply need to install every pending update from the Windows Updates screen.
- The referenced path is not complete – As it turns out, you can expect to see this error code occurring if the Event is triggered because an incomplete path is referenced by a registry key. In this case, you can manually repair the problematic path.
- Corrupted Windows Update / Windows Store component – According to some affected users, this particular issue can also occur due to some kind of system file corruption that affects either Windows Update or Windows Store on Windows 10. In this case, you can resolve the issue by resetting each component.
- System file corruption – It’s not uncommon to see this error caused by some type of system file corruption that is affecting certain OS files. In this case, you should start by running CHKDSK, SFC and DISM scans in quick succession or deploy a clean install or repair install if this issue is not effective.
Now that you are intimately familiar with every method that has the potential of causing this particular error code, here’s a list of methods that other affected users have successfully used to resolve this issue:
Method 1: Installing the Windows 10 Hotfix (if applicable)
If you started experiencing this issue immediately after you updated your Windows 10 version to build 18362.86 (or you suspect this might be the main cause of the issue ) you should start this troubleshooting guide by installing the hotfix that Microsoft has released for this particular issue.
Some users that were dealing with the same issue have confirmed that no new instances of the ESENT Errors have been created inside the Event Viewer after they installed every pending Windows 10 update and restarted their computer.
If you’re looking for specific instructions on how to install the hotfix on Windows 10, follow the steps below to use the Windows Update tab inside the Settings app to install every pending Windows 10 update:
- Start by pressing Windows key + R to open up a Run dialog box. Next, type ”ms-settings:windowsupdate’ and press Enter to open up the Windows Update tab of the Settings app.

Opening the Windows Update screen - After you’re inside the Windows update screen, go ahead and click on Check for updates. Next, follow the on-screen prompts to install every Windows update that is currently pending.

Installing every pending Windows Update - Keep in mind that if you have a lot of pending updates, you will be prompted to restart before every update is installed. In this case, restart as instructed, but make sure to return to this screen at the next startup and finish the installation of the rest of the updates.
- Once every pending update is installed, reboot your computer again and see check the Event Viewer to see if the new instances of the ESENT 490 errors have stopped occurring.

In case the same kind of issue is still occurring, move down to the next potential fix below.
Method 2: Complete the Corrected Path
As it turns out, in most documented instances you’ll encounter this issue due to a bad path that doesn’t exist in reality. if you don’t want to resolve this issue by utilizing a more comprehensive cleansing tool, one non-damaging operation would be to manually create the path expected by your OS as per the error displayed by Event Viewer.
If you want to give this potential fix a try, go ahead and look at the error inside Event Viewer and see if there’s some kind of mention of a broken location. Something like:
C:\WINDOWS\system32\config\systemprofile\AppData\Local\TileDataLayer\Database\EDB.log.

Once you manage to locate the location that is signaled out by the Event Error, open File Explorer and try to naturally navigate through the location. If any folders are missing from the list, correct the path and create a blank file so the scan can reach it.
After you do so, restart your computer and see if new instances of the same kind of ESENT 490 errors are still appearing.
Additionally, you can do this directly from an elevated CMD prompt:
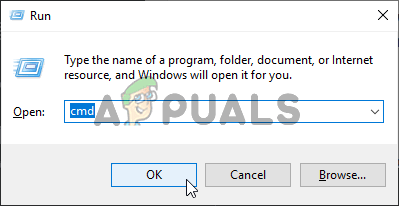
- Press Windows key + R to open up a Run dialog box. Next, type ‘cmd’ inside the Run dialog box and press Ctrl + Shift + Enter to open up an elevated Command Prompt. If you’re prompted by the UAC (User Account Control), click Yes to grant admin access.
Accessing the elevated Command Prompt - Once you’re inside the elevated command prompt, enter the commands below (one at the time) and press Enter after each command to initiate a series of commands to ensure that the path to TileDataLayer is complete:
cd config\systemprofile\AppData\Local mkdir TileDataLayer cd TileDataLayer mkdir Database
- Once the command was processed successfully, restart your computer and see if the issue is fixed once the next startup is complete.

If the issue is still not resolved and you’re still seeing new Event Viewer entrances related to ESENT 490, move down to the next potential fix below.
Method 3: Performing CHKDSK, SFC, and DISM scans
Since this issue is most likely related to some kind of system file corruption, your next attempt at fixing the ESENT 490 should be by running a couple of utilities that are designed to tackle corrupted Windows files.
Fortunately, every recent Windows version is equipped with CHKDSK (Check Disk utility) ( SFC (System File Checker) and DISM (Deployment Image Servicing and Management).
Our recommendation is to run all three utilities in quick succession (as per the instructions below) via the Recovery Menu in order to maximize your chances of fixing the corrupted files without having to clean install your Windows installation.
Follow the step-by-step instructions below for instructions on how to
- Insert a compatible installation media, start your computer normally and press any key when you get asked if you want to boot from the installation media.

Boot from Compatible Windows installation media - After you get to the initial Windows installation screen, click on Repair your computer to open up the Recovery Menu.

Repair computer via installation media Note: Keep in mind that even if you don’t have access to compatible installation media, you can still force the Recovery menu by forcing 3 unexpected shutdowns while your PC is booting up. Additionally, you can create your own installation media that’s compatible with your Windows installation.
- After you arrive inside the Recovery Menu, click on Troubleshoot from the list of available options, then click on Command Prompt from the list of available options.

Open the command prompt via the recovery menu - Inside the elevated Command Prompt, type the following command and initiate a CHKDSK scan:
CHKDSK X:
Note: X is just a placeholder for the driver that currently stores your Windows installation. Make sure to replace the letter with the drive that contains your Windows installation (C: in most cases)
- After the operation is complete restart your computer as instructed, then follow steps 1 to 3 above all over again to open another elevated CMD prompt via the Recovery menu.
- In case the issue is still not resolved, type the following command and press Enter to initiate an SFC scan:
sfc /scannow
Note: Keep in mind that this utility might freeze during random times. When this happens, don’t interrupt the operation as you run the risk of creating additional logical errors.
- Once the operation is complete, reboot your computer and see if you are able to boot normally. In case you still run into the same kind of issues, follow steps 1 to 3 once again to open another elevated Command Prompt.
- Finally, type the following command and press Enter to run a DISM scan:
DISM.exe /Online /Cleanup-Image /RestoreHealth /Source:C:\RepairSource\Windows /LimitAccess
Note: Before you initiate the DISM scan, ensure that you have a stable connection to the internet. This is important because DISM uses a sub-component of Windows Update to download healthy copies in order to replace corrupted system files
- Once the DISM scan is finished, restart your computer one final time and see if you are able to boot normally.


In case you boot back up and you see the same kind of ESENT errors inside the Event Viewer utility, move down to the next potential fix below.
Method 4: Resetting every Windows Update & Windows Store
According to some affected users, you can expect to see this issue occurring due to some type of system file corruption that is affecting either Windows Update or Windows Firewall and ends up creating a lot of different listings inside Event Viewer.
As it turns out, most of these occurrences are created because one of the services mentioned above is stuck in a limbo state (they’re neither opened nor closed).
If this scenario is applicable you should be able to fix the issue swiftly either by resetting Windows Update or Windows Store, depending on the program that is causing this problem.
Since there is no way of checking which component is causing this issue, our recommendation is to reset both in order to eliminate 2 potential culprits of the list.
Follow the first sub-guide below and then the next one after to reset both Windows Update and Windows Store on your Windows 10 operating system:
A. Resetting Windows Store
- Start by opening up a Run dialog box by pressing Windows key + R. Next, type ‘cmd’ inside the text box and press Ctrl + Shift + Enter to open up an elevated Command Prompt window. When you see the User Account Control (UAC) prompt, click Yes to grant admin access.

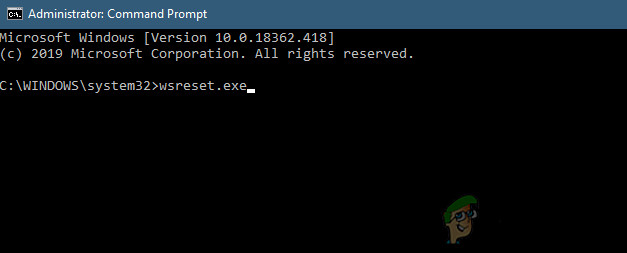
Running Command Prompt - Once you’re inside the elevated Command Prompt, type the following command and press Enter to initiate a complete Windows Store reset (and also clear any associated dependencies):
wsreset.exe

Running a wsreset operation from CMD - After the operation is complete, attempt to install the app update once again and see if the problem is now fixed.
B. Resetting Windows Update
- Start by pressing Windows key + R to open up a Run dialog box. Next, type ‘cmd’ and press Ctrl + Shift + Enter to open up an elevated Command Prompt window.
Accessing a CMD prompt Note: Once you are prompted by the UAC (User Account Control), click Yes to grant admin access.
- Once you’re inside an elevated CMD window, type the following commands in whichever order and press Enter after each one:
net stop wuauserv net stop cryptSvc net stop bits net stop msiserver
Note: Just so you understand what these commands will do to your system – These commands will stop all the relevant Windows Update services from running: BITS service, Cryptographic service, MSI Installer service, Windows update service (main).
- Next, after you manage to stop every relevant service, run the following commands in order to clear and rename two vital WU folders (SoftwareDistribution and Catroot2):
ren C:\Windows\SoftwareDistribution SoftwareDistribution.old
ren C:\Windows\System32\catroot2 Catroot2.old
Note: SoftwareDistribution and Catroot are the two main folders responsible for holding and maintaining Windows Update files. You won’t be able to delete them conventionally, so the best way to ensure that they don’t have any corrupted files that might contribute to this error is to rename them in order to force your OS to create new and healthy equivalents.
- After the two folders have been renamed, run the following commands in order to re-enable the services that you previously disabled (at step 2):
net start wuauserv
net start cryptSvc
net start bits
net start msiserver

Once every relevant service has been restarted, repeat the WU action that was previously triggering the Event Errors and see if the new events have stopped occurring.
Method 5: Reset every Windows Component
In case none of the methods above have allowed you to stop the apparition of new instances of the ESENT 490 event errors, you should seriously take into consideration that you might be dealing a case of system file corruption.
If you find yourself in a scenario like this, the only thing you can do at this point is to reset every relevant Windows component and eliminate every potentially corrupted element – When it comes to doing this, you have two ways forward:
- Clean Install – Use this method if you’re looking for a quick fix that can be deployed without the need of using compatible Windows installation media. You can deploy a clean install procedure directly from the GUI menu of your Windows installation. However, unless you back up your data in advance, you will lose any personal data that’s currently stored on the OS drive.
- Repair Install – If you have any important information on the OS drive that you plan on keeping, a repair install should be the way to go for you, even if the procedure is a bit tedious. You are forced to use compatible installation media, but you will be able to keep your personal files, installed applications, games, and even some user preferences rooted on the OS drive.

Kevin Arrows
Kevin Arrows is a highly experienced and knowledgeable technology specialist with over a decade of industry experience. He holds a Microsoft Certified Technology Specialist (MCTS) certification and has a deep passion for staying up-to-date on the latest tech developments. Kevin has written extensively on a wide range of tech-related topics, showcasing his expertise and knowledge in areas such as software development, cybersecurity, and cloud computing. His contributions to the tech field have been widely recognized and respected by his peers, and he is highly regarded for his ability to explain complex technical concepts in a clear and concise manner.