Последнее обновление: 31.10.2015
TabControl
Элемент TabControl позволяет создать элемент управления с несколькими вкладками. И каждая вкладка будет хранить некоторый набор других элементов управления,
как кнопки, текстовые поля и др. Каждая вкладка представлена классом TabPage.
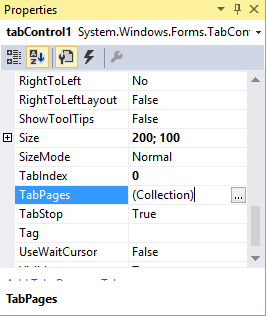
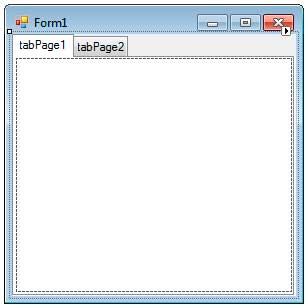
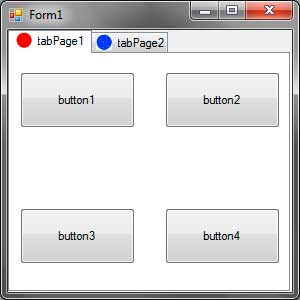
Чтобы настроить вкладки элемента TabControl используем свойство TabPages. При переносе элемента TabControl с панели инструментов на форму
по умолчанию создаются две вкладки — tabPage1 и tabPage2. Изменим их отображение с помощью свойства TabPages:
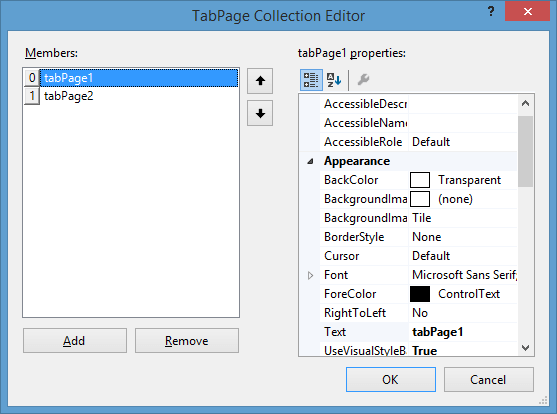
Нам откроется окно редактирования/добавления и удаления вкладок:
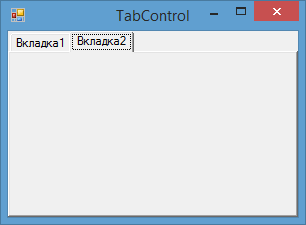
Каждая вкладка представляет своего рода панель, на которую мы можем добавить другие элементы управления,
а также заголовок, с помощью которого мы можем переключаться по вкладкам. Текст заголовка задается с помощью свойства Text.
Управление вкладками в коде
Для добавления новой вкладки нам надо ее создать и добавить в коллекцию tabControl1.TabPages с помощью метода Add:
//добавление вкладки
TabPage newTabPage = new TabPage();
newTabPage.Text = "Континенты";
tabControl1.TabPages.Add(newTabPage);
Удаление так же просто:
// удаление вкладки
// по индексу
tabControl1.TabPages.RemoveAt(0);
// по объекту
tabControl1.TabPages.Remove(newTabPage);
Получая в коллекции tabControl1.TabPages нужную вкладку по индексу, мы можем ей легко манипулировать:
// изменение свойств
tabControl1.TabPages[0].Text = "Первая вкладка";
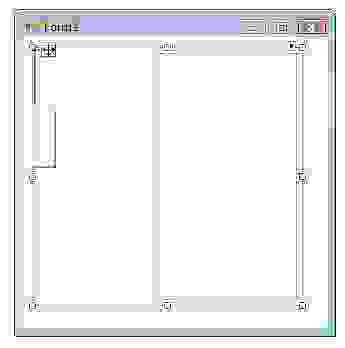
SplitContainer
Элемент SplitContainer позволяет создавать две разделенные сплитером панели. Изменяя положение сплитера, можно изменить размеры этих панелей.
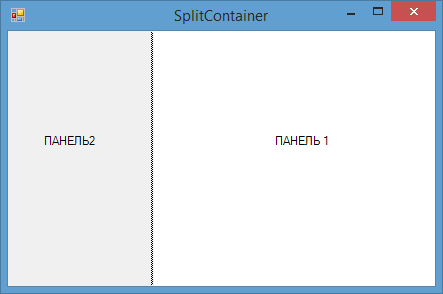
Используя свойство Orientation, можно задать горизонтальное или вертикальное отображение сплитера на форму. В данном случае
это свойство принимает значения Horisontal и Vertical соответственно.
В случае, когда надо запретить изменение положения сплиттера, то можно присвоить свойству IsSplitterFixed значение true.
Таким образом, сплитер окажется фиксированным, и мы не сможем поменять его положение.
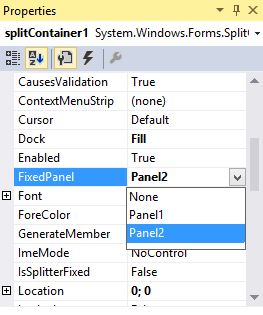
По умолчанию при растяжении формы или ее сужении также будет меняться размер обеих панелей сплитконтейнера. Однако мы можем закрепить за одной панелью
фиксированную ширину (при вертикальной ориентации сплиттера) или высоту (при горизонтальной ориентации сплиттера). Для этого нам надо установить у элемента
SplitContainer свойство FixedPanel. В качестве значения оно принимает панель, которую надо зафиксировать:
Чтобы изменить положение сплитера в коде, мы можем управлять свойством SplitterDistance, которое задает положение сплиттера в пикселях
от левого или верхнего края элемента SplitContainer. А с помощью свойства SplitterIncrement можно задать шаг, на который будет
перемещаться сплиттер при движении его с помощью клавиш-стрелок.
Чтобы скрыть одну из двух панелей, мы можем установить свойство Panel1Collapsed или Panel2Collapsed в
true
TabControl Control
The TabControl manages tab pages where each page may host different child controls. In this article, I will demonstrate how to create and use a TabControl in Windows Forms.
I wrote an article
Working with Windows TabControl with C# in 2003 using .NET 2.0 and since then, things have been changed. This article is written using Visual Studio 2010.
Creating a TabControl
We can create a TabControl control using a Forms designer at design-time or using the TabControl class in code at run-time or dynamically.
Design-time
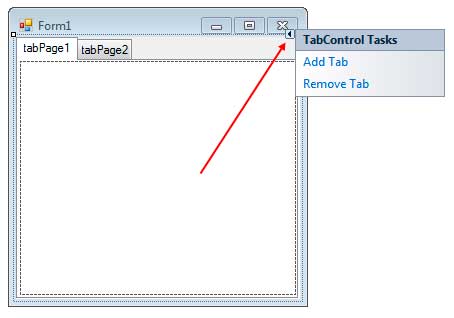
To create a TabControl control at design-time, you simply drag and drop a TabControl control from Toolbox onto a Form in Visual Studio. After you drag and drop a TabControl on a Form, the TabControl1 is added to the Form and looks like Figure 1.
Figure 1
A TabControl is just a container and has no value without tab pages. As you can see from Figure 1, by default two Tab Pages are added to the TabControl. We can add and remove tab pages by clicking on the Tasks handle and selecting Add and Remove Tab links as you see in Figure 2.
Figure 2
Add Tab link adds next tab page and Remove Tab removes the current tab page from a Tab Control. We will discuss tab pages in more detail later in this tutorial.
Run-time
TabControl class represents a tab control. The following code snippet creates a TabControl and sets its Name, BackColor, ForeColor, Font, Width, and Height properties.
- TabControl dynamicTabControl = new TabControl();
- dynamicTabControl.Name = «DynamicTabControl»;
- dynamicTabControl.BackColor = Color.White;
- dynamicTabControl.ForeColor = Color.Black;
- dynamicTabControl.Font = new Font(«Georgia», 16);
- dynamicTabControl.Width = 300;
- dynamicTabControl.Height = 200;
Once the TabControl control is ready with its properties, we need to add it to a Form by calling Form.Controls.Add method. The following code snippet adds a TabControl control to the current Form.
- Controls.Add(dynamicTabControl);
As I mentioned earlier, a TabControl is nothing without tab pages.
TabPage class represents a tab page control in Windows Forms. The following code snippet creates two TabPage controls, sets their properties, and calls TabControl.TabPages.Add() method to add tab pages to TabControl.
- TabPage tabPage1 = new TabPage();
- tabPage1.Name = «tabPage2»;
- tabPage1.Text = «Author»;
- tabPage1.BackColor = Color.Green;
- tabPage1.ForeColor = Color.White;
- tabPage1.Font = new Font(«Verdana», 12);
- tabPage1.Width = 100;
- tabPage1.Height = 100;
- dynamicTabControl.TabPages.Add(tabPage1);
- TabPage tabPage2 = new TabPage();
- tabPage2.Name = «tabPage2»;
- tabPage2.Text = «Books»;
- tabPage2.BackColor = Color.Orange;
- tabPage2.ForeColor = Color.White;
- tabPage2.Font = new Font(«Verdana», 12);
- tabPage2.Width = 100;
- tabPage2.Height = 100;
- dynamicTabControl.TabPages.Add(tabPage2);
New TabControl with two tab pages looks like Figure 3.
Figure 3
TabControl Properties
After you place a TabControl control on a Form, the next step is to set properties.
The easiest way to set properties is from the Properties Window. You can open Properties window by pressing F4 or right-click on a control and select the Properties menu item. The Properties window looks like Figure 4.
Figure 4
Name
Name property represents a unique name of a TabControl control. It is used to access the control in the code. The following code snippet sets and gets the name and text of a TabControl control.
- dynamicTabControl.Name = «DynamicTabControl»;
Positioning a TabControl
The Dock property is used to set the position of a TabControl. It is of type DockStyle that can have values Top, Bottom, Left, Right, and Fill. The following code snippet sets Location, Width, and Height properties of a TabControl control.
- dynamicTabControl.Dock = DockStyle.Left;
Font
Font property represents the font of text of a TabControl control. If you click on the Font property in the Properties window, you will see Font name, size, and other font options. The following code snippet sets Font property at run-time.
- dynamicTabControl.Font = new Font(«Georgia», 16);
Background and Foreground
BackColor and ForeColor properties are used to set background and foreground color of a TabControl respectively. If you click on these properties in Properties window, the Color Dialog pops up.
Alternatively, you can set background and foreground colors at run-time. The following code snippet sets BackColor and ForeColor properties.
- dynamicTabControl.BackColor = Color.White;
- dynamicTabControl.ForeColor = Color.Black;
Alignment and Appearance
Alignment property gets or sets the area of the control where the tabs are aligned. A TabAlignment enumeration is used to set Alignment property and have Top, Bottom, Left, or Right values.
Appearance property gets or sets the visual appearance of the control’s tabs. A TabAppearance enumeration is used to set the Appearance property and has Normal, Buttons, or FlatButtons values.
- dynamicTabControl.Alignment = TabAlignment.Left;
- dynamicTabControl.Appearance = TabAppearance.FlatButtons;
Tab Pages
TabPages property, a type of TabPageColleciton object is the gateway to access and add tab pages to a TabControl. Like any other collection, TabPageCollection has all collection functionality including add, remove, and find.
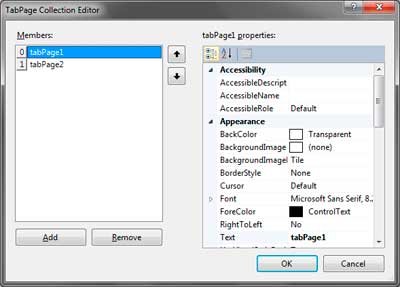
We can add and access tab pages of TabControl at design-time from Properties Window by clicking on TabPages Collection as you can see in Figure 5.
Figure 5
When you click on the Collections, the Tab Pages Collection Editor window will pop up where you can add and remove tab pages and you can also set these tab pages properties and events. I add four tab pages as you can see from Figure 6.
Figure 6
As we have seen earlier in this tutorial, we can also add and remove tab pages to a TabControl using TabPage class.
Adding Child Controls to Tab Pages
Adding child controls to tab pages at design-time is pretty straight forward. You select a tab page and drag child controls from Toolbox onto a TabPage and set their properties. Accessing these child controls from code is no different than any other controls.
Adding child controls at run-time is a little tricky. You create child controls and add them to the TabPage, not to the form.
The following snippet creates a Button control and adds it to a TabPage.
- Button button1 = new Button();
- button1.Name = «button1»;
- button1.Text = «Click Me»;
- button1.BackColor = Color.Blue;
- button1.ForeColor = Color.White;
- button1.Font = new Font(«Verdana», 12);
- button1.Width = 100;
- button1.Height = 30;
- button1.Location = new Point(50, 50);
- tabPage1.Controls.Add(button1);
Display Images in Tab Control
To display images in the header of tab pages at design-time, follow these steps.
- Drag an ImageList control onto a Form
- Add images to ImageList by clicking on its Images property
- Set TabControl.ImageList property to ImageList1
- Set TabPage.ImageIndex property to the index of the image in ImageList. Remember, ImageList index starts at 0.
To set an image in the tab pages header at run-time, first, we need to create an ImageList and add images to it.
- ImageList iconsList = new ImageList();
- iconsList.TransparentColor = Color.Blue;
- iconsList.ColorDepth = ColorDepth.Depth32Bit;
- iconsList.ImageSize = new Size(25, 25);
- iconsList.Images.Add(Image.FromFile(@«C:\Images\Garden.jpg»));
- iconsList.Images.Add(Image.FromFile(@«C:\Images\Tree.jpg»));
- iconsList.Images.Add(Image.FromFile(@«C:\Images\Waterfall.jpg»));
After that we set ImageList property of TabControl.
- dynamicTabControl.ImageList = iconsList;
The last step is to set ImageIndex property of TabPages.
- tabPage1.ImageIndex = 0;
A TabControl with image icons looks like Figure 7.
Figure 7
TabCount and RowCount
TabCount property gets the number of tab pages in a TabControl. RowCount property gets the number of rows that are currently being displayed in the control’s tab strip.
- MessageBox.Show(dynamicTabControl.TabCount.ToString());
- MessageBox.Show(dynamicTabControl.RowCount.ToString());
Selected Tab
SelectedTab and SelectedIndex properties get the selected tab and index of the selected tab in a TabControl.
- TabPage selectedTab = dynamicTabControl.SelectedTab;
- int selectedIndex = dynamicTabControl.SelectedIndex;
- dynamicTabControl.SelectedTab = selectedTab;
Summary
In this article, we discussed discuss how to create and use a TabControl control. First, we discussed how to create a TabControl and add tab pages to TabControl at design-time and run-time. After that, we saw, how to set its properties.
Вкладки являются одним из самых популярных элементов пользовательского интерфейса в приложениях Windows Forms. Они позволяют организовывать информацию в удобном и структурированном виде, позволяя пользователям легко переключаться между различными разделами приложения. В этом руководстве для начинающих мы рассмотрим, как создать вкладки в C# Windows Forms и добавить на них различные элементы управления.
Для начала работы с вкладками вам потребуется создать новый проект Windows Forms в Visual Studio. Затем добавьте на форму элемент управления TabControl, который будет служить контейнером для вкладок. Вы можете установить различные свойства TabControl, такие как высоту и ширину, отступы и другие для настройки его внешнего вида.
После добавления элемента TabControl вы можете начать добавлять вкладки на него. Для этого щелкните правой кнопкой мыши на элементе TabControl и выберите опцию Add Tab. После этого вы увидите новую вкладку на элементе TabControl и сможете переименовать ее, чтобы отразить содержимое или функциональность, которую она представляет.
Для добавления элементов управления на вкладки вы можете просто перетаскивать их из панели инструментов или использовать окно свойств для добавления элемента вручную. Вы можете добавить на вкладку любые элементы управления, такие как кнопки, текстовые поля, списки или изображения, чтобы предоставить пользователю доступ к нужной функциональности.
Важно помнить, что каждая вкладка имеет свой собственный зону клиентской области, где находятся размещенные элементы управления. Вы можете добавлять и настраивать элементы в каждой вкладке независимо друг от друга, что позволяет создавать удобные и логически структурированные пользовательские интерфейсы.
Содержание
- Основы создания вкладок
- Создание первой вкладки
- Добавление элементов на вкладку
- Создание и переключение между несколькими вкладками
Основы создания вкладок
Основные шаги для создания вкладок:
- Добавьте элемент TabControl на форму, щелкнув по нему в панели инструментов и затем на форме.
- Используйте свойство TabPages элемента TabControl для добавления новых вкладок. Новая вкладка будет иметь стандартное имя «tabPage1», «tabPage2» и т.д.
- Настройте свойства вкладки, такие как Text (заголовок вкладки) и Name (имя вкладки). Вы также можете изменить иконку вкладки, задав свойство ImageIndex и указав индекс изображения в списке изображений, связанном с элементом TabControl.
- Добавьте необходимые элементы управления на каждую вкладку внутри соответствующего элемента TabPage. Вы можете перетаскивать и размещать элементы управления, такие как кнопки, текстовые поля и другие, прямо на форме.
- Программируйте логику каждой вкладки, обрабатывая события элементов управления внутри каждой вкладки или события самой вкладки.
С помощью элемента управления TabControl вы можете создавать многоуровневые иерархии вкладок для упорядочивания информации или функций в вашем приложении. Вы также можете настраивать внешний вид вкладок с помощью стилей и редактировать их различные свойства, такие как цвет фона, цвет шрифта, использование изображений и другие.
Использование вкладок может значительно повысить удобство использования вашего приложения, помощь пользователям быстро переключаться между разными функциональными областями и сохранять простоту и понятность интерфейса.
Создание первой вкладки
Для создания вкладок в C# Windows Forms можно использовать элемент управления TabControl. Он позволяет создавать множество вкладок, на каждой из которых может быть размещено свое содержимое.
Для создания первой вкладки необходимо выполнить следующие шаги:
- Перетащите на форму элемент управления TabControl из панели элементов.
- Настройте размеры и расположение элемента управления на форме.
- Добавьте первую вкладку, кликнув правой кнопкой мыши на элементе управления TabControl и выбрав «Добавить вкладку» в контекстном меню.
- Задайте название вкладки при помощи свойства TabPage.Text.
- Дизайнер формы отобразит выбранную вкладку, на которой можно разместить другие элементы управления.
Пример кода создания первой вкладки:
 private void Form1_Load(object sender, EventArgs e)
 {
 // Создаем первую вкладку
 TabPage tabPage1 = new TabPage("Вкладка 1");
 // Добавляем вкладку в элемент управления TabControl
 tabControl1.TabPages.Add(tabPage1);
 }
Теперь вы можете добавлять на первую вкладку другие элементы управления и настраивать их свойства.
И таким образом вы можете создать несколько вкладок в C# Windows Forms и заполнить их нужным контентом.
Добавление элементов на вкладку
После создания вкладки в Windows Forms приложении в C# можно добавить различные элементы управления на эту вкладку. Это могут быть кнопки, поля ввода, списки и другие элементы, которые помогут пользователям взаимодействовать с вашим приложением.
Для добавления элементов на вкладку воспользуйтесь окном Toolbox или выберите нужный элемент управления из списка Tools. Затем просто перетащите выбранный элемент на желаемую позицию на вкладке. Вы также можете настроить свойства элемента, такие как текст, размер, цвет и другие, используя окно PropertyGrid.
Вот несколько примеров элементов, которые вы можете добавить на вкладку:
- Button — кнопка, которая выполняет определенное действие при нажатии;
- TextBox — поле ввода текста, позволяющее пользователям вводить текст;
- Label — текстовая метка, используется для отображения информации или подписей к элементам управления;
- ComboBox — выпадающий список, позволяющий выбрать один элемент из предложенных вариантов;
- ListBox — список элементов, позволяющий выбрать один или несколько элементов;
- CheckBox — флажок, позволяющий пользователю выбрать или снять выбор с определенного элемента;
Это только некоторые из доступных элементов управления. Вы можете выбрать те, которые наиболее подходят для вашего приложения и добавить их на вкладку. Помните, что правильное размещение элементов на вкладке поможет пользователям легко и удобно работать с вашим приложением.
Создание и переключение между несколькими вкладками
C# Windows Forms предоставляет возможность создания пользовательского интерфейса с использованием вкладок. Вкладки позволяют организовать информацию на нескольких разделах или рабочих областях, что упрощает навигацию пользователя и отображение различного контента. В этом разделе мы рассмотрим, как создать и переключаться между несколькими вкладками в Windows Forms.
Для создания вкладок в C# Windows Forms мы можем использовать элемент управления TabControl. TabControl представляет собой контейнер, который содержит одну или несколько вкладок. Каждая вкладка представляет собой отдельный элемент управления TabPage, который может содержать другие элементы управления.
Чтобы добавить TabControl на форму, вам нужно перейти в режим дизайна формы и выбрать элемент управления TabControl из панели инструментов. Затем вы можете изменить свойства TabControl, такие как цвет фона, размер и расположение.
Для добавления вкладок в TabControl, вы можете перейти в режим дизайна формы, выбрать элемент управления TabControl и щелкнуть правой кнопкой мыши, чтобы открыть свойства TabControl. Затем вы можете добавить новые вкладки, нажав на кнопку «…» рядом с свойством TabPages. Вы можете настроить заголовок каждой вкладки и добавить содержимое на этих вкладках.
Чтобы переключаться между вкладками в C# Windows Forms, вы можете использовать событие SelectedIndexChanged элемента управления TabControl. Когда пользователь выбирает другую вкладку, это событие будет вызвано, и вы можете выполнить нужные действия.
Например, вы можете использовать событие SelectedIndexChanged для загрузки данных на выбранной вкладке или выполнения других операций, связанных с переключением между вкладками. Для этого вам нужно добавить обработчик события SelectedIndexChanged и реализовать нужную логику.
Вот пример кода, демонстрирующий создание и переключение между двумя вкладками:
| Имя элемента управления | Тип элемента управления | Свойства |
|---|---|---|
| tabControl1 | TabControl | Location: 20, 20 Size: 300, 200 |
| tabPage1 | TabPage | Text: «Вкладка 1» |
| tabPage2 | TabPage | Text: «Вкладка 2» |
«`csharp
private void CreateTabs()
{
// Создание вкладки 1
TabPage tabPage1 = new TabPage();
tabPage1.Text = «Вкладка 1»;
// Добавление элементов управления на вкладку 1
// Создание вкладки 2
TabPage tabPage2 = new TabPage();
tabPage2.Text = «Вкладка 2»;
// Добавление элементов управления на вкладку 2
// Добавление вкладок в TabControl
tabControl1.TabPages.Add(tabPage1);
tabControl1.TabPages.Add(tabPage2);
}
private void tabControl1_SelectedIndexChanged(object sender, EventArgs e)
{
// Обработка переключения между вкладками
if (tabControl1.SelectedIndex == 0)
{
// Действия, связанные с выбранной вкладкой 1
}
else if (tabControl1.SelectedIndex == 1)
{
// Действия, связанные с выбранной вкладкой 2
}
}
Код выше создаст TabControl с двумя вкладками («Вкладка 1» и «Вкладка 2») и обработчиком события SelectedIndexChanged. При переключении между вкладками, обработчик события будет вызываться, и вы можете выполнить нужные операции, связанные с выбранной вкладкой.
В данном примере показано только создание и переключение между двумя вкладками, но вы можете создать любое количество вкладок и настроить их по своему усмотрению.
В итоге вы получите гибкую и удобную систему вкладок, позволяющую эффективно организовывать информацию и управлять содержимым в вашем приложении на C# Windows Forms.
The TabControl control (System.Windows.Forms.TabControl) allows you to create tabbed windows that you can see in many applications. An example of a tabbed window is the properties window of files and the tabs in Visual Studio.
Figure 1 – Tabs in Visual Studio
Figure 2 – Tabs in a Properties Window of a file
The TabControl serves as a container to other controls. You can access a tab by clicking it. The appearance of an active tab will change so you can distinguish which tab is activated. Once you click a tab, the controls that belong to it will be shown. The TabControl allows you to properly organize the a form into different tabs where each tab represents a category. For example, you can place a form that gets personal information on the Personal Info tab and the educational background in the Educational Background tab.
To add a tab control, go to the Containers category of the toolbox and find the TabControl. Drag it to the form. You can resize the control, but perhaps the best way is to use the Dock property so it will always take up the whole space of the form. You can go to the Properties window and find the Dock property. Click the drop down then click the middle button which means that the TabControl will be docked to all side of the form.
The TabControl consists of TabPage controls which represent the actual tab and its content. The tab pages of a tab control can be accessed using its TabPages property. The following are some useful methods of the TabPage control.
| Property | Description |
|---|---|
| Controls | The controls that exist inside this TabPage. |
| ImageIndex | Geting or seting the record showed up on this tab. |
| ImageKey | Geting or seting the key accessor for the photograph in the ImageList of the associated TabControl. |
| Text | The text that shows in the tab button of the TabPage. |
Figure 3 – TabPage Properties
To add a tab page, you can click the small arrow button located at the upper right side of the TabControl. This will open the smart menu where you can add or remove tab pages.
Alternatively, you can go to properties window and find the TabPages property of the TabControl. Make sure that the TabControl is the control selected and not a TabPage. Click the button of the TabPages property to open the TabPages Collection Editor.
The TabPage Collection Editor allows you to add and remove tabs and change properties such as the text of individual tabs. You can add controls to individual containers of the tab. For example, drag some controls to the body of the first tab. Then you can click on the second tab in the Designer and you can add another set of controls for that tab.

Let us now discuss the TabControl itself. The following are some properties of the TabControl.
| Property | Description |
|---|---|
| Alignment | The area (top, bottom, left, right) where the tabs are aligned. The default is top. |
| Appearance | The appearance of the control’s tabs. |
| ImageList | Contains a list of images that will be displayed for each tab. |
| ItemSize | Specifies the size of the tab. |
| Multiline | Allows you to create multiple rows of tabs. |
| SelectedIndex | Specifies the index of the selected tab page. |
| SelectedTab | Gets or sets the selected tab. |
| TabCount | Returns the number of TabPages of the TabControl. |
| TabPages | Allows you to access the tab pages of the TabControl and add or remove tab pages. |
Figure 4 – TabControl properties
The Alignment property specifies where the tabs are located. The default value is Top which displays the tab in the top of the TabControl. The Appearance property changes the appearance of the tabs. It can accept three values such as Normal (the default), Buttons (which makes the tab look like a button), or FlatButtons (buttons that are not popping out). Figure 4 shows the appearance of the tab using different values for the Appearance property.
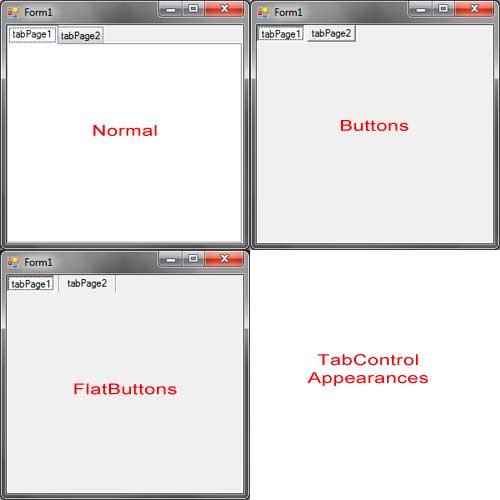
Figure 4 – TabControl Appearances
The ImageList Property allows you to add image icons to each tab. This property accepts a reference to an ImageList control. The ImageList control is commonly used for this property which is also available in other controls such as menus and tree views. We will discuss briefly here how to use the ImageList to provide images to other control, in this case, the TabControl. Drag an ImageList from the toolbox to the form. It is located in the Components section of the Toolbox. The ImageList will then be located in the component tray of the Designer. The ImageList will use the following two images:
![]()
![]()
Save it to any location in your hard drive. Now click the ImageList control located in the component tray of the Designer. Find the Images property in the Properties Window and click the button beside it. You will be presented with the Image Collection Editor.
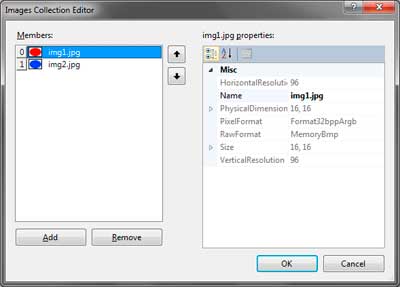
Clicking the Add button allows you to browse for an image. Add the two images I have provided then click OK. You must now assign the image list to the ImageList property of the TabControl. Go to the ImageList property of the TabControl and choose the image list we have created. To show this icon beside the tabs of the TabControl, select the individual tab page in the designer (by clicking its body) then go to the Properties Window and find the ImageIndex property. Clicking the dropdown beside it will show you the indexes and a preview of each image. Assign your desired index to each tab. You can use the same index for different tabs. Your tabs will now show images beside their text.
You can adjust the ItemSize property to adjust the size of tabs. This is useful when the images you placed in tabs are too big.
If the number of tabs is too many and it doesn’t fit the width of the form, then arrow buttons will show up to the top right of the TabControl next to the last visible tab.
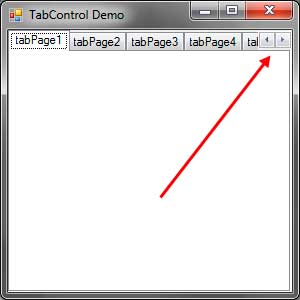
You can click the arrows to scroll the tabs to the left or to the right.
The MultiLine property allows you to create multiple columns of tabs. If the tabs are too many, then you can set this property to true.

The TabPages property allows you to add or remove tab pages to the TabControl. The following code programmatically adds three more tab pages to the TabControl.
TabPage tab1 = new TabPage("Tab 1");
TabPage tab2 = new TabPage("Tab 2");
TabPage tab3 = new TabPage("Tab 3");
tabControl1.TabPages.Add(tab1);
tabControl1.TabPages.Add(tab2);
tabControl1.TabPages.Add(tab3);
The TabPages has a type of TabPageCollection which is a collection of TabPage objects. Therefore, we can use typicall collection methods such as Add, Remove, or AddRange.
You can use the SelectedIndex property to get the index of the selected tab. The index is the position of the selected tab in the TabPages collection.
MessageBox.Show("The selected tab is " + tabControl1.TabPages[tabControl1.SelectedIndex].Text);The SelectedTab simply returns or sets the selected TabPage object.
TabPage selectedTab = tabControl1.SelectedTab;
MessageBox.Show("The selected tab is " + selectedTab.Text);
The TabCount simply returns the number of TabPages of the TabControl.
The TabControl has a SelectedIndexChanged event which triggers when the selected tab changes.
The TabControl is very useful when your form has different sections or categories. A good example where a TabControl will be useful is in a Form that provides the options or settings of an application.
Время на прочтение
4 мин
Количество просмотров 43K
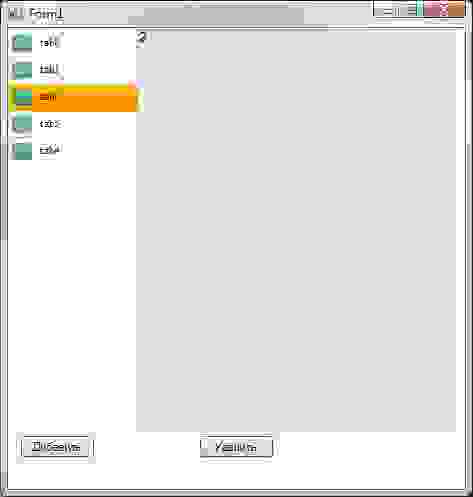
В один момент возникла задача сделать TabControl по отрисованному дизайну, с вкладками с левой стороны. Сложность была в том, что проект был уже написан с использованием winform, и переделывать его целиком не хотелось. Попытался реализовать эту задачу средствами класического TabControl, но встретился со множеством проблем, связанных с этим.
Первой проблемой стало то, что если спозиционировать вкладки с левой стороны, то мы получаем следующую картину:
Но мне нужно было, чтобы надписи шли гаризонтально. Изучив чуть глубже данный контрол, решил воспользоваться параметром DrawMode=OwnerDrawFixed. Все надписи стерлись, и на кнопке стало возможным писать и рисовать. Но остался фон самой кнопки, который полностью закрасить не удалось.
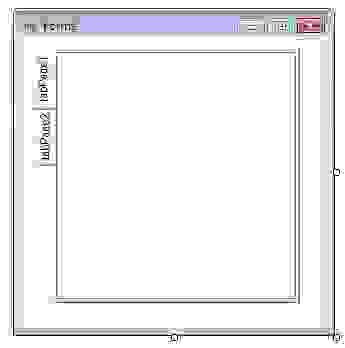
Следующим шагом поменял Appearance c Normal на Buttons, был еще вариант FlatButtons, но через конструктор его поставить не удалось, а выставление в коде ни на что не повлияло.
В режиме Buttons вылезла такая ерунда:
На картинке видно, что между кнопками и набором TabPages появилось расстояние. Отуда оно взялось и каким параметром регулируется, мне выяснить так и не удалось.
Еще некоторое время я изучал существующие платные и бесплатные библиотеки контролов на наличие возможности изменения под себя вкладок TabControl, но они либо предлагали использовать заранее созданные стили, либо позволяли максимум поменять цвет.
В итоге намучившись с ним, я решил написать свой контрол, взяв за основу стандартный. Целью стало скрыть стандартные вкладки и на смену им поставить свои, завязав их на контрол.
Постараюсь подробно описать все, что для этого пришлось сделать.
Шаг 1
Для начала в проекте нужно создать новый котрол. Для этого в панели Solution Explorer кликаем правой кнопкой по проекту, далее Add->Component, в открывшейся панели вводим имя нового контрола (у меня это NewTabControl)
Шаг 2
После создания открываем код созданного контрола. В коде делаем следующие правки:
дописываем
using System.Windows.Forms;
using System.Drawing;
Создаем три класса, наследуя их от классов стандартных контролов.
Класс нового TabControl
public partial class NewTabControl: System.Windows.Forms.TabControl
Класс нового контрола
public class NewTabPanel: System.Windows.Forms.Panel
Класс одной вкладки
public class PanelTP: System.Windows.Forms.Panel
Теперь нам нужно перезагрузить следующий метод в классе NewTabControl:
        protected override void WndProc(ref Message m)
        {
            if (m.Msg == 0x1328 && !DesignMode) m.Result = (IntPtr)1;
            else base.WndProc(ref m);
        }
Данное действие позволит нам скрыть стандартные вкладки.
Теперь нам нужно связать все классы между собой. Не буду описывать весь код, его я приложу к данной статье. Опишу только самые интересные моменты.
Шаг 3
Компонуем все элементы в классе NewTabPanel:
        private void InitializeComponent()
        {
            this.panel2 = new System.Windows.Forms.Panel(); //Панель с вкладками
            this.tabControl = new NewTabControl();
            this.Controls.Add(this.tabControl);
            this.Controls.Add(this.panel2);
            this.Size = new System.Drawing.Size(311, 361);
            this.panel2.Dock = System.Windows.Forms.DockStyle.Left;
            this.tabControl.Dock = System.Windows.Forms.DockStyle.Fill;
            tabControl.ControlAdded += new ControlEventHandler(tc_ControlAdded); //Событие на создание новой вкладки
            tabControl.ControlRemoved += new ControlEventHandler(tc_ControlRemoved); //Событие удаления вкладки
            tabControl.Selected += new TabControlEventHandler(tc_Selected); //Событие выделения вкладки
        }
Шаг 4
Теперь можно задать формат, как будет выглядеть сама вкладка.
На данном этапе вы можете сами расположить текст, картинку или любой другой элемент на будущей вкладке. А также задать размер и фон самой вкладки.
У себя я вывожу иконку и название вкладки.
В классе PanelTP создаем метод:
        private void InitializeComponent()
        {
            this.Height = 27;
            this.Width = 128;
            this.BackgroundImage = Tabpanel.Properties.Resources.tab_c_74;
            this.Click += new EventHandler(Select_Item);
            PictureBox Icon;
            Icon = new PictureBox();
            Icon.Width = 25;
            Icon.Height = 26;
            Icon.Left = 3;
            Icon.Top = 5;
            Icon.Image = Tabpanel.Properties.Resources.green_dialbut_611;
            this.Controls.Add(Icon);

            Label lname;
            lname = new Label();
            lname.Width = 95;
            lname.Height = 25;
            lname.Left = 28;
            lname.Top = 5;
            lname.Font = new System.Drawing.Font("Times New Roman", 8f, FontStyle.Regular);
            lname.Text = this.name;
            lname.Click += new EventHandler(Select_Item);
           this.Controls.Add(lname);
        }
Шаг 5
Не буду описывать методы, обрабатывающие события, они подробно описаны в приложенном проекте. Перейду к применению.
После того как мы все сохранили, на панели Toolbox появятся новые компоненты

Теперь мы можем его разместить в нашей форме как захотим.
Чтобы добавить вкладку используем:
newTabPanel1.TabPages.Add("TabName");Чтобы удалить:
newTabPanel1.TabPages.Remove(newTabPanel1.TabPages[id])Где id — это номер вкадки
При такой реализации TabControl вы всегда сможете настроить сортировку между вкладками или скрыть выбранную вкладку, сделать вкладку любого размера и оформления, сделать панель с вкладками соврачиваемой и разворачиваемой.
По такому же принципу вы можете создать любой свой контрол скомпоновав и запрограммировав его из имеющихся.
Возможно, для кого-то я описал очевидные вещи, но надеюсь, найдутся и те, кому данная статья будет полезна.
Исходники проекта можно скачать тут.
Бинарник тут.
Возможно вам также будет интересна моя статья Как подключить сторонний браузер в приложении на C#