A popup dialog box is a perfect way to quickly fetch required input from your app’s user. Learn how to create one in a Windows Forms app.

It’s common for desktop applications to use dialog boxes when prompting information from the user. You can create input dialog boxes in a Windows Forms application, by displaying a new window.
You can also add UI elements to the new dialog window. These include messages, text boxes, and «Ok» and «Cancel» buttons. When the user enters information in the input box, you can store the result and use it in other parts of the app.
How to Create an On-Click Function to Trigger the Input Dialog Box
The dialog box should not always be visible. You can trigger the dialog box to show when the user completes an action, such as a button click. You can also learn more about other Windows Forms events that you can use in a Windows Forms app.
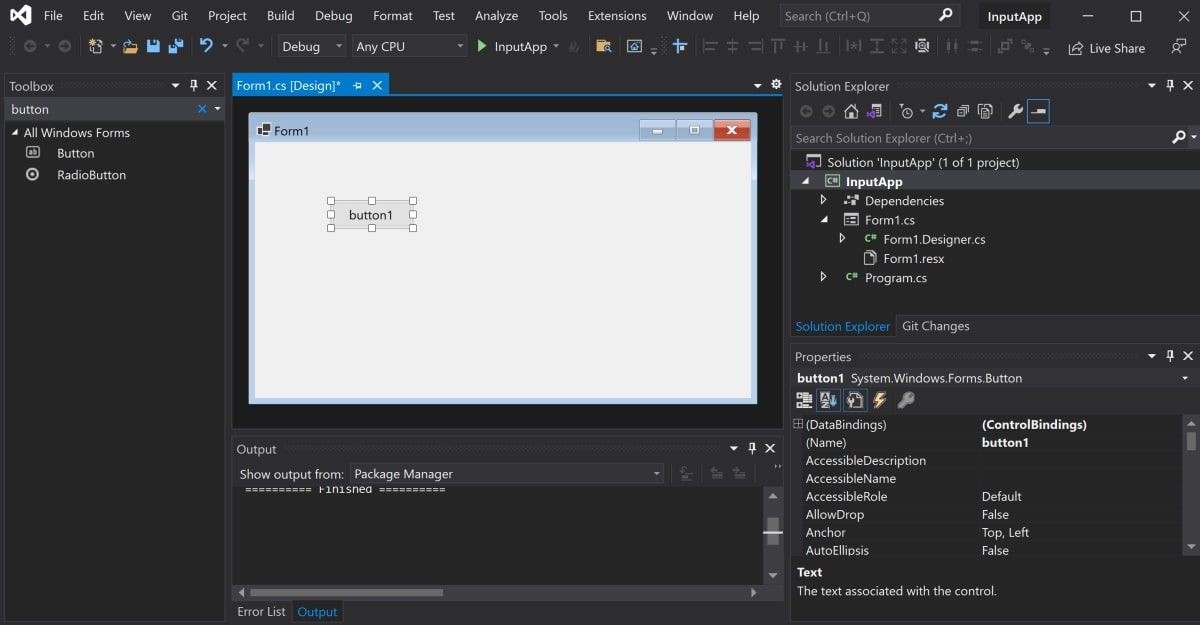
Add a button to the canvas and create a function that will run when the user clicks on the button.
- Create a new Windows Forms application in Visual Studio.
- In the Toolbox, search for a button UI control.
- Click and drag a button onto the canvas.

- In the properties window, change the properties of the button to the following new values:
Property Name
New Value
Name
dialogButton
Size
400, 100
Text
Open Input Dialog

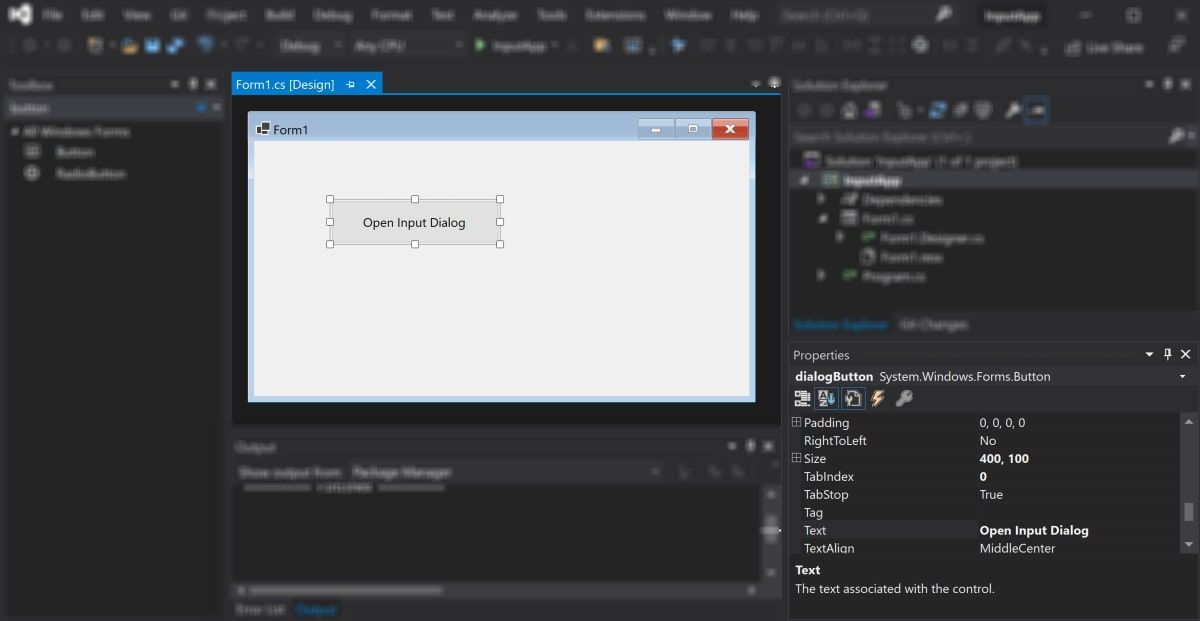
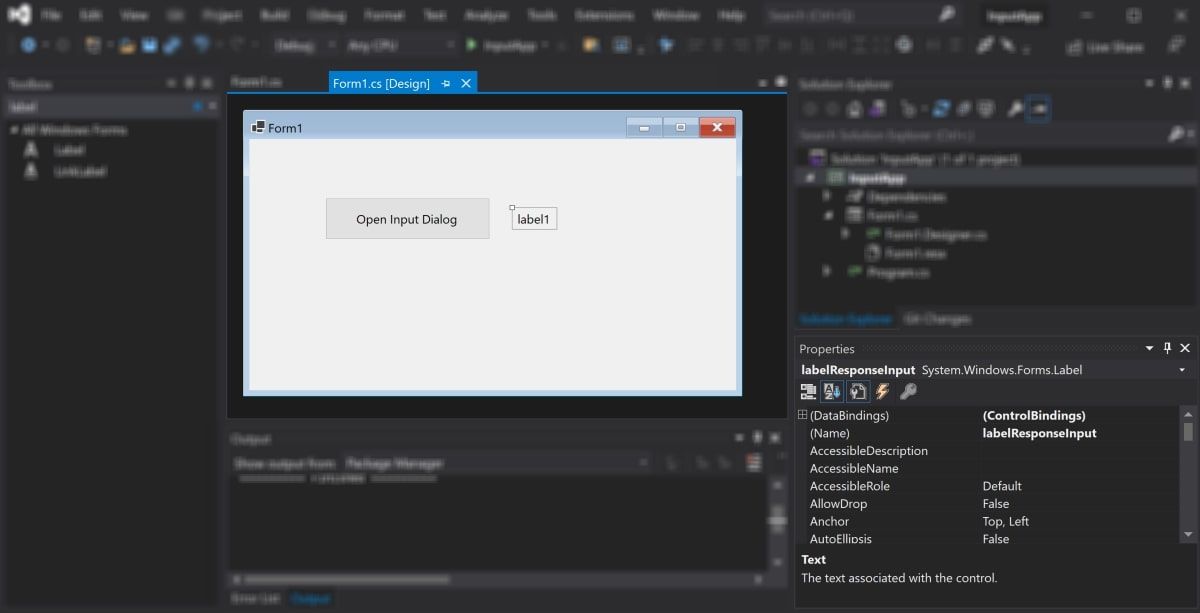
- In the Toolbox, click and drag a label onto the canvas. Place the label to the right side of the button.
- In the properties window, change the properties of the label to the following values:
Property Name
New Value
Name
labelResponseInput
Visible
False

- Double-click on the new Input Dialog button. This will generate an on-click function in the code-behind CS file for the form.
 private void dialogButton_Click(object sender, EventArgs e)
{
    // The code here will trigger when the user clicks on the button
    // It will display the input dialog box
}
How to Create the Input Dialog Box
Create the dialog box inside a new function. The function will programmatically create a new form, and add UI elements to it, including a text box with «Ok» and «Cancel» buttons.
- Under the dialogButton_Click() function, create a new function that will create the Input Dialog box. The «title» parameter will show in the top-left corner of the window. The value for the «promptText» will display to the user. The «value» parameter is an out parameter and will return the value that the user entered inside the input box.
 public static DialogResult InputBox(string title, string promptText, ref string value)
{}
- Inside the InputBox() function, create the UI elements that will display on the form.
 Form form = new Form();
Label label = new Label();
TextBox textBox = new TextBox();
Button buttonOk = new Button();
Button buttonCancel = new Button(); - Add the title of the form, which will display in the top-left corner. Also add the main message that will display to the user, above the input box.
 form.Text = title;
label.Text = promptText; - Add values for the «Ok» and «Cancel» buttons. The text property contains the text that shows on top of each button. The DialogResult property contains the type of result the button will represent. You can read more about DialogResult in Microsoft’s official documentation.
 buttonOk.Text = "OK";
buttonCancel.Text = "Cancel";
buttonOk.DialogResult = DialogResult.OK;
buttonCancel.DialogResult = DialogResult.Cancel; - Use the SetBounds() method to set the x and y positions of the label, text box, and buttons on the form. You can also specify each element’s width and height.
 label.SetBounds(36, 36, 372, 13);
textBox.SetBounds(36, 86, 700, 20);
buttonOk.SetBounds(228, 160, 160, 60);
buttonCancel.SetBounds(400, 160, 160, 60); - Configure some properties for the dialog window itself. These properties set the form size, borders, and start position. It also controls the ability to minimize or maximize the window, or resize the label if necessary.
 label.AutoSize = true;
form.ClientSize = new Size(796, 307);
form.FormBorderStyle = FormBorderStyle.FixedDialog;
form.StartPosition = FormStartPosition.CenterScreen;
form.MinimizeBox = false;
form.MaximizeBox = false; - Add the UI elements onto the new form, and set the form’s accept and cancel buttons to the button objects created earlier.
 form.Controls.AddRange(new Control[] { label, textBox, buttonOk, buttonCancel });
form.AcceptButton = buttonOk;
form.CancelButton = buttonCancel; - Show the newly created dialog window to the user.
DialogResult dialogResult = form.ShowDialog(); - Store the value that the user entered into the textbox. Return the result of the form, which would either be «Ok», or «Cancel», based on the button the user clicks on.
 value = textBox.Text;
return dialogResult;
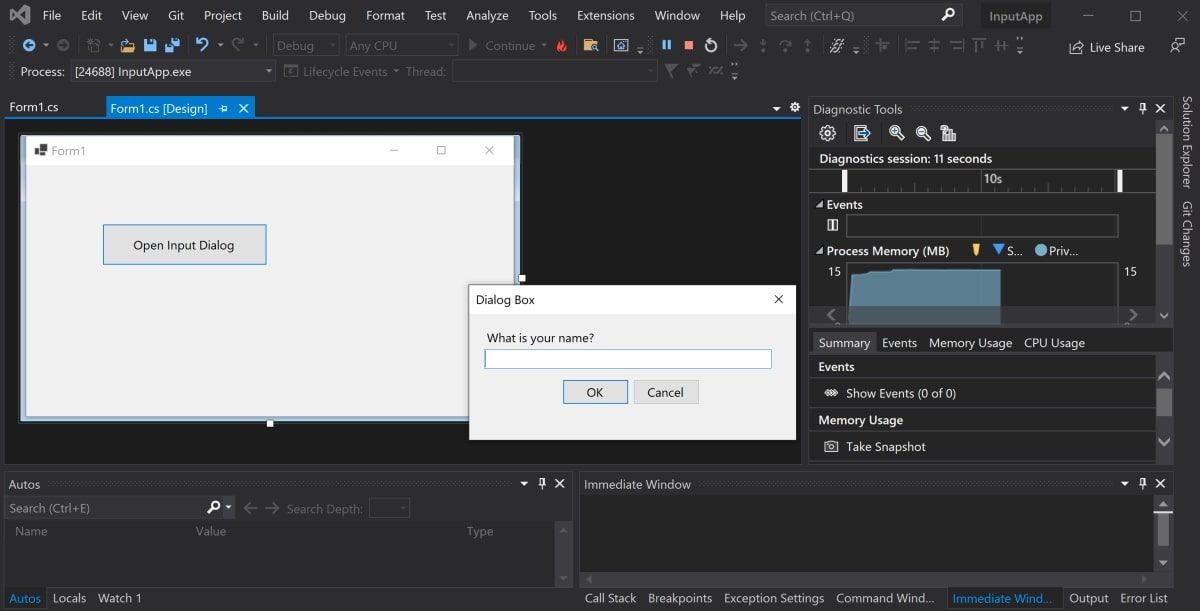
How to Use the Input Dialog Box
To use the input dialog box, call the InputBox() function inside the dialogButton_Click() function. When the user clicks on the «Open Input Dialog» button, it will show the dialog box.
- Inside the dialogButton_Click() function, create a variable to store the value that the user enters inside the text box. This value will come from the «value» out parameter.
string value = ""; - Display the dialog box by calling the InputBox() function. Check if the user clicks on the «Ok» button, and if so, add some text onto the screen to display the response back to the user.
 if (InputBox("Dialog Box", "What is your name?", ref value) == DialogResult.OK)
{
    labelResponseInput.Visible = true;
    labelResponseInput.Text = "Your name: " + value;
}
How to View the Input Dialog Pop Up
Run the application and trigger the dialog box.
- Click on the green play button at the top of the Visual Studio window.

- Click on the Open Input Dialog button to show the dialog box.

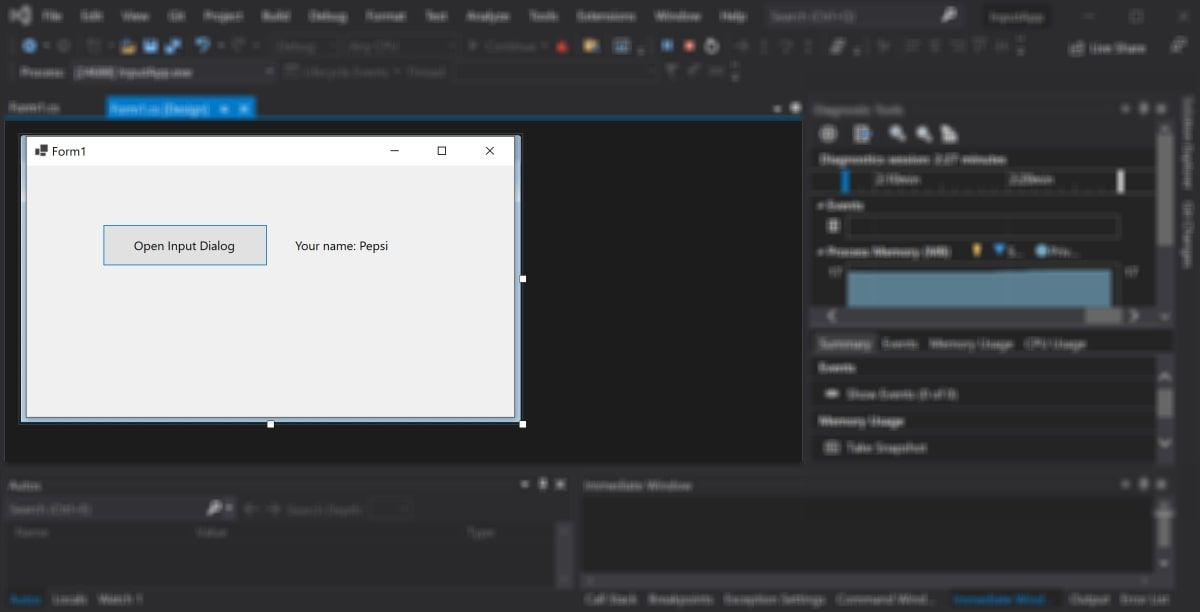
- Enter a name into the text box and click on the OK button. The dialog box will close and display the results entered into the text box.

- Click on the Open Input Dialog button again to re-open the dialog box.
- Click on the Cancel button to close the dialog box. This cancels the dialog box without completing any actions or updating the UI.
Adding Content and UI Elements to Your Windows Forms Application
You can create input dialog boxes in a Windows Forms application, and display them to the user when certain events happen. You can create a new dialog window by creating a new form. You can then add new UI elements to it, such as labels, text boxes, or buttons.
Once the user has entered the required information, you can close the input box and store the information that they entered.
If you want to add more content to your UI or dialog box, you can explore how to add other UI elements. This includes elements such as shapes or images.
Приветствую всех, сегодня я покажу, как вывести диалоговое окно с сообщением пользователю, я частенько использую в своих программах. Да и порой под забываю какое именно мне нужно, и подсматриваю здесь.
Для начало создадим обычное приложение WinForm и разместим на нем кнопку при нажатии, на которое будем выводить сообщения.
|
1 2 3 4 5 6 7 8 9 10 11 12 13 14 15 16 17 18 |
using System; using System.Windows.Forms; namespace Сообщения { public partial class Form1 : Form { public Form1() { InitializeComponent(); } private void button1_Click(object sender, EventArgs e) { } } } |
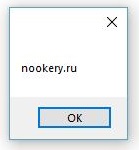
Для того что бы вывести обычно сообщения достаточно вписать в метод нажатия кнопки строку:
|
private void button1_Click(object sender, EventArgs e) { MessageBox.Show(«nookery.ru»); } |
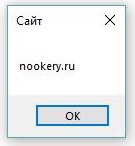
MessageBox.Show имеет перегруженные варианты метода, следующий пример нам покажет, как отобразить окно сообщения с заданным текстом и заголовком.
|
private void button1_Click(object sender, EventArgs e) { MessageBox.Show(«nookery.ru», «Сайт»); } |
В следующем примере нам придется использовать MessageBoxButtons в качестве передаваемого аргумента. Однако он имеет несколько параметров:
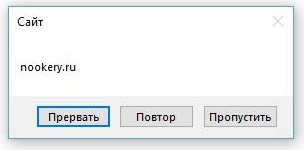
- MessageBoxButtons.AbortRetryIgnore – Прервать | Повтор | Пропустить
- MessageBoxButtons.OK — ОК
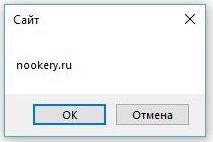
- MessageBoxButtons.OKCancel — ОК | Отмена
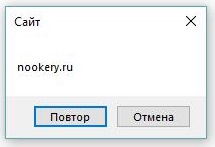
- MessageBoxButtons.RetryCancel — Повтор | Отмена
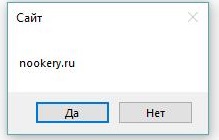
- MessageBoxButtons.YesNo — Да | Нет
- MessageBoxButtons.YesNoCancel — Да | Нет | Отмена
Это нам позволит разместить в диалоговом окне сообщение кнопку или кнопки, в зависимости от параметров.
Рассмотрим все примеры с использованием кнопок:
Вариант AbortRetryIgnore
|
private void button1_Click(object sender, EventArgs e) { MessageBox.Show(«nookery.ru», «Сайт», MessageBoxButtons.AbortRetryIgnore); } |
Вариант OK
В этом варианте у нас ничего не измениться так как он используется по умолчанию, выводит кнопку Ok.
Вариант OKCancel
|
private void button1_Click(object sender, EventArgs e) { MessageBox.Show(«nookery.ru», «Сайт», MessageBoxButtons.OKCancel); } |
Вариант RetryCancel Диалоговое окно подходит для вывода сообщения пользователю с возможностью повторения какого-либо действия, имея в функционале диалогового окна две кнопки Повтор, Отмена.
|
private void button1_Click(object sender, EventArgs e) { MessageBox.Show(«nookery.ru», «Сайт», MessageBoxButtons.RetryCancel); } |
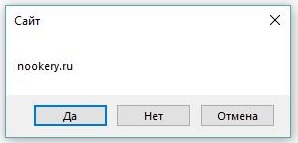
Вариант YesNo Диалоговое окно подходит для вывода сообщения пользователю с возможностью выбора, подтвердить или отказаться имя в функционале диалогового окна две кнопки Да, Нет.
|
private void button1_Click(object sender, EventArgs e) { MessageBox.Show(«nookery.ru», «Сайт», MessageBoxButtons.YesNo); } |
Вариант YesNoCancel Диалоговое окно подходит для вывода сообщения пользователю с возможностью выбора, подтвердить или отказаться имя в функционале диалогового окна три кнопки Да, Нет, Отмена.
|
private void button1_Click(object sender, EventArgs e) { MessageBox.Show(«nookery.ru», «Сайт», MessageBoxButtons.YesNoCancel); } |
Метод Show может принимать в качестве параметра изображения MessageBoxIcon которые позволяют устанавливать тип сообщения, и могут принимать следующие значения:
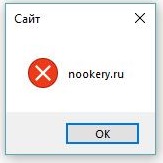
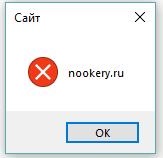
MessageBoxIcon.Error Диалоговое окно подходит для вывода сообщения пользователю об ошибке.
|
private void button1_Click(object sender, EventArgs e) { MessageBox.Show(«nookery.ru», «Сайт», MessageBoxButtons.OK, MessageBoxIcon.Error); } |
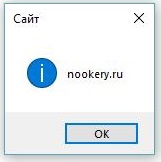
MessageBoxIcon.Information Диалоговое окно подходит для вывода сообщения пользователю о какой то информации.
|
private void button1_Click(object sender, EventArgs e) { MessageBox.Show(«nookery.ru», «Сайт», MessageBoxButtons.OK, MessageBoxIcon.Information); } |
MessageBoxIcon.None
Данные вариант стоит по умолчанию и не выводит никого изображения.
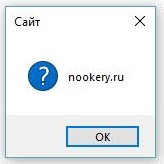
MessageBoxIcon.Question Диалоговое окно подходит для вывода сообщения пользователю о помощи.
|
private void button1_Click(object sender, EventArgs e) { MessageBox.Show(«nookery.ru», «Сайт», MessageBoxButtons.OK, MessageBoxIcon.Question); } |
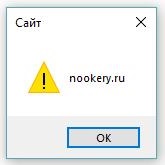
MessageBoxIcon.Warning Диалоговое окно подходит для вывода сообщения пользователю об ошибке или опасности.
|
private void button1_Click(object sender, EventArgs e) { MessageBox.Show(«nookery.ru», «Сайт», MessageBoxButtons.OK, MessageBoxIcon.Warning); } |
MessageBoxIcon.Exclamation
|
private void button1_Click(object sender, EventArgs e) { MessageBox.Show(«nookery.ru», «Сайт», MessageBoxButtons.OK, MessageBoxIcon.Exclamation); } |
MessageBoxIcon.Stop
|
private void button1_Click(object sender, EventArgs e) { MessageBox.Show(«nookery.ru», «Сайт», MessageBoxButtons.OK, MessageBoxIcon.Stop); } |
MessageBoxIcon.Asterisk
|
private void button1_Click(object sender, EventArgs e) { MessageBox.Show(«nookery.ru», «Сайт», MessageBoxButtons.OK, MessageBoxIcon.Asterisk); } |
MessageBoxIcon.Hand
|
private void button1_Click(object sender, EventArgs e) { MessageBox.Show(«nookery.ru», «Сайт», MessageBoxButtons.OK, MessageBoxIcon.Hand); } |
Для того что бы сохранить полученный результат после нажатия кнопки, нам достаточно создать переменную класса DialogResult
DialogResult может принимать следующие значения:
- DialogResult.Abort — Прервать
- DialogResult.Cancel — Отмена
- DialogResult.Ignore — Пропустить
- DialogResult.No — Нет
- DialogResult.Yes — Да
- DialogResult.OK — ОК
- DialogResult.Retry — Повтор
|
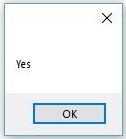
DialogResult resualt= MessageBox.Show(«nookery.ru», «Сайт», MessageBoxButtons.YesNo); |
А что бы посмотреть, что хранить переменная resualt мы можем вывести ее в сообщении:
|
MessageBox.Show(resualt.ToString()); |
В моем примере я нажал на кнопку Да и вывелось сообщения
В этих примерах мы рассмотрели возможность вывода сообщений пользователю, на основе диалоговых окно в WinForm.
In the previous lesson, Other Windows Forms Controls, we took a look at the advanced WinForms
controls. In today’s tutorial, we’re going to take a look at creating menus in
windows form applications and opening files/folders using dialogs. And also how
to use MessageBox. All this using C# .NET.
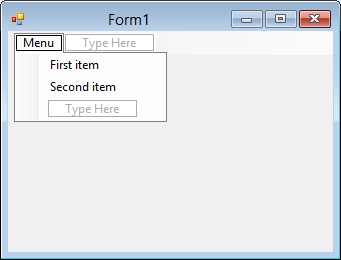
This control provides a menu bar at the top of the application form. It’s
very easy to use. After adding it to the project, we just set the names and
number of items, as shown in the picture. There’s no need to set anything in the
properties. Then we just double-click each option to set up an action that will
be triggered when the user clicks on the specific option.
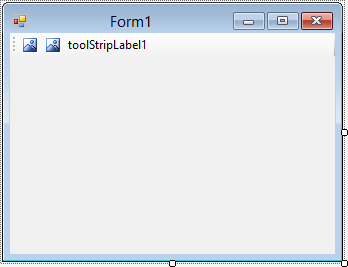
ToolStrip is very similar to the previous one,
MenuStrip. However, it does nothing by itself as it only serves for
adding several other controls, e.g. Button, Label,
DropDownButton (which is MenuStrip version of
ComboBox), Separator (used to separate the controls),
and several others. Setting up those controls is very simple, too. We just
double-click the buttons again to write the handler code.
This control can be found in the tray icon article, it’s here just for
completeness’ sake. It’s basically a menu that appears after clicking on a
certain component.
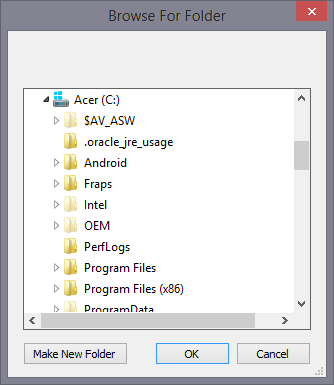
FolderBrowserDialog
If you want to work with folders in your app, this component is a necessity.
It provides simple and intuitive folder selection. The most important property
is RootFolder, which specifies the default folder when the dialog
is opened. Moreover, if you set e.g. the Documents/ folder as the
RootFolder, it’s possible to select only subfolders of the
Documents/ folder, but you’ll never be able to go up from the
folder. The ShowNewFolderButton then specifies whether it’s allowed
to create new folders.
We open the dialog from the code using the ShowDialog() method,
then we get the selected folder from the SelectedPath property.
After opening the dialog, it’s necessary to ask whether it was closed by
confirmation, otherwise we’d perform the action even if the user closed the
dialog using the Close or the Cancel buttons. The ShowDialog()
method always returns the button by which the dialog was closed.
if (folderBrowseDialog1.ShowDialog() == DialogResult.OK)
{
    string text = folderBrowserDialog1.SelectedPath;
}
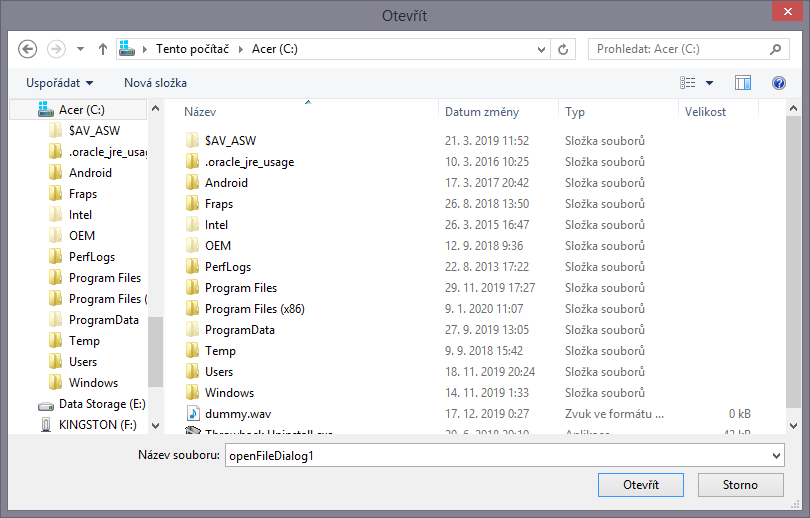
OpenFileDialog
So we’ve discussed opening folders, now it’s time to discuss files. The
procedure is almost the same — we just add the component to the form again. The
InitialDirectory property is worth mentioning, it’s practically the
same property as RootFolder of FolderBrowserDialog.
Multiselect then specifies whether multiple files can be selected.
Again, we open the dialog using the ShowDialog() method, then we
get the selected file using the FileName property.
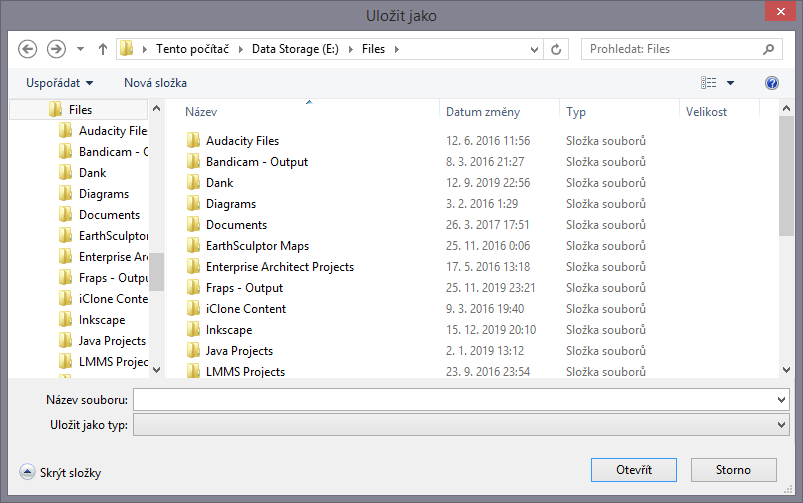
SaveFileDialog
We use this dialog to save files. Among the properties, it’s worth mentioning
FileName, which is the chosen filename, and
InitialDirectory, which is the directory where the dialog will be
located when opened. DefaultExt then specifies the file extension.
OverwritePrompt asks the user whether the file should be
overwritten if it already exists. Title then sets the dialog title.
We open the dialog using the ShowDialog() method again.
In case you want to perform other actions, use events. Specifically, the
FileOk event, that is triggered when the file has been selected
successfully. We get the filename using the FileName property.
private void saveFileDialog1_FileOk(object sender, CancelEventArgs e)
{
    File.Create(saveFileDialog1.FileName);
}
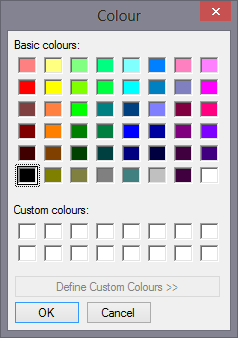
ColorDialog
As you can see from the title, this control has something to do with colors.
This dialog allows the user to pick a color. Of all the properties, the most
important one is AllowFullOpen, which determines whether it’s
possible to «create» a custom color. The Color property then
determines what color will be the default one when the dialog is opened. As
always, the dialog is opened using the ShowDialog() method.
We then get the color from the Color property. The code below
will fill the form background with the selected color.
if (colorDialog1.ShowDialog() == DialogResult.OK)
{
   this.BackColor = colorDialog1.Color;
}
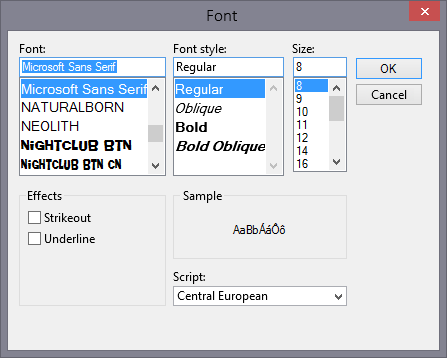
FontDialog
This dialog is very similar to the one that selects a color. Except here the
user selects a font, as the control name suggests. Just for completeness’ sake
let me say that we open it using the ShowDialog() method. The
MinSize and MaxSize properties are important as these
limits the font size the user can choose for the text (0 is
unlimited). ShowEffect then allows the user to toggle the underline
or strikethrough, and ShowColor to select the font color.
We get the font using the Font property. In case we want to get
the color as well, we must get it separately by using the Color
property. Here’s an sample:
if (fontDialog1.ShowDialog() == DialogResult.OK)
{
   label1.Font = fontDialog1.Font;
   label1.ForeColor = fontDialog1.Color;
   label1.Text = "This is the selected font";
}
MessageBox
Although this isn’t a form control, it still deserves its place here. It’s
the pop-up dialog that shows up, for example, when you perform some non-standard
operation, such as emptying the Recycle Bin.
The following code:
MessageBox.Show("This is the main text of the message box", "Window title", MessageBoxButtons.OKCancel, MessageBoxIcon.Question);
Results in showing the dialogue below:
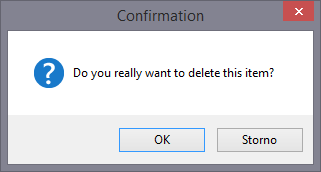
The first text is the message itself, the second one is the window title, and
MessageBoxButtons specifies the window buttons (we can choose from
OK, OK and Cancel, Yes and No, etc.). MessageBoxIcon specifies the
icon on the left side of the text. Again, there are several options to choose
from. Some parameters can be omitted.
Surely it’d be good to be able to respond to the specific buttons of the
MessageBox, right? Let’s show how to do that.
It’s not a rocket science. We just wrap the code into if with
the == DialogResult.OK ` condition (where `OK is the desired
button). The code in the body of the condition is then performed only when the
specific button is clicked.
Below is an example:
DialogResult dr = MessageBox.Show("Do you really want to delete this item?", "Confirmation", MessageBoxButtons.OKCancel, MessageBoxIcon.Question);
if (dr == DialogResult.OK)
{

}
In the next lesson, Windows Forms Controls For The Fourth Time, we’ll introduce advanced TextBoxes, a timer, and
progressbar.
- Input Dialog Box Using Microsoft Visual Basic
- Custom Input Dialog Box Using Windows Forms in
C#

This tutorial will demonstrate to create an input dialog box in C# using two different methods similar to that in VB.Net.
An Input Dialog Box is a pop-up window that displays a message prompt and requests input from a user. The input can then be used in the code.
There is no version of VB.NET’s Input Dialog box in C# so that you can use one of two methods. The first and simplest is using the InputBox provided in Microsoft.VisualBasic.Interaction. The other method is by creating your own custom dialog box using System.Windows.Forms and System.Drawing.
Input Dialog Box Using Microsoft Visual Basic
As C# does not have its own version of an input dialog box like the one in VB.NET, you can add a reference to Microsoft.VisualBasic and use its InputBox.
To utilize Microsoft.VisualBasic, you must first add it to the project’s references by following the steps below.
-
Navigate to the Solution Explorer
-
Right-click on References
-
Click
Add Reference -
Click the
Assembliestab on the left -
Find the
Microsoft.VisualBasic.dllfile and clickOK
After successfully adding the reference, you can then use its using statement in your code.
using Microsoft.VisualBasic;
The Input Box itself is created by supplying the following parameters.
Prompt: The message to be displayed within the window. This is the only mandatory parameter that needs to be passed.Title: The window title to be displayedDefault: The default value of the input text box- X Coordinate: The X Coordinate of the Input Box’s startup position
- Y Coordinate: The Y Coordinate of the Input Box’s startup position
string input = Interaction.InputBox("Prompt", "Title", "Default", 10, 10);
Once this input box has been called, the program will wait for a response before continuing on with the rest of the code.
Example:
using System;
using Microsoft.VisualBasic;

namespace VisualBasic_Example
{
    class Program
    {
        static void Main(string[] args)
        {
            //Create the input dialog box with the parameters below
            string input = Interaction.InputBox("What is at the end of the rainbow?", "Riddle", "...", 10, 10);

            //After the user has provided input, print to the console
            Console.WriteLine(input);
            Console.ReadLine();

        }
    }
}
In the example above, we create an input box with a riddle prompt that appears in the top left corner of the screen. After input is submitted, the value is printed to the console.
Output:
Custom Input Dialog Box Using Windows Forms in C#
Another option for creating an input dialog box is creating your own custom input dialog box. One benefit of creating an input dialog box is that it allows you to customize the window more than the first method. To utilize the code in the example below, you must first add a reference to System.Windows.Forms.dll and System.Drawing.dll by using the steps below.
-
Navigate to the Solution Explorer
-
Right-click on References
-
Click
Add Reference -
Click the
Assembliestab on the left -
Find the
Microsoft.VisualBasic.dllandSystem.Drawing.dllfiles and clickOK
After successfully adding the reference, you can use their using statements in your code.
Example:
using System;
using System.Windows.Forms;
using System.Drawing;

namespace CustomDialog_Example
{
    class Program
    {
        static void Main(string[] args)
        {
            //Initialize the input variable which will be referenced by the custom input dialog box
            string input = "...";
            //Display the custom input dialog box with the following prompt, window title, and dimensions
            ShowInputDialogBox(ref input, "What is at the end of the rainbow?", "Riddle", 300, 200);

            //Print the input provided by the user
            Console.WriteLine(input);

            Console.ReadLine();

        }

        private static DialogResult ShowInputDialogBox(ref string input, string prompt, string title = "Title", int width = 300, int height = 200)
        {
            //This function creates the custom input dialog box by individually creating the different window elements and adding them to the dialog box

            //Specify the size of the window using the parameters passed
            Size size = new Size(width, height);
            //Create a new form using a System.Windows Form
            Form inputBox = new Form();

            inputBox.FormBorderStyle = FormBorderStyle.FixedDialog;
            inputBox.ClientSize = size;
            //Set the window title using the parameter passed
            inputBox.Text = title;

            //Create a new label to hold the prompt
            Label label = new Label();
            label.Text = prompt;
            label.Location = new Point(5, 5);
            label.Width = size.Width - 10;
            inputBox.Controls.Add(label);

            //Create a textbox to accept the user's input
            TextBox textBox = new TextBox();
            textBox.Size = new Size(size.Width - 10, 23);
            textBox.Location = new Point(5, label.Location.Y + 20);
            textBox.Text = input;
            inputBox.Controls.Add(textBox);

            //Create an OK Button
            Button okButton = new Button();
            okButton.DialogResult = DialogResult.OK;
            okButton.Name = "okButton";
            okButton.Size = new Size(75, 23);
            okButton.Text = "&OK";
            okButton.Location = new Point(size.Width - 80 - 80, size.Height - 30);
            inputBox.Controls.Add(okButton);

            //Create a Cancel Button
            Button cancelButton = new Button();
            cancelButton.DialogResult = DialogResult.Cancel;
            cancelButton.Name = "cancelButton";
            cancelButton.Size = new Size(75, 23);
            cancelButton.Text = "&Cancel";
            cancelButton.Location = new Point(size.Width - 80, size.Height - 30);
            inputBox.Controls.Add(cancelButton);

            //Set the input box's buttons to the created OK and Cancel Buttons respectively so the window appropriately behaves with the button clicks
            inputBox.AcceptButton = okButton;
            inputBox.CancelButton = cancelButton;

            //Show the window dialog box
            DialogResult result = inputBox.ShowDialog();
            input = textBox.Text;

            //After input has been submitted, return the input value
            return result;
        }

    }
}
In the example above, we created a custom function that uses elements from System.Windows.Forms and individually adds them to the Dialog Box. While you could hard code the different elements, you could also add parameters and reference them within the function to have as much customization as you’d like. After building and showing the dialog box, the program waits for the user to provide input to print it within the console.
Output:
C# MessageBox in Windows Forms displays a message with the given text and action buttons. You can also use MessageBox control to add additional options such as a caption, an icon, or help buttons. In this article, you’ll learn how to display and use a MessageBox in C# WinForms app. You will also learn how to use C# MessageBox class dynamically in code samples.
C# MessageBox
MessageBox class has an overloaded static Show method that displays a message box with a message and action buttons. The action buttons can be OK and Cancel, Yes and No etc. Here are some of the options that can be used in C# message box.
Simple MessageBox
The simplest form of a MessageBox is a dialog with text and OK button. When you click OK button, the box disappears.
The following code snippet creates a simple Message Box.
string message = "Simple MessageBox";
MessageBox.Show(message);
MessageBox with Title
The following code snippet creates a simple MessageBox with a title.
string message = "Simple MessageBox";
string title = "Title";
MessageBox.Show(message, title); 
MessageBox with Buttons
A MessageBox can have different button combinations such as YesNo and OKCancel. The MessageBoxButtons enumeration represents the buttons to be displayed on a MessageBox and has following values.
- OK
- OKCancel
- AbortRetryIgnore
- YesNoCancel
- YesNo
- RetryCancel
The following code snippet creates a MessageBox with a title and Yes and No buttons. This is a typical MessageBox you may call when you want to close an application. If the Yes button is clicked, the application will be closed. The Show method returns a DialogResult enumeration.
string message = "Do you want to close this window?";
string title = "Close Window";
MessageBoxButtons buttons = MessageBoxButtons.YesNo;
DialogResult result = MessageBox.Show(message, title, buttons);
if (result == DialogResult.Yes) {
    this.Close();
} else {
    // Do something
}
MessageBox with Icon
A MessageBox can display an icon on the dialog. A MessageBoxIcons enumeration represents an icon to be displayed on a MessageBox and has the following values.
- None
- Hand
- Question
- Exclamation
- Asterisk
- Stop
- Error
- Warning
- Information
The following code snippet creates a MessageBox with a title, buttons, and an icon.
string message = "Do you want to abort this operation?";
string title = "Close Window";
MessageBoxButtons buttons = MessageBoxButtons.AbortRetryIgnore;
DialogResult result = MessageBox.Show(message, title, buttons, MessageBoxIcon.Warning);
if (result == DialogResult.Abort) {
    this.Close();
}
elseif(result == DialogResult.Retry) {
    // Do nothing
}
else {
    // Do something
}
MessageBox with Default Button
We can also set the default button on a MessageBox. By default, the first button is the default button. The MessageBoxDefaultButton enumeration is used for this purpose and it has the following three values.
- Button1
- Button2
- Button3
The following code snippet creates a MessageBox with a title, buttons, and an icon and sets the second button as a default button.
string message = "Do you want to abort this operation?";
string title = "Close Window";
MessageBoxButtons buttons = MessageBoxButtons.AbortRetryIgnore;
DialogResult result = MessageBox.Show(message, title, buttons, MessageBoxIcon.Warning, MessageBoxDefaultButton.Button2);
if (result == DialogResult.Abort) {
    this.Close();
}
elseif(result == DialogResult.Retry) {
    // Do nothing
}
else {
    // Do something
}
MessageBox with Message Options
MessageBoxOptions enumeration represents various options and has the following values.
- ServiceNotification
- DefaultDesktopOnly
- RightAlign
- RtlReading
The following code snippet creates a MessageBox with various options.
DialogResult result = MessageBox.Show(message, title, buttons,
MessageBoxIcon.Warning, MessageBoxDefaultButton.Button2,
MessageBoxOptions.RightAlign|MessageBoxOptions.RtlReading); 
MessageBox with Help Button
A MessageBox can have an extra button called Help button. This is useful when we need to display a help file. The following code snippet creates a MessageBox with a Help button.
DialogResult result = MessageBox.Show(message, title, buttons,
MessageBoxIcon.Warning, MessageBoxDefaultButton.Button2,
MessageBoxOptions.RightAlign, true ); 
We can also specify a help file when the Help button is clicked. The following code snippet references a help file.
DialogResult result = MessageBox.Show(message, title,
buttons, MessageBoxIcon.Question, MessageBoxDefaultButton.Button1, 0, "helpfile.chm");
Summary
In this article, we discussed how to create and use a MessageBox in a Windows Forms application.