Элементы управления
Последнее обновление: 31.10.2015
Элементы управления представляют собой визуальные классы, которые получают введенные пользователем данные и могут инициировать различные события.
Все элементы управления наследуются от класса Control и поэтому имеют ряд общих свойств:
-
Anchor: Определяет, как элемент будет растягиваться
-
BackColor: Определяет фоновый цвет элемента
-
BackgroundImage: Определяет фоновое изображение элемента
-
ContextMenu: Контекстное меню, которое открывается при нажатии на элемент правой кнопкой мыши.
Задается с помощью элемента ContextMenu -
Cursor: Представляет, как будет отображаться курсор мыши при наведении на элемент
-
Dock: Задает расположение элемента на форме
-
Enabled: Определяет, будет ли доступен элемент для использования. Если это свойство имеет значение False,
то элемент блокируется. -
Font: Устанавливает шрифт текста для элемента
-
ForeColor: Определяет цвет шрифта
-
Location: Определяет координаты верхнего левого угла элемента управления
-
Name: Имя элемента управления
-
Size: Определяет размер элемента
-
Width: ширина элемента
-
Height: высота элемента
-
TabIndex: Определяет порядок обхода элемента по нажатию на клавишу Tab
-
Tag: Позволяет сохранять значение, ассоциированное с этим элементом управления
Кнопка
Наиболее часто используемым элементом управления является кнопка. Обрабатывая событие нажатия кнопки, мы может производить те или иные действия.
При нажатии на кнопку на форме в редакторе Visual Studio мы по умолчанию попадаем в код обработчика события Click,
который будет выполняться при нажатии:
private void button1_Click(object sender, EventArgs e)
{
    MessageBox.Show("Hello World");
}
Оформление кнопки
Чтобы управлять внешним отображением кнопки, можно использовать свойство FlatStyle. Оно может принимать следующие значения:
-
Flat — Кнопка имеет плоский вид
-
Popup — Кнопка приобретает объемный вид при наведении на нее указателя, в иных случаях она имеет плоский вид
-
Standard — Кнопка имеет объемный вид (используется по умолчанию)
-
System — Вид кнопки зависит от операционной системы
Изображение на кнопке
Как и для многих элементов управления, для кнопки можно задавать изображение с помощью свойства BackgroundImage.
Однако мы можем также управлять размещением текста и изображения на кнопки.
Для этого надо использовать свойство TextImageRelation. Оно приобретает следующие значения:
-
Overlay: текст накладывается на изображение
-
ImageAboveText: изображение располагается над текстом
-
TextAboveImage: текст располагается над изображением
-
ImageBeforeText: изображение располагается перед текстом
-
TextBeforeImage: текст располагается перед изображением
Например, установим для кнопки изображение. Для этого выберем кнопку и в окне Свойств нажмем на поле Image (не путать с BackgroundImage). Нам откроется диалоговое окно
установи изображения:
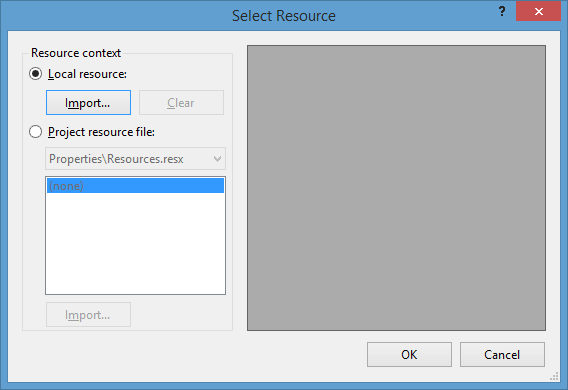
В этом окне выберем опцию Local Resource и нажмем на кнопку Import, после чего нам откроется диалоговое окно для выбора файла изображения.
После выбора изображения мы можем установить свойство ImageAlign, которое управляет позиционированием изображения на кнопке:
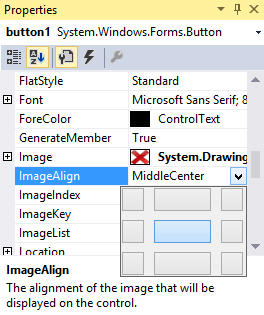
Нам доступны 9 вариантов, с помощью которых мы можем прикрепить изображение к определенной стороне кнопки. Оставим здесь значение по умолчанию — MiddleCenter,
то есть позиционирование по центру.
Затем перейдем к свойству TextImageRelation и установим для него значение ImageBeforeText. В итоге мы получим кнопку,
где сразу после изображения идет надпись на кнопке:
Клавиши быстрого доступа
При работе с формами при использовании клавиатуры очень удобно пользоваться клавишами быстрого доступа. При нажатии на клавиатуре комбинации
клавиш At+некоторый символ, будет вызываться определенная кнопка. Например, зададим для некоторой кнопки свойство Text равное &Аватар.
Первый знак — амперсанд — определяет ту букву, которая будет подчеркнута. В данном случае надпись будет выглядеть как
Аватар. И теперь чтобы вызвать событие Click, нам достаточно нажать на комбинацию клавиш Alt+А.
Кнопки по умолчанию
Форма, на которой размещаются все элементы управления, имеет свойства, позволяющие назначать кнопку по умолчанию и кнопку отмены.
Так, свойство формы AcceptButton позволяет назначать кнопку по умолчанию, которая будет срабатывать по нажатию на клавишу Enter.
Аналогично работает свойство формы CancelButton, которое назначает кнопку отмены. Назначив такую кнопку, мы можем вызвать ее нажатие,
нажав на клавишу Esc.
In today’s tutorial, we are gonna have a look at How to use Button in C# Windows Form. In our previous tutorials, we have first discussed the …
- Computer Science
- C#
- Microsoft Visual Studio
So, now we are gonna add back end programming in those Controls one by one. In today’s tutorial, I am gonna add the code for the Buttons and you will see that it won’t be any difficult to use them in your projects. So, let’s get started with How to use Button in C# Windows Form.
How to use Button in C# Windows Form ???
- First of all, create a new Project as we did in Introduction to C# Windows Forms and then add two Buttons in your Windows Form, which we have learned in How to add C# Controls in Windows Form.
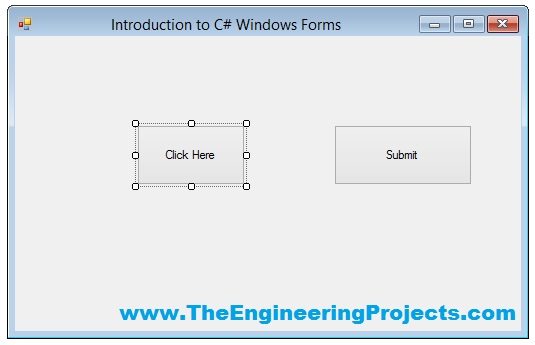
- Now, I think your C# Windows form will look something like this:
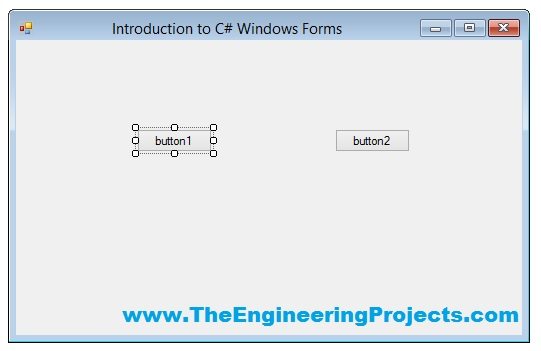
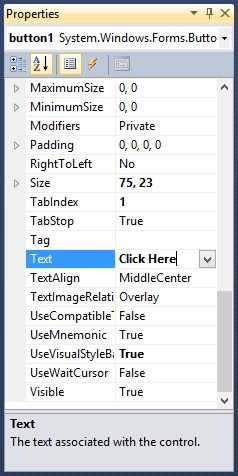
- So, now we have two buttons in our C# Windows Form, so now First of all, let’s change the text of first button from its Properties as shown in below figure:
- So, I have changed the text of Button1 to Click Here and I am gonna change the text of Button2 to Submit and they will now look like something as shown in below figure:
- Now you can see in the above figure that the Text on these buttons have changed to that which I have added in the Text section of their properties.
- Moreover, you must have also noticed that now their size has also increased, which I did by dragging the buttons.
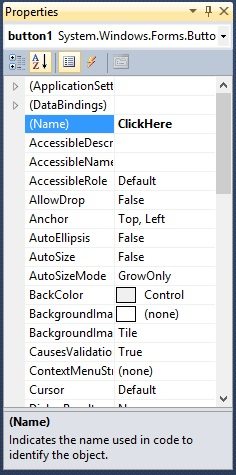
- Now let’s change the name of these buttons too so I am gonna change the Name of first button to ClickHere and that of second button to Submit.
- We can’t add spaces in the Name of the Button.
- The Name Change for first button is shown in below figure:
- Now let’s add the Click event for each of these buttons.
- Click event is the event which should happened when you press the button.
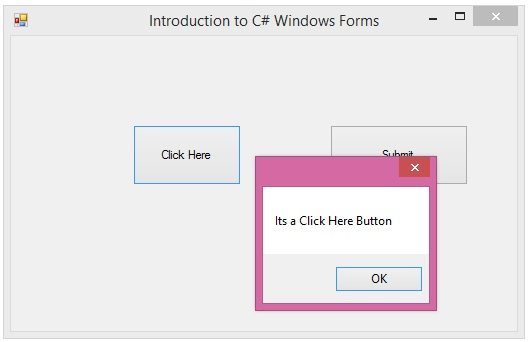
- So, now double click the first button and it will open up its code as shown below:
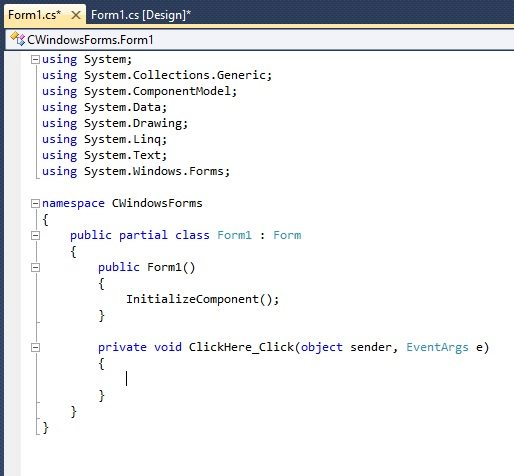
- Now you can see in the above code we have a function named ClickHere_Click, which is the click event function for first button.
- ClickHere is the name of the button which we changed above and _Click is the event. In simple words, this event will call on when the ClickHere Button is clicked.
- Next we have the arguments, which I am not currently gonna discuss here but we will have a look at them later and then we have these curly brackets { }, and that’s where our code is gonna pasted for the click event of this button.
- So, add the below code into these brackets.
MessageBox.Show("Its a Click Here Button");
- Now when you pressed the Click Here Button then a sall message box will open up as shown in below figure:
- So, now you have seen, first we have added the Button then we changed its Text and Name and later we added the back end code in it so that it could perform an event on clicking.
- Now, I have added a small code in the Submit Button Click event and it looks something like this when you click it:
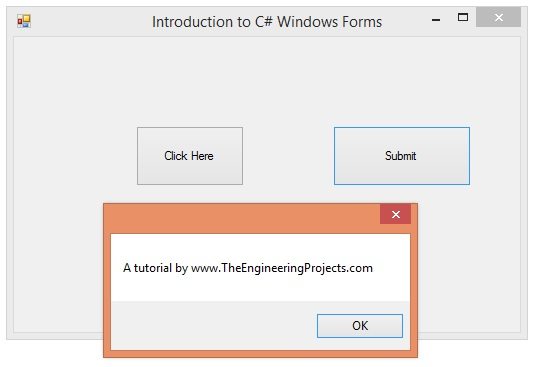
- So, that’s all about how to use button in C# Windows Form.
That’s all for today. Will meet you guys in the next tutorial on C#. Till then take care and have fun!!! 
Syed Zain Nasir
syedzainnasir
I am Syed Zain Nasir, the founder of The Engineering Projects (TEP). I am a
programmer since 2009 before that I just search things, make small projects and now I am sharing my
knowledge through this platform. I also work as a freelancer and did many projects related to
programming and electrical circuitry. My Google Profile+
Follow
Get Connected

На примере решения задачи определения площади поверхности шара, подробно описывается как программировать событие в среде Microsoft Visual Studio — C#.
Содержание
- Условие задачи
- Выполнение
- 1. Запустить MS Visual Studio. Создать проект по шаблону Windows Forms Application
- 2. Размещение элементов управления на форме.
- 3. Настройка элементов управления типа Label.
- 4. Элемент управления Button.
- 5. Корректировка вида формы.
- 6. Программирование события клика на кнопке «Вычислить«.
- 6.1. Вызов программного кода.
- 6.2. Ввод программного кода обработки события.
- 6.3. Корректировка программного кода.
- 7. Запуск программы на выполнение.
- Связанные темы
Поиск на других ресурсах:
Условие задачи
Составить программу, которая по введенному радиусу R находит площадь поверхности шара. Программу реализовать как Windows Forms Application.
Площадь поверхности шара вычисляется по формуле:
![]()
где R – радиус шара, π – константа равная 3.1415.
В программе используются следующие элементы управления:
- Label – метка для вывода сообщений;
- Button – кнопка для выполнения расчета;
- TextBox – поле ввода, предназначенное для ввода значения R.
⇑
Выполнение
1. Запустить MS Visual Studio. Создать проект по шаблону Windows Forms Application
Подробный пример создания нового приложения типа Windows Forms Application описан здесь. Сохранить проект под любым именем.
⇑
2. Размещение элементов управления на форме.
Из вкладки «Common Controls» выносим на форму четыре элемента управления (рис. 1):
- два элемента управления типа Label (метка);
- элемент управления типа Button (кнопка);
- элемент управления типа TextBox (строка ввода).

Рис. 1. Элементы управления Label, Button, TextBox
Автоматически создаются четыре объекта с именами label1, label2, button1 и textBox1. По этим именам можно будет иметь доступ к свойствам этих объектов.
Форма приложения будет иметь вид, как показано на рис. 2.

Рис. 2. Форма приложения после размещения label1, label2, button1 и textBox1
⇑
3. Настройка элементов управления типа Label.
Выделяем элемент управления (объект) label1. В палитре Toolbox изменяем свойство Text, набираем «R = «.
Точно так же изменяется свойство Text для элемента управления label2 (рис. 3). Вводим текст «Площадь поверхности шара = «.

Рис. 3. Изменение свойства Text в label1
⇑
4. Элемент управления Button.
Аналогично к label1 выделяем элемент управления (объект) button1. В свойстве Text вводим строку «Вычислить«.
⇑
5. Корректировка вида формы.
Изменяем название формы. Для этого выделяем форму. В свойстве Text формы вводим текст «Площадь поверхности шара«.
После корректировки форма будет иметь вид, как показано на рисунке 4.

Рис. 4. Вид формы после корректировки
⇑
6. Программирование события клика на кнопке «Вычислить«.
6.1. Вызов программного кода.
В программе нужно обработать событие, которое генерируется когда пользователь делает клик «мышкой» на кнопке «Вычислить«.
После нажатия на кнопке «Вычислить» формируется фрагмент кода, который будет обрабатываться нашим приложением. Во время обработки сначала определяется значение введенного радиуса R, затем делается расчет по формуле и вывод результата.
Чтобы вызвать фрагмент кода обработки события на кнопке button1 нужно выполнить такие действия:
- выделить кнопку button1 (рис. 5 — 1);
- перейти к вкладке Events (события) в окне свойств (рис. 5 — 2);
- сделать двойной щелчок «мышкой» напротив события «Click» (рис. 5 — 3).

Рис. 5. Последовательность вызова фрагмента кода обработки события Click
В итоге, откроется вкладка программного кода, который размещен в файле «Form1.cs» (рис. 6).

Рис. 6. Метод обработки события клика на кнопке button1
Листинг программного кода следующий:
using System;
using System.Collections.Generic;
using System.ComponentModel;
using System.Data;
using System.Drawing;
using System.Linq;
using System.Text;
using System.Windows.Forms;
namespace WindowsFormsApplication1
{
   public partial class Form1 : Form
   {
       public Form1()
       {
           InitializeComponent();
       }

       private void button1_Click(object sender, EventArgs e)
       {

       }
   }
}
⇑
6.2. Ввод программного кода обработки события.
В методе button1_Click вписываем код обработки события. Листинг метода следующий:
...

private void button1_Click(object sender, EventArgs e)
{
    const double Pi = 3.1415;
    double R,S;
    R = Double.Parse(textBox1.Text);
    S = 4 * Pi * R * R;
    label2.Text = "Площадь поверхности шара = " + S.ToString();
}

...
В коде описываются две переменные R и S типа double. Также описывается константа Pi.
Для преобразования из текстового типа string в тип double используется метод Parse. Таким образом заполняется значение переменной R.
R = Double.Parse(textBox1.Text.ToString());
Подобным образом можно преобразовывать данные и других типов. Например, для типа int можно написать:
int d;
d = Int32.Parse("100"); // d = 100
Результат вычисления площади поверхности шара выводится в label2.Text. Преобразование в тип string осуществляется с помощью метода ToString().
⇑
6.3. Корректировка программного кода.
В коде, описанном в пункте 6.2 нету защиты от некорректного ввода значения R. Поэтому метод button1_Click нужно переписать следующим образом:
...
private void button1_Click(object sender, EventArgs e)
{
    try
    {
        const double Pi = 3.1415;
        double R, S;
        R = Double.Parse(textBox1.Text);
        S = 4 * Pi * R * R;
        label2.Text = "Площадь поверхности шара = " + S.ToString();
    }
    catch (FormatException ex)
    {
        label2.Text = "Ошибка - " + ex.Message;
    }
}
...
Блок
try
{
  ...
}
catch (...)
{
  ...
}
позволяет осуществить программный перехват критической ситуации, которая может возникнуть в результате ввода некорректного значения в поле textBox1 (например «абракадабра»).
В этом случае в свойстве ex.Message буде выведено сообщение:
Ошибка – Input string was not in a correct format.
⇑
7. Запуск программы на выполнение.
После этого можно запустить нашу программу на выполнение и протестировать ее работу при любых значениях R.
⇑
Связанные темы
- Программирование события в Delphi 2010.
- Пример программирования события в C++ Builder.
- Пример создания и вызова диалогового окна в MS Visual Studio — C++.
⇑
C# Button class in .NET Framework class library represents a Windows Forms Button control. A Button control is a child control placed on a Form and used to process click event and can be clicked by a mouse click or by pressing ENTER or ESC keys.
If AutoEllipsis property is true, it adds ellipsis character to a control if text in control does not fit. You may have to set AutoSize to false to see the ellipses character.
Image in Button
The Image property of a Button control is used to set a button background as an image. The Image property needs an Image object. The Image class has a static method called FromFile that takes an image file name with full path and creates an Image object.
You can also align image and text. The ImageAlign and TextAlign properties of Button are used for this purpose.
The following code snippet sets an image as a button background.
- dynamicButton.Image = Image.FromFile(@«C:\Images\Dock.jpg»);
- dynamicButton.ImageAlign = ContentAlignment.MiddleRight;
- dynamicButton.TextAlign = ContentAlignment.MiddleLeft;
- dynamicButton.FlatStyle = FlatStyle.Flat;
Text and Font
The Text property of Button represents the contents of a Button. The TextAlign property if used to align text within a Button that is of type ContentAlignment enumeration.
The Font property is used to set font of a Button.
The following code snippet sets Text and Font properties of a Button control.
- dynamicButton.Text = «I am Dynamic Button»;
- dynamicButton.TextAlign = ContentAlignment.MiddleLeft;
- dynamicButton.Font = new Font(«Georgia», 16);
Button Control States
Button control has five states — Normal, Flat, Inactive, Pushed, and All. ButtonState enumeration represents a button state.
Unfortunately, Windows Forms does not have a straight-forward way to set a button control state but there is a work around.
Windows Forms has a ControlPaint class with some static methods that can be used to draw various controls at runtime. The DrawButton method is used to draw a Button control and the last parameter of this method is ButtonState enumeration.
The following code snippet sets the button state of button1 using ControlPaint class.
- ControlPaint.DrawButton(System.Drawing.Graphics.FromHwnd(button1.Handle), 0, 0, button1.Width, button1.Height, ButtonState.Pushed);
Adding Button Click Event Hander
A Button control is used to process the button click event. We can attach a button click event handler at run-time by setting its Click event to an EventHandler obect. The EventHandler takes a parameter of an event handler. The Click event is attached in the following code snippet.
- dynamicButton.Click += new EventHandler(DynamicButton_Click);
The signature of Button click event handler is listed in the following code snippet.
- private void DynamicButton_Click(object sender, EventArgs e)
- { }
Creating a C# Button Dynamically
Creating a Button control at run-time is merely a work of creating an instance of Button class, set its properties and add Button class to the Form controls.
First step to create a dynamic button is to create an instance of Button class. The following code snippet creates a Button control object.
- Button dynamicButton = new Button();
Next step, you need to set Button class properties. You need to make sure to specify the Location, Width, Height or Size properties. The default location of Button is left top corner of the Form. The Location property takes a Point that specifies the starting position of the Button on a Form. The Size property specifies the size of the control. We can also use Width and Height property instead of Size property. The following code snippet sets Location, Width, and Height properties of a Button control.
- dynamicButton.Location = new Point(20, 150);
- dynamicButton.Height = 40;
- dynamicButton.Width = 300;
In the next step, you may set more properties of the Button control.
The following code snippet sets background color, foreground color, Text, Name, and Font properties of a Button.
- dynamicButton.BackColor = Color.Red;
- dynamicButton.ForeColor = Color.Blue;
- dynamicButton.Text = «I am Dynamic Button»;
- dynamicButton.Name = «DynamicButton»;
- dynamicButton.Font = new Font(«Georgia», 16);
A Button control is used to process the button click event. We can attach a button click event handler at run-time by setting its Click event to an EventHandler obect. The EventHandler takes a parameter of an event handler. The Click event is attached in the following code snippet.
- dynamicButton.Click += new EventHandler(DynamicButton_Click);
The signature of Button click event handler is listed in the following code snippet.
- private void DynamicButton_Click(object sender, EventArgs e)
- { }
Now the last step is adding a Button control to the Form. The Form.Controls.Add method is used to add a control to a Form. The following code snippet adds a Button control to the current Form.
- Controls.Add(dynamicButton);
The complete code is listed in the following code, where CreateDynamicButton methods creates a Button control to a Form at run-time, attaches a click event handler of the button and adds Button control to the Form by calling Form.Controls.Add() method.
- private void CreateDynamicButton()
- {
- Button dynamicButton = new Button();
- dynamicButton.Height = 40;
- dynamicButton.Width = 300;
- dynamicButton.BackColor = Color.Red;
- dynamicButton.ForeColor = Color.Blue;
- dynamicButton.Location = new Point(20, 150);
- dynamicButton.Text = «I am Dynamic Button»;
- dynamicButton.Name = «DynamicButton»;
- dynamicButton.Font = new Font(«Georgia», 16);
- dynamicButton.Click += new EventHandler(DynamicButton_Click);
- Controls.Add(dynamicButton);
- }
- private void DynamicButton_Click(object sender, EventArgs e)
- {
- MessageBox.Show(«Dynamic button is clicked»);
- }
You need to make sure to call CreateDynamicButton() method on the Form’s constructor just after InitializeComponent() method, listed as following.
- public Form1()
- {
- InitializeComponent();
- CreateDynamicButton();
- }
Summary
In this article, we discussed how to create Button control in Windows Forms using C# at design-time as well as at run-time. We also saw how to set a button properties and set the button click event handler.
I have a c# form (let’s call it MainForm) with a number of custom controls on it. I’d like to have the MainForm.OnClick() method fire anytime someone clicks on the form regardless of whether the click happened on the form or if the click was on one of the custom controls. I’m looking for behavior similar to the KeyPreview feature of forms except for mouse clicks rather than key presses.
![]()
GEOCHET
21.1k15 gold badges75 silver badges98 bronze badges
asked Oct 7, 2008 at 21:12
![]()
I recommend creating a base form for the other forms in your application to inherit. Add this code to your base form to create a new event called GlobalMouseClickEventHandler:
namespace Temp
{
    public delegate void GlobalMouseClickEventHander(object sender, MouseEventArgs e);

    public partial class TestForm : Form
    {
        [Category("Action")]
        [Description("Fires when any control on the form is clicked.")]
        public event GlobalMouseClickEventHander GlobalMouseClick;

        public TestForm()
        {
            InitializeComponent();
            BindControlMouseClicks(this);
        }

        private void BindControlMouseClicks(Control con)
        {
            con.MouseClick += delegate(object sender, MouseEventArgs e)
            {
                TriggerMouseClicked(sender, e);
            };
            // bind to controls already added
            foreach (Control i in con.Controls)
            {
                BindControlMouseClicks(i);
            }
            // bind to controls added in the future
            con.ControlAdded += delegate(object sender, ControlEventArgs e)
            {
                BindControlMouseClicks(e.Control);
            };
        }

        private void TriggerMouseClicked(object sender, MouseEventArgs e)
        {
            if (GlobalMouseClick != null)
            {
                GlobalMouseClick(sender, e);
            }
        }
    }
}
This solution will work not only for top-level controls, but also nested controls such as controls placed inside of panels.
answered Aug 16, 2012 at 15:18
![]()
ChéDonChéDon
1312 silver badges3 bronze badges
1
In the form’s ControlAdded event, add a MouseClick handler to the control, with the Address of the form’s click event. I haven’t tested this, but it might work.
Private Sub Example_ControlAdded(ByVal sender As Object, ByVal e As System.Windows.Forms.ControlEventArgs) Handles Me.ControlAdded

    AddHandler e.Control.MouseClick, AddressOf Example_MouseClick
End Sub

Private Sub Example_MouseClick(ByVal sender As Object, ByVal e As System.Windows.Forms.MouseEventArgs) Handles Me.MouseClick
    MessageBox.Show("Click")
End Sub
answered Oct 7, 2008 at 21:40
1
The only way I’ve ever managed to do this is to handle the [c]Click[/c] event of every control. I don’t believe the event is raised before the control processes it.
In WPF, there are «tunneling» preview events that provide this functionality, but that doesn’t really help you in WinForms.
answered Oct 7, 2008 at 21:39
![]()
OwenPOwenP
25k13 gold badges66 silver badges103 bronze badges
1
You can hook all the control’s events, if you like, and then monitor that way. I assume there is some uber fancy Win32 api way to trap them all, but that is beyond me at the moment.
    public Form1()
    {
        InitializeComponent();
        HookEvents();
    }

    private void HookEvents() {
        foreach (Control ctl in this.Controls) {
            ctl.MouseClick += new MouseEventHandler(Form1_MouseClick);
        }
    }

    void Form1_MouseClick(object sender, MouseEventArgs e)
    {
        LogEvent(sender, "MouseClick");
    }

    // and then this just logs to a multiline textbox you have somwhere on the form
    private void LogEvent(object sender, string msg) {
        this.textBox1.Text = string.Format("{0} {1} ({2}) \n {3}",
            DateTime.Now.TimeOfDay.ToString(),
            msg,
            sender.GetType().Name,
            textBox1.Text
            );
    }
The output is something like this, showing all the events and who «sent» them up:
14:51:42.3381985 MouseClick (Form1)
14:51:40.6194485 MouseClick (RichTextBox)
14:51:40.0100735 MouseClick (TextBox)
14:51:39.6194485 MouseClick (Form1)
14:51:39.2131985 MouseClick (RichTextBox)
14:51:38.8694485 MouseClick (Button)
HTH.
answered Oct 7, 2008 at 21:57
![]()
AndrewAndrew
8,4172 gold badges48 silver badges70 bronze badges
Catching a click on an open space on the form is easy, but to get a click that’s actually on a control, you’ll need the cooperation of that control to send it to the form.
One possibility is to place a transparent control over the entire form, and accept clicks onto that, deal with them, and then pass them onto the proper control underneath.
answered Oct 7, 2008 at 21:18
![]()
James CurranJames Curran
102k37 gold badges182 silver badges259 bronze badges
1
This is a common pattern in development, its called the Observer pattern. There are lots of examples of Observer patterns and c# here is 1 example http://msdn.microsoft.com/en-us/library/ms954621.aspx but have a good google around.
answered Oct 7, 2008 at 21:32
![]()
Tim JarvisTim Jarvis
18.5k9 gold badges56 silver badges93 bronze badges