Подобно другим антивирусам, встроенный Защитник Windows ведет историю обнаруженных угроз, просмотреть которую можно в журнале защиты. Эти записи будут отображаться в журнале, даже если опасный файл обезврежен и помещен в карантин, что может вызвать своеобразный побочный эффект, проявляющийся наличием красного или желтого значка на иконке Защитника в системном лотке. в Windows 10 2004 разработчики вроде бы должны были решить эту проблему.
Но, судя по отзывам пользователей, сталкиваться с ней приходится и в последней стабильной версии системы.
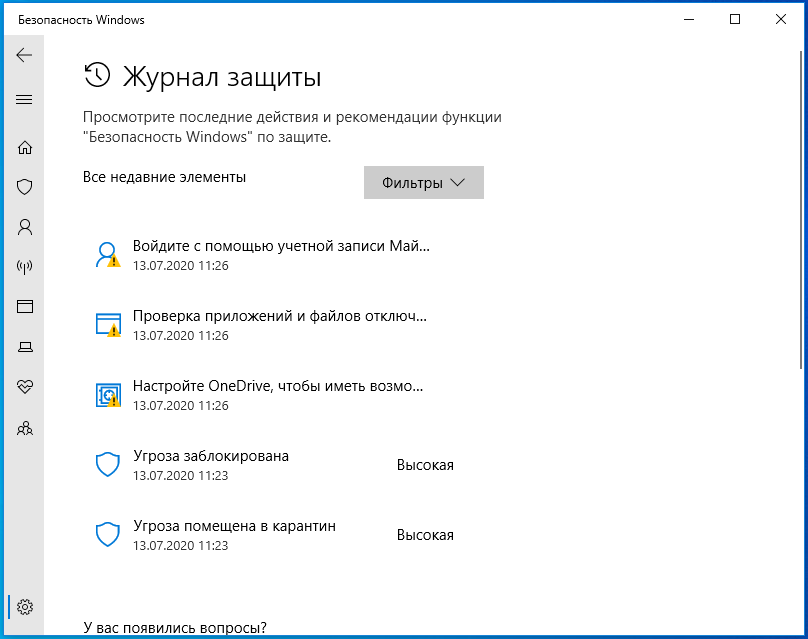
Чтобы избавиться от этих предупреждающих о несуществующей уже угрозе значков, нужно очистить журнал Windows Defender. В сборках до релиза 1903 сделать это можно было через интерфейс управления безопасностью Windows, в более поздних сборках системы кнопка очистки журнала отсутствует. Данные журнала удаляются автоматически по истечении 30-и дней, но вы можете сократить этот период или просто удалить их принудительно.
Изменение срока хранения Журнала Защитника
Для изменения срока хранения записей в журнале Защитника Windows 10 мы предлагаем использовать консоль PowerShell.
Запустив ее от имени администратора, выполните в ней команду Get-MpPreference и найдите в полученном списке параметр ScanPurgeItemsAfterDelay.
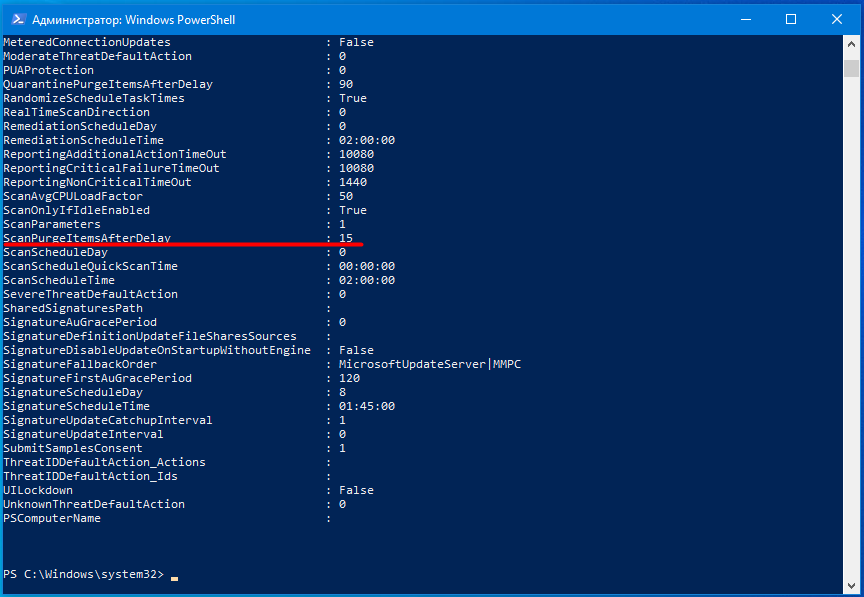
В Windows 10 2004 его значение равняется 15, то есть данные журнала хранятся 15 дней. Чтобы сократить этот срок, скажем, до двух дней, выполните в PowerShell такую команду:
Set-MpPreference -ScanPurgeItemsAfterDelay 2

Принудительная очистка Журнала Защитника
Если вы хотите очистить журнал прямо сейчас, выполните следующие действия.
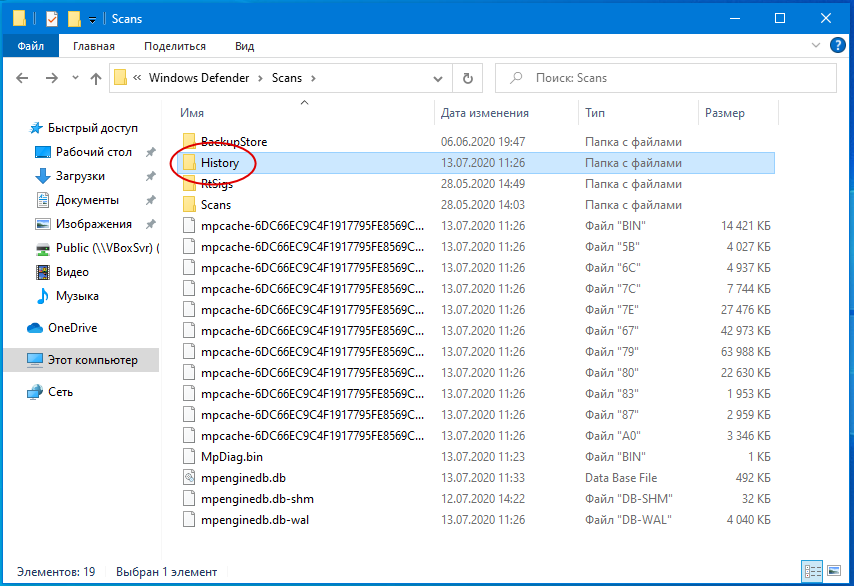
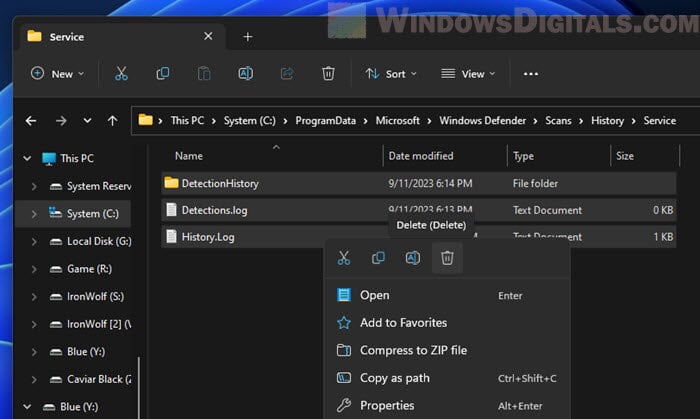
Перейдите в Проводнике в папку C:\ProgramData\Microsoft\Windows Defender\Scans, а затем зайдите в расположенную в ней папку History, подтвердив вход с правами администратора.
В свою очередь, в ней найдите папку Service и удалите ее.
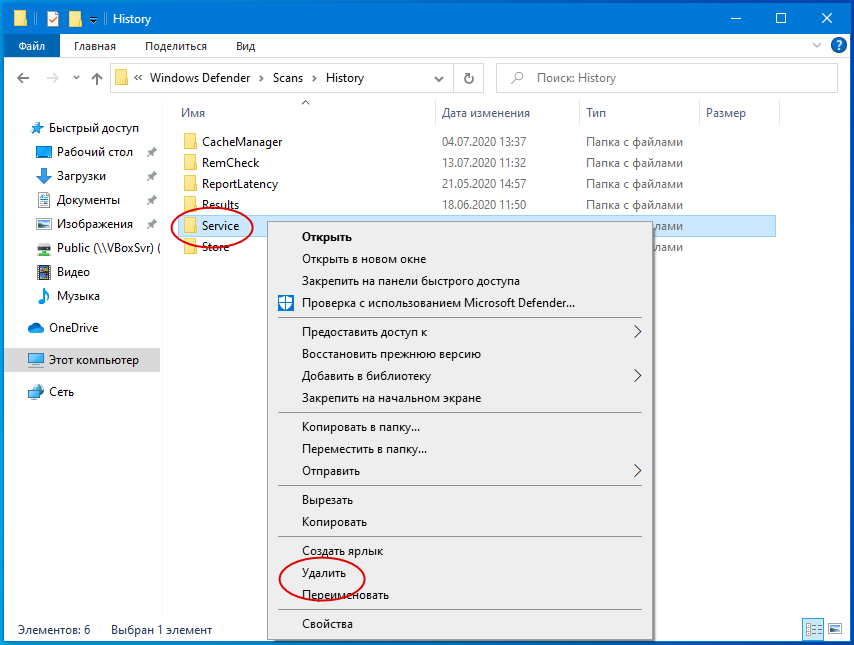
Вместе с ней будет удалена и история действий Windows Defender.
Должен исчезнуть и значок предупреждения на иконке Защитника. Однако, если у вас не настроены базовые функции безопасности, желтый значок предупреждения будет отображаться независимо от того, имеются в журнале записи или нет.
![]() Загрузка…
Загрузка…
Protection history is a part of the Windows Security app that displays actions and recommendations about threats in Windows 11 and 10. The page includes Quarantined items, Cleaned items, Removed items, Allowed items, Removed items, Blocked actions, and severity of a threat. Blocked actions option has 3 sub-menus – Block folder access, Blocked items, and Ruled-base block, similarly Severity has 4 items – Severe High, Moderate, and Low. But sometimes people complain Protection History missing issue.
The Windows Defender Protection history is empty or blank and nothing can be seen on the page when the problem occurs. Immediately after running a “Quick Scan”, “Full Scan”, “Custom Scan” or “Microsoft Defender offline scan”, usually a user navigates to Protection history. But he gets disappointed and finds himself out of nowhere when finds unoccupied because he is unable to know the status of threats or clear them on his Windows 11 computer. Fortunately, there are solutions to this problem. See – Fix: Insider Program Settings Blank, Empty, or Missing in Windows 10.
Here is how to fix Protection History missing in Windows 11 or 10 –
Way-1: Disable Windows Defender and reboot the PC
To normally access the concerned settings you can go through – How to See Protection History in Windows 10, but in this case, the content inside this page is missing. Turning off the Windows Defender and deleting the mpcache files work like wonder to fix the issue –
- Hit – Windows and R.
- Type – cmd.exe.
- Press Ctrl + Shift + Enter.
- Select Yes when the User account control setting popup opens.
- Type the following commands successively and press Enter.
del "C:\ProgramData\Microsoft\Windows Defender\Scans\History\Service\DetectionHistory\*"
del "C:\ProgramData\Microsoft\Windows Defender\Scans\mpenginedb.db"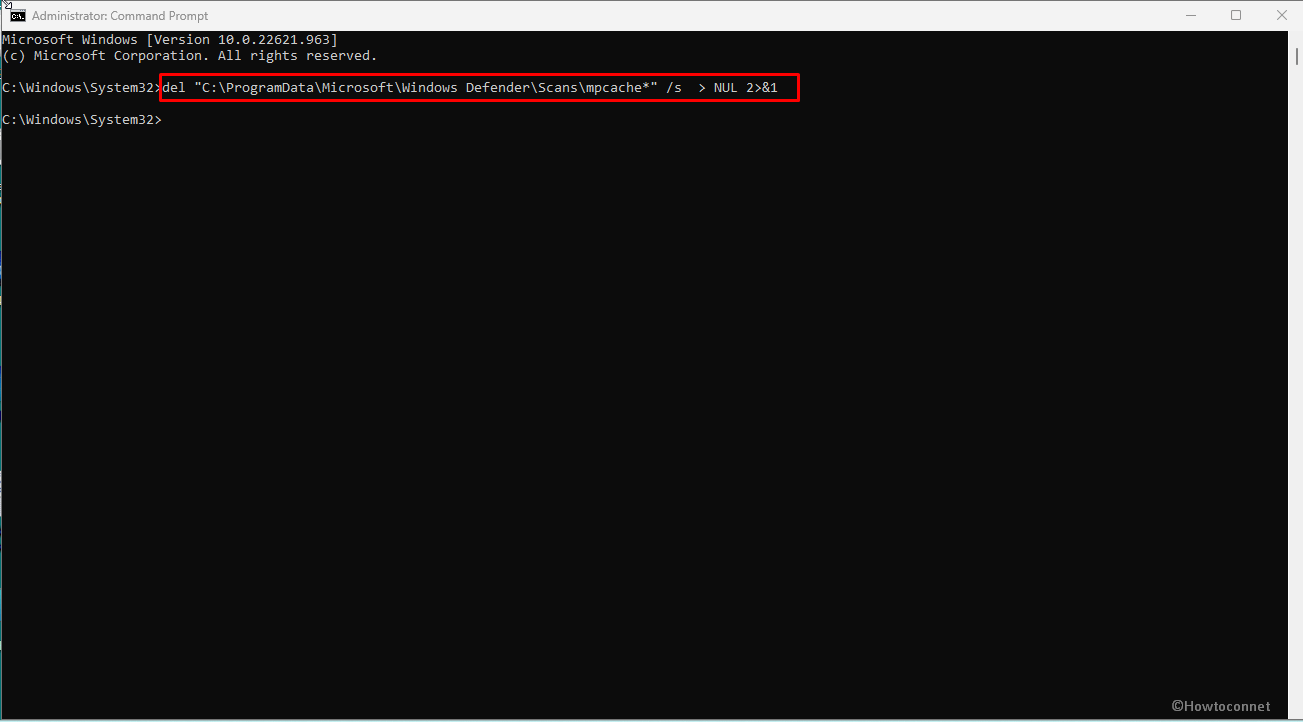
- Click on Search.
- Type Windows Security.
- Press Enter.
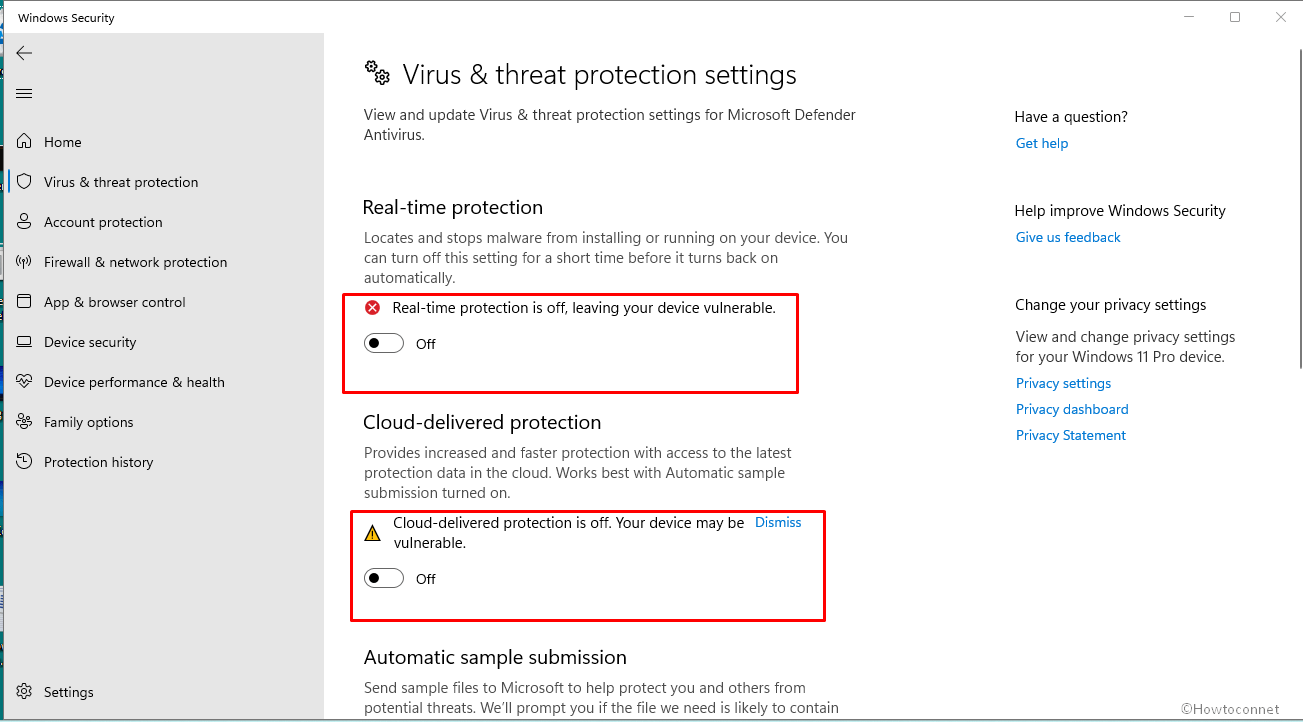
- Select – Virus & threat protection.
- Now click on the Manage settings link.
- From the next page, turn off Real-time protection and Cloud-delivered protection.
- Now open File Explorer (Win+E).
- Go to (C:) drive.
- Double-click on ProgramData.
- Open the Microsoft folder.
- Enter Windows Defender and the launch Scans folder.
- The path will be as follow –
C:\ProgramData\Microsoft\Windows Defender\Scans- Find all the files with prefix mpcache and delete them.
- On my computer, the Scans folder has the following files which I am deleting –
mpcache-8B71EC38EE6CA744C8B3D9719F943BEFDB9392A9.bin
mpcache-8B71EC38EE6CA744C8B3D9719F943BEFDB9392A9.bin.01
mpcache-8B71EC38EE6CA744C8B3D9719F943BEFDB9392A9.bin.6C
mpcache-8B71EC38EE6CA744C8B3D9719F943BEFDB9392A9.bin.7C
mpcache-8B71EC38EE6CA744C8B3D9719F943BEFDB9392A9.bin.7E
mpcache-8B71EC38EE6CA744C8B3D9719F943BEFDB9392A9.bin.67
mpcache-8B71EC38EE6CA744C8B3D9719F943BEFDB9392A9.bin.79
mpcache-8B71EC38EE6CA744C8B3D9719F943BEFDB9392A9.bin.80
mpcache-8B71EC38EE6CA744C8B3D9719F943BEFDB9392A9.bin.83
mpcache-8B71EC38EE6CA744C8B3D9719F943BEFDB9392A9.bin.87
mpcache-8B71EC38EE6CA744C8B3D9719F943BEFDB9392A9.bin.A0
mpcache-8B71EC38EE6CA744C8B3D9719F943BEFDB9392A9.bin.DB
mpcache-8B71EC38EE6CA744C8B3D9719F943BEFDB9392A9.bin.E6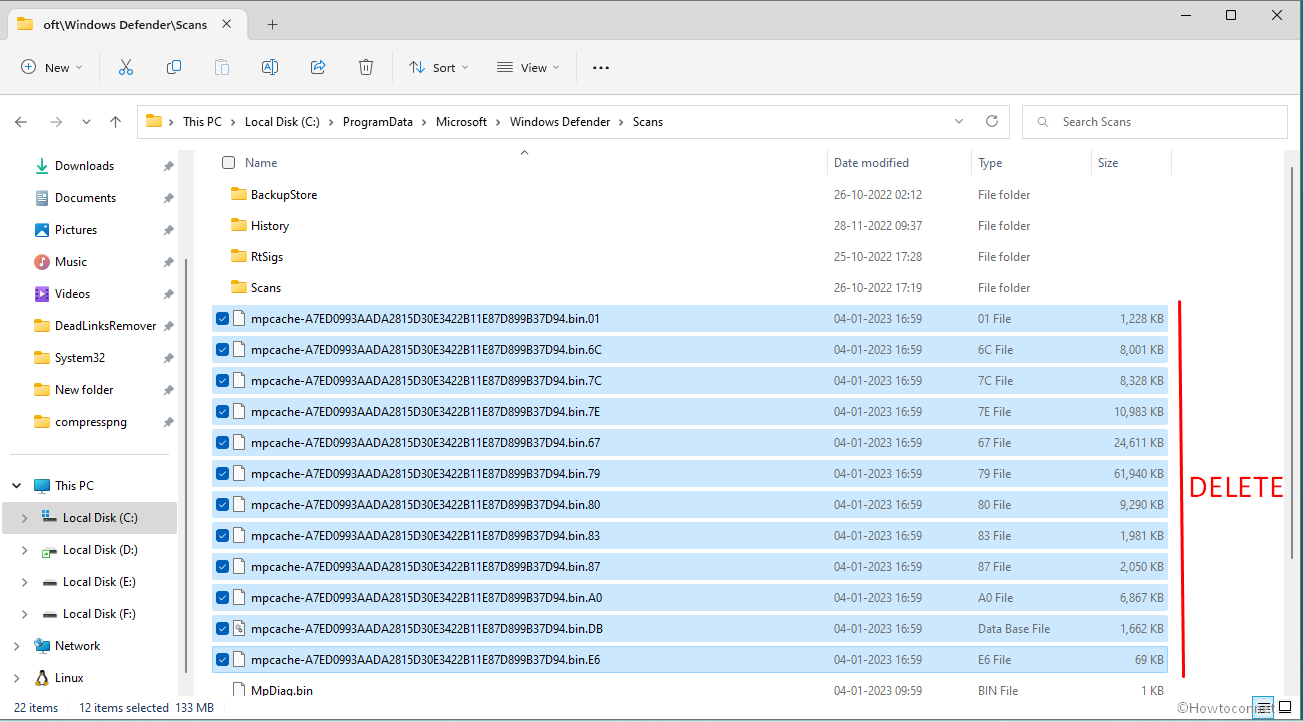
- Sometimes, you might not be able to delete mpcache files and get a message – “The action cannot be completed because the file is open in Microsoft Defender Antivirus Service”.
- In this case, press Ctrl+Shift+Esc.
- On the Task Manager, Find the processes related to Widows Security and Windows Defender.
- Right-click on each of them and select End task.
- Now try to delete mpcache files.
- Reboot the PC if you can get back the missing Protection history in Windows Defender.
Way-2: Delete mpcache files using cmd command to fix missing Windows security threat history
II you can not remove mpcache files even after turning off real-time protection and using End Task in Task Manager then a cmd command may help.
- Launch Command prompt as administrator (Steps are mentioned in the first method)
- Enter the following command –
del "C:\ProgramData\Microsoft\Windows Defender\Scans\mpcache*" /s > NUL 2>&1- Finally, restart your PC to see missing Protection History in Windows 11 or 10.
Methods:
Way-1: Disable Windows Defender and reboot the PC
Way-2: Delete mpcache files using cmd command
That’s all!!
Repair any Windows problems such as Blue/Black Screen, DLL, Exe, application, Regisrty error and quickly recover system from issues using Reimage.
Хотите удалить историю защиты Защитника Windows на ПК. Вот лучшие способы очистить историю защиты Защитника Windows в Windows 11.
Это руководство расскажет нам, как лучше всего очистить историю защиты Защитника Windows в Windows 11. Защитник Windows — это встроенная служба безопасности в ОС Windows. Это помогает защитить ваш компьютер от вредоносных программ, вирусов и других угроз безопасности. Он продолжает работать в фоновом режиме и обеспечивает защиту вашего компьютера от киберугроз в режиме реального времени. Эта программа получает регулярные обновления относительно новых определений вредоносных программ, чтобы помочь защитить ваш компьютер от новых угроз.
Теперь вы можете задаться вопросом, почему возникает необходимость очистить историю защиты вашего ПК Защитником Windows. Основная причина — очистить память вашего ПК. В противном случае, когда история защиты будет сохраняться с течением времени, это повлияет на производительность компьютера. В конце концов он замедлится, что является нежелательной ситуацией.
Во-вторых, когда данные истории защиты остаются длинными, они могут быть повреждены. Это, в свою очередь, может повлиять на функции защитника Windows. Это может остановить запуск приложений или установку обновлений.
Безопасность также является серьезной проблемой. Если ваш компьютер уязвим для кибератак, киберпреступники могут использовать конфиденциальные данные из истории защиты Защитника Windows. Они могут попытаться получить несанкционированный доступ к вашему компьютеру.
Вот несколько способов, с помощью которых можно удалить историю защиты программы-защитника Windows.
Используйте редактор групповой политики для очистки истории защиты Защитника Windows
Редактор групповой политики в основном используется для управления политиками Windows. С помощью этой утилиты вы можете очистить историю защиты защитника Windows.
- Нажимать Виндовс + Р горячие клавиши для вызова окна «Выполнить».
- Введите термин gpedit. МСК и нажмите ввод.
- Затем щелкните свой путь по следующему пути, указанному ниже.
Computer Configuration > Administrative Templates > Windows Components > Microsoft Defender Antivirus > Scan
- Под Сканировать папку, дважды щелкните по Включите удаление элементов из папки истории сканирования.
- Затем установите действие на Включено а также установить количество дней под Включите удаление элементов из папки истории сканирования.
- Затем нажмите на Применять > ХОРОШО и закройте редактор групповой политики.
- Перезагрузите компьютер, и теперь история защиты Защитника Windows была бы чиста навсегда.
Очистить историю защиты Защитника Windows с помощью PowerShell
PowerShell — это собственный инструмент командной строки, присутствующий в ОС Windows. Вы можете использовать его для выполнения различных команд для выполнения определенных задач. Кроме того, вы можете использовать его для очистки истории защиты Защитника Windows на вашем ПК.
- Нажимать Виндовс + С вызвать поиск.
- Найдите PowerShell и нажмите Открыть/запустить от имени администратора когда появится соответствующий результат поиска.
- Введите следующую команду.
Set-MpPreference -ScanPurgeItemsAfterDelay Days
- В приведенной выше команде замените «дни” с числом, обозначающим количество дней, по истечении которых автоматически история защиты будет очищена безвозвратно.
Очистить историю защиты Защитника Windows с помощью проводника
Все записи защиты защитника Windows и истории сканирования сохраняются в виде файла журнала. Используя проводник, вы можете легко получить доступ к этому файлу.
- Откройте проводник с помощью ярлыка Windows + Е.
- На левой панели нажмите на С:Драйв, который обычно имеет папку Windows.
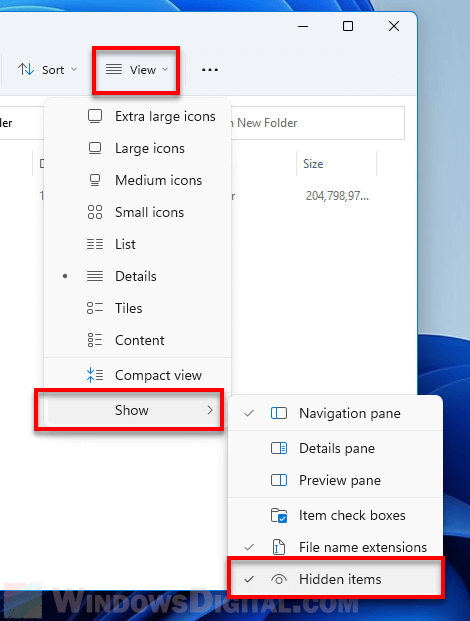
- Нажмите на Вид > из выпадающего меню и выберите Показывать.
- Под Показыватьвыбирать Скрытые предметы.
- Скопируйте и вставьте адрес, указанный ниже, в адресную строку Проводника.
C:\ProgramData\Microsoft\Windows Defender\Scans\Scans\History
- Нажмите на папку Сканы.
- Внутри Сканы, вы увидите файл журнала с именем history. В нем хранятся все записи проверок безопасности и действий, выполненных Защитником Windows.
- Выберите этот файл и нажмите Shift + Удалить горячие клавиши, чтобы окончательно удалить этот файл журнала.
Говоря о проводнике, у нас есть подробное руководство по проводнику Windows, в котором объясняются все связанные с ним функции и различные способы его открытия. Вы можете проверить это здесь.
Как очистить историю защиты Защитника Windows с помощью средства просмотра событий?
Средство просмотра событий — это встроенное приложение в ОС Windows. Он позволяет пользователям просматривать журналы событий на своих компьютерах и управлять ими. Журналы событий — это записи системных событий и уведомлений, которые генерируются Windows и другими приложениями, установленными на компьютере.
- Запустить Приложение для просмотра событий с помощью поиска Windows.
- Нажмите на Приложения и службы logs, чтобы развернуть параметры под ним на левой боковой панели.
- Продолжая на левой панели, нажмите кнопку Майкрософт папка.
- После этого щелкните значок стрелки рядом с Окна папка.
- Перейдите к Защитник Windows папка с левой боковой панели.
- Щелкните правой кнопкой мыши элемент Оперативный и выберите вариант Очистить журнал из появившегося меню.
- Появится окно подтверждения с некоторыми вариантами. Выберите вариант Сохранить и очистить.
Заключение
Это завершение этого руководства, касающееся нескольких доступных способов очистки истории защиты Защитника Windows в Windows 11. Чтобы ваш компьютер мог оптимизировать свою производительность и оставаться в безопасности и без ненужной информации, вам следует чаще использовать любой из этих методы удаления истории сканирования Защитника Windows.
Если у вас есть мысли о Лучшие способы очистить историю защиты Защитника Windows в Windows 11то не стесняйтесь заглянуть ниже поле для комментариев.
Windows Defender, the built-in antivirus program in Windows 11 and Windows 10, plays a crucial role in safeguarding your system against various threats. As part of its functionality, it maintains a history of scanned files and activities to help you keep track of potential security issues. However, there may be times when you encounter issues trying to clear this protection history, whether it’s because the option appears to be grayed out or simply unresponsive. In this guide, we’ll walk you through the steps to address this problem and ensure your Windows Defender protection history is properly cleared.
Also see: How to Clear Timeline Activity History in Windows 10 or 11
Clearing Windows Defender Protection History via File Explorer
The Windows Defender protection history is stored in a specific directory on your system. To clear it, you’ll need to navigate to this directory and delete its contents. Here’s how you can do it.
Step 1: Enabling show hidden files and folders in File Explorer
Hidden files and folders, as the name suggests, are typically not visible to users in order to prevent accidental modification or deletion. But to be able to view the Windows Defender history files, it’s essential to make them visible first. Here’s how:
- Open File Explorer: You can do this by pressing the Windows key + E or by clicking the File Explorer icon on your taskbar.
- Navigate to the “View” Tab: Click on the “View” tab at the top of the File Explorer window. This tab is located next to the “File” tab.
- Click “Show”: In the “Show” section of the ribbon, you’ll find a checkbox labeled “Hidden items.” Click on this checkbox to enable the display of hidden files and folders.

Learn more: How to Unhide a File or Folder in Windows 11
Step 2: Deleting Protection History files from the “Service” directory
Now that you’ve enabled the viewing of hidden files and folders, clearing the protection history manually is a relatively straightforward process. Here’s a step-by-step guide:
- Open File Explorer if it’s not already open.
- Navigate to the following directory by either copying and pasting it into the address bar of File Explorer or manually browsing through the folders:
C:\ProgramData\Microsoft\Windows Defender\Scans\History\Service
- Inside the “Service” folder, you’ll find a set of files related to the protection history of Windows Defender. Select all the files inside this folder. To do this quickly, you can press Ctrl + A on your keyboard.
- Once all the files are selected, right-click on them and choose “Delete” from the context menu.

- A prompt might appear asking for confirmation. Click on “Yes” to proceed with the deletion.
- After the files are deleted, you can close the File Explorer.
By completing these steps, you’ve manually cleared the Windows Defender protection history. If, however, you’re looking for an alternative method or the above steps didn’t work as intended, the Event Viewer offers another way to achieve this.
Related resource: How to Reinstall Windows Defender in Windows 11
Clearing Windows Defender Protection History through Event Viewer
If you find it challenging to clear the Windows Defender protection history using the previous method or if you prefer a different approach, you can use Event Viewer to accomplish the task. Here’s how to do it:
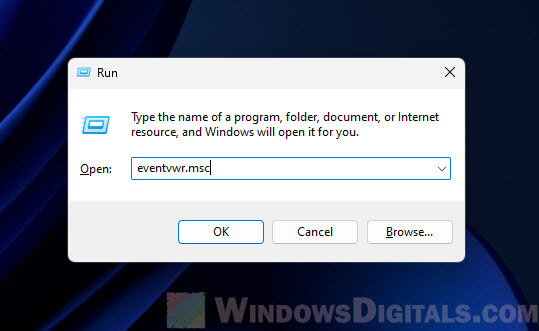
- Open Run dialog: Press Windows key + R to open the Run dialog.
- Type “eventvwr.msc” and click “OK”: In the Run dialog, type “eventvwr.msc” (without quotes) and press Enter or click “OK.” This will launch the Event Viewer application.

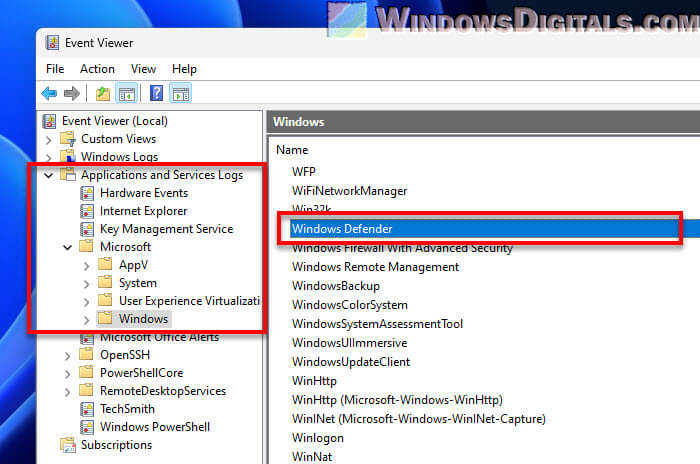
- Navigate to Windows Defender Logs: In the Event Viewer window, expand the “Applications and Services Logs” folder by clicking on the arrow next to it.
- Select “Microsoft” folder: Within the expanded list, find and click on the “Microsoft” folder to expand it further.
- Choose “Windows”: Now, locate and click on the “Windows” folder under the “Microsoft” folder.
- Click on “Windows Defender”: You will see a list of folders related to different Windows components. Find and double-click on the “Windows Defender” folder.

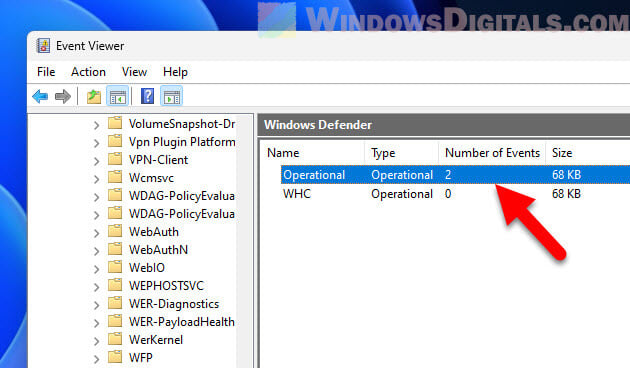
- Select Protection History: In the right pane, you’ll see a list of Operational and WHC logs related to Windows Defender. Double-click on “Operational”

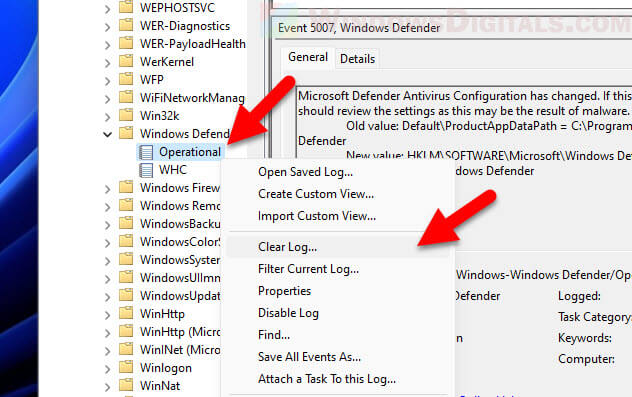
- Clear the history: To clear the protection history, right-click on “Operational” on the left pane and select “Clear Log…” from the context menu.

- Confirm clearing: A dialog box will appear asking if you want to clear the log. Click “Clear” to confirm.
This action will remove all the Windows Defender protection history logs, ensuring a clean slate. The next time you access Windows Defender, you will find that the protection history has been successfully cleared.
Linked issue: Windows Defender Security Center Service Missing Windows 11/10
Final thoughts
Whether users have attended to a protection prompt or have taken necessary actions against a suspicious file, there are various reasons one might want to clear the Windows Defender protection history. For some, it’s a matter of maintaining privacy, for others, it could be about decluttering or even ensuring that old records don’t cause undue alarm.
If the standard method of clearing history in Windows Defender doesn’t serve the purpose, the two methods detailed in this article – File Explorer and Event Viewer – can be invaluable alternatives. Always remember to navigate these processes with caution and to prioritize the security of your system.
Download Windows Speedup Tool to fix errors and make PC run faster
The Protection History page shows detections by Windows Defender and provides detailed and easier-to-understand information about threats and available actions. It now includes Controlled Folder Access blocks, along with any blocks which were made through the organizational configuration of Attack Surface Reduction Rules. In this post, we will show you how to manually clear protection history in Windows Defender on Windows 11/10.
If you use the Windows Defender Offline scanning tool, any detections it makes will now also show in this history. Additionally, you will see any pending recommendations (red or yellow states from throughout the app) in the history list.

This specifies the number of days for which items are stored in the scan log folder. After this time, Windows Defender deletes the items. If you specify a null value, Windows Defender will not remove items. If you do not specify a value, Windows Defender will remove items from the default scan log folder, that is, 30 days.
However, if you want to clear the protection history manually, you can do so in any of the three following ways;
- Using Set-MpPreference PowerShell cmdlet
- Delete Windows Defender Service folder from the local drive
- Using Event Viewer
Let’s take a look at the steps involved in relation to each of the listed methods.
1] Using Set-MpPreference PowerShell cmdlet
The Set-MpPreference cmdlet configures preferences for Windows Defender scans and updates. You can modify exclusion file name extensions, paths, or processes, and specify the default action for high, moderate, and low threat levels.
You can specify a different delay period (in days) by running the cmdlet below in PowerShell admin mode (press Win+X and then tap A on the keyboard):
Set-MpPreference -ScanPurgeItemsAfterDelay 1
The specified number 1 is the number of days after which the protection history log and items in the log folder will be cleared.
2] Delete Windows Defender Service folder from the local drive
To manually clear the protection history, this method requires you to delete the Service folder under the Windows Defender folder on the local drive.
Here’s how:
- Press Windows key + R to invoke the Run dialog.
- In the Run dialog, copy and paste the path below and hit Enter (if prompted, click Continue).
C:\ProgramData\Microsoft\Windows Defender\Scans\History
- Now, right-click the Service folder in that location and select Delete.
You can exit File Explorer.
- Next, open Windows Security > Virus & threat protection > Manage settings.
- Toggle the button to Off then to On again for Real-Time protection and Cloud-delivered protection.
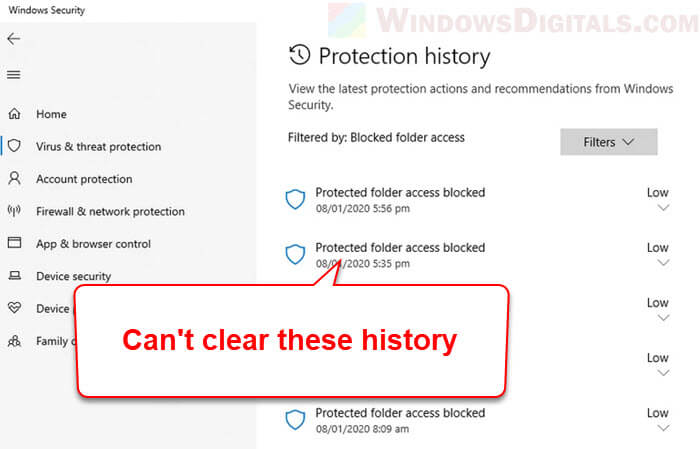
3] Using Event Viewer
![]()
To manually clear the Windows Defender protection history using the Event Viewer (eventvwr), do the following:
- Press Windows key + R to invoke the Run dialog.
- In the Run dialog, type eventvwr and hit Enter to open Event Viewer.
- Under the Event Viewer (Local) section on the left-hand side of the pane, expand the Applications and Services logs option.
- Under this, expand the Microsoft option.
- Click on Windows to open the list of all its files on the middle pane.
- On the middle pane, scroll down to find Windows Defender from the list of files.
- Right-click Windows Defender, and click on Open.
- From the two options in the middle pane, right-click on Operational, and click Open to view all the past logs.
- Now, under Windows Defender folder on the left pane, right-click on Operational.
- Click on Clear Log… on the menu.
- Select Clear or Save and Clear based on your requirement to clear the protection history.
And the above listed are the three ways to manually clear Windows Defender protection history in Windows 11/10.
Where can I find Windows Defender history?
To view your Windows Defender Protection History, open Windows Security, and select the Protection History icon on its Home tab. There you will see the Windows Defender history.
Related: You can also change the Time to Clear Windows Security Protection History.
Why is Windows Defender Protection History empty?
If Windows Defender Protection History empty, missing or not showing, you need to reset Windows Security. Open Windows Settings > Installed apps > Apps and locate Windows Security. Select Advanced options and click on the Reset button.
Read: How to view Advanced Threat Protection (ATP) Reports in Windows
How to delete Windows Defender’s MPCache Files in Windows 11?
In the C:\ProgramData\Microsoft\Windows Defender\Scans folder, you may see some MPCache files. These are Windows Defender cache files and you can delete them manually from this folder location or use Disk Cleanup Tool to delete them.
Obinna has completed B.Tech in Information & Communication Technology. He has worked as a System Support Engineer, primarily on User Endpoint Administration, as well as a Technical Analyst, primarily on Server/System Administration. He also has experience as a Network and Communications Officer. He has been a Windows Insider MVP (2020) and currently owns and runs a Computer Clinic.