Привет админ! Скажите пожалуйста, где находится Карантин Защитника Windows?
Спокойно работал в Windows 10 и вдруг в трее стали выходить сообщения Защитника — «Программа Windows Defender Antivirus обнаружила угрозы. Получите дополнительные сведения», жму на них
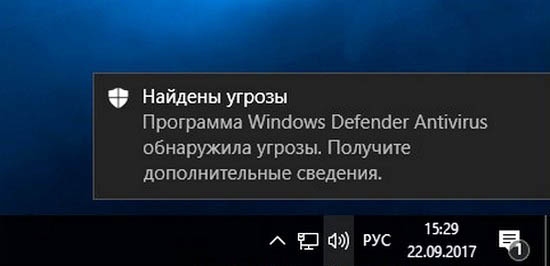
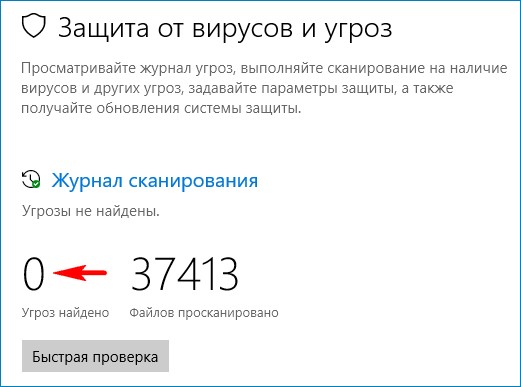
и открывается «Журнал сканирования», в котором написано — «Угрозы не найдены».
Мне бы очень хотелось узнать, в каких именно папках моей операционной системы находились вредоносные программы. Может антивирус ошибочно удалил нормальные файлы? Насколько я знаю, такая информация должна находится в карантине. Как найти его в настройках защитника?
Карантин Защитника Windows
Привет друзья! Так повелось, что у любой антивирусной программы обязательно должен быть карантин, из которого при необходимости можно восстановить заражённый вирусом файл. А как же иначе? Вдруг файл был удалён антивирусником по ошибке. Обычно карантин недалеко спрятан в настройках любого антивируса, но в случае с Защитником Windows случай особый, так как он встроен в операционную систему.
Недавно я оказался в такой же ситуации, как и наш читатель. На компьютере клиента встроенный антивирус от Майкрософт периодически находил и обезвреживал вредоносные файлы, а затем просил перезагрузку, после которой всё повторялось. Было понятно, что Windows Defender не мог справится с задачей и до конца удалить размножающийся на компьютере вирус. Лишь только открыв Карантин, мы нашли информацию о местонахождении вируса и до конца удалили его уже в безопасном режиме.
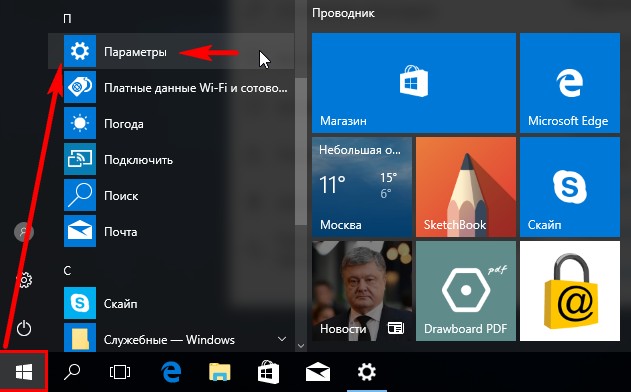
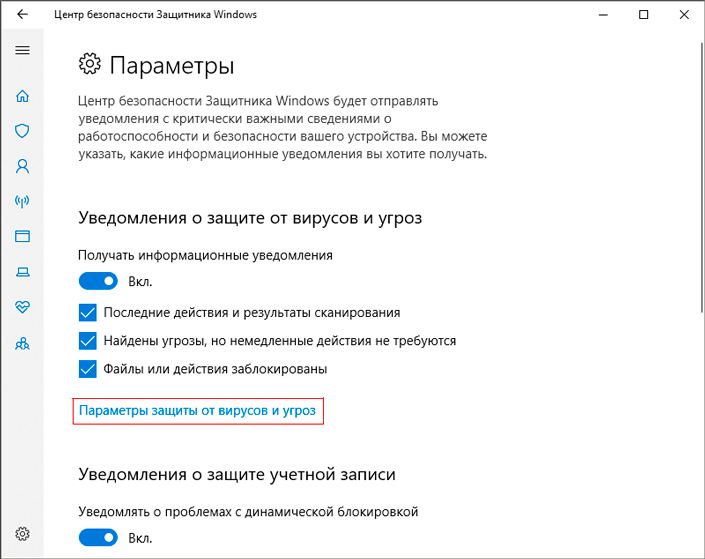
Открываем «Параметры»
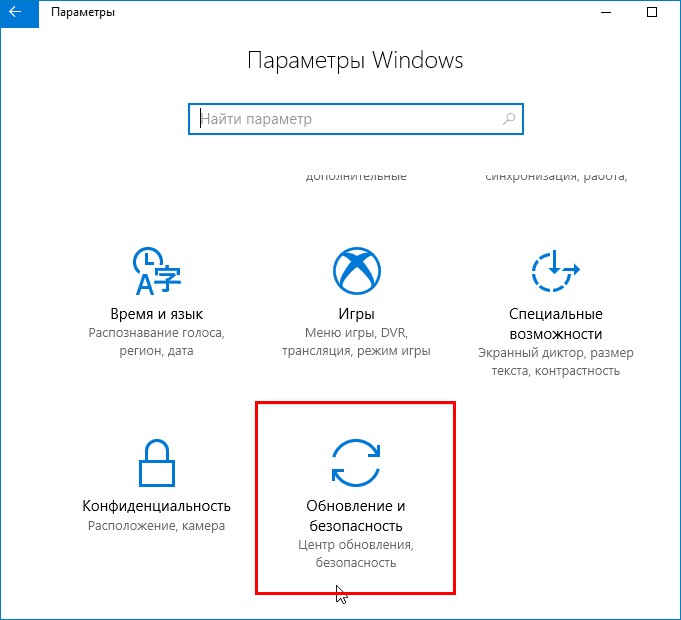
«Обновление и безопасность»
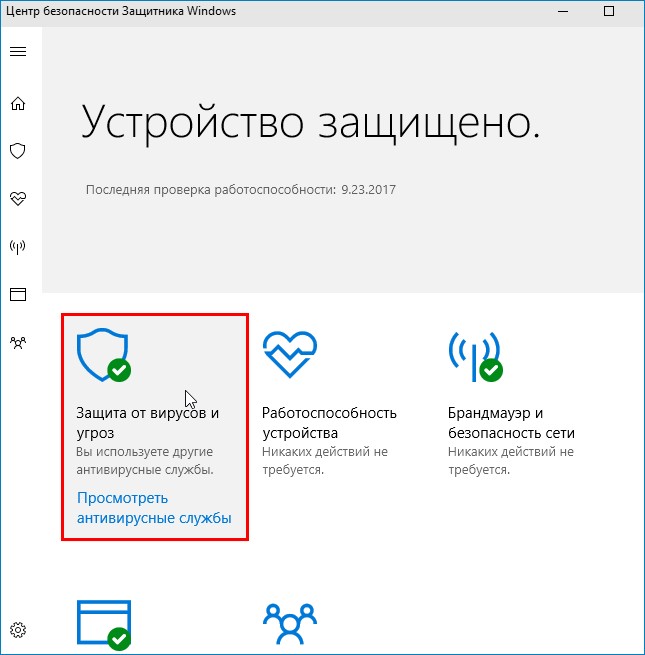
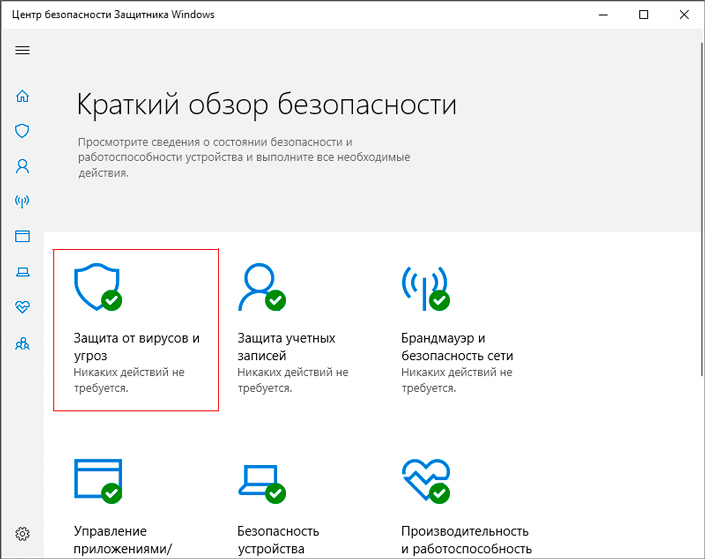
«Защитник Windows» —> «Открыть Центр безопасности Windows Defender»

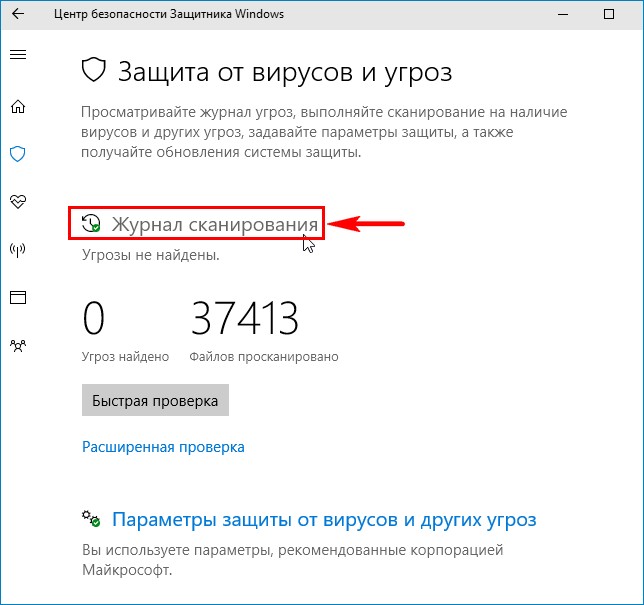
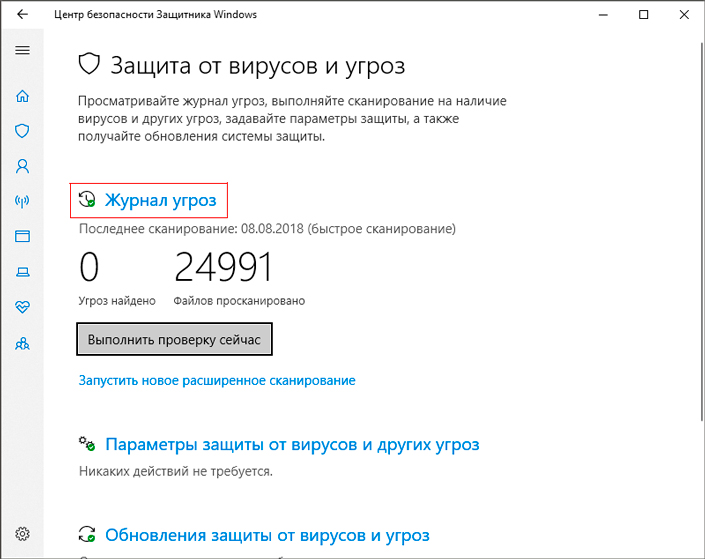
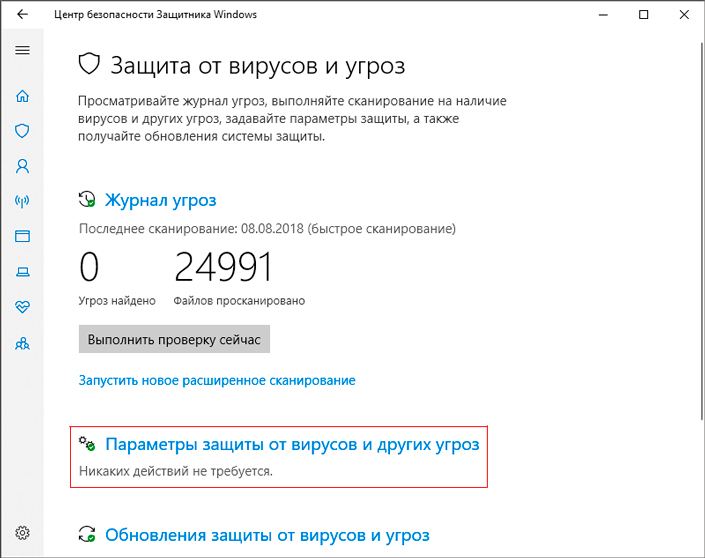
«Защита от вирусов и угроз».
«Журнал сканирования»
В данном окне и спрятался Карантин Защитника Windows. Управлять его настройками очень просто.
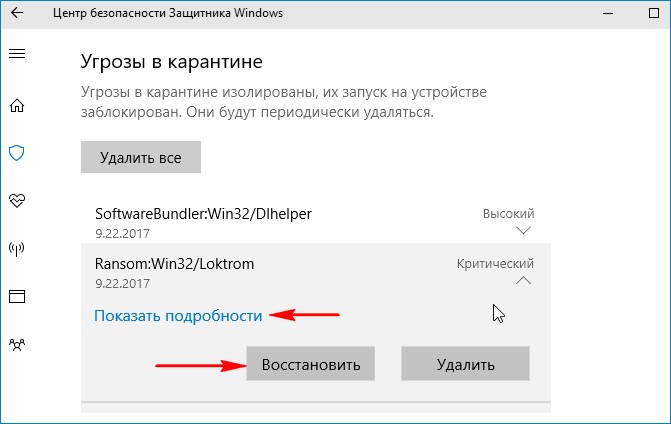
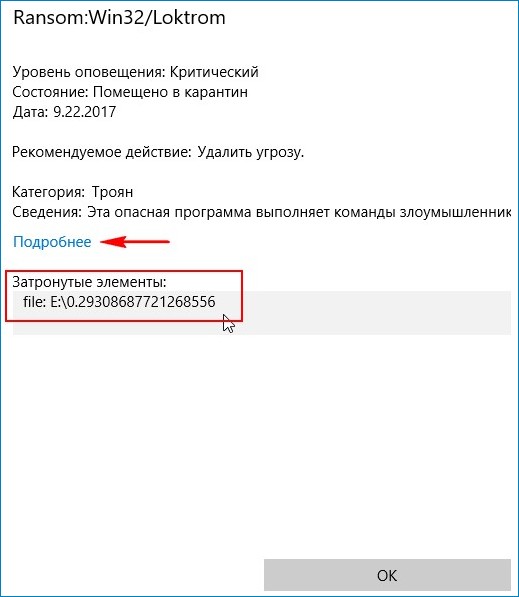
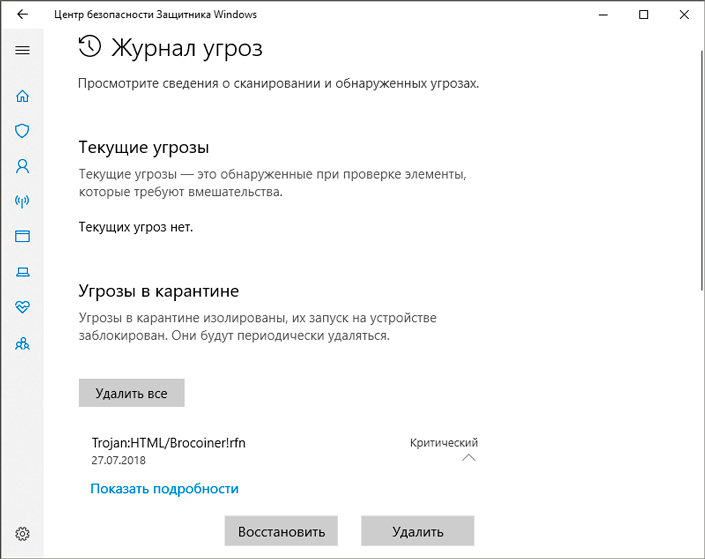
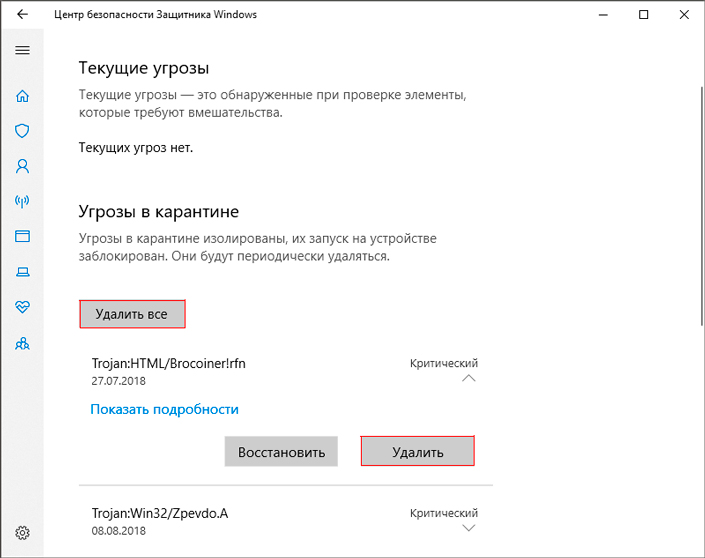
Нажмите «Удалить всё» и все угрозы удалятся. Если хотите узнать подробности, связанные с той или иной вредоносной программой, выделите её левой кнопкой мыши.
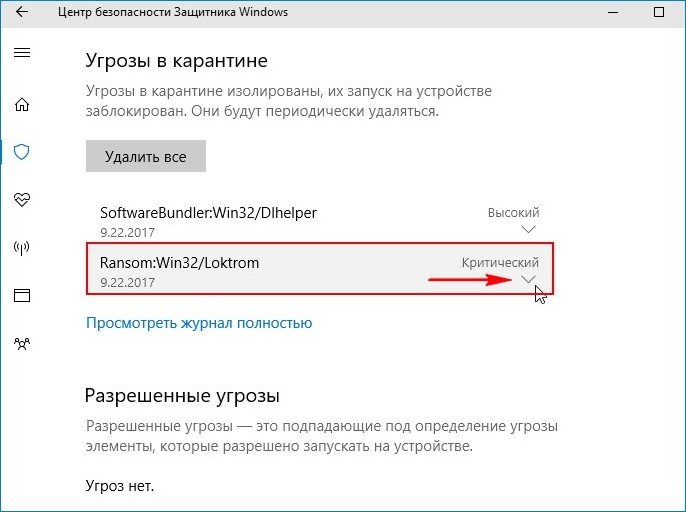
В выпадающем меню можно восстановить заражённый файл или удалить, а также узнать связанные с ним подробности. Нажмите на кнопку «Показать подробности».
Опасная троянская программа находилась нашей флешке (буква диска E:).
Для просмотра всех нейтрализованных угроз, в предыдущем окне жмите на кнопку «Посмотреть журнал полностью».
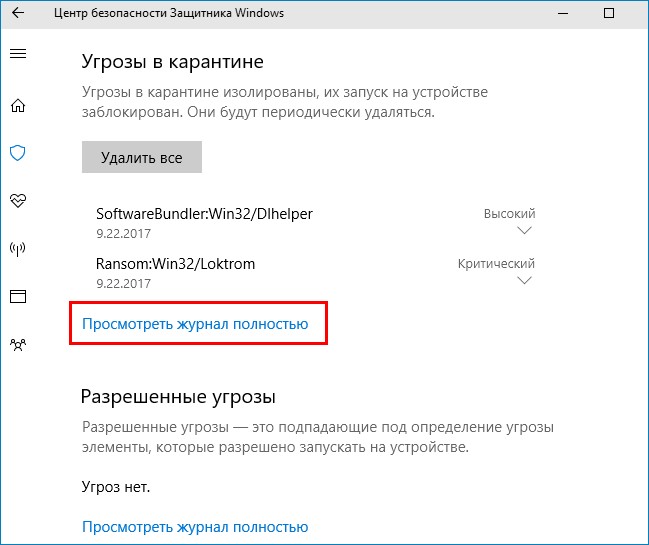
Откроется «Полный журнал» с информацией о всех нейтрализованных антивирусом объектах.
Выделите интересующую вредоносную программу левой кнопкой мыши.
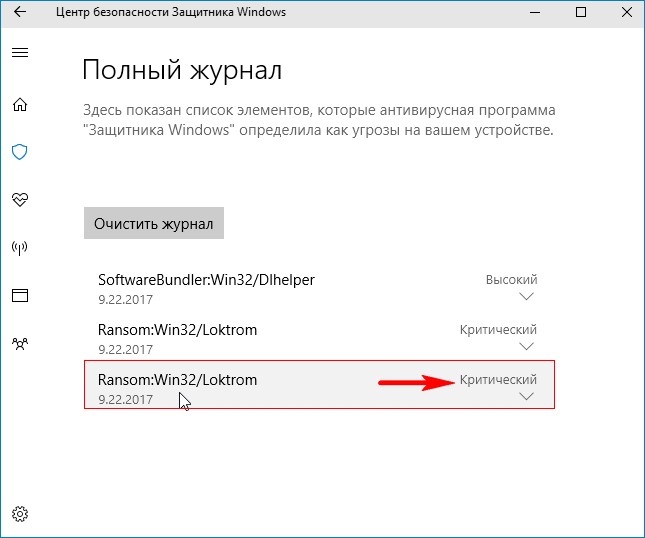
«Показать подробности»

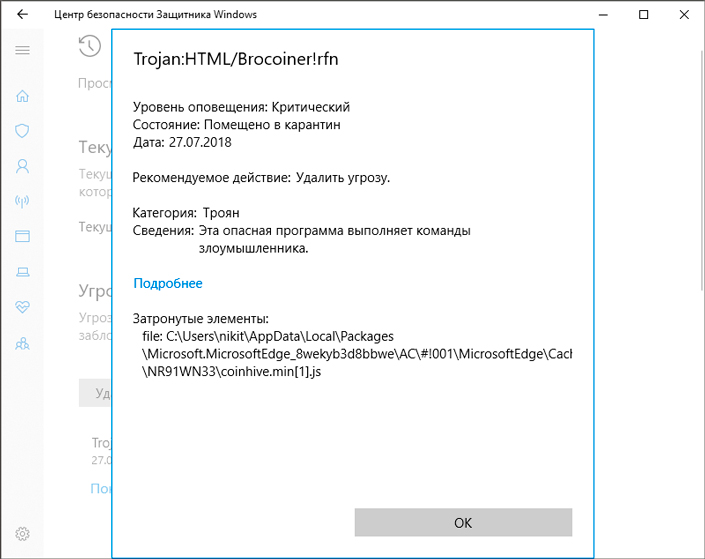
В нашем случае опасная троянская программа находилась в папке «Автозагрузка» для всех пользователей, которая находится по адресу:
C:\ProgramData\Microsoft\Windows\Start Menu\Programs\StartUp
Если нажать «Подробнее»,
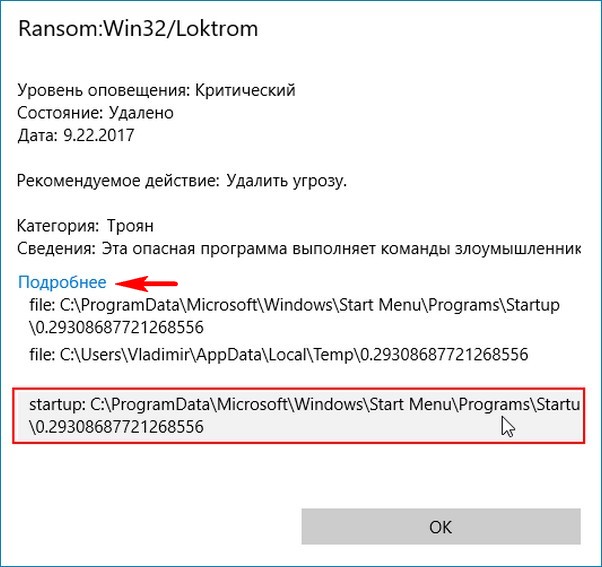
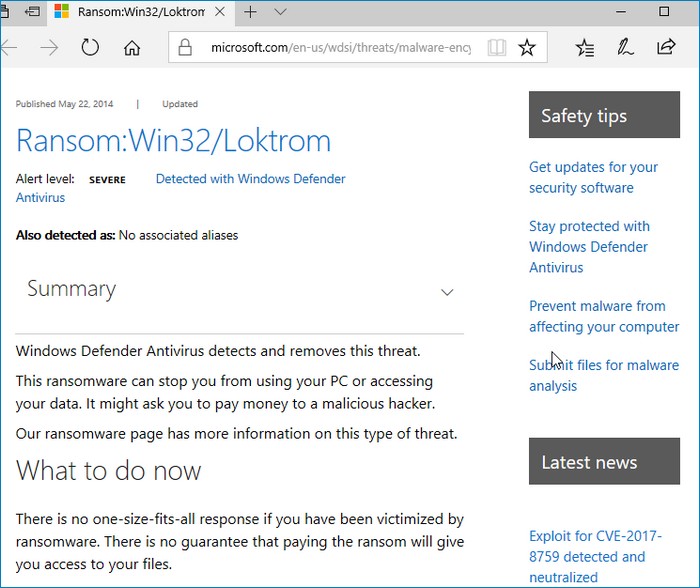
то откроется браузер Microsoft Edge с точным описанием данного вируса.
Встроенная система защиты Windows удалила ценные данные или поместила их в карантин? Сегодня мы расскажем про способы восстановления удаленных данных, разберем куда деваются перемещенные файлы, а также приведем оптимальные настройки встроенного защитника ОС.

Содержание
- Как настроить, включить или отключить встроенную защиту?
- Как восстановить файл из карантина встроенного «защитника Windows»
- Как настроить исключения для системы защиты?
- Что делать если защитник Windows удалил важные данные?
Система защиты Windows является встроенным антивирусным ПО, которое позволяет избегать проникновению и распространению вредоносных программ по компьютеру пользователя.
Антивирус в Windows 10 — достаточно мощный защитник системы, не поддающийся для взлома даже опытным хакерам. Именно поэтому самыми частыми жертвами взломов становятся пользователи, использующие более старые версии операционных систем, а также те, кто отключили антивирус, выбрав защиту от сторонних производителей.
Несмотря на свою эффективность встроенная защита Windows не идеальна, поэтому некоторые пользователи могут столкнутся с тем, что антивирус удалил важные данные, приняв их за потенциальную угрозу. Ниже мы разберем основные способы того, как вернуть утерянную информацию, удаленную защитой ОС.
Как настроить, включить или отключить встроенную защиту?
В настройках встроенной защиты пользователь сможет отключить, включить или настроить «Защитник Windows» под свои нужды.
Важно! Мы настоятельно не рекомендуем отключать защиту системы на длительный период. Это следует делать только перед установкой сторонних антивирусных программ, чтобы избежать конфликтов двух систем защиты.
Чтобы попасть в меню ручного управления встроенной защитой Windows необходимо:
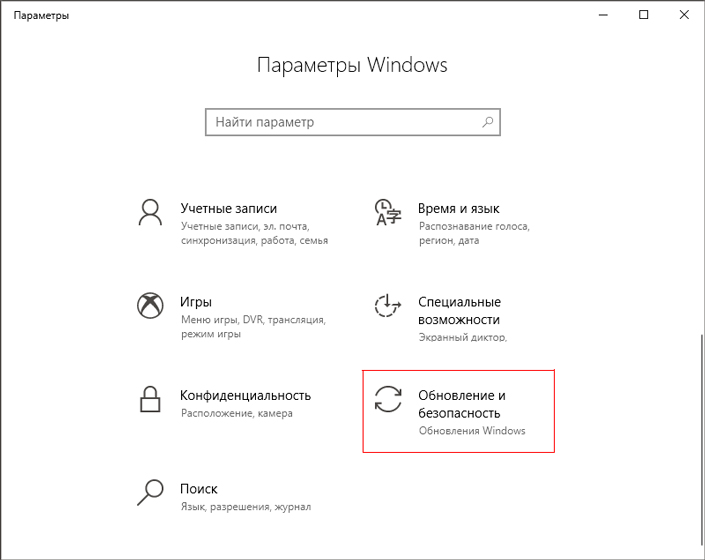
Шаг 1. Нажать правой кнопкой мыши по «Пуск» и в открывшемся окне выбрать пункт «Параметры».

Шаг 2. В открывшемся меню настроек переходим в пункт «Обновление и безопасность».

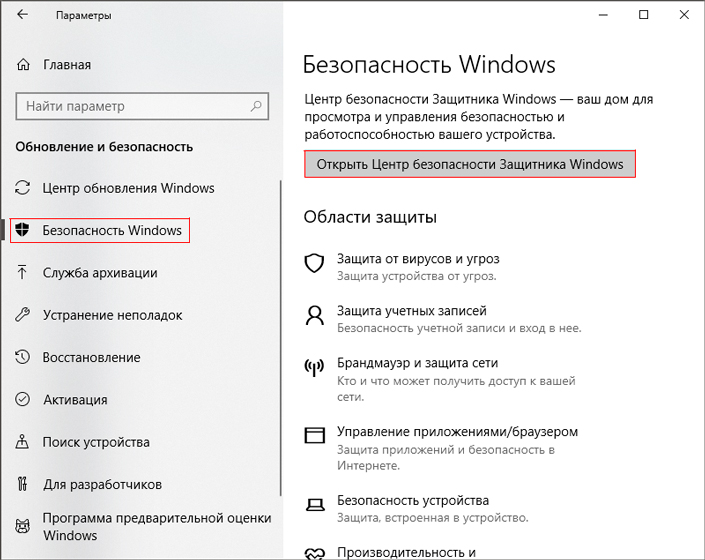
Шаг 3. В следующем окне выбираем пункт «Безопасность Windows» и нажимаем по кнопке «Открыть службу «Безопасность защитника Windows»».

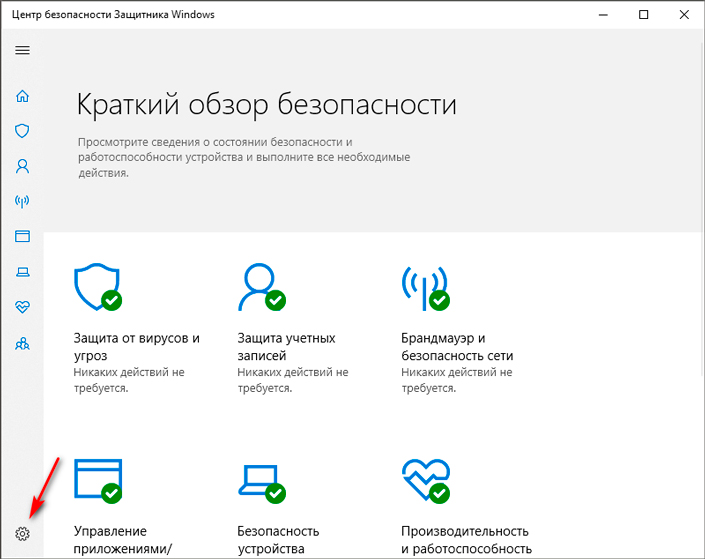
Шаг 4. В Центре безопасности защитника, переходим в нижний левый угол окна и нажимаем по шестеренке, после чего нажимаем по кнопке «Управление поставщиками».

Шаг 5. В открывшемся меню нажимаем по кнопке «Открыть приложение».

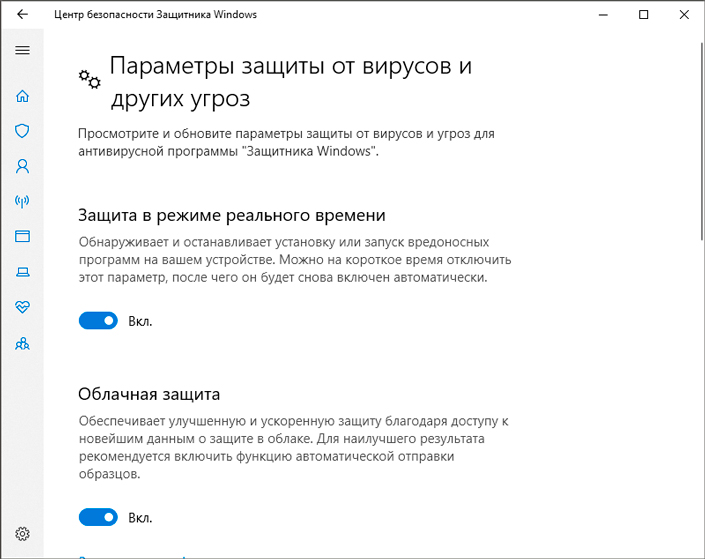
Шаг 6. Здесь находится вкладка «Параметры защиты от вирусов и угроз». Нажимаем по кнопке «Управление настройками».

Шаг 7. В открывшемся окне присутствует три направления работы встроенной защиты. Для полного отключения «Защитника Windows» достаточно перевести все пункты в режим «Выключено».


Как восстановить файл из карантина встроенного «защитника Windows»
«Защитник Windows» работает в автоматическом режиме, поэтому все подозрительные файлы и данные автоматически помещаются в карантин.
Система защиты работает по принципу сравнения подозрительных данных с информацией о вирусном ПО, которая хранится на сервере Microsoft. Это позволяет выявлять вредоносные программы с максимальной точностью, поэтому файлы, занесенные в карантин, могут являться реальной угрозой системы. Мы не рекомендуем восстанавливать те файлы, в которых нет уверенности, что они не причинят вред компьютеру.
Существует два способа просмотра файлов, попавших в карантин. Первый – через «Центр безопасности Windows», второй – через Проводник. Первый способ предоставляет максимальную безопасность и дает полный отчет, почему файл был помещен в карантин.
Второй способ – небезопасен, поскольку пользователь сможет взаимодействовать с исполняемыми файлами вируса, что непременно привет к заражению.
Чтобы попасть в карантин через проводник, достаточно просто пройти по пути проводника «C:\ProgramData\Microsoft\Windows Defender\Quarantine» и включить отображение скрытых папок и системных файлов.

Для того, чтобы открыть карантин в «Центре безопасности», необходимо:
Шаг 1. Зайти в «Центр безопасности» способом, описанным выше, после чего выбрать пункт с эмблемой щита «Защита от вирусов и угроз».

Шаг 2. В открывшемся окне выбираем пункт «Журнал угроз».

Шаг 3. В открывшемся окне можно увидеть все угрозы, которые были помещены в зону карантина. Подозрительные файлы можно удалить или восстановить в данном окне.

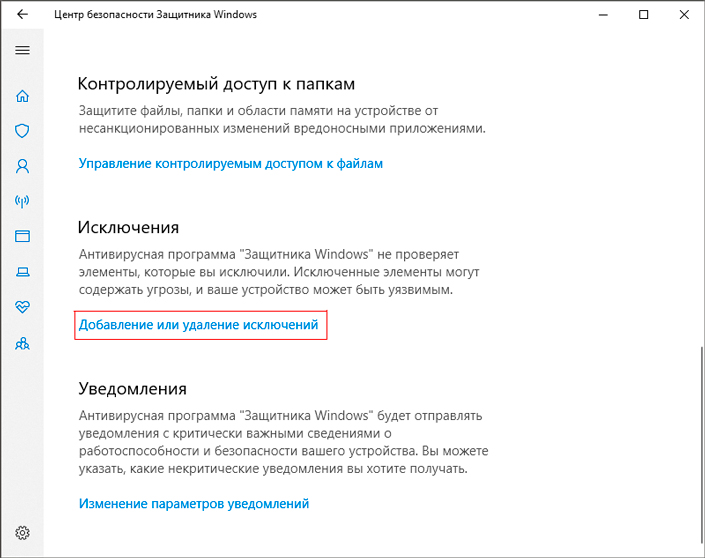
Как настроить исключения для системы защиты?
Находясь в Центре безопасности Windows можно установить исключения для определенных файлов. Данные, занесенные в исключения не будут проверятся встроенной системой защиты и их можно будет использовать в обычном режиме.
Для этого необходимо:
Шаг 1. Как и в предыдущем пункте, открываем графу с изображением щита «Защита от вирусов и угроз», после чего в следующем окне нажимаем по кнопке «Управление настройками», которая расположена под графой «Параметры защиты от вирусов и других угроз».

Шаг 2. В открывшемся окне опускаемся в самый низ настроек и переходим в пункт «Добавление или удаление исключений».

Шаг 3. В данном меню можно выбрать исключения для файлов, нажав по кнопке «Добавить исключения».

Что делать если защитник Windows удалил важные данные?
Встроенная система защиты не всегда работает корректно и периодически может удалять важные файлы воспринимая их как угрозу безопасности. Это могут быть данные как на системном диске или рабочем столе, так и на других локальных дисках. К сожалению, предугадать неадекватное поведение Защитника Windows нельзя, поэтому важно знать, как восстановить удаленный файл, чтобы не потерять данные безвозвратно.
Как только вы заметили пропажу данных немедленно скачайте и установите программу RS Partition Recovery.
Программа обладает интуитивно понятным интерфейсом, что заметно выделяет ее среди конкурентов. Кроме того, RS Partition Recovery поддерживает ВСЕ современные файловые системы благодаря чему вы можете восстанавливать данные, удаленные защитником Windows с домашних серверов и с дисков, которые использовались в других операционных системах.

Немаловажной функцией является режим глубокого сканирования диска, который позволяет восстанавливать данные, утерянные даже несколько месяцев тому назад, так как пользователи не всегда сразу же определяют пропажу информации.
У вас будет возможность сохранить восстановленный файл на жесткий диск, флэшку, ZIP-архив или загрузить его на FTP-сервер. Главное, чтобы выбранное место отличалось от диска, на котором файл хранился изначально.
Часто задаваемые вопросы
Защитник Windows – это специальный инструмент защиты Windows, который сравнивает запускаемые приложения с собственной базой данных. Фактически это встроенный антивирус Windows 10. К стати говоря, взломать защитник Windows достаточно сложная задача даже для опытных хакеров.
Откройте «Параметры Windows», затем откройте «Защита от вирусов и угроз» «Управление настройками» —> «Параметры защиты от вирусов и других угроз» —> «Добавление или удаление исключений» —> «Добавить исключения»
Для начала создайте папку и добавьте ее в исключения Защитника Windows, чтобы он снова его не удалил. Затем воспользуйтесь программой RS Partition Recovery и запишите восстановленный файл в эту папку. RS Partition Recovery создана как раз для таких случаев.
Да. Можно. Войдите в настройки Защитника Windows и откройте «Журнал Угроз». Найдите нужный вам файл и нажмите «Восстановить».
В большинстве случаев отключать Защитник Windows не нужно даже при использовании антивирусов от сторонних разработчиков. Однако если вы уверены в вашем антивирусе – вы можете его отключить. О том, как это сделать вы можете прочесть на нашем сайте.
Have you ever had the frustrating experience of having Windows Defender (Windows Security) quarantine a file that you actually needed? It can be a real headache, especially if you don’t know how to restore it.
Fortunately, the process is relatively straightforward, and in this article, we’ll walk you through everything you need to know to restore quarantined files in Windows Defender. From why files get quarantined in the first place to the step-by-step process of restoring them, you will be armed with all the information you need to get your files back where they belong.
Table of contents
- What is Microsoft Defender (Windows Security)
- What are Quarantined Files and What Happened to Them
- Which Files are Quarantined by Windows Security
- Where are Quarantined Files Stored in Windows Defender
- How to Restore Windows Defender Quarantined Files
- Restore Quarantined Items using Windows Security
- Restore Quarantined Items from Command Prompt
- Final Verdict
- Frequently Asked Questions (FAQs)
- Is It Safe To Run Quarantined Files?
- Restoring Quarantined Files by Microsoft Defender Antivirus
What is Microsoft Defender (Windows Security)
Microsoft Defender is a safety tool for protecting your computer from all sorts of digital nasties. It is like a digital bodyguard for your PC.
It is a built-in anti-malware tool that comes with the Windows operating system. It uses advanced technology to detect and remove threats in real-time, so you can browse the web and download files without worrying about viruses or malware.
Alongside scanning for malicious software, Microsoft Defender monitors your system for any suspicious activity that could indicate a potential threat. It also blocks malicious websites before they can cause any damage to your system.
But that’s not all! Microsoft Defender also includes a range of other features to keep your computer secure, including a firewall to protect your network from hackers, parental controls to keep your kids safe online, and even ransomware protection to safeguard your files from being held hostage.
The best part is that Microsoft Defender updates automatically, so you can be sure you are always protected against the latest threats.
What are Quarantined Files and What Happened to Them
Quarantined files are identified by your computer’s security software, i.e. Microsoft Defender, as potentially harmful to your system. When a file is quarantined, it is moved to a secure location on your computer that can’t cause any harm.
Quarantine is like a holding area where the file is kept away and isolated from the rest of your system to prevent it from doing any damage. Think of it like a “time-out” for a misbehaving file. Microsoft Defender can prevent it from running and potentially damaging your system or stealing your personal information by isolating it in quarantine.
When the file is isolated and put into quarantine, it is automatically removed from the original directory. Therefore, you may no longer be able to see it.
This gives you time to figure out whether the file is actually malicious or not. If you determine that the file is safe, you can release it from quarantine and put it back where it belongs. But if the file is harmful, you can safely delete it from quarantine without risking your computer.
Which Files are Quarantined by Windows Security
Quarantined files can include all sorts of things, such as viruses, malware, spyware, and other types of malicious software. Here are the common files that Windows Security usually quarantines.
- Viruses – Malicious programs that can replicate themselves and spread from one computer to another. They can cause harm to your system, steal personal information, or cause other types of damage.
- Malware – This is a general term that refers to any software designed to harm your computer, steal your data, or cause other types of damage. Malware can come in many different forms, including viruses, spyware, adware, and more.
- Trojan Horses – Programs that appear harmless but contain hidden pieces of code that cause harm to your computer. They may allow attackers to gain unauthorized access to your system or steal personal information.
- Rootkits – Stealthy types of malware that can hide their presence on your system and give attackers remote access to your computer.
- Ransomware – A type of malware that encrypts your files and demands payment in exchange for the decryption key.
- Potentially Unwanted Programs (PUPs) – Programs that are installed on your computer without your knowledge or consent. These are responsible for slowing down your system, displaying unwanted ads, or collecting personal information.
- Suspicious Files – The files that may have characteristics of malware, such as a suspicious file name or behavior, but are not classified as a specific type of threat. This includes all files and drivers authorized vendors and manufacturers do not digitally sign.
Where are Quarantined Files Stored in Windows Defender
The default location for virus storage in Windows Security is C:\ProgramData\Microsoft\Windows Defender\Quarantine. However, it is best to use the Windows Security interface to handle them instead of directly accessing this location because it is more dependable.
Note: The “ProgramData” folder is hidden by default. Learn how to show hidden folders or access the directory directly by typing in the path in the navigation bar in File Explorer.
Now that we understand what quarantine files are and why they are removed, let us move on to restoring them (if needed).
How to Restore Windows Defender Quarantined Files
As we mentioned before, some files and software are quarantined simply because they are not signed by an identified authority, but contain no virus or malware. Such files can be safely restored without putting your PC in harm’s way. There are two methods to restore quarantined files.
Restore Quarantined Items using Windows Security
The easiest and most convenient method to restore quarantined files is from the Windows Security app itself. Here is how:
-
Navigate to the following:
-
In Windows 11:
Settings app >> Privacy & security >> Windows Security >> Virus & threat protecton
-
In Windows 10:
Settings app >> Update & Security >> Windows Security >> Virus & threat protection
-
-
Click “Protection history” under Current threats.

Open Protection history in Windows Security Here, you will see a list of quarantined files along with their vulnerability intensity.
-
Click on the item that you want to restore to expand it.
List of quarantined files -
Click the “Allow” drop-down menu and then click “Allow.”

Allow the quarantined file to run -
If prompted with a UAC, click “Yes.”


The file will now be removed from quarantine and restored to its original location.
Restore Quarantined Items from Command Prompt
Another method to restore quarantined files is from the Command Prompt.
-
Launch an elevated Command prompt.
-
Run the following cmdlet to change the directory to where the Windows Security is located:
cd “%ProgramFiles%\Windows Defender”
Change directory to Windows Defender location -
Now run the following cmdlet to list all the quarantined files:
MpCmdRun.exe -restore -listall
List all quarantined files in Command Prompt You will now have the names of all the quarantined files along with the timestamp of when were quarantined. Note down the name of the file that you want to restore.
-
Now use the following command to restore a quarantined file while replacing “[FileName]”.
MpCmdRun.exe -restore -name "[Filename]"Restore quarantined items using Command Prompt


The named file will now be restored to its original directory and allowed to run on your PC.
Final Verdict
This article lists two methods to restore quarantined items on Windows 10 and 11. However, Windows Security is incapable of differentiating between actual harmful threats and the files that are safe to run but only signed by an unauthorized entity. Therefore, it is up to you, the end user, to allow and restore only the safe files on your PC.
If you accidentally restore a malicious file, the chances are, that your computer is going to get infected when you run it. That is why caution is advised when you use the methods given above to restore quarantined files and items.
Frequently Asked Questions (FAQs)
Is It Safe To Run Quarantined Files?
Files in quarantine are safe to run as long as they are not harmful. Oftentimes, Microsoft Defender detects normal files are infected and move them to the quarantine folder. Make sure to check all the quarantine files before you restore any for a safe run.
Restoring Quarantined Files by Microsoft Defender Antivirus
Almost every Windows user relies on Microsoft Windows Defender to keep their system safe from malicious items. However, the antivirus program fails to determine whether a certain file is harmful or not and quarantines it. Fortunately, following the straightforward methods shared above, you can find and recover the quarantined files easily.

- Author:
- Ruslan Yermolov
- Update date:
- Publication date:
- September 26, 2018
Many PC users have experienced data loss due to Windows Defender deleting important files due to false positive threat detection or because of a document containing malware. How can you restore files deleted by Windows Defender, and how can you reduce the number of future incidents?
Before we begin, it is important to find out why a particular file or document was picked by Windows Defender. Malicious documents or infected executable files may affect the operating system or programs. Such files are subject to quarantine or complete erasure.
Without this protection, our computers would not be safe to use; their performance would degrade, and sooner or later you would experience severe loss of data.
In order to protect computer users and to maintain the PC health and performance, the antivirus always seeks to prevent possible threats and eliminate them long before they inflict the first damage. Sometimes these preventive actions lead to the loss of files the user would not want to lose. Some other times antivirus tools have false positive detections (for example, due to digital signature mismatch, revocation or expiration), and sometimes the particular file is mistakenly reported to the manufacturer of an antivirus tool for no obvious reason.
Can we restore such files while bypassing the Windows Defender system? We definitely can!
In this article, we will take a closer look at what Windows Defender is, how to enable or disable it, and its main functions. We’ll also answer the burning question: do you actually need a third-party antivirus tool if Windows has a built-in antivirus already?
Contents:
- What is Windows Defender Offline?
- How to enable or disable Windows Defender?
- Windows Defender Quarantine
- How to open Quarantine with Windows Defender?
- Windows Defender Exclusions
- Windows Defender deleted an important file. What to do?
- Do I need a third-party antivirus in Windows 10?
- Questions and answers
- Comments
What is Windows Defender Offline?
Windows Defender is more than just a virus scanner. Instead, Windows Defender is a built-in protection system for the entire operating system. It is designed to detect, prevent and eliminate malicious software, spyware and other malware that can damage your data or your computer. Windows Defender is provided by Microsoft as a built-in tool in Windows 8, Windows 10 and newer versions.
If you are using an older version of Windows, you can always download Microsoft Security Essential, which is backwards compatible with Windows Vista and Windows 7.
What is the difference between them? Both tools are able to provide the same effective kind of protection for your operating system, so one may think that only the names are different.
Windows Defender has substantial benefits over Microsoft Security Essential because of its tight low-level integration with the OS. In fact, the operating system gets a lot of protection from rootkits and bootkits when using the latest versions of the Defender.
There are different types of viruses that can sneak and hide in our devices and completely disable built-in antivirus software.
Windows Defender Offline is designed to help solve this complex situation by working from the outside. With Windows Defender Offline, you can boot your computer straight into the antivirus, scan your computer and delete the virus while it is not running.
Here’s how to activate Windows Defender Offline.
- 1.Press Start > Settings > Update & Security > Windows Security > Virus & threat protection.
- 2.Click Run a new advanced scan.
- 3.In Advanced scans, select Windows Defender Offline scan and click Scan now. Your computer will be rebooted straight into Windows Defender. The tool will then scan your computer for about 15 minutes, then restart the system to get you back to Windows.
How to enable or disable Windows Defender?
You probably never asked this question before. The antivirus works, and there’s nothing to worry about. But what if it shuts down for some reason and needs to be turned back on?
Even in spite of the fact that Microsoft hid the on/off function deep enough in the depths of the system setting, it can still be found. Let’s see how to find it:
1. Use the Win + I key combination to open the Settings menu.
2. Go to Update and Security.

3. Select the Windows Security item.
4. Select the Open Windows Defender Security Center option.

5. Find the gear icon in an opened window. It will allow you to go to the Settings section of the built-in antivirus.

Helpful tip
You can always set notification mode to receive notifications in that window.
6. Open the Virus and Threat Protection Settings.

7. We have reached the point. In this menu, you can enable or disable any of the three Windows Defender settings:
- Real-time protection;
- Cloud-delivered protection;
- Automatic sample submission;
Windows Defender Quarantine
Before deleting any suspicious file, Windows Defender always places it in quarantine, briefly describing the nature of the possible threat and the potential threat level that threat may pose. In this chapter, we will find the exact location of the “suspects”.
By default, the Windows Defender virus storage is located under the following path: C:\ProgramData\Microsoft\Windows Defender\Quarantine. However, we recommend you to interact with them only through antivirus software as it is much more reliable.

Note:
The ProgramData folder is hidden by default. If you want to see it, you must first enable the display of hidden folders and files in the Explorer settings.
How to open Quarantine with Windows Defender?
It’s simple! Follow the steps below and you will quickly solve it.
1. Use the Win + I key combination to open the Settings menu.
2. Go to Update and Security.
3. Select the Windows Security item.
4. Select the Open Windows Defender Security Center option.
5. Open the Virus and Threat Protection window.

6. Open the Threat Log. You can also scan your device in this section.
7. Here you can see the complete list of available and eliminated threats that Windows Defender placed in quarantine. Quarantined items are absolutely harmless while they’re held in quarantine.
8. Press the Show Details to examine quarantined files.
9. In the same quarantine menu, you can delete a specific file or all detected viruses at any time by clicking the Delete button next to the desired file, or using the Delete all command to erase all files.
Windows Defender Exclusions
In certain cases, an antivirus can block even completely safe files that interact with the system and other applications in one way or another. For one or another reason, the antivirus may consider them to pose a threat. This situation is called a false positive detection. Files that are falsely detected as threats will also be quarantined. However, such files are often parts of an installed program. Placing such files into quarantine prevents the correct functionality of affected applications.
If you are absolutely sure a particular file poses no threat, you can manually fix false positive detection by adding the locked file to the list of exclusions.
Let’s look at detailed instructions on how to do this.
1. As described in the previous chapter, open the Windows Defender window.
2. Go to Virus and Threat Protection.
3. Open the Virus and Threat Protection Settings.
Scroll to the bottom of the window and find the Exclusions option. Click Add or remove exclusions.

5. Click Add exclusion and select the type.
6. Specify the path to the file, folder, file type or process that you want to add as exclusion.
If you have several programs that are falsely detected by Windows Defender, you can place all of them into a separate folder. This will ensure that these files are excluded from future detections.
Important:
We highly recommend you to never upload files obtained from untrusted sources to the Exclusion folder. Nobody wants to give a virus control over your computer. Such a careless action can lead to rather unpleasant consequences.
Windows Defender deleted an important file. What to do?

It is common for a user to simply not know how to recover a deleted file. Windows Defender blocks all attempts to recover files it deletes. Truth be told, this can sometimes save your operating system from hacking and prevent identity theft.
However, even good intentions are not always beneficial, and you may still want that deleted file back.
If you want to recover files removed by Windows Defender, you can perform low-level analysis of the disk on which the file is located with Starus Partition Recovery tool. After the scan is complete, perform the recovery to an external drive such as a USB flash drive. This will help you bypass the block imposed by Windows Defender and recover the files that were recently lost.
Top of the line product to repair broken partitions and recover missing information
Starus Partition Recovery has an intuitive user interface and offers convenient grouping by file type. You’ll be able to find the right file in a matter of seconds.
Do I need a third-party antivirus in Windows 10?
If Windows Defender is really this good, why are there so many third-party options? Are third-party antivirus tools made by companies specializing in computer security better than the built-in Microsoft antivirus? This is a very reasonable question. The answer depends on who you are and what you need.
Windows Defender is a robust built-in antivirus tool that is distributed by Microsoft for free with the OS itself. Windows Defender is well maintained and frequently updated. If you are using your computer at home, Windows Defender is probably all you need. If, however, you are working in a sensitive environment or dealing with sensitive data, or if you are managing a large network, or if the computer is part of a campus network or a publicly accessible one, then you may need a different solution with stronger protection and tighter restrictions.
Do note that updates are very important. New threats appear almost every other day. New threats cannot be detected or stopped by outdated versions of antivirus tools. If you do not receive timely updates, you will be in a worse situation than by not using an antivirus at all due to the sense of false security.
We hope you found this article useful and helped you recover deleted files with Windows Defender.
Антивирус Windows удалил мои файлы, как восстановить — довольно часто эти слова можно услышать от большинства пользователей ПК. Зачастую, помещению в карантин или полному стиранию подлежат только вредоносные документы, тем или иным образом воздействующие на операционную систему или программные файлы в ней.
Согласитесь, без этой защиты наши компьютеры не протянули бы так долго и, скорее всего, перестали бы функционировать уже через пару месяцев эксплуатации по причине критических изменений в коде.

Опасаясь за здоровье ПК, антивирус всегда стремится предупредить возможную угрозу и ликвидировать ее задолго до того, как она успеет нанести свой первый ущерб системе. Иногда эти действия приводят к стиранию файлов, которые пользователи не хотели бы терять — ведь без них может не запуститься та или иная программа, а способов загрузить их снова нет.
Можно ли восстановить такой файл, обойдя системы Защитника Windows? Однозначно да!
В этой статье мы детально рассмотрим что же такое этот Защитник Windows, как его включить или деактивировать, основные функции и, пожалуй, самую животрепещущую тему — нужна ли сторонняя программа при наличии встроенного антивируса?
Содержание статьи:
- Что такое Автономный защитник Windows?
- Как включить или деактивировать Защитник Windows?
- Карантин Защитника Windows.
- Защитник Windows. Исключения.
- Защитник Windows удалил важный файл. Что делать?
- Нужен ли сторонний антивирус при наличии Windows 10?

Что такое Автономный Защитник Windows?
Защитник Windows (Windows Defender Antivirus) — это встроенное средство защиты операционной системы, предназначенное для устранения вредоносного ПО, программ-шпионов и других приложений, способных тем или иным образом повредить нашему компьютеру. Оно предоставляется встроенным софтом исключительно для Windows 8 и более свежих версий.
Тем не менее, если вы являетесь обладателем более старых релизов ОС, вы всегда можете загрузить Microsoft Security Essential, совместимый с Windows Vista и Windows 7.
В чем между ними разница, спросите вы? Оба этих инструмента способны обеспечить одинаковую по эффективности защиту вашей операционной системы — только названия разные.
Защитник Windows обладает скорее дополнением, а не отличием от Microsoft Security Essential. Оно заключается в том, что при использовании последний версий Защитника, операционная система получает большую защиту от руткитов и буткитов.
Существуют различные типы вирусов, которые способны мастерски скрываться на наших устройствах и полностью обезоруживать встроенное антивирусное ПО.
Автономный Защитник Windows призван, чтобы помочь решить эту сложную ситуацию путем работы извне. Установите его флеш-накопитель, подключите к зараженному устройству, просканируйте его и удалить вирус!
Как включить или деактивировать Защитник Windows?
Вы, должно быть, как и я никогда раньше не задавались этим вопросом. Работает антивирус — это хорошо и не нужно совершать никаких лишних действий. Но что если он по какой-то причине отключился и его нужно вернуть в рабочее состояние?
Даже несмотря на то, что Microsoft спрятали функцию включения/отключения довольно глубоко в недрах программы, ее все же можно найти. Давайте разберем как:
1. С помощью комбинации клавиш Win + I откройте меню Настройки.
2. Перейдите в раздел Обновление и безопасность.
3. Выберите, расположенный в левом меню, пункт Безопасность Windows.
4. Выберите параметр Открыть Центр безопасности Защитника Windows.
5. В открывшемся окне найдите значок шестеренки. Он позволит позволит перейти в раздел параметров встроенного антивируса.
Полезный совет
В открывшемся окне, при желании, вы всегда можете настроить режим уведомлений для полного функционала программы.
6. Откройте Параметры защиты от вирусов и угроз.
7. Итак, мы достигли сути вопроса. В данном меню вы можете включить или отключить любой из трех параметров Защитника Windows:
- Защита в режиме реального времени;
- Облачная защита;
- Автоматическая отправка образцов;
Карантин Защитника Windows
Перед тем как удалять какой-либо подозрительный файл, Защитник Windows всегда помещает его в карантин, кратко описывая характер возможного вируса (троян и др.) и потенциальный уровень угрозы, который он может представлять. В этой главе мы с вами найдем точное местоположение “подозреваемых” и устраним исходящую от них опасность.
По умолчанию, хранилище вирусов Защитника Windows располагается по пути C:\ProgramData\Microsoft\Windows Defender\Quarantine. Однако мы рекомендуем вам взаимодействовать с ними исключительно посредством антивируса — так надежнее.
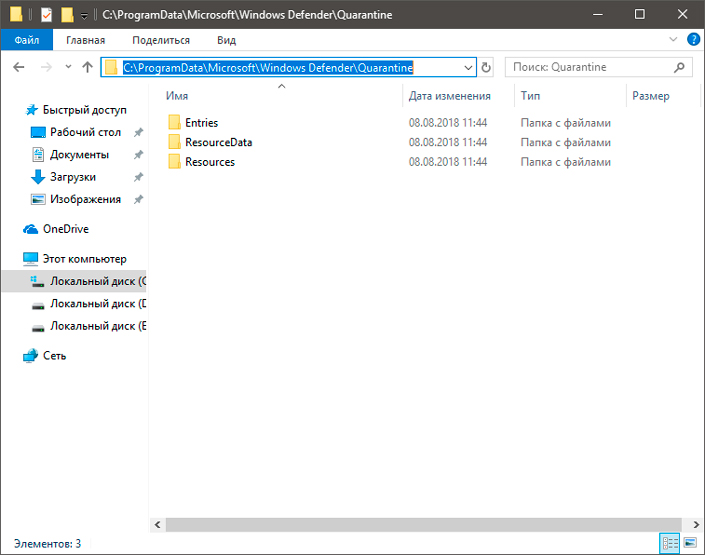
Примечание:
Папка ProgramData по умолчанию скрыта. Если вы хотите ее увидеть, сначала нужно включить режим отображения скрытых папок и файлов в параметрах Проводника.
Как открыть карантин при помощи Защитника Windows?
Все просто! Следуйте описанным ниже шагам и вы быстро достигнете нужной цели.
1. С помощью комбинации клавиш Win + I откройте меню Настройки.
2. Перейдите в раздел Обновление и безопасность.

3. Выберите, расположенный в левом меню, пункт Безопасность Windows.
4. Выберите параметр Открыть Центр безопасности Защитника Windows.

5. Откройте окно Защита от вирусов и угроз.
6. Откройте Журнал угроз. Здесь же вы можете просканировать свое устройство.
7. Перед вами появится полный список имеющихся и ликвидированных угроз, которые Защитник Windows поместил в карантин. В нем они являются абсолютно безобидными.
8. Нажмите клавишу Показать подробности, чтобы внимательно изучить помещенный в карантин файл.
9. В этом же меню карантина вы можете в любой момент произвести удаление конкретного или всех найденных вирусов, нажав клавиши Удалить напротив нужного файла или Удалить все для уничтожения всех файлов.
Защитник Windows. Исключения.
В некоторых случаях антивирус способен заблокировать даже вполне безопасные файлы, тем или иным образом взаимодействующие с системой и другими приложениями. Возможно, именно по этой причине он и считает их вредоносными, ведь они вторгаются в процесс работы разных программ, а значит могут нанести определенный вред.
Очень часто подобный карантин мешает полноценному функционированию установленных программ или даже не дает им запуститься. Можно ли это исправить? Легко! Достаточно лишь поместить блокируемый файл в список-исключение.
Давайте рассмотрим подробную инструкцию как это сделать.
1. Как это было описано в предыдущей главе, откройте окно приложения Защитник Windows.
2. Перейдите в раздел Защита от вирусов и угроз.
3. Откройте Параметры защиты от вирусов и других угроз.
Пролистайте содержимое окна в самый низ и найдите параметр Исключения. Нажмите клавишу Добавление или удаление исключений.
5. Нажмите Добавить исключение и выберите тип исключения.

6. Укажите путь к файлу, папке, типу файла или процессу, который вы хотите добавить в исключение.
Если у вас установлено несколько программ, провоцирующих Защитник Windows на недоверие, рекомендуем создать отдельную папку для них. Таким образом вы обезопасите загружаемые файлы от непредвиденных блокировок.
Важно заметить!
Крайне не рекомендуем в папку-исключение загружать файлы из ненадежных источников. Согласитесь, никто не захочет отдавать вирусу полную власть над компьютером. Такой неосторожный поступок может привести к довольно неприятным последствиям.
Защитник Windows удалил важный файл. Что делать?

Нередки случаи, когда пользователь попросту не может восстановить удаленный файл. Защитник Windows всячески его блокирует и препятствует всем попыткам восстановления. И, сказать по правде, зачастую именно это отчаянное действие антивируса и спасает нашу операционную систему от взлома, кражи личных данных и платежной информации.
Однако даже благие побуждения не всегда могут приносить пользу. Казалось бы, это крах, но не все потеряно!
Проведите глубокий низкоуровневый анализ диска, на котором расположен файл, при помощи инструмента Starus Partition Recovery и совершите восстановление на внешний накопитель. Это действие поможет обойти блокировку Защитника Windows и “реанимировать” то, что недавно было безнадежно утраченным.
Программа обладает интуитивно понятным русскоязычным интерфейсом, а удобная классификация по типу файла позволит без путаницы и траты личного времени найти нужный документ!
Нужен ли сторонний антивирус при наличии Windows 10?
Этот вопрос возникает практически у всех пользователей и является вполне резонным. Защитник Windows — надежный встроенный антивирус, распространяемый корпорацией Microsoft совершенно бесплатно и, к тому же, часто обновляется вместе с операционной системой. В таком случае нужды во встроенном программном обеспечении практически нет — это вопрос вкусов.
Тем не менее, если вы не получаете своевременных обновлений, стоит держать в уме тот факт, что с каждым днем появляется все больше вредоносных программ, противостоять которым старая версия антивируса просто не в силах. В таком случае настоятельно рекомендуем установить стороннее ПО для обеспечения компьютера наивысшим уровнем безопасности.
Надеемся, статья оказалась для вас полезной и помогла найти ответы на поставленные вопросы!
Похожие статьи про восстановление данных:
Дата:
Теги: Windows, Восстановление файлов, Как восстановить, Удаленный, Файл