This extension extends Visual Studio 2019 by C++ Windows Forms projects. Applications created by such projects have a graphical user interface.
For more details, see here.
C++ Windows forms projects are an easy way to create programs with a graphical user interface in C++.
The programming language is C++ for the business logic and C++/CLI (a C++ dialect) for the graphical user interface.
C++ Windows Forms projects are great for learning C++. Visual C++ for Windows Forms has nearly all standard C++ (C++11/C++14/C++17) language features. Since the programs are not restricted to a simple console for user interaction, they are more attractive, more flexible and much easier to use.
Of course, you can also write serious C++ applications.
My introductory textbook (in German) teaches C++ from the scratch, using C++ Windows forms. It focuses standard C++, not C++/CLI. The main difference between the examples from this book and a traditional C++ textbook is, that instead of using the console for user interaction
cout << "Hello world" << endl;
you can use a Windows control, e.g. a TextBox
textBox1->AppendText("Hello World");

Contents
- 1 How To Install C Clr Windows Forms In Visual Studio 2019
- 2 C Gui: Install C Clr Workloads In Visual Studio | Winforms
- 2.1 Conclusion
- 2.1.1 Related image with how to install c clr windows forms in visual studio 2019
- 2.1.2 Related image with how to install c clr windows forms in visual studio 2019
- 2.1 Conclusion
Join us as we celebrate the beauty and wonder of How To Install C Clr Windows Forms In Visual Studio 2019, from its rich history to its latest developments. Explore guides that offer practical tips, immerse yourself in thought-provoking analyses, and connect with like-minded How To Install C Clr Windows Forms In Visual Studio 2019 enthusiasts from around the world. Work c clr at to 2019- you on the for application top extensions by right- the got gives the click my of- click i in top at studio extension Add extensions the vs2019 winform visual screen manage then visual from clr studio then features- the c search line forms all enter this the remove dropdown windows of adding
How To Create C Clr Project In Visual Studio 2019 Youtube
How To Create C Clr Project In Visual Studio 2019 Youtube
With windows forms projects in visual studio 2019 you can use standard c 11 c 14 c 17 for your business logic. to access the windows user interface controls, use c cli (a c dialect). q & a rating & review this extension extends visual studio 2019 by c windows forms projects. 0:00 4:45 c gui: install c clr workloads in visual studio | winforms sciber 10.5k subscribers subscribe 1.8k 159k views 3 years ago buckingham palace one of the most common.

Dev Microsoft Create Visual C Clr Windows Forms Application On Microsoft Visual Studio 11
Dev Microsoft Create Visual C Clr Windows Forms Application On Microsoft Visual Studio 11
18 valid for visual studio 2017,2019, 2022 the answer is solved in this visual studio community forum. i copied the solution here for convenience: please make sure you have selected the component «c cli support» in your installation; please launch the «visual studio installer» modify your installed vs;. Add remove features. i got my winform application to work on vs2019 by adding the “extension”, “c clr windows forms for visual studio 2019”. click “extensions” at the top of the visual studio screen, then click manage extensions from the dropdown, then enter “c clr” in the search line at the top right. this gives you all of. Download the c clr windows forms for visual studio extension and then quit visual studio. then you get the message click change to install the extension. 1.1.3 create a windows forms project after restarting visual studio, you will find a list of the following options under create new project or file|new|project windows forms projects:. To install it, open the visual studio installer from the windows start menu. make sure that the desktop development with c tile is checked, and in the optional components section, also check c cli support. create a new project the following steps vary depending on which version of visual studio you are using.
C Gui: Install C Clr Workloads In Visual Studio | Winforms
C Gui: Install C Clr Workloads In Visual Studio | Winforms
one of the most common questions i get on my channel is «how do i set up visual studio for c clr windows forms application thanks for watching i hope you liked it, if you have questions or objections please ask me in the comments… all the videos, songs in this video show you how to create new c cli project in visual studio 2019 launch visual studio 2019 on the right windows c winforms in visual studio 2019 | getting started with windows forms, you can create powerful windows based applications how to create clr c project using microsoft visual studio 2022. create c user interface (gui) using the framework. c windows forms (winforms) app in visual studio 2022 windows forms (winforms) is a ui framework for building windows how to create setup file in visual studio 2019 for windows application step by step. website: foxlearn through this how to create a setup file in microsoft visual studio 2022. how to create installer for c#, vb and c applications. the video demo how to create a c clr window form project. download the project github jason557 winformcpp.git
Conclusion
Having examined the subject matter thoroughly, it is clear that post delivers informative information about How To Install C Clr Windows Forms In Visual Studio 2019. From start to finish, the author demonstrates an impressive level of expertise on the topic. In particular, the discussion of Z stands out as a highlight. Thank you for taking the time to this post. If you need further information, please do not hesitate to contact me through the comments. I am excited about hearing from you. Furthermore, below are some similar content that you may find helpful:
Время чтения: 5 минут
Windows Forms — интерфейс программирования приложений, отвечающий за графический интерфейс пользователя. Он является частью .Net Framework и создан для того, чтобы упростить взаимодействие пользователя с элементами Win API. Причём не просто упростить, а буквально полностью скрыть низкоуровневое взаимодействие с графическими элементами путём создания набора базовых компонентов и классов. При этом используемые классы не привязаны к языку разработки, благодаря чему данный проект может использоваться как на родном для Microsoft C#, так и на других языках, например, C++, VB Net и F#. Но не смотря на свою кроссплатформенность в мире языков программирования, Windows Forms проекты легко создаются на C#, однако при попытке создания проекта на C++ возникает множество проблем.
Шаг 0. А вдруг получится сразу?
В настоящее время IDE, поддерживающих Windows forms, не так много — буквально одна только Visual Studio, более известная как просто «студия». Поэтому будем рассматривать создание и решение проблем именно в этой среде разработки. Первым шагом запустим студию, начнём создавать новый проект и попытаемся найти Windows forms проект для C++:
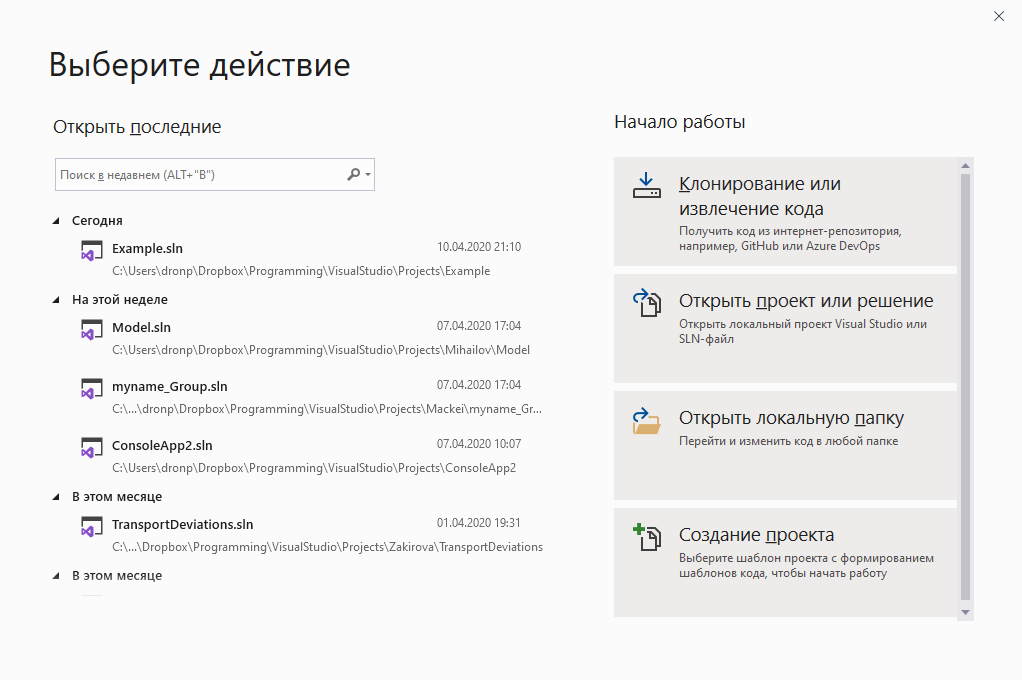
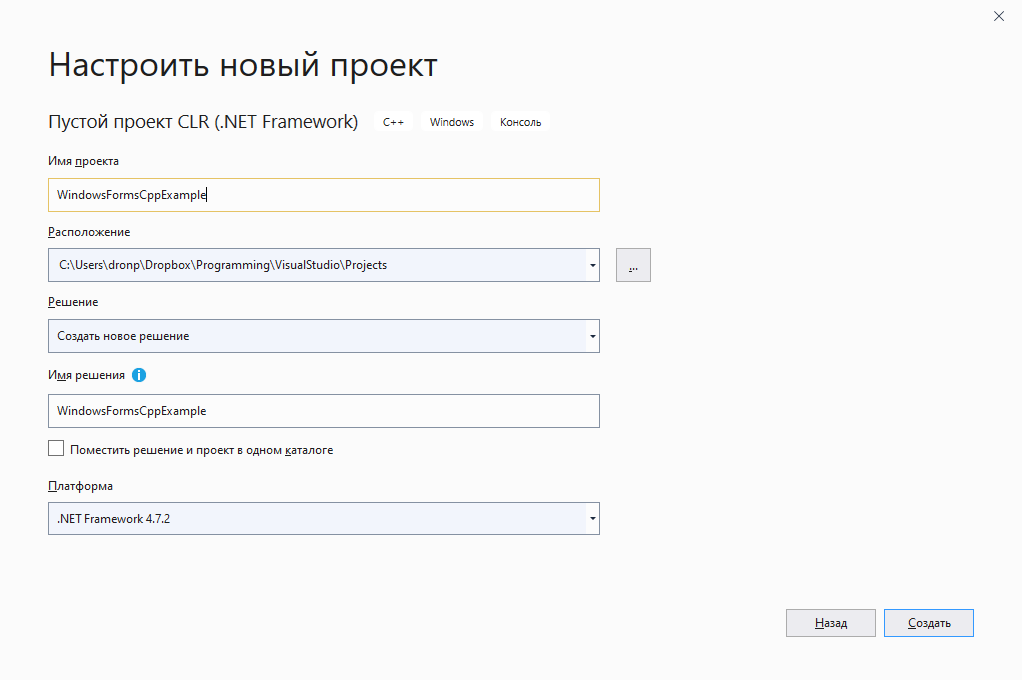
Создаём новый проект в студии
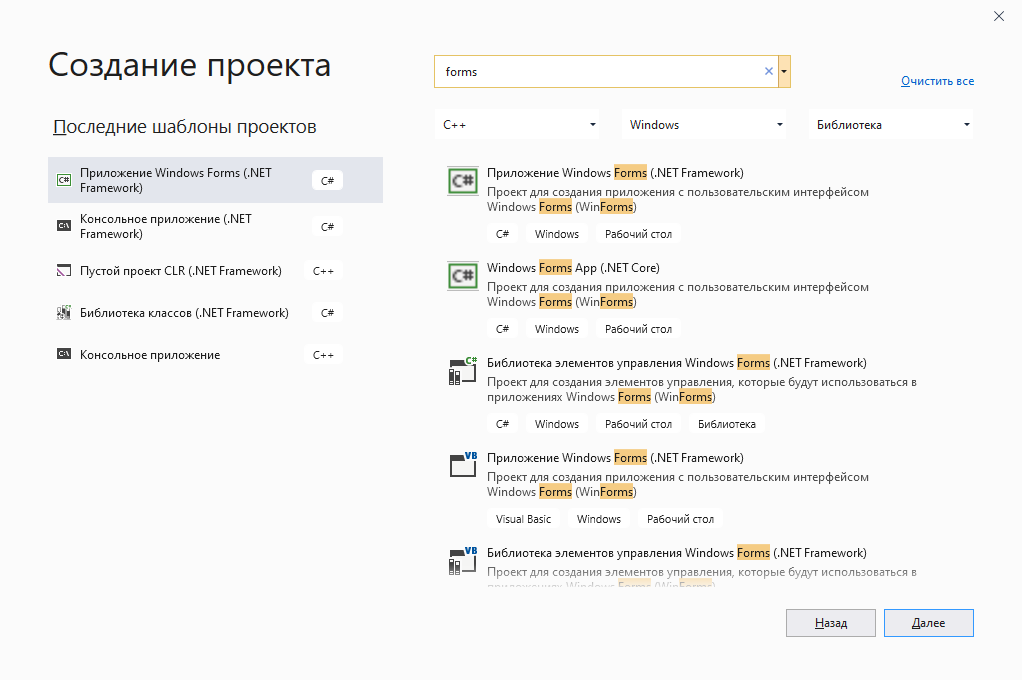
Ищем Winfows Forms для C++
Если у вас более старая версия Visual Studio, то интерфейс будет выглядеть немного иначе, однако данная функциональность будет той же. Также не исключено, что у Вас может быть данный тип проекта для C++ (на некоторых версиях формы для C++ были доступны сразу после установки IDE). Если же у Вас, как и у нас поиск не дал нужных результатов, то переходим к следующему шагу.
Шаг 1. Создание CLR проекта
Поскольку непосредственно Windows Forms проекта у нас не оказалось, мы обхитрим студию и создадим пустой CLR проект на С++. Для этого в том же окне поиска необходимо найти и выбрать Новый CLR проект, ввести имя (если нужно, то поменять директорию расположения проекта) и немного подождать, пока студия сделает свою работу.
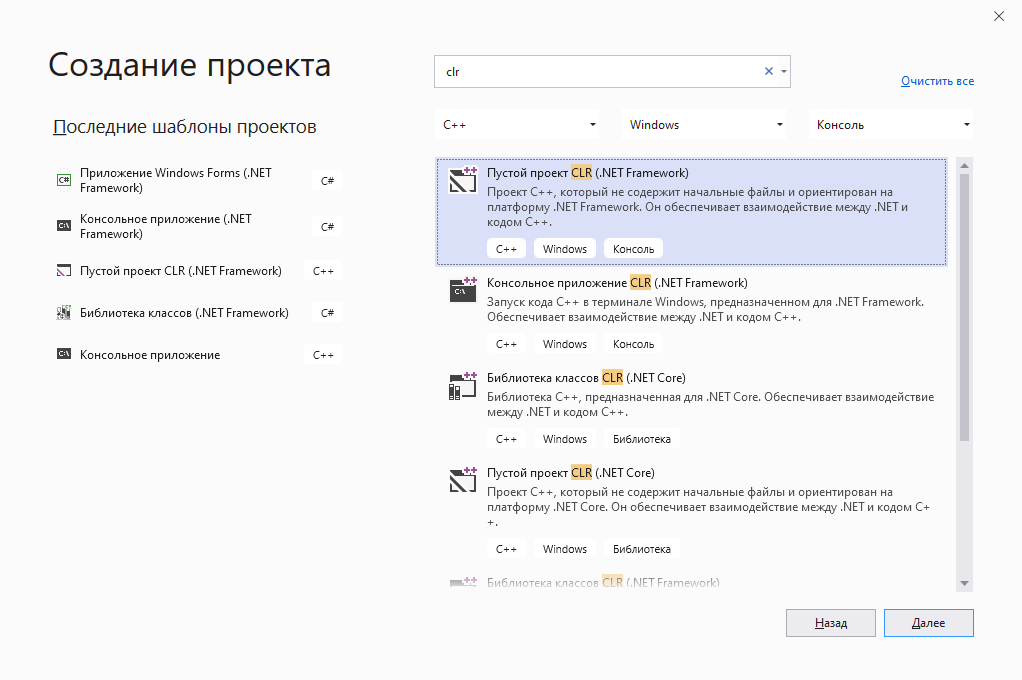
Ищем пустой CLR проект (.Net Framework)
Создаём новый пустой CLR проект
В результате Visual Stido создаст новый C++ CLR проект, который будет выглядеть примерно так:
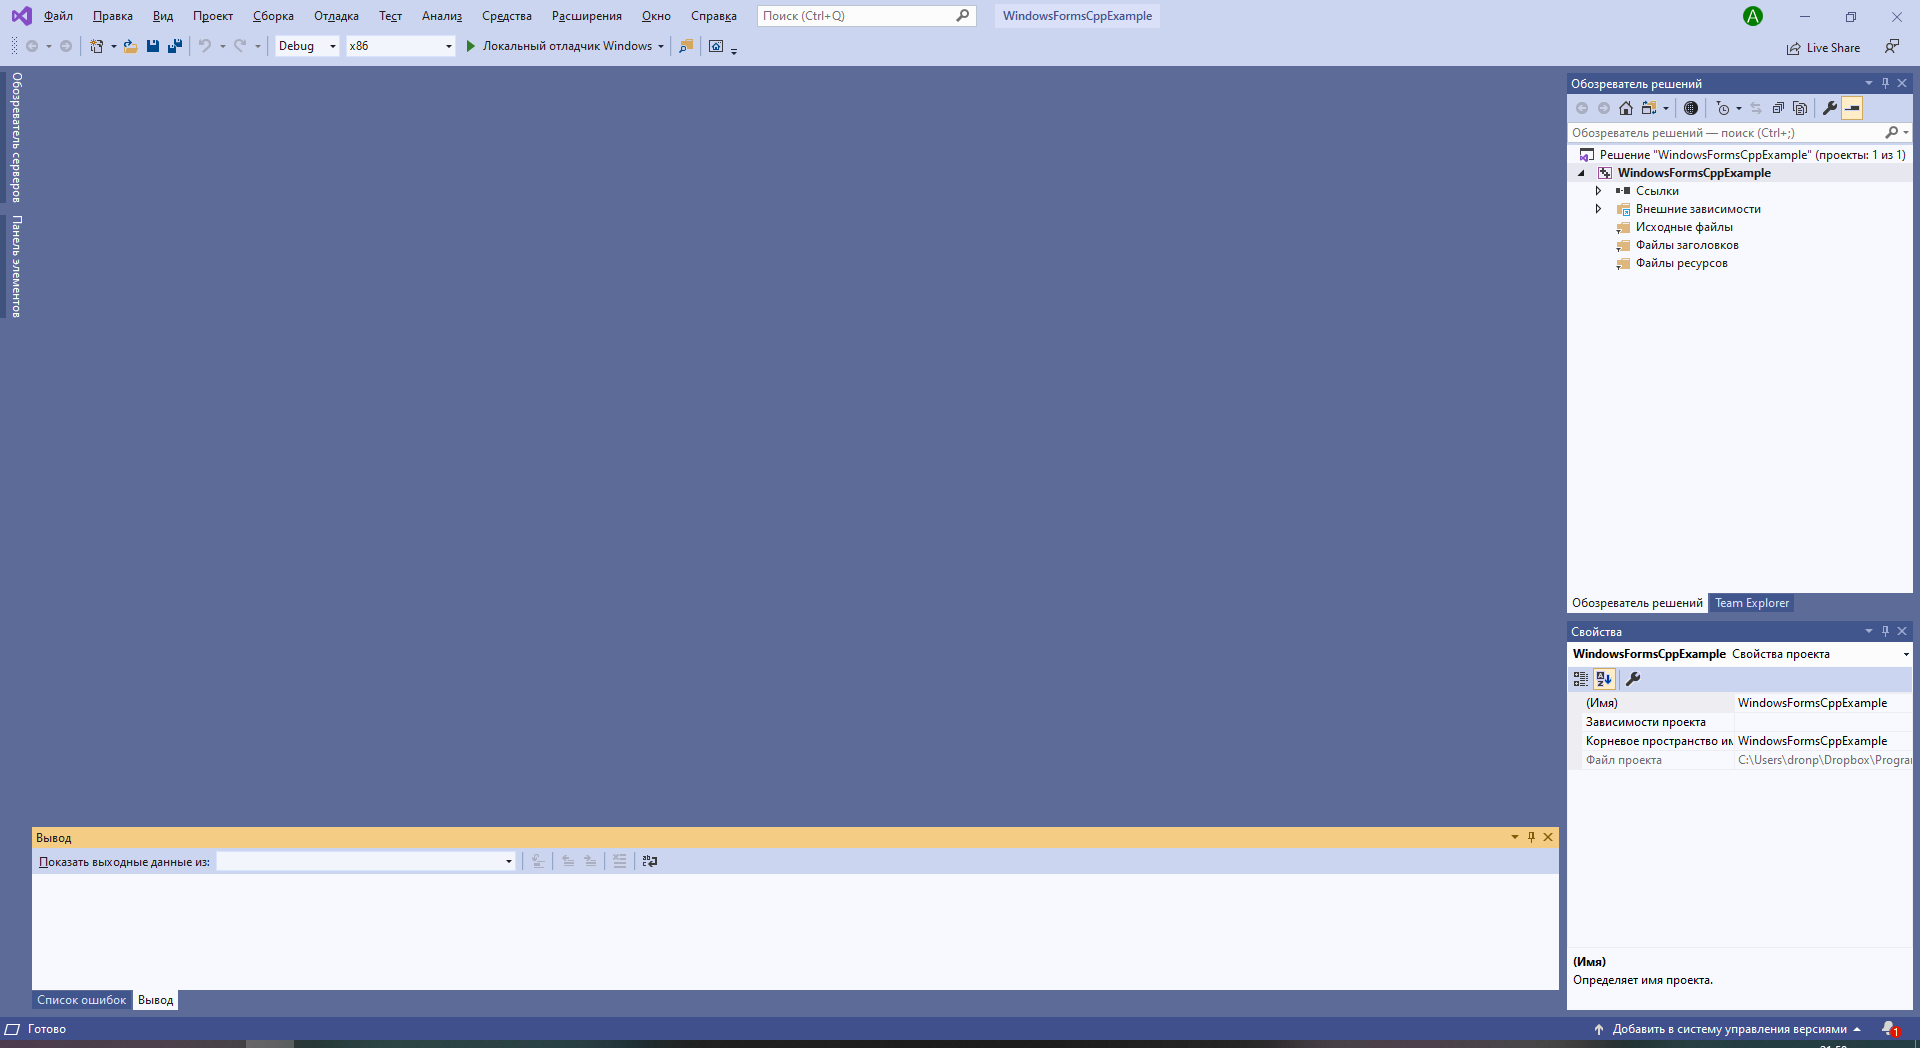
Результат создания нового CLR проекта
Шаг 2. Добавить форму
Чтобы сделать CLR проект проектом Windows Forms, нужно просто добавить в него форму. Для этого в верхнем меню нужно выбрать Проект — Добавить новый элемент и в появившемся окне выбрать категорию Visual C++ — UI и затем выбрать Форма Windows Forms.
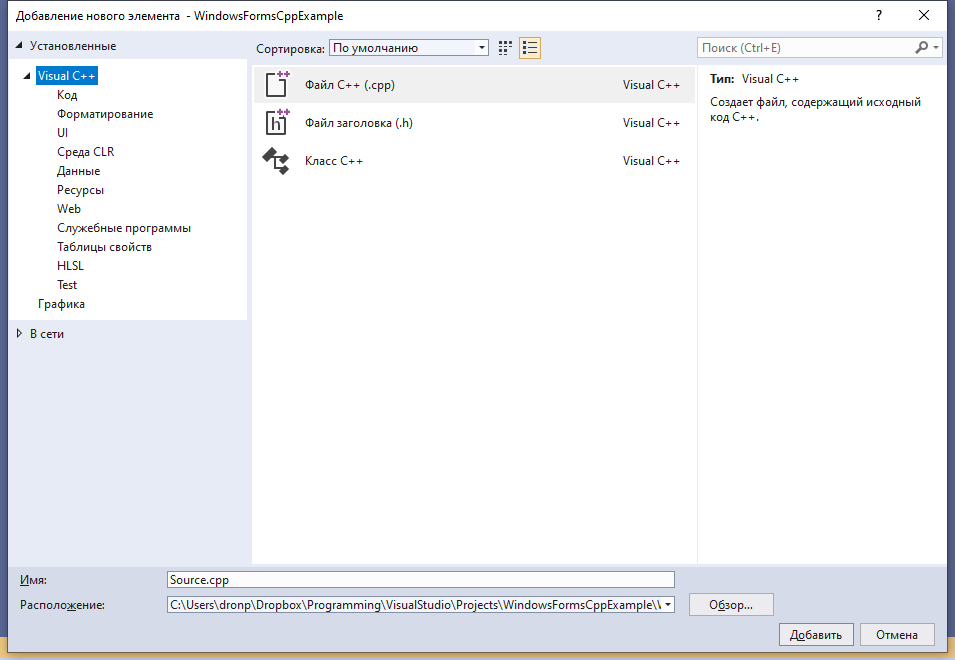
Проект -> Добавить новый элемент
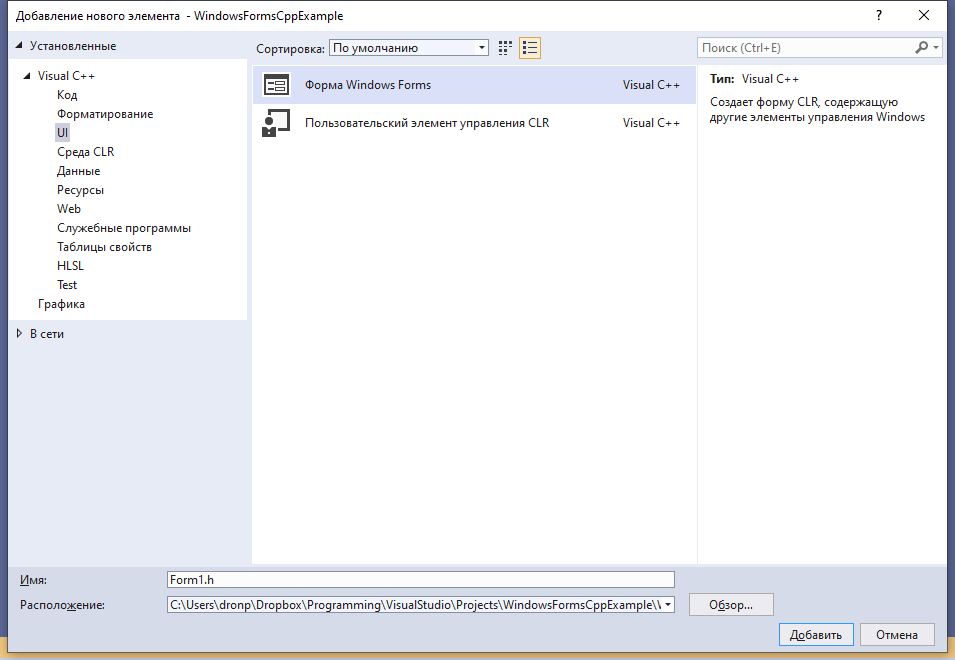
Visual C++ -> UI -> Форма Windows Forms
После данной операции нас ждёт разочарование в виде ошибки Исключение из HRESULT: 0x8000000A:
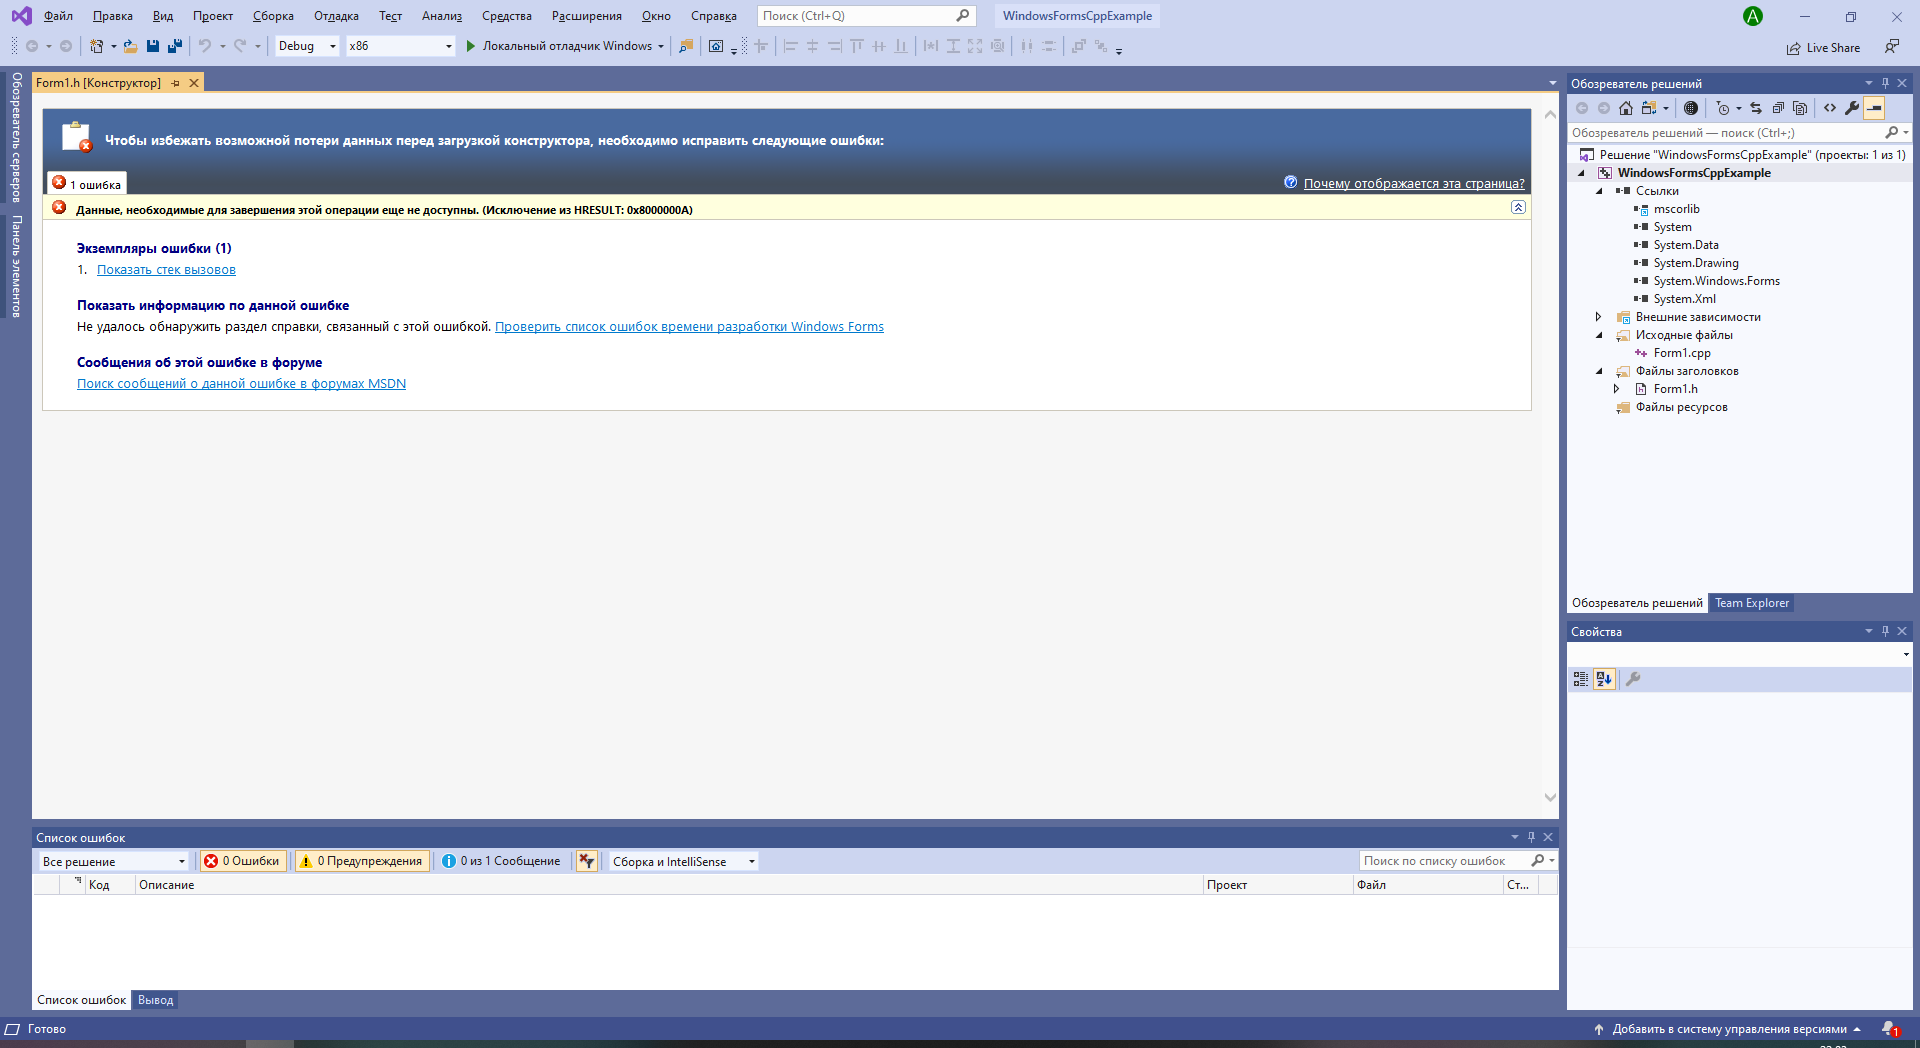
Вместо формы получили ошибку
Шаг 3. Исправляем появившуюся ошибку
Данная ошибка появляется из-за того, что для создания окна формы приложению необходима основная программа, создающая форму и переключающая управление на неё, однако после добавления новой формы файл Form1.cpp предсказуемо создаётся пустым. Поэтому необходимо добавить основную программу в файл с формой:
#include "Form1.h"

#include <Windows.h>

using namespace имя_вашего_проекта;

int WINAPI WinMain(HINSTANCE, HINSTANCE, LPSTR, int) {
    Application::EnableVisualStyles();
    Application::SetCompatibleTextRenderingDefault(false);
    Application::Run(gcnew Form1);
    return 0;
}
В результате код файла Form1.cpp будет выглядеть следующим образом:
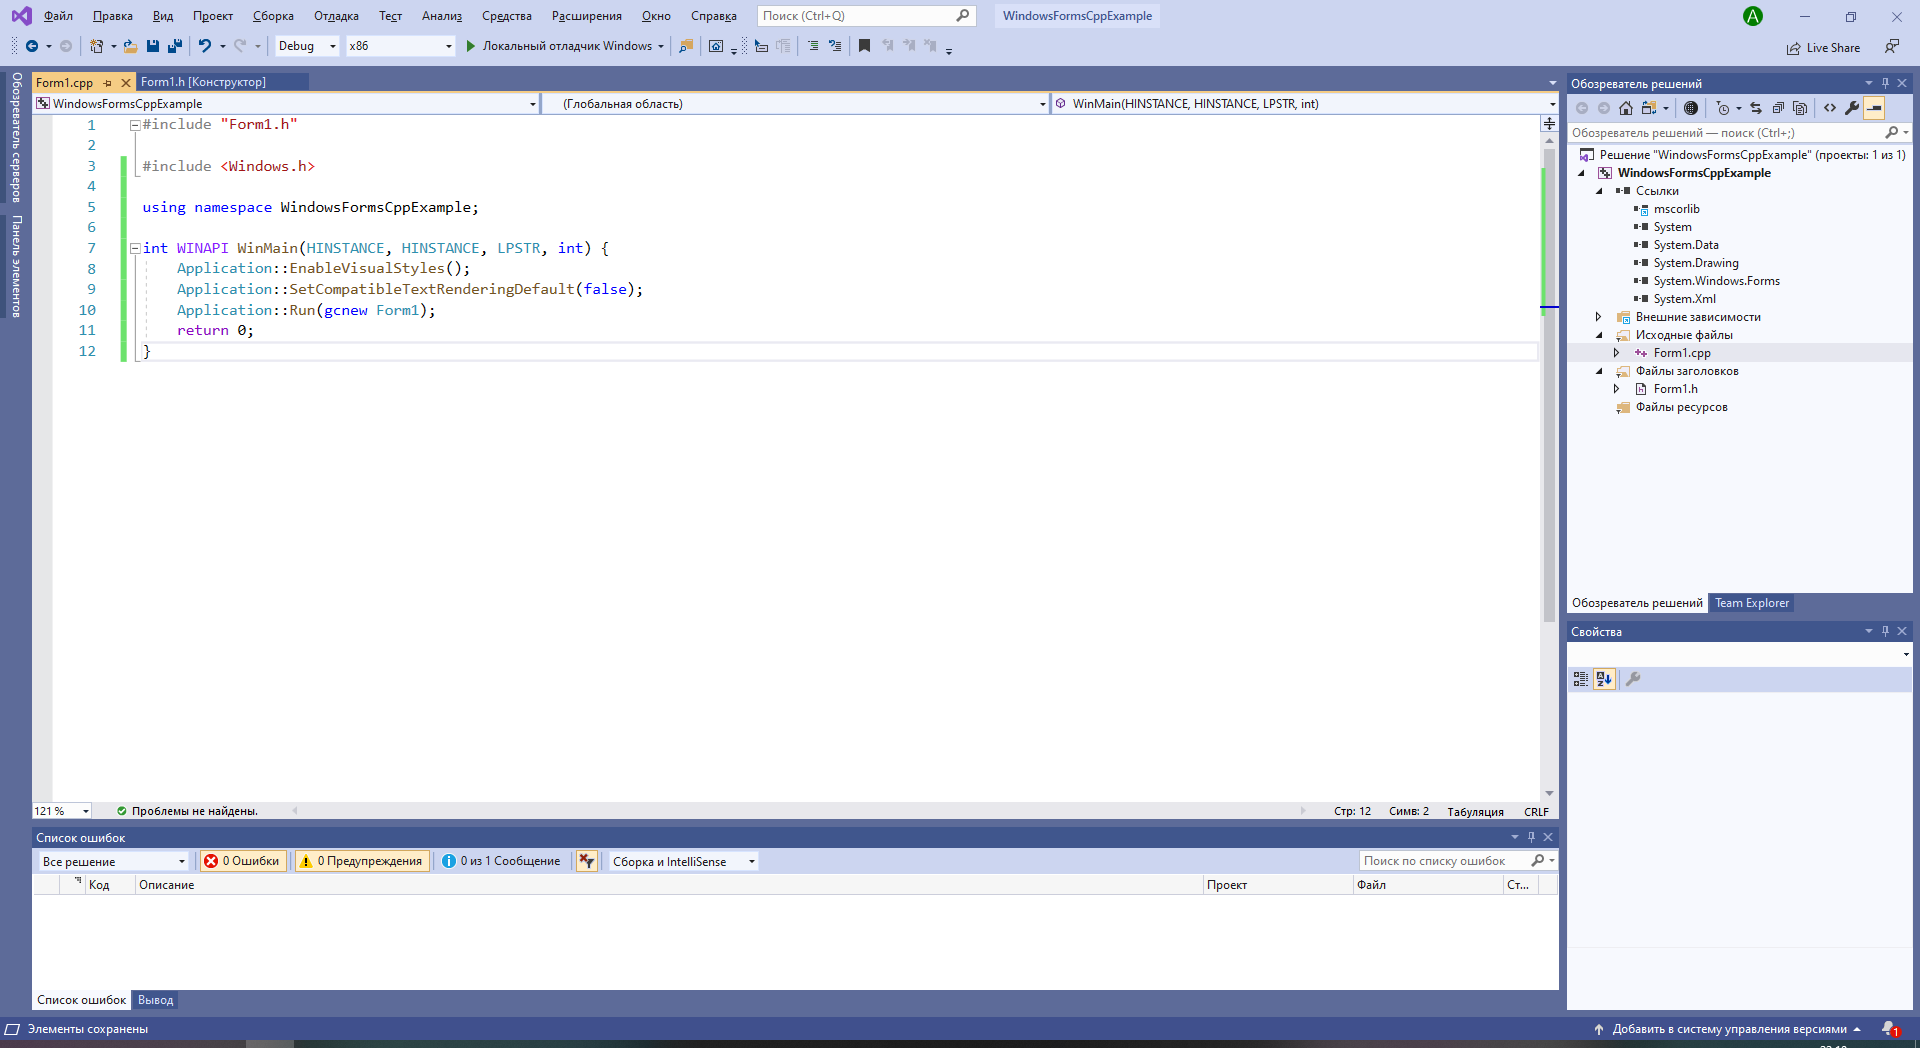
Добавление основной программы к форме
Шаг 4. Переоткрыть проект
Всё, что теперь осталось сделать — это закрыть текущее решение, а затем открыть его снова. Для этого можно закрыть саму студию, а можно выбрать в верхнем меню Файл — Закрыть решение, после чего в появившемся окне выбрать только что созданный проект и открыть его заново.
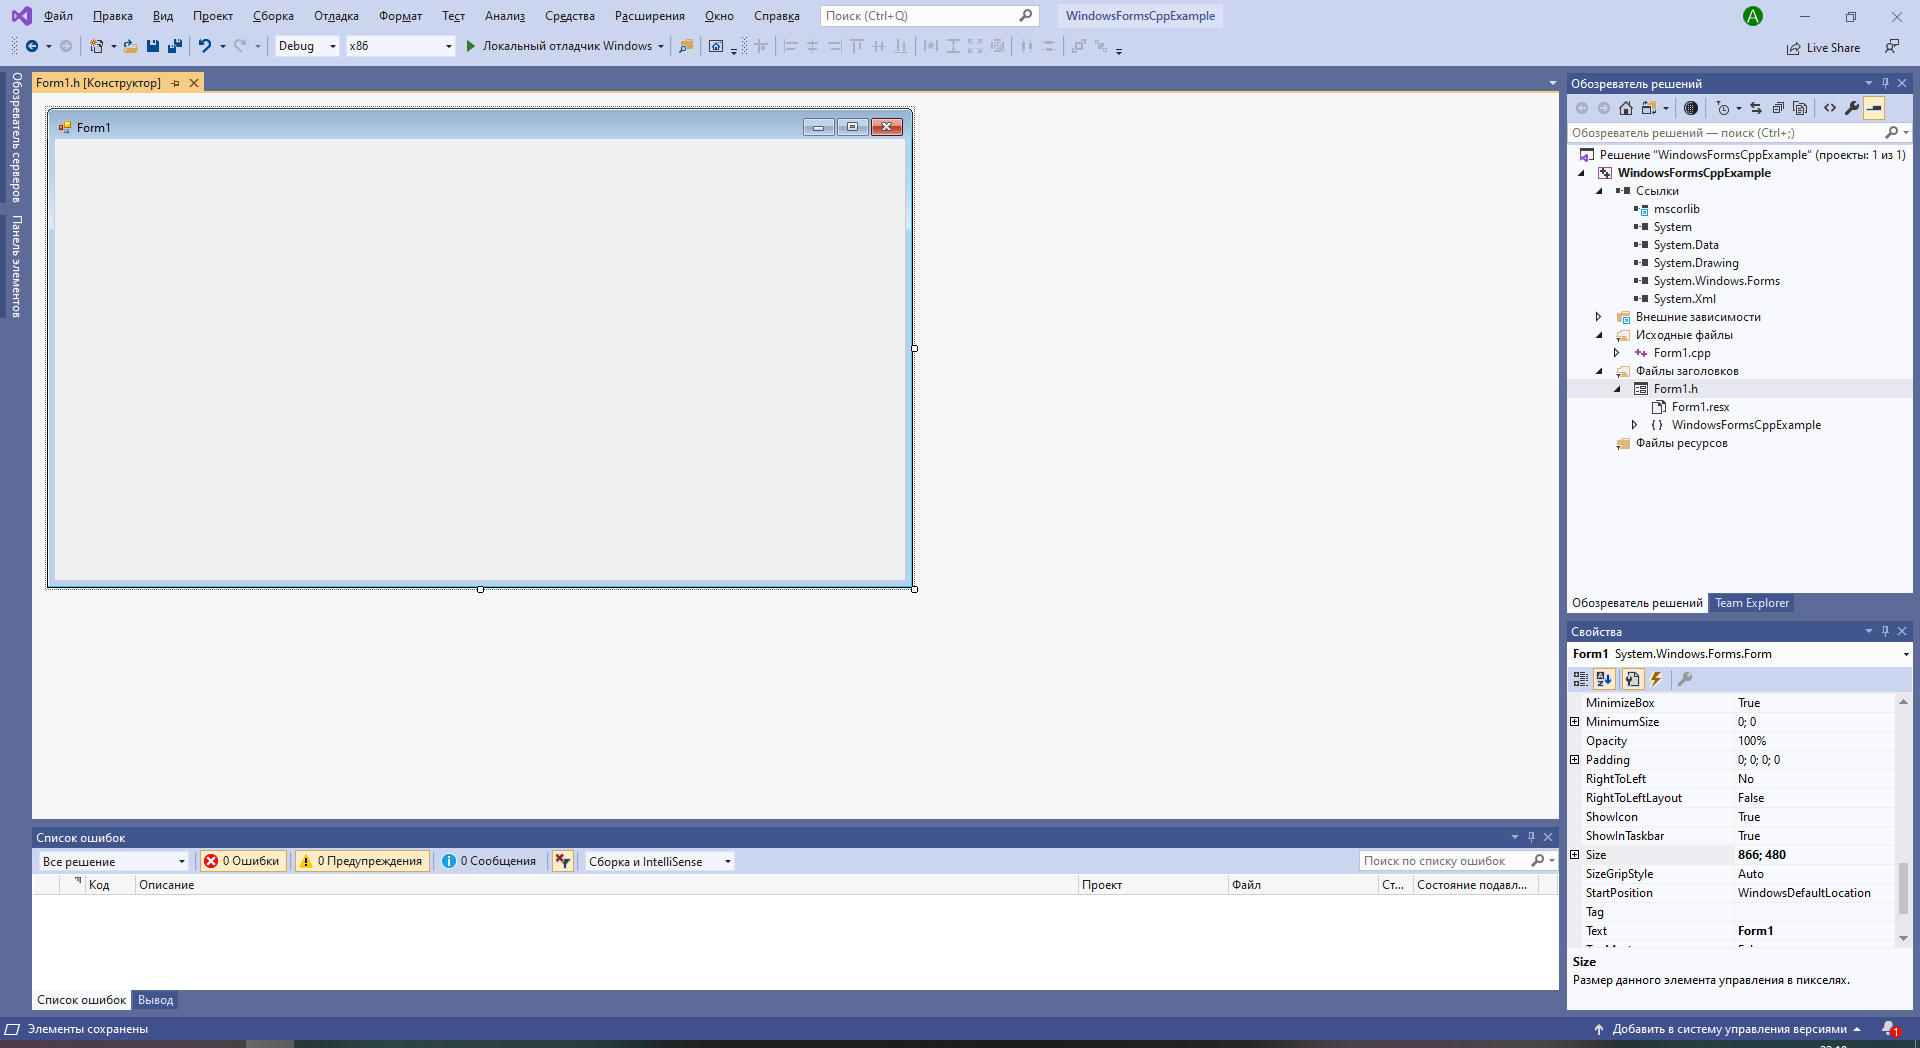
Форма создалась, можно добавлять компоненты
Благодаря добавленному коду основной программы, студия сможет создать форму и на экране появится изображение формы, на которую можно будет добавлять компоненты, задавать их свойства, а также свойства самой формы.

Программист, сооснователь programforyou.ru, в постоянном поиске новых задач и алгоритмов
Языки программирования: Python, C, C++, Pascal, C#, Javascript
Выпускник МГУ им. М.В. Ломоносова
1 Windows Forms Projects with C in Visual Studio 2019[This is a preliminary version. It will be revised soon.]The C /CLR Windows Forms for Visual Studio 2019 extension available in Visual Studio2019 under Extensions Manage Extensions makes the bookalso with Visual Studio 2019. All examples and projects can be created and compiled inVisual Studio 2019 as in Visual Studio 2017. However, there are a few minor differencesbetween installing Visual Studio and creating projects. These are described here.1.1 Windows Forms projects with C In Visual Studio up to version 2010 there are templates for Windows Forms projectsavailable, but not for Visual Studio 2012 or later. For these newer versions of Visual Studioa project template can be installed (see section 1.1.2).
21.1.1 Installing Visual Studio for Windows Forms ProjectsFor Windows Forms projects to be created in Visual Studio, additional components must beinstalled when installing Visual Studio.If this was forgotten during the installation, start the Visual Studio Installer-under Windows Start-or in Visual Studio 2019 under File New Project Create New ProjectHere the .NET desktop development, the desktop development with C and the C /CLIsupport must be installed:
31.1.2 Installing the Visual Studio Extension for Windows Forms ProjectsIf you have not yet installed the Visual Studio Extension for Windows Forms projects, click»Continue Without Code» after starting Visual Studio:and under Extensions Manage Extensionsdownload the C /CLR Windows Forms for Visual Studio extensionand then quit Visual Studio. Then you get the message
4Click Change to install the extension.1.1.3 Create a Windows Forms projectAfter restarting Visual Studio, you will find a list of the following options under Create newproject or File New ProjectWindows Forms projects:
5After clicking the button with the inscription «Next» you will be prompted to enter the nameof the project and a directory:After clicking the Create button, Visual Studio looks something like this:
6If you now click on Form1.h in the Solution Explorer, the form is displayed:Normally everything is done and you can continue with section 1.21.2 Visual Programming: A First Small ProgramAfter creating a Windows Forms project as described in Section 1.1.3
7we will first change Visual Studio a bit and then write a first little program. The followingdiscussion applies to Visual Studio 2019, but is essentially the same for other versions ofVisual Studio (2017, 2015, and earlier).The toolbox offered here on the left side is displayed when you click on it, or withView Toolbox. In some versions of Visual Studio, the Toolbox is also called theToolbox. When the form is displayed, the Toolbox displays the controls for theform.To prevent the Toolbox from obscuring the form, drag the Toolbox to the SolutionExplorer frame (press the left mouse button on the Toolbox title bar, then dragand drop the mouse button on the Solution Explorer title bar). Analogous to theproperties window. As we only need the Toolbox, the Solution Explorer and theProperties window, you can close all other windows (e.g. Team Explorer etc.)here. Then the right frame looks like this:
8The form (here Form1) is the starting point for all Windows Forms applications. Itcorresponds to the window that appears when the program is started:You can set controls from the Toolbox on a form. The Toolbox contains practically all theusual Windows controls. These are divided into different groups (e.g. general controls,containers, etc.) that can be opened and closed. Most of these controls (such as a button) aredisplayed on the form while the program is running. If the mouse pointer remains briefly ona line of the toolbox, a small message window appears with a short description:To place an element from the toolbox on the form, simply drag it from the toolbox to theform. Or you click with the mouse first on the toolbox line (it will be displayed as marked)and then on the place in the form where you wa
In Visual Studio up to version 2010 there are templates for Windows Forms projects available, but not for Visual Studio 2012 or later. For these newer versions of Visual Studio a project template can be installed (see section 1.1.2). 2 1.1.1 Installing

Как создать Windows Forms C++ проект на MVS? Что такое CLR, CLI, управляемый класс с++?Подробнее

Как сделать Paint на Windows Forms C++. (2 — Создание проекта)Подробнее

C++ перенос программы с консольного приложения на WinForms. (2. Создание проекта под Windows Forms)Подробнее

Создание оконного приложения С++/Visual studio 2019/Windows FormПодробнее

Windows Forms и C++ — создание проекта в Visual StudioПодробнее

Уроки C++ WinForms / #2 – Создание Windows ФормыПодробнее

Уроки C# .NET Windows Forms / #2 — Создание дизайна для окна авторизацииПодробнее

Уроки C# .NET Windows Forms / #1 — Создание приложения на C# с SQL (базами данных)Подробнее

C++ КАК из ПЕРВОЙ ФОРМЫ ОТКРЫТЬ ВТОРУЮ?/Visual Studio 2019/WindowsFormПодробнее

Visual Studio C#. Создание простого проекта на основе шаблона Windows Forms (.NET Framework)Подробнее

Урок№1. Первая программа и создание проекта на C# в Visual Studio 2019Подробнее

Уроки C# / Как сделать первое Windows приложениеПодробнее

Создание оконного приложения С++ (Калькулятор)/Windows Form/Visual Studio 2019Подробнее

Знакомство со средой Visual Studio 2017. Создание, открытие и сохранение проекта Windows FormsПодробнее

Создание оконного приложения C++/Windows Form/VS2019/Решение квадратного уравнения/Часть 2Подробнее

C++ Создание приложения (авторизация, ДВЕ ФОРМЫ)/WindowsForm/VisualStudio2019/MessageBox/twoFormsПодробнее

Как сделать установочник/инсталлятор Windows Forms приложения. (2. Создание установочника)Подробнее

Создаем приложение, состоящее из нескольких форм в среде Visual Studio 2017. Используем PictureBoxПодробнее
