Содержание
- Способ 1: Настройка портов в BIOS
- Способ 2: Переустановка драйверов чипсета
- Способ 3: Устранение аппаратных неполадок
- Вопросы и ответы
Способ 1: Настройка портов в BIOS
Самой частой причиной появления рассматриваемой ошибки является несоответствие ряда параметров БИОС с установленным в вашем компьютере оборудованием. Дело в том, что для корректной работы некоторых жёстких дисков большого объёма требуется либо включённый режим RAID, либо неактивная функция горячего подключения. Для устранения проблемы будет достаточно настроить соответствующие параметры.
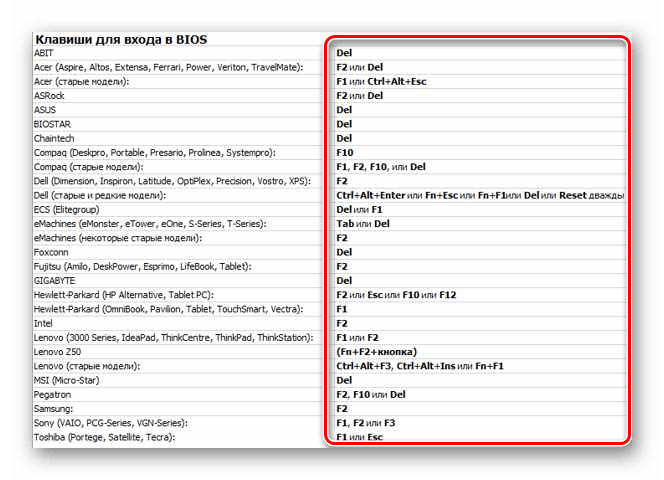
- Перезагрузите ваш ПК или ноутбук и перейдите в BIOS – как правило, за эту функцию отвечает нажатие какой-то из клавиш на клавиатуре: F9, F12, Del и прочее. Более детально о вариантах вы можете узнать из руководства по ссылке далее.
Подробнее: Как войти в BIOS на компьютере
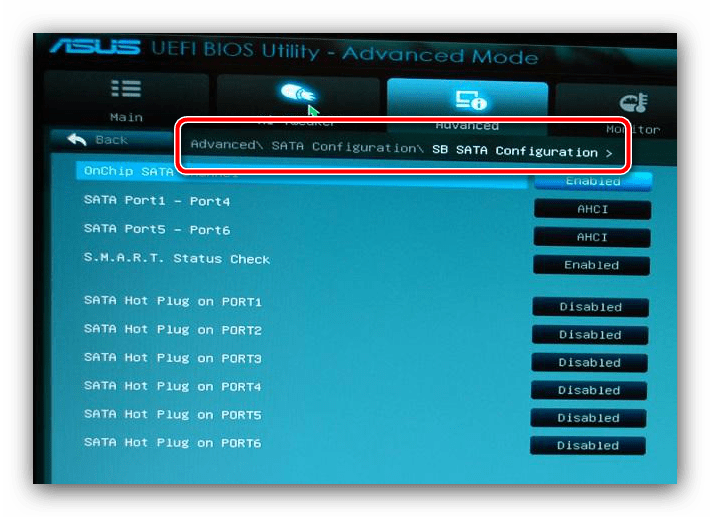
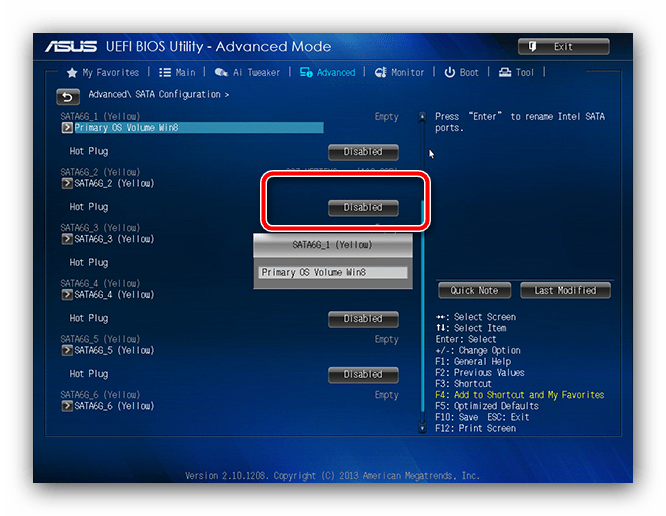
- Дальнейшие действия зависят от конкретного типа микропрограммы платы. Нужные нам пункты меню называются «SATA Configuration», и могут быть расположены в разделе «Peripherals», либо «Advanced».
- На порту, к которому подключён жёсткий диск с операционной системой, включите режим «Hot Plug»: выберите одноимённую опцию и переключите её в нужное вам положение.
- В качестве дополнительных мер рекомендуется отключить незадействованные SATA, если таковых на материнской плате несколько.
- Сохраните настройки (чаще всего за эту операцию отвечает клавиша F10) и перезагрузите компьютер.
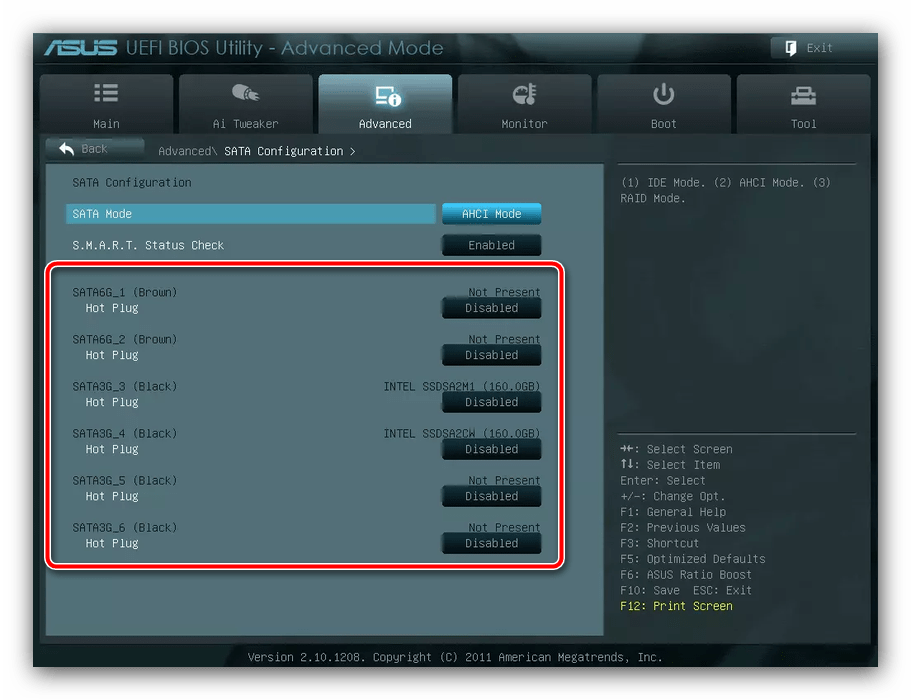
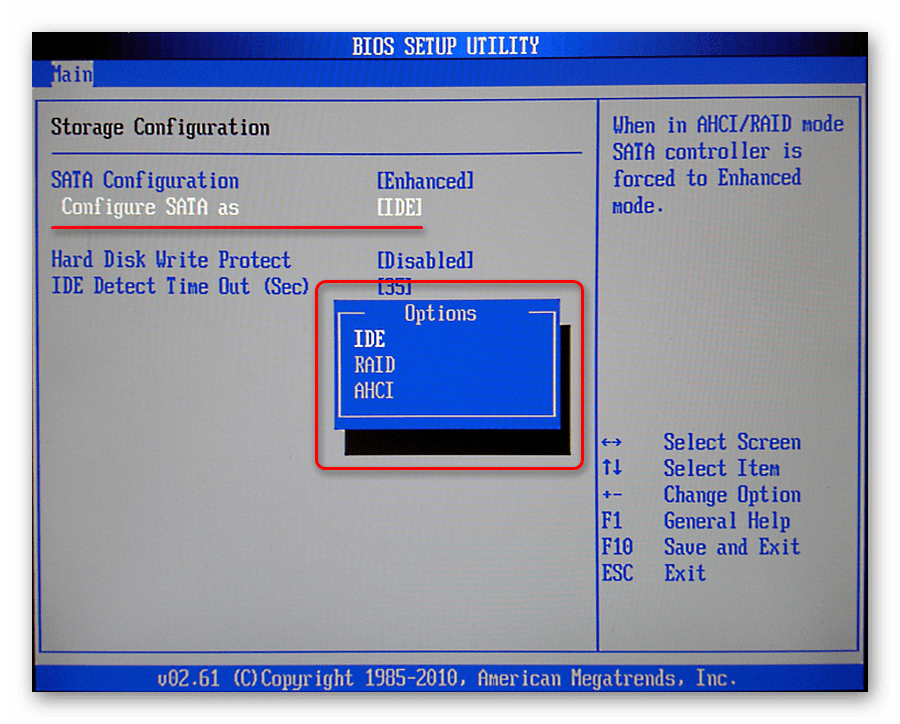
Проверьте, как себя ведёт система – ошибка должна пропасть. Если она всё ещё присутствует, снова зайдите в интерфейс управления микропрограммой и отключите AHCI-режим.
Подробнее: Что такое SATA Mode в BIOS
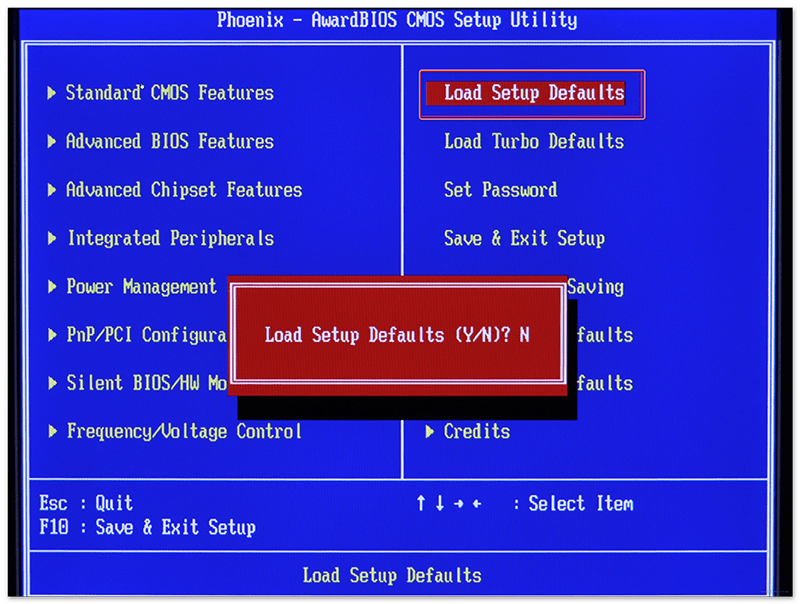
Снова сохраните настройки и попробуйте загрузиться в ОС. Если ПК сообщит, что не может обнаружить накопитель, сбросьте параметры БИОСа одним из предложенных далее методов.
Подробнее: Как сбросить BIOS на компьютере
В большинстве случаев манипуляций, которые приведены выше, будет достаточно для устранения сбоя.
Способ 2: Переустановка драйверов чипсета
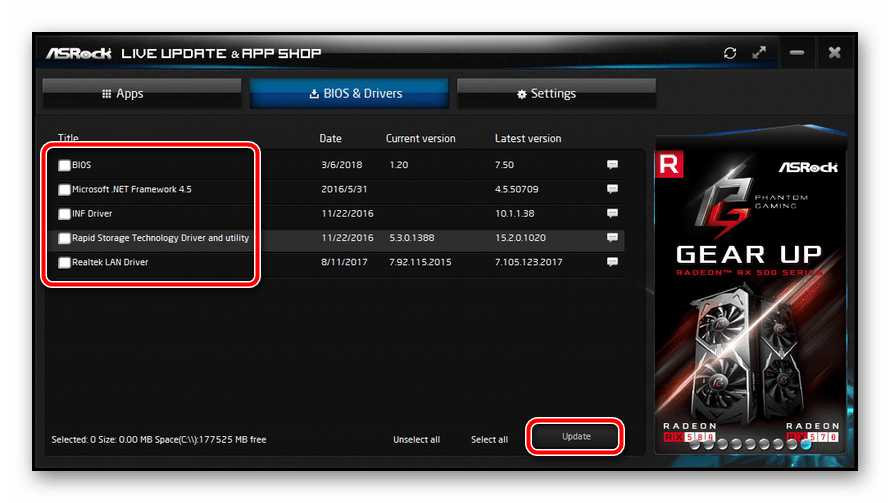
В некоторых случаях источником рассматриваемой проблемы могут быть устаревшие или несовместимые с текущей версией ОС драйвера системного чипсета. Дело в том, что именно эта микросхема отвечает за взаимодействие Windows и накопителей, которые подключены по интерфейсам SATA и IDE, а также за реализацию технологии RAID. Мы уже писали о том, как следует искать и устанавливать ПО для подобных компонентов, поэтому просто приведём ссылку на соответствующий материал.
Подробнее: Правильная установка драйверов чипсета
Способ 3: Устранение аппаратных неполадок
Последняя причина, по которой может появляться рассматриваемая ошибка – сбои аппаратных комплектующих.
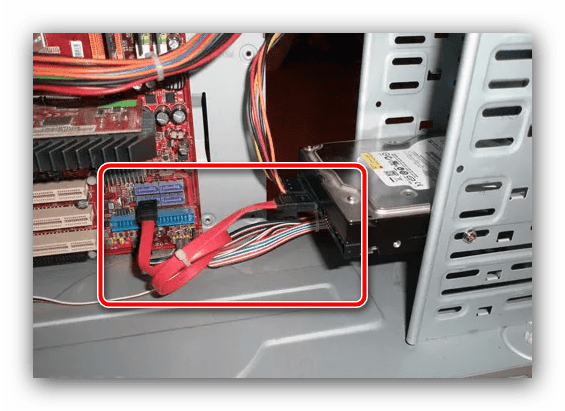
- Сперва необходимо проверить состояние контакта накопителя и компьютера. Убедитесь, что используемый SATA-кабель исправен (настольные ПК) или диск плотно прилегает к контактной площадке (ноутбук).
- Проверьте также сам накопитель, желательно на другом устройстве – удостоверьтесь, что нет никаких повреждений и количество плохих и/или нестабильных секторов не стало критическим.
Подробнее: Как проверить работоспособность жёсткого диска
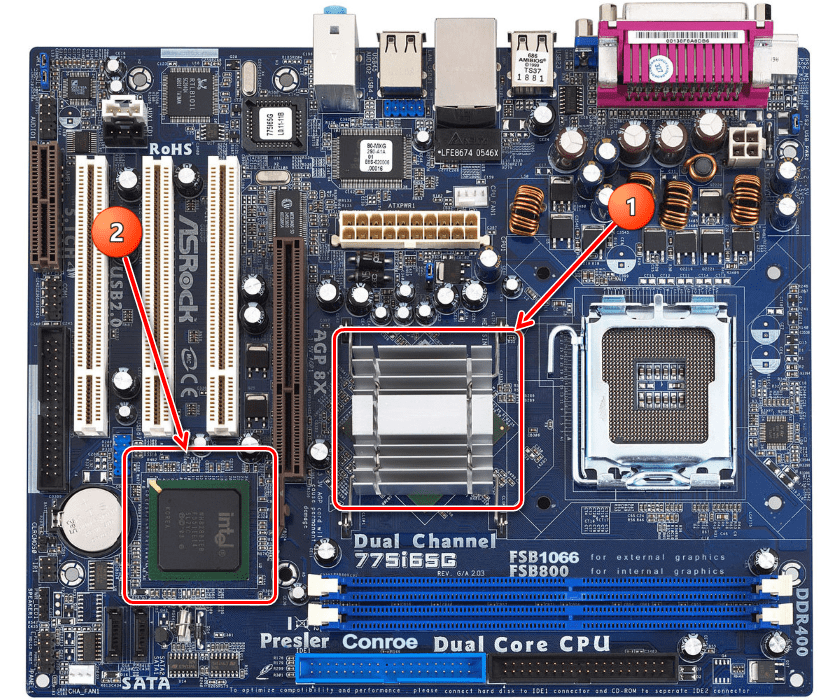
- Дальше осмотрите материнскую плату – на ней не должно быть прогоревших элементов, вздутых конденсаторов и прочих видимых повреждений. Не помешает также протестировать охлаждение компонентов, в особенности чипсетов, если таковое предусмотрено.
Подробнее:
Как проверить материнскую плату
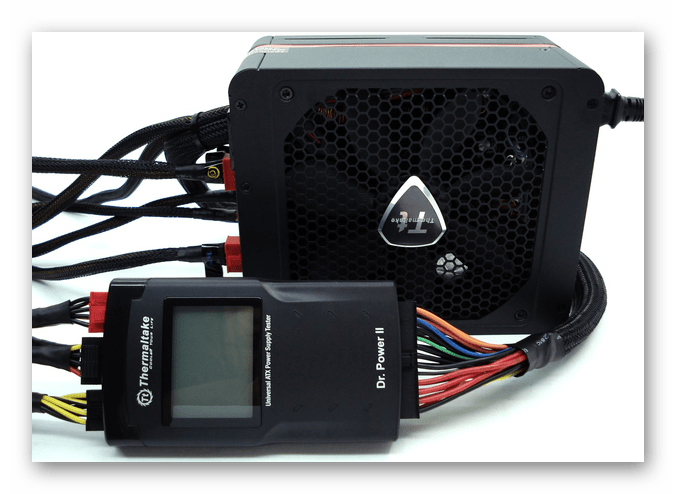
Замена конденсаторов на материнской плате - Изредка проблему вызывают сбои по питанию – например, БП не выдаёт необходимую мощность и напряжение. Обычно такое происходит из-за упомянутых выше вздутых конденсаторов, но нельзя исключать и заводской брак, и выход из строя трансформаторов. Решением в такой ситуации будет тестирование работоспособности и стабильности компьютера с блоком питания с похожими характеристиками. Если проверка покажет, что устройство работает нормально, сбойный элемент лучше заменить или отнести в сервисный центр.
Подробнее: Как проверить работоспособность блока питания на ПК
Еще статьи по данной теме:
Помогла ли Вам статья?
A quick scan to repair system files can fix this error message
by Matthew Adams
Matthew is a freelancer who has produced a variety of articles on various topics related to technology. His main focus is the Windows OS and all the things… read more
Updated on
Reviewed by
Alex Serban

After moving away from the corporate work-style, Alex has found rewards in a lifestyle of constant analysis, team coordination and pestering his colleagues. Holding an MCSA Windows Server… read more
- This error is associated with your hard drive and it’s caused by outdated drivers.
- In some instances, your power settings can cause this issue to appear.
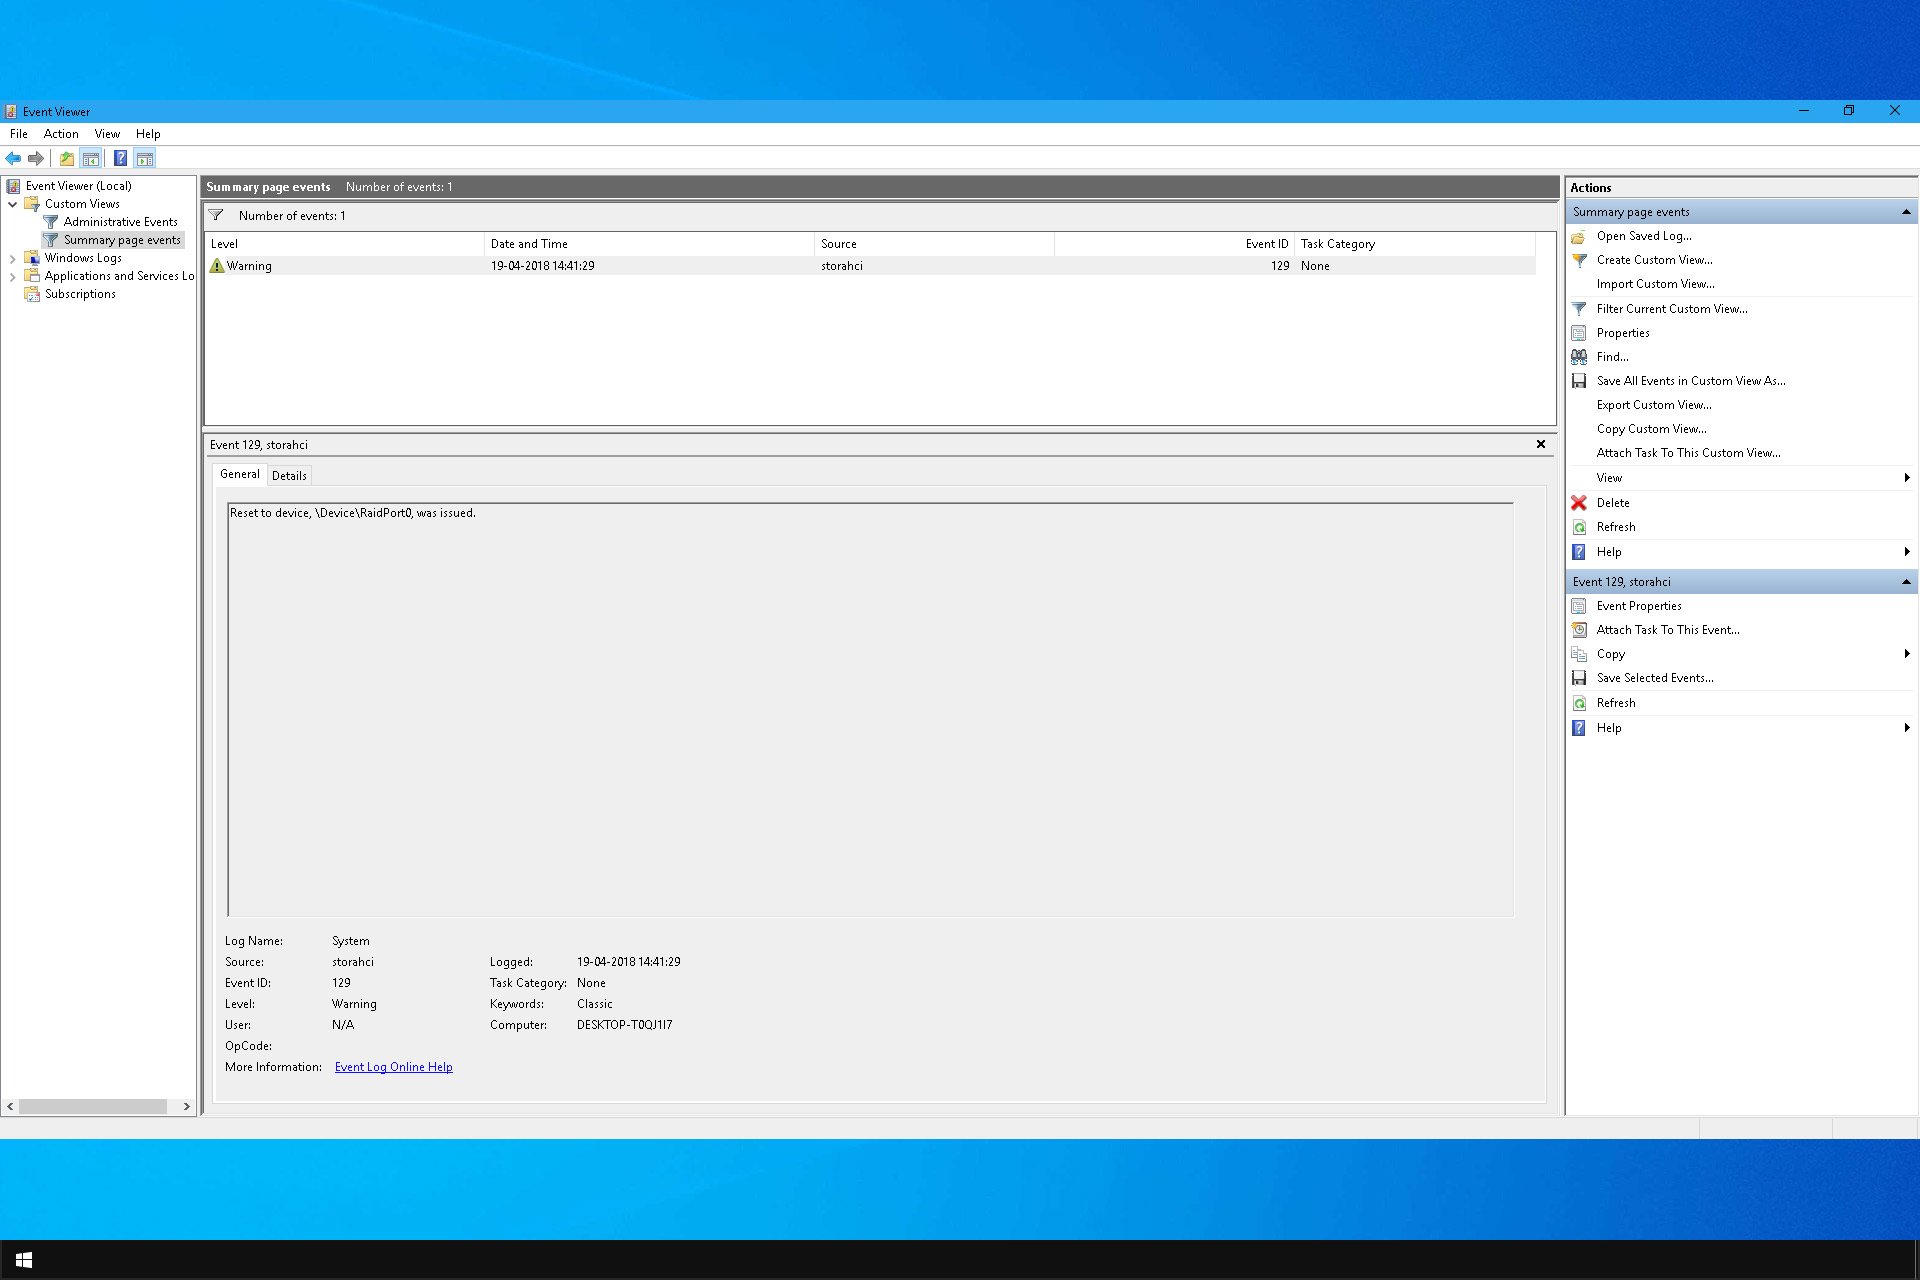
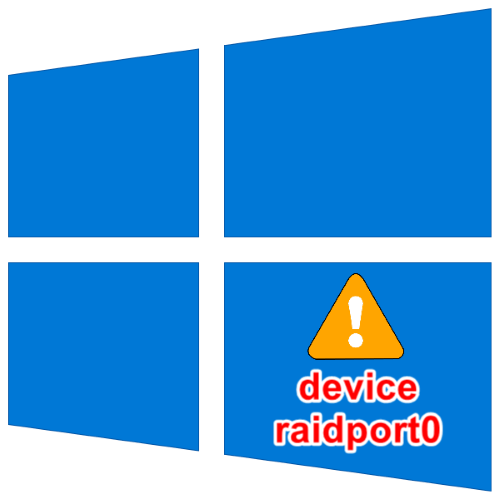
If your system freezes, you might get Reset to device, DeviceRaidPort0, was issued error in the Event Viewer.
This issue is related to SATA controllers, and to fix the freezes and other disruptions, today we’re going to show you how to fix that.
Why does Reset to device device raidport0 was issued message appear?
- Corrupted system files can sometimes lead to this error message.
- If your power settings aren’t configured properly, you might encounter this issue.
- In some rare cases, outdated drivers will cause this problem.
How can I fix Reset to device device raidport0 was issued error?
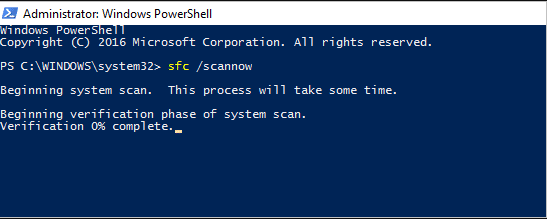
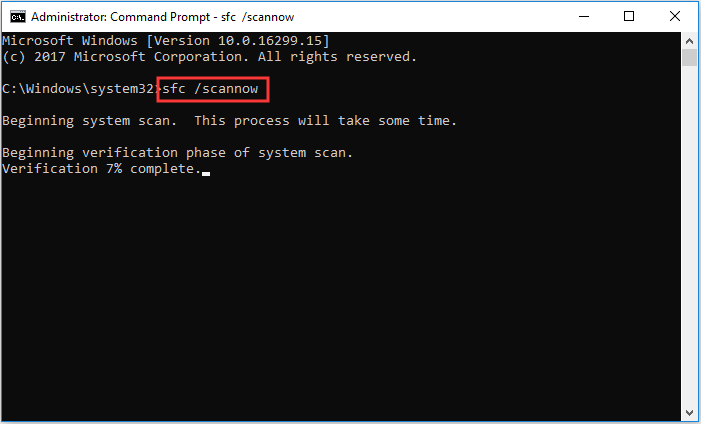
1. Run a System File Checker scan
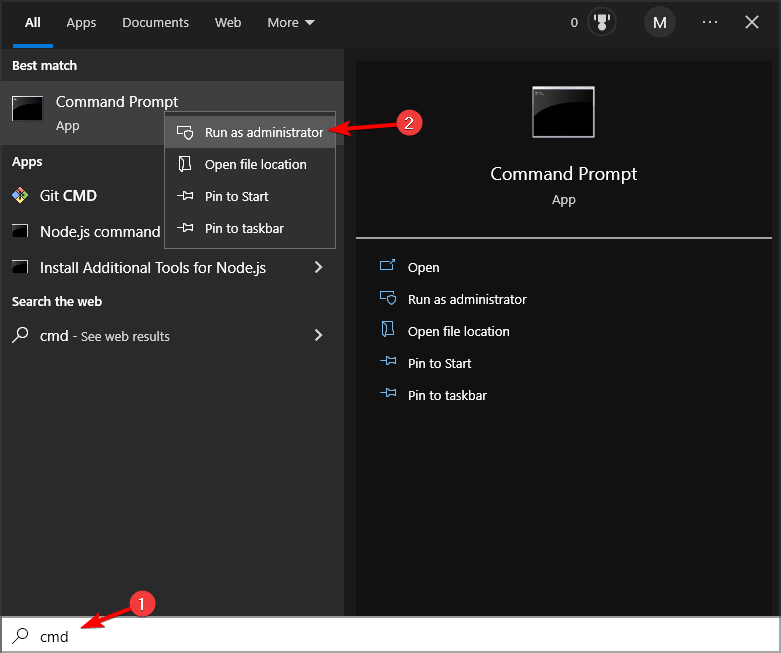
- Click the Cortana or Start menu button to open your Windows search box. Enter the keyword cmd in the search box.
- Right-click the Command Prompt and select Run as administrator.

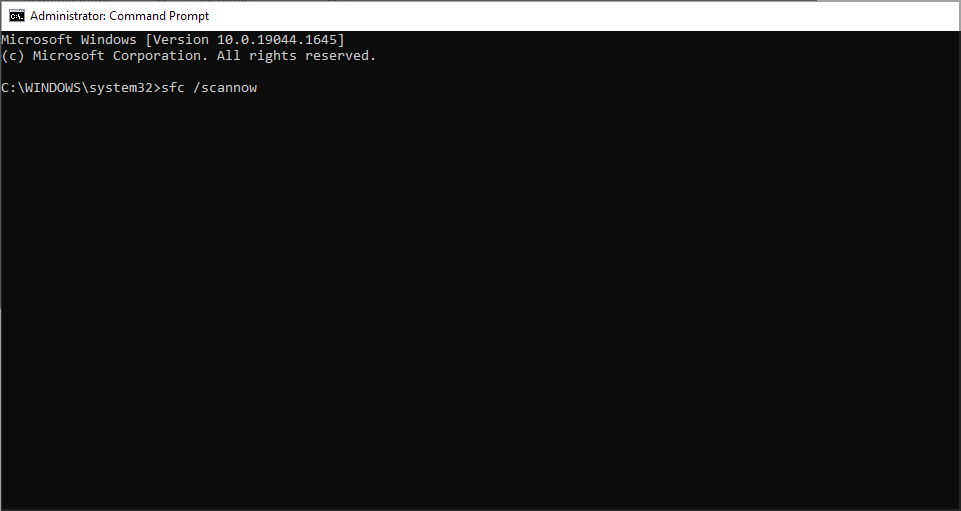
- Enter the following command and run it:
sfc /scannow
- When the SFC scan has finished, restart Windows if it has fixed any files.
- If the SFC has no impact, run a DSIM (Deployment Image Servicing and Management) scan by entering
DISM /Online /Cleanup-Image /RestoreHealth - Then, scan with the SFC tool again.
For more information, check our guide on how to fix corrupted system files. You can also try using a good repair tool to avoid further errors.
How we test, review and rate?
We have worked for the past 6 months on building a new review system on how we produce content. Using it, we have subsequently redone most of our articles to provide actual hands-on expertise on the guides we made.
For more details you can read how we test, review, and rate at WindowsReport.
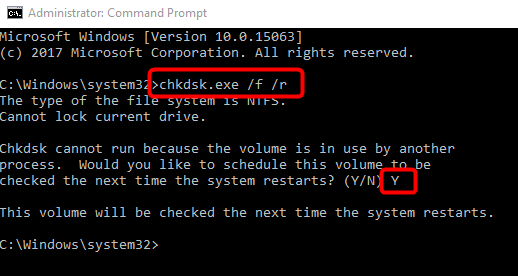
2. Run a Check Disk scan
- Open the Command Prompt as an administrator.
- Input the following command:
chkdsk /r
- The Command Prompt will request that you schedule the volume to be checked when you restart Windows. Press the Y key to confirm.
- Restart your desktop or laptop. Check Disk will scan and repair volumes during the restart.

3. Adjust the Power settings
- Open Run by pressing its Win key + R keyboard shortcut.
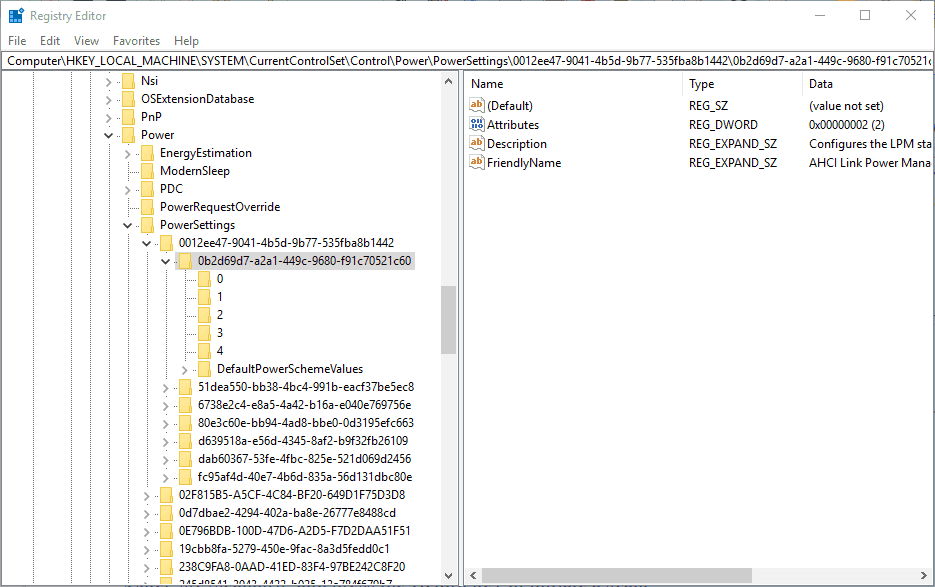
- Enter regedit in Run’s text box and click OK to open the Registry Editor.
- First, you can back up the registry by clicking File > Save and selecting All. Enter a file title in the text box, and press the Save button.
- Now open
Computer\HKEY_LOCAL_MACHINE\SYSTEM
CurrentControlSet\Control\Power\PowerSettings\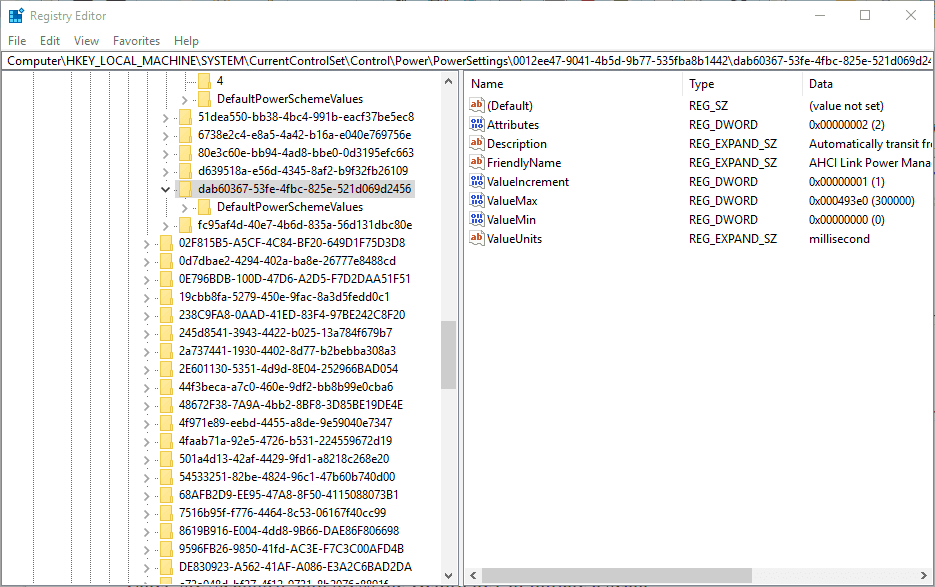
012ee47-9041-4b5d-9b77-535fba8b1442b2d69d7-a2a1-449c-9680-f91c70521c60 - Right-click Attributes on the right of the window and select Modify to open the Edit DWORD window.
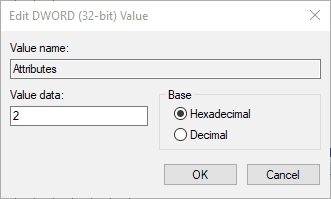
- Enter 2 in the Value data box, and press the OK button.

- Next, navigate to this Registry Editor location:
HKEY_LOCAL_MACHINE\SYSTEM\CurrentControlSet
\Control\Power\PowerSettings\
012ee47-9041-4b5d-9b77-535fba8b1442dab60367-53fe-4fbc-825e-521d069d2456
- Right-click the Attributes DWORD and select Modify from its context menu.
- Input 2 in the Edit DWORD window’s text box, and click the OK button.
- Now you can close the Registry Editor.


Now adjust the power settings by doing the following:
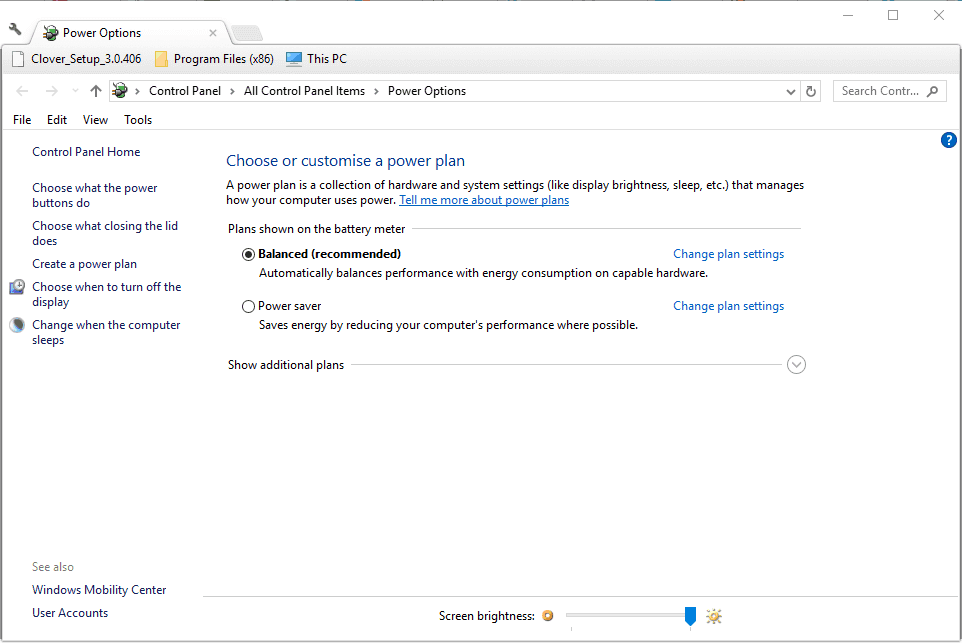
- Enter powercfg.cpl in Run to open the window below.

- Click Change plan settings > Change advanced power settings to open the Power Options window.
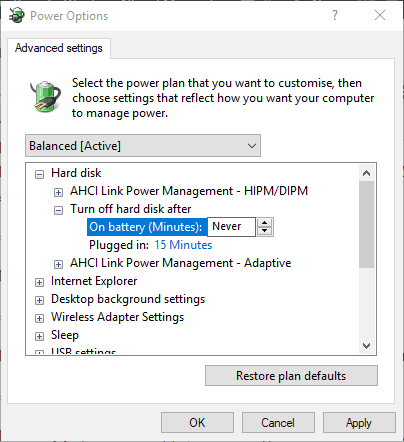
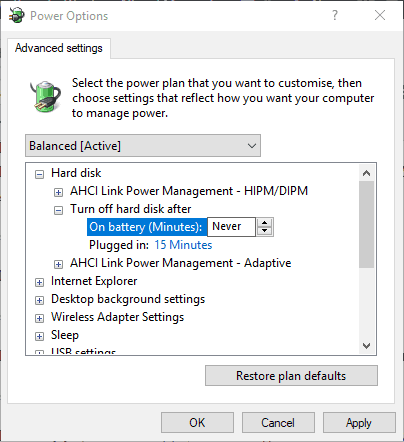
- Double-click Hard disk to expand its options.
- Double-click AHCI Link Power Management – HIPM/DIPM and switch both its On battery and Plugged in options to Active.

- Next, double-click AHCI Link Power Management – Adaptive and switch the On battery and Plugged in settings to 0.
- Double-click Turn off hard disk after and adjust it is On battery and Plugged in options to Never.
- Press Apply > OK to apply the settings and close the window.

- How to Remove Duplicate Drive Letters on Windows 11
- How to Properly Fix a PC That’s Not Turning on [12 ways]
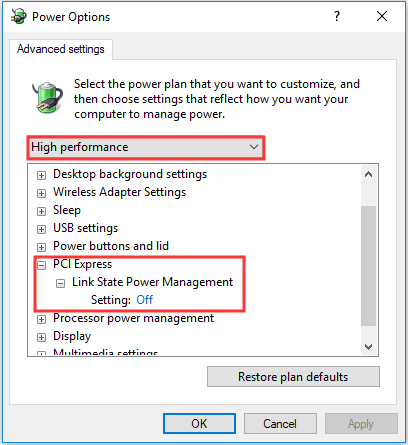
4. Configure the power plan settings
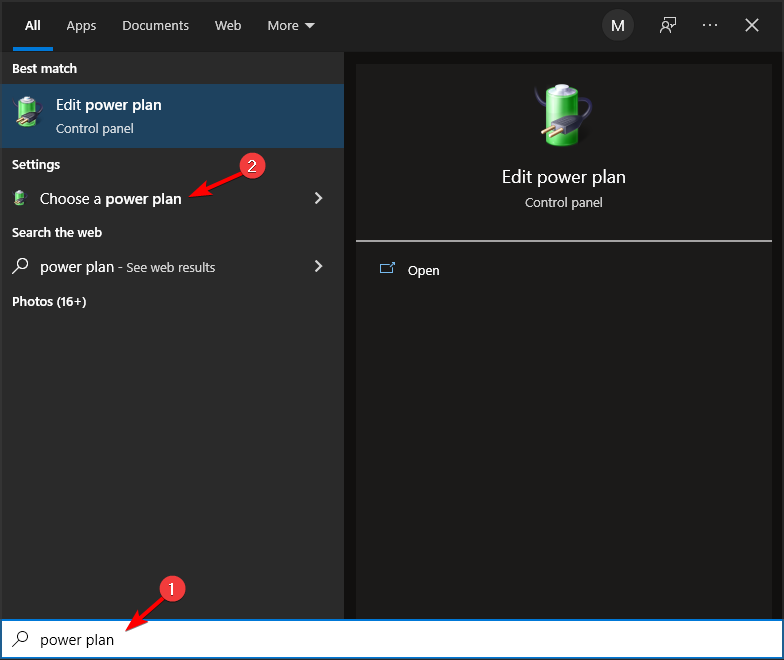
- Press the Windows key + S and type power. Select Choose a power plan.

- Select the High Performance power plan.
- Close the Power options window.
5. Update the AHCI Driver
- Press the Win + X hotkey, and select Device Manager on the menu.
- Double-click IDE ATA/ATAPI controllers on the Device Manager window.

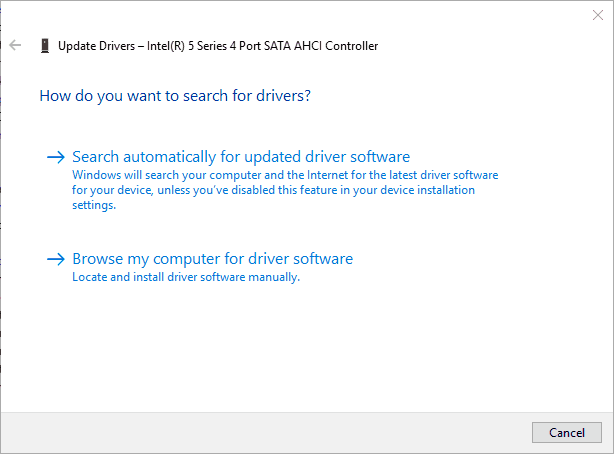
- Right-click your listed AHCI driver and select Update driver from the context menu.
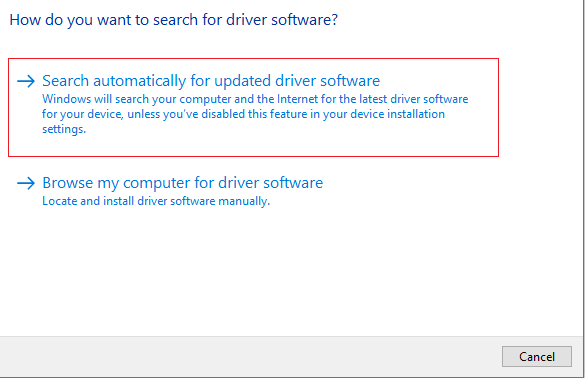
- Click the Search automatically for updated driver software option to install an updated driver.

- Alternatively, you can manually download a suitable AHCI driver from the manufacturer website. For example, this is the update Rapid Storage Technology (Intel® RST) Driver for Intel systems.
- After downloading the driver, select the Browse my computer for driver software option on the Update Drivers window directly above. Then click the Browse button to select the driver to install.

To learn more about drivers, we have a great guide on how to update outdated drivers.
6. Turn off the Fast Startup Option in Windows 10
- Press the Win key + X hotkey and select Power Options on the menu.
- Click the Additional power setting to open the tab directly below.
- Click Choose what the power buttons do on the left of the window to open the System Settings tab below.
- Select Change settings that are currently unavailable to configure the Turn on fast start-up option.
- Deselect the Turn on fast start-up (recommended) checkbox if it’s selected.
- Press the Save Changes button at the bottom of the tab.
- Then restart the Windows OS.


Those remedies might resolve the Reset to device Raidport0 error, so Windows doesn’t freeze. You could also try changing your SATA drive port and replacing the SATA or ATA cable.
Raid errors can be serious, and many reported Rcraid.sys BSoD failure, but we tackled that issue in a different guide.
We want to hear from you. Did you use a different method to fix this problem? If so, share it with us in the comments below.
![]()
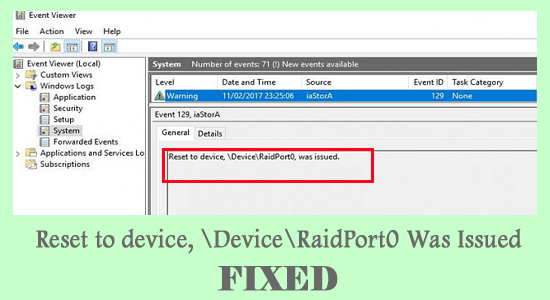
Reset to device,\ device\raidport0, was issued is a case often witnessed in Windows System, pertaining to Power Settings misconfiguration and the Windows system freezes temporarily.
The error usually appears on the server or the client PCs with different Windows platforms. So, we investigated the error and found that the error is not as difficult as it seems there are easy troubleshooting instructions that work for you to solve the error.
To fix common Windows errors, we recommend Advanced System Repair:
This software is your one stop solution to fix Windows errors, protect you from malware, clean junks and optimize your PC for maximum performance in 3 easy steps:
- Download Advanaced System Repair rated Excellent on Trustpilot.
- Click Install & Scan Now to install & scan issues causing the PC problems.
- Next, click on Click Here to Fix All Issues Now to fix, clean, protect and optimize your PC effectively.
- Windows Server trigger when the Power configurations and SATA controller cards stall the performance
- A corrupted Hard Disk often triggers the problem
- Due to the Windows Power settings configurations issues
Now follow the fixes given one by one to get past the error on Windows 10 OS
How to Fix “Reset to device,\ device\raidport0, Was Issued” Error?
Table of Contents
Fix 1: Run System File Checker
Corrupted files play the main messenger to trigger the device, deviceraidport0 issues. So, if in case the Windows system files are corrupted and causing the error then you need to run the inbuilt system file checker command to scan and repair the corrupted Windows system files.
To do this, here are the steps,
- Open Windows and in the search box
- Type Command Prompt
- Out of the results, right-click on the same and choose the command prompt to Run as Administrator

- In the command prompt type sfc/scannow and tap on Enter key
- Wait for the process to finish ( approx 15 min.)
- When finished, reboot your system to see if the error code is gone or else head to the next fix.
Fix 2: Running a CHKDSK Scan
The corrupted hard drive or the bad sectors present on the hard drive are more likely to cause the error. In this case, using a disk scan CHKDSK helps in finding corrupted portions in the hard disk and turn, helps to repair. To use them,
- Launch Command Prompt as an Administrator by right-clicking on Command Prompt Menu
- Now on the command prompt type the chkdsk /r command and tap Enter
- Wait for the time till the Disk Checking process is completed
- Restart your PC to see if the error is gone
- In case of error, try performing the next step
Fix 3: Adjust Power Settings in Registry
Power Settings are often linked with the error of Reset to device,\ device\raidport0, Was Issued. If you face the error persisting even after the previous step, perform these steps to try your luck,
- Click on Windows+R together to open the Run box
- Type regedit and click on OK to continue
- In the Registry Editor Window, find the following,
- HKEY_LOCAL_MACHINE\SYSTEM\CurrentControlSet\Control\Power\PowerSettings\012ee47-9041-4b5b-9b77-535fba8b1442\0b2d69d7-a2a1-449c-9680-f91c70521c60
- Double tap on Attributes and choose Modify for opening the Edit DWORD Window
- Change the Value data to 2 and click on OK to continue
- Once again, visit the following path,
- HKEY_LOCAL_MACHINE\SYSTEM\CurrentControlSet\Control\Power\PowerSettings\012ee47-9041-4b5b-9b77-535fba8b1442\0b2d69d7-a2a1-449c-9680-f91c70521c60
- Double click on the Attribute DWORD and choose Modify from the menu.
- Change the value data to 2 once again in the DWORD window and click on OK
- Exit Registry
- Click Win+R and type powercfg.cpl in the Run box and press OK to continue
- Change Plan Settings and tap Change Advanced Power Settings
- Double Click on Hard Disk
- Then double-tap AHCI Link Power Management- HIPM/DIPM and switch both its On battery and Plugged options to Active

- And double-tap on AHCI Link Power Management –Adaptive and turn On Battery and Plugged in the settings to 0
- Double-tap on Turn off the hard disk after that change the On Battery as well as the Plugged in option to Never.
- Tap on Apply and OK to affirm the Changes
- Restart your System to see the errors gone for good
Fix 4: Configure your Power Plan Settings
Many users suggested that settings power plan settings to the high performance work for them to solve the error. So here it is suggested to set the Power Plan Settings, to solve Reset to device, deviceraidport0, was issued an error.
Follow the steps to do so:
- Click on Windows in the search box type Power Options
- Open the Power Plan and choose Power Plan Settings
- Choose PCI Express to off
- Restart the System to check if the issue of \Device\RaidPort0 was resolved
Fix 5: Updating AHCI Driver
AHCI Driver in Windows 10 works in a way to rectify the error persisting device, deviceraidport0 issues. As the AHCI (Advanced Host Controller Interface) driver is essential for the SATA host bus adapters. And therefore, we strongly recommend you update the AHCI driver.
Follow the steps given below:
- Press the Win+R keys together, and in the Run box that appears
- Type devmgmt.msc to open Device Manager
- Inside the page, choose IDE ATA/ATAPI Controllers and find AHCI Controller
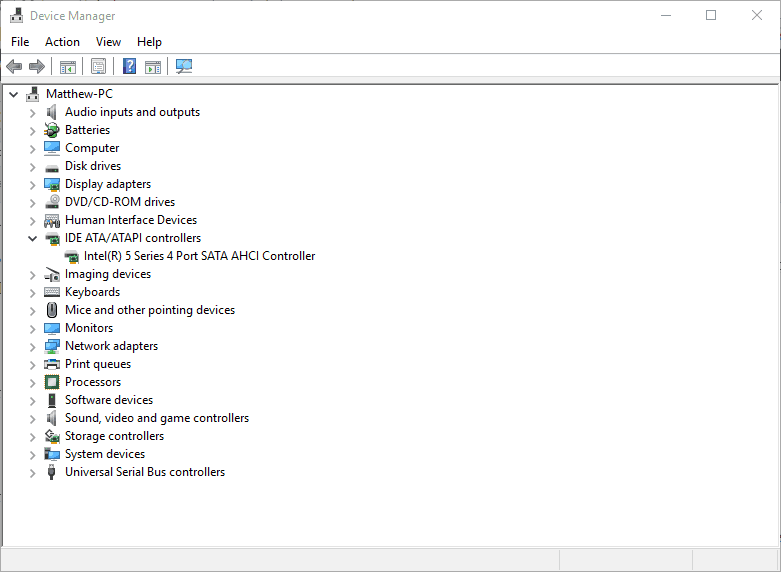
- Right-click to choose Update Driver and continue
- Choose Search automatically for updated driver software to proceed
- Reboot your system to check if the problem was resolved
Moreover, you can also update the driver using the third-party Driver Updater tool. This is an advanced tool that, just by scanning once, detects and updates the driver automatically.
Get the Driver Updater tool, to update the AHCI driver automatically
Fix 6: Reinstall System Drivers
If the system drivers you are running are missing, then also you may see the Reset to device, \Device\RaidPort0, was issued error. The outdated system driver hinders the operating system capability to perform operations on the problematic device. So, make sure your system drivers are updated.
Follow the steps to do so:
- Press Windows + X and choose Device Manager
- Now in the window that appears, check if some of the drivers are missing and then install the missing drivers.
- Or else launch the Device Manager, then expand the IDE ATA/ATAPI Controllers tab and right-click the Storage Controller
- And choose Uninstall device.
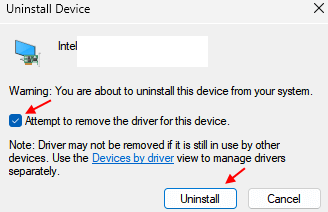
- Wait for the windows to complete the process.
Now restart the system and check if the error is fixed
Fix 7: Disable Fast Startup
Many users confirmed that updating the fast startup works for them to fix the Reset to device Raidport0 error. So, if you have enabled the Fast startup on your Windows 10 system, disabling it may work for you.
Follow these steps to do so:
- Click Win+R to open the Run box
- Type powercfg.cpl and tap on OK to proceed
- On the Power Options page, select Choose What the Power Button Does

- Choose Change Settings that are currently available
- Then choose System Settings under the Shutdown settings
- Uncheck the box next to Turn on Fast Start-up
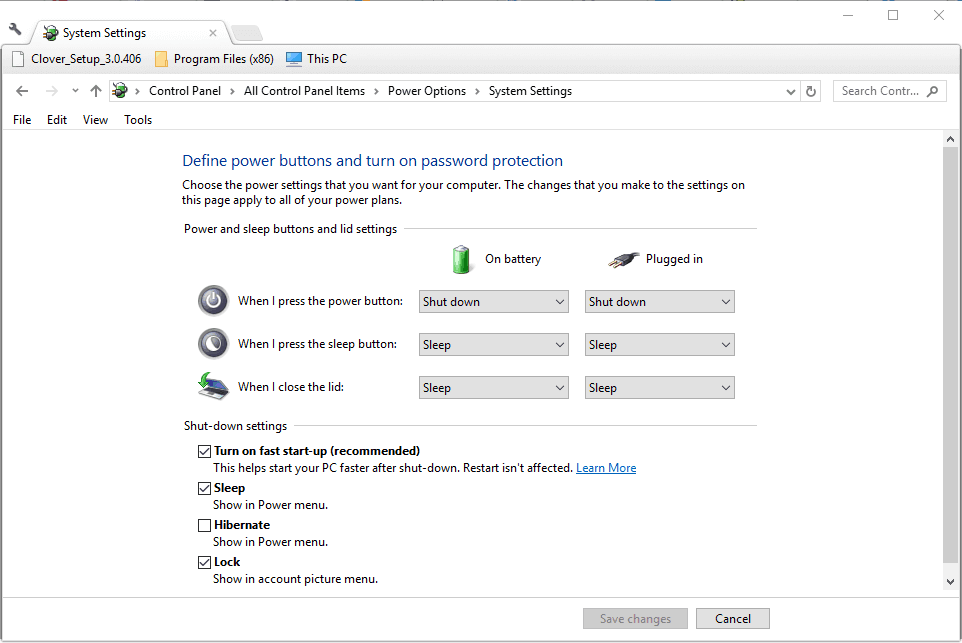
- Save changes and exit
- Restart the system to see if the error appears or not
Fix 8: Disable Antivirus
If none of the above-given fixes works for you, check if you have installed an antivirus. In this case, the 3rd party antivirus might be conflicting with the driver and causing the error. To disable the antivirus, launch the antivirus program and click on settings. Next, click on disable the antivirus program.
I hope after following the fixes given, you can solve the event id: 129 Reset to device, \Device\RaidPort0 error on Windows 10.
Recommended Solution to Fix Various PC Problems:
The problem might be due to the PC’s internal issues and errors if you are still seeing the error. Then, it is suggested to scan your system with the only PC Repair Tool.
This is an advanced repair tool that, just by scanning once, detects and fixes various Windows problems and stubborn computer errors. It not only fixes errors but also optimizes your Windows PC performance like a new one, resolving various Windows errors.
Final Words:
Reset to device, \device\ raidport0, was issued is a problem that pertains to appear with regards to power and registry issues.
Use these steps to ensure the error message gets fixed on your Windows 10 system. Make sure to try the steps given carefully.
I hope the article helped you to solve the issue. If in case you have any doubts or queries related to this particular article, you can get back to us on the Facebook page.
Good Luck..!

Hardeep has always been a Windows lover ever since she got her hands on her first Windows XP PC. She has always been enthusiastic about technological stuff, especially Artificial Intelligence (AI) computing. Before joining PC Error Fix, she worked as a freelancer and worked on numerous technical projects.
На чтение 6 мин. Просмотров 4k. Опубликовано
Ваш рабочий стол Windows временно зависает примерно на 30 секунд? Если это так, ваш журнал просмотра событий, вероятно, будет содержать ошибку « Сброс на устройство, DeviceRaidPort0, был выпущен ». Эта проблема возникает на серверных или клиентских ПК с различными платформами Windows. Системная ошибка сброса на устройство в основном относится к платам контроллера SATA и конфигурациям настроек питания Windows, и именно так вы можете это исправить.
Содержание
- Произошел сброс до deviceDeviceRaidPort1: исправьте эту ошибку в течение нескольких минут
- 1. Запустите проверку системных файлов.
- 2. Запустите проверку диска
- 3. Настройте параметры питания
- 4. Настройте параметры схемы электропитания.
- 5. Обновите драйвер AHCI
- 6. Отключите опцию быстрого запуска в Windows 10
Произошел сброс до deviceDeviceRaidPort1: исправьте эту ошибку в течение нескольких минут
- Запустите проверку системных файлов проверки
- Запустите проверку диска проверки
- Настройте параметры питания
- Настройте параметры схемы электропитания
- Обновите драйвер AHCI
- Отключите опцию быстрого запуска в Windows 10
1. Запустите проверку системных файлов.
Во-первых, возможно, стоит поискать поврежденные системные файлы. Проверка системных файлов – это встроенный инструмент Windows, который восстанавливает системные файлы, но у него нет графического интерфейса. Однако вы можете запустить сканирование SFC с помощью командной строки следующим образом.
- Нажмите кнопку меню Cortana или Start, чтобы открыть окно поиска Windows. Введите ключевое слово «cmd» в поле поиска.
-
Нажмите правой кнопкой мыши командную строку и выберите Запуск от имени администратора .

- Введите «sfc/scannow» и нажмите клавишу «Return», чтобы начать сканирование.
- После завершения сканирования SFC перезапустите Windows, если она исправила какие-либо файлы.
- Если SFC не оказывает влияния, запустите сканирование DSIM (Обслуживание образов развертывания и управление ими), введя «DISM/Online/Cleanup-Image/RestoreHealth» в окне подсказки. Сканирование DSIM может восстановить образ Windows для утилиты SFC.
- Затем выполните сканирование с помощью инструмента SFC снова.

2. Запустите проверку диска
Check Disk, иначе chkdsk, является еще одной утилитой, которая может пригодиться для исправления ошибки сброса устройства. Этот инструмент восстанавливает сектора жесткого диска и исправляет поврежденные файловые системы. Вы также можете запустить Check Disk через командную строку следующим образом.
- Откройте командную строку как администратор.
-
Введите «chkdsk/r» в окне подсказки и нажмите клавишу ввода.
- Командная строка попросит вас запланировать проверку тома при перезапуске Windows. Нажмите клавишу Y для подтверждения.
- Перезагрузите ваш рабочий стол или ноутбук. Проверка диска будет сканировать и восстанавливать тома во время перезапуска.

3. Настройте параметры питания
Корректировка пары настроек соединения ACHI может исправить ошибку «Сброс на устройство». Однако вам нужно изменить реестр, чтобы выбрать эти параметры в окне параметров электропитания. Вот как вы можете настроить параметры ACHI.
- Откройте Run, нажав сочетание клавиш Win + R.
- Введите «regedit» в текстовое поле «Выполнить» и нажмите ОК , чтобы открыть редактор реестра.
- Во-первых, вы можете сделать резервную копию реестра, нажав Файл > Сохранить и выбрав Все . Введите заголовок файла в текстовое поле и нажмите кнопку Сохранить .
-
Теперь откройте ComputerHKEY_LOCAL_MACHINESYSTEMCurrentControlSetControlPowerPowerSettings012ee47-9041-4b5d-9b77-535fba8b1442b2d69d7-a2a1-449c-9680-f91c70521c60 в снимке реестра в снимке ниже.
- Щелкните правой кнопкой мыши Атрибуты в правой части окна и выберите Изменить , чтобы открыть окно Изменить DWORD.
-
Введите “2” в поле “Значение” и нажмите кнопку ОК .
-
Затем перейдите в это место редактора реестра: HKEY_LOCAL_MACHINESYSTEMCurrentControlSetControlPowerPowerSettings012ee47-9041-4b5d-9b77-535fba8b1442dab60367-53fe-4fbc-825e-521d069d45.
- Щелкните правой кнопкой мыши атрибут DWORD и выберите Изменить в его контекстном меню.
- Введите “2” в текстовое поле окна “Изменить DWORD” и нажмите кнопку ОК .
- Теперь вы можете закрыть редактор реестра.
-
Введите «powercfg.cpl» в «Выполнить», чтобы открыть окно ниже.
- Нажмите Изменить настройки плана > Изменить дополнительные параметры питания , чтобы открыть окно параметров питания.
- Дважды нажмите Жесткий диск , чтобы расширить его параметры.
-
Дважды нажмите Управление питанием AHCI Link – HIPM/DIPM и переключите оба параметра Питание от аккумулятора и Подключено к активному.
- Затем дважды нажмите AHCI Link Power Management – Adaptive и установите для параметров Батарея и Подключено значение 0.
-
Дважды нажмите Отключить жесткий диск после и установите для параметров Питание от аккумулятора и Подключено значение «Никогда».
- Нажмите Применить > ОК , чтобы применить настройки и закрыть окно.


4. Настройте параметры схемы электропитания.
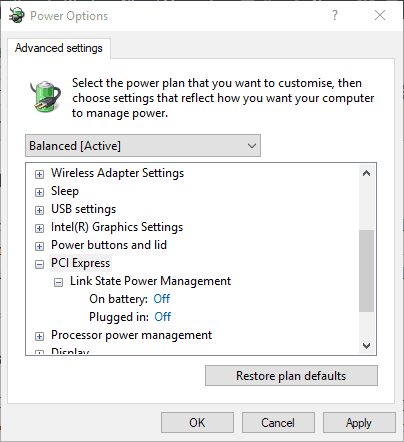
Переключение схемы управления питанием на высокую производительность также может решить проблему. Это отключит параметры соединения PCI Express для синхронизации PCI. Нажмите раскрывающееся меню в верхней части окна параметров электропитания, выберите Высокая производительность и нажмите кнопку ОК , чтобы настроить план. Затем параметры PCI Express, приведенные ниже, будут отключены, как показано на снимке ниже.

5. Обновите драйвер AHCI
Драйвер AHCI (Advanced Host Controller Interface) является важным драйвером для адаптеров шины SATA. Таким образом, обновление этого драйвера также может решить проблему с устройством. Вы можете обновить этот драйвер следующим образом.
- Нажмите горячую клавишу Win + X и выберите в меню Диспетчер устройств .
-
Дважды нажмите Контроллеры IDE ATA/ATAPI в окне диспетчера устройств.
- Щелкните правой кнопкой мыши указанный драйвер AHCI и выберите Обновить драйвер в контекстном меню.
-
Нажмите Поиск обновленного программного обеспечения драйвера , чтобы установить обновленный драйвер.
- Кроме того, вы можете вручную загрузить подходящий драйвер AHCI с веб-сайта производителя. Например, это обновленный драйвер Rapid Storage Technology (Intel® RST) для систем Intel.
- После загрузки драйвера выберите параметр Просмотреть мой компьютер для драйвера программное обеспечение в окне обновления драйверов непосредственно над. Затем нажмите кнопку Обзор , чтобы выбрать драйвер для установки.


6. Отключите опцию быстрого запуска в Windows 10
-
Отключение быстрого запуска в Windows 10 исправило ошибку сброса устройства для некоторых пользователей. Вы можете отключить эту настройку, нажав клавишу Win + горячую клавишу X и выбрав в меню Параметры электропитания .
- Нажмите Дополнительные настройки мощности , чтобы открыть вкладку непосредственно под ней.
- Нажмите Выберите, что делают кнопки питания в левой части окна, чтобы открыть вкладку «Настройки системы» ниже.
-
Выберите Изменить настройки, которые в данный момент недоступны , чтобы настроить параметр Включить быстрый запуск .
- Снимите флажок Включить быстрый запуск (рекомендуется) , если он установлен.
- Нажмите кнопку Сохранить изменения в нижней части вкладки.
- Затем перезапустите ОС Windows.


Это несколько способов устранения ошибки сброса устройства, чтобы Windows не зависала. Вы также можете попробовать изменить порт SATA-накопителя и заменить кабель SATA или ATA.
Примечание редактора . Этот пост был первоначально опубликован в октябре 2017 года и с тех пор был полностью переработан и обновлен для обеспечения свежести, точности и полноты.
What causes the error Reset to device, \Device\RaidPort0, was issued? How to fix the error reset to device device raidport0 was issued? This post from MiniTool will show you 6 solutions.
What Causes the Error Reset to Device, \Device\RaidPort0 Was Issued?
If your computer usually freezes, you may receive the error message Reset to device, \Device\RaidPort0, was issued. This issue often occurs on Windows PCs or Windows Servers.
The reset to device device raidport0 was issued error is often caused by the Windows power setting configurations, SATA Controller cards or other reasons.
So in the following section, we will show you how to fix the Reset to device device raidport0 was issued Windows 10 error.
6 Solutions: Reset to Device, \Device\RaidPort0 Was Issued
In this part, there are 6 solutions to fix the error Reset to device, \Device\RaidPort0, was issued.
- Perform System File Checking
- Run Disk Scan
- Adjust Power Settings
- Configure Power Plan Settings
- Update AHCI Driver
- Turn off Fast Startup
Now, we will show you the detailed solutions one by one.
Solution 1. Perform System File Checking
If there are corrupted system files on your computer, you may encounter the error reset to device device raidport0 was issued.
Now, here is the tutorial.
Step 1: Type Command Prompt in the search box of Windows and choose the best-matched one. Then right-click it to choose Run as administrator.
Step 2: In the command line window, type the sfc /scannow command and hit Enter to continue.
Then you need to wait for the process to be finished. Please do not close the command line window until you see the message verification 100% complete.
Related article: Quickly Fix – SFC Scannow Not Working (Focus on 2 Cases)
When it is finished, reboot your computer and check whether the error Reset to device, \Device\RaidPort0, was issued is solved.
If this solution does not take effect, try the following solutions.
Solution 2. Run Disk Scan
The second solution you can try is to run disk scan to check whether there are bad sectors on hard drive and repair them.
Now, here is the tutorial.
Step 1: Open Command Prompt and run it as administrator.
Step 2: Type the command chkdsk /r and hit Enter to continue.
When it is finished, reboot your computer and check whether the error Reset to device, \Device\RaidPort0 was issued is solved.
Solution 3. Adjust Power Settings
In general, adjusting power settings is able to fix the error reset to device device raidport0 was issued. If you come across the same issue, try this solution.
Now, here is the tutorial.
Step 1: Press Windows key and R key together to open Run dialog, then type the regedit in the box and click OK to continue.
Step 2: In the Registry Editor window, navigate to the following folder.
Computer\HKEY_LOCAL_MACHINE\SYSTEM\CurrentControlSet\Control\Power\PowerSettings\012ee47-9041-4b5d-9b77-535fba8b1442\0b2d69d7-a2a1-449c-9680-f91c70521c60

Step 3: Double-click Attributes and change its value data to 2. Then press OK to continue.

Step 4: Next, navigate to the HKEY_LOCAL_MACHINE\SYSTEM\CurrentControlSet\Control\Power\PowerSettings\012ee47-9041-4b5d-9b77-535fba8b1442\dab60367-53fe-4fbc-825e-521d069d2456.
Step 5: Double-click the Attributed and change its value data to 2. Then exit the Registry Editor window.
Step 6: Open Run dialog again and type the powercfg.cpl in the box and click OK to continue.
Step 7: In the pop-up window, click Change plan settings and change advanced power settings to continue.

Step 8: Double-click Hard Disk to expand it.
Step 9: Double-click AHCI Link Power Management – HIPM/DIPM and switch both its On battery and Plugged in options to Active.
Step 10: Double-click AHCI Link Power Management – Adaptive and switch the On battery and Plugged in settings to 0.
Step 11: Double-click Turn off hard disk after and change the On battery to Never.
Step 12: Then click Apply and OK to confirm the changes.
After that, reboot your computer to check whether the error Reset to device, \Device\RaidPort0,was issued is solved.
Solution 4. Configure Power Plan Settings
The fourth solution you can try is to configure power plan settings.
Now, here is the tutorial.
Step 1: Open the Power Options window as the method listed above.
Step 2: Change the power plan to High performance. Then the PCI Express will be configured to off.
When it is finished, reboot your computer and check whether the issue Reset to device. \Device\RaidPort0 was issued is solved.
Solution 5. Update AHCI Driver
To resolve the error reset to device device raidport0 was issued Windows 10, you can try updating the AHCI driver.
Now, here is the tutorial.
Step 1: Press Windows key and R key together to open Run dialog, then type devmgmt.msc in the box and click OK to continue.
Step 2: In the pop-up window, expand the IDE ATA/ATAPI controllers and select the AHCI controller. Then right-click it to choose Update driver to continue.

Step 3: In the pop-up window, click Search automatically for update driver software to continue.
Then you can follow the instruction to continue. When it is finished, you can reboot your computer to check whether the issue Reset to device, \Device\RaidPort0, was issued is solved.
Solution 6. Turn off Fast Startup
The last solution you can try is to turn off fast startup.
Now, here is the tutorial.
Step 1: Press Windows key and R key together to open Run dialog, then type the powercfg.cpl in the box and click OK to continue.
Step 2: In the pop-up window, click Choose what the power button does.
Step 3: Choose Change settings that are currently unavailable to continue.

Step 3: Uncheck the option Turn on fast startup.
When it is finished, reboot your computer and check whether the error Reset to device, \Device\RaidPort0, was issued is solved.
Final Words
To sum up, this post has introduced 6 ways to fix the Reset to device, \Device\RaidPort0, was issued error. If you have any better solution to fix this error, please share it in the comment zone.