Можно использовать установочный носитель (USB-накопитель или DVD-диск), чтобы установить новую копию Windows, выполнить чистую установку или переустановить Windows.
Чтобы создать установочный носитель, перейдите на веб-сайт скачивания ПО, где вы найдете пошаговые инструкции. На этом веб-сайте вы можете выбрать версию Windows и создать собственный установочный носитель с помощью USB-устройства флэш-памяти или DVD-диска. Чтобы перейти непосредственно к одной из версий, выберите одну из следующих ссылок:
-
Windows 7
-
Windows 8.1
-
Windows 10 (Затем выберите Скачать средство сейчас.)
-
Windows 11 (затем выберите Скачать средство сейчас.)
Важно: Создайте резервную копию файлов перед установкой и переустановкой Windows на компьютере. Узнайте, как это сделать.
Чтобы создать установочный носитель, необходимо следующее:
-
Компьютер с надежным подключением к Интернету. Время скачивания зависит от скорости подключения к Интернету.
-
USB-устройство флэш-памяти, внешний жесткий диск или DVD-диск. Пустое USB-устройство флэш-памяти или внешний жесткий диск объемом не менее 8 ГБ либо пустой DVD-диск (и устройство для записи на DVD-диски). Рекомендуем использовать чистый носитель, поскольку все его содержимое будет удалено. Если при записи DVD-диска из ISO-файла отображается сообщение о том, что файл образа диска слишком большой, необходимо использовать DVD-носитель с двумя слоями (DL).
-
Ключ продукта. 25-значный ключ продукта (не требуется для цифровых лицензий). Если вам требуется помощь, см. раздел Как найти ключ продукта Windows.
После создания установочного носителя вы можете сбросить или переустановить Windows. Дополнительные сведения см. в статье Параметры восстановления в Windows.
Нужна дополнительная помощь?
Нужны дополнительные параметры?
Изучите преимущества подписки, просмотрите учебные курсы, узнайте, как защитить свое устройство и т. д.
В сообществах можно задавать вопросы и отвечать на них, отправлять отзывы и консультироваться с экспертами разных профилей.
Найдите решения распространенных проблем или получите помощь от агента поддержки.
You can use installation media (a USB flash drive or DVD) to install a new copy of Windows, perform a clean installation, or reinstall Windows.
To create installation media, go to the software download website, where you’ll find step-by-step instructions. On that website, you can select a version of Windows and create your own installation media using either a USB flash drive or a DVD. To go directly to one of the versions, select one of these links:
-
Windows 7
-
Windows 8.1
-
Windows 10 (Then select Download tool now.)
-
Windows 11 (Then select Download tool now.)
Important: Back up your files before you install or reinstall Windows on your PC. Learn how.
To create the installation media, here’s what you’ll need:
-
A PC with a reliable internet connection. The download time will vary, depending on your internet connection.
-
A USB flash drive, external hard drive, or DVD. A blank USB flash drive or external hard drive with at least 8 GB of space, or a blank DVD (and DVD burner). We recommend using a blank USB or blank DVD because any content on it will be deleted. When burning a DVD from an ISO file, if you’re told the disc image file is too large, you’ll need to use dual layer (DL) DVD media.
-
A product key. Your 25-character product key (not required for digital licenses). For help finding it, go to Find your Windows product key.
After you’ve created the installation media, you can reset or reinstall Windows. To learn more, go to Recovery options in Windows.
Need more help?
Want more options?
Explore subscription benefits, browse training courses, learn how to secure your device, and more.
Communities help you ask and answer questions, give feedback, and hear from experts with rich knowledge.
Find solutions to common problems or get help from a support agent.
Простое создание загрузочных USB-дисков
Rufus — это утилита, которая помогает форматировать и создавать загрузочные Flash/Pen/Key диски, карты памяти и т.д.
Rufus будет особенно полезен в случаях, когда:
- необходимо создать загрузочный USB-диск из загрузочного ISO-образа (Windows, Linux, UEFI и др.)
- необходимо работать на системах, которые не имеют установленной ОС
- необходимо прошить BIOS или другую прошивку из-под DOS
- необходимо запустить низкоуровневую утилиту
Несмотря на небольшой размер, Rufus умеет делать все, что вам нужно!
Неполный список ISO-образов, с которыми Rufus умеет работать, представлен внизу страницы. (1)
Скачать
Последние релизы:
| Ссылка | Тип | Платформа | Размер | Дата |
|---|---|---|---|---|
rufus-4.2.exe |
Стандарт | Windows x64 | 1.4 МБ | 2023.07.26 |
rufus-4.2p.exe |
Переносная версия | Windows x64 | 1.4 МБ | 2023.07.26 |
rufus-4.2_x86.exe |
Стандарт | Windows x86 | 1.4 МБ | 2023.07.26 |
rufus-4.2_arm64.exe |
Стандарт | Windows ARM64 | 4.6 МБ | 2023.07.26 |
Другие версии (GitHub)
Другие версии (FossHub)
Системные требования:
Windows 8 или более поздней версии. После загрузки приложение готово к использованию.
Поддерживаемые языки:
| Bahasa Indonesia | , | Bahasa Malaysia | , | Български | , | Čeština | , | Dansk | , | Deutsch | , | Ελληνικά | , |
| English | , | Español | , | Français | , | Hrvatski | , | Italiano | , | Latviešu | , | Lietuvių | , | Magyar | , | Nederlands | , | Norsk | , |
| Polski | , | Português | , | Português do Brasil | , | Русский | , | Română | , | Slovensky | , | Slovenščina | , | Srpski | , |
| Suomi | , | Svenska | , | Tiếng Việt | , | Türkçe | , | Українська | , | 简体中文 | , | 正體中文 | , | 日本語 | , | 한국어 | , | ไทย | , |
| עברית | , | العربية | , | پارسی | . |
Я хочу выразить мою благодарность переводчикам, которые перевели Rufus, а также эту веб-страницу на различные языки. Если вы обнаружите, что можете пользоваться Rufus на вашем родном языке, вы должны благодарить их!
Использование
Скачайте исполняемый файл и запустите его – установка не требуется.
Исполняемый файл имеет цифровую подпись, содержащую:
- «Akeo Consulting» (v1.3.0 или более поздней версии)
- «Pete Batard — Open Source Developer» (v1.2.0 или более ранней версии)
Несколько слов о поддержке DOS:
Если вы создаете DOS загрузочный диск и используете не-US клавиатуру, Rufus выберет раскладку клавиатуры в соответствии с региональными настройками вашей системы.
Несколько слов о поддержке ISO:
Все версии Rufus, начиная с 1.1.0, позволяют создать загрузочный USB-диск из ISO-образа (.iso).
Создать ISO-образ из физического диска или из набора файлов очень легко с помощью программ для записи дисков CD, таких как свободно распространяемые InfraRecorder или CDBurnerXP.
Часто задаваемые вопросы (FAQ)
FAQ по Rufus доступен ЗДЕСЬ.
Для того чтобы оставить отзыв, сообщить об ошибке или предложить идею, пожалуйста, используйте GitHub отслеживание проблем. Также вы можете отправить e-mail.
Лицензия
Открытое лицензионное соглашение GNU (GPL) версии 3 или позднее.
Вы можете свободно распространять, изменять или даже продавать программное обеспечение при соблюдении лицензии GPLv3.
Rufus создан со 100% открытым кодом в среде MinGW32.
Изменения
- Версия 4.2 (2023.07.26)
- Add detection and warning for UEFI revoked bootloaders (including ones revoked through
SkuSiPolicy.p7b) - Add ZIP64 support, to extract
.zipimages that are larger than 4 GB - Add saving and restoring current drive to/from compressed VHDX image
- Add saving and restoring current drive to/from compressed FFU (Full Flash Update) image [EXPERIMENTAL]
- Fix a crash when trying to open Windows ISOs, with the MinGW compiled x86 32-bit version
- Fix an issue where ISOs that contain a boot image with an
'EFI'label are not detected as bootable - Increase the ISO → ESP limit for Debian 12 netinst images
- Ensure that the main partition size is aligned to the cluster size
- Add detection and warning for UEFI revoked bootloaders (including ones revoked through
- Другие версии
Исходный код
- Rufus 4.2 (6.1 МБ)
- Кроме того, вы можете клонировать git репозиторий с помощью:
$ git clone https://github.com/pbatard/rufus
- Дополнительные сведения см. в разделе проект GitHub.
Если вы разработчик, вы можете сильно помочь в развитии Rufus, прислав свои патчи с изменениями.
Пожертвования
Поскольку постоянно задаются вопросы о пожертвованиях, поясняю, что на странице нет кнопки пожертвовать.
Причина отсутствия возможности пожертвовать заключается в том, что, по моему мнению, пожертвования не помогают в разработке программного обеспечения, а только вызывают чувство вины у пользователей, которые не пожертвовали.
Если вы все же настаиваете, то всегда можете сделать пожертвование в Free Software Foundation, так как именно благодаря FSF является возможным создание Rufus.
В любом случае, я хочу вам сказать спасибо за вашу постоянную поддержку и энтузиазм, связанные с этой небольшой программой: для меня это очень важно!
Пожалуйста, продолжайте пользоваться Rufus безвозмездно, без каких-либо пожертвований – вы ничего не должны!
(1) Неполный список ISO-образов, с которыми Rufus умеет работать
| AlmaLinux | , | Arch Linux | , | Archboot | , | CentOS | , | Clonezilla | , | Damn Small Linux | , | Debian | , | Elementary OS | , |
| Fedora | , | FreeDOS | , | Garuda Linux | , | Gentoo | , | GParted | , | Hiren’s Boot CD | , | Kali Linux | , | Knoppix | , | KolibriOS | , |
| Linux Mint | , | Manjaro Linux | , | NT Password Registry Editor | , | OpenSUSE | , | Raspberry Pi OS | , | Raspbian | , |
| ReactOS | , | Red Hat | , | rEFInd | , | Rocky Linux | , | Slackware | , | Super Grub2 Disk | , | Tails | , | Trinity Rescue Kit | , |
| TrueNAS CORE | , | Ubuntu | , | UEFI Shell | , | Ultimate Boot CD | , | Windows XP (SP2+) | , | Windows Vista | , |
| Windows 7 | , | Windows 8/8.1 | , | Windows 10 | , | Windows Server 2019 | , | Windows 11 | , | … |
Updated by
Sherly on Jul 20, 2023
Overview of Burning Windows 11 ISO to USB:
| ⚙️Complex Level | Low, Beginners |
| ⏱️Duration | 5-10 minutes |
| 🚩Tools |
EaseUS Partition Master Windows Media Creation Tool |
| 💻Applies to | Burn Windows 11/10/8/7 ISO to USB |
| ✏️Ways |
Burn Windows 11 ISO to USB Using EaseUS Partition Master — Easy Burn Windows 11 ISO to USB Using Media Creation Tool — Complicated |
An ISO file is a digital image of an optical disc. In the early 2000s, Windows and other operating systems were available on optical discs. A Windows 11 ISO is just a digital copy of the disc version of Windows 11.
If you run a small office or work in a computer workshop and want a handy copy of Windows 11 to install it quickly, you can download a copy of the Windows 11 ISO file on a USB drive. And you can also download a copy of Windows 11 to your USB drive for any reason as well.
- 💡And before you proceed, make sure you have a USB drive with a minimum storage space of 8GB and that it is formatted to FAT32.
- 💡And download the Windows 11 ISO file on your PC. You can click the following link to download it:
https://www.microsoft.com/en-us/software-download/windows11
If you can’t download Windows 11 ISO file, there is a link to help you.
In our opinion, the best way to burn a Windows 11 ISO file to a USB is using EaseUS Partition Master; however, continue reading as we’re going to share everything there is to know.
Burn Windows 11 ISO to USB Using EaseUS Partition Master
EaseUS Partition Master is a fantastic tool that takes care of all your disk needs. However, it can also burn Windows 11 ISO files on your USB drive easily without throwing errors in your face. This program is extremely advanced, yet it has an easy-to-use interface that makes it easy to use by people of all ages. Install this tool on your PC and start to burn Windows 11 ISO to USB:
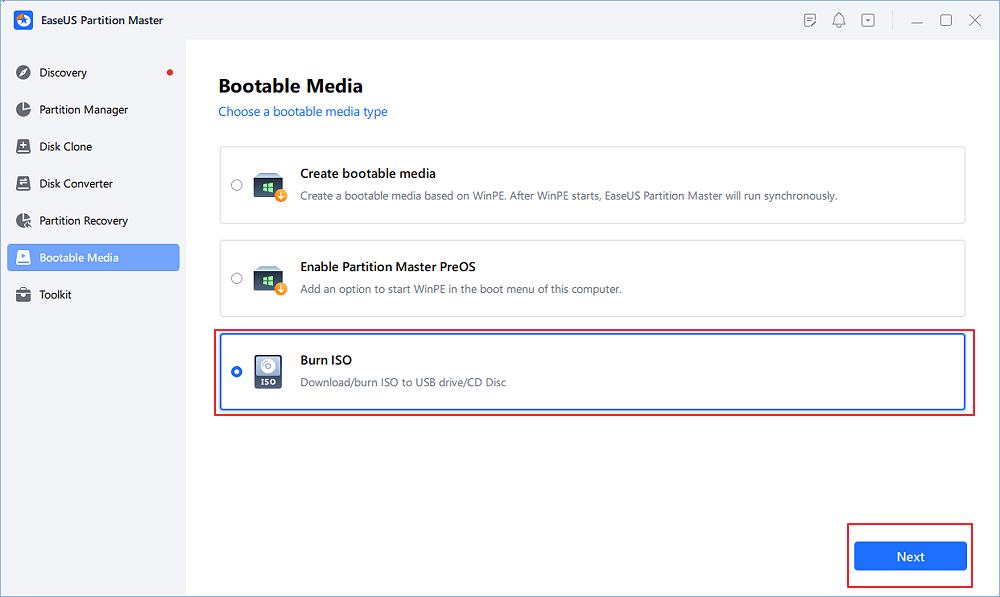
Step 1. Launch EaseUS Partition Master and go to the Bootable Media section. Click «Burn ISO» and click «Next».
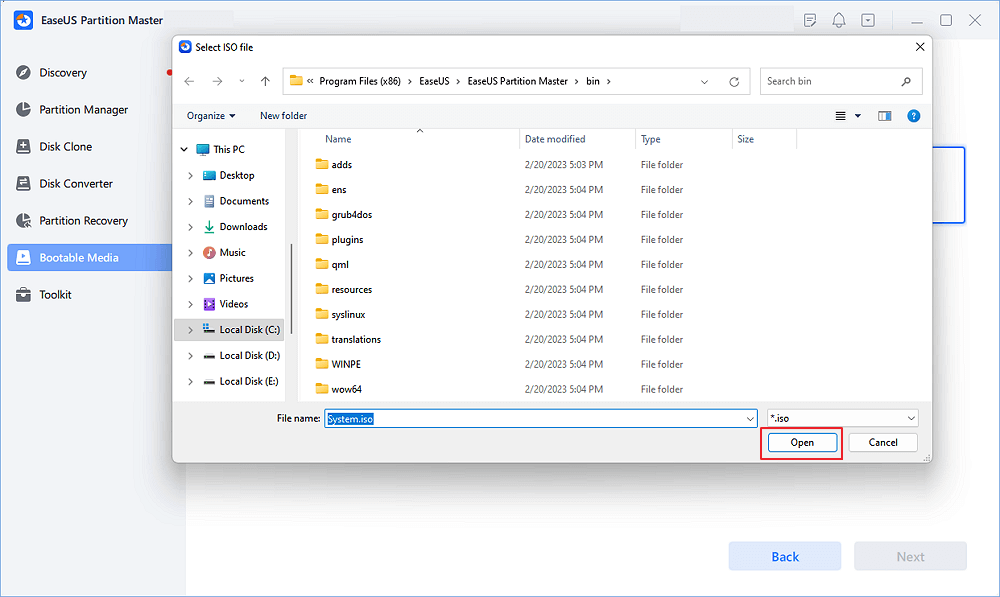
Step 2. Select the ISO image that you have downloaded on your PC, and click «Open».
Step 3. Click «Next» and select the target USB as destination and click «Burn» to execute the operation.
This tool can also work on Windows 10, Windows 8, and Windows 7. See the following articles and learn more.
Here are some other key features of EaseUS Partition Master:
- Burn ISO to USB and CD/DVD
- Format USB to FAT32
- Convert USB from NTFS to FAT32
- Boot Windows 11/10 to a USB
- Create bootable USB
To Burn Windows 11 ISO files to your USB, install this tool on your PC now. This tool can help you burn ISO to USB and manage your USB well.
Burn Windows 11 ISO to USB Using Media Creation Tool
The Media Creation Tool lets you burn the installation media on a USB drive or CD/DVD. If you don’t already have a copy of Windows 11, don’t worry; you can download it from the Microsoft website.
Check out our step-by-step guide below for the entire process of creating a bootable Windows 11 USB using Microsoft’s Media Creation Tool.
Step 1. Go to this Microsoft website to download the Windows 11 ISO.
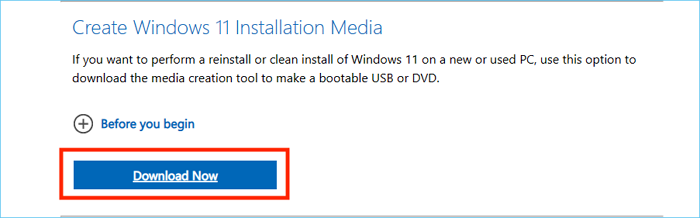
Step 2. Under the «Create Windows 11 Installation Media» section, select «Download Now.»
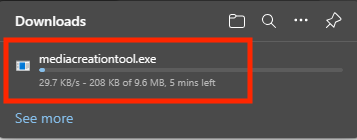
Step 3. The file will download under the file name «MediaCreationToolW11.exe.» Wait for the download to complete.
Click here to learn more details about Media Creation Tool if you are interested.
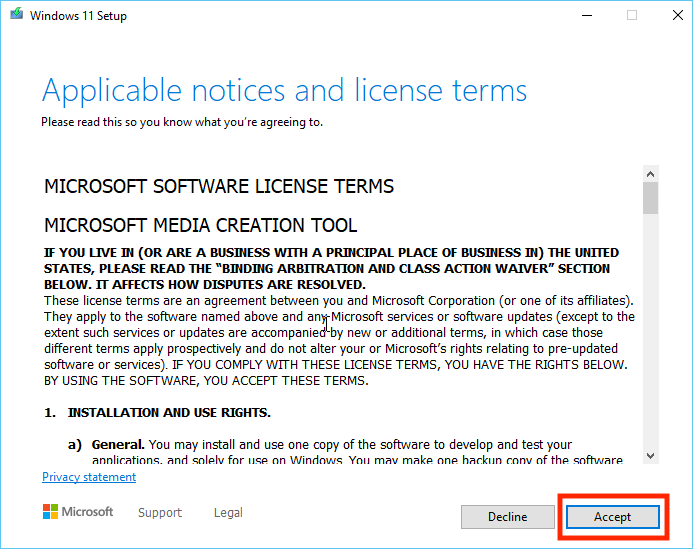
Step 4. Open the file once it has been downloaded.
Step 5. Accept the license and terms agreement by clicking on «Accept.»
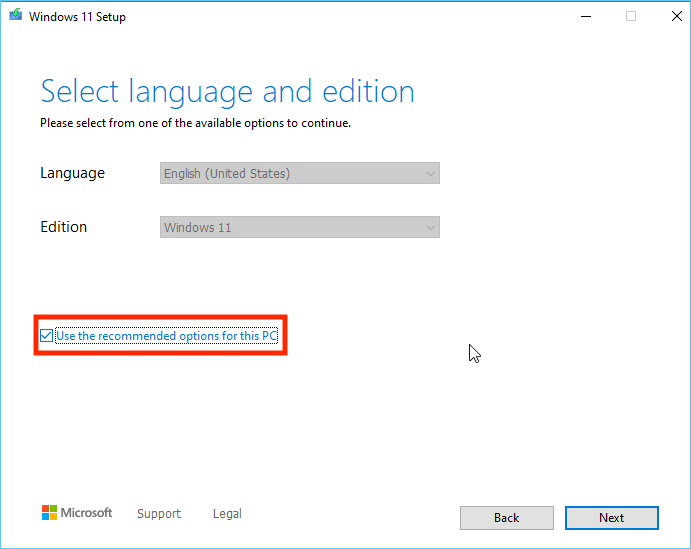
Step 6. Select your preferred language.
Step 7. Tick the «Use the recommended options for this PC» checkbox.
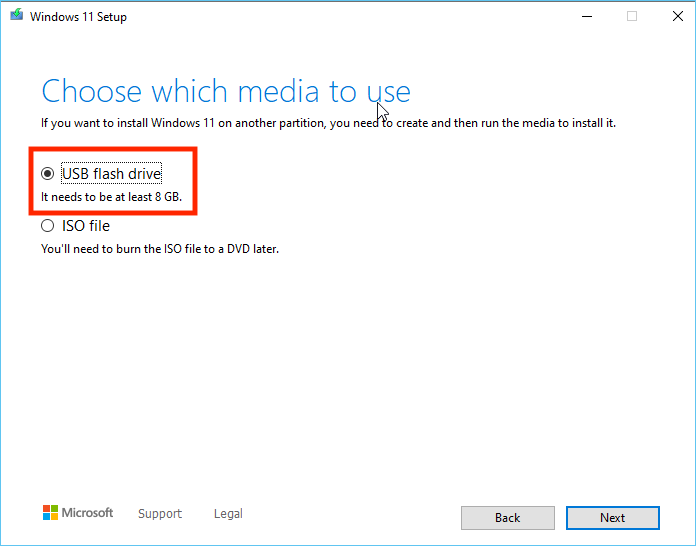
Step 8. In the «Choose which media to use» window, select «USB flash drive» and click on «Next.»
Step 9. In the «Select a USB flash drive» section, locate and select your USB drive and click on «Next.»
Step 10. Once the process is finished, click on «Finish.»
That’s it! However, EaseUS Partition Master is our favorite option to burn Windows 11 on USB because it takes us only a few clicks and takes less time compared to this option. And you can share this article to let more users know about this method.
Conclusion
Windows 11 is the latest release from Microsoft, and it is more advanced and feature-rich compared to Windows 10. It brought several new features and design changes, and it also removed a few of people’s favorite features.
But despite all of that, Windows 11 is very stable and is also compatible with third-party apps. If you want to install Windows 11 on your computers that meet the minimum requirements, you can burn the Windows 11 ISO to a USB and then plug the USB into the computers you want to install Windows 11 on and proceed.
EaseUS Partition Master is our hero at burning Windows 11 on USB because it does it so effortlessly and also has an easy-to-use interface. Try it today and see it for yourself!
Do you have any other questions about burning the Windows 11 ISO to a USB drive? Here, we answer everything about it.
1. How to burn Windows 11 to a USB via Rufus?
Here’s how to burn Windows 11 to a USB using Rufus:
Step 1. Download and install Rufus.
Step 2. Under the ‘Device’ section, click on the drop-down menu and select your USB drive.
Step 3. Select ‘Disk or ISO image’ by clicking the drop-down menu under the ‘Boot selection’ section.
Step 4. Choose the ‘Download’ option by clicking the down-arrow button on the right side, and then click the ‘Download’ button.
Step 5. Select ‘Windows 11’ and click on ‘Continue.’
Step 6. Choose Windows 11 by clicking the 22H2 or 21H2′ option under the ‘Release’ section and click on ‘Continue.’
Step 7. Under the ‘Edition’ section, select ‘Windows 11 Home/Pro/Edu’ and also select your language and the architecture of Windows.
Step 8. Click on the ‘Download’ button.
Step 9. Choose the ‘Standard Windows 11 Installation’ option under the ‘Image option’ setting.
Step 10. Select ‘Start.’
Step 11. Uncheck ‘Remove requirement for 4GB+ RAM, Secure Boot, and TPM 2.0’ and click on ‘OK.’
2. How to create a bootable USB on Windows 11?
To create a bootable USB, you need to use the Media Creation Tool and download the Windows 11 ISO file on your PC. Then, prepare a USB larger than 8GB and format it as FAT32. Click open Media Creation Tool and follow the on-screen prompts, and you can create a bootable USB.
3. How to download Windows 11 ISO file?
Here’s how to download the Windows 11 ISO file:
Step 1. Download the Windows 11 ISO file from this Microsoft website.
Step 2. Click the drop-down under ‘Download Windows 11 Disk Image (ISO) for x64 devices’ and select ‘Windows 11 multi-edition ISO x64 devices.’
Step 3. Select ‘Download Now.’
Step 4. Click the drop-down under ‘Select product language’ and select your language, then click on ‘Confirm.’
Step 5. Under ‘Download — Windows 11 English,’ click on ’64-bit Download.’
That’s it! Your download will begin now!
Installing Windows 10 from a USB is much more efficient than a disk since you can format a USB and reused it once the computer has done the installation. And as well as you can store extra data besides the Windows files on your bootable USB.
If you want to install Windows 10 with a USB then first you will need to create a bootable USB. To do so, first, you need a USB, a Windows 10 ISO file, and an application that can make it bootable.
Perquisites to burn ISO to USB on Windows 10
Before you begin the burning of ISO files on USB, let’s make sure you have all the required things that will be needed in the future.
- First you will need a USB pen drive of at least 8-16 GB free storage.
- Then you will need to download the ISO file of Windows 10.
- The last thing will be to download a third-party application to burn the ISO file.
Get yourself a USB drive
First of all, ensure that you have a USB with enough space for all the essential data of Windows 10. I would suggest an 8 GB USB should be enough; although the Window 10 itself might be less in size, it’s better to have extra space so the USB won’t overload.
One thing extra which I would suggest is, if you already don’t have any USB and want to buy a new one, make sure it’s a flash drive that has USB 3.0, 3.1, or 3.2 technology, which is up to ten times faster than the USB 2.0.
Also, make sure that you have removed or backup your files on your USB, as there is a slight chance that you might your files while burning the ISO file of Windows 10.
Download Windows 10 ISO File
Note: if you want to burn other ISO files on your USB then you will need to download them instead of Windows 10. Since we are burning Windows 10, then we are downloading Windows 10 ISO file.
Next, you need a Windows 10 ISO file, which will be the main thing used to make a bootable USB. You can lay your hands by searching the ISO file on the internet or using Media Creation Tool. You can also use the media creation tool to burn the ISO on your USB file.
If you want a guide on burning the ISO file on USB using Media Creation Tool then this is going to help you. How to Create Windows 10 Bootable USB without Third-party apps?
Bootable Application
One last thing you need before we can start is a third-party application that will make the USB bootable. There are many applications out there, but I would highly recommend Rufus; with its simple, user-friendly GUI, you can make the USB bootable in no time. You can download Rufus by going to their official website: Rufus – Create bootable USB drives easily.
On the website, scroll down and click on the latest version of Rufus under the Download section, and your download will start automatically. Once the download is completed, you are going to use the application directly, since there is no need for the installation of RUFUS.
How to burn ISO to USB Windows 10

You are going to follow these steps one by one to complete the operation.
Step 1: Connect your USB to your computer.
Step 2: Open the Rufus application.

Step 3: Under the Device tab, select your connected USB.
Tip: it is recommended to format your USB before burning the ISO file. You can format it by going to This PC and there you will right-click on USB, select the options, and format the USB.
Step 4: Click on the Select button. In the following window, locate your Windows 10 ISO file that you have downloaded. Once selected, click on the OK button.

Step 5: Leave everything else as default and click on the Start button.
Tip: You can change the name of your bootable USB under the Volume Label box. There is no specific guide on changing the name, you can name whatever you like.
Step 6: Now a pop window will appear with a warning of all the data being removed. Click on Yes and start the operation.
Step 7: Wait for Rufus to complete the process and click on the Close button once finished.
And that’s it now you have a bootable Windows 10 USB which you can use to install the Windows 10 on your pc.