At some point (beginning of 2020 year) Qt installer started to require users to have Qt Account (again), otherwise you can’t proceed with the installation. More details in the Qt’s official blog post.
That’s something that already happened before, but back then community got really mad about it, so The Qt Company reverted that, and installer started to work without Qt Account. And now they fucking did it again, and apparently this time community wasn’t that mad (or there is nothing left of that community after all the stunts The Qt Company has been pulling over the past years).
Anyway, I won’t tolerate such anal-probing, so The Qt Company (or rather its management) can go fuck itself, and I’ll be just building Qt from sources — it’s not that scary as it sounds.
In the very same blog post The Qt Company stated that LTS releases will be only available to commercial users, so The Qt Company can go fuck itself twice at this point. But don’t even trip, dawg, as we’ll still be able to build LTS releases from sources without Qt Account and/or commercial license. Aw, geez!
Just to clarify and to TLDR the article: it’s not about pirating the binaries, it’s not about some hack or anything shady at all — everyone can get the Qt sources and build whatever version they want. And certainly, you’ll still need to comply with GPL/LGPL terms (depending on components that you’ll be using).
Getting the Qt sources
Clone Git repository
Go to the Qt’s Git repository. Find the latest (or whichever you need) release — it’s hard not to notice that branches match releases, so 5.15.2 branch is the latest release at the moment (03.12.2020).
$ cd /d/programs/
$ mkdir -p qt/src && cd $_
$ git clone --depth 1 -b 5.15.2 git://code.qt.io/qt/qt5.git 5.15.2
That’s not the entire source code just yet, as Qt is divided into modules and first you need to initialize/download them. This is done with init-repository Perl script, so you’ll need to have Perl installed and available in your PATH.
By default it will initialize a lot of modules (essential, addon, preview, deprecated), and it will take quite some disk space (and time) to initialize all of them. Here’s the full list of default modules (the script prints it out):
$ cd 5.15.2
$ git submodule init qt3d qtactiveqt qtandroidextras qtbase qtcharts qtconnectivity qtdatavis3d
qtdeclarative qtdoc qtgamepad qtgraphicaleffects qtimageformats qtlocation qtlottie qtmacextras
qtmultimedia qtnetworkauth qtpurchasing qtqa qtquick3d qtquickcontrols qtquickcontrols2
qtquicktimeline qtremoteobjects qtrepotools qtscript qtscxml qtsensors qtserialbus qtserialport
qtspeech qtsvg qttools qttranslations qtvirtualkeyboard qtwayland qtwebchannel qtwebengine
qtwebglplugin qtwebsockets qtwebview qtwinextras qtx11extras qtxmlpatterns
I don’t want preview, deprecated and obsolete groups, and also I don’t want quite a lot of some other stuff, so I ran it like this:
$ ./init-repository --module-subset=essential,addon,-qtwebengine,-qtactiveqt,-qt3d,\
-qtlottie,-qtdatavis3d,-qtgamepad,-qtpurchasing,-qtquick3d,-qtquickcontrols,\
-qtquicktimeline,-qtspeech,-qtvirtualkeyboard,-qtwayland,-qtsensors,-qtserialbus,\
-qtserialport,-qtscxml,-qtremoteobjects,-qtqa
It took 40 minutes (with my 3 MB/s connection) and 3 GB to initialize such a list. Be sure to check it in case you might actually need some modules which I excluded here.
Download source package
Or you can just get a source package ZIP archive from the download page. That will be actually much faster, and even though you can’t choose modules here, later you’ll be able to skip building unwanted modules with -skip option (-skip qtwebengine, -skip qtactiveqt, -skip qt3d and so on).
Building Qt from sources
Now when you have the sources, you can just build Qt and get the same binaries that are installed using installer.
I’ll describe the process for Windows 10 and Visual Studio 2019 / MSVC 142 (assuming that you have all that), but it will be almost the same with different toolchains and on other platforms too.
5.x with qmake
Let’s say you have downloaded/cloned sources to d:\programs\qt\src\5.15.2 and you would like to install Qt to d:\programs\qt\5.15.2. Open x64 Native Tools Command Prompt for VS 2019 and there:
> c:
> cd d:\programs\qt\src\5.15.2
> mkdir build
> cd build
> ..\configure.bat -release -no-pch -prefix "d:\programs\qt\5.15.2" -skip qtwebengine -nomake tools -nomake tests -nomake examples
Choose and accept Open Source license terms (if you do accept those) and wait for the configuration to finish. Note that this will give you release build, so don’t forget to set your projects to release configuration too. Also be aware that by default Qt is built for dynamic linking, and if you need static linking, then you need to add -static option too.
By the way, I have a more detailed article about building static Qt from sources, although the only difference there is basically just this -static option.
Anyway, once it’s configured, run the build and then install using jom (you do have jom, don’t you):
It took about 1 hour to build and 10 minutes to build and install the binaries. The resulting size of the installation folder (d:\programs\qt\5.15.2) is 143 MB.
Out of curiosity, I also built Qt with sources from source package ZIP archive and the same configuration options (so it built also all the stuff that I excluded with modules), and there it took a bit longer than 1 hour and resulted in 193 MB of installation folder. So actually simply downloading the source package and keeping all the modules can save you quite some time, and 50 MB of difference doesn’t seem to be significant enough to not to do so.
6.x with CMake
Starting with Qt 6, you can build it with CMake. The process is almost the same as with qmake. I tried it with Qt 6.0.1 (downloaded to d:\programs\qt\src\6.0.1).
At first I wanted to see if I can now run everything from Git BASH:
# where to install the binaries to
$ mkdir /d/programs/qt/6.0.1
# build folder
$ cd /d/programs/qt/src/6.0.1
$ mkdir build && cd $_
$ ../configure -cmake-generator "Visual Studio 16 2019" -release -no-pch -prefix "d:/programs/qt/6.0.1" -skip qtwebengine -nomake tools -nomake tests -nomake examples
and that failed:
ERROR: C++11 <random> is required and is missing or failed to compile.
ERROR: detected a std::atomic implementation that fails for function pointers.  Please apply the patch corresponding to your Standard Library vendor, found in qtbase/config.tests/atomicfptr

CMake Error at qtbase/cmake/QtBuildInformation.cmake:72 (message):
  Check the configuration messages for an error that has occurred.
Call Stack (most recent call first):
  qtbase/cmake/QtBuildInformation.cmake:10 (qt_configure_print_summary)
  CMakeLists.txt:87 (qt_print_feature_summary)
After a brief googling I found that Visual Studio 16 2019 generator is not supported. I’ve set it here because otherwise by default with Ninja it discovers Clang toolchain, which I also have in my environment, but I want to build Qt with MSVC toolchain.
And while I could’ve tried to set cl.exe for CMAKE_C_COMPILER and CMAKE_CXX_COMPILER explicitly, I decided not to and just switched back to x64 Native Tools Command Prompt for VS 2019. There MSVC toolchain is detected just fine:
**********************************************************************
** Visual Studio 2019 Developer Command Prompt v16.8.3
** Copyright (c) 2020 Microsoft Corporation
**********************************************************************
[vcvarsall.bat] Environment initialized for: 'x64'

D:\programs\qt\src>cd 6.0.1\build

D:\programs\qt\src\6.0.1\build>ninja --version
1.9.0

D:\programs\qt\src\6.0.1\build>cmake --version
cmake version 3.18.4

D:\programs\qt\src\6.0.1\build>..\configure.bat -release -no-pch -prefix "d:/programs/qt/6.0.1" -skip qtwebengine -nomake tools -nomake tests -nomake examples

+ cd qtbase
+ D:\programs\qt\src\6.0.1\qtbase\configure.bat -top-level -release -no-pch -prefix "d:/programs/qt/6.0.1" -skip qtwebengine -nomake tools -nomake tests -nomake examples
CMake Warning at D:/programs/qt/src/6.0.1/qtbase/cmake/QtProcessConfigureArgs.cmake:223 (message):
  '-nomake tools' is not implemented yet.
Call Stack (most recent call first):
  D:/programs/qt/src/6.0.1/qtbase/cmake/QtProcessConfigureArgs.cmake:625 (qtConfAddWarning)
  D:/programs/qt/src/6.0.1/qtbase/cmake/QtProcessConfigureArgs.cmake:689 (check_qt_build_parts)

'D:/programs/cmake/bin/cmake.exe' '-DBUILD_qtwebengine=OFF' '-DBUILD_WITH_PCH=OFF' '-DCMAKE_INSTALL_PREFIX=d:/programs/qt/6.0.1' '-DQT_BUILD_TESTS=FALSE' '-DQT_BUILD_EXAMPLES=FALSE' '-DCMAKE_BUILD_TYPE=Release' '-G' 'Ninja' 'D:/programs/qt/src/6.0.1'
-- The CXX compiler identification is MSVC 19.28.29335.0
-- The C compiler identification is MSVC 19.28.29335.0
-- The ASM compiler identification is MSVC
-- Found assembler: D:/programs/vs/2019/VC/Tools/MSVC/14.28.29333/bin/Hostx64/x64/cl.exe
-- Detecting CXX compiler ABI info
-- Detecting CXX compiler ABI info - done
-- Check for working CXX compiler: D:/programs/vs/2019/VC/Tools/MSVC/14.28.29333/bin/Hostx64/x64/cl.exe - skipped
-- Detecting CXX compile features
-- Detecting CXX compile features - done
-- Detecting C compiler ABI info
-- Detecting C compiler ABI info - done
-- Check for working C compiler: D:/programs/vs/2019/VC/Tools/MSVC/14.28.29333/bin/Hostx64/x64/cl.exe - skipped
-- Detecting C compile features
-- Detecting C compile features - done
Apparently, -nomake tools is not implemented yet (or was renamed), but that’s okay-ish. The configuration successfully completes, though with some more warnings:
# ...

OpenGL:
    Desktop OpenGL ....................... no
    Dynamic OpenGL ....................... yes
    OpenGL ES 2.0 ........................ no
    OpenGL ES 3.0 ........................ no
    OpenGL ES 3.1 ........................ no
    OpenGL ES 3.2 ........................ no
  Vulkan ................................. no

# ...

WARNING: QDoc will not be compiled, probably because libclang could not be located. This means that you cannot build the Qt documentation.
 Either set CMAKE_PREFIX_PATH or LLVM_INSTALL_DIR to the location of your llvm installation. On Linux systems, you may be able to install libclang by installing the libclang-dev or libclang-devel package, depending on your distribution. On macOS, you can use Homebrew's llvm package.
WARNING: Clang-based lupdate parser will not be available. LLVM and Clang C++ libraries have not been found.

Qt is now configured for building. Just run 'cmake --build . --parallel'

Once everything is built, you must run 'cmake --install .'
Qt will be installed into 'D:/programs/qt/6.0.1'

To configure and build other Qt modules, you can use the following convenience script:
        D:/programs/qt/6.0.1/bin/qt-configure-module.bat

If reconfiguration fails for some reason, try to remove 'CMakeCache.txt' from the build directory

-- Configuring done
-- Generating done
CMake Warning:
  Manually-specified variables were not used by the project:

    BUILD_qtwebengine

-- Build files have been written to: D:/programs/qt/src/6.0.1/build
So, first of all Desktop OpenGL is not detected, which is a bit concerning, as I seem to remember that it should be. However, having built and run a couple of Qt Quick application, I didn’t see any issues.
Then BUILD_qtwebengine is ignored, so does it mean that WebEngine will be also built? How does one disable it then?
And finally, QDoc and lupdate will not be compiled, but that’s also a minor issue.
Let’s run the build and install now:
$ cmake --build . --parallel
$ cmake --install .
For me that took 1 hour and resulted in 159 MB of installation folder (d:\programs\qt\6.0.1). So WebEngine wasn’t built after all.
Failed pcre2_jit_compile.c.obj, oaidl.h
If your build fails with something like this:
Building C object qtbase\src\3rdparty\pcre2\CMakeFiles\BundledPcre2.dir\src\pcre2_jit_compile.c.obj
FAILED: qtbase/src/3rdparty/pcre2/CMakeFiles/BundledPcre2.dir/src/pcre2_jit_compile.c.obj
D:\programs\vs\VC\Tools\MSVC\14.29.30133\bin\Hostx64\x64\cl.exe /nologo -DHAVE_CONFIG_H -DPCRE2_CODE_UNIT_WIDTH=16 -DPCRE2_STATIC -DQT_NO_DEBUG -DQT_NO_EXCEPTIONS -DUNICODE -DWIN32 -DWIN64 -D_CRT_SECURE_NO_WARNINGS -D_ENABLE_EXTENDED_ALIGNED_STORAGE -D_UNICODE -D_USE_MATH_DEFINES -D_WIN64 -ID:\programs\qt\src\6.2.0\build\qtbase\src\3rdparty\pcre2\BundledPcre2_autogen\include -ID:\programs\qt\src\6.2.0\qtbase\src\3rdparty\pcre2\src -ID:\programs\qt\src\6.2.0\qtbase\mkspecs\win32-msvc -ID:\programs\qt\src\6.2.0\build\qtbase\include /DWIN32 /D_WINDOWS /DNDEBUG -O2 -MD -W0 /wd4530 /wd4577 -FS -Zc:rvalueCast -Zc:inline -Zc:strictStrings -Zc:throwingNew -Zc:referenceBinding -Zc:externConstexpr -Zc:wchar_t -guard:cf -Zc:__cplusplus -permissive- -utf-8 -std:c11 /showIncludes /Foqtbase\src\3rdparty\pcre2\CMakeFiles\BundledPcre2.dir\src\pcre2_jit_compile.c.obj /Fdqtbase\lib\Qt6BundledPcre2.pdb /FS -c D:\programs\qt\src\6.2.0\qtbase\src\3rdparty\pcre2\src\pcre2_jit_compile.c
C:\Program Files (x86)\Windows Kits\10\include\10.0.17763.0\um\oaidl.h(487): error C2059: syntax error: '/'
C:\Program Files (x86)\Windows Kits\10\include\10.0.17763.0\um\oaidl.h(502): error C2059: syntax error: '/'
C:\Program Files (x86)\Windows Kits\10\include\10.0.17763.0\um\oaidl.h(530): error C2059: syntax error: '}'
C:\Program Files (x86)\Windows Kits\10\include\10.0.17763.0\um\oaidl.h(531): error C2059: syntax error: '}'
C:\Program Files (x86)\Windows Kits\10\include\10.0.17763.0\um\oaidl.h(533): error C2059: syntax error: '}'
C:\Program Files (x86)\Windows Kits\10\include\10.0.17763.0\um\oaidl.h(534): error C2059: syntax error: '}'
C:\Program Files (x86)\Windows Kits\10\include\10.0.17763.0\um\oaidl.h(665): error C2079: 'varDefaultValue' uses undefined struct 'tagVARIANT'
C:\Program Files (x86)\Windows Kits\10\include\10.0.17763.0\um\oaidl.h(950): error C2079: 'varValue' uses undefined struct 'tagVARIANT'
C:\Program Files (x86)\Windows Kits\10\include\10.0.17763.0\um\propidlbase.h(319): error C2059: syntax error: '/'
C:\Program Files (x86)\Windows Kits\10\include\10.0.17763.0\um\propidlbase.h(378): error C2371: 'pvarVal': redefinition; different basic types
C:\Program Files (x86)\Windows Kits\10\include\10.0.17763.0\um\oaidl.h(510): note: see declaration of 'pvarVal'
C:\Program Files (x86)\Windows Kits\10\include\10.0.17763.0\um\propidlbase.h(379): error C2059: syntax error: '}'
C:\Program Files (x86)\Windows Kits\10\include\10.0.17763.0\um\propidlbase.h(380): error C2059: syntax error: '}'
C:\Program Files (x86)\Windows Kits\10\include\10.0.17763.0\um\propidlbase.h(383): error C2059: syntax error: '}'
C:\Program Files (x86)\Windows Kits\10\include\10.0.17763.0\um\propidlbase.h(384): error C2059: syntax error: '}'
[19/8412] Building C object qtbase\src\3rdparty\pcre2\CMakeFiles\BundledPcre2.dir\src\pcre2_study.c.obj
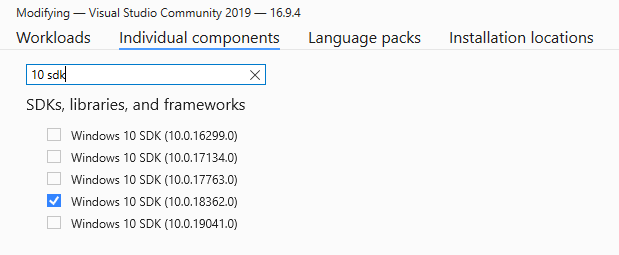
ninja: build stopped: subcommand failed.Then perhaps you have an “old” Windows 10 SDK installed. In my case it was 10.0.17763, so I deleted that one and installed 10.0.18362 instead (using Visual Studio Installer):
It might be a good idea to reboot the system just in case before starting a new build.
Alternatively, perhaps, you can get PCRE2, make it visible to Qt configuration and pass -system-pcre. Or maybe even configure Qt without PCRE (-no-pcre).
Using your own Qt build
This is it, you can already use this your very own Qt distribution to build your projects.
With CMake and bare CLI
I have an article about that already, but there it’s more about CMake and Visual Studio Code, so here will be a shorter CLI-only version.
Be aware that with Qt 6 you might need to explicitly set Ninja as your generator (and help it discover cl.exe), otherwise it might fail with the same error as on configuring/building the Qt itself.
Say, you have some Qt Quick project with CMake and the following CMakeLists.txt:
cmake_minimum_required(VERSION 3.15)

project("color-corners")

# that's all you need for your Qt installation to be discovered by CMake
set(CMAKE_PREFIX_PATH "d:/programs/qt/5.15.2")

set(CMAKE_INCLUDE_CURRENT_DIR ON)
set(CMAKE_AUTOMOC ON)

message("Looking for Qt...")

find_package(Qt5 REQUIRED Quick Qml)
if (${Qt5_FOUND})
    message("Found Qt " ${Qt5_VERSION})
else()
    message("Couldn't find Qt")
endif()

set(sources
    main.cpp
)

qt5_add_resources(qrc qml.qrc)

add_executable(${CMAKE_PROJECT_NAME} WIN32 ${sources} ${qrc})

target_link_libraries(
    ${CMAKE_PROJECT_NAME}
    Qt5::Quick
    Qt5::Qml
    )
Configure and build the project:
$ cd /d/code/qt/color-corners/
$ mkdir build && cd $_

$ cmake ..
-- Building for: Visual Studio 16 2019
-- Selecting Windows SDK version 10.0.18362.0 to target Windows 10.0.18363.
-- The C compiler identification is MSVC 19.27.29112.0
-- The CXX compiler identification is MSVC 19.27.29112.0
-- Detecting C compiler ABI info
-- Detecting C compiler ABI info - done
-- Check for working C compiler: D:/programs/vs/2019/VC/Tools/MSVC/14.27.29110/bin/Hostx64/x64/cl.exe - skipped
-- Detecting C compile features
-- Detecting C compile features - done
-- Detecting CXX compiler ABI info
-- Detecting CXX compiler ABI info - done
-- Check for working CXX compiler: D:/programs/vs/2019/VC/Tools/MSVC/14.27.29110/bin/Hostx64/x64/cl.exe - skipped
-- Detecting CXX compile features
-- Detecting CXX compile features - done
Looking for Qt...
Found Qt 5.15.2
-- Configuring done
-- Generating done
-- Build files have been written to: D:/code/qt/color-corners/build

$ cmake --build . --config Release
Microsoft (R) Build Engine version 16.7.0+b89cb5fde for .NET Framework
Copyright (C) Microsoft Corporation. All rights reserved.

  Checking Build System
  Automatic MOC for target color-corners
  Generating qrc_qml.cpp
  Building Custom Rule D:/code/qt/color-corners/src/CMakeLists.txt
  mocs_compilation.cpp
  main.cpp
  qrc_qml.cpp
  Generating Code...
  color-corners.vcxproj -> D:\code\qt\color-corners\build\Release\color-corners.exe
  Building Custom Rule D:/code/qt/color-corners/src/CMakeLists.txt
So it’s all good: CMake found your Qt installation and successfully built the project.
But you might, however, get the following error:
Qt5Gui.lib(Qt5Gui.dll) : fatal error LNK1112: module machine type 'x86' conflicts with target machine type 'x64' [D:\code\qt\color-corners\build\color-corners.vcxproj]Try to re-configure the project with explicitly set x32/x86 architecture:
$ rm -r ./* && cmake -G "Visual Studio 16 2019" -A Win32 ..
$ cmake --build . --config Release
If that works fine, then it means that you built Qt in x86 Native Tools Command Prompt, so your Qt build is x32/x86. If you need x64, then you’ll need to build Qt again, but this time in x64 Native Tools Command Prompt.
In Qt Creator
Most likely you’ll want to use your Qt build in Qt Creator.
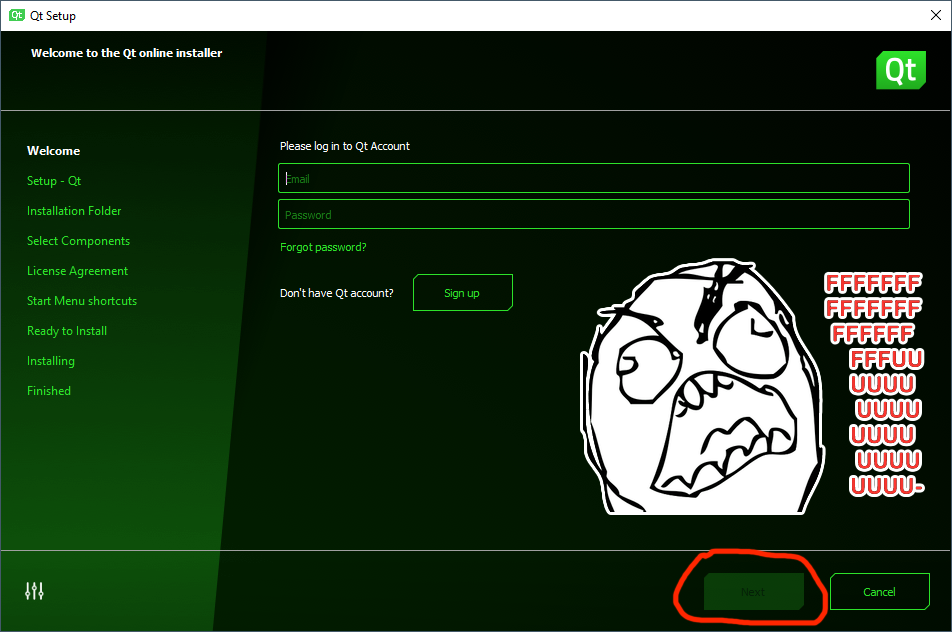
Install Qt Creator
The Qt Creator installer is also available at the official download page. Good news that installer does not require Qt Account (yet?). Actually, it does, but only if it discovers internet connection — it that case the first installer view looks like this at the moment:
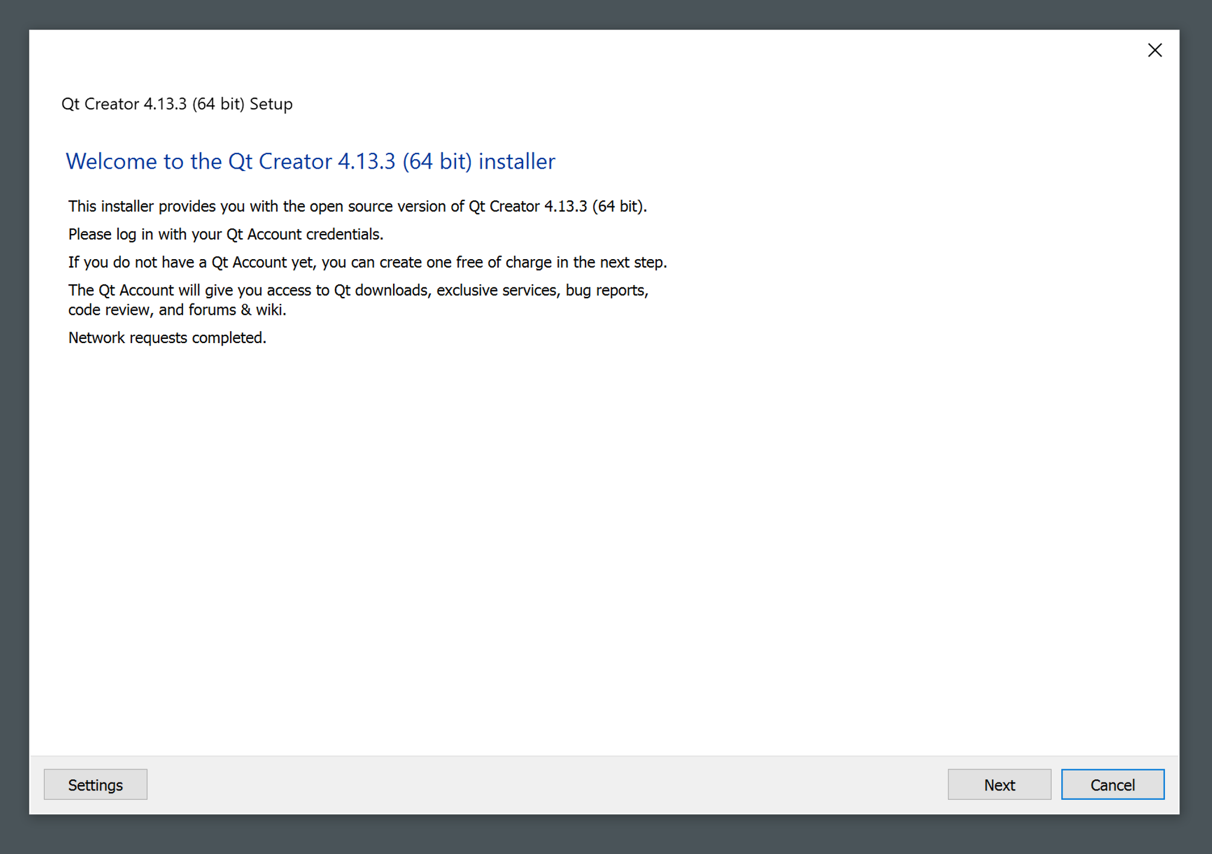
So you can just disconnect from the internet or block any network access for the installer before launching it, and then the first view will look like this:
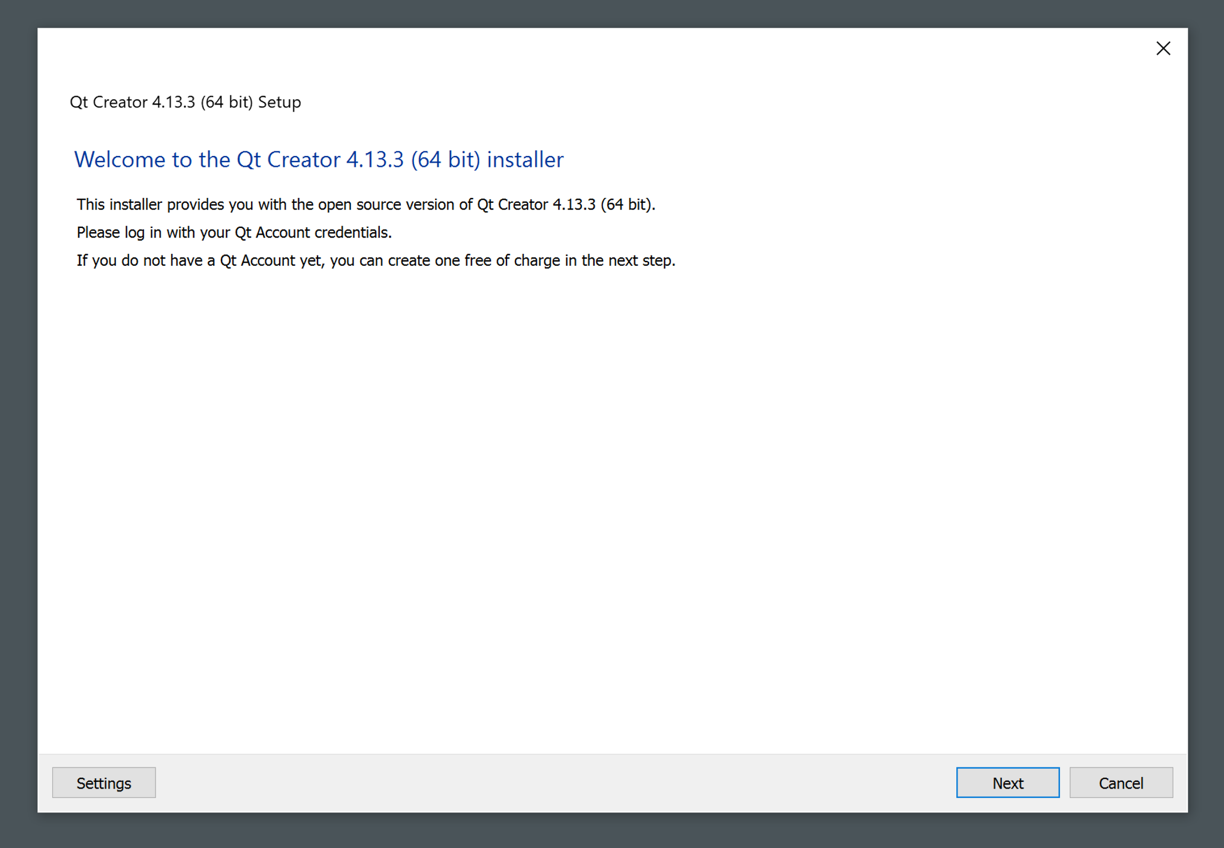
or this:
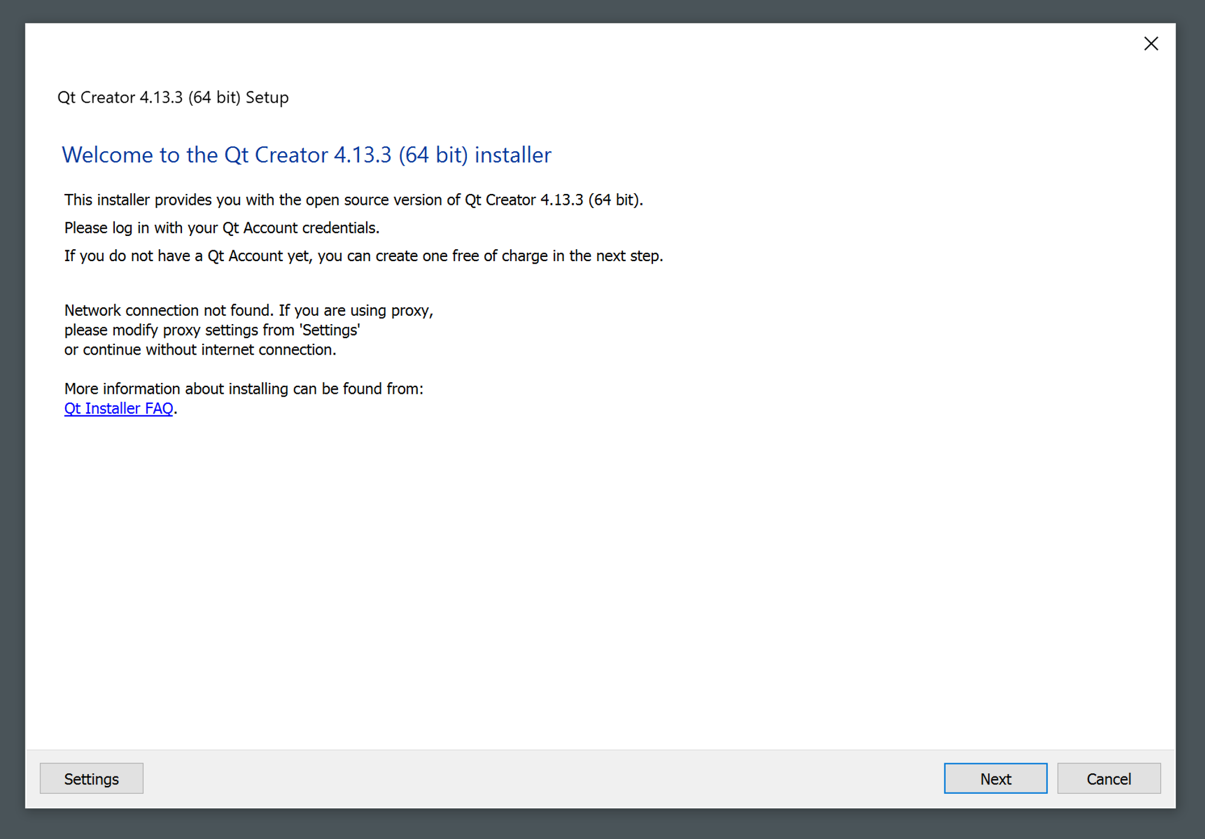
So you’ll be able to proceed without Qt Account.
And if you are brave enough, you can of course build it from sources as well.
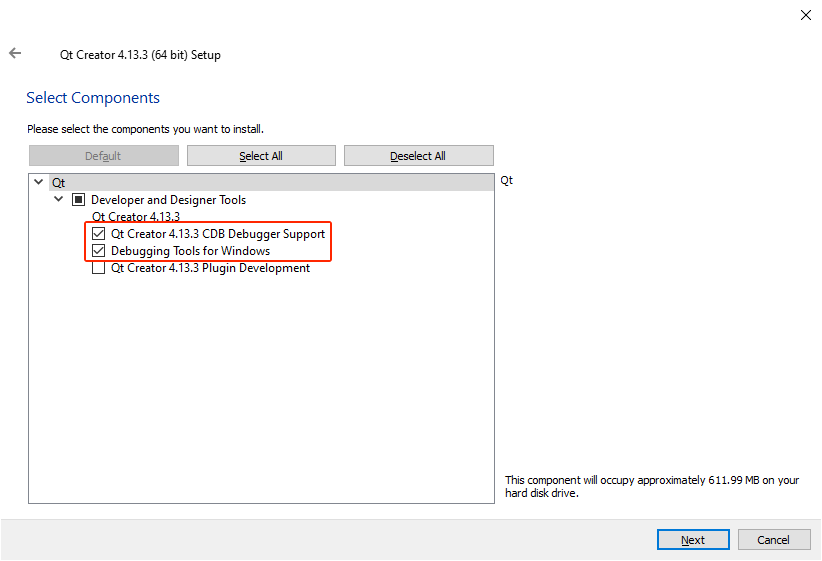
If you, like me, are using MSVC toolchain and CDB, then it is important to check CDB Debugger Support and Debugging Tools for Windows components:
Add a new kit
First time you launch Qt Creator, it will suggest you to “link” existing Qt installation, which is nice. But what does it actually want — I have no fucking idea, because when I pointed it to my Qt build, it didn’t enable Link with Qt button:
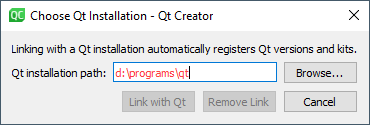
To hell with this thing then.
Just in case, note that I’ve updated the Qt paths in my system after adding a section about Qt 6, so now I have two Qt versions, but screenshots below still point to old paths. The screenshots also have 5.12.2 version, but that’s just a typo — it should be 5.15.2 there.
Open Qt Creator settings, go to Kits and there to Qt Versions. Add your Qt build here (you’ll need to provide path to d:\programs\qt\VERSION\bin\qmake.exe). Click on Apply button, otherwise versions list on the Kits tab won’t have it.
Now go to Kits tab and add a new kit. Select your Qt version, C and C++ compilers (in my case it’s amd64 variant) and debugger (CDB). If you haven’t installed CDB Debugger Support and Debugging Tools for Windows, then you won’t have CDB option available.
If you won’t set debugger, you’ll get a yellow warning. To get details about what’s wrong, hover your mouse over it and there will be a pop-up tooltip with some explanation:
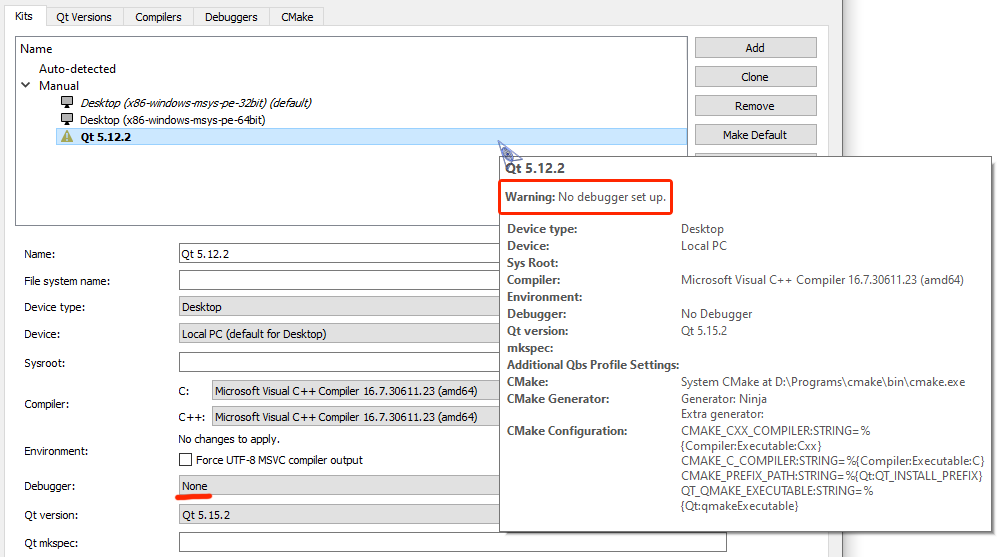
Despite it’s just a warning, you nevertheless won’t be able to select this kit in your projects.
If you’ll set a wrong compiler, then you’ll get a red error and the following explanation in the pop-up tooltip:
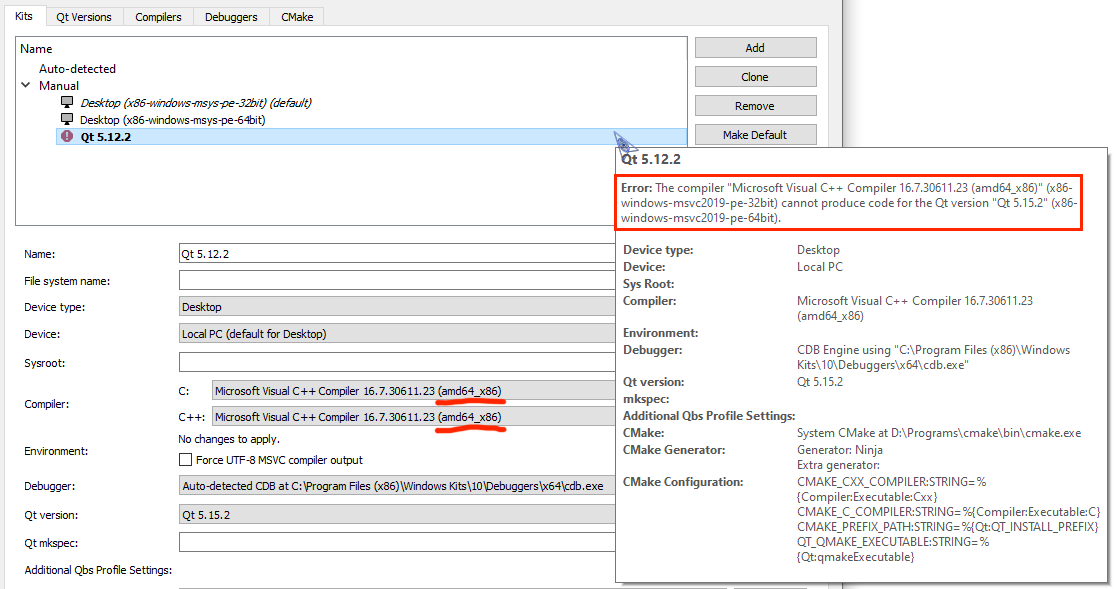
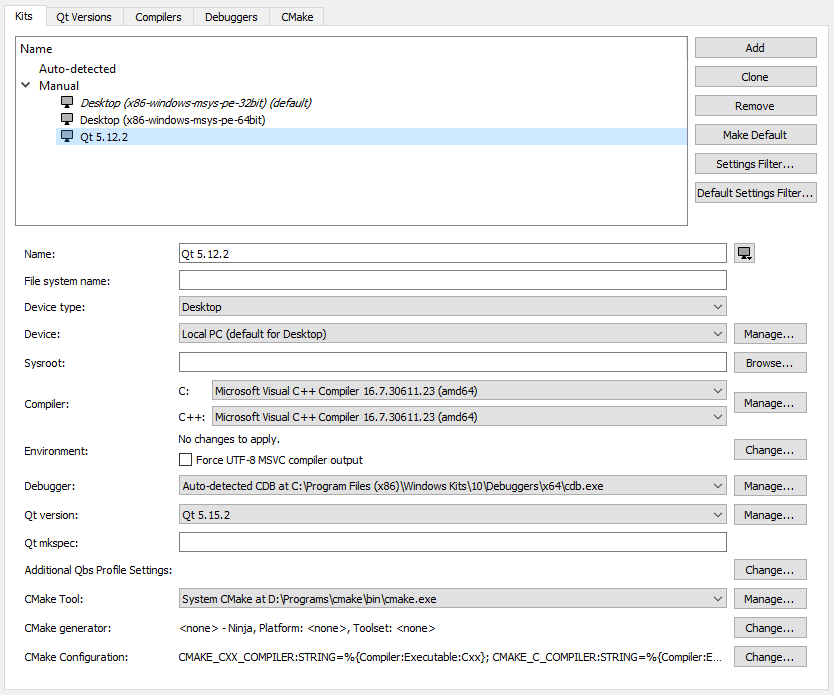
And if everything is good, then the kit won’t have any yellow/red warnings/errors:
So here you’ve got a perfectly splendid Qt installation without using the installer and creating Qt Account. And The Qt Company’s management can go fuck itself for the third time now.
Updates
03.03.2022
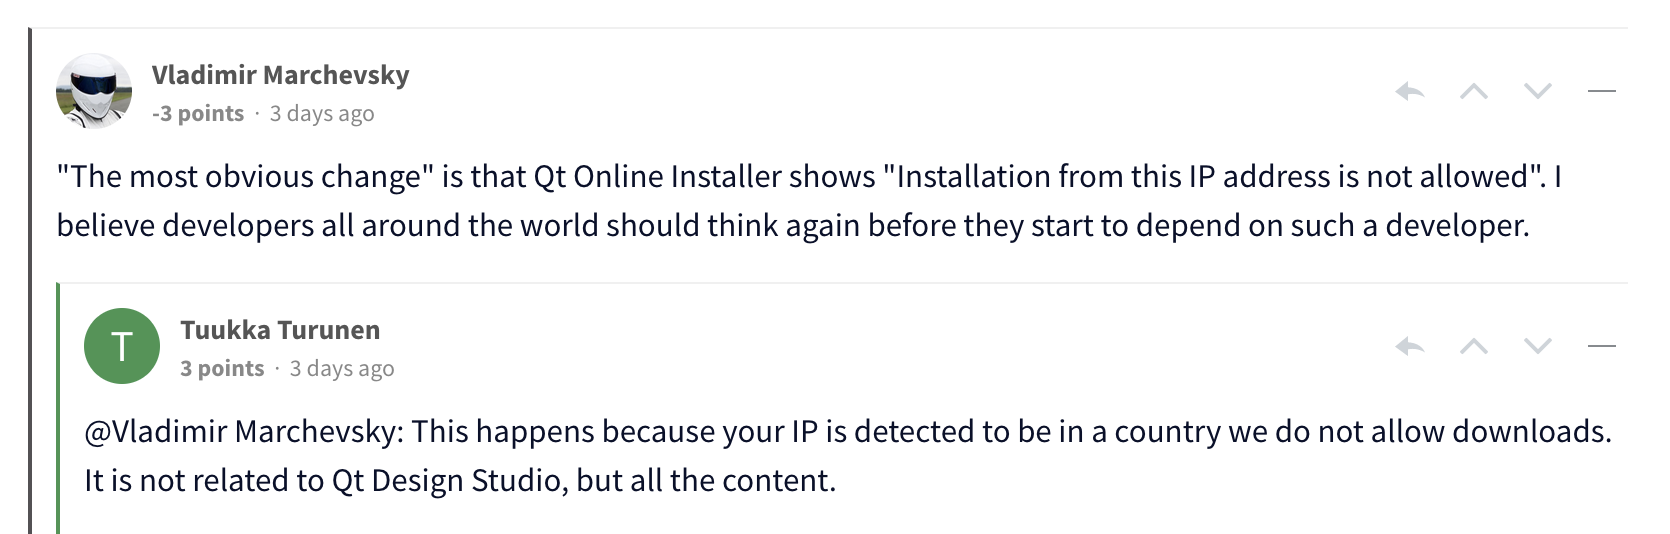
The Qt Company has blocked installing Qt from installer and logging-in to Qt Account using russian IP addresses.
So far this has been mentioned only in this thread on Qt forum and also in comments under Qt Design Studio 3.1 Released blog post. Company representatives confirmed the blocking:
and

So reporting bugs and editing wiki will become unavailable too? It’s strange that posting on forum is still available, as it is also tied to Qt Account, but perhaps they used VPN.
What an unexpected way for this article to suddenly become more in demand.
![]()
Embed
What would you like to do?
Build Qt 6 on Windows
This file contains bidirectional Unicode text that may be interpreted or compiled differently than what appears below. To review, open the file in an editor that reveals hidden Unicode characters.
Learn more about bidirectional Unicode characters
| setlocal | |
| SET PATH=C:\Dev\cmake\3.26.3\bin;%PATH% | |
| SET PATH=C:\Dev\ninja\1.11.1;%PATH% | |
| SET PATH=C:\Dev\python\3.10\App\Python;C:\Dev\python\3.10\App\Python\Scripts;%PATH% | |
| SET PATH=C:\Dev\node\19;%PATH% | |
| SET PATH=%PATH%;C:\Dev\cygwin64\bin | |
| CALL «C:\Program Files\Microsoft Visual Studio\2022\Professional\VC\Auxiliary\Build\vcvars64.bat« | |
| @REM SET PATH=C:\Dev\qt\6.5.0\bin;%PATH% | |
| doskey ls=dir /b /ON | |
| doskey cat=type $* | |
| start «dev shell« /D . cmd | |
| endlocal | |
| exit |
In this post you’ll find information about how to build Qt from source. We’ll be building the latest version of Qt, released about a week ago, using its source codes, both dynamically and statically and with various customized configurations. So without further ado, let’s start.
Prerequisites
Assumptions (means Prerequisites) for this process are the following:
- On Windows this is Microsoft Visual Studio
- On macOS this is XCode and relevant development tools.
- On Linux, this is Build essentials and relevant development tools.
- On all platforms you need to have Python installed (2.7 or later, NOT 3.X because some modules, such as Web Engine simply do not support it at the moment) Check this by running “python -h” command from command prompt or terminal. If you don’t have it installed you won’t see it’s help messages, so just download and install it. If it’s simply not in the path, make sure you add it.
- On all platforms you need to have ActivePerl installed. (Check this by running “perl -h” command from command prompt or terminal. If you don’t have it installed you won’t see it’s help messages, so just download and install it. If it’s simply not in the path, make sure you add it.)
- You also need bison, flex and GPerf in order to successfully build some modules such as the QtWebEngine module. On Windows, they are included in the gnuwin32/bin folder inside the source files folder for convenience purposes. Just make sure they are added to the PATH.
Make sure to get the latest version of each one of dependencies mentioned above, apart from the ones which are explicitly mentioned. If you don’t have the latest version, then just update it.
If you are sure about the prerequisites mentioned above, then just proceed with the instructions. In any case, even if something is missing you’ll be faced with (usually meaningful) errors and warning messages which will lead you back to the missing (not installed) prerequisites.
Get the source files
OK, to start, first of all, download the latest Qt 5.9.2 source codes from here:
https://download.qt.io/official_releases/qt/
Just so that we have an example case during this tutorial, I will assume 5.9.2 is the latest version of Qt, so we can get it from here:
https://download.qt.io/official_releases/qt/5.9/5.9.2/single/qt-everywhere-opensource-src-5.9.2.zip
Or here:
https://download.qt.io/official_releases/qt/5.9/5.9.2/single/qt-everywhere-opensource-src-5.9.2.tar.xz
Extract it to a folder of your choice (let’s call it “PATH_TO_EXTRACTED_QT_SOURCE_FILES”)
As it was mentioned in the Prerequisites section, if you are on Windows, you must add the following to the PATH (This is only required in Windows for taking care of bison, flex and gperf binaries):
PATH_TO_EXTRACTED_QT_SOURCE_FILES/gnuwin32Configuration
We are ready to configure our Qt build:
- If you are on Windows, open “Developer Command Prompt for VS ####” (replace “####” with 2017, 2015 and so on depending on your installed MSVC version) in Administrator mode
- If you are on macOS or Linux, simply open up a terminal instance.
After that, switch to the folder where you extracted the source files from the link above, using the command below:
cd PATH_TO_EXTRACTED_QT_SOURCE_FILESAnd to start Qt configuration, type the following:
configureWait until you are presented with the following:
Selecting Qt Edition.

Type 'c' if you want to use the Commercial Edition.
Type 'o' if you want to use the Open Source Edition.

Which edition of Qt do you want to use?
Simply, type “o” (for Open Source Edition) and press Enter.
After a few moments, you should be getting the following prompt:
You are licensed to use this software under the terms of
the GNU Lesser General Public License (LGPL) version 3
or the GNU General Public License (GPL) version 2.

Type 'L' to view the GNU Lesser General Public License version 3 (LGPLv3).
Type 'G' to view the GNU General Public License version 2 (GPLv2).
Type 'y' to accept this license offer.
Type 'n' to decline this license offer.

Do you accept the terms of either license?
Again, simply type “y” (for Yes) and press Enter.
This will start the configuration tests, you’ll see lots of informational text similar to the following:
Running configuration tests...
...

Done running configuration tests.

Configure summary:

...

WARNING: Python version 2 (2.7.5 or later) is required to build QtWebEngine.

Qt is now configured for building. Just run 'nmake'.
Once everything is built, you must run 'nmake install'.
Qt will be installed into '\usr\local\Qt-5.9.2'.

Prior to reconfiguration, make sure you remove any leftovers from
the previous build.
Build and Install
Type “nmake” if you are on Window, or “sudo make” if you are on macOS or Linux.
Note that on Windows, if you have “jom” installed you can replace “nmake” with “jom”. As a tip, you can usually find “jom” in “bin” folder of Qt Creator. “jom” can help
Then, wait for a long (long, long) time until building is finished.
- If you face any issues and you have to rebuild from scratch, make sure you clean the build folder using “nmake clean” command on Window, and “make clean” command on macOS and Linux. After fixing the issues one way or another, start from the “make” step above, you don’t have to re-configure if you will go with the same configuration.
- Otherwise, meaning if everything went fine during the build,
- And if you provided a “-prefix” parameter to “configure” command (see example configurations below), then just type “nmake install” if you are on Windows, otherwise “sudo make install”, then press Enter to get your Qt built files in the folder of your preference.
- If you didn’t provide a “-prefix” parameter to “configure” command, by default Qt uses the folder you saw in the messages at the end of configuration, which was “\usr\local\Qt-5.9.2” in our case. So typing “nmake install” (or “sudo make install”) will install the libraries in the default folder.
Configuration Examples
Below are some example configure commands that you can use for building Qt with various configurations:
Get configure help information:
configure -?Standard build configuration (as we used in this tutorial):
configureAuto select/confirm open-source license:
configure -opensource -confirm-licenseDisable codes not allowed for app stores (all relevant platforms):
configure -appstore-compliantExplicitly mentioning platform (See PATH_TO_EXTRACTED_QT_SOURCE_FILES/qtbase/mkspecs. Replace XXXXX below with an entry in mkspecs folder, such as winrt-x64-msvc2017)
configure -platform-XXXXXStatic build, the recommended way (since QtWebEngine does not support static linking at the moment):
configure -opensource -confirm-license -static -skip webengineSkipping any Qt repository you don’t need (Replace XXXXX with the name of repository in PATH_TO_EXTRACTED_QT_SOURCE_FILES. Omit the initial “qt” from the repository name):
configure -skip XXXXXChanging the output (install) directory of the created Qt build:
configure -prefix "C:\Qt\build"You can use any combination of the parameters to further customize your Qt build as you require.
When building Qt statically for Windows (using MSVC Compilers), you’ll still need to have MSVC Runtime DLL files. To remove dependency on MSVC Runtime DLL files (AKA MSVC Redistributables) you need to tweak msvc-desktop.conf file (Located in PATH_TO_EXTRACTED_QT_SOURCE_FILES/qtbase/mkspecs/common). Look for the following codes in msvc-desktop.config file:
QMAKE_CFLAGS_RELEASE = $$QMAKE_CFLAGS_OPTIMIZE -MD
QMAKE_CFLAGS_RELEASE_WITH_DEBUGINFO += $$QMAKE_CFLAGS_OPTIMIZE -MD -Zi
QMAKE_CFLAGS_DEBUG = -Zi -MDd
And update them to the following:
QMAKE_CFLAGS_RELEASE = $$QMAKE_CFLAGS_OPTIMIZE -MT
QMAKE_CFLAGS_RELEASE_WITH_DEBUGINFO += $$QMAKE_CFLAGS_OPTIMIZE -MT -Zi
QMAKE_CFLAGS_DEBUG = -Zi -MTd
And then run configure command as mentioned above.
As always, put a comment below if you’ve got any questions about building Qt from source codes. You can also refer to the following link for a complete list of requirements and possible build customization on all platforms:
http://doc.qt.io/qt-5/build-sources.html
Сборка Qt из исходного кода предоставляет множество преимуществ для разработчиков, позволяя создавать приложения с уникальными возможностями и оптимизировать процесс разработки под свои потребности. В этом руководстве мы рассмотрим подробные шаги по сборке Qt на Windows.
Перед началом процесса сборки вам понадобится некоторое программное обеспечение, например, Qt Creator и MinGW. Вы также можете использовать Microsoft Visual Studio в качестве компилятора. Далее мы описываем каждый шаг в деталях, чтобы вы смогли успешно собрать Qt из исходного кода на Windows.
Первым шагом является загрузка исходного кода Qt с официального сайта разработчика. После этого вам потребуется установить Git для Windows, чтобы склонировать репозиторий Qt на ваш компьютер. Далее вы должны создать новую папку для клонирования репозитория и выполнить команду git clone с URL-адресом репозитория Qt.
Содержание
- Подготовка к сборке Qt
- Загрузка и установка необходимых компонентов
- Настройка окружения сборки
- Скачивание и распаковка исходного кода Qt
- Настройка и сборка Qt
- Шаг 1: Загрузка исходного кода
- Шаг 2: Установка зависимостей
- Шаг 3: Настройка переменных среды
- Шаг 4: Конфигурация и сборка Qt
- Шаг 5: Проверка установки
Подготовка к сборке Qt
Перед тем как перейти к сборке Qt из исходного кода на Windows, необходимо выполнить несколько подготовительных шагов.
1. Установите все необходимые инструменты и зависимости:
- Установите компилятор MinGW или MSVC, в зависимости от вашего выбора.
- Установите Python версии 2.7 или выше
- Установите Perl версии 5.26 или выше
- Установите Git для Windows
2. Скачайте исходный код Qt:
Перейдите на официальный сайт Qt (www.qt.io) и скачайте необходимую версию исходного кода Qt.
3. Разархивируйте исходный код:
Создайте директорию, в которую вы хотите разархивировать исходный код, и распакуйте архив в эту директорию.
4. Подготовка окружения:
- Откройте командную строку или Git Bash и перейдите в директорию, в которую был разархивирован исходный код.
- Выполните команду
configureдля настройки сборки Qt. Укажите путь к компилятору, версию Qt, а также другие параметры, если необходимо.
После завершения этих шагов вы будете готовы к сборке Qt из исходного кода на Windows.
Загрузка и установка необходимых компонентов
Перед тем, как приступить к сборке Qt из исходного кода на Windows, необходимо убедиться, что у вас есть все необходимые компоненты. Для этого вам потребуются:
- Компилятор C++
- Python
- Perl
- Программа CMake
- Программа ICU (International Components for Unicode)
Компилятор C++ – это основной инструмент, который требуется для компиляции исходного кода Qt. В Windows вы можете использовать MinGW или MSVC.
Установите Python и Perl, поскольку эти языки необходимы для некоторых скриптовых задач во время сборки Qt.
Программа CMake – это мощный инструмент для автоматизации процесса сборки программного обеспечения. Он позволяет создавать кроссплатформенные проекты и генерировать файлы для компиляции.
ICU – это библиотека, которая предоставляет различные функции для работы с юникодом, такие как поддержка различных языков и кодировок. Она необходима для сборки Qt, так как Qt использует юникод во многих своих компонентах.
Важно установить все эти компоненты перед началом сборки Qt. В противном случае, процесс сборки может прерваться из-за отсутствия необходимых зависимостей.
Настройка окружения сборки
Перед тем как начать сборку Qt из исходного кода, необходимо настроить окружение. В данном разделе рассмотрены основные шаги этого процесса.
1. Установите необходимые инструменты разработки. Для сборки Qt на Windows вам понадобятся следующие инструменты:
- Visual Studio. Рекомендуется использовать последнюю версию Visual Studio, совместимую с вашей версией Qt. Вы можете скачать Visual Studio с официального сайта Microsoft.
- Python. Qt использует скрипты на Python для сборки. Убедитесь, что у вас установлена последняя версия Python и добавьте ее путь в переменную среды PATH.
- Perl. Некоторые скрипты в Qt требуют Perl. Установите Perl и добавьте его путь в переменную среды PATH.
2. Установите Git. Qt использует Git для управления исходным кодом. Вы можете скачать Git с официального сайта.
3. Установите CMake. Некоторые компоненты Qt требуют CMake для сборки. Вы можете скачать CMake с официального сайта.
4. Загрузите исходный код Qt. Вы можете скачать исходный код с официального сайта Qt или склонировать его репозиторий с помощью команды git clone.
5. Создайте директорию сборки. Для того чтобы собрать Qt, необходимо создать директорию, в которой будет происходить процесс сборки. Рекомендуется создать отдельную директорию, отличную от директории с исходным кодом.
После завершения настройки окружения, вы готовы приступить к сборке Qt из исходного кода на Windows.
Скачивание и распаковка исходного кода Qt
Прежде чем начать сборку Qt из исходного кода, необходимо скачать и распаковать исходный код Qt. Для этого нужно выполнить следующие действия:
- Откройте веб-браузер и перейдите на официальный сайт Qt, по адресу www.qt.io.
- На главной странице найдите и нажмите на кнопку «Download», которая обычно расположена в верхней части сайта.
- В открывшемся разделе «Downloads» выберите необходимую версию Qt для скачивания. Вам может потребоваться выполнить бесплатную регистрацию на сайте, чтобы получить доступ к загрузке.
- Выберите операционную систему «Windows», а затем выберите компоненты, которые вы хотите установить. Основные компоненты уже выбраны по умолчанию, но вы можете выбрать пакеты дополнительных инструментов и модулей Qt, если это необходимо.
- Нажмите на кнопку «Download» и дождитесь завершения загрузки исходного кода Qt.
- После завершения загрузки найдите скачанный файл исходного кода Qt и распакуйте его в удобном для вас месте на диске.
После успешной распаковки исходного кода Qt вы готовы приступить к процессу сборки Qt на вашем компьютере.
Настройка и сборка Qt
В этом разделе мы рассмотрим подробные шаги по настройке и сборке Qt из исходного кода на Windows. Перед началом установки убедитесь, что ваш компьютер соответствует минимальным требованиям для сборки Qt.
Шаг 1: Загрузка исходного кода
Первым шагом является загрузка исходного кода Qt с официального сайта. Вы можете выбрать последнюю стабильную версию или скачать определенную версию, если вам необходимо поддерживать совместимость с уже существующим проектом.
Шаг 2: Установка зависимостей
Перед сборкой Qt необходимо установить все необходимые зависимости. Вы можете использовать инструмент Chocolatey для автоматической установки всех зависимостей. Откройте командную строку от имени администратора и выполните команду:
choco install -y python3 jom perl ninja openldap openssl icu
Это установит все необходимые зависимости для успешной сборки Qt.
Шаг 3: Настройка переменных среды
После установки зависимостей необходимо настроить переменные среды. Откройте командную строку от имени администратора и выполните следующие команды:
- set PATH=%PATH%;C:\python\Scripts
- set PYTHON=C:\python\python.exe
Замените «C:\python» путем к вашей установленной версии Python.
Шаг 4: Конфигурация и сборка Qt
Теперь мы готовы приступить к конфигурации и сборке Qt. Перейдите в папку, где вы разархивировали исходный код Qt, и запустите командную строку от имени администратора.
Выполните следующие команды для настройки и сборки Qt:
- configure -opensource -confirm-license -debug-and-release -nomake examples -nomake tests
- jom
- jom install
Эти команды настроят и соберут Qt с выбранными опциями. Это может занять некоторое время в зависимости от производительности вашего компьютера.
Шаг 5: Проверка установки
После успешной сборки вы можете проверить установку, запустив примеры Qt или создав свой собственный проект и компилируя его с помощью Qt Creator.
Теперь у вас должна быть настроенная и собранная версия Qt на вашем компьютере. Вы можете использовать ее для разработки собственных приложений на основе Qt.
Потребовалось мне тут, что бы Qt приложение было в одном exe. Для этого придётся перекомпилировать Qt.
Качаем: Git
Качаем: Perl, версию 32х битную.
Качаем: Python 2 (У меня 2.7).
Качаем: MinGW, y меня 730 (для распаковки нужен 7Zip, запускать «C:\Programm Files (x86)\7-Zip\7zFM.exe»).
Открываем консольку (Win+R, вводим cmd), прописываем необходимые системные переменные (пути замените на свои):
set PATH=C:\MinGW\mingw730_32\bin\;%PATH%
set PATH=C:\Strawberry\perl\bin\;%PATH%
Переходим в папку, в которой будем развлекаться, качаем исходники Qt:
cd C:/QtStatic
git clone https://github.com/qt/qt5
cd qt5
perl init-repository
Конфигурируем:
configure -opensource -confirm-license -platform win32-g++ -static -release -opengl desktop -qt-zlib -qt-libpng -qt-libjpeg -nomake examples[tip]В конфиге не включён SSL, кому нужно:
Качаем и ставим Win32OpenSSLLite
-openssl -I «c:\Qt\3dparty\openssl-1.0.2m\include» -L «c:\Qt\3dparty\openssl-1.0.2m»
[/tip]
[tip]
Если вдруг нужно переконфигурировать и пересобрать, то нужно сначала очистить результаты предыдущих потуг:
 git submodule foreach --recursive "git clean -dfx"
 git clean -dfx
[/tip]
Собираем (Часа 4) и ставим:
mingw32-make -j4
mingw32-make install
После установки настраиваем QtCreator для использования новой версии фреймворка:
В верхней менюшке Инструменты -> Параметры -> Сборка и запуск
Компиляторы -> Добавить
MinGW -> C++
Название: Qt 5.12 Static MinGW
Путь: C:\MinGW\mingw730_32\bin\c++.exe
Отладчики -> Добавить
Название: Qt 5.12 Static DBG
Путь: C:\MinGW\mingw730_32\bin\gdb.exe
Профили Qt -> Добавить
Название: Qt 5.12 Static
Путь: C:\QtStatic\qt5\qtbase\bin\qmake.exe
Комплекты -> Добавить
Название: Qt 5.12 Static
Тип устройства: Desktop
Компилятор C++: Qt 5.12 Static MinGW
Отладчик: Qt 5.12 Static DBG
Профиль Qt: Qt 5.12 Static
Нажимаем «Применить».
Можно попробовать сделать простенький проект. В параметрах сборки и запуска поставьте «Release» т.к. мы только эту версию собрали. Так же в «*.pro» файл необходимо добавить указание на статическую сборку и линковку libGCC.
QMAKE_LFLAGS += -static -static-libgccНу вот, как-то так =)