These instructions cover how to get a working copy of the source code and a
compiled version of the CPython interpreter (CPython is the version of Python
available from https://www.python.org/). It also gives an overview of the
directory structure of the CPython source code.
Alternatively, if you have Docker installed you
might want to use our official images. These
contain the latest releases of several Python versions, along with Git head,
and are provided for development and testing purposes only.
See also
The Quick reference gives brief summary of the process from
installing Git to submitting a pull request.
Install Git#
CPython is developed using Git for version control. The Git
command line program is named git; this is also used to refer to Git
itself. Git is easily available for all common operating systems.
-
Install
As the CPython repo is hosted on GitHub, please refer to either the
GitHub setup instructions
or the Git project instructions for step-by-step
installation directions. You may also want to consider a graphical client
such as TortoiseGit or
GitHub Desktop. -
Configure
Configure your name and email and create
an SSH key
as this will allow you to interact with GitHub without typing a username
and password each time you execute a command, such asgit pull,
git push, orgit fetch. On Windows, you should also
enable autocrlf.
Get the source code#
The CPython repo is hosted on GitHub. To get a copy of the source code you should
fork the Python repository on GitHub, create a local
clone of your personal fork, and configure the remotes.
You will only need to execute these steps once per machine:
-
Go to https://github.com/python/cpython.
-
Press Fork on the top right.
-
When asked where to fork the repository, choose to fork it to your username.
-
Your fork will be created at
https://github.com/<username>/cpython. -
Clone your GitHub fork (replace
<username>with your username):$ git clone git@github.com:<username>/cpython.git
(You can use both SSH-based or HTTPS-based URLs.)
-
Add an
upstreamremote, then configuregit
to pullmainfromupstreamand always push toorigin:$ cd cpython $ git remote add upstream https://github.com/python/cpython $ git config --local branch.main.remote upstream $ git remote set-url --push upstream git@github.com:<your-username>/cpython.git
-
Verify that your setup is correct:
$ git remote -v
origin  git@github.com:<your-username>/cpython.git (fetch)
origin  git@github.com:<your-username>/cpython.git (push)
upstream        https://github.com/python/cpython (fetch)
upstream        git@github.com:<your-username>/cpython.git (push)
$ git config branch.main.remote
upstream
For more information about these commands see
Git Bootcamp and Cheat Sheet.
If you did everything correctly, you should now have a copy of the code
in the cpython directory and two remotes that refer to your own GitHub fork
(origin) and the official CPython repository (upstream).
If you want a working copy of an already-released version of Python,
i.e., a version in maintenance mode, you can checkout
a release branch. For instance, to checkout a working copy of Python 3.8,
do git switch 3.8.
You will need to re-compile CPython when you do such an update.
Do note that CPython will notice that it is being run from a working copy.
This means that if you edit CPython’s source code in your working copy,
changes to Python code will be picked up by the interpreter for immediate
use and testing. (If you change C code, you will need to recompile the
affected files as described below.)
Patches for the documentation can be made from the same repository; see
Getting started.
Compile and build#
CPython provides several compilation flags which help with debugging various
things. While all of the known flags can be found in the
Misc/SpecialBuilds.txt file, the most critical one is the Py_DEBUG flag
which creates what is known as a “pydebug” build. This flag turns on various
extra sanity checks which help catch common issues. The use of the flag is so
common that turning on the flag is a basic compile option.
You should always develop under a pydebug build of CPython (the only instance of
when you shouldn’t is if you are taking performance measurements). Even when
working only on pure Python code the pydebug build provides several useful
checks that one should not skip.
Unix#
The core CPython interpreter only needs a C compiler to be built,
however, some of the extension modules will need development headers
for additional libraries (such as the zlib library for compression).
Depending on what you intend to work on, you might need to install these
additional requirements so that the compiled interpreter supports the
desired features.
If you want to install these optional dependencies, consult the
Install dependencies section below.
If you don’t need to install them, the basic steps for building Python
for development is to configure it and then compile it.
Configuration is typically:
$ ./configure --with-pydebug
More flags are available to configure, but this is the minimum you should
do to get a pydebug build of CPython.
Note
You might need to run make clean before or after re-running configure
in a particular build directory.
Once configure is done, you can then compile CPython with:
This will build CPython with only warnings and errors being printed to
stderr and utilize up to 2 CPU cores. If you are using a multi-core machine
with more than 2 cores (or a single-core machine), you can adjust the number
passed into the -j flag to match the number of cores you have (or if your
version of Make supports it, you can use -j without a number and Make
will not limit the number of steps that can run simultaneously.).
At the end of the build you should see a success message, followed
by a list of extension modules that haven’t been built because their
dependencies were missing:
The necessary bits to build these optional modules were not found:
_gdbm
To find the necessary bits, look in configure.ac and config.log.

Checked 106 modules (31 built-in, 74 shared, 0 n/a on macosx-13.4-arm64, 0 disabled, 1 missing, 0 failed on import)
If the build failed and you are using a C89 or C99-compliant compiler,
please open a bug report on the issue tracker.
If you decide to Install dependencies, you will need to re-run both
configure and make.
Once CPython is done building you will then have a working build
that can be run in-place; ./python on most machines (and what is used in
all examples), ./python.exe wherever a case-insensitive filesystem is used
(e.g. on macOS by default), in order to avoid conflicts with the Python
directory. There is normally no need to install your built copy
of Python! The interpreter will realize where it is being run from
and thus use the files found in the working copy. If you are worried
you might accidentally install your working copy build, you can add
--prefix=/tmp/python to the configuration step. When running from your
working directory, it is best to avoid using the --enable-shared flag
to configure; unless you are very careful, you may accidentally run
with code from an older, installed shared Python library rather than from
the interpreter you just built.
Clang#
If you are using clang to build CPython, some flags you might want to set to
quiet some standard warnings which are specifically superfluous to CPython are
-Wno-unused-value -Wno-empty-body -Qunused-arguments. You can set your
CFLAGS environment variable to these flags when running configure.
If you are using clang with ccache, turn off the noisy
parentheses-equality warnings with the -Wno-parentheses-equality flag.
These warnings are caused by clang not having enough information to detect
that extraneous parentheses in expanded macros are valid, because the
preprocessing is done separately by ccache.
If you are using LLVM 2.8, also use the -no-integrated-as flag in order to
build the ctypes module (without the flag the rest of CPython will
still build properly).
Optimization#
If you are trying to improve CPython’s performance, you will probably want
to use an optimized build of CPython. It can take a lot longer to build CPython
with optimizations enabled, and it’s usually not necessary to do so. However,
it’s essential if you want accurate benchmark results for a proposed performance
optimization.
For an optimized build of Python, use
configure --enable-optimizations --with-lto.
This sets the default make targets up to enable Profile Guided Optimization (PGO)
and may be used to auto-enable Link Time Optimization (LTO) on some platforms.
See --enable-optimizations and --with-lto
to learn more about these options.
$ ./configure --enable-optimizations --with-lto
Windows#
Note
If you are using the Windows Subsystem for Linux (WSL),
clone the repository from a native Windows shell program
like PowerShell or the cmd.exe command prompt,
and use a build of Git targeted for Windows,
e.g. the Git for Windows download from the official Git website.
Otherwise, Visual Studio will not be able to find all the project’s files
and will fail the build.
For a concise step by step summary of building Python on Windows,
you can read Victor Stinner’s guide.
All supported versions of Python can be built
using Microsoft Visual Studio 2017 or later.
You can download and use any of the free or paid versions of Visual Studio.
When installing it, select the Python development workload
and the optional Python native development tools component
to obtain all of the necessary build tools.
You can find Git for Windows on the Individual components tab
if you don’t already have it installed.
Note
If you want to build MSI installers, be aware that the build toolchain
for them has a dependency on the Microsoft .NET Framework Version 3.5
(which may not be included on recent versions of Windows, such as Windows 10).
If you are building on a recent Windows version, use the Control Panel
()
and ensure that the entry
.NET Framework 3.5 (includes .NET 2.0 and 3.0) is enabled.
Your first build should use the command line to ensure any external dependencies
are downloaded:
PCbuild\build.bat -c Debug
The above command line build uses the -c Debug argument
to build in the Debug configuration,
which enables checks and assertions helpful for developing Python.
By default, it builds in the Release configuration
and for the 64-bit x64 platform rather than 32-bit Win32;
use -c and -p to control build config and platform, respectively.
After this build succeeds, you can open the PCbuild\pcbuild.sln solution
in the Visual Studio IDE to continue development, if you prefer.
When building in Visual Studio,
make sure to select build settings that match what you used with the script
(the Debug configuration and the x64 platform)
from the dropdown menus in the toolbar.
Note
If you need to change the build configuration or platform,
build once with the build.bat script set to those options first
before building with them in VS to ensure all files are rebuilt properly,
or you may encounter errors when loading modules that were not rebuilt.
Avoid selecting the PGInstrument and PGUpdate configurations,
as these are intended for PGO builds and not for normal development.
You can run the build of Python you’ve compiled with:
PCbuild\amd64\python_d.exe
See the PCBuild readme for more details on what other software is necessary
and how to build.
Install dependencies#
This section explains how to install additional extensions (e.g. zlib)
on Linux and macOS. On Windows,
extensions are already included and built automatically.
Linux#
For Unix-based systems, we try to use system libraries whenever available.
This means optional components will only build if the relevant system headers
are available. The best way to obtain the appropriate headers will vary by
distribution, but the appropriate commands for some popular distributions
are below.
On Fedora, Red Hat Enterprise Linux and other yum based systems:
$ sudo yum install yum-utils
$ sudo yum-builddep python3
On Fedora and other DNF based systems:
$ sudo dnf install dnf-plugins-core  # install this to use 'dnf builddep'
$ sudo dnf builddep python3
On Debian, Ubuntu, and other apt based systems, try to get the
dependencies for the Python you’re working on by using the apt command.
First, make sure you have enabled the source packages in the sources list.
You can do this by adding the location of the source packages, including
URL, distribution name and component name, to /etc/apt/sources.list.
Take Ubuntu 22.04 LTS (Jammy Jellyfish) for example:
deb-src http://archive.ubuntu.com/ubuntu/ jammy main
Alternatively, uncomment lines with deb-src using an editor, e.g.:
sudo nano /etc/apt/sources.list
For other distributions, like Debian, change the URL and names to correspond
with the specific distribution.
Then you should update the packages index:
Now you can install the build dependencies via apt:
$ sudo apt-get build-dep python3
$ sudo apt-get install pkg-config
If you want to build all optional modules, install the following packages and
their dependencies:
$ sudo apt-get install build-essential gdb lcov pkg-config \
      libbz2-dev libffi-dev libgdbm-dev libgdbm-compat-dev liblzma-dev \
      libncurses5-dev libreadline6-dev libsqlite3-dev libssl-dev \
      lzma lzma-dev tk-dev uuid-dev zlib1g-dev
macOS#
For macOS systems (versions 10.9+),
the Developer Tools can be downloaded and installed automatically;
you do not need to download the complete Xcode application.
If necessary, run the following:
This will also ensure that the system header files are installed into
/usr/include.
Also note that macOS does not include several libraries used by the Python
standard library, including libzma, so expect to see some extension module
build failures unless you install local copies of them. As of OS X 10.11,
Apple no longer provides header files for the deprecated system version of
OpenSSL which means that you will not be able to build the _ssl extension.
One solution is to install these libraries from a third-party package
manager, like Homebrew or MacPorts, and then add the appropriate paths
for the header and library files to your configure command.
For example, with Homebrew, install the dependencies:
$ brew install pkg-config openssl@3.0 xz gdbm tcl-tk
Then, for Python 3.11 and newer, run configure:
$ GDBM_CFLAGS="-I$(brew --prefix gdbm)/include" \
  GDBM_LIBS="-L$(brew --prefix gdbm)/lib -lgdbm" \
  ./configure --with-pydebug \
              --with-openssl="$(brew --prefix openssl@3.0)"
Or, for Python 3.8 through 3.10:
$ CPPFLAGS="-I$(brew --prefix gdbm)/include -I$(brew --prefix xz)/include" \
  LDFLAGS="-L$(brew --prefix gdbm)/lib -L$(brew --prefix xz)/lib" \
  ./configure --with-pydebug \
              --with-openssl="$(brew --prefix openssl@3.0)" \
              --with-tcltk-libs="$(pkg-config --libs tcl tk)" \
              --with-tcltk-includes="$(pkg-config --cflags tcl tk)"
And finally, run make:
Alternatively, with MacPorts:
$ sudo port install pkgconfig openssl xz gdbm tcl tk +quartz
Then, for Python 3.11 and newer, run configure:
$ GDBM_CFLAGS="-I$(dirname $(dirname $(which port)))/include" \
  GDBM_LIBS="-L$(dirname $(dirname $(which port)))/lib -lgdbm" \
  ./configure --with-pydebug
And finally, run make:
There will sometimes be optional modules added for a new release which
won’t yet be identified in the OS-level build dependencies. In those cases,
just ask for assistance in the Core Development category on Discourse.
Explaining how to build optional dependencies on a Unix-based system without
root access is beyond the scope of this guide.
For more details on various options and considerations for building, refer
to the macOS README.
Note
While you need a C compiler to build CPython, you don’t need any
knowledge of the C language to contribute! Vast areas of CPython are
written completely in Python: as of this writing, CPython contains slightly
more Python code than C.
Regenerate configure#
If a change is made to Python which relies on some POSIX system-specific
functionality (such as using a new system call), it is necessary to update the
configure script to test for availability of the functionality.
Python’s configure script is generated from configure.ac
using GNU Autoconf.
After editing configure.ac, run make regen-configure to generate
configure, pyconfig.h.in, and aclocal.m4.
When submitting a pull request with changes made to configure.ac,
make sure you also commit the changes in the generated files.
The recommended and by far the easiest way to regenerate configure is:
If you are regenerating configure in a clean repo,
run one of the following containers instead:
$ podman run --rm --pull=always -v $(pwd):/src:Z quay.io/tiran/cpython_autoconf:271
$ docker run --rm --pull=always -v $(pwd):/src quay.io/tiran/cpython_autoconf:271
Notice that the images are tagged with 271.
Python’s configure.ac script requires a specific version of
GNU Autoconf.
For Python 3.12 and newer, GNU Autoconf v2.71 is required.
For Python 3.11 and earlier, GNU Autoconf v2.69 is required.
For GNU Autoconf v2.69, change the :271 tag to :269.
If you cannot (or don’t want to) use the cpython_autoconf containers,
install the autoconf-archive and pkg-config utilities,
and make sure the pkg.m4 macro file located in the appropriate
aclocal location:
$ ls $(aclocal --print-ac-dir) | grep pkg.m4
Note
Running autoreconf is not the same as running autoconf.
For example, running autoconf by itself will not regenerate
pyconfig.h.in.
autoreconf runs autoconf and a number of other tools
repeatedly as appropriate.
Regenerate the ABI dump#
Maintenance branches (not main) have a special file located in
Doc/data/pythonX.Y.abi that allows us to know if a given Pull Request
affects the public ABI. This file is used by the GitHub CI in a check
called Check if the ABI has changed that will fail if a given Pull Request
has changes to the ABI and the ABI file is not updated.
This check acts as a fail-safe and doesn’t necessarily mean that the Pull
Request cannot be merged. When this check fails you should add the relevant
release manager to the PR so that they are aware of the change and they can
validate if the change can be made or not.
Important
ABI changes are allowed before the first release candidate. After the first release
candidate, all further releases must have the same ABI for ensuring compatibility
with native extensions and other tools that interact with the Python interpreter.
See the documentation about the release candidate phase.
When the PR check fails, the associated run will have the updated ABI file
attached as an artifact. After release manager approval, you can download and
add this file into your PR to pass the check.
You can regenerate the ABI file by yourself by invoking the regen abidump
Make target. Note that for doing this you need to regenerate the ABI file in
the same environment that the GitHub CI uses to check for it. This is because
different platforms may include some platform-specific details that make the
check fail even if the Python ABI is the same. The easier way to regenerate
the ABI file using the same platform as the CI uses is by using Docker:
# In the CPython root:
$ docker run -v$(pwd):/src:Z -w /src --rm -it ubuntu:22.04 \
    bash /src/.github/workflows/regen-abidump.sh
Note that the ubuntu version used to execute the script matters and
must match the version used by the CI to check the ABI. See the
.github/workflows/build.yml file for more information.
Troubleshoot the build#
This section lists some of the common problems that may arise during the
compilation of Python, with proposed solutions.
Avoid recreating auto-generated files#
Under some circumstances you may encounter Python errors in scripts like
Parser/asdl_c.py or Python/makeopcodetargets.py while running make.
Python auto-generates some of its own code, and a full build from scratch needs
to run the auto-generation scripts. However, this makes the Python build require
an already installed Python interpreter; this can also cause version mismatches
when trying to build an old (2.x) Python with a new (3.x) Python installed, or
vice versa.
To overcome this problem, auto-generated files are also checked into the
Git repository. So if you don’t touch the auto-generation scripts, there’s
no real need to auto-generate anything.
Editors and tools#
Python is used widely enough that practically all code editors have some form
of support for writing Python code. Various coding tools also include Python
support.
For editors and tools which the core developers have felt some special comment
is needed for coding in Python, see Additional resources.
Directory structure#
There are several top-level directories in the CPython source tree. Knowing what
each one is meant to hold will help you find where a certain piece of
functionality is implemented. Do realize, though, there are always exceptions to
every rule.
Doc-
The official documentation. This is what https://docs.python.org/ uses.
See also Building the documentation. Grammar-
Contains the EBNF grammar file for
Python. Include-
Contains all interpreter-wide header files.
Lib-
The part of the standard library implemented in pure Python.
Mac-
Mac-specific code (e.g., using IDLE as a macOS application).
Misc-
Things that do not belong elsewhere. Typically this is varying kinds of
developer-specific documentation. Modules-
The part of the standard library (plus some other code) that is implemented
in C. Objects-
Code for all built-in types.
PC-
Windows-specific code.
PCbuild-
Build files for the version of MSVC currently used for the Windows
installers provided on python.org. Parser-
Code related to the parser. The definition of the AST nodes is also kept
here. Programs-
Source code for C executables, including the main function for the
CPython interpreter. Python-
The code that makes up the core CPython runtime. This includes the
compiler, eval loop and various built-in modules. Tools-
Various tools that are (or have been) used to maintain Python.
Contribute using GitHub Codespaces#
What is GitHub Codespaces?#
If you’d like to start contributing to CPython without needing to set up a local
developer environment, you can use
GitHub Codespaces.
Codespaces is a cloud-based development environment offered by GitHub that
allows developers to write, build, test, and debug code directly within their
web browser or in Visual Studio Code (VS Code).
To help you get started, CPython contains a
devcontainer folder
with a JSON configuration file that provides consistent and versioned codespace
configurations for all users of the project. It also contains a Dockerfile that
allows you to set up the same environment but locally in a Docker container if
you’d prefer to use that directly.
Create a CPython codespace#
Here are the basic steps needed to contribute a patch using Codespaces.
You first need to navigate to the
CPython repo hosted on GitHub.
Then you will need to:
-
Press the
,key to launch the codespace setup screen for the current
branch (alternatively, click the green Code button and choose
thecodespacestab and then press the
green Create codespace on main button). -
A screen should appear that lets you know your codespace is being set up.
(Note: Since the CPython devcontainer is provided, codespaces will use the
configuration it specifies.) -
A web version of VS Code will open inside your web
browser, already linked up with your code and a terminal to the remote
codespace where CPython and its documentation have already been built. -
Use the terminal with the usual Git commands to create a new branch, commit
and push your changes once you’re ready!
If you close your repository and come back later you can always resume your
codespace by navigating to the CPython repo, selecting the codespaces tab and
selecting your most recent codespaces session. You should then be able to pick
up from where you left off!
Use Codespaces locally#
On the bottom left side of the codespace screen you will see a green or grey
square that says Codespaces. You can click this for additional
options. If you prefer working in a locally installed copy of VS Code you can
select the option Open in VS Code. You will still be working on the remote
codespace instance, thus using the remote instance’s compute power. The compute
power may be a much higher spec than your local machine which can be helpful.
Introduction
Installing Python is easy using the pre-built installers and packages
from your operating system. However, if you want to build the
cutting-edge version directly from GitHub master branch, you will
have to build your own version from source. You may also want to do it
just to reinforce your understanding of Python.
This guide will walk through the steps needed to build Python 3
from source and then create a virtual environment that you can use
for projects.
Build steps
This assumes a Linux development environment and was tested in Fedora 30.
You may need to install some of the necessary dev tools like make
or gcc on your system.
The main steps are:
- Obtain the source code
- Run the
configurescript - Run
make - Run
make install
Get the source code
You can get the latest code by cloning directly from master GitHub branch.
At the time of this writing, the Git repository contains Python 3.9.
git clone https://github.com/python/cpython
You can also download the source for official releases on the releases page.
Configure
A configure script comes in the source that can be passed many values.
This will create the Makefile.
One in particular that is important is the --prefix. This will determine
where the final built files go.
cd cpython
./configure --prefix=$HOME/python3.9
By default, it will generate (among other things) a libpython3.9.a static
library that you can use to link with C applications (e.g. gcc my.c -lpython3.9).
If you want to build the shared library instead of the static one (libpython3.so),
the use the --enabled-shared flag. This will NOT build the static library and
you will have to ensure the .so file is loadable when running Python which
adds more complexity. I recommend avoiding the shared library unless you
have a need for it.
./configure --enable-shared
If you want to add optimizations, also add on the --enable-optimizations flag.
./configure --enable-optimizations
An example with all the options might look like this:
./configure --enable-optimizations --prefix=$HOME/python3.9
Build
Use the make tool to build the files followed by make install to
put the final files in the location specified by configure’s --prefix.
make # Do the bulk of compilation
Near the end of the output, you should see a success message and
some suggestions on optional modules. In the output below it mentions
that it could not build _tkinter.
Python build finished successfully!
The necessary bits to build these optional modules were not found:
_dbm                  _gdbm                 _tkinter
nis                   readline
To find the necessary bits, look in setup.py in detect_modules() for the module's name.


The following modules found by detect_modules() in setup.py, have been
built by the Makefile instead, as configured by the Setup files:
_abc                  atexit                pwd
time
In Fedora, the optional missing dependencies can be installed with:
dnf install tk-devel readline-devel gdbm-devel
In Debian, the packages are:
apt install libncurses-dev libgdbm-dev libz-dev tk-dev libsqlite3-dev libreadline-dev liblzma-dev libffi-dev libssl-dev
Run ./configure and make again to rebuild with the dependencies.
After the build was successful, compile all the final files in to the target
destination that was specified by --prefix on the configure script.
make install # Puts the final files in prefix location
Post-build
After it performs the install, the prefix directory specified in configure
will contain the output, which should be four directories:
├── bin
├── include
├── lib
└── share
- The
bindir contains the all-importantpython3executable. - The
includedirectory contains all the include files needed for Python dev, including the importantPython.hused for writing C extensions. This is the directory you would add togccwith the-Iflag if compiling C applications with embedded Python. - The
libdirectory has all the Python modules as well as thelibpython3.9.alibrary. Add this library directory togccsearch path for libraries with-Land link to the lib with-lpython3.9. - The
sharedirectory will contain the man pages. Can be read withman(e.g.man ./share/man/man1/python3.9.1).
You could run Python directly from the bin/python3 executable, or add bin/ to your PATH environment variable.
Since Python 3 comes with the virtual environment package, I suggest creating
a new virtual environment from the freshly built Python.
# Create a virtual environment from the new python
$HOME/mycpython/bin/python3 -m venv $HOME/venv
Then you can activate the virtual environment and ensure everything looks good.
source $HOME/venv/bin/activate
which python
which pip
python --version
pip --version
Further reading
To learn more about virtual environments, see my Python Virtual Environments Tutorial.
To learn more about Python’s import paths, see my Python import, sys.path, and PYTHONPATH Tutorial.
Conclusion
After reading this, you should be able to build Python 3 from source
using make and create a virtual environment using your built Python.
I want to install Python 3.4.6 but it is only available in source code format.
The install options on the official Python website are Gzip’d source tarball and XZ compressed source tarball. I have never installed Python this way before so I don’t know what to do. How do I install Python and what file do I download?
https://www.python.org/downloads/release/python-346/
![]()
jww
98.2k91 gold badges413 silver badges888 bronze badges
asked Apr 25, 2017 at 22:43
![]()
14
- Download the source as a .tar.gz
- Extract the source using a program such as 7-Zip
- Follow the instructions in
PCbuild\readme.txt
You will need Visual Studio 2010 Express, which is becoming increasingly hard to find. See the comments in this question for a link to download it. You can also try Visual Studio Community 2017, which will probably work as well. All that you really need to do is open a solution and click build.
![]()
answered Apr 25, 2017 at 23:01
![]()
AldenAlden
2,2291 gold badge15 silver badges21 bronze badges
2
Use the latest version
Step 1 – Prerequsiteis
Use the following command to install prerequisites for Python before installing it.
sudo apt-get install build-essential checkinstall
sudo apt-get install libreadline-gplv2-dev libncursesw5-dev libssl-dev \
    libsqlite3-dev tk-dev libgdbm-dev libc6-dev libbz2-dev
Step 2 – Download Python 3.7
Download Python using following command from python official site. You can also download latest version in place of specified below.
cd /usr/src
wget wget https://www.python.org/ftp/python/3.7.0/Python-3.7.0.tgz
Now extract the downloaded package.
sudo tar xzf Python-3.7.0.tgz
Step 3 – Compile Python Source
Use below set of commands to compile python source code on your system using altinstall.
cd Python-3.7.0
sudo ./configure --enable-optimizations
sudo make altinstall
make altinstall is used to prevent replacing the default python binary file /usr/bin/python.
Step 4 – Check Python Version
Check the latest version installed of python using below command
python3.7 -V

Python-3.7.0
answered Aug 11, 2018 at 12:20
![]()
Sonia RaniSonia Rani
6089 silver badges4 bronze badges
The Python 3.4 branch is in security fixes only mode. This means that only security fixes will be accepted on this branch, no more non-critical bug fixes. New releases on this branch are source-only, no binaries will be provided.
See the official announcement.
If you really need a python 3.4.6 binary for windows, you will have to compile it yourself. But if you’re new to python and just want to try or learn python, there’s no reason why you couldn’t use version 3.4.4, or 3.6.x.
answered May 17, 2017 at 8:52
![]()
jlhjlh
4,37840 silver badges45 bronze badges
I’m having a blast building CPython from scratch and thought it’s probably a good idea to keep track of the build steps. I figured this one’s something I’ll be doing/repeating for a long time. This has the potential of making Python app deployment quite simple.
Start by downloading and extracting a copy of compressed Python sources. Here’s one example:
https://www.python.org/ftp/python/3.9.12/Python-3.9.12.tgz
Extract and CD to the folder containing the sources using PowerShell. Then run the following command to build Python:
.\PCbuild\build.bat -e -c Release -p x64 -t BuildKeep in mind, this requires Visual Studio and its C++ development components to be present on your computer.
Add the build folder to the path. (something like C:\Python-3.9.12\PCbuild\amd64)
CD to build folder and run the following:
python -m ensurepip --upgradeNow you can install pip packages and start using Python. Here’s an example:
python -m pip install jupyterlabHave fun!
Watch Now This tutorial has a related video course created by the Real Python team. Watch it together with the written tutorial to deepen your understanding: Python Basics: Setting Up Python
Installing or updating Python on your computer is the first step to becoming a Python programmer. There are a multitude of installation methods: you can download official Python distributions from Python.org, install from a package manager, and even install specialized distributions for scientific computing, Internet of Things, and embedded systems.
This tutorial focuses on official distributions, as they’re generally the best option for getting started with learning to program in Python.
In this tutorial you’ll learn how to:
- Check which version of Python, if any, is installed on your machine
- Install or update Python on Windows, macOS, and Linux
- Use Python on mobile devices like phones or tablets
- Use Python on the Web with online interpreters
No matter what operating system you’re on, this tutorial has you covered. Find your operating system below and dive in!
How to Install Python on Windows
There are three installation methods on Windows:
- The Microsoft Store
- The full installer
- Windows Subsystem for Linux
In this section, you’ll learn how to check which version of Python, if any, is installed on your Windows computer. You’ll also learn which of the three installation methods you should use. For a more comprehensive guide, check out Your Python Coding Environment on Windows: Setup Guide.
How to Check Your Python Version on Windows
To check if you already have Python on your Windows machine, first open a command-line application, such as PowerShell.
You can also use cmd.exe or Windows Terminal.
With the command line open, type in the following command and press Enter:
C:\> python --version
Python 3.8.4
Using the --version switch will show you the version that’s installed. Alternatively, you can use the -V switch:
C:\> python -V
Python 3.8.4
In either case, if you see a version less than 3.8.4, which was the most recent version at the time of writing, then you’ll want to upgrade your installation.
If you’re interested in where the installation is located, then you can use the where.exe command in cmd.exe or PowerShell:
C:\> where.exe python
C:\Users\mertz\AppData\Local\Programs\Python\Python37-32\python.exe
Note that the where.exe command will work only if Python has been installed for your user account.
What Your Options Are
As mentioned earlier, there are three ways to install the official Python distribution on Windows:
-
Microsoft Store package: The most straightforward installation method on Windows involves installing from the Microsoft Store app. This is recommended for beginner Python users looking for an easy-to-set-up interactive experience.
-
Full Installer: This approach involves downloading Python directly from the Python.org website. This is recommended for intermediate and advanced developers who need more control during the setup process.
-
Windows Subsystem for Linux (WSL): The WSL allows you to run a Linux environment directly in Windows. You can learn how to enable the WSL by reading the Windows Subsystem for Linux Installation Guide for Windows 10.
In this section, we’ll focus on only the first two options, which are the most popular installation methods in a Windows environment.
If you want to install in the WSL, then you can read the Linux section of this tutorial after you’ve installed the Linux distribution of your choice.
The two official Python installers for Windows aren’t identical. The Microsoft Store package has some important limitations.
Limitations of the Microsoft Store Package
The official Python documentation has this to say about the Microsoft Store package:
The Microsoft Store package is an easily installable Python interpreter that is intended mainly for interactive use, for example, by students. (Source)
The key takeaway here is that the Microsoft Store package is “intended mainly for interactive use.” That is, the Microsoft Store package is designed to be used by students and people learning to use Python for the first time.
In addition to targeting beginning Pythonistas, the Microsoft Store package has limitations that make it ill-suited for a professional development environment. In particular, it does not have full write access to shared locations such as TEMP or the registry.
Windows Installer Recommendations
If you’re new to Python and focused primarily on learning the language rather than building professional software, then you should install from the Microsoft Store package. This offers the shortest and easiest path to getting started with minimal hassle.
On the other hand, if you’re an experienced developer looking to develop professional software in a Windows environment, then the official Python.org installer is the right choice. Your installation won’t be limited by Microsoft Store policies, and you can control where the executable is installed and even add Python to PATH if necessary.
How to Install From the Microsoft Store
If you’re new to Python and looking to get started quickly, then the Microsoft Store package is the best way to get up and running without any fuss. You can install from the Microsoft Store in two steps.
Step 1: Open the Python App Page in the Microsoft Store
Open the Microsoft Store app and search for Python.
You’ll likely see multiple versions that you can choose to install:
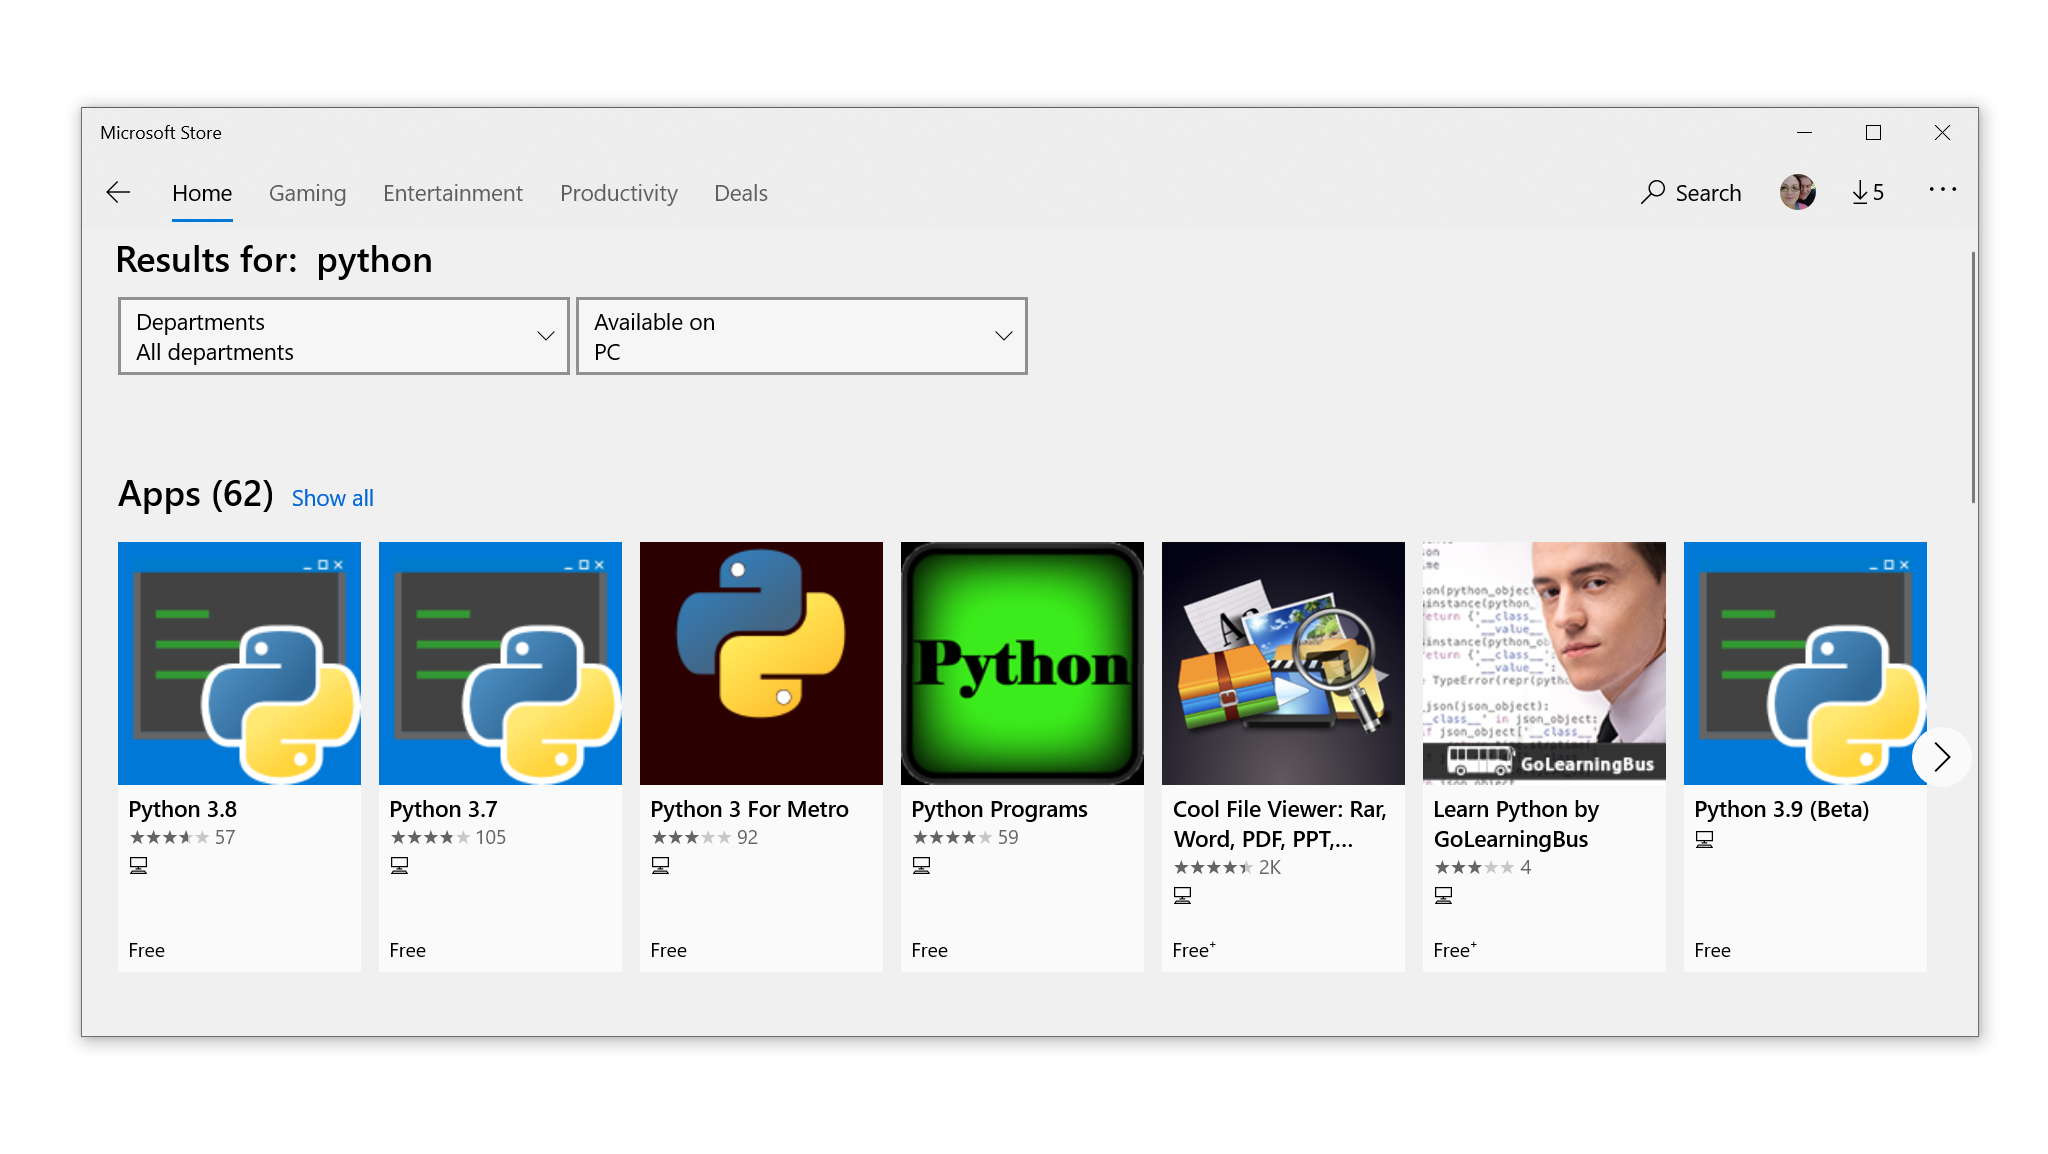
Select Python 3.8, or the highest version number you see available in the app, to open the installation page.
Alternatively, you can open PowerShell and type the following command:
If you don’t already have a version of Python on your system, then when you press Enter, the Microsoft Store will automatically launch and take you to the latest version of Python in the store.
Step 2: Install the Python App
After you’ve selected the version to be installed, follow these steps to complete the installation:
-
Click Get.
-
Wait for the application to download. When it’s finished downloading, the Get button will be replaced with a button that says Install on my devices.
-
Click Install on my devices and select the devices on which you’d like to complete the installation.
-
Click Install Now and then OK to start the installation.
-
If the installation was successful, then you’ll see the message “This product is installed” at the top of the Microsoft Store page.
Congratulations! You now have access to Python, including pip and IDLE!
How to Install From the Full Installer
For professional developers who need a full-featured Python development environment, installing from the full installer is the right choice. It offers more customization and control over the installation than installing from the Microsoft Store.
You can install from the full installer in two steps.
Step 1: Download the Full Installer
Follow these steps to download the full installer:
-
Open a browser window and navigate to the Python.org Downloads page for Windows.
-
Under the “Python Releases for Windows” heading, click the link for the Latest Python 3 Release — Python 3.x.x. As of this writing, the latest version was Python 3.8.4.
-
Scroll to the bottom and select either Windows x86-64 executable installer for 64-bit or Windows x86 executable installer for 32-bit.
If you aren’t sure whether to select the 32-bit or the 64-bit installer, then you can expand the box below to help you decide.
For Windows, you can choose either the 32-bit or the 64-bit installer. Here’s the difference between the two:
-
If your system has a 32-bit processor, then you should choose the 32-bit installer. If you attempt to install the 64-bit version on a 32-bit processor, then you’ll get an error at the beginning and the install will fail.
-
On a 64-bit system, either installer will work for most purposes. The 32-bit version will generally use less memory, but the 64-bit version performs better for applications with intensive computation.
If you’re unsure which version to pick, go with the 64-bit version.
If you have a 64-bit system and would like to switch from 64-bit Python to 32-bit (or vice versa), then you can just uninstall Python and then reinstall it by downloading the other installer from Python.org.
When the installer is finished downloading, move on to the next step.
Step 2: Run the Installer
Once you’ve chosen and downloaded an installer, run it by double-clicking on the downloaded file. A dialog box like the one below will appear:
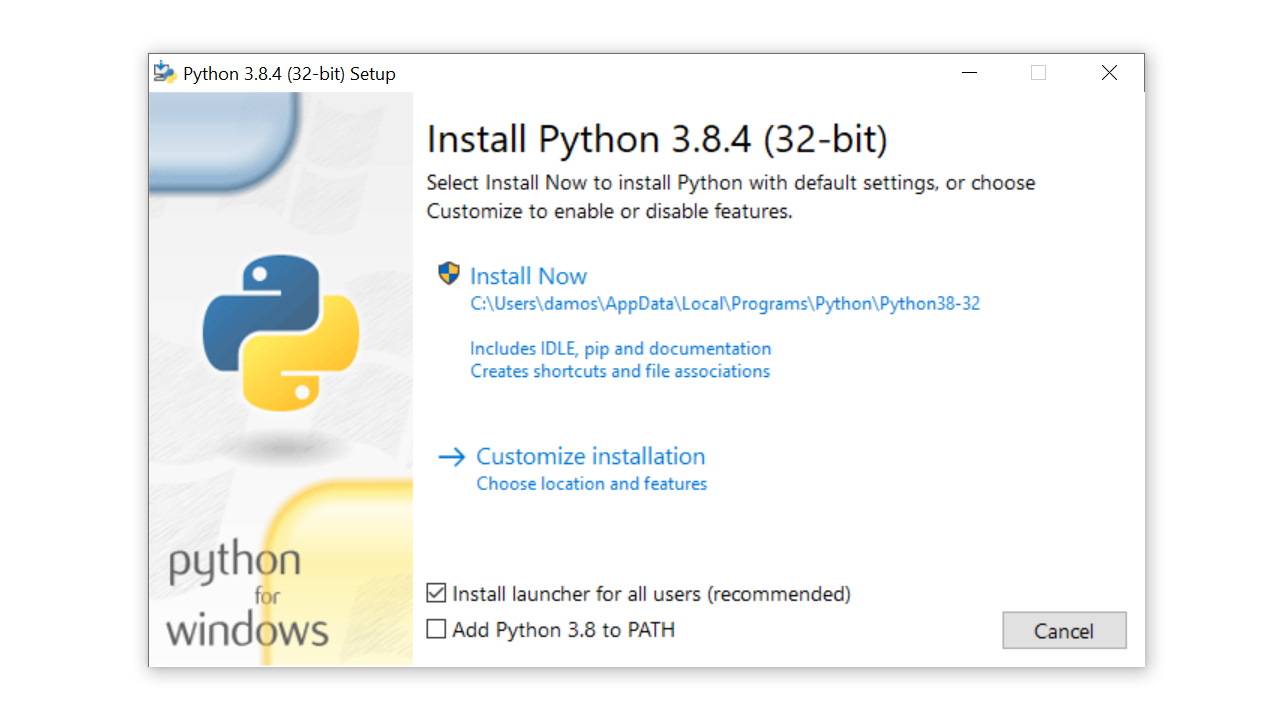
There are four things to notice about this dialog box:
-
The default install path is in the
AppData/directory of the current Windows user. -
The Customize installation button can be used to customize the installation location and which additional features get installed, including
pipand IDLE. -
The Install launcher for all users (recommended) checkbox is checked default. This means every user on the machine will have access to the
py.exelauncher. You can uncheck this box to restrict Python to the current Windows user. -
The Add Python 3.8 to
PATHcheckbox is unchecked by default. There are several reasons that you might not want Python onPATH, so make sure you understand the implications before you check this box.
The full installer gives you total control over the installation process.
Customize the installation to meet your needs using the options available on the dialog box. Then click Install Now. That’s all there is to it!
Congratulations—you now have the latest version of Python 3 on your Windows machine!
How to Install Python on macOS
Python 2 comes preinstalled on older versions of macOS. This is no longer the case for current versions of macOS, starting with macOS Catalina.
There are two installation methods on macOS:
- The official installer
- The Homebrew package manager
In this section, you’ll learn how to check which version of Python, if any, is installed on your macOS device. You’ll also learn which of the two installation methods you should use.
How to Check Your Python Version on a Mac
To check which Python version you have on your Mac, first open a command-line application, such as Terminal.
With the command line open, type in the following commands:
# Check the system Python version
$ python --version

# Check the Python 2 version
$ python2 --version

# Check the Python 3 version
$ python3 --version
If you have Python on your system, then one or more of these commands should respond with a version number.
For example, if Python 3.6.10 were already set up on your computer, then the python3 command would display that version number:
$ python3 --version
Python 3.6.10
You’ll want to get the latest version of Python if any of these conditions is true:
- None of the above commands returns a version number.
- The only version you see displayed is in the Python 2.X series.
- You have a version of Python 3 that isn’t the latest available, which was version 3.8.4 as of this writing.
What Your Options Are
There are two ways to install the official Python distribution on macOS:
-
The official installer: This method involves downloading the official installer from the Python.org website and running it on your machine.
-
The Homebrew package manager: This method involves downloading and installing the Homebrew package manager if you don’t already have it installed, and then typing a command into a terminal application.
Both the official installer and the Homebrew package manager will work, but only the official installer is maintained by the Python Software Foundation.
The distributions installed by the official installer and the Homebrew package manager aren’t identical. Installing from Homebrew has some limitations.
Limitations of Installing From Homebrew
The Python distribution for macOS available on Homebrew doesn’t include the Tcl/Tk dependency required by the Tkinter module. Tkinter is the standard library module for developing graphical user interfaces in Python and is in fact an interface for the Tk GUI toolkit, which isn’t part of Python.
Homebrew doesn’t install the Tk GUI toolkit dependency. Instead, it relies on an existing version installed on your system. The system version of Tcl/Tk may be outdated or missing entirely and could prevent you from importing the Tkinter module.
macOS Installer Recommendations
The Homebrew package manager is a popular method for installing Python on macOS because it’s easy to manage from the command line and offers commands to upgrade Python without having to go to a website. Because Homebrew is a command-line utility, it can be automated with bash scripts.
However, the Python distribution offered by Homebrew isn’t controlled by the Python Software Foundation and could change at any time. The most reliable method on macOS is to use the official installer, especially if you plan on doing Python GUI programming with Tkinter.
How to Install From the Official Installer
Installing Python from the official installer is the most reliable installation method on macOS. It includes all the system dependencies needed for developing applications with Python.
You can install from the official installer in two steps.
Step 1: Download the Official Installer
Follow these steps to download the full installer:
-
Open a browser window and navigate to the Python.org Downloads page for macOS.
-
Under the “Python Releases for Mac OS X” heading, click the link for the Latest Python 3 Release — Python 3.x.x. As of this writing, the latest version was Python 3.8.4.
-
Scroll to the bottom and click macOS 64-bit installer to start the download.
When the installer is finished downloading, move on to the next step.
Step 2: Run the Installer
Run the installer by double-clicking the downloaded file. You should see the following window:
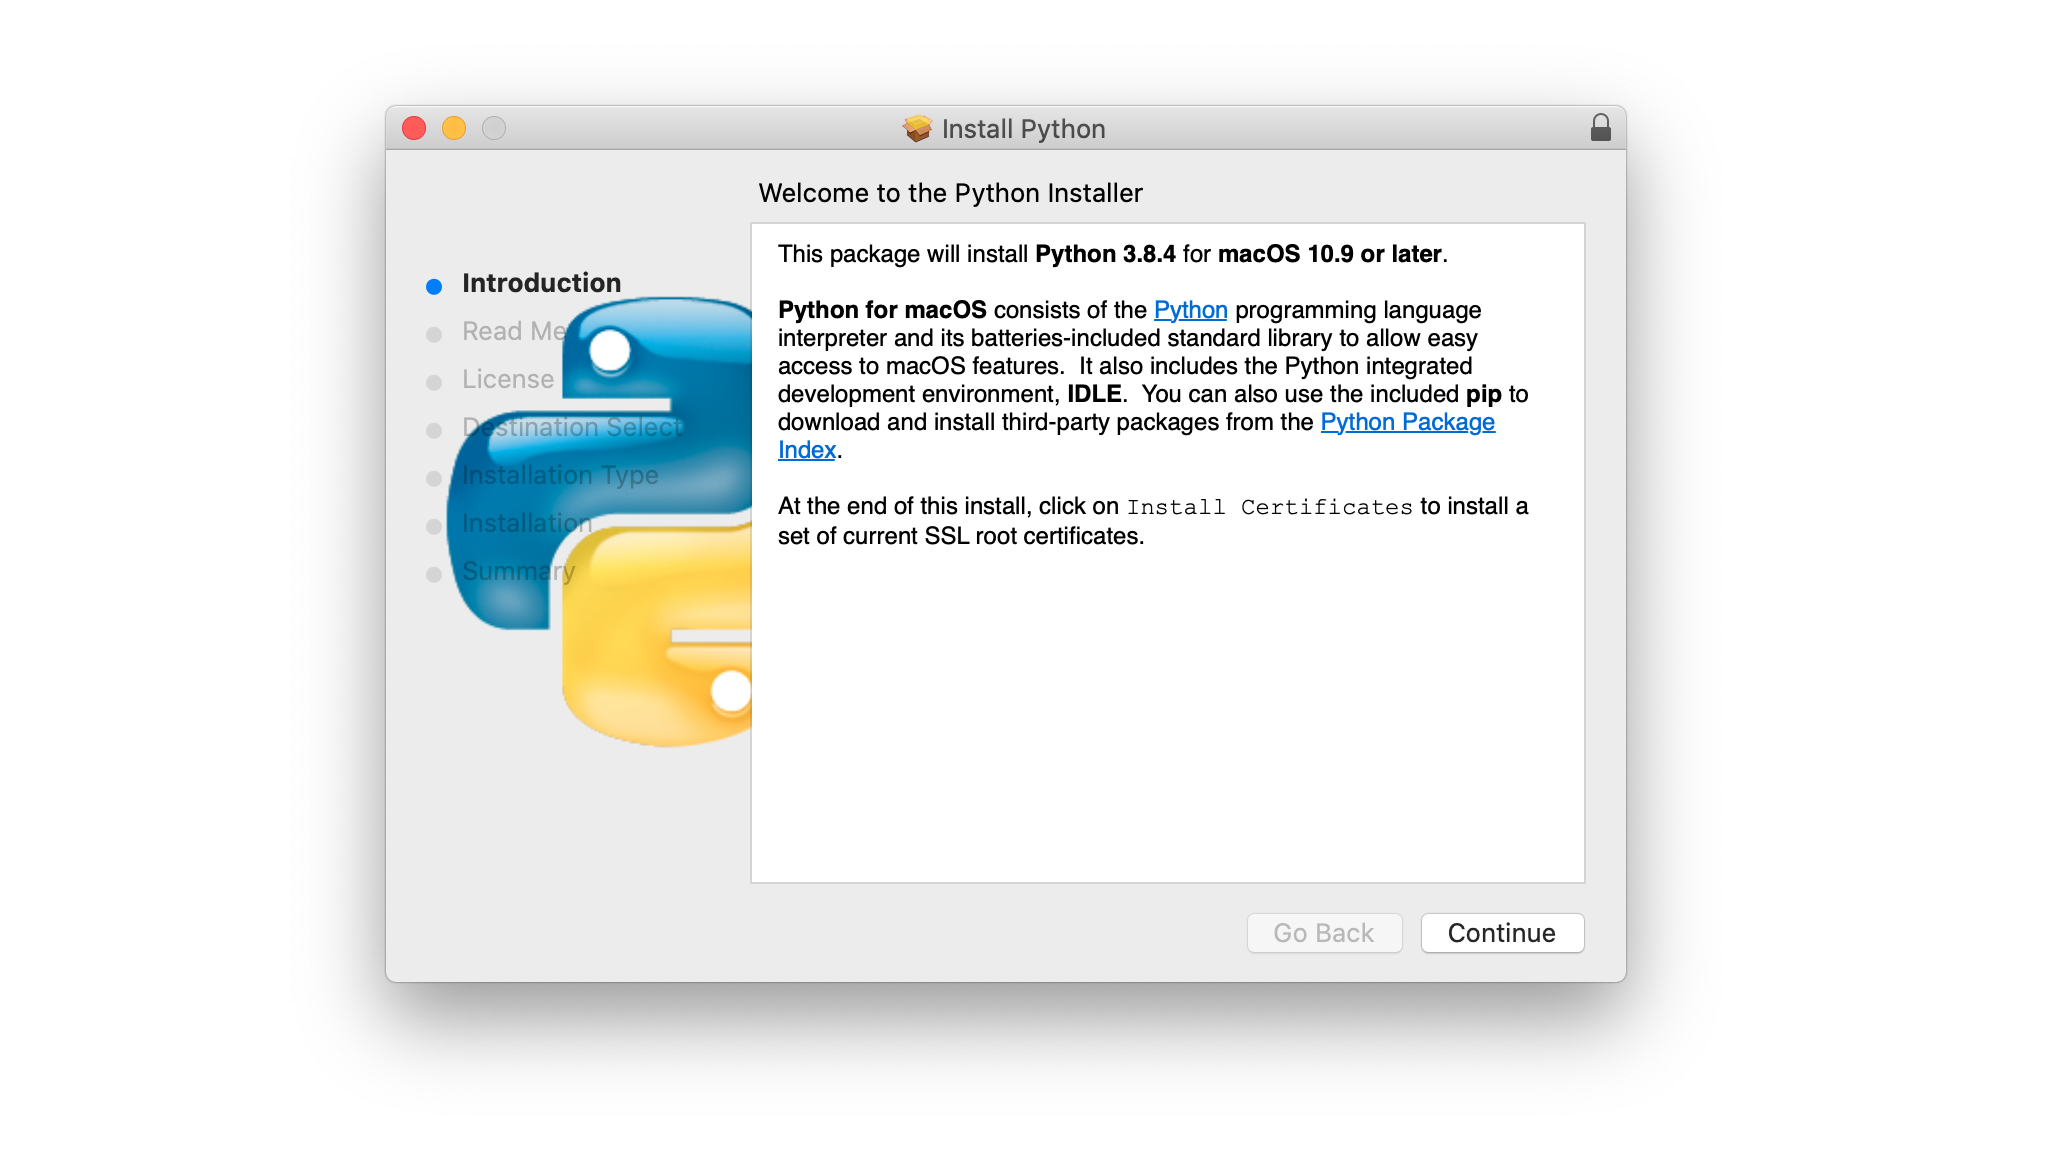
Follow these steps to complete the installation:
-
Press Continue a few times until you’re asked to agree to the software license agreement. Then click Agree.
-
You’ll be shown a window that tells you the install destination and how much space it will take. You most likely don’t want to change the default location, so go ahead and click Install to start the installation.
-
When the installer is finished copying files, double-click the Install Certificates command in the finder window to make sure your SSL root certificates are updated.
Congratulations—you now have the latest version of Python 3 on your macOS computer!
How to Install From Homebrew
For users who need to install from the command line, especially those who won’t be using Python to develop graphical user interfaces with the Tkinter module, the Homebrew package manager is a good option. You can install from the Homebrew package manager in two steps.
Step 1: Install Homebrew
If you already have Homebrew installed, then you can skip this step. If you don’t have Homebrew installed, then use the following procedure to install Homebrew:
-
Open a browser and navigate to http://brew.sh/.
-
You should see a command for installing Homebrew near the top of the page under the tile “Install Homebrew.” This command will be something like the following:
$ /bin/bash -c "$(curl -fsSL https://raw.githubusercontent.com/Homebrew/install/master/install.sh)"Highlight the command with your cursor and press Cmd+C to copy it to your clipboard.
-
Open a terminal window and paste the command, then press Enter. This will begin the Homebrew installation.
-
Enter your macOS user password when prompted.
Depending on your Internet connection, it may take a few minutes to download all of Homebrew’s required files. Once the installation is complete, you’ll end up back at the shell prompt in your terminal window.
Now that Homebrew is installed, you’re ready to install Python.
Step 2: Install Python
Follow these steps to complete the installation with Homebrew:
-
Open a terminal application.
-
Type in the following command to upgrade Homebrew:
$ brew update && brew upgrade
Installing with Homebrew is now as straightforward as running the command brew install python3. This will download and set up the latest version of Python on your machine.
You can make sure everything went correctly by testing if you can access Python from the terminal:
-
Open a terminal.
-
Type
pip3and press Enter. -
You should see the help text from Python’s
pippackage manager. If you get an error message runningpip3, then go through the install steps again to make sure you have a working installation.
Congratulations—you now have Python on your macOS system!
How to Install Python on Linux
There are two installation methods on Linux:
- Using your operating system’s package manager
- Building Python from source code
In this section, you’ll learn how to check which version of Python, if any, is on your Linux computer. You’ll also learn which of the two installation methods you should use.
How to Check Your Python Version on Linux
Many Linux distributions come packaged with Python, but it probably won’t be the latest version and may even be Python 2 instead of Python 3. You should check the version to make sure.
To find out which version of Python you have, open a terminal window and try the following commands:
# Check the system Python version
$ python --version

# Check the Python 2 version
$ python2 --version

# Check the Python 3 version
$ python3 --version
If you have Python on your machine, then one or more of these commands should respond with a version number.
For example, if you already had Python 3.6.10 on your computer, then the python3 --version command would display that version number:
$ python3 --version
Python 3.6.10
You’ll want to get the latest version of Python if your current version is in the Python 2.X series or is not the latest version of Python 3 available, which was 3.8.4 as of this writing.
What Your Options Are
There are two ways to install the official Python distribution on Linux:
-
Install from a package manager: This is the most common installation method on most Linux distributions. It involves running a command from the command line.
-
Build from source code: This method is more difficult than using a package manager. It involves running a series of commands from the command line as well as making sure you have the correct dependencies installed to compile the Python source code.
Not every Linux distribution has a package manager, and not every package manager has Python in its package repository. Depending on your operating system, building Python from source code might be your only option.
Which installation method you use mainly boils down to whether your Linux OS has a package manager and whether you need to control the details of the installation.
Linux Installation Recommendations
The most popular way to install Python on Linux is with your operating system’s package manager, which is a good choice for most users. However, depending on your Linux distribution, Python may not be available through a package manager. In this case, you’ll need to build Python from source code.
There are three main reasons that you might choose to build Python from source code:
-
You can’t download Python from your operating system’s package manager.
-
You need to control how Python gets compiled, such as when you want to lower the memory footprint on embedded systems.
-
You want to try out beta versions and release candidates of the latest and greatest version before it’s generally available.
To complete the installation on your Linux machine, find your Linux distribution below and follow the steps provided.
How to Install on Ubuntu and Linux Mint
In this section, you’ll learn how to install Python using Ubuntu’s apt package manager. If you’d like to build Python from source code, skip ahead to the How to Build Python From Source Code section.
Depending on the version of the Ubuntu distribution you run, the process for setting up Python on your system will vary. You can determine your local Ubuntu version by running the following command:
$ lsb_release -a
No LSB modules are available.
Distributor ID: Ubuntu
Description:    Ubuntu 16.04.4 LTS
Release:        16.04
Codename:       xenial
Follow the instructions below that match the version number you see under Release in the console output:
-
Ubuntu 18.04, Ubuntu 20.04 and above: Python 3.8 doesn’t come by default on Ubuntu 18.04 and above, but it is available in the Universe repository. To install version 3.8, open a terminal application and type the following commands:
$ sudo apt-get update
$ sudo apt-get install python3.8 python3-pip
Once the installation is complete, you can run Python 3.8 with the
python3.8command andpipwith thepip3command. -
Linux Mint and Ubuntu 17 and below: Python 3.8 isn’t in the Universe repository, so you need to get it from a Personal Package Archive (PPA). For example, to install from the “deadsnakes” PPA, use the following commands:
$ sudo add-apt-repository ppa:deadsnakes/ppa
$ sudo apt-get update
$ sudo apt-get install python3.8 python3-pip
Once the installation is complete, you can run Python 3.8 with the
python3.8command and runpipwith thepip3command.
Congratulations! You now have Python 3 set up on your machine!
How to Install on Debian Linux
Before you can install Python 3.8 on Debian, you’ll need to install the sudo command. To install it, execute the following commands in a terminal:
$ su
$ apt-get install sudo
$ sudo vim /etc/sudoers
After that, open the /etc/sudoers file using the sudo vim command or your favorite text editor. Add the following line of text to the end of the file, replacing your_username with your actual username:
your_username ALL=(ALL) ALL
Now you can skip ahead to the How to Build Python From Source Code section to finish installing Python.
How to Install on openSUSE
Building from source is the most reliable way to set up Python on openSUSE. To do that, you’ll need to install the development tools, which can be done in YaST via the menus or by using zypper:
$ sudo zypper install -t pattern devel_C_C
This might take a while to complete as it installs over 150 packages. Once it’s completed, skip ahead to the How to Build Python From Source Code section.
How to Install on CentOS and Fedora
Python 3.8 isn’t available in the CentOS and Fedora repositories, so you’ll have to build Python from source code. Before you compile Python, though, you need to make sure your system is prepared.
First, update the yum package manager:
Once yum finishes updating, you can install the necessary build dependencies with the following commands:
$ sudo yum -y groupinstall "Development Tools"
$ sudo yum -y install gcc openssl-devel bzip2-devel libffi-devel
When everything is finished installing, skip ahead to the How to Build Python From Source Code section.
How to Install on Arch Linux
Arch Linux is fairly diligent about keeping up with Python releases. It’s likely you already have the latest version. If not, use the following command to update Python:
When Python is finished updating, you should be all set!
How to Build Python From Source Code
Sometimes your Linux distribution doesn’t have the latest version of Python, or maybe you just want to be able to build the latest, greatest version yourself. Here are the steps you need to take to build Python from source:
Step 1: Download the Source Code
To start, you need to get the Python source code. Python.org makes this fairly straightforward. If you go to the Downloads page, then you’ll see the latest source for Python 3 at the top. Just make sure you don’t grab Legacy Python, Python 2!
When you select the Python 3 version, you’ll see a “Files” section at the bottom of the page. Select Gzipped source tarball and download it to your machine. If you prefer a command-line method, you can use wget to download the file to your current directory:
$ wget https://www.python.org/ftp/python/3.8.4/Python-3.8.4.tgz
When the tarball finishes downloading, there are a few things you’ll need to do to prepare your system for building Python.
Step 2: Prepare Your System
There are a few distro-specific steps involved in building Python from scratch. The goal of each step is the same on all distros, but you might need to translate to your distribution if it doesn’t use apt-get:
-
First, update your package manager and upgrade your packages:
$ sudo apt-get update $ sudo apt-get upgrade -
Next, make sure you have all of the build requirements installed:
# For apt-based systems (like Debian, Ubuntu, and Mint)
$ sudo apt-get install -y make build-essential libssl-dev zlib1g-dev \
       libbz2-dev libreadline-dev libsqlite3-dev wget curl llvm \
       libncurses5-dev libncursesw5-dev xz-utils tk-dev

# For yum-based systems (like CentOS)
$ sudo yum -y groupinstall "Development Tools"
$ sudo yum -y install gcc openssl-devel bzip2-devel libffi-devel
It’s fine if you already have some of the requirements installed on your system. You can execute the above commands and any existing packages will not be overwritten.
Now that your system is ready to go, it’s time to start building Python!
Step 3: Build Python
-
Once you have the prerequisites and the TAR file, you can unpack the source into a directory. Note that the following command will create a new directory called
Python-3.8.3under the one you’re in:$ tar xvf Python-3.8.4.tgz $ cd Python-3.8.4 -
Now you need to run the
./configuretool to prepare the build:$ ./configure --enable-optimizations --with-ensurepip=installThe
enable-optimizationsflag will enable some optimizations within Python to make it run about 10 percent faster. Doing this may add twenty or thirty minutes to the compilation time. Thewith-ensurepip=installflag will installpipbundled with this installation. -
Next, you build Python using
make. The-joption simply tellsmaketo split the building into parallel steps to speed up the compilation. Even with the parallel builds, this step can take several minutes: -
Finally, you’ll want to install your new version of Python. You’ll use the
altinstalltarget here to avoid overwriting the system Python. Since you’re installing into/usr/bin, you’ll need to run as root:
It might take a while to finish installation. Once it’s done, you can verify that Python is set up correctly.
Step 4: Verify Your Installation
Test that the python3.8 --version command returns the latest version:
$ python3.8 --version
Python 3.8.4
If you see Python 3.8.4, then you’re all set!
If you have some extra time on your hands, you can also run the test suite to make sure everything is working properly on your system.
To run the test suite, type the following command:
You’ll probably want to find something else to do for a while, as your computer will be running tests for some time. If all the tests pass, then you can be confident that your brand-new Python build is working as expected!
How to Install Python on iOS
The Pythonista app for iOS is a full-fledged Python development environment that you can run on your iPhone or iPad. It features a Python editor, technical documentation, and an interpreter all rolled into a single app.
Pythonista is surprisingly fun to use. It’s a great little tool when you’re stuck without a laptop and want to work on your Python skills on the go. It comes with the complete Python 3 standard library and even includes full documentation that you can browse offline.
To set up Pythonista, you need to download it from the iOS app store.
How to Install Python on Android
If you have an Android tablet or phone and want to practice Python on the go, there are several options available. The one that we found most reliably supports Python 3.8 is Pydroid 3.
Pydroid 3 features an interpreter that you can use for REPL sessions, and it also allows you to edit, save, and execute Python code.
You can download and install Pydroid 3 from the Google Play store. There is a free version and also a paid Premium version that supports code prediction and code analysis.
Online Python Interpreters
If you want to try out the examples in this tutorial without setting up Python on your machine, then there are several websites that offer an online Python interpreter:
- Python.org Online Console
- Repl.it
- Python Fiddle
- Trinket
- Python Anywhere
These cloud-based Python interpreters may not be able to execute some of the more complex examples in this tutorial, but they’re adequate for running most of the code and may be a nice way to get started. More information on using these sites is presented in the next tutorial in this series.
Conclusion
Congratulations! You now have access to the latest version of Python for your system. Your Python journey is just beginning.
In this tutorial you’ve learned how to:
- Check which version of Python, if any, is installed on your system
- Install the latest version of Python on Windows, macOS, and Linux
- Use Python on mobile devices like phones or tablets
- Use Python on the Web with online interpreters
You’re now ready to get started programming in Python! Be sure to share your progress and any questions you may have in the comments below.
Watch Now This tutorial has a related video course created by the Real Python team. Watch it together with the written tutorial to deepen your understanding: Python Basics: Setting Up Python