Ошибка 0x0000007B (INACCESSABLE_BOOT_DEVICE) при загрузке компьютеру указывает на то, что Windows не может получить доступ к загрузочному диску из-за отсутствия необходимого драйвера или повреждения носителя.
Администратор может столкнуться с ошибкой 0x0000007B в следующих случаях:
- При восстановлении Windows из бэкапа на другой физический компьютер или виртуальную машину Hyper-V, VMware или VirtualBox (как частный случай восстановление из Bare Metal Recovery на другое железо);
- После переносе (клонировании) Windows на новый диск или новый компьютер;
- При миграции физической системы с помощью создании образа компьютера (например, с помощью disk2vhd) и разворачивании из этого vhd образа новой виртуальной машины;
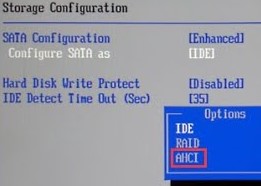
- При переключении режима работы SATA контроллера в BIOS с AHCI на IDE/RAID, или наоборот (в этом случае достаточно открыть настройки BIOS и вернуть исходный режим SATA);

- При замене материнской платы и / или контроллера жесткого диска;
- После обновления BIOS/UEFI или смене настроек.
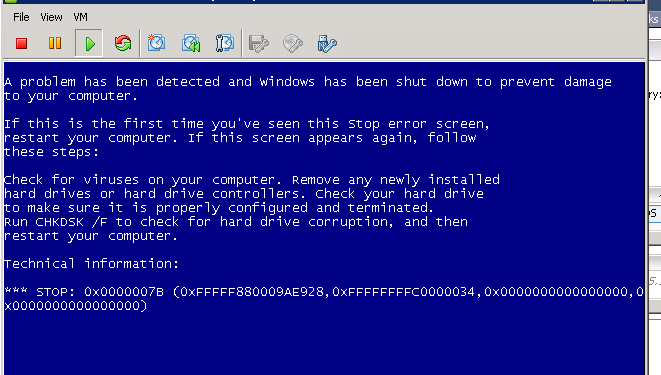
Чаще всего я сталкивался с ошибкой 0x7b после конвертации физического компьютера с Windows Server 2008 R2/ Windows 7 в виртуальную машину с помощью VMware vCenter Converter. После окончания конвертации Windows на новой ВМ не загружается и на экране появляется BSOD со стоп-кодом:
STOP: 0x0000007B (0xFFFFF880009A9928, 0xFFFFFFFFC0000034, 0x0000000000000000, 0x0000000000000000).
Ошибка INACCESSABLE_BOOT_DEVICE в этом случае вызвана тем, что контроллер жесткого диска нового сервера (компьютера или виртуальной машины) отличается от исходного оборудования. Например, в большинстве гипервизоров для подключения дисков по умолчанию используется SCSI или SAS контроллер, который обычно отключен в исходном образе Windows. Т.е. драйвер lsi_sas.sys установлен, но служба, которая его запускает – отключена. В результате операционная системе не может загрузить необходимый драйвер и загрузка Windows прерывается с BSOD.
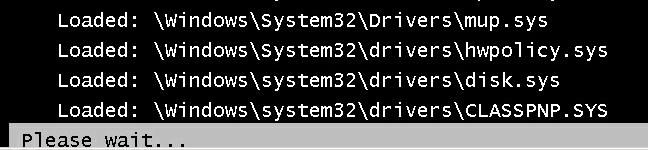
В режиме отладки видно, что загрузка Windows останавливается на этапе загрузки драйвера CLASSPNP.SYS.
Для исправления проблемы, нужно загрузиться с установочного диска/ USB флешки с Windows или загрузочного диска (например, MsDaRT). Если вы загрузили компьютер с установочного диска, нужно на первом экране начала установки (выбор языка и раскладки клавиатуры) нажать сочетание клавиш Shift+F10. Должно открыться окно командной строки, в котором нужно выполнить команду:
Regedit.exe
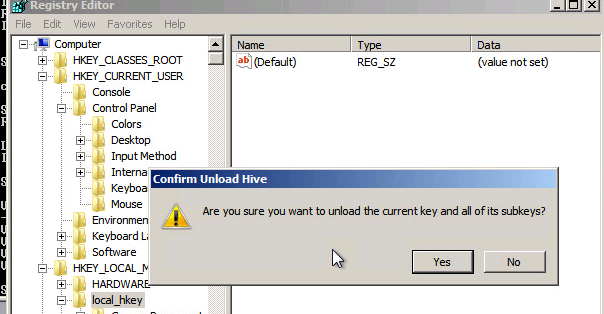
В открывшемся окне редактора реестра выберите на раздел HKEY_LOCAL_MACHINE и нажмите меню File -> Load Hive. На локально диске сервера (не перепутайте его с диском со средой WinPE) выберите файл \Windows\System32\config\SYSTEM. В этом файле хранится системная часть реестра вашей Windows.
Эти действия смонтируют в редактор реестра куст реестра вашей системы с жесткого диска. Укажите временное имя новой ветки (например, local_hkey).
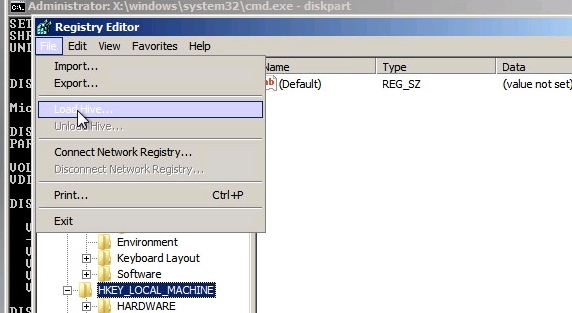
В загруженной ветке перейдите в раздел HKEY_LOCAL_MACHINE\local_hkey\ControlSet001\services\.
Найдите следующие ключи реестра:
- Atapi
- Intelide
- LSI_SAS
В каждом из этих ключей найдите параметр типа REG_DWORD с именем Start и измените его значение на 0 (0x00000000).
Примечание. Значение Start=0, означает что данная служба (и соответвующий драввер) будут загружаться при загрузке Windows. Start=3 – ручной запуск службы.
Если перед возникновением проблемы вы переключили режим работы SATA контроллера на AHCI, нужно также в разделе msahci установить Start=0 (см. статью Как включить AHCI в Windows без переустановки).

Для сохранения изменений в файле реестра на диске нужно выбрать ваш HKEY_LOCAL_MACHINE\local_hkey и в меню выбрать Unload Hive.
Теперь можете перезагрузить сервер в обычном режиме. Windows должна загрузится нормально, при загрузке будет выполнен автоматический поиск и установка драйверов для нового контроллера диска.
Если после данных изменений ваша Windows так и не загрузилась с той же ошибкой INACCESSABLE_BOOT_DEVICE, значит у вас используются какой-то другой тип контроллера. Попробуйте в ветке HKEY_LOCAL_MACHINE\local_hkey\ControlSet001\services изменить значение параметра Start в соответствии с таблицей.
| Служба Windows | Виртуальная машина VMWare или HyperV | Физический ПК с Windows x64 с нативным SATA адаптером | Физический ПК с RAID контроллером |
| aliide | 3 | 3 | 3 |
| amdide | 3 | 3 | 3 |
| atapi | 0 | 0 | 0 |
| cmdide | 3 | 3 | 3 |
| iastorv | 3 | 3 | 3 |
| intelide | 0 | 3 | 3 |
| msahci | 3 | 0 | 0 |
| pciide | 3 | 0 | 3 |
| viaide | 3 | 3 | 3 |
| LSI_SAS | 0 | 3 | 3 |
Ручная установка драйвера при возникновении ошибки INACCESSABLE_BOOT_DEVICE
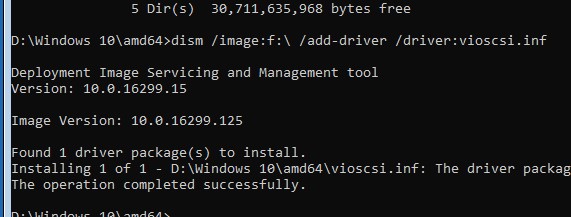
Вы можете вручную установить драйверы в ваш офлайн образ Windows. Например, после выполнения миграции хоста через P2V вы можете установить в офлайн образ драйвер для VMware SCSI Disk Controller или драйвер VirtIO (для KVM виртуализации). Для этого скопируйте необходимые драйвера на загрузочную USB флешку и загрузитесь с нее.
Для установки драйвера в офлайн образ Windows (в этом примере он находитмя на диске F:), выполните команду:
dism /image:f:\ /add-driver /driver:vioscsi.inf
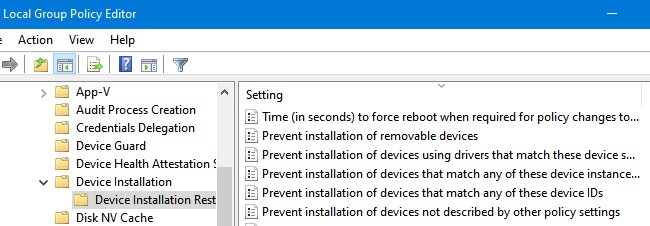
В некоторых организациях настроены групповые политики, которые ограничивают установку сторонних драйверов в Windows. Например, с помощью следующих параметров в разделе Computer Configuration -> Administrative Templates -> System -> Device Installation -> Device Installation Restrictions:
- Prevent installation of devices that match any of these device IDs
- Prevent installation of devices using drivers that match these device setup classes
- Prevent installation of removable devices
- Prevent installation of devices not described by other policy settings.
Если эти политики включены, Windows не сможет выполнить автоматическую установки драйвера контроллера. В этом случае нужно
- Загрузить с диска ветку реестра \Windows\System32\config\SYSTEM (как описано выше);
- Затем перейдите в ветку
HKEY_LOCAL_MACHINE\local_hkey\System\ControlSet001\Control\PnP - Измените значения параметров реестра DisableCDDB и DontStartRawDevices на 0
- Выгрузите куст реестра и перезагрузите компьютер.
Операционные системы Windows XP и 7, несмотря на прекращение официальной поддержки со стороны компании Microsoft, и довольной мощной рекламной кампании относительно десятки, продолжают занимать лидирующие позиции на рынке операционных систем. Их надёжность проверена годами и доказана миллионами довольных пользователей. Тем не менее, даже при их использовании могут возникать ошибки, мешающие полноценной работе.

Одна из них — ошибка 0x0000007b, в результате чего появляется так называемый синий экран смерти, компьютер не реагирует на ваши действия от слова «совсем». Единственный выход — перезагрузка, но и она в таких случаях не помогает. Чаще всего возникает проблема при переустановке Windows XP или 7, и проявляет себя при загрузке системы, хотя это может произойти и при других ситуациях. Примечательно то, что ситуация может повториться даже на новом компьютере или ноутбуке.
В этой статье рассмотрим, по каким причинам возникает ошибка 0x0000007b при установке Windows XP или Windows 7, а также все способы решения. Если вы всё прочтёте и будете внимательно следовать инструкциям, у вас без проблем получится всё исправить.
Причины появления ошибки
На самом деле причин, по которым возникает синий экран с ошибкой stop 0x0000007b, довольно-таки много. Причём все они прямо зависят от того, какую операцию в этот момент вы выполняете. Единственное, что между ними общего, это установка Windows XP, а также запуск этой версии или более новой Windows 7. Итак, что может быть причиной проблемы?
При запуске системы:
- Повреждение важных системных файлов, отвечающих за запуск системы.
- Вирусы, которые могут проникать в систему очень глубоко и влиять на работу системы.
- Физический дефект жёсткого диска компьютера или ошибки в его работе.
- Вставленная в USB-разъём флешка.

Так выглядит ошибка 0x0000007B
При установке системы:
- Некорректные установки BIOS, из-за чего происходит сбой.
- Некорректная работа драйверов, использующихся в контроллере загрузки. Если они повреждены, контроллер попросту не может выполнить процедуру установки Windows до конца.
- Отсутствует поддержка жёсткого диска или контроллера SCSI устанавливаемой операционной системы. Может быть на современных моделях компьютеров или ноутбуков, так как XP уже считается устаревшей.
Способы решения
Во время запуска системы
Запуск последней рабочей конфигурации
Поскольку сбой может быть временным и случайным, в Windows 7 и XP можно очень просто вернуться к последней рабочей конфигурации. Что это значит? Во время работы система в специальный раздел на жёстком диске копирует рабочие файлы, отвечающие за запуск системы и её полноценную работу. Также время от времени создаётся образ рабочего состояния системы, при котором всё работает должным образом. На жёстком диске хранятся несколько таких образов. При каждом запуске компьютера система автоматически выбирает самый последний и со временем более старые настройки удаляются. Поэтому, если при запуске возникает ошибка 0x0000007b, попробуйте открыть последнюю рабочую настройку.
Для этого во время запуска операционной системы, нажмите кнопку F8, чтобы выйти в меню загрузки. Для того чтобы запустить этот режим наверняка, и не прозевать момент, нажмите кнопку несколько раз. Вы увидите список вариантов загрузки: безопасный режим, ведение журнала загрузки, режим отладки и другие. Вам нужно выбрать «Последняя удачная конфигурация (дополнительно)». Если всё пройдёт успешно, начнётся нормальная загрузка Windows. Если же этого не произошло, этот способ вам не поможет, поэтому попробуйте один из следующих.
» Windows")
Выбираем «Последняя удачная конфигурация (дополнительно)»
Проверка диска на ошибки
Жёсткий диск — не самый надёжный компонент вашего компьютера, особенно если он не твёрдотельный. Он имеет движущиеся механизмы, состоит из магнитной поверхности и считывающей головки. Если вы пользуетесь ноутбуком и часто работаете на нём прямо на ходу, возможно, даже в транспорте, возможны повреждения некоторых секторов жёсткого диска. Если будет повреждён сектор, на котором записаны системные файлы, необходимые для работы Windows 7 или XP, запуск будет невозможным. Чтобы убедиться в том, работает ли ваш жёсткий диск с ошибками или возможна ещё какая-либо причина, потребуется воспользоваться фирменной утилитой проверки жёсткого диска. Но как его открыть, если Windows не запускается?
- На другом компьютере загрузите установочный файл Windows 7 или XP и запишите его на диск или флешку. Обращаем ваше внимание на то, что Windows XP лучше всего будет работать с диска, тогда как в случае использования семёрки можно воспользоваться и флешкой.
- Зайдите в настройки BIOS и выставьте загрузку с вашего носителя в качестве приоритетного. Для этого вам нужно найти пункт настроек Boot Device Priority или First Boot Device. Также можно во время загрузки нажать на клавиатуре F11 или F12, и выбрать ваш диск или флешку из списка. В этом случае настройки БИОСа менять не придётся.
- После того как начнётся загрузка с диска, перейдите в Диагностика — Дополнительные параметры — Командная строка, после чего введите в открывшемся окне команду chkdsk /f/r. Она проведёт полную проверку жёсткого диска вашего компьютера или ноутбука на наличие ошибок, а также, при возможности, исправит ошибки и восстановит данные.

Команда chkdsk /f/r
- После окончания процедуры вам будет предложено перезагрузиться в обычном режиме. Не забудьте достать загрузочные флешку или диск, а также, если вы меняли настройки BIOS, вернуть их на первоначальные.

Обычно такой проверки вполне достаточно для восстановления работоспособности. Если же диск повреждён настолько сильно, что стандартное средство Windows не может справиться с проблемой, попробуйте воспользоваться специализированным программным обеспечением для реанимации жёстких дисков. Если же проблемы не были обнаружены, но ошибка 0x0000007b повторяется, попробуйте следующий способ.
Проверка на вирусы
Некоторые вредоносные файлы настолько коварны и опасны, что проникают глубоко в системный раздел Windows и повреждают системно важные компоненты, в результате чего возникает ошибка 0x0000007b. Если предыдущие два способа вам ничем не помогли, попробуйте провести проверку на наличие вирусов, загрузив компьютер в безопасном режиме. Вот пошаговые действия, которые необходимо для этого выполнить:
- На другом, работающем нормально компьютере, скачайте бесплатный антивирусный сканер и запишите его на флешку. Одним из лучших вариантов такого антивируса является Dr. WebCureIt. Подробнее о том, как создавать флешку с портативным антивирусом, читайте на нашем сайте в этой статье.
- При запуске компьютера несколько раз нажмите кнопку F8, чтобы запустить режим загрузки системы.
- Выберите пункт «Безопасный режим».

Выбираем пункт «Безопасный режим»
- Вставьте флешку с антивирусом, запустите его и проведите тщательную проверку всей системы.
- Загрузите Windows в обычном режиме.

При установке Windows XP
Неправильные настройки BIOS
Наиболее частой причиной, по какой вас может беспокоить ошибка 0x0000007b при установке Windows XP, является неправильно выставленный режим работы винчестера. Дело в том, что всё современные подключается по интерфейсу SATA, который обеспечивает надёжность и высокую скорость передачи данных, и использует современный стандарт ACHI, который позволяет задействовать все возможности SATA. Сама же Windows XP не поддерживает этот стандарт, так как в те времена его ещё не существовало. Соответственно, из-за этой несовместимости и происходит ошибка 0x0000007b при установке Windows XP и выходит синий экран.
Для возвращения работоспособности в настройках BIOS выставьте по умолчанию режим IDE, который будет работать в режиме совместимости с SATA. Где находится этот пункт настроек? Как выставить нужный параметр?
- Включите компьютер и перейдите в BIOS. Зависимо от производителя ноутбука или материнской платы системного блока, клавиши или их комбинации, которые нужно нажимать для перехода в BIOS, может отличаться. Чаще всего это F2, Del, Esc.
- Зависимо от используемого типа БИОСа расположение меню может несколько отличаться. Вот что может потребоваться нажать:
- Главное меню — Advanced — OnChip SATA Type — Native IDE — F10 для сохранения настроек.
- Главное меню — Advanced — IDE Configuration — Compatible — F10 для сохранения настроек.
- Главное меню — Main — SATA Mode — IDE Mode — F10 для сохранения настроек.
- После активации режима повторите установку Windows XP.
Отсутствие драйвера контроллера
Windows XP известна своими сборками от различных программистов, которые либо вырезают некоторые компоненты для облегчения образа и возможности работы даже на старых и очень слабых системах, либо встраивают дополнительное программное обеспечение. При использовании обрезанных сборок очень часто можно столкнуться с тем, что в них отсутствует необходимый драйвер контроллера, из-за которого обрывается установка XP и выбивается синий экран с ошибкой.
Единственно верным решением будет загрузка другого образа операционной системы с уже встроенным драйвером. Для этого можно поискать другую сборку на торрент-трекерах и внимательно ознакомиться с описанием.
Заключение
Теперь вы знаете, как бороться с ошибкой 0x0000007b при установке или запуске Windows 7 или Windows XP. Мы описали наиболее часто встречающиеся причины её возникновения, а также наиболее действенные методы решения. Если же всё равно ничего не помогло, синий экран продолжает выскакивать, то стоит задуматься над покупкой нового компьютера или ноутбука либо же попросту полностью переустановить систему, скачать чистый и оригинальный образ. В комментариях просим вас указать, получилось ли у вас избавиться от проблемы по нашим рекомендациям.
«Last Friday, I tried to install a small free software tool in my Windows 7 computer, and it was almost finished. Then Windows popped up a message, telling me that the installation was almost finished and I should reboot Windows to keep the change. It also mentioned that an unknown error had occurred so that I must restart my computer to fix the error.
Yes, then the BSOD with the error code «0x0000007B» occurred to my PC. Windows 7 failed to boot, and I tried several times. It just wouldn’t enter the Windows screen. Does anyone know how to fix this problem in Windows 7? I need your help!»
Have you ever encountered the blue screen of death in Windows system with the 0x00000007B error code shown on your PC? Having a boot loop in Windows 7 that the computer cannot loathe d system with an error code — 0x0000007B? Don’t know how to fix this error? Relax! All these troubles can all be fixed in this article. Here we’ll provide you with complete solutions to guide you to fix the 0x0000007B issue with blue screen error on Windows 7 without any obstacles.
If you are not quite familiar with Windows system and don’t know quite much about Windows system management jobs, it’s highly recommended for you to follow Solution 1 to get the error fixed.
If you prefer 100% free method, you may follow Solution 2, 3 and 4 to get troubles fixed. Let’s see the detailed method to solve Windows 7 BSOD with 0x0000007B error code error now.
Solution 1: Fix Windows 7 boot loop via bootable disk
The fastest and most effective method to fix Windows 7 boot loop with 0x0000007B BSOD error is to use a bootable disk to reboot Windows and restore it into a healthy state.
To do this, you shall create a WinPE bootable disk from a healthy PC and then reboot Windows 7 with the 0x0000007B error from the bootable disk. How to create a bootable disk? Professional partition manager software such as EaseUS Partition Master can help. Follow the guide to use this tool to fix boot loop on Windows 7.
Step 1. Start EaseUS Partition Master after connecting the external drive/USB to your computer, go to «Bootable Media,» and click «Create bootable media.»

Step 2. Select an available USB Drive or CD/DVD and click «Create.» You can also burn the Windows ISO file to the storage media.

Step 3. Connect the created bootable drive to the new computer and reboot the computer by pressing and holding F2/Del to enter the BIOS. Then, set the WinPE bootable drive as the boot disk and press F10 to exit.
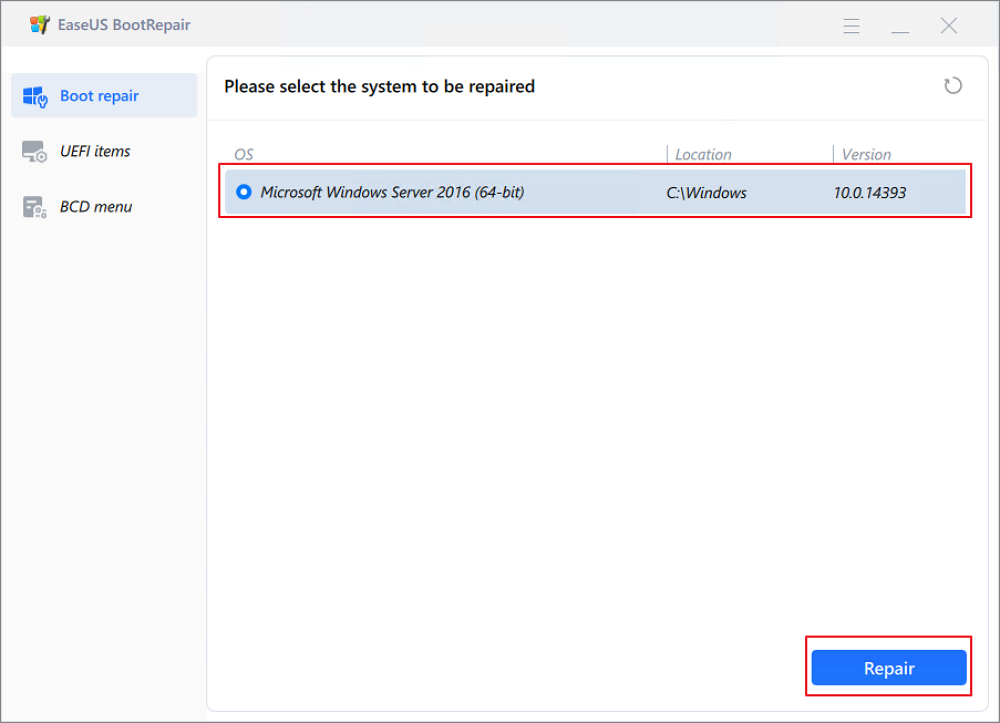
Step 4. Boot the computer again and enter the WinPE interface. Then, open EaseUS Partition Master and click «Boot Repair» under the «Toolkit» option.
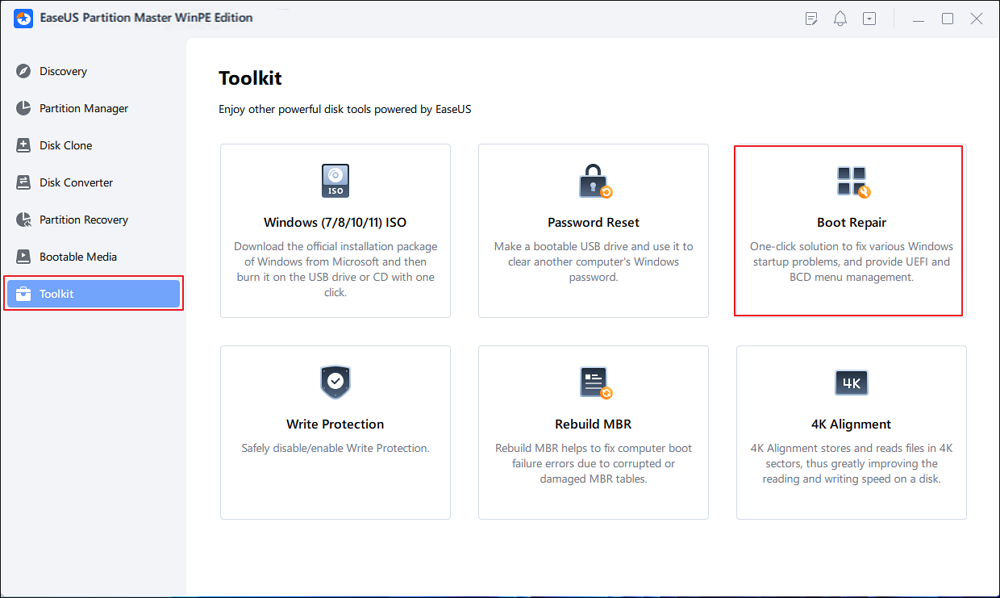
Step 5: Select the system you want to repair and click «Repair.»
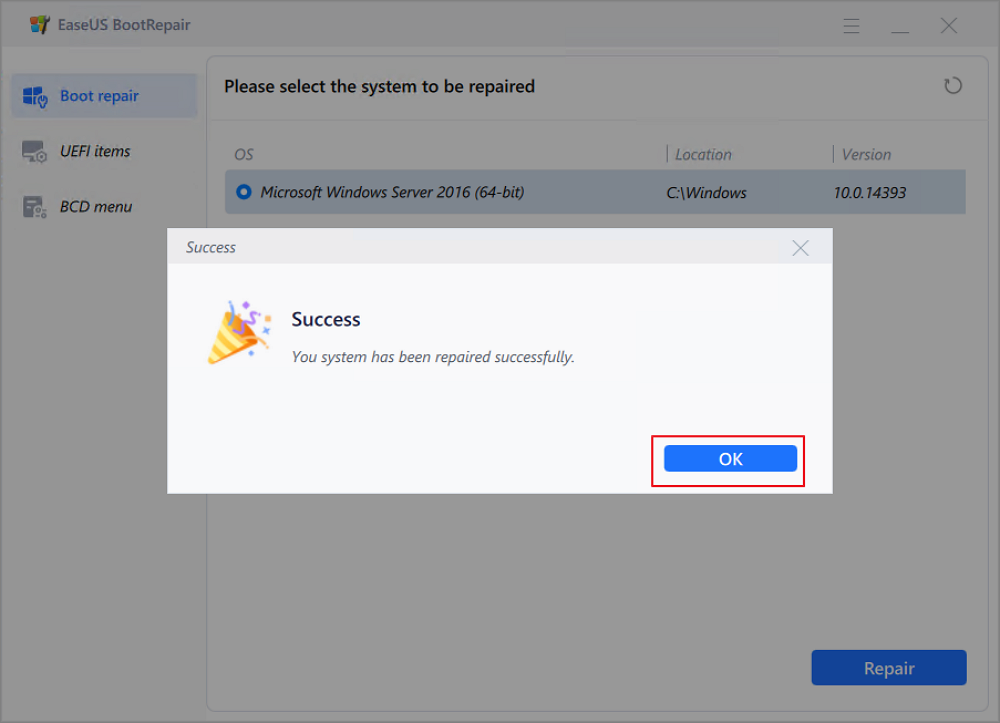
Step 6. Wait a moment, and you will receive an alert that the system has been successfully repaired. Click «OK» to complete the boot repair process.
It supports to create a bootable disk and fix dead PC into a healthy state with ease. You can just free download it and follow the steps to solve Windows 7 BSOD with 0x0000007B error code with ease now:
Data loss trouble in Windows system with 0x0000007B might be unavoidable, and you don’t need to worry at all. Professional data recovery software — EaseUS Data Recovery Wizard can help you restore all lost data due to system error with its Deep Scan mode.
Solution 2: Solve 0x0000007B error by changing Windows Configuration
Step 1: Shut down PC and reboot PC by press the «Power» button > Press «F2» while PC is booting up.
Step 2: Enter BIOS and change «SATA Operation» from AHCI to ATA in Advanced option.
Step 3: Save changes by selecting «Yes».
Step 4: Press «F10» continuously till a window pops up with the message: Save configuration and reset? > Select «Yes».
Step 5: Then you’ll see a Setup Window, and you can follow the guide to setup Windows again:
- To set up Windows now, press «Enter».
- To repair Windows installation using Recovery Console, press «R».
- To quit Setup without installing Windows, press «F3».
If you need to get Windows 7 back immediately and get rid of 0x0000007B from your PC, the first option shall work.
Solution 3: Fix 0x0000007B error via Windows installation media
Step 1: Set USB as a Windows installation drive in advance and connect it with PC.
Step 2: Restart PC and press «F12» continuously till the «Boot Windows» menu shows up.
Step 3: Select your USB as the boot drive to try to reboot Windows.
Step 4: If it fails, reboot PC and press «F2» to enter BIOS.
Step 5: Set «SATA Mode» from AHCI to IDE > Save changes and reboot.
Step 6: Choose to load Windows from USB flash drive, and you’ll enter a Windows Setup window with below choice:
- To set up Windows now, press «Enter».
- To repair Windows installation using Recovery Console, press «R».
- To quit Setup without installing Windows, press «F3″.
A fast move to get 0x0000007B blue screen problem solved in your PC is to select the first option and press Enter to setup Windows 7 now.
Solution 4: Extract old PC data and reinstall Windows system to fix the matter
If none of the methods works to help you out, you may just try this method to directly reinstall Windows system on your PC. Don’t worry about losing data. The two steps below will help to solve all your worries and get problems fixed with ease:
Step 1: Extract old PC data first.
You can either choose to remove the hard drive to a new PC and extract data or to use EaseUS Todo Backup to create an emergency disk in the USB drive to reboot the PC with 0x0000007B error and backup your present PC data.
Step 2: Reinstall the Windows system to fix the 0x0000007B error.
- Go to the Microsoft website and download a Windows 7 system image for your PC.
- Install the image in your USB drive and connect it with a PC.
- Press «Del» to enter BIOS and set USB as the boot media.
- Load system and follow the onscreen guide to install Windows in your PC to get 0x0000007B error code fixed.
Don’t worry about having BSOD with error code 0x0000007B in Windows 7 anymore. If you are having a similar problem in other Windows systems such as Windows 10 or 8, you can also follow this article to get your problem solved.
If you still have a problem, watch this video:
It is very annoying to meet the stop error 0x0000007b when you boot your computer, and this error is often accompanied by Blue Screen of Death. But luckily, this post offered by MiniTool Solution has gathered multiple efficient methods to fix the error.
When you use the Windows operating system, it is very common to meet different Windows update errors such as 0x80240017 and BSOD such as MACHINE CHECK EXCEPTION. So what will you do if you meet the BSOD 0x0000007B at Windows startup? Keep reading, and then you can know how to fix error 0x0000007B.
What Causes the BSOD 0x0000007B?
The STOP 0x0000007B error often occurs on Blue Screen of Death. So what causes the BSOD 0x0000007B? The causes are shown below:
- Missing or corrupted bootloader files.
- Incorrect BIOS configuration.
- Boot sector virus.
- Damaged Registry.
- Corrupted EFI bootloader.
- Hard drive failure.
And this error may appear on any of Microsoft’s Windows operating system such as Windows 10, Windows 8, Windows 7, Windows Vista, Windows XP, Windows 2000, and Windows NT.
How to Fix the BSOD 0x0000007B?
Since there are multiple causes of the stop error 0x0000007B, there are also many possible methods to fix the error.
Method 1: Restart Your PC
When you encounter the stop error code 0x0000007B, there is a message showing on the screen: “If this is the first time you’ve seen this Stop error screen, restart your computer.” Therefore, restarting your computer may help you to get rid of the error.
Sometimes, the error 0x0000007B may be just a fluke so that your computer failed to boot correctly. Thus, you give the chance to your PC to boot correctly by rebooting your PC. But if this doesn’t work, then you can try the following methods.
Method 2: Boot Your Computer to Last Known Good Configuration (Advanced)
If you meet the BSOD 0x0000007B on Windows 7 or Windows Vista, then you can boot your computer to Last Known Good Configuration (advanced). Here is the tutorial:
Step 1: Restart your computer and then wait for the screen with the logo of the manufacturer to pass.
Step 2: Repeatedly press F8 (or another button/button combination) as soon as the logo disappears.
Step 3: Choose the Last Known Good Configuration (advanced) option in the Advanced Boot Options window.
Step 4: Press Enter and wait for the process to complete.
After you have booted your computer to Last Known Good Configuration, then the 0x0000007B error should be fixed.
Method 3: Run a Full Virus Scan
You may encounter the BSOD 0x0000007B when your computer is infected with a boot-sector virus, so you can run a virus scan on your computer to get rid of the error. Here is a quick guide on how to do that:
Step 1: Boot your computer into Safe Mode and then launch your third-party antivirus software. And you should make sure that your antivirus software is up to date.
Tip: If there is no third-party antivirus tool on your computer, then it is recommended to boot your computer into Safe Mode with the Internet so that you can download antivirus software.
Step 2: Run a complete virus scan on your entire computer. And if there is any virus on your computer, remove them using your third-party antivirus tool.
Step 3: Restart your computer to check if the error 0x0000007B disappears.
Method 4: Run the System File Checker Tool
Sometimes, missing or corrupted system files could be the culprit of the 0x0000007B error, therefore, you are supposed to run the System File Checker tool. Here is the tutorial:
Step 1: Boot your computer into Safe Mode. Type cmd in the Search bar and then right-click Command Prompt to choose Run as administrator.
Step 2: Type sfc /scannow in the popped up window and then press the Enter key.
Tip: You can also do this by using a Windows recovery disk. To access Command Prompt, go to the path Repair your computer > Troubleshoot > Advanced options > Command Prompt.
Step 3: Let the System File Checker finish and then restart your computer to see if the 0x0000007B error is gone.
Method 5: Run the CHKDSK Tool
If running the SFC tool doesn’t work, then you should try to use the built-in Windows CHKDSK tool to scan the disk. Here is the instruction to run the CHKDSK tool:
Step 1: In Windows Safe Mode, run Command Prompt as an administrator.
Step 2: Type chkdsk c: /r in the window and then press the Enter key. (c is the letter of the drive where you save your system).
Note: If you receive a message saying that “Chkdsk cannot run because the volume is in use by another process. Would you like to schedule this volume to be checked the next time the system restarts” in the Command Prompt window, then type Y on the keyboard.

Step 3: Restart your computer to make the command take effect and then check if the error happens again.
Method 6: Change the Hard Disk Controller Option from the BIOS
If you suffered hard drive controller errors, then the stop code 0x0000007B will appear, therefore, you can change the hard disk controller option from the BIOS.
After entering BIOS, you should change the option from AHCI Mode to IDR Mode or vice versa.
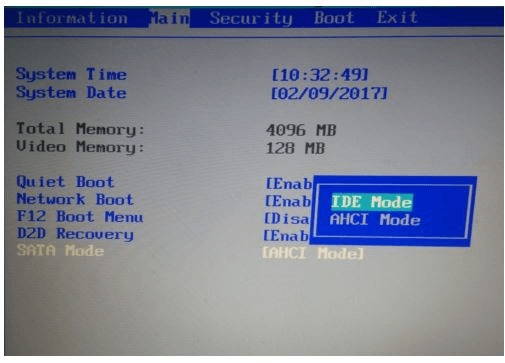
After changing the hard disk controller option, the 0x0000007B error should disappear.
Method 7: Run the System Restore
If you have created a system restore point, then you can run System Restore to get rid of the 0x0000007B error. System Restore is a powerful utility for Windows that allows you to undo certain changes to your computer and revert to a previous normal state.
If you want to get detailed instructions to run the System Restore, then it is recommended to read this post – What Is System Restore Point and How to Create It? Look Here!
Method 8: Fix the MBR
If there is a corrupted master boot record, then it is possible for you to meet the 0x0000007B error. MBR plays an important role when you boot your computer and once MBR is damaged or corrupted, your computer may suffer different serious problems.
Hence, if you meet the stop code, what you should do is to fix the MBR. Then how to fix the MBR? Simple instructions are here.
Step 1: Boot your computer to Windows RE, and then navigate to Troubleshoot > Advanced options > Command Prompt.
Step 2: Type the following commands one by one if you are using Windows 8/10:
- bootrec /fixmbr
- bootrec /fixboot
- bootrec /scanos
- bootrec /rebuildbcd
You can get detailed information from this post – Step-by-Step Guide to Repair and Fix MBR Windows 7/8/8.1/10.
Method 9: Clear the CMOS
You may meet the error code 0x0000007B due to the BIOS memory issue, therefore, you can clear the CMOS to get rid of the error. And if this method still cannot solve the problem, then you should try the following methods.
Method 10: Run Start-up/Automatic Repair
You can also perform the Start-up Repair to deal with the stop error code 0x0000007B. Here is the tutorial:
Step 1: Boot your computer to Windows RE, click Troubleshoot and then click Advanced options.
Step 2: On the Advanced options screen, click Automatic Repair or Start-up Repair.

Step 3: Let the process finish and then reboot your computer to check if the error is fixed.
Method 11: Perform a Clean Installation of Windows
If all the methods above cannot help you get rid of the error 0x0000007B, then you can only try to perform a clean installation of Windows. But you should know that you will lose all the files, folders and settings related to your system on your computer if you perform this method.
Therefore, backing up your important data is very necessary before you adopt this method.
Back up Your Important Files
How to back up data quickly and safely? You should use MiniTool ShadowMaker to do it. It is a piece of effective and professional backup and restore software.
MiniTool ShadowMaker is capable of backing up files and folders, disks and partitions, and even the system to different locations. And it is easy to restore backup image files using the Restore feature.
In addition to the Backup feature, the Sync feature is also very convenient when you want to sync files and folders to different locations. And the Clone Disk can help you to make a bootable external hard drive. What’s more, this software allows you to try it for free within 30 days, so why don’t you download it and have a try?
MiniTool ShadowMaker TrialClick to Download100%Clean & Safe
Here are the steps to back up your data:
Step 1: Install and launch MiniTool ShadowMaker, then click Keep Trial on another normal computer.
Step 2: Choose Connect under This Computer to enter the main interface.

Step 3: Go to the Tools page, and then click Media Builder to create bootable media.

Step 4: Use the bootable media to launch your computer, and then go to the Backup page.
Step 5: Click Source and then select Folders and Files. Check all the files and folders that you need and then click OK.

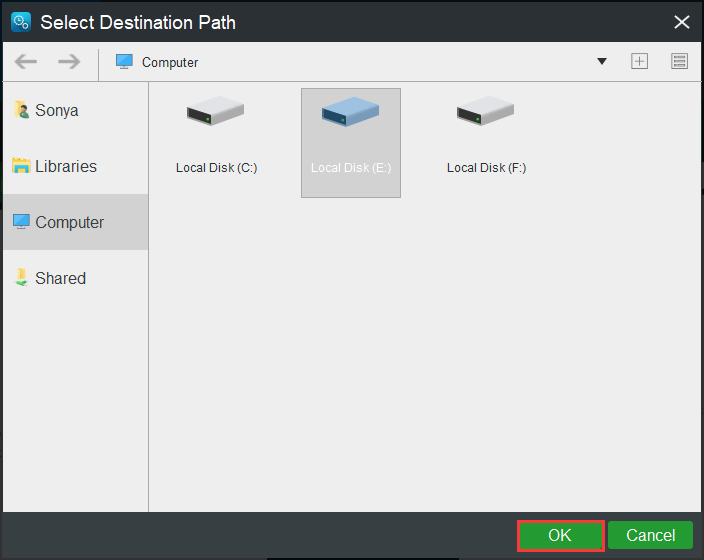
Step 6: Click Destination and then choose the external hard drive as a destination to save the backup image. Click OK to save changes.
Note: You can save your backup image to four different locations: Administrator, Libraries, Computer, and Shared.
Step 7: After you have chosen the backup source and destination, then click Back up Now to start to back up files and folders. You need to start the task on the Manage page if you click Back up Later.

Step 8: Wait for MiniTool ShadowMaker to finish backing up files and folders.
Reinstall Your System
After backing up all the important data on your computer, then you can try to reinstall your operating system. Now follow the instructions below to do that:
Step 1: Download the Media Creation Tool from Microsoft on a USB flash drive with at least 8 GB storage space and then create a USB bootable drive using this tool.
Note: All the data on the USB flash drive will be removed.
Step 2: Insert the USB bootable drive to your computer and then boot your computer from the USB (change the boot order).
Step 3: Click Install Now and then follow the onscreen instructions to perform a clean installation.
You can read this post – How to Install Windows 10 on a New Hard Drive (with Pictures) to get detailed instructions.
After you reinstall your system, the 0x0000007B should have disappeared.
It is very disappointing to meet the stop code 0x0000007B when I boot my computer, but luckily, I have found some useful solutions to solve the problem in this post.Click to Tweet
Bottom Line
Although it is frustrating to meet the stop error code 0x0000007B when you boot your computer, you don’t need to worry about it too much because this pot has offered 11methods for you. And if you have any confusion about the methods or have better advice, then you can leave a comment below or send an email to [email protected].
0x0000007B FAQ
How do I fix error 0x000000b?
- Restart your PC.
- Revert to Last Known Good Configuration.
- Run a virus scan.
- Run SFC.
- Run CHKDSK.
- Change the hard disk controller option.
- Run System Restore.
- Fix the MBR.
- Clear CMOS.
- Run Start-up Repair.
- Reinstall System.
How do I fix inaccessible boot device?
What does error code 0xC000000E mean?
Error code 0xC000000E means that your computer needs to be repaired, and there is a hardware failure or an incorrect drive configuration, so if you want to fix the error, then you should read this post – How Can You Fix Error Code 0xc000000e in Windows 10?