Windows 7 Starter Windows 7 Starter N Windows 7 Home Basic Windows 7 Home Premium Windows 7 Professional Windows 7 Professional N Windows 7 Enterprise Windows 7 Enterprise N Windows 7 Ultimate Windows 7 Ultimate N Windows Vista Ultimate Windows Vista Enterprise Windows Vista Business Windows Vista Home Premium Windows Vista Home Basic Windows Vista Business 64-bit Edition Windows Vista Enterprise 64-bit Edition Windows Vista Home Premium 64-bit Edition Windows Vista Home Basic 64-bit Edition Windows Vista Ultimate 64-bit Edition More…Less
Summary
When you use the Recovery Environment (Windows RE) to troubleshoot startup issues, first try the Startup Repair option in the System Recovery Options dialog box. If this does not resolve the issue, or if you have to manually troubleshoot additional issues, use the Bootrec.exe tool. This article talks about how to use the Bootrec.exe tool in the Windows RE to troubleshoot and repair the following items in Windows Vista or Windows 7:
-
A master boot record (MBR)
-
A boot sector
-
A Boot Configuration Data (BCD) store
You can also use the Bootrec.exe tool to troubleshoot a Windows Boot Configuration Data file is missing required information error.
How to run the Bootrec.exe tool
To run the Bootrec.exe tool, first start the Windows RE:
-
Put the Windows Vista or Windows 7 media in the DVD drive, and then start the computer.
-
Press a key when you are prompted.
-
Select a language, a time, a currency, a keyboard, or an input method, and then click Next.
-
Click Repair your computer.
-
Select the operating system that you want to repair, and then click Next.
-
In the System Recovery Options dialog box, click Command Prompt.
-
Type Bootrec.exe, and then press Enter.
 Note To start the computer from the Windows Vista or Windows 7 DVD, the computer must be configured to start from the DVD drive. For information about how to do this, see the documentation that was included with the computer, or contact the computer manufacturer.
The Bootrec.exe tool supports the following options. Use the option that’s appropriate for your situation.
/FixMbr
This option writes a Windows 7 or Windows Vista-compatible MBR to the system partition. It does not overwrite the existing partition table. Use this option when you must resolve MBR corruption issues, or when you have to remove nonstandard code from the MBR.
/FixBoot
This option writes a new boot sector to the system partition by using a boot sector that’s compatible with Windows Vista or Windows 7. Use this option if one of the following conditions is true:
-
The boot sector was replaced with a nonstandard Windows Vista or Windows 7 boot sector.
-
The boot sector is damaged.
-
An earlier Windows operating system was installed after Windows Vista or Windows 7 was installed. In this situation, the computer starts by using Windows NT Loader (NTLDR) instead of Windows Boot Manager (Bootmgr.exe).
/ScanOs
This option scans all disks for installations that are compatible with Windows Vista or Windows 7. It also displays the entries that are currently not in the BCD store. Use this option when there are Windows Vista or Windows 7 installations that the Boot Manager menu does not list.
/RebuildBcd
This option scans all disks for installations that are compatible with Windows Vista or Windows 7. Additionally, it lets you select the installations that you want to add to the BCD store. Use this option when you must completely rebuild the BCD store.
Note Use the Bootrec.exe tool to troubleshoot a «Bootmgr Is Missing» error. If rebuilding the BCD store doesn’t resolve the startup issue, you can export and delete the BCD store and then run this option again. By doing this, you make sure that the BCD store is completely rebuilt.
To do this, type the following commands at the Windows RE command prompt:
-
bcdedit /export C:\BCD_Backup
-
c:
-
cd boot
-
attrib bcd -s -h -r
-
ren c:\boot\bcd bcd.old
-
bootrec /RebuildBcd
Need more help?
Want more options?
Explore subscription benefits, browse training courses, learn how to secure your device, and more.
Communities help you ask and answer questions, give feedback, and hear from experts with rich knowledge.
Много лет компания Microsoft улучшала систему восстановления операционной системы Windows, и в Windows 7 и Windows Vista она работает практически в автоматическом режиме. Если вы загрузитесь с установочного диска Windows 7 и щелкните «Восстановление системы» («Repair Computer»), система восстановления Windows будет запущена и самостоятельно попытается исправить все ошибки, которые она найдет. Она способна исправить большое количество проблем, однако, вполне вероятна ситуация, когда оказывается поврежден загрузчик, и с этой проблемой система восстановления не может справиться. В этом случае можно восстановить загрузчик вручную при помощи утилиты Bootrec.exe.
Приложение Bootrec.exe служит для исправления ошибок, связанных с повреждением загрузчика и, как следствие, невозможностью запуска операционных систем Windows 7 и Windows Vista.
Последовательность действий
- Настройте параметры BIOS таким образом, чтобы первым устройством загрузки был DVD-привод
- Вставьте установочный компакт-диск с Windows 7 и загрузитесь с него до этого окна:

- Щелкните «Восстановление системы» («Repair your computer»).
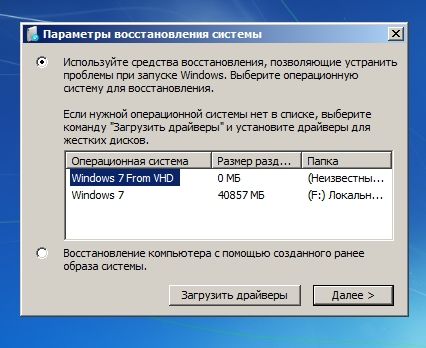
- Выберите операционную систему, которую необходимо восстановить, и нажмите «Далее» («Next»)

- В окне «Параметры восстановления системы» («System Recovery Options») выберите пункт «Командная строка» («Command Prompt»)

Откроется окно интерпретатора командной строки cmd.exe, где следует ввести:
Bootrec.exe


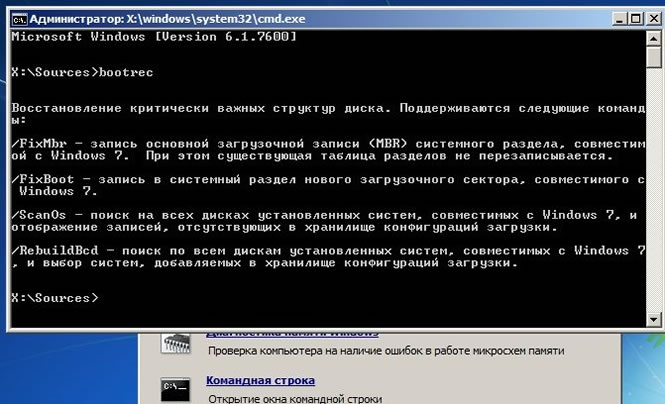
Утилита выведет справку по доступным ключам командной строки.
Описание ключей запуска утилиты Bootrec.exe
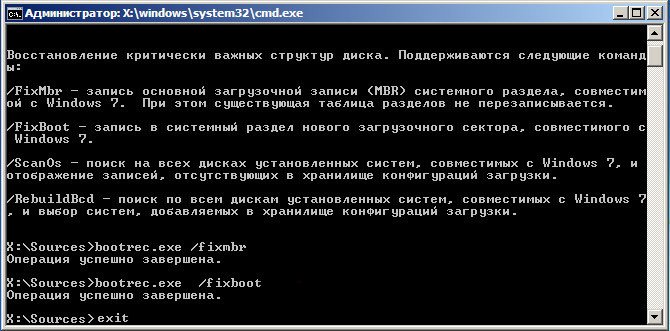
Bootrec.exe /FixMbr — Запущенная с ключом /FixMbr, утилита записывает совместимую с Windows 7 и Windows Vista главную загрузочную запись (Master Boot Record, MBR) в системный раздел. Используйте эту опцию для разрешения проблем, связанных с повреждением главной загрузочной записи, или если вы желаете удалить из неё нестандартный код. Существующая таблица разделов в этом случае не перезаписывается
Bootrec.exe /FixBoot — Запущенная с ключом /FixBoot, утилита записывает в системный раздел новый загрузочный сектор, совместимый с Windows 7 и Windows Vista. Использовать эту опцию нужно в следующих случаях:
- Загрузочный сектор Windows Vista или Windows 7 был заменен нестандартным.
- Загрузочный сектор поврежден.
- Была установлена предыдущая версия операционной системы Windows после установки Windows Vista или Windows 7. Например, если была установлена Windows XP, будет использоваться NTLDR (Windows NT Loader, загрузчик Windows NT), код штатного загрузчика NT 6 (Bootmgr) будет затерт программой установки Windows XP.
Следует отметить, что подобного эффекта можно добиться использованием утилиты bootsect.exe, также находящейся на загрузочном носителе Windows 7. Для этого необходимо запустить bootsect.exe со следующими параметрами:
bootsect /NT60 SYS — Загрузочный сектор системного раздела будет перезаписан кодом, совместимым с BOOTMGR. Подробней об использовании утилиты bootsect.exe можно узнать, запустив её с параметром /help.
Bootrec.exe /ScanOs — Запущенная с ключом /ScanOs, утилита сканирует все диски на предмет установленных операционных систем Windows Vista и Windows 7. Кроме того, при её использовании выводится список найденных систем, которые в данный момент не прописаны в хранилище данных конфигурации загрузки Windows (Boot Configuration Data (BCD) Store)
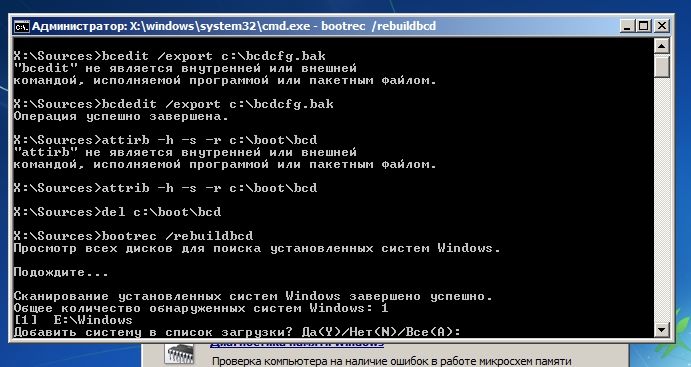
Bootrec.exe /RebuildBcd — Запущенная с этим ключом, утилита сканирует все диски на предмет наличия установленных операционных систем Windows Vista или Windows 7. Найденные ОС выводятся в список, из которого их можно добавить в хранилище данных конфигурации загрузки Windows (Boot Configuration Data Store). Используйте также эту опцию, если вы хотите полностью перестроить хранилище данных конфигурации загрузки. Перед этим необходимо удалить предыдущее хранилище. Набор команд при этом может быть таким:
bcdedit /export C:\BCDcfg.bak
attrib -s -h -r c:\boot\bcd
del c:\boot\bcd
bootrec /RebuildBcd
В вышеприведенном примере текущее хранилище конфигурации загрузки экспортируется в файл C:\BCDcfg.bak, с него снимаются атрибуты «системный», «скрытый» и «только для чтения», после чего оно удаляется командой DEL и заново перестраивается командной bootrec /RebuildBcd.
Конечно, утилита Bootrec.exe весьма функциональна, однако, она не поможет, если, например, файл загрузчика Windows bootmgr поврежден или физически отсутствует. В таком случае можно воспользоваться другой утилитой, также входящей в состав дистрибутивного носителя Windows 7 — bcdboot.exe.
Восстановление среды загрузки с помощью BCDboot.exe
BCDboot.exe — это средство, которое используется для создания или восстановления среды загрузки, расположенной в активном системном разделе. Утилита также может быть использована для переноса файлов загрузки с одного жесткого диска или раздела на другой.
Командная строка в данном случае может выглядеть таким образом:
bcdboot.exe e:\windows
Замените e:\windows на путь, соответствующий вашей системе. Эта операция восстановит поврежденную среду загрузки Windows, включая файлы хранилища конфигурации данных загрузки (BCD), в том числе упомянутый выше файл bootmgr.
Синтаксис параметров командной строки утилиты bcdboot
Утилита bcdboot.exe использует следующие параметры командной строки:
BCDBOOT источник [/l язык] [/s буква_диска] [/v] [/m [{GUID_загрузчика_операционной системы}]]
источник — Указывает расположение каталога Windows, используемого в качестве источника при копировании файлов среды загрузки.
/l — Необязательный параметр. Задает язык среды загрузки. По умолчанию используется английский (США).
/s — Необязательный параметр. Указывает букву диска системного раздела, куда будет установлены файлы среды загрузки. По умолчанию используется системный раздел, заданный микропрограммой BIOS.
/v — Необязательный параметр. Включает режим подробного протоколирования работы утилиты.
/m — Необязательный параметр. Объединяет параметры вновь созданной и уже имеющейся загрузочной записи хранилища и записывает их в новую загрузочную запись. Если GUID загрузчика операционной системы задан, для создания загрузочной записи объединяет объект загрузчика с шаблоном системы.
Резюме. В статье были рассмотрены принципы работы с утилитами bootrec.exe и bcdboot.exe, служащими для разрешения проблем, связанных с невозможностью запуска операционной системы Windows 7 из-за поврежденного или отсутствующего загрузчика
Если у Вас нет диска, с которого была установлена ОС Windows 7, то восстановить загрузки ОС можно другими способами.
Вариант 1. Автоматически — при помощи среды восстановления Windows RE в Windows 7.
Во время установки Windows 7 на жестком диске автоматически создается служебный раздел, обеспечивающий доступ в среду восстановления Windows RE (Recovery Environment). Используя данный служебный раздел, Вы можете:
— загрузиться в среду восстановления с жесткого диска
— создать компакт-диск, содержащий среду восстановления
1) Выполните загрузку в среду восстановления с жесткого диска или диска восстановления системы.
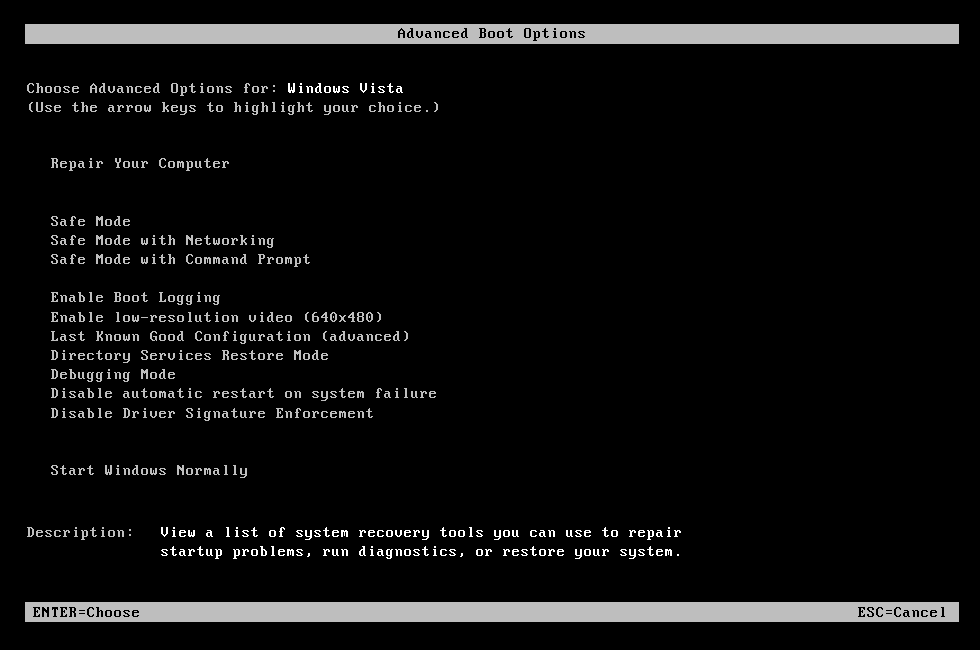
Для того чтобы войти в меню Дополнительные варианты загрузки, нажмитеF8 после включения компьютера (но до загрузки операционной системы).
2) Выберите первый пункт меню Устранение неполадок компьютера (Repair your computer) и нажмите Enter.
3) Выберите язык раскладки клавиатуры, на котором у вас задан пароль административной учетной записи.
4) Введите пароль администратора. После ввода пароля вы увидите окно с вариантами восстановления.
5) Выберите пункт Восстановление запуска(Startup repair), также иногда может помочь пункт Восстановление системы (System Restore), позволяющий вернуться к точке, созданной до возникновения проблемы.
Вариант 2. Восстановление вручную, с созданием мультизагрузочного меню.
Здесь главное — это добраться до командной строки для введения дальнейших команд.
1) Скачайте архив Bootfiles_x86+x64.zip (содержит файлы: Bcdboot.exe; Bcdedit.exe; Bootsect.exe; Bootrec.exe).
2) Создайте папку Boot.
3) Распакуйте скачанный архив и скопируйте файлы нужной Вам битности в созданную Вами папку Boot.
4) Запустите среду необходимую для работы:
5) Загрузитесь в Windows, установленную на другой диск или в среду восстановления (На жестком диске запускается нажатием, клавиши F8. Если клавишаF8 используется материнской платой, после выбора диска нажмитеF8 снова, выберите пункт меню Устранение неполадок компьютера (Repair your computer) и нажмите Enter)
6) Запустите командную строку.
В Windows: Win + R → cmd → ОК.
В среде восстановления: Выберите язык раскладки клавиатуры, на котором у вас задан пароль административной учетной записи. Введите пароль администратора. Выберите пункт Командная строка (Command Prompt)
Далее все команды вводимые в командную строку будут одинаковы как в Windows, так и в среде восстановления.
1) Windows 7 использует усовершенствованный метод загрузки — хранилище данных конфигурации загрузки. Это хранилище содержит все сведения обо всех операционных системах, установленных на компьютере. Следовательно, загрузчики более ранних операционных систем Windows, не могут быть использованы для ее запуска. Итак, для восстановления, загрузочного сектора Windows 7, перезаписываем загрузочный сектор на всех разделах:
X:\boot\bootsect.exe /nt60 all
где Х — буква диска, на котором содержится программа Bootsect.exe
2) Если у Вас вторая система Windows XP, то Вам необходимо выполнить ещё ряд действий:
Создайте в хранилище загрузки Windows 7 — хранилище для загрузки Windows XP.
Bcdedit /create {ntldr} /d «Microsoft Windows XP»
Если же система откажется это делать, значит данное хранилище уже создано, поэтому необходимо его только переименовать:
Bcdedit /set {ntldr} description «Microsoft Windows XP»
Далее укажите загрузчику Windows 7 устройство расположения файлов загрузки Windows XP:
Bcdedit /set {ntldr} device partition=C:
Затем укажите загрузчику Windows 7 путь к загрузчику Windows XP:
Bcdedit /set {ntldr} path \ntldr
После добавьте строчку о выборе Windows XP в меню загрузки и расположив ее под остальными:
Bcdedit /displayorder {ntldr} /addlast
Также для работы с загрузчиками, Вы можете воспользоваться программой EasyBCD, позволяющей выполнять указанные выше действия, используя графический интерфейс.
Для информации:
Главная Загрузочная Запись (Master Boot Record — MBR), совместимая с загрузчиком операционной системы (ntldr — для Windows XP и bootmgr — для Windows 7/Vista);
Файлы загрузки: для Windows XP — файлы ntdetect.com и boot.ini, для Windows 7/Vista — хранилище загрузки — Boot Configuration Data (BCD), которое расположено в скрытой системной папке BOOT.
Вариант 3. Восстановление вручную, при помощи bootrec.exe.
1) Загрузитесь в среду восстановления (На жестком диске запускается нажатием, клавишиF8. Если клавишаF8 используется материнской платой, после выбора диска нажмитеF8 снова, выберите пункт меню Устранение неполадок компьютера (Repair your computer) и нажмите Enter)
2) Выберите операционную систему, которую необходимо восстановить, и нажмите «Next»(«Далее»).
3) В окне Опции системы восстановления (System Recovery Options) выберите пункт Командная строка (Command Prompt).
4) Откроется окно интерпретатора командной строки cmd.exe, где следует ввести:
Bootrec.exe /FixMbr
Параметр /FixMbr записывает в системный раздел основную загрузочную запись, совместимую с Windows 7. Этот параметр не перезаписывает существующую таблицу разделов. Данный параметр следует использовать для устранения проблем, связанных с повреждением основной загрузочной записи, или если необходимо удалить из основной загрузочной записи нестандартный код.
Bootrec.exe /FixBoot
Параметр /FixBoot записывает в системный раздел новый загрузочный сектор с использованием загрузочного сектора, совместимого с Windows 7. Этот параметр следует использовать, если выполняется хотя бы одно из перечисленных ниже условий.
— Загрузочный сектор Windows 7 был заменен нестандартным загрузочным сектором
— Загрузочный сектор поврежден
— После установки Windows 7 на компьютер была установлена более ранняя версия операционной системы Windows. В данном случае для запуска компьютера вместо диспетчера загрузки Windows (Bootmgr.exe) используется загрузчик Windows NT (NTLDR).
Bootrec.exe /RebuildBcd
Параметр /RebuildBcd выполняет поиск установленных операционных систем, совместимых с Windows 7, на всех дисках. Кроме того, этот параметр позволяет выбрать установленные системы, которые необходимо добавить в хранилище данных конфигурации загрузки. Этот параметр следует использовать в том случае, если необходимо выполнить полную перестройку данных конфигурации загрузки.
Если Вы не запомнили необходимого Вам значения Вы можете просто ввести:
Bootrec.exe
и утилита выведет справку по доступным ключам командной строки.
Нужен хороший совет, как произвести восстановление загрузчика Windows 7, если восстановление запуска с помощью установочного диска семёрки не помогло. Вкратце объясню в чём дело: на компьютере сначала была установлена Windows 7, затем второй системой понадобилась Windows XP, после установки естественно запускалась она одна, для загрузки двух операционных систем использовал программу EasyBCD. В дальнейшем XP стала не нужна и раздел на котором она находилась я форматировал из Windows 7. Сейчас при загрузке кроме чёрного экрана ничего. Что можно предпринять в таком случае? Поподробнее если можно. Сергей.
Привет друзья! Самое главное не волнуйтесь, проблема у вас несложная и в принципе простое средство «Восстановление запуска Windows 7» описанное в нашей статье должно помочь, но! Если данная статья вам не поможет, то должны помочь две другие:
- Ошибка BOOTMGR is missing press CTR-Alt-Del for restart при загрузке Windows 7
- Ошибка NTLDR is missing при загрузке Windows 7
- Форматирование в командной строке скрытого раздела «Зарезервировано системой» объём 100 МБ содержащего файлы загрузки Windows 7 и дальнейшее автоматическое восстановление системы
в этих статьях описаны ещё несколько хороших способов восстановить загрузку вашей операционной системы, кроме них есть ещё одна Как восстановить систему Windows 7, так что пробуйте и просто так не сдавайтесь.
Напомню вам, что нельзя устанавливать старшую операционную систему после младшей, Windows 7 ни в коем случае не будет загружаться после установки на компьютер Windows XP, так как последняя при установке переписывает главную загрузочную запись (MBR) на себя. Поэтому вы установили дополнительный менеджер загрузки EasyBCD, который используется для настройки загрузки нескольких операционных систем и имеет в свою очередь свой загрузчик.
- Ещё хочу сказать, что часто в неудачной загрузке Windows 7 виноваты ошибки файловой системы, исправить их можно даже в том случае когда операционная система не загружается, все подробности в другой нашей статье «Программа Chkdsk«
- Друзья, в этой статье мы будем работать со средой восстановления Windows 7, а если точнее с командной строкой среды восстановления. Необходимые команды я Вам дам, но если Вам их будет трудно запомнить, можно создать шпаргалку — текстовый файл со списком необходимых реанимационных команд и открыть его прямо в среде восстановления. Это сильно облегчит Вам работу.
- Главная загрузочная запись (MBR) — это первый сектор на жёстком диске, в котором находится таблица разделов и маленькая программа загрузчик, которая считывает в данной таблице данные с какого раздела жёсткого диска производить загрузку ОС, в дальнейшем информация передаётся в раздел с установленной операционной системой, для её загрузки. Если в главной загрузочной записи находится неправильная информация о расположении системы, значит мы при загрузке получим разные ошибки, вот одна из них «BOOTMGR is missing press CTR-Alt-Del for restart» или будем наблюдать чёрный экран. Исправляется проблема восстановлением загрузчика Windows 7.
Когда вы удалили старушку XP вместе с EasyBCD, то оставили свой компьютер на произвол судьбы с непонятной ему загрузочной записью и он в знак благодарности выдаёт вам чёрный экран. Для исправления ситуации, мы с вами проведём восстановление загрузчика Windows 7, а именно перезапишем главную загрузочную запись с помощью утилиты Bootrec.exe, находящейся на диске восстановления или на установочном диске Windows 7 (друзья, если у вас нетбук и вы хотите использовать среду восстановления находящуюся на флешке, то прочтите сначала комментарии). Так же данной утилитой мы запишем новый загрузочный сектор, понятный Windows 7.
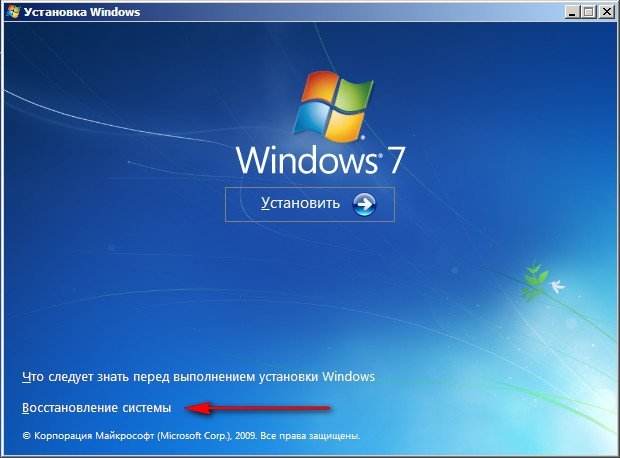
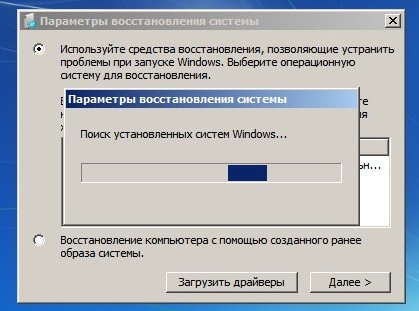
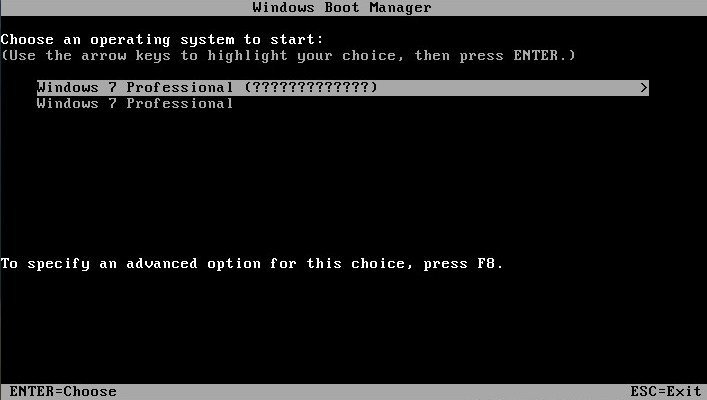
Загружаемся с диска восстановления или установочного диска с Windows 7, в начальной фазе загрузки компьютера, при появлении предложения загрузиться с диска «Press any key to boot from CD…», жмём в течении 5 секунд на любую клавишу клавиатуры, иначе с диска вы не загрузитесь

далее Восстановление системы.
Происходит недолгий поиск установленных систем Windows и анализ проблем мешающих их загрузке
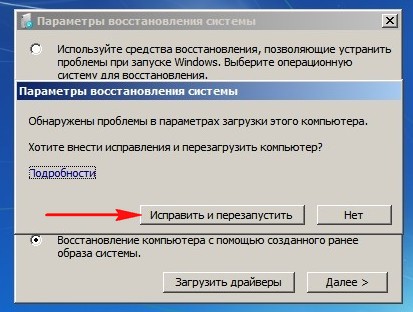
Обычно проблемы быстро бывают найдены и среда восстановления предлагает устранить их автоматически. Нажмите на кнопку «Исправить и перезапустить», после этого компьютер перезагрузится и загрузка Windows 7 будет восстановлена.
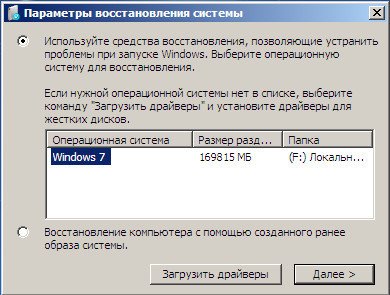
Если проблемы с загрузкой системы продолжатся или вам не будет предложено исправить проблемы автоматически, значит в этом окне нужно выбрать операционную систему, которую нужно восстановить, она у вас скорее всего одна и Далее.
В первую очередь выберите средство Восстановление запуска, оно тоже может решить проблемы с загрузкой Windows 7
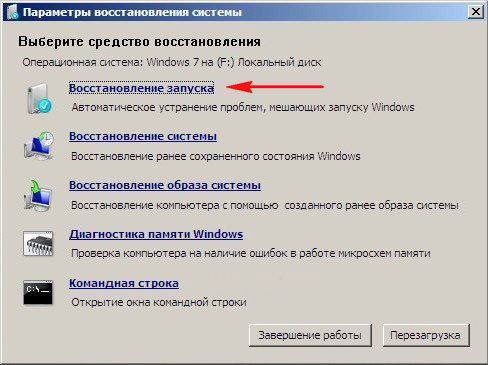
Восстановление загрузчика Windows 7 вручную
Если и это средство не поможет, выбираем средство Командная строка

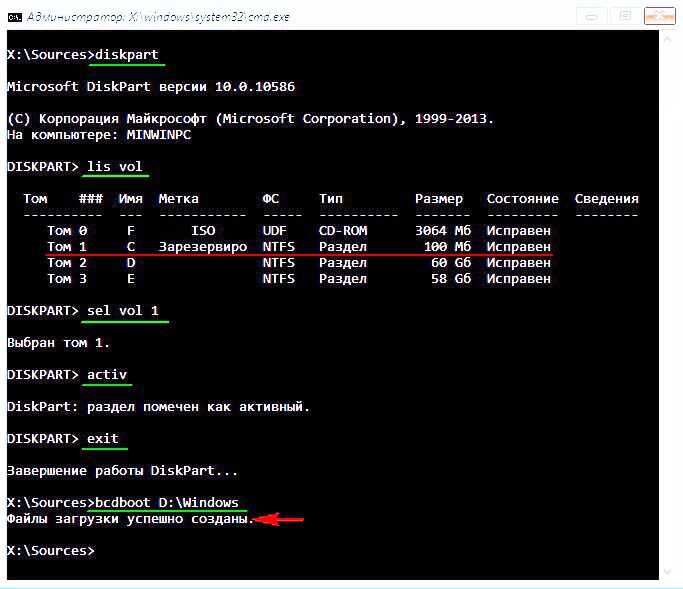
Вводим команды:
diskpart
lis vol (выводим список разделов жёсткого диска и видим, что «Том 1» является скрытым разделом System Reserved (Зарезервировано системой), объём 100 Мб, на нём должны располагаться файлы загрузки Windows 7 и именно его нужно сделать активным). Также видим раздел с установленной Windows 7, у него буква D:, объём 60 Гб.
sel vol 1 (выбираем Том 1)
activ (делаем его активным)
exit (выходим из diskpart)
bcdboot D:\Windows (где D: раздел с установленной Windows 7), данная команда восстанавливает файлы загрузки Windows 7 (файл bootmgr и файлы конфигурации хранилища загрузки (BCD))!
«Файлы загрузки успешно созданы»
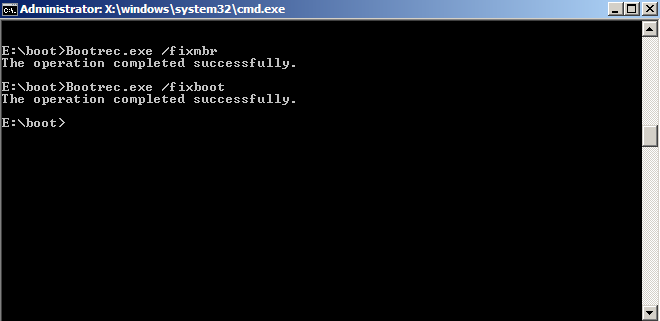
В окне командной строки вводим команду Bootrec и Enter
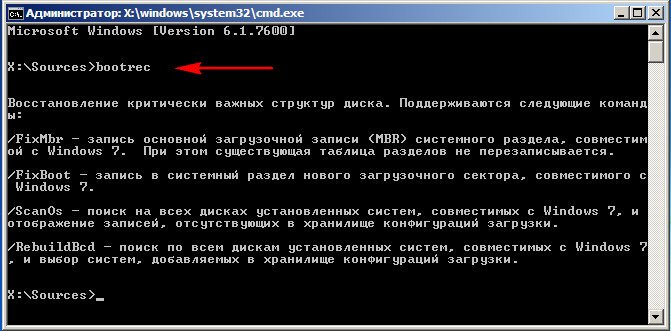
выходит полная информация о возможностях утилиты. Выбираем запись основной загрузочной записи Bootrec.exe /FixMbr.
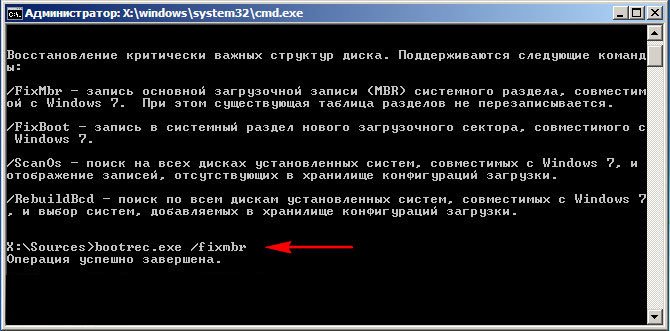
Операция успешно завершена. В первый сектор загрузочного раздела записана новая загрузочная запись.
Вторая команда Bootrec.exe /FixBoot записывает новый загрузочный сектор.
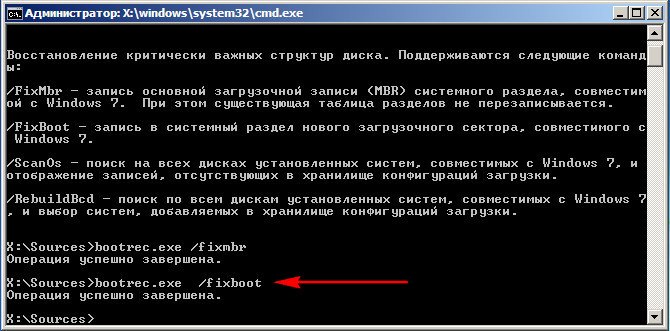
Операция успешно завершена. Exit. Далее пробуем загрузить нашу Windows 7.
Друзья, если команды Bootrec.exe /FixMbr и Bootrec.exe /Fixboot Вам не помогут, не отчаивайтесь, есть ещё одно средство.
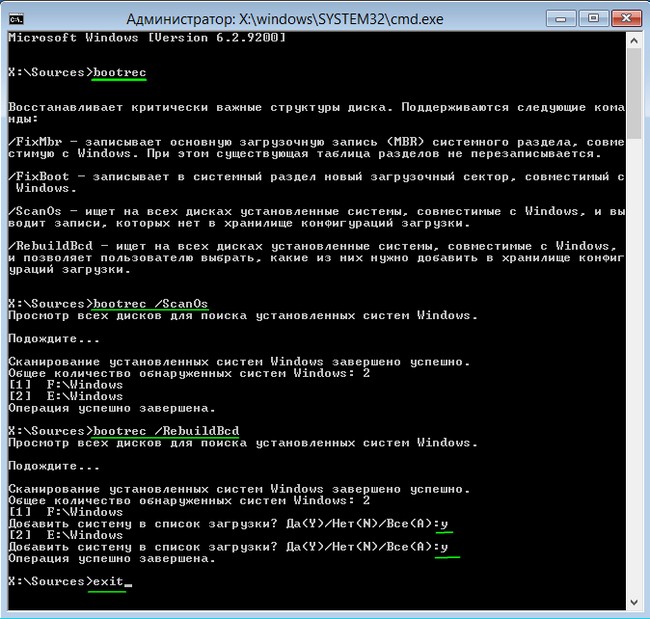
Способ №3
Вводим команду Bootrec /ScanOs, она просканирует все ваши жёсткие диски и разделы на наличие операционных систем и если такие будут найдены, то выйдет соответствующее предупреждение. Затем нужно ввести команду Bootrec.exe /RebuildBcd, данная утилита предложит внести найденные Windows в меню загрузки, соглашаемся и вводим Y и жмём Enter, всё найденная Windows добавлена в меню загрузки.
В моём случае найдено две операционные системы. Всё видно на скришноте.
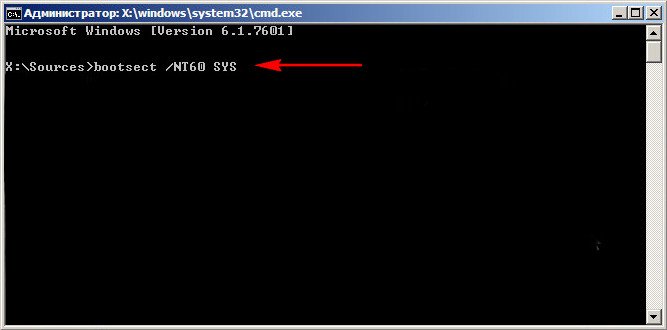
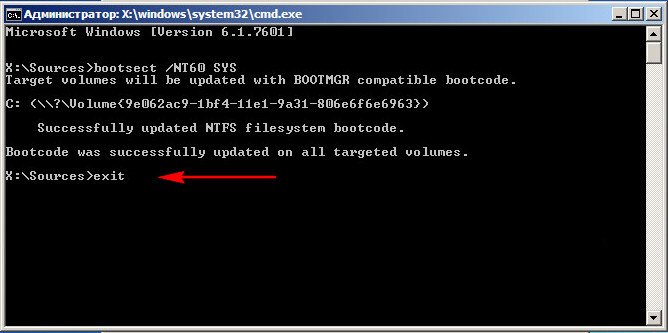
Кроме вышеприведённого способа, есть ещё один, вводим в командной строке bootsect /NT60 SYS, основной загрузочный код, так же будет обновлён.
Exit
Наша найденная Windows 7 появляется в меню загрузки операционных систем
Если всё, что сказано выше не помогает, попробуйте заново перезаписать все файлы хранилища загрузки BCD, повторятся не буду, всё подробно объяснено в этой статье
http://remontcompa.ru/421-ntldr-is-missing-v-windows-7.html
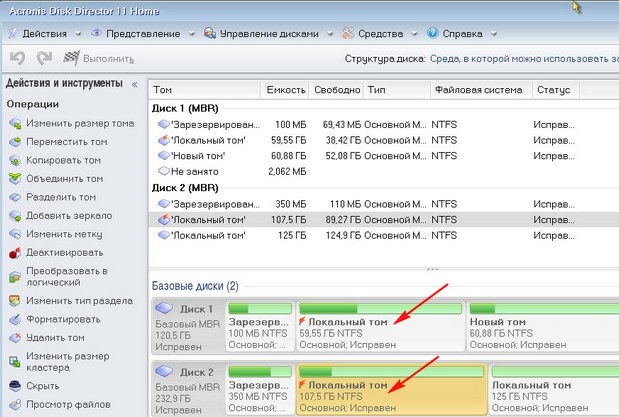
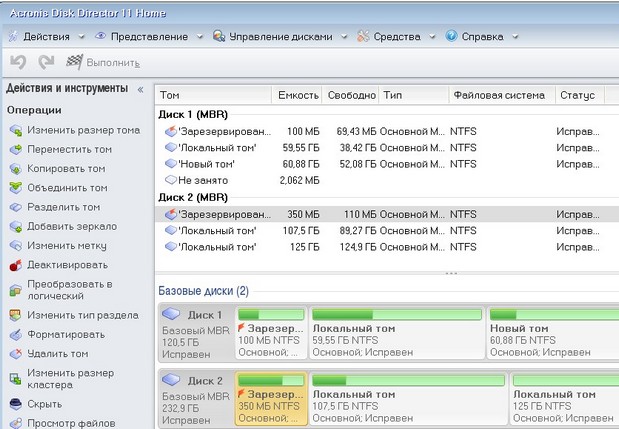
Недавно один мой знакомый принёс мне компьютер с жалобой на то что две установленные у него на разных жёстких дисках операционные системы Windows 7 и Windows 8 не загружаются выдавая разные ошибки при загрузке.
Первым делом я загрузил компьютер с загрузочного диска Acronis Disk Director и увидел такую картину. Как видим имеются два жёстких диска, первый Диск 1 с установленной Windows 7, а второй Диск 2 с установленной Windows 8. Обратите внимание на два красных флажка, которыми помечены совсем не те разделы, которые нужно. Почему? Красный флажок означает то, что данный раздел активен и с него должна происходить загрузка операционной системы.
Так вот, ошибка в том, что у нас на обоих жёстких дисках должны быть отмечены красным флажком первые скрытые разделы System Reserved (Зарезервировано системой). На Windows 7 объём такого раздела составляет 100 МБ, а на Windows 8 350 МБ, именно эти разделы носят атрибуты: Система. Активен и именно на этих разделах находятся файлы конфигурации хранилища загрузки (BCD) и файл менеджера загрузки системы (файл bootmgr). А у нас получается эти атрибуты носят другие разделы. Из-за этого Windows 7 и Windows 8 не загружаются.
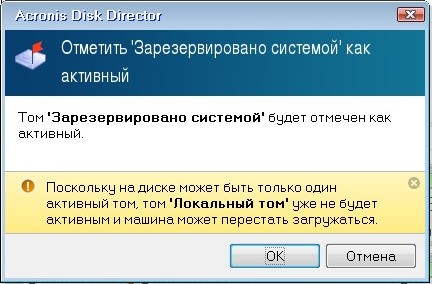
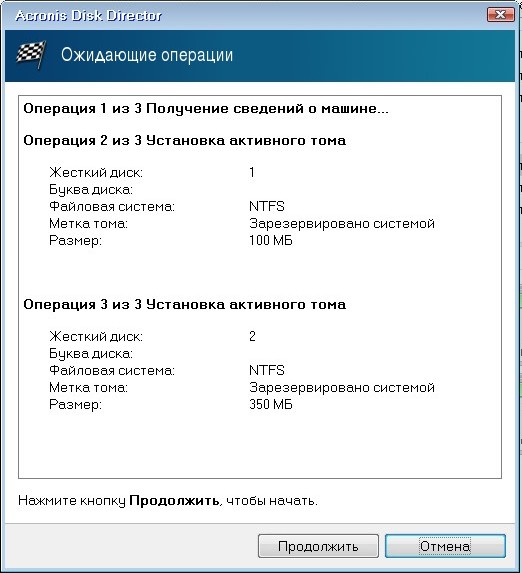
Выбираем первый жёсткий Диск 1, щёлкаем на первом разделе System Reserved (Зарезервировано системой) правой мышью и выбираем «Отметить как активный»

Том «Зарезервировано системой» будет отмечен как активный. Нажимаем ОК.
То же самое делаем с Диском 2. Программа Acronis Disk Director работает в режиме отложенной операции, чтобы изменения вступили в силу нажимаем кнопку «Применить ожидающие операции»
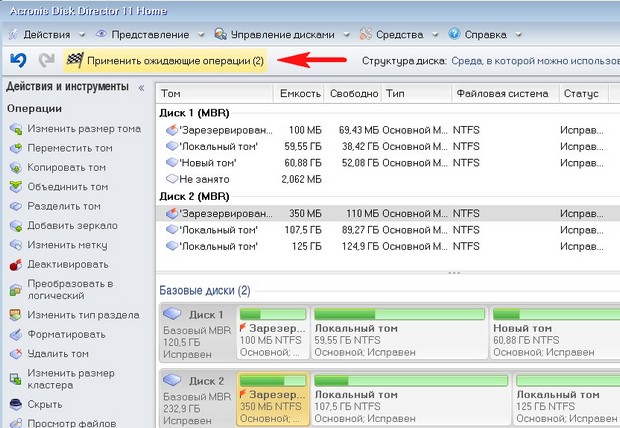
Продолжить.
Как видим, после наших изменений активными стали те разделы которые нужно.
Выходим из программы и перезагружаемся. Результат работы положительный — поочерёдно загружаются обе операционные системы.
This guide explains how to use the Bootrec (bootrec.exe) utility for the following Windows versions: Windows XP (bootcfg, not bootrec), Vista, 7, 8, 8.1 or 10.
Bootrec in Windows
Bootrec or the bootrec.exe utility is a tool provided by Microsoft in Windows Recovery Environment, or the Windows RE.
When your computer fails to start, Windows automatically starts in this Windows RE – a recovery platform based on Windows Preinstallation Environment – where you can find various tools that can potentially fix your computer: Startup Repair, Command Prompt etc.
This is useful to troubleshoot and potentially fix errors that are preventing your computer to start.
Bootrec.exe is used in connection with:
- Master Boot Record (MBR) [related guide: Fix the MBR]
- Boot Sector
- Boot Configuration Data (BCD)
- boot.ini [related guides: Invalid BOOT.INI file; Fatal error reading boot.ini; Rebuilding Boot.ini]
This utility is available for Microsoft Windows Vista, Microsoft Windows 7, Microsoft Windows 8 and Microsoft Windows 8.1.
Bootrec in Windows XP
Microsoft Windows XP doesn’t have a bootrec.exe utility, but a bootcfg.exe utility which is part of the Windows XP Recovery Console.
Windows XP has, instead, the bootcfg utility that can be used to modify the boot.ini file.
To read about bootcfg, follow our guide: Bootcfg – Guide for Windows XP
Bootrec in Windows Vista
You can run the bootrec commands in Windows Vista if you can boot into Windows Vista and access the System Recovery Options (your system may not have this installed) or you have the installation disc available to access Command Prompt.
If you can’t boot into your Windows Vista system or don’t have the original installation disc, use Easy Recovery Essentials and run Command Prompt. Download Easy Recovery Essentials and burn it to any CDs, DVDs or USBs.
If you have the installation disc
Instructions on how to access bootrec.exe by using the original installation disc in Windows Vista:
- Insert the CD/DVD of Windows Vista in the optical drive
- Reboot the computer
- Press any key to boot from the CD/DVD
- Select a language, time and keyboard and click Next
- Click Repair your computer

- Select the operating system
- Click Next
- At the System Recovery Options box, click Command Prompt
- Once Command Prompt appears, you can type the command:
bootrec.exe
- Hit Enter


For more commands and parameters you can run, go to Commands and parameters. If common commands don’t work for your system, go to Troubleshooting for tips.
If you don’t have the installation disc
If you don’t have the Windows Vista installation disc, you can access System Recovery Options or use Easy Recovery Essentials to launch Command Prompt.
System Recovery Options is installed on your system if the Repair Your Computer option appears at the Advanced Boot Options menu.
Instructions on how to access bootrec.exe without the installation disc in Windows Vista:
- Reboot the computer
- Press F8 as the Windows Vista logo appears
- Select Repair Your Computer
If Repair Your Computer is not available, System Recovery Options is not installed on your system. Access Command Prompt from the installation disc or use Easy Recovery Essentials.
- Select Command Prompt from the System Recovery Options menu
- When Command Prompt opens, type the commands:
bootrec /rebuildbcd
- Hit Enter
For more commands and parameters you can run, go to Commands and parameters. If common commands don’t work for your system, go to Troubleshooting for tips.
Instructions if you use Easy Recovery Essentials:
- Download Easy Recovery Essentials
- Burn the ISO Image. Follow our instructions on how to burn a bootable ISO image. If you’d like to have a recovery USB instead, follow our instructions on how to make a recovery USB.
- Boot Easy Recovery Essentials from the CD, DVD or USB
- Select Launch Command Line

Bootrec in Windows 7
You can access bootrec.exe on Windows 7 systems similar to Windows Vista systems: via the System Recovery Options (which is, by default, available in Windows 7) or via the installation disc.
If you can’t boot into your Windows 7 system or don’t have the original installation disc, use Easy Recovery Essentials and run Command Prompt. Download Easy Recovery Essentials and burn it to any CDs, DVDs or USBs.
If you have the installation disc
Instructions on how to access bootrec.exe by the installation disc in Windows 7:
- Insert the disc in the drive
- Reboot the computer
- Press any key to boot from the CD/DVD
- Select a language, time and keyboard
- Click Next
- Click Repair your computer
- Select the operating system
- Click Next
- At the System Recovery Options box, click Command Prompt
- At Command Prompt, you can type the commands:
bootrec.exe
- Hit Enter


For more commands and parameters you can run, go to Commands and parameters. If common commands don’t work for your system, go to Troubleshooting for tips.
If you don’t have the installation disc
Instructions on how to access bootrec.exe without the installation disc in Windows 7:
- Reboot the computer
- Press F8 as the Windows 7 logo appears
- Select Repair Your Computer
If Repair Your Computer is not available, System Recovery Options is not installed on your system. Access Command Prompt from the installation disc or use Easy Recovery Essentials.
- Hit Enter
- Select Command Prompt
- When it opens, type the necessary commands:
bootrec /rebuildbcd
- Hit Enter

For more commands and parameters you can run, go to Commands and parameters. If common commands don’t work for your system, go to Troubleshooting for tips.
Instructions if you use Easy Recovery Essentials:
- Download Easy Recovery Essentials
- Burn the ISO Image. Follow our instructions on how to burn a bootable ISO image. If you’d like to have a recovery USB instead, follow our instructions on how to make a recovery USB.
- Boot Easy Recovery Essentials from the CD, DVD or USB
- Select Launch Command Line
Bootrec in Windows 8 and 8.1
In Windows 8, you can access the bootrec.exe utility by using your original installation media: DVD or USB drive.
If you can’t boot into your Windows 8/8.1 system or don’t have the original installation disc, use Easy Recovery Essentials and run Command Prompt. Download Easy Recovery Essentials and burn it to any CDs, DVDs or USBs.
If you have the installation disc (DVD, USB)
Instructions on how to access bootrec.exe with the installation disc (DVD or USB media) in Windows 8 or 8.1:
- Insert the Windows 8 or 8.1 DVD or USB
- Reboot the system
- Press any key at the “Press any key to boot” message
- Click Repair your computerOr press R.
- Select Troubleshoot, then select Command Prompt
- When Command Prompt appears, simply type the necessary commands:
bootrec /FixMbr
- Press Enter after each command
- When you are finished with Command Prompt, type
exit, press Enter and remove the DVD/USB from the drive
 Or press R.
For more commands and parameters you can run, go to Commands and parameters. If common commands don’t work for your system, go to Troubleshooting for tips.
If you don’t have the installation disc (DVD, USB)
If you don’t have the original disc, you can either boot to System Recovery Options and select Command Prompt or use Easy Recovery Essentials and run Command Prompt (you can burn EasyRE to any CDs, DVDs or USBs).
Instructions on how to access bootrec.exe without the installation disc in Windows 8 or 8.1:
- Reboot the system
- Press Shift and F8 quickly
Shift + F8 doesn’t always work, as reported by some users. If this is the case for your system, consider using Easy Recovery Essentials to run Command Prompt – details below this section of steps.
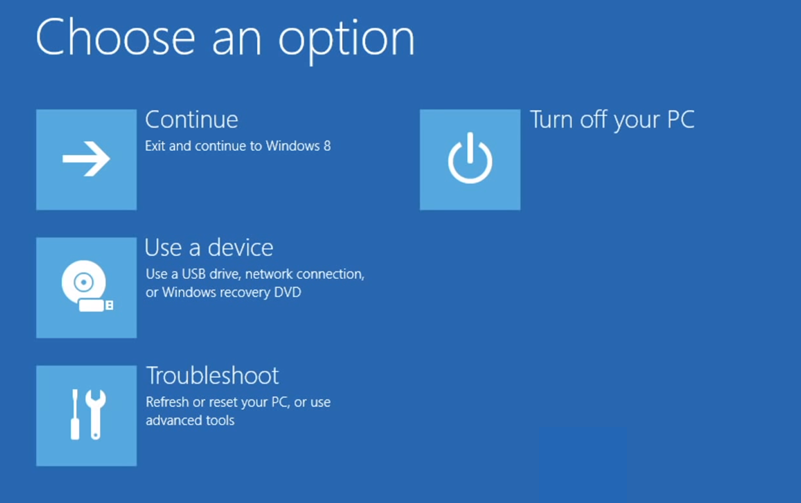
- At the Choose an option screen, select Troubleshoot
- Select Command Prompt
- When Command Prompt opens, type the commands:
bootrec /FixMbr
- Hit Enter
For more commands and parameters you can run, go to Commands and parameters. If common commands don’t work for your system, go to Troubleshooting for tips.
Instructions if you use Easy Recovery Essentials:
- Download Easy Recovery Essentials
- Burn the ISO Image. Follow our instructions on how to burn a bootable ISO image. If you’d like to have a recovery USB instead, follow our instructions on how to make a recovery USB.
- Boot Easy Recovery Essentials from the CD, DVD or USB
- Select Launch Command Line
Bootrec in Windows 10
In Windows 10 you can access the bootrec.exe utility by using your original installation media: DVD or USB drive.
If you can’t boot into your Windows 10 system or don’t have the original installation disc, use Easy Recovery Essentials and run Command Prompt. Download Easy Recovery Essentials and burn it to any CDs, DVDs or USBs.
If you have the installation disc (DVD, USB)
Instructions on how to access bootrec.exe with the installation disc (DVD or USB media) in Windows 10:
- Insert the Windows 10 DVD or USB
- Reboot the system
- Press any key at the “Press any key to boot” message
- Click Repair your computer
 Or press R.
 - Select Troubleshoot, then select Command Prompt
- When Command Prompt appears, simply type the necessary commands:
bootrec /FixMbr
- Press Enter after each command
- When you are finished with Command Prompt, type
exit, press Enter and remove the DVD/USB from the drive
 Or press R.
For more commands and parameters you can run, go to Commands and parameters. If common commands don’t work for your system, go to Troubleshooting for tips.
If you don’t have the installation disc (DVD, USB)
If you don’t have the original disc, you can either boot to System Recovery Options and select Command Prompt or use Easy Recovery Essentials and run Command Prompt (you can burn EasyRE to any CDs, DVDs or USBs).
Instructions on how to access bootrec.exe without the installation disc in Windows 10:
- Reboot the system
- Press Shift and F8 quickly
Shift + F8 doesn’t always work, as reported by some users. If this is the case for your system, consider using Easy Recovery Essentials to run Command Prompt – details below this section of steps.
- At the Choose an option screen, select Troubleshoot

- Select Command Prompt
- When Command Prompt opens, type the commands:
bootrec /FixMbr
- Hit Enter

For more commands and parameters you can run, go to Commands and parameters. If common commands don’t work for your system, go to Troubleshooting for tips.
Instructions if you use Easy Recovery Essentials:
- Download Easy Recovery Essentials
- Burn the ISO Image. Follow our instructions on how to burn a bootable ISO image. If you’d like to have a recovery USB instead, follow our instructions on how to make a recovery USB.
- Boot Easy Recovery Essentials from the CD, DVD or USB
- Select Launch Command Line
Commands and parameters
The commands and parameters below are for the bootrec.exe utility in Windows Vista, 7, 8, 8.1 and 10.
Windows XP uses the bootcfg utility. For commands and parameters for bootcfg, go to Parameters at Windows XP section.
Parameters for bootrec.exe are:
bootrec /FixMbr will write a Windows Vista and Windows 7 compatible MBR to the system partition.
bootrec /FixBoot will write a new boot sector to the system partition. If your system is Windows 7, FixBoot will write a Windows 7-compatible boot sector and so on.
bootrec /ScanOs will scan the hard drives for any installations. ScanOs will also print installations that are not currently in the BCD.
bootrec /RebuildBcd will scan for installations on your hard drive and allows you to select which to add to the BCD.
Download Bootrec.exe
You cannot download bootrec.exe as it’s a command line utility part of Windows.
To access the utility, you have these options available:
- boot into the recovery mode of your Windows to access Command Prompt
- get the original installation disc of your Windows version to access System Recovery
- use Easy Recovery Essentials, our recovery and repair disk, and access Command Line from there
Instructions if you use Easy Recovery Essentials:
- Download Easy Recovery Essentials
- Burn the ISO Image. Follow our instructions on how to burn a bootable ISO image. If you’d like to have a recovery USB instead, follow our instructions on how to make a recovery USB.
- Boot Easy Recovery Essentials from the CD, DVD or USB
- Select Launch Command Line
Instructions on how to access bootrec.exe without the installation disc:
- For Windows Vista
- For Windows 7
- For Windows 8
- For Windows 10
Instructions on how to access bootrec.exe with the installation disc:
- For Windows Vista
- For Windows 7
- For Windows 8
- For Windows 10
Troubleshooting
bootrec /RebuildBcd doesn’t work
If bootrec /RebuildBcd does not fix the error, you can also try to completely rebuild the BCD. TO do so, you need to run these steps:
- Type this command:
bcdedit /export C:\BCDBackup
- Type
c:, where c: is where your Windows is installed - Type
cd boot - Type this command:
attrib bcd -s -h -r
- Type this command:
ren c:\boot\bcd bcd.old
- Type this command:
bootrec /RebuildBcd
The requested system device cannot be found
If Bootrec shows the “The requested system device cannot be found” error, follow the steps from bootrec /RebuildBcd doesn’t work.
bootrec /ScanOs doesn’t find Windows
It’s possible that the bootrec /ScanOs command can find 0 Windows installations:
Total identified Windows installations: 0
In this case you can try the steps from bootrec /RebuildBcd doesn’t work or try:
ren c:\bootmgr bootmgrbackup, wherec:is where your Windows is installedbootrec /RebuildBcdbootrec /FixBoot
bootrec prints Element not found
Various bootrec commands, like bootrec /RebuildBcd or bootrec /FixBoot, can print this error:
Element not found
In this case, try any of the following tips:
- Run the steps from bootrec /RebuildBcd doesn’t work
- If you have a SATA cable, move it to another port
- Make sure the partition is active. To do that, run these commands:
diskpartlist diskselect disk 0, where0is the number of your disklist partitionselect partition 0, where0is the number of your partition numberactiveexit
bootrec in Windows 7 doesn’t work
If the bootrec /FixMbr or bootrec /FixBoot commands don’t work in Windows 7, try the following steps to restore the boot sector code for your system:
This solution works only if you have the original Windows 7 installation disc. Otherwise, use Easy Recovery Essentials to access Command Prompt or run Automated Repair for automatic repairs.
- Type these commands and press Enter after each:
diskpart
select disk 0
list volume
- Remember the letter of your media drive that has the installation disc, e.g. CD-ROM or DVD-ROM drive
- Type the following commands, press Enter after each and replace
D:below with the letter of your media drive:exit D: cd boot dir
- Type this command:
bootsect /nt60 SYS /mbr
- Press Enter
- Remove the CD or DVD from the media drive
- Type
exit - Press Enter
- Reboot the computer
bootrec in Windows 8/10 doesn’t work
If the bootrec utility doesn’t fix your Windows 8 system, you can also try to fix the EFI bootloader of your system:
- Boot from the install disc (DVD or USB)
- Click Repair your computer
- Choose Troubleshoot, then Command Prompt
- Type these commands in the exact order shown below and press Enter after each command:
diskpart
sel disk 0
list vol
- Select the volume number that has the FAT32 under the Fs column:
sel vol 2
where
2is the number of the FAT32 partition printed by Command Prompt above. - Assign a unique letter to this partition. The letter must not be already available on your computer, e.g. C: or D: or E:
assign letter=x:
- The confirmation message should appear:
DiskPart successfully assigned the drive letter or mount point.
- Type
exitto quit the diskpart utility (step 4):exit
- Type the following command, but replace
x:with the letter of the partition you chose earlier:cd /d x:\EFI\Microsoft\Boot\
- Type the bootrec command:
bootrec /fixboot
- Backup your old BCD configuration to create a new one:
ren BCD BCD.Backup
- Type this command to replace the BCD, but remember to replace
x:with the letter of the FAT32 partition mentioned earlier:bcdboot c:\Windows /l en-us /s x: /f ALL
- Remove the media from the drive: DVD or USB
- Type
exit - Hit Enter
- Reboot the computer
More Information
Support Links
- Easy Recovery Essentials for Windows – our repair and recovery disk.
It’s an easy-to-use and automated diagnostics disk. It’s available for Windows 8, Windows 7 and Windows Vista. It’s also available for Windows XP and Windows Server.
Read more at Windows Recovery Disks.
- The NeoSmart Support Forums, member-to-member technical support and troubleshooting.
- Get a discounted price on replacement setup and installation discs: Windows XP, Windows Vista, Windows 7, Windows 8, Windows 10.
Applicable Systems
This Windows-related knowledgebase article applies to the following operating systems:
- Windows XP (all editions)
- Windows Vista (all editions)
- Windows 7 (all editions)
- Windows 8 (all editions)
- Windows 8.1 (all editions)
- Windows 10 (all editions)
- Windows Server 2003 (all editions)
- Windows Server 2008 (all editions)
- Windows Server 2012 (all editions)
Propose an edit