Это сообщение об ошибке указывает на то, что загрузочный сектор поврежден или отсутствует.
Решение
Воспользуйтесь приведенными ниже способами, чтобы устранить ошибки запуска Windows.

Способ 1. Запуск средства восстановления при загрузке в среде восстановления Windows (WinRE)
Чтобы выполнить восстановление при загрузке в среде восстановления Windows (WinRE), сделайте следующее:
-
Вставьте установочный диск Windows в дисковод и запустите компьютер.
-
После появления сообщения Press any key to boot from CD or DVD (Нажмите любую клавишу для загрузки с компакт-диска или DVD-диска), выполните требуемое.
Если компьютер не обнаружит носитель автоматически-
При перезагрузке найдите на экране инструкции, в которых объясняется, как прервать загрузку в обычном режиме и войти в программу настройки BIOS. Чтобы начать настройку BIOS, для большинства компьютеров можно нажать клавиши F2, F10, ESC или DEL.
-
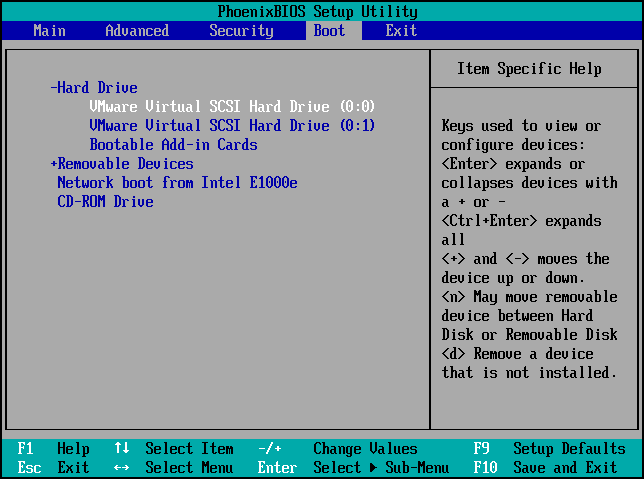
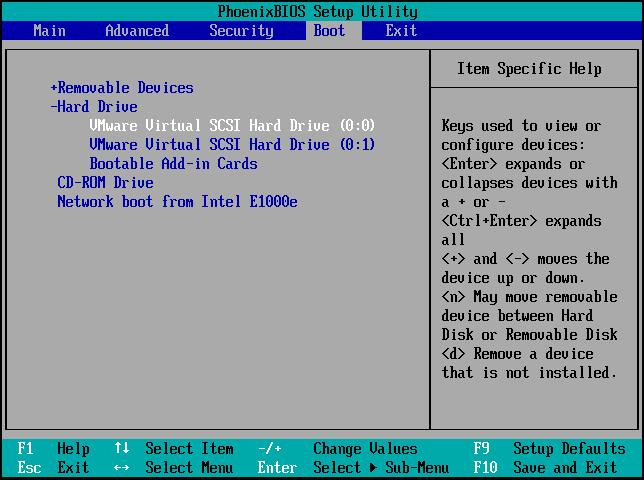
В окне программы настройки BIOS Setup Utility найдите вкладку Boot Order (Порядок загрузки), Boot Options (Параметры загрузки) или Boot (Загрузка). Следуя инструкциям на экране, воспользуйтесь клавишами со стрелками, чтобы открыть вкладку Boot Order (Порядок загрузки), а затем нажмите клавишу ВВОД.
-
В списке загрузки найдите обозначение компакт-диска, DVD-диска или USB-устройства флэш-памяти (CD, DVD или USB flash drive соответственно). Возможно, носитель определен как Removable Device (Съемное устройство). Следуя инструкциям на экране, воспользуйтесь клавишами со стрелками, чтобы поднять обозначение диска в списке загрузки и сделать его первым. Нажмите клавишу ВВОД. Теперь последовательность загрузки с компакт-диска, DVD-диска или USB-устройства флэш-памяти изменена.
-
Нажмите клавишу F10, чтобы сохранить изменения и выйти из программы настройки BIOS Setup Utility. Выберите команду Yes (Да) в окне подтверждения. Компьютер будет перезагружен.
-
-
Выберите язык, время и денежные единицы, а также способ ввода и клавиатуру, затем нажмите кнопку Далее.
-
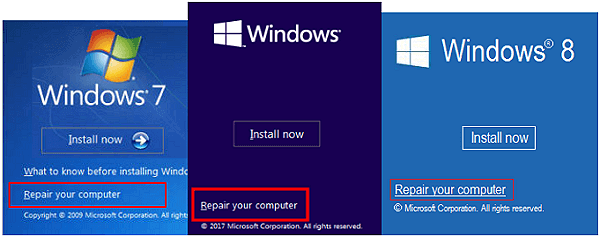
Выберите пункт Восстановить компьютер.
-
При появлении диалогового окна Параметры восстановления системы выберите диск с установочными файлами Windows и нажмите кнопку Далее.
-
В окне Параметры восстановления системы выберите пункт Восстановление системы.
-
Укажите операционную систему, которую требуется восстановить, и нажмите кнопку Далее.
-
В диалоговом окне Параметры восстановления системы выберите пункт Восстановление при загрузке.
Способ 2. Перестроение данных конфигурации загрузки в среде восстановления Windows (WinRE)
Для перестроения данных конфигурации загрузки в среде восстановления Windows (WinRE) выполните следующие действия
-
Вставьте установочный диск Windows в дисковод и запустите компьютер.
-
После появления сообщения Press any key to boot from CD or DVD (Нажмите любую клавишу для загрузки с компакт-диска или DVD-диска), выполните требуемое.
Если компьютер не обнаружит носитель автоматически-
При перезагрузке найдите на экране инструкции, в которых объясняется, как прервать загрузку в обычном режиме и войти в программу настройки BIOS. Чтобы начать настройку BIOS, для большинства компьютеров можно нажать клавиши F2, F10, ESC или DEL.
-
В окне программы настройки BIOS Setup Utility найдите вкладку Boot Order (Порядок загрузки), Boot Options (Параметры загрузки) или Boot (Загрузка). Следуя инструкциям на экране, воспользуйтесь клавишами со стрелками, чтобы открыть вкладку Boot Order (Порядок загрузки), а затем нажмите клавишу ВВОД.
-
В списке загрузки найдите обозначение компакт-диска, DVD-диска или USB-устройства флэш-памяти (CD, DVD или USB flash drive соответственно). Возможно, носитель определен как Removable Device (Съемное устройство). Следуя инструкциям на экране, воспользуйтесь клавишами со стрелками, чтобы поднять обозначение диска в списке загрузки и сделать его первым. Нажмите клавишу ВВОД. Теперь последовательность загрузки с компакт-диска, DVD-диска или USB-устройства флэш-памяти изменена.
-
Нажмите клавишу F10, чтобы сохранить изменения и выйти из программы настройки BIOS Setup Utility. Выберите команду Yes (Да) в окне подтверждения. Компьютер будет перезагружен. Пусть компьютер загрузится в обычном режиме. Проверка займет несколько минут. За это время удалится вредоносная программа, которой, возможно, заражен компьютер.
-
-
Выберите язык, время и денежную единицу, способ ввода данных (с клавиатуры или другой), а затем нажмите кнопку Далее.
-
Выберите пункт Восстановить компьютер.
-
Укажите операционную систему, которую требуется восстановить, и нажмите кнопку Далее.
-
В диалоговом окне Параметры восстановления системы выберите пункт Командная строка.
-
Введите Bootrec /RebuildBcd и нажмите клавишу ВВОД.
Подробнее о том, как использовать Bootrec.exe, см. в статье Как использовать средство Bootrec.exe в среде восстановления Windows для устранения неполадок при запуске Windows.
Способ 3. Запуск восстановления системы в среде восстановления Windows (WinRE)

Чтобы выполнить восстановление системы в среде восстановления Windows (WinRE), сделайте следующее:
-
Вставьте установочный диск Windows в дисковод и запустите компьютер.
-
После появления сообщения Press any key to boot from CD or DVD (Нажмите любую клавишу для загрузки с компакт-диска или DVD-диска), выполните требуемое.
Если компьютер не обнаружит носитель автоматически-
При перезагрузке найдите на экране инструкции, в которых объясняется, как прервать загрузку в обычном режиме и войти в программу настройки BIOS. Чтобы начать настройку BIOS, для большинства компьютеров можно нажать клавиши F2, F10, ESC или DEL.
-
В окне программы настройки BIOS Setup Utility найдите вкладку Boot Order (Порядок загрузки), Boot Options (Параметры загрузки) или Boot (Загрузка). Следуя инструкциям на экране, воспользуйтесь клавишами со стрелками, чтобы открыть вкладку Boot Order (Порядок загрузки), а затем нажмите клавишу ВВОД.
-
В списке загрузки найдите обозначение компакт-диска, DVD-диска или USB-устройства флэш-памяти (CD, DVD или USB flash drive соответственно). Возможно, носитель определен как Removable Device (Съемное устройство). Следуя инструкциям на экране, воспользуйтесь клавишами со стрелками, чтобы поднять обозначение диска в списке загрузки и сделать его первым. Нажмите клавишу ВВОД. Теперь последовательность загрузки с компакт-диска, DVD-диска или USB-устройства флэш-памяти изменена.
-
Нажмите клавишу F10, чтобы сохранить изменения и выйти из программы настройки BIOS Setup Utility. Выберите Да в окне подтверждения.
-
-
Выберите язык, время и валюту, а также способ ввода и клавиатуру, затем нажмите кнопку Далее.
-
Выберите пункт Восстановить компьютер.
-
При появлении диалогового окна Параметры восстановления системы выберите диск с установочными файлами Windows и нажмите кнопку Далее.
-
В диалоговом окне Параметры восстановления системы выберите пункт Восстановление системы.
-
Следуйте указаниям мастера восстановления системы и выберите подходящую точку восстановления.
-
Нажмите кнопку Готово, чтобы восстановить систему.
Дополнительные сведения о восстановлении системы см. в разделе Восстановление системы: часто задаваемые вопросы.
Способ 4. Использование средства восстановления при загрузке, если оно уже установлено на компьютере

Если у вас нет установочного диска Windows, но при этом на компьютере заранее установлено средство восстановления при загрузке, выполните следующие действия, чтобы восстановить загрузочные файлы.
-
Извлеките из компьютера все дискеты, компакт-диски и DVD-диски, а затем перезагрузите компьютер, нажав кнопку питания.
-
Если на компьютере установлена только одна операционная система, при перезагрузке компьютера нажмите и удерживайте клавишу F8. Клавишу F8 необходимо нажать до появления эмблемы Windows. В случае появления эмблемы Windows необходимо повторить перезагрузку после вывода приглашения войти в систему Windows.
-
Если на компьютере установлено несколько операционных систем, с помощью клавиш со стрелками выберите операционную систему, которую необходимо восстановить, а затем нажмите и удерживайте клавишу F8.
-
-
На экране Дополнительные варианты загрузки выберите с помощью клавиш со стрелками пункт Устранение неполадок компьютера и нажмите клавишу ВВОД. (Если пункт Восстановление системы отсутствует, то средства восстановления не установлены на компьютере или отключены администратором сети.)
-
Выберите раскладку клавиатуры и нажмите кнопку Далее.
-
Выберите имя пользователя, введите пароль и нажмите кнопку OK.
-
В меню Параметры восстановления системы выберите пункт Восстановление при загрузке. Средство восстановления при загрузке может предлагать вам выбор вариантов устранения проблемы и перезагружать компьютер в процессе восстановления.
Добрый день, друзья. Ошибка bootmgr is missing Windows 10 что делать? Когда вы загружаете ОС Виндовс на экране своего компьютера вы можете увидеть ошибку «bootmgr is missing». Данный сбой системы не даёт пользователю полностью загрузить компьютер до включения рабочего стола. Суть этой ошибки заключается в повреждении загрузчика. Если быть более точным, в повреждении файла bootmgr. В повреждённом состоянии файл загрузиться не сможет.
BOOTMGR – от английского сокращения Windows Boot Manager, является частицей ПО, которая загружается из загрузки кода раздела. В своём естественном состоянии данный элемент возможно только читать и местом его нахождения является каталог тома, установленного в режиме «Активный». Данный сбой возможет в любом варианте ОС Виндовс, от XP до 10. При этом, исправление проблемы у разных версий практически одни и те же.
Решаем данный сбой в версиях Виндовс 7 — 10
Итак, самое первое, что нам при этом нужно, это убрать из системного блока все USB соединения. В числе данных соединений находятся мышка с клавиатурой. После этого, перезагружаем компьютер и проверяем наличие данного сбоя. Если извлечение USB не смогло помочь, то начнём искать выход другим методом.
Выбираем приоритетный диск для загрузки
Чтобы узнать какой на данный момент в вашем БИОС из дисков является приоритетным, необходимо войти в БИОС/UEFI и лично это увидеть. Должен быть приоритетным диск С, на котором находится ОС Виндовс. Итак, проводим перезагрузку и в то время, когда компьютер загружается, многократно кликаем по кнопкам кнопки DEL или F2.
Но, вполне возможно, что в вашей версии системы придётся попробовать нажать на всё клавиши ряда F, в том числе и ESC. Вполне возможно, это кнопочка F8. Если вам так и не удалось в него войти, я написал статью: — Как войти в БИОС Windows 10.
Я не знаю, какой вариант BIOS у вас установлен, поэтому расскажу про самый простой. Итак, войдя в БИОС, нам нужна вкладка Boot. Переходим в неё с помощью стрелок и нажимаем «Ввод». В новом окошке необходимо на 1-е место установить систему. Это может быть или «1st Boot Device», или «Boot option», всё зависит от версии системы.
Итак, нажмём на «1st Boot Device» и в контекстном меню выберем ваш системный диск. Для изменения диска выбираем (+). Чтобы внесенный нами изменения сохранились, жмём F10. У вас должно получиться что-то типа:
Система UEFI
Если у вас UEFI, а не БИОС, то в этом случае поставить жесткий диск ещё легче, так как он скорее всего на русском языке, и в нём работает мышка. Вверху справа выбираем «Русский», затем в нижней части окошка с лева просто перетаскиваем мышкой нужный диск на первой место. Жмём «ввод».
Восстанавливаем запуск
Теперь нам необходимо войти в «Дополнительные параметры». Чтобы это сделать, нажимаем клавишу включения и держим её включенной секунд десять. При появлении режима WinRE, окошко «Выбор действия» переходим по команде «Поиск и устранение неисправностей»,
Затем, в окошке «диагностика» выбираем «Дополнительные параметры».
В новом окне выбираем «Восстановление при загрузке».
Данный режим проведёт восстановление и устранит сбой bootmgr is missing. Если вам этот метод не помог? Тогда переходим к другому.
Восстанавливаем через командную строку
Итак, применим восстановление используя командную строку утилиту «bootrec». Заходим в «Выбор действия» по подсказке выше. Выбираем «Поиск и устранение…», затем в новом окне «Дополнительные…», далее нам нужно выбрать «Командная строка».
Войдя в данную строку, нужно ввести следующие сочетания одно за другим:
Вначале введём bootrec /rebuildbcd нажимаем «Ввод» и проводим перезагрузку. После этого, нам станет ясно, устранён ли сбой. Не устранён?
Тогда в командную строку вводим сочетание bootrec /fixboot – которое и должно удалить все проблемы с нашей ОС.
Восстановление ОС
Можно поступить по-другому, из окна «Дополнительные параметры» нажать на команду «Восстановление системы». Итак, входим в данное окошко по методу, описанному выше, и кликнем по команде «Восстановление системы». Данная ошибка при этом методе должна исправиться.
Откат системы из резервной копии
Это на мой взгляд самый лучший способ. Вам не нужно ни чего настраивать, или проводить лечение системы. Вы просто восстанавливаете её из резервной копии, когда она работала как отлаженные часы и никаких проблем не было. Единственное условие, такая резервная копия у вас должна быть. Про то, что подобные копии системы ОБЯЗАТЕЛЬНО нужно создавать, когда ваша система работает отлично, без перебоев, я писал во многих своих статьях.
Данный способ много раз меня выручал при различных системных сбоях. Последний раз, буквально несколько дней назад, когда у меня стал возникать: — Синий экран смерти Windows 10. Про этот способ я написал отдельную статью: — Как сделать резервную копию Windows? Можете даже не сомневаться, в отличие от других методов, данный способ вам поможет наверняка!
Вывод: — Откуда появляется ошибка bootmgr is missing windows 10 что делать и как её удалить вы теперь понимаете. Воспользуйтесь тем способом из четырёх, который вам ближе. Если же у вас есть резервная копия системы, записанная на флешку, вы себе намного облегчили жизнь! Успехов!
С уважением, Андрей Зимин 10.11.2019
Статья отредактирована 25.06.2023
Понравилась статья? Поделитесь с друзьями!
Have you encountered the situation when a black screen pops up and says «BOOTMGR is Missing. Press Ctrl+Alt+Del to restart» while you are booting your Windows 10/8/7/XP computer? Don’t worry and take it easy! This post will walk you through 11 useful solutions to fix the issue of Boot Manager missing.
What Is BOOTMGR
BOOTMGR is short for Windows Boot Manager which refers to a small piece of software that is loaded from the volume boot code. Usually, the BOOTMGR file is read-only and is locating in the boot directory of the partition which is set as “active”.
On most PCs, the partition is labeled as system reserved without a drive letter. If there is no system reserved partition, BOOTMGR probably locates in your primary partition C. BOOTMGR can read boot configuration data and display the operating system selection menu.
However, sometimes BOOTMGR may be missing or lost due to reasons including incorrect bootable disk, damaged MBR, outdated BIOS, loose or damaged hard disk interface cables, etc.
BOOTMGR Error Messages
This issue usually appears shortly after the computer is turned on, immediately after the Power On Self Test (POST for short) is complete.
When the BOOTMGR error message occurs, the Windows has initially started to load. And you can see the message “BOOTMGR is missing. Press Ctrl+Alt+Del to restart“, as shown below:
In addition, you may receive different messages like “BOOTMGR is missing. Press any key to restart” or “CDBOOT: Couldn’t find BOOTMGR“.
Tip: BOOTMGR issue only applies to Windows 7, Windows 8, Windows 10 and Windows Vista. In Windows XP, missing NTLDR issue is common. Thus, if you encounter NTLDR missing error, please refer to this post – 10 Solutions to Fix NTLDR Is Missing in Windows 10/8/7.
11 Solutions to Missing BOOTMGR
- Restart your PC
- Remove all removable media
- Change boot order in BIOS
- Repair Master Boot Record
- Mark partition active
- Test hard drive
- Run Windows Startup Repair
- Reseat all internal data nad power cables
- Update BIOS
- Clean Install
- Replace the hard drive
How to Fix BOOTMGR Is Missing Windows 7/8/10
When the issue “Windows couldn’t find BOOTMGR or missing BOOTMGR” occurs, you would try to search for solutions on the internet. Here we have summarized eleven solutions for you and hopefully, you can solve your problem on your Windows 7/8/10 computer.
Here is a related video for you:
Solution 1: Restart Your Desktop or Laptop
Once Windows prompts you “BOOTMGR is missing, please try to restart your PC by pressing Ctrl+Alt+Del keys or any key”, follow what the error message suggests first because maybe the BOOTMGR error is just a fluke.
However, sometimes a reboot can’t solve the BOOTMGR problem. Therefore, please try the following ways if rebooting did not work.
Solution 2: Remove All Removable Media
Since BOOTMGR error can be caused by booting your computer from a non-bootable hard drive, you should check if your PC is configured to boot from a USB flash drive, a floppy disk, or other non-bootable disks.
If this is the problem, please remove the device and make sure your BIOS doesn’t load from any of them. Otherwise, missing BOOTMGR issue will happen again.
Solution 3: Change Boot Order in BIOS
After unplugging a non-bootable disk, perhaps Boot Manager not found error will still appear. In this case, you need to consider checking the boot sequence in BIOS.
Step 1: Restart your computer.
Step 2: Then press a specific key to go to the main interface of BIOS.
Note: The key is different depending on different computers and different Windows operating systems. It can be F2,F8, F10,F12, Esc or Del, etc.
Step 3: Then under the Boot tab, modify the boot order to set the hard drive as the first boot device.
After restarting PC, if the error “Boot Manager is missing” still happens, try to look for the next way.
Solution 4: Repair Master Boot Record
It is most likely that the message “BOOTMGR is missing” happens due to damaged Master Boot Record (MBR). In this case, it is necessary to repair MBR. You might be wondering about how you can repair MBR to fix BOOTMGR is missing with USB drive effectively; especially when the operating system is unbootable.
Don’t worry, we will introduce you a piece of professional partition and disk management software – MiniTool Partition Wizard. This tool has multiple editions including Free, Pro, Pro Ultimate, Server and more which are designed for users with different needs.
Professional Edition and the advanced editions all have a feature called Bootable Media, which is available when there is no OS or OS fails to boot.
If you fail to boot your Windows 7/8/10 OS due to the error “BOOTMGR is missing”, you can try this function. Unfortunately, the Free Edition doesn’t support this feature.
Tip: Before you do, please purchase MiniTool Partition Wizard Professional Edition to build a bootable USB flash drive or CD/DVD disc, then connect this device to your PC and boot from this device by changing the boot order in BIOS. Then start to fix BOOTMGR missing issue with a USB drive or DVD/CD disc by rebuilding MBR.
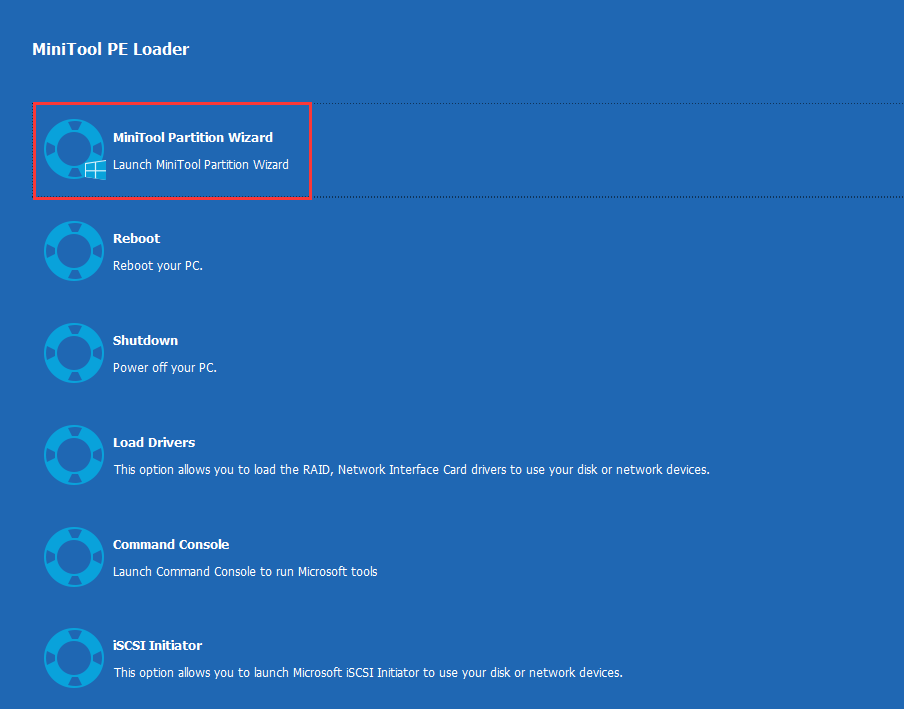
Step 1: A few seconds later, you will see the MiniTool PE Loader interface. Please launch MiniTool Partition Wizard.
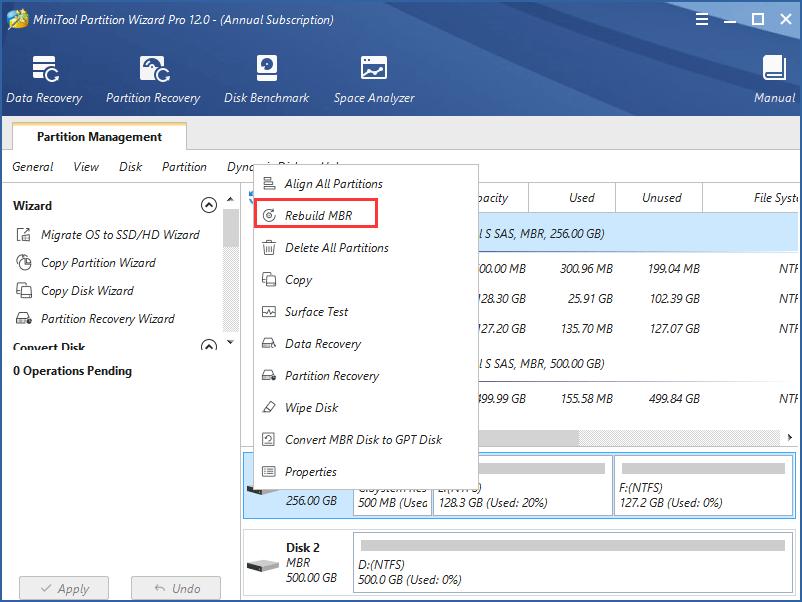
Step 2: In the MiniTool Partition Wizard main interface, right-click the target disk and choose the Rebuild MBR feature.
Step 3: Click Apply to perform MBR restoration. After finishing this operation, please exit the program and restart your computer again. The “BOOTMGR is missing press Ctrl+Alt+Del to restart” error might be solved by this way.
In addition to performing MBR recovery, some of you choose to use the bootrec tool. Firstly, you need to prepare a Windows installation disc and connect it to your PC. Next, try to repair the issue “BOOTMGR is missing” in Windows 7 with Command Prompt.
Please launch CMD according to the wizard. On Windows 7/8/10, type the following commands in turn:
bootrec /fixmbr
bootrec /fixboot
bootrec /rebuildbcd
Tip: For Windows 8/10, you need to type bootrec /scanos before rebuilding BCD.
To fix BOOTMGR using CMD seems to be a bit complicated. Therefore, here we suggest using MiniTool Partition Wizard since it is a more convenient solution.
Solution 5: Mark Partition Active
If you have marked a wrong partition active, the computer will fail to start up and show the BOOTMGR error message because the active partition probably doesn’t contain boot files. In PC there is only one active partition and system partition or boot partition must be primary and active.
In this case, you must mark the partition within boot files active to ensure the computer runs properly. In order to solve the issue, please reset your system partition active.
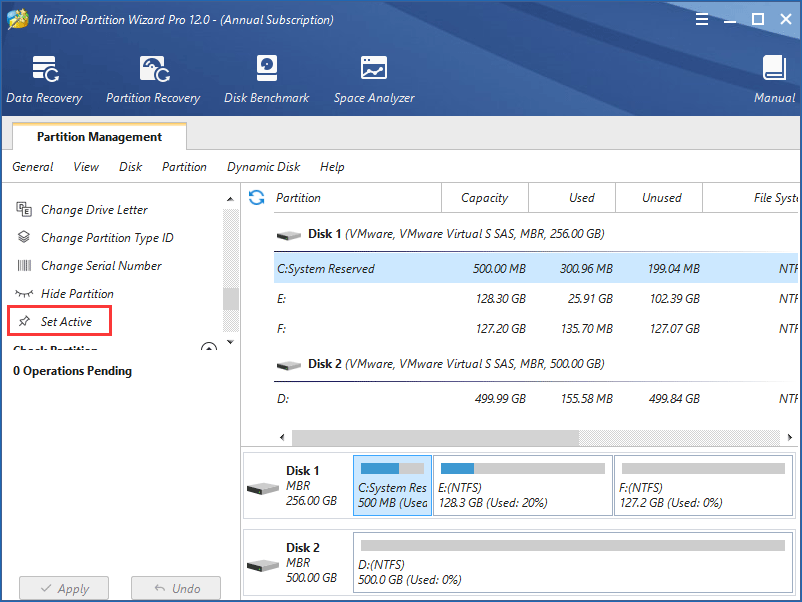
How to mark the partition active to fix “BOOTMGR is missing” on Windows 7/8/10? You can use MiniTool Partition Wizard Professional Edition as well and the operation is also very simple. Remember to boot your computer from the bootable disc or USB drive to enter the main interface of MiniTool Partition Wizard first.
Step 1: Select the wrong active partition. You could see there are many partition functions in the left pane and please select Set Inactive.
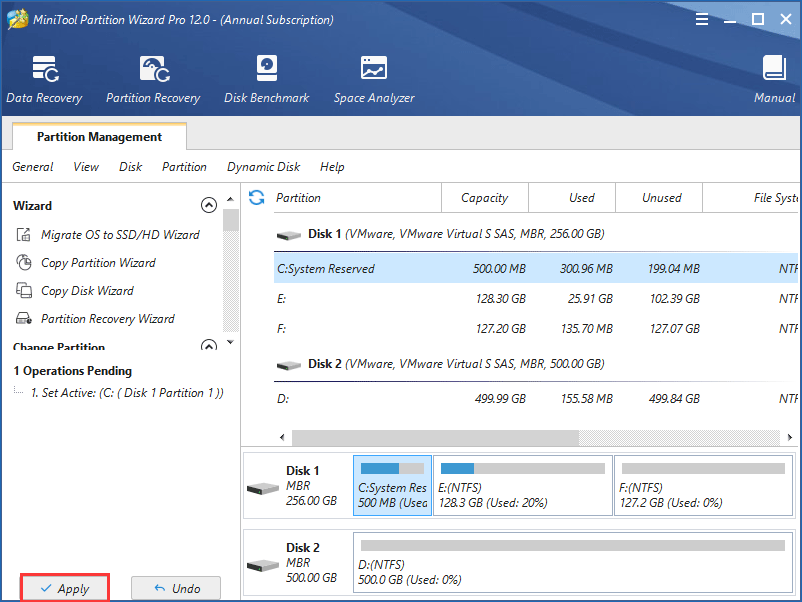
Step 2: Select the target partition, click the Set Active function from Partition Management menu.
Step 3: At last, you will go back to the main interface of MiniTool Partition Wizard again and click the Apply button to make these changes effective.
Solution 6: Test Hard Drive
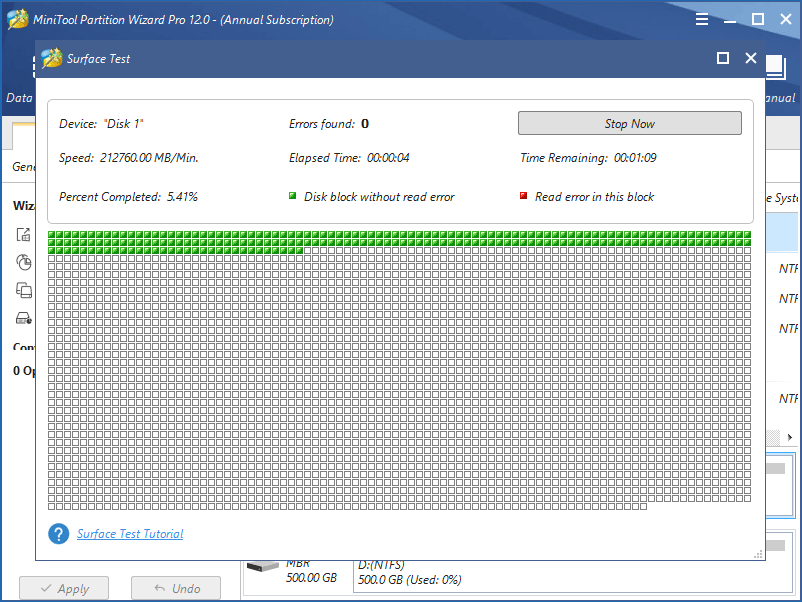
Another reason that may cause BOOTMGR files missing is that there are some bad sectors. What you need to do is to check the disk surface.
MiniTool Partition Wizard provides a feature to do this with its Surface Test on Windows 7/8/10. If bad sectors exist, this tool will mark them red. On the contrary, healthy sectors will be marked green.
Related article: What to Do If I Find Bad Sectors on Hard Drive in Windows 10/8/7?
Once bad blocks are found, you can use the chkdsk tool to shield them. If there are many bad blocks, in order to avoid data loss, please back up the significant data on the target disk.
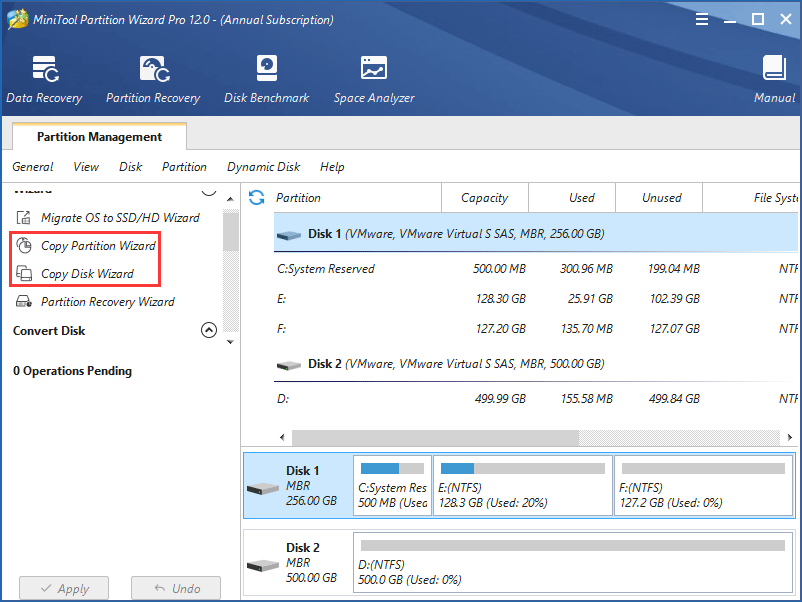
Fortunately, MiniTool Partition Wizard has those two functions: copy partition and copy disk. Here we strongly suggest cloning the entire disk data to an appropriate hard drive.
Tip:
1. The destination hard drive should be larger than the used disk space of the original disk.
2. Make sure there is no important data on the destination disk, otherwise, all data will be destroyed during the copy process.
Are you experiencing the same issue? Now try MiniTool Partition Wizard Professional Edition to create a bootable disc or USB drive to boot your computer and then fix the issue of missing BOOTMGR on Windows 7/8/10.
If there are no logical bad sectors detected on your hard drive, you can skip the backup operation and try the next solution.
Solution 7: Perform Windows Startup Repair
In addition, you can perform a Windows startup repair. This way can replace any missing or corrupted files, including BOOTMGR. You may be wondering that if there is no CD disc, can BOOTMGR is missing Windows 7 fix without CD be done? In other words, how to fix BOOTMGR is missing in Windows 7 without CD?
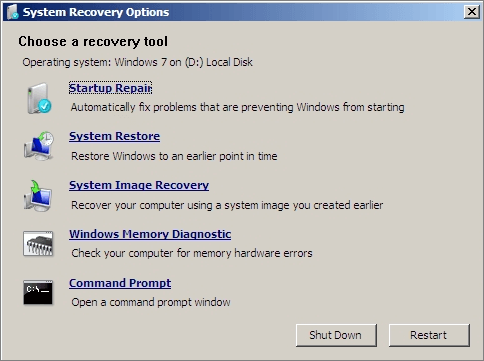
Create a bootable USB from ISO and then boot the PC from the USB drive to enter the Windows Recovery Environment. On Windows 7, choose Startup Repair under the System Recovery Options window to continue.
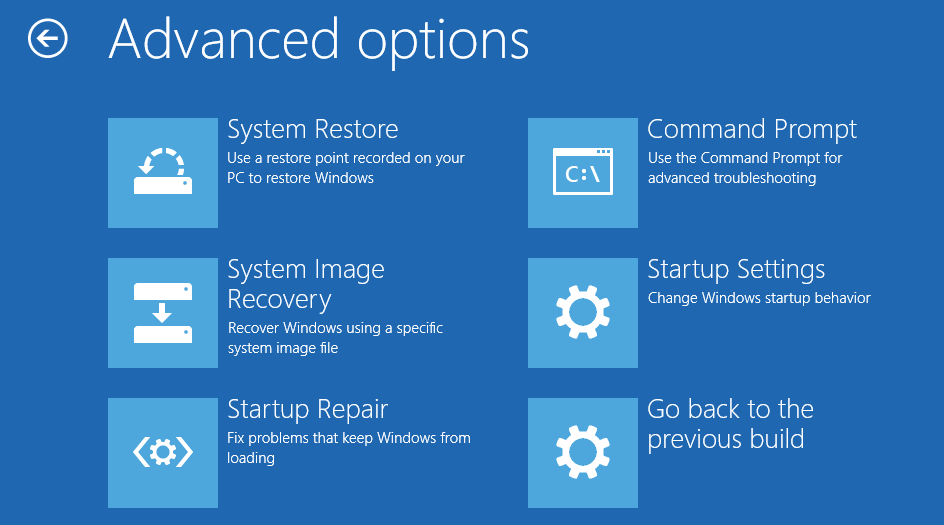
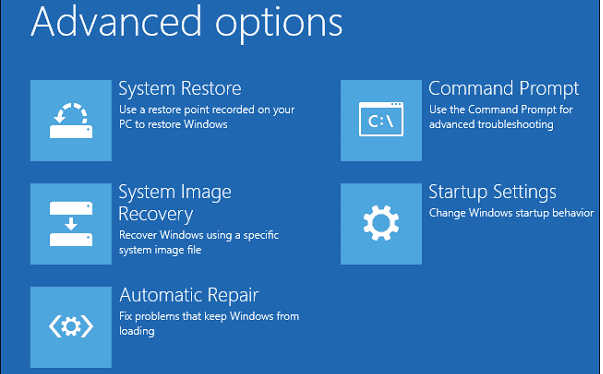
On Windows 8/10, go Troubleshoot → Advanced options → Automatic Repair(Windows 
Solution 8: Reseat All Internal Data and Power Cables
The above content mentioned the “BOOTMGR is missing press Ctrl+Alt+Delete to restart” error could be caused by loose, unplugged or malfunctioning power cables. Please try to replace the old cable with a new IDE one to check whether your cable works or not.
Solution 9: Update the Motherboard BIOS
If the BIOS on your motherboard is outdated, sometimes you will get a BOOTMGR error message. Thus, you should ensure the BIOS is upgraded to the latest version. If it is not, try to update it first since the BIOS must be available on your computer. If you don’t know how to update it, you could find the way from the article How to Update Your BIOS.
Solution 10: Perform a Clean Windows Installation
If all the solutions above did not work when trying to solve the Boot Manager missing issue, it is a good way to perform a Windows installation to repair this error. This way, it will completely remove Windows from your PC. However, all data will be deleted so you’d better back up important files before re-installing OS.
At first, follow solution 6 which shows you how to clone disk or partition using MiniTool Partition Wizard. Then you can start to install a new operating system. There is another professional backup software: MiniTool ShadowMaker that you can use it for Windows 10/8/7. It’s very easy to back up data without booting OS with the help of this software.
Solution 11: Replace the Hard Drive
If you still receive a BOOTMGR message, you should consider that the hard drive has a physical issue. The only solution for this situation is to replace the died or damaged hard disk with a new one and re-install Windows after that.
“When I ran Windows 10, I got a black screen showing “BOOTMGR is missing”. Luckily, these solutions are helpful to fix BOOTMGR. Hope you can get rid of it.”Click to Tweet
Bottom Line
Here you have come to the end of this post. After learning so much information about BOOTMGR, we think you now know what “BOOTMGR is missing” error is and understand several solutions to solve the BOOTMGR error. Now, it is time for you to solve this problem in order to fix your computer and make it runs normally.
If you have any suggestions to fix BOOTMGR on Windows 7/8/10, please don’t hesitate to tell us by leaving a comment below or sending an email to [email protected]. Thank you!
BOOTMGR Is Missing FAQ
How do I fix Bootmgr is missing?
Insert your Windows install CD. Restart your computer and boot from the CD. Click Repair your computer after selecting your language, time and keyboard method. Then choose Startup Repair under the System Recovery Options window to continue. After the Startup Repair is done, restart and check if the error “Bootmgr is missing” is fixed.
How do I fix Bootmgr is missing in Windows 10?
You can run Startup Repair to fix Bootmgr is missing in Windows 10. Create a bootable USB drive with Windows 10 Media Creation Tool. Boot from the USB drive. Click on Repair your computer after selecting language preferences. Go to Troubleshoot > Advanced options > Startup Repair. After the repair process completed, follow the prompts to restart Windows 10.
How do I fix Bootmgr is missing in Windows 7 without CD?
To fix BOOTMGR is missing in Windows 7 without CD, you can create a bootable USB from ISO and then boot the PC from the USB drive to enter the Windows Recovery Environment. Click the Repair your computer option after selecting your language, time and keyboard method. Then on Windows 7, choose Startup Repair under the System Recovery Options window to continue.
What is a Bootmgr?
BOOTMGR, the abbreviation of Windows Boot Manager, is a small piece of software that is loaded from the volume boot record. It executes winload.exe (Windows boot loader) to load important device drivers and core parts of Windows operating system. BOOTMGR helps your Windows 10, Windows 8, Windows 7, or Windows Vista operating system start. When BOOTMGR is missing, the operating system will not load, so you are unable to boot into Windows.
Сегодня при включении компьютера внезапно вылезла ошибка «BOOTMGR is missing. Press Ctrl+Alt+Del to restart». Система не загружалась. При нажатии на клавиши ПК перезагружался и снова появлялось это же сообщение.
Проблема популярна, поэтому в этой статье я расскажу о том, что делать, если вы столкнулись с этим сообщением и как исправить проблему на долгий срок. При появлении вопросов, смело задавайте их в комментариях. Итак, начнем.
Содержание статьи
- Что это и почему появляется
- Изменение настроек загрузки (boot)
- Windows 7, XP
- Windows 10 и 8
- Задействуем командную строку (универсальный метод)
- Другие варианты решений
- Видео инструкция
- Комментарии пользователей
Что это и почему появляется
В переводе на технический русский «BOOTMGR is missing» означает «Отсутствует загрузочная область». Это вовсе не значит, что ее нет, скорее всего загрузчик просто поврежден и его нужно восстанавливать. О том, как это сделать я расскажу ниже.
А вот список основных причин возникновения неполадки:
- Загрузка происходит не с жесткого диска или SSD на котором установлена операционка. А скажем, с USB флешки или с накопителя в дисководе.
- Повреждение загрузочных файлов.
- Поломка жесткого диска (ошибки или поврежденные сектора).
Теперь подробно разберем каждую неисправность и попробуем самостоятельно исправить ошибку.
Изменение настроек загрузки (boot)
Чтобы не вникать в настройки БИОС попробуйте отключить от ПК все лишнее (вторые HDD, USB флешки, карт ридеры, телефоны, фотоаппараты и прочие устройства с памятью). Возможно, ошибка самоустранится.
Если это не дало результата, то перейдем к редактированию настроек BIOS.
- Изменить порядок загрузки можно в БИОС через меню «Boot». Читайте о том, как войти в BIOS. Найдите опцию «Boot Option 1» и отметьте в ней свой накопитель с ОС. Сохраните настройки.
- Также можно использовать специальное «Boot Menu», которое вызывается одной из кнопок «F8» — «F11» (нажимайте до тех пор, пока не увидите Boot Menu) сразу после того, как произойдет включение компьютера после нажатия кнопки включения.
Если изменение конфигурации не избавило от «BOOTMGR is missing», то скорее всего дело в поврежденной загрузочной области. Как с этим бороться читайте ниже.
Windows 7, XP
Для работы понадобится загрузочный диск или флешка. Дальше действуйте по инструкции.
- Загрузитесь с флешки или диска и дойдите до экрана установки.
- Щелкните по «Восстановлению».
- Отметьте синим цветом операционку.
- Запустите автоматическое средство «Восстановление запуска».
Если средство найдет ошибки мешающие загрузке, но не исправит их, переходите к универсальным пунктам, речь о них пойдет ниже.
Windows 10 и 8
В этих версиях уже имеется выбор, использовать загрузочную флешку с дистрибутивом или запустить средство устранения неполадок, которое предусмотрено в системе.
Подробная инструкция:
- При использовании флешки дойдите до этапа установки и выберите «Восстановление».
Если загрузочного накопителя нет, при старте компьютера начните нажимать кнопку «F8» до появления окна с дополнительными опциями.
- Войдите в «Поиск и устранение неполадок».
- Переместитесь в «Дополнительные параметры».
- Теперь нажмите по пункту «Восстановление при загрузке».
Дождитесь завершения процесса проверки.
Читайте про все возможные варианты восстановления загрузчика в Windows 10, 8.
Задействуем командную строку (универсальный метод)
Еще один эффективный способ избавиться от надоедливого сообщения «BOOTMGR is missing. Press Ctrl Alt Del to restart» — командная строка. Откроем ее через среду восстановления с флешки или диска.
Дальше действуйте по шагам:
- Воспользуемся командами diskpart и list volume для отображения всех разделов.
- Запоминаем букву тома с меткой «Зарезервировано». При отсутствии такой метки можно ориентироваться на объем примерно 95 – 510 Мб. Также запоминаем букву установочного накопителя.
Бывает, что у зарезервированного места нет буквы. В таком случае ее нужно задать. Вводим select volume N (где N — порядковый номер тома). Затем assign letter=V (присваиваем букву V). После того как все шаги будут выполнены, не забудьте удалить метку «V» используя «remove letter=V», чтобы раздел не мешался в проводнике компьютера.
- Выходим через — exit.
- Командой J: открываем загрузочный накопитель. Вместо «J» введите свою букву.
- Теперь командой copy bootmgr V:\ переносим файлы загрузки (boot) с «J» в область с меткой «Зарезервировано» и объемом 95 – 510 Мб. И таким же способом переносим его в раздел с операционкой.
- Снова exit.
Закрываем командную строку и перезагружаемся.
Также можно использовать команду bcdboot.exe C:\Windows, где вместо «C» нужно ввести букву тома на котором установлена ОС. Это полностью пересоздаст загрузочную область.
Есть и другие команды, правда они менее эффективны. Срабатывают далеко не всегда.
bootrec /fixmbr
bootrec /fixboot
bootrec /rebuildbcd
Их преимущество заключается в том, что они запускают автоматический поиск и исправление загрузчика во всех существующих разделах и копий операционки.
Другие варианты решений
Разберем основные сложности и дополнительные варианты решений.
- Если ни одна из команд не работает, то скорее всего операция проводится над неактивным разделом. Нужно пометить системный диск активным. В помощь следующие команды (буква «N» обозначает номер, у каждого он может быть свой):
diskpart
list disk
select disk N
list partition
select partition N
active
Если вдруг случайно пометили активным не тот раздел, то вместо команды «active» нужно ввести «inactive».
- Некоторым юзерам помогает отключение ПК из сети вместе с отсоединением от материнской платы питания, оперативной памяти, видеокарты, жесткого диска и SSD. После повторного подключения «BOOTMGR is missing» пропадает.
- Установите другую сборку ОС или измените конфигурацию компьютера. Иногда ошибка появляется из-за несовместимости железа.
- Обновите BIOS и при необходимости замените батарею питания. Из-за севшей батареи настройки CMOS не сохраняются.
- Возможно, загрузочный сектор с объемом (95 – 510 Мб) или раздел с операционной системой преобразовался в RAW формат. Можно попробовать его преобразовать обратно в NTFS. Однако получается это не всегда и помогает только полная переустановка.
- Используйте точку отката. При этом они должны быть созданы.
Читайте про похожую ошибку «BOOTMGR corrupt».
Заключительной рекомендацией станет использование утилит для создания бэкапа (резервных копий). Причем многие из них делают его автоматически, например, сразу при загрузке компьютера. Восстановление системы из резервных копий происходит в течении 30-40 минут. Это экономит время и избавляет от периодических переустановок софта.
Видео инструкция
| Workable Solutions | Step-by-step Troubleshooting |
|---|---|
| Fix 1. Restart Your Computer | The Bootmgr error could be a fluke. Rebooting a computer can fix software conflicts that cause Bootmgr…Full steps |
| Fix 2. Reset All Internal Data and Power Cables | Bootmgr error could be caused by unplugged, loose, or malfunctioning power or controller cables…Full steps |
| Fix 3. Remove Non-Bootable Media | Bootmgr error will appear if your computer is trying to boot from a non-bootable media inserted…Full steps |
| Fix 4. Change the Boot Order in BIOS | If you have more than one drive, go to BIOS and make sure the bootable device is listed first…Full steps |
| Fix 5. Rebuild BCD in WinRE | You can use the bootrec.exe tool in the Windows Recovery Environment (Windows RE) to repair the error…Full steps |
| Fix 6. Fix Corrupted MBR with Bootable USB | The Bootmgr is missing hight happen due to a damaged Master Boot Record. So, you can repair MBR…Full steps |
| More 4 Useful Methods | Run Startup Repair, perform a system restore if you have a backup image and clean installation Windows…Full steps |
Windows 10 BOOTMGR Is Missing Error Overview
Some users may have the experience of getting a black screen, showing the error message «BOOTMGR is Missing. Press Ctrl+Alt+Del to restart» while trying to boot their Windows 10 or Windows 7 PCs lust like the screenshot displays:
You may also see BOOTMGR is missing with the following different error messages:
- «BOOTMGR is missing Press any key to restart.»
- «BOOTMGR image is corrupt. The system cannot boot.»
- «Couldn’t find BOOTMGR»
What Is BOOTMGR
BOOTMGR (Windows Boot Manager) is a read-only hidden file that is located in the root directory of a partition marked Active, which is usually a system-reserved partition without a drive letter. BOOTMGR loads volume boot code automatically and starts your operating system from the hard drive.
When BOOTMGR is missing or corrupted, Windows can’t boot and shows you the ‘BOOTMGR is Missing’ error.
What Are the Causes of BOOTMGR is Missing Windows 10/7
When you start your computer, the PST (stands for Power On Self Test) processes begin to run by BIOS before booting your Windows copy. The BOOTMGR is missing error occurs after the Power On Self Test (POST) is complete, and Windows starts to load.
The BOOTMGR error can be caused by many things, including:
- The BOOTMGR files are corrupted and misconfigured.
- Windows boot sector is damaged or missing.
- The PC is set to boot from a non-bootable device.
- Errors, corruptions, or bad sectors appear on the hard drive.
- Other reasons like outdated BIOS, loose or damaged hard disk interface cables, hard drive, and operating system upgrade issues.
This guide will talk about how to fix Bootmgr is missing error on Windows 10 or Windows 7. Let’s get started.
We’ve provided below 10 fixes that you can use to fix Windows 10, or Windows 7 BOOTMGR is missing problem. Go through in order, step by step, and check which one will work for you.
Fix 1. Restart Your Desktop or Laptop
It’s not a deceptive trick; sometimes, a rebooting can help you repair BOOTMGR. And if it doesn’t work, try the next way.
Fix 2. Reset All Internal Data and Power Cables
BOOTMGR missing error may be due to unplugged, loose, faulty power, or controller cables. Re-set and reconnect all SATA cables and power cables between the PC and hard drives.
Fix 3. Remove Non-Bootable Media
To rule out the possibility that the ‘BOOTMGR is Missing’ error appears because your PC is trying to boot from a non-bootable device, make sure you have removed all the removable media such as a USB flash drive, a floppy disk, or other unbootable disks.
Fix 4. Change the Boot Order in BIOS
Does the Windows 10 BOOTMGR missing issue still happen? Check the boot sequence in BIOS and make sure the correct hard drive or other bootable device is listed first to boot your computer.
Step 1. Restart your Windows 10 or Windows 7 computer. When the computer starts to boot up, press DEL or F2 key to enter BIOS Setup.
Step 2. Then, under the «Boot» tab, check if the hard drive is set as the BIOS’s first boot device. If not, correct it. Finally, restart the PC.
Fix 5. Recreate BCD from Windows Recovery Environment (WinRE)
A corrupted or incorrectly configured BCD could cause BOOTMGR is missing error. bootrec.exe is a tool built in the Windows Recovery Environment (Windows RE) that you can use to troubleshoot and repair boot configuration data and master boot records. To rebuild BCD from Windows Recovery Environment (WinRE), follow these steps:
Step 1. Insert Windows installation disk to your PC and restart it from the disk, click «Repair your computer».
Step 2. Click «Troubleshoot» > «Advanced options» > «Command Prompt» and type: C: and hit Enter.
Step 3. In Command prompt, type the following commands in order and hit Enter:
bootrec /fixmbr
bootrec /fixboot
bootrec /rebuildbcd
Chkdsk /f
Step 4. After completing each command successfully, type exit and restart your computer. It should be able to boot up and run properly again.
Fix 6. Repair Corrupted Master Boot Record with Bootable USB
If the MBR is corrupted, the computer wouldn’t boot up and shows BOOTMGR is missing error message, and you’ll need to rebuild the MBR on your PC with the help of EaseUS Windows partition manager. You can repair the corrupted MBR with a bootable UBS and fix BOOTMGR is missing on Windows 10/8/7 without installation disc.
- Transfer free disk space from one drive to another directly.
- Resize/move, merge, clone partition, and check file system error.
- Clone disk, convert to MBR/GPT, convert to dynamic/basic, and even wipe data.
- Migrate OS to SSD to speed up Windows without reinstalling.
Step 1. Create a WinPE bootable disk
- Launch EaseUS Partition Master, and click «Bootable Media» on the toolbar. Select «Create bootable media».
- Click «Next» to finish the process.
Step 2. Boot EaseUS Partition Master Bootable USB
- Connect the bootable USB or CD/DVD to your PC.
- Press F2 or Del when you restart the computer to enter the BIOS screen. Set and boot your computer from «Removable Devices» or «CD-ROM Drive». And then EaseUS Partition Master will run automatically.
Step 3. Rebuild MBR
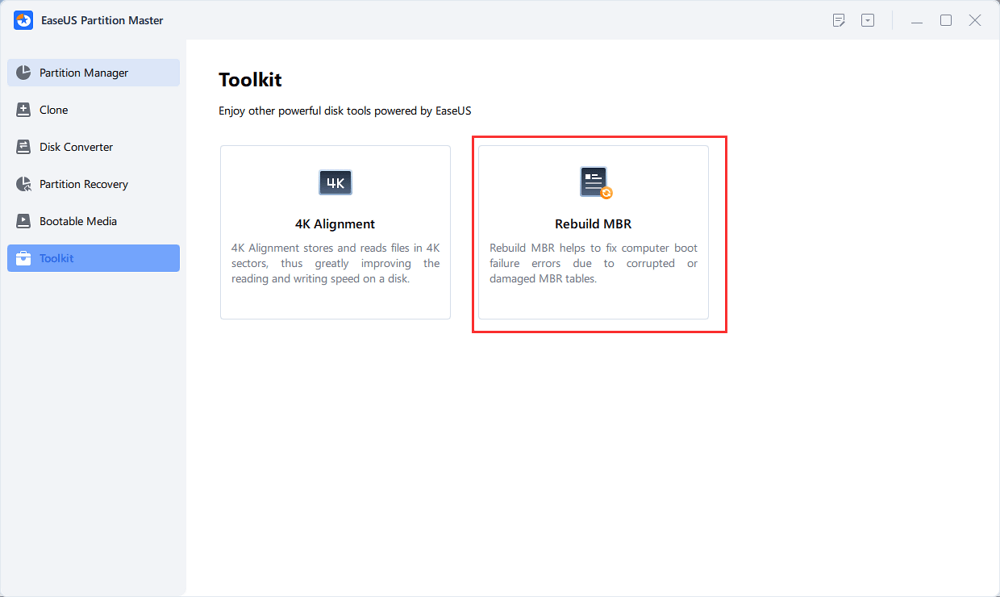
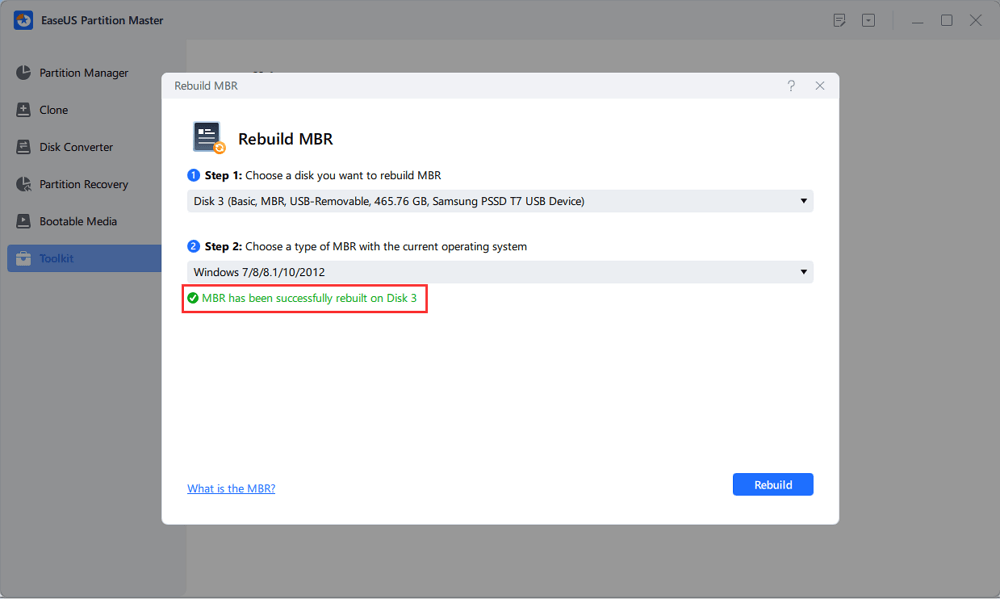
- Click «Toolkit» and choose «Rebuild MBR».
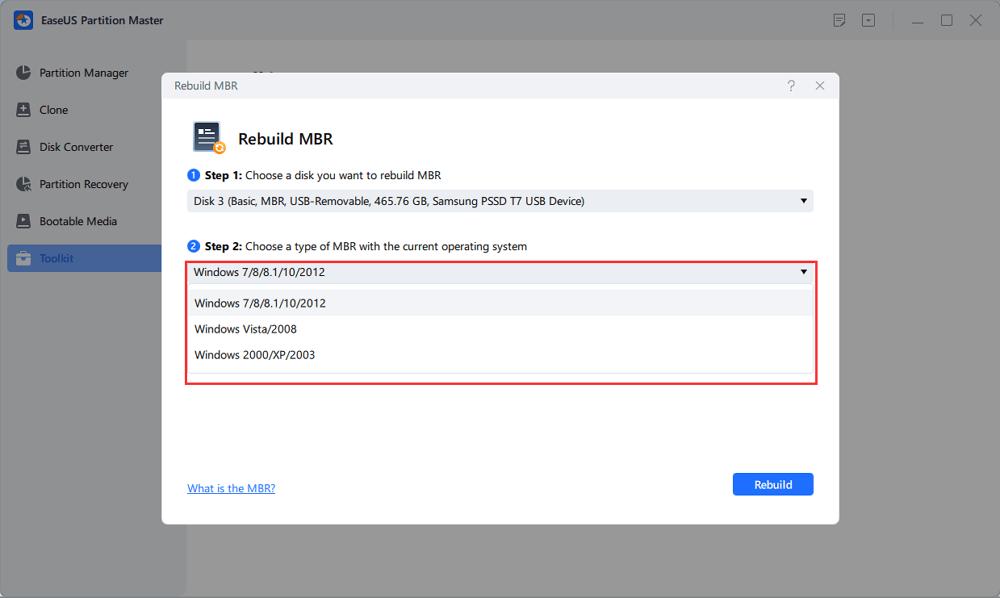
- Select the disk and the type of MBR. Then, click «Rebuild».
- After that, you can see «MBR has been successfully rebuilt on Disk X».
Fix 7. Run Startup Repair from Windows Recovery Environment (WinRE)
Run Startup Repair on Windows 7 to fix BOOTMGR is missing:
Step 1. Insert the Windows installation disc, and then start the computer. If there is no installation CD, how to fix BOOTMGR is missing in Windows 7 without CD? You can create a bootable USB from ISO and then boot the PC from the USB drive to enter the Windows Recovery Environment.
Step 2. Select «Startup Repair» under the System Recovery Options window to continue.
Run Startup Repair on Windows 10 and Windows 10
Step 1. Insert the Windows 10 bootable installation disc, and then start the computer.
Step 2. Press a key when the message Press any key to boot from CD or DVD appears.
Step 3. Select a language, a time and currency, a keyboard or input method, and then click «Next». Select «Repair your computer».
Step 4. Click «Troubleshoot» on the Choose an option screen. Then, on the Troubleshoot screen, click the «Advanced» option.
Step 5. On the Advanced options screen, click «Automatic Repair or Startup Repair».
Restart your computer and check whether you have successfully fix BOOTMGR is missing in Windows 10. If not, continue.
Fix 8. Perform a System Restore if You Have a Backup Image
If System Restore is enabled on your computer, you can try to run System Restore from Windows Recovery Environment (WinRE) to fix Windows 7 or Windows 10 BOOTMGR is missing problem.
Step 1. Repeat the steps above to find the Startup Repair options by using the Windows installation disc. This time, select «System Restore».
Step 2. Follow the System Restore Wizard instructions and select the appropriate restore point.
Step 3. Select Finish to restore the system.
These are all the possible methods that might help you fix BOOTMGR is missing error caused by various reasons. We hope that these solutions are helpful. Otherwise, I am afraid you may need to consider to do a clean Windows Installation or replace the PC hard drive.
Fix 9. Perform a Clean Installation of Windows
Performing a clean installation of Windows will completely remove Windows from your PC and install it again from scratch. This way can certainly resolve the BOOTMGR is missing issue on Windows operating system.
A clean installation will erase all of your data, so you must back up your important files in advance, or you will lose them all. If you can’t access your data to back them up, use professional data recovery software — EaseUS Data Recovery Wizard to recover data from a computer that won’t boot.
Step 1. Create a bootable disk
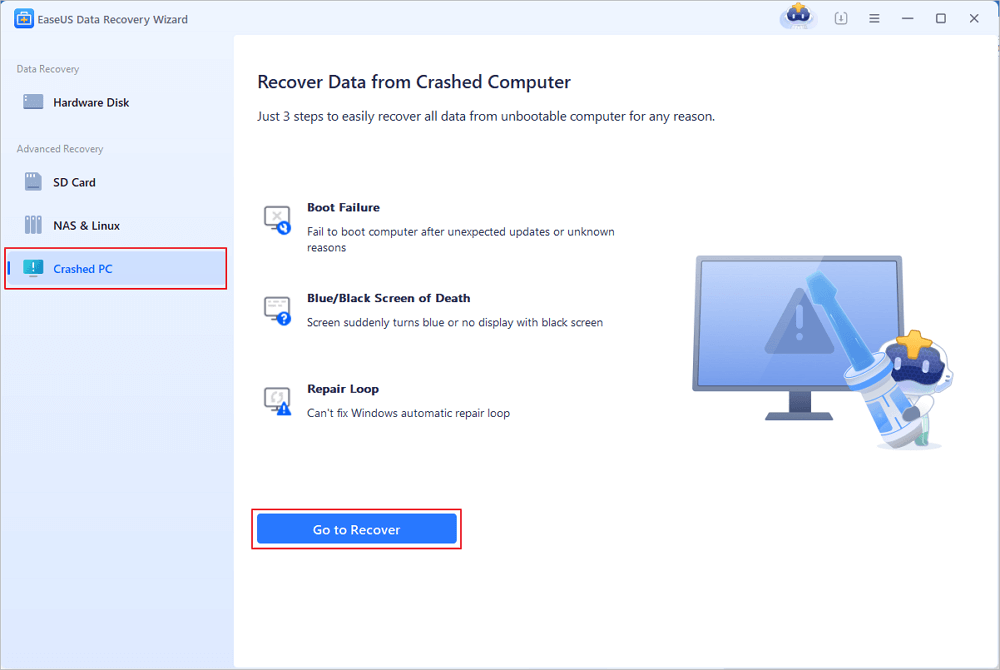
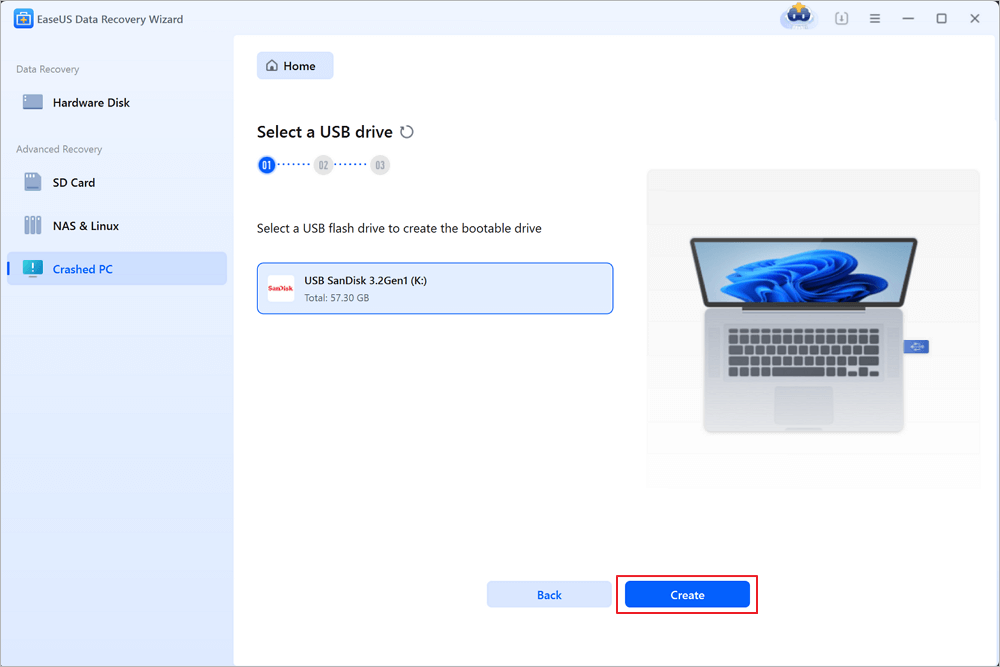
Launch EaseUS Data Recovery Wizard, choose «Crashed PC Recovery» and click «Go to Recover».
Select an empty USB to create the bootable drive and click «Create».
Warning: When you create a bootable disk, EaseUS Data Recovery Wizard will erase all data saved in the USB drive. Back up important data beforehand.
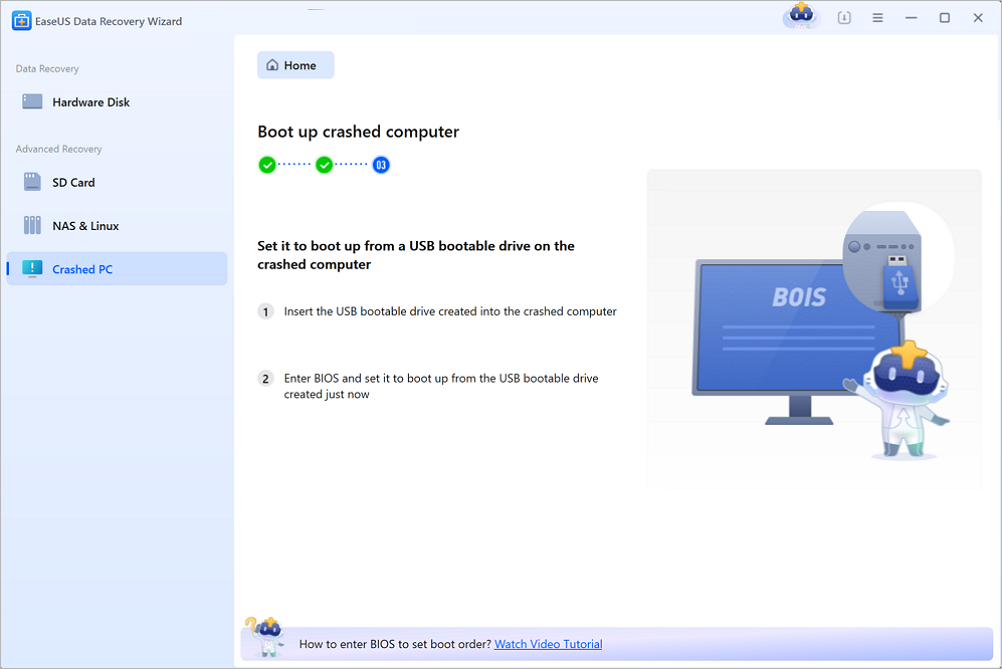
Step 2. Boot your computer from the bootable USB
Connect the bootable disk to the PC that won’t boot and change your computer boot sequence in BIOS. For most users, it works well when they restart their computer and press F2 simultaneously to enter BIOS.
Set to boot the PC from «Removable Devices» (bootable USB disk) beyond Hard Drive. Press «F10» to save and exit.
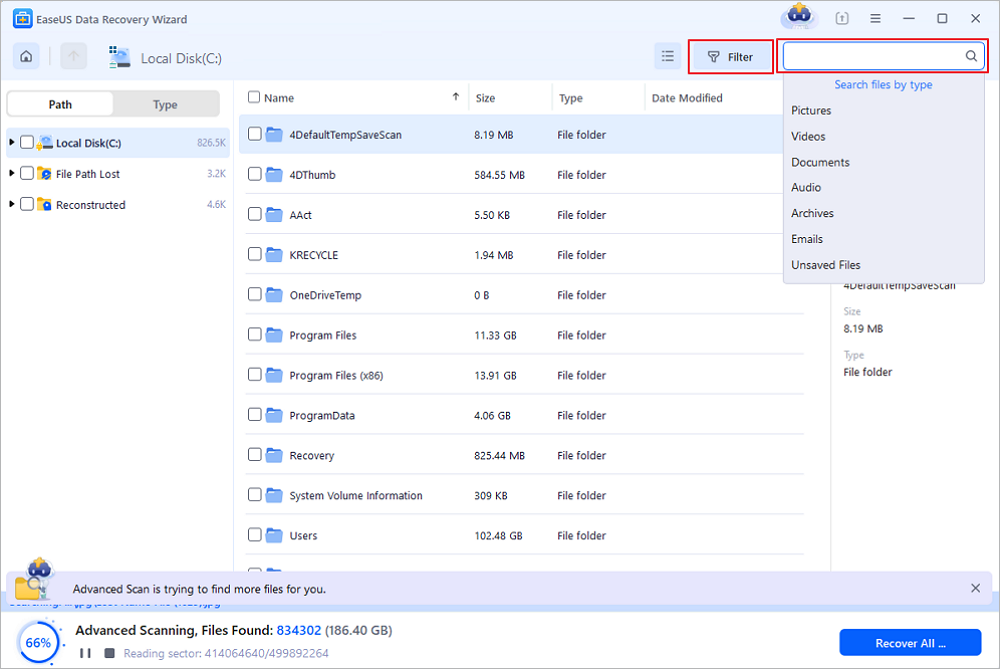
Step 3. Recover data from a crashed system/PC
After booting from EaseUS Data Recovery Wizard bootable disk, select the drive you want to scan to find all your lost files. Preview and recover the files you need to a safe location.
Fix 10. Replace the Hard Drive
If the clean installation fails neither, you’re most likely facing a hardware issue with your hard drive. Then, recover your data from the corrupted hard drive and replace the hard drive. Then, you will not encounter the BOOTMGR missing error in Windows.


