This tutorial will be showing you how to boot ISO files stored on your hard drive with the GRUB2 boot loader. Normally you need to create a live DVD or live USB in order to boot Linux ISO images. You can do it with graphical tools or from the command line. But what if you don’t have an optical disk or USB thumb drive around, or your computer does not support burning ISO images to an optical disk?

GRUB to the rescue
GRUB2 (GRand Unified Bootloader) is the standard boot loader for Linux. It can boot Linux ISO image files stored on the hard drive without a USB or DVD. GRUB Legacy (version 0.x) doesn’t have this feature. Many Linux distributions can be booted directly from an ISO file.
- GRUB2 supports many file systems, including but not limited to
ext4,HFS+, andNTFS, which means you can put your ISO file on any of these file systems. - GRUB2 can read files directly from LVM and RAID devices.
- GRUB2 also has network support. You can load ISO images over the network by using the TFTP protocol.
To use GRUB2 to boot ISO files, you need a Linux distro with GRUB2 as the boot loader already installed on your computer. The following instructions work on both the traditional BIOS and the newer UEFI firmware. However, if you use UEFI, then you should disable secure boot in the firmware for GRUB2 to boot ISO files, otherwise, you might see the “can not find command loopback” error.
Now let’s get started.
Boot Ubuntu ISO Files From GRUB2
Log in to a computer running Linux and download an Ubuntu ISO image file. Then open up a terminal window and edit the /etc/grub.d/40_custom file with a command-line text editor like Nano.
sudo nano /etc/grub.d/40_custom
The first line of this file is #! /bin/sh indicating it’s a shell script. In this file, we can add custom entries to the GRUB boot menu.
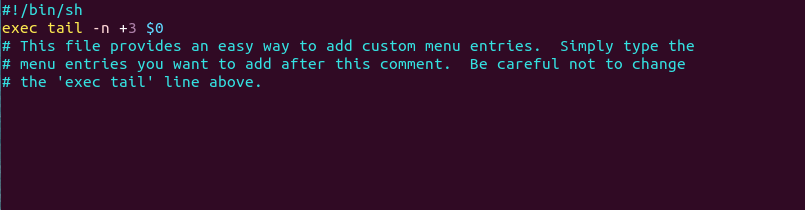
Copy and paste the following text at the end of this file.
menuentry "ubuntu-20.04.2.0-desktop-amd64.iso" {
  insmod ext2
  set isofile="/home/linuxbabe/Downloads/ubuntu-20.04.2.0-desktop-amd64.iso"
  loopback loop (hd0,5)$isofile
  linux (loop)/casper/vmlinuz boot=casper iso-scan/filename=$isofile quiet noeject noprompt splash
  initrd (loop)/casper/initrd
}
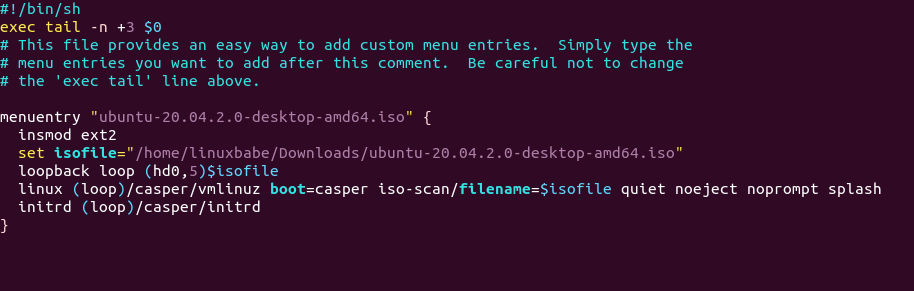
Where:
- menuentry: This entry will be displayed on the GRUB2 boot menu. You can name it whatever you like.
- The insmod command inserts a module. Since the ISO file is stored under my
ext4home dierctory, theext2module is needed. If it’s stored on an NTFS partition, then you needinsmod ntfsinstead. Note that GRUB may not be able to recognize XFS and Btrfs file system, so it’s not recommended to store the ISO file on a XFS or Btrfs partition. - set isofile: Specify that path of your ISO image file. Here I’m using Ubuntu 20.04 Desktop ISO file saved under the
Downloadsfolder. - loopback: Mount the ISO file.
hd0means the first hard drive in the computer and5means the ISO file is stored on the 5th disk partition. - The
linuxcommand loads a Linux kernel from the specified path. casper/vmlinuz.efi is the linux kernel inside the Ubuntu ISO image. - The
initrdcommand loads an initial ramdisk from the specified path. It can only be used after thelinuxcommand has been run. The initial ramdisk is a minimal root file system mounted to the RAM. casper/initrd.lz is the initrd file inside the Ubuntu ISO image.
Note that GRUB does not distinguish IDE from SCSI. In Linux kernel:
/dev/hdarefers to the first IDE hard drive and/dev/sdarefers to the first SCSI or SATA hard drive./dev/nvme0n1refers to the first NVMe SSD./dev/nvme1n1refers to the second NVMe SSD.
But in GRUB, the first hard drive is always referred to as hd0, no matter what the interface type is. Also note that partition numbers in GRUB start at 1, not 0.
If the ISO file is stored on an extended partition of MBR disk, the partition number starts from 5, instead of 1. For example, the first logical partition inside an extended partition will be numbered as 5; the second logical partition inside an extended partition will be numbered as 6. To check your partition number, you can run lsblk or sudo parted -l command in the terminal window.
Save and close the file. (Press Ctrl+O, then press Enter to save a file in Nano text editor. Press Ctrl+X to exit.)
Then update GRUB boot menu with the following command:
sudo grub-mkconfig -o /boot/grub/grub.cfg
On Fedora, CentOS, RHEL, OpenSUSE, the command to run is:
sudo grub2-mkconfig -o /boot/grub2/grub.cfg
On Debian, Ubuntu, Linux Mint, you can use the following command to update GRUB boot menu.
sudo update-grub
You might not see the new menu entry right away, but you will see it when you reboot your computer.
sudo shutdown -r now
You will see your custom entry at the bottom of the GRUB2 boot menu. If GRUB couldn’t boot your ISO image, please check /etc/grub.d/40_custom file to see if there is a typo or you left out a space or something like that.

You can add as many menu entries as you like in the /etc/grub.d/40_custom file.
Debian ISO
Download the Debian live CD ISO file. Next, open up a terminal window and edit the /etc/grub.d/40_custom file with a text editor such as Nano.
sudo nano /etc/grub.d/40_custom
In this file, we can add custom entries to the GRUB boot menu. In this case, we want to add an entry to boot a Debian ISO file.
menuentry "debian-live-10.8.0-amd64-lxqt.iso" {
  insmod ext2
  set isofile="/home/linuxbabe/Downloads/debian-live-10.8.0-amd64-lxqt.iso"
  loopback loop (hd0,5)$isofile
  linux (loop)/live/vmlinuz-4.19.0-14-amd64 boot=live findiso=$isofile
  initrd (loop)/live/initrd.img-4.19.0-14-amd64
}
Note that the vmlinuz and initrd.img file include version number. You should mount your Debian ISO file and check if you should update it. Save and close the file. Then update GRUB boot menu.
sudo grub-mkconfig -o /boot/grub/grub.cfg
or
sudo grub2-mkconfig -o /boot/grub2/grub.cfg
Arch Linux ISO
Download the Arch Linux ISO file. Next, open up a terminal window and edit the /etc/grub.d/40_custom file with a text editor such as Nano.
sudo nano /etc/grub.d/40_custom
In this file, we can add custom entries to the GRUB boot menu. In this case, we want to add an entry to boot a Arch Linux ISO file.
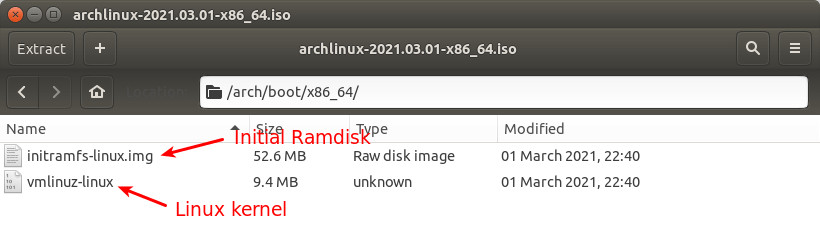
menuentry "archlinux-2021.03.01-x86_64.iso" {
  insmod ext2
  set isofile="/home/linuxbabe/Downloads/archlinux-2021.03.01-x86_64.iso"
  loopback loop (hd0,5)$isofile
  linux (loop)/arch/boot/x86_64/vmlinuz-linux archisolabel=ARCH_202103 img_dev=/dev/sda5 img_loop=$isofile earlymodules=loop
  initrd (loop)/arch/boot/x86_64/initramfs-linux.img
}
Note that if you download a newer Arch Linux ISO file such as archlinux-2021.04.01-x86_64.iso, then you need to update the archisolabel to ARCH_202104. You can also find out what the label should be by mounting the Arch Linux ISO in your file manager. The label will be shown in your file manager.

Also you might need to change the value of img_dev. It’s the name of the device where your ISO file is stored.
Save and close the file. Then update GRUB boot menu.
sudo grub-mkconfig -o /boot/grub/grub.cfg
or
sudo grub2-mkconfig -o /boot/grub2/grub.cfg
Clonezilla Live ISO
Clonezilla is a free open-source and reliable tool for bare metal backup and recovery of disk drives. Download the Clonezilla live ISO file. Next, open up a terminal window and edit the /etc/grub.d/40_custom file with a text editor such as Nano.
sudo nano /etc/grub.d/40_custom
In this file, we can add custom entries to the GRUB boot menu. In this case, we want to add an entry to boot Clonezilla Live ISO file.
menuentry "clonezilla-live-20210127-groovy-amd64.iso" {
  insmod ext2
  set isofile="/home/linuxbabe/Downloads/clonezilla-live-20210127-groovy-amd64.iso"
  loopback loop (hd0,5)$isofile
  linux (loop)/live/vmlinuz boot=live findiso=$isofile
  initrd (loop)/live/initrd.img
}
Save and close the file. Then update GRUB boot menu.
sudo grub-mkconfig -o /boot/grub/grub.cfg
or
sudo grub2-mkconfig -o /boot/grub2/grub.cfg
RHEL 8/CentOS Stream ISO
First, download the ISO image file. For RHEL 8, please read the following article to learn how to download ISO image file.
- How to Download and Install RHEL8 For Free (Red Hat Enterprise Linux)
CentOS Stream ISO image can be downloaded from its official website.
Next, open up a terminal window and edit the /etc/grub.d/40_custom file with a text editor such as Nano.
sudo nano /etc/grub.d/40_custom
In this file, we can add custom entries to the GRUB boot menu. In this case, we want to add an entry to boot RHEL 8/CentOS/Fedora ISO file.
menuentry "rhel-8.3-x86_64-boot.iso" {
  insmod ext2
  set isofile="/home/linuxbabe/Downloads/rhel-8.3-x86_64-boot.iso"
  loopback loop (hd0,5)$isofile
  linux (loop)/isolinux/vmlinuz noeject inst.stage2=hd:/dev/sda5:$isofile
  initrd (loop)/isolinux/initrd.img
}
In the above code, /dev/sda5 is the 5th partition of the first disk where the ISO image file is stored. Save and close the file. Then update GRUB boot menu.
sudo grub-mkconfig -o /boot/grub/grub.cfg
or
sudo grub2-mkconfig -o /boot/grub2/grub.cfg
Fedora ISO
Fedora ISO image can be downloaded from its official website. Next, open up a terminal window and edit the /etc/grub.d/40_custom file with a text editor such as Nano.
sudo nano /etc/grub.d/40_custom
In this file, we can add custom entries to the GRUB boot menu. In this case, we want to add an entry to boot Fedora ISO file.
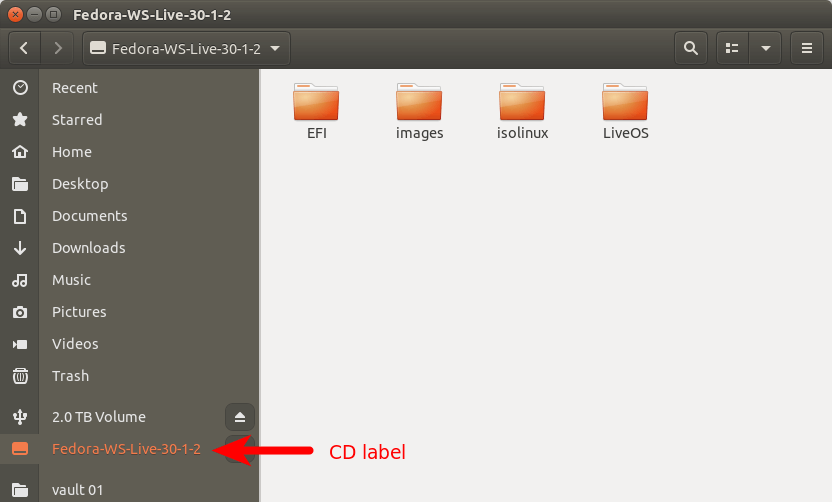
menuentry "Fedora-Workstation-Live-x86_64-33-1.2.iso" {
  insmod ext2
  set isofile="/home/linuxbabe/Downloads/Fedora-Workstation-Live-x86_64-33-1.2.iso"
  loopback loop (hd0,5)$isofile
  linux (loop)/isolinux/vmlinuz root=live:CDLABEL=Fedora-WS-Live-33-1-2 rd.live.image verbose iso-scan/filename=$isofile
  initrd (loop)/isolinux/initrd.img
}
In the above code, CDLABEL is the the label displayed in your file manager when the ISO image is mounted.
Save and close the file. Then update GRUB boot menu.
sudo grub-mkconfig -o /boot/grub/grub.cfg
or
sudo grub2-mkconfig -o /boot/grub2/grub.cfg
OpenSUSE Leap Live ISO
Download the OpenSUSE Leap live ISO file. Next, open up a terminal window and edit the /etc/grub.d/40_custom file with a text editor such as Nano.
sudo nano /etc/grub.d/40_custom
In this file, we can add custom entries to the GRUB boot menu. In this case, we want to add an entry to boot OpenSUSE Leap Live ISO file.
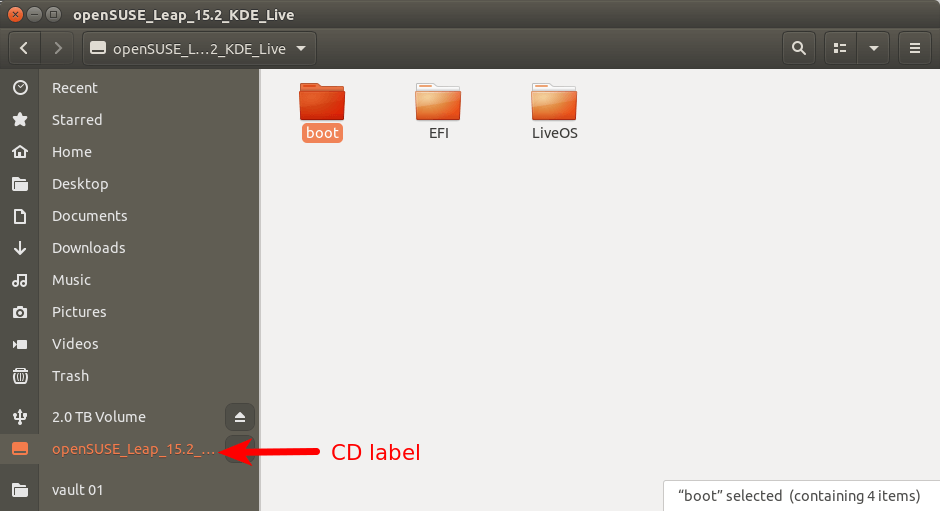
menuentry "openSUSE-Leap-15.2-KDE-Live-x86_64-Build31.383-Media.iso" {
  insmod ext2
  set isofile="/home/linuxbabe/Downloads/openSUSE-Leap-15.2-KDE-Live-x86_64-Build31.383-Media.iso"
  loopback loop (hd0,5)$isofile
  linux (loop)/boot/x86_64/loader/linux boot=isolinux root=live:CDLABEL=openSUSE_Leap_15.2_KDE_Live rd.live.image verbose iso-scan/filename=$isofile
  initrd (loop)/boot/x86_64/loader/initrd
}
In the above code, CDLABEL is the the label displayed in your file manager when the ISO image is mounted.
Save and close the file. Then update GRUB boot menu.
sudo grub-mkconfig -o /boot/grub/grub.cfg
or
sudo grub2-mkconfig -o /boot/grub2/grub.cfg
Kali Linux Live ISO
Download the Kali Linux live ISO file. Next, open up a terminal window and edit the /etc/grub.d/40_custom file with a text editor such as Nano.
sudo nano /etc/grub.d/40_custom
In this file, we can add custom entries to the GRUB boot menu. In this case, we want to add an entry to boot a Kali Linux Live ISO file.
menuentry "kali-linux-2021.1-live-amd64.iso" {
  insmod ext2
  set isofile="/home/linuxbabe/Downloads/kali-linux-2021.1-live-amd64.iso"
  loopback loop (hd0,5)$isofile
  linux (loop)/live/vmlinuz boot=live findiso=$isofile
  initrd (loop)/live/initrd.img
}
Save and close the file. Then update GRUB boot menu.
sudo grub-mkconfig -o /boot/grub/grub.cfg
or
sudo grub2-mkconfig -o /boot/grub2/grub.cfg
Linux Mint Live ISO
Download the Linux Mint ISO file. Next, open up a terminal window and edit the /etc/grub.d/40_custom file with a text editor such as Nano.
sudo nano /etc/grub.d/40_custom
In this file, we can add custom entries to the GRUB boot menu. In this case, we want to add an entry to boot a Linux Mint ISO file.
menuentry "linuxmint-20.1-cinnamon-64bit.iso" {
  insmod ext2
  set isofile="/home/linuxbabe/Downloads/linuxmint-20.1-cinnamon-64bit.iso"
  loopback loop (hd0,5)$isofile
  linux (loop)/casper/vmlinuz boot=casper iso-scan/filename=$isofile quiet noeject noprompt splash
  initrd (loop)/casper/initrd.lz
}
Save and close the file. Then update GRUB boot menu.
sudo grub-mkconfig -o /boot/grub/grub.cfg
or
sudo grub2-mkconfig -o /boot/grub2/grub.cfg
Finding Out the Linux kernel and initrd File Name
The Linux kernel and initrd (initial ramdisk) file can be different for different Linux ISO images. For Ubuntu, the Linux kernel is located at /casper/vmlinuz and the initrd image file is located at /casper/initrd. If you don’t know where they are located, just open your ISO image with archive manager. The following screenshot shows the Arch Linux ISO image file.
Display GRUB Boot Menu
Some Linux distributions like Ubuntu hide the GRUB boot menu if there’s only one OS installed on the hard drive. To show the GRUB boot menu, edit a configuration file.
sudo nano /etc/default/grub
Find the following line, which tells GRUB to hide the boot menu.
GRUB_TIMEOUT_STYLE=hidden
Add the # character at the beginning to comment out this line.
#GRUB_TIMEOUT_STYLE=hidden
Then find the following line.
GRUB_TIMEOUT=0
Change 0 to 10, so you will have 10 seconds to choose an entry in the GRUB boot menu.
GRUB_TIMEOUT=10
Save and close the file. Then update GRUB configurations.
sudo update-grub
Change the Boot Order in GRUB
Let’s say you want to boot into the ISO by default in GRUB, then edit the configuration file.
sudo nano /etc/default/grub
Find the following line, which makes GRUB select the first entry in the boot menu.
GRUB_DEFAULT=0
Change it to something like this:
GRUB_DEFAULT="clonezilla-live-20210127-groovy-amd64.iso"
If the /etc/grub.d/40_custom file has this entry menuentry "clonezilla-live-20210127-groovy-amd64.iso", then GRUB will select this entry by default. Update GRUB for the changes to take effect.
sudo update-grub
You can also keep the default boot order, but boot an ISO file for the next boot only with:
sudo grub-reboot clonezilla-live-20210127-groovy-amd64.iso
or
sudo grub2-reboot clonezilla-live-20210127-groovy-amd64.iso
Then reboot.
sudo shutdown -r now
Additional Tips
If you have a SATA disk and an NVMe SSD inside your computer, the SATA disk is the first and the NVMe SSD is the second. The same goes for a USB drive and an NVMe SSD. If you have an optical disk, then GRUB might think the optical disk is the first disk.
If you see the following error when GRUB trying to boot an ISO image file, it likely that you have specified the ISO file location to an optical disk.
can not get C/H/S value
If you have a file system that spans the entire disk, then you don’t need to specify the partition number in GRUB. For example, I have an ISO file on my second disk. I didn’t make any partitions on the second disk, so I can specify (hd1) in GRUB configuration file.
loopback loop (hd1)$isofile
If you see an error message like below when updating the GRUB boot menu, you can ignore this error.
grub-probe: error: cannot find a GRUB drive for /dev/loop11p3. Check your device.map.
Windows 10 ISO
Yes, you can create a Windows 10 bootable USB on Ubuntu or any Linux distro. If you don’t have a USB thumb drive, you can boot Windows 10 ISO on the hard drive with GRUB2. Download the Windows 10 ISO file. Note that you might not be able to download the ISO from this link on a Windows computer. This download link is visible to users on Linux computer.
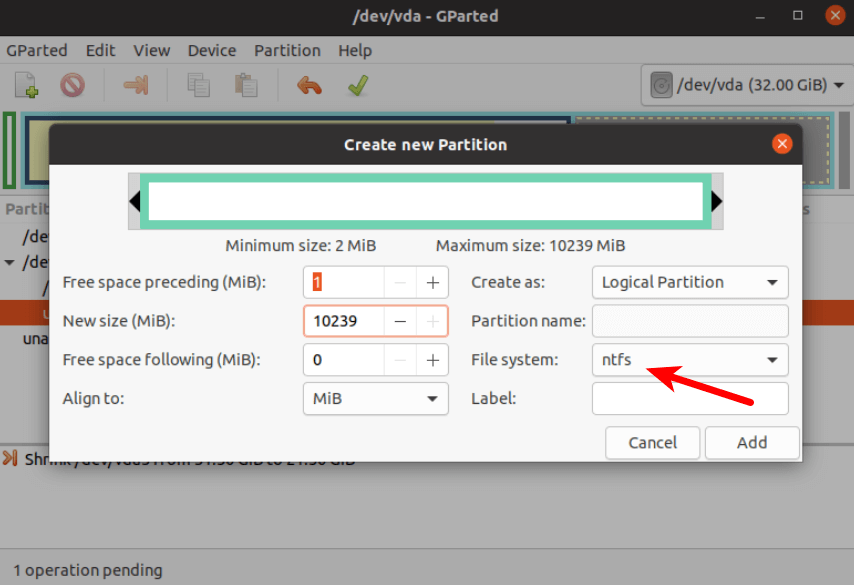
GRUB2 can not boot Windows 10 ISO directly. You need to create a separate NTFS partition on your disk with a partition editor like GParted and extract the Windows 10 ISO to that partition. The latest Windows 10 ISO file is 5.8G. The new NTFS partition should be at least 7G and it should not be used to store any other files.
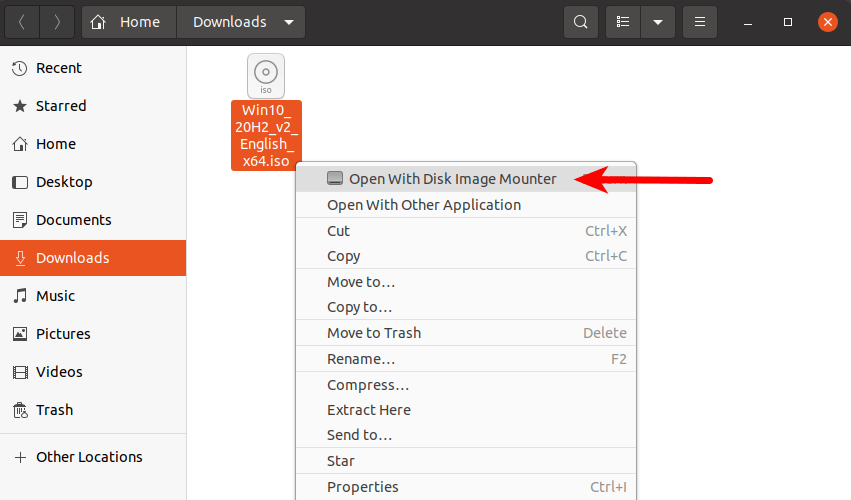
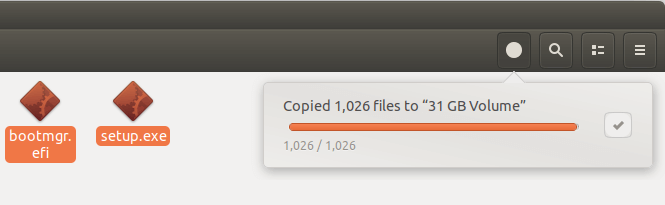
Then find your Windows 10 ISO in file manager. Open it with disk image mounter.
Open the mounted file system. Select all files and folders and copy them to the NTFS partition.
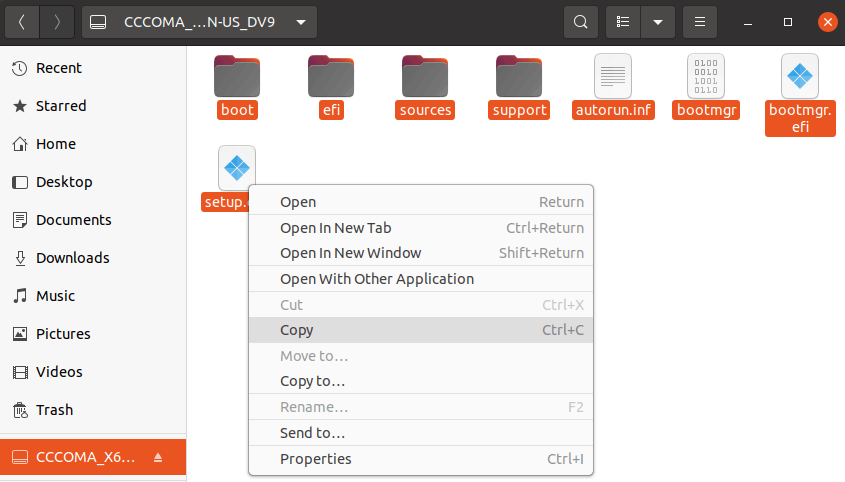
Sometimes the file manager on Ubuntu hangs and it seems that the copy operation has stopped. Actually, it’s working. Just be patient. When you see a checkmark, it means the copy operation has finished.
Next, open up a terminal window and edit the /etc/grub.d/40_custom file with a text editor such as Nano.
sudo nano /etc/grub.d/40_custom
In this file, we can add custom entries to the GRUB boot menu. In this case, we want to add an entry to boot the Windows 10 installer. If your computer still uses the traditional BIOS firmware, then add the following text in this file.
menuentry "Windows-10-Installer.iso" {
  set root=(hd0,6)
  insmod part_msdos
  insmod ntfs
  insmod ntldr
  #uncomment the following line if your computer has multiple hard drives.
  #drivemap -s (hd0) ${root}
  ntldr /bootmgr
}
My NTFS partition number is 6, so I use (hd0,6) as the root. You can run sudo parted -l command to check your NTFS partition number. If your computer has multiple hard drives, use the drivemap command to set the partition (hd0,6) as the first hard disk, so Windows will be able to boot.
If your computer uses UEFI firmware, then add the following text in this file.
menuentry "Windows-10-Installer.iso" {
  set root=(hd0,6)
  insmod part_gpt
  insmod ntfs
  insmod chain
  chainloader /efi/boot/bootx64.efi
}
Save and close the file. Then update GRUB boot menu.
sudo grub-mkconfig -o /boot/grub/grub.cfg
or
sudo grub2-mkconfig -o /boot/grub2/grub.cfg
Unplug all your external USB storage devices, then reboot your computer. Note that the Windows desktop ISO installer doesn’t work properly on Proxmox KVM virtual machines.
Wrapping Up
I hop this tutorial helped you boot ISO files with GRUB2 boot loader. As always, if you found this post useful, then subscribe to our free newsletter to get more tips and tricks. Take care 🙂
Booting Windows XP with grub4dos
Booting the actual ISO with grub legacy or grub2 won’t work, but with older windows versions (i.e. XP) it is possible to unpack the i386 folder from the ISO to the USB stick, and then use grub4dos to call the bootloader:
title windows installer via setupldr.bin
find --set-root /i386/setupldr.bin
chainloader /i386/setupldr.bin
or
title windows installer via /bootsect.bin
find --set-root /i386/setupldr.bin
chainloader /bootsect.bin
This might not work with newer windows versions or with newer hardware but there is also the option of..
Booting Windows 7 with grub2
With grub2 apparently something like this could work for Windows 7:
menuentry "Windows 7 (bootmgr)" --class windows --class os {
    insmod part_msdos
    insmod ntfs
    insmod ntldr
    ### A: either use this line or the next one, but not both
    set root='(hd0,msdos1)'
    ### B:
    ### search --no-floppy --set=root --fs-uuid ____INSERT_PARTITION_UUID_HERE___
    ntldr ($root)/bootmgr
}
Option A assumes your bootable USB stick/HDD is the first device and has a msdos style partition table. Adjust to match your configuration. If your boot device has a GPT partition table, then most likely you’ll need to use (hd0,gpt1) (GPT in general is trickier to set up).
Option B uses the drive’s unique UUID, which can be seen on Linux with sudo blkid or on OSX with e.g. diskutil info disk0s1 (or Disk Utility > Info).
The final entry might look for example like this:
menuentry "Windows 7 installer" --class windows --class os {
    insmod part_msdos
    insmod ntfs
    insmod ntldr
    search --no-floppy --set=root --fs-uuid 0E239BC6-F960-3107-89CF-1C97F78BB46B
    ntldr /bootmgr
}
Есть не так уж много вариантов использования нескольких дистрибутивов Linux на одной машине. Вы можете установить их все на жесткий диск, на виртуальную машину или сохранить в виде ISO образа и загружаться в реальном времени.
Первый и второй способы не очень выгодны так как требуют очень много места на жестком диске, с другой стороны, для третьего способа нужно иметь CD диск или USB флешку для хранения образа и загрузчика. Но есть еще один вариант — хранить ISO образ на жестком диске, и загружаться с него по мере надобности. Здесь не нужно столько дискового пространства как при установке, и не нужен внешний носитель информации. В этой статье будет рассмотрена загрузка с ISO образа в Grub.
Что нам понадобится
В этой статье мы будем использовать загрузчик Grub, впрочем, он и так используется в большинстве дистрибутивов Linux. Также нам понадобится ISO образ, с которого будем загружаться и вы должны знать на каком разделе он размещён. Удобнее всего разместить его на загрузочном разделе. Чтобы узнать какой раздел диска у вас загрузочный выполните:
fdisk -l
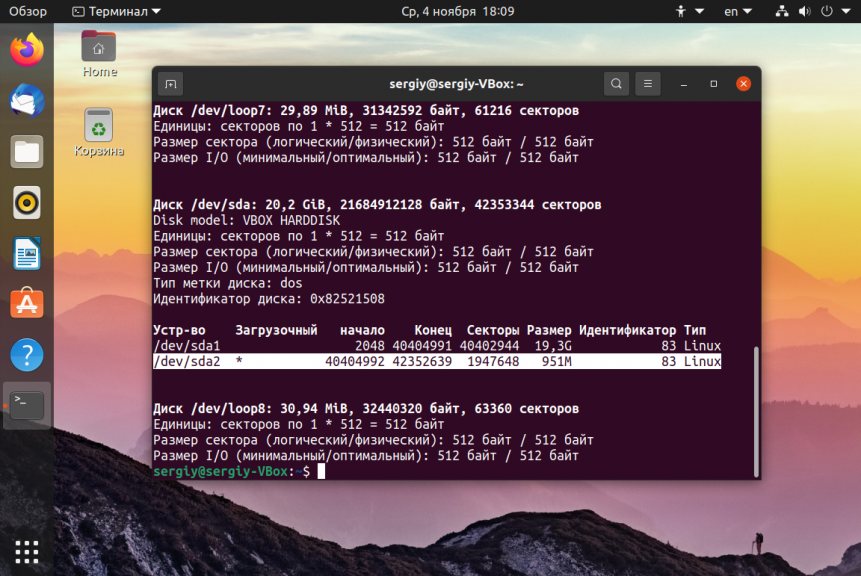
Загрузочный раздел будет помечен знаком * в колонке Загрузочный или Boot. Например, у меня /dev/sda2 или как пишется в Grub hd0,2 — загрузочный.
Разделы /dev/sda1 и /dev/sdb3 будут называться в Grub hd0,1 и hd1,3 соответственно. В синтаксисе Grub именование дисков начинается с нуля, а именование разделов с единицы.
Сначала откройте файл /etc/default/grub и закомментируйте там эту строку если она там есть:
GRUB_HIDDEN_TIMEOUT=0
Перед строчкой должна стоять решетка. Сохраните изменения, а затем откройте файл /etc/grub.d/40_custom. Здесь мы добавим пункт для загрузки с образа, синтаксис выглядит следующим образом:
menuentry «Заголовок пункта» {
set isofile=«Адрес ISO файла»
loopback loop Раздел в форме записи Grub на котором расположен ISO$isofile
Параметры загрузки ядра
}
Перед тем, как переходить к настройке Grub надо выяснить ещё один момент. Как в оригинальном образе выполняется загрузка дистрибутива. Обычно в каждом загрузочном образе есть папка Grub в которой можно посмотреть файл grub.cfg или другой подобный, например loopback.cfg и узнать какими строками там загружается ядро:

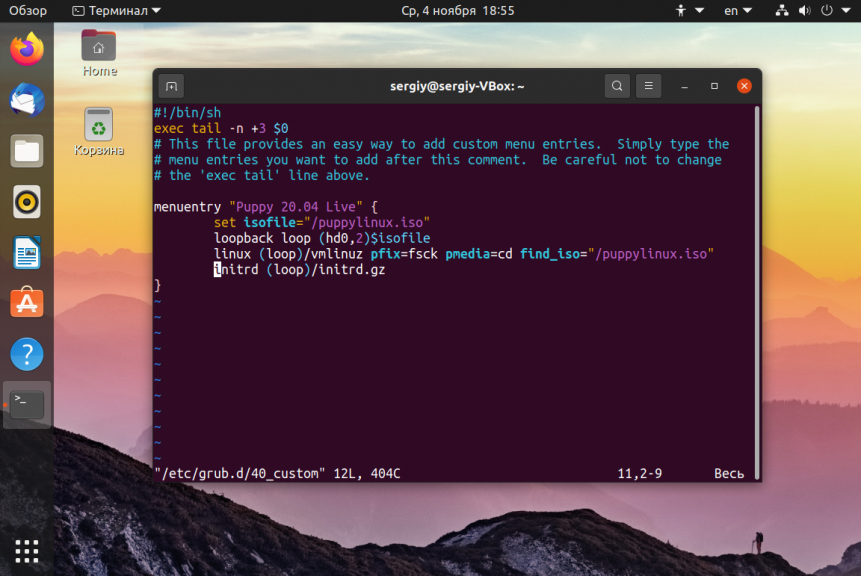
Только перед путями к файлам надо добавить адрес (loop). Путь к образу надо указывать от начала того диска, на котором он расположен. Например, если диск расположен в корне загрузочного раздела, который монтируется в /boot, то и путь будет /файл.iso, а не /boot/файл.iso. Теперь можно переходить к примеру, запись для загрузки Puppy Linux будет выглядеть вот так:
menuentry "Puppy 20.04 Live" {

set isofile="/puppylinux.iso"

loopback loop (hd0,2)$isofile

linux (loop)/vmlinuz pfix=fsck pmedia=cd findiso="/puppylinux.iso"

initrd (loop)/initrd.gz

}
Каждый дистрибутив индивидуален и надо с каждым разбираться отдельно. Если вы хотите запускать Gparted:
menuentry "GParted Live amd64" {

set isofile="/gparted-live-0.18.0-2-amd64.iso"

loopback loop (hd0,2)$isofile

loopback loop $isofile

linux (loop)/live/vmlinuz boot=live config union=aufs noswap noprompt ip=frommedia toram=filesystem.squashfs findiso=${isofile}

initrd (loop)/live/initrd.img

}
Или даже Fedora Linux:
menuentry "Fedora Live" {

set isofile="/Fedora.iso"

loopback loop (hd0,2)$isofile

loopback loop $isofile

linux (loop)/isolinux/vmlinuz0 root=live:CDLABEL=Fedora-Live rootfstype=auto ro rd.live.image quiet rhgb rd.luks=0 rd.md=0 rd.dm=0 iso-scan/filename=${isofile}

initrd (loop)/isolinux/initrd0.img

}
Обратите внимание, что опции будут меняться в зависимости от дистрибутива и расположения в нем загрузочных файлов. Кроме того, важно то где размещен ISO образ, если ваш домашний каталог зашифрован лучше его хранить на загрузочном разделе, как в примерах выше.
Хотите больше? Можно загрузится с ISO для автоматического выполнения каких-либо действий. Например, если вы параноик и хотите иметь возможность быстро стереть свой жесткий диск можно использовать DBAN. Но будьте осторожны так как это сотрет все данные без возможности восстановления.
menuentry "Darik's Boot and Nuke" {

set isofile="/dban.iso"

loopback loop (hd0,1)$isofile

linux (loop)/dban.bzi nuke="dwipe" silent

}
Есть еще много вещей, которые можно сделать с помощью загрузки ISO образа в Grub, неважно хотите ли вы очень быструю Live систему или иметь возможность уничтожить все кончиком пальца.
Загрузка windows с iso образа в Grub
Если вам нужна загрузка Windows с ISO образа Grub, то это делается тоже не очень сложно, но немного по другому. Сначала нужно скачать syslinux и извлечь оттуда memdisk в папку /boot/. Это должна быть папка, куда установлены файлы Grub. Дальше добавьте в конфигурационный файл 40-grub.conf такие строки:
menuentry "Boot Windows" {

search -f "--set-root /Windows.iso"

insmod memdisk

linux16 /boot/memdisk iso

initrd16 /Windows.iso

}
Образ Windows должен лежать в корне одного из разделов и называться Windows.iso, дальше команда search автоматически найдет этот раздел и установит его в качестве корня. Потом останется только загрузка windows с iso образа grub.
Завершение настройки Grub
Мы все подготовили, теперь остается обновить конфигурацию загрузчика Grub, чтобы новые пункты добавились в /boot/grub/grub.cfg и появились в меню загрузки. Для Ubuntu команда будет выглядеть вот так:
sudo update-grub
В других дистрибутивах может понадобится команда:
sudo grub-mkconfig -o /boot/grub/grub.cfg
Затем можно перезагрузиться и посмотреть что получилось:
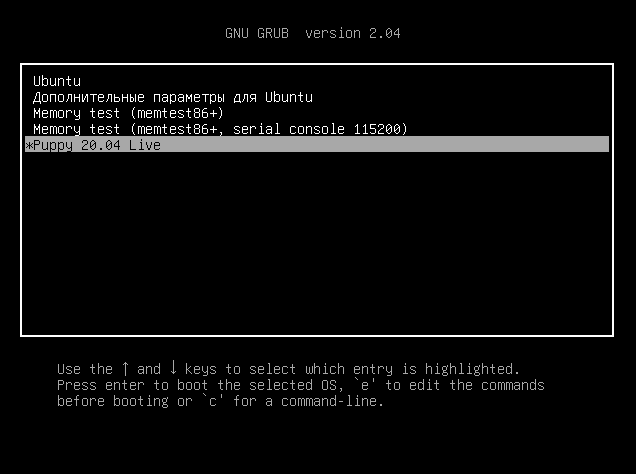
Если что-то пошло не так, вы можете нажать клавишу E и редактировать этот пункт меню чтобы попытаться исправить проблему прямо в загрузчике.
Выводы
Теперь вы знаете как выполняется загрузка iso образа grub, здесь нет ничего сложного, но зато это очень полезная возможность получить несколько систем на своем компьютере, затратив при этом минимум памяти и времени на их установки. Если у вас остались вопросы, спрашивайте в комментариях!
Обнаружили ошибку в тексте? Сообщите мне об этом. Выделите текст с ошибкой и нажмите Ctrl+Enter.
Если grub не принципиален и хочется простоты работы с установочными образами, рекомендую обратить внимание на Ventoy для того чтобы создать загрузочную флешку, необходимо всего лишь установить программу на флешку и скопировать обычным способом ISO образы на эту флешку, работает с разными системами.

Компромиссное решение
Для наиболее полного ответа проделал эксперимент.
К сожалению 32gb флешки не было под рукой, но хватило и 8gb
C помощью GParted разбил ее на 3 раздела:

На второй раздел обычным способом скопировал файлы из iso (win10) Третий оставил пустым так как предположил если сработает со вторым то и с третьим заработает (по принципу индукции).
На первый раздел установил grub, у меня в системе он второй версии поэтому соответственно устанавливал ее:
- смонтровал первый раздел
mkdir /mnt/USB && mount /dev/sdb1 /mnt/USB
- поставил:
grub-install --force --removable --no-floppy --target=i386-pc --boot-directory=/mnt/USB/boot /dev/sdb
- скачал конфиг:
cd /mnt/USB/boot/grub
wget pendrivelinux.com/downloads/multibootlinux/grub.cfg
- внес изменения
# This Menu entry brought to you courtesy of https://www.pendrivelinux.com/boot-multiple-iso-from-usb-via-grub2-using-linux/

set timeout=60
set default=0

menuentry "Windows 10" {
    insmod part_msdos
    insmod ntfs
    insmod ntldr
    set root='hd0,msdos2'
    ntldr ($root)/bootmgr
}

menuentry "Reboot" {
    reboot
}
menuentry "Shut Down" {
    halt
}
Значение для рута получил командой search -u UUID из под grub, для этого после загрузки с флешки можно нажать c после чего появится ожидание ввода команд grub> где и следует ввести комманду поиска.
Сам UUID глянул в GParted:

Таким образом распаковывая iso в разные разделы и находя их по UUID можно создать флешку с разными версиями Windows.
На заключительном этапе очень помог kvm, устанавливал так для KDE:
sudo apt-get install qemu-kvm
Для теста под linux достаточно ввести команду:
sudo kvm -boot c -drive file=/dev/sdb,cache=none -m 1024
Опция -m 1024 отвечает за оперативку, меньше делать не стоит, лучше больше.
В финале я добрался до приветствия, пришлось подождать минут 10.

This method allows you to directly boot from a number of different unmodified Windows Install 7/8/10 ISOs on a bootable USB drive AND then run Setup to install Windows to a system.
No files need to be extracted from the ISO – just copy the ISO file and boot!
- Legacy, UEFI or PXE boot is supported.
- The ISO is automatically mounted as a virtual drive so Setup can find and use the Install.wim\esd file.
- 2GB or more RAM is required to be in the system (it may fail to work if not enough RAM is available).
- The Windows Install ISO file does not need to be modified in any way.
I will describe here only the outline process so that you can see how it is done. Easy2Boot uses a similar (but not identical) process when MBR-booting.
Example grub2 menus are also provided (grub4dos only MBR boots, grub2 will MBR and UEFI32 and UEFI64 boot).
PROCESS IN OUTLINE:
- Add Windows Install ISO to a grub4dos or grub2 bootable USB drive
- Add a menu for grub4dos\grub2
- The menu uses wimboot to boot to files inside the ISO
- Add in a null.cfg file which contains the full path of the ISO (except for the drive letter)
- The menu also injects a startnet.bat file and winpeshl.ini file
- For MBR booting we swap BIOS device hd0 with hd1 so that Windows does not think the boot drive is the USB drive (it may refuse to install Windows to a Removable USB drive or Setup may install the Windows boot code to a USB hard disk if we don’t do this).
- When the grub2\grub4dos menu is picked, here is what happens…
- The ISO is mounted (by grub4dos as a CD device using map or by grub2 as a loop device)
- wimboot will load the boot.wim, boot.SDI and BCD from the mounted ISO into RAM
- wimboot injects into the boot.wim\X: RAM drive a null.cfg file which contains the file path of the ISO
- wimboot injects into the boot.wim\X: RAM drive a winpeshl.ini and startup.bat file
- The boot.wim file is booted to by wimboot via bootmgr+BCD and startup.bat runs
- startup.bat finds the USB drive and installs ImDisk (which is also located in a folder on the USB drive somewhere)
- startup.bat finds the null.cfg file in X:\Windows\System32 and from this we can determine the name of the ISO that we need to load
- startup.bat uses ImDisk to load the ISO as drive Y: from the USB drive
- startup.bat runs X:\Setup.exe which will now be able to find the \sources\install.wim file on the Y: virtual DVD drive mounted by ImDisk
If required, we can also inject an XML file into the X:\Windows\System32 folder and specify this as the unattend file when we run setup.exe. This will cause Setup to be automated.
For MBR-bootong, it is necessary to swap the BIOS drives 0 (USB drive) and 1 around so that Windows will think the ‘boot’ drive is the internal hard disk and not the USB drive – otherwise Windows will refuse to install the boot code (and the Windows OS) to the first internal hard disk.
Download files – see link at the bottom of this article.
You can use VBox+VMUB to test (see Tutorial 4) but the grub2 drivemap command can cause WinPE to hang and not boot in a VM.
Example grub2 MBR menu:
menuentry "WIN10 Install" --unrestricted --class Windows {set isoname=win10.isoloopback loop /$isonamelinux16 /wimboot/wimbootinitrd16 \newc:bcd:(loop)/boot/bcd \newc:null.cfg:/wimboot/null.cfg \newc:winpeshl.ini:/wimboot/winpeshl.ini \newc:startup.bat.sdi:/wimboot/startup.bat \newc:boot.sdi:(loop)/boot/boot.sdi \newc:boot.wim:(loop)/sources/boot.wimdrivemap -s hd0 hd1boot)
Note: filenames defined after newc: must not be bigger than 31 characters or wimboot will fail.
Also grub is case sensitive so beware! – e.g. /Boot/boot.sdi instead of /boot/boot.sdi.
wimboot will try to locate a suitable bootmgr or bootxxx.efi boot file, so you don’t usually need to specify one.
You can also add in bootmgr.exe or bootmgr or bootx64.efi/bootmgfw.efi files if the wim file does not contain a suitable file (copy the files to the \wimboot folder) add an extra @bootmgr=/bootmgr.exe entry (or /bootmgr (or /bootmgfw.efi if UEFI).
iPXE wimboot is used for MBR booting but a special grub2 (unsigned, non-secure) version of grub2 with wimboot.mod is required for UEFI-booting.
Example MBR grub4dos menu:
Use Grub4dos 2020-02-29.7z (note: shows as 2020-03-04 in command prompt) (other versions may have bugs – so try this version first!)
Most files are in grub2_wimboot.zip (see end of page).
title Install Windows10x64UK_Oct_2018 using wimboot methodmap /Windows10x64UK_Oct_2018.iso (0xff)map --hookroot (0xff)# the root path now points to the files inside the ISO file# hd0,0 is the USB drive that we booted fromkernel (hd0,0)/wimboot/wimbootinitrd @null.cfg=(hd0,0)/wimboot/null.cfg @startup.bat=(hd0,0)/wimboot/startup.bat @winpeshl.ini=(hd0,0)/wimboot/winpeshl.ini @bcd=/boot/bcd @boot.sdi=/boot/boot.sdi @boot.wim=/sources/boot.wimmap (hd0) (hd1)map (hd1) (hd0)map --hookboot
IMPORTANT: order of the files in the initrd line seems to be important, the bcd and .wim file should be the last files loaded for the MBR version of wimboot.
On our USB drive we have a \wimboot folder:
- \wimboot\wimboot
- \wimboot\winpeshl.ini
- \wimboot\startup.bat
- \wimboot\null.cfg (contains the line installiso=xxxxxxxxx where xxxxxxxxx is the path and filename of the ISO using forward slashes)
- \wimboot\imdisk\(files from grub2_wimboot.zip)
- \Windows10x64UK_Oct_2018.iso
Example winpeshl.ini
[LaunchApps]
startup.bat
See Easy2Boot’s \_ISO\e2b\docs\QRUN.g4b file (search for ‘wimboot’ to see how you can use grub4dos to change null.cfg contents, etc.
ADDING A ‘WINDOWS INSTALL FROM ISO’ MENU TO THE E2B GRUB2 MENU SYSTEM
Set up your E2B drive with a second partition and the E2B grub2 menu files FIRST, then switch to the .imgPTN23 file so that the first partition contains the standard grub2 boot menu system files and the second partition contains your grub2 menu folders (e.g. \_ISO\MAINMENU, etc.) and then…
The following windows_install.grub2 menu text file can be added to the \_ISO\MAINMENU folder on the 2nd partition.
- Download the grub2_wimboot files – extract it onto the root of the 2nd partition so you have a new \wimboot folder
- Download the windows_install.grub2 file and copy it to \_ISO\MAINMENU\grub2 folder on the 2nd E2B partition. Rename it as custom_menu.grub2 if using grub2 Beta 10 or later.
- Create a new \_ISO\MAINMENU\WINDOWS folder (must be in capital letters) on the 2nd partition and place all your Windows Install ISOs in that folder.
This is for MBR booting
2nd partition (additions)
- \wimboot folder
- \_ISO\MAINMENU\grub2\custom_menu.grub2
- \_ISO\MAINMENU\WINDOWS\ (your windows isos here)
Note: E2B grub2 v10W.imgPTN already includes wimboot and a new Windows Install W menu (you just copy your ISOs to the 2nd partition!) – see next section below…
Add grub2 UEFI + wimboot (using a1ive grub2)
I suggest you use the latest E2B grub2 v10W .imgPTN file – see bottom of this page for instructions.
The following instructions are for the v10A E2B grub2 menu system and is more difficult to set up…
A1ive has added a wimboot grub2 module into his special version of grub2 (unsigned).
1. Download the grub2 UEFI zip file
2. Extract the files to the \EFI\BOOT folder on the first FAT32 partition (after switching in the E2B grub2 .imgPTN file)
3. Use the windows_install.grub2 menu file (copy to \_ISO\MAINMENU\grub2 folder)
4. Place all your Windows Install ISO files in the \_ISO\MAINMENU\WINDOWS folder – must end in .ISO or .iso.
5. Add this line into one of the customX_menu.grub2 files at the very bottom to add in the windows menu
source $isofpath/grub2/windows_install.grub2
The E2B grub2 menu system will automatically add-in any customX_menu.grub2 files but the source line is required so that it adds in the windows_install.grub2 menu (or rename it as custom3_menu.grub2 instead if you wish),
The Windows ISOs will be automatically added into the main grub2 menu when you boot. If you have placed Windows Install ISOs in the \_ISO\MAINMENU\WINDOWS folder, they should be listed in the grub2 menu when you boot.
The ISO filename can contain spaces. It must end in .ISO or .iso (case sensitive – so not .ISo for instance).
Standard Microsoft dual-architecture Install ISOs are supported, x64 will be used if the CPU is a 64-bit processor.
For MBR-booting, the menu may run bootmgr and then hang on a Virtual Machine due to the drivemap command – so test on a REAL SYSTEM if you have boot problems on a VM.
\_ISO\MAINMENU\grub2\windows_install.grub2
#WINDOWS INSTALL MENU#$isofpath e.g. (hd0,msdos2)/_ISO/LINUX - use only in if [ -e tests#$root2 e.g. (hd0,msdos2) partition containing payload files#$root e.g. hd0,msdos1 boot partition with grub2 on it#$root2uuid e.g. 1234-2123-33 (uuid of $root2)#Special variables: MBR EFI MBR32 MBR64 EFI32 EFI64 BIT32 BIT64 FAT (true if filesystem on ptn2 is FAT)#Examples:#if $BIT32 ; then echo 32-bit ; fi#if ! $BIT64 ; then echo not 64-bit ; fi#if [ $BIT64 = true and $FAT = true ] ; then echo 64-bit MBR on FAT partititon ; fi#if [ $BIT64 = true and $EFI = true ] ; then echo 64-bit EFI (same as \$EFI64) ; fi#CHECK_MNU_FOLDER sets these variables on return - do not use filename and filenamex inside menuentry#$ip e.g. /_ISO/LINUX#$ipf e.g. (hd0,msdos2)/_ISO/LINUX#$isofile e.g. /_ISO/LINUX/xxxx.iso#supports filenames with spacesfunction ListWimBoot {echo Adding WINDOWS ISO files from $ifp/WINDOWSfor file in $ifp/WINDOWS/*.iso $ifp/WINDOWS/*.ISO; doif ! test -f "$file"; then continue; firegexp -s filename "$ip/WINDOWS/(.*)" "$file"regexp -s filenamex "$ip/WINDOWS/(.*)(.[iI][Ss][oO])" "$file"# echo $filemenuentry "${filenamex}" "${filename}" {#do not use $filename inside menuentry - use $isoname instead!set isoname="$2" ; CHECK_MNU_FOLDER#ip, ipf and isofile are now set correctly after CHECK_MNU_FOLDERloopback loop "${ipf}/WINDOWS/${isoname}"set pp=if test -f (loop)/x64/sources/boot.wim; then set pp=/x64; fiif $MBR32; thenif test -f (loop)/x86/sources/boot.wim; then set pp=/x86; fifiecho Using ${pp}/sources/boot.wim...set root=$root2set installiso="${ip}/WINDOWS/${isoname}"save_env -f /wimboot/null.cfg installiso# cat /wimboot/null.cfg# readlinux16 /wimboot/wimbootinitrd16 \# newc:bootmgr:(loop)${pp}/bootmgr \newc:winpeshl.ini:/wimboot/winpeshl.ini \newc:null.cfg:/wimboot/null.cfg \newc:startup.bat:/wimboot/startup.bat \newc:boot.wim:(loop)${pp}/sources/boot.wim \newc:bcd:(loop)${pp}/boot/bcd \newc:boot.sdi:(loop)${pp}/boot/boot.sdi#swap hd0 (USB) with hd1 (internal hdd) so 'boot disk' is internal hdd#this means may only work on real systemdrivemap -s hd0 hd1boot}done}function ListWimBootEFI {echo Adding WINDOWS ISO files from $ifp/WINDOWS/for file in $ifp/WINDOWS/*.iso $ifp/WINDOWS/*.ISO; doif ! test -f "$file"; then continue; firegexp -s filename "$ip/WINDOWS/(.*)" "$file"regexp -s filenamex "$ip/WINDOWS/(.*)(.[iI][Ss][oO])" "$file"# echo $filemenuentry "${filenamex} EFI" "${filename}" {set isoname="$2" ; CHECK_MNU_FOLDER#ip ipf and isofile are now set correctly after CHECK_MNU_FOLDERloopback loop "${ipf}/WINDOWS/${isoname}"set pp=if test -f (loop)/x64/sources/boot.wim; then set pp=/x64; fiset bootmg=bootia32.efiif $EFI32; thenif test -f (loop)/x86/sources/boot.wim; then set pp=/x86; fiset bootmg=bootx64.efifiecho Using ${pp}/sources/boot.wim...set root=$root2set installiso="${ip}/WINDOWS/${isoname}"save_env -f /wimboot/null.cfg installiso# cat /wimboot/null.cfg# read#NOTE: ORDER IS IMPORTANT! May get 0xC000000f error if order is wrong! boot.wim should be first.#use wimboot --pause to see any error ( also --rawbcd --rawwim --index=1 --gui )wimboot \@:startup.bat:/wimboot/startup.bat \@:winpeshl.ini:/wimboot/winpeshl.ini \@:null.cfg:/wimboot/null.cfg \@:boot.wim:(loop)${pp}/sources/boot.wim \# @:bootmgfw.efi:(loop)${pp}/efi/boot/$bootmg \@:bcd:(loop)${pp}/efi/microsoft/boot/bcd \@:boot.sdi:(loop)${pp}/boot/boot.sdiboot}done}if ! $EFI ; then ListWimBoot; fiif $EFI ; then ListWimBootEFI; fi
If wimboot uses an incorrect bootmgr/bootgmfw.efi file you may get a 0xc000000f unknown error BSOD – it is often better to not specify this file and let wimboot find it.
Note that the full path of the ISO is placed in null.cfg which is later picked up by startup.bat.
Example startup.bat file:
@echo offTITLE %~dpnx0 (WIMBOOT startup.bat)wpeinit.exeREM prevent wpeinit from running againren X:\windows\system32\wpeinit.exe wpeinit.exe.oldfor %%I in (C D E F G H I J K L M N O P Q R S T U V W X Y Z) do if exist %%I:\wimboot\startup.bat set USBDRIVE=%%I:IF "%USBDRIVE%"=="" (echo ERROR - could not find \wimboot\startup.bat on any drive!@echo onfor %%I in (C D E F G H I J K L M N O P Q R S T U V W X Y Z) do if exist %%I:\wimboot\startup.bat set USBDRIVE=%%I:pausegoto :EOF)color 1fcls@echo FOUND USB DRIVE AT DRIVE %USBDRIVE%SET BIT=32if "%PROCESSOR_ARCHITECTURE%"=="AMD64" SET BIT=64FOR /L %%A IN (0,1,5000) DO ECHO NOTHING > nul:: get path of the ISO into MYISO e.g. /_ISO/WINDOWS/WIN10/Windows10ProBoth.isocd /d %USBDRIVE%\set MYISO=INVALID_ISO_NAME.ISOecho Looking for X:\Windows\System32\null.cfg contents...for /f "tokens=1,2 delims==" %%a in ('find "installiso=" X:\Windows\System32\null.cfg') do set isopath=%%bREM change linux forward slash to Windows backslashset string1=%isopath:/=\%if exist "%USBDRIVE%%string1%" set MYISO=%string1%if not exist "%USBDRIVE%%MYISO%" if exist X:\Windows\System32\null.cfg type X:\Windows\System32\null.cfgif not exist "%USBDRIVE%%MYISO%" echo ERROR: Can't find %USBDRIVE%%MYISO% && pause && goto :EOFif exist "%USBDRIVE%%MYISO%" echo Loading %USBDRIVE%%MYISO%...REM Load ISO using ImDiskTITLE LOAD WINDOWS ISO USING IMDISKcall \wimboot\imdisk\IMDISK_install.cmdcall \wimboot\imdisk\IMDISK_instiso.cmdREM Find mounted DVD driveset DVDDRIVE=FOR %%D IN (A B C D E F G H I J K L M N O P Q R S T U V W X Y Z) DO (DIR %%D:\SOURCES\install.* > nul 2>&1 && (call set DVDDRIVE=%%D:) && echo FOUND %%D:\SOURCES\install.*)FOR %%D IN (A B C D E F G H I J K L M N O P Q R S T U V W X Y Z) DO (DIR %%D:\SOURCES\x86\install.* > nul 2>&1 && (call set DVDDRIVE=%%D:) && echo FOUND %%D:\SOURCES\x86\install.*)FOR %%D IN (A B C D E F G H I J K L M N O P Q R S T U V W X Y Z) DO (DIR %%D:\SOURCES\x64\install.* > nul 2>&1 && (call set DVDDRIVE=%%D:) && echo FOUND %%D:\SOURCES\x64\install.*)FOR %%D IN (A B C D E F G H I J K L M N O P Q R S T U V W X Y Z) DO (DIR %%D:\x86\SOURCES\install.* > nul 2>&1 && (call set DVDDRIVE=%%D:) && echo FOUND %%D:\x86\SOURCES\install.*)FOR %%D IN (A B C D E F G H I J K L M N O P Q R S T U V W X Y Z) DO (DIR %%D:\x64\SOURCES\install.* > nul 2>&1 && (call set DVDDRIVE=%%D:) && echo FOUND %%D:\x64\SOURCES\install.*):ENDSEARCHIF "%DVDDRIVE%"=="" echo WARNING: VIRTUAL DRIVE DRIVE NOT FOUND!IF "%DVDDRIVE%"=="" echo WARNING: install.* not found on any mounted volume.IF "%DVDDRIVE%"=="" pauseecho.IF NOT "%DVDDRIVE%"=="" echo ISO FILE MOUNTED AS %DVDDRIVE%REM startnet.cmd normally only contains wpeinit.exe, custom ISOs may contain other commands, so try to run themif exist X:\WINDOWS\SYSTEM32\startnet.cmd call cmd /c X:\WINDOWS\SYSTEM32\startnet.cmdif not exist X:\WINDOWS\SYSTEM32\startup.bat exitIF "%DVDDRIVE%"=="" cmdMODE CON COLS=30 LINES=2echo DO NOT CLOSE THIS WINDOWREM X:\Sources\setup.exe /Unattend:%E2BDRIVE%\AutoUnattend.xmlREM X:\Setup.exe will allow the repair option, X:\Sources\Setup.exe will directly run SetupX:\setup.exe
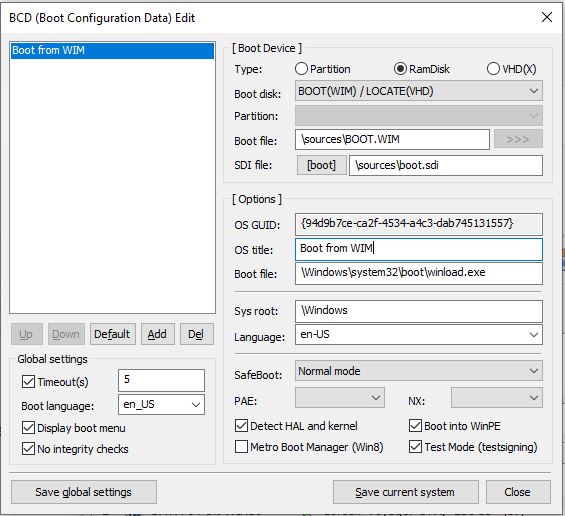
THE BCD
You must use a standard Microsoft WinPE BCD which is usually already present in a standard Microsoft Windows Install ISO.
Special WinPE ISOs tend to contain non-standard BCDs which will give a BSOD.
If in doubt, make a new BCD file using BootIce and copy it to the \wimboot folder so you can use it with wimboot.
The files will be placed by wimboot into their standard locations inside the RAMDisk that it makes so you must use standard names and paths in the BCD.
For UEFI – BCD must be set to boot from \sources\boot.wim and use \boot\boot.sdi and boot file=\Windows\system32\boot\winload.efi

For MBR – BCD must be set to boot from \sources\boot.wim and use \boot\boot.sdi
and boot file=\Windows\system32\boot\winload.exe
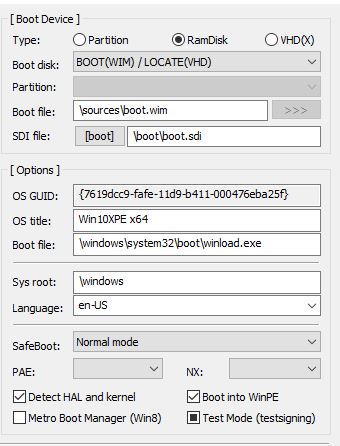
If you get an error check that the winload file exists in the correct path inside the boot.wim by using 7Zip to open the ISO and \sources\boot.wim file.
Note: A solid black checkbox indicates ‘not defined in BCD’.
wimboot command line
wimboot will parse the following extra commands on the same line (e.g. linux16 /wimboot pause):
rawbcd Use raw (unpatched) BCD files
rawwim Use raw (unpatched) WIM files
gui Allow graphical output from bootmgr/bootmgfw
pause Pause before booting OS
pause=quiet Pause without displaying any prompt
index=n WIM boot index
initrdfile Ignored to allow to be used with syslinux
after processing the command line, the files in the initrd ramdrive will be loaded.
For UEFI:
wimboot [--gui] [--rawbcd] [--rawwim] [--pause] [--index=n] @:boot.wim:/path/to/test.wim @:bootmgfw.efi:/path/to/test.efi @:bcd:/path/to/bcd @:boot.sdi:/path/to/boot.sdi * params: * --gui or -g Display graphical boot messages. * --rawbcd or -b Disable rewriting .exe to .efi in the BCD file. * --rawwim or -w Disable patching the wim file. * --pause or -p * --index=n or -i n Use WIM image index n.
File Injection into \Windows\System32
Files named ‘BCD’, or ending in ‘.wim’ or ‘.sdi’ are ignored and are not injected into the X:\Windows\System32 folder.
All other files added using wimboot will be added to the X:\windows\system32 folder with the new name that you specify.
Make your own grub2 boot files
The bootx64.efi and bootia32.efi files are stub files which load grubx64.efi and grubia32.efi.
To build you own grub2 files, download a build from here.
C:\TEMP\builds-master\
- .gitignore
- build_grub.bat <<< run this
- grub-install.exe
- grub-mkimage.exe
- README.md
- +—arch
- | +—arm64
- | +—ia32
- | +—legacy
- | | \—ntboot
- | | \—NTBOOT.MOD
- | \—x64
- +—i386-efi
- +—i386-pc
- +—locale
- \—x86_64-efi
Double-click on build_grub.bat to make new core.img, grubx64.efi and grubia32.efi boot files.
The builtin.lst files under the arch folder contain a list of modules which will be added into grub2.
The EFI files will be unsigned and so will not Secure Boot.
EXAMPLE WINPE E2B .GRUB2 MENUS
Download custom2_menu.grub2 for WinPE files.
Create a .grub2 menu – e.g. \_ISO\MAINMENU\grub2\custom2_menu.grub2 in the 2nd E2B partition.
#WINDOWS PE EXAMPLES# uses iPXE wimboot (2017-05-1) 30242 bytes http://ipxe.org/wimboot#download# \wimboot folder on Partition 2 should contain wimboot, bootmgr, bootmgr.exe# bootmgr.exe can be found in \Windows\Boot\PXE folder - copy it to the USB:\wimboot folder#$isofpath e.g. (hd0,msdos2)/_ISO/LINUX - use only in if [ -e tests#$root2 e.g. (hd0,msdos2) partition containing payload files#$root e.g. hd0,msdos1 boot partition with grub2 on it#$root2uuid e.g. 1234-2123-33 (uuid of $root2)#Special variables: MBR EFI MBR32 MBR64 EFI32 EFI64 BIT32 BIT64 FAT (true if filesystem on ptn2 is FAT)#Examples:#if $BIT32 ; then echo 32-bit ; fi#if ! $BIT64 ; then echo not 64-bit ; fi#if [ $BIT64 = true and $FAT = true ] ; then echo 64-bit MBR on FAT partititon ; fi#if [ $BIT64 = true and $EFI = true ] ; then echo 64-bit EFI (same as \$EFI64) ; fi#CHECK_MNU_FOLDER sets these variables on return#$ip e.g. /_ISO/LINUX#$ifp e.g. (hd0,msdos2)/_ISO/LINUX#$isofile e.g. /_ISO/LINUX/xxxx.iso# ---------------------function GetWimbootFiles {#This function looks for files needed for iPXE WIMBOOT#The filenames are case-sensitive, so we try to look for most likely ones!set pp=if test -f (loop)/x64/sources/boot.wim; then set pp=/x64; fiif test -f (loop)/x64/Sources/boot.wim; then set pp=/x64; fiif test -f (loop)/x64/Sources/Boot.wim; then set pp=/x64; fiif test -f (loop)/x64/Sources/BOOT.wim; then set pp=/x64; fiif test -f (loop)/x64/Sources/BOOT.WIM; then set pp=/x64; fiif $BIT32; thenif test -f (loop)/x86/sources/boot.wim; then set pp=/x86; fiif test -f (loop)/x86/Sources/boot.wim; then set pp=/x86; fiif test -f (loop)/x86/Sources/Boot.wim; then set pp=/x86; fiif test -f (loop)/x86/Sources/BOOT.wim; then set pp=/x86; fiif test -f (loop)/x86/Sources/BOOT.WIM; then set pp=/x86; fifiunset bmeif [ -e "/wimboot/bootmgr.exe" ]; then set bme=/wimboot/bootmgr.exe ; fiif [ -e "(loop)/bootmgr.exe" ]; then set bme=(loop)/bootmgr.exe ; fiif [ -e "(loop)/BOOTMGR.EXE" ]; then set bme=(loop)/BOOTMGR.EXE ; fiif [ -e "(loop)/BOOTMGR.exe" ]; then set bme=(loop)/BOOTMGR.exe ; fiif [ -e "(loop)/Bootmgr.exe" ]; then set bme=(loop)/Bootmgr.exe ; fiunset bm1if [ -e "/wimboot/bootmgr" ]; then set bm1=/wimboot/bootmgr ; fiif [ -e "(loop)/bootmgr" ]; then set bm1=(loop)/bootmgr ; fiif [ -e "(loop)/Bootmgr" ]; then set bm1=(loop)/Bootmgr ; fiif [ -e "(loop)/BOOTMGR" ]; then set bm1=(loop)/BOOTMGR ; fiunset bcdif [ -e "(loop)${pp}/BOOT/BCD" ]; then set bcd=(loop)${pp}/BOOT/BCD ; fiif [ -e "(loop)${pp}/BOOT/bcd" ]; then set bcd=(loop)${pp}/BOOT/bcd ; fiif [ -e "(loop)${pp}/BOOT/Bcd" ]; then set bcd=(loop)${pp}/BOOT/bcd ; fiif [ -e "(loop)${pp}/Boot/BCD" ]; then set bcd=(loop)${pp}/Boot/BCD ; fiif [ -e "(loop)${pp}/Boot/bcd" ]; then set bcd=(loop)${pp}/Boot/bcd ; fiif [ -e "(loop)${pp}/Boot/Bcd" ]; then set bcd=(loop)${pp}/Boot/bcd ; fiif [ -e "(loop)${pp}/boot/BCD" ]; then set bcd=(loop)${pp}/boot/BCD ; fiif [ -e "(loop)${pp}/boot/bcd" ]; then set bcd=(loop)${pp}/boot/bcd ; fiif [ -e "(loop)${pp}/boot/Bcd" ]; then set bcd=(loop)${pp}/boot/bcd ; fiunset sdiif [ -e "(loop)${pp}/BOOT/BOOT.SDI" ]; then set sdi=(loop)${pp}/BOOT/BOOT.SDI ; fiif [ -e "(loop)${pp}/BOOT/boot.sdi" ]; then set sdi=(loop)${pp}/BOOT/BOOT.SDI ; fiif [ -e "(loop)${pp}/BOOT/Boot.sdi" ]; then set sdi=(loop)${pp}/BOOT/BOOT.SDI ; fiif [ -e "(loop)${pp}/Boot/BOOT.SDI" ]; then set sdi=(loop)${pp}/Boot/BOOT.SDI ; fiif [ -e "(loop)${pp}/Boot/boot.sdi" ]; then set sdi=(loop)${pp}/Boot/boot.sdi ; fiif [ -e "(loop)${pp}/Boot/Boot.sdi" ]; then set sdi=(loop)${pp}/Boot/BOOT.SDI ; fiif [ -e "(loop)${pp}/boot/BOOT.SDI" ]; then set sdi=(loop)${pp}/boot/BOOT.SDI ; fiif [ -e "(loop)${pp}/boot/boot.sdi" ]; then set sdi=(loop)${pp}/boot/boot.sdi ; fiif [ -e "(loop)${pp}/boot/Boot.sdi" ]; then set sdi=(loop)${pp}/boot/BOOT.sdi ; fiunset wimif [ -e "(loop)${pp}/sources/boot.wim" ]; then set wim=(loop)${pp}/sources/boot.wim ; fiif [ -e "(loop)${pp}/Sources/boot.wim" ]; then set wim=(loop)${pp}/Sources/boot.wim ; fiif [ -e "(loop)${pp}/Sources/Boot.wim" ]; then set wim=(loop)${pp}/Sources/Boot.wim ; fiif [ -e "(loop)${pp}/SOURCES/boot.wim" ]; then set wim=(loop)${pp}/SOURCES/boot.wim ; fiif [ -e "(loop)${pp}/SOURCES/Boot.wim" ]; then set wim=(loop)${pp}/SOURCES/Boot.wim ; fiif [ -e "(loop)${pp}/SOURCES/BOOT.wim" ]; then set wim=(loop)${pp}/SOURCES/BOOT.wim ; fiif [ -e "(loop)${pp}/SOURCES/BOOT.WIM" ]; then set wim=(loop)${pp}/SOURCES/BOOT.WIM ; fiunset bmefi64set t="(loop)${pp}/bootmgr.efi" ; if [ -e "$t" ]; then set bmefi64="$t" ; fiset t="(loop)${pp}/EFI/BOOT/BOOTX64.EFI" ; if [ -e "$t" ]; then set bmefi64="$t" ; fiset t="(loop)${pp}/EFI/BOOT/Bootx64.efi" ; if [ -e "$t" ]; then set bmefi64="$t" ; fiset t="(loop)${pp}/EFI/BOOT/bootx64.efi" ; if [ -e "$t" ]; then set bmefi64="$t" ; fiset t="(loop)${pp}/EFI/Boot/BOOTX64.EFI" ; if [ -e "$t" ]; then set bmefi64="$t" ; fiset t="(loop)${pp}/EFI/Boot/Bootx64.efi" ; if [ -e "$t" ]; then set bmefi64="$t" ; fiset t="(loop)${pp}/EFI/Boot/bootx64.efi" ; if [ -e "$t" ]; then set bmefi64="$t" ; fiset t="(loop)${pp}/Efi/BOOT/BOOTX64.EFI" ; if [ -e "$t" ]; then set bmefi64="$t" ; fiset t="(loop)${pp}/Efi/BOOT/Bootx64.efi" ; if [ -e "$t" ]; then set bmefi64="$t" ; fiset t="(loop)${pp}/Efi/BOOT/bootx64.efi" ; if [ -e "$t" ]; then set bmefi64="$t" ; fiset t="(loop)${pp}/efi/Boot/BOOTX64.EFI" ; if [ -e "$t" ]; then set bmefi64="$t" ; fiset t="(loop)${pp}/efi/Boot/Bootx64.efi" ; if [ -e "$t" ]; then set bmefi64="$t" ; fiset t="(loop)${pp}/efi/Boot/bootx64.efi" ; if [ -e "$t" ]; then set bmefi64="$t" ; fiunset bmefi32set t="(loop)${pp}/bootmgr.efi" ; if [ -e "$t" ]; then set bmefi32="$t" ; fiset t="(loop)${pp}/EFI/BOOT/BOOTX64.EFI" ; if [ -e "$t" ]; then set bmefi32="$t" ; fiset t="(loop)${pp}/EFI/BOOT/Bootx64.efi" ; if [ -e "$t" ]; then set bmefi32="$t" ; fiset t="(loop)${pp}/EFI/BOOT/bootx64.efi" ; if [ -e "$t" ]; then set bmefi32="$t" ; fiset t="(loop)${pp}/EFI/Boot/BOOTX64.EFI" ; if [ -e "$t" ]; then set bmefi32="$t" ; fiset t="(loop)${pp}/EFI/Boot/Bootx64.efi" ; if [ -e "$t" ]; then set bmefi32="$t" ; fiset t="(loop)${pp}/EFI/Boot/bootx64.efi" ; if [ -e "$t" ]; then set bmefi32="$t" ; fiset t="(loop)${pp}/Efi/BOOT/BOOTX64.EFI" ; if [ -e "$t" ]; then set bmefi32="$t" ; fiset t="(loop)${pp}/Efi/BOOT/Bootx64.efi" ; if [ -e "$t" ]; then set bmefi32="$t" ; fiset t="(loop)${pp}/Efi/BOOT/bootx64.efi" ; if [ -e "$t" ]; then set bmefi32="$t" ; fiset t="(loop)${pp}/efi/Boot/BOOTX64.EFI" ; if [ -e "$t" ]; then set bmefi32="$t" ; fiset t="(loop)${pp}/efi/Boot/Bootx64.efi" ; if [ -e "$t" ]; then set bmefi32="$t" ; fiset t="(loop)${pp}/efi/Boot/bootx64.efi" ; if [ -e "$t" ]; then set bmefi32="$t" ; fi#either bootmgr.exe or bootmgr is required. It can be inside the boot.wim fileif ! [ -e /wimboot/wimboot ]; then echo ERROR: /wimboot/wimboot does not exist! Please add /wimboot folder to Partition 2 ; read ; fiechoif [ "$bme" = "" ]; then echo WARNING: bootmgr.exe not found ; fiif [ "$bm1" = "" ]; then echo WARNING: bootmgr not found ; fiif [ "$bme" = "" -a "$bm1" = "" ]; then set werr=1 ; fiif [ "$bcd" = "" ]; then echo ERROR: BCD not found in ISO file ; set werr=1 ; fiif [ "$sdi" = "" ]; then echo ERROR: boot.sdi not found in ISO file ; set werr=1 ; fiif [ "$wim" = "" ]; then echo ERROR: boot.wim not found in ISO file ; set werr=1 ; fiecho Using:echo bm1=$bm1echo bme=$bmeecho bcd=$bcdecho sdi=$sdiecho wim=$wimecho bmefi64=$bmefi64echo bmefi32=$bmefi32echo --------if [ "$werr" = "1" ]; then echo Possible error: Press a key to continue anyway... ; read ; fi}# ---------- Win10PESE_x64.ISO ------if $MBR64; thenif [ -e "$isofpath/Win10PESE_x64.ISO" ]; thenmenuentry "Win10PESE_x64.ISO (BIOS WIMBOOT)" --unrestricted --class windows {set isoname=Win10PESE_x64.ISO ; CHECK_MNU_FOLDERset root=$root2loopback loop $isofileGetWimbootFileslinux16 /wimboot/wimboot pauseinitrd16 \# newc:bootmgr:$bm1 \newc:boot.sdi:$sdi \newc:boot.wim:$wim \newc:bcd:$bcdboot}fifi#This menu will be shown for 32-bit and 64-bit CPUsif $EFI; thenif [ -e "$isofpath/Win10PESE_x64.ISO" ]; thenmenuentry "Win10PESE_x64.ISO (UEFI WIMBOOT)" --unrestricted --class windows {set isoname=Win10PESE_x64.ISO ; CHECK_MNU_FOLDERset root=$root2loopback loop "$isofile"# GetWimbootFilesset pp=if test -f (loop)/x64/sources/boot.wim; then set pp=/x64; fiif $EFI32; thenif test -f (loop)/x86/sources/boot.wim; then set pp=/x86; fifiecho Using ${pp}/sources/boot.wim...wimboot --pause \@:boot.sdi:(loop)${pp}/Boot/boot.sdi \# @:bootmgfw.efi:(loop)${pp}/efi/boot/bootx64.efi \@:boot.wim:(loop)${pp}/sources/boot.wim \@:bcd:(loop)${pp}/efi/microsoft/boot/bcdboot}fifi# ------------- Win10XPE_X64.iso ----------------------#WORKS (wimboot doesn't work)if $MBR64; thenif [ -e "$isofpath/Win10XPE_x64.ISO" ]; thenmenuentry "Win10XPE_x64 (BIOS MEMDISK)" --unrestricted --class windows {set isoname=Win10XPE_x64.ISO ; CHECK_MNU_FOLDERlinux16 ($root)/boot/grub/memdisk iso rawset root=$root2initrd16 $isofile# drivemap -s (hd0) (hd1)boot}fifi# ----------- ampe64.iso ------------------if $MBR64; thenif [ -e "$isofpath/ampe64.iso" ]; thenmenuentry "ampe64.iso WORKS (BIOS WIMBOOT)" --unrestricted --class windows {set isoname=ampe64.iso ; CHECK_MNU_FOLDERset root=$root2loopback loop $isofileGetWimbootFileslinux16 /wimboot/wimboot pauseinitrd16 \# newc:bootmgr:$bm1 \newc:boot.sdi:$sdi \newc:boot.wim:$wim \newc:bcd:$bcdboot}fifi#This menu will be shown for 32-bit and 64-bit CPUsif $EFI; thenif [ -e "$isofpath/ampe64.iso" ]; thenmenuentry "ampe64.iso (UEFI WIMBOOT)" --unrestricted --class windows {set isoname=ampe64.iso ; CHECK_MNU_FOLDERset root=$root2loopback loop "$isofile"GetWimbootFilesif [ "$bmefi64" = "" ]; then echo ERROR: bootmgr EFI file not found ; fiif [ "$sdi" = "" ]; then echo ERROR: boot.sdi file not found ; fiif [ "$wim" = "" ]; then echo ERROR: boot.wim file not found ; fiif [ "$bcd" = "" ]; then echo ERROR: BCD file not found ; fiecho Using $wim...wimboot --pause \# @:bootmgfw.efi:$bmefi64 \@:boot.sdi:$sdi \@:boot.wim:$wim \@:bcd:$bcdecho boot...readboot}fifi# Strelec WinPE TEST# This menu will be shown for 32-bit and 64-bit CPUs# Make strelec_BCD using BootIce - BCD must be set to boot from \sources\boot.wim and use \boot\boot.sdi and boot file=\Windows\system32\boot\winload.efi# Need to obtain missing bootx64.efi from a standard Win10 ISO and add to \wimboot folder# Once at Desktop, right-click on Strelec ISO in Explorer and MOUNT as Y: - then run MistAll from start menuif $EFI64; thenif [ -e "$isofpath/WinPE10_8_Sergei_Strelec_x86_x64_2019.02.04_English.iso" ]; thenmenuentry "TEST WinPE10_8_Sergei_Strelec_x86_x64_2019.02.04_English.iso (UEFI WINPE WIMBOOT)" --unrestricted --class windows {set isoname=WinPE10_8_Sergei_Strelec_x86_x64_2019.02.04_English.iso ; CHECK_MNU_FOLDERset root=$root2loopback loop "$isofile"wimboot --pause \@:boot.sdi:(loop)/SSTR/boot.sdi \@:bootmgfw.efi:/wimboot/bootx64.efi \@:boot.wim:(loop)/SSTR/strelec10x64Eng.wim \@:bcd:/wimboot/strelec64_BCDboot}fifi
————————————————-
GRUB2 UEFI + WIMBOOT (IPXE)
You can use the iPXE environment instead of a grub2 environment
- \boot.ipxe – config file run by iPXE
- \ipxe64.efi – contains iPXE boot code (x64)
- \ipxe32.efi – contains iPXE boot code (32-bit)
- \wimboot – the wimboot code
- \win\boot64.wim – \win folder contains your bootable wim file (any name)
- \win\BCD2 – and name for BCD
- \win\boot.sdi – generic boot.sdi
1. Go to the ROMMatic site and create a 64-bit and 32-bit .EFI file using – Advanced – EFI PXE bootstrap xx-bit (.efi)
and paste in the following script in the Embedded script box at the bottom:
#!ipxe
chain file:/boot.ipxe
then click on Proceed and wait (if you get a timeout – try again)
2. Now you should have a ipxe64.efi file and a ipxe32.efi file which you can load from grub2:
- menuentry “iPXE wimboot” {
- chainloader /ipxe64.efi
- boot
- }
3. Create the iPXE config file \boot.ipxe
#!ipxe#use --name for UEFI when file has different name from default#add second virtual name for MBR booting#ensure BCD has standard \sources\boot.wim and \sources\boot.sdi pathsifopenkernel file:/wimbootinitrd --name bcd file:/win/bcd2 bcdinitrd --name boot.sdi file:/win/boot.sdi boot.sdiinitrd --name boot.wim file:/win/boot64.wim boot.wimechoecho Platform=${platform} BuildArch=${buildarch}echoimgstatprompt --timeout 5000 Press a key... ||boot
The same boot.sdi file can be used by all Windows 7/8/10 etc. AFAIK.
4. Use BootIce to ensure that the BCD2 file has standard file paths for the boot.wim and boot.sdi
If these paths are not ‘standard’, then you will get a BSOD 0xc000000f error!
See iPXE wimboot description for more details.
The big problem with this method is that the boot.ipxe configuration file cannot be passed the path of the boot.wim file by grub. Once grub chainloads the .efi boot file, all connections with grub are lost.
This means that you can only boot to one boot.wim OR you must prompt the user to enter path of the boot.wim file by adding scripting into the boot.ipxe file,
e.g.
echo Please enter the full path of the boot.wim file...read wimboot- and then use
initrd --name boot.wim file:$wimboot boot.wim
in the boot.iPXE menuentry…
#!ipxe#use --name for UEFI when file has different name from default#add second virtual name for MBR booting#ensure BCD has standard \sources\boot.wim and \sources\boot.sdi pathsifopen:getwimimgfreeechoechoecho Please enter the full path of the boot.wim file...echo Press ENTER for /win/boot64.wimclear wimbootechoread wimbootisset ${wimboot} || set wimboot /win/boot64.wimecho wimboot=${wimboot}#check file existsimgfetch file:${wimboot} || goto getwimread askkernel file:/wimbootinitrd --name bcd file:/win/bcd2 bcdinitrd --name boot.sdi file:/win/boot.sdi boot.sdiinitrd --name boot.wim file:${wimboot} boot.wimechoecho Platform=${platform} BuildArch=${buildarch}echoimgstatprompt --timeout 5000 Press a key... || boot
Download files
Click here (OneDrive folder) if you cannot find any file mentioned in the articles on this site or Contact Me.