- Remove From My Forums
-
Question
-
Hello,
I have Windows Server 2012 DataCenter with Active Directory installed. Now whenever I want to access the server, it automatically entered recovery mode and there is nothing I can do with that. I want to access the old F8 Menu like in Window Server 2008 R2
to boot using any of these:Safe Mode
Directory services restore mode
Last Good Known Configuration
But I cannot, Can anyone help me…Thanks
Haitham Al-Haj
-
Changed type
Wednesday, March 20, 2013 6:04 AM
-
Changed type
Answers
-
-
Marked as answer by
Yan Li_
Tuesday, April 2, 2013 1:27 AM
-
Marked as answer by
- Open the Power menu by normal means, such as via the Settings charm.
- Hold down the Shift key and select Restart.
- Select a reason for restarting the server and click Continue.
- Windows will shut down.
- Select Startup Settings on the Advanced options screen, then click Restart.
Where is startup and recovery?
To open System Startup and Recovery, launch Control Panel, select System and Security, select System, Advanced System Settings, click the Advanced tab in the Systems Settings dialog box, and then click Settings under Startup and Recovery to display a property page similar to the one shown in Figure 33.30.
How do I start Windows server automatically?
To launch the Auto-Restart utility as a Windows Service:
- From the desktop, click Start > Control Panel.
- Double-click Administration Tools.
- Double-click Services to display the Services window:
- Double-click NetIQ Operations Center Auto-Restart Service.
How do I get to the boot menu on a server?
How do I change Windows startup settings?
How to Change Windows Startup Settings
- Click “Start” on your Windows taskbar, click “Run,” type “msconfig” (without the quotes) into the dialog box and hit “Enter.”
- Click on the “Startup” tab to reveal the programs in the Startup list.
- Check the box next to each program that you wish to start with the operating system.
How do I add programs to Windows Server startup?
To assign computer startup scripts In the console tree, click Scripts (Startup/Shutdown). The path is Computer Configuration\Windows Settings\Scripts (Startup/Shutdown). In the results pane, double-click Startup. In the Startup Properties dialog box, click Add.
Where is Startup folder in Windows Server 2012?
To answer your question, there are three ways, The Startup folder is hidden by default in Windows 8 and Windows Server 2012. Solution 1 Open the Windows Run dialog by using the Windows Key + R key combination. Type %AppData% into the Run field and press enter.
How to start a program in Windows Server 2012?
The configurations are not very different between Windows Server 2012 and previous versions of Windows Server. 1. Run the Windows Remote Desktop Connection -> Options -> Programs -> Check Start the following program on connection -> Specify the path and file name.
How to boot Windows Server 2012 into safe mode?
1 Press the Windows key + R to open the Run box. Type msconfig and press Enter. 2 Now the System Configuration dialog box will be opened. Under the Boot tab, check the Safe boot option and click OK . 3 Reboot your computer and it will boot directly into Safe Mode automatically.
What to do with startup folder in Windows?
Using the task scheduler or editing the registry works, but, you shouldn’t have to do either one of those. The whole point of the Startup folder is to, you know, run programs at startup. There is a definitely a bug in Windows in this regard. Still should be working.
In this tutorial you ‘ll find instructions on how to enable the F8 key on Windows Server 2012, 2016 or 2019, in order to access the ‘Advanced Boot Options menu’ (Safe Mode, Safe Mode with Networking, etc.), if your server fails to start normally.
As you probably know in Windows Server 2012, 2016 and 2019, the F8 key is enabled by default in order to access the Advanced Boot Options menu when needed. But, if Windows does not function properly and especially if Windows is unable to boot normally, the F8 key does not work.
How to Turn On the F8 Boot Menu if Server 2012/2016/2019 Fails to Start.*
* Note: If you can boot to Windows, then you don’t need to apply these steps, because the F8 key is already enabled. So, test it, and only if it doesn’t work, open an elevated command prompt and give the two (2) commands mentioned below from Windows.
1. Boot the Server from a Windows Installation Media (DVD or USB).
2. At the Windows Setup screen press SHIFT + F10 to access command prompt, or choose Next –> Repair your computer –> Troubleshoot –> Advanced Options –> Command Prompt.

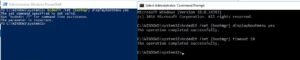
3. In command prompt, type the following commands in order:
- bcdedit /set {bootmgr} displaybootmenu yes
- bcdedit /set {bootmgr} timeout 10

4. Close all windows and reboot the server.
5. After reboot, press the F8 key at the Windows Boot Manager screen to access the Advanced Boot Options menu.

That’s it! Let me know if this guide has helped you by leaving your comment about your experience. Please like and share this guide to help others.
UPDATED: March 2018
If you have worked on Windows 8 or newer, you will know that Microsoft has removed the F8 boot functionality. They did this to decrease boot times. What is odd is that they applied this logic to servers; I would not have. Regardless the F8 Safe Mode functionality is not truly removed, it is just turned off.
To turn F8 boot on in Server 2012 you need to get to an elevated CMD prompt. 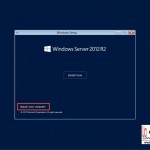
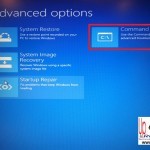 If your server is functional that is easy. If your server won’t boot (hence the need for F8) then you can boot off of a Windows Server install DVD and select REPAIR YOUR COMPUTER option, the Troubleshooting, then Command Prompt.
Once you have a Command Prompt (as an administrator) open enter the following commands which are self explanatory:
- bcdedit /set {bootmgr} displaybootmenu yes
- bcdedit /set {bootmgr} timeout 10
Reboot your machine and enjoy pressing F8 and getting back into SAFE MODE or LAST KNOWN GOOD to work out your problem.
This will also work on Windows 8 and Windows 10.
Note that the BCDEDIT commands do NOT work from PowerShell. They NEED to be run from CMD.EXE :
Thanks to a number of blogs including THIS one.
Thanks
В статье подробно описан и продемонстрирован процесс создания загрузочной USB флешки с Windows Server 2012 R2, а также процесс активации Windows Server 2012 R2.
Процесс создания загрузочной USB флешки, установки операционной системы и активации показан на примере Windows Server 2012 R2 Datacenter, однако данное руководство также полностью подходит для установки версий Windows Server 2012 R2 Foundation/Essentials/Standard.
ВАЖНО! Прежде чем переустанавливать Windows Server 2012 R2, скопируйте всю ценную для Вас информацию на сторонние носители. Если имеется такая возможность, желательно скачать драйверы сетевой карты для компьютера на который Вы будете устанавливать Windows Server 2012 R2.
Для установки Windows Server 2012 R2 понадобятся:
1. USB флешка объемом 8Гб или больше. Имейте ввиду, что в процессе создания загрузочной USB флешки с Windows Server 2012 R2 вся информация находящаяся на флешке будет удалена;
2. Оригинальный образ (ISO-образ) Windows Server 2012 R2;
Скачать Windows Server 2012 R2
.
3. Утилита Rufus для создания загрузочной USB флешки из ISO-образа Windows Server 2012 R2;
Скачать Rufus
.
4. Утилита Activator KMSAuto для активации Windows Server 2012 R2;
Скачать Activator KMSAuto
.
I. Создание загрузочной флешки с Windows Server 2008 R2
1. Вставьте USB флешку в USB разъем.
2. Запустите скачанную утилиту Rufus.
Перед Вами откроется окно:

Рис.1
.
3. На Рис.1 видно USB флешку, которую Вы вставили в USB разъем.
4. Нажмите на иконку, после чего откроется окно выбора ISO-образа. Выберите скачанный Вами ранее ISO-образ с Windows Server 2012 R2 (прим. вспомните куда Вы его сохраняли).
5. Нажимаем Открыть.
6. Нажимаем Старт.

Рис.2
.
7. Появится окно предупреждения, информирующее о том, что все данные на USB флешке будут удалены. Нажимаем ОК, после чего начнётся установка ISO-образа. После окончания установки ISO-образа (Рис.2) нажмите Закрыть.
.
II. Добавление активатора Windows на USB флешку
1. Откройте созданную загрузочную USB флешку с Windows Server 2012 R2.
2. Распакуйте (прим. с помощью WinRAR или просто открыть через Проводник) скачанную Вами ранее утилиту Activator KMSAuto. Полученную папку Activator KMSAuto переместите на загрузочную USB флешку с Windows Server 2012 R2 (Рис.3).

Рис.3
.
III. Установка Windows Server 2012 R2
1. Вставьте загрузочную USB флешку с Windows Server 2012 R2 в разъём USB.
2. Сразу после запуска компьютера необходимо вызвать Boot menu. Т.к. на разных материнских платах и ноутбуках клавиши вызова Boot menu отличаются, ниже приведена таблица (Рис.4) в соответствии с которой Вам необходимо нажать соответствующую клавишу (прим. если у Вас стационарный компьютер, и Вы не знаете какая материнская на нём стоит, обесточьте компьютер, откройте боковую крышку системного блока и посмотрите модель материнской платы).

Рис.4
.
3. Boot menu незначительно отличается на разных моделях и приблизительно выглядит следующим образом (Рис.5, Рис.6, Рис.7).

Рис.5
.

Рис.6
.

Рис.7
.
4. Выберите загрузку с USB флешки и нажмите Enter.
5. Далее на дисплее появится надпись «Press any key to boot from CD or DVD…», нажмите любую клавишу на клавиатуре (Рис.8).

Рис.8
.
6. В появившемся окне установки Windows Server 2012 R2 выберите нужный язык и нажмите Далее (Рис.9).

Рис.9
.
7. Для начала установки нажмите Установить (Рис.10).

Рис.10
.
8. Выбираем необходимую нам операционную систему (прим. в данном руководстве установка показана на примере Windows Server 2012 R2 Datacenter (сервер с графическим интерфейсом)).
Примечание! Windows Server 2012 R2 включает вариант облегченной установки Windows Server 2012 R2 в которую не включена графическая оболочка. Вся настройка и обслуживание выполняется при помощи интерфейса командной строки Windows, или подключением к серверу удалённо посредством Консоли управления. При этом доступны Блокнот и некоторые элементы панели управления, к примеру, Региональные Настройки.
После того как вы выбрали нужную Вам операционную систему нажмите Далее (Рис.11).

Рис.11
.
9. В появившемся окне поставьте галочку напротив Я принимаю условия лицензии, затем нажмите Далее (Рис.12).

Рис.12
.
10. В разделе тип установки выберите Выборочная: только установка Windows (для опытных пользователей) (Рис.13).

Рис.13
.
11. Выберите опцию Создать (Рис.14).

Рис.14
.
12. Появится строка, в которой нужно указать размер создаваемого логического диска, затем нажмите Применить (прим. если Вам необходимо создать два и более разделов — сначала задайте размер первого логического диска, затем, из оставшегося незанятого пространства, аналогичным образом, создайте другие разделы) (Рис.15).

Рис.15
.
13. Откроется окно, в котором сообщается, что Windows необходимо создать дополнительные разделы для системных файлов. Нажмите ОК (Рис.16).

Рис.16
.
14. Выберите раздел для установки Windows Server 2012 R2 (прим. в данном руководстве это Диск 0 Раздел 2), затем нажмите Далее (Рис.17).

Рис.17
.
15. Начнется установка Windows Server 2012 R2, в процессе которой компьютер перезагрузится (Рис.18).

Рис.18
.
16. Придумайте и введите новый пароль для учётной записи администратора (прим. пароль, как минимум, должен содержать буквы разного регистра и цифры), затем нажмите Готово (Рис.19).

Рис.19
.
17. После окончания установки, для входа в систему, нажмите Ctrl + Alt + Delete (Рис.20).

Рис.20
.
18. Введите пароль администратора, затем нажмите Enter (или синюю иконку со стрелочкой) (Рис.21).

Рис.21
.
19. После запуска системы появится рабочий стол Windows Server 2012 R2 (Рис.22).

Рис.22
.
IV. Активация Windows Server 2012 R2
1. На установленной Windows Server 2012 R2 откройте загрузочную USB флешку с Windows Server 2012 R2, в ней откройте папку Activator KMSAuto и запустите файл KMSAuto (Рис.23).

Рис.23
.
2. В открывшемся окне нажмите Активация Windows, после окончания активации внизу появится надпись Completed (Рис.24).

Рис.24
.
3. После активации откройте Пуск > Компьютер (пр. кнопкой мыши) > Свойства (Рис.25).

Рис.25
.
4. Откроется окно, внизу которого будет написано, что активация Windows выполнена (Рис.26).

Рис.26
.
Установка и активация Windows Server 2012 R2 завершена! Надеемся, что данное руководство помогло Вам!
.