BOOT.INI — это внутренний файл Windows с параметрами запуска. К нему обращается ОС, когда вы включаете компьютер. Если вас не устраивают изначальные настройки запуска, их можно изменить. Нужно лишь внести изменения в этот файл. Но отыскать его непросто: системные папки часто скрыты от глаз пользователя, чтобы человек случайно не удалил или не переместил важный каталог. В новых Windows этот файл отсутствует.

Что такое BOOT.INI?
Если на компьютере не одна ОС, при запуске будет предложен выбор. Именно за это отвечает BOOT.INI. В нём прописано, какая из систем приоритетная, с какими настройками её загружать и т. п.
При включении Windows обращается к нескольким файлам, которые контролируют загрузку на разных этапах. Это ntbootdd.sys, ntdetect.com, ntldr, bootsect.dos. И, конечно, сам BOOT.INI. Если какой-то из них переименовать, перетащить, удалить или неаккуратно отредактировать, это может вызвать проблемы. Компьютер будет без конца перезагружаться, выдавать ошибки или элементарно не включаться. Поэтому с внутренними данными операционной системы надо обращаться осторожно. Неправильная цифра или не в том месте поставленное тире — и вам придётся восстанавливать ОС.

Будьте осторожны при редактировании boot.ini, поскольку в случае ошибки потребуется переустановка или восстановление Windows
Как найти BOOT.INI
Вначале поговорим о Windows XP. Где находится BOOT.INI в этой модели? Его можно найти непосредственно в корневой директории (там, где основные дистрибутивы системы). Но увидеть его не получится, если не активировано отображение скрытых объектов. Чтобы включить эту опцию:
- Зайдите в «Панель управления» (в меню «Пуск»).
- Откройте «Параметры папок» в разделе «Оформление и персонализация».
- Найдите вкладку «Вид».
- Прокрутите ползунок вниз. Там будет строчка «Показывать скрытые файлы». Поставьте галочку.

Теперь вы сможете увидеть BOOT.INI. Он находится прямо на системном диске (обычно это диск C:\). Сам файл имеет иконку в виде листка с шестерёнкой. Он будет полупрозрачным. Это означает, что он скрытый, и снять с него этот атрибут невозможно.
Если вы не представляете, где именно установлена ваша ОС, зайдите в меню «Пуск — Поиск». Выберите «Файлы и папки» и в поле для ввода напишите название или часть названия. В окне отобразятся все результаты с таким именем.
Если вы используете Windows 7, во всех моделях, начиная с Vista, эти настройки заменили на файл конфигурации «BCD», который не имеет расширения. Его можно запустить как часть реестра, но настроить или изменить в нём что-то будет трудно. Он содержит очень много параметров и значений, в которых непросто ориентироваться. В Windows 10 BOOT.INI тоже отсутствует, поэтому менять параметры загрузки придётся другим способом.
BCD намного полезнее и функциональнее своего «предшественника», но этот файл не предназначен для ручной настройки. Он нужен для нужд системы, и исправлять в нём что-либо не стоит.
Как редактировать?
BOOT.INI можно отредактировать в любом текстовом процессоре. Подойдёт обычный блокнот Windows или «продвинутый» Notepad+. Но перед этим надо разрешить доступ к файлу, иначе после внесения изменений его нельзя будет сохранить.
- Кликните по нему правой кнопкой мыши.
- Выберите «Свойства».
- Во вкладке «Общие» уберите галочку из пункта «Только чтение».
- Нажмите «Применить».
После этого можно менять значения в BOOT.INI. Файл имеет чёткую структуру. Не рекомендуется удалять в нём что-то, перемещать операторы без надобности, стирать скобки или знаки препинания. Вкратце о каждом параметре:
- «Timeout» показывает, сколько времени даётся на выбор ОС при запуске (если установлено несколько). Напишите после знака равенства «=» нужную вам цифру. Таймер ведёт отсчёт в секундах.
- В «default» обозначена операционная система, заданная по умолчанию. Она будет загружена, если за отведённое время вы не выберите, какую именно ОС активировать. Этот параметр может выглядеть примерно так: «scsi(0)disk(0)rdisk(0)partition(1)\WINDOWS».
- «Scsi» — контроллер, который управляет физическим диском. Если их несколько, второй будет иметь вид «scsi(1)».
- «Partition» — это раздел, в котором находится ОС. К примеру, «Partition(1)» указывает на C:\, «partition(2)\» — на D:\ и так далее.
- Ниже параметра «operating systems» представлен список установленных операционных систем. Если у вас одна ОС, там будет одна строчка.
- Могут быть вписаны и другие параметры. Например, «/SOS», чтобы при запуске показывались имена драйверов, или «/debug» для отладки ядра. Все возможные команды есть на официальном сайте Microsoft.

Как менять порядок загрузки без файла BOOT.INI
Так как отредактировать BOOT.INI в Windows 7 и более поздних версиях не получится из-за отсутствия этого файла, придётся настраивать порядок загрузки другим способом. Конечно, можно попробовать поработать с BCD, но разобраться во всех его опциях будет непросто.
Если вам надо поменять время, которое даётся на выбор ОС, или поставить другую систему по умолчанию, сделать это можно так:
- Откройте «Мой компьютер».
- Щёлкните в любом свободном месте окна правой кнопкой мыши.
- Зайдите в «Свойства».
- Затем — в«Дополнительные настройки».
- На вкладке «Дополнительно» в разделе «Восстановление и загрузка» нажмите «Параметры». Там будут нужные опции.

Ещё один способ:
- Перейдите в Пуск — Выполнить.
- В открывшемся окне напишите «msconfig» (без кавычек). Появятся настройки конфигурации.
- Вкладка «Загрузки». Откроется список установленных ОС. Можно решить, какую из них назначить по умолчанию, и изменить таймаут при запуске и выборе системы.
К сожалению, эти методы не позволяют задать особые параметры.
Использование программ
Описанные выше задачи можно упростить. Для этого существуют специальные утилиты — менеджеры загрузок. С ними можно обойтись и без BOOT.INI. Вот некоторые из этих программ:
- Оболочка для BCD. С её помощью можно настроить этот файл.
- OSL2000 BootManager. Поддерживает работу с большим количеством операционных систем (до 100 штук).
- Обеспечивает быстрый перезапуск в нужную ОС.
В Windows XP BOOT.INI отвечает за порядок загрузки системы. Его можно изменить, прописав команды вручную. В последующих версиях ОС файл убрали. Но настройка параметров запуска всё равно доступна. Если вы не разбираетесь в этом вопросе, воспользуйтесь предназначенными для этого программами. Так не придётся трогать собственную информацию Windows.
Windows Задать вопросНаписать пост
Разберём за что отвечал файл «boot.ini», куда он пропал и каким образом настраивать порядок загрузки в версиях Windows после 7. На самом деле окно настройки почти не изменялось, хотя сам файл постоянно переезжал и менял расширение.
Само название переводится, как «загрузка». А расширение обозначает, что это файл конфигурации. Он содержит в себе информацию о том, в каком порядке и как будет загружаться операционная система. Если в Windows XP файл boot.ini можно без труда найти в корне диска «С:» (является скрытым), то уже в Windows 7 он полностью исчез. На смену ему пришла утилита конфигурации.
Расположение параметров загрузки
Поскольку в «boot.ini» (или «boot.sdi» — для более поздних версий Windows) содержится порядок загрузки системы, а также дополнительные опции для этой процедуры, изменение параметров может повлечь практически непоправимые последствия. Не стоит изменять что-либо наугад, хотя способ изменений весьма прост: требуется найти и переделать файл. От версии операционной системы (ОС) зависит, как это делается:
- Windows XP – включаем отображение скрытых файлов. Находим «boot.ini» в корневом каталоге диска «С:» и открываем его с помощью блокнота;
- В Windows 7 и более поздних, файл расположен в папке «system32». Но имеет расширение, которое невозможно отредактировать блокнотом. Вместо него используется альтернативный метод – специальная утилита.
В Windows XP не рекомендуется предпринимать какие-либо действия и редактировать файл, кроме удаления посторонних записей.
Редактирование файла
Изменить записи с помощью блокнота в «семёрке» уже нельзя. Зато действуют 2 альтернативных способа: «msconfig», вызывающий окно с настройками системы и «bcdedit», который позволяет сделать необходимое с помощью консольных команд. Различие заключается только в графическом интерфейсе первого.
Использование msconfig
С графическим представлением проще работать. Поэтому данная утилита кажется очень удобной многим пользователям. Вызывается она следующим образом:
- Нажимаем «Win+R» для вызова окна «Выполнить».
- Вписываем в строку «msconfig».

- Открываем раздел «загрузка».

- Вносим необходимые изменения.
- Нажимаем «Применить» и «Ок».


Данное окно открывает огромное количество опций и настроек:
- Построение порядка загрузки. Просто перемещаем нужную версию ОС выше по списку.
- Тайм-аут. Определяет время, предоставленное пользователю для выбора загружаемой версии Windows.


- Безопасный режим. Имеет ряд основных настроек. Полезная опция, которая отключает загрузку программ и большинства драйверов, что помогает справиться с настройкой. Например, удалить драйвер видеокарты и установить новый.
- Опции загрузки. Устанавливают некоторые дополнительные аргументы при загрузке системы. «Без GUI» загружает систему в режиме консоли (без интерфейса). «Базовое видео» запускает режим в котором не используется драйвер видеокарты. «Журнал загрузки» записывает порядок запуска ОС. «Информация об ОС» выводит дополнительные сведения о Windows в процессе загрузки.
- Дополнительные параметры. Позволяют провести downgrade компьютера системными средствами. Опция полезна только разработчикам и «ретро-геймерам». В остальных случаях не стоит её трогать.
- Использовать по умолчанию. Указывает, что данная система будет загружаться, если не был сделан выбор.
- Удалить. Уничтожает загрузочную запись, исключая ОС из списка загрузки.
Без графической составляющей (bcdedit)
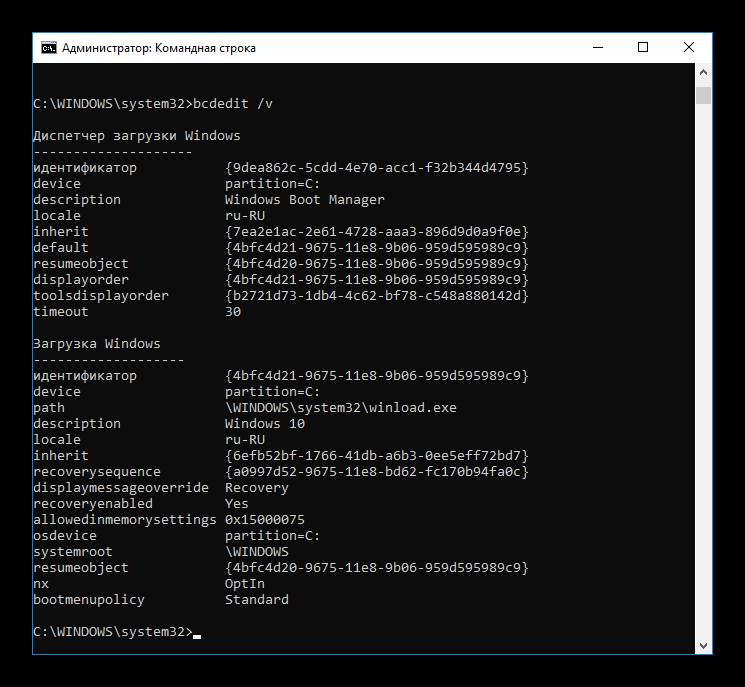
Является копией предыдущего способа с той лишь разницей, что вместо графической составляющей предстоит работать с чёрным окном консоли. Опции, по сути, такие же, отличается только порядок их включения. Вместо нажатий на галочки требуется вводить команды. Вызывается «bcdedit» следующим образом:
- Запускаем «Командную строку» от имени Администратора.
- Вводим команду «bcdedit» и нажимаем «enter».

- Пробуем изменить настройки.

Примечание: весьма полезной командой будет «bcdedit /?» — она выводит справку по работе с консольной версией настройки порядка загрузки.
Список наиболее полезных аргументов для данной команды:
- /v отображает полные описания установленных копий Windows;
- /bootsequence указывает, что Диспетчер загрузки будет использовать цикл записей единожды;
- /default устанавливает копию Windows для загрузки по умолчанию;
- /timeout выставляет время на выбор ОС;
- /deletevalue удаляет копию записанной команды из хранилища.
Остальные значения чуть сложнее в использовании. Впрочем, данный способ тоже не самый простой. Куда как удобнее использовать «msconfig».
Ещё один способ
Есть способ о существовании которого следует упомянуть. Это редактирование записей реестра. Вот только ошибки в таком редактировании могут стать фатальными и единственным способом исправить что-либо станет полная переустановка Windows. Причем при наличии двух предыдущих утилит правку реестра лучше не применять.
Reader Interactions
Хочу отредактировать файл boot.ini на сервере windows 2016 (или windows 10), не могу его найти, обычно он должен лежать на диске C:\ (в более поздних версиях).
команда в cmd:
bootcfg /query
ERROR: Cannot open BOOT.INI file.
По умолчанию этого файла нет, если его просто создать по адресу C:\boot.ini. файл игнорируется, видимо это пережиток windows xp.
Где находится и как называется данный файл?
![]()
wchistow
3,0625 золотых знаков11 серебряных знаков28 бронзовых знаков
задан 1 фев 2017 в 9:31
![]()
Paulo BereziniPaulo Berezini
2,3076 золотых знаков22 серебряных знака34 бронзовых знака
Нигде не находится и никак не называется.
См. справку по BCDEdit.
ответ дан 1 фев 2017 в 9:43
![]()
Могу добавить к ответу Akina, что вместо штатного консольного BCDEdit мне намного удобнее оказалось воспользоваться бесплатной утилитой EasyBCD.
С её помощью легко настроил dual-boot разных версий Windows, которые изначально были установлены по отдельности на разных дисках.
ответ дан 13 июл 2017 в 7:24
![]()
VadzimVadzim
1313 бронзовых знака
Boot. ini is a text file located at the root of the system partition, typically c:Boot. ini. Boot.
Contents
- 1 How do I find my boot INI file?
- 2 How do I fix boot ini in Windows 10?
- 3 Where are boot options stored?
- 4 What replaced boot ini?
- 5 Does Windows 10 use boot ini?
- 6 How do I edit an INI file in Windows 10?
- 7 How do I rebuild BCD in Windows 10?
- 8 What causes boot BCD error?
- 9 How do I remove BCD from Windows 10?
- 10 How do I find my BCD store?
- 11 What files does Windows 10 use to boot?
- 12 How do I use Windows 10 bootloader?
- 13 Where are INI files located?
- 14 How do I change a TXT file to ini?
- 15 How do I change my ini file?
- 16 How do I fix a corrupted BCD file?
- 17 How do I fix a corrupted master boot record?
- 18 How do I fix EFI Microsoft boot BCD?
- 19 How do you fix boot failure?
- 20 How do I fix error 0xc0000098?
How do I find my boot INI file?
Click Start, point to Programs, point to Accessories, and then click Notepad. On the File menu, click Open. In the Look in box, click the system partition, in the Files of type box, click All Files, locate and click the Boot. ini file, and then click Open.
How do I fix boot ini in Windows 10?
Insert your installation media into the computer.
- Boot to the media.
- Click Next on the Windows Setup menu.
- Click “Repair your computer.”
- Choose Troubleshoot.
- Select “Advanced options.”
- Pick “Command Prompt.”
- Type Bootrec /fixmbr and press the enter key.
- Type Bootrec /scanos and press the enter key.
Where are boot options stored?
Windows boot options are stored in the Boot Configuration Data (BCD) store on BIOS-based and EFI-based computers.
What replaced boot ini?
Bcdedit.exe
This utility has been replaced with the Bcdedit.exe command-line tool to affect the Windows code which runs in the pre-operating system environment by adding, deleting, editing, and appending entries in the BCD store.
Does Windows 10 use boot ini?
On Windows 10 the boot. ini file has been replaced with Boot Configuration Data (BCD).
How do I edit an INI file in Windows 10?
It’s not a common practice for people to open or edit INI files, but they can be opened and changed with any text editor. Just double-clicking on an INI file will automatically open it in the Notepad application in Windows. See our Best Free Text Editors list for some alternative text editors that also edit INI files.
How do I rebuild BCD in Windows 10?
How to Rebuild the BCD in Windows 10, 8, 7, or Vista
- On Windows 10 or Windows 8: Start Advanced Startup Options.
- In Windows 10/8, select Troubleshoot > Advanced options.
- Select the Command Prompt button to start it.
- At the prompt, type the bootrec command as shown below, and then press Enter: bootrec /rebuildbcd.
What causes boot BCD error?
One of the most common causes of this error is the BCD that became missing or corrupt. That could happen because of disk write errors, power outages, boot sector viruses, or errors made while configuring the BCD manually.
How do I remove BCD from Windows 10?
To delete old EFI entries, open an elevated Command Prompt, type bcdedit /enum firmware, and press Enter. Unlike the command used for the Windows Boot Manager, the “enum firmware” command lists all objects available in the BCD store, including any Linux installations.
How do I find my BCD store?
The BCD information resides in a data file named bootmgfw. efi in the EFI partition in the EFIMicrosoftBoot folder. You will also find a copy of this file in the Windows Side-by-Side (WinSxS) directory hierarchy.
What files does Windows 10 use to boot?
Where is the boot file stored in Windows 10? Windows boot configuration data (BCD) can be considered a database for boot-time configuration data. The BCD Store file is usually located in the Boot folder of a Windows System Reserved partition.
How do I use Windows 10 bootloader?
The Windows 10 Boot Loader does become the default when Windows 10 is installed. You can adjust this from within Windows 10 by going to Control Panel > System > Advanced System Settings. On the Advanced Tab, you have a Settings Button under Startup and Recovery.
Where are INI files located?
ini file is located inside each user’s data folder, which by default is hidden.
How do I change a TXT file to ini?
Also, if you save a file using Notepad, select save as and then select the down arrow next to save as type and select all files. Then type in options. ini in the file name block. This will save the file as options.
How do I change my ini file?
How to specify INI file modifications
- Decide upon the extent of the modifications.
- Go to the INI files project page.
- Right-click anywhere in the list to open its context menu.
- On the context menu that appears, choose New INI Value.
- InstallMate creates a new INI file key.
How do I fix a corrupted BCD file?
Rebuild BCD in Windows 11/10
- Boot your computer into Advanced Recovery Mode.
- Launch Command Prompt available under Advanced Options.
- To rebuild the BCD or Boot Configuration Data file use the command – bootrec /rebuildbcd.
- It will scan for other operating systems and let you select the OS’s you want to add to BCD.
How do I fix a corrupted master boot record?
Fix the MBR in Windows 10
- Boot from the original installation DVD (or the recovery USB)
- At the Welcome screen, click Repair your computer.
- Choose Troubleshoot.
- Choose Command Prompt.
- When the Command Prompt loads, type the following commands: bootrec /FixMbr bootrec /FixBoot bootrec /ScanOs bootrec /RebuildBcd.
How do I fix EFI Microsoft boot BCD?
File :EFIMicrosoftBootBCD Error code: 0xc0000034
- Insert the Windows installation disc in the disc drive or connect USB media and then start the computer.
- Press a key when you are prompted.
- Select a language, a time, a currency, a keyboard or an input method, and then click Next.
- Click Repair your computer.
How do you fix boot failure?
How do I fix a boot failure?
- Restart the PC and enter BIOS setup.
- Locate the option for changing boot sequence.
- Set the drive that contains the operating system as the first boot device.
- Save the changes to BIOS utility and exit.
- Restart your PC with the new boot order and see if the boot failure gets fixed.
How do I fix error 0xc0000098?
1) Boot your PC from your setup disk (USB/DVD/CD). 2) Select Repair your computer and go to Troubleshoot > Advanced Options > Startup Repair. 3) Startup Repair will begin scanning your installation for known issues and will attempt a repair if it finds any. 4) If it fails, you can run Startup Repair again.
You may have heard of the boot.ini file in Windows, but do you know what it is? This file stores the options your computer needs to boot. It is located in the root folder of your system drive and is commonly named c:Boot.ini. If your computer is using BIOS firmware, the Boot.ini file is located in the system partition. If it is missing or corrupted, a repair is necessary.
Unlike InstallShield files, bootable files are preconfigured to run when your computer boots up. Bootable files are stored on the hard disk and other devices. Windows 10 will not automatically boot from these files if you delete them. Here are some things you can do to change the default time. The default value is 30 seconds. If you have multiple systems, you can set the time to something else.
The Boot Ini file is located in the root folder “C”. The Windows 7 version is not in the “C” folder, but you can still see the contents of this system file. There are several ways you can access the boot ini file. The first method is to open “Run”, which is located in the Start menu. In the Run dialog box, enter the command “msconfig”.
Where is the Windows 10 Boot File?
If you’ve forgotten where you installed Windows 10, you can always make a bootable USB drive and install it from it. To do this, you need the Windows installation media in ISO file format and an empty USB drive with at least 5 GB of space. To make a bootable USB drive, you must download it from Microsoft’s website. The file should take a few minutes to download and then you can boot your computer from it.
The Boot Configuration Data file is used to load Windows when the operating system boots. If the BCD file is corrupted or deleted, it cannot load Windows properly. In addition, the boot configuration data file may also be damaged, causing the computer to be unable to boot. To fix the issue, you can either follow the instructions below, or follow guides designed for specific types of firmwares. This way, you can fix the boot BCD error without the need to download and install Windows again.
How Do I Find Windows Boot Files?
To find the files that are causing Windows to boot up, you need to determine the disk layout of your PC. Older PCs use the Master Boot Record (MBR) disk layout to load Windows. Newer PCs use the GUID Partition Table (GPT) disk layout to perform booting. This is sometimes referred to as an EFI boot. By identifying the disk layout of your PC, you can troubleshoot and fix any problems.
To identify which boot file is causing your computer to fail to start, first determine whether it is from the local system or from a remote file server. To do this, go to Control Panel, then click the Files tab. Choose the appropriate operating-system and release. Next, click Browse, then enter the file name and description, and then click OK. You can also find the file’s checksum value, if any.
If the Windows installation tool does not detect the boot device, try installing it from a USB flash drive. After installing it, you can connect the USB drive to your computer and reboot. The USB drive will now boot up Windows from the USB drive. This solution is also effective for restoring system boot order. When using an UEFI boot device, you must choose the right one for the operating system you’re installing.
What Replaced Boot INI File?
What Replaced Boot INI File in Windows10? Windows 10 has a new boot configuration file known as Boot Configuration Data (BCD) that contains boot options for Windows systems. BCD is more flexible than boot.ini and can apply to more than one type of platform. If you’ve recently updated your operating system to Windows 10, you may have noticed changes in the BCD. To fix this problem, follow the steps below.
To fix this issue, go to the Advanced Startup Options menu and choose the Command Prompt option. From here, you can scan the hard drive for other operating systems. You can then select those to add to the BCD. Once you’ve done this, restart your PC. If this didn’t solve your boot problem, try repairing the BCD first. If you’ve backed up important files, you can also rebuild the BCD.
How Do I Create a Boot INI File?
To start up your computer, you must create a boot file. The Boot folder is located in the same partition as BOOTMGR. If you don’t have this folder, you can use the Microsoft media creation tool to create it. Once you’ve created the boot file, you need to make sure that the file is stored in the correct location. Here are some instructions:
First, create a backup of the file. You can do this by creating a floppy disk and storing it in a safe place. You can always revert back to a previous version of the file if you make any changes. To edit the file, go to Control Panel and click on the System icon. In the Advanced window, click the Advanced tab. Scroll down until you find the Startup and Recovery section.
Where is Boot Information Stored?
Where is boot information stored on Windows 10? The boot configuration data file is a firmware-independent database that tells the Windows runtime environment where to look to find boot information. It also establishes boot priority and the timing in which your PC can access multiple bootable partitions. Windows OS clean install creates two bootable partitions: one is the operating system partition and the other is the recovery partition, which can be accessed during repair.
The Boot Configuration Data is stored in a data file, which has the same format as a Windows Registry hive. It is located at /EFI/Microsoft/Boot/BCD on the EFI System Partition. To access this boot information, press and hold the Shift key and click the Advanced Boot Options. When the advanced boot options are enabled, Windows will begin to boot automatically.
To repair a faulty boot configuration data file on Windows 10, you need to use a command line. Run “bcdedit” and input the system’s unique identifier and GUID. You should then copy these files to the BCD file. Then, overwrite the MBR boot sector. If all three steps fail, your computer will not boot. You should use a third-party tool to make this process easier and safer.
Does Windows 10 Have a Repair Tool?
Does Windows 10 have a repair tool? Yes, it does. This built-in repair tool has a number of applications, which can solve a variety of PC issues. One of these tools can even run unattended. This option can be useful when a computer has recently changed software on it. If you’re having trouble with your PC, try a repair tool that will restore your PC to its default settings.
Windows Repair is a portable program that contains hundreds of mini-fixes for Windows. This program can fix a wide range of problems, ranging from common issues like a corrupt recycle bin to more advanced issues like restoring access to the Registry Editor. The Repair Tool also allows you to perform a scan for a specific problem. You can choose from one of six sections to see if your computer has any issues.
Windows Repair is the all-in-one repair tool in Windows 10. It emphasizes the importance of running the repair in safe mode because other programs may conflict with it and prevent the tool from successfully fixing the problem. The interface is not easy to navigate, but once you’ve opened the program, simply move to the Repairs – Main section and click on the Open Repairs button. Then, select the repair option that fixes your problem.
How Do I Edit the Boot Menu in Windows 10?
You can change the boot loader menu on your PC to choose your preferred operating system. However, if you don’t want Windows 10 to boot in this way, you can choose another one instead. To change the default operating system, you can type “bcdedit” into the PowerShell console. Make sure that you use quotes around the identifier. You can also change the boot menu time-out to speed up the boot process and allow more time to choose a boot entry.
While you can change the boot menu on Windows 10, the only characteristic you need to change is the display order of the loaders. This is the default boot method for Windows and has been introduced in Windows 8. Since this OS has multiple elements, other BCD tools cannot edit all combinations. However, the Visual BCD Editor allows you to change this setting. The boot menu is the most important part of your computer, so you should know how to modify it.
Learn More Here:
1.) Android Help Center
2.) Android – Wikipedia
3.) Android Versions
4.) Android Guides