What is Blynk?
Blynk is a platform with iOS and Android apps to control Arduino, ESP8266, Raspberry Pi and the likes over the Internet.
You can easily build graphic interfaces for all your projects by simply dragging and dropping widgets.
If you need more information, please follow these links:
- Blynk site
- Blynk docs
- Blynk community
- Blynk Examples generator
- App Store
- Google Play
- Blynk library
- Kickstarter


Content
- Download
- Requirements
- Quick Local Server setup
- Enabling mail on Local server
- Quick local server setup on Raspberry PI
- Docker container setup
- Enabling server auto restart on unix-like systems
- Enabling server auto restart on Windows
- Update instruction for unix-like systems
- Update instruction for Windows
- App and sketch changes for Local Server
- Advanced local server setup
- Administration UI
- HTTP/S RESTful API
- Enabling sms on local server
- Enabling raw data storage
- Automatic Let’s Encrypt Certificates
- Manual Let’s Encrypt SSL/TLS Certificates
- Generate own SSL certificates
- Install java for Ubuntu
- How Blynk Works?
- Blynk Protocol
GETTING STARTED
Blynk server
Blynk Server is an Open-Source Netty based Java server, responsible for forwarding
messages between Blynk mobile application and various microcontroller boards and SBCs (i.e. Arduino, Raspberry Pi. etc).
Download latest server build here.

Requirements
- Java 8/11 required (OpenJDK, Oracle)
- Any OS that can run java
- At least 30 MB of RAM (could be less with tuning)
- Open ports 9443 (for app and hardware with ssl), 8080 (for hardware without ssl)
Ubuntu java installation instruction.
For Windows download Java here and install.
Quick local server setup
-
Make sure you are using Java 11
java -version Output: java version "11" -
Run the server on default ‘hardware port 8080’ and default ‘application port 9443’ (SSL port)
java -jar server-0.41.16.jar -dataFolder /path
That’s it!
NOTE: /path should be real existing path to folder where you want to store all your data.
-
As an output you should see something like that:
  Blynk Server successfully started.
  All server output is stored in current folder in 'logs/blynk.log' file.
Enabling mail on Local server
To enable mail notifications on Local server you need to provide your own mail credentials. Create file mail.properties within same folder where server.jar is.
Mail properties:
    mail.smtp.auth=true
    mail.smtp.starttls.enable=true
    mail.smtp.host=smtp.gmail.com
    mail.smtp.port=587
    mail.smtp.username=YOUR_EMAIL_HERE
    mail.smtp.password=YOUR_EMAIL_PASS_HERE
Find example here.
WARNING : only gmail accounts are allowed.
NOTE : you’ll need to setup Gmail to allow less secured applications.
Go here and then click «Allow less secure apps».
Quick local server setup on Raspberry PI
-
Login to Raspberry Pi via ssh;
-
Install java 8:
sudo apt install openjdk-8-jdk openjdk-8-jre -
Make sure you are using Java 8
java -version Output: java version "1.8" -
Download Blynk server jar file (or manually copy it to Raspberry Pi via ssh and scp command):
wget "https://github.com/blynkkk/blynk-server/releases/download/v0.41.16/server-0.41.16-java8.jar" -
Run the server on default ‘hardware port 8080’ and default ‘application port 9443’ (SSL port)
java -jar server-0.41.16-java8.jar -dataFolder /home/pi/Blynk
That’s it!
-
As output you will see something like that:
  Blynk Server successfully started.
  All server output is stored in current folder in 'logs/blynk.log' file.
Docker container setup
Quick Launch
-
Install Docker
-
Run Docker container
docker run -p 8080:8080 -p 9443:9443 mpherg/blynk-server
Quick Launch on Raspberry Pi
-
Install Docker
-
Run Docker container
docker run -p 8080:8080 -p 9443:9443 linuxkonsult/rasbian-blynk
Full customisation
- Check README in docker folder
Enabling server auto restart on unix-like systems
-
To enable server auto restart find /etc/rc.local file and add:
java -jar /home/pi/server-0.41.16-java8.jar -dataFolder /home/pi/Blynk & -
Or if the approach above doesn’t work, execute
add the following line
@reboot java -jar /home/pi/server-0.41.16-java8.jar -dataFolder /home/pi/Blynk &
save and exit.
Enabling server auto restart on Windows
-
Create bat file:
-
Put in it one line:
java -jar server-0.41.16.jar -dataFolder /home/pi/Blynk -
Put bat file to windows startup folder
You can also use this script to run server.
Update instruction for unix-like systems
IMPORTANT
Server should be always updated before you update Blynk App. To update your server to a newer version you would need to kill old process and start a new one.
-
Find process id of Blynk server
-
You should see something like that
username 10539 1.0 12.1 3325808 428948 pts/76 Sl Jan22 9:11 java -jar server-0.41.16.jar -
Kill the old process
10539 — blynk server process id from command output above.
- Start new server as usual
After this steps you can update Blynk app. Server version downgrade is not supported.
WARNING!
Please do not revert your server to lower versions. You may loose all of your data.
Update instruction for Windows
-
Open Task Manager;
-
Find Java process;
-
Stop process;
-
Start new server as usual
App and sketch changes
- Specify custom server path in your application


-
Change your ethernet sketch from
to
Blynk.begin(auth, "your_host", 8080);or to
Blynk.begin(auth, IPAddress(xxx,xxx,xxx,xxx), 8080); -
Change your WIFI sketch from
Blynk.begin(auth, SSID, pass));to
Blynk.begin(auth, SSID, pass, "your_host", 8080);or to
Blynk.begin(auth, SSID, pass, IPAddress(XXX,XXX,XXX,XXX), 8080); -
Change your rasp PI javascript from
var blynk = new Blynk.Blynk(AUTH, options = {connector : new Blynk.TcpClient()});to
var blynk = new Blynk.Blynk(AUTH, options= {addr:"xxx.xxx.xxx.xxx", port:8080}); -
or in case of USB when running blynk-ser.sh provide ‘-s’ option with address of your local server
./blynk-ser.sh -s you_host_or_IP
IMPORTANT
Blynk is being constantly developed. Mobile apps and server are updated often. To avoid problems during updates either turn off auto-update for Blynk app, or update both local server and blynk app at same time to avoid possible migration issues.
IMPORTANT
Blynk local server is different from Blynk Cloud server. They are not related at all. You have to create new account when using Blynk local server.
Advanced local server setup
For more flexibility you can extend server with more options by creating server.properties file in same folder as server.jar.
Example could be found here.
You could also specify any path to server.properties file via command line argument -serverConfig. You can
do the same with mail.properties via -mailConfig and sms.properties via -smsConfig.
For example:
java -jar server-0.41.16-java8.jar -dataFolder /home/pi/Blynk -serverConfig /home/pi/someFolder/server.properties
Available server options:
-
Blynk app, https, web sockets, admin port
-
Http, hardware and web sockets port
-
For simplicity Blynk already provides server jar with built in SSL certificates, so you have working server out of the box via SSL/TLS sockets. But as certificate and it’s private key are in public this is totally not secure. So in order to fix that you need to provide your own certificates. And change below properties with path to your cert. and private key and it’s password. See how to generate self-signed certificates here
  #points to cert and key that placed in same folder as running jar.

  server.ssl.cert=./server_embedded.crt
  server.ssl.key=./server_embedded.pem
  server.ssl.key.pass=pupkin123
Note: if you use Let’s Encrypt certificates you’ll have to add #define BLYNK_SSL_USE_LETSENCRYPT before #include <BlynkSimpleEsp8266_SSL.h> in the Arduino Sketch for your hardware.
-
User profiles folder. Folder in which all users profiles will be stored. By default System.getProperty(«java.io.tmpdir»)/blynk used. Will be created if not exists
-
Folder for all application logs. Will be created if it doesn’t exist. «.» is dir from which you are running script.
-
Log debug level. Possible values: trace|debug|info|error. Defines how precise logging will be. From left to right -> maximum logging to minimum
-
Maximum allowed number of user dashboards.
user.dashboard.max.limit=100 -
100 Req/sec rate limit per user. You also may want to extend this limit on hardware side.
user.message.quota.limit=100 -
this setting defines how often you can send mail/tweet/push or any other notification. Specified in seconds
notifications.frequency.user.quota.limit=60 -
Maximum allowed user profile size. In Kb’s.
user.profile.max.size=128 -
Number of strings to store in terminal widget (terminal history data)
terminal.strings.pool.size=25 -
Maximum allowed number of notification queue. Queue responsible for processing email, pushes, twits sending. Because of performance issue — those queue is processed in separate thread, this is required due to blocking nature of all above operations. Usually limit shouldn’t be reached
notifications.queue.limit=5000 -
Number of threads for performing blocking operations — push, twits, emails, db queries. Recommended to hold this value low unless you have to perform a lot of blocking operations.
blocking.processor.thread.pool.limit=6 -
Period for flushing all user DB to disk. In millis
profile.save.worker.period=60000 -
Specifies maximum period of time when hardware socket could be idle. After which socket will be closed due to non activity. In seconds. Leave it empty for infinity timeout
hard.socket.idle.timeout=15 -
Mostly required for local servers setup in case user want to log raw data in CSV format. See [raw data] (#raw-data-storage) section for more info.
enable.raw.data.store=true -
Url for opening admin page. Must start from «/». For «/admin» url path will look like that «https://127.0.0.1:9443/admin».
-
Comma separated list of administrator IPs. Allow access to admin UI only for those IPs. You may set it for 0.0.0.0/0 to allow access for all. You may use CIDR notation. For instance, 192.168.0.53/24.
allowed.administrator.ips=0.0.0.0/0 -
Default admin name and password. Will be created on initial server start
admin.email=admin@blynk.cc admin.pass=admin -
Host for reset password redirect and certificate generation. By default current server IP is taken from «eth» network interface. Could be replaced with more friendly hostname. It is recommended to override this property with your server IP to avoid possible problems of host resolving.
server.host=blynk-cloud.com -
Email used for certificate registration, could be omitted in case you already specified it in mail.properties.
contact.email=pupkin@gmail.com
Administration UI
Blynk server provides administration panel where you can monitor your server. It is accessible at this URL:
https://your_ip:9443/admin

WARNING
Please change default admin password and name right after login to admin page. THIS IS SECURITY MEASURE.
WARNING
Default allowed.administrator.ips setting allows access for everyone. In other words,
administration page available from any other computer. Please restrict access to it via property allowed.administrator.ips.
Turn off chrome https warning on localhost
-
Paste in chrome
chrome://flags/#allow-insecure-localhost -
You should see highlighted text saying: «Allow invalid certificates for resources loaded from localhost». Click enable.
HTTP/S RESTful
Blynk HTTP/S RESTful API allows to easily read and write values to/from Pins in Blynk apps and Hardware.
Http API description could be found here.
Enabling sms on local server
To enable SMS notifications on Local Server you need to provide credentials for SMS gateway (currently Blynk server
supports only 1 provider — Nexmo. You need to create file sms.properties
within same folder where server.jar is.
    nexmo.api.key=
    nexmo.api.secret=
And fill in the above properties with the credentials you’ll get from Nexmo. (Account -> Settings -> API settings).
You can also send SMS over email if your cell provider supports that. See discussion for more details.
Enabling raw data storage
By default raw data storage is disabled (as it consumes disk space a lot).
When you enable it, every Blynk.virtualWrite command will be saved to DB.
You will need to install PostgreSQL Database (minimum required version is 9.5) to enable this functionality:
1. Enabling raw data on server
Enable raw data in server.properties :
    enable.db=true
    enable.raw.db.data.store=true
2. Install PostgreSQL. Option A
    sudo sh -c 'echo "deb http://apt.postgresql.org/pub/repos/apt/ `lsb_release -cs`-pgdg main" >> /etc/apt/sources.list.d/pgdg.list'
    wget -q https://www.postgresql.org/media/keys/ACCC4CF8.asc -O - | sudo apt-key add -

    sudo apt-get update
    sudo apt-get install postgresql postgresql-contrib
2. Install PostgreSQL. Option B
    sudo apt-get update
    apt-get --no-install-recommends install postgresql-9.6 postgresql-contrib-9.6
3. Download Blynk DB script
    wget https://raw.githubusercontent.com/blynkkk/blynk-server/master/server/core/src/main/resources/create_schema.sql
    wget https://raw.githubusercontent.com/blynkkk/blynk-server/master/server/core/src/main/resources/reporting_schema.sql
4. Move create_schema.sql and reporting_schema.sql to temp folder (to avoid permission problems)
    mv create_schema.sql /tmp
    mv reporting_schema.sql /tmp
Result:
    /tmp/create_schema.sql
    /tmp/reporting_schema.sql
Copy it to clipboard from your console.
5. Connect to PostgreSQL
6. Create Blynk DB and Reporting DB, test user and tables
    \i /tmp/create_schema.sql
    \i /tmp/reporting_schema.sql
/tmp/create_schema.sql — is path from step 4.
You should see next output:
    postgres=# \i /tmp/create_schema.sql
    CREATE DATABASE
    You are now connected to database "blynk" as user "postgres".
    CREATE TABLE
    CREATE TABLE
    CREATE TABLE
    CREATE TABLE
    CREATE TABLE
    CREATE TABLE
    CREATE TABLE
    CREATE TABLE
    CREATE TABLE
    CREATE TABLE
    CREATE TABLE
    CREATE ROLE
    GRANT
    GRANT
Quit
Now start your server and you should see next text in postgres.log file :
    2017-03-02 16:17:18.367 - DB url : jdbc:postgresql://localhost:5432/blynk?tcpKeepAlive=true&socketTimeout=150
    2017-03-02 16:17:18.367 - DB user : test
    2017-03-02 16:17:18.367 - Connecting to DB...
    2017-03-02 16:17:18.455 - Connected to database successfully.
WARNING:
Raw data may consume your disk space very quickly!
CSV data format
Data format is:
For example:
Where 10 — value of pin.
1438022081332 — the difference, measured in milliseconds, between the current time and midnight, January 1, 1970 UTC.
To display the date/time in excel you may use formula:
=((COLUMN/(60*60*24)/1000+25569))
0 — device id
Automatic Let’s Encrypt certificates generation
Latest Blynk server has super cool feature — automatic Let’s Encrypt certificates generation.
However, it has few requirements:
-
Add
server.hostproperty inserver.propertiesfile.
For example :
IP is not supported, this is the limitation of Let’s Encrypt. Also have in mind that myhost.com
should be resolved by public DNS severs.
-
Add
contact.emailproperty inserver.properties. For example :contact.email=test@gmail.com -
You need to start server on port 80 (requires root or admin rights) or
make port forwarding to default Blynk HTTP port — 8080.
That’s it! Run server as regular and certificates will be generated automatically.
Manual Let’s Encrypt SSL/TLS Certificates
-
First install certbot on your server (machine where you going to run Blynk Server)
wget https://dl.eff.org/certbot-auto chmod a+x certbot-auto -
Generate and verify certificates (your server should be connected to internet and have open 80/443 ports)
./certbot-auto certonly --agree-tos --email YOUR_EMAIL --standalone -d YOUR_HOST
For example
./certbot-auto certonly --agree-tos --email pupkin@blynk.cc --standalone -d blynk.cc
-
Then add to your
server.propertiesfile (in folder with server.jar)server.ssl.cert=/etc/letsencrypt/live/YOUR_HOST/fullchain.pem server.ssl.key=/etc/letsencrypt/live/YOUR_HOST/privkey.pem server.ssl.key.pass=
Generate own SSL certificates
-
Generate self-signed certificate and key
openssl req -x509 -nodes -days 1825 -newkey rsa:2048 -keyout server.key -out server.crt -
Convert server.key to PKCS#8 private key file in PEM format
openssl pkcs8 -topk8 -v1 PBE-SHA1-2DES -in server.key -out server.enc.key
If you connect hardware with USB script you have to provide an option ‘-s’ pointing to «common name» (hostname) you did specified during certificate generation.
As an output you’ll retrieve server.crt and server.pem files that you need to provide for server.ssl properties.
Install java for Ubuntu
    sudo add-apt-repository ppa:openjdk-r/ppa \
    && sudo apt-get update -q \
    && sudo apt install -y openjdk-11-jdk
or if above doesn’t work:
    sudo apt-add-repository ppa:webupd8team/java
    sudo apt-get update
    sudo apt-get install oracle-java8-installer
Port forwarding for HTTP/S API
    sudo iptables -t nat -A PREROUTING -p tcp --dport 80 -j REDIRECT --to-port 8080
    sudo iptables -t nat -A PREROUTING -p tcp --dport 443 -j REDIRECT --to-port 9443
Enabling QR generation on server
sudo apt-get install libxrender1
Behind wifi router
If you want to run Blynk server behind WiFi-router and want it to be accessible from the Internet, you have to add port-forwarding rule on your router. This is required in order to forward all of the requests that come to the router within the local network to Blynk server.
How to build
Blynk has a bunch of integration tests that require DB, so you have to skip tests during build.
mvn clean install -Dmaven.test.skip=true
How Blynk Works?
When hardware connects to Blynk cloud it opens either keep-alive ssl/tls connection on port 443 (9443 for local servers) or keep-alive plain
tcp/ip connection on port 8080. Blynk app opens mutual ssl/tls connection to Blynk Cloud on port 443 (9443 for local servers).
Blynk Cloud is responsible for forwarding messages between hardware and app. In both (app and hardware) connections Blynk uses
own binary protocol described below.
Blynk protocol
Hardware side protocol
Blynk transfers binary messages between the server and the hardware with the following structure:
| Command | Message Id | Length/Status | Body |
|---|---|---|---|
| 1 byte | 2 bytes | 2 bytes | Variable |
Command and Status definitions: BlynkProtocolDefs.h
Mobile app side protocol
Blynk transfers binary messages between the server and mobile app with the following structure:
| Command | Message Id | Length/Status | Body |
|---|---|---|---|
| 1 byte | 2 bytes | 4 bytes | Variable |
Websockets web side protocol
Blynk transfers binary messages between the server and websockets (for web) with the following structure:
| Websocket header | Command | Message Id | Body |
|---|---|---|---|
| 1 byte | 2 bytes | Variable |
When command code == 0, than message structure is next:
| Websocket header | Command | Message Id | Response code |
|---|---|---|---|
| 1 byte | 2 bytes | 4 bytes |
Possible response codes.
Possible command codes
Message Id and Length are big endian.
Body has a command-specific format.
Licensing
GNU GPL license
Introduction:
Blynk Legacy is a very powerful Internet of Things(IoT ) software solution which allows you to design your own IoT APP without Android and iOS APP programming knowledge.
Following tutorial will guide to install Blynk legacy server in your local Windows, Mac computer or Linux like Raspberry Pi.
Picture 1.1 shows how Blynk systems works:
Picture 1.1
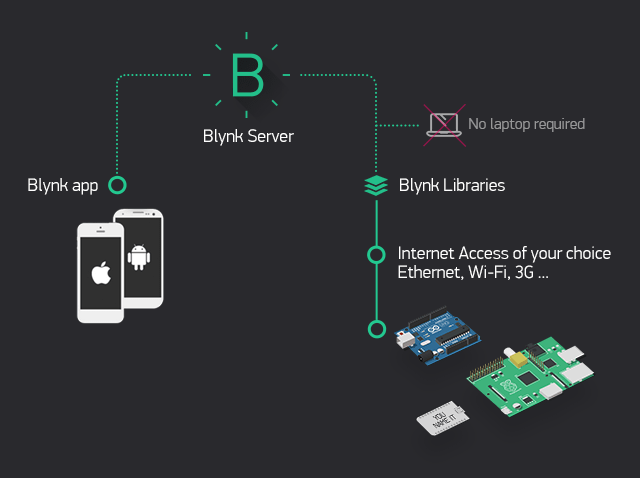
From Above picture, you can see Blynk software consists three parts:
- Blynk Legacy APP which is installed in your Cell phone or tablet
- Blynk Legacy Server
- Blynk Library which is installed in IoT terminal device such as Arduino, Raspberry Pi etc.
In this Lesson, we will teach students how to install Blynk Legacy local Server and setup APP and Arduino sketch code to make them working in Blynk Local Server.
Install Server on local PC
You can install local Blynk server on any computer which has Java 11 (or higher version). Java environment is a basic module which comes with those popular OS such as Windows, MacOS and Linux. So if your computer is not too old, you no need install any Java software to run Blynk server.
In this tutorial, we will teach how to install local Blynk server on Windows, MacOS and Raspbian(Raspberry Pi OS). If you use other OS, the installation is similar, just make sure you have Java 11 and JDK 8+ installed in your OS.
Install Blynk local server on Windows
1)Download Blynk local server from https://osoyoo.com/driver/blynk/blynk-server.jar
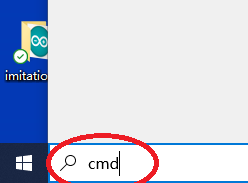
2)In Windows search bar , type cmd to open command windows
3)After open the command window, go to the fold where blynk-server.jar file is saved. Test your java environment by typing following command in cmd terminal:
java -version
You should see something as following
java version "1.8.0_202"
If you can’t see java version, it means your haven’t installed Java properly, please read this article to install Java
4)Go to your download folder, replace the bold font path with your folder path
cd C:\Users\Admin\your download folder
Then run following command to start the local Blynk server:
java -jar ./blynk-server.jar -dataFolder ./Blynk
you will see following result:

Now your local Blynk server has been successfully installed and running in your Windows.
Install Blynk local server on Apple Macbook Computer
1)Download Blynk local server from https://osoyoo.com/driver/blynk/blynk-server.jar
2)Open MacBook terminal window,
Go to your download folder, Run following command to start the local Blynk server:
java -jar ./blynk-server.jar -dataFolder ./Blynk
you will see following result:

Install Blynk local server on Raspberry Pi or similar Linux computer
1)Open your Pi shell terminal or use SSH to connect Raspberry Pi remote terminal
2)Download Blynk local server by following command
wget http://osoyoo.com/driver/blynk/blynk-server.jar
2)Go to your download folder, Run following command to start the local Blynk server:
java -jar ./blynk-server.jar -dataFolder ./Blynk
The java server will start in one or two minutes, then you will see following result:

If you want the Raspberry Pi to start Blynk Server automatically when starting your Pi, you can run following command:
crontab -e
Then you can add following in the bottom crontab file
@reboot java -jar /home/pi/blynk-server.jar -dataFolder /home/pi/Blynk
After that, use Ctrl-X to save and exit the file and reboot your computer. Your Blynk server will automatically start every time.
You can visit the admin page of Blynk Server url:
https://your_RaspberryPi_ip_address:9443/admin
Cell Phone APP download and configure:
Prerequisite:
You have successfully installed Blynk server in your local computer. Next step is to install Blynk Legacy APP in your cell phone.
Before install and setup your Blynk APP, you need to know your local server’s LAN IP address first, if you don’t know how to do it, read following article:
How to know my computer’s local IP address
Now let’s start to install and setup Blynk Legacy APP
1)Google Play and Apple Store do not support Blynk Legacy APP downloading anymore. But Android Mobile Device can still download the apk file from following link:
https://osoyoo.com/driver/blynk/blynk_legacy.apk
2) Open Blynk App, click Login , you will see following UI:
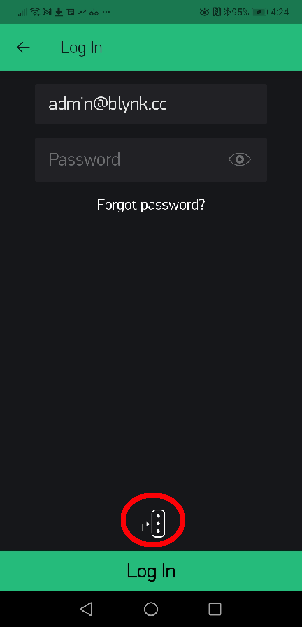
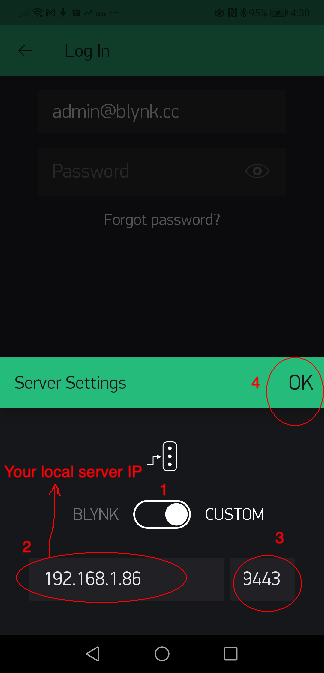
3)Click the three dot icon in above UI to set local server IP and port.
Do following settings:
- Switch server from BLYNK to CUSTOMS
- Set your local blynk server IP
- Set port to 9443
- click OK
See following picture:
After you have set up the local server IP and port, you can use following steps to connect APP to local Blynk server:
- Set Email field to [email protected]
- Set password field to admin
- Click Login
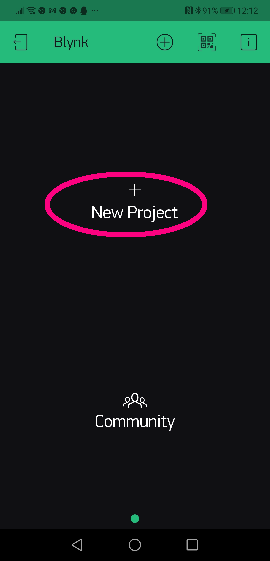
If your Local Blynk is not running properly or IP address setting is wrong, APP will show Can’t connect to Server, Try later…If server running and IP setting are all ok, you will a New Project UI as following:
Congratulations! You have successfully installed local Blynk Server and connected your APP to the server.
Suppose you are using Arduino as terminal device, you click +New Project to add an Arduino project:
You can name your Project Lesson1 and select Arduino UNO (or Arduino MEGA if you are using MEGA2560),
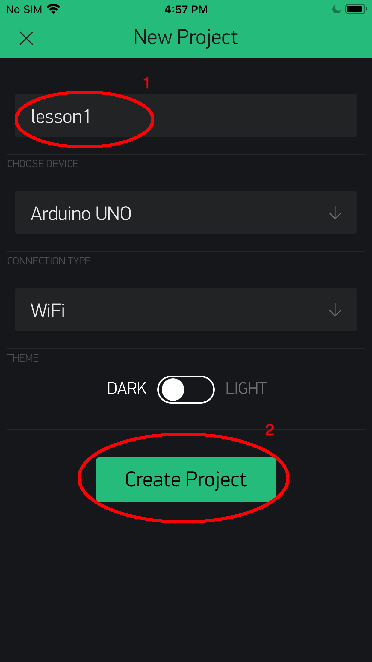
In above UI, Click Create Project, you will see a blank project named lesson1 as following picture, In future, you can click (+) sign to add control Widget to create your APP UI
![]()
Get Auth Token
Blynk Auth token is the password to let your Arduino board to exchange project data with local Blynk server. You need to set this token in your Arduino code file in future. Token is associated with a project, so you must create a project in APP before getting a Token.
You have two methods to get Blynk Token:
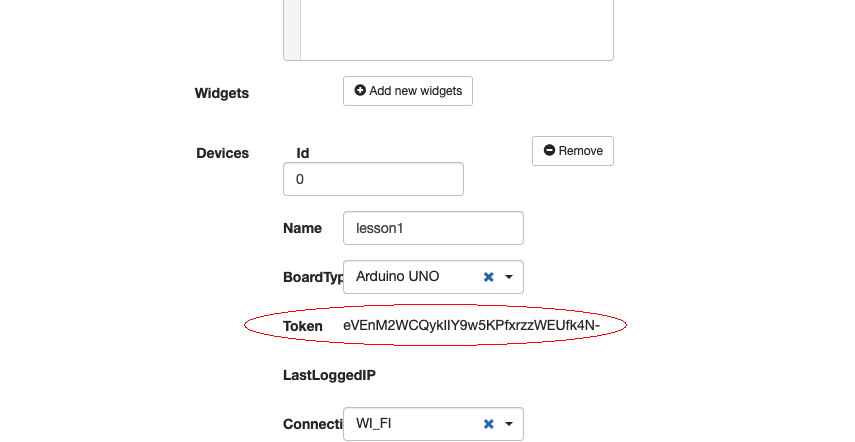
Method 1) In your folder where you download and save blynk-server.jar file, you will see a sub-folder called blynk, enter that folder, you will find a file [email protected] , please use a text editor to open this file:

After open the the file, you will see following content:
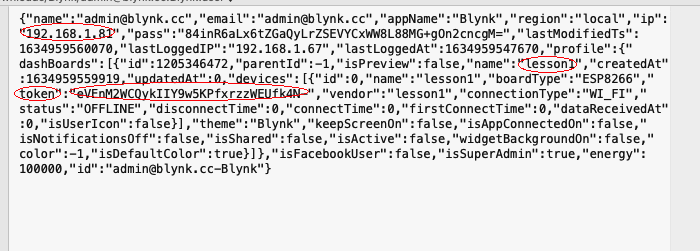
In above picture, you can see that, on the right of the word “token“, there is a long string
eVEnM2WCQykIIY9w5KPfxrzzWEUfk4N–
This is the token of the lesson 1 project , copy this token to a file , and you will use it in your Arduino or Raspberry Pi client software code.
Method 2) Get token from local blynk control panel:
Please open your browser and visit following url:
https://your_server_ip:9443/admin
your_server_ip is the IP address of your local Blynk server.
Above https:// url default certificate is self-signed. It will therefore be considered unreliable. You will have to accept the alert message displayed by your internet browser. If you are using Google Chrome browser, You will see following alert:
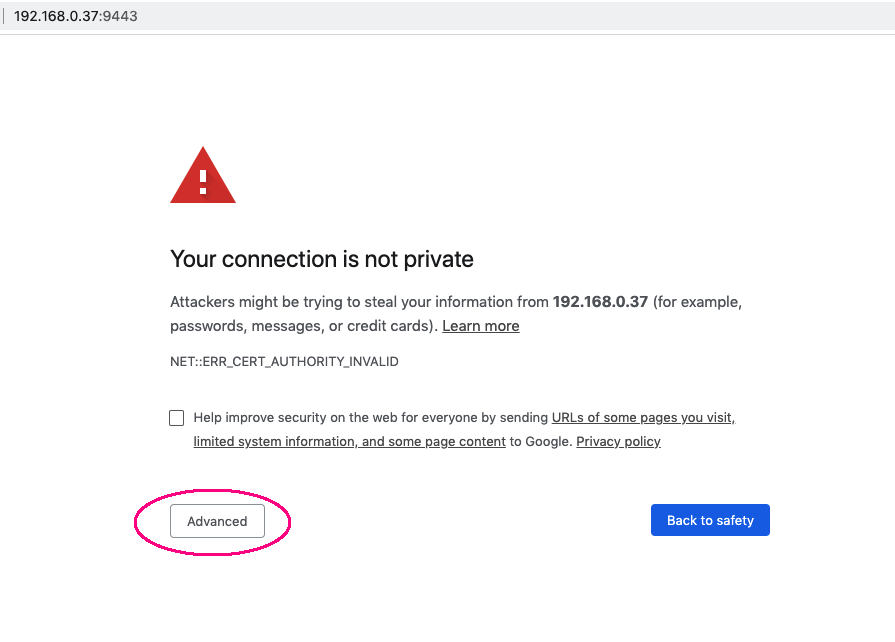
Click Advanced, then select proceed to the unsafe IP as following:

You will go to Server login page, please use user name [email protected] and password admin to login to control panel.
then please click Users->[email protected]:
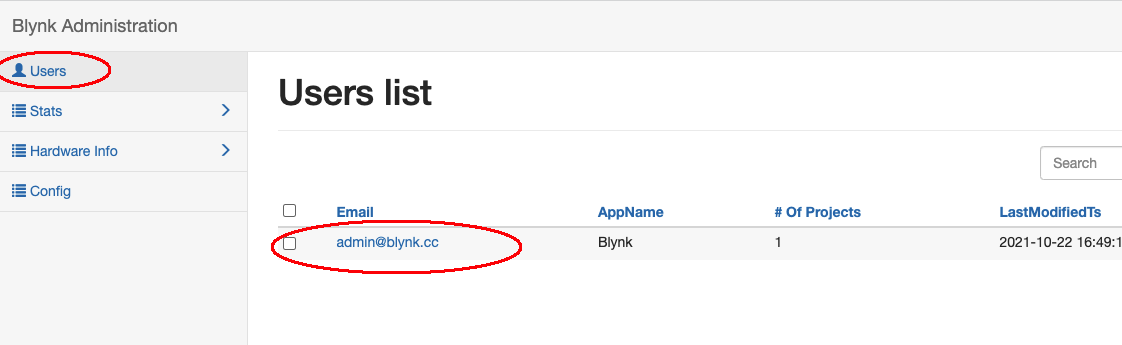
Click [email protected], then you will find the Token which was just assigned for your project:
На чтение 3 мин Опубликовано Обновлено
Blynk — это платформа для создания IoT (интернета вещей) проектов, которая позволяет взаимодействовать с различными устройствами и сенсорами через мобильные устройства. Blynk сервер может быть развернут публично или локально, в зависимости от ваших потребностей.
Установка Blynk сервера на операционную систему Windows имеет несколько шагов. Сначала нужно скачать и установить Java Development Kit (JDK). Затем необходимо скачать Blynk сервер с официального сайта и распаковать его архив. После этого нужно открыть командную строку и перейти в папку с Blynk сервером.
Важно помнить, что локальный сервер потребляет больше ресурсов, поэтому ваш компьютер должен иметь достаточно мощности для его работы. Также учтите, что вы можете испытывать трудности с настройкой маршрутизации и открытием портов, если у вас есть сетевой экран или роутер.
После перехода в папку с Blynk сервером, необходимо запустить его с помощью команды «java -jar server-xxx.jar», где xxx — номер версии сервера. Запуск сервера займет некоторое время, и после успешного запуска вы увидите сообщение о том, что сервер слушает порт 8080.
Если вы хотите изменить порт, на котором работает сервер, вы можете указать его в параметре командной строки при запуске сервера. Например, «java -jar server-xxx.jar -httpPort 8888» установит порт 8888 для сервера.
После успешного запуска сервера, вы можете открыть веб-браузер и ввести адрес «localhost:8080» для доступа к панели администратора Blynk. Вам будет предложено создать новый аккаунт администратора и установить пароль для него. После этого вы сможете настроить и использовать ваш локальный сервер Blynk для разработки и управления вашими IoT проектами.
Подготовка к установке
Перед началом установки Blynk локального сервера на Windows необходимо выполнить несколько предварительных шагов:
1. Проверьте системные требования. Убедитесь, что ваш компьютер соответствует требованиям, предъявляемым к установке Blynk локального сервера на Windows. Вам потребуется Windows 7 или более поздняя версия операционной системы.
2. Установите Java Development Kit (JDK). Blynk локальный сервер требует наличия JDK для правильной работы. Установите JDK, следуя инструкциям на официальном сайте Oracle.
3. Загрузите установочные файлы Blynk сервера. Перейдите на официальный сайт Blynk и скачайте архив с установочными файлами Blynk сервера для Windows.
4. Разархивируйте архив. После загрузки архива, разархивируйте его в удобное для вас место на компьютере.
5. Создайте файл server.properties. В папке с разархивированными файлами Blynk сервера создайте новый файл с именем server.properties. В этом файле будут указаны настройки сервера.
6. Отредактируйте файл server.properties. Откройте файл server.properties с помощью текстового редактора и отредактируйте настройки сервера в соответствии с вашими потребностями. Здесь вы можете указать порт, на котором будет работать сервер, логин и пароль для административного доступа и другие параметры.
После выполнения этих шагов вы будете готовы к установке Blynk локального сервера на Windows.
Local-windows-Blynk-server
This is an up to date tutorial on how to set up a local windows Blynk server with a mention of some issues, giving you more security and inf. energy points.
Getting Started
these insturction will guide you on how to build your own windows local Blynk server, other online tutorials found to be out of date or not mentioning some special cases, it is highly recommended to start using blynk cloud at first to get an overview about blynk platform, then move to the local server -it’s a bit buggy-.
PS1: you will find other tutorials on how to build it on Mac and Linux, it’s easy.
PS2: if you have some experiance in the field, follow the original repository.
Requirements
-
Blynk Library.
-
Blynk APP: Google Play , Apple Store.
-
Java 9.
-
Open ports 8443 (for app), 8442 (for hardware without ssl), 8441 (for hardware with ssl), Open by default.
-
The latest Blynk local server to be found here.
-
Mail and Server properties to be found in this repository.
Installing
- Install Java v9 via a normal double click, you can check your existing version by opening the
cmdand typing:
You should get the following output:
java version "9.0.1"
Java(TM) SE Runtime Environment (build 9.0.1+11)
Java HotSpot(TM) 64-Bit Server VM (build 9.0.1+11, mixed mode)
-
Create a folder, let say for example
C:/BlynkServer, put the installed server, the downloaded mail and server properties files in it. -
Right click the mail file, add your email and password in where requested:
mail.smtp.username=xxx@gmail.com
mail.smtp.password=xxxx
- Make sure your E-mail accepts unknown apps requests, to do that go to your email’s security, if you have a two way authentication you have to add Blynk to the approved apps, else just go here and allow less secure apps.
Running the Server
- Start the
cmd as administartor: to start a command prompt as an administrator, you can search for cmd, rightclick it and run at as administrator, or: Click Start, click All Programs, and then click Accessories. Right-click Command prompt, and then click Run as administrator. If the User Account Control dialog box appears, confirm that the action it displays is what you want, and then click Continue.
- Now we need to go to the path where we created the folder, simply type
cdand the folder path after it, for example:
- Run the server:
java -jar server-0.28.6.jar -dataFolder /Path
You should get the following:
Blynk Server 0.28.6 successfully started.
All server output is stored in folder 'c:BlynkStuff.logs' file.
- Thats it, now you should see two new folders being created, Keep it running, if you want to stop it just
Ctrl + C.
- Get your local IP by by going to
cmdand type:
this should return lots of info including your local IP that looks something like this:
IPv4 Address. . . . . . . . . . . : 192.168.1.55
Save it somewhere, you are going to need it later.
Connecting to the Server
- Run the Blynk Application, and go to
Create New account, follow the picture by adding your own local IP, and enter any email and password.

-
You should be logged in, Create a project and check if you recived an auto token via your E-mail, if not; check your email security as said above or disable antivirus SSL sheild in your mail scanning, if the problem remains, you can still get it via the admin panel as we will see later.
-
After creating the project you will have 100,000 Energy points to use and you will be connected to the local server.
Uploading a sketch
-
After downloading the Blynk library and extracting it to the Arduino’s library folder -usually located under
DocumentsArduinoLibraries, open the Arduino IDE. -
pick any sketch, the only thing it change will be as follows:
OLD
  Blynk.begin(auth);
  // You can also specify server:
  //Blynk.begin(auth, "blynk-cloud.com", 8442);
  //Blynk.begin(auth, IPAddress(192,168,1,100), 8442);
NEW
//Blynk.begin(auth); , //We will comment this
// You can also specify server:
//Blynk.begin(auth, "blynk-cloud.com", 8442);
Blynk.begin(auth, IPAddress(192,168,1,100), 8442);  //Uncomment this, enter your local server's IP
that’s all, Upload the sketch, you’re ready to go.
Accessing the admin panel
- Usually when you start the server for the first time, it will give you admin email and password as follows:
Email : admin@blynk.cc
Password: admin
- Go to:
https://your_ip:9443/admin
OR
https://localhost:9443/admin
From there you will monitor your server, access signed users, check their projects and auth tokens.
That’s All.
Good luck tinkering around!
Introduction:
Blynk Legacy is a very powerful Internet of Things(IoT ) software solution which allows you to design your own IoT APP without Android and iOS APP programming knowledge.
Following tutorial will guide to install Blynk legacy server in your local Windows, Mac computer or Linux like Raspberry Pi.
Picture 1.1 shows how Blynk systems works:
Picture 1.1
From Above picture, you can see Blynk software consists three parts:
- Blynk Legacy APP which is installed in your Cell phone or tablet
- Blynk Legacy Server
- Blynk Library which is installed in IoT terminal device such as Arduino, Raspberry Pi etc.
In this Lesson, we will teach students how to install Blynk Legacy local Server and setup APP and Arduino sketch code to make them working in Blynk Local Server.
Install Server on local PC
You can install local Blynk server on any computer which has Java 11 (or higher version). Java environment is a basic module which comes with those popular OS such as Windows, MacOS and Linux. So if your computer is not too old, you no need install any Java software to run Blynk server.
In this tutorial, we will teach how to install local Blynk server on Windows, MacOS and Raspbian(Raspberry Pi OS). If you use other OS, the installation is similar, just make sure you have Java 11 and JDK 8+ installed in your OS.
Install Blynk local server on Windows
1)Download Blynk local server from https://osoyoo.com/driver/blynk/blynk-server.jar
2)In Windows search bar , type cmd to open command windows
3)After open the command window, go to the fold where blynk-server.jar file is saved. Test your java environment by typing following command in cmd terminal:
java -version
You should see something as following
java version "1.8.0_202"
If you can’t see java version, it means your haven’t installed Java properly, please read this article to install Java
4)Go to your download folder, replace the bold font path with your folder path
cd C:UsersAdminyour download folder
Then run following command to start the local Blynk server:
java -jar ./blynk-server.jar -dataFolder ./Blynk
you will see following result:
Now your local Blynk server has been successfully installed and running in your Windows.
Install Blynk local server on Apple Macbook Computer
1)Download Blynk local server from https://osoyoo.com/driver/blynk/blynk-server.jar
2)Open MacBook terminal window,
Go to your download folder, Run following command to start the local Blynk server:
java -jar ./blynk-server.jar -dataFolder ./Blynk
you will see following result:
Install Blynk local server on Raspberry Pi or similar Linux computer
1)Open your Pi shell terminal or use SSH to connect Raspberry Pi remote terminal
2)Download Blynk local server by following command
wget http://osoyoo.com/driver/blynk/blynk-server.jar
2)Go to your download folder, Run following command to start the local Blynk server:
java -jar ./blynk-server.jar -dataFolder ./Blynk
The java server will start in one or two minutes, then you will see following result:
If you want the Raspberry Pi to start Blynk Server automatically when starting your Pi, you can run following command:
crontab -e
Then you can add following in the bottom crontab file
@reboot java -jar /home/pi/blynk-server.jar -dataFolder /home/pi/Blynk
After that, use Ctrl-X to save and exit the file and reboot your computer. Your Blynk server will automatically start every time.
You can visit the admin page of Blynk Server url:
https://your_RaspberryPi_ip_address:9443/admin
Cell Phone APP download and configure:
Prerequisite:
You have successfully installed Blynk server in your local computer. Next step is to install Blynk Legacy APP in your cell phone.
Before install and setup your Blynk APP, you need to know your local server’s LAN IP address first, if you don’t know how to do it, read following article:
How to know my computer’s local IP address
Now let’s start to install and setup Blynk Legacy APP
1)In Google Play or iOS APP store, search Blynk Legacy and install the APP.
2) Open Blynk App, click Login , you will see following UI:
3)Click the three dot icon in above UI to set local server IP and port.
Do following settings:
- Switch server from BLYNK to CUSTOMS
- Set your local blynk server IP
- Set port to 9443
- click OK
See following picture:
After you have set up the local server IP and port, you can use following steps to connect APP to local Blynk server:
- Set Email field to [email protected]
- Set password field to admin
- Click Login
If your Local Blynk is not running properly or IP address setting is wrong, APP will show Can’t connect to Server, Try later…If server running and IP setting are all ok, you will a New Project UI as following:
Congratulations! You have successfully installed local Blynk Server and connected your APP to the server.
Suppose you are using Arduino as terminal device, you click +New Project to add an Arduino project:
You can name your Project Lesson1 and select Arduino UNO (or Arduino MEGA if you are using MEGA2560),
In above UI, Click Create Project, you will see a blank project named lesson1 as following picture, In future, you can click (+) sign to add control Widget to create your APP UI
![]()
Get Auth Token
Blynk Auth token is the password to let your Arduino board to exchange project data with local Blynk server. You need to set this token in your Arduino code file in future. Token is associated with a project, so you must create a project in APP before getting a Token.
You have two methods to get Blynk Token:
Method 1) In your folder where you download and save blynk-server.jar file, you will see a sub-folder called blynk, enter that folder, you will find a file [email protected] , please use a text editor to open this file:
After open the the file, you will see following content:
In above picture, you can see that, on the right of the word “token“, there is a long string
eVEnM2WCQykIIY9w5KPfxrzzWEUfk4N–
This is the token of the lesson 1 project , copy this token to a file , and you will use it in your Arduino or Raspberry Pi client software code.
Method 2) Get token from local blynk control panel:
Please open your browser and visit following url:
https://your_server_ip:9443/admin
your_server_ip is the IP address of your local Blynk server.
Above https:// url default certificate is self-signed. It will therefore be considered unreliable. You will have to accept the alert message displayed by your internet browser. If you are using Google Chrome browser, You will see following alert:
Click Advanced, then select proceed to the unsafe IP as following:
You will go to Server login page, please use user name [email protected] and password admin to login to control panel.
then please click Users->[email protected]:
Click [email protected], then you will find the Token which was just assigned for your project:
What is Blynk?
Blynk is a platform with iOS and Android apps to control Arduino, ESP8266, Raspberry Pi and the likes over the Internet.
You can easily build graphic interfaces for all your projects by simply dragging and dropping widgets.
If you need more information, please follow these links:
- Blynk site
- Blynk docs
- Blynk community
- Blynk Examples generator
- App Store
- Google Play
- Blynk library
- Kickstarter
Content
- Download
- Requirements
- Quick Local Server setup
- Enabling mail on Local server
- Quick local server setup on Raspberry PI
- Docker container setup
- Enabling server auto restart on unix-like systems
- Enabling server auto restart on Windows
- Update instruction for unix-like systems
- Update instruction for Windows
- App and sketch changes for Local Server
- Advanced local server setup
- Administration UI
- HTTP/S RESTful API
- Enabling sms on local server
- Enabling raw data storage
- Automatic Let’s Encrypt Certificates
- Manual Let’s Encrypt SSL/TLS Certificates
- Generate own SSL certificates
- Install java for Ubuntu
- How Blynk Works?
- Blynk Protocol
GETTING STARTED
Blynk server
Blynk Server is an Open-Source Netty based Java server, responsible for forwarding
messages between Blynk mobile application and various microcontroller boards and SBCs (i.e. Arduino, Raspberry Pi. etc).
Download latest server build here.
Requirements
- Java 8/11 required (OpenJDK, Oracle)
- Any OS that can run java
- At least 30 MB of RAM (could be less with tuning)
- Open ports 9443 (for app and hardware with ssl), 8080 (for hardware without ssl)
Ubuntu java installation instruction.
For Windows download Java here and install.
Quick local server setup
-
Make sure you are using Java 11
java -version Output: java version "11" -
Run the server on default ‘hardware port 8080’ and default ‘application port 9443’ (SSL port)
java -jar server-0.41.12.jar -dataFolder /path
That’s it!
NOTE: /path should be real existing path to folder where you want to store all your data.
-
As an output you should see something like that:
  Blynk Server successfully started.
  All server output is stored in current folder in 'logs/blynk.log' file.
Enabling mail on Local server
To enable mail notifications on Local server you need to provide your own mail credentials. Create file mail.properties within same folder where server.jar is.
Mail properties:
    mail.smtp.auth=true
    mail.smtp.starttls.enable=true
    mail.smtp.host=smtp.gmail.com
    mail.smtp.port=587
    mail.smtp.username=YOUR_EMAIL_HERE
    mail.smtp.password=YOUR_EMAIL_PASS_HERE
Find example here.
WARNING : only gmail accounts are allowed.
NOTE : you’ll need to setup Gmail to allow less secured applications.
Go here and then click «Allow less secure apps».
Quick local server setup on Raspberry PI
-
Login to Raspberry Pi via ssh;
-
Install java 8:
sudo apt-get install oracle-java8-jdk -
Make sure you are using Java 8
java -version Output: java version "1.8" -
Download Blynk server jar file (or manually copy it to Raspberry Pi via ssh and scp command):
wget "https://github.com/blynkkk/blynk-server/releases/download/v0.41.12/server-0.41.12-java8.jar" -
Run the server on default ‘hardware port 8080’ and default ‘application port 9443’ (SSL port)
java -jar server-0.41.12-java8.jar -dataFolder /home/pi/Blynk
That’s it!
-
As output you will see something like that:
  Blynk Server successfully started.
  All server output is stored in current folder in 'logs/blynk.log' file.
Docker container setup
Quick Launch
-
Install Docker
-
Run Docker container
docker run -p 8080:8080 -p 9443:9443 mpherg/blynk-server
Full customisation
- Check README in docker folder
Enabling server auto restart on unix-like systems
-
To enable server auto restart find /etc/rc.local file and add:
java -jar /home/pi/server-0.41.12-java8.jar -dataFolder /home/pi/Blynk & -
Or if the approach above doesn’t work, execute
add the following line
@reboot java -jar /home/pi/server-0.41.12-java8.jar -dataFolder /home/pi/Blynk &
save and exit.
Enabling server auto restart on Windows
-
Create bat file:
-
Put in it one line:
java -jar server-0.41.12.jar -dataFolder /home/pi/Blynk -
Put bat file to windows startup folder
You can also use this script to run server.
Update instruction for unix-like systems
IMPORTANT
Server should be always updated before you update Blynk App. To update your server to a newer version you would need to kill old process and start a new one.
-
Find process id of Blynk server
-
You should see something like that
username 10539 1.0 12.1 3325808 428948 pts/76 Sl Jan22 9:11 java -jar server-0.41.12.jar -
Kill the old process
10539 — blynk server process id from command output above.
- Start new server as usual
After this steps you can update Blynk app. Server version downgrade is not supported.
WARNING!
Please do not revert your server to lower versions. You may loose all of your data.
Update instruction for Windows
-
Open Task Manager;
-
Find Java process;
-
Stop process;
-
Start new server as usual
App and sketch changes
- Specify custom server path in your application
-
Change your ethernet sketch from
to
Blynk.begin(auth, "your_host", 8080);or to
Blynk.begin(auth, IPAddress(xxx,xxx,xxx,xxx), 8080); -
Change your WIFI sketch from
Blynk.begin(auth, SSID, pass));to
Blynk.begin(auth, SSID, pass, "your_host", 8080);or to
Blynk.begin(auth, SSID, pass, IPAddress(XXX,XXX,XXX,XXX), 8080); -
Change your rasp PI javascript from
var blynk = new Blynk.Blynk(AUTH, options = {connector : new Blynk.TcpClient()});to
var blynk = new Blynk.Blynk(AUTH, options= {addr:"xxx.xxx.xxx.xxx", port:8080}); -
or in case of USB when running blynk-ser.sh provide ‘-s’ option with address of your local server
./blynk-ser.sh -s you_host_or_IP
IMPORTANT
Blynk is being constantly developed. Mobile apps and server are updated often. To avoid problems during updates either turn off auto-update for Blynk app, or update both local server and blynk app at same time to avoid possible migration issues.
IMPORTANT
Blynk local server is different from Blynk Cloud server. They are not related at all. You have to create new account when using Blynk local server.
Advanced local server setup
For more flexibility you can extend server with more options by creating server.properties file in same folder as server.jar.
Example could be found here.
You could also specify any path to server.properties file via command line argument -serverConfig. You can
do the same with mail.properties via -mailConfig and sms.properties via -smsConfig.
For example:
java -jar server-0.41.12-java8.jar -dataFolder /home/pi/Blynk -serverConfig /home/pi/someFolder/server.properties
Available server options:
-
Blynk app, https, web sockets, admin port
-
Http, hardware and web sockets port
-
For simplicity Blynk already provides server jar with built in SSL certificates, so you have working server out of the box via SSL/TLS sockets. But as certificate and it’s private key are in public this is totally not secure. So in order to fix that you need to provide your own certificates. And change below properties with path to your cert. and private key and it’s password. See how to generate self-signed certificates here
#points to cert and key that placed in same folder as running jar. server.ssl.cert=./server_embedded.crt server.ssl.key=./server_embedded.pem server.ssl.key.pass=pupkin123 -
User profiles folder. Folder in which all users profiles will be stored. By default System.getProperty(«java.io.tmpdir»)/blynk used. Will be created if not exists
-
Folder for all application logs. Will be created if it doesn’t exist. «.» is dir from which you are running script.
-
Log debug level. Possible values: trace|debug|info|error. Defines how precise logging will be. From left to right -> maximum logging to minimum
-
Maximum allowed number of user dashboards.
user.dashboard.max.limit=100 -
100 Req/sec rate limit per user. You also may want to extend this limit on hardware side.
user.message.quota.limit=100 -
this setting defines how often you can send mail/tweet/push or any other notification. Specified in seconds
notifications.frequency.user.quota.limit=60 -
Maximum allowed user profile size. In Kb’s.
user.profile.max.size=128 -
Number of strings to store in terminal widget (terminal history data)
terminal.strings.pool.size=25 -
Maximum allowed number of notification queue. Queue responsible for processing email, pushes, twits sending. Because of performance issue — those queue is processed in separate thread, this is required due to blocking nature of all above operations. Usually limit shouldn’t be reached
notifications.queue.limit=5000 -
Number of threads for performing blocking operations — push, twits, emails, db queries. Recommended to hold this value low unless you have to perform a lot of blocking operations.
blocking.processor.thread.pool.limit=6 -
Period for flushing all user DB to disk. In millis
profile.save.worker.period=60000 -
Specifies maximum period of time when hardware socket could be idle. After which socket will be closed due to non activity. In seconds. Leave it empty for infinity timeout
hard.socket.idle.timeout=15 -
Mostly required for local servers setup in case user want to log raw data in CSV format. See [raw data] (#raw-data-storage) section for more info.
enable.raw.data.store=true -
Url for opening admin page. Must start from «/». For «/admin» url path will look like that «https://127.0.0.1:9443/admin».
-
Comma separated list of administrator IPs. Allow access to admin UI only for those IPs. You may set it for 0.0.0.0/0 to allow access for all. You may use CIDR notation. For instance, 192.168.0.53/24.
allowed.administrator.ips=0.0.0.0/0 -
Default admin name and password. Will be created on initial server start
admin.email=admin@blynk.cc admin.pass=admin -
Host for reset password redirect and certificate generation. By default current server IP is taken from «eth» network interface. Could be replaced with more friendly hostname. It is recommended to override this property with your server IP to avoid possible problems of host resolving.
server.host=blynk-cloud.com -
Email used for certificate registration, could be omitted in case you already specified it in mail.properties.
contact.email=pupkin@gmail.com
Administration UI
Blynk server provides administration panel where you can monitor your server. It is accessible at this URL:
https://your_ip:9443/admin
WARNING
Please change default admin password and name right after login to admin page. THIS IS SECURITY MEASURE.
WARNING
Default allowed.administrator.ips setting allows access for everyone. In other words,
administration page available from any other computer. Please restrict access to it via property allowed.administrator.ips.
Turn off chrome https warning on localhost
-
Paste in chrome
chrome://flags/#allow-insecure-localhost -
You should see highlighted text saying: «Allow invalid certificates for resources loaded from localhost». Click enable.
HTTP/S RESTful
Blynk HTTP/S RESTful API allows to easily read and write values to/from Pins in Blynk apps and Hardware.
Http API description could be found here.
Enabling sms on local server
To enable SMS notifications on Local Server you need to provide credentials for SMS gateway (currently Blynk server
supports only 1 provider — Nexmo. You need to create file sms.properties
within same folder where server.jar is.
    nexmo.api.key=
    nexmo.api.secret=
And fill in the above properties with the credentials you’ll get from Nexmo. (Account -> Settings -> API settings).
You can also send SMS over email if your cell provider supports that. See discussion for more details.
Enabling raw data storage
By default raw data storage is disabled (as it consumes disk space a lot).
When you enable it, every Blynk.virtualWrite command will be saved to DB.
You will need to install PostgreSQL Database (minimum required version is 9.5) to enable this functionality:
1. Enabling raw data on server
Enable raw data in server.properties :
    enable.db=true
    enable.raw.db.data.store=true
2. Install PostgreSQL. Option A
    sudo sh -c 'echo "deb http://apt.postgresql.org/pub/repos/apt/ `lsb_release -cs`-pgdg main" >> /etc/apt/sources.list.d/pgdg.list'
    wget -q https://www.postgresql.org/media/keys/ACCC4CF8.asc -O - | sudo apt-key add -

    sudo apt-get update
    sudo apt-get install postgresql postgresql-contrib
2. Install PostgreSQL. Option B
    sudo apt-get update
    apt-get --no-install-recommends install postgresql-9.6 postgresql-contrib-9.6
3. Download Blynk DB script
    wget https://raw.githubusercontent.com/blynkkk/blynk-server/master/server/core/src/main/resources/create_schema.sql
    wget https://raw.githubusercontent.com/blynkkk/blynk-server/master/server/core/src/main/resources/reporting_schema.sql
4. Move create_schema.sql and reporting_schema.sql to temp folder (to avoid permission problems)
    mv create_schema.sql /tmp
    mv reporting_schema.sql /tmp
Result:
    /tmp/create_schema.sql
    /tmp/reporting_schema.sql
Copy it to clipboard from your console.
5. Connect to PostgreSQL
6. Create Blynk DB and Reporting DB, test user and tables
    i /tmp/create_schema.sql
    i /tmp/reporting_schema.sql
/tmp/create_schema.sql — is path from step 4.
You should see next output:
    postgres=# i /tmp/create_schema.sql
    CREATE DATABASE
    You are now connected to database "blynk" as user "postgres".
    CREATE TABLE
    CREATE TABLE
    CREATE TABLE
    CREATE TABLE
    CREATE TABLE
    CREATE TABLE
    CREATE TABLE
    CREATE TABLE
    CREATE TABLE
    CREATE TABLE
    CREATE TABLE
    CREATE ROLE
    GRANT
    GRANT
Quit
Now start your server and you should see next text in postgres.log file :
    2017-03-02 16:17:18.367 - DB url : jdbc:postgresql://localhost:5432/blynk?tcpKeepAlive=true&socketTimeout=150
    2017-03-02 16:17:18.367 - DB user : test
    2017-03-02 16:17:18.367 - Connecting to DB...
    2017-03-02 16:17:18.455 - Connected to database successfully.
WARNING:
Raw data may consume your disk space very quickly!
CSV data format
Data format is:
For example:
Where 10 — value of pin.
1438022081332 — the difference, measured in milliseconds, between the current time and midnight, January 1, 1970 UTC.
To display the date/time in excel you may use formula:
=((COLUMN/(60*60*24)/1000+25569))
0 — device id
Automatic Let’s Encrypt certificates generation
Latest Blynk server has super cool feature — automatic Let’s Encrypt certificates generation.
However, it has few requirements:
-
Add
server.hostproperty inserver.propertiesfile.
For example :
IP is not supported, this is the limitation of Let’s Encrypt. Also have in mind that myhost.com
should be resolved by public DNS severs.
-
Add
contact.emailproperty inserver.properties. For example :contact.email=test@gmail.com -
You need to start server on port 80 (requires root or admin rights) or
make port forwarding to default Blynk HTTP port — 8080.
That’s it! Run server as regular and certificates will be generated automatically.
Manual Let’s Encrypt SSL/TLS Certificates
-
First install certbot on your server (machine where you going to run Blynk Server)
wget https://dl.eff.org/certbot-auto chmod a+x certbot-auto -
Generate and verify certificates (your server should be connected to internet and have open 80/443 ports)
./certbot-auto certonly --agree-tos --email YOUR_EMAIL --standalone -d YOUR_HOST
For example
./certbot-auto certonly --agree-tos --email pupkin@blynk.cc --standalone -d blynk.cc
-
Then add to your
server.propertiesfile (in folder with server.jar)server.ssl.cert=/etc/letsencrypt/live/YOUR_HOST/fullchain.pem server.ssl.key=/etc/letsencrypt/live/YOUR_HOST/privkey.pem server.ssl.key.pass=
Generate own SSL certificates
-
Generate self-signed certificate and key
openssl req -x509 -nodes -days 1825 -newkey rsa:2048 -keyout server.key -out server.crt -
Convert server.key to PKCS#8 private key file in PEM format
openssl pkcs8 -topk8 -inform PEM -outform PEM -in server.key -out server.pem
If you connect hardware with USB script you have to provide an option ‘-s’ pointing to «common name» (hostname) you did specified during certificate generation.
As an output you’ll retrieve server.crt and server.pem files that you need to provide for server.ssl properties.
Install java for Ubuntu
    sudo add-apt-repository ppa:openjdk-r/ppa
    && sudo apt-get update -q
    && sudo apt install -y openjdk-11-jdk
or if above doesn’t work:
    sudo apt-add-repository ppa:webupd8team/java
    sudo apt-get update
    sudo apt-get install oracle-java8-installer
Port forwarding for HTTP/S API
    sudo iptables -t nat -A PREROUTING -p tcp --dport 80 -j REDIRECT --to-port 8080
    sudo iptables -t nat -A PREROUTING -p tcp --dport 443 -j REDIRECT --to-port 9443
Enabling QR generation on server
sudo apt-get install libxrender1
Behind wifi router
If you want to run Blynk server behind WiFi-router and want it to be accessible from the Internet, you have to add port-forwarding rule on your router. This is required in order to forward all of the requests that come to the router within the local network to Blynk server.
How to build
Blynk has a bunch of integration tests that require DB, so you have to skip tests during build.
mvn clean install -Dmaven.test.skip=true
How Blynk Works?
When hardware connects to Blynk cloud it opens either keep-alive ssl/tls connection on port 443 (9443 for local servers) or keep-alive plain
tcp/ip connection on port 8080. Blynk app opens mutual ssl/tls connection to Blynk Cloud on port 443 (9443 for local servers).
Blynk Cloud is responsible for forwarding messages between hardware and app. In both (app and hardware) connections Blynk uses
own binary protocol described below.
Blynk protocol
Hardware side protocol
Blynk transfers binary messages between the server and the hardware with the following structure:
| Command | Message Id | Length/Status | Body |
|---|---|---|---|
| 1 byte | 2 bytes | 2 bytes | Variable |
Command and Status definitions: BlynkProtocolDefs.h
Mobile app side protocol
Blynk transfers binary messages between the server and mobile app with the following structure:
| Command | Message Id | Length/Status | Body |
|---|---|---|---|
| 1 byte | 2 bytes | 4 bytes | Variable |
Websockets web side protocol
Blynk transfers binary messages between the server and websockets (for web) with the following structure:
| Websocket header | Command | Message Id | Body |
|---|---|---|---|
| 1 byte | 2 bytes | Variable |
When command code == 0, than message structure is next:
| Websocket header | Command | Message Id | Response code |
|---|---|---|---|
| 1 byte | 2 bytes | 4 bytes |
Possible response codes.
Possible command codes
Message Id and Length are big endian.
Body has a command-specific format.
Licensing
GNU GPL license
Introduction: How to Create a Blynk Local Server
Blynk is a software/app allows a user to control arduino devices from a smartphone or tablet. This can be done by using the company’s Blynk server or the user can host their own Blynk server. This Instructable shows you as to how the user can create their local Blynk Server.
The Files required for the process can be downloaded from the links below.
Blynk Server File: http://www.mediafire.com/download/8pyk6eg0gp5q6l2…
JavaJDK 8.77
32Bit: http://www.mediafire.com/download/72y69zvenhc10my…
64Bit: http://www.mediafire.com/download/72y69zvenhc10my…
Server Properties File: http://www.mediafire.com/download/1uxkg9jkwwmxcb3…
Mail Properties FIle: http://www.mediafire.com/download/1uxkg9jkwwmxcb3…
OpenSSL Installation Files
32Bit: http://www.mediafire.com/download/ae66hxukjp4fvax…
64Bit: http://www.mediafire.com/download/ae66hxukjp4fvax…
SSL Commands File: http://www.mediafire.com/download/ae66hxukjp4fvax…
Blynk Aurdino Library Files: http://www.mediafire.com/download/saccgzz86yeaqvf…
Step 1: The Actual Process
The actual process of creating a Blynk server has been clearly demonstrated in the video.
Be the First to Share
Recommendations
32 Comments
unable to write ‘random state’
I’m getting this error after running this statement : openssl x509 -req -days 1500 -in server_embedded.csr -signkey server_embedded.key -out server_embedded.crt

Hello,
These are the errors I get after I have done the certificates and restarted the server.
Do you have any idea of what I should do next?
I followed your video exactly so far. Running Win7
Thank you

same problem , finding solution , plzz reply if u finf the sol
Please fill you Encryption password in file «server.properties»
server.host=
server.ssl.cert=./server_embedded.crt
server.ssl.key=./server_embedded.pem
server.ssl.key.pass=Fill you Encrytion Password heare <<====
#Blynk server allows to use 2 hosts for same IP, below properties for second host
server2.host=
server2.ssl.cert=./server_embedded.crt
server2.ssl.key=./server_embedded.pem
server2.ssl.key.pass=Fill you Encrytion Password here<<====
client.ssl.cert=
client.ssl.key=


thanks a lot man , i did solve it before , but thanks 💚
i just copied the .key file (rsa private key ) to.
the .pem file
so the rsa private key of .pem file matched with the rsa private key of .key file
n that’s it , it worked ,
idk but the rsa private key of both the files previously was different ,
now its the same n working
Hi,
Thank you very much.
hi…
i try to setup a blynk server, and following your instruction in the video but i stuck at the command prompt: wait too long but nothing happen.. can you help me?

press control+c
I’m trying to being nice and to help you
i see no problem in your picture
your blynk server just started successfully as i see in your picture
if you see
Blynk server successfully started.
it means that tells you have a working local blynk server to confirm that, open up your browser and nether visit localhost:9443/admin, 127.0.0.1:9443/admin, your ip address:9443/admin, or your public ip address:9443/admin
if your browser cannot connect and you tryed localhost:9443/admin, 127.0.0.1:9443/admin, your ip address:9443/admin, and/or your public ip address:9443/admin
this means you had a real problem.
you can view the log which appears on cmd
for example, it should be
All server output is stored in folder ‘C:pathtopath..logs’ file.
in your picture
All server output is stored in folder ‘D:Blynk Server..logs’ file.
you can contact me with email «shehabtweel@gmail.com»
For further help.
— Shehab Ali Tweel
after getting the certificates , i run the server to check , i get error

i did all the 4 commands given to create certificates , now when i check my server.properties file , it is same as before , it has not changed ,
plzzzzzzz helppppppp
The server file is a zip file????
Do i unzip, if so where to???
Hello,
I am getting the same error:
Error Message: ‘openss1 is not recognised as an internal or external command, operable program or batch file’.
I have tried entering it manually nothing helped.
Well at the place of openssl … you have to put actually the path to your openssl folder that you have downloaded. Your actual command should look like
`C:OpenSSL-Win64binopenssl.exe genrsa -out server_embedded.key 2048`
It works

sir , recently i started a new iot project which uses NodeMcu and blynk app. in blynk app i require more widgets and so more energy. hence i searched in web and found your video. i just followed your steps. and took 5 days to host it successfully. NOw the blynk app connects to my local server and i can access free energy. But now the problem is , the Nodemcu is not coming online in my blynk app. in app it shows «device is not online yet». but it will be connect to mobile wifi. and even i can acces my admin account also. so i request you to give me solution. as soon as possible . looking forward for your answer. thank you
hi, I have made it. but just wonder why there are many warnings??
warnings:
1. an illegal reflective access operation has occurred.
2. illegal reflective access by io.netty.util.internal.platformdependent0 (-folder path-/server-0.15.2.jar) to field java.nio.buffer.address
3. please consider reporting this to the maintainers of io.netty.util.internal.platformdependent0
4. use —illegal-access=warn to enable warnings of further illegal reflective access operations
5. all illegal access operations will be denied in a future release.
question: 1. does the connected device is connecting to the local machine hotspot or both were connecting to a local network or both?

first you must see your Raspberry pi IP and put it in your scetch.. after that you must make a port to your router (8443) i your android blynk use this port.. (in the mail.properties text file you must put your email and pass).In the blynk app put the switch in private server and IP (raspberry pi IP) and port 8443..If anyone have some problem P.M me
where’s the video?
in step 1
on the internet everybody shows how to connect the application to the server but nobody explains how to connect hardware to the local server how would you prevent your arduino getting connected to bylnk.cc servers instead of your local blynk server
What is Blynk?
Blynk is a platform with iOS and Android apps to control Arduino, ESP8266, Raspberry Pi and the likes over the Internet.
You can easily build graphic interfaces for all your projects by simply dragging and dropping widgets.
If you need more information, please follow these links:
- Blynk site
- Blynk docs
- Blynk community
- Blynk Examples generator
- App Store
- Google Play
- Blynk library
- Kickstarter


Content
- Download
- Requirements
- Quick Local Server setup
- Enabling mail on Local server
- Quick local server setup on Raspberry PI
- Docker container setup
- Enabling server auto restart on unix-like systems
- Enabling server auto restart on Windows
- Update instruction for unix-like systems
- Update instruction for Windows
- App and sketch changes for Local Server
- Advanced local server setup
- Administration UI
- HTTP/S RESTful API
- Enabling sms on local server
- Enabling raw data storage
- Automatic Let’s Encrypt Certificates
- Manual Let’s Encrypt SSL/TLS Certificates
- Generate own SSL certificates
- Install java for Ubuntu
- How Blynk Works?
- Blynk Protocol
GETTING STARTED
Blynk Server is an Open-Source Netty based Java server, responsible for forwarding
messages between Blynk mobile application and various microcontroller boards and SBCs (i.e. Arduino, Raspberry Pi. etc).
Download latest server build here.


Requirements
- Java 8/11 required (OpenJDK, Oracle)
- Any OS that can run java
- At least 30 MB of RAM (could be less with tuning)
- Open ports 9443 (for app and hardware with ssl), 8080 (for hardware without ssl)
Ubuntu java installation instruction.
For Windows download Java here and install.
Quick local server setup
-
Make sure you are using Java 11
java -version Output: java version "11" -
Run the server on default ‘hardware port 8080’ and default ‘application port 9443’ (SSL port)
java -jar server-0.41.16.jar -dataFolder /path
That’s it!
NOTE: /path should be real existing path to folder where you want to store all your data.
-
As an output you should see something like that:
  Blynk Server successfully started.
  All server output is stored in current folder in 'logs/blynk.log' file.
Enabling mail on Local server
To enable mail notifications on Local server you need to provide your own mail credentials. Create file mail.properties within same folder where server.jar is.
Mail properties:
    mail.smtp.auth=true
    mail.smtp.starttls.enable=true
    mail.smtp.host=smtp.gmail.com
    mail.smtp.port=587
    mail.smtp.username=YOUR_EMAIL_HERE
    mail.smtp.password=YOUR_EMAIL_PASS_HERE
Find example here.
WARNING : only gmail accounts are allowed.
NOTE : you’ll need to setup Gmail to allow less secured applications.
Go here and then click «Allow less secure apps».
Quick local server setup on Raspberry PI
-
Login to Raspberry Pi via ssh;
-
Install java 8:
sudo apt install openjdk-8-jdk openjdk-8-jre -
Make sure you are using Java 8
java -version Output: java version "1.8" -
Download Blynk server jar file (or manually copy it to Raspberry Pi via ssh and scp command):
wget "https://github.com/blynkkk/blynk-server/releases/download/v0.41.16/server-0.41.16-java8.jar" -
Run the server on default ‘hardware port 8080’ and default ‘application port 9443’ (SSL port)
java -jar server-0.41.16-java8.jar -dataFolder /home/pi/Blynk
That’s it!
-
As output you will see something like that:
  Blynk Server successfully started.
  All server output is stored in current folder in 'logs/blynk.log' file.
Docker container setup
Quick Launch
-
Install Docker
-
Run Docker container
docker run -p 8080:8080 -p 9443:9443 mpherg/blynk-server
Quick Launch on Raspberry Pi
-
Install Docker
-
Run Docker container
docker run -p 8080:8080 -p 9443:9443 linuxkonsult/rasbian-blynk
Full customisation
- Check README in docker folder
Enabling server auto restart on unix-like systems
-
To enable server auto restart find /etc/rc.local file and add:
java -jar /home/pi/server-0.41.16-java8.jar -dataFolder /home/pi/Blynk & -
Or if the approach above doesn’t work, execute
crontab -e
add the following line
@reboot java -jar /home/pi/server-0.41.16-java8.jar -dataFolder /home/pi/Blynk &
save and exit.
Enabling server auto restart on Windows
-
Create bat file:
start-blynk.bat -
Put in it one line:
java -jar server-0.41.16.jar -dataFolder /home/pi/Blynk -
Put bat file to windows startup folder
You can also use this script to run server.
Update instruction for unix-like systems
IMPORTANT
Server should be always updated before you update Blynk App. To update your server to a newer version you would need to kill old process and start a new one.
-
Find process id of Blynk server
ps -aux | grep java -
You should see something like that
username 10539 1.0 12.1 3325808 428948 pts/76 Sl Jan22 9:11 java -jar server-0.41.16.jar -
Kill the old process
kill 10539
10539 — blynk server process id from command output above.
- Start new server as usual
After this steps you can update Blynk app. Server version downgrade is not supported.
WARNING!
Please do not revert your server to lower versions. You may loose all of your data.
Update instruction for Windows
-
Open Task Manager;
-
Find Java process;
-
Stop process;
-
Start new server as usual
App and sketch changes
- Specify custom server path in your application


-
Change your ethernet sketch from
Blynk.begin(auth);to
Blynk.begin(auth, "your_host", 8080);or to
Blynk.begin(auth, IPAddress(xxx,xxx,xxx,xxx), 8080); -
Change your WIFI sketch from
Blynk.begin(auth, SSID, pass));to
Blynk.begin(auth, SSID, pass, "your_host", 8080);or to
Blynk.begin(auth, SSID, pass, IPAddress(XXX,XXX,XXX,XXX), 8080); -
Change your rasp PI javascript from
var blynk = new Blynk.Blynk(AUTH, options = {connector : new Blynk.TcpClient()});to
var blynk = new Blynk.Blynk(AUTH, options= {addr:"xxx.xxx.xxx.xxx", port:8080}); -
or in case of USB when running blynk-ser.sh provide ‘-s’ option with address of your local server
./blynk-ser.sh -s you_host_or_IP
IMPORTANT
Blynk is being constantly developed. Mobile apps and server are updated often. To avoid problems during updates either turn off auto-update for Blynk app, or update both local server and blynk app at same time to avoid possible migration issues.
IMPORTANT
Blynk local server is different from Blynk Cloud server. They are not related at all. You have to create new account when using Blynk local server.
Advanced local server setup
For more flexibility you can extend server with more options by creating server.properties file in same folder as server.jar.
Example could be found here.
You could also specify any path to server.properties file via command line argument -serverConfig. You can
do the same with mail.properties via -mailConfig and sms.properties via -smsConfig.
For example:
java -jar server-0.41.16-java8.jar -dataFolder /home/pi/Blynk -serverConfig /home/pi/someFolder/server.properties
Available server options:
-
Blynk app, https, web sockets, admin port
https.port=9443 -
Http, hardware and web sockets port
http.port=8080 -
For simplicity Blynk already provides server jar with built in SSL certificates, so you have working server out of the box via SSL/TLS sockets. But as certificate and it’s private key are in public this is totally not secure. So in order to fix that you need to provide your own certificates. And change below properties with path to your cert. and private key and it’s password. See how to generate self-signed certificates here
  #points to cert and key that placed in same folder as running jar.

  server.ssl.cert=./server_embedded.crt
  server.ssl.key=./server_embedded.pem
  server.ssl.key.pass=pupkin123
Note: if you use Let’s Encrypt certificates you’ll have to add #define BLYNK_SSL_USE_LETSENCRYPT before #include <BlynkSimpleEsp8266_SSL.h> in the Arduino Sketch for your hardware.
-
User profiles folder. Folder in which all users profiles will be stored. By default System.getProperty(«java.io.tmpdir»)/blynk used. Will be created if not exists
data.folder=/tmp/blynk -
Folder for all application logs. Will be created if it doesn’t exist. «.» is dir from which you are running script.
logs.folder=./logs -
Log debug level. Possible values: trace|debug|info|error. Defines how precise logging will be. From left to right -> maximum logging to minimum
log.level=trace -
Maximum allowed number of user dashboards.
user.dashboard.max.limit=100 -
100 Req/sec rate limit per user. You also may want to extend this limit on hardware side.
user.message.quota.limit=100 -
this setting defines how often you can send mail/tweet/push or any other notification. Specified in seconds
notifications.frequency.user.quota.limit=60 -
Maximum allowed user profile size. In Kb’s.
user.profile.max.size=128 -
Number of strings to store in terminal widget (terminal history data)
terminal.strings.pool.size=25 -
Maximum allowed number of notification queue. Queue responsible for processing email, pushes, twits sending. Because of performance issue — those queue is processed in separate thread, this is required due to blocking nature of all above operations. Usually limit shouldn’t be reached
notifications.queue.limit=5000 -
Number of threads for performing blocking operations — push, twits, emails, db queries. Recommended to hold this value low unless you have to perform a lot of blocking operations.
blocking.processor.thread.pool.limit=6 -
Period for flushing all user DB to disk. In millis
profile.save.worker.period=60000 -
Specifies maximum period of time when hardware socket could be idle. After which socket will be closed due to non activity. In seconds. Leave it empty for infinity timeout
hard.socket.idle.timeout=15 -
Mostly required for local servers setup in case user want to log raw data in CSV format. See [raw data] (#raw-data-storage) section for more info.
enable.raw.data.store=true -
Url for opening admin page. Must start from «/». For «/admin» url path will look like that «https://127.0.0.1:9443/admin».
admin.rootPath=/admin -
Comma separated list of administrator IPs. Allow access to admin UI only for those IPs. You may set it for 0.0.0.0/0 to allow access for all. You may use CIDR notation. For instance, 192.168.0.53/24.
allowed.administrator.ips=0.0.0.0/0 -
Default admin name and password. Will be created on initial server start
[email protected] admin.pass=admin -
Host for reset password redirect and certificate generation. By default current server IP is taken from «eth» network interface. Could be replaced with more friendly hostname. It is recommended to override this property with your server IP to avoid possible problems of host resolving.
server.host=blynk-cloud.com -
Email used for certificate registration, could be omitted in case you already specified it in mail.properties.
[email protected]
Administration UI
Blynk server provides administration panel where you can monitor your server. It is accessible at this URL:
https://your_ip:9443/admin

WARNING
Please change default admin password and name right after login to admin page. THIS IS SECURITY MEASURE.
WARNING
Default allowed.administrator.ips setting allows access for everyone. In other words,
administration page available from any other computer. Please restrict access to it via property allowed.administrator.ips.
Turn off chrome https warning on localhost
-
Paste in chrome
chrome://flags/#allow-insecure-localhost -
You should see highlighted text saying: «Allow invalid certificates for resources loaded from localhost». Click enable.
HTTP/S RESTful
Blynk HTTP/S RESTful API allows to easily read and write values to/from Pins in Blynk apps and Hardware.
Http API description could be found here.
Enabling sms on local server
To enable SMS notifications on Local Server you need to provide credentials for SMS gateway (currently Blynk server
supports only 1 provider — Nexmo. You need to create file sms.properties
within same folder where server.jar is.
    nexmo.api.key=
    nexmo.api.secret=
And fill in the above properties with the credentials you’ll get from Nexmo. (Account -> Settings -> API settings).
You can also send SMS over email if your cell provider supports that. See discussion for more details.
Enabling raw data storage
By default raw data storage is disabled (as it consumes disk space a lot).
When you enable it, every Blynk.virtualWrite command will be saved to DB.
You will need to install PostgreSQL Database (minimum required version is 9.5) to enable this functionality:
1. Enabling raw data on server
Enable raw data in server.properties :
    enable.db=true
    enable.raw.db.data.store=true
2. Install PostgreSQL. Option A
    sudo sh -c 'echo "deb http://apt.postgresql.org/pub/repos/apt/ `lsb_release -cs`-pgdg main" >> /etc/apt/sources.list.d/pgdg.list'
    wget -q https://www.postgresql.org/media/keys/ACCC4CF8.asc -O - | sudo apt-key add -

    sudo apt-get update
    sudo apt-get install postgresql postgresql-contrib
2. Install PostgreSQL. Option B
    sudo apt-get update
    apt-get --no-install-recommends install postgresql-9.6 postgresql-contrib-9.6
3. Download Blynk DB script
    wget https://raw.githubusercontent.com/blynkkk/blynk-server/master/server/core/src/main/resources/create_schema.sql
    wget https://raw.githubusercontent.com/blynkkk/blynk-server/master/server/core/src/main/resources/reporting_schema.sql
4. Move create_schema.sql and reporting_schema.sql to temp folder (to avoid permission problems)
    mv create_schema.sql /tmp
    mv reporting_schema.sql /tmp
Result:
    /tmp/create_schema.sql
    /tmp/reporting_schema.sql
Copy it to clipboard from your console.
5. Connect to PostgreSQL
    sudo su - postgres
    psql
6. Create Blynk DB and Reporting DB, test user and tables
    i /tmp/create_schema.sql
    i /tmp/reporting_schema.sql
/tmp/create_schema.sql — is path from step 4.
You should see next output:
    postgres=# i /tmp/create_schema.sql
    CREATE DATABASE
    You are now connected to database "blynk" as user "postgres".
    CREATE TABLE
    CREATE TABLE
    CREATE TABLE
    CREATE TABLE
    CREATE TABLE
    CREATE TABLE
    CREATE TABLE
    CREATE TABLE
    CREATE TABLE
    CREATE TABLE
    CREATE TABLE
    CREATE ROLE
    GRANT
    GRANT
Quit
q
Now start your server and you should see next text in postgres.log file :
    2017-03-02 16:17:18.367 - DB url : jdbc:postgresql://localhost:5432/blynk?tcpKeepAlive=true&socketTimeout=150
    2017-03-02 16:17:18.367 - DB user : test
    2017-03-02 16:17:18.367 - Connecting to DB...
    2017-03-02 16:17:18.455 - Connected to database successfully.
WARNING:
Raw data may consume your disk space very quickly!
CSV data format
Data format is:
value,timestamp,deviceId
For example:
10,1438022081332,0
Where 10 — value of pin.
1438022081332 — the difference, measured in milliseconds, between the current time and midnight, January 1, 1970 UTC.
To display the date/time in excel you may use formula:
=((COLUMN/(60*60*24)/1000+25569))
0 — device id
Automatic Let’s Encrypt certificates generation
Latest Blynk server has super cool feature — automatic Let’s Encrypt certificates generation.
However, it has few requirements:
-
Add
server.hostproperty inserver.propertiesfile.
For example :server.host=myhost.com
IP is not supported, this is the limitation of Let’s Encrypt. Also have in mind that myhost.com
should be resolved by public DNS severs.
-
Add
contact.emailproperty inserver.properties. For example :[email protected] -
You need to start server on port 80 (requires root or admin rights) or
make port forwarding to default Blynk HTTP port — 8080.
That’s it! Run server as regular and certificates will be generated automatically.

Manual Let’s Encrypt SSL/TLS Certificates
-
First install certbot on your server (machine where you going to run Blynk Server)
wget https://dl.eff.org/certbot-auto chmod a+x certbot-auto -
Generate and verify certificates (your server should be connected to internet and have open 80/443 ports)
./certbot-auto certonly --agree-tos --email YOUR_EMAIL --standalone -d YOUR_HOST
For example
./certbot-auto certonly --agree-tos --email [email protected] --standalone -d blynk.cc
-
Then add to your
server.propertiesfile (in folder with server.jar)server.ssl.cert=/etc/letsencrypt/live/YOUR_HOST/fullchain.pem server.ssl.key=/etc/letsencrypt/live/YOUR_HOST/privkey.pem server.ssl.key.pass=
Generate own SSL certificates
-
Generate self-signed certificate and key
openssl req -x509 -nodes -days 1825 -newkey rsa:2048 -keyout server.key -out server.crt -
Convert server.key to PKCS#8 private key file in PEM format
openssl pkcs8 -topk8 -v1 PBE-SHA1-2DES -in server.key -out server.enc.key
If you connect hardware with USB script you have to provide an option ‘-s’ pointing to «common name» (hostname) you did specified during certificate generation.
As an output you’ll retrieve server.crt and server.pem files that you need to provide for server.ssl properties.
Install java for Ubuntu
    sudo add-apt-repository ppa:openjdk-r/ppa
    && sudo apt-get update -q
    && sudo apt install -y openjdk-11-jdk
or if above doesn’t work:
    sudo apt-add-repository ppa:webupd8team/java
    sudo apt-get update
    sudo apt-get install oracle-java8-installer
Port forwarding for HTTP/S API
    sudo iptables -t nat -A PREROUTING -p tcp --dport 80 -j REDIRECT --to-port 8080
    sudo iptables -t nat -A PREROUTING -p tcp --dport 443 -j REDIRECT --to-port 9443
Enabling QR generation on server
sudo apt-get install libxrender1
Behind wifi router
If you want to run Blynk server behind WiFi-router and want it to be accessible from the Internet, you have to add port-forwarding rule on your router. This is required in order to forward all of the requests that come to the router within the local network to Blynk server.
How to build
Blynk has a bunch of integration tests that require DB, so you have to skip tests during build.
mvn clean install -Dmaven.test.skip=true
How Blynk Works?
When hardware connects to Blynk cloud it opens either keep-alive ssl/tls connection on port 443 (9443 for local servers) or keep-alive plain
tcp/ip connection on port 8080. Blynk app opens mutual ssl/tls connection to Blynk Cloud on port 443 (9443 for local servers).
Blynk Cloud is responsible for forwarding messages between hardware and app. In both (app and hardware) connections Blynk uses
own binary protocol described below.
Blynk protocol
Hardware side protocol
Blynk transfers binary messages between the server and the hardware with the following structure:
| Command | Message Id | Length/Status | Body |
|---|---|---|---|
| 1 byte | 2 bytes | 2 bytes | Variable |
Command and Status definitions: BlynkProtocolDefs.h
Mobile app side protocol
Blynk transfers binary messages between the server and mobile app with the following structure:
| Command | Message Id | Length/Status | Body |
|---|---|---|---|
| 1 byte | 2 bytes | 4 bytes | Variable |
Websockets web side protocol
Blynk transfers binary messages between the server and websockets (for web) with the following structure:
| Websocket header | Command | Message Id | Body |
|---|---|---|---|
| 1 byte | 2 bytes | Variable |
When command code == 0, than message structure is next:
| Websocket header | Command | Message Id | Response code |
|---|---|---|---|
| 1 byte | 2 bytes | 4 bytes |
Possible response codes.
Possible command codes
Message Id and Length are big endian.
Body has a command-specific format.
Licensing
GNU GPL license
Open Source Agenda is not affiliated with «Blynk Server» Project. README Source: blynkkk/blynk-server
We make lots of projects in IoT and we all connect it with some IoT platforms using internet. In this article you will learn how to connect a IoT Project using Local Blynk Server.
If you haven’t build local blynk server then please read the below post to configure the same.
Configure Raspberry Pi Based Local Blynk Server for IoT Projects
Parts List
This is a simple project using few components listed
- WeMos D1 Mini x 1
- Led any color x 1
- Resistor 330Ω x 1
- Breadboard x 1
- Jumper wires
How it Works?
The working is as same as connecting your device to blynk cloud and operating it. Instead of connecting it with blynk cloud we are connecting it with blynk local cloud server.
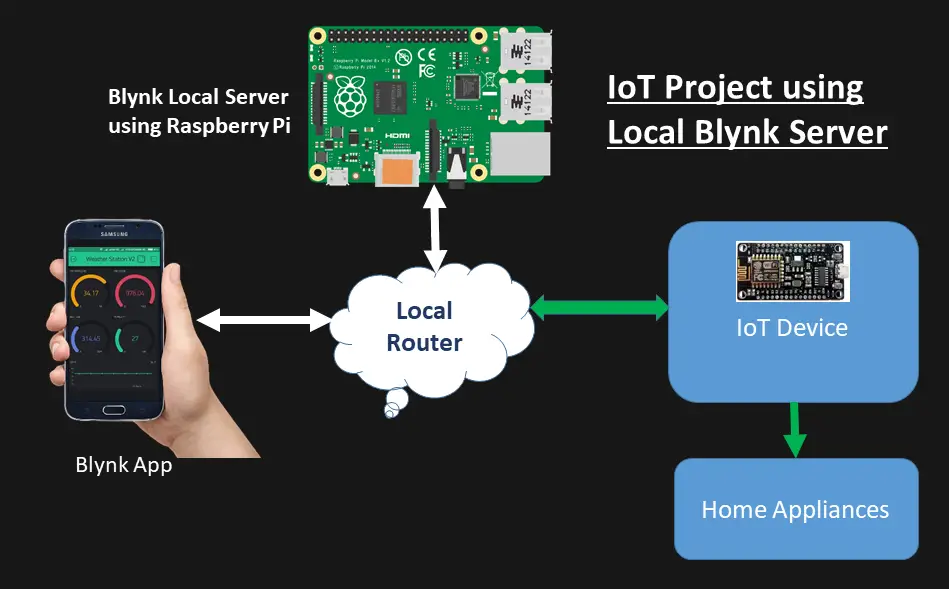
Connection Diagram
This is a simple connection diagram connecting three components. Below is the pin out diagram of WeMos D1 mini.
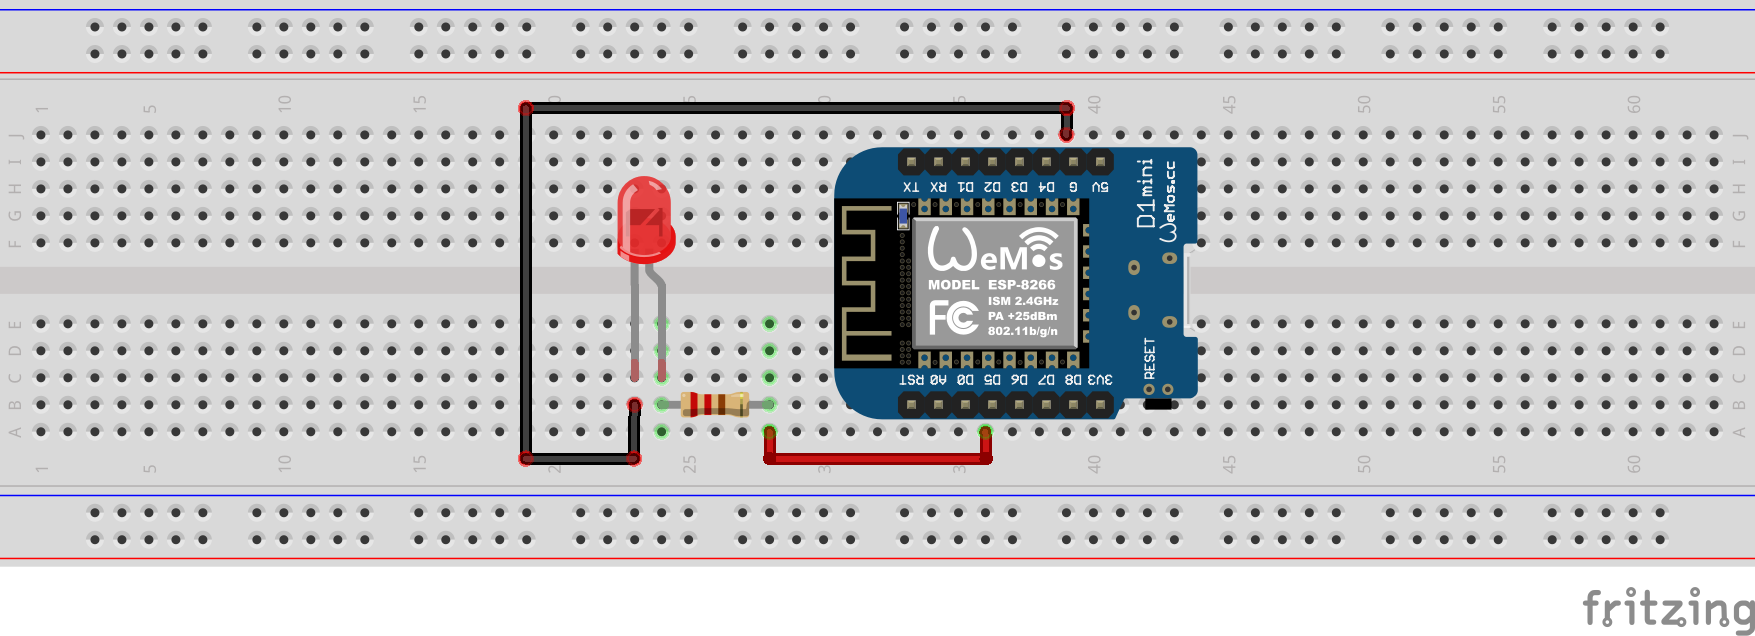
Registering Blynk App using Blynk Local Server
Download the app for your respective platform App Store or Google Play. Open the downloaded app
Tap on Log in
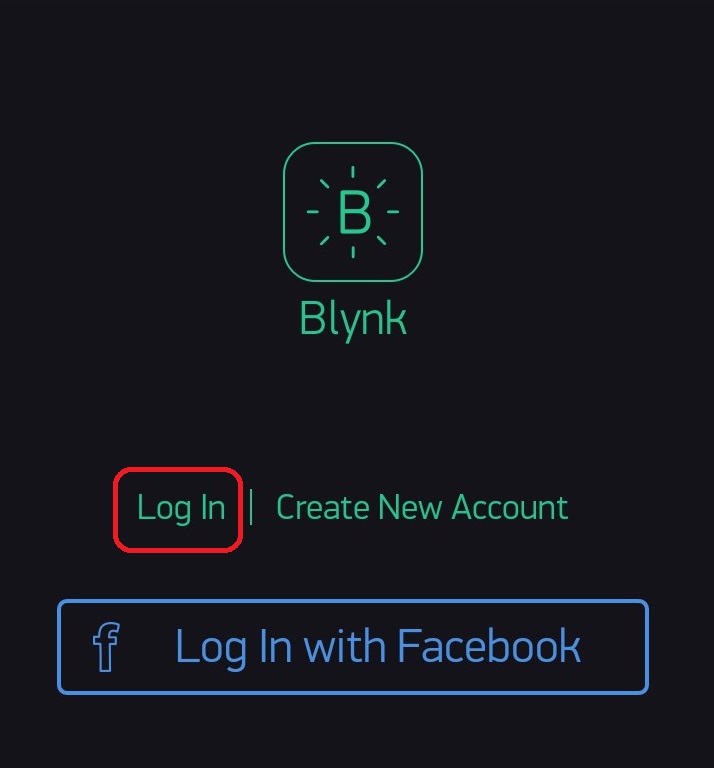
Tap on the Icon below
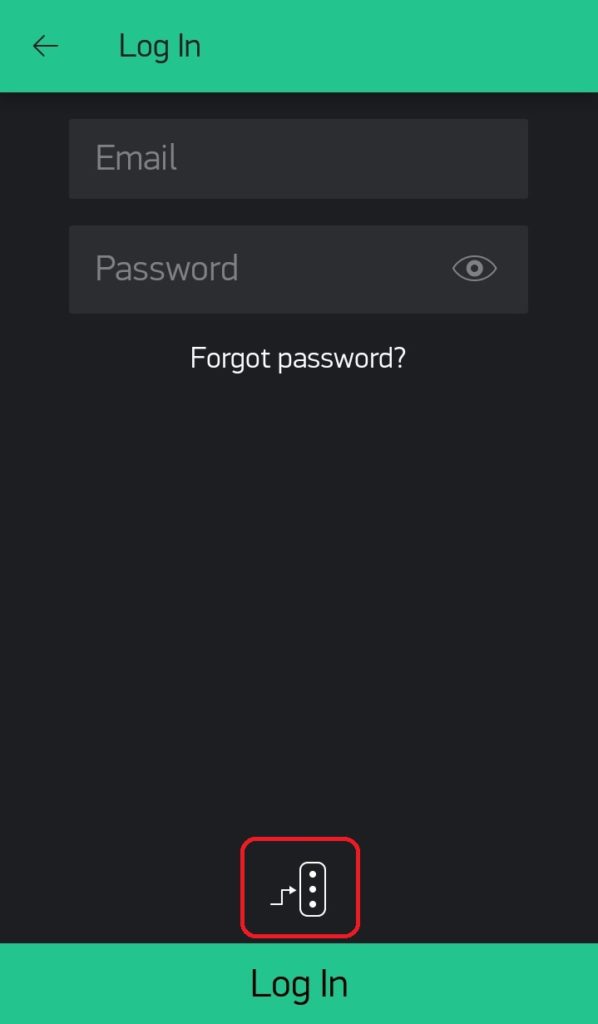
Slide the switch from BLYNK to CUSTOM
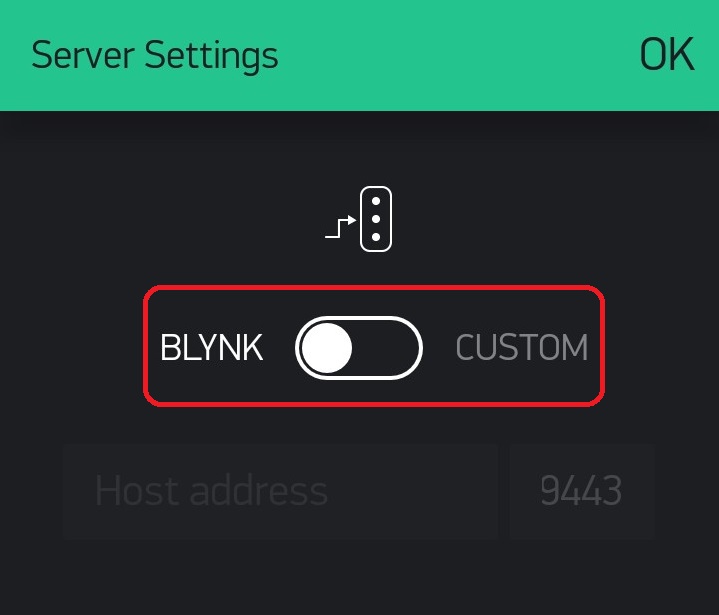
Enter the raspberry pi Local IP address and keep the default port as 9443. Tap on OK
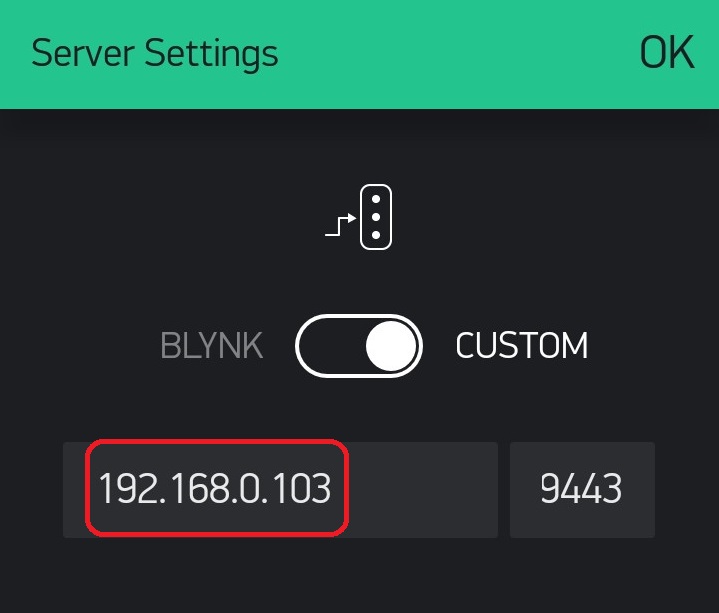
Enter your email address and provide a password to complete the registration process and Tap on Log In

Blynk Project Setup
Previously we have seen registering for first time in Blynk app using local blynk server.
Tap on New Project and update the details. Select the device WeMos D1 mini and tap on Create
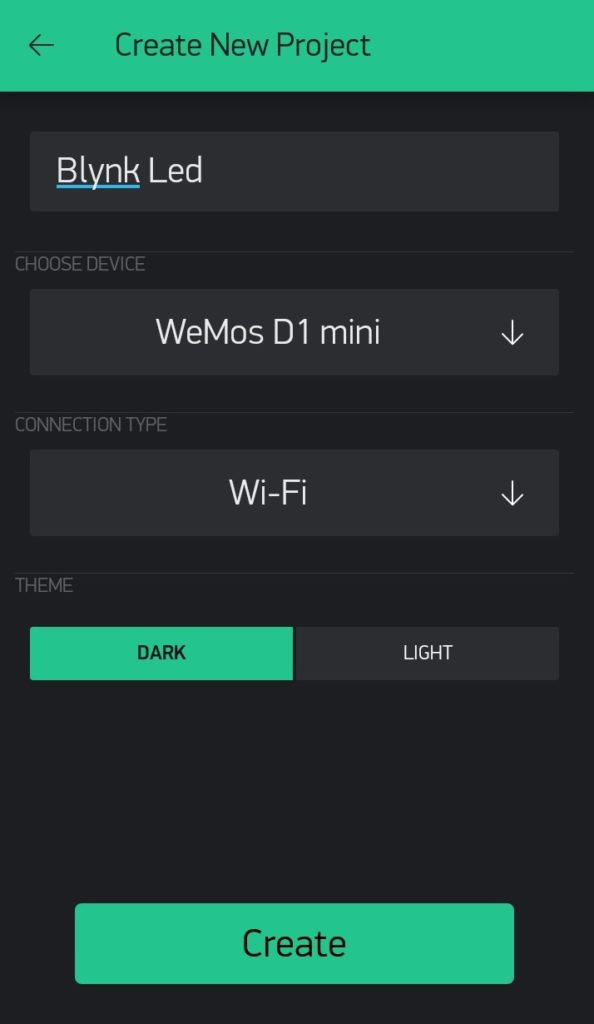
Authentication token will be sent to your registered email address.
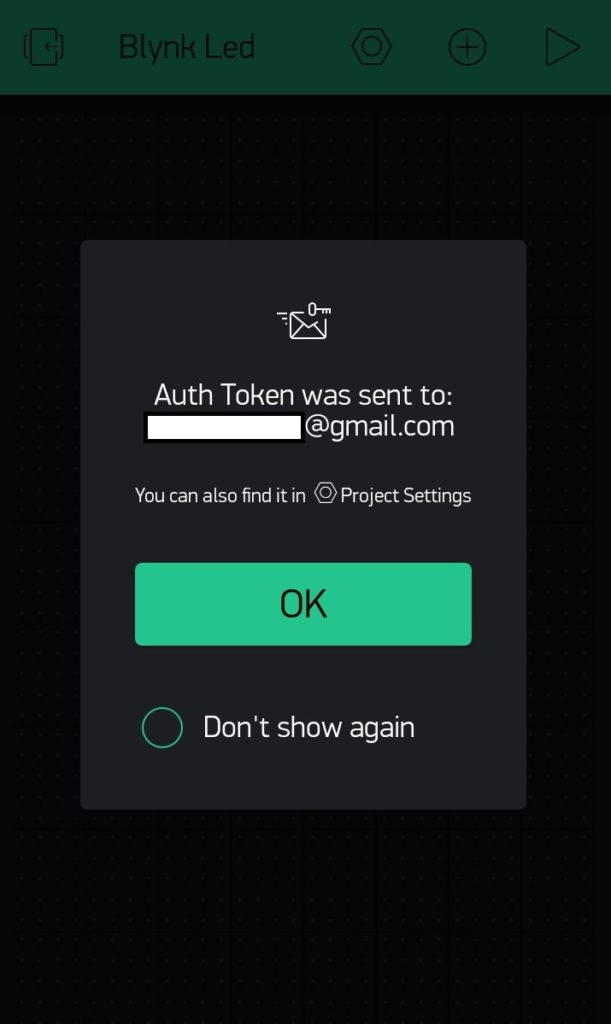
The mail will look same
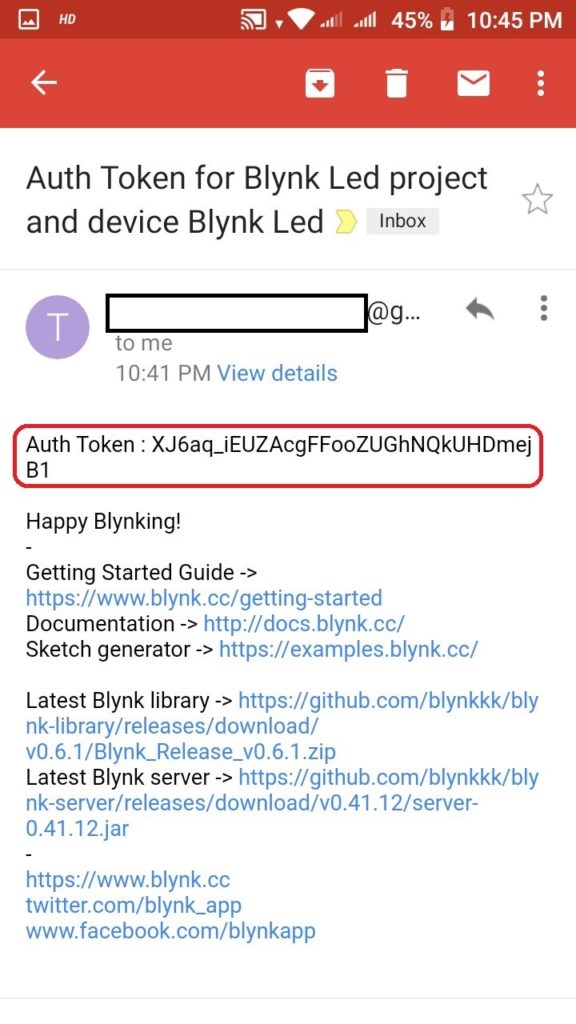
Once your project is ready, you have to add Styled Button as shown below
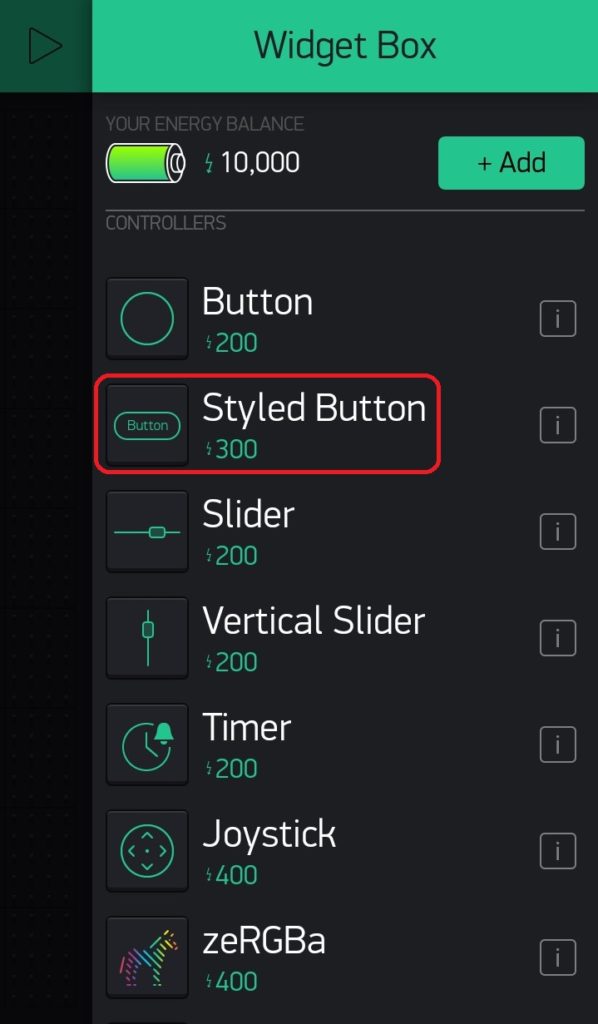
Tap on selected switch and we will configure it below
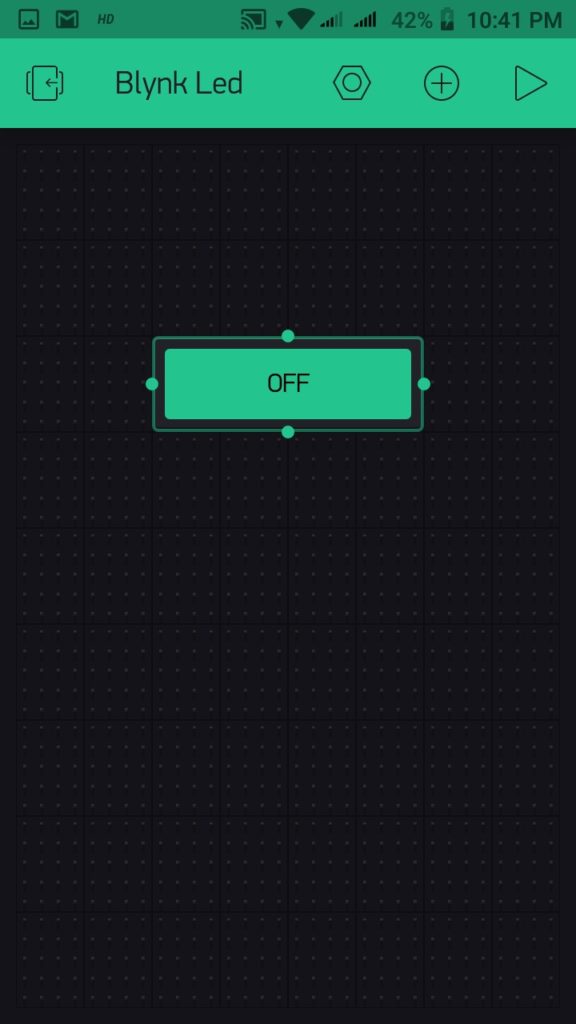
Just add a name and configure the details as shown below
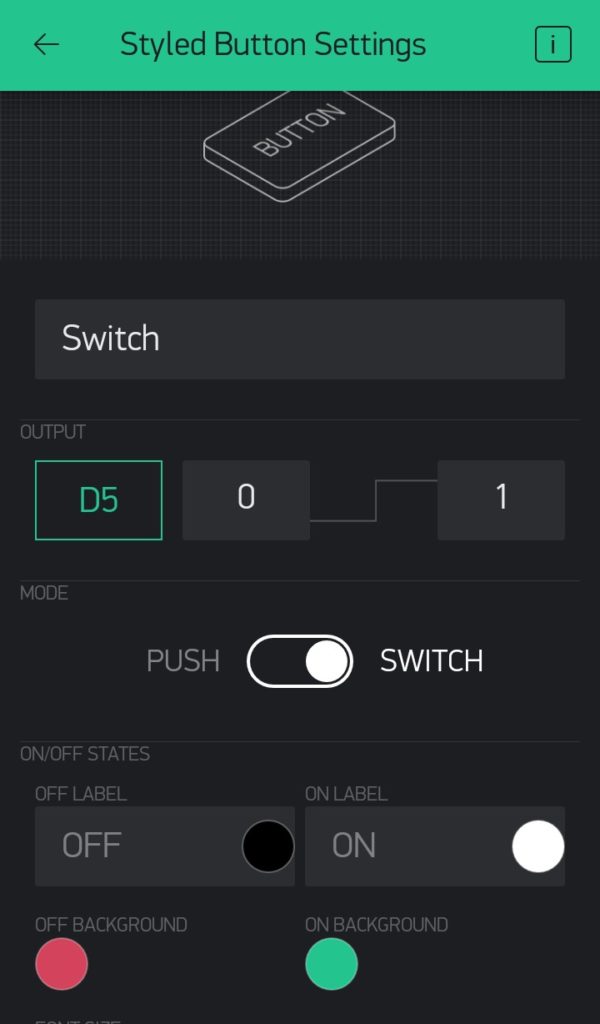
Your blynk setup in project is ready now.
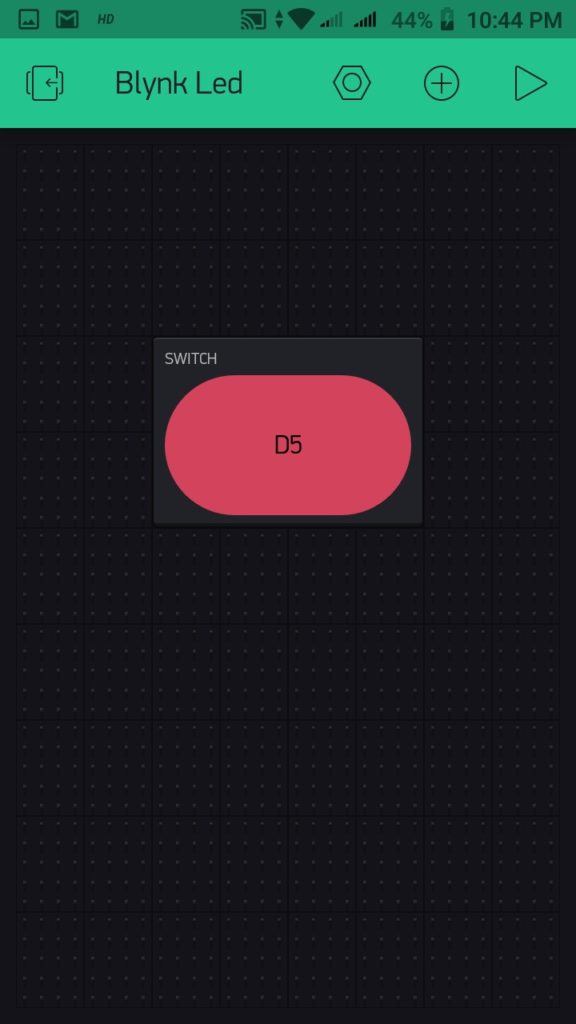
Code
Copy paste this code in your Arduino IDE and upload the code. You can check how to upload code in WeMos D1 mini.
#include &lt;ESP8266WiFi.h&gt;
#include &lt;BlynkSimpleEsp8266.h&gt;
// You should get Auth Token in the Blynk App.
// Go to the Project Settings (nut icon).
char auth[] = &quot;YourAuthToken&quot;;
// Your WiFi credentials.
// Set password to &quot;&quot; for open networks.
char ssid[] = &quot;Your_Network_Name&quot;;
char pass[] = &quot;Your_Password&quot;;
void setup()
{
// Debug console
Serial.begin(9600);
Blynk.begin(auth, ssid, pass, IPAddress(XXX,XXX,XXX,XXX), 8080);
}
void loop()
{
Blynk.run();
}
Construction
Below arrange has been done on a breadboard for testing raspberry pi based local server.
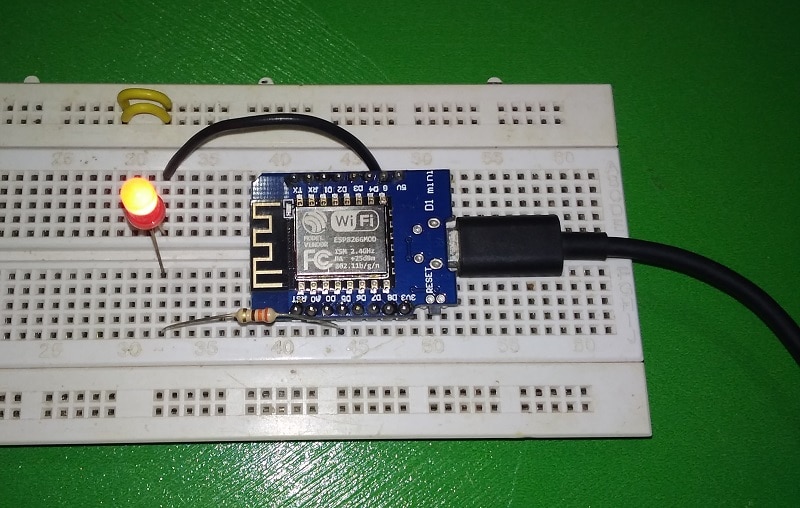
Testing
Once you power on the project, you can open the blynk app and check the device is connected to your local blynk server. Then if you press the switch in your blynk app the led light connected to D5 pin of WeMos D1 Mini will turn on and on press again the light will turn off.
This shows that your project is using local blynk server and further it doesn’t need any internet to access this local server. Like wise you can build your IoT projects and connect it with you blynk local server.
Conclusion
This is a simple project that can be built by any beginner to learn how to create a IoT Project and connect it using Local Blynk Server. This will also let you learn configuring a local blynk server on a raspberry pi.

Creating A Blynk Local Server In Windows
Dive into the captivating world of Creating A Blynk Local Server In Windows with our blog as your guide. We are passionate about uncovering the untapped potential and limitless opportunities that Creating A Blynk Local Server In Windows offers. Through our insightful articles and expert perspectives, we aim to ignite your curiosity, deepen your understanding, and empower you to harness the power of Creating A Blynk Local Server In Windows in your personal and professional life. Allows How arduino or server the done user devices the server- user server this how instructable can you this local control to be can a blynk blynk shows to host their by from to tablet- as a create- blynk using company39s software the a user blynk own create is a or app can smartphone
Creating A Blynk Local Server In Windows Youtube
Creating A Blynk Local Server In Windows Youtube
10 10 0:00 23:00 creating a blynk local server in windows sid’s e classroom 15.1k subscribers subscribe 486 74k views 7 years ago windows tutorials a tutorial on creating blynk local. 1 like aop july 27, 2016, 3:48pm 3 i’m trying to the java server file is within the c:\users\jacob\documents\blynk server directory. stir me straight, @dmitriy. examples work best. dmitriy july 27, 2016, 4:04pm 4 @aop you need to either specify full path to jar file or go to dir with jar and run from there.

Blynk Local Server On Windows แบบใช เองในบ านนะ ไม ได ต งค าเร อง
Blynk Local Server On Windows แบบใช เองในบ านนะ ไม ได ต งค าเร อง
Cd c:\users\admin\your download folder then run following command to start the local blynk server: java jar . blynk server.jar datafolder . blynk you will see following result: now your local blynk server has been successfully installed and running in your windows. install blynk local server on apple macbook computer. These are the official directions… it does assume you have some basic knowledge about command line use. github blynkkk blynk server blynk is an internet of things platform aimed to simplify building mobile and web applications for the internet of things. easily connect 400 hardware models like arduino, esp8266, esp32, raspberr. How to set up local blynk server on windows : step 1 : download java se development kit from : oracle in java technologies javase jdk16 downloads #license lightbox download the version as per your operating system download the server file from : osoyoo driver blynk blynk server.jar. How to create a blynk local server: blynk is a software app allows a user to control arduino devices from a smartphone or tablet. this can be done by using the company’s blynk server or the user can host their own blynk server. this instructable shows you as to how the user can create….

Blynk Tutorial Local Server Blynk In Windows Youtube
Blynk Tutorial Local Server Blynk In Windows Youtube
How to set up local blynk server on windows : step 1 : download java se development kit from : oracle in java technologies javase jdk16 downloads #license lightbox download the version as per your operating system download the server file from : osoyoo driver blynk blynk server.jar. How to create a blynk local server: blynk is a software app allows a user to control arduino devices from a smartphone or tablet. this can be done by using the company’s blynk server or the user can host their own blynk server. this instructable shows you as to how the user can create…. • wifi • ethernet • cellular (gsm, 2g, 3g, 4g, lte) get started in 5 minutes 1 create a blynk account 1 minute the quickstart guide will start automatically 2 follow quickstart guide 3 minutes we will walk you through the whole process 3 install blynk apps 1 minute no ios or android coding required 4. Registering blynk app using blynk local server. download the app for your respective platform app store or google play. open the downloaded app. tap on log in. tap on the icon below. slide the switch from blynk to custom. enter the raspberry pi local ip address and keep the default port as 9443. tap on ok.

Get Started With Iot How To Build A Diy Blynk Board Opensource
Get Started With Iot How To Build A Diy Blynk Board Opensource
• wifi • ethernet • cellular (gsm, 2g, 3g, 4g, lte) get started in 5 minutes 1 create a blynk account 1 minute the quickstart guide will start automatically 2 follow quickstart guide 3 minutes we will walk you through the whole process 3 install blynk apps 1 minute no ios or android coding required 4. Registering blynk app using blynk local server. download the app for your respective platform app store or google play. open the downloaded app. tap on log in. tap on the icon below. slide the switch from blynk to custom. enter the raspberry pi local ip address and keep the default port as 9443. tap on ok.
Creating A Blynk Local Server In Windows
Creating A Blynk Local Server In Windows
a tutorial on creating blynk local server. please find the links for the files below. skip the certificates generation part. with the how to install blynk local server in raspberry pi. install blynk local server in raspberry pi. run blynk local server on raspberry pi this video shows how to setup local blynk server on raspberry pi board to get unlimited blynk energy. to try out free trial version a tutorial on creating a blynk and local server on windows. in the tutorial, we set up a blynk server locally on raspberry pi. we set it up using a raspberry pi 4 and we also create a demo apaitu blynk local server hack berhubung legacy blynk sudah tidak disupport maka di aplikasi yang kita download dari app store please comment it you have any question. #iot #blynk #householdlifehacker. this video shows how to install blynk local server on google cloud platform service. ***update 03 2020*** » sudo apt get install
Conclusion
After exploring the topic in depth, it is evident that the post offers valuable information about Creating A Blynk Local Server In Windows. From start to finish, the author presents a wealth of knowledge on the topic. Especially, the section on X stands out as a highlight. Thanks for taking the time to the post. If you would like to know more, please do not hesitate to contact me through social media. I am excited about hearing from you. Furthermore, below are a few relevant content that you may find useful: