Подключили Bluetooth наушники к своему ноутбуку или компьютеру с Windows 11, но не работает микрофон? В этой статье я покажу несколько решений, которые позволят исправить работу микрофона на беспроводных наушниках. Так как мне часто приходится подключать к своему ноутбуку разные беспроводные наушники, то с этой проблемой я сталкивался лично. К тому же у меня есть опыт в решении проблем с микрофоном в предыдущей версии Windows.
После успешного подключения Bluetooth наушников к Windows 11 чаще всего сталкиваются с двумя проблемами:
- Windows 11 не видит подключенные наушники как устройство для вывод звука и соответственно звук через беспроводные наушники не воспроизводится, несмотря на то, что они подключены.
- Windows 11 не работает с микрофоном в Bluetooth наушниках. Звук на наушники компьютер выводит, но микрофон не видит и он не работает. Его нет в списке устройств для ввода звука. Программы так же не могут использовать микрофон на наушниках для звонков или записи звука.
Так как сейчас практически все Bluetooth наушники имеют встроенный микрофон, и многие подключают их к ноутбукам и компьютерам для использования этого микрофона в разговорах через мессенджеры (Discord, Viber, Skype, WhatsApp, Telegram, SnapChat и т. д.), для игры, или просто для записи звука, то сталкиваться с подобными проблемами в Windows 11 не очень приятно.
В данном случае совсем не важно какие у вас наушники. Решения подойдут как для TWS наушников (когда правый и левый наушник отдельно), так и для обычных. Даже если у вас Bluetooth колонка с микрофоном, и он не работает, вы так же можете применять решения из этой статьи.
Проверяем, видит ли Windows 11 микрофон на наушниках
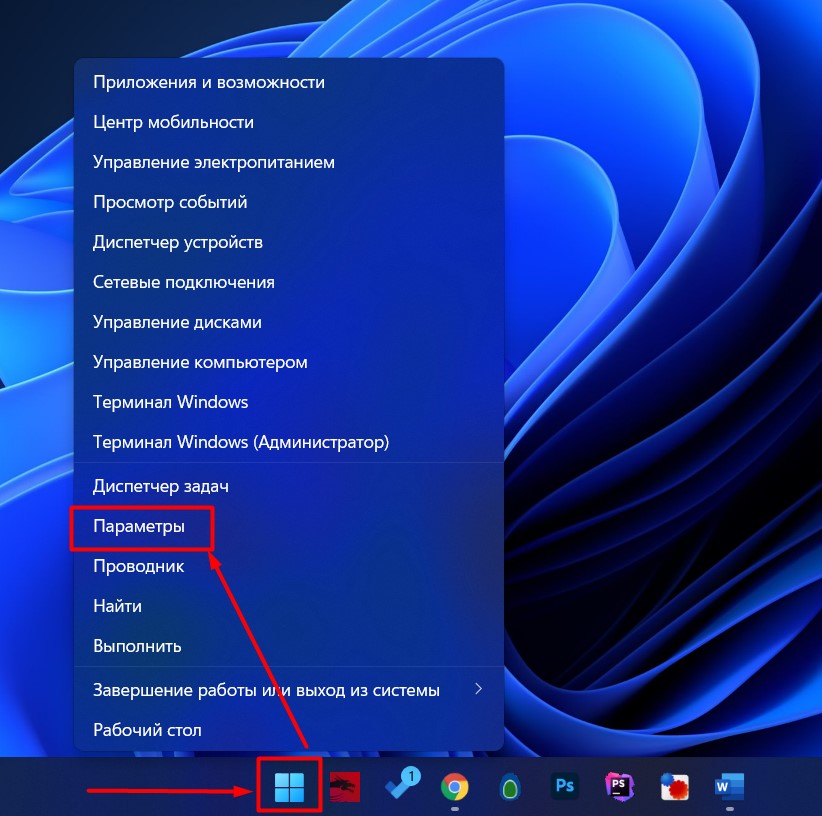
Все очень просто. Когда мы в Windows 11 подключаем какие-то наушники по Bluetooth, система сразу определяет, как она может их использовать. Эта информация отображается возле названия наушников в параметрах. Проверьте, что написано у вас. Для этого откройте Параметры (можно нажать правой кнопкой на меню Пуск) и перейдите в раздел Bluetooth и устройства – Устройства. Есть три варианта:
«Подключены микрофон и звук», но микрофон не работает
Когда возле наушников надпись «Подключены микрофон и звук» (Подключенный голос, музыка), то микрофон должен работать. Но, к сожалению, это не всегда так.
Настройки устройства ввода
Возможно, наушники просто не выбраны в качестве устройства для ввода звука (устройство для разговора или записи). Проверить это и исправить не сложно.
- Убедитесь, что наушники подключены к компьютеру.
- Откройте Параметры. Я обычно открываю их из меню, которое можно вызвать нажав правой кнопкой мыши на Пуск.
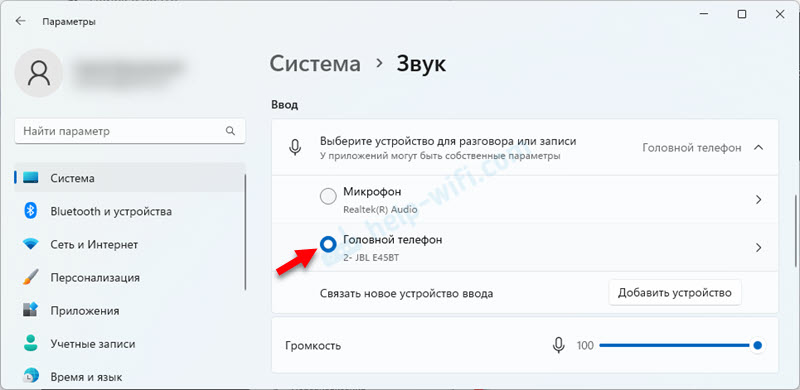
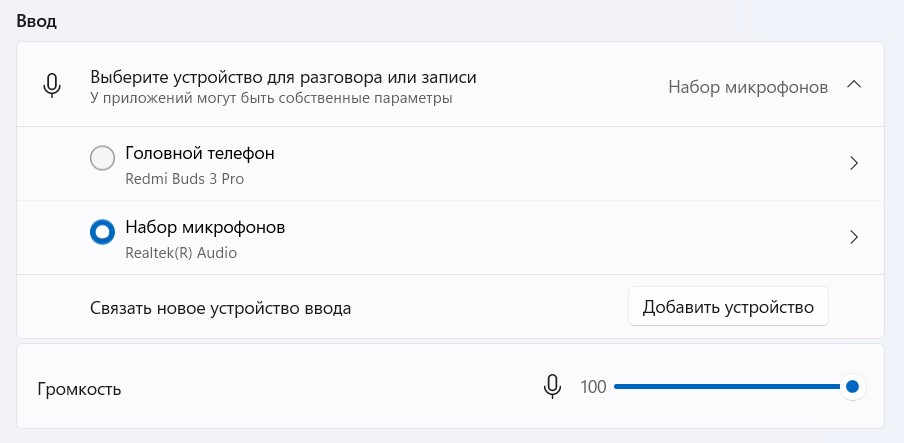
- Перейдите в раздел Система – Звук. В разделе Ввод должны быть выбраны именно Bluetooth наушники.
 Там будет отображаться их название. А само устройство для ввода звука будет называться Головной телефон. Так же проверьте, чтобы не была скручена громкость.
 Там будет отображаться их название. А само устройство для ввода звука будет называться Головной телефон. Так же проверьте, чтобы не была скручена громкость.
Настройка доступа к микрофону в Windows 11
- В параметрах перейдите в раздел Конфиденциальность и защита – Микрофон.
- Проверьте, чтобы был включен Доступ к микрофону, Разрешить приложениям доступ к микрофону и Разрешить классическим приложениям доступ к микрофону (этот пункт внизу страницы).

- На этой же странице найдите приложение в котором у вас не работает микрофон и убедитесь, что для него так же включен доступ к микрофону.

Настройки в самом приложении
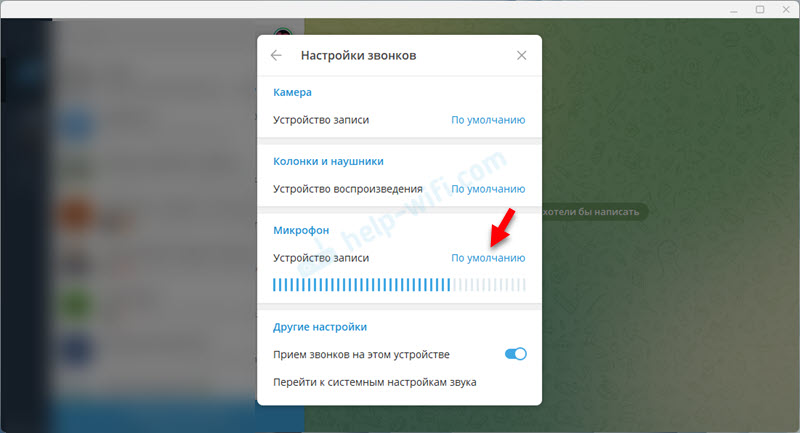
В приложениях, особенно в мессенджерах, или в играх могут быть отдельные настройки микрофона. Например, в том же Discord или Telegram. Обычно там установлено устройство ввода по умолчанию (которое выбрано в настройках Windows 11). Но все же не лишним будет проверить эти параметры.
Покажу на примере Telegram. В настройках, в разделе Настройки звонков можно проверить и сменить устройство записи (микрофон).
Когда все настроено правильно, в настройках микрофон определяется, но вас не слышно при звонках, в играх, при записи голоса и т. д., то я рекомендую подключить наушник к другому устройству (желательно к телефону), чтобы убедиться, что микрофон на наушниках рабочий.
Возле наушников «Подключен звук» и Windows 11 не видит микрофон (устройство для разговора или записи)
Если в параметрах возле ваших наушников надпись Подключен звук (Подключенная музыка), то первым делом просто удалите наушники и подключите их повторно. Если это не сработало, примените решения, о которых я расскажу ниже.
Проверка служб
- Откройте Параметры. Для этого нажмите правой кнопкой мыши на меню Пуск, или нажмите сочетание клавиш Win + X.
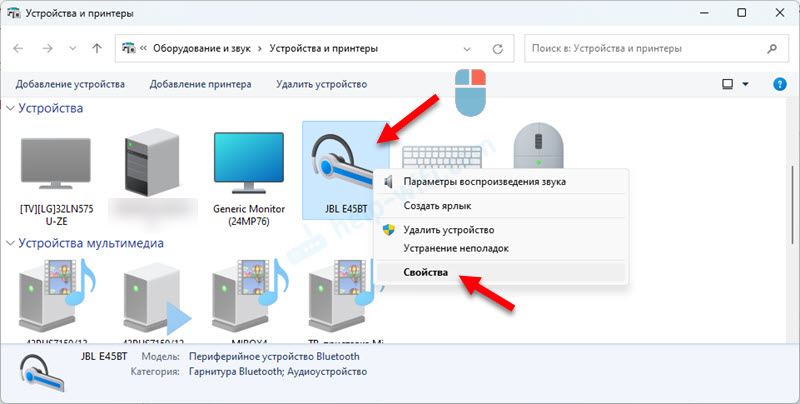
- Перейдите в раздел Bluetooth и устройства – Устройства – Дополнительные параметры устройств и принтеров.

- Откроется окно, в котором нужно нажать правой кнопкой мыши на свои наушники и выбрать Свойства.

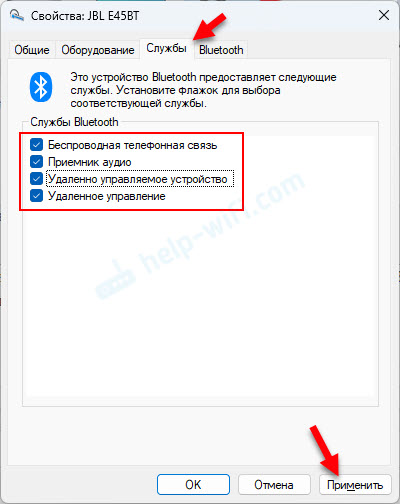
- Перейдите на вкладку Службы. Установите галочки возле всех служб и нажмите на кнопку Применить. За работу микрофона в через Bluetooth наушники в Windows 11 отвечает служба Беспроводная телефонная связь. А за вывод звука отвечает служба Приемник аудио.

- Если вы открыли свойства, а там все службы уже включены, но микрофон не работает, тогда попробуйте отключить все службы (убрать галочки и применить), затем перезагрузить ноутбук, открыть снова свойства Bluetooth наушников и включить все службы. Часто помогает именно выключить/включить службы.

Обновление драйверов
Если на вашем компьютере установлены устаревшие драйверы на Bluetooth адаптер, то это может вызвать разные проблемы при подключении и работе беспроводных наушников. В том числе проблемы с микрофоном.
Нужно обязательно загрузить новые драйверы с сайта производителя ноутбука или адаптера и установить их. Драйвер должен быть именно для Windows 11. Как это сделать я подробно показывал в статье драйвер Bluetooth для Windows 11: как скачать, установить, обновить, исправить проблемы.
После переустановки/обновления драйвера удалите наушники и подключите их заново после перезагрузки компьютера.
Похожие статьи
Нет звука в беспроводных Bluetooth наушниках на телефоне. Наушники подключены, но звук идет через динамики телефона
Драйвер Bluetooth для Windows 11: как скачать, установить, обновить, исправить проблемы?
Как подключить наушники TWS i7, i8, i9, i10, i11, i12, F9 к телефону, iPhone, ноутбуку или компьютеру?
Bluetooth наушники (колонка) не определяются как «Аудио» и отображаются как «Другие устройства» в Windows 11, 10
Введение
Windows 11 — это самая новая и самая популярная операционная система для компьютеров. Однако, многие пользователи сталкиваются с проблемой неправильной работы микрофона на блютуз наушниках. В этой статье мы рассмотрим, как можно решить эту проблему.
Шаги решения проблемы
Выполните следующие шаги, чтобы решить проблему с микрофоном на блютуз наушниках в Windows 11:
1. Проверьте настройки основного микрофона
Перед тем, как делать что-либо другое, убедитесь в том, что все настройки основного микрофона установлены правильно.
- Шаг 1: Нажмите на значок «Настройки» в правом нижнем углу задачи.
- Шаг 2: Нажмите на «Система».
- Шаг 3: Выберите «Звук».
- Шаг 4: На странице «Звук» выберите «Устройства для ввода».
- Шаг 5: Если блютуз наушники — это единственное устройство записи, которое отображается, то проверьте, что у них выставлена максимальная громкость. Если есть другие устройства записи, то убедитесь, что блютуз наушники выбраны как основное устройство записи.
2. Обновите драйвера блютуз наушников
Если наушники были подключены ранее, то возможно, у вас установлены устаревшие драйверы. Чтобы обновить драйвера наушников выполните следующие действия:
- Шаг 1: Перейдите в «Диспетчер устройств» (нажмите на значок «Настройки» в правом нижнем углу экрана, выберите «Система», а затем «Диспетчер устройств»).
- Шаг 2: Найдите в списке «Блютуз-адаптеры» и раскройте его.
- Шаг 3: Найдите ваш блютуз-наушник в списке и кликните на нем правой кнопкой мыши, выберите «Обновить драйвер».
- Шаг 4: Нажмите на «Автоматическое обновление драйверов».
3. Отключите другие устройства записи
Если у вас есть другие устройства записи подключенные к компьютеру, то возможно блютуз наушники не определяются как основное устройство записи. Для решения этой проблемы:
- Шаг 1: Найдите значок «Настройки» в правом нижнем углу экрана и запустите его.
- Шаг 2: Нажмите на «Система».
- Шаг 3: Выберите «Звук».
- Шаг 4: Выберите «Устройства для ввода».
- Шаг 5: Отключите все другие устройства записи, чтобы оставить только блютуз наушники.
4. Удалите наушники и заново подключите их
Если ничто из вышеперечисленного не помогло, то последним способом является удаление наушников и их заново подключение. Для этого:
- Шаг 1: Найдите значок «Настройки» в правом нижнем углу экрана и запустите его.
- Шаг 2: Нажмите на «Устройства».
- Шаг 3: Выберите «Блютуз и другие устройства».
- Шаг 4: Найдите свои наушники в списке и выберите «Удалить устройство».
- Шаг 5: Заново подключите наушники в соответствии с инструкциями в их руководстве пользователя.
Заключение
В этой статье мы рассмотрели несколько способов решения проблемы с микрофоном на блютуз наушниках в Windows 11. Выполнение как описанных выше, так и других шагов должно помочь вам решить эту проблему и наслаждаться использованием наушников на 100%.
by Vladimir Popescu
Being an artist his entire life while also playing handball at a professional level, Vladimir has also developed a passion for all things computer-related. With an innate fascination… read more
Updated on
- Windows 11 AirPods microphone issues can arise due to your microphone settings.
- In order to fix the problem at hand, try to unpair the AirPods and pair them again.
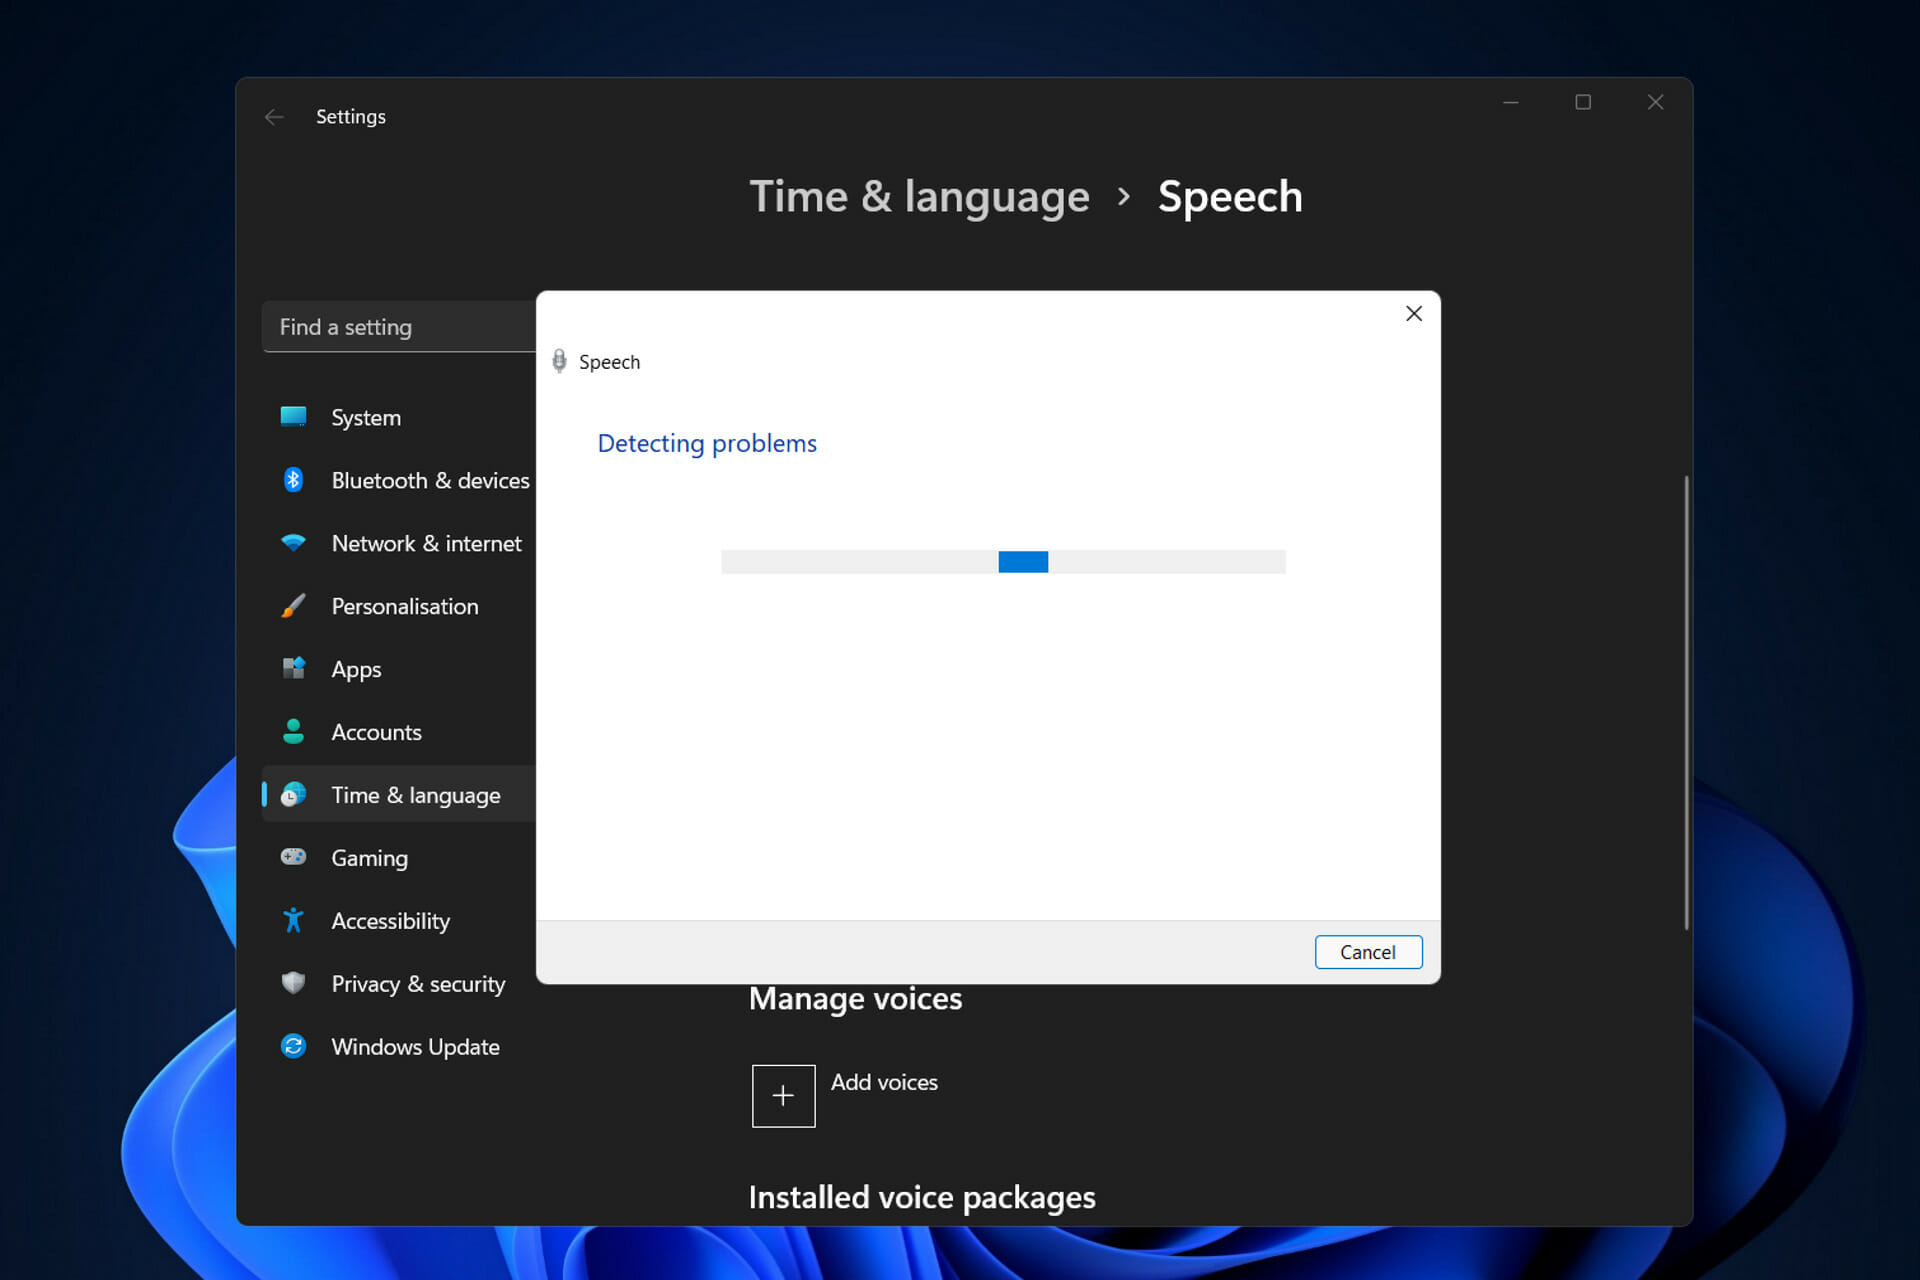
- Alternatively, you can run the Record Audio Troubleshooter.
XINSTALL BY CLICKING THE DOWNLOAD
FILE
It is possible that your AirPods microphone will cease operating on Windows from time to time. Thus, today’s topic is how to fix Windows 11 AirPods microphone issues.
Furthermore, it can be a significant problem, especially if you are required to participate in video meetings on a frequent basis if the audio works but the microphone doesn’t.
Let’s have a look at how you can resolve this aggravating problem as quickly as possible, right after we see whether AirPods are compatible with Windows or not, since this was one of your most asked questions. Follow along!
Are AirPods compatible with Windows?
AirPods are designed to function smoothly with iPhones and other Apple devices, but you can use Bluetooth to pair and connect them to any Windows 11 PC.
Additionally, your AirPods can remember your Windows 11 computer, your iPhone, and other devices, letting you switch between them whenever you choose and however you want.
It is necessary to turn your Bluetooth on and pair your AirPods with your Windows 11 computer in order to make the connection. From that point forward, they will remember the PC, allowing you to rejoin whenever you wish to.
How we test, review and rate?
We have worked for the past 6 months on building a new review system on how we produce content. Using it, we have subsequently redone most of our articles to provide actual hands-on expertise on the guides we made.
For more details you can read how we test, review, and rate at WindowsReport.
When you open the case in close proximity to your iPhone, AirPods will instantly connect to your phone, and if your Mac detects your AirPods, you’ll receive an automatic popup prompting you to connect to your phone.
The process of using AirPods with a Windows 11 PC is a little more involved, but it’s simple to re-establish a connection and continue to use them with your computer whenever you choose.
How can I fix AirPods microphone issues in Windows 11?
1. Unpair your device and pair it again
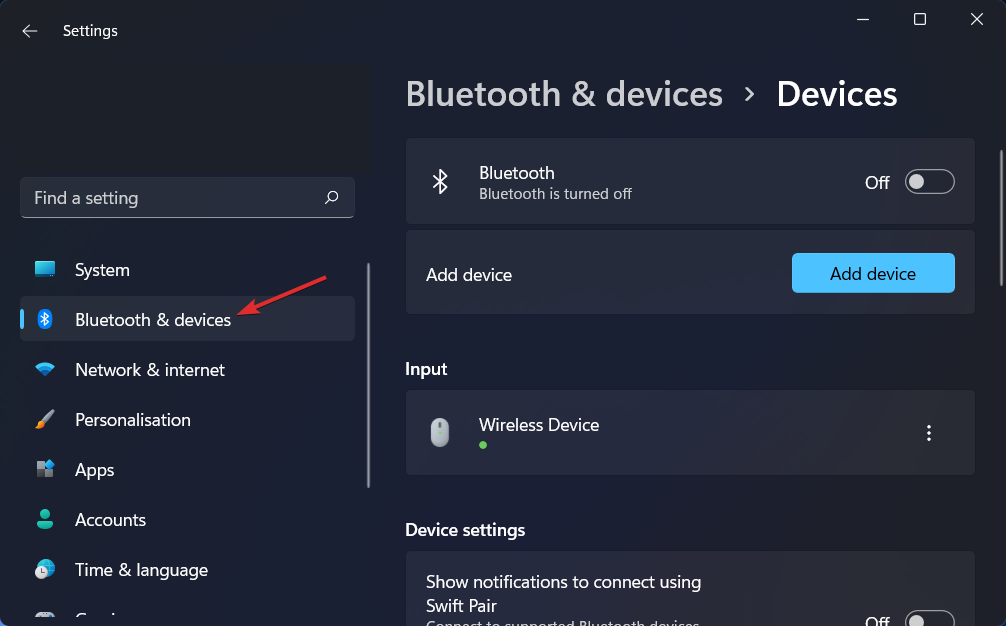
- Navigate to Settings and click on Bluetooth & devices from the left side.

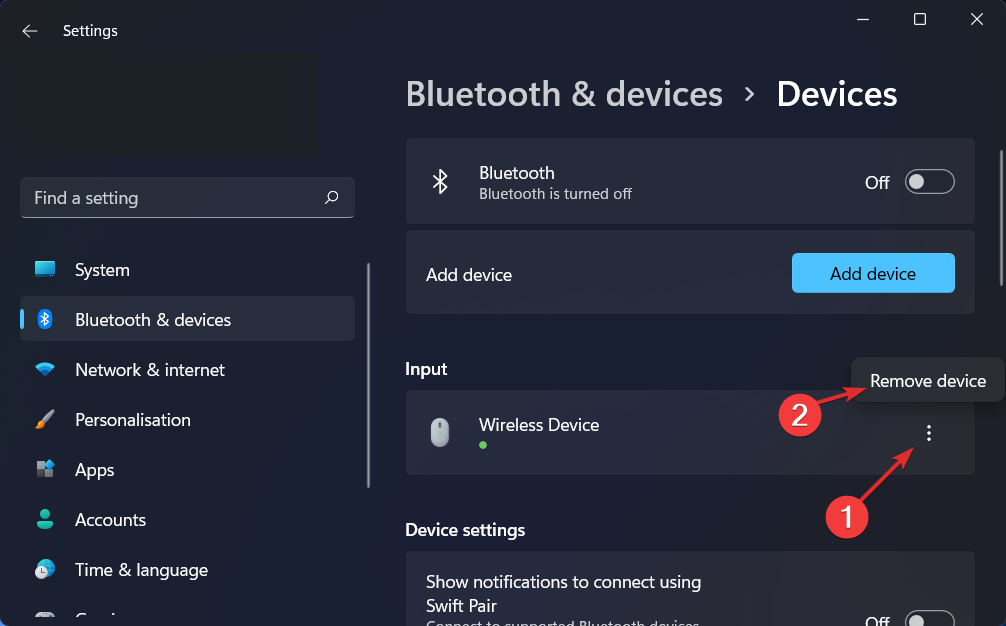
- Locate your AirPods device, click on the three dot icon and choose Remove device. In our case, we don’t have the device connected, thus we show cased with the mouse input.
- Now pair your AirPods again as you have previously done it and test them to see if the microphone works.
This is the simplest solution you can try and surprisingly, it works! Problems, including the Windows 11 AirPods microphone issues, regarding your peripherals, can be easily fixed if you don’t skip this seemingly useless solution.
- Microsoft Paint Cocreator: A complete guide on the new AI tool
- Windows 11 adds more apps to the share links feature
2. Update drivers
When it comes to keeping your PC in peak operating condition, Outbyte Driver Updater is a lightweight software solution designed specifically for individuals who don’t want to waste time completing procedures such as opening the Device Manager or visiting each manufacturer’s website to download updates.
The Outbyte Driver Updater database has up-to-date drivers for your Windows 11 machine and many other devices such as Bluetooth ones, including your AirPods, which you may download and install. It is capable of installing updated drivers as soon as they are made available by their respective manufacturers.
3. Allow microphone access
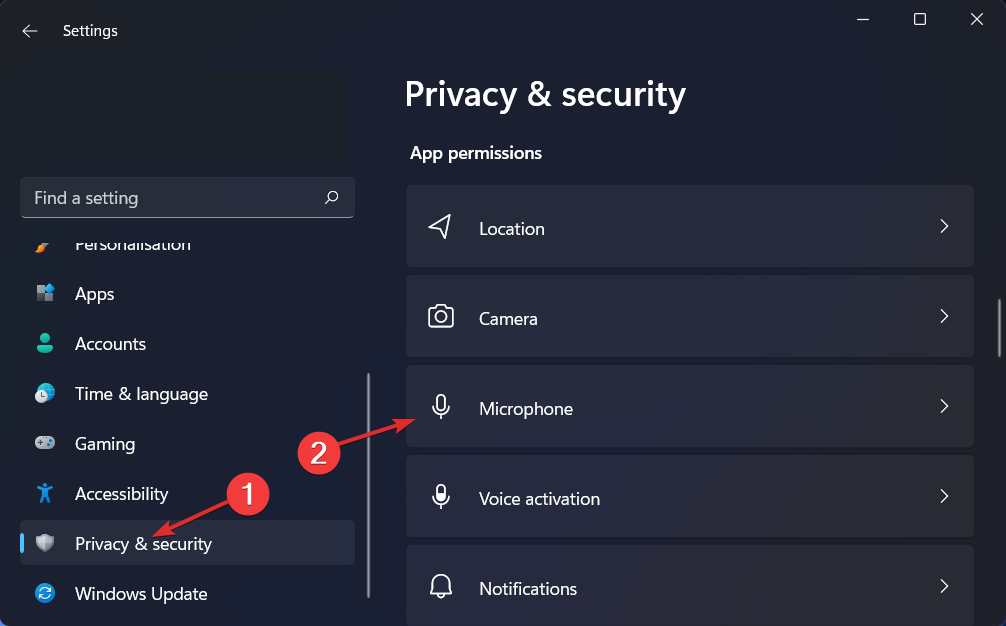
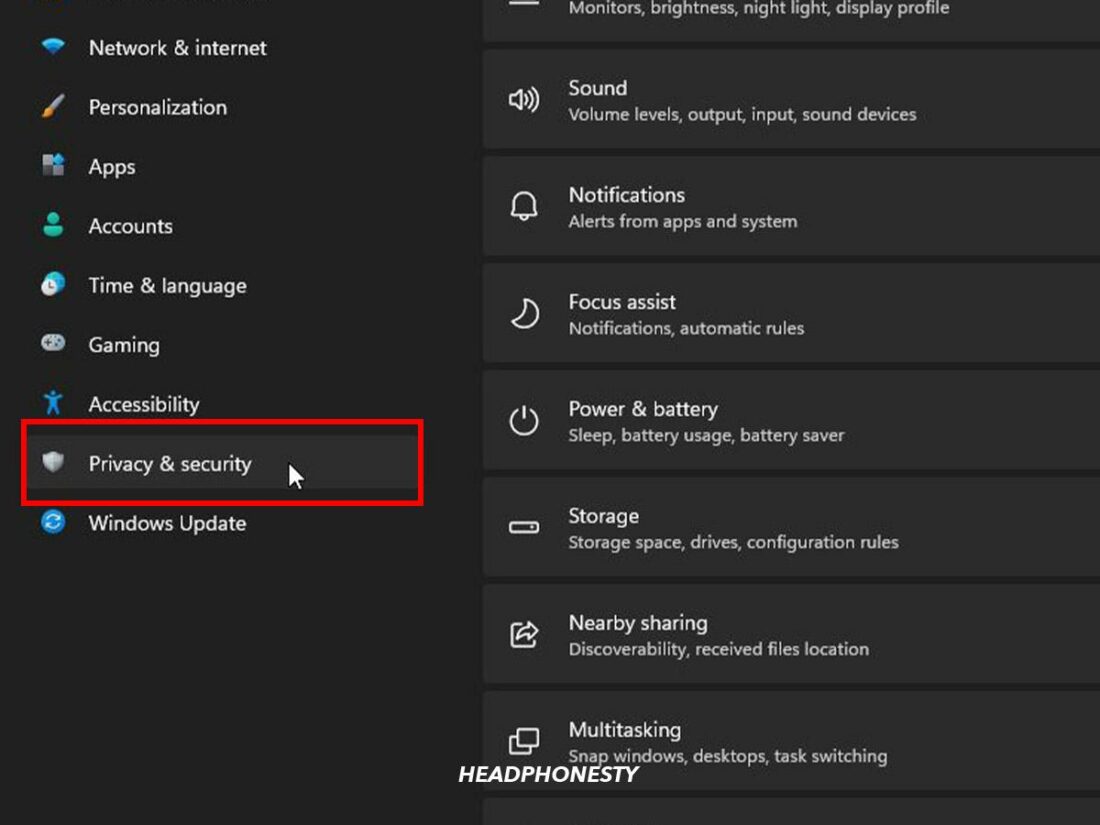
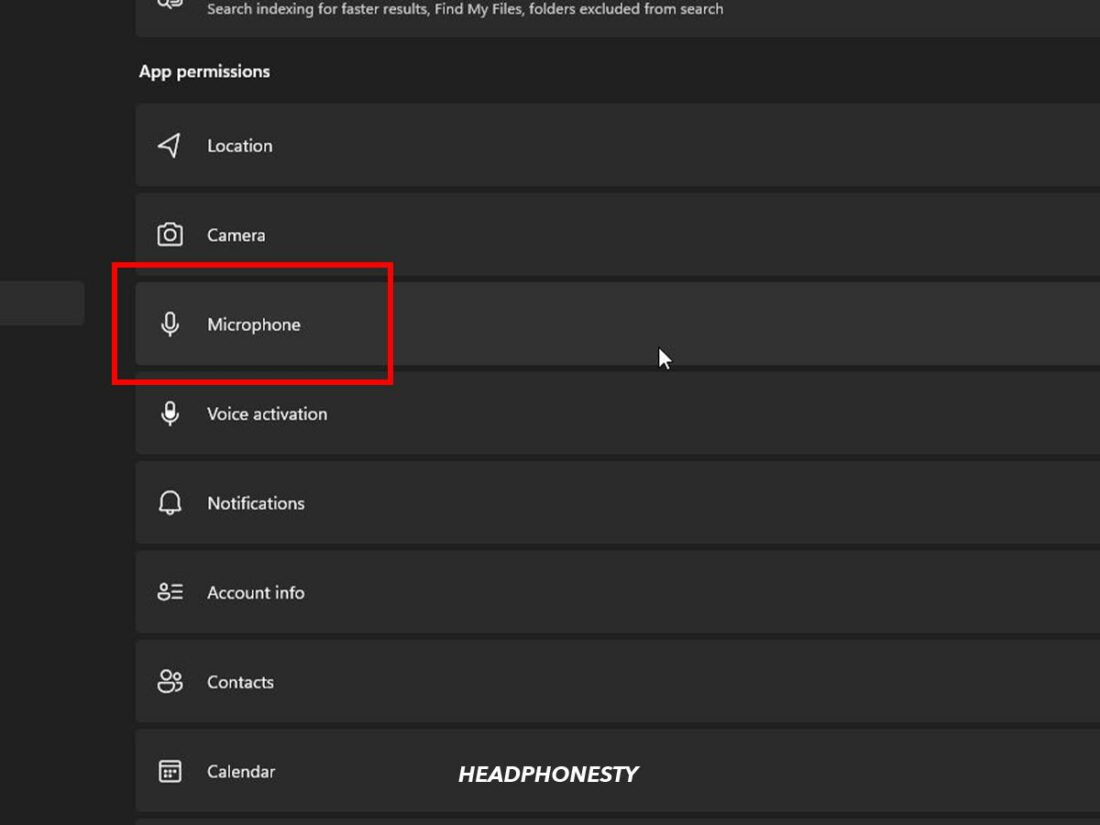
- Open Settings and navigate to Privacy & security followed by Microphone, as we have shown below.
- Next, make sure that the toggle next to the Let apps access your microphone option is turned on.
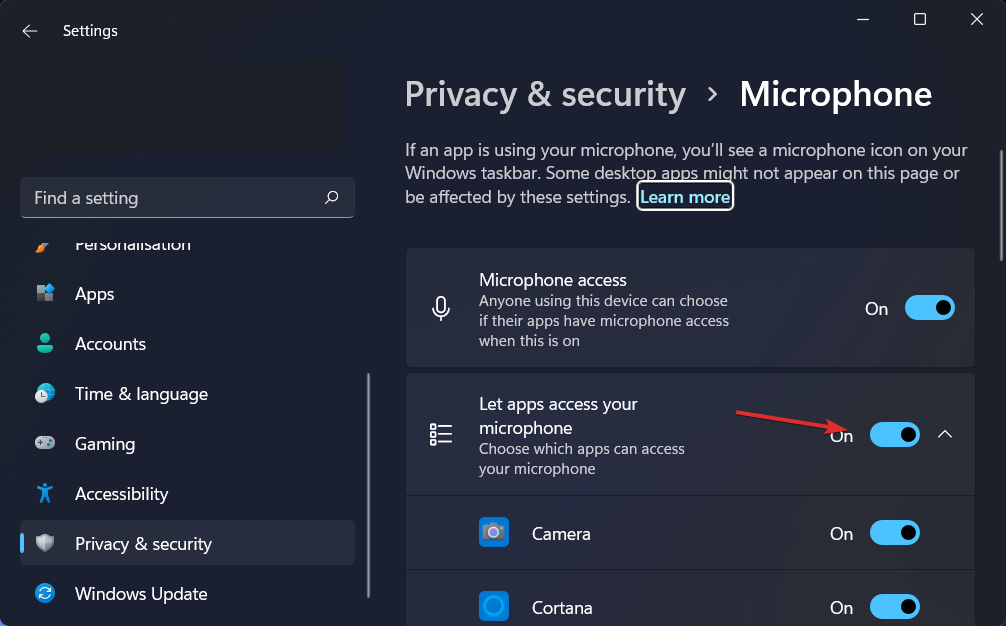
In the Let apps access your microphone section, you can uncheck the boxes next to the apps that you don’t want access to your microphone, or check the ones that you want to have it.
- How to enable microphone access in Windows 11
- Is Discord mic not working in browser/app? Fix it fast
- FIX: Microphone not working in Windows 11
4. Run the Recording Audio troubleshooter
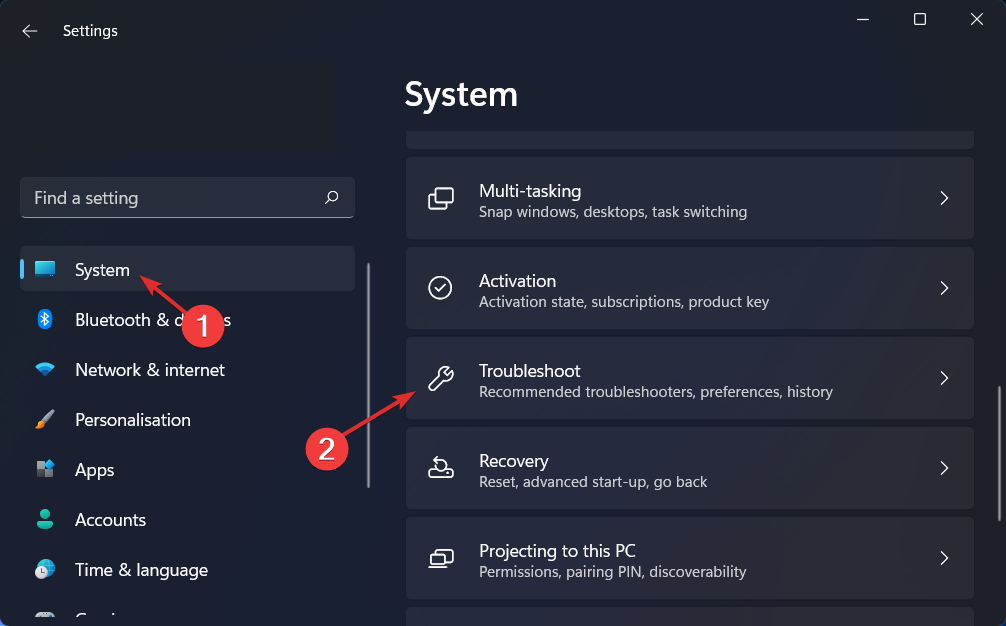
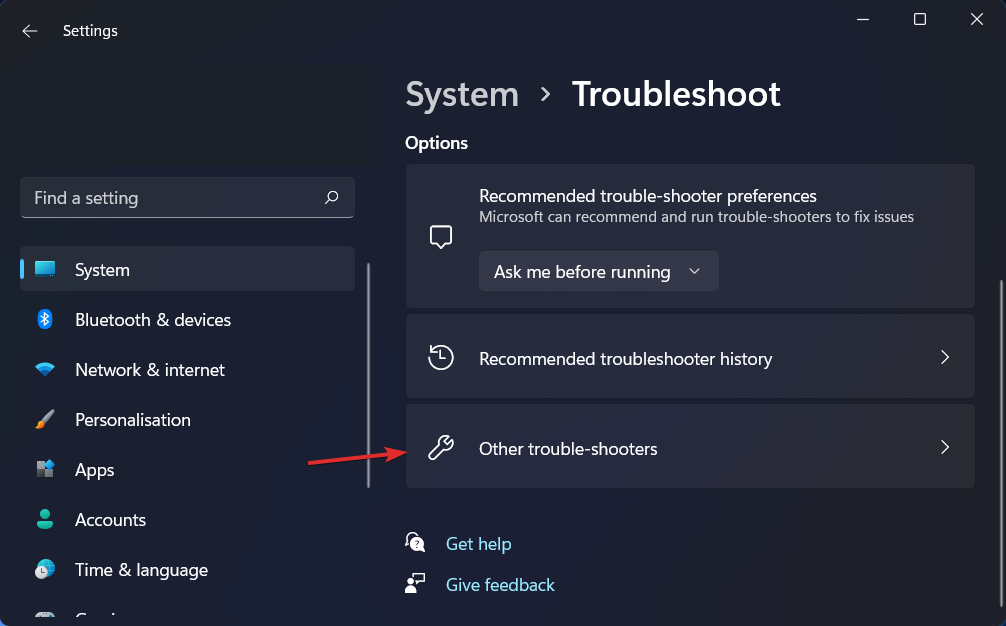
- Press the Windows key + I to open the Settings app. Next, navigate to System followed by Troubleshoot, as we have shown below.
- After you are inside the Troubleshoot menu, click on Other trouble-shooters.
- Next, scroll down until you meet the Recording Audio troubleshooter and click Run next to it.
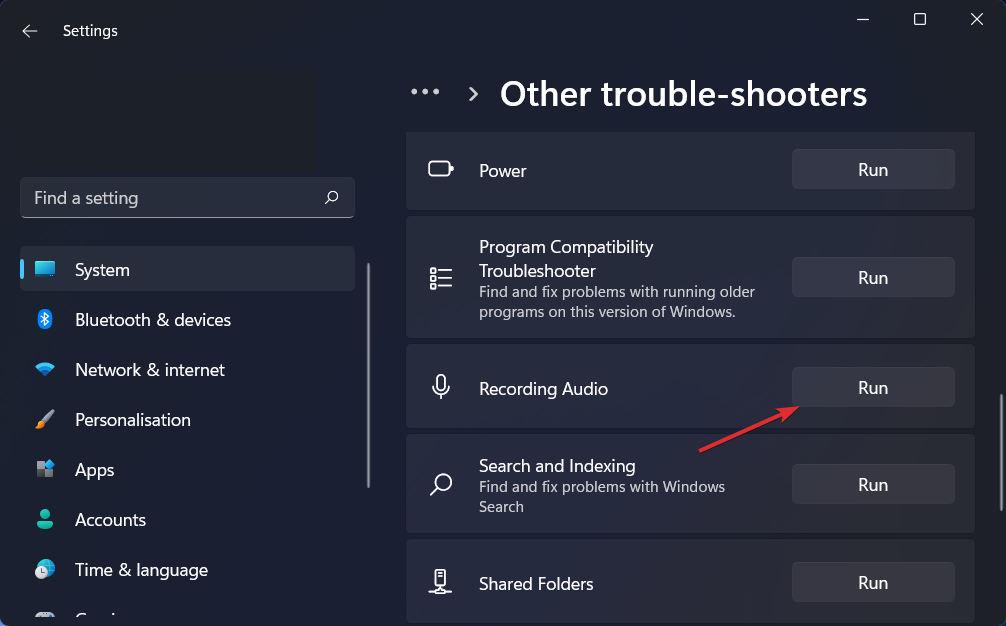
After it has completed searching for faults, the troubleshooter will reveal the precise bug that occurred as well as instructions on how to fix it. Keep in mind to carefully read and adhere to the instructions displayed on your computer screen.
![]()
Read through as we explore why your Bluetooth audio is acting up on Windows 11 and how to fix it.
So you’ve just upgraded to the new and shiny Windows 11, expecting it to bring a fresh experience for you. But for reasons only Microsoft knows, your Bluetooth headphones, earbuds, or mic just won’t show up on your PC after the update. Or, even when they do, you’re greeted with audio issues and random disconnections.
“But they were working fine in Windows 10!” you exclaim.
Frustratingly, despite its new features, Windows 11 needs a lot of work. This is particularly true for its Bluetooth audio issues, as noted by countless users after upgrading their systems. But fret not! We’ve compiled several solutions to help fix yours.
Here are our tried-and-true methods for resolving Bluetooth audio issues on Windows 11. Let’s dive right in!
In This Article
- Check for New Windows 11 Updates or Patches
- Set Your Bluetooth Device as the Default Output Device
- Turn Off Audio Enhancements
- Remove All Bluetooth Devices and Re-pair Your Default Device
- Update or Roll Back Bluetooth and Audio Drivers
- Let Windows 11 Reinstall All Sound Drivers
- Run Bluetooth and Playing Audio Troubleshooters
- Disable Handsfree Telephony and Remote Control
- Restart Bluetooth Support Service and Set It to Automatic
- Restart Windows Audio Services and Set Them to Automatic
- Enable the Device Association Service
- Check Microphone Privacy Settings
- If None of These Solutions Work, Here’s Why
- Conclusion
Check for New Windows 11 Updates or Patches
Since Microsoft is constantly releasing updates to fix minor and major bugs for Windows 11 – including those related to Bluetooth audio – checking for Windows updates and patches should be the first thing you try.
Microsoft might have fixed the issue in the latest build if your current Bluetooth headphones or earbuds aren’t working. Here’s how you can check for new updates on Windows 11:
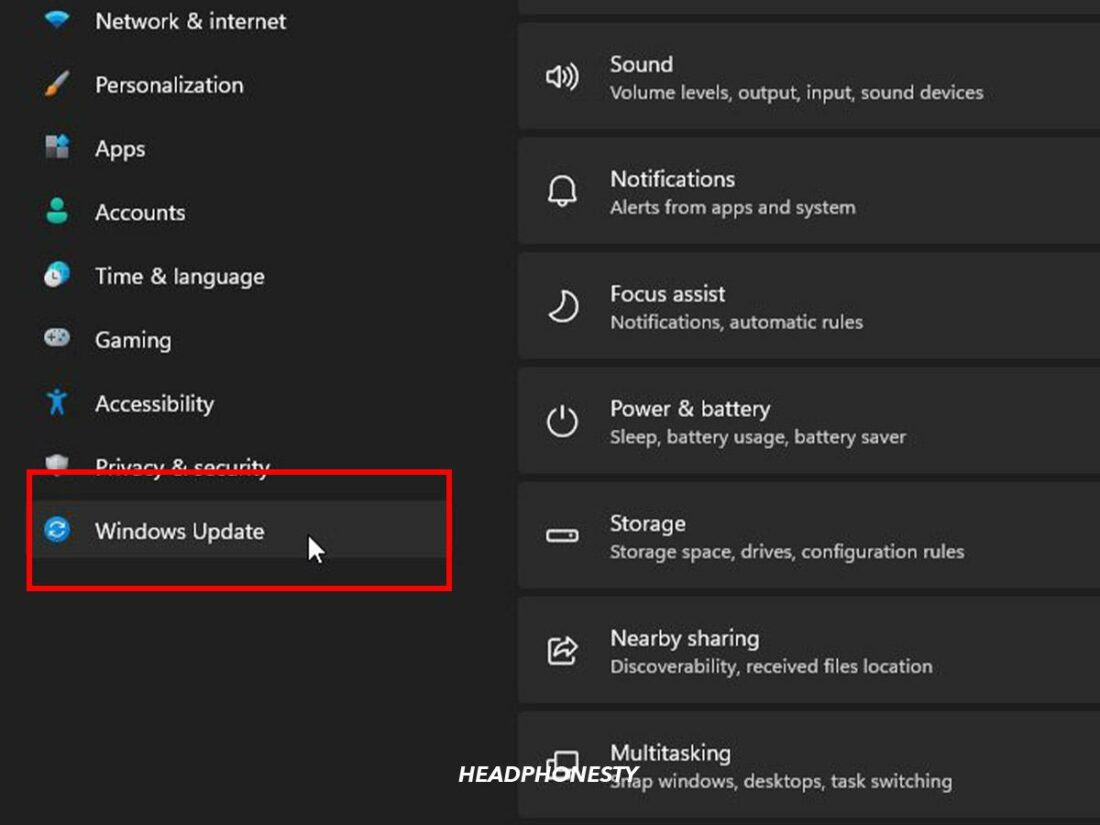
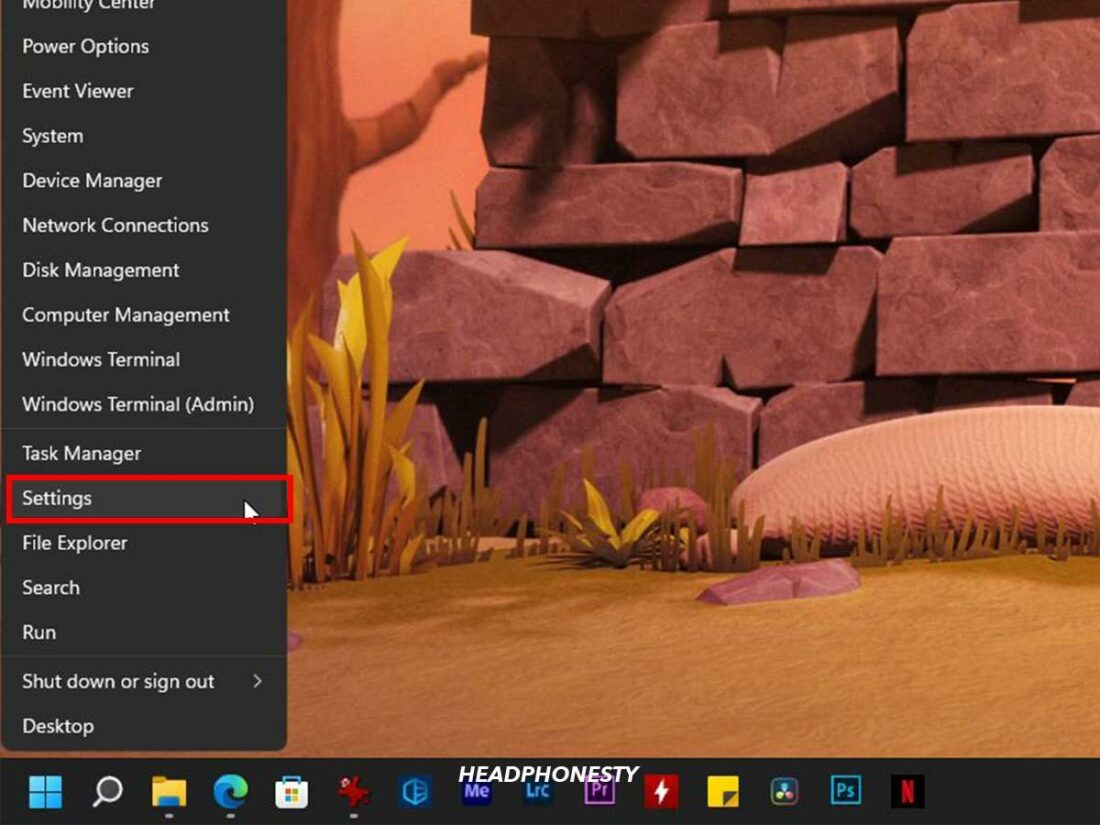
- Go to Start and select Settings.

“Settings” highlighted in the Start menu. - Select Windows Update.
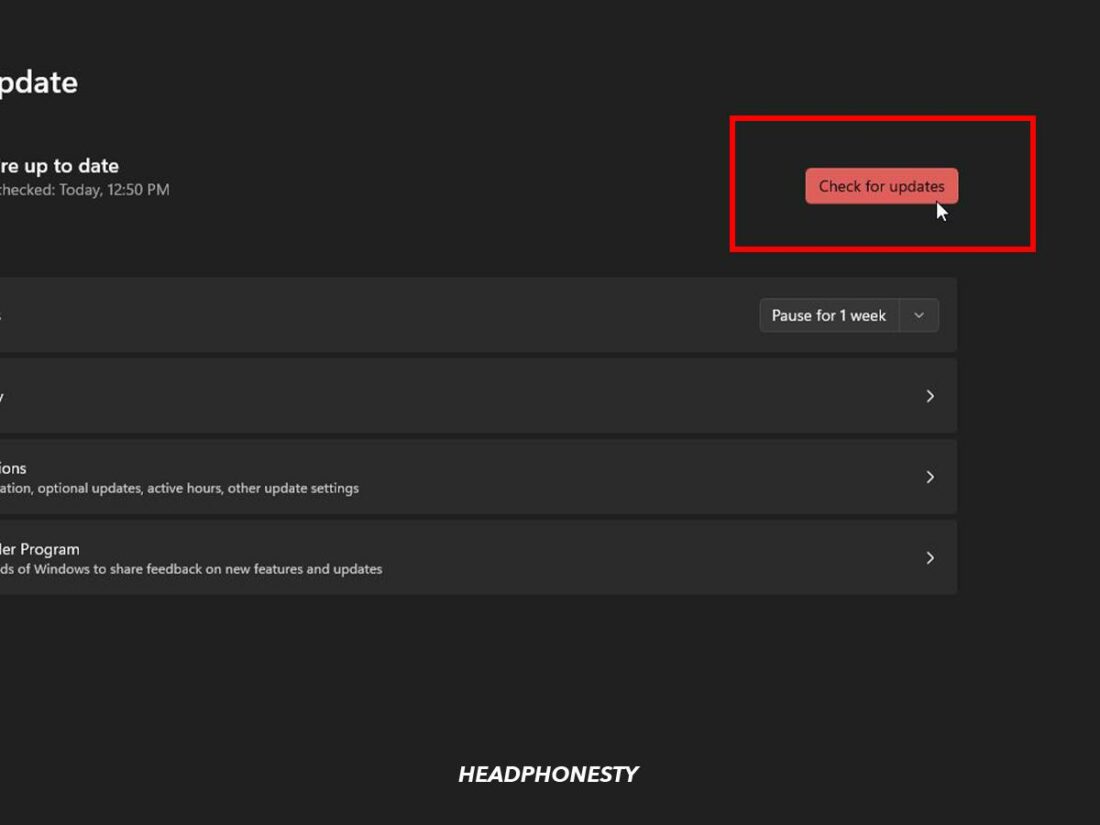
“Windows Update” highlighted in the Start menu. - Click Check for updates at the top right corner.
Check for updates. - After finding the latest update, click Download & install.

You should also check Windows 11’s optional updates by clicking Advanced Options > Optional Update. This shows other updates you can download, including driver updates.
Set Your Bluetooth Device as the Default Output Device
You might not have set up the default output device properly when you have multiple audio output devices on your Windows PC. If the default audio output is not your Bluetooth speaker or headphones – they won’t output any sound.
Luckily, this is a fairly simple fix you should perform before trying other methods. Here’s how to do it:
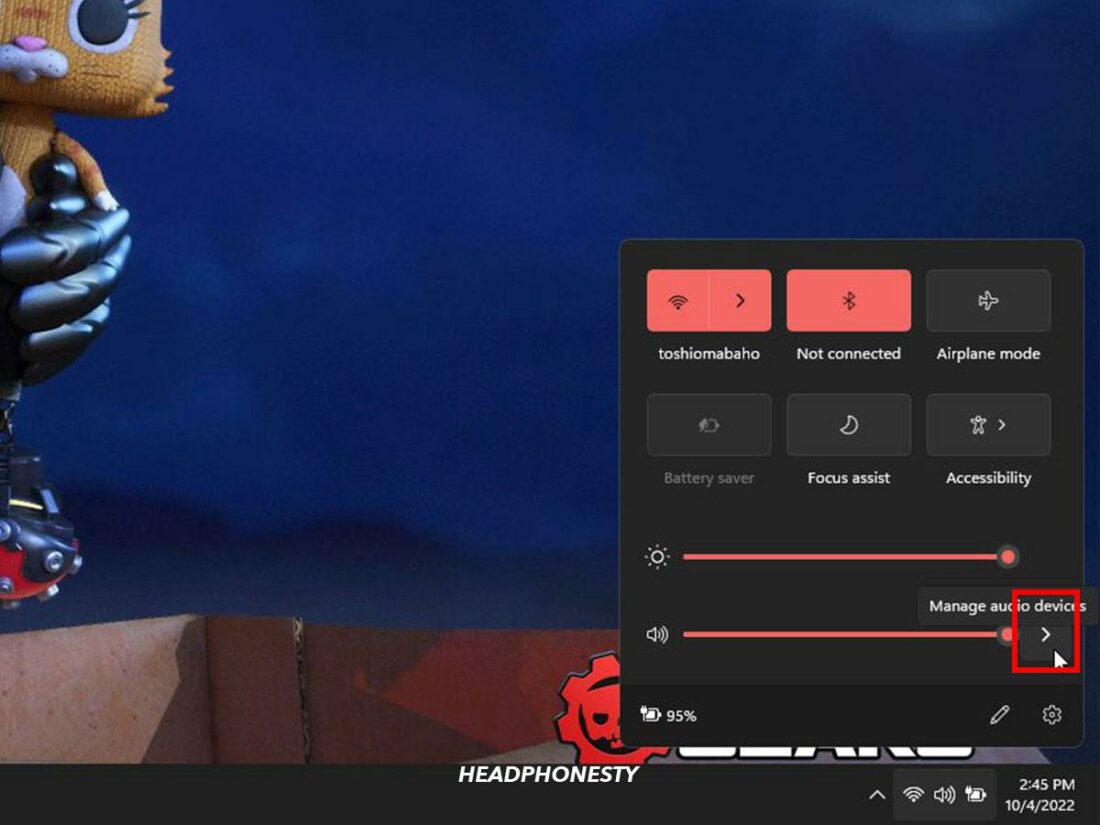
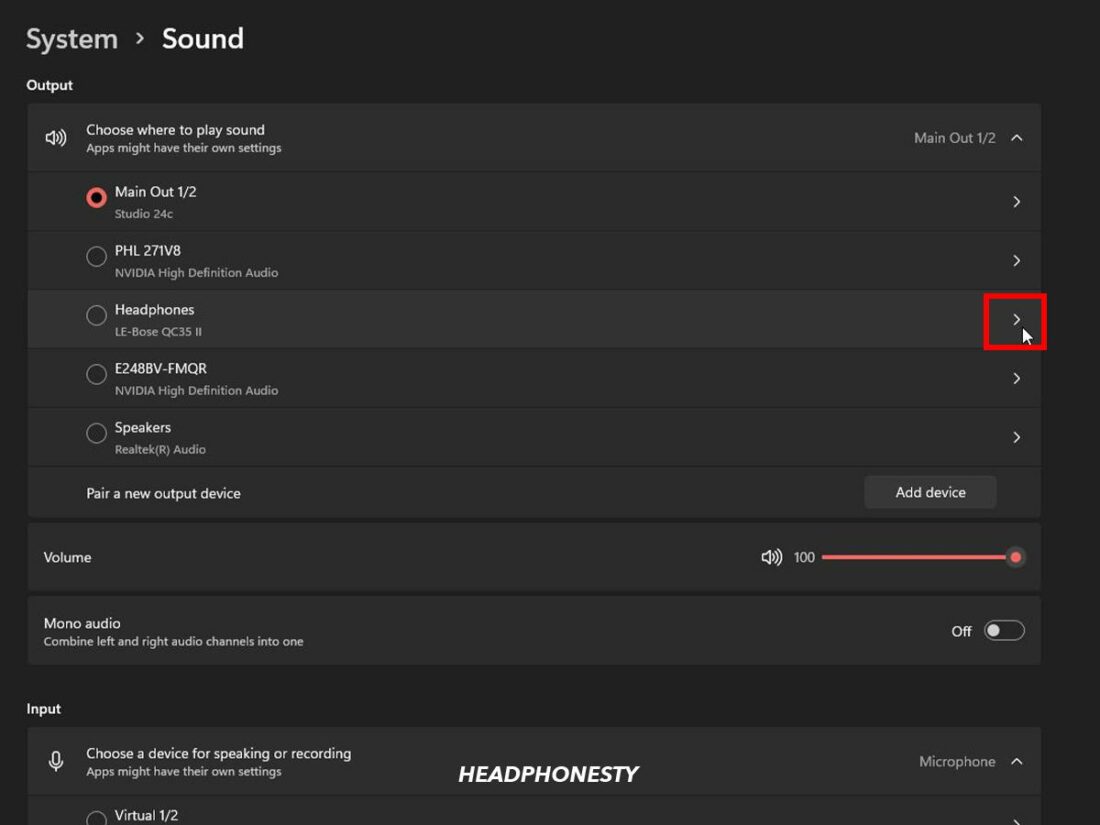
- Click on the speaker icon on the bottom right corner of your taskbar.
Speaker icon highlighted in Windows taskbar. - On the mini control panel, click on the arrow next to the volume slider.
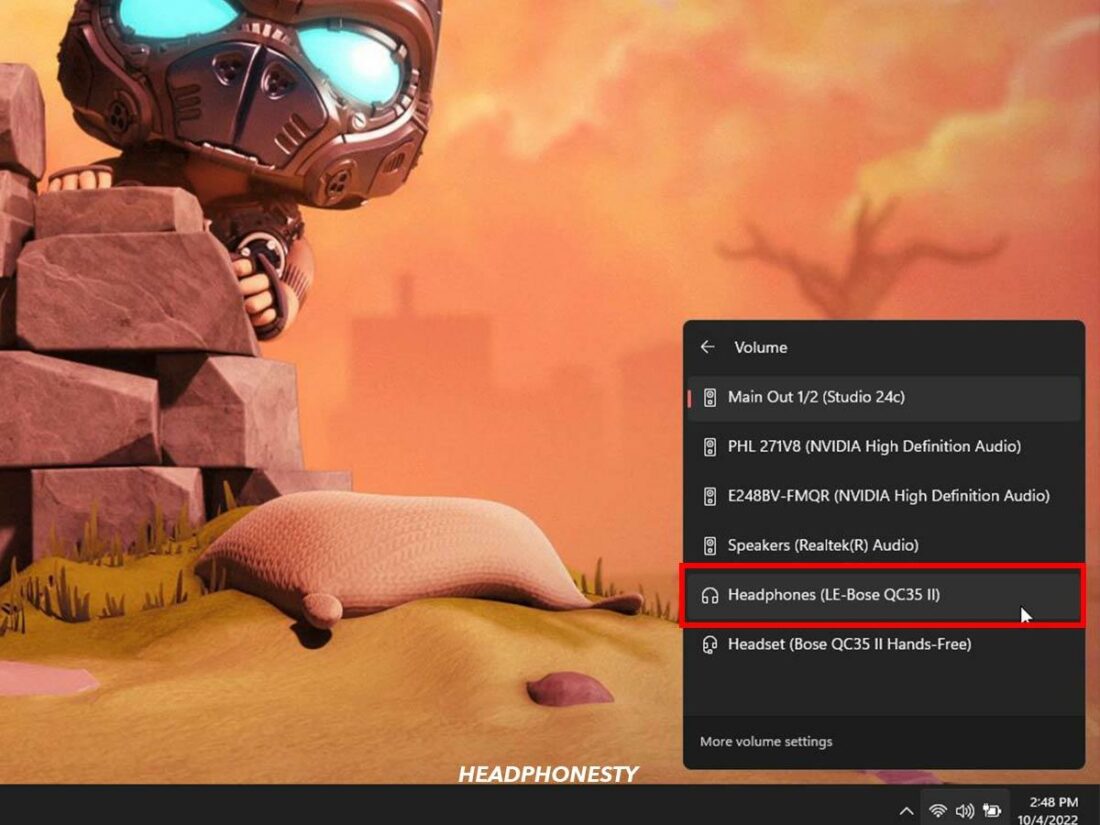
Arrow beside the slider. - Select your Bluetooth audio device from the devices list.
Select your Bluetooth audio device.

Using third-party apps like Soundswitch allows you to switch between Bluetooth and audio outputs with a keyboard shortcut. It’s a must-try if you have multiple audio devices connected to your PC.
Turn Off Audio Enhancements
Audio enhancements are sound-altering packages shipped by Microsoft and third-party vendors (such as your PC manufacturer) to improve your device’s built-in audio hardware. However, these enhancements can cause issues with external audio hardware – including Bluetooth headphones and microphones.
If the fixes above haven’t solved your issue, you should try turning off your device’s audio enhancements. Here’s how to do so:
- Go to Start > Settings.
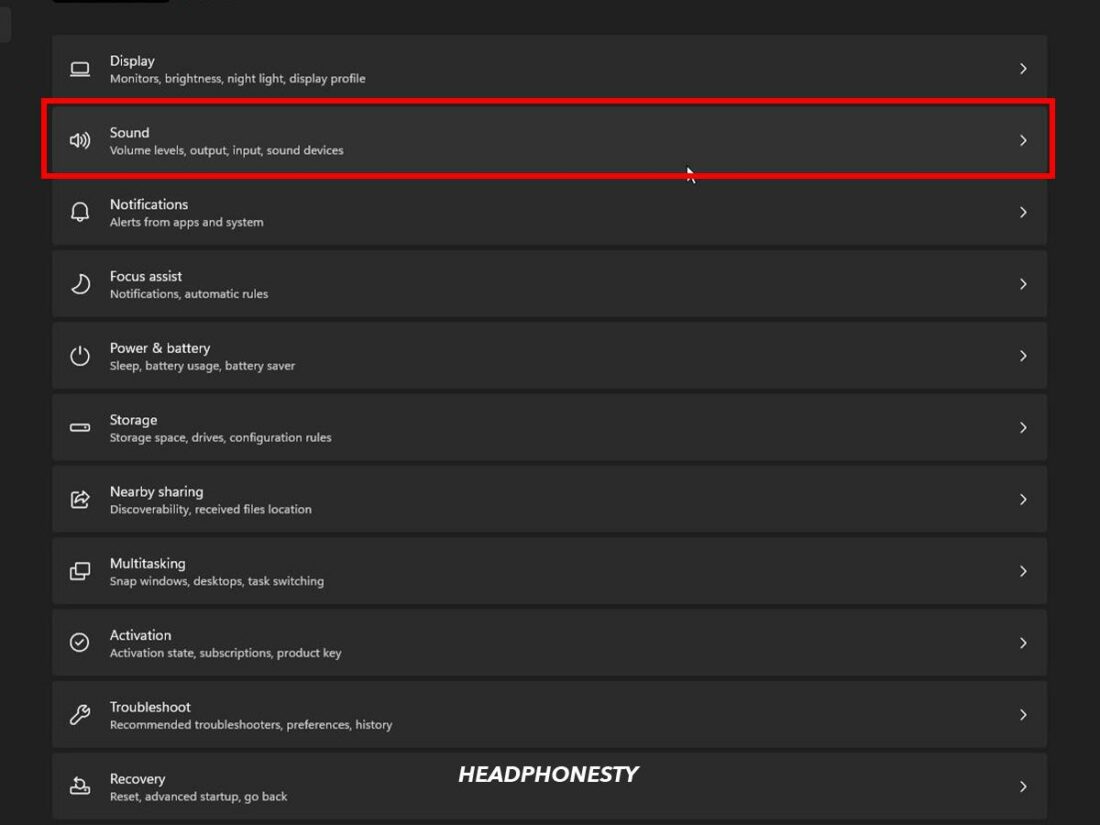
“Settings” highlighted in the Start menu. - Select the System tab, then click Sound.
“Sound” highlighted under System tab. - Click the arrow icon next to your Bluetooth audio device’s name.
Arrow icon highlighted. - Turn off the Enhance audio toggle.
Enhance audio toggle.
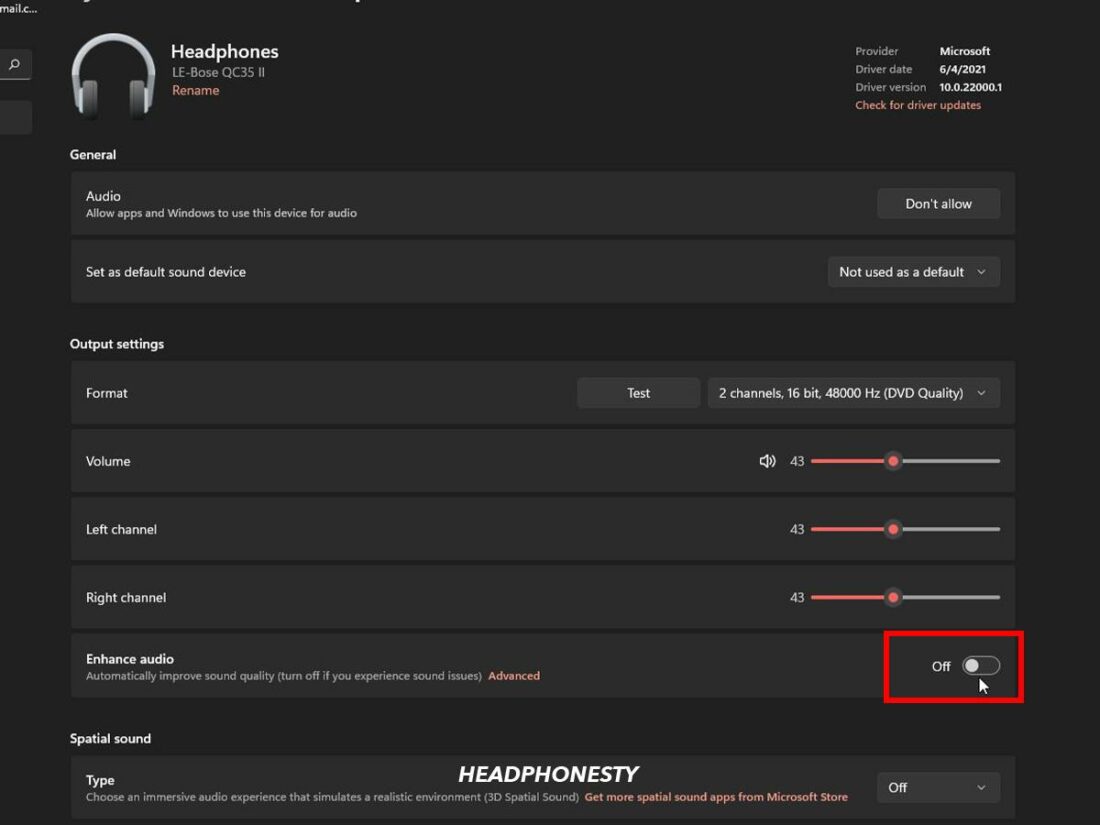
If your Bluetooth audio device has a mic, you should also disable its audio enhancement under the input tab.
Remove All Bluetooth Devices and Re-pair Your Default Device
Bluetooth is a wireless connection that requires bandwidth to transfer signals. Each Bluetooth device connected to your PC uses up the bandwidth – the more devices you use, the less bandwidth each one gets.
Low bandwidth on a Bluetooth device can cause connection or sound quality issues. If you think this is the case, you can try removing all connected Bluetooth devices and re-pair your Bluetooth audio device. Here’s how to do so:
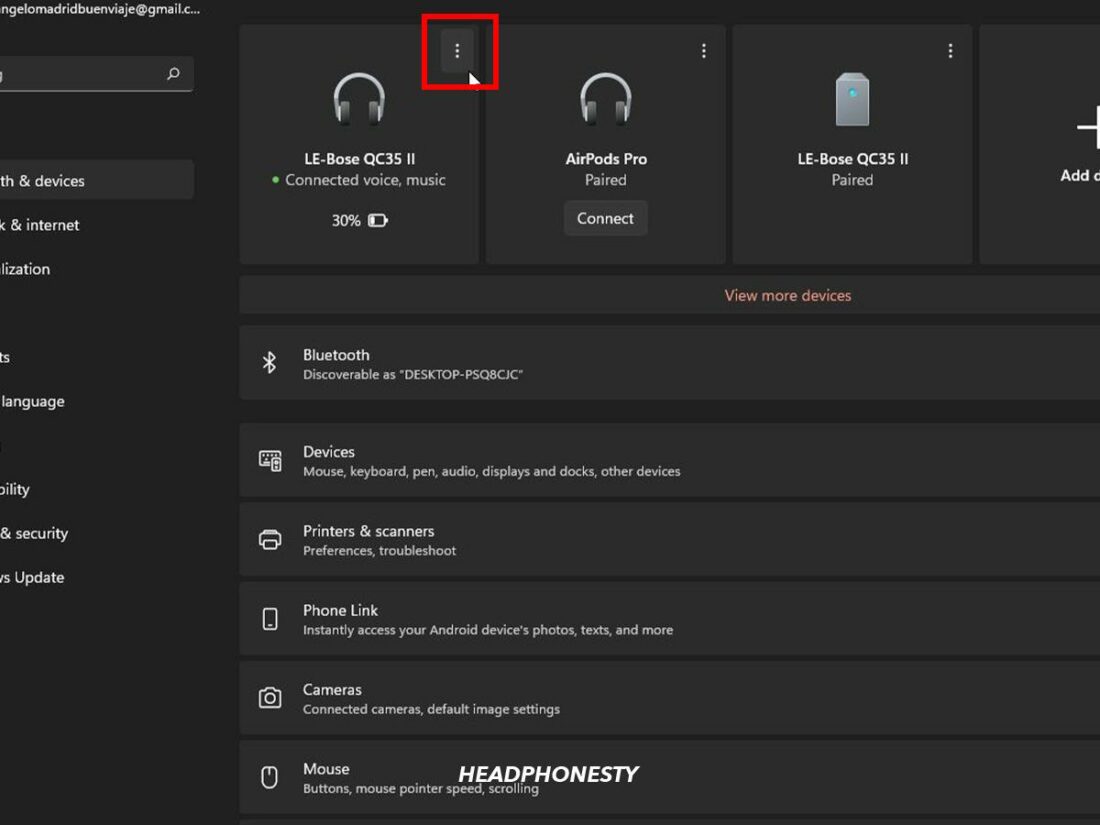
- Go to Start > Settings > Bluetooth & Devices.
“Bluetooth & Devices” highlighted in Settings. - Click the three dots at the corner of your device’s name.
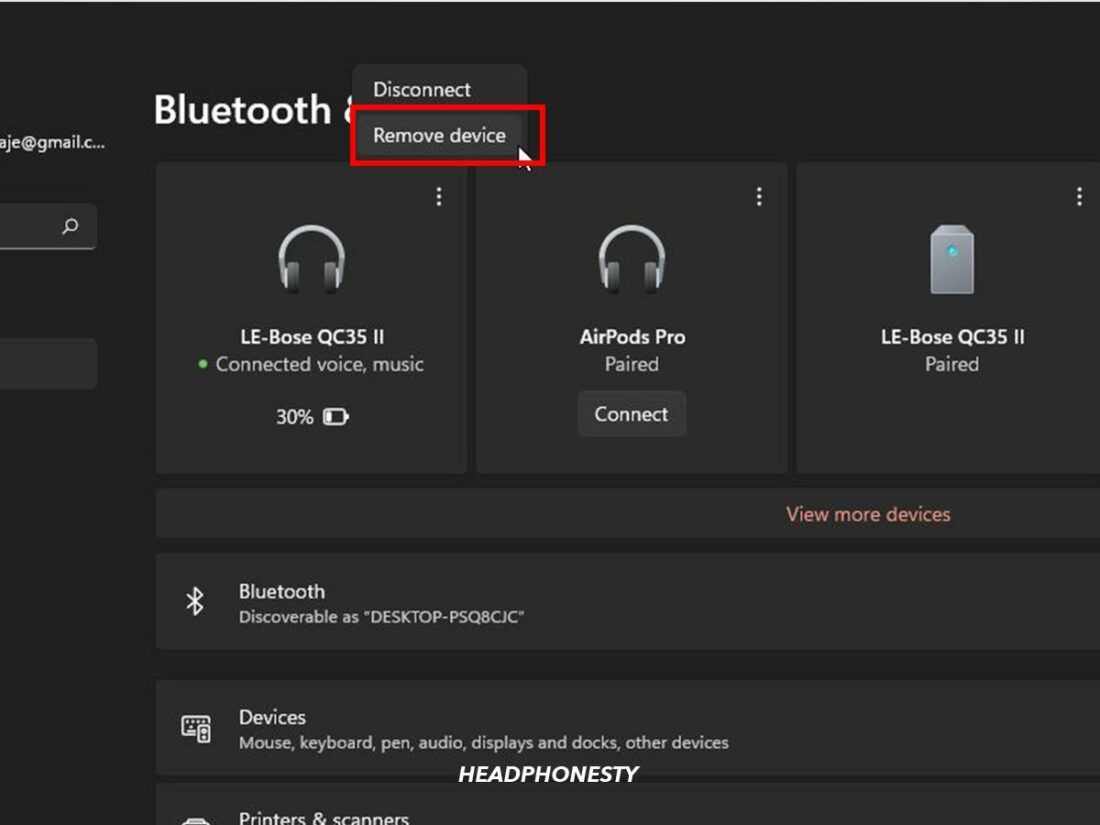
Three dots highlighted. - Select Remove device. Use the same steps to remove all other connected Bluetooth devices.
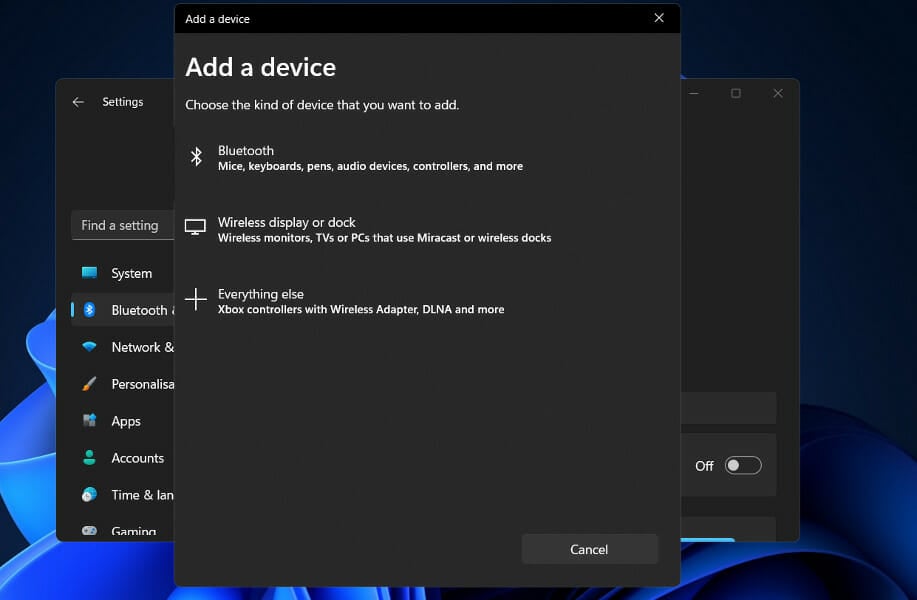
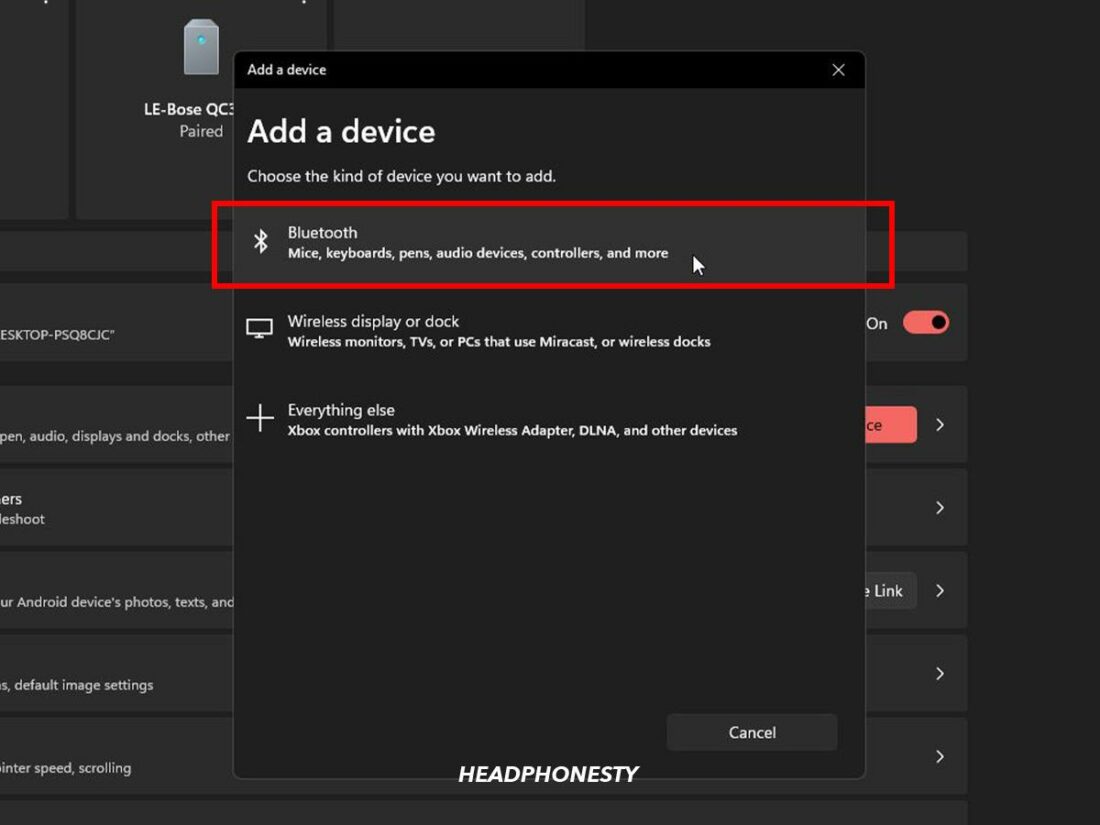
Remove device. - Once done, connect your Bluetooth device by clicking Add a device > Bluetooth.
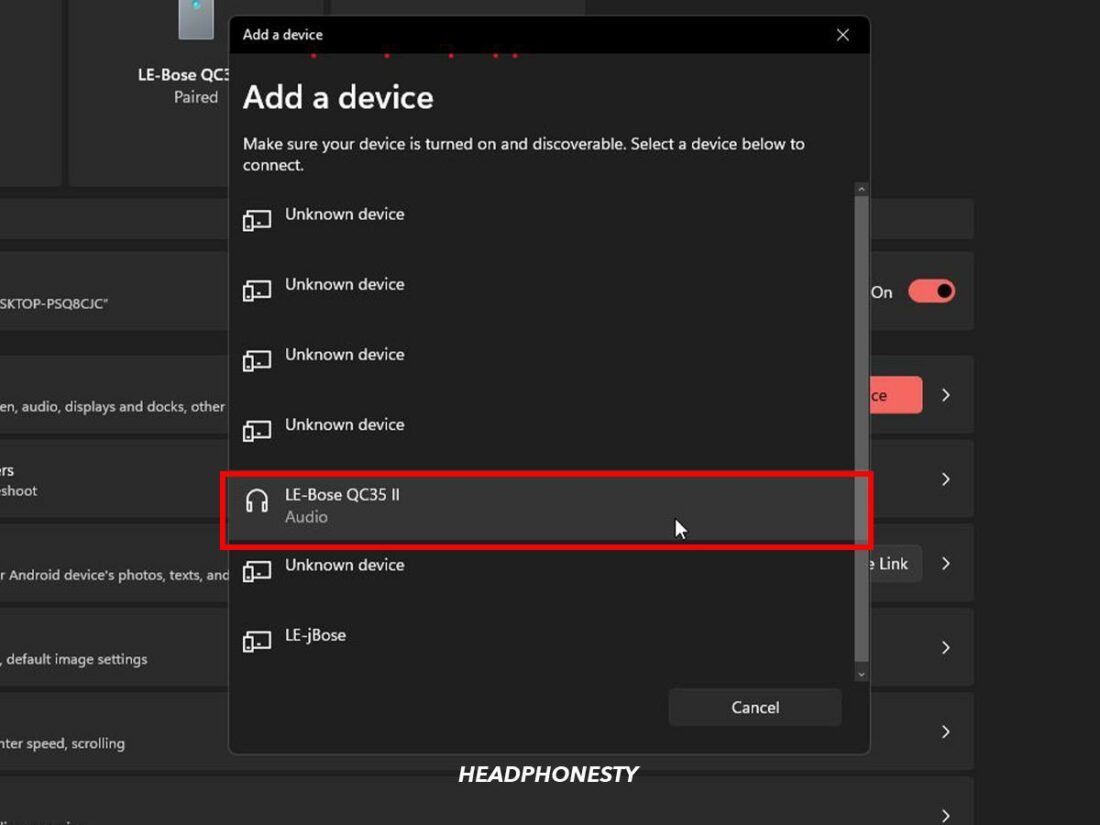
“Bluetooth” under Add a device. - Select your Bluetooth audio device from the list. Ensure that it’s in pairing mode.
Select your Bluetooth audio device. - Check if you still have the connection issue.

The turn-on pairing mode method varies between devices and brands. Typically, you can activate pairing mode for Bluetooth headphones, earbuds, and speakers by holding the power button for a few seconds. If that doesn’t work, consult the manual.
Update or Roll Back Bluetooth and Audio Drivers
Bluetooth and audio drivers are responsible for bridging the communication between Windows and your Bluetooth audio device. If the drivers are faulty, they can prevent your device from working.
You can approach this in two ways: updating the driver or rolling back the driver’s update. Here are the explanations for each approach:
Update your Bluetooth driver
If you haven’t changed anything and your Bluetooth audio issue seems to occur out of the blue, you should try updating your drivers. Here’s how to do so:
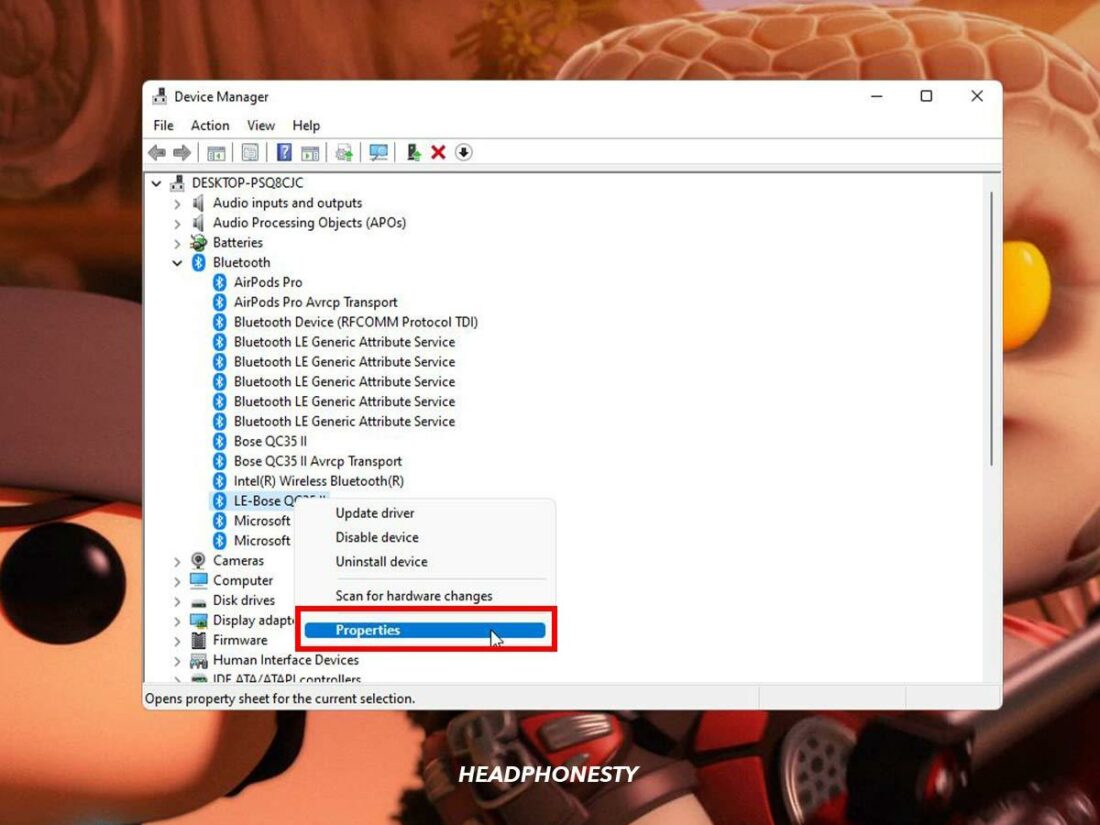
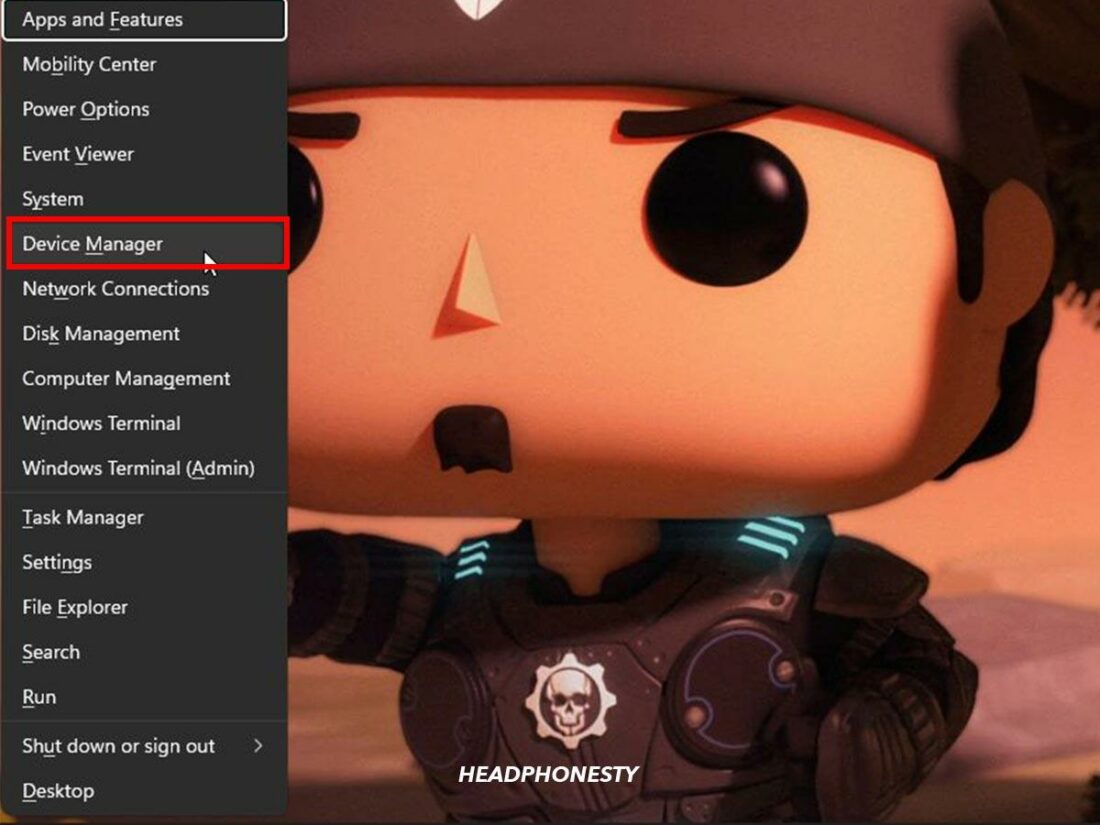
- Press the Windows key + X, and select Device Manager.
“Device manager” highlighted. - Right-click your device’s name under Bluetooth, then select Properties.
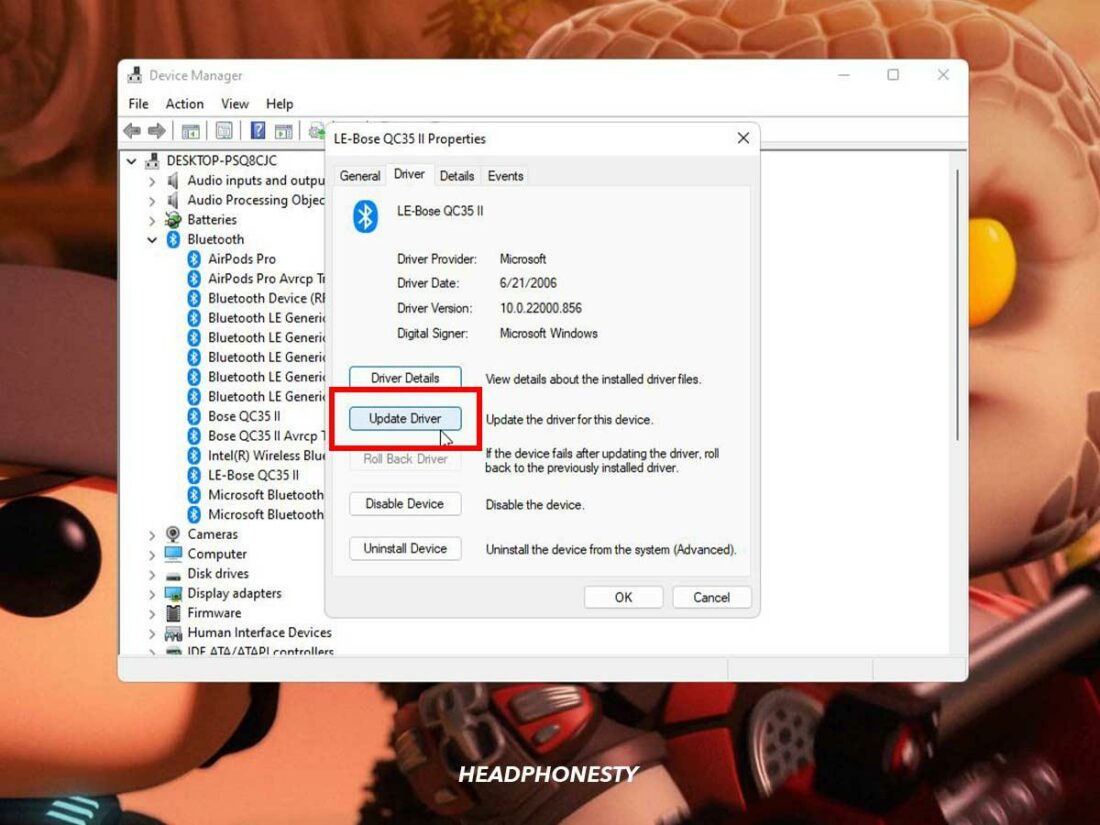
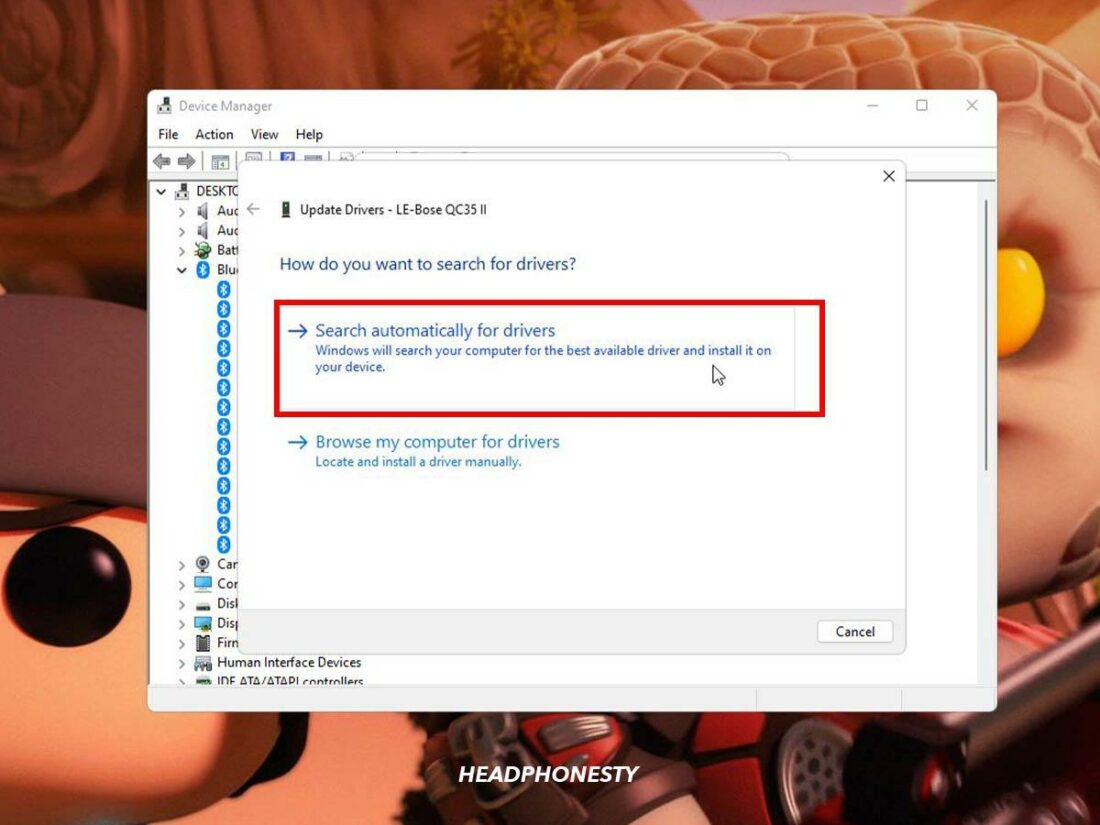
“Properties” highlighted. - Go to the Driver tab, and select Update driver.
“Update driver” highlighted. - Select Search automatically for drivers to begin the update process.
Search automatically for drivers.

Remember, you should also check whether your Bluetooth audio device has dedicated drivers for Windows 11. You can search “[brand name] driver for Windows 11” on search engines to find them.
Roll back your Bluetooth driver update
If your Bluetooth audio problem started after a Windows update, it could be because you also updated your Bluetooth driver.
You can try fixing it by rolling back to the previous version. Here’s how to do it:
- Press the Windows key + X, and select Device Manager.
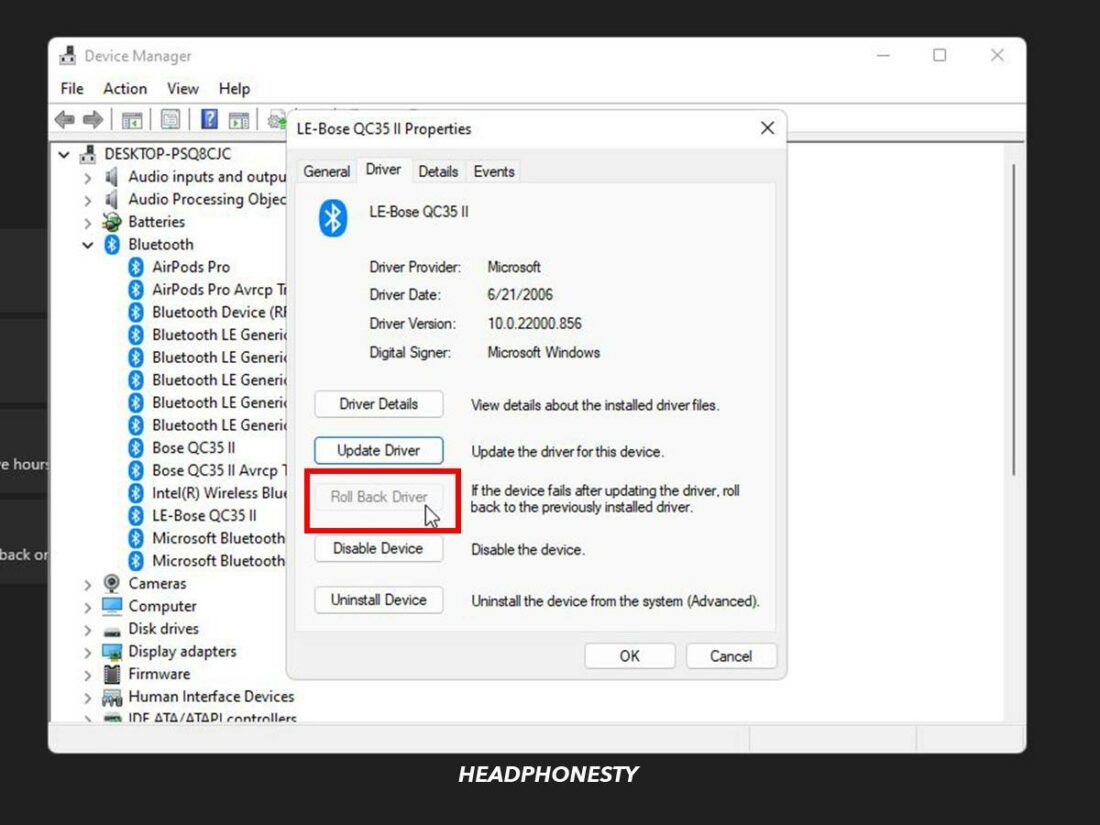
“Device manager” highlighted. - Right-click on your Bluetooth audio device driver, then select Properties.
“Properties” highlighted. - Go to the Driver tab, and click Roll Back Driver.
“Rollback driver” highlighted. - Select why you’re rolling back the driver update, then click Yes.
- Check if you still have the Bluetooth audio issue.

Let Windows 11 Reinstall All Sound Drivers
Corrupted Bluetooth or sound drivers are also possible culprits of your issues. However, it can be difficult to pinpoint which drivers are faulty – so your best bet is just to reinstall all of them.
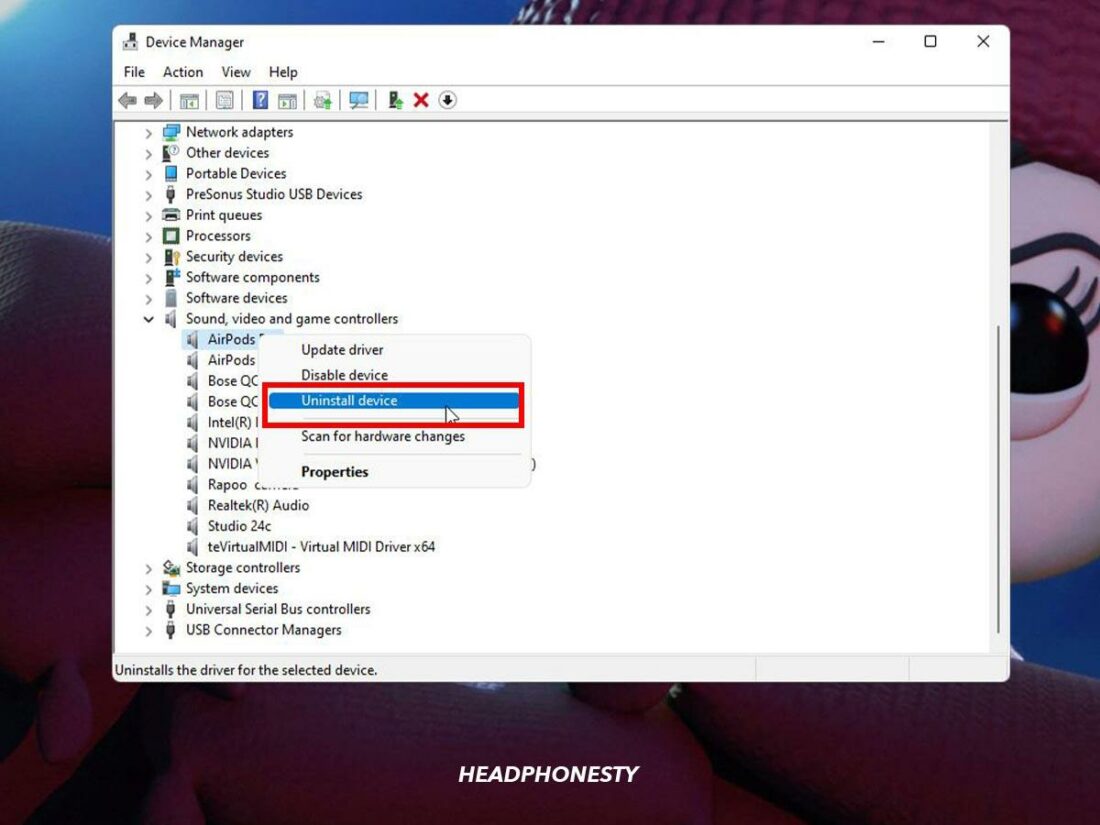
Here’s how you can reinstall sound drivers via Windows Device Manager:
- Press the Windows key + X, and select Device Manager.
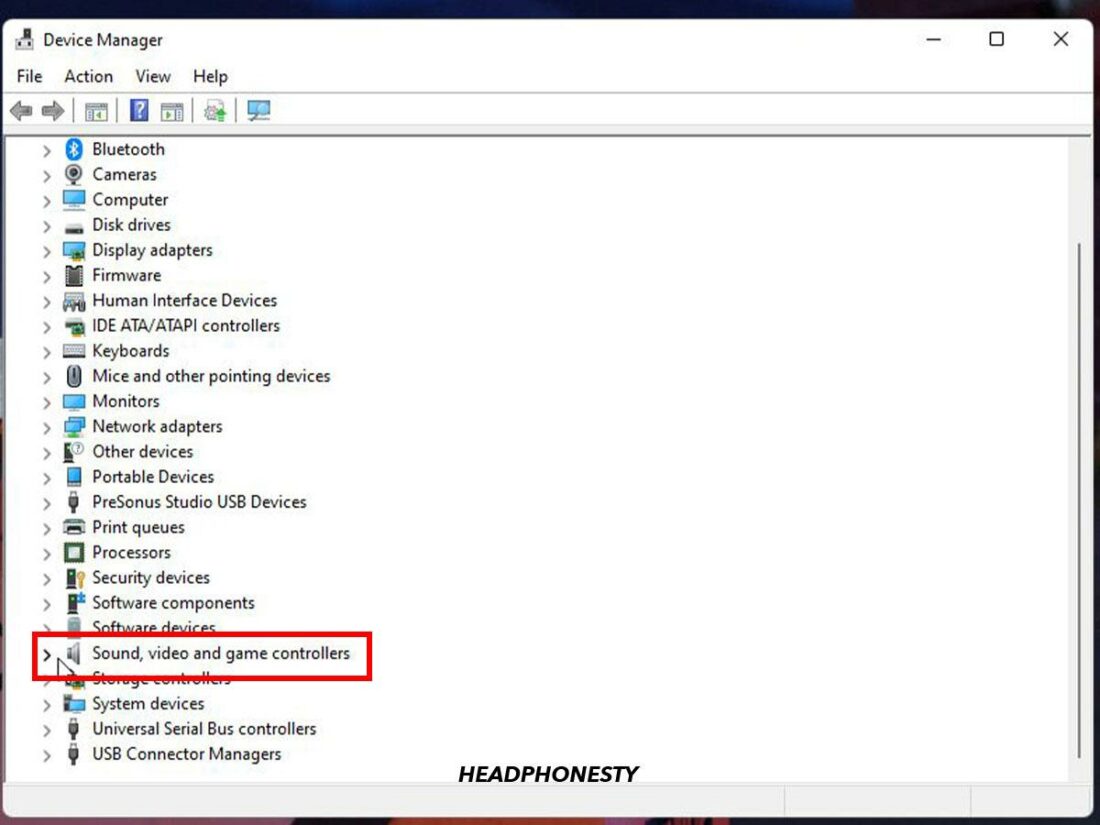
“Device Manager” highlighted. - Expand the Sound, video, and game controllers dropdown.
“Sound, video, and game controllers” highlighted. - Right-click on each of the items listed under it, then select uninstall. Once done, restart your PC.
Uninstall device. - Upon restart, Windows will attempt to reinstall the drivers. You can check it by going to Device Manager and looking for the devices you uninstalled. If they are there, it means Windows successfully reinstalled the drivers.

If your Bluetooth audio device does not show in the Device Manager, ensure it’s paired to your PC. Then, go to Device Manager and click Scan for hardware changes. This will prompt Windows to scan for newly added hardware and automatically install the required drivers.
Run Bluetooth and Playing Audio Troubleshooters
If fumbling in Windows 11’s Settings app hasn’t done you any good, it might be a good idea to try the built-in troubleshooter.
The Bluetooth and Playing Audio troubleshooters will attempt to detect the cause of your issues – then, they’ll recommend some fixes to resolve those issues. Here’s how you can run these troubleshooters:
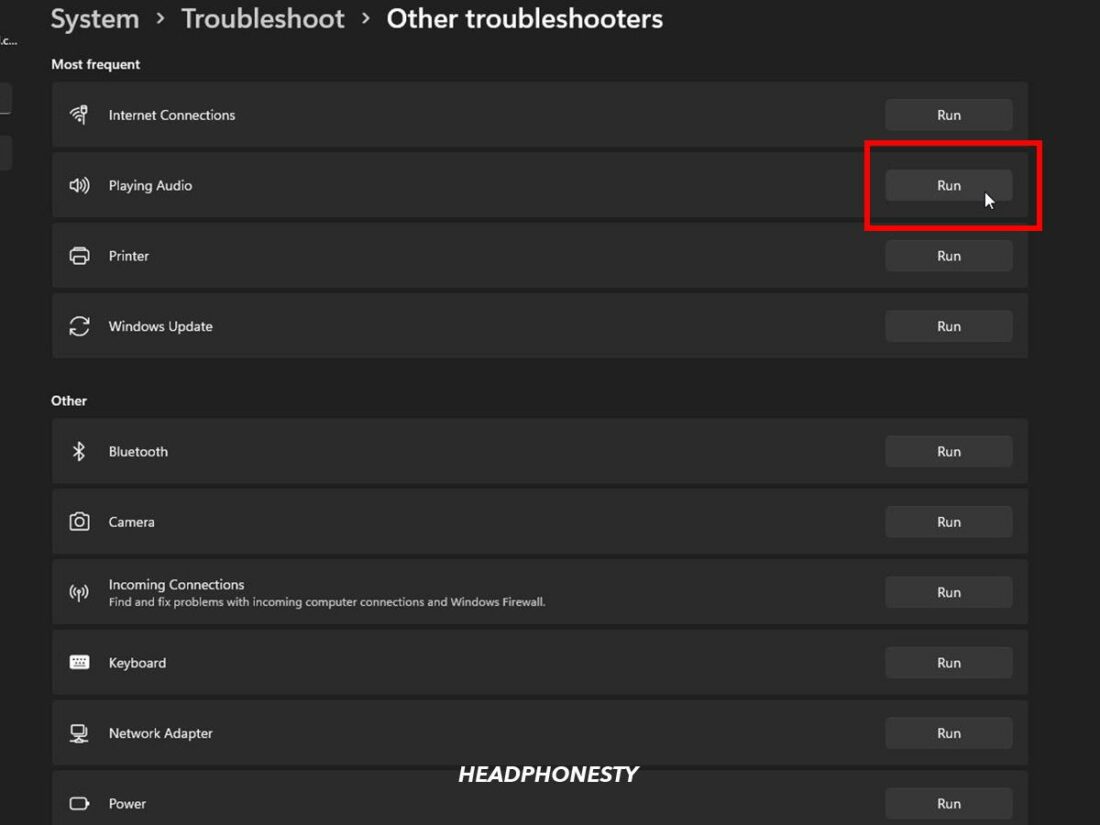
- Go to Start > Settings > System.
“System” highlighted under Settings. - Select Troubleshoot, then click Other troubleshooters.
“Other troubleshooter” highlighted. - Click Run next to Playing Audio.
Run Playing audio troubleshooter. - Select the device you want to troubleshoot. This option will pop up only if you have multiple audio output devices.
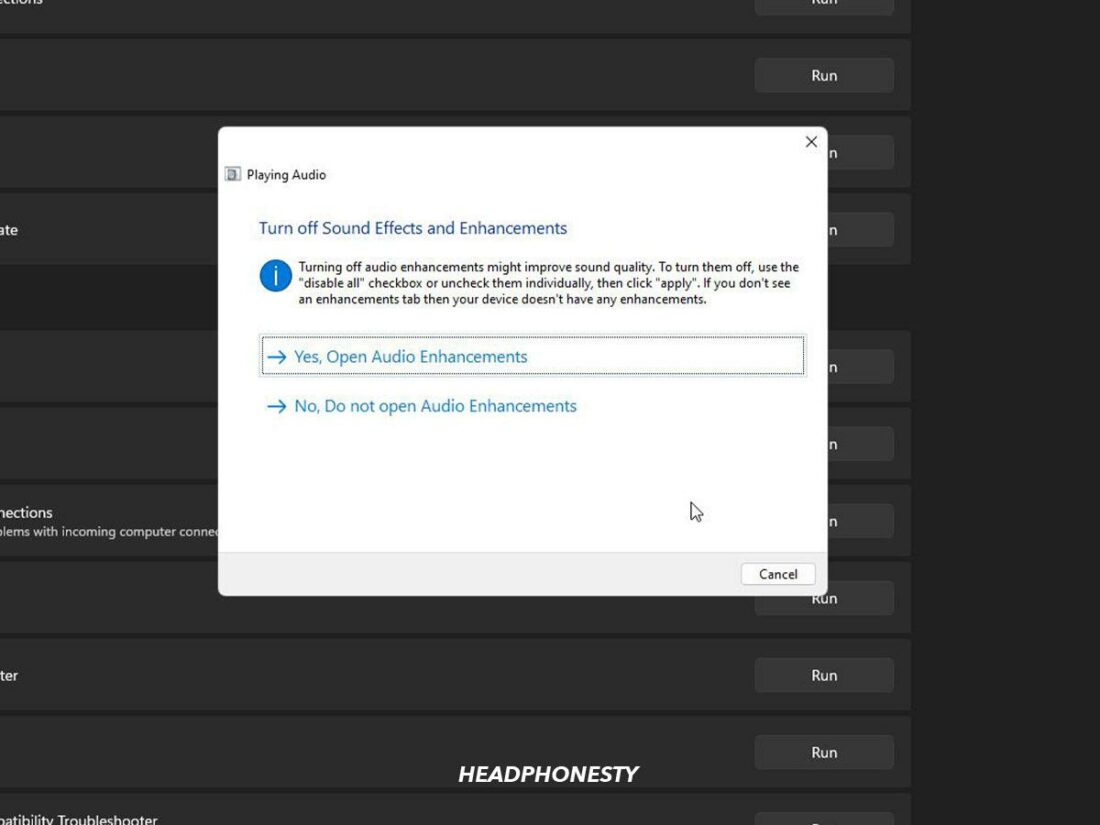
Select the device you want to troubleshoot. - Wait for Windows to find the recommended fix, then follow the on-screen instructions.
Playing audio troubleshooter dialog box. - Repeat steps 3-5 on the Bluetooth troubleshooter.
Run Bluetooth troubleshooter.


If Bluetooth and audio troubleshooters couldn’t find the problem, try this next method.
Disable Handsfree Telephony and Remote Control
The Handsfree Telephony feature often stops some apps from transmitting audio to the Bluetooth device. It’s because the apps interpret the Bluetooth connection as a phone call.
The Handsfree Telephony is a feature that helps Windows with the phone call functionality of Bluetooth devices, especially headphones and earbuds. This feature splits the sound profile for phone calls and regular audio playback – with the former having lower bandwidth and worse sound quality.
If you suspect that this is the cause of your Bluetooth audio issue, here’s how to disable Handsfree Telephony:
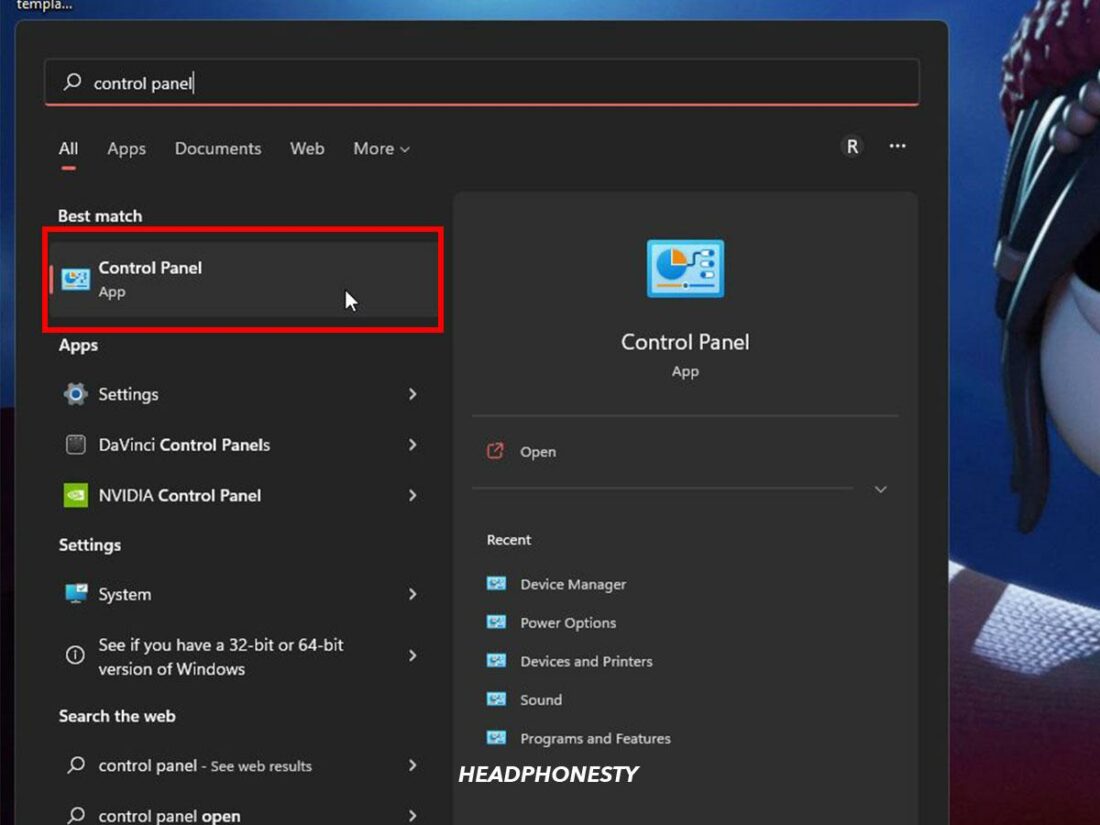
- Go to Start, then search for Control Panel.
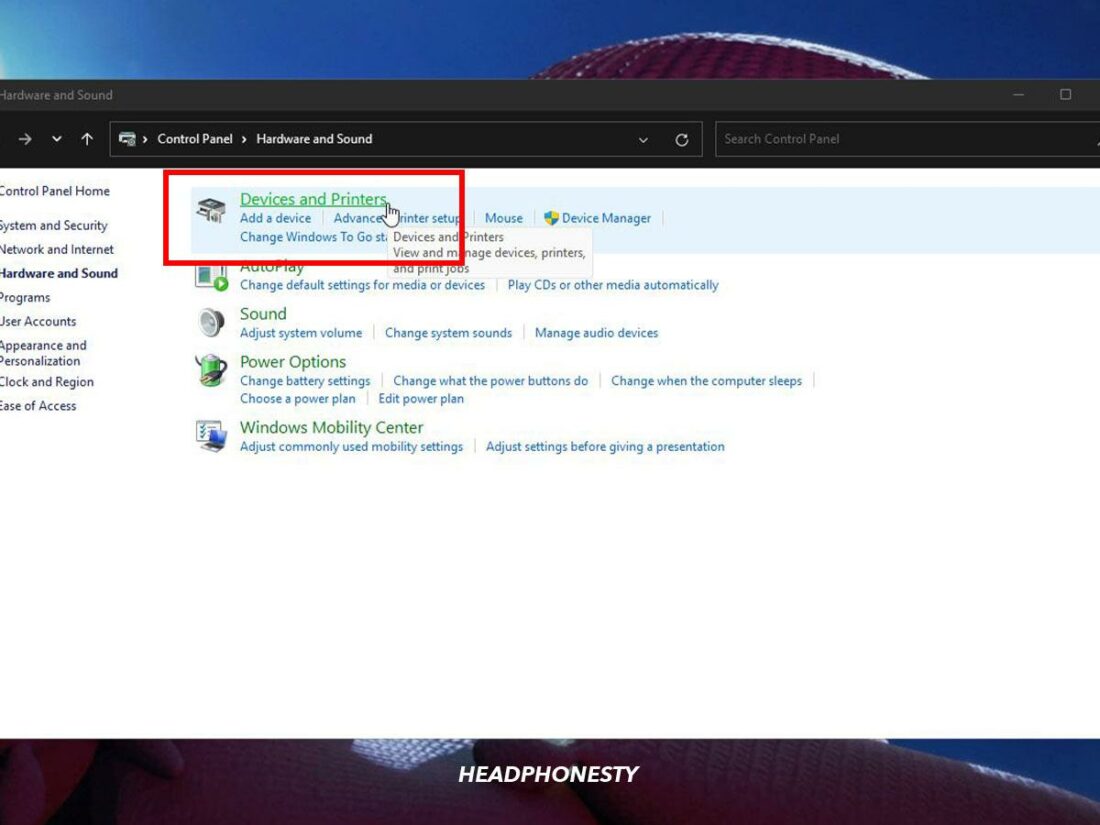
“Control Panel’ highlighted. - Select Hardware and Sound > Devices and Printers.
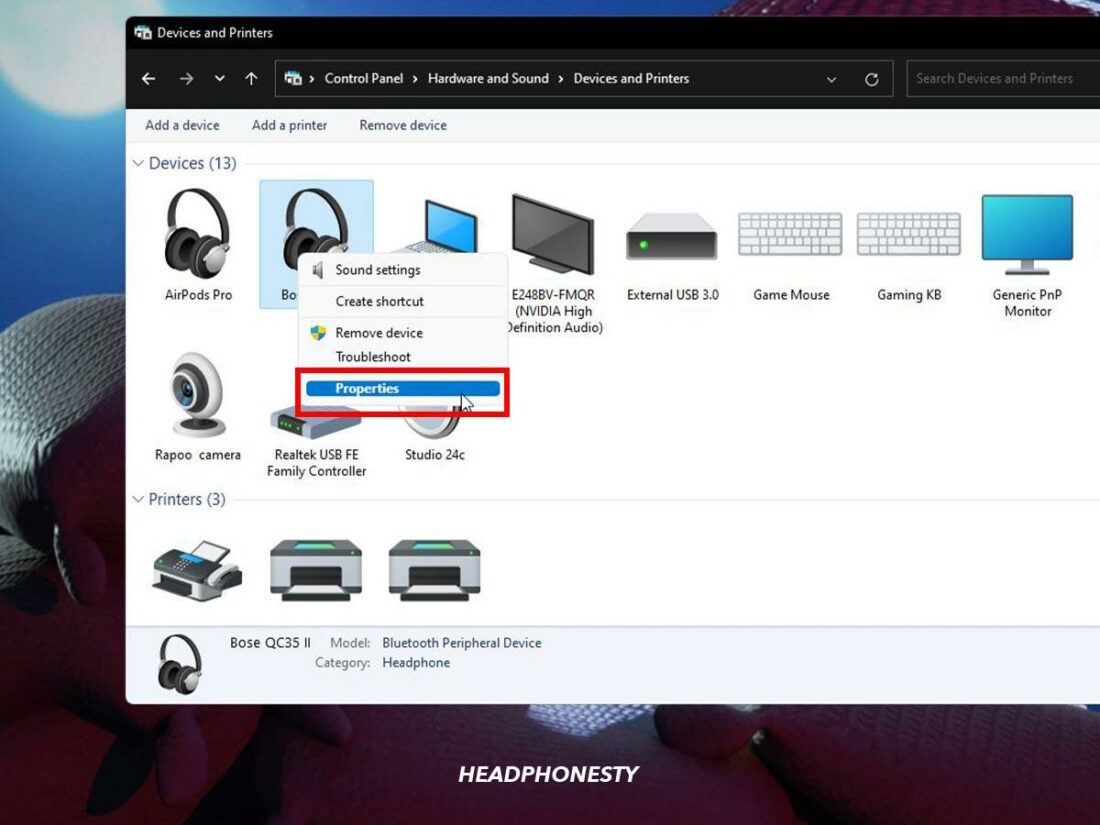
“Devices and Printers” highlighted. - Right-click on your Bluetooth audio device name, then select Properties.
“Properties” highlighted. - Go to the Services tab, and uncheck Handsfree Telephony and Remote Control.
Uncheck Handsfree Telephony and Remote Control.
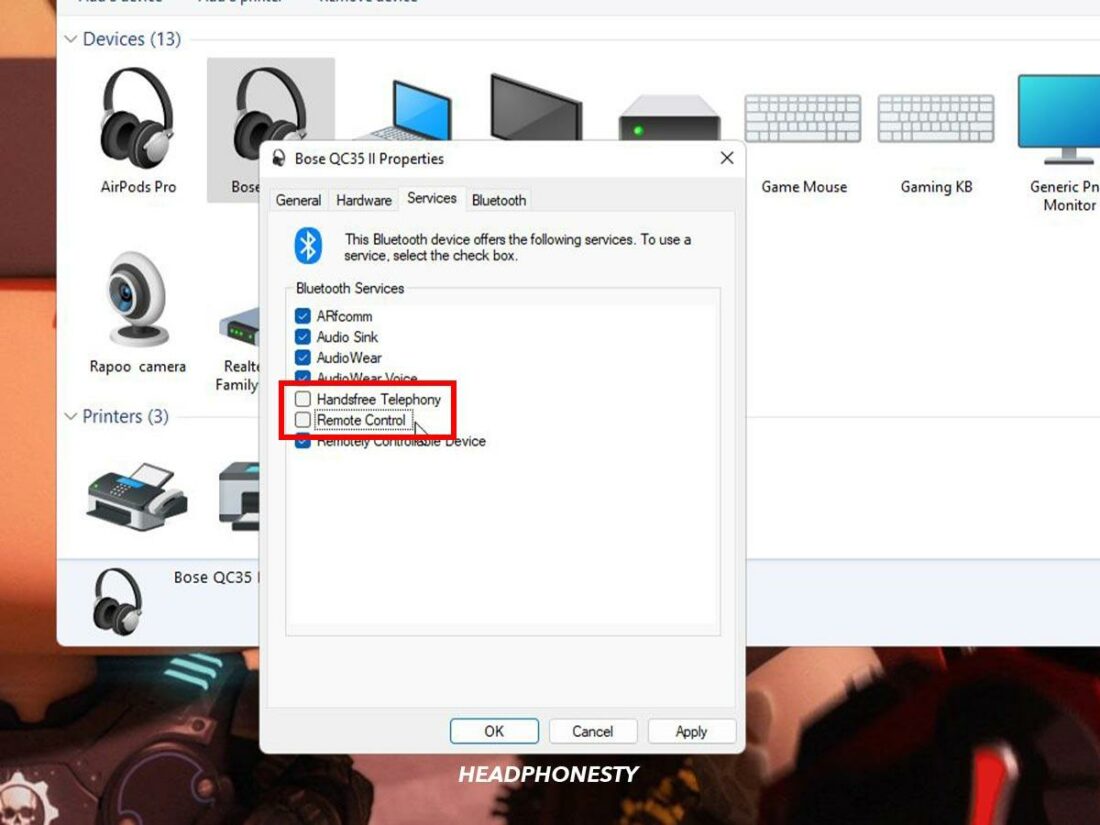
Unchecking the Handsfree telephony means you can’t use your device’s mic for phone calls with your PC. While disabling Remote Control deactivates your Bluetooth device’s control like play/pause, previous/next, etc.
Restart Bluetooth Support Service and Set It to Automatic
Another common issue that causes Bluetooth audio to not work on Windows 11 is faulty Bluetooth service. Some users have complained that their Bluetooth menu was missing or couldn’t connect to their devices.
Fortunately, this issue is relatively easy to solve. You can simply restart the Bluetooth Support Service. As an additional measure, you can set it to start automatically to prevent the issue from happening again.
Here’s how to do so:
- Press the Windows key + R, then type services.msc and click enter.
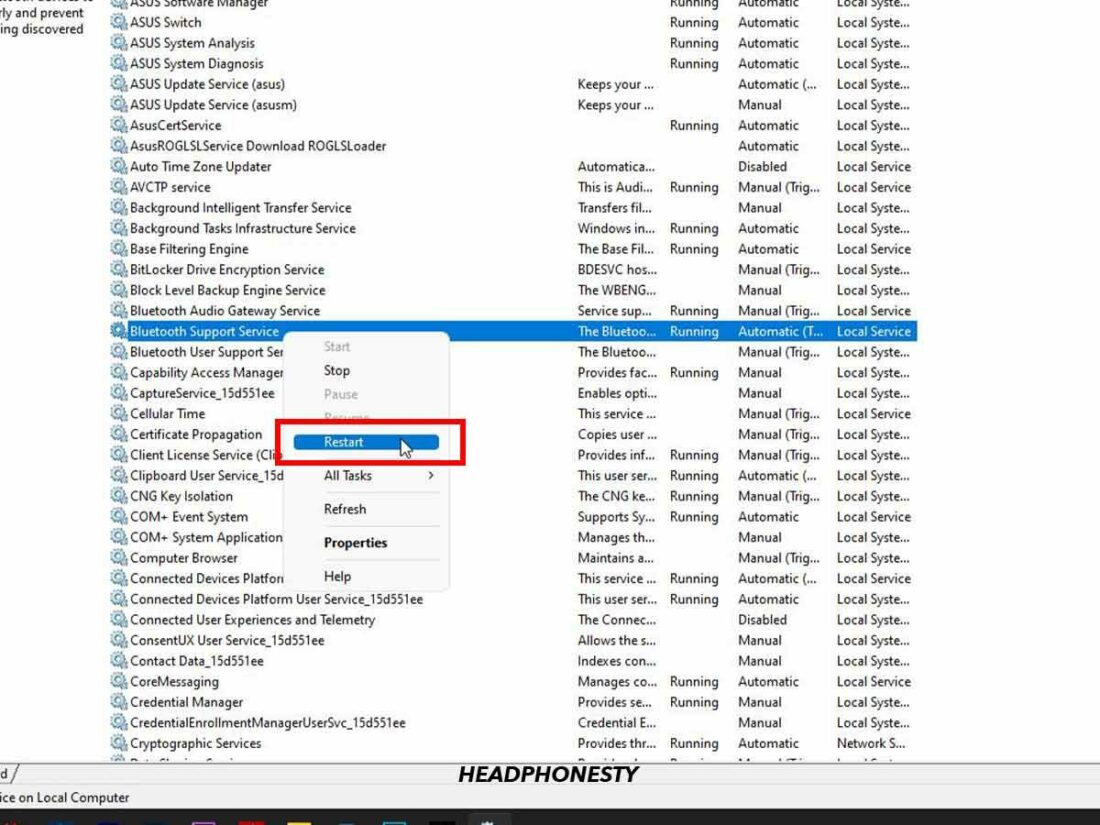
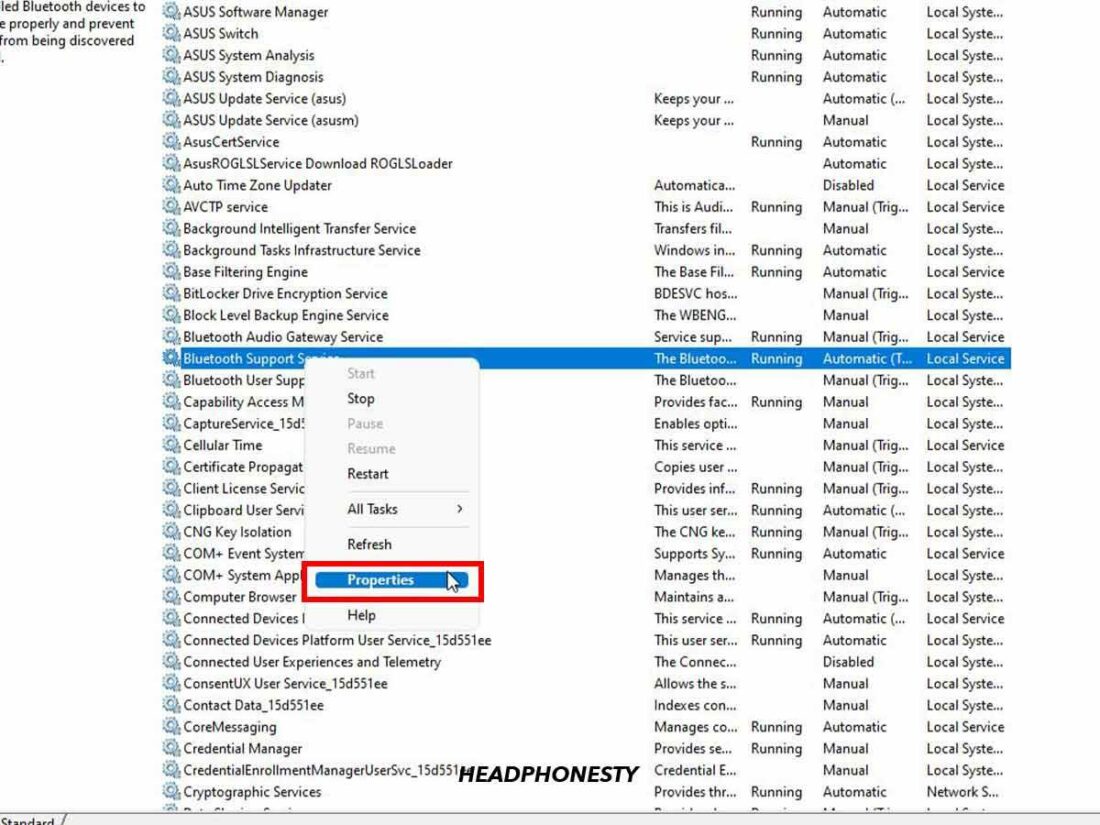
Launch “Sevices” from the Run dialog box. - Right-click on Bluetooth Support Service, then select restart.
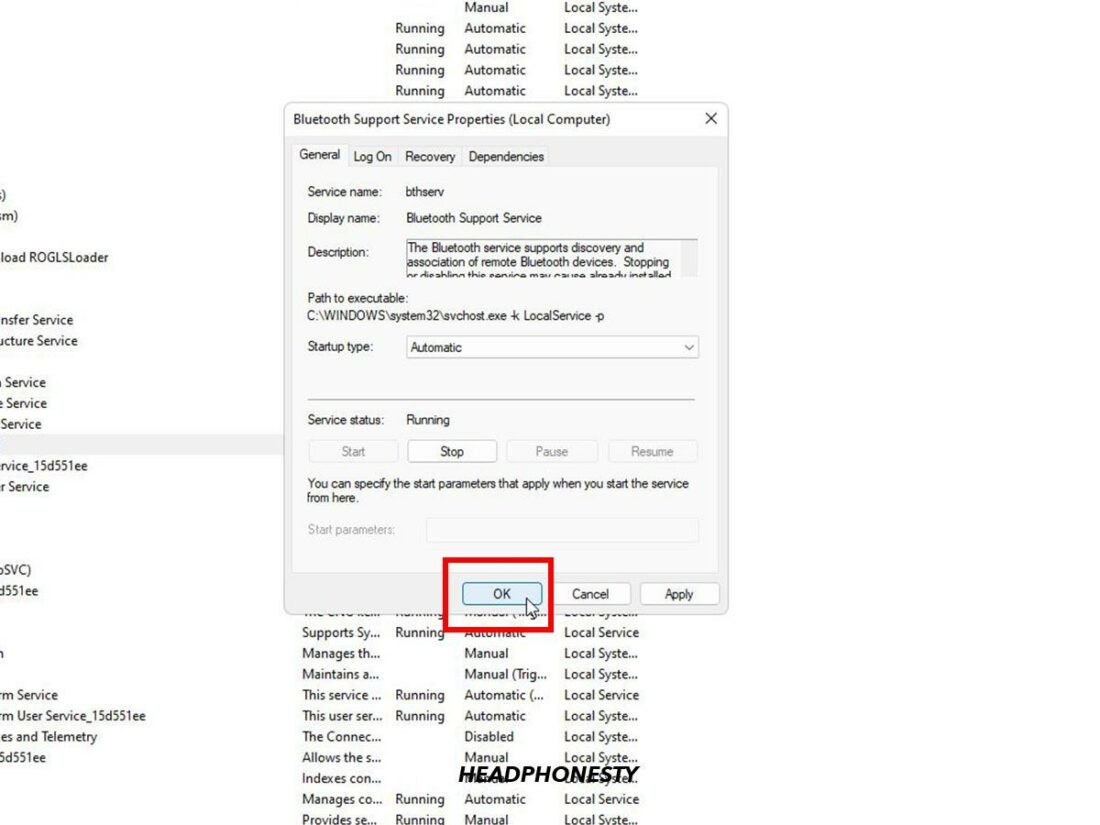
Restart Bluetooth Support Service. - Right-click on Bluetooth Support Service once more and select Properties.
“Properties” highlighted. - Set the Startup type to Automatic.
“Automatic” highlighted. - Click OK to save the changes.
“OK” highlighted.


This is largely similar to the ‘turning it off, then on again’ approach to Bluetooth services on Windows. Restarting the Bluetooth service forces it to start a clean slate, minimizing factors that cause issues.
Restart Windows Audio Services and Set Them to Automatic
Since Bluetooth audio devices use both Bluetooth and audio drivers, it’s also possible that faulty audio services can trigger audio issues on Windows 11. Like the previous method, you can easily fix and prevent this from happening again by restarting the services.
Here’s how to do so:
- Press the Windows key + R, then type services.msc and click enter.
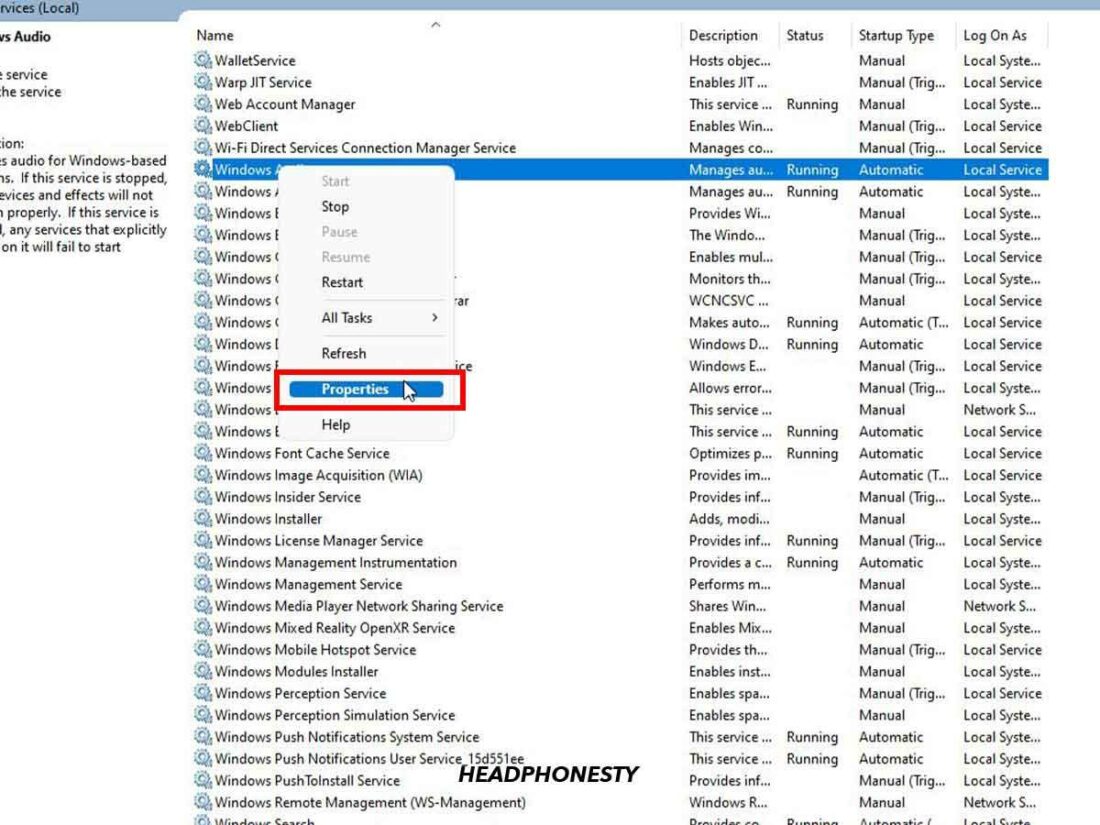
Launch “Services” from the Run dialog box. - Right-click on Windows Audio, then select restart.
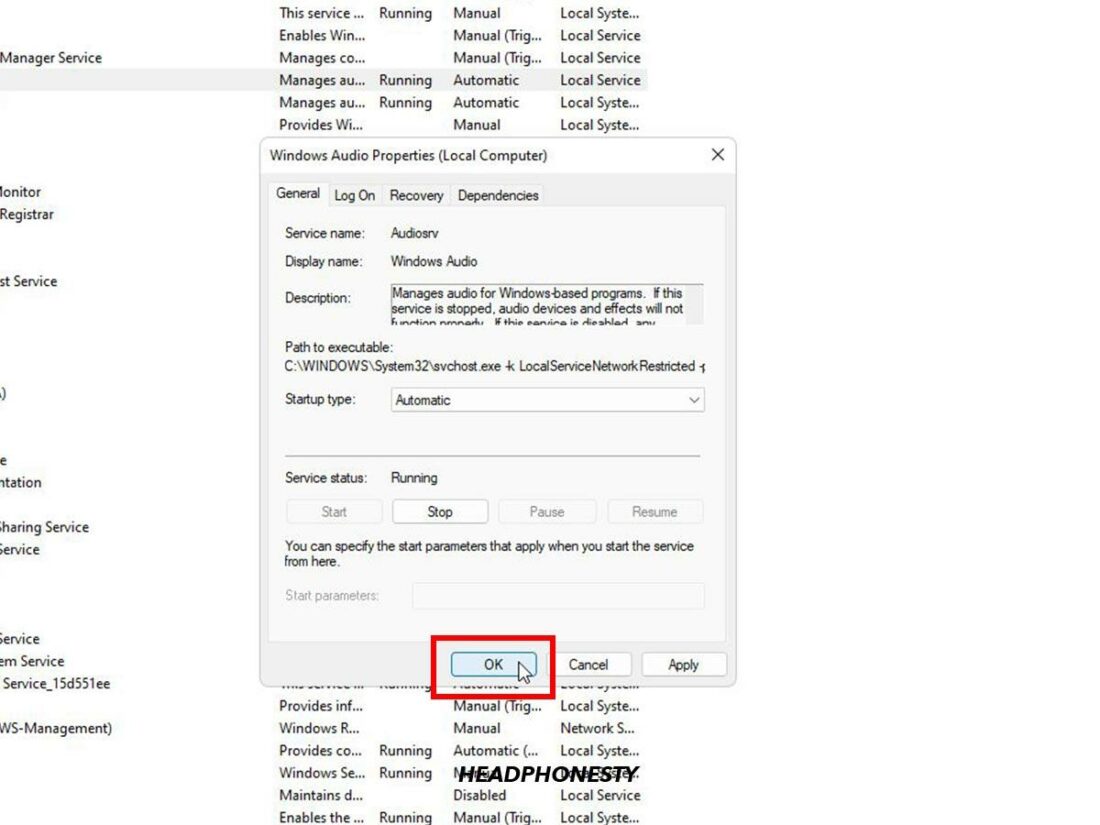
Restart Windows Audio Services. - Right-click on Windows Audio once more and select Properties.
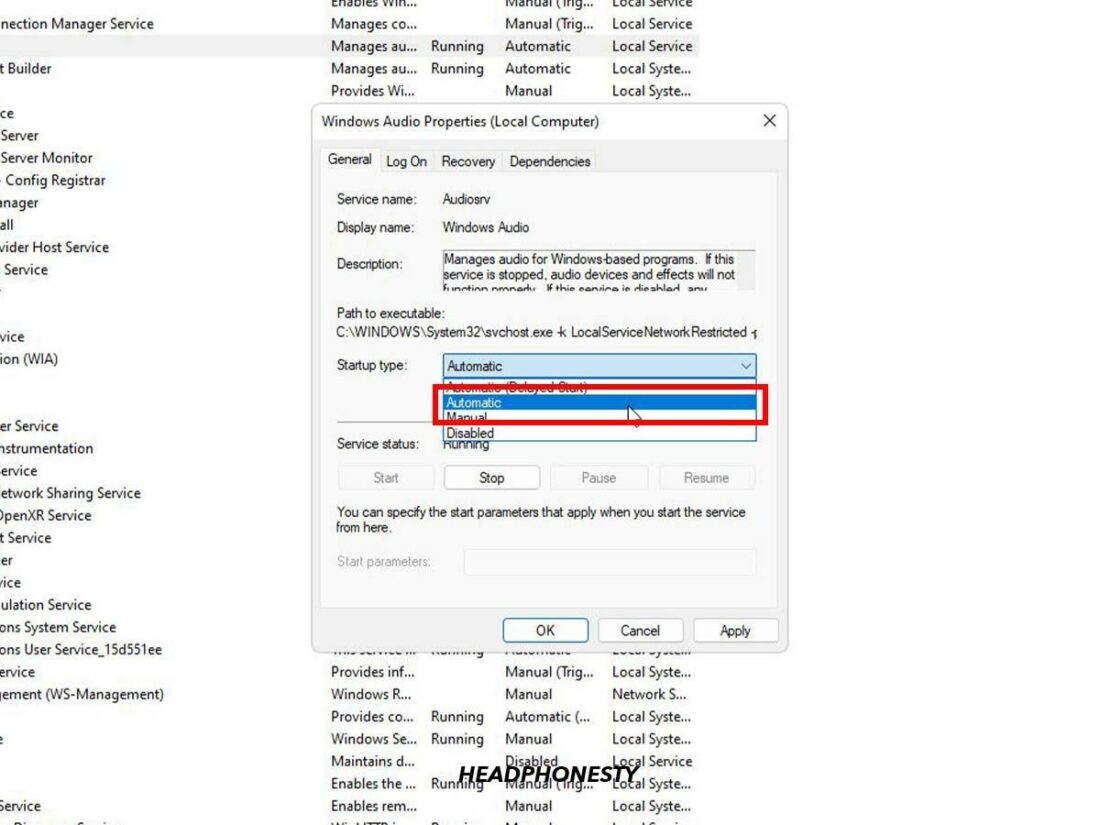
“Properties” highlighted. - Set the Startup type to Automatic.
“Automatic” highlighted. - Click OK to save the changes.
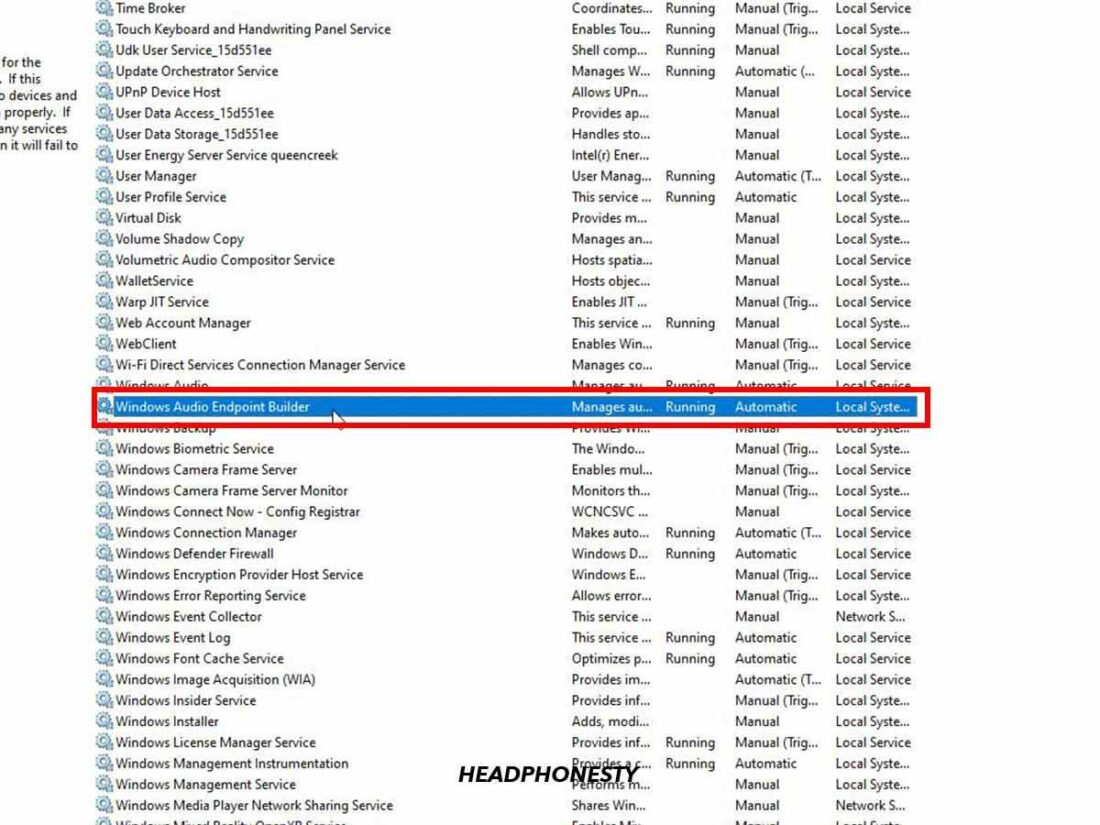
“OK” highlighted. - Repeat steps 2-5 for Windows Audio Endpoint Builder and Remote Procedure Call services.
Windows Audio Endpoint Builder.


Enable the Device Association Service
The Device Association Service handles the pairing process of both wired and wireless devices to Windows. If this service isn’t running, that may be why your Windows 11 Bluetooth audio is not working.
To make sure this isn’t the cause of your issue, here’s how you can check the Device Association Service status:
- Press the Windows key + R, then type services.msc then enter.
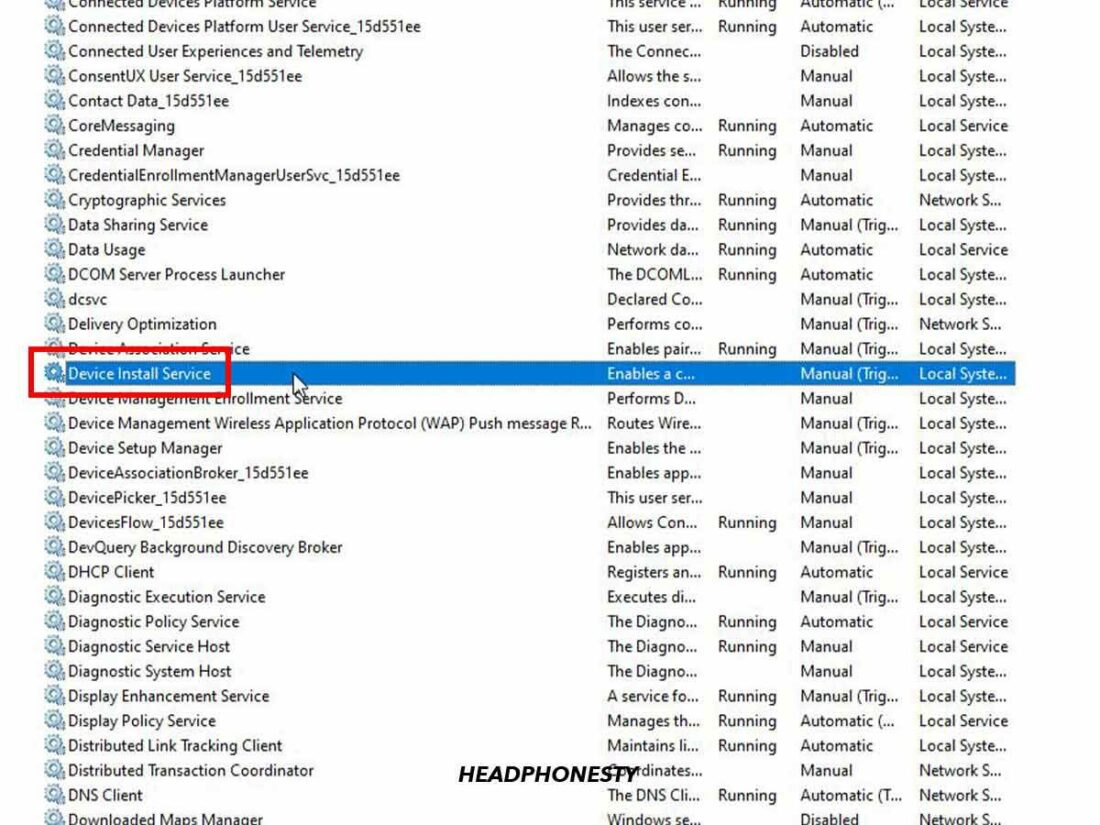
Launch “Services” from the Run dialog box. - Find the entry for Device Association Service and check its status.
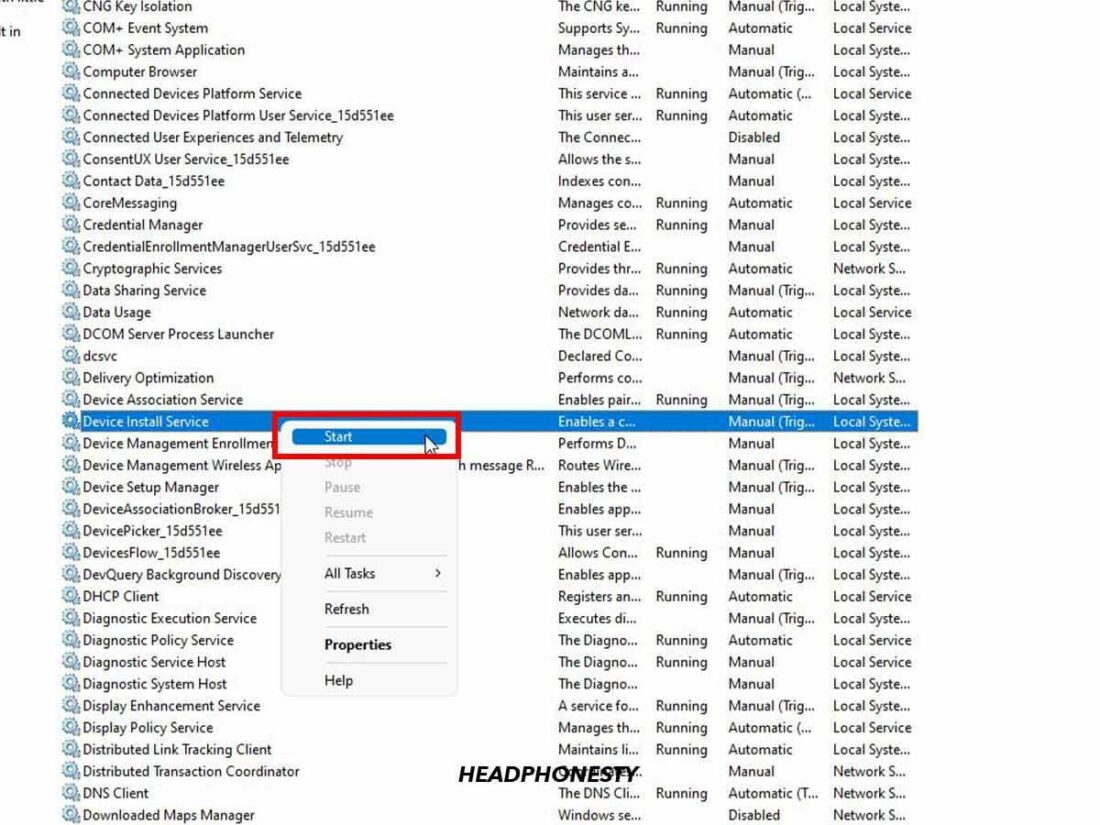
Device Association Service. - If the service status doesn’t say Running, right-click on it and select Start.
“Start” highlighted.

You should also ensure that the Device Association Framework Provider Host is running. This service works in tandem with Device Association Service in registering external devices.
Check Microphone Privacy Settings
If your audio output is working fine, but your microphone isn’t working, there might be an issue with the privacy configuration.
In that case, here’s how you can change your microphone’s privacy settings:
- Go to Start > Settings > Privacy & Security.
“Privacy and Security” highlighted. - Under App Permission, select Microphone.
“Microphone” highlighted. - Turn on the toggle for Microphone access.
Microphone access toggle switch.
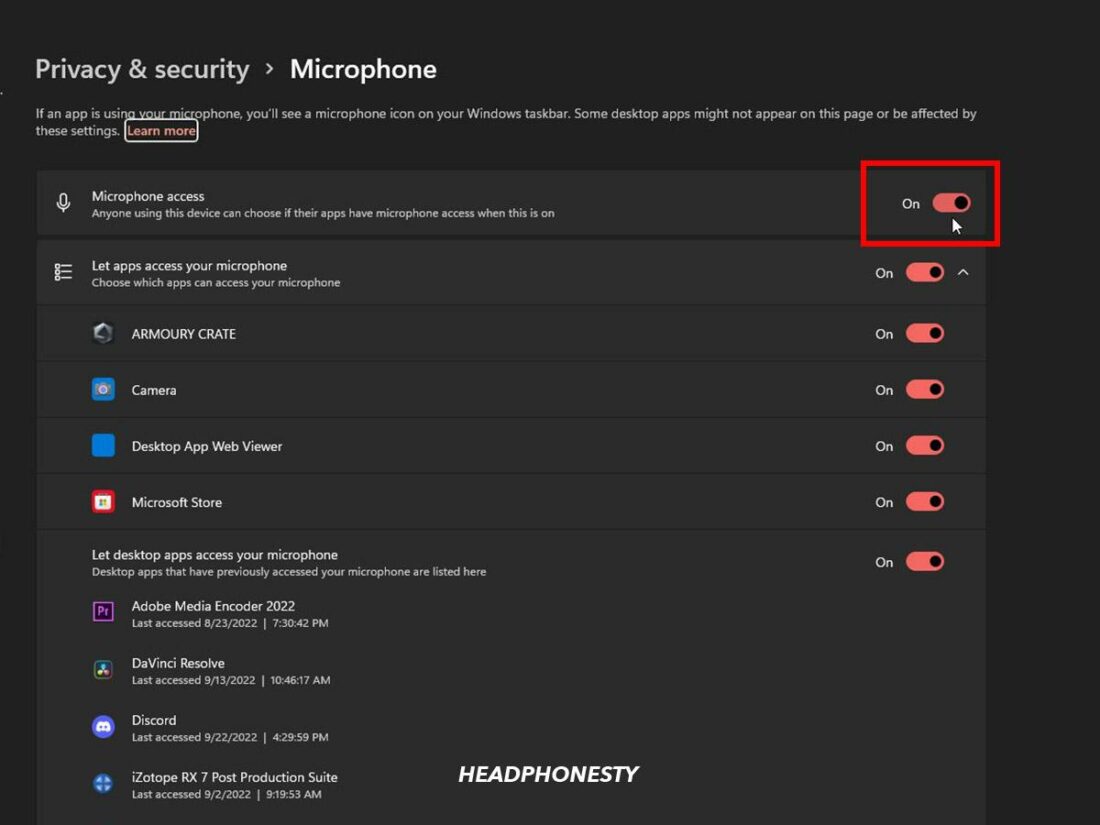
If you have issues with specific apps like Discord or Zoom, make sure to enable microphone access for them. You can find the list of apps under Let apps access your microphone. There’s also an option to enable Cortana voice assistant access through your Bluetooth headphones in the Privacy & Security > Voice Activation.
If None of These Solutions Work, Here’s Why
There is no shortage of fixes to try beyond the ones we mentioned above. However, if the methods above didn’t solve your issues, you should understand these two important issues about Windows 11:
Windows 11 stability
Since its release in October 2021, Windows 11 has been a young operating system that needs a lot of work before it can be considered stable. These issues are even more common for those who upgraded from an older version of Windows.
According to Windows 11 Insiders, Microsoft is testing a new feature that makes it easier to manage Bluetooth connections. However, that’s not a guaranteed fix for the underlying Bluetooth instability issues.
The good news is that Windows 11 is getting continuous updates and patches. Microsoft’s latest beta release for Windows 11 build 22H2 reportedly fixes some Bluetooth-related issues.
However, as recently as last month, users still reported issues with Bluetooth earbuds not working on Windows 11.
Windows 11 system requirements
While the two don’t seem directly related, the lack of compatibility for Windows 11 might play a part in the rising volume of Bluetooth issue reports. Further support of this case is people’s reports complaining that their Bluetooth devices worked fine in Windows 10.
When Microsoft released Windows 11, they also released a stringent system requirement for users to see if they were eligible for an upgrade.
Logically, any PC that meets the system requirement should be able to upgrade to Windows 11. However, there were reports that even users with highest-end PCs could not upgrade due to the TPM 2.0 requirement – a hardware-based security feature that not all PCs have.
While you can bypass the TPM module requirement, Microsoft doesn’t recommend it since it’s the building block for many of Windows 11’s security features. They even provided an official guide on how to bypass the TPM 2.0 requirement.
If you bypassed the TPM 2.0 requirement to upgrade to Windows 11, it could be the reason you’re having Bluetooth issues. Microsoft stated that we should expect risks of compatibility issues upon the TPM 2.0 bypass.
That said, no source of information claims TPM is the direct cause of Bluetooth audio issues. However, it does show that Windows 11 has a massive gap to cover before it can adequately work with different hardware and software – Bluetooth headphones included.
Conclusion
Barring hardware-related issues, the fixes above should have solved your Bluetooth audio issue. You should now have no problem using your Bluetooth audio device with your shiny installation of Windows 11.
Windows 11 still has a lot of homework in the Bluetooth audio department. But given Microsoft’s continuous support for it, hopefully, they will solve those issues.
What do you think of Windows 11’s new system requirements? Do you think they may be the cause of your Bluetooth issues? Let us know in the comments!
Всем привет! Сегодня предлагаю вам познакомиться с тем, как включить и настроить микрофон на компьютере под управлением Windows 11. Точнее на ноутбуке (да потому что я любитель ноутбуков), но глобально ничего не поменяется – напротив, будет больше нюансов. Со времен «десятки» мало чего поменялось, но неопытный пользователь может запутаться в новых интерфейсах. Так что спешу исправить эту несправедливость в мире и помочь всем. На связи Ботан, и вы на портале WiFiGid.
Содержание
- Особенности подключения – Шпаргалка
- Подключение по проводу
- Подключение по Bluetooth
- Настройка – Windows 11 – Базовая
- Настройка – Классические параметры микрофона
- Настройка – Родной софт
- Настройка – Внешний софт
- Задать вопрос автору статьи
Особенности подключения – Шпаргалка
Я очень надеюсь, что вы грамотный человек и все правильно подключили. Но на всякий случай оставлю здесь несколько заметок от себя. Вы же можете спокойно пропустить этот короткий раздел.
В наше время микрофоны в общем смысле бывают двух видов – проводные (как правило стандартные 3,5 мм разъем) и по Bluetooth. При этом они могут быть выполнены как отдельно, так и встроенные в гарнитуру. А еще, если вы тоже владелец ноутбука, скорее всего подключать ничего не нужно – почти все ноутбуки имеют встроенный микрофон вполне себе допустимого качества для тех же переговоров.
И да, эта статья не про настройку профессиональных микрофонов. Здесь мы просто хотим показать простому домашнему пользователю, как сделать свой микрофон рабочим под простые задачи вроде использования в Scype, Discord или Zoom.
Подключение по проводу
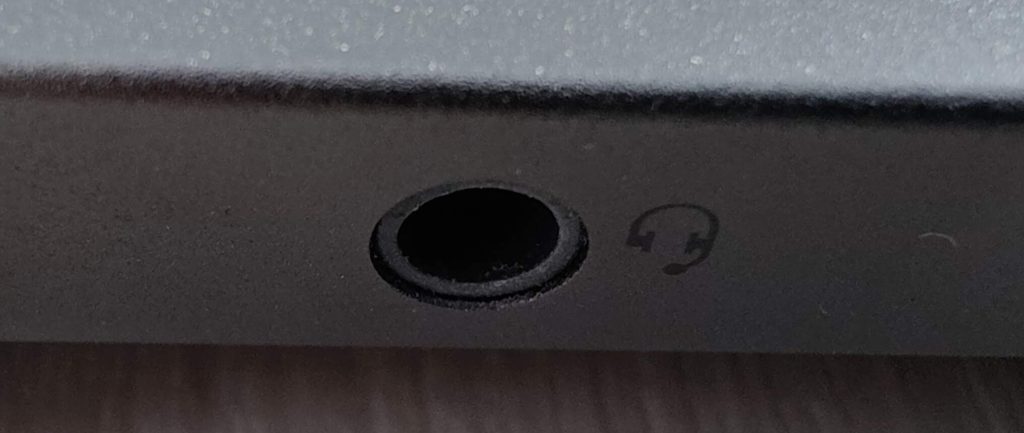
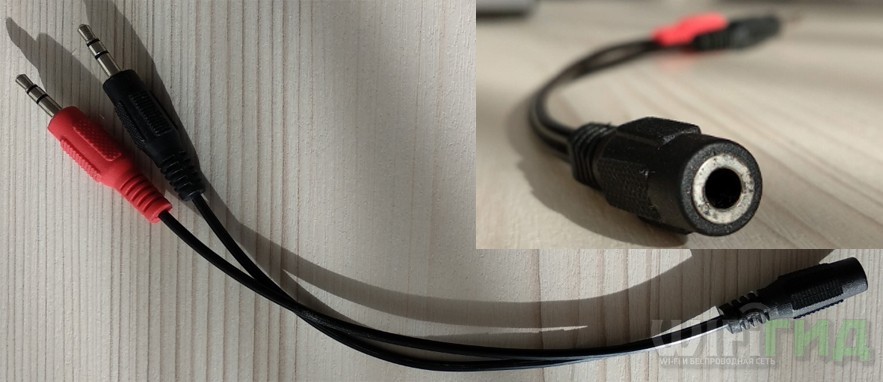
С проводными микрофонами все просто – есть разъем 3,5 мм, есть гнездо под 3,5 мм (mini-Jack). Гнезда бывают трех видов (обобщенно):
- Под динамики. Сюда мы микрофон не вставляем. Имеет тематический рисунок, а на компьютерах чаще всего зеленый цвет.
- Под микрофон. Наш случай. Имеет значок микрофона или розовый цвет. На самом деле если что-то не получится с первого раза, ничего страшного – в худшем случае просто переподключите его.
- Гибридный разъем. Особенно часто встречается на ноутбуках. Сюда можно подключить как наушники, так и динамики, и все будет работать.
А еще, если у вас гарнитура, штекер под микрофон может быть объединен с наушником (обычно 4 деления вместо трёх) – такой штекер вставляем или в гибридный разъем или же туда, куда нужно прямо сейчас (нужно записать звук – в разъем под микрофон). Хотя в продаже есть и переходники, если критично использовать и то, и то.
Обо всех этих тонкостях очень подробно на нашем сайте написал Бородач в статье про такую же операцию только под Windows 10. Если возникают сложности, рекомендую прочитать ее здесь.
Подключение по Bluetooth
Здесь тоже нет чего-то сверхсложного. Действуем по инструкции:
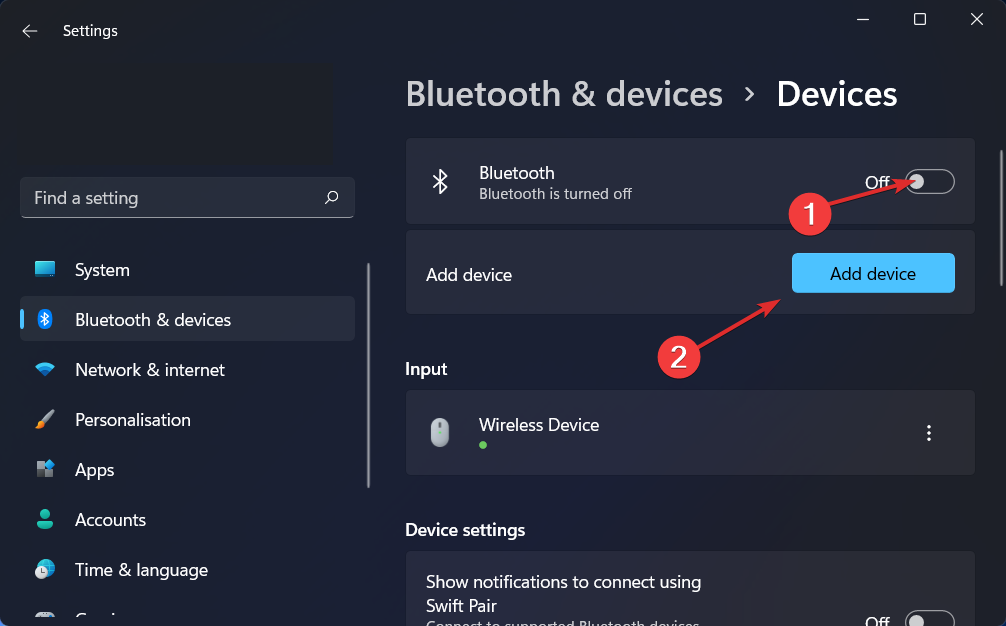
- Переходим любым удобным способом в «Параметры» (я щелкаю правой кнопкой мышки по «Пуск» и выбираю «Параметры»).
- Выбираем «Bluetooth и устройства» в левом меню и нажимаем на кнопку «Добавить устройства» (если Bluetooth выключен, здесь же можно сразу включить его, но, разумеется, сам аппаратный модуль Bluetooth в вашей системе должен присутствовать).
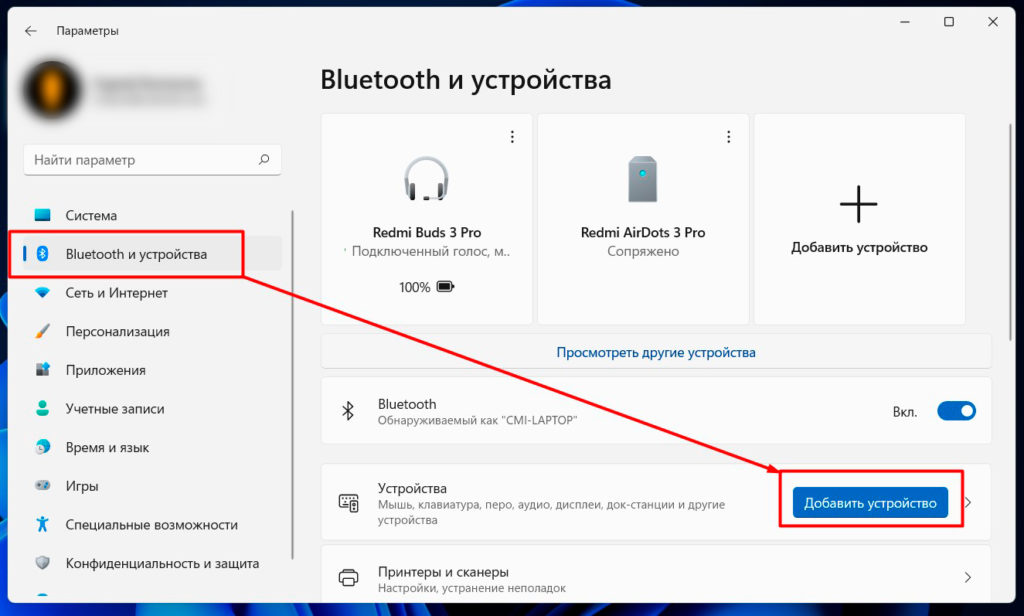
- А дальше уже действуем по обстоятельствам. Т.е. не забываем включить режим сопряжения на своей гарнитуре/микрофоне (смотреть его инструкцию), ищем их в появившемся списке устройств, подключаемся. Все не сложно, но статья немного не об этом.
Коль у нас статья о настройке, давайте перейдем непосредственно к настройке. Начнем со стандартных настроек Windows.
- Переходим в «Параметры».
- «Система – Звук».
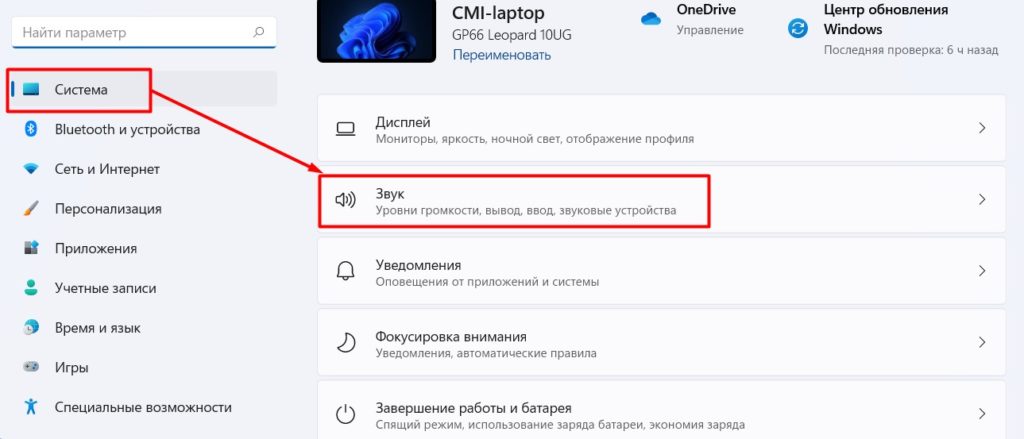
- Листаем чуть ниже до устройств ввода.
- Здесь можно выбрать свое устройство по умолчанию (но помним, что конечные приложения, которыми вы пользуетесь, могут глубоко наплевать на установленные здесь параметры). Здесь же можно выбрать громкость микрофон.
- А если щелкнуть по самому микрофону, откроются его расширенные настройки.
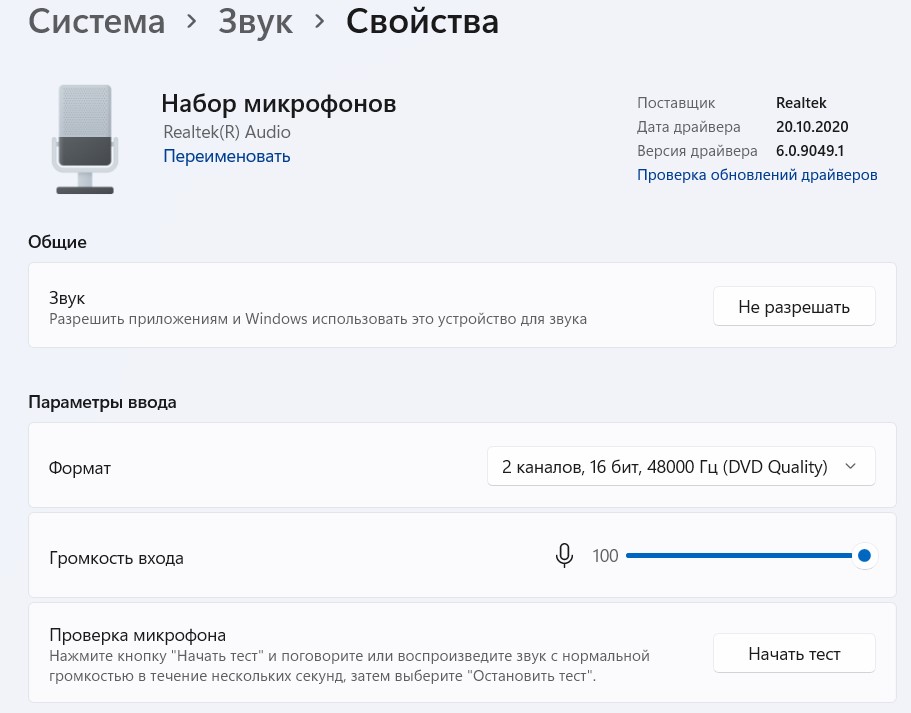
А все остальное в Windows 11 они решили спрятать, т.к. тут даже нельзя проверить уровень захвата звука. Переходим в расширенные настройки.
Настройка – Классические параметры микрофона
Я надеюсь, что после раздела выше вы ничего не закрыли, т.к. сейчас мы пролистаем чуть ниже устройств ввода.
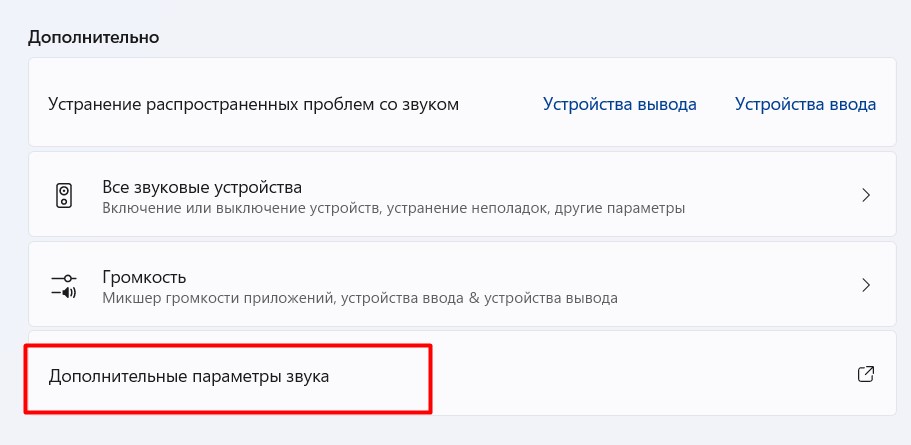
- Выбираем там же «Дополнительные параметры звука» (секция «Дополнительно» в разделе ниже устройств ввода).
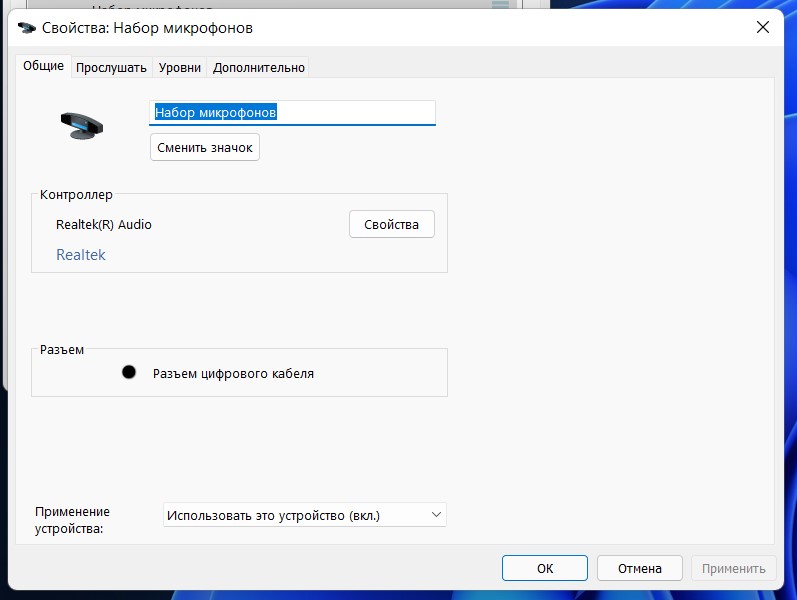
- В открывшемся окошке переходим на вкладку «Запись», выбираем в списке наш микрофон и щелкаем по нему два раза левой кнопкой мыши.
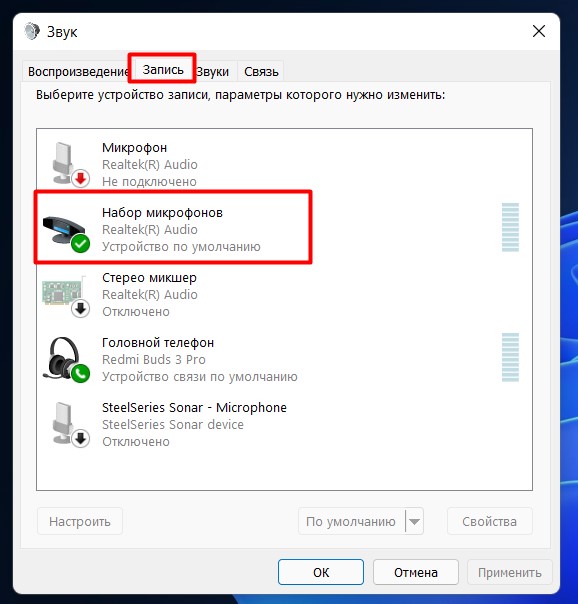
- И попадаем в привычный классический настройщик микрофона – тут и возможность прослушки, и уровни усиления, и шумодав (если поддерживается).
Настройка – Родной софт
В зависимости от вашего компьютера, у вас может быть свой родной софт для настройки работы микрофонов. Этот раздел не прямое руководство, но больше напоминание о такой возможности. А то будете менять в стандартных настройках – но почему-то работать не будет, а это вмешивается в работу сторонняя программа.
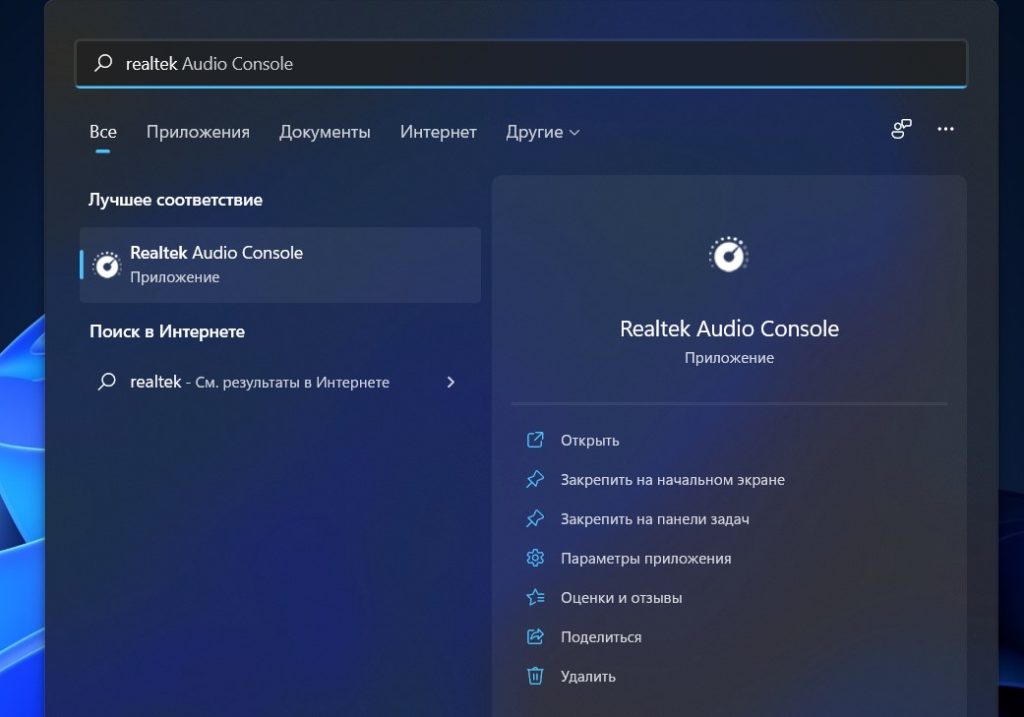
Например, очень часто работой микрофонов может управлять софт от Realtek (популярные аудиочипы). В поиске Windows 11 можно прописать «realtek» и запустить эту программу:
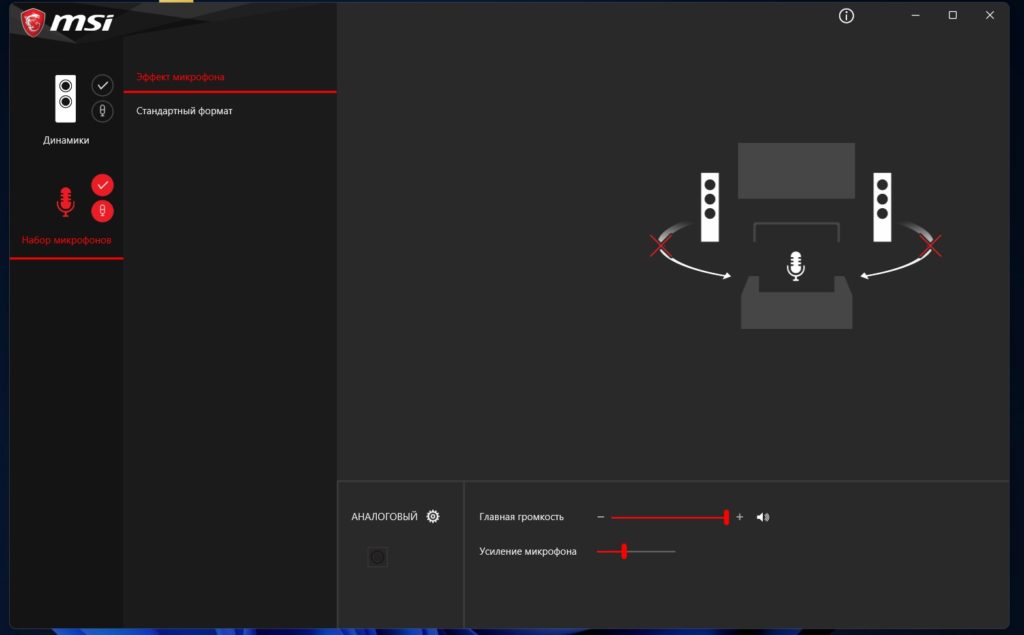
Сама программа тоже визуально может изменяться, у меня ее вообще подменяет аналог от производителя ноутбука MSI:
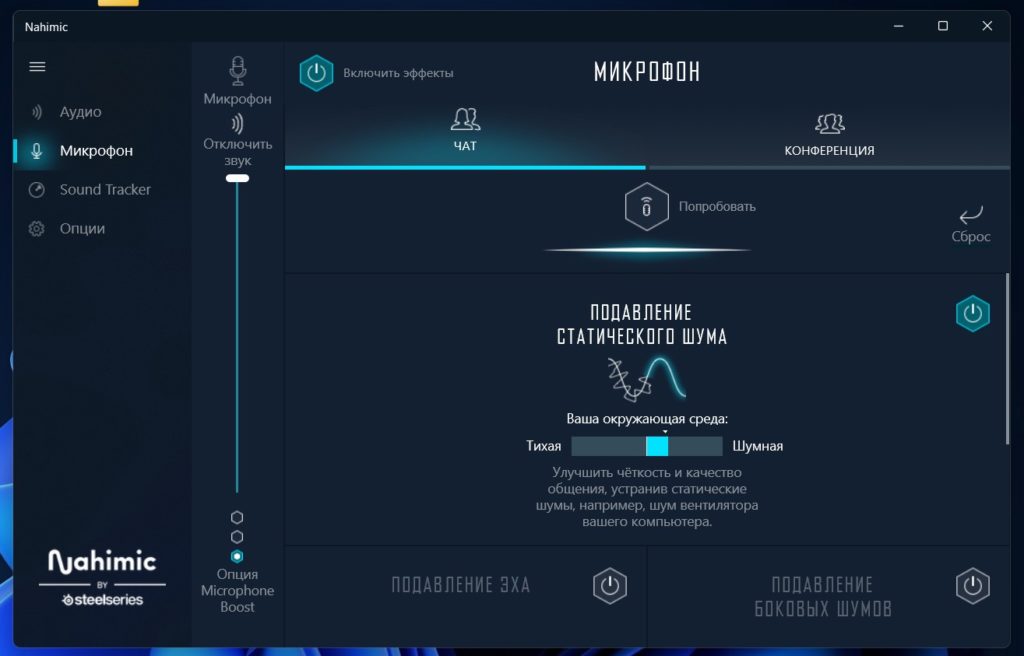
А еще тут же есть встроенная софтина от Nahimik, которая очень сильно вмешивается в работу аудиосистемы, в том числе и микрофонов (у вас, конечно, такого может и не быть, но могут быть аналоги, о которых я даже не слышал):
Настройка – Внешний софт
И вроде бы все хорошо, но при использовании внешних программ (Scype, Discord, Zoom и т.д.) все может пойти не по плану. В моем случае все настройки и тесты показывали хороший звук, а вот скайп почему-то решил не использовать все доступные микрофоны из набора, а взял лишь какой-то один тихий.
Это к тому, что у программ, которые используют микрофон, вкусы могут быть отличны от дефолтных настроек Windows 11. Т.е. проверить настройку нужно будет еще и в них. Как это делать и где – тут уже нужно смотреть настройки конкретной программы, и все перепроверять. Я лишь покажу злополучный раздел, который издевается надо мной уже длительное время, в Scype.
Переходим в «Настройки – Звук и видео» и ищем раздел с микрофоном.
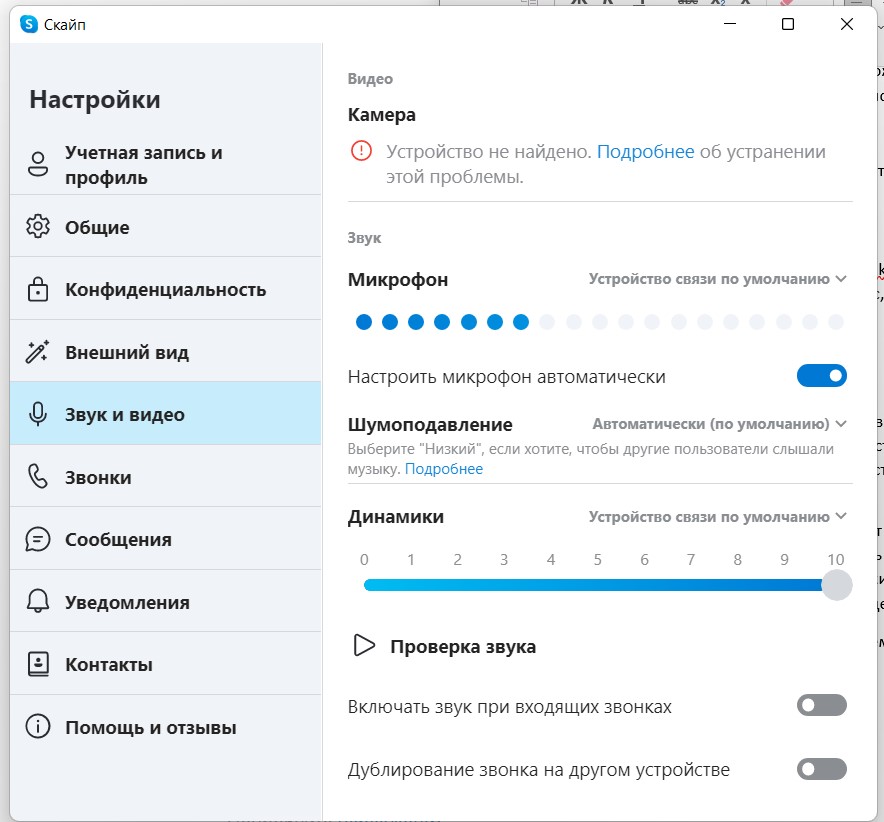
И вот «Устройство по умолчанию» – это не всегда то, что установлено в настройках Windows. Вот так и приходится жить.
Друзья, если у вас остались какие-то вопросы или есть замечания, пожалуйста, напишите их в комментариях под этой статьей. Вам не так сложно, а миллионы других читателей нашего портала будут очень рады дельному совету. Мы видим лишь основные моменты, но даже в такой теме могут быть нюансы на конкретной платформе. Помогаем друг друга, а вам благодарность от нас и других читателей)