BlueStacks is a cloud-based cross-platform that supports playing Android games or applications on Windows as well as Apple devices. With a recent update in the Windows operating system i.e. Enabling Hyper-V, the previous versions of BlueStacks are failing on Incompatible Windows Settings error.
When this error occurs, you also see an option to Review the FAQ. The moment you click on this button, BlueStacks closes and you are redirected to the Support site on your default web browser. Attempt running BlueStacks as admin and this problem might resolve instantly.

In case the error persists, you need to disable Hyper-V by following the below sections.
- Disabling Hyper-V under Windows Features
- Reinstall BlueStacks 5 version for Hyper-V
- How do I install BlueStacks with Hyper-V enabled?
- What are some other ways to disable Hyper-V on Windows?
- How do I disable Memory Integrity on Windows?
- How to disable Ads in BlueStacks
If you are getting Incompatible Windows Settings while starting BlueStacks on your computer, go through the below set of solutions and apply them sequentially.
Note: Before you apply any workaround, make sure to right-click on the BlueStacks icon and choose the “Run as administrator” option first. Chances are pretty high that the incompatibility issue resolves this way alone.

1] Disabling Hyper-V under Windows Features
There are certain features in Windows that normally prevent BlueStacks from opening on your computer. If that’s the case, you must disable all these features by following the below steps –
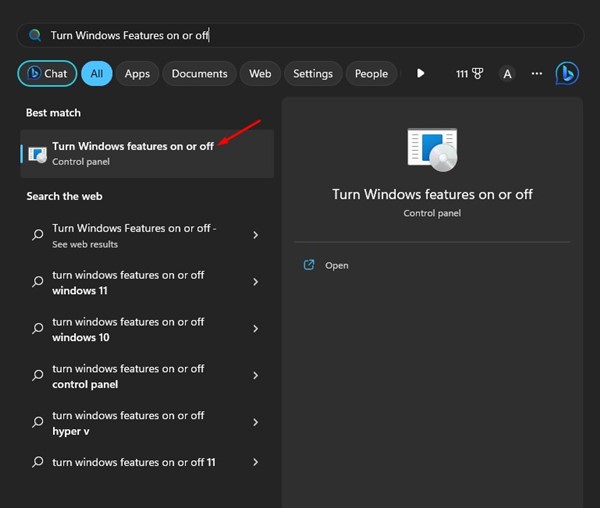
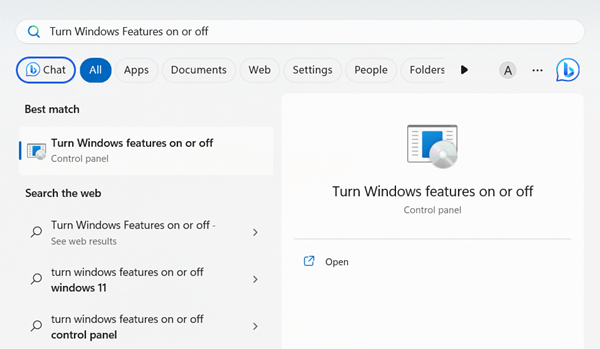
- Press Windows + S, and search for Windows Features in the text field.
- Click on the top result i.e. Turn Windows features on or off.
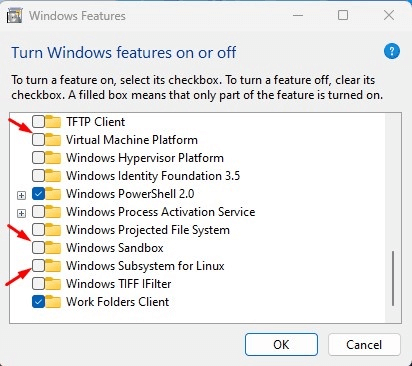
- On Windows Features, scroll down and locate the following features –
Hyper-V
Virtual Machine Platform
Windows Hypervisor Platform
Windows Sandbox
Windows Subsystem for Linux

- Make sure to uncheck the boxes against all these features, and click OK.
- You must restart your device next so that the recent changes come into effect from the next login.
Note: If you are using the Home edition of Windows, you will not find the option to disable Windows Sandbox.
2] Reinstall BlueStacks 5 version for Hyper-V
BlueStacks fail to start primarily when Hyper-V is enabled on your Windows PC. You may disable the same as stated above or disable Hyper-V using CMD. If the Incompatible Windows Settings error is still appearing on BlueStacks, one should reinstall the BlueStacks 5 version that supports the Hyper-V feature. Here’s how to download and install the latest version of BlueStacks 5 on Windows 11 –
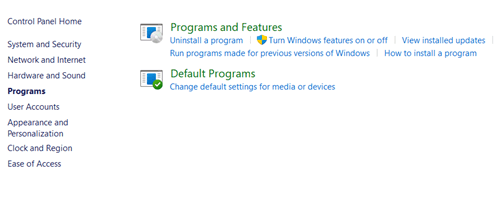
- First of all, launch Control Panel.
- Go to Programs and Features next, and locate BlueStacks on it.
- Right-click on this program, and choose the Uninstall button.

- The User Account Control window will appear next. Well, click on the Yes button to authorize removing this program from your device.
Note: Uninstalling BlueStacks 5 will remove all your downloaded apps, other app settings, and your game data.
Wait for the uninstallation to complete, and once this is over, navigate to BlueStacks’s official site. Locate and click on the button – Download BlueStacks 5. The setup file will immediately start downloading on your computer.
How do I install BlueStacks with Hyper-V enabled?
Assuming you have already downloaded its set-up file, double-click on the same to begin its installation. When you see the Install now button, click on it. Now, wait for the installation to complete. The installer will automatically download and install the BlueStacks latest version supporting Hyper-V.
If the Incompatible Windows Settings error appears again while opening BlueStacks, right-click on its icon, and select Run as administrator. Hopefully, BlueStacks will run normally on your Windows 11 PC.
What are some other ways to disable Hyper-V on Windows?
In certain cases, you might not find the option to disable Hyper-V on Windows using Windows Features. Well, in such cases, what you can do is launch CMD as administrator, and run the below code on it –
dism.exe /online /enable-feature /featurename:VirtualMachinePlatform /all

After this code runs successfully, the Command Prompt will ask whether you would like to restart your PC. Type Y and your system will restart automatically.
Alternatively, you may also execute the below command to disable Hyper-V and Windows Hypervisor Platform on your computer. Make sure to launch the Command prompt as administrator first and then only run the below code on it-
bcdedit /set hypervisorlaunchtype off
After you disable Hyper-V, restart your PC and check if you can run BlueStacks without receiving the compatibility issues on it.
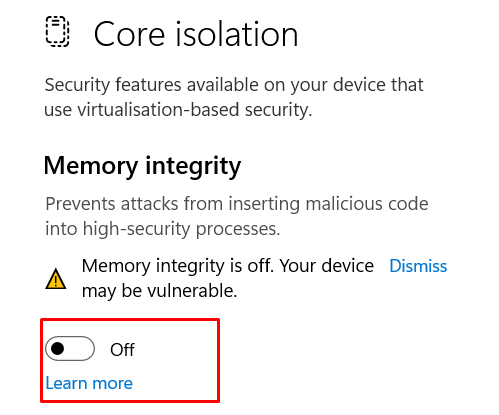
How do I disable Memory Integrity on Windows?
Though you will find the Virtual Machine Platform and Windows hypervisor platform, there are cases when users don’t find these features inside Windows Features. Well, in that case, you need to disable Memory integrity under Windows Defender. To disable Memory integrity, follow these easy steps –
- On Windows Search, type Core isolation and click on the top result.
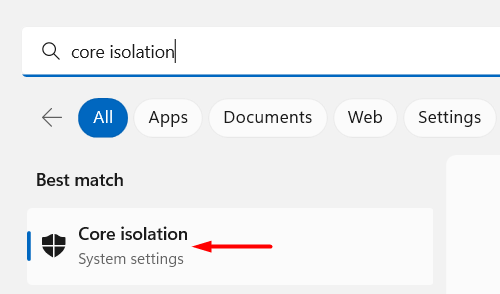
- Doing so will Core isolation inside Windows Security.
- Disable the toggle switch available next to Memory integrity.
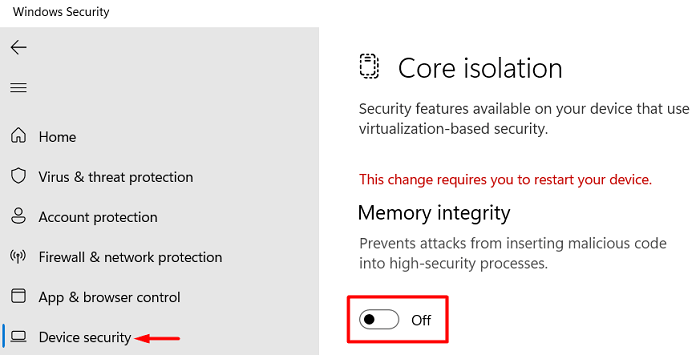
- The UAC window will prompt immediately afterward, click Yes to authorize performing this task.
- Close Windows Security and restart your PC.
Sign back into your device again and check if you can open BlueStacks without getting the same Review the FAQ error.
How to disable Ads in BlueStacks
BlueStacks has now enabled displaying Ads when you are playing a game on it. The ads appearing on its interface don’t obstruct the gameplay by design, however, they might distract you from playing your normal game.
Though BlueStacks suggests not disabling ads on it, they do provide options to disable viewing ads on it. Follow the below instructions on how to remove ads from BlueStacks –
- Launch BlueStacks first, and click on the gear icon (Settings).

- When the Settings window launches, select Preferences from the left sidebar.
- On its right pane, disable the toggle switch available next to “Allow BlueStacks to show Ads during gameplay”.

- BlueStacks will confirm this request again by displaying a message – “Please keep ads enabled“.
- Click Disable and the ads will be disabled from its interface. In case you click on Sure, the ads keep on appearing during your gameplay.
- Click Save changes and exit the Settings window.
You may now start playing a game on BlueStacks without getting any ads appearing on it.
Even though Windows 11 supports Android apps natively, users still stick with emulators like BlueStacks to run Android apps and games on their PC.
The reason for that being is simple – BlueStacks can handle Android apps & games better compared to the native WSA for Windows 11.
However, several users have been found facing problems while running the BlueStacks emulator on Windows 11. Windows 11 users get an ‘Incompatible Windows Settings’ error message while launching the emulator.
The full BlueStacks error message reads:
‘Incompatible Windows Settings
To launch BlueStacks, you must make some changes to your Windows Settings. We have an FAQ that explains it in detail’
The error message appears only when starting the BlueStacks emulator on Windows 11, and it does provide you an option to Read the FAQ page.
If you relied on BlueStacks to run your favorite Android games on PC, we could feel your pain. But don’t worry; the error can be easily fixed on Windows 11.
First, the error mainly appears after updating Windows 11, but rolling back the operating system to its previous state won’t help. Here’s what you can do to fix the BlueStacks error message.
1. Disable Hyper-V on your Windows 11
The ‘Incompatible Windows Settings’ error usually appears when installing BlueStacks 5 on a machine where Hyper-V is enabled. Hence, you can try disabling the Hyper-V and then run the BlueStacks emulator.
1. First, click on Windows 11 search and type ‘Turn Windows Features on or off’. Next, click on the most relevant result from the list.
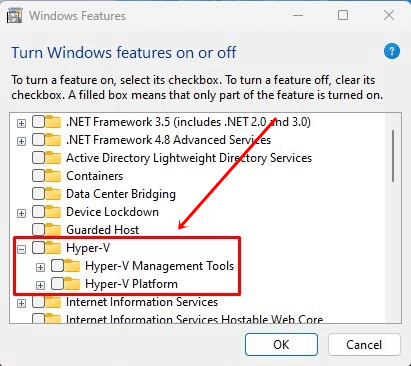
2. This will open Windows features. Here you need to scroll down and expand the Hyper-V option.
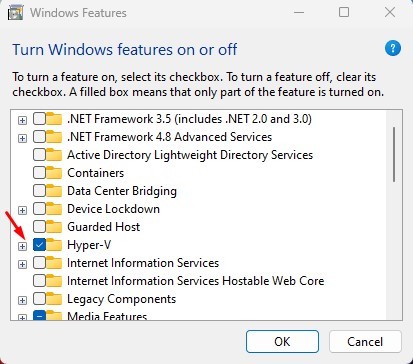
3. Now uncheck the Hyper-V, Hyper-V Management tools, and Hyper-V Platform.
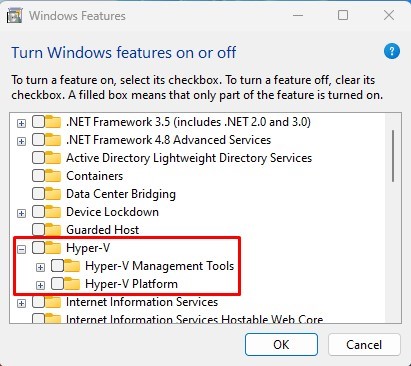
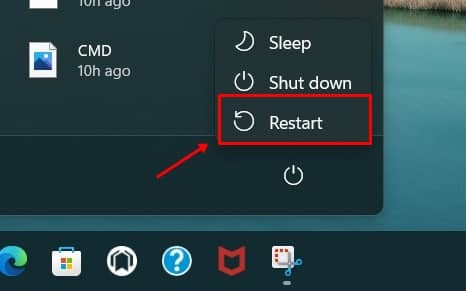
4. After making the changes, click the Ok button and restart your computer.
That’s it! After the restart, you can run the BlueStacks 5 emulator on your Windows 11 computer.
2. Disable Windows Sandbox & Subsystem for Linux
On the same Windows Features option, you need to disable the Windows Sandbox and Windows Subsystem for Linux as well. Here’s what you need to do.
1. Open Windows search and type ‘Windows Features‘. Next, open the ‘Turn Windows features on or off‘ app from the list.

2. Next, scroll down to the bottom and uncheck the ‘Windows Sandbox‘ and ‘Windows Subsystem for Linux‘ checkboxes.

That’s it! After making the changes, restart your Windows 11 computer and run the BlueStacks emulator. This time you won’t get the error anymore.
3. Run BlueStacks as an administrator
Many users have searched for BlueStacks ‘Incompatible Windows Settings’ error message on Reddit. A popular Reddit comment says running BlueStacks as an administrator would resolve the issue.
Running BlueStacks as an administrator has helped many Reddit users resolve the ‘Incompatible Windows Settings’ error. Hence, you can try that as well.
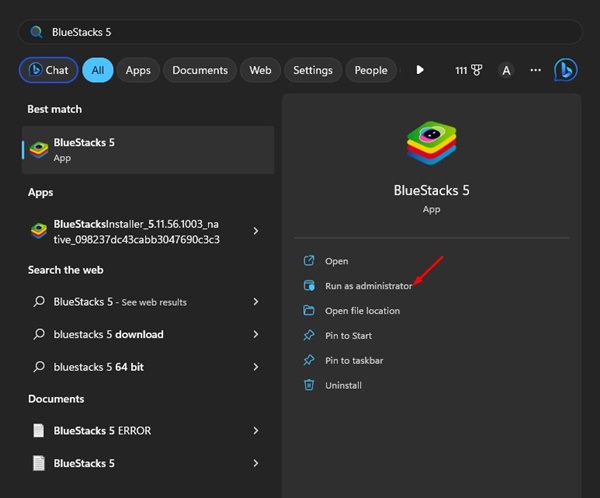
To run BlueStacks as an administrator, open Windows 11 search and type in BlueStacks. Next, right-click on the BlueStacks and select ‘Run as administrator‘.
This will run the BlueStacks emulator with administrator rights and fix the ‘Incompatible Windows Settings’ error message.
4. Install the 32-bit BlueStacks

The BlueStacks 64-bit is only compatible with Hyper-V enabled. So, if you are using BlueStacks 64-bit, but the Hyper-V is disabled, you either need to turn on the Hyper-V or install a 32-bit BlueStacks.
To download BlueStacks 32-bit, you need to open this webpage and click on the ‘Download’ button beside the ‘Nougat 32-Bit’
Once downloaded, uninstall your existing BlueStacks installation from Windows 11. You can remove it from the Control Panel or the Start Menu. And after uninstalling the older installation, install the BlueStacks 32-bit to resolve the error.
5. Download & Run the Custom.exe file from BlueStacks
If the problem hasn’t yet been fixed on your Windows 11, you can download and run a custom.exe file provided by BlueStacks.
The file disables Hyper-V and removes all its traces. Since the actual cause of the problem is Hyper-V, running the file is recommended.
1. First, download & run the custom.exe file on your computer.
2. The tool will disable Hyper-V entirely on your system.
3. Once the job is done, you will see a pop-up asking you to restart your computer. You must click the ‘Ok‘ button to restart your PC.
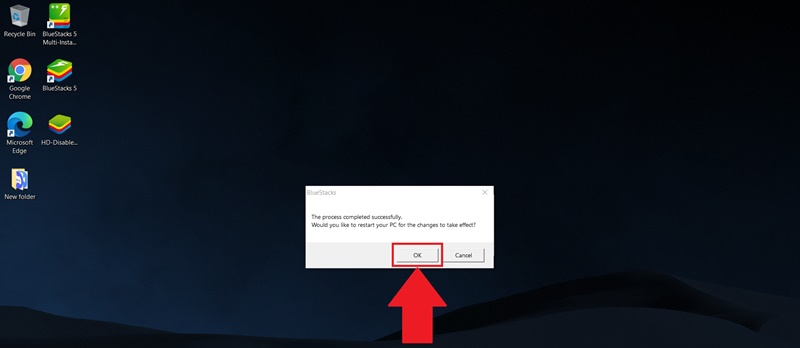
That’s it! After the restart, try running the BlueStacks emulator again. This time, you won’t get the error.
Also Read: Download BlueStacks Offline Installer Latest Version (Windows & Mac)
So, these are the five best methods to fix the ‘Incompatible Windows Settings’ error message on BlueStacks 5 on Windows 11. If you had followed the steps carefully, the problem would have been fixed. And if you need more help resolving this BlueStacks 5 error message, let us know in the comments.
Несмотря на то, что ошибка возникает из-за технических проблем, ее можно быстро устранить. Однако для полного устранения проблемы требуется выполнить очень простой и легкий метод.
1. Отключите Hyper-V
Когда дело доходит до программного обеспечения для виртуализации, Hyper-V часто приходит на ум первым. Однако, если это мешает работе BlueStacks, ситуация может быть не такой идеальной, как кажется. Более того, это может снизить производительность приложения и даже привести к серьезным проблемам, таким как несовместимые ошибки настроек Windows.
Хотя последняя версия BlueStacks совместима с Hyper-V, если вы столкнулись с проблемой, вам следует как можно скорее отключить ее.
- Нажимать Окна > искать Включение или отключение компонентов Windows > нажмите на Открыть.

- Затем прокрутите вниз, и вы получите Опция Hyper-Vщелкните крошечная стрелка расширить свой вспомогательный элемент.
- Следующий, снимите флажок все ящики отключить Hyper-V и его возможности. Теперь нажмите на Хорошо кнопка.
- После этого вам нужно перезапуск систему и проверьте, нормально ли работает BlueStacks, или перейдите к следующему способу.
2. Отключить целостность памяти
Целостность памяти — это полезная функция безопасности, которая обеспечивает дополнительную безопасность во время виртуализации и является частью изоляции ядра. Однако это может быть еще одной причиной того, что вы сталкиваетесь с ошибкой несовместимых настроек BlueStack.
В качестве исправления вам необходимо отключить его службы, чтобы пользоваться BlueStacks в вашей системе. Вот чему вам нужно следовать.
- Нажимать Пуск Windows> Настройки> Конфиденциальность и безопасность.
- Далее нажмите на Безопасность Windows > Откройте Безопасность Windows.
- Затем нажмите на Безопасность устройства и выберите Изоляция ядра подробности.
- Теперь просто отключите Целостность памяти Кнопка-переключатель.
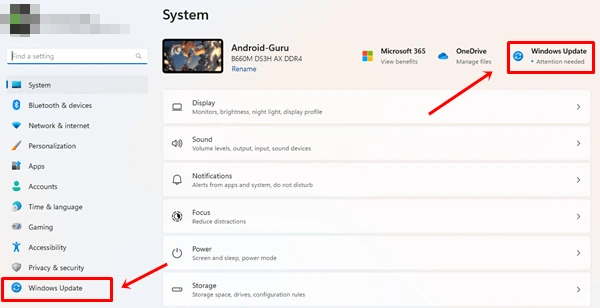
3. Удалите Центр обновления Windows.
Обновление Windows — это всегда хорошо, но если оно не совместимо с BlueStacke. Поэтому мы должны удалить его. Это то, чему вам нужно следовать.
- Нажимать Windows > Настройки > Центр обновления Windows.
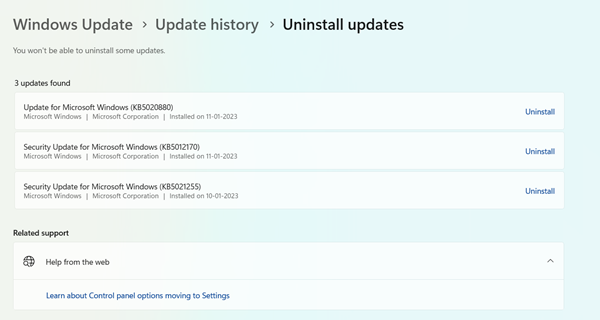
- Затем нажмите на История обновленийи выберите Удалить обновления.
- Теперь вы можете видеть все недавно установленные обновления, которые вы можете удалить, чтобы улучшить совместимость с BlueStacks. Однако нажмите на Удалить обновления.
4. Отключить Песочница и подсистема Windows для Linux
Если вы включили песочницу Windows, велика вероятность, что вы не сможете использовать Bluestacks. В качестве исправления вам необходимо отключить песочницу Windows и подсистему для Linux, чтобы эффективно запускать Bluestacks.
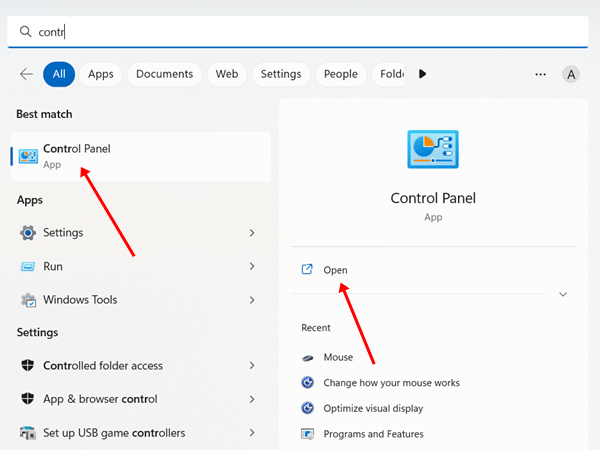
- Нажимать Окна > искать Панель управления > Открыть это.
- Затем нажмите на Программы.
- Далее выберите Включение или отключение функций Windows.
- Отключить Песочница Windows, Подсистема Windows для Linux вам нужно снять флажки, как показано на изображении ниже.
- Сейчас перезапуск систему и проверьте, работает ли BluStacks или выдает ту же ошибку.
5. Подумайте о 32-битных BlueStacks
У Bluestacks есть много версий для установки в нашей системе. Мы должны перепроверить все, прежде чем загружать именно ту версию, которая соответствует спецификациям нашей системы для лучшей совместимости. Хотя у каждой версии свой инстинкт.
Предположим, если вы планируете загрузить 64-битную версию BlueStacks, вам не нужно отключать Hyper-V. В недавнем обновлении 64-разрядная версия BlueStacks совместима с Hyper-V.
Однако, если 64-разрядная версия не работает для вас, вам следует использовать 32-битная версия BlueStacks Nougat. Кроме того, вы должны отключить Hyper-V, чтобы использовать 32-разрядную версию. Убедитесь, что вы удалили предыдущую версию из системы.
6. Запустите BlueStacks от имени администратора
До сих пор мы обсудили несколько вопросов и их решения. Вот еще один эффективный метод, который вы должны попробовать, когда вы получаете несовместимые ошибки настроек BlueStacks.
Однако вам нужно запустить приложение от имени администратора. До сих пор это помогло многим пользователям, надеюсь, вы также сможете найти решение. Просто нажмите Окна и искать BlueStacksи нажмите на Запустить от имени администратора.
7. Отключите оставшуюся часть Hyper-V с помощью пользовательского файла .exe.
Даже если вы отключили Hyper-V, у него все равно есть кое-что, что может помешать виртуализации. Тем не менее, вот процесс, чтобы отключить его тоже.
- Скачать и установить этот обычай .exe файл чтобы полностью отключить Hyper-V.
- Однако вам необходимо перезапуск система после успешной установки. Это отключит все функции и возможности Hyper-V.
Несмотря на то, что ошибка несовместимых настроек Windows в BlueStack может возникать по многим причинам, вы должны знать и применять эти общие исправления. Однако, если у вас есть какие-либо сомнения или вопросы, сообщите нам об этом в разделе комментариев.
According to various reports from users, after upgrading to Windows 11 22H2 whenever they open Bluestack, especially Bluestack 5, it shows a dialog box with the error message “Incompatible Windows settings”.

The message in the dialog box suggests users download the latest version of Bluestack 5 or modify windows settings on the PC accompanied by a “Review the FAQ” for more information. Clicking on it closes the app and redirects to the Support site.
Unfortunately, the majority of the affected users are already running the latest version of Bluestack 5, and they have no idea what “windows settings” refers to.
If you made up to this blog post, then it’s highly possible you’re one out of those affected users who’s unable to use Bluestack after upgrading to Windows 11 22H2, right? fret not!
Before you start reading the solution to fix this problem, it’s important to understand why the “Incompatible Windows settings” dialog appears in Windows 11. So below is the explanation:
Bluestack has a great history of compatibility issues with the Hyper-V feature of Windows, and if you have enabled Hyper-V on Windows 11 PC, then it’s highly possible that you will see Incompatible Windows settings dialog.
Developers working behind Bluestack 5 are already aware of the “Incompatible Windows settings” dialog box and suggest users run Bluestacks 5 version for Hyper V and Disable Hyper-V. So depending on your requirements, you can use one of the solutions:
Run Bluestacks 5 (P64) version for Hyper V
Uninstall the previous version of Bluestack 5 on your Windows 11 PC. For that, launch the Settings app by pressing WIN + I key combination.

Select Apps > Installed Apps. On the right side, locate the Bluestack 5, and click Uninstall Twice.
After that, you need to head over to this page, and scroll down until you reach the section shown in the following screenshot:

Here, click on the Download button next to the “Pie 64-bit(Supports Hyper-V)“. You will get the Bluestacks 5 setup file.
Run the setup file and complete the installation by following the on-screen instructions.
And you will be able to run Bluestack 5 Player app on your Windows 11 PC without an issue.
Run Bluestack 5 as Administrator
After installing the Bluestack 5 for Hyper-V if the error message still appears, then try to run Bluestack 5 app with administrator rights. Here’s how you can do that:
Click on the Search icon and type Bluestacks 5, and when the same app appears in the search results, click to open it.

When the UAC dialog box appears, click Yes to continue.
This time you should be able to run Bluestack App Player without any error message.
Disable Hyper-V in Windows 11
In case, due to any reason Bluestacks 5 Hyper-V version fails to fix the issue, then the only solution is to disable Hyper-V in Windows 11.
You can check the instructions discussed here in the post or follow the instructions in the below added below:
Make sure to restart your computer to disable the Hyper-V feature in Windows 11.
In case, due to any reason above steps fails to disable the Hyper-V, then you can try Download and run this custom .exe file for disabling Hyper -V.
Follow the on-screen instructions suggested by the tool.

Wait for a few seconds, and once the process completes successfully, a dialog box with confirmation will appear.
Tip – If you disable Hyper-V on Windows 11 PC, then you can install Standard Bluestacks 5 app on Windows 11 as well.
So these are possible solutions that will surely help in fixing Fix – Bluestacks 5 “Incompatible Windows settings” in Windows 11 22H2. Let me know which solution helped you in fixing the issue.
Also, if you know any other solution that helped you feel free to share it in the comments.
As an independent platform, it takes a lot of effort to create and curate quality content daily. Our content is totally funded by users like you.
Therefore, if you find information on this website useful, we kindly ask for your support in maintaining the longevity of our platform. If each person who benefits from our website contributes, we can secure a brighter future for our website.
Donate on Paypal or Buy us a coffee if you find the information shared in this blog post useful. Mention ‘Coffee’ in the Subject. So that I can thank you


Viney Dhiman, the mind behind GeekerMag, is a seasoned content writer with over 12 years of experience. Specializing in simplifying complex tech concepts, he covers Windows OS, Android, iOS, web apps, and product reviews. His work can be found on popular tech websites like Gizmodo and The Verge, and he has been interviewed by the Microsoft Edge team.
Even though the error occurs due to technical issues, it can be quickly resolved. However, it requires completing a super simple and easy method to fix the issue completely.
1. Disable Hyper-V
When it comes to virtualizing software, Hyper-V is often the first option that comes to mind. However, if it interferes with BlueStacks, the situation may not be as ideal as it seems. Moreover, it can reduce the app’s performance and even lead to serious issues such as incompatible Windows setting errors.
Although the latest version of BlueStacks is compatible with Hyper-V, if you have encountered an issue, then you should consider disabling it asap.
- Press Windows > search for Turn Windows Features on or off > click on Open.
- Then scroll down, and you will get the Hyper-V option, click the tiny arrow to expand its subsidiary element.
- Next, uncheck all the boxes to disable Hyper-V and its functionalities. Now click on the Ok button.

- After that, you need to restart the system and check whether BlueStacks is working fine or move down to the next method.

2. Disable the Memory Integrity
Memory integrity is a useful security feature that offers additional security during virtualization and is part of core isolation. However, it could be another reason that you are facing BlueStack incompatible settings error.
As a fix, you need to disable its services to enjoy BlueStacks on your system. Here’s what you need to follow.
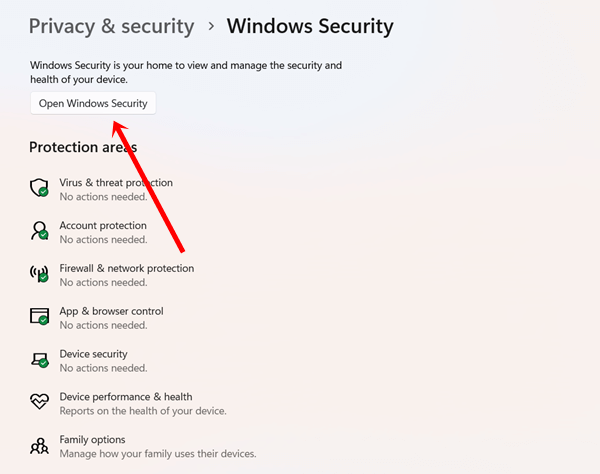
- Press Windows start > Settings > Privacy & Security.
- Next, click on Windows security > Open Windows security.

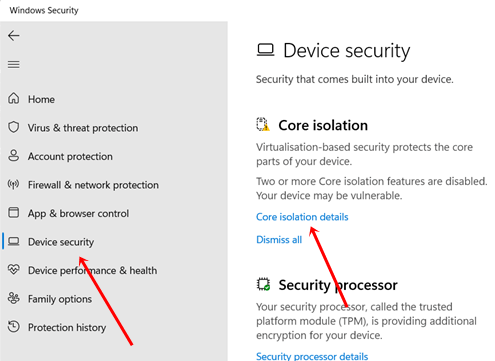
- Then click on Device Security and select Core Isolation details.

- Now simply disable the Memory Intergrity toggle button.

3. Uninstall Windows Update
Updating Windows is always good, but if it doesn’t compatible with BlueStacke. Therefore, we have to uninstall it. This is what you need to follow.
- Press Windows > Settings > Windows update.

- Then click on Update History, and select Uninstall updates.

- Now you can see all recently installed updates that you can uninstall to make nice compatibility with BlueStacks. However, click on Uninstall updates.
4. Disable Windows Sandbox & Subsystem for Linux
If you have enabled Windows Sandbox, then chances are high that you can’t use Bluestacks. As a fix, you need to disable Windows Sandbox and Subsytem for Linux to run Bluestacks efficiently.
- Press Windows > search for Control Panel > Open it.

- Then click on Programs.
- Next, select Turn Windows features on or off.

- To disable Windows Sandbox, Windows Subsystem for Linux you need to uncheck boxes, just like the image shown below.

- Now restart the system and check whether BluStacks is running or throwing the same error.
5. Consider 32-bit BlueStacks
Bluestacks have many versions to install on our system. We have to cross-check everything before downloading the exact version that matches our system specifications for better compatibility. Although, each version has a different instinct.
Suppose, if you are considering downloading BlueStacks 64-bits, then you don’t need to disable the Hyper-V. In the recent update, BlueStacks 64-bit is compatible with Hyper-V.
However, if 64-bit is not working for you, then you should go with the BlueStacks Nougat 32-bit version. Also, you have to disable Hyper-V to use the 32-bit. Make sure you have uninstalled the previous version from the system.

6. Run BlueStacks as Administrator
So far we have discussed several issues and their solution. Here is another effective method that you should try when you are getting incompatible BlueStacks settings errors.
However, you need to run the app as an administrator. It helped a lot of users till now, hopefully, you can also get a solution. Just press Windows and search for BlueStacks, and click on Run as Administrator.
7. Disable Hyper-V Leftover using Custom .exe File
Even if you’ve disabled Hyper-V, still, it has some leftovers to interfere with virtualization. However, here is a process to disable it too.
- Download and install this custom .exe file to disable Hyper-V completely.
- However, you need to restart the system after installing it successfully. It will disable all Hyper-V features and functionalities.
Even though BlueStack’s incompatible Windows settings error could occur for many reasons, these are the common fixes you should know and apply. However, if you have any doubts or questions, let us know in the comment section.