DIY Video Studio is supported by its readers. Please assume links on this site are affiliate links, and that I get commissions for purchases made through these links. As an Amazon Associate, I earn from qualifying purchases. Thank you if you use any of the links.
When I went shopping for my Blue Yeti, because I knew it had been originally launched in 2009, I asked, “does the Blue Yeti does work with Windows 10”. Yes, it does, I was assured. Happy with that answer, I went ahead and bought this nice-looking USB microphone.
When I got the mic home because an installation disk wasn’t included in the box, I looked on the Blue Microphones![]() website to see if I could find any installation files and a Blue Yeti drivers download. However, I needn’t have bothered.
website to see if I could find any installation files and a Blue Yeti drivers download. However, I needn’t have bothered.

You do not need Blue Yeti drivers for Windows 10 since the Yeti is a Plug’n’Play USB microphone. Just connect the Yeti to your PC’s USB port with the supplied cable and Windows 10 will recognize and install the Yeti as a USB audio input device.
So, instead of having to look for installation software and drivers, it turns out that setting up the Blue Yeti is very simple. Which of course is one of the advantages of using a USB microphone. You don’t need those professional XLR plugs and cables, nor do you need to get and install an audio interface. USB keeps everything simple.
Connecting a Blue Yeti to your Windows 10 PC
To connect the Yeti to your PC, you’ll need the USB cable that came with your Blue Yeti. Insert the mini-USB plug into the socket on the base of the Yeti.
Then connect the other end, the one with the USB-A plug, into one of the USB ports on your computer. If you are using a more recent computer that only has USB-C ports, you’ll obviously need a mini-USB to USB-C cable.
Once connected to your computer, since the Yeti is a Plug’n’Play device, Windows 10 will detect the microphone and install it as one of your available audio input devices. You probably will now be able to start using your Blue Yeti as your sound input in whatever app you’re going to run, such as Audacity, Adobe Audition, or Zoom.
Setting your Blue Yeti as the default audio input device
Although Windows may automatically set the Blue Yeti as your default input audio device, it may not do that if you have another device already selected, such as the microphone on a webcam. If that’s the case, here’s what to do.
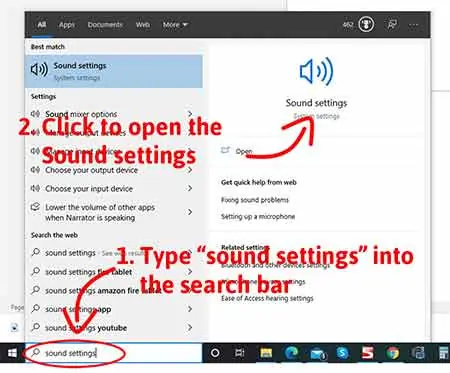
To select the Blue Yeti as your microphone you need to do that in Windows Sound settings. There are two easy ways to open the Sound settings window.
(1) Type “sound settings” in the Windows search bar. Then in the results list that opens, click on Sound Settings.
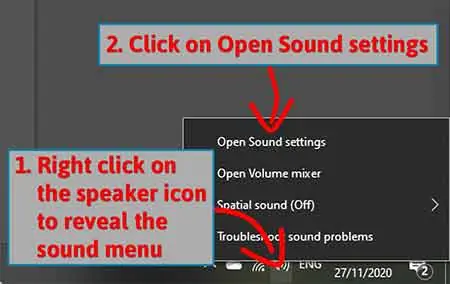
(2) Right-click on the Speaker icon in the bottom right of the Windows 10 task bar. A small panel will open. Then click on “Open Sound settings”.
Whichever method you use, you should now see the Sound settings window open.
Under Sound you will first see a section titled Output. Below this there is another section called Input. This is where you can choose your input device.
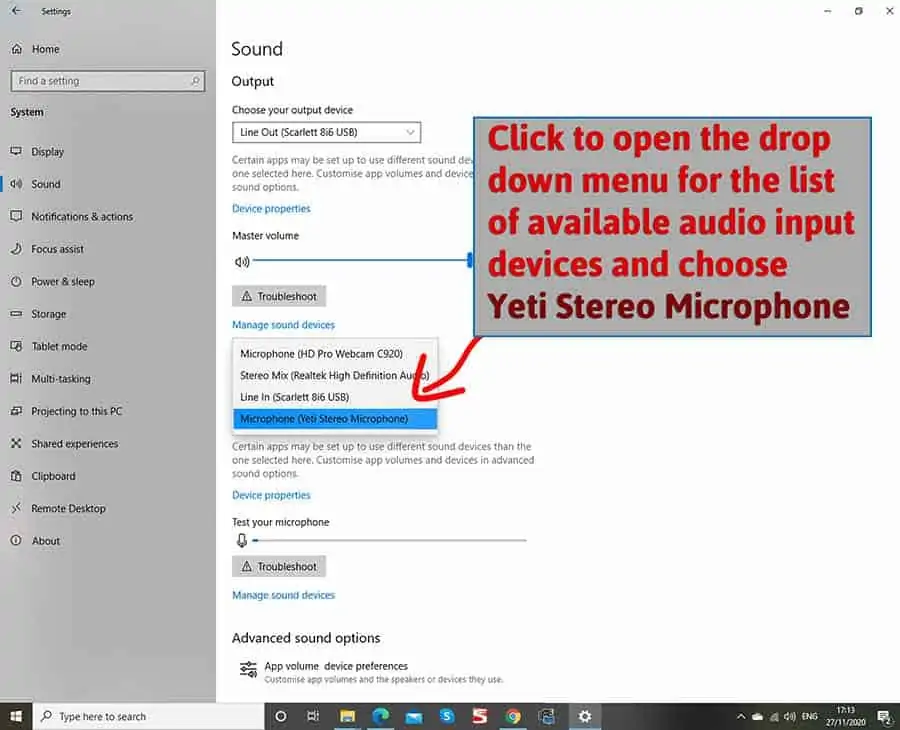
If you already have another microphone installed, perhaps if you have a webcam, it might be set as your default audio input device.
To change to the Yeti, click on the box beneath “Choose your input device”. Then select the Blue Yeti from the drop-down list of available audio input devices.
Once you’ve selected the Yeti as your input device, its entry in the list will turn blue, and you’re done. The Blue Yeti will now be your selected default audio input device.
Blue Yeti USB device not recognized windows 10
The solution to your Blue Yeti not showing up Windows 10 may end up with you having to dive into Windows Sound System settings and Device Manager but there are a few things to try first.
If your blue yeti is not showing up as a device in Windows, before you do anything else, make sure it is plugged into your computer’s USB port.
In my experience, even if the Yeti has previously been installed, it must be connected to the PC in order to be visible in Device Manager or Sound Settings.
[i] Check the USB cable
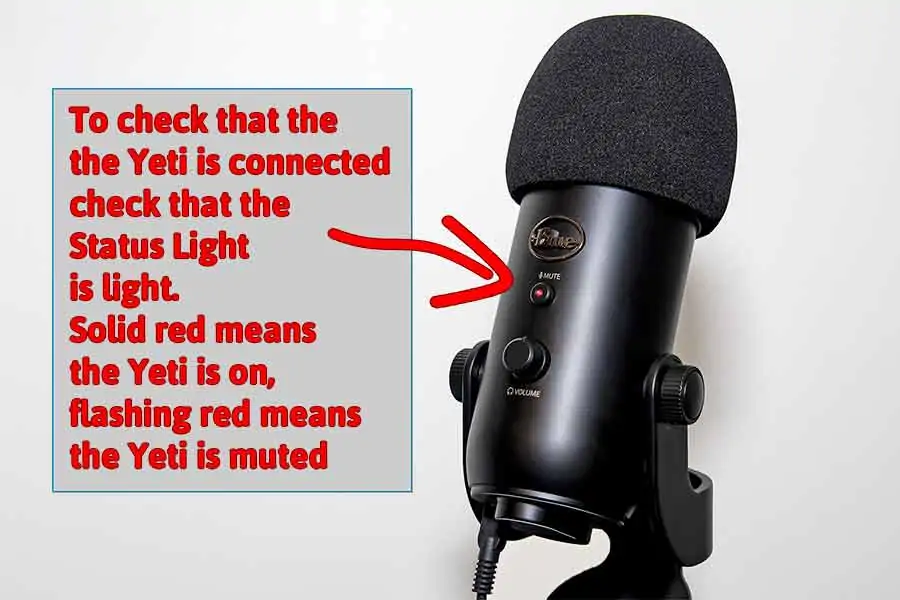
The simplest test of all is to visually check the status light in the middle of the Yeti’s mute button. The microphone does not have an on/off switch, so if the mic is plugged into your PC the status light will be lit up red. If you have muted the Yeti by pressing the mute button the status light will flash red. Either way, you will know if the mic is receiving power from your computer.
If the status light does not come on when the mic is connected, check the USB cable. Is each USB connector fully inserted? Try unplugging and plugging in again. If the Yeti’s status light still doesn’t light up, try another USB port on your computers or try using a USB cable that you know works.
[2] Check the Yeti on another computer
Still no luck? Try using the Blue Yeti on another computer.
If the Yeti’s status light comes on and everything appears fine, then the USB socket on your original computer may be faulty.
But if the status light doesn’t come on and you have tried a couple of USB cables, then the Yeti may be faulty.
[3] Reinstall your Blue Yeti as an audio device
If the Yeti’s red status light is lit but you’re still getting the “Blue Yeti not recognized Windows 10” error you can try uninstalling and then reinstalling the Yeti.
You’ll need to go into your computer’s Device Manager and delete the Blue Yeti as an audio device and then connect the microphone again, so Windows reinstalls it. To do this, follow these steps.
Step 1: Ensure the Blue Yeti is connected to a USB port on your computer. You should see the red LED on the mic’s mute button lit up.
Step 2: Right-click on the Windows logo icon on the left corner of the taskbar to open the pop-up menu. You should see “Device Manager” as approximately the fifth entry from the top. Click on it to open the Device Manager.
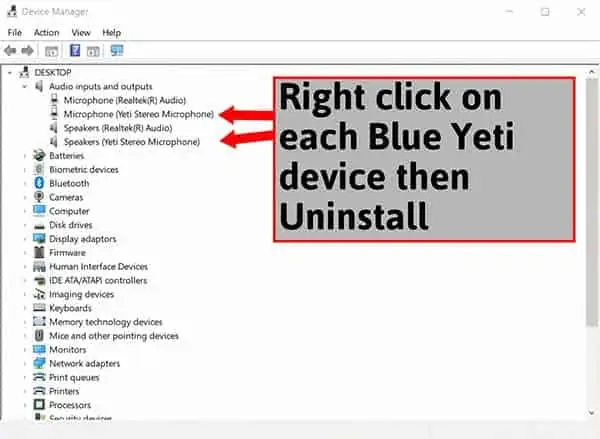
Step 3: With the Device Manager open, expand Audio inputs and outputs. You should see Yeti Stereo Microphone listed as both a microphone and speakers. Right-click on each Blue Yeti device and choose “Uninstall”.
Step 4: With the Yeti uninstalled you can now unplug the Yeti’s USB cable from your computer.
Step 5: Reboot the computer. Once the PC has rebooted and you’ve logged back into Windows, connect the Blue Yeti microphone using the USB cable and wait for Windows to install the microphone again.
Hopefully the Yeti will now be detected, and you can go ahead and use it in the app of your choice. But if you’re still experiencing problems you can try updating the Blue Yeti’s drivers.
[4] Update the Blue Yeti microphone driver
If the Yeti is still not being detected it may be that the drivers may have become corrupt and are stopping the microphone from functioning.
You’ll again need to open the Device Manager, so the initial steps are much the same as in uninstalling and reinstalling the Yeti as an audio device.
Step 1: Ensure the Blue Yeti is connected to a USB port on your computer. You should see the red LED on the mic’s mute button lit up.
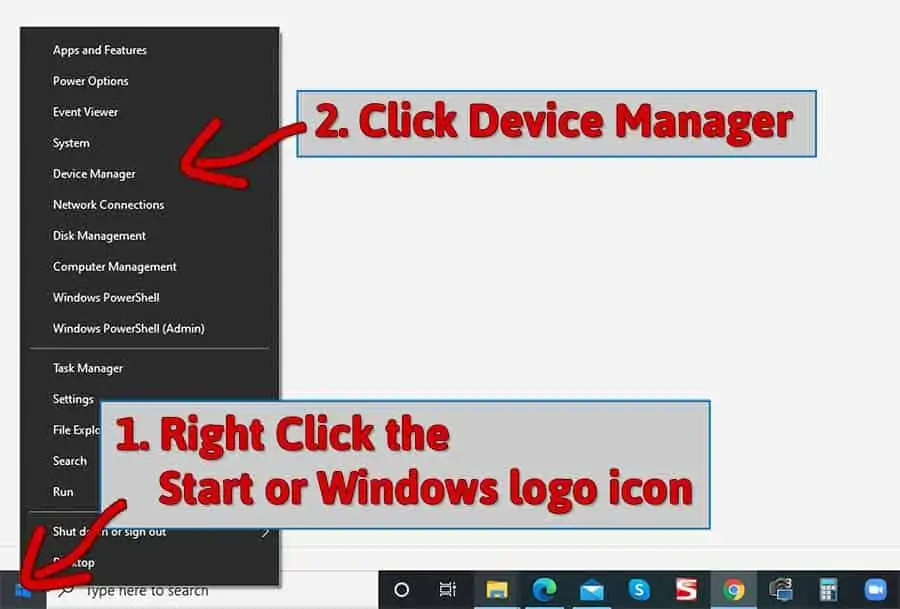
Step 2: Right click on the Start or Windows logo icon on the left corner of the taskbar to open the pop-up menu.
You should see “Device Manager” as approximately the fifth entry from the top. Click on it to open the Device Manager.
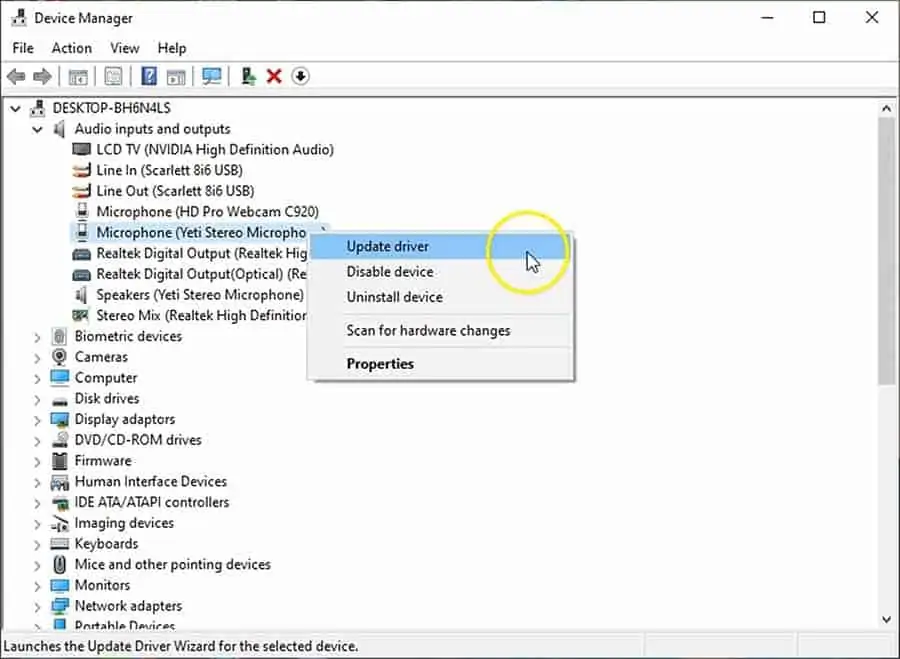
Step 3: With the Device Manager open, expand Audio inputs and outputs. You should see Yeti Stereo Microphone listed as both a microphone and speakers. Right-click on each Blue Yeti device and choose “Update Driver”.
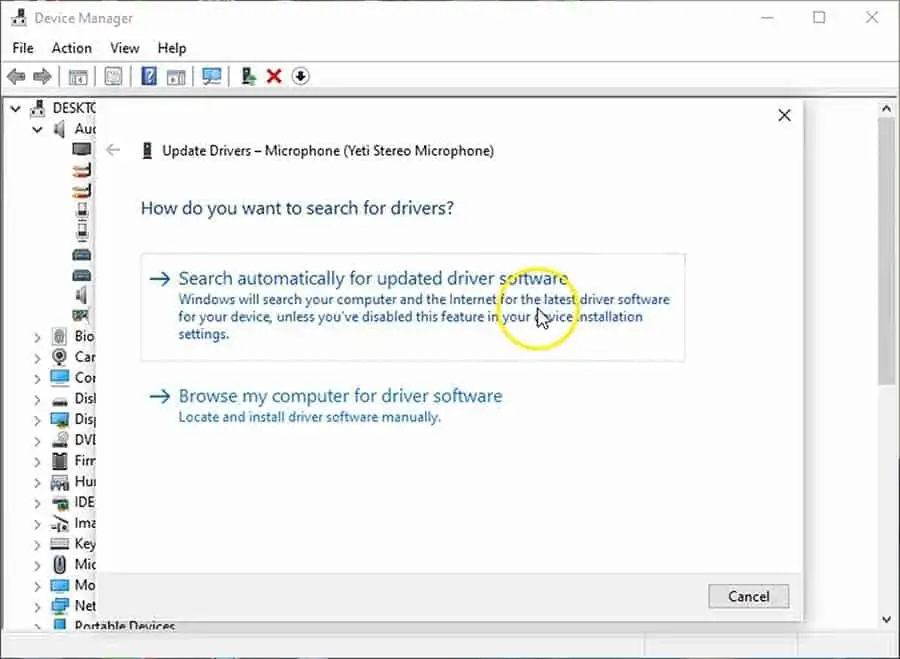
Step 4: Windows will ask you; how do you want to search for drivers? Choose the first option of Search automatically for updated driver software.
Device Manager will search for the required driver and update it, but it may also report that the best driver is already installed.
Step 6: If all went well, restart your computer and log into Windows. Hopefully this will have fixed the problem and you’ll no longer have the problem of “Blue Yeti not recognized Windows 10”.
[5] Avoid using a Blue Yeti with a USB hub
If you use a lot of USB devices, be aware that Blue Microphones does not recommend plugging the Yeti into a USB hub.
Normally, you should not share a USB hub with other high-data throughput devices. This could lead to problems such as the Blue Yeti producing choppy audio, clicks, or stuttering. Using a USB hub may also cause problems with the Yeti not being recognized.
This has not been a problem for me when I’ve tried using a USB. I tried using my Yeti with a USB hub but did not experience any problems. But I know of others who have. If that’s the case for you, try bypassing the USB hub and plugging the Yeti directly into one of your computer’s USB ports.
Tosh Lubek runs an audio and video production business in the UK and has been using the Canon EOS R since it was released in the Autumn of 2018. He has used the camera to shoot TV commercials for Sky TV, promotional business videos, videos of events and functions, and YouTube creator content. He has also won international awards for his advertising and promotional work. You can meet him by visiting his “video booth” at HashTag business events across the country.
Are you looking for software and driver for your Blue Yeti Microphone Product. In this article you will find the latest Blue Yeti Microphone drivers and free software installation. These hardware drivers provide you with solutions to fix errors in your Microphone Audio.
Click “Download” to get the Blue Yeti Microphone Driver and software Update Tool, and install software BlueSherpa it on PC (Windows 11, 10, 8, 7) and macOS 13.0 Ventura, Mac OS Monterey, 12.0, Big Sur, 11.0. You can also find the English version of the User manual/ Quick Setup Guides For FREE.
Download Logitech’s free G HUB software to unlock advanced Blue VO!CE broadcast vocal effects and access firmware updates for your YETI, YETI NANO or YETI X
Blue Sherpa can also be used for firmware updates and customizing microphone settings for your USB mic. Sherpa is compatible with Yeti X, Yeti, Yeti Nano, Snowball and Snowball iCE.
HARDWARE SETUP
Yeti is plug ‘n play with MAC and PC systems and is compatible with macOS (10.14, 10.15 ,11.0 or higher), Windows 11, 10 ,Windows 8 (incl. 8.1), Windows 7, Windows Vista,XP Home Edition, and XP Professional. Simply connect the Yeti directly to your computer with the supplied USB cable (avoid USB hubs or multipliers), and you are good to go. For more specific information about how to setup Yeti with MAC and PC, Please click here.*

Download and Install Software for Windows
Download and Install Software for macOS
User manual Blue Yeti USB Microphone DOWNLOAD PDF
How to install Drivers Microphone
1. Find the driver installer on your desktop; right click and select and run.
2. Double click on downloaded file to run it
3. Follow the on-screen instructions until the installer prompts you to plug in the device.
4. Following steps Please see below for the exact instructions for your OS
5. Click Download Driver allow the Blue YETI installer to complete the installation.
6. After the installation is complete, reboot your computer.
Blue Yeti Drivers Windows 10:
Just today am having a very annoying problem with my Blue Yeti. It seems like the device gets slower every time I use it. Latency is never at less than 20mbs for me. I can not seem to find any of the standard fixes to make any difference. Any help or suggestions would be much appreciated.
Download Blue Yeti Drivers Windows 10 (Here)
I have taken the blue yeti wireless microphone with me everywhere. I use it in the car for interviews, live performances, meetings, etc. I also use it at work where it’s convenient to take recordings during the breaks. To make things worse, I have tried several free converters to see which one would work with my computer and iPad.
Instructions About:
All the converters that I used worked fine. The only issue was that it was giving different results every time I used it. At one point it would give a list of 6 languages that I used which made it very frustrating. Then after wasting a few hours trying to figure out what this program was all about, I decided to use a program that would help me solve the problem.
Blue Yeti Drivers For Windows 10: It’s software that can help you solve the problem. To start with it installed the latest version of Blue Yeti drivers on my computer and it found thousands of errors in order to fix it. After installing the program, it took just minutes to scan my computer for errors and I was able to fix all the errors with the help of this program. It didn’t even take me that long to set it up as well! I didn’t even have to wait for the scan to finish before I had a fully functional USB microphone. It’s so convenient.
Download Blue Yeti Drivers Windows 10:
Blue Yeti Drivers For Windows: It worked. After downloading and installing the program, it was able to detect all the drivers for my microphone directly in the operating system. Installing all the drivers for your devices is quite a daunting task if you are not aware of what exactly you want. But in this case, everything was explained to me and I didn’t even need to go out of my chair. It was so easy to use.
Blue Yeti Drivers For Windows: It worked. After installing the software and scanning my computer, it was able to detect all the drivers for my Blue Yeti USB mic instantly. Installing all the drivers for your devices is a daunting task if you’re not aware of what exactly you want. But in this case, everything was described to me and I didn’t even have to go out of my chair. It was so simple to use.
How the driver will help you to connect?
This is just one example of how a software program that I downloaded can help me get the right-click recording quality. So even if you are a novice, don’t worry. Even someone who is not very tech-savvy can use the free converter to show details on how to record audio using a Blue Yeti USB microphone right from their desktop computer. Isn’t that great? You can record voice notes directly from your computer.
This little free tool can save you a ton of time trying to figure out how to record audio using your Blue Yeti microphones. If you are going to start recording at home, you need this program. The last thing you want is to waste time trying to figure out how to record audio. This software can make it really easy, fast, and effortless. You can set up a great-sounding home recording studio right from your desktop computer if you take advantage of the free converter show details.
Read to know about different ways to download, install and update the Blue Yeti microphone driver on Windows 10, 11.
Among users and YouTubers, Blue Yeti mics are very common. It is an excellent piece of gear for recording audio, whether it be music or podcasts. Its excellent price/quality ratio is the main reason for its enormous popularity. Although it is a reliable microphone, several customers have reported unstable connectivity problems or errors like the Blue Yeti mic not being recognized.
Outdated, missing, or corrupt drivers are the prime reason for the Blue Yeti microphone-related issues or errors. However, the good news is that you can easily fix such problems by updating Blue Yeti drivers from time to time. In this article, we’ll go through a few practical and efficient ways to find, download and install the latest drivers for Blue Yeti microphones on Windows 10/11.
Quickest Way to Install Blue Yeti Mic Driver Update on Windows 11, 10
If you are looking for the simplest method then you should use Bit Driver Updater. It is a globally renowned driver updater program that automatically detects your system and quickly provides you with a list of new drivers. Additionally, with the help of this utility, you can perform bulk driver downloads at once. Get Bit Driver Updater for Free from the download link given below.

3 Methods to Download, Install & Update Blue Yeti Microphone Driver on Windows 11/10
The following are non-cumbersome methods that can be used to perform Blue Yeti driver download for Windows 10 and 11. Without further ado, let’s get started!
Method 1: Update Blue Yeti Drivers in Device Manager
If you have adequate time and decent computer skills then you can follow the steps below to manually update Blue Yeti microphone drivers using Windows in-built utility tool named Device Manager:
- Just make sure the Blue Yeti microphone is connected to your computer before starting the process.
- Quickly press the Windows + R keys together to open the Run Dialog box.
- In the run dialog box, type devmgmt.msc and hit the Enter key. You can also click on the Ok option.

- This will open the Device Manager on your computer. Find and double-click the Sound, Video, and Game Controllers option. Now see if your Blue Yeti device is included in the list. If not, then go to the Universal Serial Bus Controllers and double-click on the same to expand its category.
- After that, click right on the USB Composite Device and click on Update Driver Software to proceed.

- From the next prompt, choose Search Automatically for Updated Driver Software option.


Windows now starts looking for the latest drivers and later on installs all the available drivers including the Blue Yeti microphone driver.
Also Read: Blue Snowball Microphone Drivers Download for Windows
Method 2: Use Driver Updating Tool to Automatically Install Blue Yeti Driver (Recommended)
Sometimes, Blue Yeti won’t appear in Device Manager and fails to provide you with the best driver updates. In that scenario, we advise using Bit Driver Updater or another recognized driver updater program.
The Bit Driver Updater automates the entire process of locating and installing the most recent drivers on a Windows computer. Also, the software replaces all out-of-date or missing drivers with just one click of the mouse. It only provides genuine drivers that have passed the WHQL testing process. To update Blue Yeti drivers and fix issues like Blue Yeti drivers not being detected you can use this amazing driver updating tool. Here is how!
- Download Bit Driver Updater from the button provided below.

- Run the downloaded file and follow the on-screen instructions to complete the process.
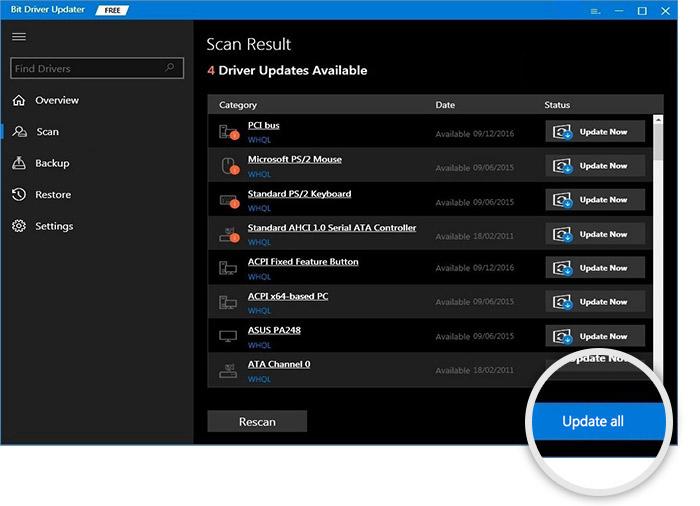
- Launch the driver updater software on your computer and select the Scan option from the left-hand menu.

- Wait for the scanning to be finished. Click the Update Now button next to the Blue Yeti driver.
- Choose the Update All button if you wish to update all out-of-date drivers at once.


See how easy it is to find, download and install the latest version of driver updates using Bit Driver Updater. It is worth noting that the pro version of Bit Driver Updater provides 24/7 technical support and a full money-back guarantee but for a limited time.
Once everything is done, reboot your computer to apply changes.
Method 3: Use Windows Update to Install Blue Yeti Mic Drivers
Last but not least, users can also use Windows Update to download all the latest driver updates as well as other system updates to enhance PC’s overall performance. Below is how to do that:
- Altogether press Windows and I keys from your keyboard to open Windows Settings.
- Then, choose the Update & Security option.

- Make sure Windows Update is selected from the left menu pane and then click on Check For Updates.


Now, wait until Windows searches for the latest updates and installs them. Once done, simply start your PC all over again.
Also Read: Download and Update Microphone Driver for Windows 10
How to Download & Update Blue Yeti Drivers on Windows 10/11: Explained
So, the above suggestions were three simple ways that you can use to get the latest Blue Yeti microphone drivers installed on your Windows 11, 10. We hope you find the guide useful. Please feel free to drop your queries in the comments section below.
For more information related to technology or technical issues, follow us on Social Media and subscribe to our Newsletter.
Микрофон Blue Yeti – это одна из самых популярных моделей микрофонов на рынке. Он обладает высоким качеством звука и широким спектром функций, который позволяет использовать его для различных целей. Однако, чтобы полностью насладиться всеми возможностями этого микрофона, необходимо установить правильные драйверы. В данной статье мы расскажем о том, как установить драйвер для Blue Yeti на компьютере с операционной системой Windows 10.
Первым шагом является подключение микрофона к компьютеру при помощи USB-кабеля. После этого необходимо скачать драйвер для Blue Yeti с официального сайта производителя или с других надежных источников. Если у вас еще нет драйвера, рекомендуется скачать самую последнюю версию, чтобы быть уверенными в совместимости с операционной системой Windows 10.
После скачивания драйвера, необходимо запустить его установку. Для этого необходимо найти загруженный файл и дважды кликнуть по нему. Следуйте инструкциям мастера установки и дождитесь завершения процесса. После установки драйвера, компьютер может запросить перезагрузку. Выполните этот запрос, чтобы драйверы правильно вступили в работу.
Важно отметить, что некорректно установленные или устаревшие драйвера могут привести к неправильной работе микрофона. Поэтому рекомендуется следить за обновлениями программного обеспечения и регулярно обновлять драйверы, чтобы сохранить оптимальную производительность микрофона Blue Yeti.
После установки драйвера может потребоваться настройка микрофона в операционной системе Windows 10. Чтобы сделать это, необходимо открыть «Настройки» и выбрать раздел «Устройства». В этом разделе можно выбрать микрофон Blue Yeti как устройство записи и настроить его параметры, такие как чувствительность, уровень громкости и другие. Проверьте работу микрофона, записывая короткие аудиофайлы или проводя тестовые звонки.
Теперь ваш микрофон Blue Yeti готов к использованию на компьютере с операционной системой Windows 10. Установка драйвера и настройка микрофона позволят вам насладиться качественным звуком и комфортным использованием данного устройства для различных целей, включая запись аудио, голосовые команды, позвонки и прочие задачи.
Содержание
- Почему нужен драйвер для микрофона Blue Yeti и как он работает?
- Как скачать и установить драйвер для микрофона Blue Yeti на Windows 10?
- Проблемы с установкой драйвера для микрофона Blue Yeti на Windows 10 и как их решить?
- Как работать с микрофоном Blue Yeti после установки драйвера на Windows 10?
- 1. Подключение микрофона Blue Yeti
- 2. Настройка аудио-устройства
- 3. Тестирование микрофона Blue Yeti
- 4. Настройка дополнительных параметров
Почему нужен драйвер для микрофона Blue Yeti и как он работает?
Когда вы подключаете микрофон Blue Yeti к компьютеру с операционной системой Windows 10, операционная система автоматически пытается найти и установить соответствующий драйвер. Однако, иногда драйвера необходимо установить вручную.
Драйвер для микрофона Blue Yeti обеспечивает совместимость между микрофоном и операционной системой Windows 10, а также позволяет использовать все функциональные возможности микрофона, такие как регулировка громкости, выбор направления записи и управление чувствительностью.
Установка драйвера для микрофона Blue Yeti обычно состоит из нескольких шагов:
- Скачайте соответствующий драйвер с официального сайта производителя микрофона Blue Yeti.
- Откройте скачанный файл с драйвером и следуйте инструкциям установщика.
- После завершения установки, перезагрузите компьютер, чтобы изменения вступили в силу.
- Подключите микрофон Blue Yeti к компьютеру.
- Проверьте работу микрофона, открыв любое программное обеспечение для записи звука или видео и убедившись, что микрофон работает правильно.
Если у вас возникли проблемы с установкой драйвера для микрофона Blue Yeti или микрофон продолжает работать некорректно после установки, вы можете обратиться в техническую поддержку Blue Yeti или на официальный форум, чтобы получить дополнительную помощь и решить проблему.
Как скачать и установить драйвер для микрофона Blue Yeti на Windows 10?
- Откройте веб-браузер и перейдите на официальный веб-сайт Blue Microphones.
- На главной странице сайта найдите раздел «Поддержка» или «Скачать драйверы».
- В разделе «Поддержка» найдите модель своего микрофона Blue Yeti и нажмите на нее.
- На странице модели микрофона найдите раздел «Драйверы» или «Скачать драйверы».
- Выберите операционную систему Windows 10 из списка поддерживаемых операционных систем и нажмите на ссылку для скачивания драйвера.
- Дождитесь завершения загрузки драйвера.
- Откройте загруженный файл драйвера и следуйте инструкциям установщика для его установки.
- После завершения установки перезагрузите компьютер, чтобы изменения вступили в силу.
Поздравляем! Теперь вы успешно скачали и установили драйвер для микрофона Blue Yeti на операционной системе Windows 10. Ваш микрофон готов к использованию со всеми своими функциями.
Проблемы с установкой драйвера для микрофона Blue Yeti на Windows 10 и как их решить?
Установка драйвера для микрофона Blue Yeti на операционной системе Windows 10 может приводить к некоторым проблемам. В этом разделе рассмотрим популярные проблемы и способы их решения.
| Проблема | Решение |
|---|---|
| Отсутствие подключения | Убедитесь, что микрофон Blue Yeti правильно подключен к компьютеру. Попробуйте использовать другой порт USB или кабель. Если проблема не решена, проверьте настройки устройства в панели управления, чтобы убедиться, что микрофон выбран как устройство записи по умолчанию. |
| Отсутствие звука или низкое качество звука | Проверьте уровень громкости микрофона в настройках звука. Убедитесь, что громкость не находится на минимуме, и откорректируйте ее при необходимости. Также стоит проверить настройки уровня записи в программе, которую вы используете для записи звука. |
| Драйвер не распознан или не установлен | Скачайте последнюю версию драйвера для Blue Yeti с официального веб-сайта производителя. После скачивания запустите установочный файл и следуйте инструкциям. Если у вас все еще возникают проблемы, попробуйте вручную обновить драйвер через Менеджер устройств. |
| Проблемы с совместимостью | Если после установки драйвера у вас все еще возникают проблемы с микрофоном Blue Yeti, проверьте совместимость микрофона с операционной системой Windows 10 на сайте производителя. Если микрофон не совместим, попробуйте установить драйвер для предыдущей версии операционной системы. |
Надеемся, что эти рекомендации помогут вам решить возникающие проблемы с установкой драйвера для микрофона Blue Yeti на Windows 10 и настроить его работу в соответствии с вашими потребностями.
Как работать с микрофоном Blue Yeti после установки драйвера на Windows 10?
После успешной установки драйвера для микрофона Blue Yeti на операционную систему Windows 10, вам открываются новые возможности использования этого мощного аудио-устройства. В этом разделе мы рассмотрим основные шаги, которые помогут вам начать работать с микрофоном Blue Yeti и настроить его для оптимальной записи звука.
1. Подключение микрофона Blue Yeti
Перед началом работы с микрофоном Blue Yeti, убедитесь, что он правильно подключен к вашему компьютеру через USB-порт. Убедитесь, что микрофон включен, и светодиодный индикатор на передней панели горит.
2. Настройка аудио-устройства
Для установки аудио-устройства Blue Yeti в качестве предпочтительного микрофона в Windows 10, выполните следующие шаги:
- Нажмите правой кнопкой мыши на значок динамика, расположенный на панели задач, и выберите «Звуки».
- Перейдите на вкладку «Запись».
- Найдите устройство Blue Yeti в списке доступных микрофонов и выделите его.
- Нажмите кнопку «Установить по умолчанию».
- Нажмите «Применить» и «ОК», чтобы сохранить изменения.
3. Тестирование микрофона Blue Yeti
Для того чтобы убедиться, что ваш микрофон Blue Yeti работает правильно, выполните тестовую запись аудио:
- Нажмите правой кнопкой мыши на значок динамика, расположенный на панели задач, и выберите «Звуки».
- Перейдите на вкладку «Запись».
- Найдите устройство Blue Yeti в списке доступных микрофонов и выделите его.
- Нажмите кнопку «Свойства» и перейдите на вкладку «Уровни».
- Увеличьте уровень громкости, при необходимости, до желаемого значения.
- Нажмите кнопку «ОК».
- Нажмите кнопку «Запись».
- Говорите в микрофон и наблюдайте за визуальным откликом в виде уровня звука.
4. Настройка дополнительных параметров
Микрофон Blue Yeti имеет ряд дополнительных параметров, которые могут быть полезны в зависимости от вашей конкретной ситуации записи:
- Режим записи: выберите один из четырех режимов записи (стерео, кардиоид, омнидирекционный или двойное кардиоидное) в зависимости от вашего предпочтения и потребностей записи.
- Уровень громкости на микрофоне: настройте уровень громкости на самом микрофоне, чтобы достигнуть оптимального уровня записи.
- Фильтр шума: включите фильтр шума, чтобы устранить нежелательные шумы и искажения во время записи.
Примените необходимые настройки, в зависимости от ваших потребностей, для достижения наилучшего результат при записи с микрофоном Blue Yeti.
Теперь, когда вы знаете, как работать с микрофоном Blue Yeti после установки драйвера на Windows 10, вы готовы к созданию качественных аудиозаписей, подходящих для любых целей, будь то подкасты, стриминг, обучающие видео или песни. Удачной работы и приятного творчества!