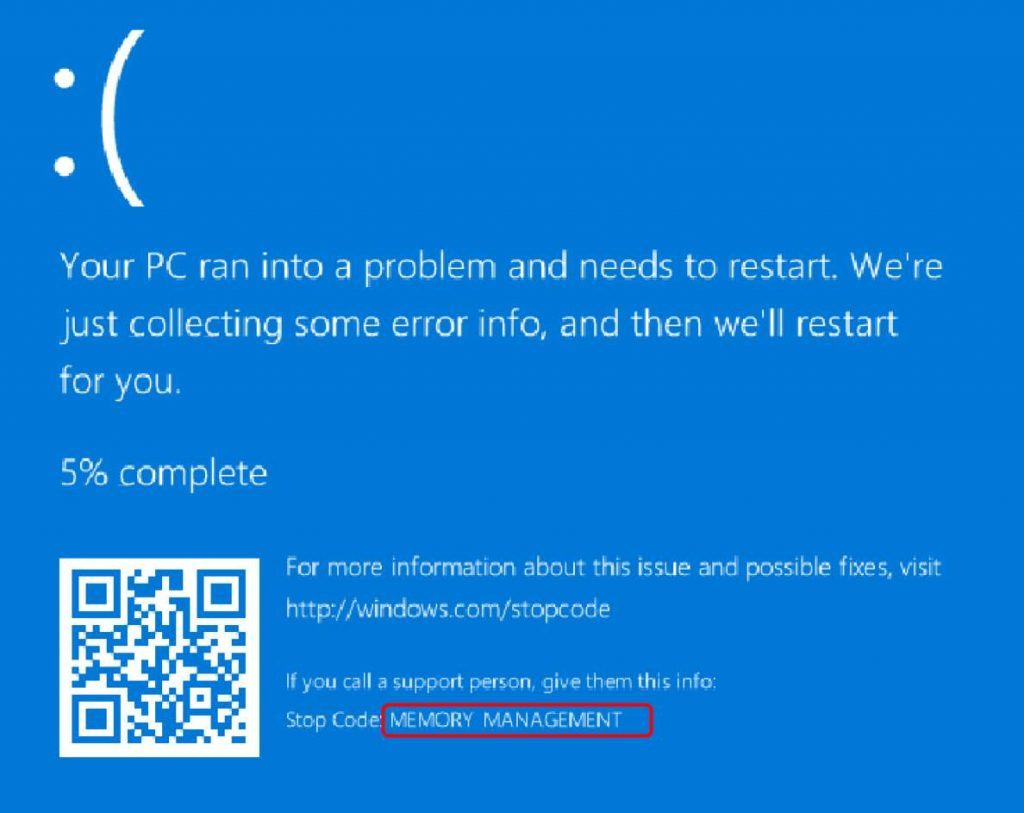
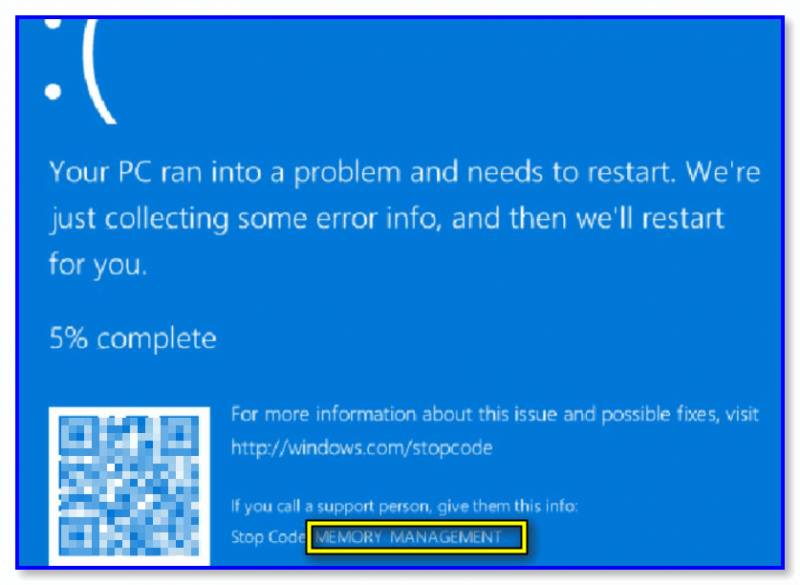
Have you ever been working away on your computer when suddenly the dreaded Blue screen of Death (BSOD) appears, telling you there’s been a MEMORY MANAGEMENT error?
Well, you’re not alone. A lot of Windows users are having the same problem.
But the good news is we have five solutions you can try to fix this memory management error.
What is memory management?
In a nutshell, memory management is the process that manages memory usage in your computer.
It keeps track of every byte of memory in your computer, and whether it’s free or being used. It decides how much memory to allocate to certain processes (including the programs you launch), and when to give it to them. It also ‘frees up’ memory when you close a program by marking it as available to be used by something else.
But like all processes running on your computer, sometimes it can crash. And when it does, you’ll probably see the MEMORY MANAGEMENT error message soon after.
Why would I have the MEMORY MANAGEMENT BSOD error?
According to Microsoft, the Memory Management blue screen of death error appears when there’s been a severe memory management error.
Sounds horrible, doesn’t it? But don’t worry – it’s not fatal.
Tools such as WhoCrashed and BlueScreenView can help you figure out what’s causing the horrifying BSOD on your computer. But chances are it will be one of these:
- software or hardware conflict
- virus infection
- faulty video driver
- faulty memory
- disk errors
- corrupted system files
Try these fixes:
Here are 5 fixes for you to try. You may not have to try them all. Just work your way down the list until you find the one that works for you.
To try these fixes you need to be logged into Windows on the problem computer. If you can’t log into Windows normally, shut down your computer, turn it back on in Safe Mode, then try the fix.
- Update video card driver
- Run a disk check
- Run Windows memory diagnostic test
- Check newly installed software and haardware
- Scan for possible virus infection
- Repair system files
- Other options
Fix 1: Update the video card driver
A common cause of the MEMORY MANAGEMENT error is a damaged, outdated or incorrect video card driver. And so to fix the error you need to update your video card driver to the most recent correct version.
There are two ways to update the driver: manually and automatically.
Manual driver update – To manually update the driver, head to the video card manufacturer’s website and search for the most recent correct video driver. Unless you’re getting the error on a laptop, in which case you should always go to the laptop manufacturer’s website. The video drivers provided by the chipset or hardware manufacturer may not include the customized features.
Automatic driver update – If you don’t have the time, patience, or computer skills to update your drivers manually, you can do it automatically with Driver Easy. Driver Easy will automatically find the correct driver for your video card, download it, and install it correctly.
Here’s how to use it:
1) Download and install Driver Easy.
2) Run Driver Easy and click the Scan Now button. Driver Easy will then scan your computer and detect any problem drivers.

3) Click the Update button next to all flagged video device to automatically download and install the correct version of its driver (you can do this with the FREE version).
Or click Update All to automatically download and install the correct version of all the drivers that are missing or out of date on your system (this requires the Pro version which comes with full support and 30-day money back guarantee. You’ll be prompted to upgrade when you click Update All).

Once you’ve updated the flagged video drivers, restart your computer and log back into Windows normally.
If you don’t get any more MEMORY MANAGEMENT errors, then you’ve found the culprit. But if the BSODs keep happening, here’s another solution you can try…
Fix 2: Run a disk check
The BSOD error could also be caused by a corrupted NTFS volume. Here’s how to resolve the problem.
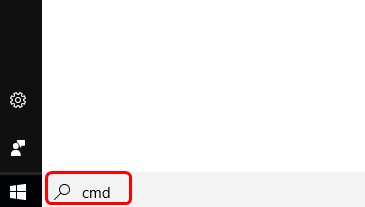
1) On your keyboard, hold down the Windows logo key and press the S key to bring up the search box, and type cmd.
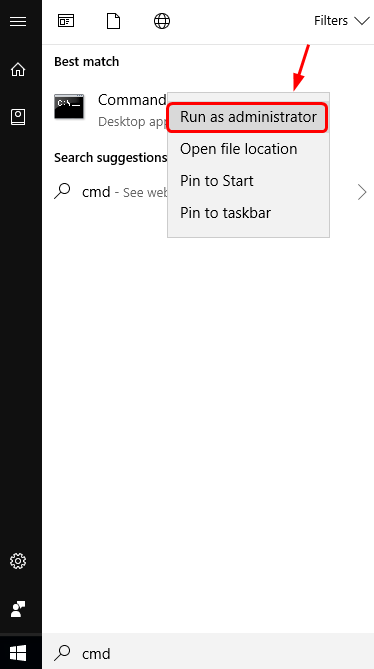
2) Right-click Command Prompt and select Run as administrator.
3) Type chkdsk /f /r, and press Enter on your keyboard.
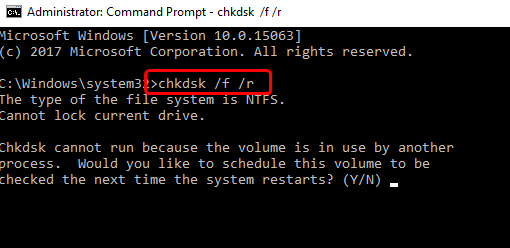
4) When asked “Would you like to schedule this volume to be checked next time the system restarts?”, press Y.
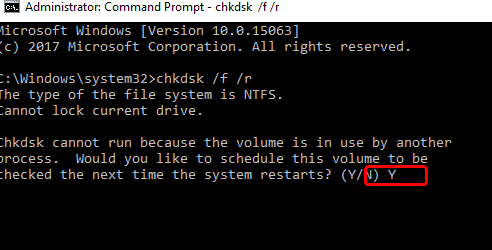
5) Exit the Command Prompt and restart your computer.
If that fixed the problem, great. But if not, here’s what to try next…
Fix 3: Run Windows memory diagnostic test
The fact your computer is having a problem with memory management could mean there’s a problem with its Random Access Memory (RAM).
Fortunately, Windows comes with a tool that can test your RAM and let you know if there are any issues with it. Here’s how to use it.
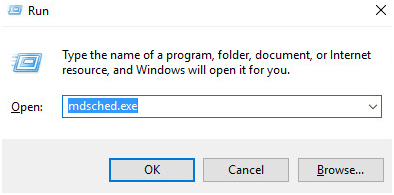
1) On your keyboard, hold down the Windows logo key and press R to invoke the Run command, type mdsched.exe and hit Enter.
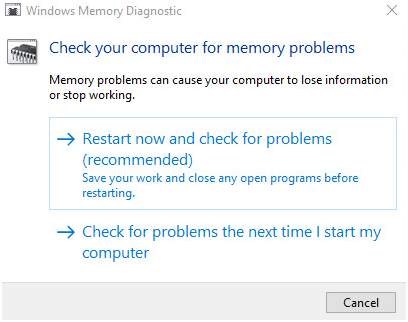
2) Choose to either Restart now and check for problems (recommended) to check your memory straight away, or Check for problems the next time I start my computer if you want to keep working and do the memory check later.
3) When the Windows Memory Diagnostic Tool actually runs, you’ll see this screen that shows the number of passes it’s doing, along with how far it has progressed.
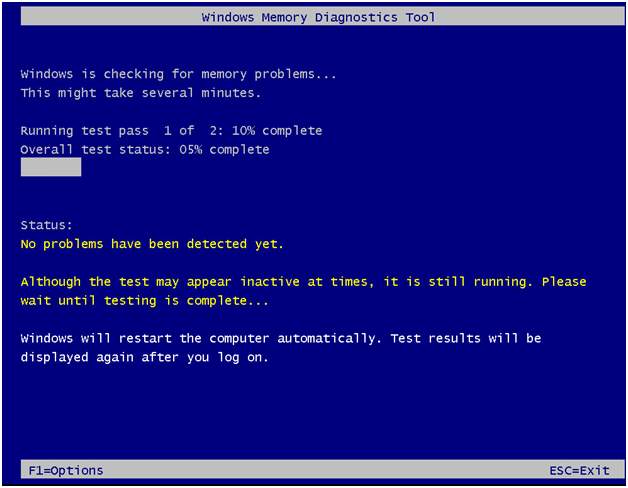
If you don’t see any errors here (or the next time you log on), chances are the memory in your computer is fine.
This means you should now try the next fix…
Fix 4: Check newly installed software and hardware
Have you installed any new hardware or software recently? If any of them are incompatible with your operating system or conflicting with your other programs, they could be triggering the error, and you should uninstall them to see.
If that doesn’t resolve the problem, there’s still one more thing you can try…
Fix 5: Scan for a virus infection
In some rare cases, the MEMORY MANAGEMENT blue screen of death error could be caused by a virus.
If you haven’t scanned your computer for viruses with your antivirus program, do it now.
If you don’t have a third-party antivirus program installed, use the one that comes with Windows—Windows Defender.
Fix 6: Repair system files
The MEMORY MANAGEMENT blue screen of death error may be related to system files. When the system files were broken or corrupted, it may cause a Blue screen issue.
There are 2 ways to solve it. Here’s how:
- Repair & replaces corrupted system files with Fortect
- Run sfc/scannow command
Repair & replaces corrupted system files with Fortect
Fortect is a powerful tool to repair and rebuild Windows. It is tailored to your specific system and is working in a private and automatic way. There’s no harm to your PC and no worries about losing any programs and your personal data.
- Download and install Fortect.
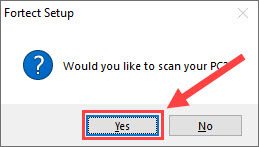
- Open Fortect and click Yes to run a free scan of your PC.

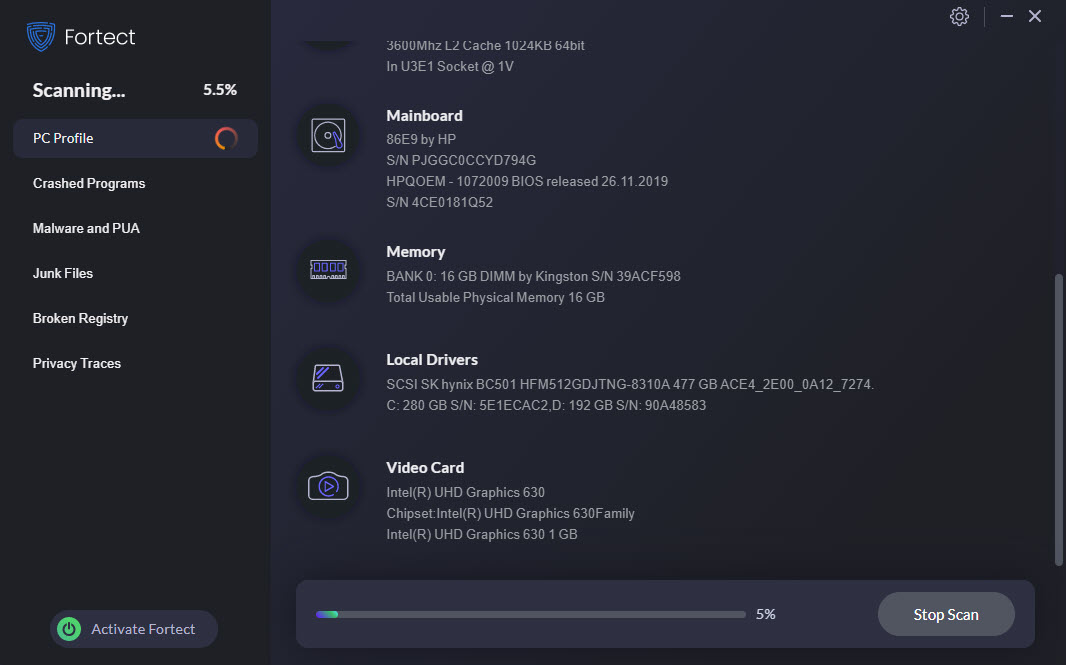
- Fortect will scan your computer thoroughly. This may take a few minutes.

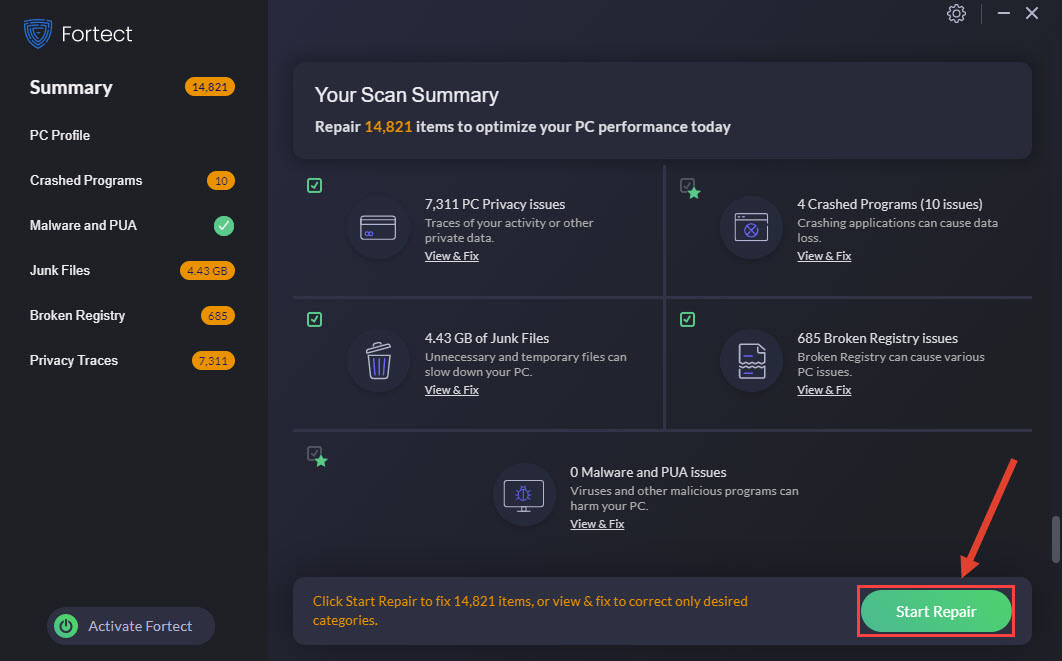
- Once done, you’ll see a detailed report of all the issues on your PC. To fix them automatically, click START REPAIR. This requires you to purchase the full version. But don’t worry. If Fortect doesn’t solve the issue, you can request a refund within 60 days.

The Pro version of Fortect comes with 24/7 technical support. If you need any assistance, please contact Fortect support:
Email: support@fortect.com
Run sfc /scannow command
1) On your keyboard, press the Windows logo key and the R key at the same time to invoke the Run box.
2) Type cmd and press Shift+Ctrl+Enter together on your keyboard to open Command Prompt in the administrator mode. 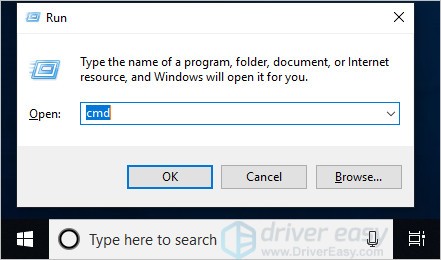
Note: Do NOT click OK or just press the Enter key as that won’t allow you to open Command Prompt in the administrator mode.
3) Type sfc /scannow (or copy-paste) and press Enter. Then wait for the verification is 100% complete. 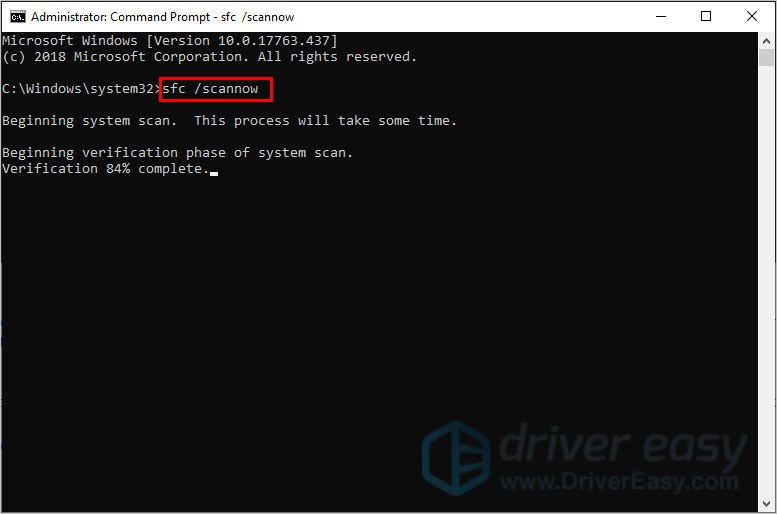
4) Restart your computer to check whether the blue screen issue is fixed or not.
If the result indicates there are broken files but SFC can’t fix them, you can turn to Deployment Image Servicing and Management (DISM) Tool for deeper examination and repair.
Other options
Here are some suggestions from other users that you might want to try.
1) See if you can find any programs that are conflicting with each other.
2) Disable any rogue modems in Device Manager.
3) Uninstall the Gigabyte Energy Save program.
If all else fails, you may have to reset Windows, or maybe even reinstall it together. We all know reinstalling will delete all the data on your hard drive, you have to back up all your important files before doing it.
However, with Fortect, there’s no need for lengthy back-ups, support phone calls, or risk to your personal data. Fortect can reset Windows to the state exactly when it was just installed without affecting third-party software.
Here’s how to use it:
- Download and install Fortect.
- Open Fortect and click Yes to run a free scan of your PC.
- Fortect will scan your computer thoroughly. This may take a few minutes.
- Once done, you’ll see a detailed report of all the issues on your PC. To fix them automatically, click START REPAIR. This requires you to purchase the full version. But don’t worry. If Fortect doesn’t solve the issue, you can request a refund within 60 days.
The Pro version of Fortect comes with 24/7 technical support. If you need any assistance, please contact Fortect support:
Email: support@fortect.com
But treat these options as a last resort, because they both take quite a long time.
Reference:
About Memory Management
Hope this post meets your needs. If you have any questions or suggestions, welcome to leave comments.
 Здравствуйте!
Можно ли самому себе (со скуки) быстро «насоздавать» лишних проблем с ПК?.. 👀 Легко! Один мой знакомый в попытках ускорить систему, почти «убил» ее стабильность — начала появляться ошибка со стоп-кодом «Memory management» при попытке включить ПК и загрузить ОС Windows (пример на фото ниже 👇).
Собственно, мне пришлось ему немного помочь (само собой, так и появилась эта заметка).
Вообще, этот стоп-код переводится на русский как «Управление памятью» (но не всегда проблема напрямую связана с ОЗУ). Как бы там ни было, здесь (ниже) я приведу несколько рекомендаций, которые в ряде случаев (не всегда!) помогают устранить сию проблему.
И так…
*
Синий экрана со стоп-кодом Memory management // фото с проблемного ПК
*
Содержание статьи📎
- 1 Что можно предпринять для исправления проблемы
- 1.1 ШАГ 1
- 1.2 ШАГ 2
- 1.3 ШАГ 3
- 1.4 ШАГ 4
- 1.5 ШАГ 5
- 1.6 ШАГ 6
→ Задать вопрос | дополнить
Что можно предпринять для исправления проблемы
ШАГ 1
Для начала 👉 обратите внимание после чего стала появляться эта ошибка, не подключали ли вы накануне новое оборудование, не устанавливали ли драйвера, программы и т.д. и т.п.?
Совет банален: отключите это новое оборудование (удалите программу, установленную накануне). Установите «старый» драйвер, при котором система работала стабильно.
Кроме этого, можно попробовать откатить систему 👉 к точке восстановления (на ту дату, когда Windows «вела» себя стабильно). Для этого нужно нажать на WIN+R, и использовать команду rstrui.

Выбор точки для отката системы
*
ШАГ 2
Далее посоветовал бы 👉 проверить плашки ОЗУ (прим.: оперативную память). Причем, желательно перед этим выключить ПК и вынуть все плашки из слотов, кроме одной из них (и именно с ней провести тест). Затем, подобный тест провести с другой плашкой (возможно, что есть неисправность конкретно с одной из них).
Как провести тест:
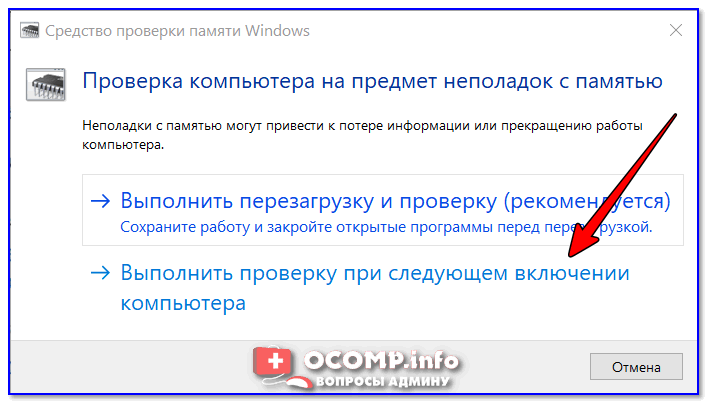
- нажать сочетание Win+R, чтобы появилось окно «выполнить»;
- ввести команду mdsched и нажать Enter. Должно появиться окно, с предложением провести тест ОЗУ. Пример ниже. 👇
👉 В помощь!
Тест ОЗУ (RAM): проверка оперативной памяти на ошибки — см. пошаговую инструкцию
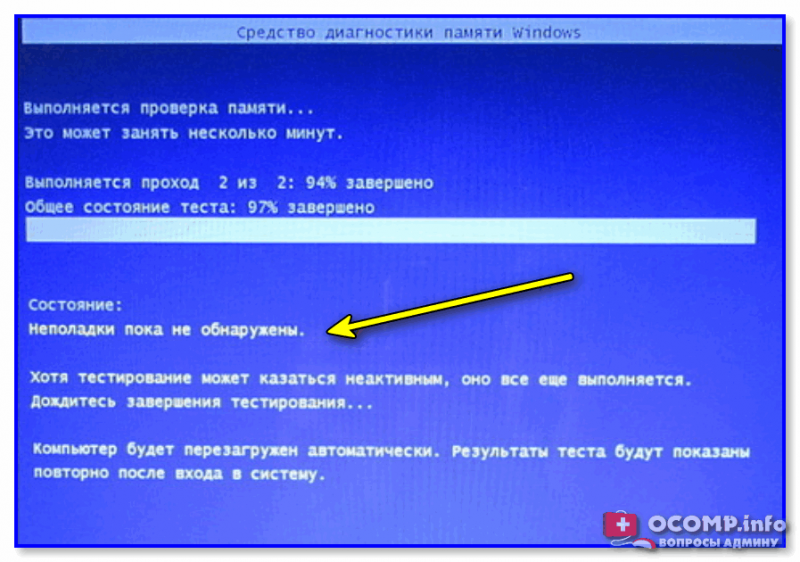
Средство проверки памяти Windows
После перезагрузки ПК — запустится проверка памяти. Основное, куда нужно смотреть — вкладка «Состояние»: если с памятью все в порядке — должен быть статус «Неполадки пока не обнаружены».
Пример проверки плашки
*
ШАГ 3
Этот шаг больше актуален для ПК, где в BIOS можно задавать соотв. настройки.
Далее я бы посоветовал приглядеться 👉 к частоте, на которой работает память (2400 / 2666 / 3200 Mhz и пр.). В Windows 10, кстати, частоту (на которой работает память) можно посмотреть в диспетчере задач (Ctrl+Alt+Del). 👇

Диспетчер задач — память
Некоторые плашки при загрузке XMP профиля (это задается в BIOS), скажем для поднятия с 2400 Mhz до 3200 Mhz — начинают вести себя нестабильно: время от времени из-за этого вылетают «синие экраны» с перезагрузкой ПК… (чаще всего такое наблюдал на плашках от AMD и китайских «no-name»)
Я бы вообще, порекомендовал 👉 зайти в BIOS и 👉 сбросить настройки в оптимальные (после ничего не менять, кроме раздела BOOT, если того требует загрузка ОС).
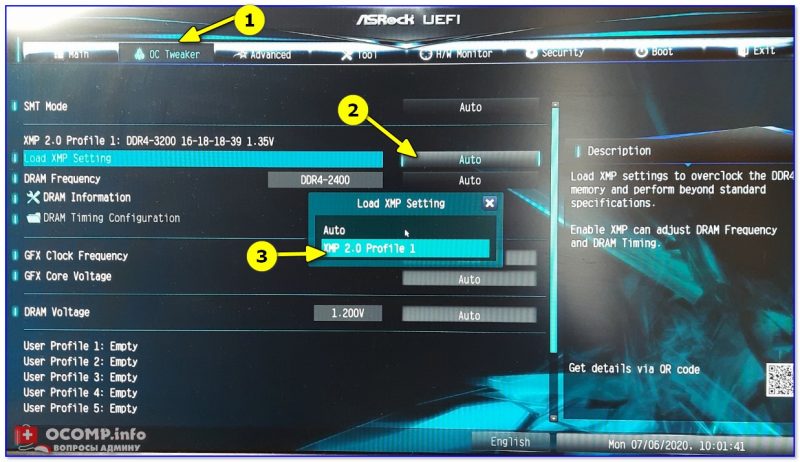
ASRock UEFI — загружаем XMP профиль
*
👉 Важно!
В некоторых случаях (это редко, но бывает) возможно есть проблема «несовместимости»* ОЗУ и мат. платы (*официально совместимы, но на практике постоянно сбои…).
Например, сталкивался с этим у производителей мат. плат AsRock и определенных плашек ОЗУ от AMD: в отдельности друг от друга работают вполне стабильно, но «вместе» — ошибки…
Мотив: по возможности, попробуйте заменить все свои плашки памяти на одну от другого производителя. Будет ли появл. синий экран?..
*
ШАГ 4
В Windows 8/10 драйверы для большинства оборудования 👉 устанавливаются автоматически (с одной стороны — это хорошо; но с другой — часто драйвера ставятся не самые «подходящие»… В результате получаем ошибки и «вылеты» синих экранов).
*
Что я бы посоветовал:
- загрузить драйверы с офиц. сайта (особенно это касается драйверов для видеокарты, мат. платы, чипсета, звуковой карты, сетевых адаптеров. Точные модели ваших «железок» можно узнать в AIDA, например). Если у вас ноутбук — скачивайте с сайта производителя ноутбука (т.е. с сайта ASUS, Lenovo и пр., а не AMD, nVidia…);
- затем отключите компьютер от интернета и произведите установку «родных драйверов»;
- после, отключите в Windows авто-обновление драйверов. О том, как это сделать — 👉 см. в этой заметке;
- подключите снова компьютер к интернету и проверьте работу. Будут ли снова сыпаться ошибки со стоп-кодом Memory management…
*
Кстати, как вариант, можно воспользоваться спец. утилитами для поиска и обновления драйверов. Например, 👉 Driver Booster, помимо всего прочего, может помочь найти и установить недостающие пакеты Net FrameWork, Visual C++ и пр.
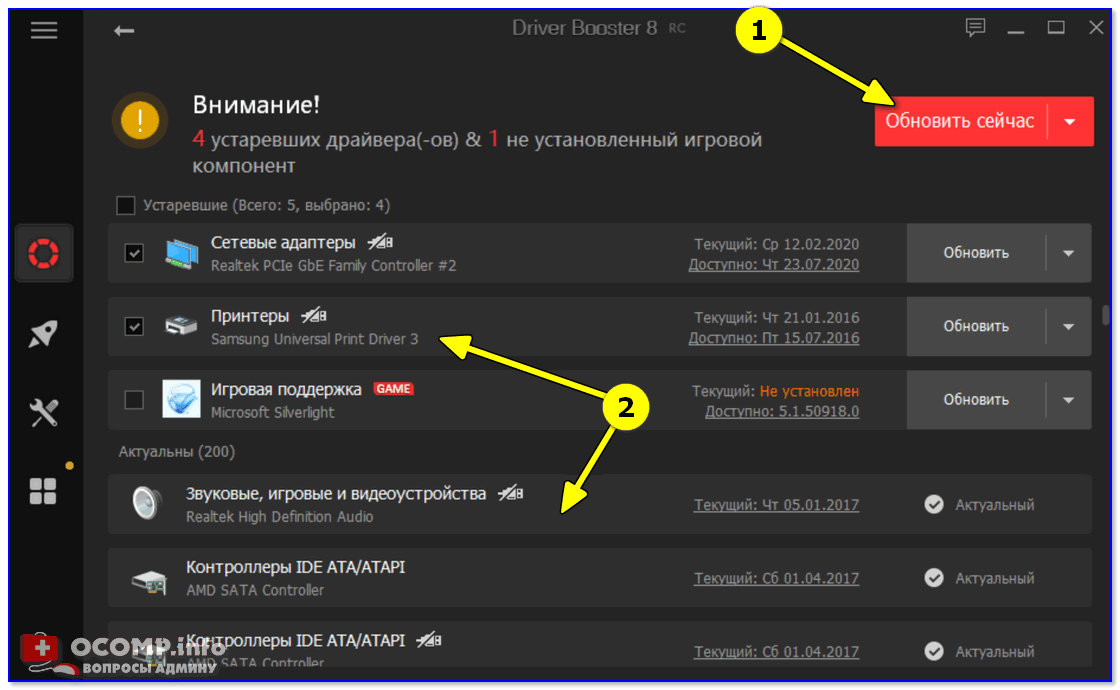
Driver Booster — найдено 4 устаревших драйвера, и 1 игровой компонент // пример работы программы
*
ШАГ 5
Следующее, что посоветовал бы — это проверить работу ПК 👉 с помощью LiveCD-флешки. Это позволит нам хотя бы понять, не связана ли проблема с текущей ОС (с ее системными ошибками, сбоями, конфликтами драйверов и пр.).
Кроме этого, на LiveCD-флешке есть программа OCCT (на том LiveCD, который порекомендовал я). И с помощью нее можно запустить довольно «жесткий тест», который поможет 👉 проверить стабильность работы БП, ЦП, видеокарты и пр.
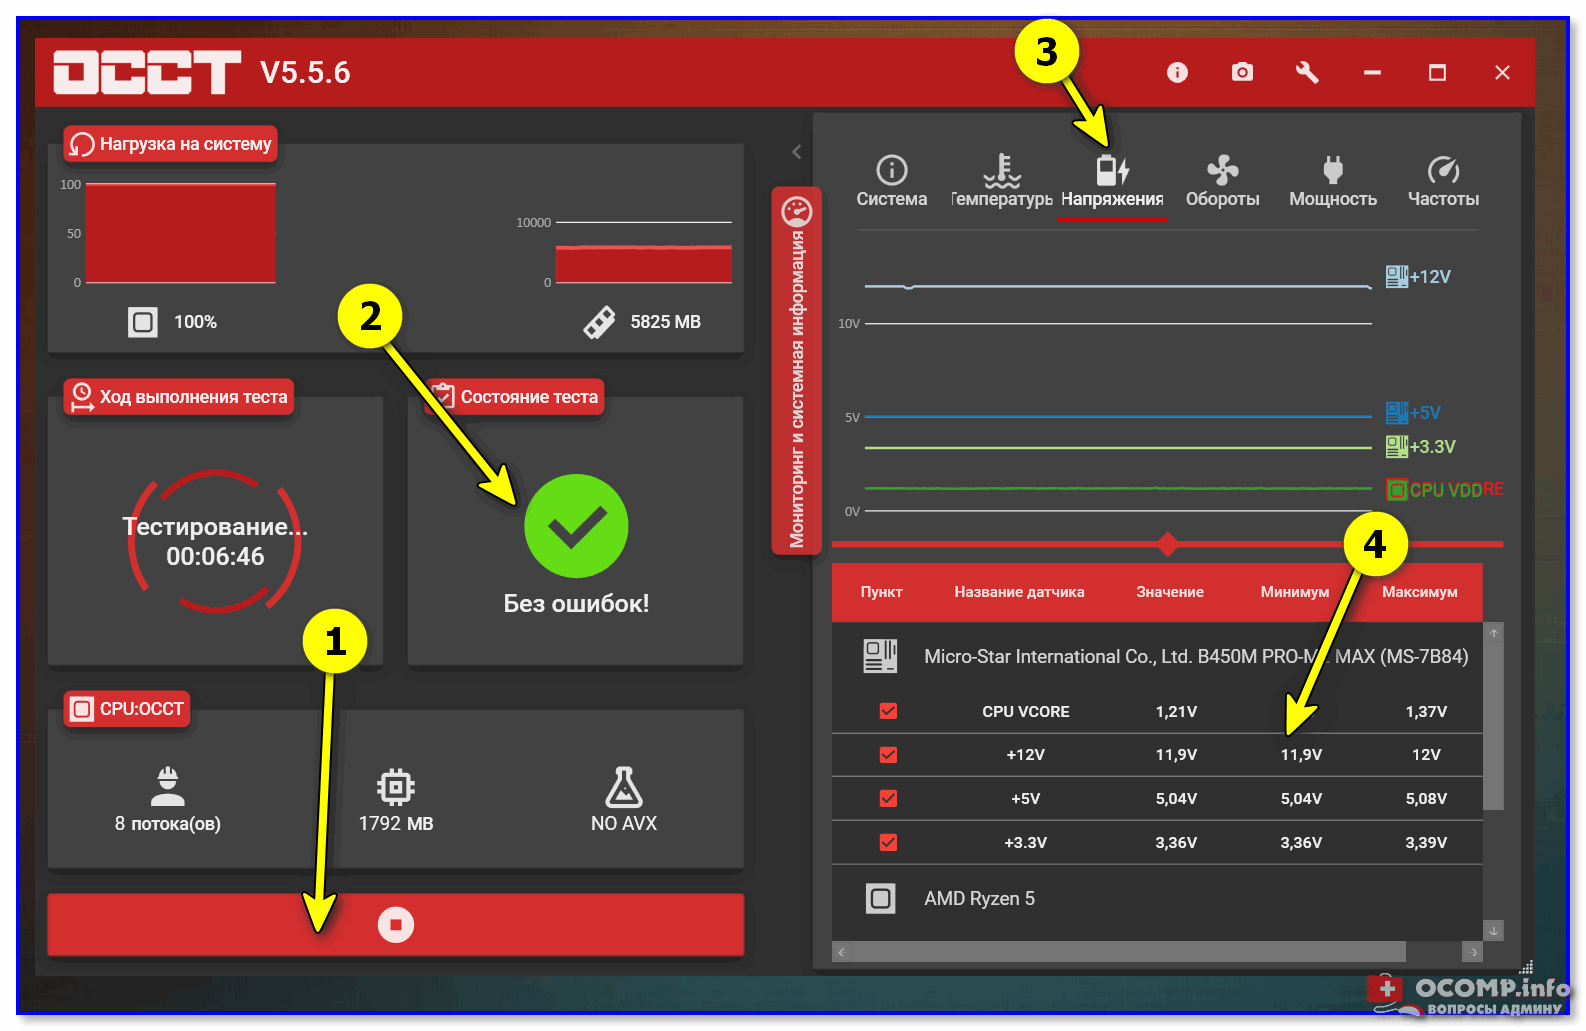
OCCT (программа для тестирования ПК) — вкладка с напряжениями
*
Если, загрузившись с LiveCD, синие экраны «пропали» и компьютер работает стабильно, на мой взгляд можно попробовать:
- установить новую ОС Windows в свободное место жесткого диска (👉 это можно сделать без удаления данных и текущей копии ОС). Причем, я бы посоветовал взять версию 👉 Windows LTSC (она без Store, Edge, Cortana, OneDrive и пр.);
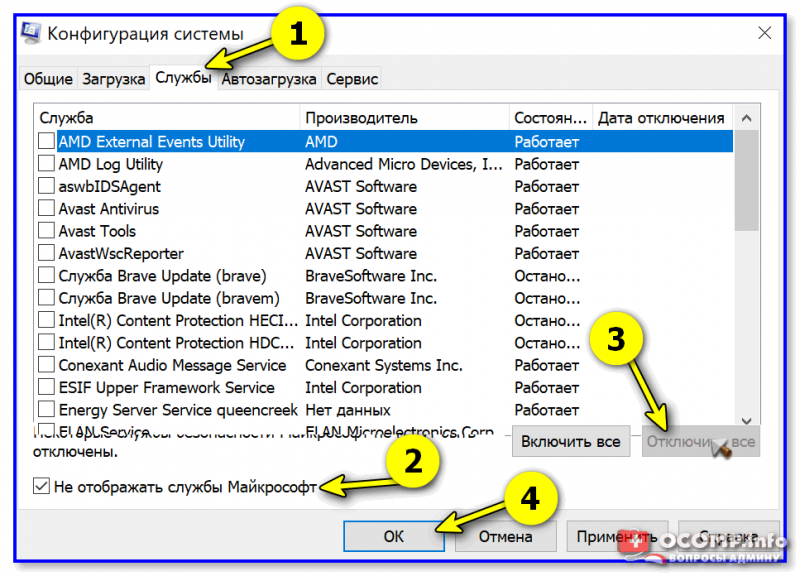
- попробовать произвести загрузку «проблемной» Windows без «сторонних» служб. Чтобы это сделать: нажмите Win+R, и используйте команду msconfig. Далее в списке служб отключите все, кроме служб от Microsoft. См. скриншот ниже. 👇

Конфигурация системы — отключение служб
- если ОС Windows будет корректно работать без сторонних служб — попробуйте поочередно их включать и проверять работу ПК. Чаще всего сбои бывают из-за антивирусов, панелей управления от драйверов, виртуальных CD-дисководов и пр.
*
ШАГ 6
Если всё вышеприведенное не дало результатов — могу лишь порекомендовать ко всему прочему выполнить общие рекомендации при появлении синего экрана. Их я приводил в одной своей инструкции (ссылочка ниже).
*
👉 В помощь!
Синий экран в Windows 10: «На вашем ПК возникла проблема…» (а за ним перезагрузка компьютера).
*
PS
Всё же (я настаиваю 😉) в первую очередь при появл. стоп-кода Memory management — нужно перепроверять ОЗУ (в т.ч. с заменой плашек), драйвера (на мат. плату, чипсет, видеокарту, сетевые карты), настройки и версию BIOS (возможно стоит произвести обновление). В подавляющем большинстве случаев — причина в «этом»… ☝
*
Если вы решили проблему иначе — дайте знать в комментариях!
Всего доброго!
👋


Ни один пользователь не застрахован от появления ошибок в своей операционной системе. И одной из самых неприятных из них является синий экран «BSOD» с ошибкой Memory Management и кодом остановки «0x0000001A», который чаще всего встречается в Windows 10 и реже в Windows 8 и 7. И в этой статье мы подробно разберем что это за сбой и как его исправить.
Содержание статьи
- Причины возникновения
- Проверка важных файлов
- Настраиваем чистый запуск
- Выявление конфликтного драйвера
- Диагностика оперативной памяти
- Неисправность жесткого диска
- Вредоносное ПО
- Настройка схемы электропитания
- Обновление драйверов
- Виртуальная память
- Обновление BIOS
- Обновление ОС
- Сброс Windows 10, 8
- Видео инструкция
- Комментарии пользователей
Причины возникновения
Как и у любой другой неисправности причин появления данного синего экрана несколько:
- Повреждены системные файлы или драйвера.
- Проблема в настройках схемы электропитания.
- Наличие вирусов.
- Конфликтные службы.
- Недостаток виртуальной памяти.
- Устаревшая конфигурация.
- Неисправность оперативной памяти «ОЗУ».
- Неисправность других комплектующих.
Вышеприведенные причины относятся и к другой схожей ошибке:
- «video memory management internal»
Способы ее устранения идентичны.
После того, как мы ознакомились со всевозможными причинами, перейдем к разбору и решению каждого пункта.
Если ОС не загружается, то все действия необходимо выполнять из безопасного режима.
Проверка важных файлов
В результате повреждения системных файлов может нарушиться работа отдельных приложений и всей системы. Поэтому в первую очередь рекомендую выполнить проверку целостности важных файлов.
Сделать это можно следующим способом:
- Открываем строку команд.
- Вводим фразу «sfc /scannow».

- Жмем клавишу «Enter».
- Дожидаемся завершения операции и перезагружаем компьютер.

Данное средство не всегда способно устранить имеющиеся проблемы. Поэтому в дополнение к нему необходимо использовать утилиту «DISM». Для ее работы требуется доступ в интернет.
Инструкция по запуску «DISM»:
- Запускаем командную строку.
- Вводим фразу «DISM /Online /Cleanup-Image /RestoreHealth».

- Щелкаем по клавише «Enter».
- После чего начнется автоматическая загрузка и замена поврежденных файлов.
- Ждем окончания процедуры и перезагружаем компьютер.

Дополнительно рекомендуется провести проверку файловой системы утилитой chkdsk.
Настраиваем чистый запуск
Если сбой появился после инсталляции нового программного обеспечения, то его необходимо выявить и удалить.
Для этого:
- Щелкаем по клавишам «WIN+R», вводим фразу «msconfig» и щелкаем «ОК».

- В первой же вкладке «Общие» активируем «Выборочный запуск» и убираем галочки со всех опций.

- Перемещаемся во вкладку «Службы», активируем опцию «Не отображать службы Майкрософт» и нажимаем «Отключить все».
- Нажимаем «Применить», затем «ОК» и закрываем окно.
- Поступит запрос на перезагрузку, выбираем «Выход без перезагрузки».
- С помощью комбинации «CTRL+SHIFT+ESC» запускаем диспетчер задач и заходим в раздел «Автозагрузка».

- Теперь с помощью правого клика отключаем автозапуск каждой программы.
- Перезагружаем компьютер.


После этого повторите все действия, которые вызвали неполадку. Если она более не повторится, значит проблема находится в одной из отключенных служб или приложений. Для выявления неисправного компонента необходимо поочередно включать каждую из служб и программ.
Выявление конфликтного драйвера
Если вы помните, какое устройство последним было установлено в системе, то просто удалите его и проверьте результат. Если же нет, то придется искать нестабильный драйвер с самого начала.
Действуем по порядку:
- Запускаем ОС в безопасном режиме с поддержкой командной строки. Для этого в момент запуска нужно нажать клавишу «F8» и выбрать соответствующий пункт.

- Открываем поиск клавишей «WIN+S».
- Вводим фразу «verifier», щелкаем по найденному компоненту правой мышкой и запускаем от имени администратора.

- При появлении окна контроля учетных записей, необходимо в нем нажать на кнопку «Да».

- Отметьте опцию создания нестандартных параметров и нажмите «Далее».

- Активируем тесты, указанные на скриншоте ниже, и жмем «Далее».
- Отмечаем пункт «Выбрать имя драйвера из списка» и щелкаем «Далее».
- Дождитесь загрузки информации об установленных компонентах.
- В новом окне нажимаем мышкой по столбцу «Поставщик». Таким образом мы отсортируем список приложений по изготовителю. Отмечаем галочками все приложения, поставщиком которых не является «Microsoft» и жмем «Готово».
- Далее отобразится сообщение с просьбой перезагрузки, закрываем его и перезагружаем компьютер вручную.

- Если система загрузится и начнет стабильно работать, то это значит, что проблем с драйверами не обнаружено. В противном случае вы увидите дополнительные параметры загрузки, из которых нужно выбрать «Поиск и устранение неисправностей».

- Заходим в раздел «Дополнительные параметры».

- Выбираем пункт просмотра других параметров восстановления.

- Перемещаемся в «Параметры загрузки».

- Далее щелкаем «Перезагрузить».

- В перечне режимов загрузки выбираем «Безопасный режим с поддержкой командной строки».
- Жмем клавиши «WIN+R», вводим в единственную графу команду «cmd» и щелкаем «Ок».
- В появившемся окне вводим команду «verifier /reset» и жмем «Enter».

- Затем выполняем еще одну команду «shutdown -r -t 0». Первая отключит зацикленную перезагрузку, а вторая загрузит систему в обычном режиме.
- После того как ОС загрузится, нужно перейти по пути «C:\Windows\Minidump».
- В конечной папке будет находиться файл с расширением «.dmp». Для открытия данного формата рекомендую использовать программу «BlueScreenView». После чего отобразится примерно следующее:


В нижней части окна на розовом фоне будут выделены неисправные компоненты, которые вызывают ошибку. Остается скопировать названия файлов и вбить их в поисковую систему, чтобы определить к какой программе они относятся, и после этого удалить ее.
Диагностика оперативной памяти
Стоит отметить, что диагностика может длиться несколько часов, точное время зависит от общего объема ОЗУ. Если вы не готовы ждать, то переходите к следующему разделу.
Итак, как начать диагностику ОЗУ:
- Пользователям Windows 10 и 8 доступно штатное средство. Для запуска которого нужно нажать «WIN+R», ввести «mdsched.exe» и нажать «Ок».
- Выбрать опцию «Выполнить перезагрузку и проверку». После этого окно закроется, сохраните важные данные и перезагрузите компьютер. Диагностика начнется автоматически при запуске ОС.

- Дождитесь завершения процедуры, после чего обратите внимание на строку «Состояние», найденные ошибки будут отображены здесь.


Альтернативным вариантом станет использование утилиты «MemTest86». Она работает из-под DOS и не зависит от используемой операционной системы. Подойдет как для старенькой Windows 7, так и для новой Windows 10.
Неисправность жесткого диска
Жесткий диск – механическое устройство, которое со временем изнашивается и требует замены. Проведите диагностику диска программой «Victoria» или «MHDD».

При обнаружении большого количества недоступных секторов и ошибок следует срочно перенести важную информацию на другое устройство и приобрести новый накопитель, желательно SSD. Именно SSD рекомендуется использовать для ОС.
Вредоносное ПО
Также не стоит исключать возможность заражения компьютера вредоносным ПО. Вирусы способны не только замедлять работу ПК и похищать важные данные, но и нарушать работу вызывая различные сбои. Нередко устранить неполадку удается с помощью поиска и удаления всех имеющихся угроз.
Инструкция по выполнению проверки:
- Если ОС загружается и есть доступ в интернет, то необходимо скачать антивирусные сканеры и провести первую проверку с их помощью. Сканирование желательно запускать в безопасном режиме.

- Если ОС не загружается, то нужно скачать все те же самые утилиты через другое устройство и перекинуть, используя флешку или портативный HDD на основной ПК.
- По завершению рекомендуется установить комплексный антивирус и выполнить конечную процедуру проверки.
- Очистить компьютер и реестр с помощью «Ccleaner» или «Reg Organizer».

После выполнения вышеописанных процедур можно проверять результат, предварительно перезагрузив компьютер.
Настройка схемы электропитания
Попробуйте изменить тип электропитания на «Сбалансированный» режим.
Как это сделать:
- Запустите окно выполнить командой «WIN+R», введите «powercfg.cpl» и щелкните «Ок».
- Активируйте пункт «Сбалансированный», и закройте окно.


Проверьте результат.
Обновление драйверов
В более редких случаях устранить BSOD получается только путем обновления драйверов. Есть два пути, первый – находить и скачивать каждый драйвер с официального источника или воспользоваться программой для автоматической загрузки.
Второй метод позволяет сэкономить много времени и подходит даже неопытным пользователям. Поэтому рассмотрим всю процедуру на его примере.
Существует масса приложений для автоматического обновления, наиболее популярные из них это SamDrivers, Drivers Pack Solutions и Driver Booster. Лично я рекомендую воспользоваться последним вариантом.
Подробная инструкция:
- Скачиваем, запускаем утилиту и жмем «Пуск».

- Дожидаемся завершения сканирования, отмечаем галочкой все компоненты и жмем «Обновить сейчас».


После завершения процедуры перезагружаем ПК.
Виртуальная память
Не исключено, что синий экран появляется из-за недостаточного объема виртуальной памяти. Поэтому предлагаю его увеличить.
Для этого:
- Жмем «WIN+R», вводим команду «sysdm.cpl» и щелкаем «Ок».
- Перемещаемся в раздел «Дополнительно» и в подразделе «Быстродействие» заходим в «Параметры».

- Заходим во вкладку «Дополнительно» и в разделе «Виртуальная память» нажимаем «Изменить».

- Снимаем галочку с пункта автоматического выбора объема и активируем «Указать размер». В графе исходного значения вводим «3500» и максимального «7000», затем жмем «Ок» и закрываем открытые окна.


Производим перезагрузку системы.
Обновление BIOS
Если ПК использует устаревшую версию BIOS, то ее необходимо обновить. Это позволит избежать конфликтов между оборудованием и возможно решит имеющуюся проблему.
Обновление ОС
Обновление Windows 10 может устранить различные сбои, а также повысить стабильность работы вашего устройства.
- Введите в строку поиска слово «update» и запустите средство проверки обновлений.

- При наличии свежего ПО, установите его, а затем перезапустите ПК.

После этого проблема должна исчезнуть.
Запустить процедуру обновления Windows 7 можно через «Центр обновления Windows», найти который можно также с помощью строки поиска, доступной из меню «Пуск».
Еще один вариант решения проблемы – выполнить откат Windows 10, 8 к первоначальному состоянию.
Для этого:
- Откройте строку поиска комбинацией «WIN+S», введите фразу «recovery» и войдите в нужный раздел.

- Щелкните по кнопке «Начать». После нажатия кнопки начнется автоматическая перезагрузка, поэтому предварительно сделать бэкап важных данных.

- Выберите пункт «Удаление файлов и очистка диска», затем нажмите «Продолжить».


Дождитесь окончания процесса.
Пользователям семерки сброс недоступен, поэтому остается только переустановить ОС или воспользоваться точкой восстановления.
Видео инструкция
Windows will list a series of error messages and stop codes when your computer (mainly the hard drive) goes wrong. The memory management error is one of the many common errors, which often appears on a blue screen. When you meet this error, you can find useful solutions from this MiniTool post.
Memory Management Error Windows 10/11
Computer memory refers to any physical devices that are used to store information by making use of integrated circuits. The information can be stored temporarily like RAM (random access memory) or permanently, like ROM (read-only memory).
What Is Memory Management in An Operating System?
As its name suggests, memory management is a feature that is responsible for managing the primary memory of the computer in an operating system. The main functions of Windows memory management are:
- Keep control of the status of each memory location (both allocated and free).
- Decide how to allocate the memory during the competing process.
- Decide which one to get the memory, when to receive it, and how much it could get.
- Assign a certain memory location when the memory allocation process is finished.
What Is Memory Management Error
Memory management error refers to the error related to a computer’s memory. It can be a physical problem with RAM or a faulty memory/RAM. One main cause for the memory management error to show up in Windows 10 (MEMORY_MANAGEMENT BSOD error Windows 10) is outdated or broken graphics card drivers (especially when the graphics card also has memory).
Memory Management Blue Screen Error
If you encounter a MEMORY_MANAGEMENT BSOD Windows 10, it means the system finds a severe memory management error. The memory management BSOD error shows up on your PC screen with (or without) a stop code, such as 0x0000001A. Whenever there’s a severe problem detected, the MEMORY_MANAGEMENT error will appear on your computer screen, causing a blue screen of death.
Causes & Situations of Memory Management Error Windows 10/11
Real Cases
Case 1: Getting memory management error blue screen many times a day immediately after the latest Win10 update.
I never got a blue screen. I install the updates and on the same day, I’m getting that blue screen over and over again. I get it almost every time I try to turn my PC off, so I get to never leave my apartment or go to sleep because I can’t just turn my PC off without having to wait for it to reboot (which happens after the blue screen) so I can turn it off again. It is 11 AM and I have gotten the blue screen today maybe 2 or 3 times already. Is anyone else having this issue? Didn’t some Windows 10 updates destroy CPUs in some PCs, wasn’t that in the news? Could this be related to Win 10 update-induced hardware damage? — asked by KalleSatan answers.microsoft
Case 2: Memory Management Error Windows 10.
All indications were that my system was OK for an upgrade. However, Acer did not support the upgrade of my laptop: Acer Aspire V5-571 P. Processor i7-3537U, Ram 8G, 64bitOS, Touch screen. I upgraded from Windows 8.1 to 10 without any problems or issues. Approximately 20 minutes after use and repeatedly after that the system would fail, blue screen: (gather information. Pointing to a memory management problem. Ran the Microsoft memory troubleshooter. No problem was identified. Because the laptop would not stay up for longer than 20 minutes. Even when left with no additional program running. I reverted to Windows 8.1 Everything is fine again. Where to start? — posted by Hal70400answers.microsoft
According to the two cases, it’s obvious that Windows updates could be the reason for the memory management error. More causes will be listed in the following content.
What Causes Windows 10 Memory Management Error
There are a lot of reasons that should be responsible for Windows 10 blue screen memory management issues: disk error, outdated/damaged drivers, faulty memory/RAM, etc.
9 main causes of Memory Management blue screen of death in Windows 10:
- Windows update: After you upgrade your Windows from an older version, this error may appear.
- Disk errors: Errors have been found on the disk mounted to that computer.
- Graphics card drivers’ issue: The drivers of devices are missing, outdated, damaged, or broken.
- Virus infection: The computer virus invades your system and then damages it.
- Faulty memory: The memory is incorrect.
- Faulty RAM: The RAM (Random-access memory) goes wrong.
- Hardware issues: Hardware problems were detected on one or more of the hardware (such as graphics cards).
- Software issue: Problems are found in one or more of the software (corrupt files and missing operating system are included).
- Software or hardware conflict: Software/hardware conflicts with other software/hardware.
3 Popular Situations of the Memory Management Error in Windows
The MEMORY_MANAGEMENT can show up on any version of Windows. It tends to occur especially when you plan to run highly demanding processes like VR games and 4K live streams. I summarized the most popular three situations in which the error occurs.
Situation 1: MEMORY_MANAGEMENT crashes.
The stop code memory management Windows 10 will prevent you from entering the system as usual. You’ll see the memory management error blue screen most of the time. Under such circumstances, you have no choice but to reboot the device to have a try. However, the problem may not be fixed by rebooting. What’s worse, PC crashes and even crash loops may result from this.
Situation 2: Windows 10 memory management loop.
Once the Windows 10 BSOD stop code memory management shows up on your computer, it may cause an error loop. Even though the system doesn’t crash sometimes, the MEMORY_MANAGEMENT error will still be there every time users shut down and restart their computers.
Situation 3: MEMORY_MANAGEMENT on Asus, Acer, HP, Lenovo, Surface Pro, and Surface Pro 3.
If Windows stop code memory management error appears in this case, all the devices will be influenced. As for the Surface line of Microsoft, this issue is especially popular on Surface Pro and Surface Pro 3 devices.
How to Fix Memory Management Error in Windows 10/11
Restart Your Computer
When you run into the MEMORY_MANAGEMENT error on your PC, you can try the simplest and the most common solution – restart your PC. Some users said the memory management error won’t appear anymore after the restart while others are still bothered by it.
If the MEMORY_MANAGEMENT error message still shows up when you’re running your PC, you should follow the advanced troubleshooting solutions given below.
Recover Data from PC
No matter whether your computer works well after rebooting or is still troubled by this error, rescuing data from your computer should be the priority. To obtain a secure data recovery service, you can seek help from a professional file recovery software, MiniTool Power Data Recovery.
MiniTool Power Data Recovery is the best free data recovery tool for Windows users because it is compatible with all Windows systems. It can retrieve lost files, deleted photos, missing videos, and many other types of files. Besides, if you need to recover files from an external hard drive, USB flash drive, CD/DVD, SD card, or other devices, this software can make it easy.
Then, you can rescue your data with the following guide.
Step 1: Download and install MiniTool Power Data Recovery.
MiniTool Power Data Recovery FreeClick to Download100%Clean & Safe
Step 2: Connect a USB flash drive or other removable devices to your computer, then launch the software. You are suggested to recover your important files to another device to avoid mistaken deletion or secondary loss.
Step 3: If you want to retrieve files from a specific location, you can choose a partition in the Local Devices section, or choose the Desktop, Recycle Bin, or Select Folder choice at the bottom of this interface, then click on the Scan button.
You can also turn to the Devices tab and scan the whole disk.
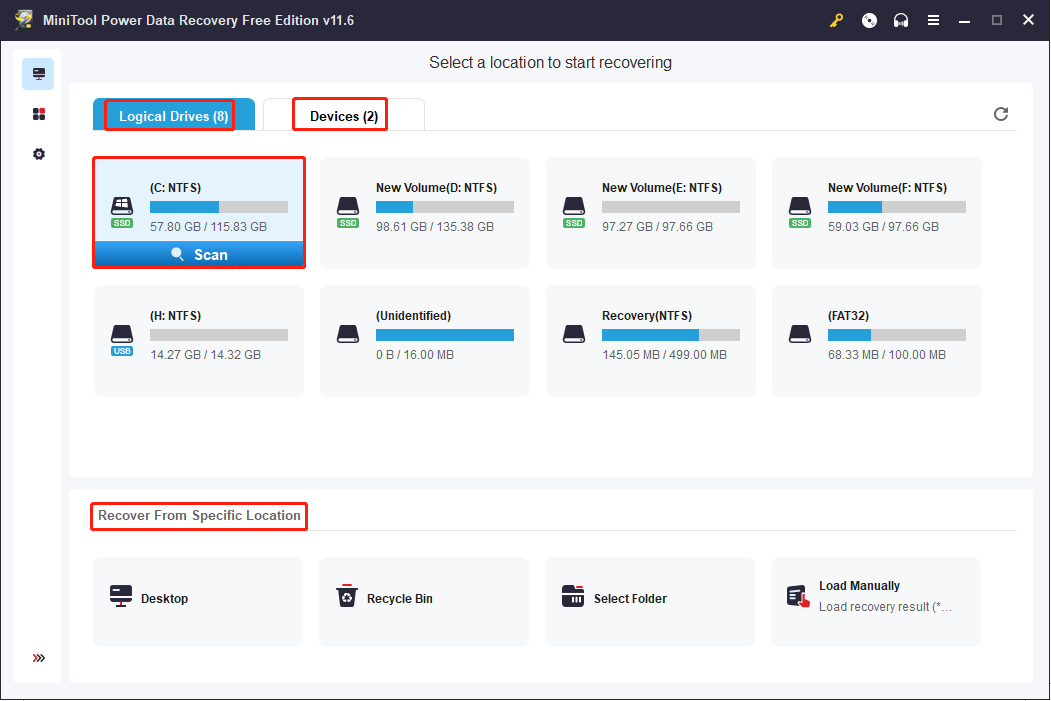
Step 4: Wait for the scan process to complete. There will display numerous files on the result page. You can browse the file list to find your wanted files.
You can get help from functional features on this page to increase the efficiency of data recovery.
- Filter: set filter criteria to narrow down the file list, including file size, file type, file category, and date modified.
- Type: list files based on their types, such as pictures, documents, archives, videos, etc.
- Search: find files by inputting their full or part of names in the search box.
- Preview: examine whether the chosen file is the correct one.

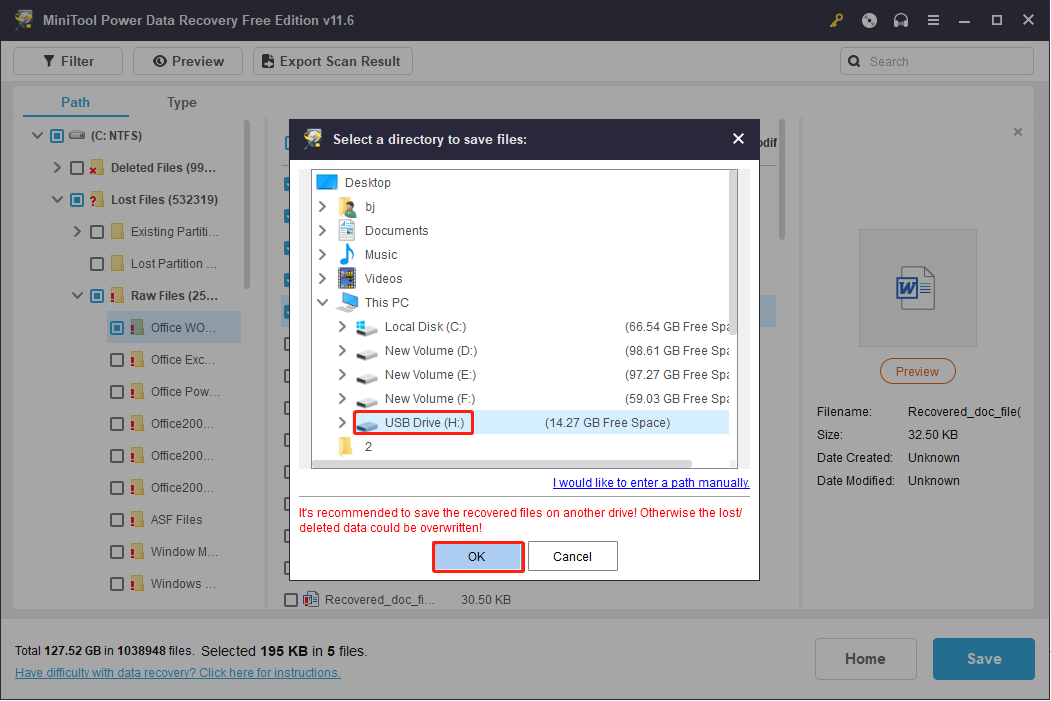
Step 5: Add check marks ahead of the files you want to recover, then click Save.

Step 6: In the following window, choose the connected drive as the storage destination and click OK.
The free edition only allows you to recover up to 1GB of files. You can go to this page to have an advanced edition which will provide an unlimited data recovery capacity.
MiniTool Power Data Recovery FreeClick to Download100%Clean & Safe
Now, you can try to repair the Windows memory management error by using the ways mentioned in the next section.
Method 1: Run the SFC Scanner
System File Checker (SFC) is a Windows built-in to cope with system-related problems. The sfc /scannow command is the most commonly used one to scan the integrity of the protected system files. It will find out the corrupted or missing system files and replace them with the correct ones.
Step 1: Press Win + S and type Command Prompt into the search box.
Step 2: Choose Run as administrator from the right pane.
Step 3: Type sfc /scannow and hit Enter.

Method 2: Perform CHKDSK
CheckDisk, abbreviated as CHKDSK, is a free tool to check the integrity of the file system. Different from the SFC, CHKDSK scans the entire drive for errors. You can find the CHKDSK utility in all Windows systems and run it via Command Prompt.
Step 1: Press Win + R to open the Run window.
Step 2: Type cmd into the text box and press Shift + Ctrl + Enter to run Command Prompt as administrator.
Step 3: Type CHKDSK x: /f and hit Enter. Please replace x with the drive letter that you want to scan.
Tips:
Please distinguish the difference between CHKDSK /f and CHKDSK /r. The parameter /f only checks for logical issues while the parameter /r is used to check physical errors.
Wait for the process to complete itself. If the target drive is in use, you’ll receive an error message suggesting you schedule the disk scan the next time the system restarts.
Method 3: Use the Windows Memory Diagnostic Tool
A corrupted/damaged RAM is a common cause of the memory management error on your computer. You can replace it with a new one to solve the problem easily. But before that, you need to run the Windows Memory Diagnostic Tool to make sure it’s really broken.
Step 1: Press Win + R to open the Run window.
Step 2: Type mdsched.exe and hit Enter to open Window Memory Diagnostic.
Step 3: Select one choice based on your needs.
- Restart now and check for problems (recommended): check your memory straight away.
- Check for problems the next time I start my computer: allow you to keep working and do the memory check later.
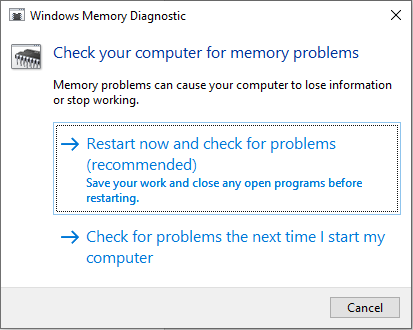
When the Windows Memory Diagnostic Tool runs, Windows will start to check for memory problems. You should wait for it to end.
If no problem is found, your memory on the computer may be fine, so you should try other methods to fix the management error.
Method 4: Run a Full System Scan
Malicious software and virus infection may cause various issues on your computer, including BSOD errors. You can perform a full scan to examine if any malware exists on your computer. Windows system has its own antivirus tool. You can use it with the next steps.
Step 1: Press Win + I to open the Settings window.
Step 2: Choose Update & Security and click on the Windows Security tab.
Step 3: Select Virus & threat protection from the right pane.
Step 4: Choose Scan options to find the Full scan selection, then click Scan now.
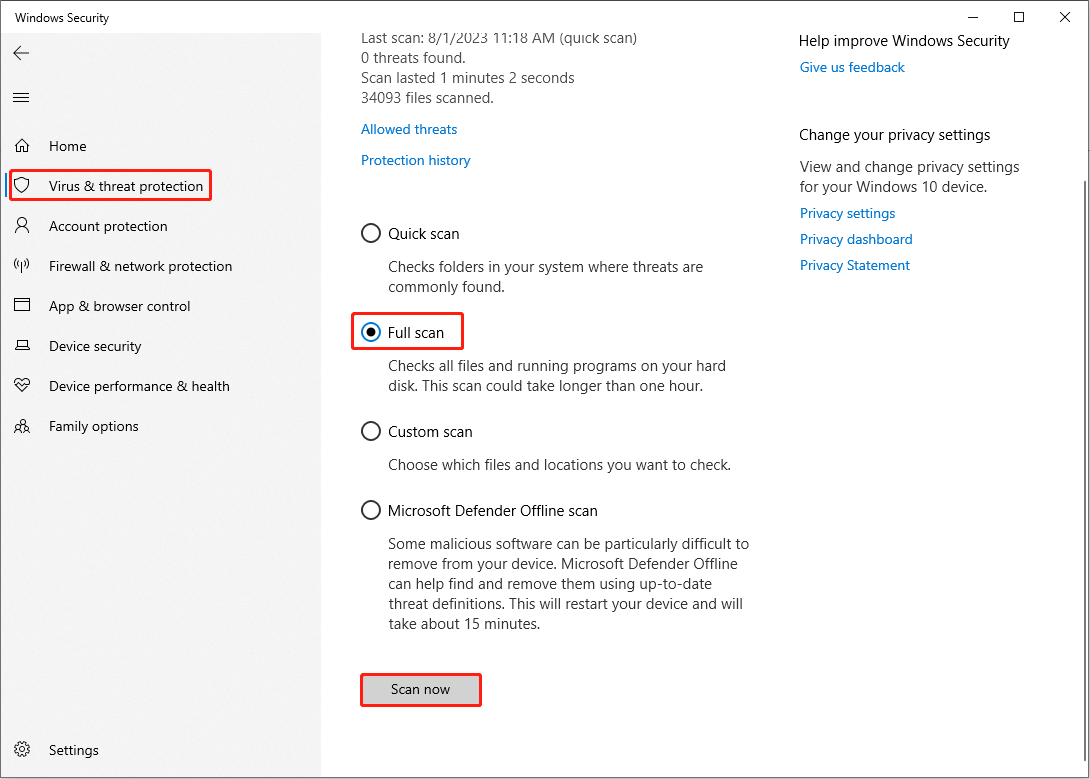
Wait for the scan process to finish. You can also open the Windows Security window by clicking the shield icon in the system tray.
Method 5: Update Drivers
An outdated or broken graphics card driver could also lead to the memory management error in Windows. Additionally, the new drivers that come with the new hardware may also cause a problem. Therefore, updating drivers could become a quick and easy fix.
Step 1: Press Win + X and choose Device Manager from the WinX menu.
Step 2: Browse the list to check if there is an error symbol, usually a yellow exclamation icon.
If the symbol appears, please update the corresponding driver by right-clicking on it and choosing Update driver; if there is nothing wrong, the driver may not be the reason causing the error.
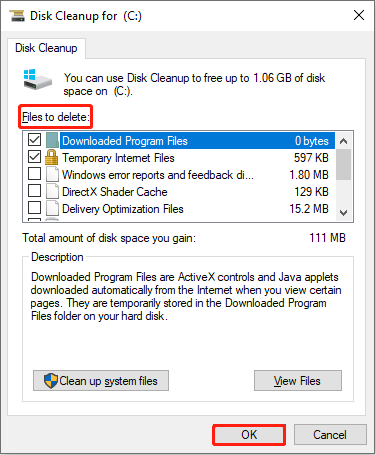
Method 6: Clear Temporary Files and Folders
If there are too many temporary files and folders, it may cause apps to respond slowly, affect processing speed, and trigger error codes. You can use Disk Cleanup to delete all these unnecessary files. This is a Windows snap-in tool that can scan and remove unwanted files.
Step 1: Press Win + S and type Disk Cleanup into the search box.
Step 2: Select the best-matched one to open Disk Cleanup.
Step 3: Choose the target drive from the drop-down list.

Step 4: Select files under the Files to delete section, then click OK to delete them.
Other Fixes for Blue Screen Memory Management Error Windows 10/11
If you still can’t fix the Windows stop code MEMORY_MANAGEMENT (blue screen MEMORY_MANAGEMENT) in Windows 10/11, you may as well try these solutions.
- Remove recently installed software and hardware.
- Enlarge the Virtual Memory.
- Look for software problems like software corruption and conflict.
- Update your Windows 10 to the latest version.
- Revert the PC’s settings to default if you have changed the clock rate of your PC.
- Make use of the System Restore feature.
- Reset or reinstall your Windows 10 (it’s the last trump card).
Verdict
Memory management BSODs seem to be difficult to take care of, especially for inexperienced computer users. The memory management error may occur due to various reasons in different situations. But you can tackle the problem with the methods demonstrated above.
If you choose to fix your computer first, please remember to check your important files after all these steps. MiniTool Power Data Recovery can restore your files if they are lost.
MiniTool Power Data Recovery FreeClick to Download100%Clean & Safe
You are welcome to share any problems with us via [email protected].