
С тех пор, как Google выпустил обновление Android 10 или Pie для всех устройств. Он стал популярным среди пользователей Android благодаря плавному темному режиму, новым цветовым темам, режиму фокусировки и другим улучшениям. Все производители Android-смартфонов также начали развертывание этого обновления на своих устройствах.
Как мы все знаем, когда Google выпустит следующую версию Android, мы увидим новые и дополнительные функции, которые Google реализовал в своей новой версии Android. Так что испытание всех функций всегда будет лучшим опытом.
Итак, рассмотрев все ваши запросы сегодня, мы пришли к простому способу, который позволяет вам бесплатно запускать Android 10 на своем ПК. ДА!! вы правильно прочитали, вы можете установить последнюю версию на ПК с Windows.
До сих пор вы могли использовать Android только на своем телефоне, но теперь вы можете использовать его на своем ПК, будь то ПК с Windows или Linux, и даже Chromebook, все это возможно только благодаря ОС Bliss.
Почему именно Bliss OS?
Bliss OS – это проект ОС с открытым исходным кодом на базе Android, который включает в себя множество параметров настройки и дополнительных функций безопасности. В отличие от проекта Android x86, Bliss OS предоставляет красивый пользовательский интерфейс для взаимодействия с некоторыми интересными функциями, которые вы используете на своем телефоне Android. Его легко установить и легко использовать.
Лучшее в использовании ОС Bliss на вашем ПК заключается в том, что если вы еще не получили обновления Android 10 на свой телефон, вы можете установить его на свой компьютер и сделать ставку на Android 10 на своем ПК бесплатно, звучит интересно? Несмотря на то, что смартфон по-прежнему работает под управлением Android 10, каждый хочет ощутить то же самое на большом экране с мощным оборудованием, которое только возможно на компьютере.

Особенности Bliss OS
Визуально ОС Bliss имеет тот же стиль запуска в стиле рабочего стола, что и другая ОС Windows. Несколько лет назад компания Jide анонсировала аналогичную ОС Android, работающую на ПК, под названием Remix OS. Но позже разработчики прекратили его выпуск, но все же они запустили эмулятор Remix OS, который позволяет запускать приложения и игры Android на вашем ПК.

Вот некоторые функции, которые есть в Bliss OS.
- Он поставляется с параметрами настройки и тематики.
- Bliss OS может адаптироваться к любому размеру экрана, поэтому вам не придется идти на компромисс с идеальным качеством изображения.
- Bliss OS создана с упором на скорость и стабильность с настройками для работы с самыми требовательными приложениями.
- Удобство работы от аккумулятора: предусмотрены дополнительные параметры, которые помогут настроить потребление заряда аккумулятора до оптимального уровня.
- Он часто предоставляет обновления безопасности AOSP, поэтому используйте его без проблем.
Как установить Android 10 вместе с Windows 10
Итак, это все о Bliss OS, и я надеюсь, что теперь вы знаете, что она может помочь вам запустить Android 10 на ПК, Linux или даже в Chromebook. Что ж, этого достаточно, чтобы знать об этой операционной системе с открытым исходным кодом. Вот правильная последовательность двойной загрузки Android Pie и Windows 10 с использованием Bliss, не теряя ни секунды, давайте начнем.
Что вам потребуется
- Bliss OS ISO (https://blissroms-x86.github.io/)
- Руфус
- USB-накопитель минимум 8 ГБ
1. Отключите безопасную загрузку
Большинство поставщиков теперь поставляются с UEFI BIOS, поэтому в этом случае вам необходимо отключить безопасную загрузку перед ее установкой.
Чтобы отключить безопасную загрузку, просто перейдите в меню BIOS, используя (F2, F9 или любой другой ключ вашей системы, если вы не знаете точный ключ, просто введите его в Google, вы найдете), или вы можете отключить безопасную загрузку через Windows настройки.
- Перейдите в Настройки Windows 10 >> Обновление и безопасность >> Восстановление.
- В настройках восстановления нажмите на опцию перезапуска сейчас.
- Вы попадете в специальное меню загрузки, где вам нужно нажать на параметр «Устранение неполадок».
- Теперь нажмите Advanced Option и выберите Настройки прошивки UEFI.
- Отсюда вы можете легко отключить безопасную загрузку.
2. Создание раздела
- Щелкните правой кнопкой мыши значок « Этот компьютер» на рабочем столе и выберите « Управление».
- Затем перейдите к инструменту управления дисками из списка слева.
- Выберите раздел, на котором достаточно места (не менее 8 ГБ), а затем щелкните правой кнопкой мыши этот раздел >> Сжать том.
- Введите размер в мегабайтах, например, если вы хотите сделать раздел 7 ГБ, затем вставьте 7168 МБ, после выбора желаемого размера раздела нажмите кнопку « Сжать».
- Теперь ваш раздел успешно создан. Теперь запустите Rufus и выберите загруженный файл BlissOS.iso, а затем выберите USB-накопитель. (Держите USB-накопитель подключенным к ПК, не удаляйте его)
- Наконец, нажмите кнопку ОК.
3. Установка
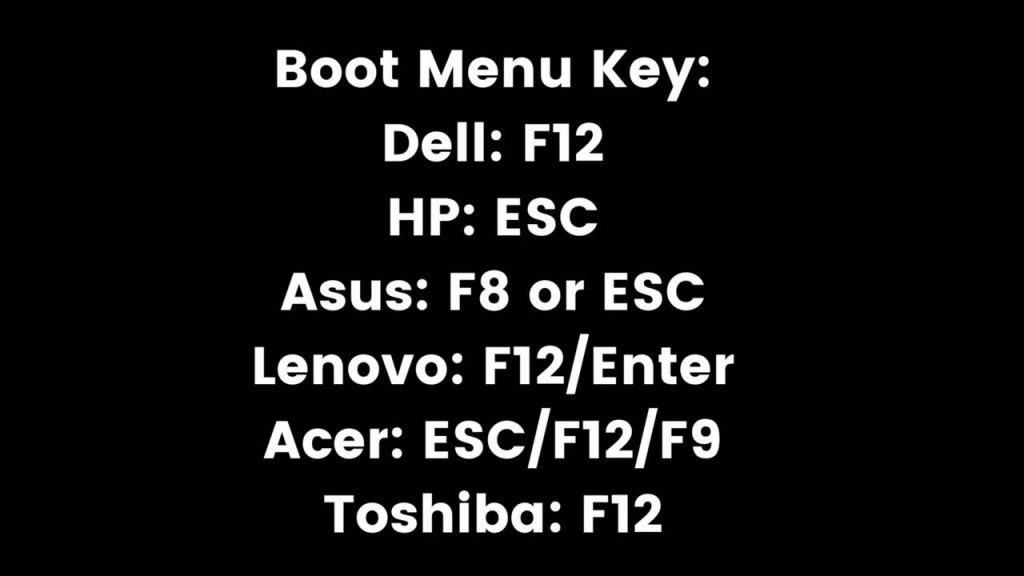
- Теперь перезагрузите компьютер и нажмите клавишу меню загрузки, если у вас материнская плата Dell, затем нажмите клавишу F12 , у другого производителя другая клавиша меню загрузки (так что погуглите).
- Как только вы войдете в меню загрузки, выберите свое USB-устройство.
- Там вы увидите меню установки Bliss OS, и вам нужно будет выбрать 4-й вариант, который называется «Установка Bliss OS 12».
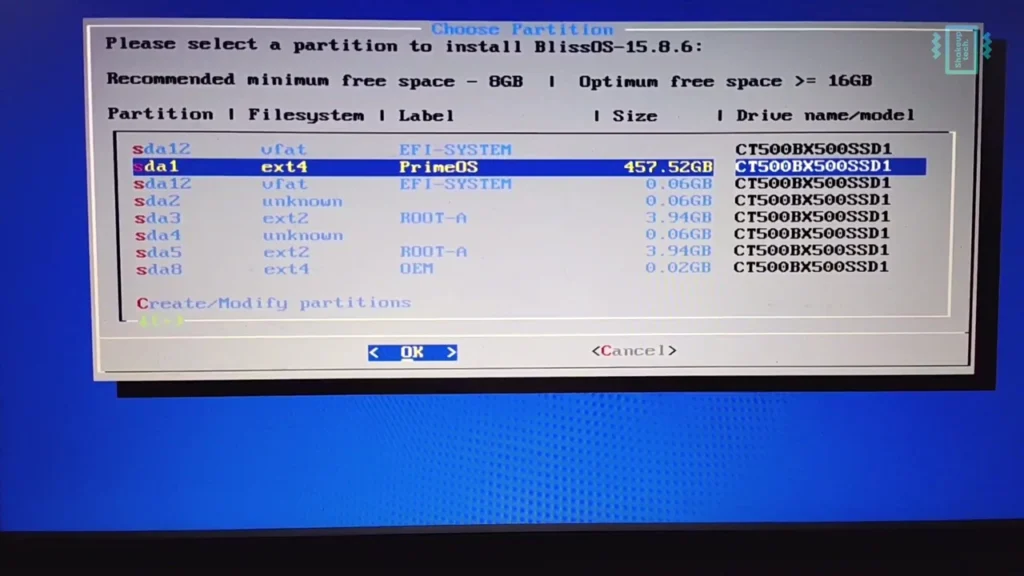
- Теперь вы получите окно схемы разделов и выберите раздел размером 7 ГБ, который мы создали ранее.
- Затем отформатируйте раздел в формате ext4.
- После форматирования раздела должен начаться процесс установки.
- Когда установка завершится успешно, вам будет предложено создать образ диска, который требуется для внутренней памяти, как на смартфоне Android, поэтому просто выберите вариант Да.
- Теперь ваш Android 10 будет установлен на ваш компьютер.
- После завершения перезагрузите компьютер после отображения логотипа загрузки вы можете выбрать другую ОС BLiss Android 10 или Windows 10.
- Готово, теперь ваш компьютер работает под управлением Windows 10, 8.1, 7 и Android 10.
Это оно! теперь ваш компьютер работает под управлением Android вместе с Windows 10, вы можете выбрать, какую операционную систему вы хотите запустить, пока появится меню grub.
На сегодня все!
Надеюсь, вам понравился этот пост, и теперь вы чувствуете себя как Android на своем ПК. На самом деле Bliss OS – это ОС с открытым исходным кодом, а это значит, что в этот проект внесут больший вклад разработчики со всего мира. Если вы столкнулись с какой-либо ошибкой во время установки, не стесняйтесь писать комментарий.
Этот пост тебе немного помогает? Если да, то поделитесь этим постом со своими коллегами и сообщите им, что они также могут запускать Android на своем ПК, Linux или Chromebook, если вам нужны более интересные и полезные руководства, подобные этому, тогда подпишитесь на этот блог, а пока оставайтесь настроен.
Содержание статьи
- Почему именно Bliss OS?
- Особенности Bliss OS
- Как установить Android 10 вместе с Windows 10
- Что вам потребуется
- 1. Отключите безопасную загрузку
- 2. Создание раздела
- 3. Установка
- На сегодня все!
Bliss OS is an Open Source Operating System, based on Android, that incorporates many optimizations, features, and expanded device support. Bliss OS lets the user choose between Desktop or Tablet UI, based on the launcher being used. Let us explore the brand new Bliss OS 15 and also learn how to install and dual boot Bliss OS and Windows.
Creating Partitions To Dual Boot Bliss OS
Search for Partitions in Windows search dialogue. You’ll see Create and Format Partition. Open that program and it’ll show all the partitions on our Drives. Apart from C Drive, there will be a D Drive. We’ll shrink this one to accommodate our new operating system. Right-click on D Drive and select shrink volume. We have to type in the value in terms of MB. So we’ll enter any value above 15 GB i.e. 15000 MB.
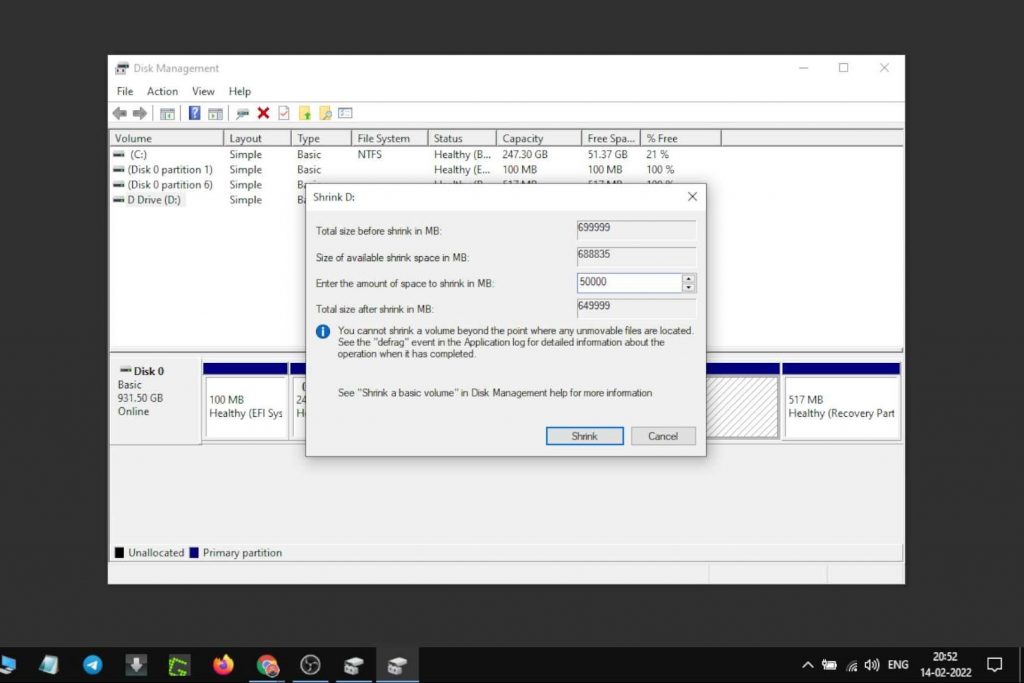
Once you shrink it a new unallocated partition will be created. right-click on that and select Create new volume and press Next and continue. Additionally, while we are here we can also check the partition scheme of our drive. So right-click on Disk 0 and select Properties and then under volume, you can see the partition scheme. It’ll be either MBR or GPT.
Bliss OS Download
There are multiple versions of Bliss OS available to download. You can choose between Android 11 or Android 12L and both of them are stable builds and can be used as daily drivers. Bliss OS is available either with or without Gapps, there is also a FOSS version. You can read about the different versions below and what they include.
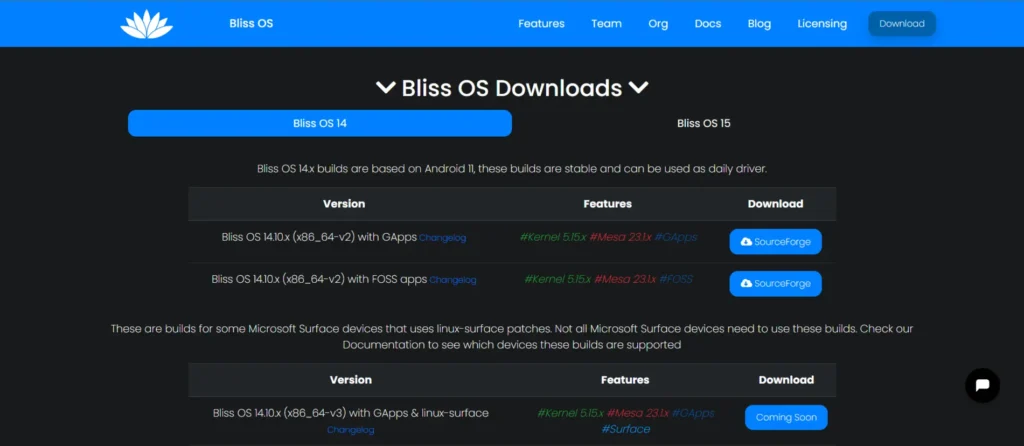
- Stock or Vanilla – Normally barebones, minimal apps added. Perfect for product testing
- FOSS – Includes Free and Open Source apps and app store solutions (Aurora Droid for open-source apps from F-Droid repos, and Aurora Store for accessing the Google Play library of apps)
- Gapps/GMS – Includes Google Play Services (Minimal set of apps, comparable to Pico/Nano)
(DOWNLOAD)
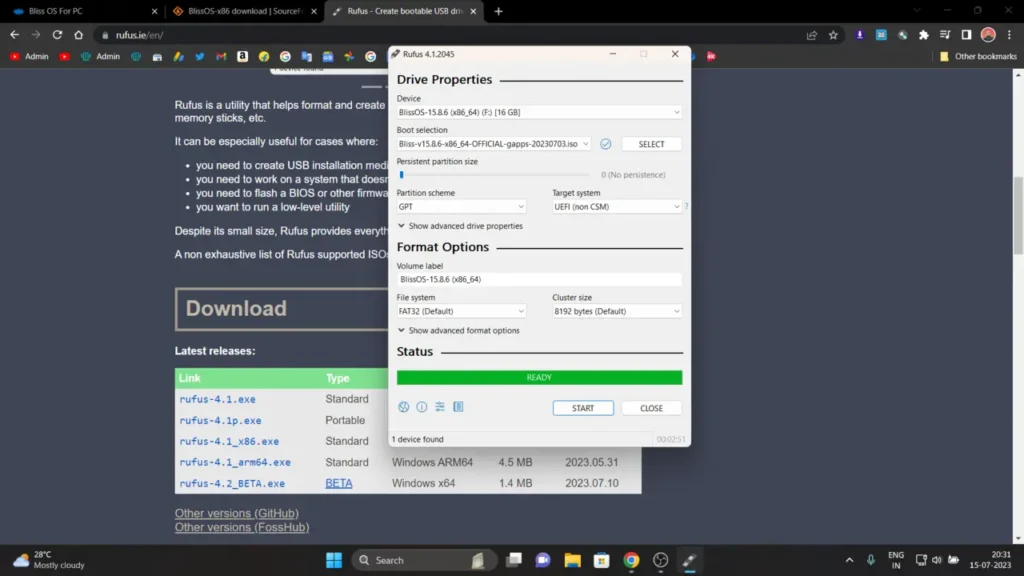
Creating Bootable USB
We can make a bootable USB using two methods. How To Create Bootable USB For Multiple ISO Files
Moreover, we need to download a program called Rufus. Once you open the program you need to select your USB and partition scheme. Then select the ISO file from the file manager and hit press start and it’ll create the bootable USB with your desired ISO.
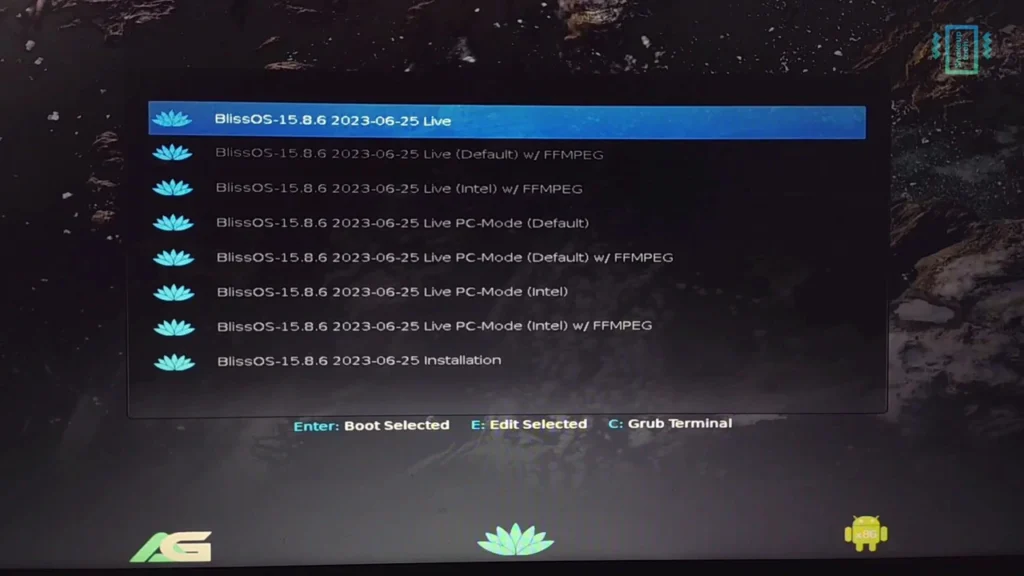
To install the ISO we need to boot into the BIOS menu of our system. For my HP laptop pressing ESC while restarting the system opens up the BIOS menu. Furthermore, in the BIOS menu select the Boot Device Options and select the Bootable USB. Once you select it you can see different Bliss OS names, scroll down using the down arrow key and select the Bliss OS Installation option.
Now a window with choose partition will show up. Select the partition that we have created. Format the partition into EXT4 format and select Yes to all and the partition will be formatted. Then run the Bliss OS and your system will restart. To boot into your BIOS menu again and select the Bliss OS using the arrow keys. Now you can start the setup process by connecting to the internet and adding your Google account.
Bliss OS 15 Android 12L Review
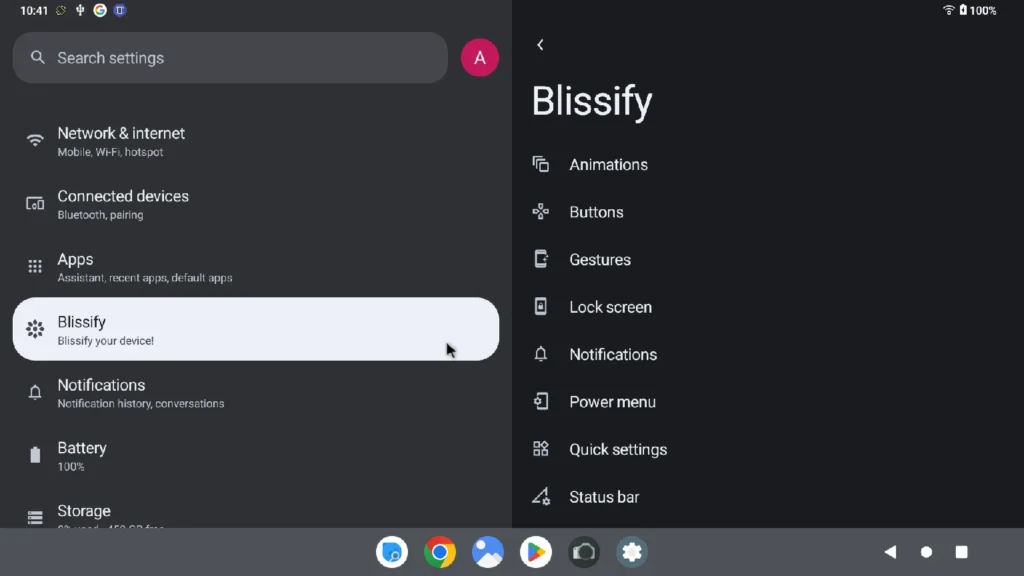
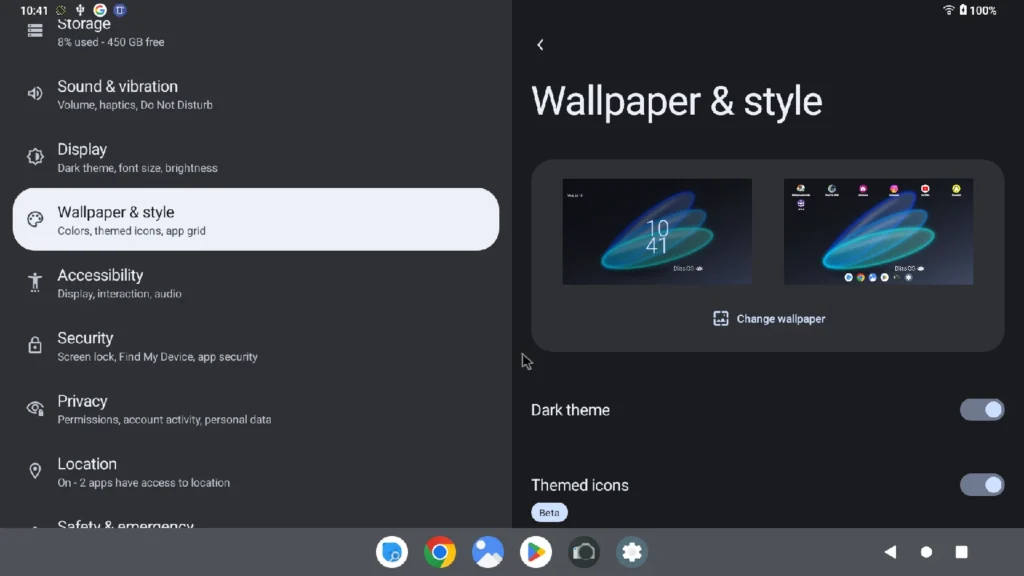
Bliss OS is a popular custom ROM for Android smartphones. Similarly, the Windows port experience has been kept the same with multiple customization options. I had quite a good experience using the Bliss OS 15 with Android 12L, which was quite surprising. Firstly, I would suggest choosing the Quickstep launcher as default when it prompts as the default taskbar can provide inconsistent performance. Additionally, choose the three-button navigation from the navigation settings as it will simplify going back.
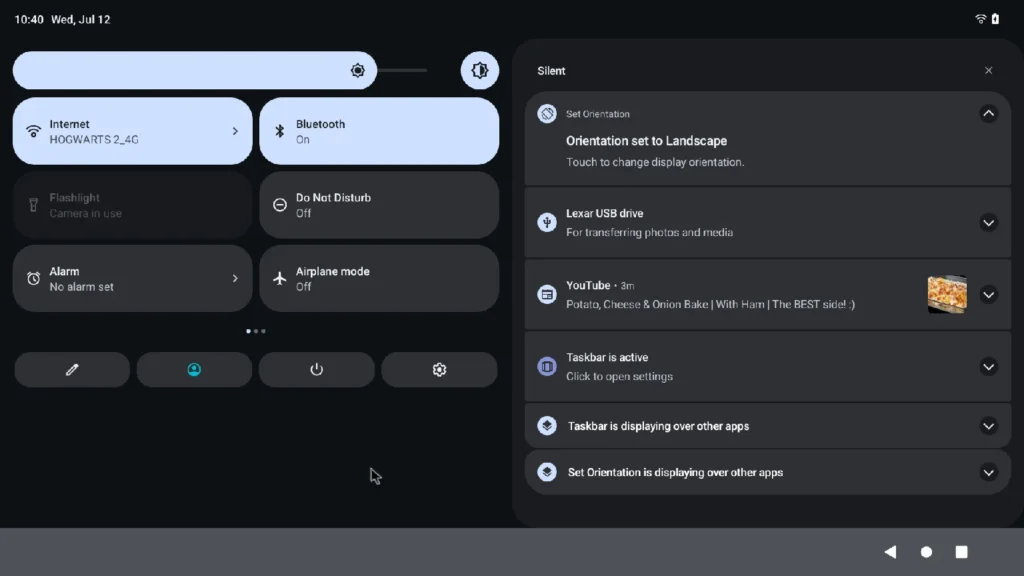
Moreover, you can access the app launcher by swiping up with the mouse and it works quite smoothly. There is the taskbar that tries to mimic the Windows start menu but in my experience, it was quite laggy. Like in the Android custom ROM version, here we also have the Blissify options for customization. We can customize the status bar, lock screen, buttons, icons, and more. Although, not all of the options work here but still it’s good to see these options.
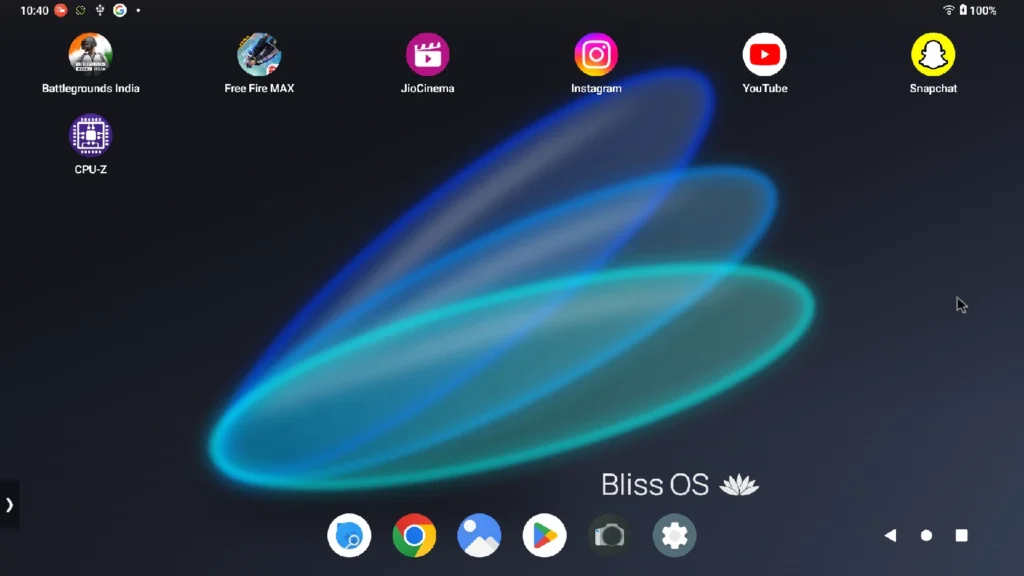
Android Apps and Games on Bliss OS 15
Now the main reason for using any Android OS is the Google Play Store and the support for Android apps and games. I tried many apps and games and most of them worked smoothly. Starting off with apps like Instagram, Snapchat, and Youtube, all worked without issues. We can even use OTT apps like Jio Cinema, Crunchyroll, Amazon Prime, etc to watch web series and movies.
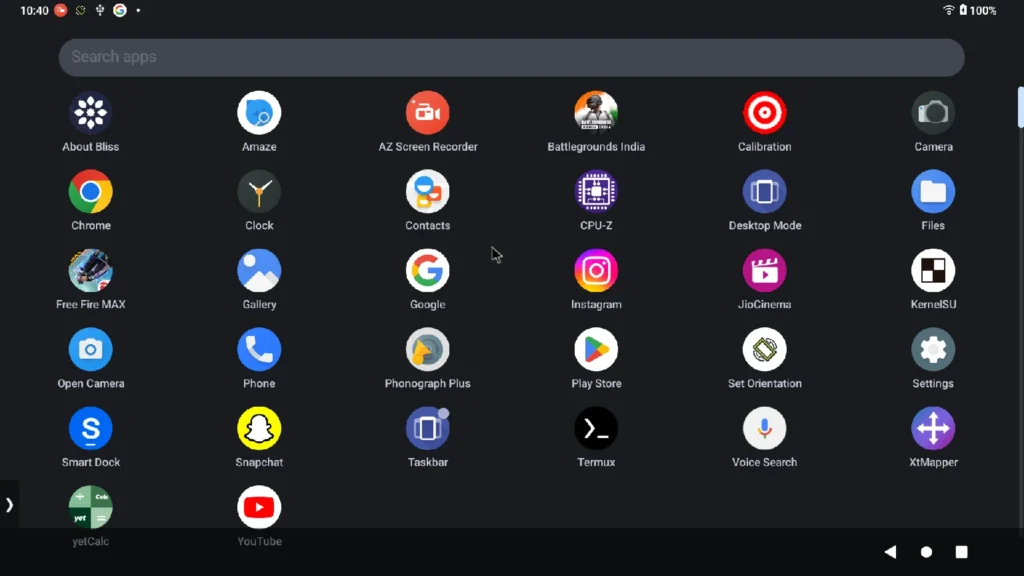
However, games were a different case as most of them did not work. BGMI launched fine but then it shows a restricted area error which can be due to it recognizing it as the emulator. But even games like Free Fire which works in Prime OS did not work here. So if you are planning on gaming then this is not the OS for it.
This is only for advanced users. For regular users, please visit our main Installation Guide found here.
Custom Install — Bliss OS 8.x/10.x/11.x UEFI/ESP (64-bit)
Just as a reminder, Team Bliss is NOT responsible for any damage caused by this guide. By continuing, you automatically agree to these terms.
Part 1 — Mounting Your UEFI/ESP Partition
You will want to make sure you can view hidden and system files in Explorer options. Once you do that, hit the start menu, and type in cmd. Once «Command Prompt» shows up, right click on it and choose «Open as administrator».
cmd is not showing up, what should I do?
Press the Windows key and the R key to bring up the «Run…» dialog. Type in cmd, and then press Ctrl-Shift-Enter. Press «Yes» on the UAC popup.
Run the following:
Then check to see if it is mounted already. Run «Task Manager» by either
- Pressing Ctrl-Alt-Del and then clicking on «Task Manager», or
- Pressing Ctrl-Shift-Esc
Click on «File», «Run new task», «Browse», «This computer», and SYSTEM (X or type in X: in the filepath bar. If you cannot access X:, then that could mean one of three things.
- You have an ESP setup (follow the installation method below)
- You have a legacy MBR setup
- Your setup has a custom boot sequence
Part 1 (alternate) — ESP setup
Windows 10 sometimes has an EFI partition already mounted under drive letter Z:, hidden. A very quick and easy way to access the ESP (EFI System Partition) in Windows 10 without using the command line is to start «Task Manager» (check above if you forgot the steps), and then click on «File», «Run new task», «Browse», «This computer», and SYSTEM (Z or type in Z: in the filepath bar).
Now go to boot/grub/grub.cfg and edit it accordingly with Notepad++ or another text editor. Save the file and your’re ready to go!
Part 1 (alternate) — Killing the explorer.exe
Run cmd as admin and enter the following command:
taskkill /im explorer.exe /fThis will kill the explorer.exe process — don’t be surprised if it shows a warning. This step is sometimes required, because by default explorer.exe is ran by the currently logged in user, and it has to be run by the «Administrator» in order to view the mounted system drive. The «Administrator» account is not the same as an account with administrative privileges.
This will mount the system partition that usually consists of UEFI related files. X: is the letter of the drive — you can use whatever letter you want, but it has to be free for assignment. Then type:
This will run explorer as «Administrator» and will allow you to browse the mounted system partition.
The above may not work for all devices, as some handle UEFI differently.
Part 2 — UEFI installation
Let’s start by downloading the required files. Here is a customized UEFI boot for 32/64-bit machines.
Please note that if you came from our Nougat builds to our Bliss OS 8.x builds, you will have to edit the grub.cfg.
If you are using Bliss OS 8.x/10.x, please use the grub entry below as a guide:
menuentry 'Bliss-x86' --class android {
    search --file --no-floppy --set=root /AndroidOS/system.sfs
    linux /AndroidOS/kernel root=/dev/ram0 SRC=/AndroidOS androidboot.selinux=permissive androidboot.hardware=android_x86_64 quiet DATA=
    initrd /AndroidOS/initrd.img
}
If you are installing on ext3/ext4, due to a bug in the install you will have to use the following grub entry setup:
menuentry 'Bliss-x86' --class android {
    search --file --no-floppy --set=root /AndroidOS/system.sfs
    linux /AndroidOS/kernel root=/dev/ram0 SRC=/AndroidOS  androidboot.selinux=permissive androidboot.hardware=android_x86_64 quiet DATA=
    initrd /AndroidOS/initrd.img
}
Now that we have the partition mounted, we can copy that BOOT directory to your UEFI partition using explorer as the Administrator or by using the «New Task» dialog from Task Manager. (See above if you forgot the steps!) Once it is copied, go back to the Administrator cmd prompt and type:
or if you used Z:, type:
This will dismount the UEFI/ESP volume for safe reboot. We then suggest you use EasyUEFI here to create the UEFI boot entry. Open the app, and create a new entry. Select your UEFI partition, and in the «File» Path, click «Browse» and use the file manager window to browse to your BOOT/grub/grubx64.efi file. Click OK, and then choose the new grub entry and move it to the top. Make sure Secure Boot is turned off or else it likely will just boot back to Windows.
Part 4 — The Manual Blissification of Your PC
To do a manual «Wubi like» install of Bliss OS after you install the UEFI entry, you will need to open the Bliss OS .iso/.img with 7zip, and then drag all the .img & .sfs files to C:/android-x86 or whatever your target drive is (make sure your grub entries match where you are putting these). Then create your data.img. We suggest using a tool like RMXtools (use version 1.7) from XDA to create it. Check the tool’s thread for detailed instructions. You will want to create your data.img inside that android-x86 folder.
You can now reboot if you have installed the custom UEFI entry right and selected it using EasyUEFI. You should boot right to the Android-x86 grub theme. There, you can use up and down to select, and return to boot that entry. You can also hit e to edit the selected entry. You will want to pay attention to which entry you select, since there will be one for Bliss-x86(32bit) and one or Bliss-x86_64(64bit).
Do you want to use Bliss OS on your PC? Are you looking for the best option about how to install Bliss OS on a PC? Then you are on the right page. Just proceed further and know more details. Bliss OS is the popular android OS for PC which is used by an enormous number of people. The latest updated version of Bliss OS 14 makes use of the Android 11-based ROMs supporting the x86 environment. It is specially designed to work with both PC and mobiles in the most effective manner. Generally, you can able to install the Bliss OS on Android gadgets very easily. Along with that, you can also able to install it on your Windows computers, Chromebooks, and Macbooks too.
Interesting factors of Bliss OS
In case you have not used the Android Pie OS, then sure you can try this Bliss OS on your computer. Bliss OS is basically provided as the ROM for making a flash to Android gadgets and as the ISO image for using it on your pc. You can also able to get the ISO version of Bliss OS. The ISO version is effectively a live disk image and it means that you can able to use it on your device not even installing it. So, on the whole, it is very clear that you can able to install the Bliss OS on any laptop or computer.
Also Read: How to install Prime OS on PC
Contents
- Methods to install Bliss OS on PC
- 1. With UEFI support — Dual-boot installation for PC
- 2. Installation process on the complete Hard drive
- Is Bliss OS compatible with all types of hardware configurations?
- Can Bliss OS be installed alongside other operating systems such as Windows 10 on the same computer?
- What are the benefits of using Bliss OS compared to other operating systems?
There are almost two methods are available to install Bliss OS on your pc. If you follow those two methods, then sure you can able to use the Bliss OS on your pc without any issues. Below, you will check out the methods.
-
With UEFI support — Dual-boot installation for PC
-
Installation process on the complete hard drive
1. With UEFI support — Dual-boot installation for PC
In this method, no data will be erased.
- At first, you have to visit the https://Blissroms.com/
- Then you have to download the Bliss OS ISO image
- In your Windows computer, you have to install the 7-Zip initially
- Then you have to open the archive by making right-clicking on the downloaded ISO file and then selecting 7-Zip.
- After that, you have to extract the Androidx86-Installv26.0003.exe to the Windows desktop from the ISO file.
- Then you have to make double-click on the extracted file to launch the installer.
- You have to select the target drive, select storage capacity and select the ISO file in the installer and then click the install option.
- After some point in time, the process of installation will be completed.
- Finally, you can reboot your windows and then choose the Bliss OS via the boot menu.
2. Installation process on the complete Hard drive
Before using this method to install Bliss OS, you have to know what the outcome will be. If you do the installation process on the complete hard drive, then it will completely erase every from your hard drive. Please be very careful while using this method. Backing up your entire data is the best option for you to not lose anything.
- First, you have to visit the https://Blissroms.com/.
- Then you have to download the Bliss OS ISO image.
- Create the bootable USB drive by making use of Rufus or burn the ISO to a blank DVD via making use of ImgBurn.
- Next, you have to boot it into the pc by making use of the bootable USB drive or DVD.
- Then the auto-installation process will take places
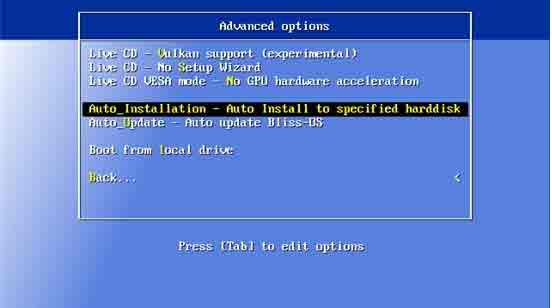
- After that, you have to select the advanced options through the menu.
- You have to choose the Yes option when it is asked to go by erasing the complete data on the hard drive.
- You have to wait for a certain amount of time to complete the process.
- Now you can able to check out some options displayed on the screen, and there you can click the Run Bliss-OS.
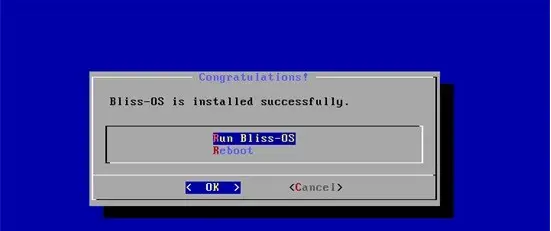
- Immediately you can find a Bliss logo on your system and after that, you can choose a certain option for the launcher app.
- The launcher app is the best option for mobile gadgets like the taskbar and table for the windows pc.
- You can able to get a Windows taskbar-style experience through the Taskbar launcher.
Also Read: Phoenix OS PUBG (How to Play PUBG Mobile on PC without Lag)
Frequently Asked Questions
Is Bliss OS compatible with all types of hardware configurations?
Bliss OS is compatible with most hardware configurations, but it is recommended to check the system requirements before installing it.
Can Bliss OS be installed alongside other operating systems such as Windows 10 on the same computer?
Yes, Bliss OS can be installed alongside other operating systems such as Windows 10 using a dual-boot setup.
What are the benefits of using Bliss OS compared to other operating systems?
The benefits of using Bliss OS include access to the latest Android apps, customization options, and a user-friendly interface.
Conclusion
It is a fact that the Bliss OS is not suitable for the old model desktop/pcs. It is mainly because the Android pie code needs effective performance from the hardware. Also, you have to avoid using it on the low-end Android gadget. Apart from that, you can able to use the Bliss OS on all types of modern computers. From the above-mentioned scenario, you will have found how to install Bliss OS on pc. So, the wait is over! Just have a try and feel it’s a user-friendly experience.
Also Read:
Difference Between Chrome OS and Android OS
Best PS4 Emulators for Windows PC
Best PUBG Emulator For PC
BlissOS is one of the Android OS available for computers, currently offers Android 11 in a stable branch and a few other betas builds go all the way up to Android 12. Here you will learn how to dual boot BlissOS with Windows 11 or even Windows 10. Also we help you with the links to download the operating system.
⭐Have issues booting BlissOS, try the alternative Phoenix OS and it’s dual boot guide.
Download Bliss OS 15 [Android 12]
You need these two things to get started.
1. Head over to download the latest alpha version of bliss OS 15 based on Android 12. And if you prefer stable (Android 9) download that from here.
2. The file you just downloaded should be in .ISO format. Now we need two more things, a USB drive and a tool to create a bootable USB, we recommend Rufus.
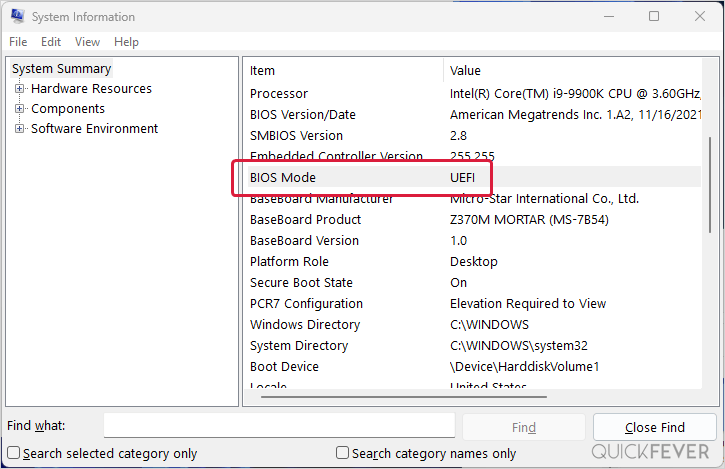
Important: You need to figure out your BIOS mode. If you have a recent computer it will surely have UEFI support and if it’s very old go with the Legacy build of bliss OS. To check that search system information on your computer and look for BIOS mode
Create a Bootable USB of BlissOS
- Open the Rufus on your Windows computer.
- Click on the Browse button and select BlissOS image.
- Click on the Start button, a USB 3.0 takes less than a minute to complete.
- Ths USB drive is now ready to boot BlissOS on your computer.
Once you have Bootable USB ready, plug it in and boot your computer. The process is different from the motherboard to motherboard. This process includes:
If you need a more descriptive method with steps and images, here you go.
1. Get your Bootable BlissOS USB drive and plug it into a system where you want to dual boot it.
2. Press F9 to access the boot menu when your PC starts.
The boot menu can be accessed using one of the following buttons (F9, DEL, ESC, F12, F2) also boot preference can be altered from BIOS settings.
3. Following the guide requires opting for the Install BlissOS option. But you’re free to test the operating system without having to install it to see how it’ll work. That is also a good method to see which things are working I.e. Bluetooth, wifi and which aren’t.
Install BlissOS on UEFI (dual boot)
EFI is intended for new computers that support UEFI.
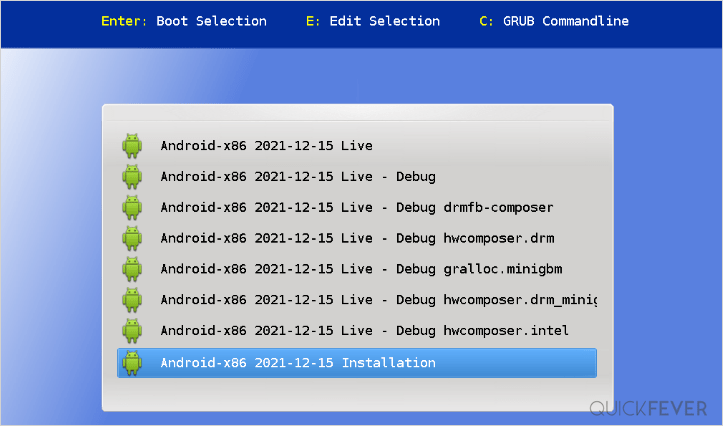
Boot from the USB and select “Android-x86 …Installation“: If you can’t able to get to this screen, Enable USB boot in BIOS and set the preferred boot device to a USB drive.
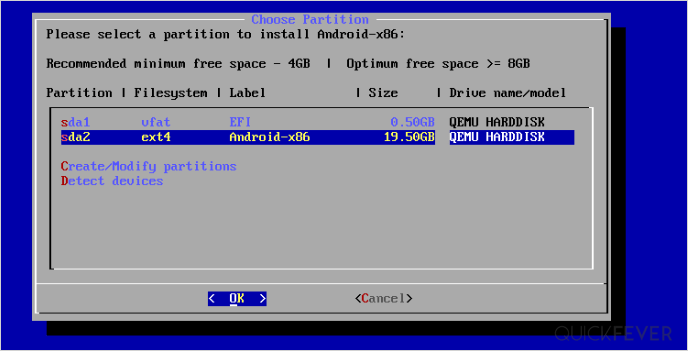
Installer loads and will ask you to select a partition. If a dual boot is your goal, simply select the NTFS drive where Windows is currently installed. As a result, the installer creates an image on the Windows partition.
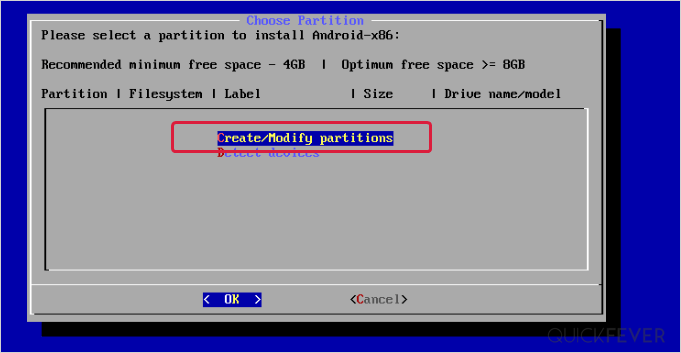
After that select the partition where your Windows is currently installed.
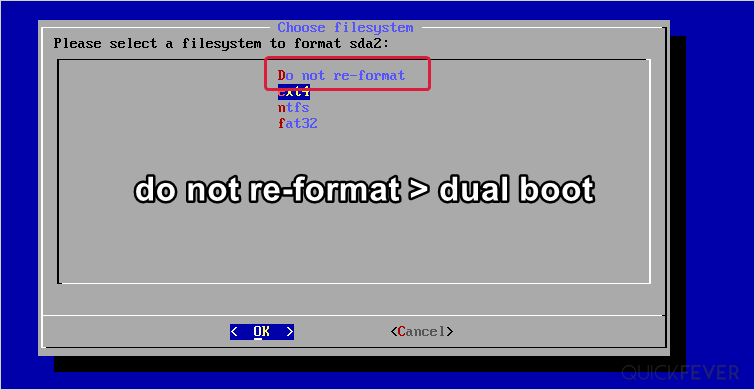
Next, you’ll be asked to select a filesystem, since we don’t want Windows to get removed, choose “Do not re-format” this leaves the Windows 11 or Windows 10 intact.
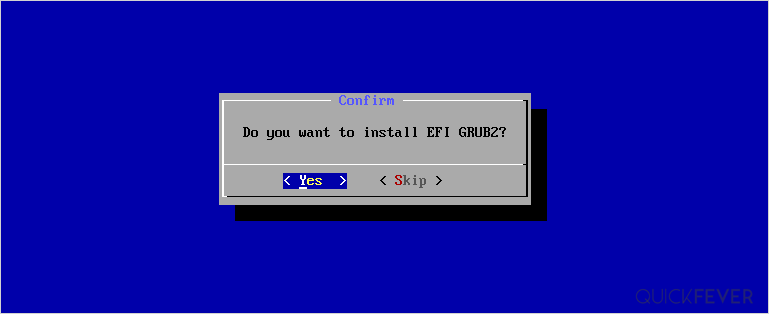
The next screen asks whether you want to install the Grub bootloader. Select Yes and click Ok. This is type is very crucial because a bootloader have all the information of the installed operating system. If you skip this option you will end up having only blissOS and a clean install of Windows 11 will be required in case you want that then.
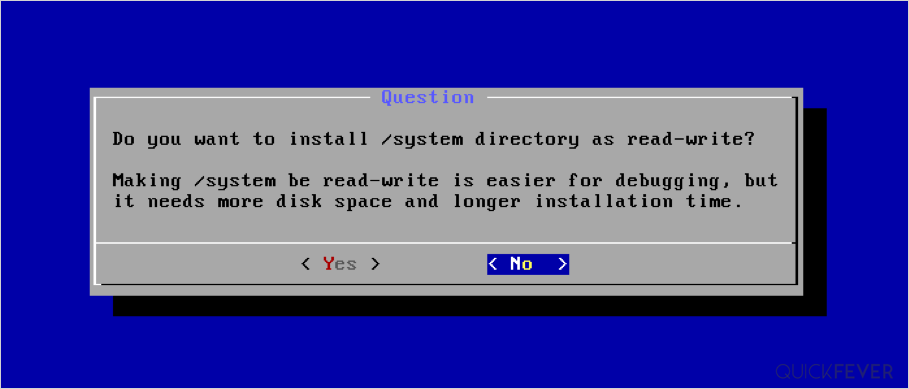
An additional prompt asks for Read-only permission, if you want root permission select, Yes, but we’ll go with No.
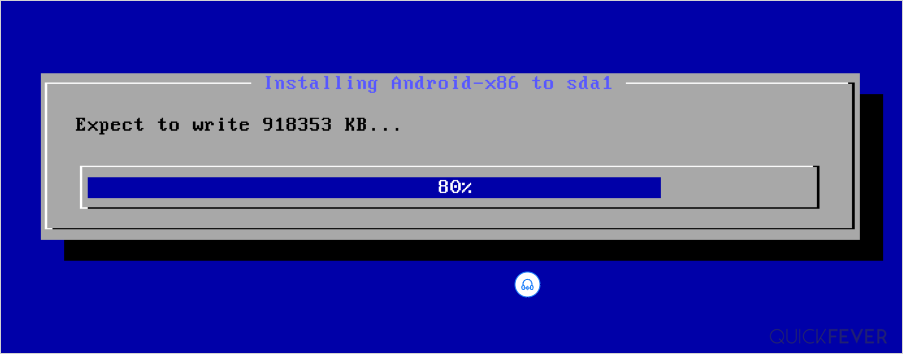
The installer now begins to copy the image to the disk. Depending on the type of Hard Disk it can take somewhere from a minute to 10 minutes.
Hindi next tab you can specify how much space you want to to give for the data image a good range is between 8 to 32 GB for most users.
Install BlissOS on Legacy
Legacy hardware are all the old computers who does not support UEFI interface. A good thumb rule is, if your computer can’t install Windows 11 or Windows 10 then you need legacy version of the operating system. However some motherbaords support both Legacy and UEFI interface.
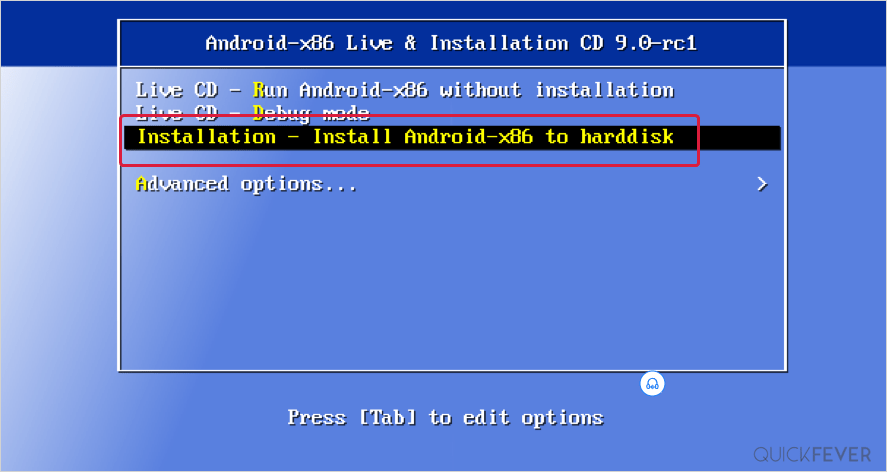
Boot from the USB and select “Installation – Install Android-x86 to harddisk”: If you can’t able to get to this screen, Enable USB boot in BIOS and set the preferred boot device to a USB drive.
Installer loads and will ask you to select a partition. If a dual boot is your goal, simply select the NTFS drive where Windows is currently installed. As a result, the installer creates an image on the Windows partition.
After that select the partition where your Windows is currently installed.
Next, you’ll be asked to select a filesystem, since we don’t want Windows to get removed, choose “Do not re-format” this leaves the Windows 11 or Windows 10 intact.
The next screen asks whether you want to install the Grub bootloader. Select Yes and click Ok. This is type is very crucial because a bootloader have all the information of the installed operating system. If you skip this option you will end up having only blissOS and a clean install of Windows 11 will be required in case you want that then.
An additional prompt asks for Read-only permission, if you want root permission select, Yes, but we’ll go with No.
The installer now begins to copy the image to the disk. Depending on the type of Hard Disk it can take somewhere from a minute to 10 minutes.
Hindi next tab you can specify how much space you want to to give for the data image a good range is between 8 to 32 GB for most users.
Since you are here…
I’ve got a small favor to ask. This is an independent site, and producing content takes a lot of hard work and time. Although many people are reading Quickfever, many use adblocker. And unlike many other sites, there is no paywall blocking.
So you can see why your help is needed. If everyone who finds this website useful and helps to support it, the future would be much more secure. Thank you.
1. Buy everything from Amazon.com US, Amazon.in India
2. Donate for coffee
If you use adblocker, please disable it for this site.