Device encryption helps protect your data and it’s available on a wide range of Windows devices.
Normally when you access your data it’s through Windows and has the usual protections associated with signing into Windows. If somebody wants to bypass those Windows protections, however, they could open the computer case and remove the physical hard drive. Then by adding your hard drive as a second drive on a machine they control, they may be able to access your data without needing your credentials.
If your drive is encrypted, however, when they try to use that method to access the drive, they’ll have to provide the decryption key (which they shouldn’t have) in order to access anything on the drive. Without the decryption key the data on the drive will just look like gibberish to them.

Having trouble playing the video? Watch it on YouTube.
Is BitLocker asking for your recovery key? See Find your BitLocker recovery key.
Is it available on my device?
BitLocker encryption is available on supported devices running Windows 10 or 11 Pro, Enterprise, or Education.
On supported devices running Windows 10 or newer BitLocker will automatically be turned on the first time you sign into a personal Microsoft account (such as @outlook.com or @hotmail.com) or your work or school account.
BitLocker is not automatically turned on with local accounts, however you can manually turn it on in the Manage BitLocker tool.
To manage BitLocker encryption
Tap Start and in the search box, type Manage BitLocker and then select it from the list of results.

Note: You’ll only see this option if BitLocker is available for your device. It isn’t available on Windows Home edition.
If you have BitLocker turned on for your device, it’s important to be sure you have the Recovery Key backed up somewhere. If BitLocker thinks an unauthorized user is trying to access the drive it will lock the system and ask for the BitLocker recovery key. If you don’t have that key, you won’t be able to access the drive, and Microsoft support doesn’t have access to the recovery keys either so they can’t provide it to you, or create a new one, if it’s been lost.
It only takes a few moments to back up your recovery key. For more info see Back up your BitLocker recovery key.
If your device doesn’t support BitLocker, you may be able to use Windows Device Encryption instead.
To see if you can use Windows device encryption
-
In the search box on the taskbar, type System Information, right-click System Information in the list of results, then select Run as administrator. Or you can select the Start button, and then under Windows Administrative Tools, select System Information.
-
At the bottom of the System Information window, find Device Encryption Support. If the value says Meets prerequisites, then device encryption is available on your device.
To turn on Windows device encryption
-
Sign in to Windows with an administrator account (you may have to sign out and back in to switch accounts). For more info, see Create a local or administrator account in Windows 10.
-
Select the Start button, then select Settings > Update & Security > Device encryption. If Device encryption doesn’t appear, it isn’t available.
-
If device encryption is turned off, select Turn on.
Additional resources
Back up your BitLocker recovery key
Finding your BitLocker recovery key in Windows
Need more help?
Want more options?
Explore subscription benefits, browse training courses, learn how to secure your device, and more.
Communities help you ask and answer questions, give feedback, and hear from experts with rich knowledge.
Эта функция доступна в версиях Frontline Starter и Frontline Standard, Business Plus, Enterprise Standard и Enterprise Plus, Education Standard и Education Plus, Enterprise Essentials и Enterprise Essentials Plus, Cloud Identity Premium. Сравнение версий
Как администратор, вы можете указать, как выполняется шифрование на устройствах с Microsoft Windows 10 или 11, зарегистрированных в службе управления устройствами Windows. Если на устройстве включено шифрование BitLocker, заданные вами параметры вступят в силу. Чаще всего настраивают:
- шифрование диска;
- дополнительную аутентификацию при запуске;
- способы восстановления из предзагрузочной среды;
- шифрование данных на жестких дисках;
- способы восстановления жестких дисков;
- шифрование данных на съемных носителях.
Подготовка
Чтобы настройки шифрования применялись, устройства должны быть зарегистрированы в службе управления устройствами Windows. Подробнее об управлении устройствами Windows…
Как настроить шифрование BitLocker
- Нажмите Настройки BitLocker.
- Чтобы применить настройки ко всем пользователям, выберите организационное подразделение верхнего уровня. В обратном случае выберите дочернее подразделение.
- В разделе Шифрование диска выберите в списке значение Включено.
- Задайте нужные настройки (развернуть все): Шифрование диска
- Способ шифрования данных на системных дисках. Выберите алгоритм и надежность ключа для шифрования дисков операционной системы.
- Дополнительная аутентификация при запуске. Укажите, должен ли BitLocker требовать дополнительную аутентификацию при каждом запуске компьютера и используется ли доверенный платформенный модуль (TPM). Если этот параметр включен, доступны следующие настройки:
- Разрешить использование BitLocker без совместимого TPM. Установите этот флажок, чтобы для запуска требовался пароль или USB-накопитель.
- Настроить запуск TPM без PIN-кода или ключа. Вы можете требовать аутентификацию при запуске с помощью TPM вместо PIN-кода или ключа.
- PIN-код запуска TPM. Можно указать, что перед запуском нужно ввести PIN-код (от 6 до 20 цифр). Вы также можете настроить минимальную длину PIN-кода.
- Ключ запуска TPM. Вы можете требовать от пользователей проходить аутентификацию с помощью ключа запуска TPM, чтобы получить доступ к диску. Ключ запуска – это USB-ключ с информацией для шифрования диска. При подключении USB-ключа происходит аутентификация доступа к диску. После этого диск готов к использованию.
- Настройка ключа и PIN-кода запуска TPM. Вы можете указать, что нужно использовать и ключ, и PIN-код запуска.
- Способы восстановления из предзагрузочной среды. Включите этот параметр, чтобы настроить сообщение или изменить URL, которые отображаются на экране восстановления ключа перед загрузкой, если системный диск заблокирован.
- Способы восстановления системных дисков. Включите этот параметр, чтобы указать доступные пользователям способы восстановления данных с системных дисков, защищенных с помощью BitLocker. Если параметр включен, доступны следующие настройки:
- Разрешить агент восстановления данных. Под агентами восстановления данных подразумеваются пользователи, чьи сертификаты инфраструктуры открытых ключей используются для создания предохранителя сетевого ключа BitLocker. Если это разрешено, такие пользователи могут разблокировать диски, защищенные с помощью BitLocker, указав свои учетные данные PKI.
- Задать пароль восстановления (48 цифр). Укажите, могут или должны ли пользователи создать пароль восстановления из 48 цифр.
- 256-разрядный ключ восстановления. Укажите, могут или должны ли пользователи создать 256-разрядный ключ восстановления.
- Скрыть варианты восстановления в мастере настройки BitLocker. Установите этот флажок, чтобы запретить пользователям выбирать способ восстановления диска при включении BitLocker.
- Сохранить данные для восстановления, связанные с BitLocker, в доменных службах Active Directory. Если этот флажок установлен, вы можете выбрать, какие данные для восстановления, связанные с BitLocker, должны храниться в Active Directory. Вы можете хранить ключ и пароль восстановления или только пароль восстановления. Если этот параметр включен, доступна следующая настройка:
- Не включать BitLocker, пока данные восстановления не будут сохранены в Active Directory. Если выбран этот вариант, пользователи смогут включить шифрование BitLocker только после того, как компьютер подключится к домену и данные для восстановления будут сохранены в Active Directory.
Шифрование данных на жестких дисках
- Шифрование данных на жестких дисках. При включении этого параметра запись на жесткие диски будет разрешена только в том случае, если они зашифрованы. Если этот параметр включен, доступны следующие настройки:
- Способ шифрования данных на жестких дисках. Выберите алгоритм и надежность ключа для шифрования жестких дисков.
- Способы восстановления жестких дисков. Включите, чтобы выбрать доступные пользователям способы восстановления данных с жестких дисков, защищенных с помощью BitLocker. Если этот параметр включен, доступны следующие настройки:
- Разрешить агент восстановления данных. Под агентами восстановления данных подразумеваются пользователи, чьи сертификаты инфраструктуры открытых ключей используются для создания предохранителя сетевого ключа BitLocker. Если это разрешено, такие пользователи могут разблокировать диски, защищенные с помощью BitLocker, указав свои учетные данные PKI.
- Пароль восстановления (48 цифр). Укажите, могут или должны ли пользователи создать пароль восстановления из 48 цифр.
- 256-разрядный ключ восстановления. Укажите, могут или должны ли пользователи создать 256-разрядный ключ восстановления.
- Скрыть варианты восстановления в мастере настройки BitLocker. Установите этот флажок, чтобы запретить пользователям выбирать способ восстановления диска при включении BitLocker.
- Сохранить данные для восстановления, связанные с BitLocker, в доменных службах Active Directory. Если этот флажок установлен, вы можете выбрать, какие данные для восстановления, связанные с BitLocker, должны храниться в Active Directory. Вы можете хранить ключ и пароль восстановления или только пароль восстановления. Если этот параметр включен, доступна следующая настройка:
- Не включать BitLocker, пока данные восстановления не будут сохранены в Active Directory. Если выбран этот вариант, пользователи смогут включить шифрование BitLocker только после того, как компьютер подключится к домену и данные для восстановления будут сохранены в Active Directory.
Шифрование данных на съемных носителях
- Шифрование данных на съемных носителях. Включите этот параметр, чтобы разрешить запись на съемные носители только в том случае, если они зашифрованы. Если этот параметр включен, доступны следующие настройки:
- Способ шифрования данных на съемных носителях. Выберите алгоритм и надежность ключа для шифрования съемных носителей.
- Запретить запись на устройства, настроенные в другой организации. Если флажок установлен, запись возможна только на те диски, поля идентификации которых совпадают с полями идентификации компьютера. Эти поля задаются групповой политикой организации.
- Нажмите Сохранить. В дочернем организационном подразделении можно выбрать вариант Наследовать или Переопределить для настроек родительского подразделения.
Изменения вступают в силу в течение 24 часов (обычно быстрее). Подробнее…
Как установить для шифрования диска значение «Не настроено»
Если выбрать для параметра Шифрование диска значение Не настроено, заданные в консоли администратора правила BitLocker перестанут применяться. В этом случае для правил на устройствах пользователей начнет действовать прежняя настройка. Если устройство зашифровано, его настройки или данные на нем не будут изменены.
Как отключить шифрование BitLocker
- Нажмите Настройки BitLocker.
- Чтобы отключить профиль только для некоторых пользователей, в списке слева выберите нужное организационное подразделение. Если этого не сделать, настройки будут применены ко всем пользователям в организации.
- В разделе Шифрование диска выберите в списке значение Отключено.
- Нажмите Сохранить. В дочернем организационном подразделении можно выбрать вариант Наследовать или Переопределить для настроек родительского подразделения.
Статьи по теме
- Включите управление устройствами Windows.
- Как зарегистрировать устройство в службе управления устройствами Windows
Google, Google Workspace, а также другие связанные знаки и логотипы являются товарными знаками компании Google LLC. Все другие названия компаний и продуктов являются товарными знаками соответствующих компаний.
Эта информация оказалась полезной?
Как можно улучшить эту статью?
(Image credit: Future)
On Windows 11, BitLocker adds an extra layer of security with encryption to protect your device and files from unauthorized access. When using encryption, the feature scrambles the data on the drive to make it unreadable for anyone without the correct decryption key (your account password).
The BitLocker security feature is available on Windows 11 Pro, Enterprise, and Education editions. However, on Windows 11 Home, you can use «device encryption,» a limited version of BitLocker. It works identically to the full version but without many advanced management settings and capabilities, such as «BitLocker To Go.» Also, when using device encryption, all the drives will encrypt automatically, while the full version of BitLocker allows you to choose the storage using encryption.
This guide will walk you through the steps to set up device encryption with BitLocker on your computer.
How to set up BitLocker on Windows 11 Pro
To configure BitLocker in the Pro edition of Windows 11, use these steps:
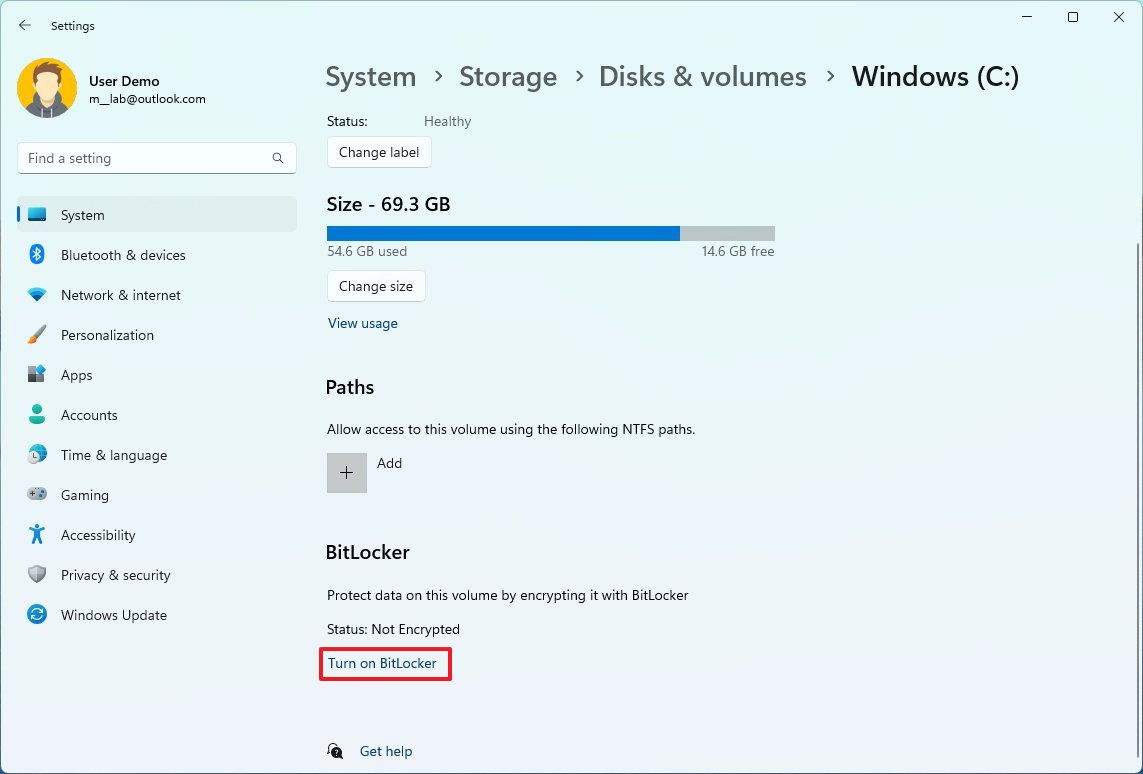
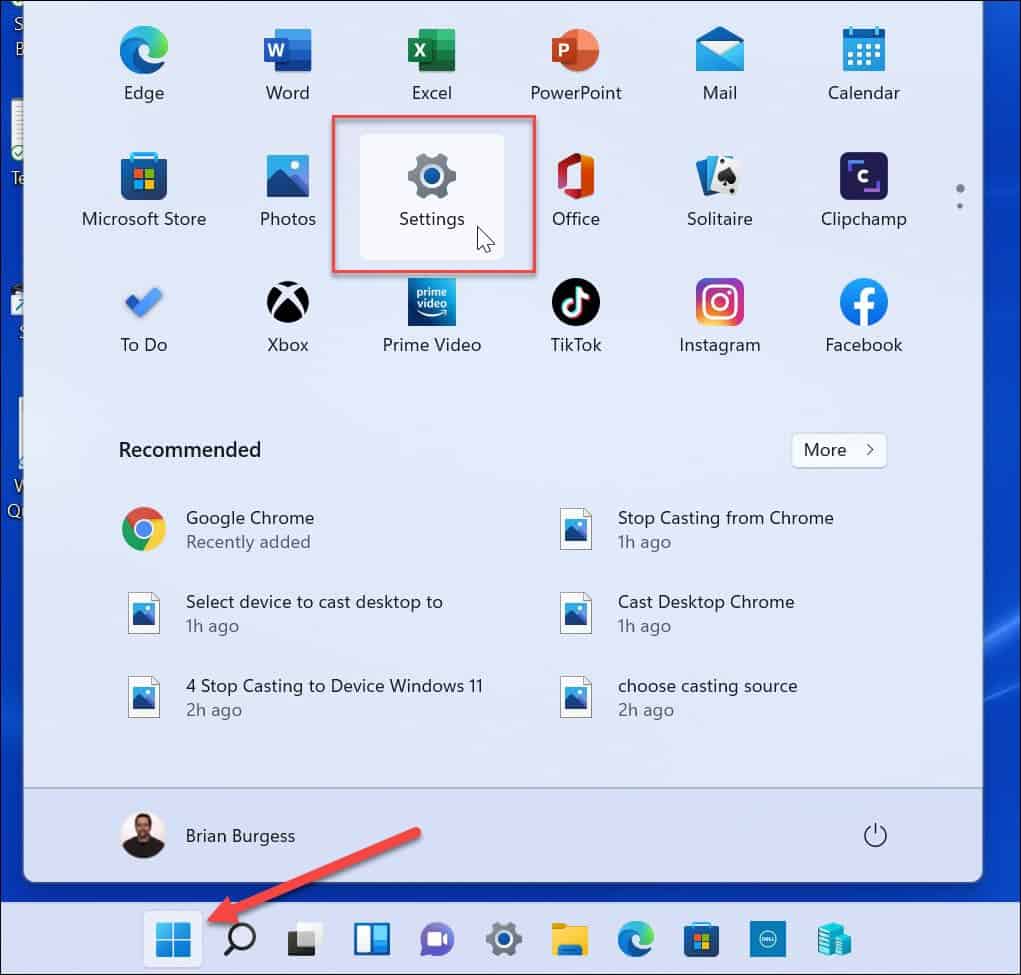
- Open Settings.
- Click on System.
- Click the Storage page on the right side.
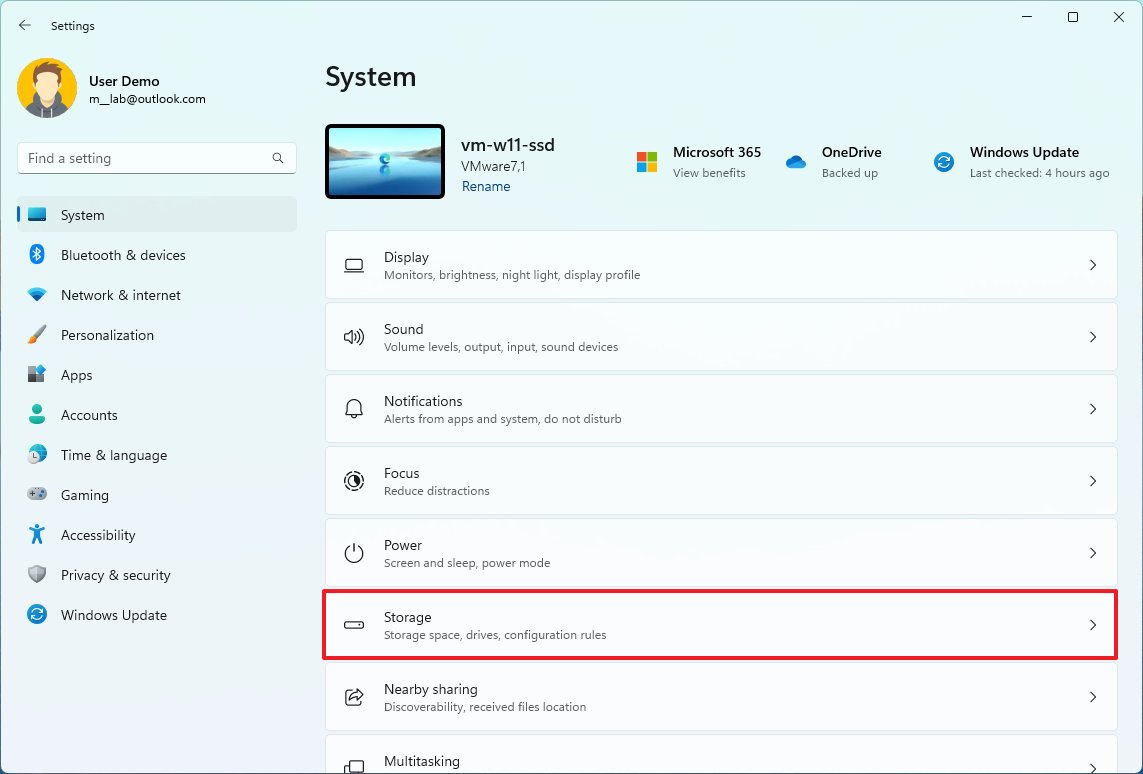
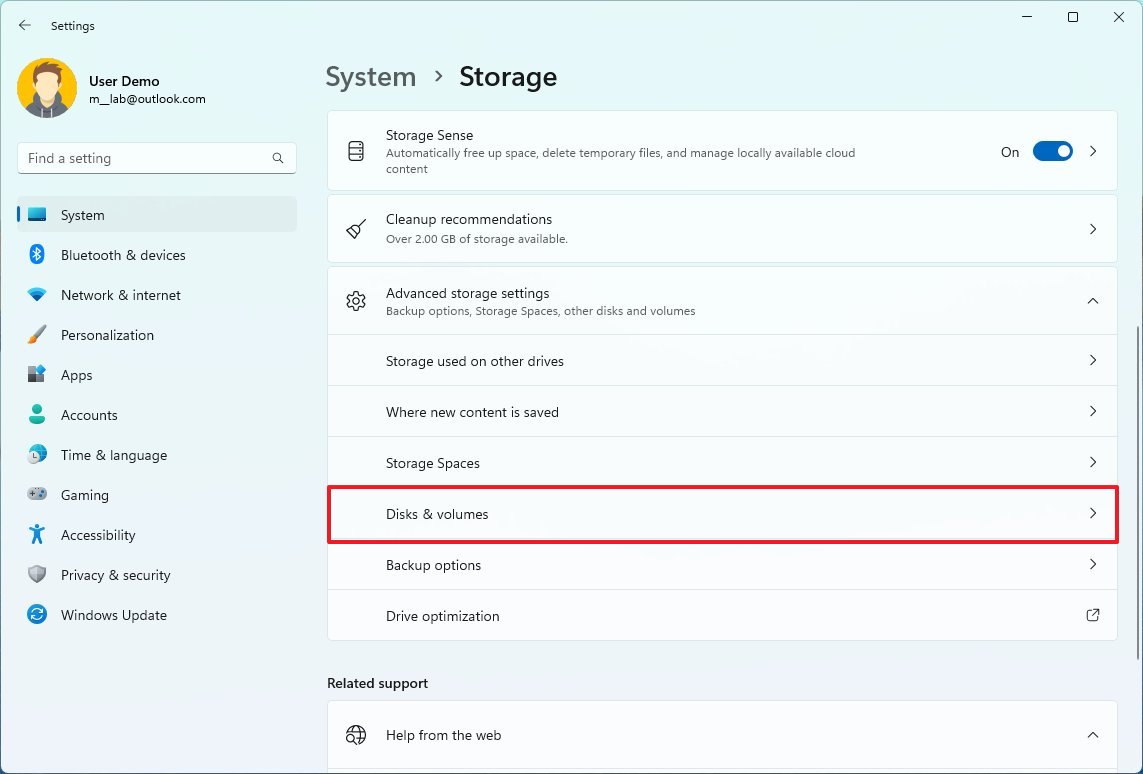
- Under the «Storage management» section, click on Advanced storage settings.
- Click on Disks & volumes.
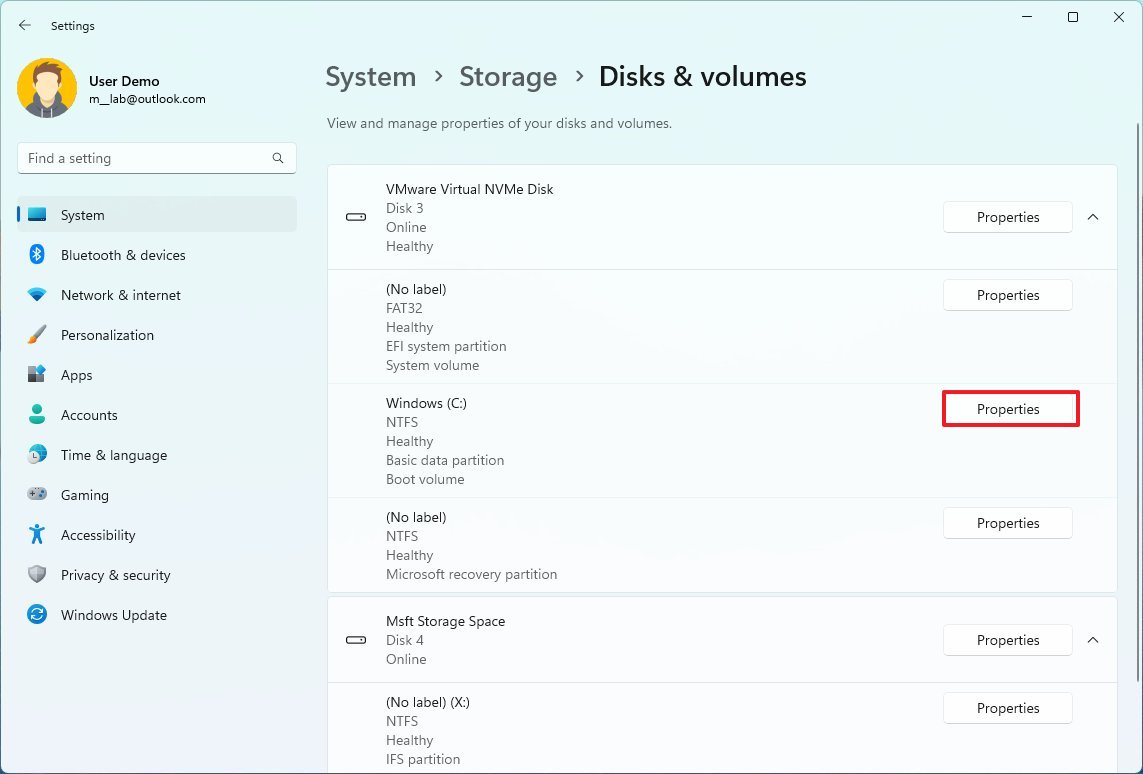
- Select the drive with the partition to encrypt.
- Select the partition to enable encryption and click the Properties button.
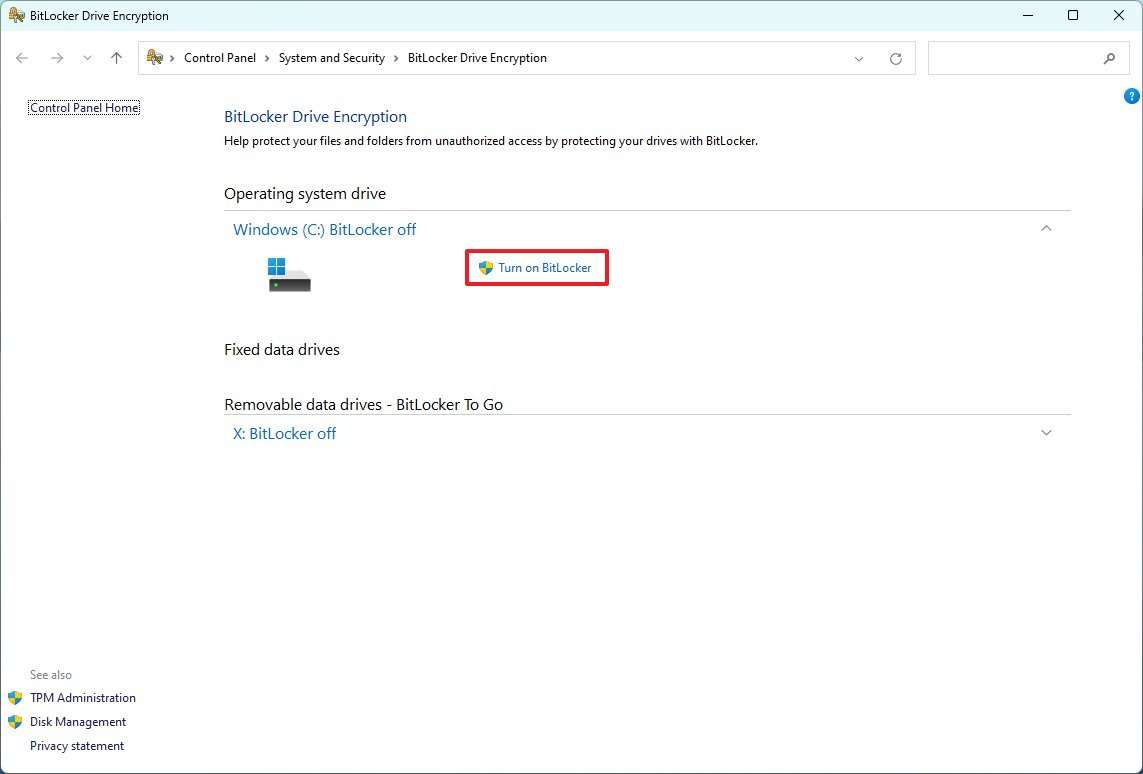
- Click the «Turn on BitLocker» option.
- Click the «Turn on BitLocker» option again.
- Select the option to back up the recovery key — for example, Save to your Microsoft account.
- Quick note: You can always find the recovery key on your Microsoft account. Also, the option to save online is only available when the account is connected to a Microsoft account.
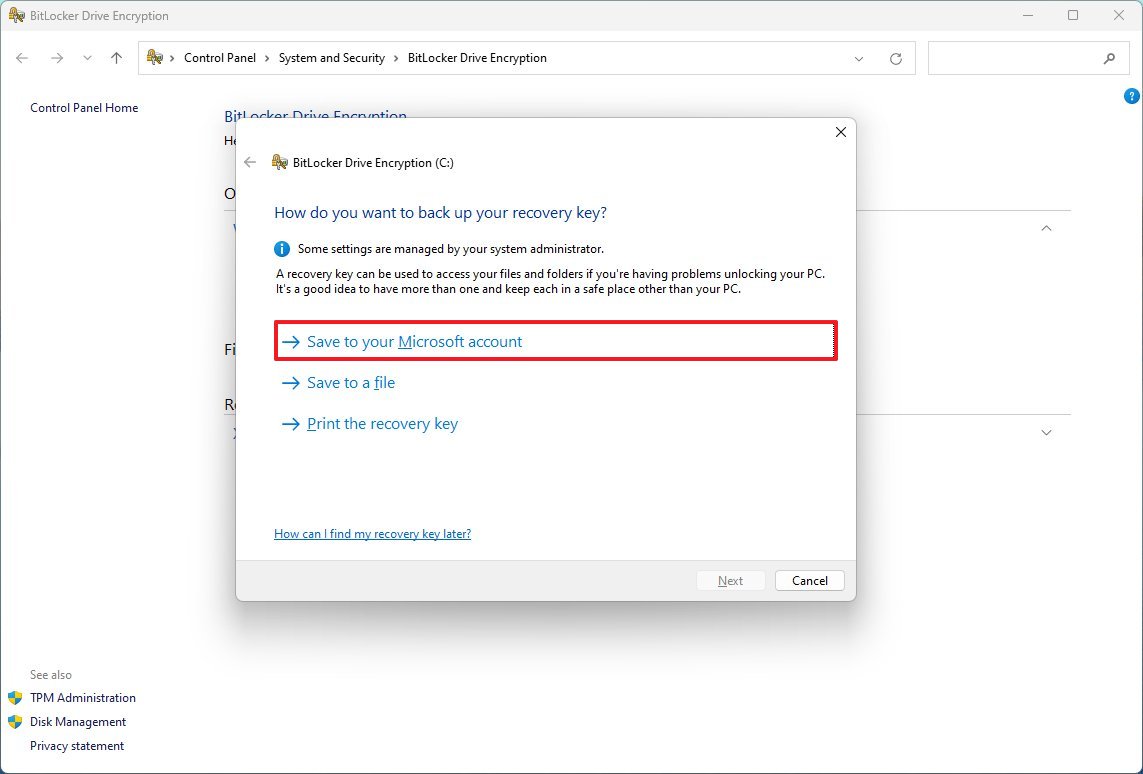
- Click the Next button.
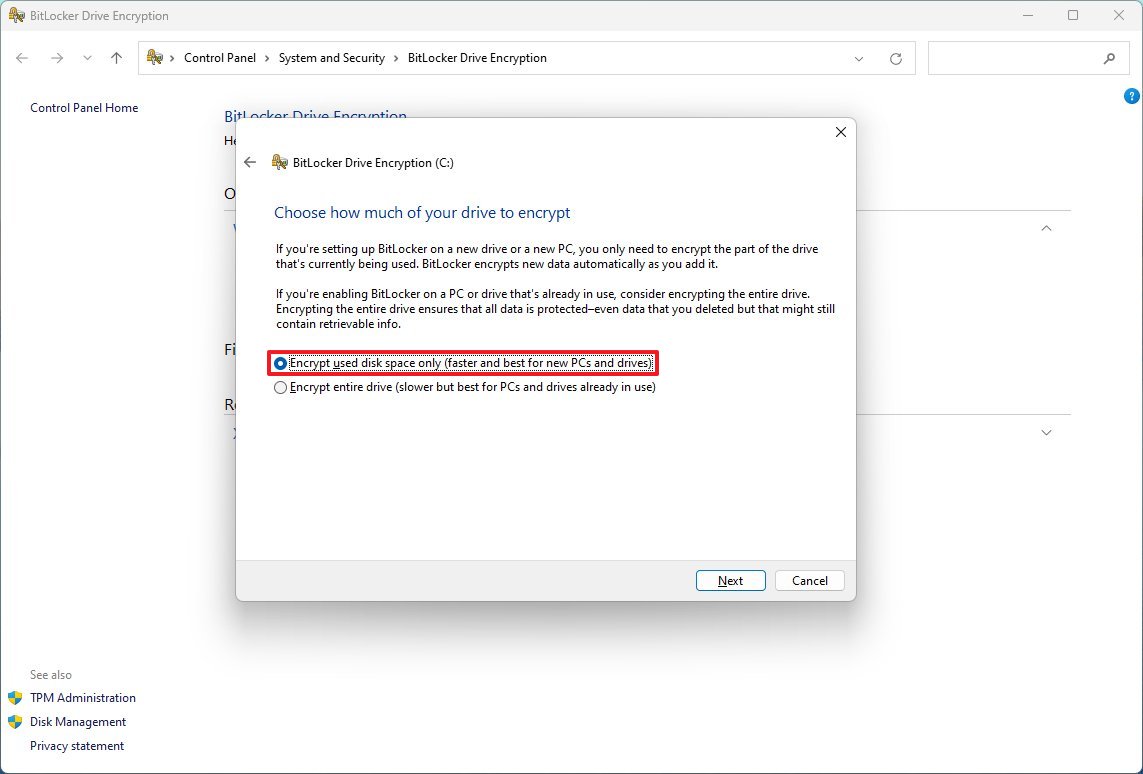
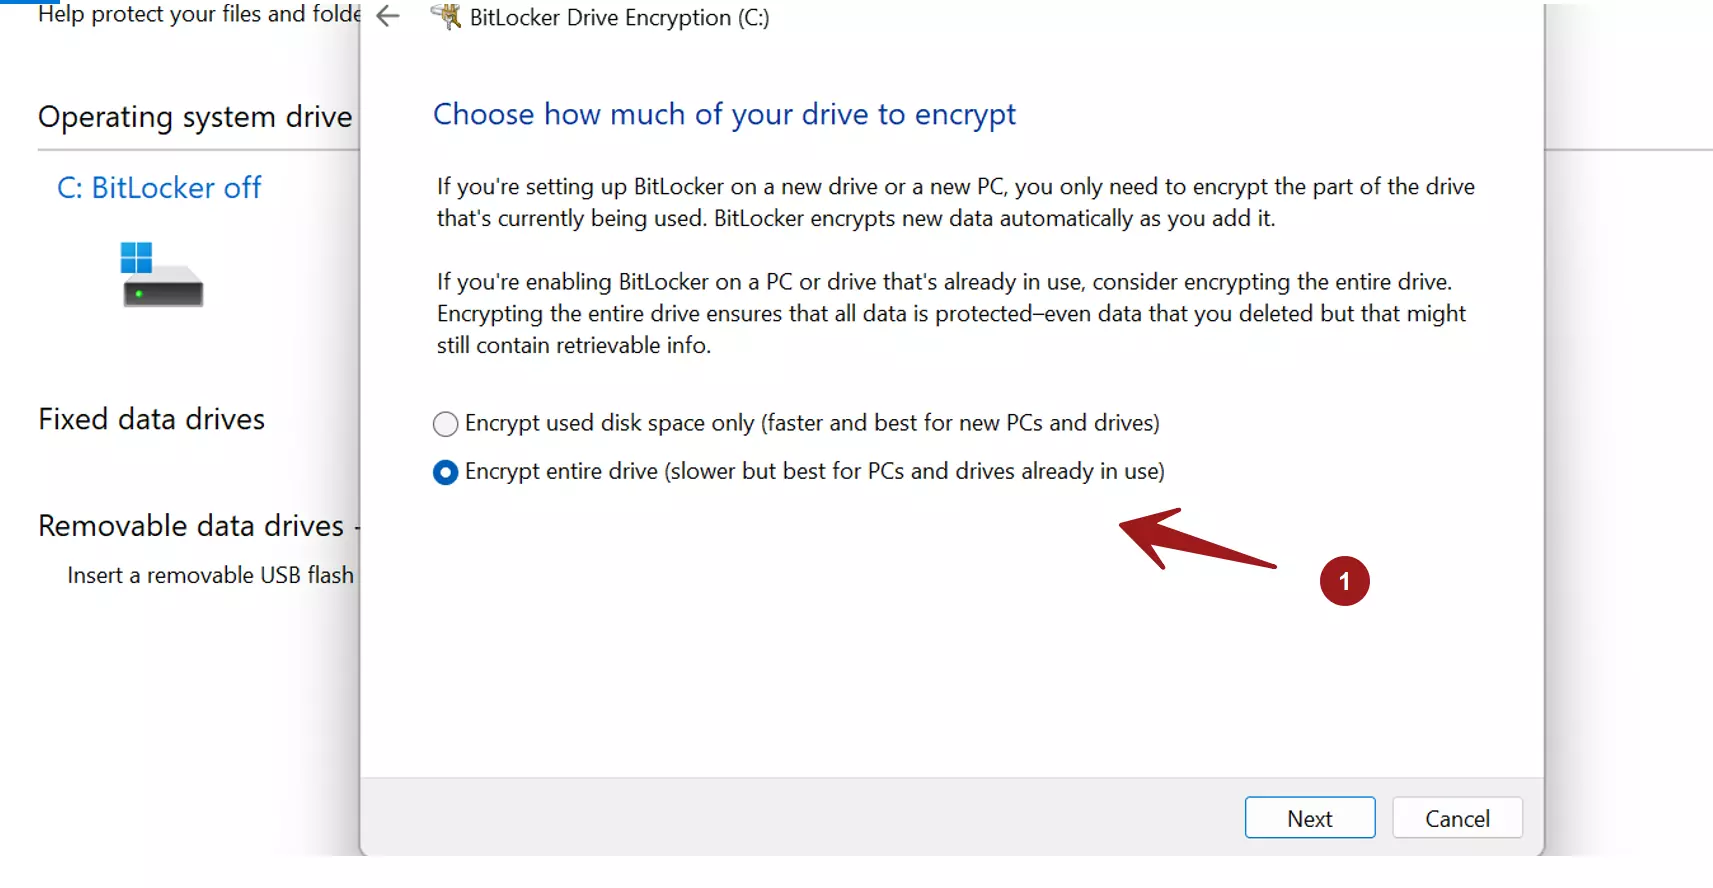
- Select the «Encrypt used disk space only» option.
- Click the Next button.
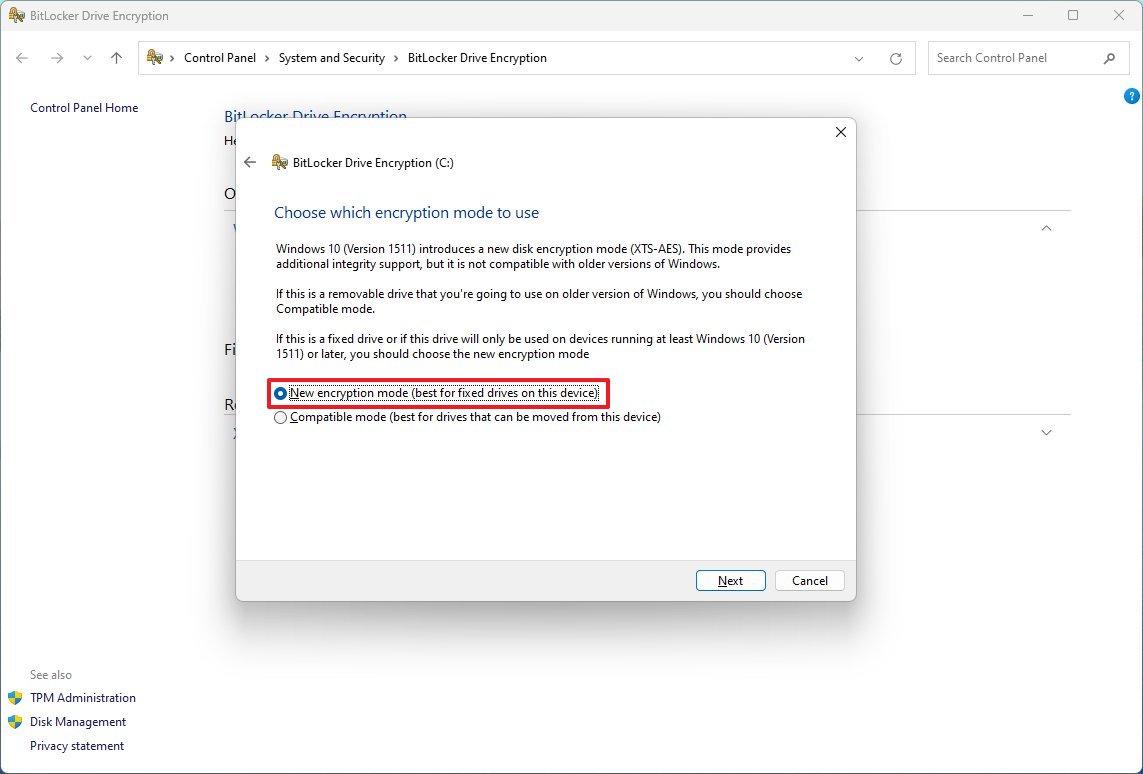
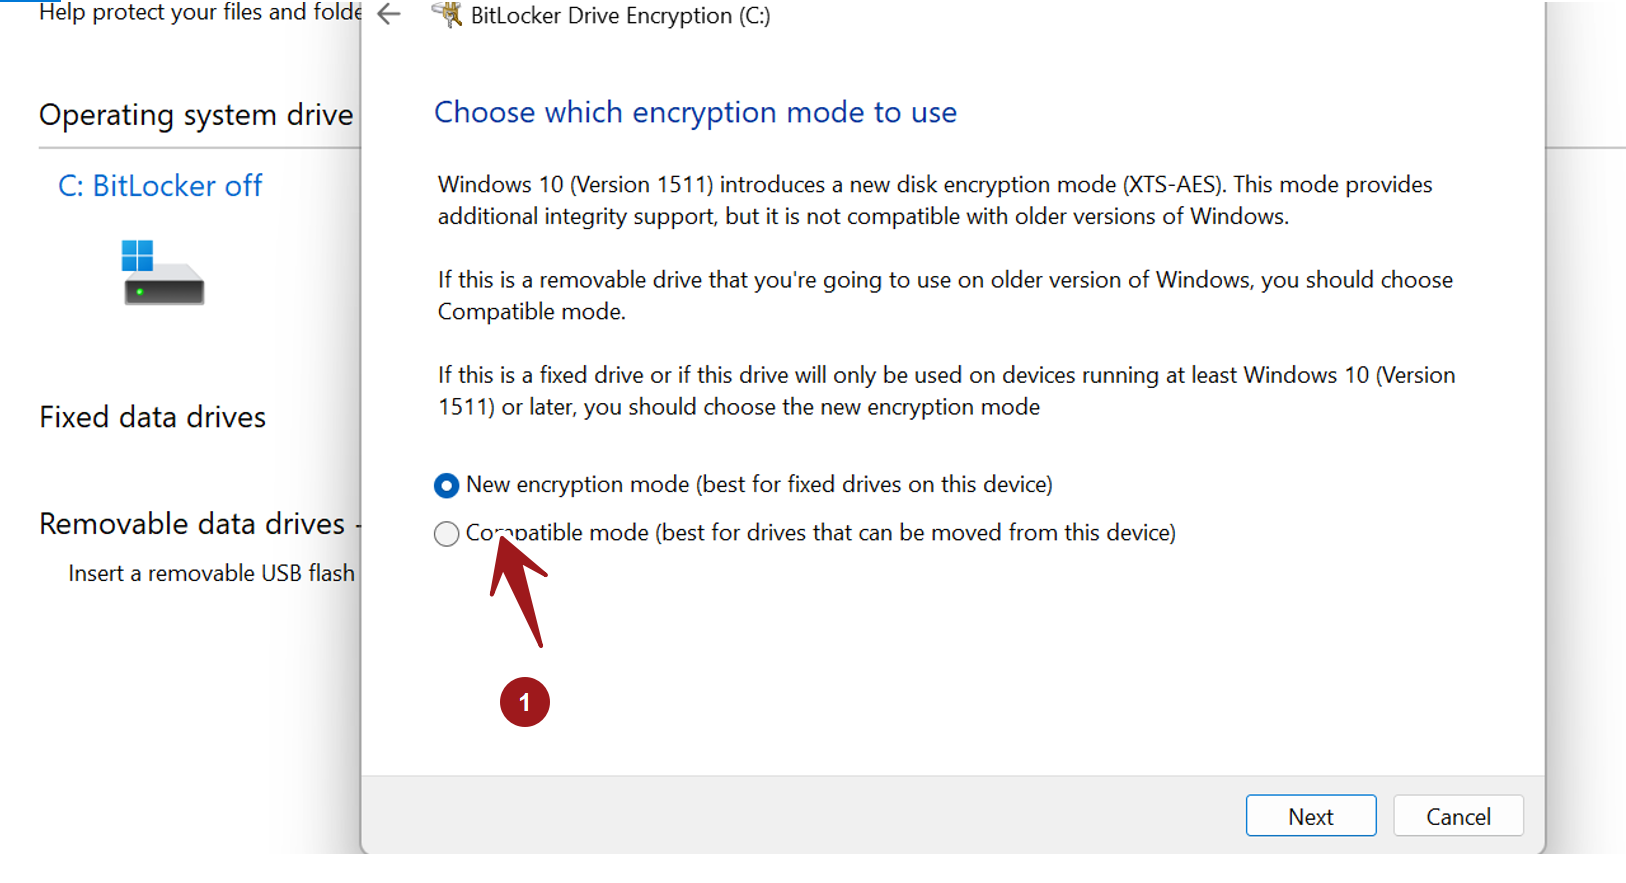
- Select the «New encryption mode» option.
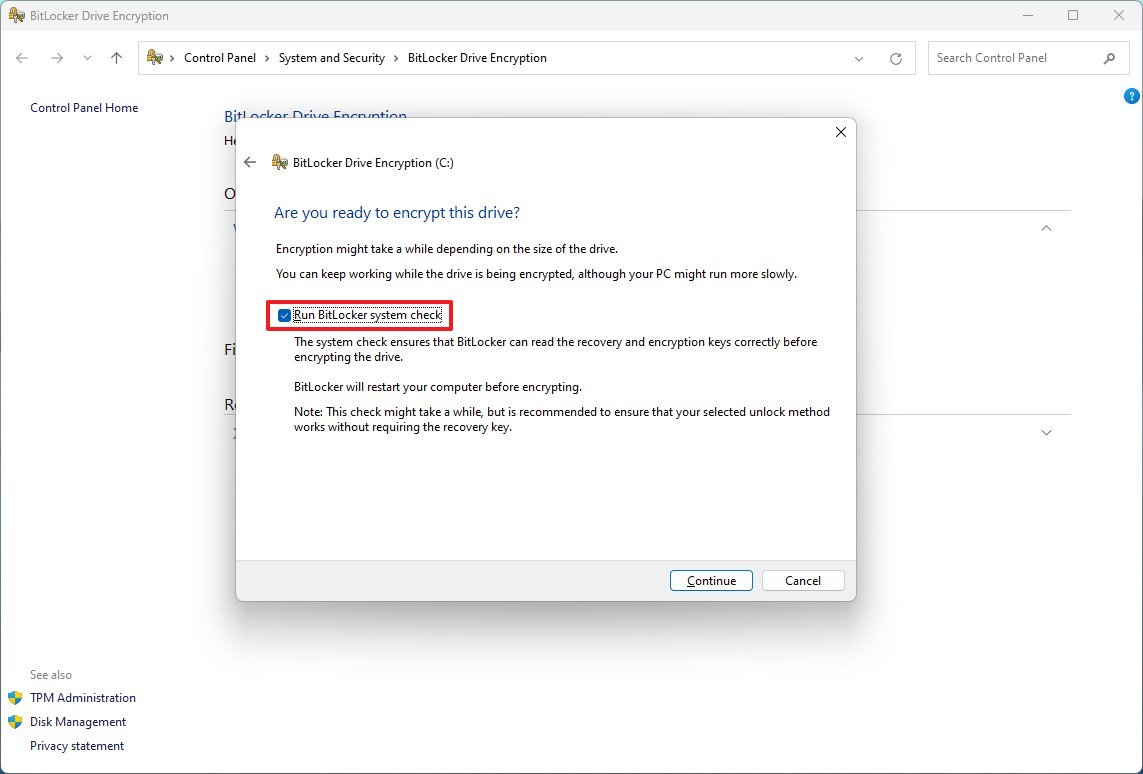
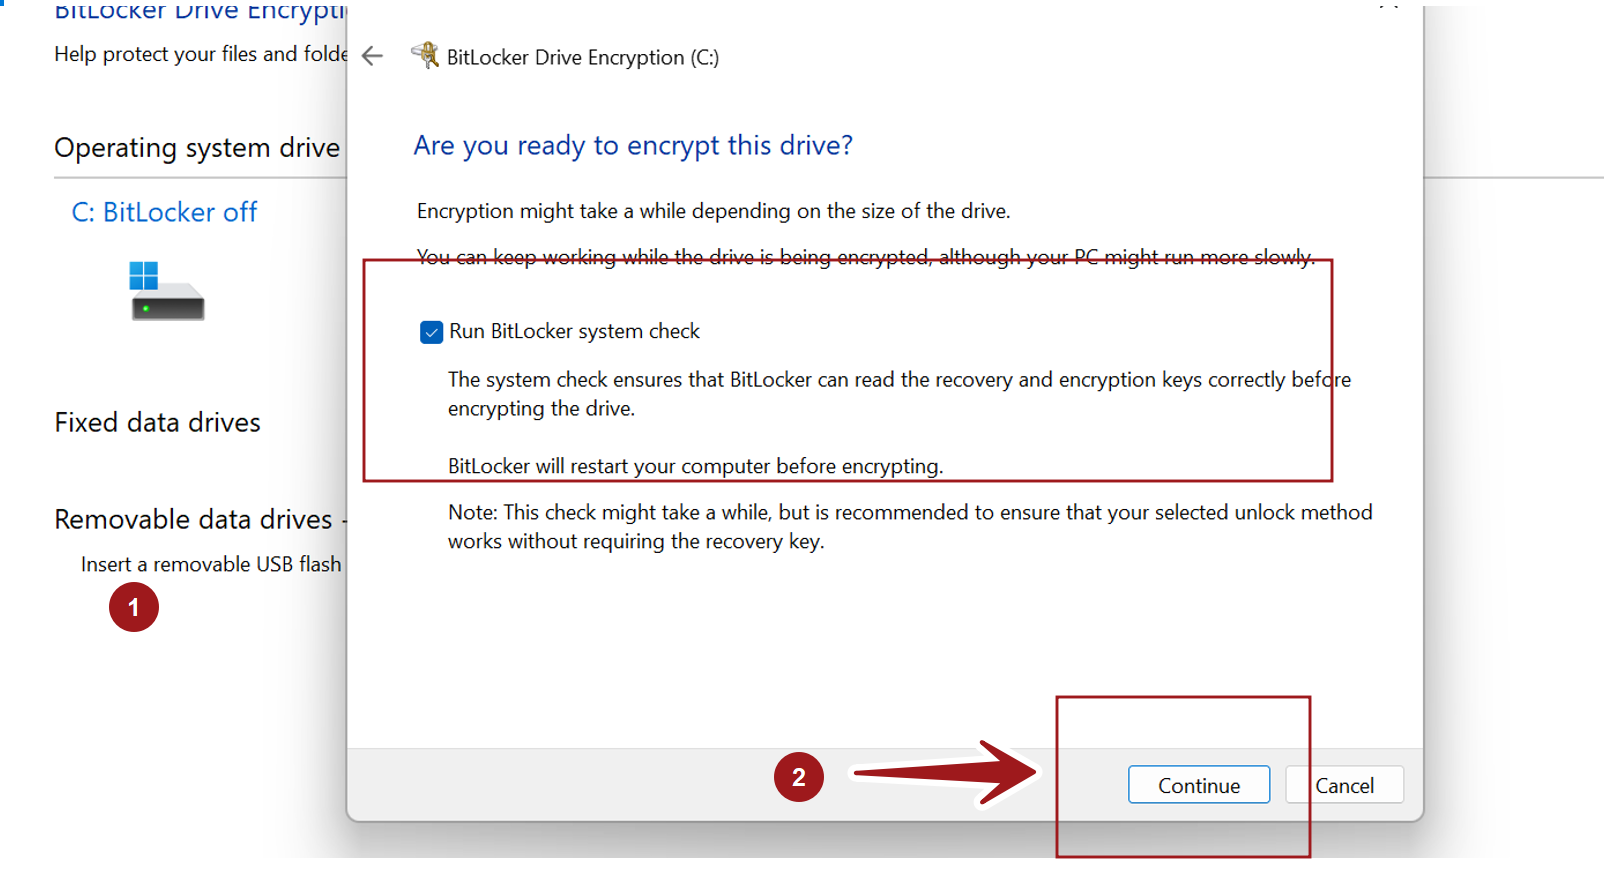
- Check the «Run BitLocker system check» option.
- Click the Restart now button (if applicable).
Once you complete the steps, the system will begin encrypting the data on the drive.
While in the «BitLocker Drive Encryption,» it is also possible to encrypt other drives, such as secondary storage, external USB hard drives, and removable data drives, using «BitLocker To Go.»
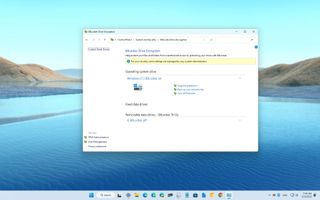
Remove BitLocker encryption
If you need to remove the system encryption, use these steps:
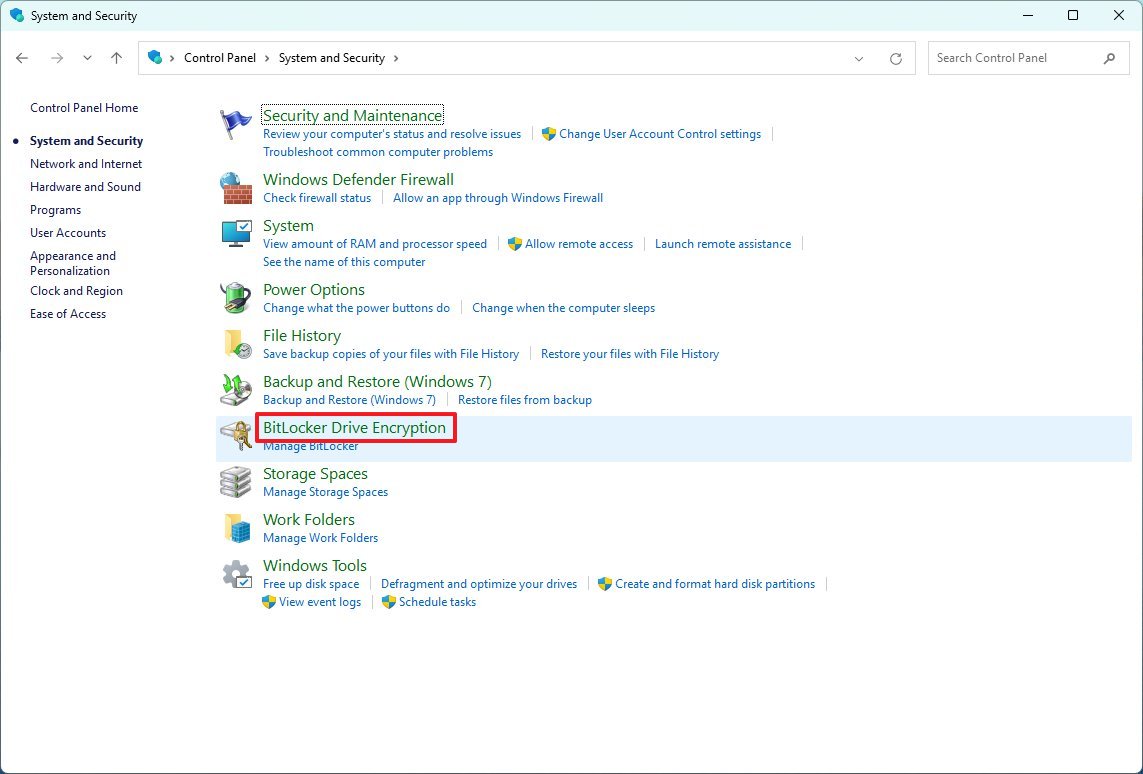
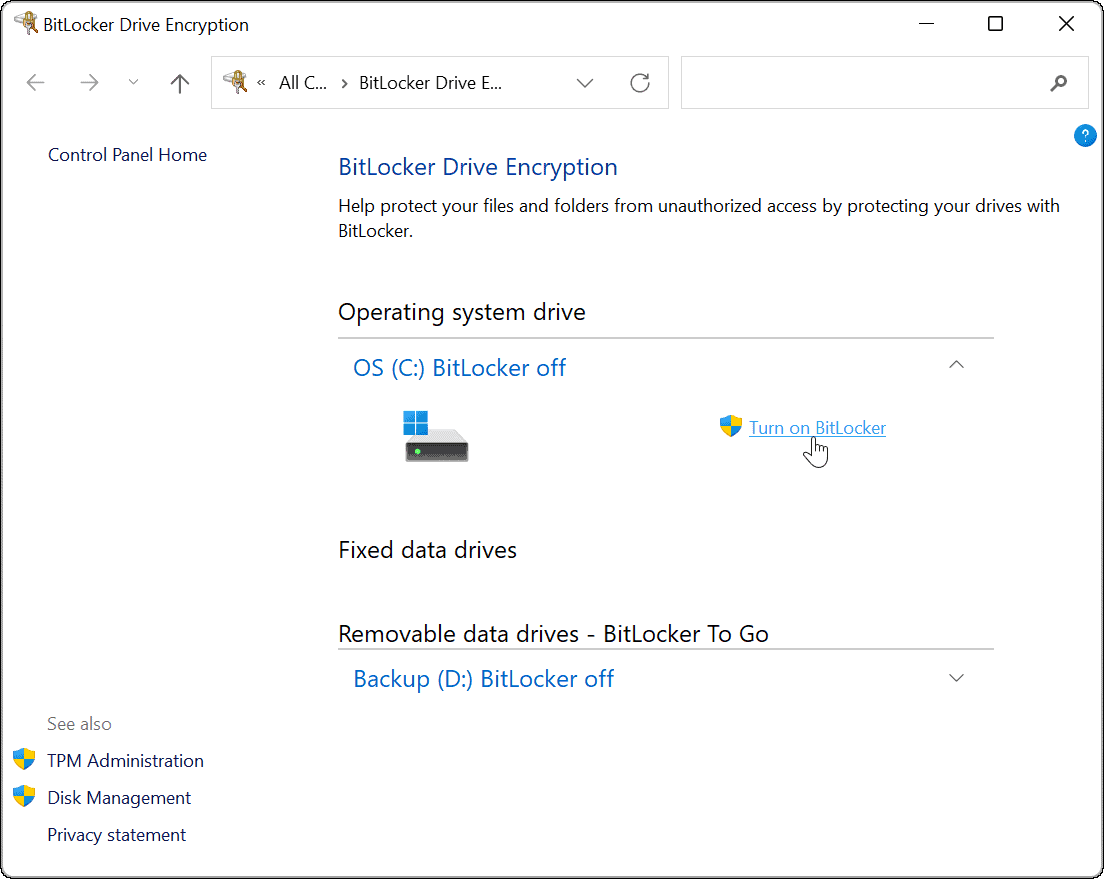
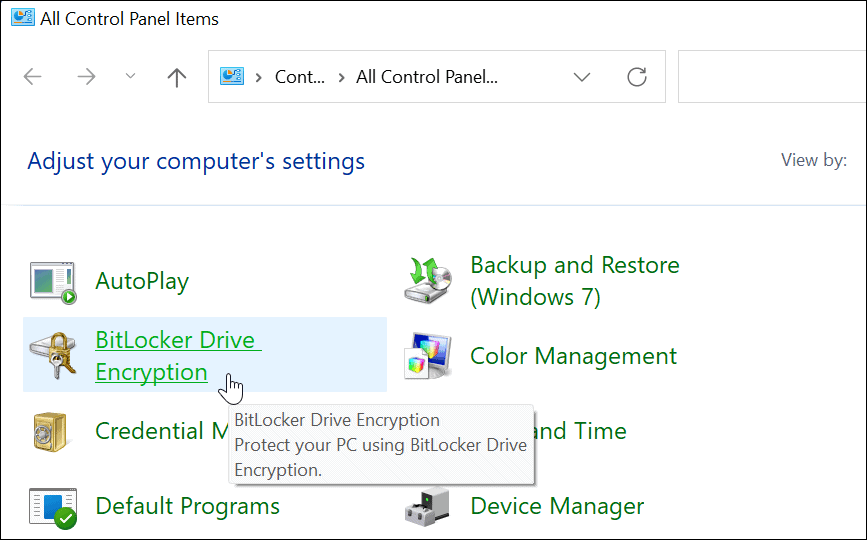
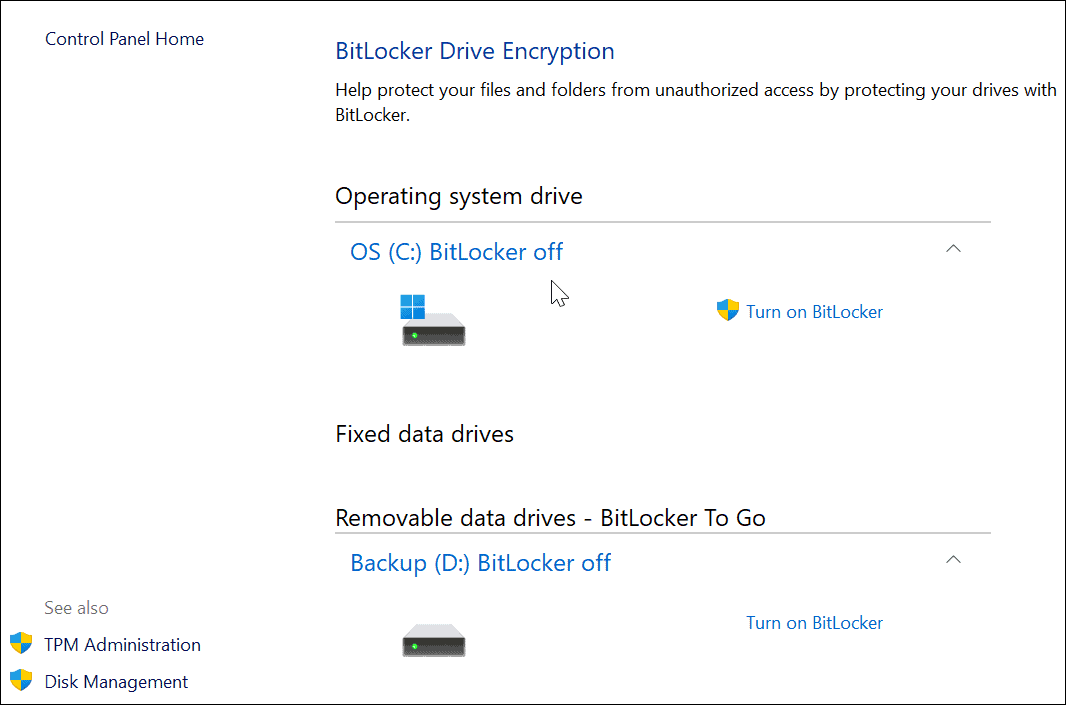
- Open Control Panel.
- Click on System and Security.
- Click on BitLocker Drive Encryption.
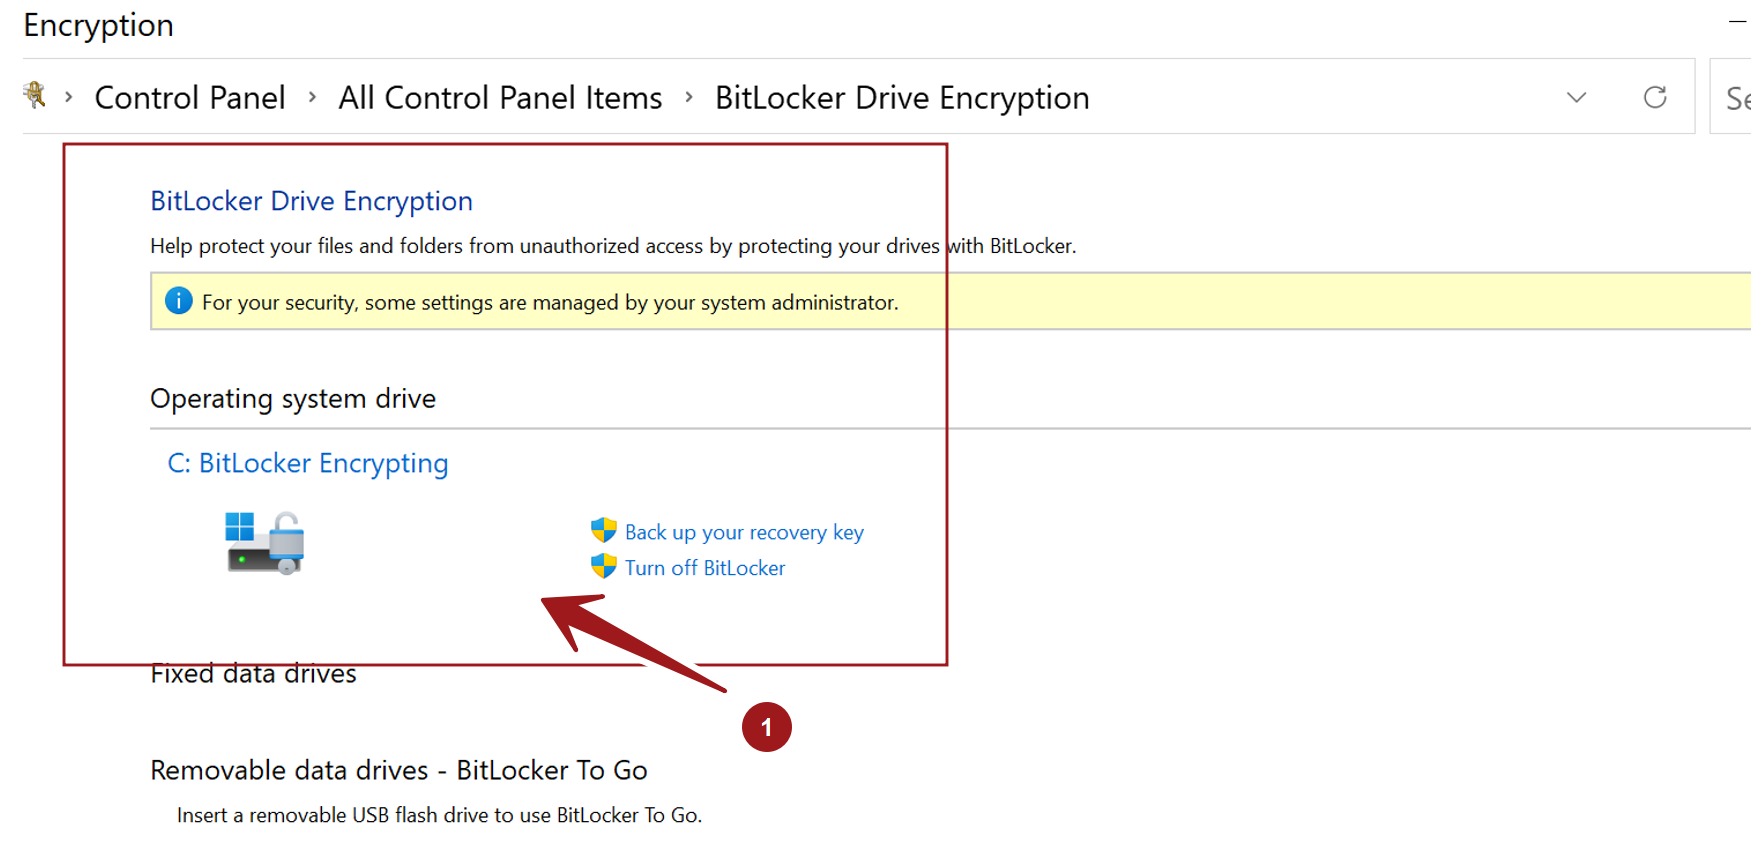
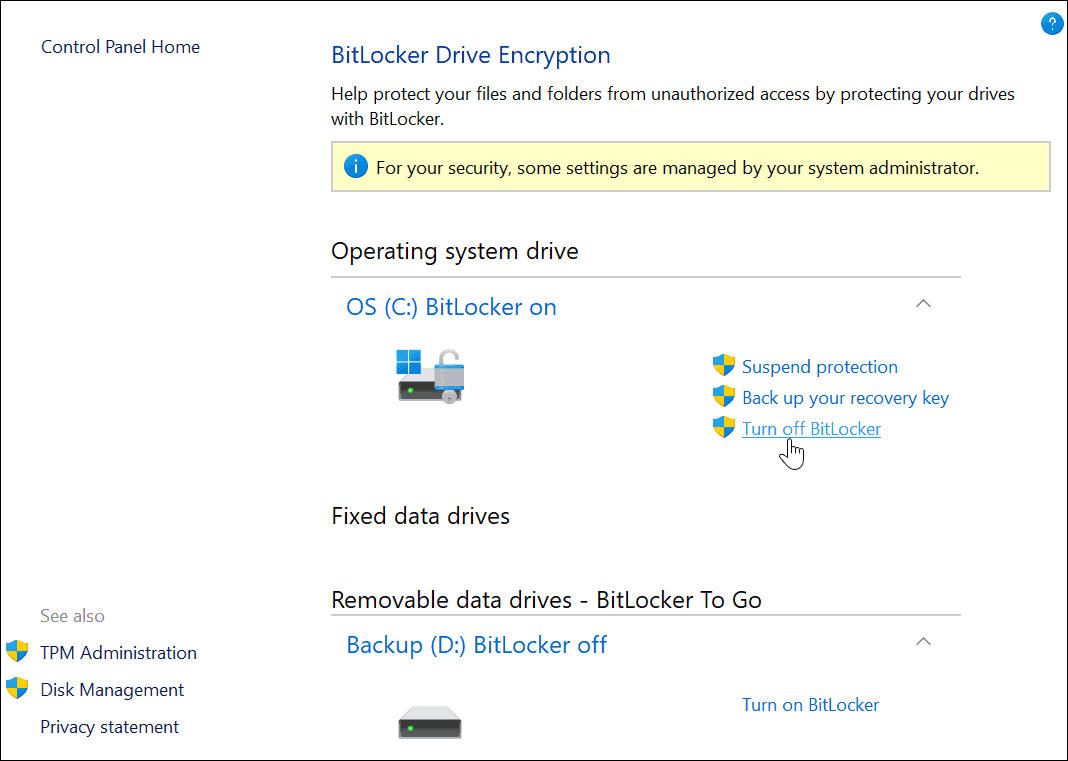
- Under the «Operating system drive» section, click the «Turn off BitLocker» option.
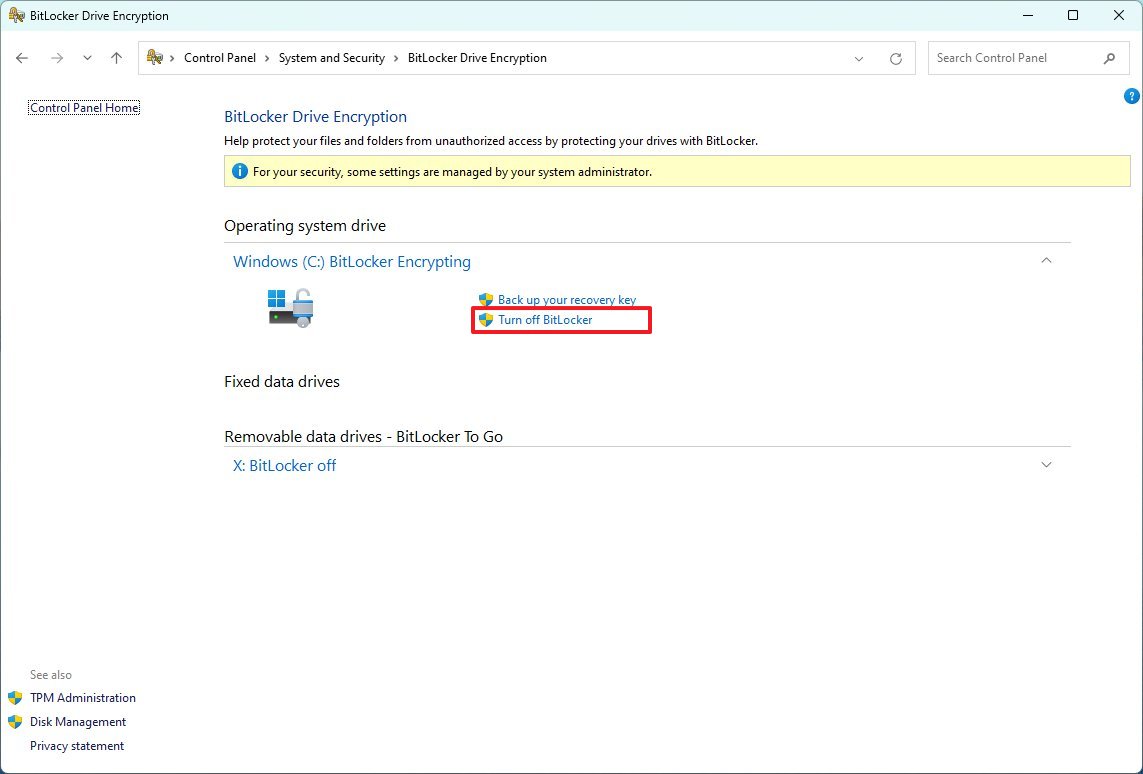
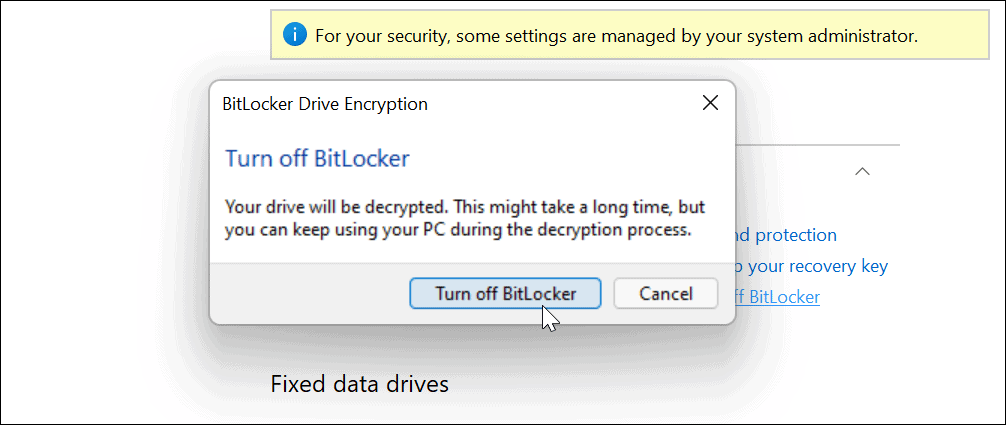
- Click the «Turn off BitLocker» button again.
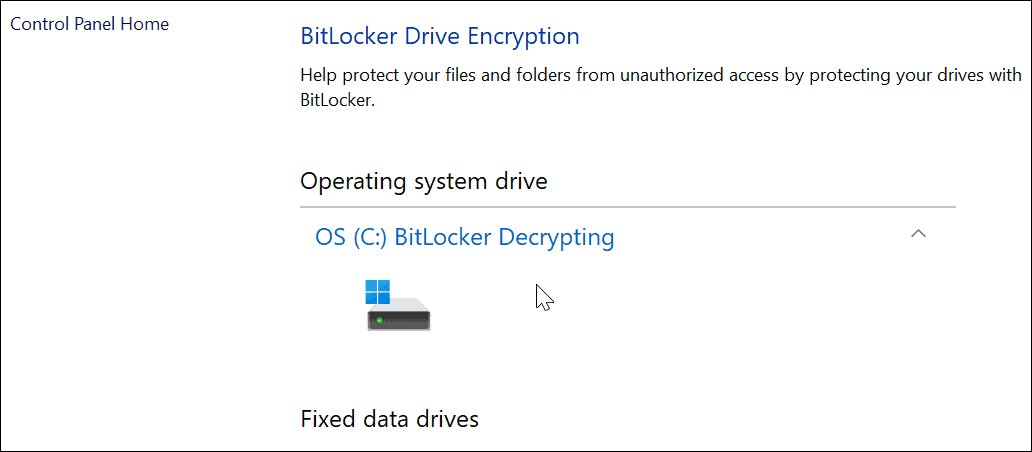
After you complete the steps, the decryption process will take a while, depending on how large the drive is and your data.
How to set up BitLocker on Windows 11 Home
To configure BitLocker in the Home edition of Windows 11, use these steps:
- Open Settings.
- Click on Privacy & Security.
- Click the Device encryption setting.
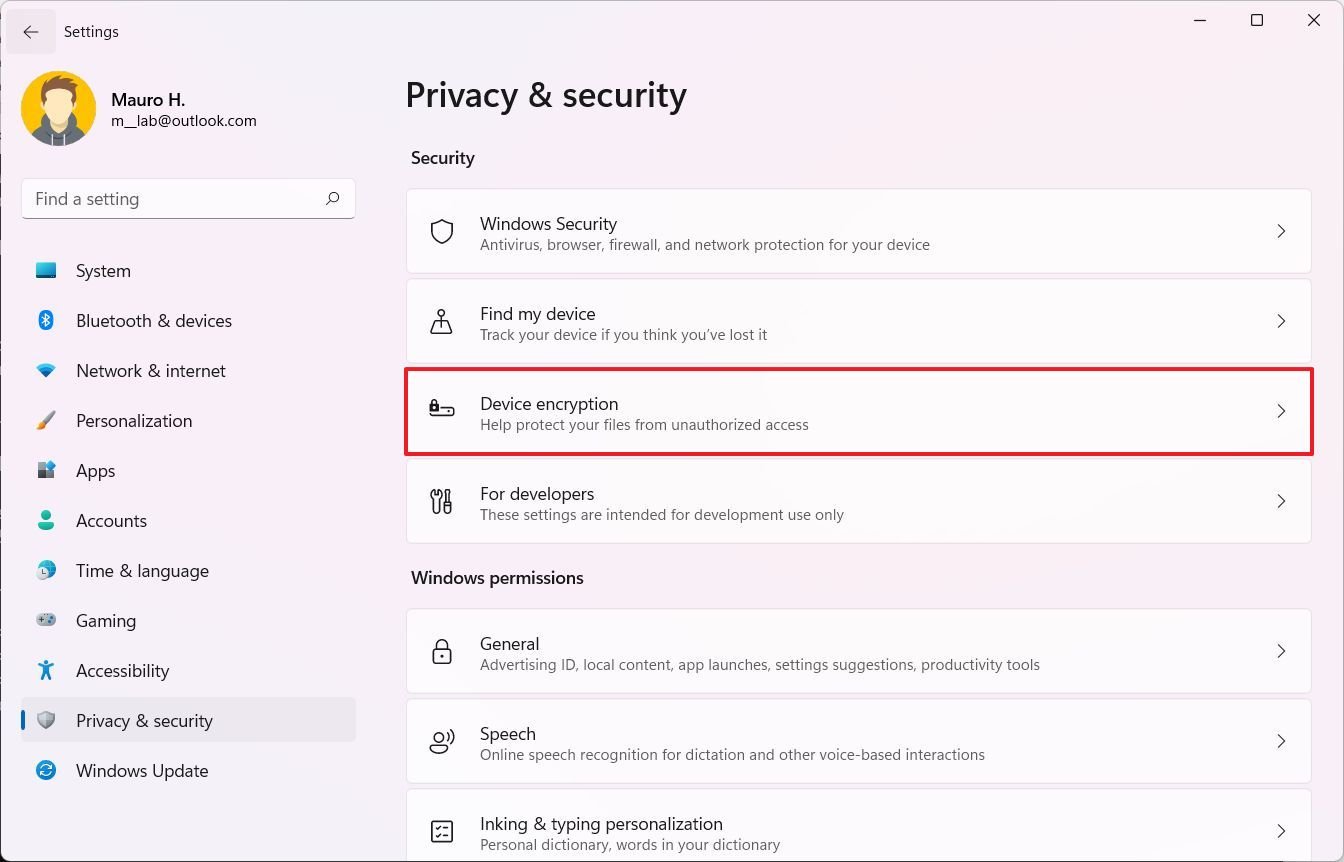
- Turn on the Device encryption toggle switch.
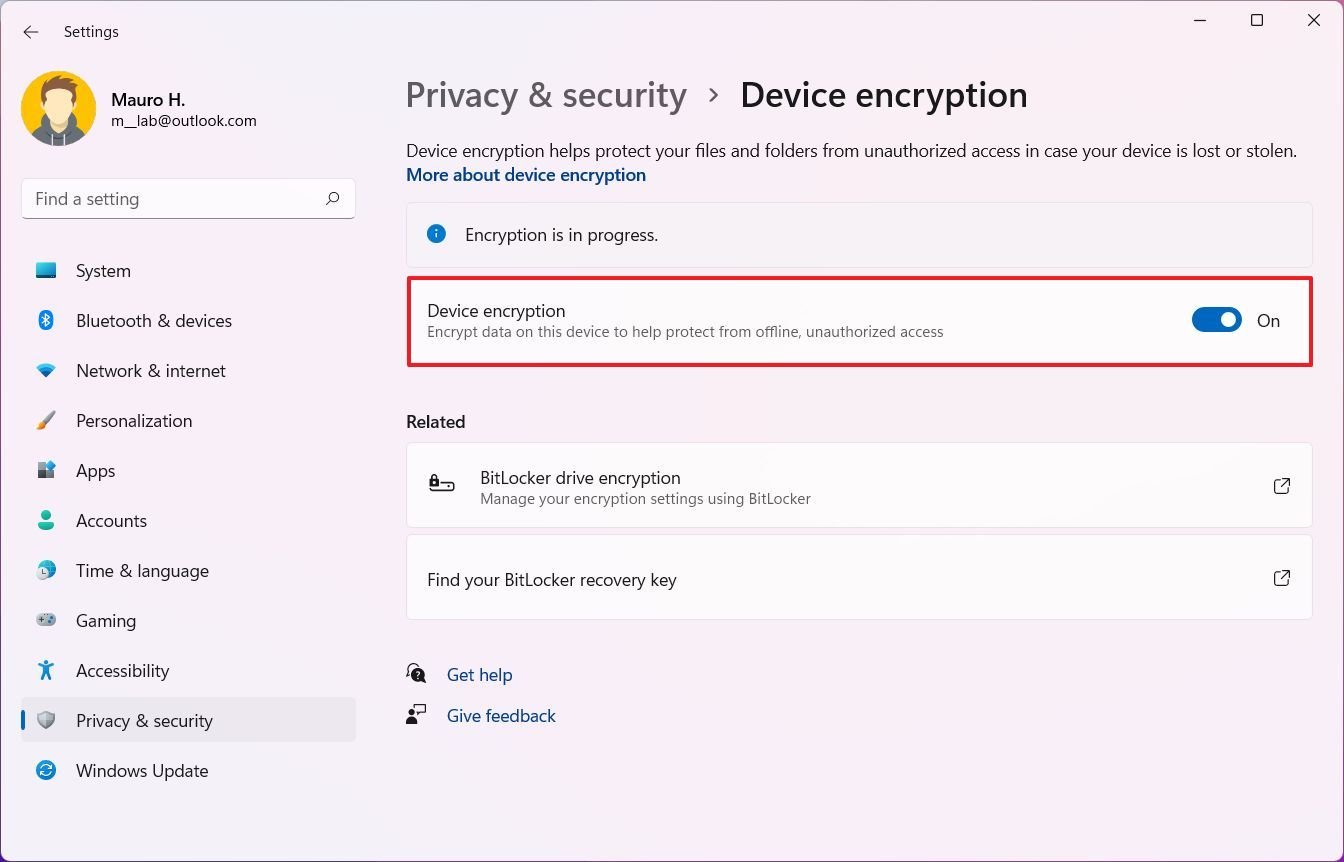
- (Optional) Under the «Related» section, click the «BitLocker drive encryption» option.
- Under the «Operating system drive» section, click the «Back up your recovery key» option.
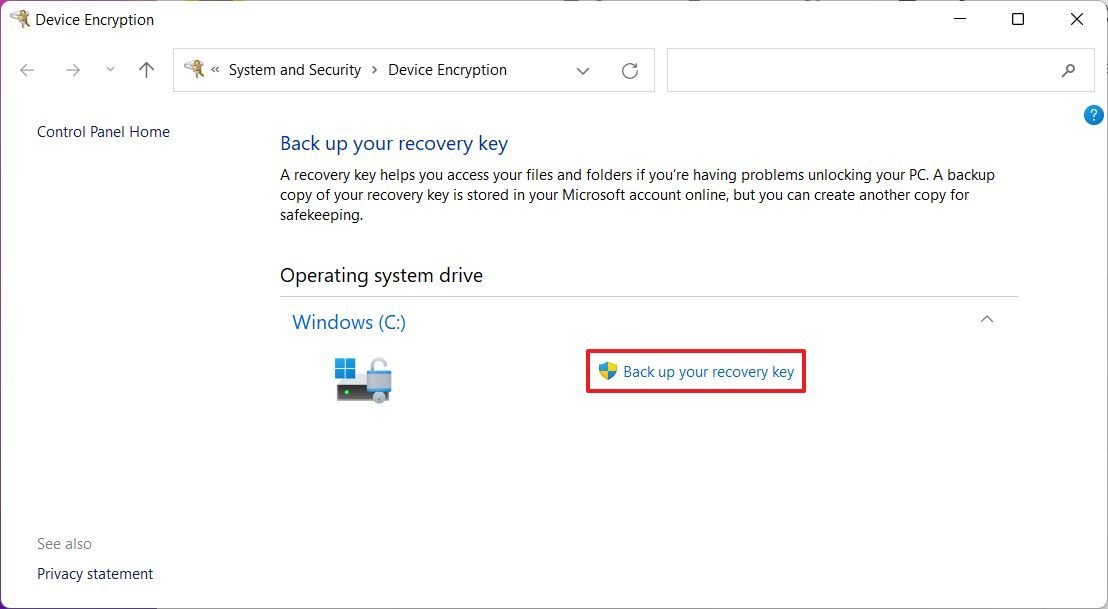
- Click the Save to a file option.
- Save the BitLocker recovery key in a different location.
- Click the Save button.
Once you complete the steps, BitLocker will turn on the system to encrypt the files on the drive.
This version of BitLocker is only available on some devices. If you don’t find the option, the device most likely doesn’t support encryption. You would typically see this feature on devices like Microsoft Surface devices and those from other brands like HP, Lenovo, Dell, etc.
Remove BitLocker encryption
To decrypt a device using BitLocker, use these steps:
- Open Settings.
- Click on Privacy & Security.
- Click the Device encryption setting.
- Turn off the Device encryption toggle switch.
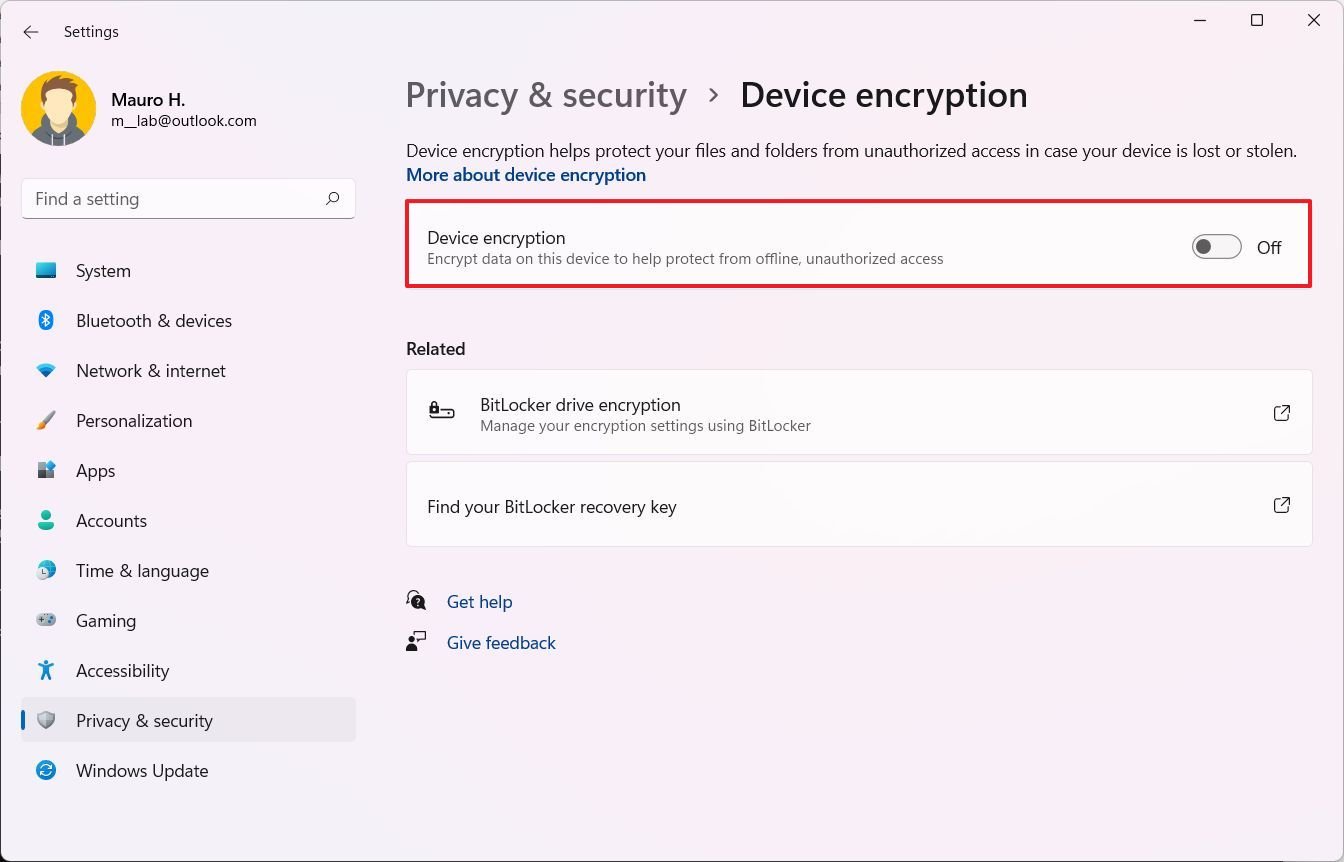
After you complete the steps, the decryption process will begin on the device.
More resources
For more helpful articles, coverage, and answers to common questions about Windows 10 and Windows 11, visit the following resources:
- Windows 11 on Windows Central — All you need to know
- Windows 10 on Windows Central — All you need to know

Cutting-edge operating system
A refreshed design in Windows 11 enables you to do what you want effortlessly and safely, with biometric logins for encrypted authentication and advanced antivirus defenses.
All the latest news, reviews, and guides for Windows and Xbox diehards.
Mauro Huculak is technical writer for WindowsCentral.com. His primary focus is to write comprehensive how-tos to help users get the most out of Windows 10 and its many related technologies. He has an IT background with professional certifications from Microsoft, Cisco, and CompTIA, and he’s a recognized member of the Microsoft MVP community.
Windows
Overview
In this post, we will learn steps how to enable BitLocker Drive Encryption on Windows 11 operating system.
Enable TPM
We need to enable Security Processor / TPM 2.0 (Trusted Platform Module) to use BitLocker Encryption. This is the key system requirement for Windows 11 operating system itself. We can quickly check if TPM is enabled on Windows 11 using the below steps:
Select Start > Run.(or Windows Key + R key combination)
Type tpm.msc and click OK button.
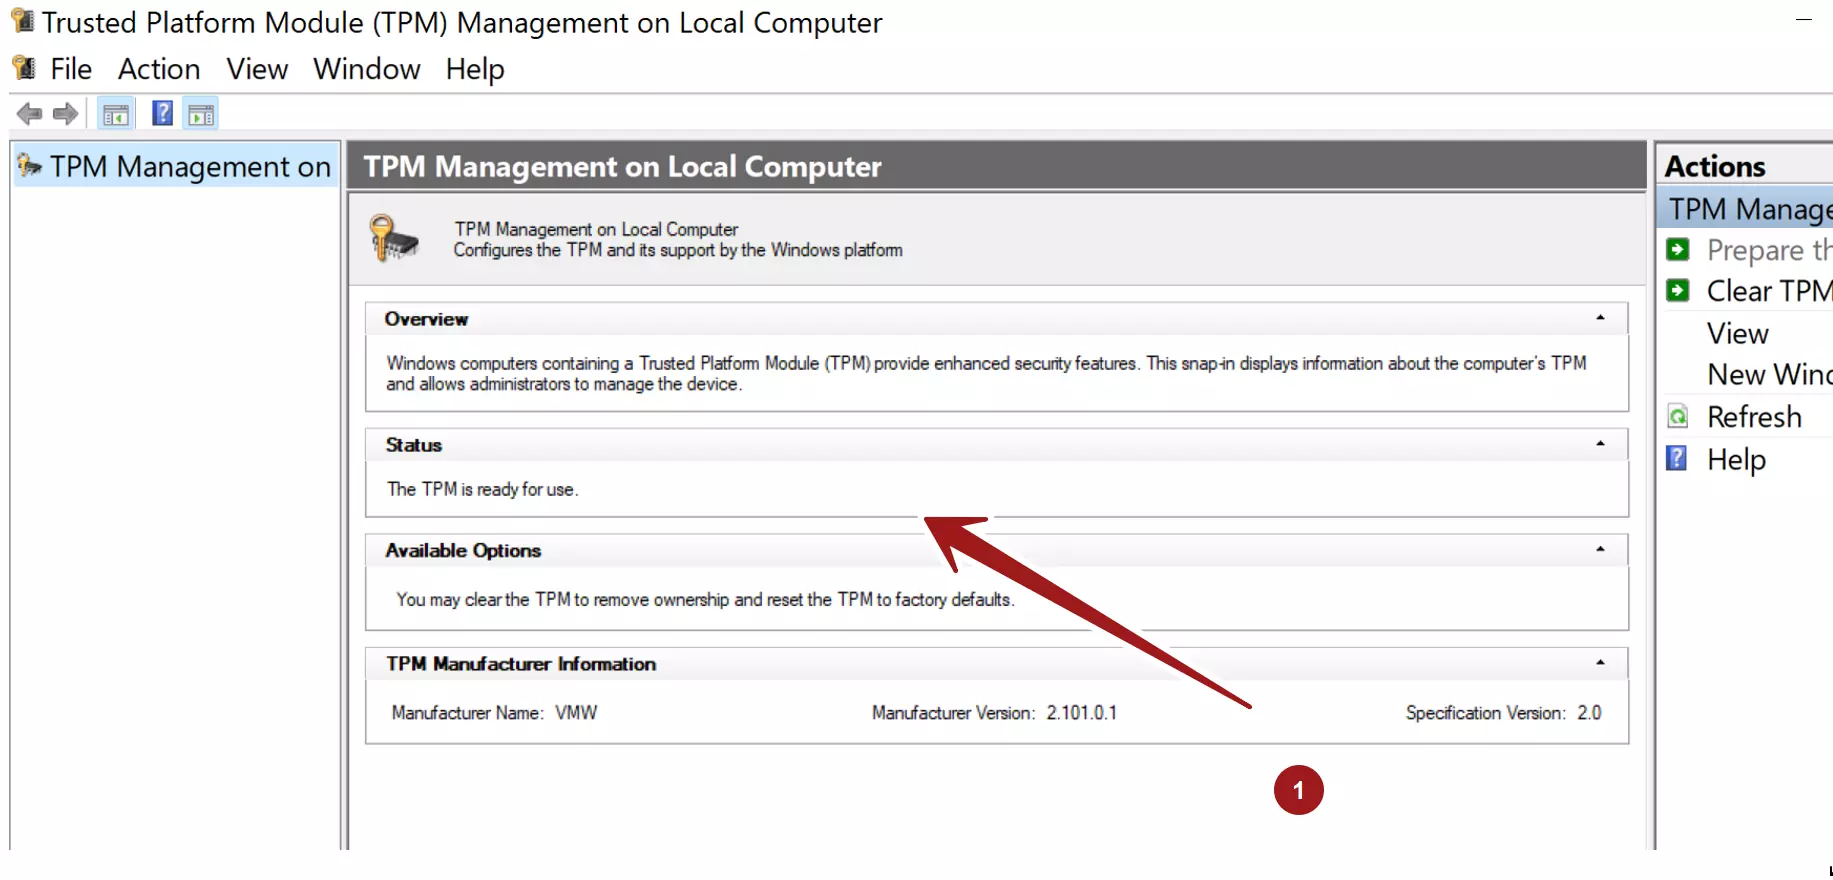
Most modern computers support TPM. We can enable TPM in UEFI firmware settings. Follow the steps to change the firmware settings to enable TPM.
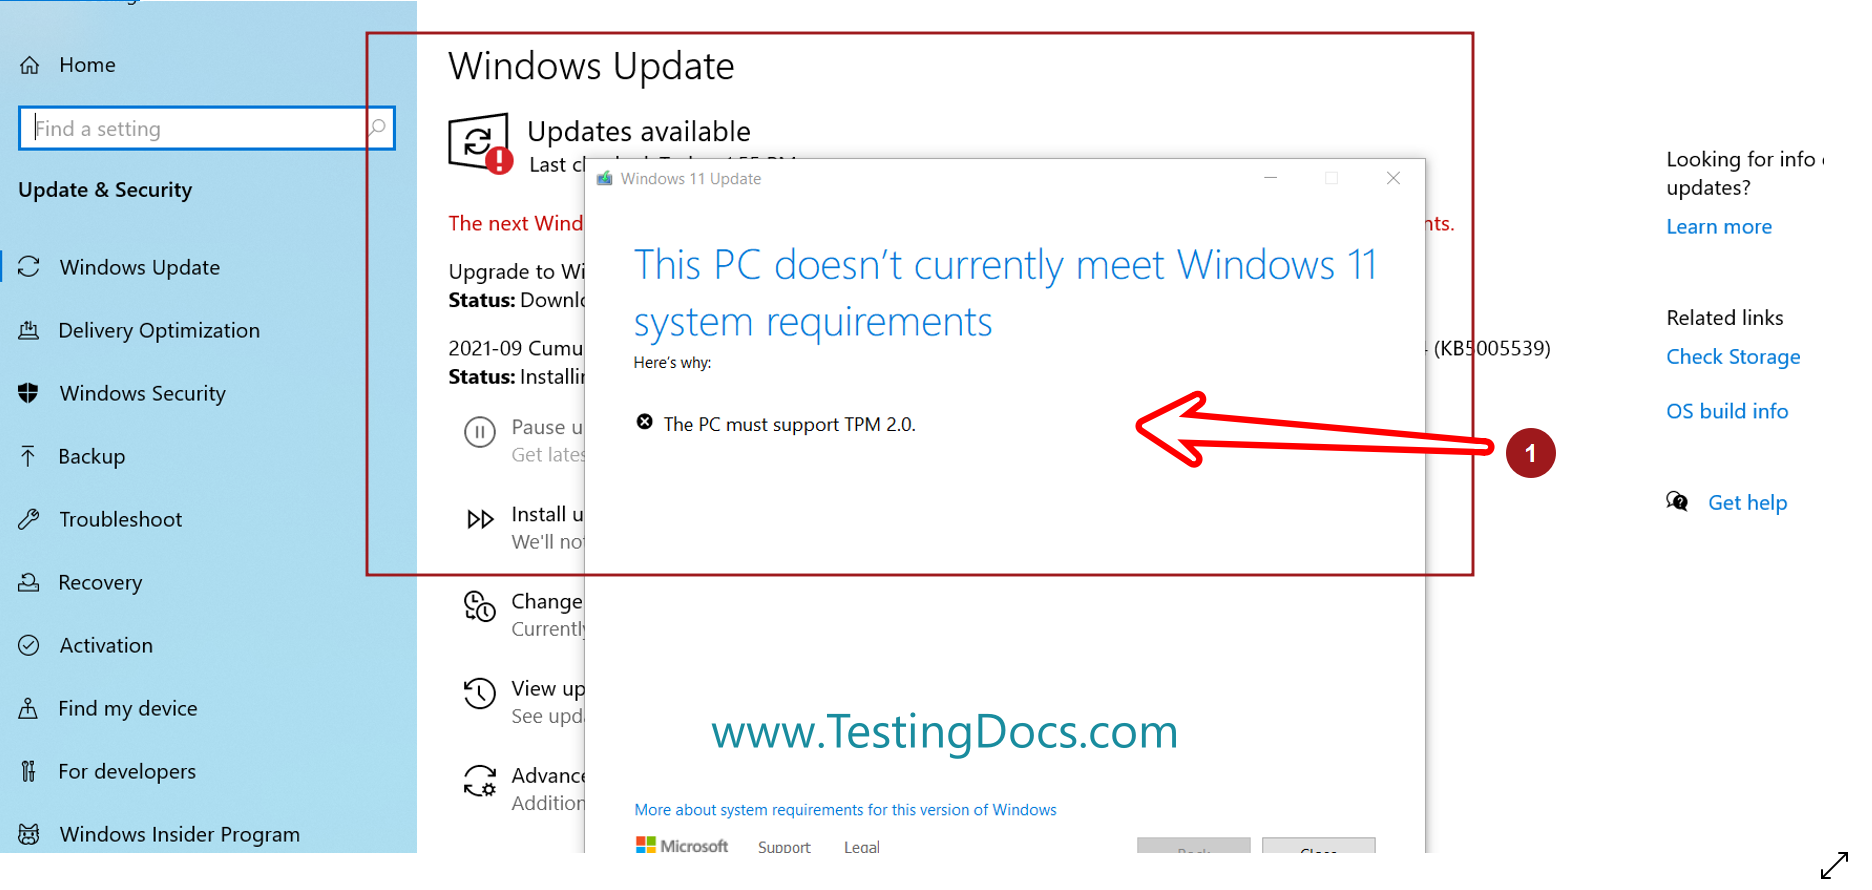
Side Note: Failed Windows Update
Windows 11 update checks for PC requirements. The existing Windows 10 PC should support minimum TPM 2.0 for the Windows update to upgrade the PC to Windows 11.
Enable BitLocker Drive Encryption
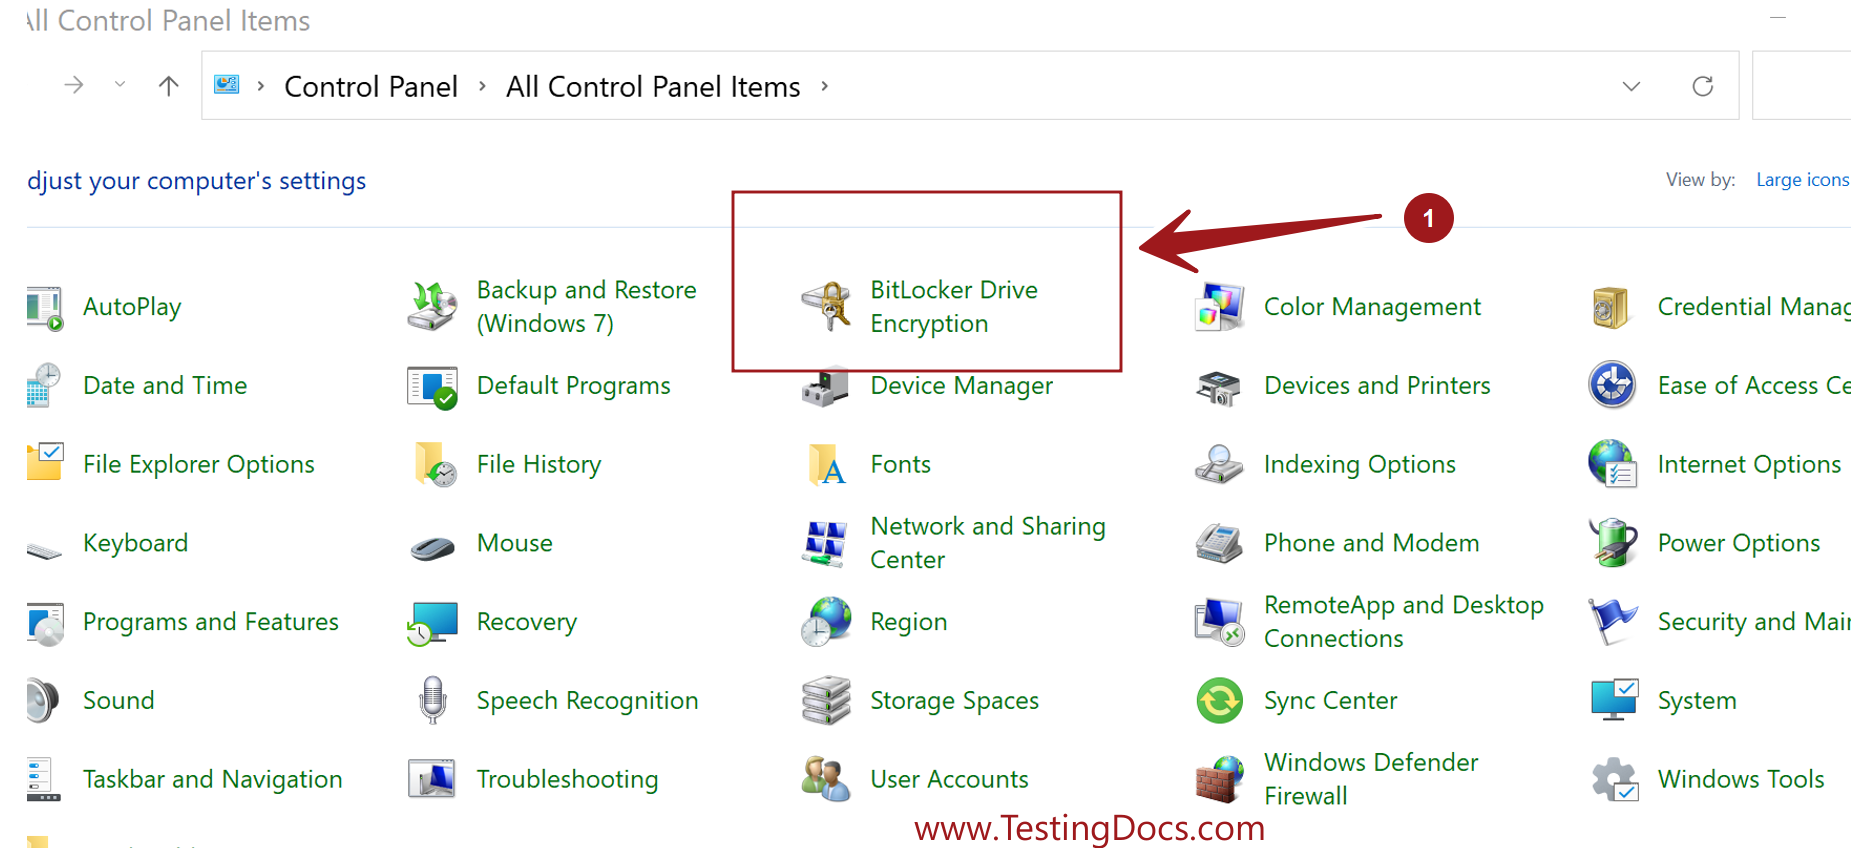
Search Control Panel in the Search bar.
Choose Control Panel >> BitLocker Drive Encryption
Click Turn On BitLocker and click Yes on the Elevation prompt. We need to have Administrative privileges to enable it.
Save the Recovery key file to a location other than your PC.
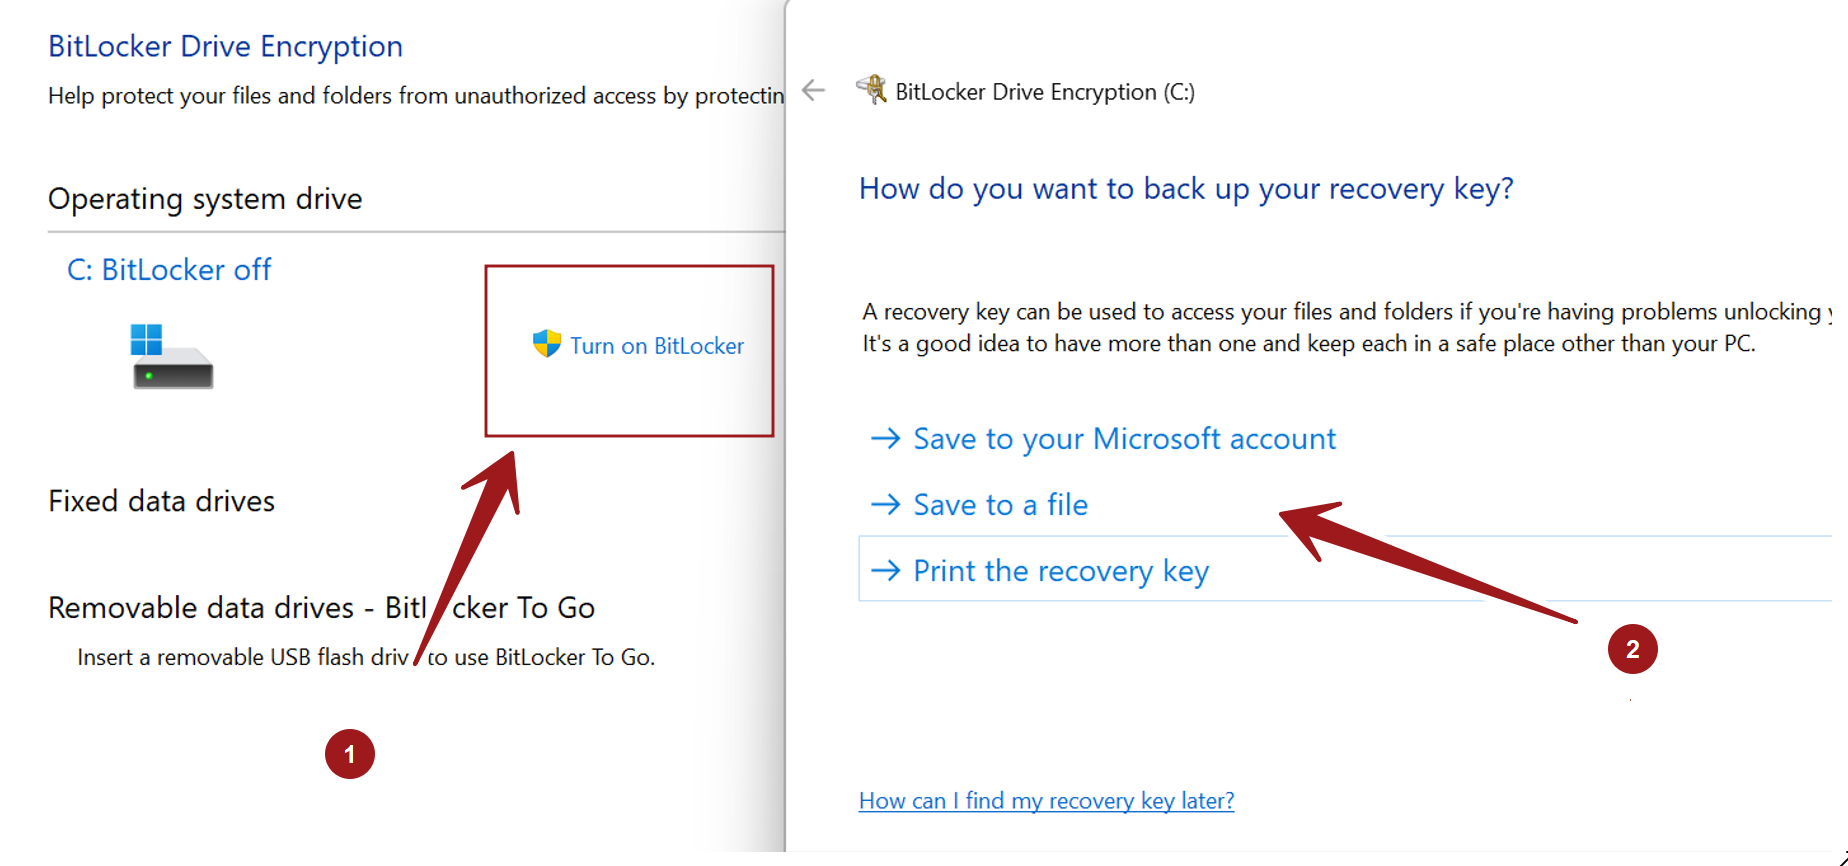
Click on Next button.
In the Next Screen choose how much you want the drive to be encrypted. For existing drive choose the entire drive.
Click the Next button. In the next screen choose the Encryption mode.
For fixed hard drives the first option is best. The new mode is not compatible with older versions of Windows.
In the Next screen, choose the BitLocker System check and Click on Continue button to restart the machine.
Save all your unsaved work before hitting the Continue button.
Backup the Recovery file to some safe location other than your current PC.
After restart the entire drive would be encrypted for extra security. The process might take a while depending on the drive size.
That’s it. BitLocker is enabled on Windows 11 machine.
—
Windows 11 Tutorials
More Information on Windows 11
https://www.microsoft.com/en-us/windows

If you want to encrypt the data on your local drive and protect it from malware or data theft, you can use BitLocker on Windows 11 to do it. Here’s how.
Originally launched as a Windows 7 feature, BitLocker encryption is available to Windows 11 users to help protect saved data on your local, fixed, and removable drives. Using BitLocker, your data is scrambled using difficult-to-break AES encryption. Only users with the correct access (using a password, PIN, Windows Hello, or recovery code) can view and edit the files.
You can use BitLocker to Go on Windows 11 to encrypt data on removable USB drives. If you want to use BitLocker to encrypt a fixed drive (such as your local C: drive), you’ll need to follow this guide instead.
You can use BitLocker to encrypt any drive on a Windows 11 PC, but there is a catch. BitLocker is only available to Windows 11 users running Windows 11 Pro, Education, or Enterprise. If you want to use it, you’ll need to upgrade from Home to Pro (or another version).
To use BitLocker to encrypt your local or other fixed drives on Windows 11, follow these steps:
- Press the Start button and click the Settings icon (or press Windows key + I).
- In the Settings menu, select System on the left, then click Storage on the right.

- Under Storage, click Advanced storage settings (listed in the Storage management section), then select Disks & volumes.

- In the Disks and volumes section, you’ll need to pick the drive you wish to encrypt with BitLocker, then click the Properties button.

- Next, click the Turn on BitLocker option under the BitLocker section near the bottom.

- Next, click Turn on BitLocker next to the drive you selected to encrypt with BitLocker.
- After a couple of system checks, select how you want to back up your recovery key. You can choose to save to your Microsoft account, save to a file, or print the recovery key.
- The recovery key is essential for recovering your files without a password. If you lose your password and don’t have the recovery key, you won’t be able to access your files. We strongly recommend you do this, although it does remain optional.
- If you decide to save the 48-digit recovery key, the easiest way to store it is to link it to your Microsoft account. You’ll be able to recover the key in the BitLocker recovery keys section in your account settings.
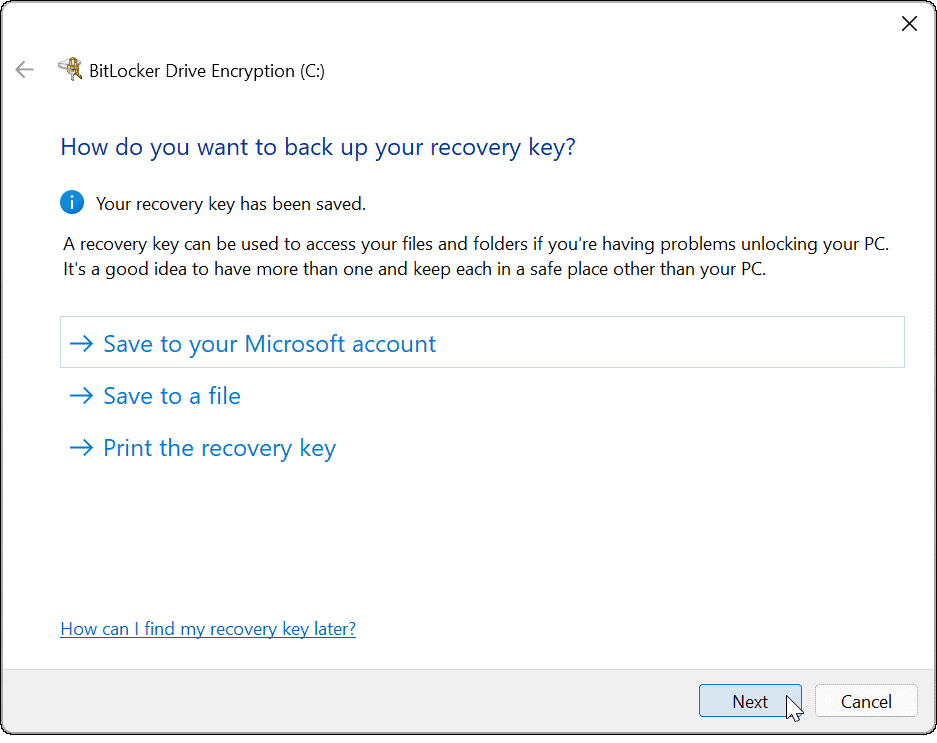
- After your recovery key is backed up, click Next.
- Make sure to select Encrypt used space only (faster and best for new PCs and drives) on the following screen and click Next.

- You’ll need to determine your encryption mode. For best security, select New encryption mode (best for fixed drives on this device) as the preferred encryption mode, then click Next.
- If you’re planning on moving your BitLocker drive to a Windows PC using an older version of Windows (earlier than Windows 10 version 1511), you’ll need to select Compatible mode (best for drivers that can be moved from this device) instead.

- Next, check the Run BitLocker system check option, then click Continue.

- To complete the check and BitLocker encryption process, you’ll need to restart Windows 11.
- Once your PC restarts, log in and wait for BitLocker to encrypt your PC. You’ll see a lock next to your drive when you launch File Explorer to show this is complete.
![]()
How to Disable BitLocker Encryption on Windows 11
You’re free to disable BitLocker encryption on a Windows 11 drive at any time. Decrypting the drive will ensure that other users can freely access any saved files without needing a decryption key or recovery code.
To disable BitLocker encryption on a fixed drive, follow these steps:
- Click the Start button and type control panel, then select the Best match result.
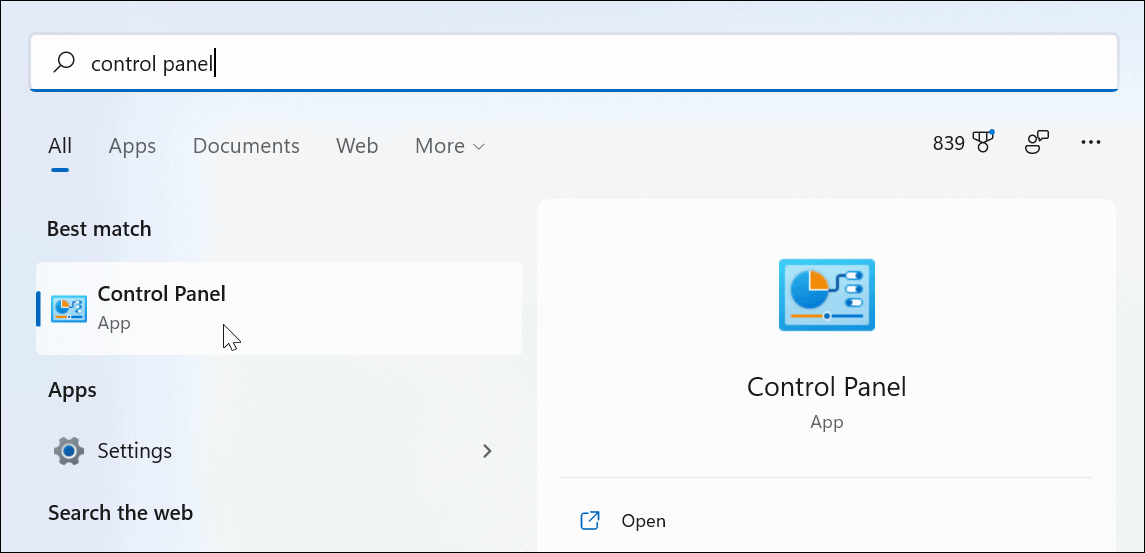
- When Control Panel opens, click the BitLocker Drive Encryption option.
- Find the drive with enabled BitLocker encryption, then click the Turn off BitLocker option.
- When the confirmation dialog message appears, click the Turn off BitLocker button.
- A notification message will pop up letting you know that the drive decryption is in progress. Allow time for this to complete.

- You’ll also see confirmation that the drive is decrypting in Control Panel.
- When the decryption process is complete, you’ll see a fly-out notification. You’ll also see BitLocker off next to the decrypted hard drive in Control Panel.
Protecting Your Files on Windows 11
The steps above will help you to encrypt and protect your local files by using BitLocker encryption on Windows 11. BitLocker is critical to use if you’re protecting your personal and private data from hackers, malware, and other dangerous online threats.
BitLocker is just one feature designed to protect your Windows 11 PC—read up about TPM on Windows 11 and why it’s important for your PC security. If you’re not on Windows 11 yet, you can use BitLocker on Windows 10, too.
Before making any significant changes to your system, however, don’t forget to create a full system backup on Windows 11. This will allow you to recover your settings, files, and other data if something goes wrong during the encryption (or decryption) process.
![]()