FAQ
Продукт
E420, E520, MINIPC PB50, MINIPC PB60V, MINIPC PB61V, MINIPC PB62, MINIPC PN52, MINIPC PN80, PA90, PB40, PB40-B, PB50, PB50-B, PB60, PB60-B, PB60G, PB60S, PB60S-B, PB60V, PB61S, PB61V, PB61V-B, PB61V-H, PB62, PB62-B, PB63, PB63-B, PL63, PL63-A, PL63-B, PL64, PL64-B, PL64-D1, PL64-D1-B, PN30, PN40, PN40Q, PN41, PN41-A, PN41-B, PN41-S1, PN41-S1-B, PN41-S1-M, PN41-S1-MI, PN42, PN42-B, PN42-S, PN42-S-B, PN50, PN50-B, PN50-E1, PN50-E1-B, PN50-F, PN50F2, PN50-S1, PN51, PN51-B, PN51-E1, PN51E1-B, PN51-S1, PN51-S1-B, PN52, PN52-B, PN53, PN53-B, PN53-S1, PN53-S1-B, PN60, PN60-B, PN60-R, PN61, PN61-B, PN61S, PN61T, PN62, PN62-B, PN62S, PN63, PN63-B, PN63-S1, PN63-S1-B, PN64, PN64-B, PN64-E1, PN64-E1-B, PN65, PN65-B, PN80, PN865, UN42, UN45, UN45H, UN62, UN62V, UN65, UN65H, UN65U, UN66, UN66S, UN68U, VC60, VC60DGT, VC60V, VC62B, VC65, VC65-C, VC65-C1, VC65R, VC66, VC66-C, VC66-C2, VC66D, VC66R, VC68R, VC68V, VM40B, VM42, VM45, VM60, VM62, VM62B, VM62N, VM65, VM65-K, VM65N, VM65N-K
[Ноутбук/AIO] Как обновить BIOS в системе Windows
Чтобы получить более подробную инструкцию, Вы также можете перейти по ссылке на видео ASUS Youtube ниже:
Содержание:
Перед началом обновления BIOS Вам нужно сначала скачать необходимые утилиты. Есть два способа их скачать:
Способ 1: Скачайте утилиту обновления BIOS через MyASUS
Способ 2: Скачайте утилиту обновления BIOS с сайта поддержки ASUS
Примечание: Если Вы столкнулись с какими-либо проблемами при обновлении BIOS, пожалуйста, обратитесь в Сервисный центр ASUS.
Способ 1: Скачайте утилиту обновления BIOS через MyASUS
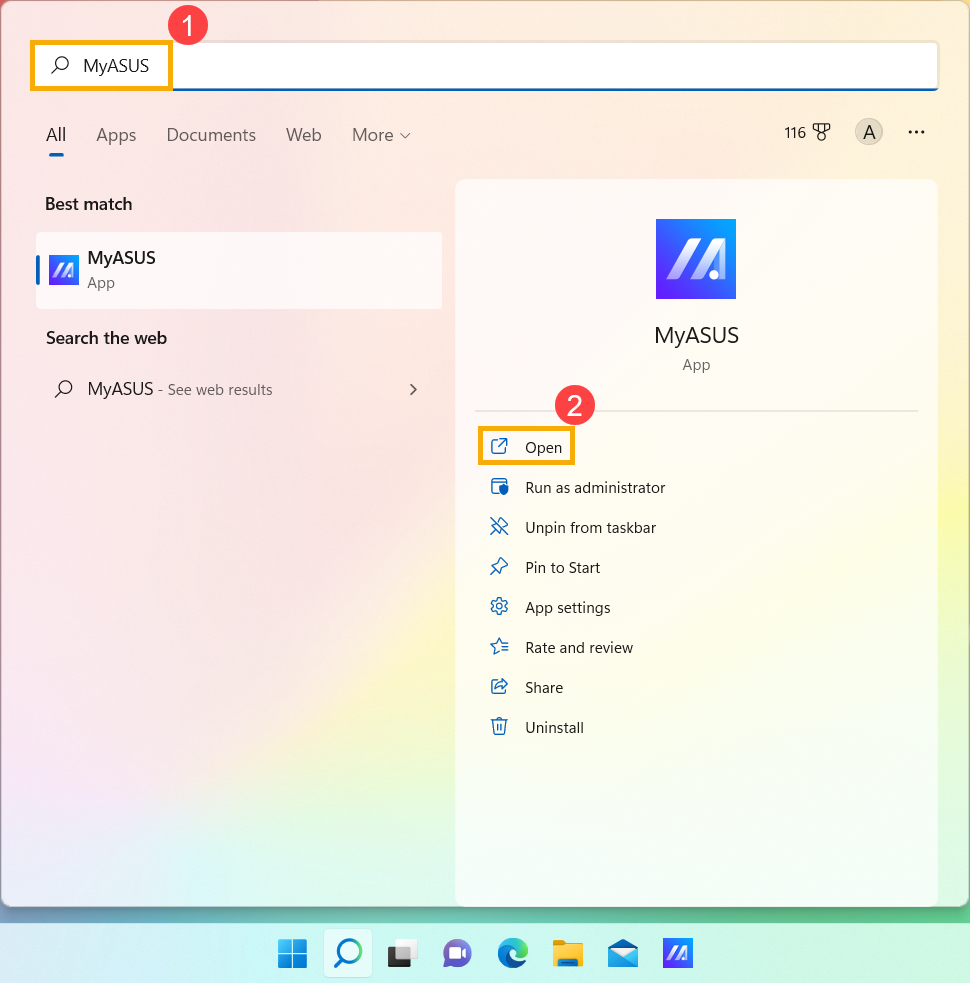
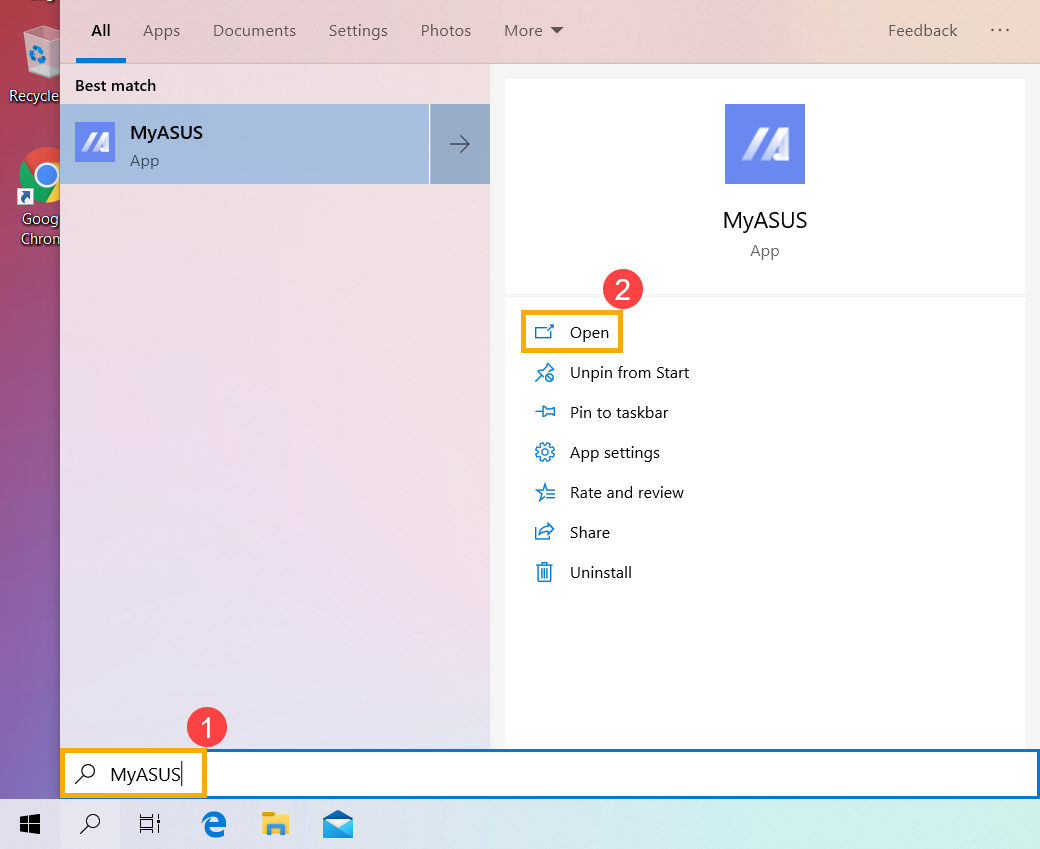
- Укажите в поисковой строке Windows [MyASUS] ①, затем нажмите [Открыть] ②. (Картинка слева относится к операционной системе Windows 11, картинка справа — к Windows 10).
Если результаты поиска ничего не показали, значит утилита не установлена. Пожалуйста, установите утилиту по инструкции.
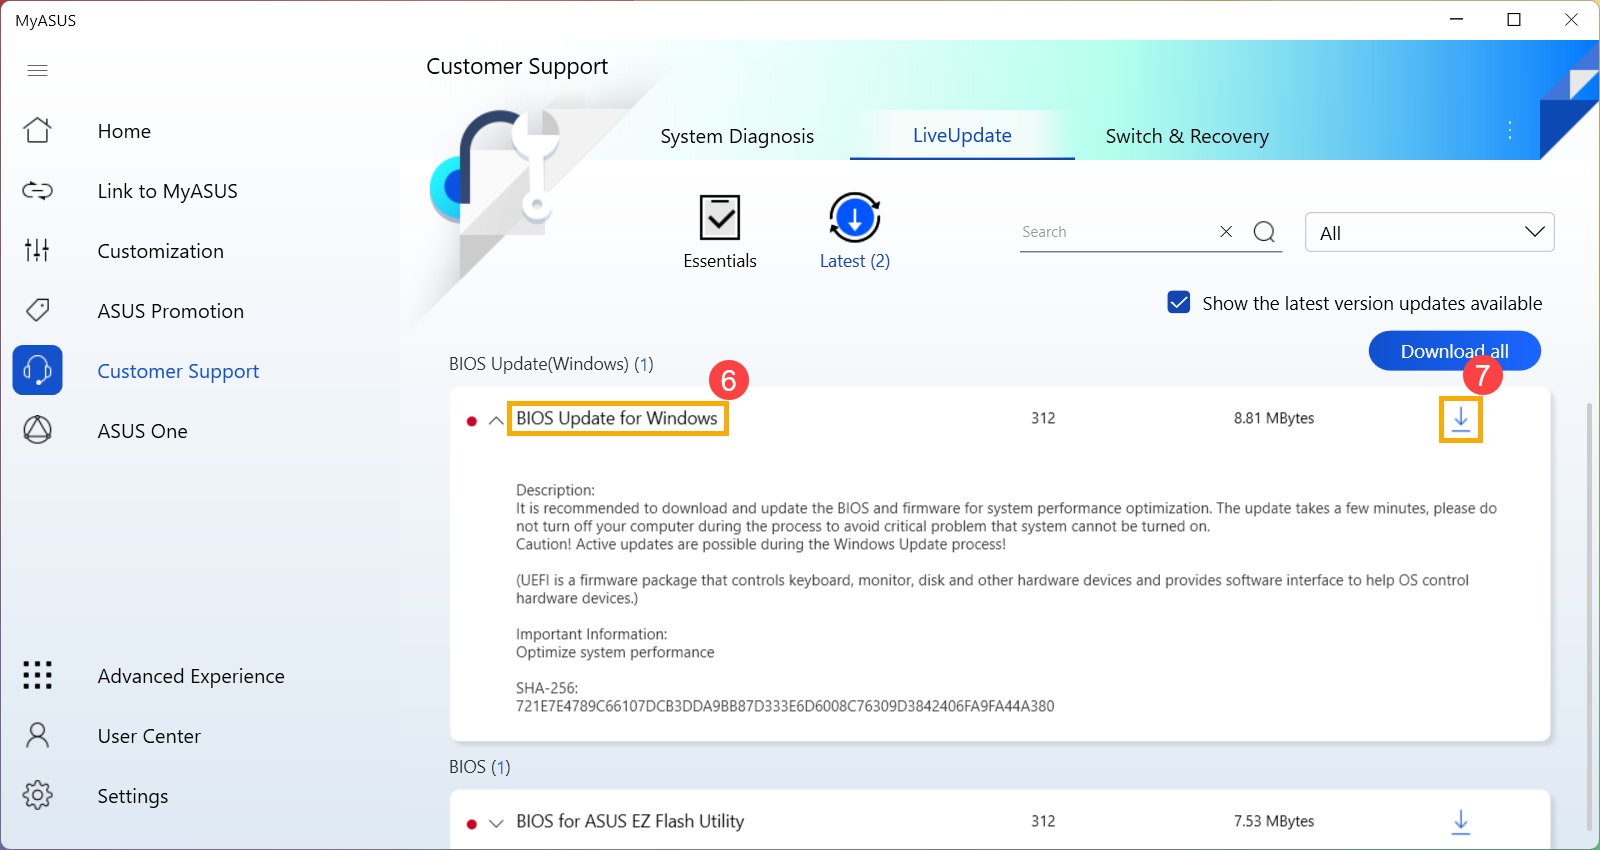
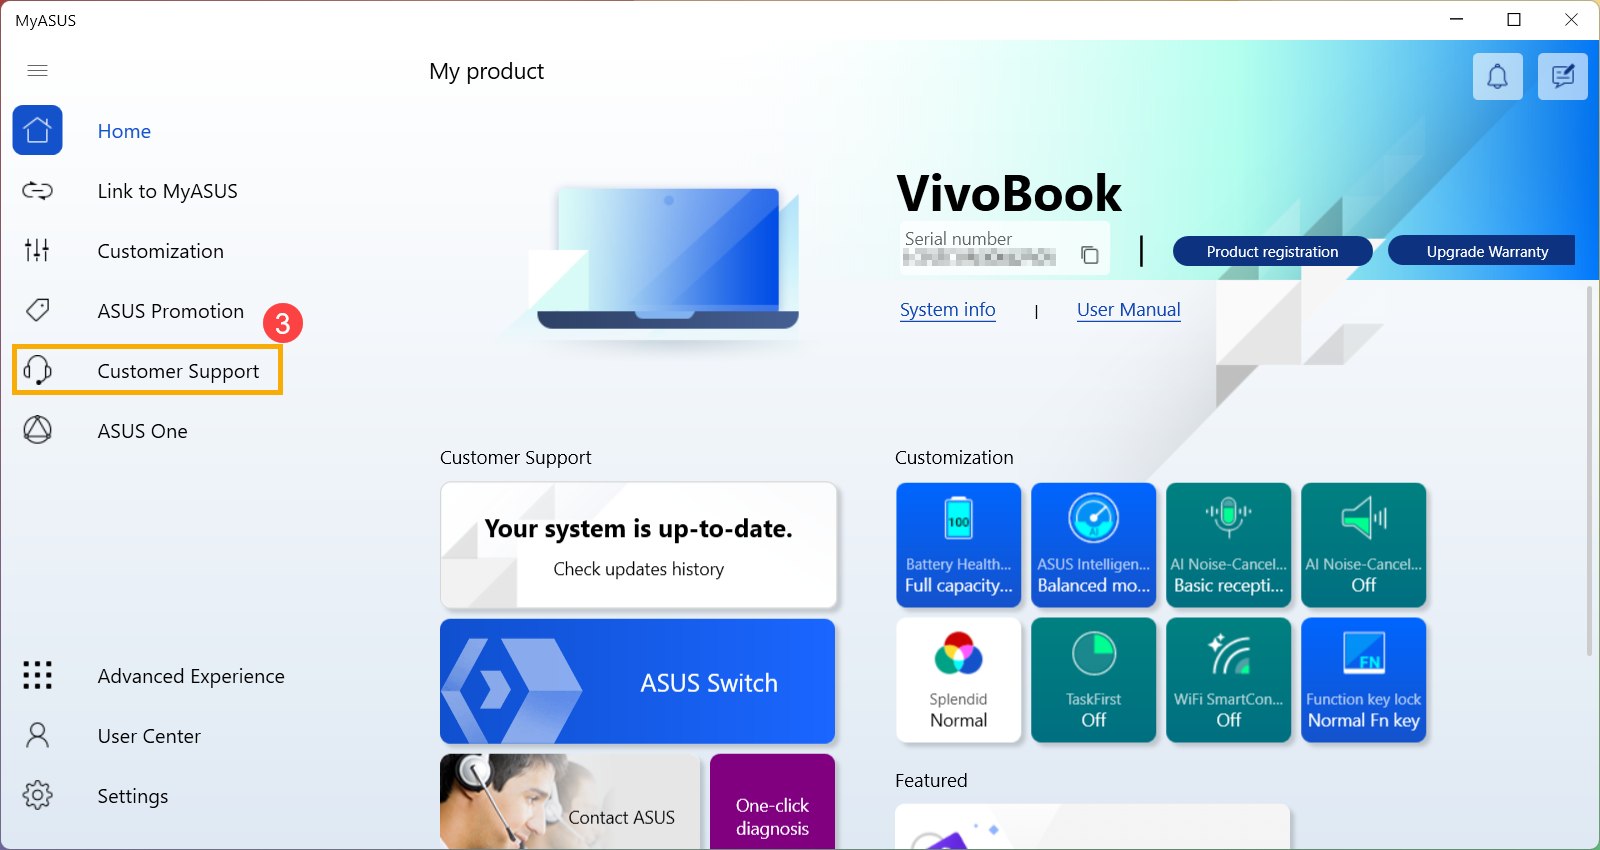
- В MyASUS выберите [Поддержка пользователя] ③.
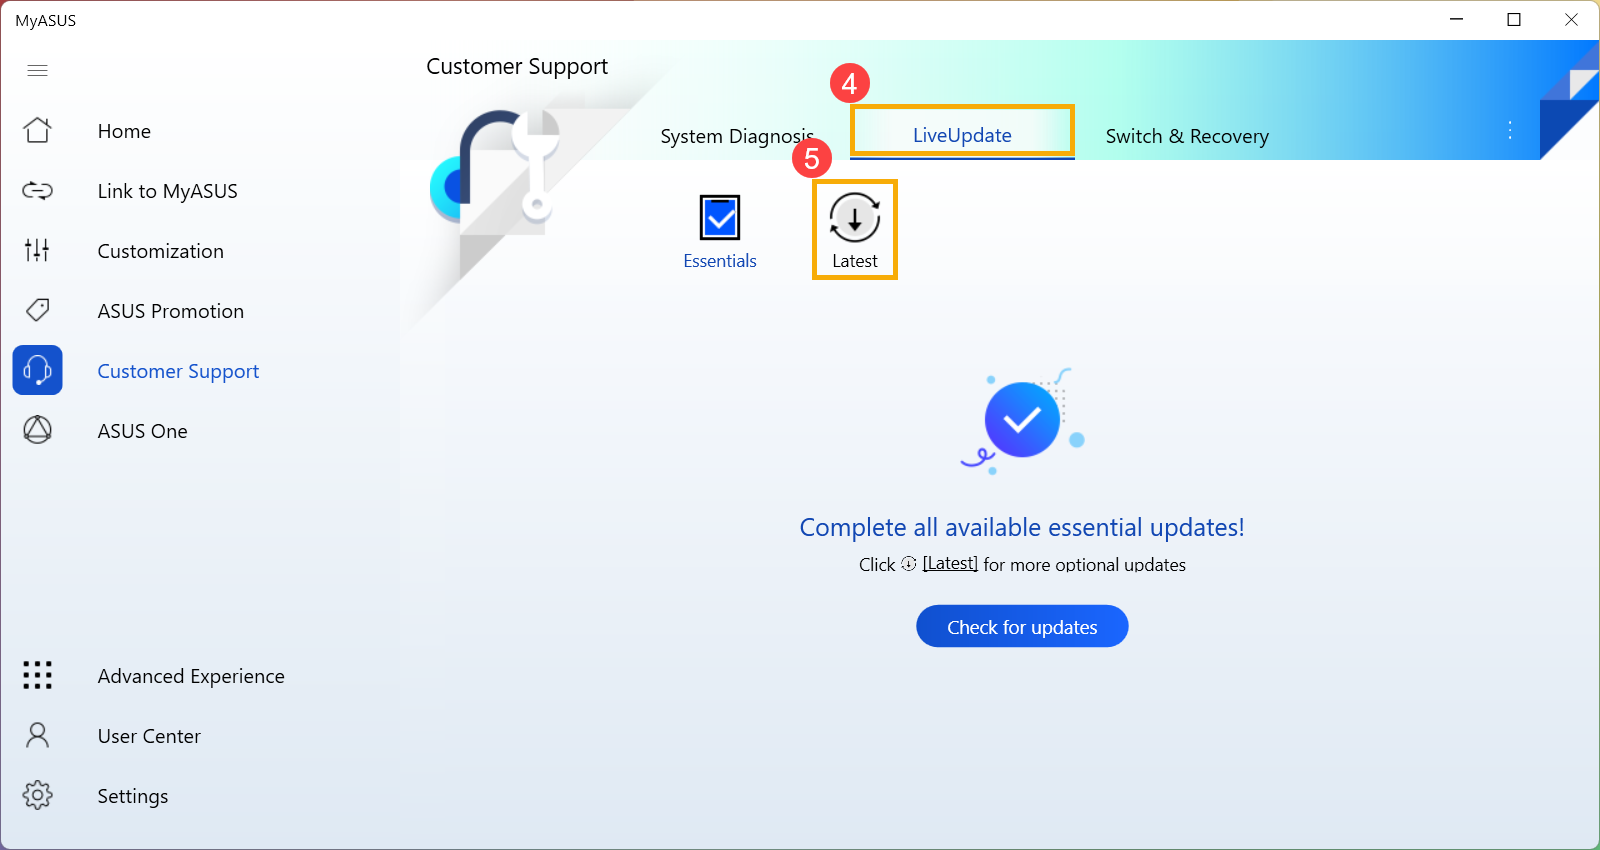
- Выберите [Live Update] ④, а затем [Последние обновления] ⑤, узнать больше можно по ссылке: [MyASUS для Windows] Live Update.
Примечание: если Вы не видите вкладку Live Update в MyASUS это означает, что компьютер не поддерживает эту функцию, перейдите к способу 2. Узнать больше можно по ссылке: Почему я вижу только “Поддержку пользователей” в MyASUS .
- Найдите [BIOS Update для Windows или BIOS Installer для Windows], который расположен в разделе BIOS Update (Windows) ⑥. Когда найдете файл, нажмите [Скачать
] ⑦ затем обратитесь к приложению: Как использовать BIOS Installer для обновления BIOS.
Примечание: Если Вы не нашли «BIOS Update для Windows” или “BIOS Installer для Windows”, т.к. некоторые модели не поддерживают обновление BIOS из среды Windows, пожалуйста, обратитесь к статье Как использовать утилиту EZ Flash для обновления BIOS.
Назад к содержанию
Способ 2: Скачайте утилиту обновления BIOS с сайта поддержки ASUS
- Перейдите на страницу поддержки ASUS с названием модели Вашего компьютера, здесь Вы можете узнать больше о том, как найти и загрузить BIOS.
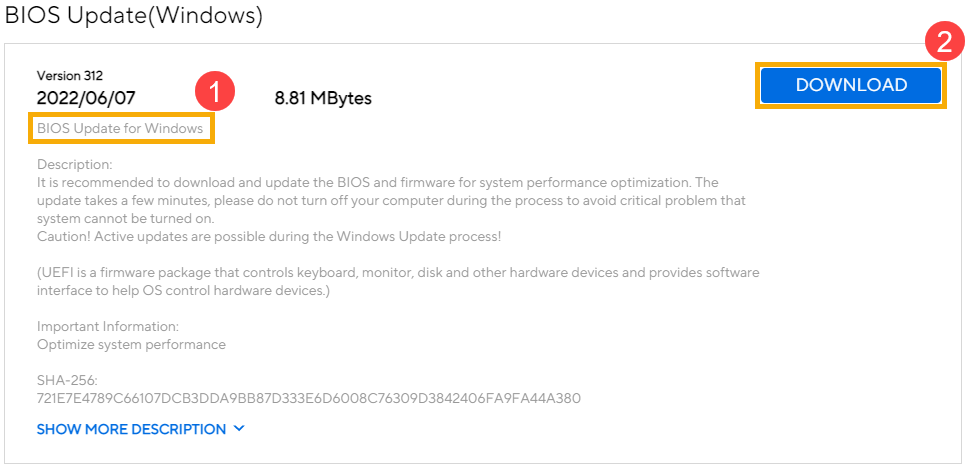
Примечание: Чтобы загрузить соответствующий файл BIOS, см. раздел Как правильно определить название модели. - На странице поддержки, пожалуйста, найдите [BIOS Update для Windows или BIOS Installer для Windows], который расположен в разделе BIOS Update(Windows) ①. Если Вы видите там файл, нажмите [Скачать] ②, затем обратитесь к приложению Как использовать BIOS Installer для обновления BIOS.
Примечание: Если Вы не нашли «BIOS Update для Windows” или “BIOS Installer для Windows”, т.к. некоторые модели не поддерживают обновление BIOS из среды Windows, пожалуйста, обратитесь к статье Как использовать утилиту EZ Flash для обновления BIOS.
Назад к содержанию
Приложение:
Как использовать BIOS Update для Windows для обновления BIOS
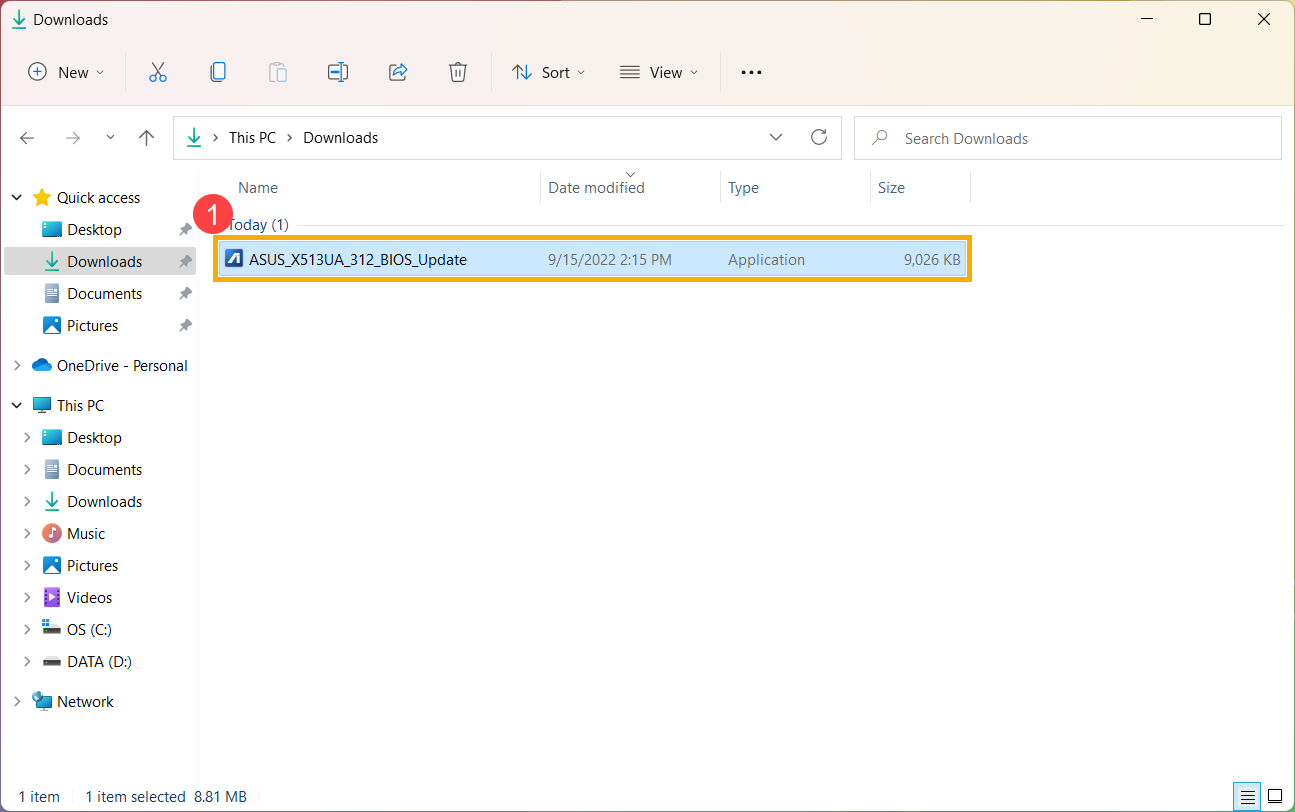
- После загрузки файла обновления BIOS для Windows дважды щелкните приложение обновления BIOS, чтобы начать обновление BIOS ①. (В качестве примера ниже взята модель: X513UA)
Если файл, который Вы скачали, является архивом, нажмите на него правой кнопкой мышки, и выберите «Извлечь все».
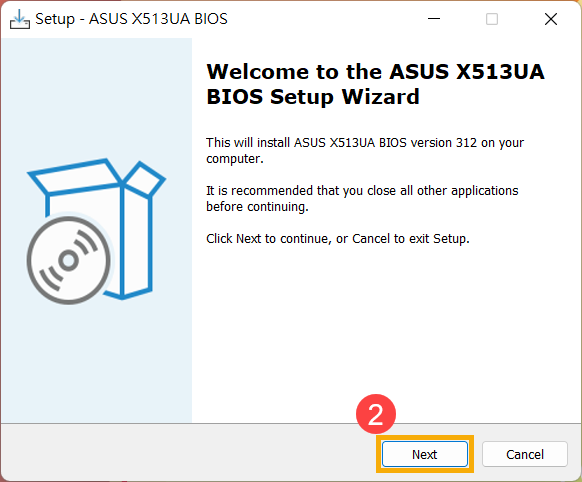
- Мастер установки поможет Вам начать процесс обновления BIOS, нажмите [Далее] ②.
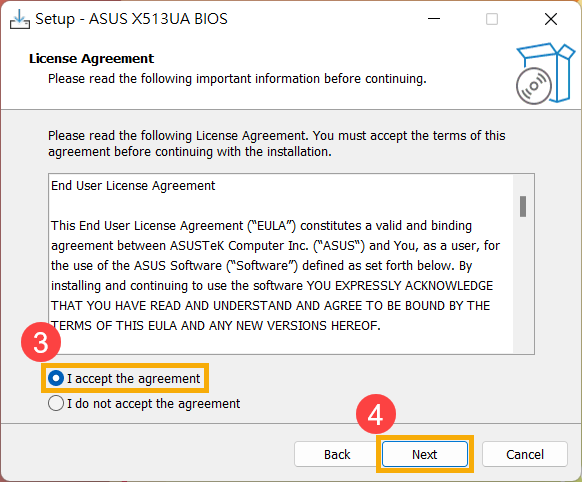
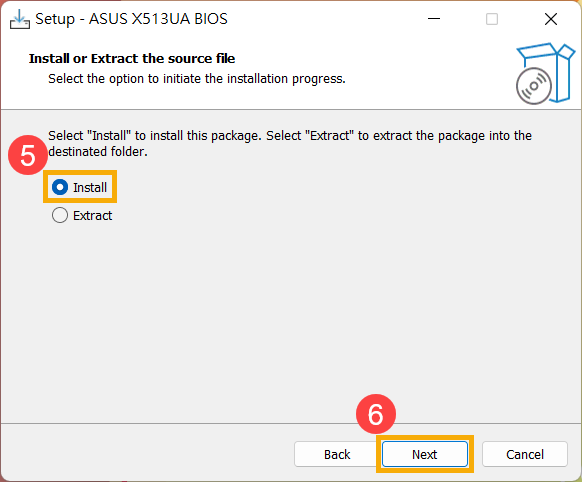
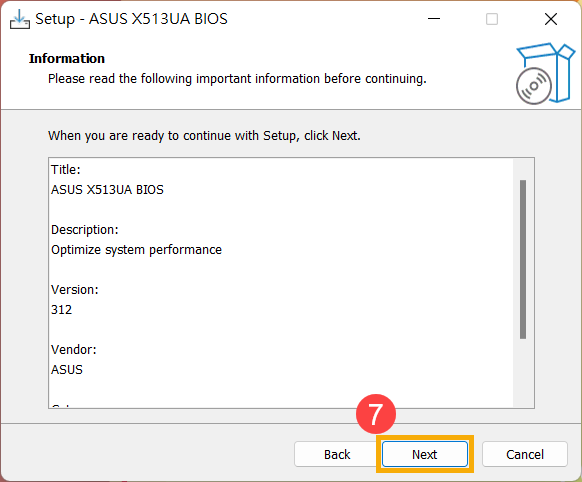
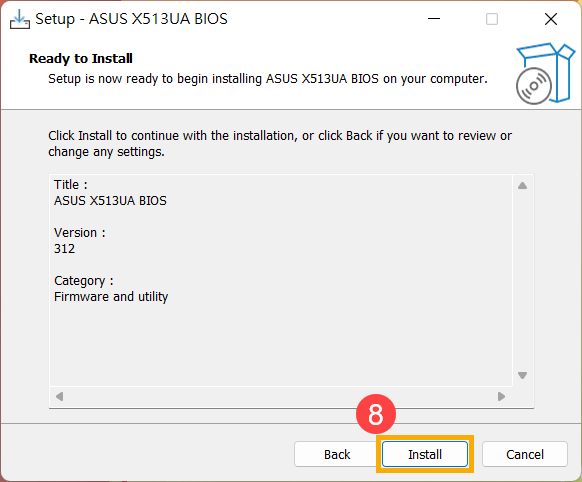
- Ознакомьтесь с Лицензионным соглашением, установите галочку [Я принимаю условия соглашения] ③ и потом нажмите [Далее] ④.
- Следите за индикатором процесса установки обновления BIOS.
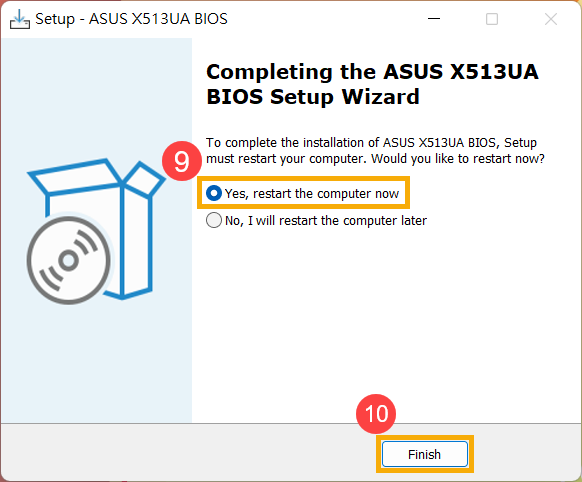
- Теперь выберите [Да, перезагрузить компьютер сейчас] ⑨ и нажмите [Готово] ⑩. Ноутбук перезагрузится и начнется процесс обновления BIOS. После завершения обновления операционная система Windows загрузится автоматически.
Примечание: Перед тем как нажать Готово в утилите, сохраните все открытые документы/приложения, чтобы избежать потери данных.
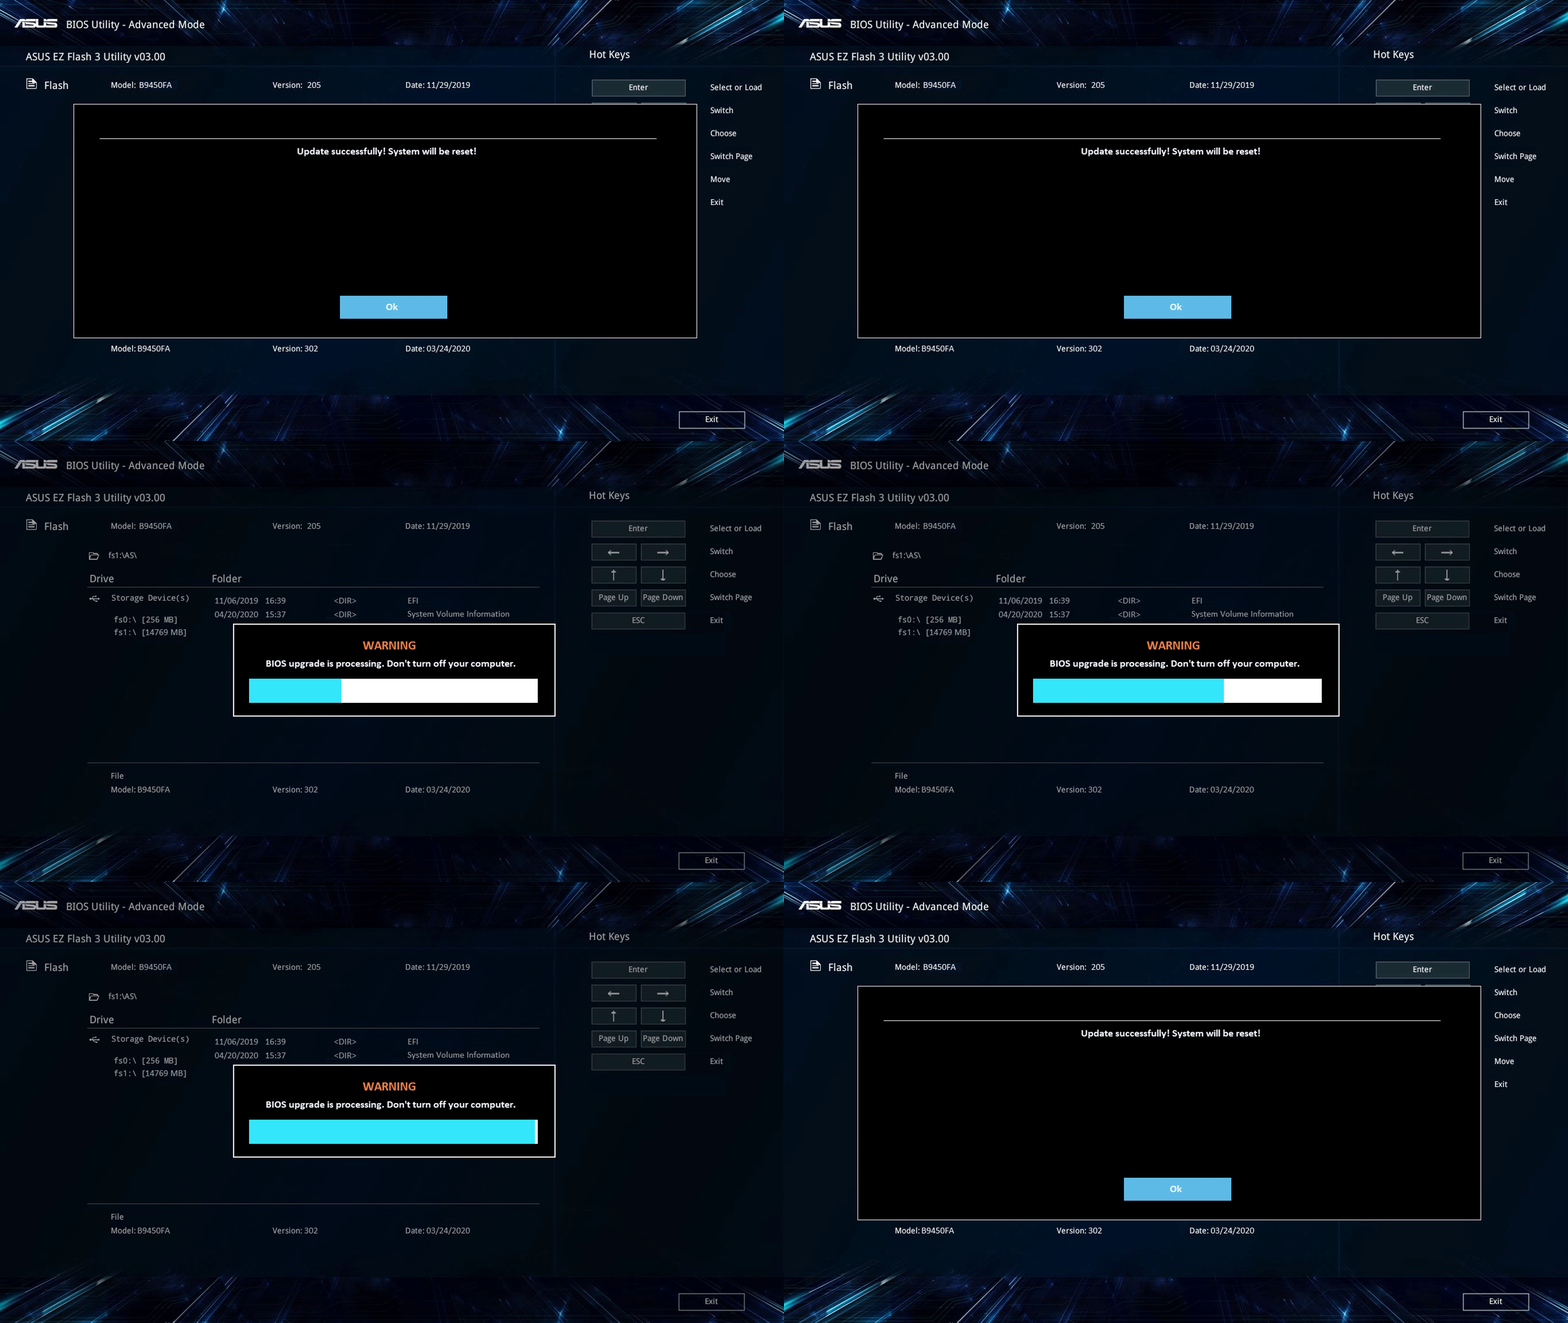
Примечание: Пожалуйста, убедитесь, что адаптер питания подключен к ноутбуку перед выполнением обновления BIOS. Во время выполнения обновления BIOS не выключайте ноутбук, т.к. это может привести к поломке устройства.
Процесс обновления BIOS.
- После того, как компьютер загрузится в Windows, это будет означать, что BIOS был успешно обновлен. Здесь Вы можете узнать больше о том, как проверить версию BIOS, чтобы проверить, успешно ли обновлен BIOS.
Назад к приложению
Эта информация была полезной?
Yes
No
- Приведенная выше информация может быть частично или полностью процитирована с внешних веб-сайтов или источников. Пожалуйста, обратитесь к информации на основе источника, который мы отметили. Пожалуйста, свяжитесь напрямую или спросите у источников, если есть какие-либо дополнительные вопросы, и обратите внимание, что ASUS не имеет отношения к данному контенту / услуге и не несет ответственности за него.
- Эта информация может не подходить для всех продуктов из той же категории / серии. Некоторые снимки экрана и операции могут отличаться от версий программного обеспечения.
- ASUS предоставляет вышеуказанную информацию только для справки. Если у вас есть какие-либо вопросы о содержании, пожалуйста, свяжитесь напрямую с поставщиком вышеуказанного продукта. Обратите внимание, что ASUS не несет ответственности за контент или услуги, предоставляемые вышеуказанным поставщиком продукта.
ASUS BIOS Update
для Windows
ASUS BIOS Update — фирменная утилита для обновления BIOS материнских плат ASUS через интернет. Позволяет проверить в режиме реального времени наличие новой версии, скачать ее и прошить прямо в среде операционной системы Windows.
ТОП-сегодня раздела «Обновления, патчи»
MSI LiveUpdate 6.2.0.74
MSI LiveUpdate — это полезные и мощные приложения для автоматической загрузки и обновления BIOS,…

ASUS BIOS Live Update — Фирменная утилита для обновления BIOS материнских плат ASUS через интернет…
Отзывы о программе ASUS BIOS Update
Сова про ASUS BIOS Live Update 7.17.11 [05-01-2021]
Win7, синий экран через раз при клике на файл установки!
2 | 11 | Ответить
Krot в ответ Сова про ASUS BIOS Live Update 7.17.11 [05-01-2021]
Надо запускать от имени администратора!
7 | 10 | Ответить
Сергей про ASUS BIOS Live Update 7.17.11 [16-07-2019]
Чего я не прочитал отзывы? Синий экран после клика Сетап.
10 | 10 | Ответить
Антон про ASUS BIOS Live Update 7.17.11 [05-09-2017]
Народ не качайте эту лажу.У меня биос из за нее слетел начисто пришлось мамку менять. Кто не верит гуглите asus update сбой на 3 этапе.
8 | 10 | Ответить
Дитрий про ASUS BIOS Live Update 7.17.11 [10-06-2014]
Лажа не качайте
12 | 7 | Ответить
ЮРГЕН про ASUS BIOS Live Update 7.17.11 [17-10-2013]
ПРОГА НЕ ХОЧЕТ ВЫХОДИТЬ В ИНТЕРНЕТ.СТОИТ 7.МАТЬ Asus P5L 1394
6 | 12 | Ответить


WinZip — это программа для архивирования и сжатия файлов, разработанная компанией Corel. Она

МФУ (многофункциональное устройство)

Компания, известная своими принтерами, сканерами и МФУ. Повышенная надежность и

Корпорация с мировым именем. Занимает лидирующие позиции на рынке процессоров для

Один из старейших производителей разнообразной электроники. Среди продукции компании

Драйвера для ноутбука играют не менее важную роль, чем операционная система. Ведь именно от них

Крупный производитель процессоров, видеокарт, и чипсетов для использования в материнских

Шина (разъем) на материнской плате. Служит для подключения периферийных устройств: сетевых

Компания, производящая различную технику. В числе ее продуктов присутствуют смартфоны,

Драйвер сетевой карты нетбука, ноутбука или стационарного ПК. Необходим для

Программное обеспечение, позволяющее задействовать возможности звуковой

Известная компания, производящая различные продукты, в том числе МФУ и принтеры. Для

Самый крупный производитель видеокарт для компьютеров. Драйвер играет важную роль в

HP LaserJet Драйвер — это программное обеспечение, которое необходимо для корректной работы

CrystalDiskMark — это бесплатная программа для тестирования производительности жестких дисков и

Media Creation Tool — это официальное приложение от Microsoft для создания установочного носителя

Sublime Text — это текстовый редактор для программистов и разработчиков, предоставляющий множество

VMWare Workstation — это программное обеспечение для создания и управления виртуальными машинами на

Trend Micro HijackThis — это бесплатная программа для диагностики и удаления вредоносных программ

MultiBoot — это программное обеспечение для создания загрузочных флешек с несколькими операционными

BitDefender — это программа для защиты компьютера от вредоносных программ, включая вирусы,

HitmanPro — это антивирусная программа, которая использует технологию облачных вычислений для

HDDScan — это бесплатное приложение для диагностики и мониторинга жестких дисков. Оно предоставляет

RivaTuner — это мощная программа для настройки видеокарты и мониторинга ее работы. Она позволяет

GetDataBack — это программа для восстановления данных, которая позволяет восстанавливать удаленные,

MHDD — это бесплатная программа для диагностики и ремонта жестких дисков. Она позволяет

BlueSoleil — это программа для работы с Bluetooth-устройствами на компьютере. Она позволяет

Minitool Partition Wizard — это программа для работы с дисками и разделами жесткого диска

ActiveSync — это программа, разработанная компанией Microsoft, которая позволяет синхронизировать

Microsoft Security Essentials — это бесплатная антивирусная программа от компании Microsoft,

CPU Control — это программа для управления процессором компьютера. Она позволяет настраивать

ASUS Update — это программа для автоматического обновления BIOS и драйверов на компьютерах и

Intel Driver — это программное обеспечение для автоматического обновления и установки драйверов для

Mcafee — это программа для защиты компьютера и интернет-активности от различных видов угроз,

WinThruster — это программа для оптимизации производительности компьютера и исправления проблем в

Classic Shell — это бесплатная программа для настройки меню Пуск в операционных системах Windows.

Утилита, предназначенная для оптимизации операционной системы Windows.

HDD Low Level Format Tool — это бесплатная программа, которая позволяет пользователям выполнить

CrystalDiskInfo — это бесплатная программа, которая позволяет пользователю мониторить состояние

FAR Manager — это файловый менеджер для операционной системы Windows, который позволяет

Display Driver Uninstaller (DDU) — это бесплатная утилита для полного удаления драйверов

Ashampoo Burning Studio — это программа для записи и копирования файлов на оптические диски, такие

Core Temp — это бесплатная утилита для мониторинга температуры процессора компьютера. Она

Calibre — это бесплатная утилита для управления электронными книгами. Она предоставляет

HWMonitor — это бесплатная утилита для мониторинга температуры, напряжения и скорости вращения

Eclipse — это интегрированная среда разработки (IDE) для разработки программного обеспечения на

Firebird — это реляционная база данных с открытым исходным кодом, которая является мощной, гибкой и

Android Studio — это интегрированная среда разработки (IDE) для разработки мобильных приложений под

Kingo Root — это бесплатное программное обеспечение, которое позволяет получать рут-права на

Arduino — это бесплатная среда разработки и программирования микроконтроллеров. Она позволяет

LibreOffice — это бесплатный офисный пакет, который включает текстовый редактор, таблицы,

Everest — это программа для диагностики и мониторинга компьютера. Она позволяет пользователю

STDU Viewer — это бесплатная программа для чтения различных электронных книг и документов в формате

Defraggler — это бесплатная программа для дефрагментации жесткого диска в операционной системе

EasyBCD — это бесплатная программа для настройки загрузчика операционных систем Windows. Она

AVG Antivirus — это бесплатное программное обеспечение для защиты компьютера от вирусов, шпионского

AVG Internet Security — это программное обеспечение для защиты компьютера от вирусов, шпионского

FB2 Reader — это бесплатная программа для чтения электронных книг в формате FB2. Она позволяет

ImgBurn — это бесплатная программа для записи образов дисков на CD, DVD, HD DVD и Blu-ray. Она

Nero Burning ROM — это программа для записи данных на диски CD, DVD и Blu-ray. Она позволяет

TestDisk — это бесплатная программа для восстановления данных с поврежденных разделов жесткого

Hetman Partition Recovery — это программа для восстановления удаленных или поврежденных разделов

Smart Defrag — это программа для дефрагментации жестких дисков на компьютерах под управлением

TuneUp Utilities — это программное обеспечение, которое позволяет оптимизировать производительность

Eraser — это бесплатная программа для безопасного удаления данных с жестких дисков и других

Samsung Kies — это бесплатная программа от Samsung, которая позволяет пользователям управлять

Cool Reader — это бесплатная программа для чтения электронных книг на компьютере. Она поддерживает

FBReader — это бесплатная программа для чтения электронных книг на компьютере и мобильных

Mem Reduct — это бесплатная программа для оптимизации работы оперативной памяти компьютера.

CheMax — это бесплатная программа для игроков, которая содержит список кодов и читов для более чем

Glary Utilities — это комплексное приложение для оптимизации и поддержки работы компьютера. Оно

Driver Genius — это утилита для обновления и управления драйверами устройств на компьютере. Она

Adobe Dreamweaver — это мощный редактор веб-страниц и приложений, разработанный компанией Adobe

Xpadder — это программа, которая позволяет превратить обычный геймпад или джойстик в полноценное

Speccy — это бесплатная программа, которая предоставляет подробную информацию о железе компьютера.

ABBYY Lingvo — это программа-словарь, которая предназначена для перевода и изучения иностранных

Kerish Doctor — это программа для оптимизации и обслуживания компьютера. Она предназначена для

HDD Regenerator — это программа, которая используется для восстановления жестких дисков с

Punto Switcher — это программа для автоматического переключения раскладки клавиатуры на компьютере.

Razer Game Booster — это программа, разработанная компанией Razer, которая позволяет оптимизировать

Acronis True Image — это программа для резервного копирования и восстановления данных,

Uninstall Tool — это программа для удаления приложений с компьютера, разработанная компанией

Auslogics BoostSpeed — это программа для оптимизации и ускорения работы компьютера, разработанная

R-Studio — это программа для восстановления данных с жестких дисков, разработанная компанией

Nox App Player — это программа для запуска мобильных приложений на компьютере, разработанная

Reg Organizer — это программа для оптимизации реестра Windows и управления установленными

Clean Master — это бесплатная программа для очистки и оптимизации компьютера, разработанная

Acronis Disk Director — это программа для управления дисками и разделами на компьютере,

Driver Booster Free — это бесплатная программа для обновления драйверов компьютера, разработанная

Victoria HDD — это бесплатная программа для тестирования и диагностики жестких дисков,

Razer Cortex — это бесплатная программа для оптимизации компьютера для игр, разработанная компанией

Wise Care 365 Pro — это платная программа для оптимизации и очистки компьютера, разработанная

Nokia PC Suite — это бесплатная программа для управления мобильными устройствами Nokia,

Mobogenie — это бесплатная программа для управления мобильными устройствами на базе операционной

IObit Malware Fighter — это бесплатная программа для обнаружения и удаления вредоносных программ и

IObit Uninstaller — это бесплатная программа для удаления нежелательных программ и приложений с

Foxit Reader — это бесплатная программа для чтения PDF-файлов, разработанная компанией Foxit

Alcohol 120% — это программа для создания и эмуляции CD/DVD-дисков, разработанная компанией Alcohol

Revo Uninstaller — это бесплатная программа для удаления программ и очистки компьютера от ненужных

SpeedFan — это бесплатная программа для мониторинга и управления температурой компьютерных

WinRAR — это программа для архивирования и сжатия файлов, разработанная компанией RARLAB. Версия 64

AdwCleaner (Адв Клинер) от Malwarebytes представляет собой бесплатный софт для выявления и удаления
ASUS BIOS Update — утилита для обновления BIOS на материнских платах фирмы ASUS. C помощью ASUS BIOS Update можно сохранять, управлять и обновлять BIOS материнских плат непосредственно из операционной системы Windows. Программа может (при подключении к Интернету) автоматически проверять наличие новых прошивок BIOS на сайте Asus, и в случае обнаружения обновления скачивать его на компьютер, после чего автоматически производит обновление BIOS.
Также в ASUS BIOS Update присутствует возможность обновления BIOS из файла прошивки, находящегося на локальном жестком диске. Поддерживает работу с материнскими платами серий P5, P4, P, P3, P2B, SK8, A8, K8, A7, K7V, TR, TU, CU и MEW (возможно, и с другими также).
Основные возможности ASUS BIOS Update:
— Сохранение текущего BIOS.
— Загрузка последнего BIOS из Интернет.
— Обновление BIOS из сохраненного файла.
— Обновление BIOS напрямую через Интернет.
— Просмотр информации о версии BIOS.
Внимание:
Обновление BIOS напрямую через Интернет не рекомендуется из-за возможности обрыва подключения и (как следствия) повреждения текущей версии прошивки.
Изменения в последней версии
- Нет данных.
| Разработчик: | |
| Официальный сайт: | www.asus.ua |
| Обновлено: | |
| Версия Windows: | 95, 98, ME, 2000, XP, 2003, Vista, 7 |
| Язык интерфейса: | English |
Скачать ASUS BIOS Update для Windows
Download Article
An easy-to-follow guide on updating an ASUS BIOS
Download Article
- Finding Model and BIOS Version
- Downloading the Update
- ASUS EZ Update Method
- ASUS EZ Flash 3 Method
- USB BIOS FlashBack Method
- Video
- Tips
- Warnings
|
|
|
|
|
|
|
If your ASUS computer has stability issues or crashes frequently, you may need to update the BIOS. Luckily, it’s easy to update the BIOS on most newer models of ASUS. In most cases, you can do it easily from within Windows using the EZ Update utility. If that’s not working, we’ll explain how to update the BIOS from a USB drive—even if your ASUS won’t start up at all.
Things You Should Know
- In many cases you can update the BIOS over the internet using the EZ Update utility in the AI Suite 3 app.
- You may need to use one of the USB methods if your system is very unstable or doesn’t support EZ Update.
- You can download the latest BIOS update file for your ASUS model from the ASUS Download Center.
-
1
Find the model name of your computer with DXDIAG. To make sure you’re getting the right BIOS update, you’ll need to gather information about your ASUS computer, motherboard, and current BIOS version. Typically, you can find your computer’s model number on a sticker on the back of the computer or on the original box that your computer came in. If you don’t see it there, look it up this way:[1]
- Type DXDIAG into the search bar in the Windows taskbar or Start menu.
- Click the DIXDIAG app in the search results.
- Find your computer’s model name next to the System Model header.
- You can also see your current BIOS version in this utility.
-
2
Look up your motherboard model and BIOS version in the BIOS utility. If you want to go directly to the download page for your ASUS’s motherboard, look up your motherboard model number instead. To do this, reboot your computer and hold down the Del key. Your computer will start up in the BIOS utility. Look for the motherboard model name and BIOS version in the top left corner of the screen.[2]
- You can also see the model number for your motherboard by opening the computer case and looking for the sticker on the motherboard itself. However, this method will not tell you which version of the BIOS is currently installed.
Advertisement
-
1
-
2
Enter your model name or select it from the dropdown menus. Type the model name of your computer or motherboard into the search bar under the header Please enter a model name. Or, use the Select a product dropdowns to find your computer or motherboard model.
-
3
Click Driver & Utility. It’s a link on the right side of the page.
-
4
Click the BIOS & FIRMWARE tab. You’ll find this near the middle of the page.
- You may be prompted to select your current operating system from a dropdown menu.
-
5
Look for an available update. You’ll see the latest BIOS update file here. If the date on the BIOS update file is more recent than the date on which your computer was manufactured, your BIOS most likely needs to be updated.
- If the file is several years old, chances are that your BIOS isn’t in need of an update.
- If you see several BIOS versions listed, select the most recent one.
-
6
Click DOWNLOAD. It’s to the right of the BIOS file. Doing so prompts the BIOS file’s ZIP folder to download onto your computer.
-
7
Unzip the BIOS file. Once you download the BIOS update file, locate the ZIP file in your Downloads folder and extract it.
- Look for a file in the unzipped folder with a .CAP file extension. This is the BIOS update file, which you can use to update the BIOS manually if necessary.
Advertisement
-
1
Download the AI Suite 3 app from the ASUS Download Center. Navigate to https://www.asus.com/support/Download-Center/ and enter the model name for your motherboard. From there:[3]
- Click the Driver & Utility link on the right side of the page.
- Make sure the Driver & Tools tab is selected.
- Select your operating system from the dropdown menu.
- Find the latest version of ASUS AI Suite 3 under the Software and Utility header and click Download.
- Before downloading the file, look at the description and see if EZ Update is mentioned. If not, the latest AI Suite 3 for your computer model may not support this update method.[4]
- Before downloading the file, look at the description and see if EZ Update is mentioned. If not, the latest AI Suite 3 for your computer model may not support this update method.[4]
- Extract the ZIP file in your Downloads folder and double-click the AsusSetup.exe file.
- Click Install and follow the prompts to reboot your computer.
-
2
Open AI Suite 3 in your Start menu. Once the computer reboots, launch the AI Suite 3 app.
-
3
Select EZ Update in the main menu. Click the ☰ button to open the main menu in the AI Suite 3 app, then click EZ Update in the menu on the left side of the screen.
-
4
Click Check Now!, then Connect to check for updates online. Ideally, you should be able to update the BIOS directly from the EZ Update utility without having to manually download the update file. To do this, click the Check Now! button under the header Check updates from internet in the main EZ Update window. Then, click Connect at the bottom of the window.
-
5
Select the update from the list and click Update. If any BIOS updates are available, they should show up in the list of available updates under your motherboard’s model name. Click the Update button at the bottom of the window.
-
6
Click OK to restart your computer. Once the updates finish installing, a window will pop up asking if you want to restart your computer now to finish the process. Select OK.
- The computer will restart and automatically open the EZ Flash utility. Wait for the updates to finish processing. Your computer will restart again.
- Don’t attempt to shut down or reboot your computer during the update process, since interrupting the update could do serious damage to your system.
-
7
Restart again after the American Megatrends screen appears. Once the update is finished, you’ll see a screen with an American Megatrends logo. Restart your computer again.
-
8
Go back into EZ Update to confirm the installation. Once your computer restarts, open AI Suite 3 again and navigate back to EZ Update in the menu. Look at the information on the right side of the screen under the Current BIOS header. Confirm that the newest version of the BIOS is listed there.
-
9
Use the manual update option if you can’t update online. If for whatever reason you aren’t able to update over the internet, you can use AI Suite 3 to update the BIOS manually using the downloaded BIOS update file. Confirm that you’ve downloaded the correct version of the BIOS, then open AI Suite 3 and navigate to EZ Update. From there:[5]
- Click the ••• button next to Manually update Boot logo or BIOS
- Select the BIOS update file you downloaded to your computer. Double-check that the correct information is listed under the Selected BIOS header on the right side of the window.
- Click Update in the lower right corner of the screen.
- Click Flash, then select OK to confirm.
- Click OK again to restart your computer. Wait for the update to complete, after which your computer will restart again.
- Restart again after the American Megatrends screen appears.
- Check the current BIOS information in EZ Update again after your computer is finished restarting.
Advertisement
-
1
Format a USB flash drive in FAT16/32 format. To use this method, you’ll need to install the BIOS from a USB flash drive. This may be a good option if your computer is too unstable to use the EZ Update method, or if your device doesn’t support EZ Update. To format the flash drive:[6]
- Select a USB drive with at least 1GB of free space. Back up any data on the drive, since formatting it will erase it.
- Connect the flash drive to your computer and open File Explorer. If your ASUS is too unstable for this process, you may need to use a different computer.
- Select your USB drive, right-click it, and select Format….
- Choose FAT32 or FAT16 from the dropdown menu and click Start. Confirm by clicking OK.
- When the format is complete, click OK again.
- Keep in mind that not all ASUS computers have the EZ Flash 3 feature built in. Check the technical specifications for your computer’s motherboard on the ASUS website before you try this method.[7]
-
2
Copy your BIOS update file onto the USB drive. After you download and unzip the correct BIOS file from the ASUS download center, drag and drop the .CAP file into the USB drive. You can also copy and paste it if you prefer.[8]
-
3
Connect the flash drive with the BIOS file to your ASUS PC. Insert the USB drive with the BIOS update file into the USB port on your ASUS.
-
4
Reboot your ASUS and hold down the Del key. Boot up your computer and wait for the ASUS logo to appear. As soon as you see it, press and hold Del. This will boot up the computer in the BIOS utility.
-
5
Press F7 to enter Advanced Mode. You can also click Advanced Mode at the bottom of the screen with your mouse.
-
6
Click the Tool tab and select ASUS EZ Flash 3 Utility.
-
7
Select your USB drive from the list of storage devices. Look for a header that says Storage Devices on the left side of the screen. You should see the USB drive with your BIOS update file listed there. Click on it to select it.
-
8
Click the update file and select Yes. Once you select the correct file, a window will pop open asking if you want to read the file. Click Yes to confirm.
-
9
Double check the BIOS information, then click Yes. A second window will pop up asking you if you really want to update the BIOS. Check the BIOS information to make sure you’re installing the right version, then click Yes again to start the update.
- Once the update is complete, click OK to confirm and restart your computer.
- Don’t do anything to interrupt the update process, since this could cause serious damage to your system and make it impossible to boot up your computer again.
Advertisement
-
1
Use this method if you’re unable to boot up at all. The USB BIOS FlashBack method is ideal in situations where your computer is severely compromised and you can’t get the motherboard to start up at all. It’s not available for ASUS computers, but you can find a list of motherboards that are compatible with BIOS FlashBack here: https://www.asus.com/support/FAQ/1038568/
-
2
Format a USB flash drive in FAT16/32 format. This method involves installing the BIOS update from a USB drive. You’ll need one with at least 1GB of free space. To format the flash drive:[9]
- Connect the flash drive to a working computer and open File Explorer.
- Select your USB drive, right-click it, and select Format….
- Choose FAT32 or FAT16 from the dropdown menu and click Start. Confirm by clicking OK.
- When the formatting process is complete, click OK again.
-
3
Copy the BIOS update file onto the USB drive. On a working computer, download the correct BIOS version from the ASUS Download Center. Extract the zip file, then drag and drop the .CAP file onto the USB drive.
- In some cases, you may see a file called BIOSRenamer in the folder with the BIOS update file. If you see this, double-click it to automatically rename the BIOS file, then move the renamed file onto the USB drive.
-
4
Insert the USB drive into the FlashBack port on your ASUS. The location of this port varies from one model to another. Consult your user manual if you’re not sure where to find it.
- If you don’t have the paper copy of your manual anymore, you can download it from the ASUS Download Center: https://www.asus.com/us/support/Download-Center/
-
5
Make sure your computer is shut down but still plugged in. If you’re unable to shut down the computer properly, you may need to press and hold the power button for several seconds until the power light turns off.[10]
Make sure your computer is still connected to a working power source, since a loss of power during the update could do serious damage. -
6
Press and hold the BIOS FlashBack button for 3 seconds. Look for a button on the back of your computer that says BIOS and shows two arrows curving toward each other. Hold the button for 3 seconds, or until you see the light on the button blink 3 times.
-
7
Wait for the BIOS FlashBack light to go out before restarting. It may take up to 8 minutes for the update to complete. During the update, don’t press the power button, unplug the computer, remove the USB drive, or press the CLR_CMOS button. Doing any of those things could disrupt the update and make it impossible for your computer to reboot again.
- Once the update is complete, the light on the BIOS FlashBack button will turn off. After that, you can try rebooting your computer.
- To check if the new BIOS version installed correctly, hold down F2 or Del after the ASUS logo appears during the restart process. This will cause your computer to boot up in the BIOS/UEFI menu. Look for the BIOS information under the Main tab.
Advertisement
Ask a Question
200 characters left
Include your email address to get a message when this question is answered.
Submit
Advertisement
Video
-
Since there’s a risk that your system could be damaged after a BIOS update, always back up your computer before attempting an update.
-
If your computer doesn’t start up properly after an update, you may need to get it serviced professionally.
-
The ASUS BIOS should update automatically whenever a new Windows update installs. However, if your system is unstable or automatic updates aren’t working properly, you may need to try one of these methods.
Thanks for submitting a tip for review!
Advertisement
-
Unplugging your computer or attempting to force-restart it during the BIOS update process can cause the BIOS to become corrupted, thus making your computer’s motherboard impossible to use and «bricking» your computer.
Advertisement
About This Article
Thanks to all authors for creating a page that has been read 223,755 times.
 ]
] 