Проверьте корректность загрузки в UEFI
Это важно в первую очередь в тех случаях, когда вы добавили диск, на котором была когда-то установлена операционная система, а также если вы сами сбросили UEFI или это произошло из-за полной разрядки батареи материнской платы. В параметры UEFI проще всего попасть из работающей Windows 10:
- В стартовом меню нажмите «Выключить» и затем выберите «Перезагрузка», зажав клавишу «Shift».
- Далее нажмите «Поиск и устранение неисправностей | Дополнительные параметры | Параметры встроенного ПО UEFI | Перезагрузить».
Чтобы попасть в UEFI в Windows 7, сразу после включения нужно быстро и часто нажимать несколько раз одну из клавиш: «F1», «F2» или «Del» — более точное указание поищите в руководстве пользователя материнской платы или ноутбука.
Откорректируйте приоритет загрузки
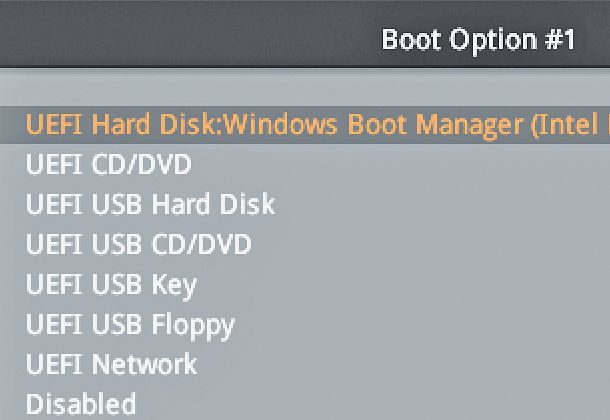
UEFI материнских плат, как правило, сначала отображают упрощенный интерфейс, в котором очередность загрузки представляется в виде ряда символов — с помощью мыши их можно перетаскивать и устанавливать в нужном порядке. Диск с операционной системой должен находиться на первом месте — UEFI обычно отображает «Windows Boot Manager» в имени диска.
Если системный диск вообще там не отображается, перейдите в режим расширенного просмотра, нажав «Advanced» в верхней или нижней части экрана, и найдите запись «Boot» — здесь очередность загрузки будет представлена более развернуто. Под записью «UEFI Hard Disk Drive BBS» приоритет вашего системного диска должен быть установлен как «Boot Option #1».
Если диск не появляется в меню
Если диск в меню вообще не появляется или появляется изредка, вероятно, повреждено само аппаратное обеспечение. Но прежде чем выкинуть накопитель, подключите его по другому кабелю передачи данных и кабелю питания и попробуйте другой порт SATA материнской платы, чтобы исключить вариант дефекта этих компонентов.
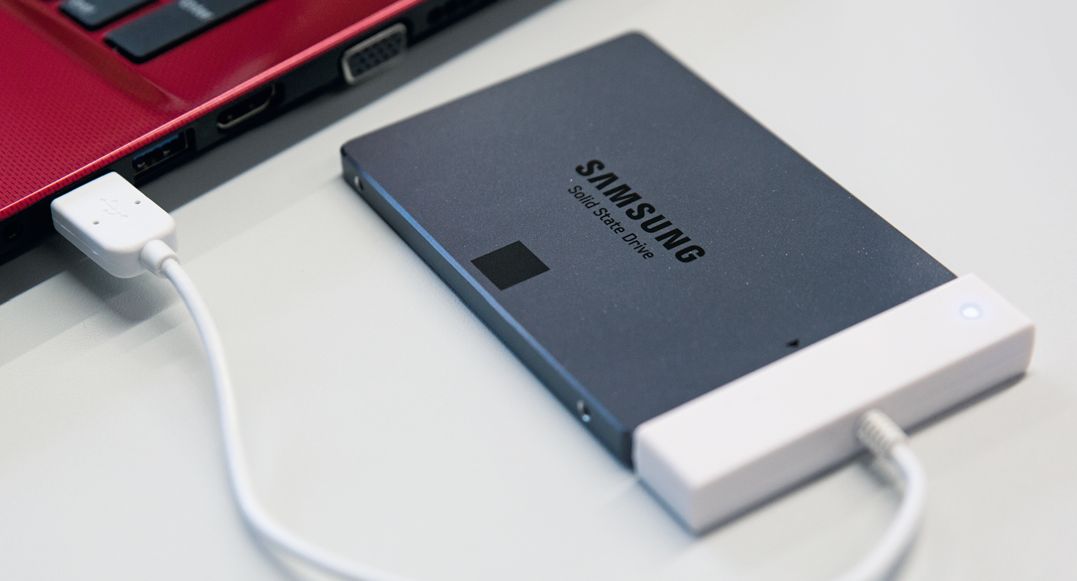
Если ни одна из попыток не увенчается успехом, придется подключать новый носитель и переустанавливать систему. Потом можно подключить старый диск по SATA или в корпусе для внешнего диска по USB к рабочему компьютеру, чтобы попытаться спасти файлы, которые хранились на нем, с помощью инструментов Recuva или Testdisc/Photorec.
В решении проблем с Windows помогут наши статьи:
- Как восстановить поврежденные системные файлы Windows
- Сбой при запуске Windows — что делать?
Фото: компании-производители

Редактор направлений «Мобильные устройства» и «Техника для дома»
Всем привет!
Короче, сделал небольшой апгрейд компьютера, хотя это больше похоже на даунгрейд, но все же – с древнего i7 до относительно современного i3 10105F по частотам i3 даже выше, ddr-3 на ddr-4, мать пришлось сменить.
Короче, ну думаю че там хард перенесу и ос сама там все подхватит, в целом так и получилось, но были нюансы.
Короче, все собрал, как не странно он включился, и зашёл автоматом в UEFI, там все хорошо, проц, память, жесткий диск, все определилось, все ОК, но нельзя хард мой старый загрузочный с установленной на него виндой 10 выбрать в качестве приоритетного устройства для загрузки в разделе boot, хотя сам хард биос определяет и видит.
Ну думаю странная фигня, вроде и хард видит и он точно работал и загружался и загрузочный и все ок, все как всегда хорошо только ничего не работает и не поставить хард в загрузку с него.
Оказывается, там нужно включить какую-то фигню в разделе Boot, секции Advanced Mode под названием CSM(Compatibility Support Module) – Lauch CSM в Enable, после этого перезагрузиться и загрузка с харда пошла в обычном режиме, причем если сразу после включения этой функции посмотреть возможные устройства, с которых можно загрузиться там также харда не будет, нужно именно после перезагрузки повторно заходить в биос и тогда хард должен появиться уже в списке устройств с которых можно загружаться. Короче такая странная, мутная фигня.
А да, и винда 10 не установила прямо все драйвера, пришлось устанавливать какие-то дрова с чипсетом и т.п. с диска к материнке.
А так все прошло относительно лайтово, думал будет хуже и винда не загрузиться, хотя нежелание загружаться со 100% загрузочного харда который на старом компьютере загружался немного удивила, при том что биос стразу определил этот хард.
От апгрейда прямо вау эффекта нету, но кажется, что стало работать побыстрее, древние харды ещё все портят, но все-таки более современный проц, с более высокой частотой и более быстрая оперативная память, вроде ведьмак 3 по меньше стал подлагивать местами, главное работает да и ладно.
Когда компьютер не видит загрузочный диск с операционной системой Windows 10, это может быть вызвано несколькими факторами. Нет необходимости паниковать — есть несколько шагов, которые можно предпринять для решения этой проблемы.
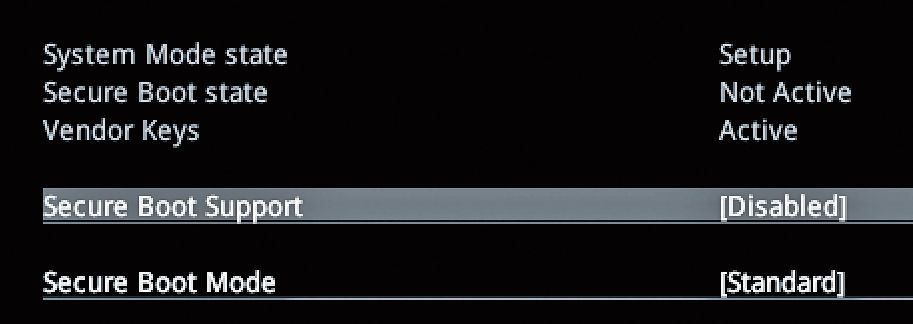
Проверьте BIOS/UEFI настройки
В первую очередь, убедитесь, что ваш компьютер правильно настроен для загрузки с диска. При загрузке компьютера нажмите определенную клавишу (обычно Del, F2 или F10), чтобы войти в настройки BIOS/UEFI. Проверьте, что в разделе «Boot» установлено правильное устройство для загрузки, и в случае необходимости, поменяйте его на ваш загрузочный диск.
Проверьте загрузочный диск
Возможно, загрузочный диск поврежден или не является совместимым с вашим компьютером. Попробуйте использовать другой загрузочный диск или создайте новый из официального источника. Убедитесь, что диск правильно вставлен в привод и не имеет видимых повреждений.
Проверьте порт и кабель
Иногда проблема может быть в порту или кабеле. Убедитесь, что кабель между компьютером и приводом DVD/CD или USB-порт подключены правильно и надежно. Если вы используете внешний привод, попробуйте подключить его через другой USB-порт.
Обновите драйвера
Если все вышеперечисленные шаги не привели к успеху, попробуйте обновить драйверы вашего компьютера. Зайдите на официальный сайт производителя вашего компьютера и загрузите последние драйверы для вашей модели. Установите их на компьютер и попробуйте снова загрузиться с диска.
Обратитесь за помощью
Если ни один из вышеперечисленных шагов не помог вам решить проблему, рекомендуется обратиться за помощью к специалисту или технической поддержке. Они смогут провести более подробное и комплексное исследование проблемы и предложить варианты решения.
Необходимо помнить, что каждый компьютер уникален, и решение данной проблемы может быть уникальным для вашей конкретной системы. Следуйте указанным выше шагам в соответствии со своими настройками и оборудованием.
Key Takeaways:
- «No boot disk has been detected or the disk has failed» error usually occurs when booting the computer.
- A wrong boot configuration or a corrupt boot disk may cause the no boot disk has been detected error.
- EaseUS will provide six options to fix the error, and you can follow this tutorial.
HP or Acer users may receive no boot disk has been detected error when booting their PC. The system cannot find the boot information needed to load the operating system. EaseUS will help you analyze the detailed cause and provide possible solutions to boot your computer successfully.
The computer needs to boot up the system by checking the hard drive for boot information and other operational information. No boot disk has been detected or the disk has failed, indicating that the boot information retrieval has failed. The following are some common causes of this error:
- Faulty or loose hard disk connection
- Incorrect boot order setting
- Corrupt boot configuration data
- Failed hard drive
- HDD/SSD missing operating system
After understanding the causes of these difficulties, we will continue to show you effective solutions on how to solve the no boot disk has been detected or the disk has failed problem. If you like this passage, click the social buttons below to share it with others in need.
Six Solutions to Fix No Boot Disk Has Been Detected Error
Knowing why the error occurred, you can jump directly to the target solution for error repair. Instead, you can fix the undetected boot disk error through these troubleshooting steps in order:
- 1. Check the Hard Disk Connection
- 2. Change the Boot Order
- 3. Repair the Boot Sector
- 4. Check the File System
- 5. Run the Automatic Repair
- 6. Do A fresh install of Windows
This guide will provide detailed step-by-step instructions for each method:
📖Extend Reading: Default Boot Device Missing or Boot Failed
1. Check the Hard Disk Connection
To fix the boot error, check the hard drive connection and ensure it is properly connected to your computer. Laptop shaking may cause the connected wires to loose, resulting in undetected boot disk errors. Please be careful when handling it to avoid damaging the hardware.
Step 1. Turn off the computer remove the battery, and remove the HDD from the computer.
Step 2. Clean all ports and cables and reconnect the HDD.
Note: If you do not have professional tools and practical knowledge, it is better to consult a computer person or engineer to help you.
![]()
2. Change the Boot Order
If the boot disk is not at the top of the boot order, the computer will try to boot from another source. This may also cause the problem of undetected disk errors if the computer cannot find valid boot information. For this case, you can change the computer’s boot order in the BIOS as follows:
Step 1. Turn on your computer and enter BIOS by holding F1/F2/F12/Del or another specified key.
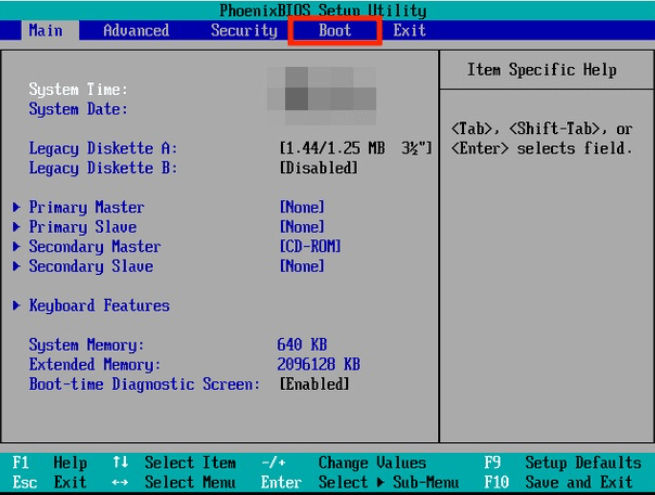
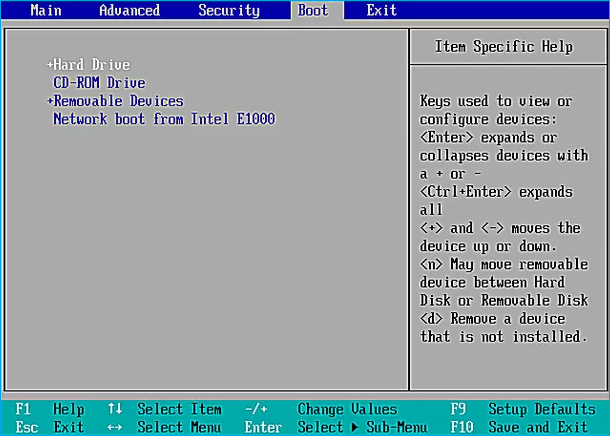
Step 2. Select the Boot option from the list of options.
Step 3. Find the computer’s boot order and use the arrows to move it up.
If this method is not working, please continue to try other fixes.
Also read: The System Cannot Find Any Bootable Devices
3. Repair the Boot Sector
The master boot record is located at the beginning of the bootable hard disk, and it helps your computer boot successfully. A corrupted MBR can also cause the system to fail to recognize the boot information and thus fail to boot your computer. Therefore, you must repair the boot sector. There are two ways that users can repair the boot sector:
Use EaseUS Partition Master to Rebuild MBR
EaseUS Partition Master is a versatile disk management tool. It simplifies the steps of the Windows built-in tool to help you quickly repair the MBR. Creating a WinPE bootable disk makes it possible to easily boot your computer without losing data. If you are not familiar with computer operations, this tool is perfect for you:
Free download this powerful tool and rebuild MBR:
Step 1. Create a WinPE bootable disk
- Launch EaseUS Partition Master, and click «Bootable Media» on the toolbar. Select «Create bootable media».
- Click «Next» to finish the process.

Step 2. Boot EaseUS Partition Master Bootable USB
- Connect the bootable USB or CD/DVD to your PC.
- Press F2 or Del when you restart the computer to enter the BIOS screen. Set and boot your computer from «Removable Devices» or «CD-ROM Drive». And then EaseUS Partition Master will run automatically.
Step 3. Rebuild MBR
- Click «Toolkit» and choose «Rebuild MBR».

- Select the disk and the type of MBR. Then, click «Rebuild».

- After that, you can see «MBR has been successfully rebuilt on Disk X».

If you meet other boot errors, you can use EaseUS Partition Master to fix them:
Use CMD to Rebuild MBR
If you are familiar with computer commands, you should use the Windows Media Creation Tool to create bootable media and then use the command prompt to repair the MBR in the Windows recovery environment:
Step 1. Boot your computer from the Windows bootable installation CD or DVD.
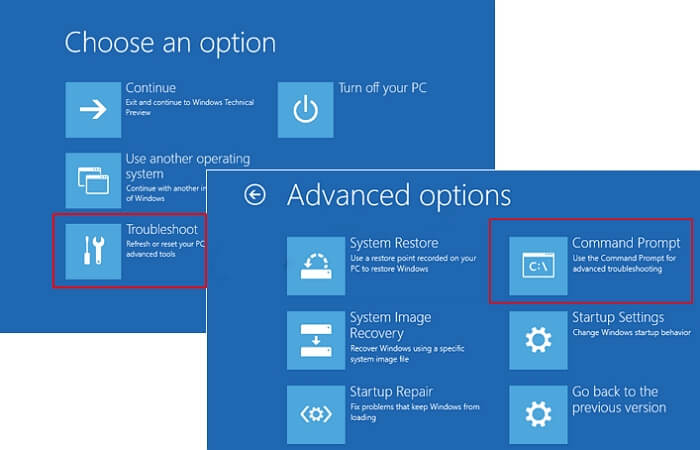
Step 2. Start the command prompt: select Troubleshoot in Choose an option and select Command prompt in Advanced options.
Step 3. Enter the following commands in sequence at the command prompt box and press enter:
- bootrec /fixmbr
- bootrec /fixboot
- bootrec /scanos
- bootrec /rebuildbcd
Please be careful when entering the commands to avoid data loss. You can then reboot your computer to see if the problem with the failed disk has been resolved.
4. Check the File System
If something is wrong with your system hard drive, you may also get a «the disk has failed» error. In this case, you have two ways to detect and fix the file system error on your hard disk. Both ways are based on the same principle as method 3, requiring you to have created bootable media. You can check the file system as follows:
Use EaseUS Partition Master to Check File System
EaseUS Partition Master provides «Check File System» and «Disk Surface Test» to help you find and fix hard disk errors. It is an alternative to Windows commands, but it is simpler and more comprehensive in solving problems. After you create bootable USB in Method 3, you can open your computer and use the tool directly:
Step 1. Right-click the target partition that has a problem.
Step 2. Choose «Advanced» > «Check File System».
Step 3. Confirm if you want to hide the partition or not.
Step 4. In the Check File System window, check the «Try to fix errors if found» option.
Step 5. Click «Start» to check errors on your partition.
In addition, the tool can check hard drive health comprehensively and alert you if there are problems with hard drive performance or temperature.
Run CHKDSK to Check File System
CHKDSK is a method Windows provides to detect and repair file system errors. Similar to method 3, you need to go to the command prompt:
Step 1. Start your computer from a Windows bootable device.
Step 2. Go to Advanced Options and select Command Prompt.
Step 3. Type the command: chkdsk c: /f/R/X and press Enter.

Extend reading: How to Run CHKDSK on SSD
5. Run the Automatic Repair
You can also run the Automatic Repair/Startup Repair on your system to fix the error that prevents your PC from booting. Before you start, you must also use EaseUS Partition Master or Windows installation media to enter the Windows recovery environment.
Step 1. Boot from the CD/DVD and press any key to continue.
Step 2. Click on Repair your computer and select Troubleshoot.
Step 3. Select Advanced options>Automatic/Start-up Repair.
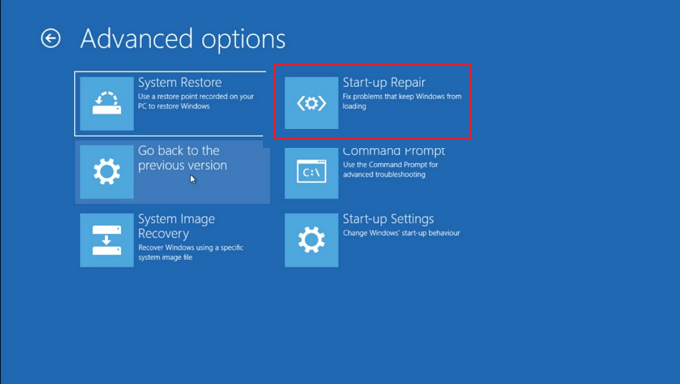
Step 4. Wait for Windows to finish repairing automatically.
6. Do A Fresh Install of Windows
If all solutions are not working, a Windows system may fail. You can fix the error by doing a fresh install of Windows. This method will erase all files, so you can back up important information or copy a partition to another drive before doing a fresh install.
Read more about installing Windows at: How to Clean Install Windows
You May Also Like:
Conclusion
Six solutions are provided to fix the boot error: «no boot disk has been detected, or the disk has failed» error. Whether using an HP laptop or another computer, you can find solutions to boot problems in this article. Among other things, EaseUS Partition Master provides a quick and easy solution to help you create bootable media and fix the most likely errors.
FAQs About No Boot Disk Has Been Detected
If you have more questions about this topic, you can check out the simple questions and answers below 1:
1. What should I do if no bootable device shows?
No bootable device is probably because you did not change the boot order. To fix the error, you should change the bootable device first:
Step 1. Restart your computer and enter the BIOS screen.
Step 2. Under the Boot tab, find the hard drive and move it to the top of the boot order.
2. What does no boot disk has been detected mean?
No boot disk has been detected means that your computer will not boot. This could be because your boot disk is corrupt or poorly connected to your computer, and the computer cannot access it to retrieve boot information.
3. Why does «media test failure, check cable» happen?
This error indicates that there is a problem with the PXE of the computer. Problems with your boot sequence configuration, corrupt boot devices, corrupt boot sectors, or power supply problems can all cause this error.