В этой статье будет описан порядок создания резервной копии (backup) сервера работающего под ОС Windows Server 2008 R2 штатными средствами и восстановление (restore) из полученного образа.
Все админы делятся на две категории: на тех, кто еще не делает бэкапы и тех, кто УЖЕ делает бэкапы
Backup
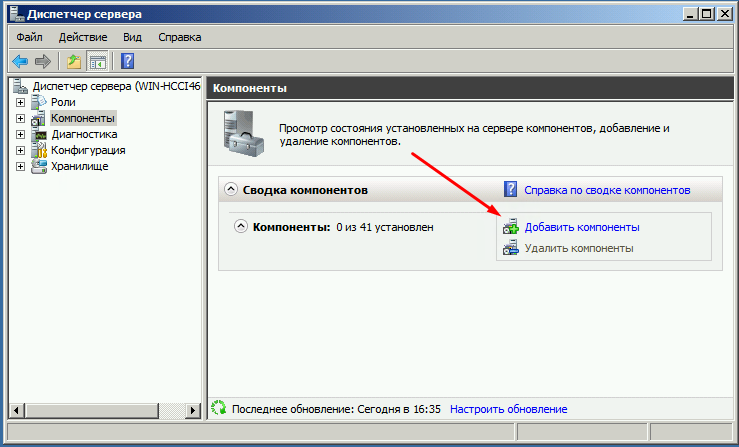
Для того что бы можно было создать образ нашего сервера сначала нужно установить компонент системы Система архивации данных Windows Server, для этого запускаем Диспетчер сервера, выбираем Компоненты, жмём Добавить компоненты
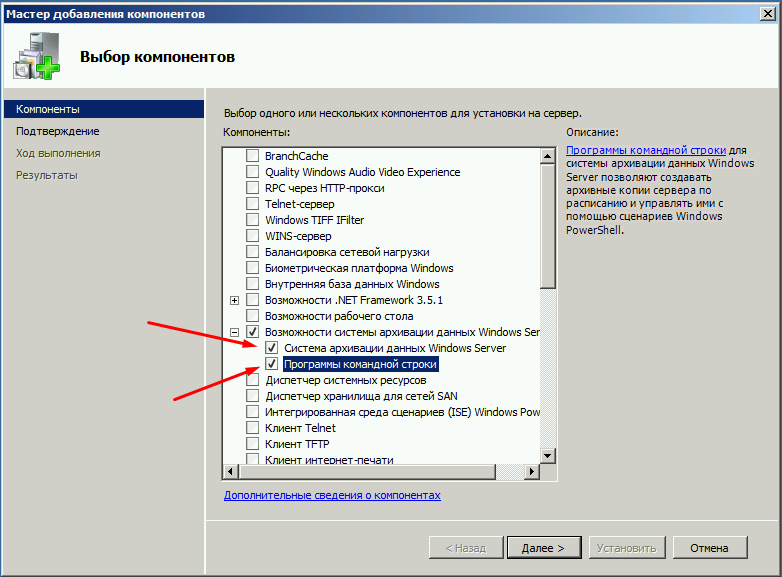
в появившемся окне ставим галочки напротив Система архивации данных Windows Server и Программы командной строки. Жмём далее, установить и дожидаемся окончания процесса установки.
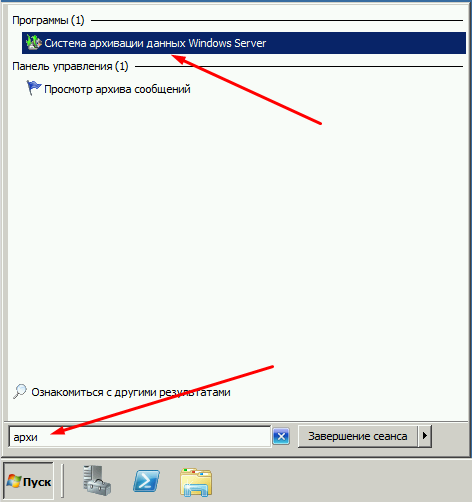
Теперь мы можем приступать к резервному копированию, для этого переходим в меню пуск и набираем в строке поиска «архив», затем выбираем Система архивации данных Windows Server.
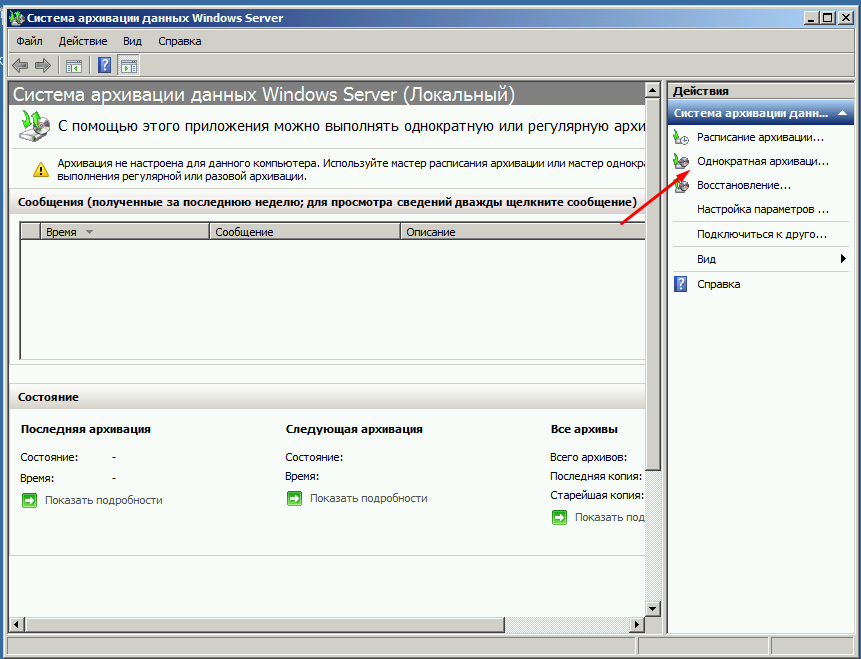
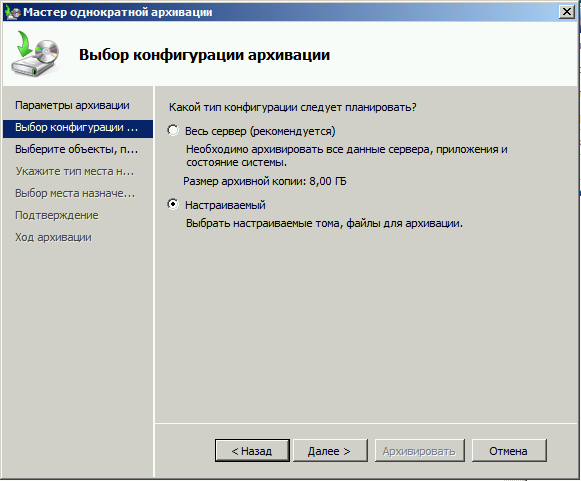
В этом окне собраны основные элементы управления системой архивации, в данном обзоре мы воспользуемся Однократной архивацией. В дальнейшем если у Вас есть например отдельный жёсткий диск для хранения образов, Вы можете создать расписание архивации.
Выбираем Настраиваемый, жмём далее
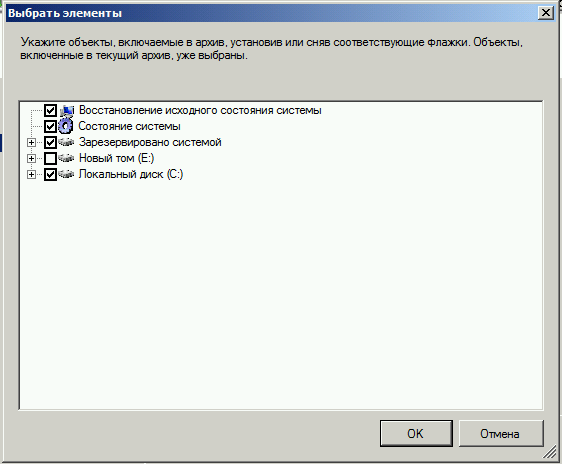
Жмём добавление элементов и ставим галочку Восстановление исходного состояния системы, возможно у Вас будут другие диски, которые не выберутся автоматически, но Вы хотите их включить в архив, можете смело ставить галку. Есть только одно но, нельзя ставить галку на том диске куда вы хотите сохранить архив.
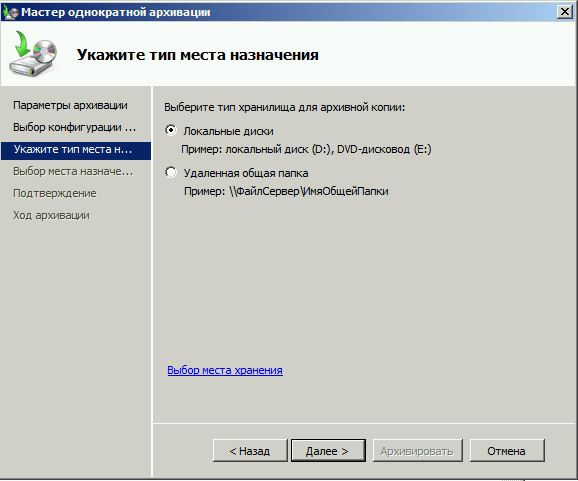
На следующем этапе необходимо выбрать куда мы будем сохранять данные, я буду сохранять на внешний USB диск, который у меня находится под буквой E: поэтому выбираю Локальные диски. Хотя система архивации позволяет сохранять образы системы так же по сети, в общую папку например.
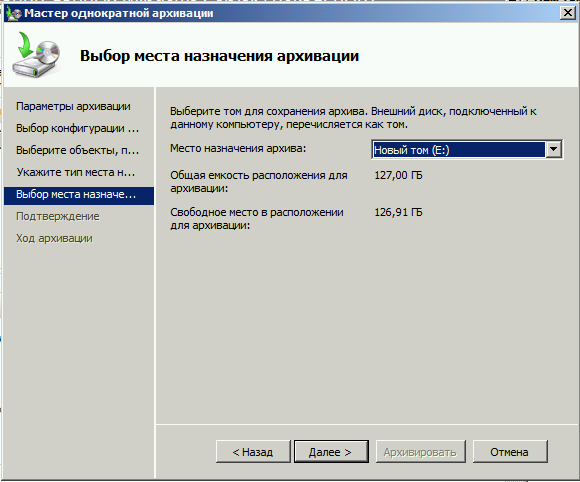
На следующем шаге система предлагает выбрать диск куда мы будем сохранять архив, в моём случае это E:
Жмём далее, затем Архивировать и ждём пока процесс архивации закончится.
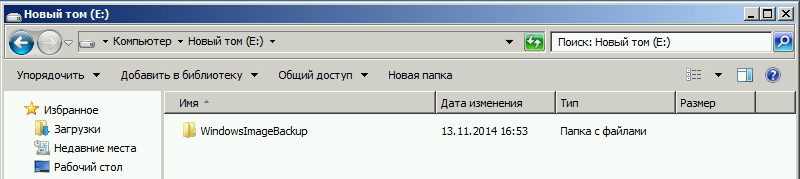
По завершению процесса архивации можем зайти на жёсткий диск и посмотреть, должна появится папка WindowsImageBackup.
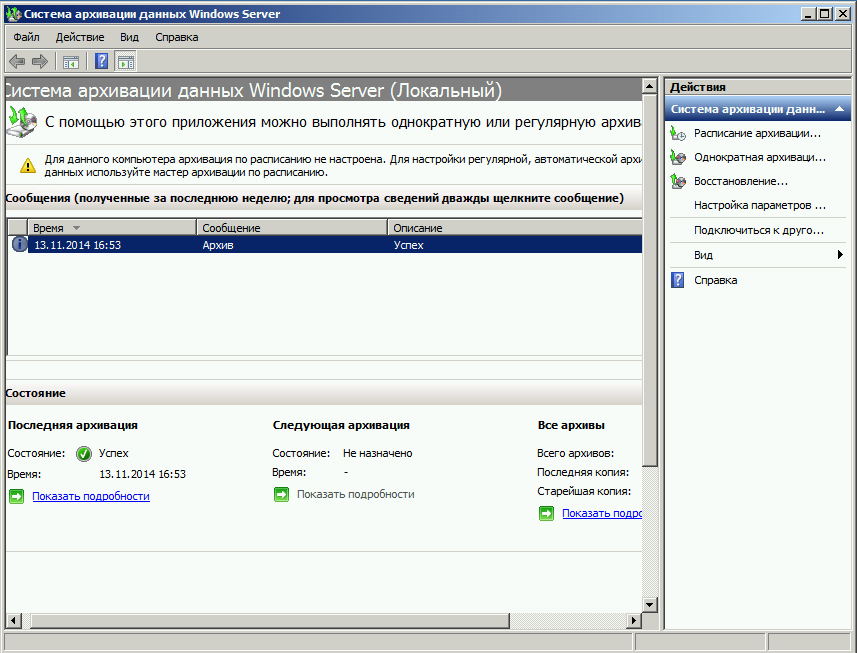
В окне Системы архивации в случае успешного завершения создания образа системы должна стоять отметка Успех. Дважды щёлкнув по строке мы можем увидеть подробности.
Restore
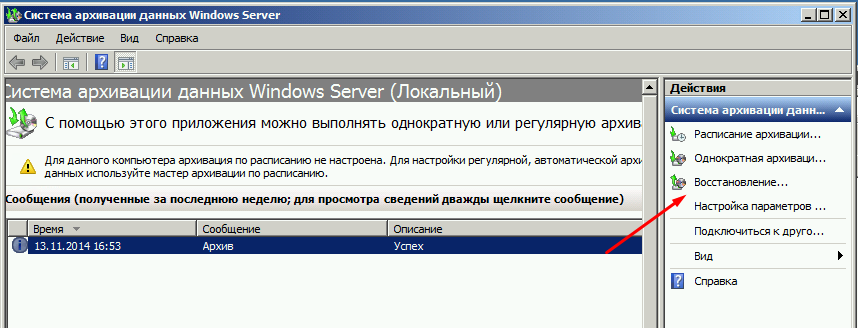
Для того что бы восстановится из этого образа есть два способа, первый из окна Системы архивации, подходит в том случае если наша система загружается. Для того что бы восстановится жмём кнопку Восстановление
Выбираем Этот сервер
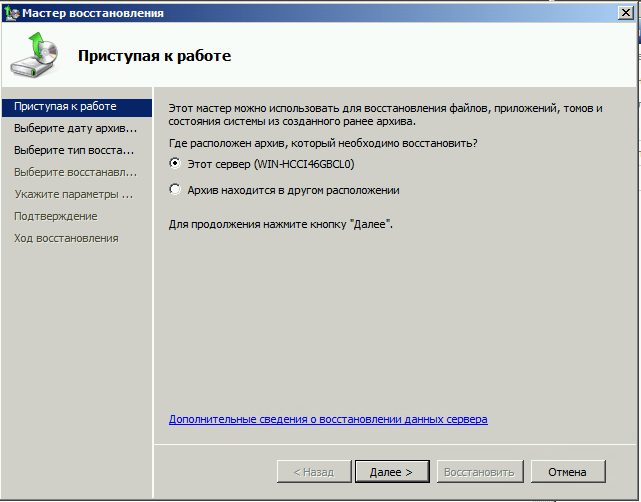
И выбираем дату, архива.
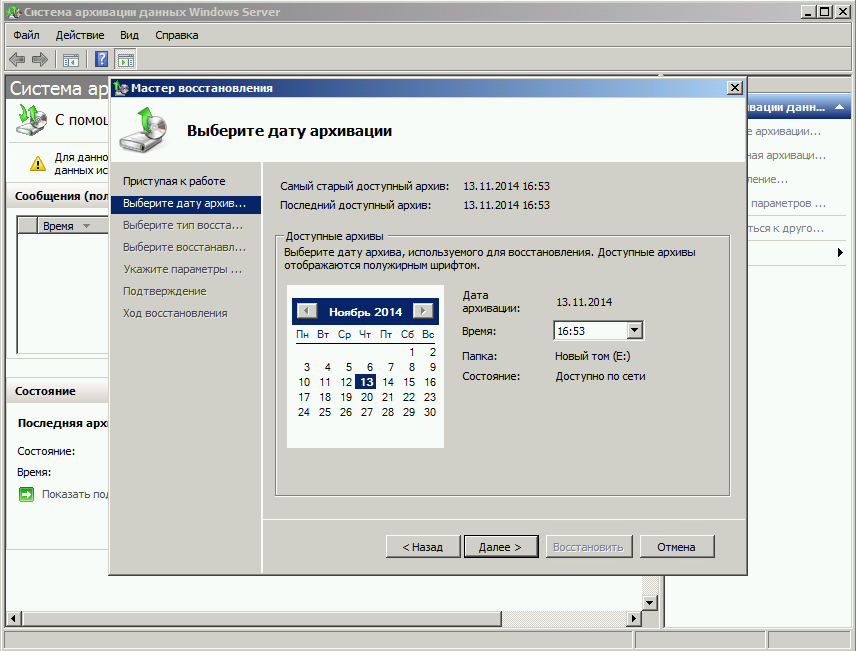
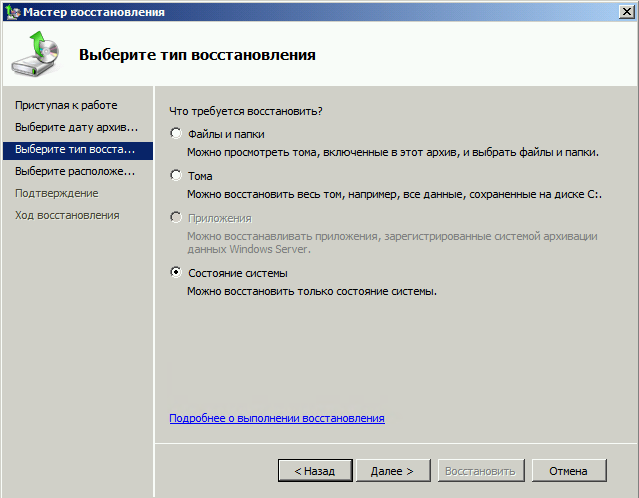
На следующем шаге мы можем выбрать нужные нам файлы и папки, или же выбрать восстановление состояния системы если хотим восстановить весь сервер.
И затем выбираем исходное размещение. И жмём кнопку восстановить.
Bare metal recovery
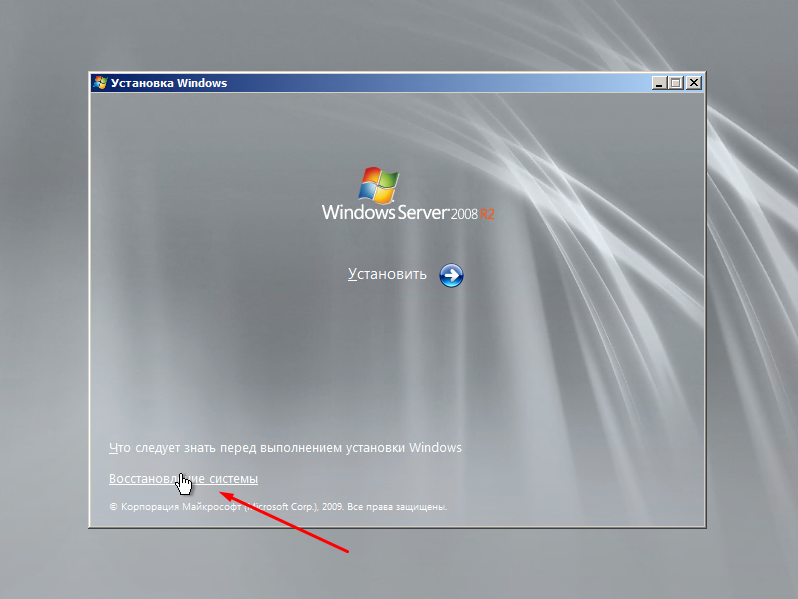
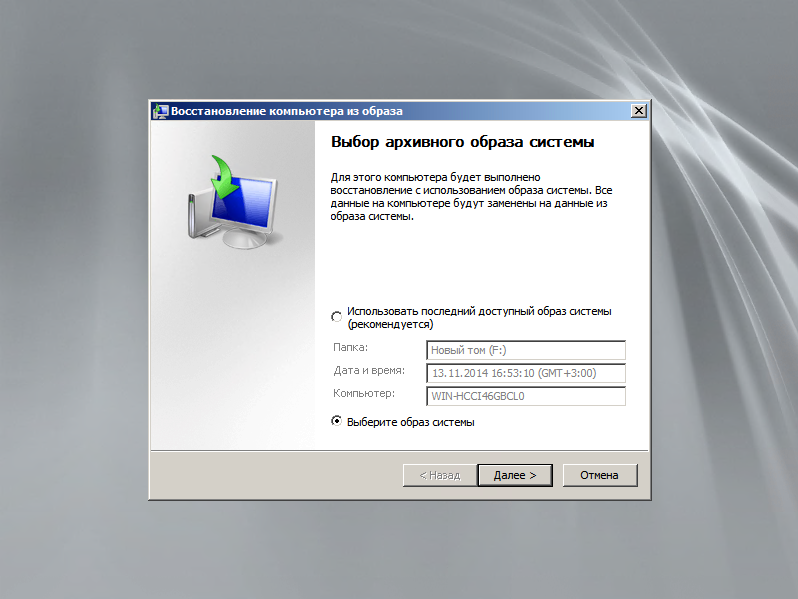
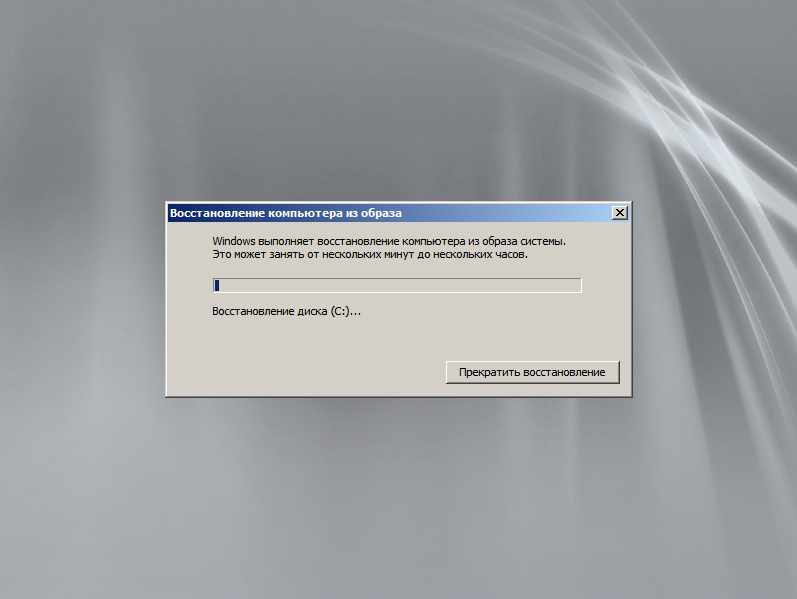
Так же, если наш сервер по какой-либо причине не загружается, или мы заменили его на новый мы можем воспользоваться установочным диском Windows Server для того чтобы восстановить состояние системы, для этого загружаемся с установочного диска и на втором экране установки выбираем восстановить
На следующем шаге выбираем Восстановление компьютера с помощью созданного ранее образа системы.
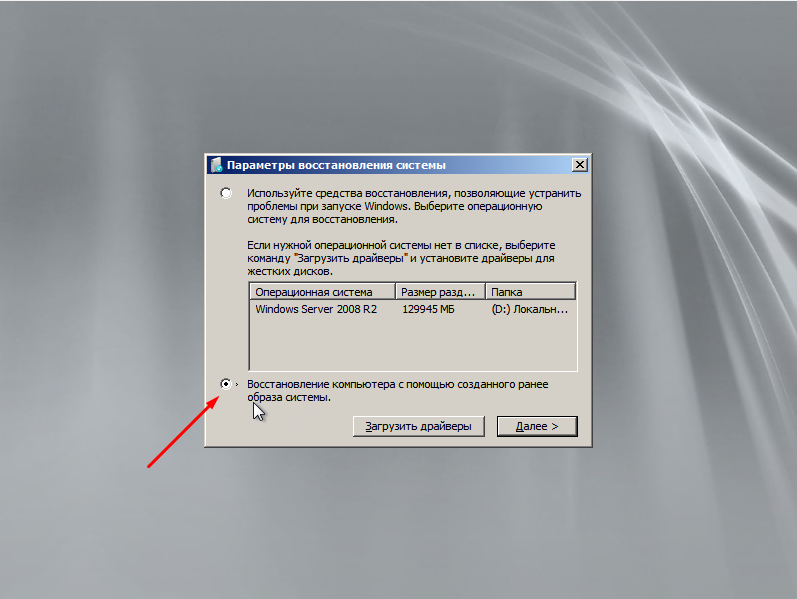
Далее нам предлагают либо использовать последний удачный, либо выбрать образ, попробуем выбрать.
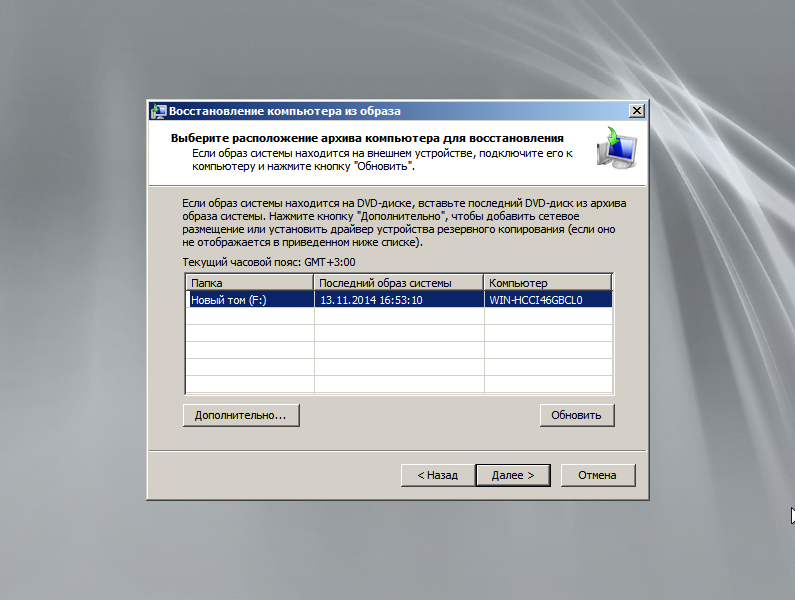
Система сама сканирует диски на наличие образа, есть возможность через кнопку дополнительно установить драйвер или выбрать сетевое расположение образа. Выбираем образ и жмём далее.
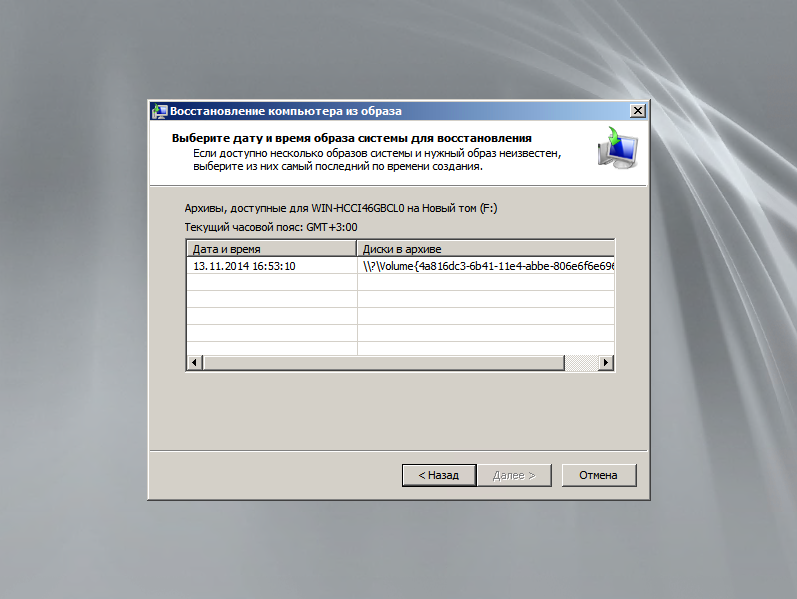
Выбираем нужный нам архив доступный в образе и так же, далее.
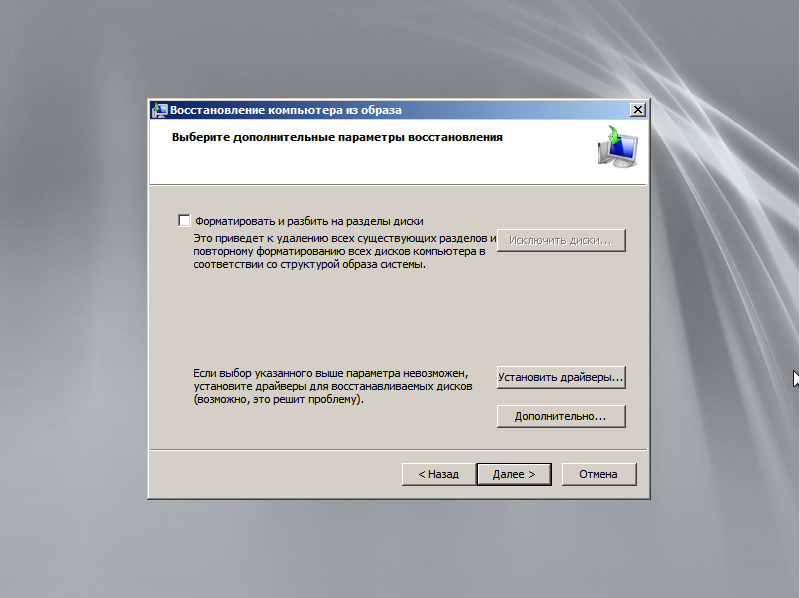
Если случилась такая неприятность и мы заменили диск, то стоит поставить галочку Форматировать и разбить на разделы диски. Если же установлен диск который разбит как надо то эту галочку можно не ставить. Затем жмём готово и ждём пока система восстановится.
Пожалуй на этом всё.
Как и прежде любые вопросы или пожелания можно оставлять в комментариях ниже, буду стараться по возможности ответить.
Solutions provider takeaway: This chapter excerpt provides information on Windows server backup in Windows Server 2008 R2. You will learn how to configure backup settings, back up specific files and perform system state and bare-metal backups.
Manage Backup and Recovery
Now that you have seen some of the tools for backups and recovery, it is time to put them to use. When you perform backups traditionally, you want to have the backups on a schedule so you are sure they are happening at regular intervals. This will make finding the right media for recovery easy. Even though Backup and Recovery are performed separately, they are joined together in form and function. The type of backup you perform will always dictate the recovery options available to you. In reality, the backup strategy is determined by your recovery requirements and what your service-level agreement is with your users and business. Is it OK if a user has to wait 24 hours to recover a file? What if the user is the CEO? Is it OK to turn off a server during work hours? What if the server is mission critical to your organization? These are all key questions, among many others, that you need to address when defining your policies and procedures and determining the best way to handle the needs of your organization.
Whether you choose to perform backup and recovery tasks with the GUI, command-line tool, or the PowerShell cmdlets, you are essentially performing the same task. In this section, you will learn how to use the backup and recovery tools to perform your daily tasks. Not that to perform either backup or recovery, you do need to be a member of the Backup Operators or Administrators groups.
Back Up Your Server
After you have determined your backup strategy, it is time to back up the server. When you back up your server, you want to make sure you schedule your backup times to not impact your network or your users. Try to schedule the backups after-hours, when the system is being used the least. You also want to make sure your backups complete in a timely manner; this is where knowing the difference between full and incremental backups can offer value to you and your organization.
Configure Backup Settings
Before you perform your backup, you may need to define your backup settings. You have only a few selections to make to configure your backup. Specifically, you need to determine whether you want to perform a full/normal backup, an incremental backup, or a custom combination of both of these methods. To configure your server, perform the following steps:
- Start Windows Server Backup by selecting Start ⇒ Administrative Tools ⇒ Windows Server Backup.
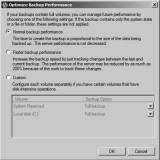
- In the right Actions task pane, click Configure Performance Settings; you will see a screen similar to Figure 8.7.
-
Figure 8.7: Backup performance settings

The three options listed determine how the backup will be performed. It is important for you to know the choices you make here will not be applied if you are backing up only system state.
- Normal Backup Performance is the default method for Windows Server Backup, and this method will perform a normal backup.
- Faster Backup Performance will perform an incremental backup for your system.
- Custom will allow you to choose a combination of the previous two options for your drives. For example, you could perform a full backup on your data volume but only an incremental backup on your system drive.
- Select the setting for your system, and click OK.
Back Up Your Server
After you have installed the backup tools, it is now just a matter of setting up the tasks to begin protecting your system. When you are ready to perform the backup and you know what files and folders you want to protect, you are ready to set up the backup test and schedule.
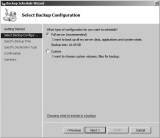
The first time you load the tool, you will see a message telling you no backup has been configured and you need to either set up a backup schedule or set up a backup once to begin protecting your system. Whether you choose to create a backup schedule or perform a backup once, the choices in the wizard are the same, with the exception of configuring the schedule:
- Start Windows Server Backup by selecting Start ⇒ Administrative Tools ⇒ Windows Server Backup.
- To launch the backup wizard, in the Actions pane on the right, select Backup Schedule to create a regular backup task, or select Backup Once if you just want to perform an immediate backup. For this set of tasks, you will see the Backup Schedule choice.
- Review the Getting Started screen, and click Next to see a screen similar to Figure 8.8.
-
Figure 8.8: Configuring the backup
- Select Full Server (Recommended), and click Next.
- Set your schedule; the default is once a day at 9 p.m. You can also configure multiple times a day to perform the backup. After you set your schedule, click Next.
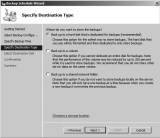
- On the Specify Destination Type screen, as shown in Figure 8.9, you’ll see two new choices in Windows Server 2008 R2; these allow you to store your backup to another volume and to a network share. These methods provide flexibility for your backup process that did not exist in prior versions of Windows servers. However, make sure you make note of the performance costs to your additional volume or network. You will have to decide what the right balance is for you and your organization. After you make your selection, click Next.
-
Note: The first time you run the backup wizard, you may be asked to format the destination drive. When you select the default choice of Backup To Hard Disk That Is Dedicated For Backups, it will reformat the selected disk before the backup process begins. Make sure you have saved any necessary data off the drive. The format of the drive has to be NTFS; also, make sure you have at least 1½ times the free drive space compared to what you are backing up.
Figure 8.9 : Backup destinations
- On the Select Destination Disk page, select where you want to store your backups. For a scheduled backup, this can be another hard drive or a network share. It cannot be an optical drive or removable media. However, you can use optical drives or removable media for backup-once backups, and these media choices provide a great choice for bare-metal backups. After you make your selection, click Next.
- If you are presented with a warning to format the disk and you are positive you want to use the selected disk, click Yes. Otherwise, click No, and select another drive to store your backup.
- Review the Confirmation screen, and click Finish to create the scheduled task for backup and format the volume (if this is your first time using Windows Server Backup). If you chose Backup Once, you will click Backup to immediately perform the backup.
- Review your Summary screen, and click Close.
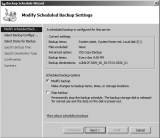
Note: After you have run the backup wizard the first time, the next time you run it you will see a screen similar to Figure 8.10. This allows you to modify the existing backup or stop the backup process. You can still configure the backup once if you need to create new backups for different files or needs, like bare-metal recovery.
Figure 8.10: Modifying the existing backup schedule
Back Up Specific Files
In Windows Server Backup in Windows Server 2008, you had to back up the entire volume. In Windows Server 2008 R2, you now can include or exclude folders or individual files. You can also exclude files based on the file types with filters. For this purpose, you will see how to modify an existing backup schedule.
- Start Windows Server Backup by selecting Start ⇒ Administrative Tools ⇒ Windows Server Backup.
- To launch the backup wizard, in the Actions pane on the right, select Backup Schedule.
- On the Modify Backup Schedules screen, verify that Modify Backup is selected, and click Next.
- Select Custom, and click Next.
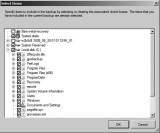
- On the Select Items For Backup screen, you will see what you are currently backing up. If want to add or remove from the backup, click Add Items, and you will see a screen similar to Figure 8.11.
-
Figure 8.11: Backup item selection
- Select the items you want to add to or remove from the backup by selecting or deselecting the check boxes next to the items. If you want to select specific folders, click the + sign next to your listed hard drives to expand the directory tree and then make your folder selections. When you are done selecting items to back up, click OK.
- If you want to exclude certain files from your backup, such as temporary files (*.tmp) or music files (.wmv, .mp3, and so on), click the Advanced Settings button.
- Click Add Exclusion to select the drive or folders you want to apply your exclusions.
- Select the drive you want to use. Typically you will want your full volumes to have the exclusion applied. However, you can select individual folders or files to exclude directly. When you’re done selecting your locations, click OK.
- To exclude certain files, click in the File Type column, and type in your exclusion. You can also specify whether you want apply the filter to the subfolders. For example, if you wanted to exclude .tmp files from your backup, type *.tmp. Your screen would look similar to Figure 8.12.
-
Figure 8.12: Backup exclusions
If you want to add more exclusions, click Add Exclusion, and repeat the process. Likewise, if you want to remove the exclusion, you can select it and click Remove Exclusion.
- When you are finished creating exclusions, click OK to proceed through the rest of the wizard.
- Set or modify your schedule, and click Next.
- Select your destination type, and click Next.
- Select the destination disk, and click Next.
- If you are presented with a warning to format the disk and you are positive you want to use the selected disk, click Yes. Otherwise, click No, and select another drive to store your backup.
- Review the Confirmation screen, and click Finish to create the scheduled task for backup and format the volume (if this is your first time using Windows Server Backup). If you chose Backup Once, you will click Backup to immediately perform the backup.
- Review your Summary screen, and click Close.

Perform a System State Backup
When you back up the system state, you are backing up a majority of the system configuration information. In Windows Server 2008 R2, you can perform the system state backup inside the Windows Server Backup Tool, and you do not have to solely use wbadmin.exe. Also, if you have installed additional roles on the Windows Server 2008 R2 server, your system state will contain more data. By default, on a server with no additional roles, the system state backup always contains the following components:
- Registry
- COM+ class registration database
- Boot files, including system files
- System files under Windows File Protection
If the system is a domain controller in addition to the default system state data, system state will contain the following:
- Active Directory service
- SYSVOL directory
|
|||
If you have installed clustering on the server, the system state data will contain the clustering services information.
If you have installed a certificate services server, the system state data will contain the certificate services database.
If you have installed IIS, the system state data will contain the IIS metadirectory.
- Start Windows Server Backup by selecting Start ⇒ Administrative Tools ⇒ Windows Server Backup.
- To launch the backup wizard, in the Actions pane on the right, select Backup Schedule to create a regular backup task, or select Backup Once if you just want to perform an immediate backup. For this set of tasks, you will see the Backup Schedule choice.
- Review the Getting Started screen, and click Next.
- Select Custom, and click Next.
- On the Select Items For Backup screen, click Add Items.
- Click System State, click OK, and then click Next.
- If presented with a scheduling window, set or modify your schedule, and click Next.
- Select your destination type, and click Next.
- Select the destination disk, and click Next.
- If you are presented with a warning to format the disk and you are positive you want to use the selected disk, click Yes. Otherwise, click No, and select another drive to store your backup.
- Review the Confirmation screen, and click Finish to create the scheduled task for backup and format the volume (if this is your first time using Windows Server Backup). If you chose Backup Once, you will click Backup to immediately perform the backup.
- Review your Summary screen, and click Close.
Perform a Bare-Metal Backup
Another backup option that will provide you with a great option in case of a catastrophic failure is a bare-metal backup. The bare-metal backup will back up your system state, your system volume, and the system reserved data. This backup set is also unique in that you will need the Windows Server 2008 R2 installation media available during recovery.
This is a good time to use a USB drive or another portable media to store this backup. The main reason is because to perform the restore, you need to boot the system into the Windows Recovery Environment using a Windows Server 2008 R2 installation DVD.
- Start Windows Server Backup by selecting Start ⇒ Administrative Tools ⇒ Windows Server Backup.
- To launch the backup wizard, in the Actions pane on the right, select Backup Schedule to create a regular backup task, or select Backup Once if you just want to perform an immediate backup. For this set of tasks, you will see the Backup Schedule choice.
- Review the Getting Started screen, and click Next.
- Select Custom, and click Next.
- On the Select Items For Backup step, click Add Items.
- Click Bare Metal Recovery, and click OK; then click Next.
- If presented with a scheduling window, set or modify your schedule, and click Next.
- Select your destination type, and click Next.
- Select the destination disk, and click Next.
- If you are presented with a warning to format the disk and you are positive you want to use the selected disk, click Yes. Otherwise, click No, and select another drive to store your backup.
- Review the Confirmation screen, and click Finish to create the scheduled task for backup and format the volume (if this is your first time using Windows Server Backup). If you chose Backup Once, you will click Backup to immediately perform the backup.
- Review your Summary screen, and click Close.
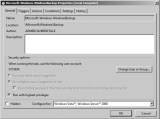
Look at the Scheduled Tasks
Whenever you create a backup schedule, you may be wondering where the task is stored. The task is stored in the Task Scheduler tool, and you can view your backup tasks there. You can also run the task directly from the Task Scheduler. The tasks in the Task Scheduler have several properties you can modify, as shown in Table 8.2.
Table 8.2: Task Property Tabs
|
Property Tab |
Definition |
| General | Contains the description, author, and what account will be used to run the command. |
| Triggers | Determines when the task will be performed. In the case of a backup, the trigger is date and time. |
| Actions | Determines what programs or commands will be run. |
| Conditions | Specifies additional options, combined with the triggers, that determine whether the task should run. |
| Settings | Controls additional behaviors of the task. An important setting here is Allow Task To Be Run On Demand. If you want to be able to run your tasks directly from the Task Scheduler, you have to select this setting to turn it on. |
| History | Shows the past history of the task when it was run. |
Property Tab Definition
- Click Start ⇒ Administrative Tools ⇒ Task Scheduler.
- Expand the tree to view the backup tasks. Click the + to expand Task Scheduler Library ⇒ Microsoft ⇒ Windows, and then click Backup.
- Double-click the task to view the properties of the backup task, and you will see a screen similar to Figure 8.13.
Figure 8.13: Backup task
You can also view the status of your backups and get more details on the main console page of the Windows Server Backup window, as shown in Figure 8.14.
Figure 8.14: Windows Server Backup
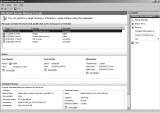
From the main console window, you can view the details, status, and next schedule for your backups and recovery processes. The Windows Server Backup Tool will show all the events with your backups and restores in this main console window.
![]()
![]() Backing Up and Recovering Your Server
Backing Up and Recovering Your Server
![]() Windows server backup in Windows Server 2008 R2
Windows server backup in Windows Server 2008 R2
![]() Bare-metal, system state recovery in Windows Server 2008 R2
Bare-metal, system state recovery in Windows Server 2008 R2
Printed with permission from Wiley Publishing Inc. Copyright 2010. Microsoft Windows Server 2008 R2 Administration Instant Reference by Matthew Hester and Chris Henley. For more information about this title and other similar books, please visit Wiley Publishing Inc.
Dig Deeper on MSP business strategy
-
How to configure shadow copies on file servers
By: Damon Garn
-
How to avoid common GPO backup and restore problems
By: Mike Kanakos
-
How to use file server reporting in FSRM
By: Damon Garn
-
How to implement file classification in file servers
By: Damon Garn


In-Depth
Backup Basics in Windows Server 2008 R2
A free tool from Microsoft can make backing up data in Windows Server 2008 R2 efficient and almost hassle-free. Here’s how to use it effectively.
Back in the day, Microsoft’s free backup tool was the now venerable NTBackup. However, that utility has gone to the great recycle bin in the sky.
Windows Server 2008 offers a new set of backup tools, and I want to show you how easy it is to use them with the new Windows Server 2008 R2. Be aware that the new backup feature can’t manage backups created with NTBackup.
Installation
First off, we need to install the backup feature, as it’s not installed by default. Use the Add Features wizard in Server Manager and add the Windows Server Backup Features (Figure 1). I’m going to use the command-line tools sub-feature so that I can use Windows PowerShell, which I will explain in more detail later in this article.
You can also use command-line tools, including ServerManagerCMD.exe, to install the feature:
C:\ servermanagercmd -install backup-features
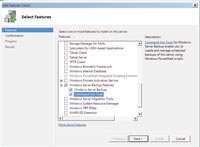 [Click on image for larger view.] |
| Figure 1. The backup feature is not installed by default, so you must install it using the Add Features Wizard. |
The next step is to identify locations for your backups. You can back up files to a network share, a local volume or a dedicated disk. You can’t back up data to tape, but given the growth and widespread availability of inexpensive USB-attached storage, this isn’t that much of a setback these days.
Creating a Backup Job
Windows Backup is intended to provide a one-stop setup to protect a server. You can enable a scheduled task to back up files and the system state, or to provide for a bare-metal restore. Microsoft assumes you’ll have one scheduled task for this purpose. I’m assuming that you’re using the Windows Backup feature because of limited budget and are after maximum protection given the utility’s constraints.
After you install the Windows Backup feature, expand the Storage node in Server Manager and select Windows Server Backup. In the Actions pane, select «Backup Schedule,» which will start the Backup Schedule Wizard. Then, click Next on the Getting Started screen.
During step two, specify what type of backup you want. Try doing a complete server backup. You can also create a custom backup and pick items such as selected files and system state. I’ll show you how to do a quick file backup later, but for now I’m assuming you want complete server protection.
In the third step, specify when you want the backup task to run. Most of the time, a single backup should be sufficient, but you can run it more than once a day. If you’re backing up critical files, this might be a good choice.
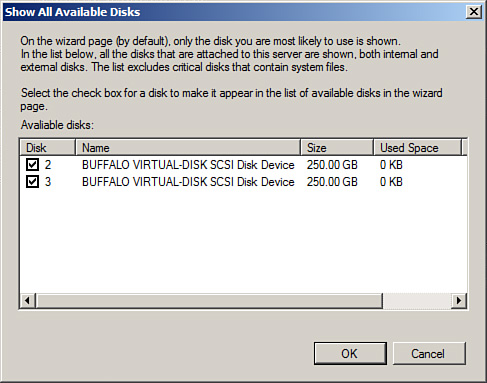
In step four, determine where to store the backup. Microsoft recommends using a dedicated hard disk. Remember, this drive will be reformatted and unavailable for anything else. You can also use a volume or a network share. Pay close attention to the warnings and limitations. You might see a warning reminding you that the disk will be reformatted. If you don’t see all the disks, click the Show All Available Disks button to refresh. When you select a new disk, you’ll be warned.
Once selected, you’ll have a chance to confirm your backup settings. If anything is incorrect, use the Previous button to go back and correct the error. If all goes well, you should get a summary screen. The next day, you can check the Windows Server Backup node for results or errors.
You can also use Windows Backup to run a one-time backup. Select the Backup Once option in the Actions pane. You can use the same settings as your scheduled job or pick something completely different. If you select the latter, the wizard runs again and you can enter new parameters. For example, you might want to copy files to a network share. Remember, any existing backups to the same folder will be overwritten. The backup will execute immediately. If this is a separate backup task you’d like to do often, then you’ll want to take advantage of a scripted solution from the command line or Windows PowerShell. I’ll cover that procedure later.
Restoring Data
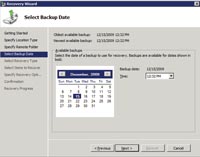
Windows Backup uses a time stamp as version information. Using the Recover task launches a wizard that’s easy to follow. Select the appropriate backup source. The Recovery Wizard will display a datetime control of all available backups (see Figure 2). Select the appropriate one. Depending on the type of backup, you may only have once choice.
 [Click on image for larger view.] |
| Figure 2. Data recovery is easy with the Recovery Wizard. |
Moving on, select what type of data you want to recover. If you select Files and Folders, you’ll be able to highlight the files you want to recover. Unfortunately, selecting files from multiple directories is next to impossible. You can easily recover everything or recover selected files from one directory. Keep that in mind when you set up the backup job.
When you recover files, you’ll need to specify the target folder, which can be the original folder or an alternate location. You can also control what happens when you restore a current file if a current version exists. You can create a copy so that you have both versions; you can overwrite the existing version; or you can skip restoring if an existing version is detected. The recovery process happens immediately.
Using WBADMIN.EXE
If you installed the command backup tools, then you have a few more options. Open a command prompt and look at help for WBADMIN.EXE. You can use the tool to set up a scheduled backup, but I think the GUI is much easier. I find this tool more useful for creating one-time backup jobs. Run the following command to see syntax help:
C:\> wbadmin start backup /?
I don’t have space to cover all the options, but let me demonstrate how you might use the command-line tool to periodically back up files to a network share:
@echo off
::Demo-Backup.bat
::demonstration script using WBADMIN.EXE on a
Windows Server 2008 R2 Server

rem backup share UNC
set backupshare=\\mycompany-dc01\backup

rem files and folders to include
set include=c:\scripts,c:\files

rem define date time variables for building
the folder name
set m=%date:~4,2%
set d=%date:~7,2%
set y=%date:~10,4%
set h=%time:~0,2%
set min=%time:~3,2%
set sec=%time:~6,2%

rem defining a new folder like \\mycompany-dc01\
backup\RESEARCHDC\12152009_132532
set newfolder=%backupshare%\%computername%\
%m%%d%%y%_%h%%min%%sec%
echo Creating %newfolder%

mkdir %newfolder%

rem run the backup
echo Backing up %include% to %newfolder%
wbadmin start backup -backuptarget:%newfolder%
-include:%include% -quiet
rem Clear variables
set backupshare=
set include=
set m=
set d=
set y=
set h=
set min=
set sec=
set newfolder=
I don’t want to overwrite any existing backups, so I’ll create a new folder that uses the computer name and a datetime stamp as part of the file name. The batch file has code to handle that task. The main function of the script is to call WBADMIN.EXE to create a backup on the specified share. Look at syntax help if you want to tweak this step. I like this script because I can set up my own scheduled task using the Task Scheduler. So, even though the backup wizard only lets me create one scheduled task, I can create as many as I want using WBADMIN.EXE. I can also use this tool to create system state backups, as well.
To see what backup jobs have executed, run this command:
C:\> wbadmin get versions
Pay attention to the version identifier; you’ll need it to recover files using WBADMIN (you can also use the Recovery Wizard).
Backing up with PowerShell
The other command-line approach is to use Windows Backup PowerShell cmdlets. To access them, you’ll first need to load the Windows backup snap-in:
PS C:\> add-pssnapin Windows.ServerBackup
To see which cmdlets are included, use Get-Command:
PS C:\> get-command -pssnapin windows.server
backup
Unfortunately, creating a backup job is a multistep process. While you can type the necessary commands at the prompt interactively, I think you’ll find it easier with a scripted approach. Here’s a PowerShell version of my original batch file:
#requires -version 2.0
#requires -pssnapin Windows.ServerBackup

#Demo-WBBackup.ps1

$policy = New-WBPolicy
$files=new-WBFileSpec c:\scripts,c:\files
Add-wbFileSpec -policy $policy -filespec $files
$backdir=("\\mycompany-dc01\backup\{0}\{1:MMd
dyyyy_hhmmss}" -f $env:computername,(get-date))

write-host "Creating $backdir" -foregroundcolor Green
mkdir $backdir | out-null

$backupLocation = New-WBBackupTarget -network
$backdir

Add-WBBackupTarget -Policy $policy -Target
$backupLocation

write-host "Backing up $files to $backdir" -fore
groundcolor Green
$policy
Start-WBBackup -Policy $policy
The PowerShell cmdlets are based around creating and executing a policy. The policy includes the files or volumes to include or exclude, as well as where to back up the files and a few assorted options. You can also create system-state and bare-metal recovery jobs. In my demonstration, I’m simply backing up a few directories. The Start-WBBackup cmdlet carries out the backup task.
When you look at the list of Windows Backup cmdlets, you’ll notice one glaring omission. There are no cmdlets for restoring data. I imagine the assumption is that you wouldn’t want to automate this step, although you can with WBADMIN.EXE. Perhaps cmdlets will be added in the future. In the meantime, you can use the Recovery Wizard or WBADMIN.EXE to restore files.
Your Turn
As you try your hand at these tools, I’m sure you’ll realize there’s a great deal more that Windows Backup brings to the party. As with any backup software, make sure you practice the restore process in a non-production setting. You don’t want to learn the process when you have to recover for real and your boss is breathing down your neck. Become familiar with the process so that when the time comes, you end up being the hero.
About the Author
Jeffery Hicks is an IT veteran with over 25 years of experience, much of it spent as an IT infrastructure consultant specializing in Microsoft server technologies with an emphasis in automation and efficiency. He is a multi-year recipient of the Microsoft MVP Award in Windows PowerShell. He works today as an independent author, trainer and consultant. Jeff has written for numerous online sites and print publications, is a contributing editor at Petri.com, and a frequent speaker at technology conferences and user groups.
Windows Server Backup Overview
Windows Server 2008 R2
contains a built-in powerful backup program appropriately named Windows
Server Backup. Windows Server Backup is installed as a system feature
and it allows administrators to back up and restore system, file,
folder, and application data for Windows Server 2008 R2 systems.
Windows Server Backup
includes a graphical user interface (GUI) MMC snap-in, as well as a very
functional command-line utility. Windows Server Backup includes a few
new functions but also has new restrictions. Windows Server Backup
replaces the previous version of backup included with Windows Server
2003 and earlier Windows operating systems, known as Ntbackup, but the
features and functions are much different.
Backup Storage Support and Media Management
Windows Server
Backup allows administrators to back up to locally attached disks,
network shares, and DVD writable media. Tape devices are not supported
by Windows Server Backup, and to back up to DVD media, the system
requires a local writable DVD drive.
Using
Ntbackup.exe in previous versions of Windows Server editions, media
management was one of the biggest challenges administrators faced. Tape
media needed to be prelabeled if any logical media management was
required for backups. Also, if disk-based file backups were used, the
file could end up filling up the server disk if the media was configured
to append instead of overwrite when new backups were performed. The
other option for backup media was to overwrite the media when a backup
was run, but that also relabeled the media and any stickers on the tape
would no longer match. Media management was possible, but just very
tedious.
Windows Server Backup
greatly improves media management by taking full control of the media,
including labeling, efficiently storing data, cataloging the backup
media, and managing the free disk space. Performing backups using remote
server shares or local volumes as backup destinations has the risk of
filling up the destination volume. When local disks are dedicated for
Windows Server Backup and the utilized disk space is nearing capacity,
the backup system will overwrite the oldest backup data on the disk to
keep the disk from filling and to keep the backup job from failing.
External Disks
Windows Server Backup
supports backup data to be stored on locally attached disks and writable
DVD media located in local writable DVD drives. Locally attached disks
include internal disk drives, hot-swappable disk drives, and drives
externally connected via USB 2.0 or IEEE 1394 interfaces. Also,
SAN-attached disks can be used as backup destinations. Storing backups
on SAN storage enables faster rotation or replication of backup disks
volumes to other SAN storage without impacting Windows system
performance.
CD/DVD Writer Drives
Windows Server 2008 R2
contains many features that can take advantage of DVD writer drives.
These include the Windows Server Backup feature to capture backups to
DVD and Windows Deployment Services, which can be used to create boot,
capture, and discover images on DVD media. With regard to Windows Server
Backup, a manual backup can be created to contain a volume or entire
system backup, and might span multiple DVDs. This can be a valuable
option as data from remote servers can be synchronized across the
network using Distributed File System Replication, but creating a full
system backup across a WAN link usually is not an option. Branch office
administrators can be tasked with creating full system DVD backups
monthly, quarterly, or more frequently to provide full system recovery
options, and the media can easily be copied, archived, and shipped to
offsite storage locations or to a central office.
Remote Shared Folder and Folder on Local Volume
Shares on remote servers or
folders on local volumes can be designated as backup targets for manual
and scheduled backup jobs. Designating a remote shared folder allows an
administrator to create a backup not stored on media physically mounted
in the system, and
also allows for the backup of multiple servers to be stored on a
central server. Choosing to back up using a folder on a local volume
removes the restriction of having to dedicate an entire volume for
backup usage. There are two very important catches to be aware of when
using remote shared folders and folders on local volumes:
-
When using a remote
shared folder, only one copy of the backup can be stored within the
folder, and each backup will perform a full overwrite backup. -
When
a folder on a local volume is selected as a backup destination, the
performance of that volume will be severely impacted during backup,
which could cause poor system performance if any user data is stored and
accessed on the same volume.
Tape Devices
Tape devices are not
supported in Windows Server Backup. Administrators who want to back up
data to tape will require Microsoft System Center Data Protection
Manager or third-party backup applications, or they will be forced to
create manual backups to disk and then copy the data to tape drives.
Backup Media Files
In the previous backup application, Ntbackup.exe, backup data stored on disks was stored in a single file with a .bkf extension. This file contained the data as well as the catalog and could easily be moved and mounted in an Ntbackup.exe
console on any server on the network. Windows Server Backup stores
system backup data in a folder named WindowsImageBackup. Beneath this
folder is subfolder named after the server that was backed up. Included
in the server folder is a set of Extensible Markup Language (XML) files
that detail the backup history, catalog, and system configuration
details of the media. Also included in the server folder are one or more
virtual hard disk (VHD) files. The VHD files are close to exact
duplicates of the backed-up server volumes.
The VHD file can quickly be
added and viewed in a virtual machine, so protecting the backup folders
is critical to server security.
Note
Windows Server Backup does not
encrypt the backup data stored on DVDs or disks. Administrators should
take all precautions to ensure that any disks, DVD media, or remote
server shares that store backup data are secured with NTFS permissions
on remote shares and physically secure on disks and DVDs.
Backup Options
Windows Server 2008 R2 has
made creating and managing backups simple within the Windows Server
Backup interfaces. Using the GUI-based console, the Wbadmin command-line
utility, or through PowerShell cmdlets, backups can be run to protect
disk volumes, full systems, the System State only, or set to back up
just individual files and folders. In addition, specific files and
folders can be excluded from a backup.
Manual Backup Options
Windows
Server Backup allows for backups to be created on a recurring schedule
or manually using the Backup Once option available in the Windows Server
Backup console. Manual backups can be stored on local disks, burned to
DVD media, or stored on remote shares. Manual backups on remote shares
can be used for complete PC restore operations if the system to be
recovered can access the network location during the restore operation.
Scheduled Backup Options
Scheduled backup
operations allow administrators to create a backup schedule that adds
backup automation to a Windows Server 2008 R2 system. Scheduled backups
can be configured to run once a day or multiple times per day to provide
the required level of recoverability.
Windows Server Backup MMC Snap-In
The Windows Server Backup feature includes a Microsoft Management Console snap-in. The file is named wbadmin.msc
and is available from the Administrative Tools menu. Most
backup-related tasks can be performed using this console, including
creating backups, reviewing backup history, and restoring data.
The Windows Server Backup
snap-in can be used to connect and manage backups on remote Windows
Server 2008 R2 systems with the Windows Server Backup feature installed.
Windows Backup Command-Line Utility
All editions of Windows Server
2008 R2 include the option of installing the Windows Server Backup
feature’s command-line tools. The primarily utility included is wbadmin.exe,
which provides more granular control of backup- and recovery-related
tasks. As more and more administration of Windows systems moves back
into the shell or command prompt environment, this utility will provide
administrators with the functions they require to manage backups within
this environment. Wbadmin provides the ability for administrators to
start backups and recoveries of systems, get information, and configure
new backup storage and schedule backup policies.
Windows Server Backup PowerShell Cmdlets
Windows Server 2008 R2
includes several PowerShell cmdlets for managing Windows Server Backup.
The PowerShell cmdlets are installed with the Windows Server Backup
feature command-line tools option. Unlike wbadmin.exe,
PowerShell cmdlets for Windows Server Backup provide much more
flexibility when managing remote systems. Most command-line executable
files are being removed and replaced with PowerShell cmdlets, and
administrators should consider this when creating and documenting backup
and recovery tasks. One function that is not included in the current
set of cmdlets is the ability to perform data recovery. This still needs
to be performed using the MMC snap-in or the wbadmin.exe
command-line utility.
Using Windows Server Backup
When
an organization decides to use Windows Server Backup, the type of
backup and the storage media for the backups must be determined. For
example, if scheduled backups will be used, an organization will need to
determine the correct storage destination for their Windows Server 2008
R2 backups as each destination has its own set of requirements and
implications that should be understood and considered.
Installing Windows Server Backup
Although the Windows
Server Backup console is listed in Administrative Tools, the Windows
Server Backup feature still needs to be installed. The easiest way to
install the Windows Backup tools is to use the Add Features function
within Server Manager. Of course, for Server Core deployments,
installing using PowerShell is preferred.
Installing Windows Server Backup Using Server Manager
On every edition of Windows
Server 2008 R2, except for Server Core installations, the Windows Server
Backup feature can be installed using Server Manager. To install the
Windows Server Backup feature, perform the following steps:
|
1. |
Log on to the Windows Server 2008 R2 system with an account with administrator privileges. |
|
2. |
Click Start, click All Programs, click Administrative Tools, and select Server Manager. |
|
3. |
In the tree pane, select the Features node, and select the Add Features link in the tasks pane. |
|
4. |
When Figure 1. Selecting the Windows Server Backup features.
|
|
5. |
On the Confirm Installation Selections page, review the summary, and click Install to continue. |
|
6. |
On the Installation Results page, review the results, and click Close to complete the installation. |

Installing Windows Server Backup Using Windows PowerShell ServerManager Module
In many cases, administrators
might choose to use the Windows PowerShell environment to manage a
server and as a preference when installing roles, role services, or
features. When a particular feature or role is installed using the
Windows PowerShell ServerManager module, all features, role services,
and role dependencies are also added. To install the Windows Server
Backup features, including the Windows Server Backup PowerShell cmdlets
using Windows PowerShell, perform the following steps:
|
1. |
Log on to the Windows Server 2008 R2 system with an account with administrator privileges. |
|
2. |
Click Start, click All Programs, click Accessories, and click the Windows PowerShell folder to reveal the application shortcuts. |
|
3. |
Right-click |
|
4. |
Type cd \ and press Enter. |
|
5. |
Type Import-Module ServerManager and press Enter. |
|
6. |
Type Add-WindowsFeature Backup-Tools and press Enter. After the installation completes, the results will be listed in the window, as shown in Figure 2. Figure 2. Installing Windows Server Backup using Windows PowerShell.
|
|
7. |
Type Get-WindowsFeature |More |
|
8. |
Type exit in the PowerShell window and press Enter. |

Installing Windows Server Backup on Server Core Installations
On a Windows Server 2008
R2 Server Core deployment, if the Windows Server Backup feature is not
installed, it can be installed by performing the following steps:
|
1. |
Log on to the Windows Server 2008 R2 Server Core system with an account with administrator privileges. |
|
2. |
In the Command Prompt window, type cd \ and press Enter. |
|
3. |
Type in Start /w ocsetup.exe WindowsServerBackup and press Enter. |
|
4. |
Log |
|
5. |
Click Start, click All Programs, click Administrative Tools, and select Windows Server Backup. |
|
6. |
In the Actions pane, click the Connect to Another Computer link. |
|
7. |
In |
|
8. |
If |
Scheduling a Backup Using Windows Server Backup and Allocating Disks
After Windows Server Backup
has been installed, no backups will be automatically scheduled. The
fastest way to get a backup configured and define any dedicated disks
for backups is to run the Backup Schedule Wizard. This wizard enables
administrators to not only select and exclude which backup items will be
contained within a backup, but it also allows the administrator to
configure a recurring backup schedule and allocate a dedicated disk for
scheduled backups if used. One thing to keep in mind is that if the
configuration will support backing up to multiple dedicated disks, to
provide some level of backup media rotation, it is recommended that all
of the disks be available during the running of the wizard.
When dedicated disks will be
used for Windows Server Backup jobs, these disks will be erased,
reformatted, and from there on, assigned and managed by Windows Server
Backup. The disk allocation process will create a single NTFS formatted
volume that spans the entire disk and will set the disk volume label to
include the server name, the date and time the disk is allocated, and
the disk number for each disk. For example, if disk 1 is assigned to the
backup of SERVER10 on October 8, 2009 at 6:10 p.m., the label will be
SERVER10 2009_10_08 18:10 DISK_01. To allocate disks for Windows Server
Backup, perform the following steps:
|
1. |
Log on to the Windows Server 2008 R2 system with an account with administrator privileges. |
|
2. |
Click Start, click All Programs, click Administrative Tools, and select Windows Server Backup. |
|
3. |
In |
|
4. |
Click Next on the Getting Started page. |
|
5. |
Select the Full Server (Recommended) option button, and click Next to continue. |
|
6. |
On Figure 3. Setting the scheduled backup to run every day at 9:00 p.m.
|
|
7. |
On |
|
8. |
Because |
|
9. |
In Figure 4. Selecting local disks to be used for scheduled backups.
Note When multiple disks are |
|
10. |
Back on the Select Destination Disk page, check all of the disks that have been added, and click Next to continue. |
|
11. |
A |
|
12. |
On |
|
13. |
On the Summary page, review the results, and click Close to complete the process. |

Creating a scheduled
backup using Windows Server Backup enables an administrator to automate
the backup process, and with the backup and VSS managing the dedicated
disks, the administrator only needs to verify that backups have been run
successfully.
Manually Running a Scheduled Backup
After
the scheduled backup is created for a server, an administrator can let
the backup run as scheduled or the backup can be run manually using the
Backup Once link. To manually run a scheduled backup, simply use the
Backup Once link and select the Scheduled Backup Options option button
on the Backup Options page. Click Next and click Backup on the
Confirmation page to start the backup. One important point to note is
that if multiple disks are allocated to a scheduled backup, running a
manual backup does not allow the administrator to select which disk to
use. The only way to control which disk is used for scheduled backup is
to either remove all the other allocated disks from the system or mark
the disks as offline using Disk Management or Diskpart.exe.
Running a Backup to a Shared Network Folder
Starting with Windows
Server 2008 R2, both manual and scheduled backups can use dedicated
backup disks, a specific folder on a local volume, or a shared network
folder as a backup destination. When a shared network folder is chosen
as the backup destination, a system administrator can store full backups
on alternate locations to allow for different recovery scenarios. Also,
something important to consider is that if a dedicated disk or specific
folder on a local volume is selected, this offers no automated offsite
backup. Using a shared network folder can enable offsite backup if the
destination system is located in a remote data center, and the backup
window and bandwidth between the sites can tolerate the over the wire
network backup. To select a shared network folder as a backup
destination for a manual backup as an example, perform the following
steps:
|
1. |
Log on to the Windows Server 2008 R2 system with an account with administrator privileges. |
|
2. |
Click Start, click All Programs, click Administrative Tools, and select Windows Server Backup. |
|
3. |
In the Actions pane, click on the Backup Once link to start the Backup Once Wizard. |
|
4. |
On |
|
5. |
On the Specify Destination Type page, select Remote Shared Folder, and click Next, as shown in Figure 5. Figure 5. Selecting to store the backup on a remote shared folder.
|
|
6. |
On |
|
7. |
Click Note If |
|
8. |
On the Confirmation page, review the settings and click Backup to start the manual backup. |
|
9. |
On |

Storing a Backup on DVD
On a Windows Server 2008 R2
system with a local DVD writer drive, backups can be directed to a DVD
for storage. Backups stored on DVD media can be used to restore the
entire system or entire volumes; files and folders or any other granular
restores cannot be performed using a DVD backup media.
When an administrator has a DVD
backup of a system, it can be used to restore the entire system, but the
Windows Server 2008 R2 bootable installation media must also be
available. With a DVD backup, additional steps and documentation will be
required to restore a
system from a failed state back into operation. As a best practice,
whenever a system contains a DVD writer drive, create a full system
backup to DVD upon initial server deployment and when disks are changed,
and create DVD backups regularly.
To create a backup on DVD media, perform the following steps:
|
1. |
Log on to the Windows Server 2008 R2 system with an account with administrator privileges. |
|
2. |
Click Start, click All Programs, click Administrative Tools, and select Windows Server Backup. |
|
3. |
In the Actions pane, click on the Backup Once link to start the Backup Once Wizard. |
|
4. |
When |
|
5. |
On |
|
6. |
On the Specify Destination Type page, select the Local Drives option button, and click Next. |
|
7. |
On |
|
8. |
On the Confirmation page, review the settings and click Backup to start the manual backup to DVD. |
|
9. |
On |
|
10. |
If additional DVDs are required, label them and place them in the drive as prompted. |
|
11. |
Overall backup progress should be viewed in real time, and the window can be closed after the backup completes. |
Windows Server Backup 2008 R2 – это встроенное в операционную систему Windows Server 2008 R2 решение для создания и восстановления резервных копий данных. Этот мощный инструмент предоставляет возможность создавать полные и инкрементные резервные копии различных компонентов сервера, включая операционную систему, данные пользователей и системные файлы.
Настройка резервного копирования Windows Server Backup 2008 R2 – важная процедура для обеспечения безопасности данных на сервере. В этом подробном руководстве мы рассмотрим шаги по настройке резервного копирования с использованием Windows Server Backup 2008 R2.
В начале руководства мы расскажем о том, как установить и настроить Windows Server Backup 2008 R2. Затем мы покажем, как создать расписание резервного копирования и выбрать, какие файлы и папки запланировать для резервного копирования. Мы также рассмотрим способы восстановления данных с созданной резервной копии.
Правильная настройка резервного копирования Windows Server Backup 2008 R2 обеспечит вам надежное решение для защиты важных данных на вашем сервере. Следуя этому подробному руководству, вы сможете создавать резервные копии по расписанию, легко восстанавливать данные и обеспечивать безопасность вашего сервера.
Содержание
- Установка Windows Server Backup на сервер
- Как установить Windows Server Backup на сервере с операционной системой Windows Server 2008 R2
- Создание плана резервного копирования
- Как создать план резервного копирования с помощью Windows Server Backup
- Настройка расписания резервного копирования
- Как настроить расписание резервного копирования в Windows Server Backup
Установка Windows Server Backup на сервер
Шаг 1: Откройте «Управление сервером» (Server Manager) на вашем сервере.
Шаг 2: Перейдите на панель «Роли» в левой части экрана и нажмите на кнопку «Добавить роль» (Add Roles).
Шаг 3: В мастере «Добавление роли» (Add Roles Wizard) выберите сервер, на котором вы хотите установить Windows Server Backup, и нажмите «Дале
Как установить Windows Server Backup на сервере с операционной системой Windows Server 2008 R2
- Откройте меню «Пуск» и выберите «Служебные программы».
- Выполните щелчок по «Server Manager», чтобы открыть надстройку для управления сервером.
- В левой панели выберите пункт «Ролевые службы» и затем «Добавить роли».
- Откроется мастер установки ролей. Нажмите «Далее», чтобы перейти к следующему шагу.
- Выберите сервер, на котором вы хотите установить Windows Server Backup, и нажмите «Далее».
- В списке ролевых служб найдите «Файловые и службы сохранения» и отметьте его галочкой.
- Появится окно с подтверждением установки необходимых дополнительных компонентов. Нажмите «Добавить требуемые функции» и затем «Далее».
- После завершения добавления компонентов мастер установки вернется на предыдущий экран. Нажмите «Установить» для начала процесса установки.
- По окончании установки роли «Файловые и службы сохранения» нажмите «Закрыть».
Поздравляю, теперь на вашем сервере установлена роль Windows Server Backup. Вы можете использовать эту роль для настройки и управления процессом резервного копирования данных на вашем сервере с операционной системой Windows Server 2008 R2.
Создание плана резервного копирования
План резервного копирования определяет расписание и параметры резервного копирования данных на сервере. Создание плана позволяет автоматизировать процесс резервного копирования, что упрощает его управление и повышает надежность сохранения данных.
Чтобы создать план резервного копирования в Windows Server Backup 2008 R2, выполните следующие шаги:
- Откройте программу Windows Server Backup.
- На главной странице программы выберите раздел «Планы резервного копирования».
- Нажмите на кнопку «Создать план резервного копирования».
- В появившемся окне введите название плана и его описание.
- Выберите тип резервного копирования: полное, инкрементальное или дифференциальное.
- Укажите расписание, по которому будет выполняться резервное копирование. Вы можете выбрать ежедневное, еженедельное или ежемесячное расписание с определенным временем начала.
- Определите настройки хранения резервных копий, указав место для их сохранения и срок их хранения.
- Укажите данные для резервного копирования и исключения, если необходимо.
- Проверьте настройки и нажмите «Создать план резервного копирования».
После создания плана резервного копирования он будет автоматически выполняться согласно заданному расписанию. Вы также можете запустить план резервного копирования вручную или изменить его настройки в любое время.
Как создать план резервного копирования с помощью Windows Server Backup
Windows Server Backup предоставляет удобный инструмент для создания и настройки плана резервного копирования, который позволяет вам регулярно делать резервные копии данных на вашем сервере.
Чтобы создать план резервного копирования с помощью Windows Server Backup, выполните следующие шаги:
- Откройте программу Windows Server Backup, щелкнув на панели инструментов кнопку «Пуск», выбрав «Администрирование» и затем «Резервное копирование».
- В окне «Windows Server Backup» выберите «Действия» в правой части окна и щелкните «Создание плана резервного копирования».
- Выберите «Пользовательский» тип плана резервного копирования и нажмите «Далее».
- Выберите «Локальная база данных», чтобы сохранить резервные копии на вашем сервере, и нажмите «Далее».
- Выберите диски или папки, которые вы хотите включить в план резервного копирования, и нажмите «Далее».
- Выберите расписание для выполнения резервного копирования. Вы можете выбрать ежедневное, еженедельное или ежемесячное расписание, а также указать нужное время начала резервного копирования.
- Выберите место для сохранения резервных копий. Вы можете выбрать другой локальный диск, сетевой путь или удаленное хранилище.
- Проверьте настройки плана резервного копирования и нажмите «Далее».
- Дайте плану резервного копирования имя и нажмите «Завершить».
После завершения этих шагов план резервного копирования будет создан и готов к использованию. Вы можете изменить или модифицировать план в любое время, открыв программу Windows Server Backup и выбрав соответствующий план из списка.
Теперь вы знаете, как создать план резервного копирования с помощью Windows Server Backup. Будьте уверены, что план резервного копирования настроен правильно и регулярно проверяйте, что все данные успешно сохраняются в резервных копиях.
Настройка расписания резервного копирования
Чтобы настроить расписание резервного копирования:
-
Откройте Windows Server Backup. Для этого щелкните на кнопке «Пуск», выберите «Администрирование» и затем «Резервное копирование».
-
Выберите «Действие» > «Настроить расписание резервного копирования».
-
Выберите «Добавить задачу» и укажите расписание для резервного копирования. Вы можете выбрать ежедневное, еженедельное или ежемесячное расписание в зависимости от ваших потребностей.
-
Выберите время начала резервного копирования и укажите операционную систему, чтобы она знала, что делать в случае, если время начала резервного копирования совпадет с работой других задач на сервере.
-
Укажите место для хранения резервных копий. Можно выбрать внутренний жесткий диск, сетевое хранилище или оптический диск в зависимости от ваших возможностей и требований.
-
Нажмите «Готово», чтобы сохранить настройки расписания резервного копирования.
Теперь ваше расписание резервного копирования настроено, и Windows Server Backup будет автоматически создавать резервные копии в соответствии с заданными параметрами. Не забудьте проверить настройки регулярно и изменить их, если ваши требования изменились.
Как настроить расписание резервного копирования в Windows Server Backup
Windows Server Backup в Windows Server 2008 R2 предоставляет возможность настройки расписания для регулярного выполнения резервного копирования данных. Это позволяет автоматизировать процесс создания резервных копий и гарантировать сохранность важных данных.
Чтобы настроить расписание резервного копирования в Windows Server Backup, выполните следующие шаги:
| Шаг | Описание |
|---|---|
| 1 | Откройте программу Windows Server Backup. |
| 2 | Выберите вкладку «Настроить расписание» в левой части окна. |
| 3 | Нажмите на кнопку «Добавить расписание». |
| 4 | Укажите имя расписания и выберите частоту выполнения резервного копирования (ежедневно, еженедельно или ежемесячно). |
| 5 | Выберите время начала выполнения резервного копирования. |
| 6 | Выберите дни недели (для еженедельного расписания) или дни месяца (для ежемесячного расписания), когда будет выполняться резервное копирование. |
| 7 | Нажмите на кнопку «ОК» для сохранения настроек расписания. |
После завершения этих шагов, расписание резервного копирования будет задано и резервное копирование будет выполняться автоматически согласно настройкам. Вы всегда можете изменить или удалить настройки расписания в программе Windows Server Backup.