Display scaling has been a problem for a long time, and even though, Windows 10 has introduced changes to prevent blurry apps as a result of incorrect scaling, it’s still a big issue, especially when using traditional desktop applications and multi-monitor setups.
However, the operating system includes an option in the Settings app to make it easier to fix apps when they become blurry without having to sign out. For instance, when changing the display settings, running a remote session, or docking and undocking a device.
This guide will teach you the steps to use Windows 10 settings to fix scaling issues on your computer.
- Fix blurry apps on Windows 10
- Fix app scaling issues individually on Windows 10
Fix blurry apps on Windows 10
To fix blurry apps from the Settings app on Windows 10, use these steps:
-
Open Settings on Windows 10.
-
Click on System.
-
Click on Display.
-
Under “Scale and layout,” click the “Advanced scaling settings” option.

-
Turn on the “Let Windows try to fix apps so they’re not blurry” toggle switch.


Once you complete the steps, Windows 10 will try to make sure apps don’t look blurry the next time you open the app without having to sign out and sign back into your device.
In addition, if the system detects that you may be running a blurry app, a notification will inform you that there’s an option to fix this issue when you reopen the app.
This feature only works for apps running on your primary display. If you use a multi-monitor setup with different scale factors, apps may still look blurry on secondary monitors. Furthermore, this may not work with every program.
Fix app scaling issues individually on Windows 10
To fix scaling issues on applications individually overriding the global scaling settings on Windows 10, use these steps:
-
Right-click the .exe of the app.
-
Click on Properties.
-
Click the Compatibility tab.
-
Under “Settings,” click the “Change high DPI settings” button.

-
Check the “Use this setting to fix scaling problems for this program instead of the one in Settings” option.
-
Choose when to apply the scaling settings, including when opening the app or when signing in to Windows 10.
-
Check the “Override high DPI scaling behavior” option.
-
Choose the behavior with the drop-drop menu, including “Application,” “System,” or “System (Enhanced).”

-
Click the OK button.
-
Click the Apply button.
-
Click the OK button.


After completing the steps, even though, you may have specific global scaling settings configured on Windows 10, the app will not respond to those settings. Instead, it’ll use the custom settings you selected within the “Compatibility” settings.
We may earn commission for purchases using our links to help keep offering the free content. Privacy policy info.
All content on this site is provided with no warranties, express or implied. Use any information at your own risk. Always backup of your device and files before making any changes. Privacy policy info.
Windows 10 Windows 8.1 Surface Pro 4 Surface Pro 3 Surface Book More…Less
Summary
When you use a high-DPI device such as a Surface Pro 3, Surface Pro 4, or Surface Book together with external monitors, you experience the following issues:
-
Elements such as applications, the taskbar, icons, toolbars, text, and dialog boxes appear to be fuzzy.
-
Elements are too large or too small compared to the rest of the desktop.
-
Blurry text appears in applications or in the Windows interface.
Although these symptoms may be seen on a single monitor, they’re more common when you use multiple monitors that vary in display resolution. These symptoms also occur when the hardware configuration changes, such as when you dock and undock a device that uses external monitors, or you detach an external monitor from the device.
These issues commonly occur in the following scenarios:
-
Applications are moved between monitors that use different display resolutions.
-
The monitor that applications are displayed on changes between docked and undocked configurations.
-
Users mix connections during the same logon session. For example, users log on through a remote desktop connection (RDC), and later connect directly without first logging off.
Display information is determined when a user logs on to the system. A logoff-logon process resets the display information and improves behavior. However, the issue recurs if the monitor configuration changes during the same logon session, such as when you dock or undock the device or detach an external monitor.
This issue has become more prevalent since the introduction of 4k and higher resolution monitors, especially when these monitors are mixed together with older, standard monitors.
For more information about how Windows scales applications, see the following Core Team Blog articles:
Display Scaling in Windows 10
Display Scaling changes for the Windows 10 Anniversary Update
Improving your scaling experience
Improved high-DPI support for desktop apps
Resolution
To resolve this issue, use the following methods.
-
Check for software updates
Improvements are continuously being added to Windows 10 and Office 2016 applications. If you are experiencing a specific issue, first check whether it has been resolved in the latest Windows release or cumulative update. To check Windows 10 updates, see the following Microsoft Knowledge Base article:Windows 10 Update History
-
Match screen resolutions
Consider deploying monitors that have complementary screen resolutions.When you use multiple monitors (including when you dock or connect to remote screens), a greater difference in the resolution between the native device and external device is more likely to cause the issues to occur. For more information, see the following OneDrive presentation:
Surface Pro 3 and Multi-Monitor Guidance
-
Use UWP applications
Use or deploy Universal Windows Platform (UWP) applications instead of Win32 applications.Modern (UWP) apps always scale correctly. If there is a comparable modern app available, you can substitute that app to mitigate the scaling issues. For example, Edge is a modern app that does not cause the DPI Scaling issues that Internet Explorer might experience. Similarly, Remote Desktop is an alternative to mstsc.exe.
-
Check for known issues
See the following articles for more information about known issues in these specific products.Office 2016
3165808 Internet Explorer 11 Window display changes between built-in device monitor and an external monitor
Workaround
To work around scaling issues, try the following methods:
-
Log out and in
Log out and log back in to the system. This improves how applications and elements are displayed when the monitor configuration changes. -
Adjust display settings
Windows 10Select Display > Change the size of text, apps, and other items, and then adjust the slider for each monitor.
Earlier Windows systems
Right-click the application, select Properties, select the Compatibility tab, and then select the Disable display scaling on high DPI settings check box.
-
Change application properties
In Explorer or on the Start menu, right-click the application name, select Properties, select the Compatibility tab, and then select the Disable display scaling on high DPI settings check box.Note: In Windows 10 Version 1703 and later version of Windows, the text of the Disable display scaling on high DPI settings option is changed to Override high DPI scaling behavior, scaling performed by: Application.
-
Check whether applications are DPI-aware
To determine an application’s support of DPI Scaling, follow these steps:-
Download and run Sysinternals Process Explorer.
-
In Process Explorer, click the columns, and then add the DPI Awareness column to the view.
-
Start the application that you want to check.
-
In Process Explorer, locate the application, and then examine the DPI Awareness column.
DPI Awareness status definitions
Per-Monitor Aware: Per-monitor DPI-aware. These applications check for the DPI when they are started, and adjusts the scale factor whenever the DPI value changes. These applications are not automatically scaled by the system.
System Aware: System DPI-aware. These applications do not scale for DPI changes. They query for the DPI one time, and then use that value for the lifetime of the application. If the DPI changes, the application does not adjust to the new DPI value. It will be automatically scaled up or down by the system when the DPI changes from the system value.
Unaware: DPI-unaware. These applications do not scale for DPI changes. They are always assumed to have a scale factor of 100 percent (96 DPI). These applications are automatically scaled by the system at any other DPI settings.
For more information, see the following MSDN topic:
PROCESS_DPI_AWARENESS enumeration
-
-
Report an issue
Many UI elements have been updated because of customer feedback. Because DPI Scaling issues can involve multiple symptoms and configuration, information from users can help us identify specific scenarios and prioritize the development of updates.To provide such feedback, follow these steps:
-
Record monitor configurations. To do this, take a screenshot of Display window (Start > Settings > System > Display).
-
For each monitor, note the make and model, scaling percentage, and resolution.
-
Record the steps that you must follow to reproduce the issue.
-
Take screenshots or video of the desktop or applications before and after the scaling issues occur.
-
Run DXDiag.exe on the system.
-
Select Start > Feedback Hub. Search on “DPI” to check whether any listed issue matches your specific issue. If you find a match, you can add additional feedback, including screen shots, DXDiag results, and any other relevant information.
-
More Information
Display scaling is a deceptively complex problem. There is no magic bullet or single fix to resolve all DPI Scaling problems. DPI Scaling benefits from continuous improvements in the core operating system, in application development models, and in applications from both Microsoft and third parties.
Different versions of Windows and application development models have different display scaling capabilities and limitations.
For example, in Windows that were released earlier than Windows 8.1, desktop environment and applications understand only one scale factor, generally based on the primary display at the time that the logon session starts. When the display changes in the middle of a logon session, the system bitmaps scale content from the system scale factor to the new monitor scale factor. This makes sure that content doesn’t become excessively large or small. However, text may appear blurred. (The effect is worse when you scale up.) If the system shrinks or stretches UI elements to the correct size, this may cause some blurriness in dialog boxes and other UI elements.
In Windows 10, investments were made so that large parts of the desktop UX will scale crisply in docking-undocking scenarios. Additional scalability improvements were made to the taskbar, File Explorer, desktop icons, context menu, and other UI elements to improve the user experience.
Microsoft is continuously updating the system and first-party applications. Third-party applications may require similar investments.
References
|
MSDN: Writing DPI-aware Win32 applications |
High DPI |
|
TechNet |
High DPI Support for IT Professionals |
|
Thurrott Blog: July 13, 2015 post that discusses DPI Scaling. Article is based on the «Devices» chapter of the Windows 10 Field Guide. |
Windows 10 Feature Focus: Display Scaling |
|
Windows Blog: July 15, 2013 |
Windows 8.1 DPI Scaling Enhancements |
|
Build 2015: Display Scaling: What it is and what you need to know about it to have great visuals |
Display Scaling: What It Is and What You Need to Know About it to Have Great Visuals Display scaling: What it is and why it matters to you.pptx |
|
Build 2014: Windows Desktop Development Platform Advancements |
Windows Desktop Development Platform Advancements Windows Desktop Development Platform Advancements.pptx |
|
Build 2013: Making your desktop apps shine on high-DPI displays |
Making Your Desktop Apps Shine on High- DPI Display |
Need more help?
Want more options?
Explore subscription benefits, browse training courses, learn how to secure your device, and more.
Communities help you ask and answer questions, give feedback, and hear from experts with rich knowledge.
I will first address your second question and then the first one.
High DPI
High DPI refers to the setting when the display is set to more than 96 dpi. The exact DPI of your display depends on 3 things.
- Resolution
- Physical size
- Windows setting
I have a 2560×1440 display of 14 inches. This translates to 209 dpi (you can use Pythagoras theorem), which effectively means a maximum setting of 192 dpi. Windows can be configured to the following dpi settings
- 96 dpi — 100%
- 120 dpi — 125%
- 144 dpi — 150%
- 168 dpi — 175%
- 192 dpi — 200%
- 216 dpi — 225%
- 240 dpi — 250%
This is what you set through Display Settings in control panel. So, I can set my 14″ display to any DPI setting from 96 dpi to 192 dpi.
I also have a 21.5″ monitor with 1920×1080 resolution. This translates to 102 dpi (effectively 96 dpi). This means I cannot set this monitor to high dpi. Even if I change the percentage through Display Settings it will only result in a zooming effect.
Display Scaling
When we change the DPI setting of a display, the number of pixels available on the display changes. Suppose we move from 96 dpi to 192 dpi, the number of available pixels on the display will double (note that the pixels are present always, we just use less or more of them depending on the dpi setting). Under 96 dpi setting, a window of 96 pixels width would occupy entire width of the screen. But under 192 dpi setting, the same window would occupy only half the width of the screen. This may result in your fonts (and other things) appear too small to be read. So, windows offers an option of Display Scaling. When the DPI of a display changes, windows will automatically scale the window sizes to suit the display. In the above case, after Display Scaling, our window would occupy the entire width of the screen.
When users switch to games or multiple monitors, they need the right resolution, text, image and other settings. Blurry apps are another problem.
Plug-n-play are feasible with different devices connected to Windows 11. But when you change to a bigger screen, you need advanced scaling settings optimized.
Previous to the current OS, there was special option to change the refresh rate and resolution automatically.
But that has changed in Windows 11.
- Advanced Scaling Settings
- What is DPI scaling level in Windows
- How to change Display Scale in Windows 11
- Set Custom Display DPI Scale in Windows 11
- Increase or Decrease Text Size in Windows 11
- Reset Scaling Setting in Windows 11
- Use Registry to Change Display Scaling DPI in Windows 11
- Fix Blurry apps automatically in Windows 11/10
- Why Advanced Scaling Settings Windows 11 missing is bothering some users?
The advanced scaling settings is not there. But when you switch to a different monitor, a notification comes asking permission to automatically to set the right scaling settings.
If you have an external monitor, you can change the display setting, scaling and font size for that device.
Then in the advanced scaling settings, you can choose that profile. For now, the current option is limited. It only shows the current settings that are set.

What is DPI scaling level in Windows
DPI scaling, also known as Display Scaling, is a feature in Windows that allows users to adjust the size of objects on their computer screens.
This feature is especially useful for users who have high-resolution displays or those who have visual impairments. DPI scaling essentially tells Windows how to “stretch” images, text, and other objects so they appear bigger or smaller on the screen.
By default, Windows automatically sets DPI scaling based on the resolution of the screen, but users can customize this setting by going to the “Display settings” menu.
DPI scaling can also be set on a per-application basis, which means that users can have different scaling options for different programs.
Overall, DPI scaling makes it easier for Windows users to read text, view images, and work with other objects on their screens, regardless of their monitor size or resolution.
How to change Display Scale in Windows 11
- Launch “Settings” with the “Win + I” shortcut.
- Select System > Display.
- Select a scaling option of your choice from the “Scale” dropdown menu.
- The scaling will change instantly.
This is the preferred and common method to change DPI scale in Windows 11. The size of text, apps and other items are changed. The scale % depends on your graphics card and monitor resolution. Some may have even 200% also.

Set Custom Display DPI Scale in Windows 11
- Open the Windows 11 Settings app.
- Select the System > Display on the left hand side.
- Under Scale & Layout click the arrow beside Scale.
- Type a scaling value between 100 and 500 in the “Custom Scaling” field.
- Click the “Save” icon next to the field.
- With that, you set a custom display scaling in Windows 11.

Increase or Decrease Text Size in Windows 11
- In the Settings app, navigate to the following.
- Select Accessibility > Text Size.
- Use the Text Size slider to increase or decrease the text size.
- Click the “Apply” button to save changes.

Reset Scaling Setting in Windows 11
- Open the Windows 11 Settings app.
- Go to the System > Display page.
- Select the “Recommended” option from the Scaling dropdown menu.
- With that, you reset the display scaling in Windows 11.
Use Registry to Change Display Scaling DPI in Windows 11
Open the registry editor by typing regedit in the search box.
Go to HKEY_CURRENT_USER\Control Panel\Desktop
- Find the “
LogPixels” value and edit it. - Switch the Base option from Hexadecimal to Decimal.
- Change the its value data to one of the following numbers:
- 96 = default 100%
- 120 = medium 125%
- 144 = larger 150%
- 192 = extra-large 200%
- 240 = custom 250%
- 288 = custom 300%
- 384 = custom 400%
- 480 = custom 500%
Next, find the Win8DpiScaling value and open it. Set its value data to 1 if you use LogPixels value other than 96.
Restart Windows 11 for the changes to take effect.
Fix Blurry apps automatically in Windows 11/10
The biggest problem with wrong scaling is the blurry apps on your main display. Since you have changed to another monitor, Windows 11 thinks that that is the current scaling.
It tries to set a similar scale for the old or new display. Then you see blurry apps as they are not properly scaled. But there is life-saver!
Windows 11 will automatically notify you about blurry apps when you unplug from the display and connect to the new one. You can make changes to the apps using the notification setting.
Each app can also be customized to have a different scaling DPI.
Advanced Display Settings in Windows 11/10
Though the advanced display settings option was introduced in Windows 10 v1803, it was removed in Windows 11.
The current advanced display settings page will only tell about the screens connected to the computer. It also tells about the refresh rate, resolution, bit rate, depth, color format etc.
Other than that it is not of much use.
Graphics Settings in Windows 11/10
If you are using Windows 11, you need to go to System > Display. Under the related settings, you can see Graphics. Click the blurry app in the list, and select the Options button.

Following that, choose the Graphics performance based on the current setting.
Why Advanced Scaling Settings Windows 11 missing is bothering some users?
Windows 11 is the latest version of Microsoft’s operating system, and it comes with many new features and customization options.
The advanced scaling settings in Windows 11 are a crucial aspect of the user interface as they determine how images and text are displayed on the screen.
However, some users have reported that the advanced scaling settings in Windows 11 are missing, making it difficult to adjust the scaling of the screen to their liking.
This issue has caused frustration among users who have been looking for a way to customize their display settings further.
While Microsoft has yet to address this issue, there are some workarounds that users can use to get the advanced scaling settings back.
Overall, the missing advanced scaling settings in Windows 11 problem is a significant inconvenience for users who require a high level of customization in their user interface.

Palla Sridhar is the writer and admin for WindowsTechIt.com. His primary focus is to write comprehensive how-tos and solutions guides for Windows 11, 10, Skype, Outlook, HDMI, Redmi, Facebook, Google, Tech Apps and LinkedIn.
У меня Windows 7 с масштабированием DPI до 120 DPI. Это создает некоторые проблемы с более старыми приложениями, такими как обрезанный текст, размытая графика или слишком большой текст.
Я хотел бы отключить масштабирование DPI для этих приложений. Я пробовал это: применение.exe «контекстное меню — > Свойства — > compatibilty — > отключить масштабирование дисплея на высоких настройках DPI».
этот параметр ничего не меняет. Приложение по-прежнему отображается как 120 точек на дюйм, а не как 96 точек на дюйм. Я также проверил его на свежий, не перепутались Windows 7 на виртуальной машине-такое же поведение.
вопрос: как заставить одно приложение использовать 96 DPI другим, рабочим, способом?
5 ответов
У меня просто была такая же проблема, и выбор любого из флажков не имел никакого значения. Это то, что я сделал, что это исправлено:
-
перейдите в » Панель управления\внешний вид и персонализация\дисплей «и нажмите на опцию» Установить пользовательский размер текста (DPI)». Убедитесь, что флажок» Использовать масштабирование DPI в стиле Windows XP » не установлен. При необходимости выйдите из системы, чтобы применить изменения.
-
вместо выбора параметров совместимости, запустите мастера и позволить Windows выбрать его для вас. Это можно сделать, щелкнув правой кнопкой мыши значок программы и выбрав в меню пункт «устранение неполадок совместимости». Это исправило обрезку дисплея для меня. Текст немного размытый, но с этим я могу жить, я просто счастлив, что могу видеть все это.


3

отвечен mastseller 2023-01-21 13:39
Я понимаю, что это очень старый вопрос, но я только что нашел решение проблемы. Переключите тему (Панель управления > все элементы панели управления > Персонализация)с темы Aero на основную тему, и масштабирование дисплея для каждого приложения будет работать.
2
отвечен Dave 2023-01-21 15:56
просто предположение, но, может быть, если вы запустите приложение в режиме совместимости xp, или, возможно, отключить настройки визуальной темы для этого приложения, он будет игнорировать настройки DPI?
1
отвечен acme64 2023-01-21 18:13
ответ мастселлера (1. ответ) работает, но много текста приложения становятся размытыми :(.
Но теперь работает флажок «Использовать масштабирование DPI в стиле Windows XP». Поэтому, если есть какое-то приложение, где нечеткое в правом возмущении, чем малый размер, сделайте это:
1) Поиск стартового файла приложения (.exe .com) в файловом менеджере, или это значок (или, если приложение работает, вы можете найти его в диспетчере задач windows тоже).
2) щелкните правой кнопкой мыши на нем и нажимаем на свойства.
3) Нажмите на Вкладка совместимость.
4) Установите флажок» Использовать масштабирование DPI в стиле Windows XP».
5) перезапустите приложение (оно работает).
вы должны сделать со всем нечетким применением по-одному, но оно работает.
0
отвечен Darknight 2023-01-21 20:30
Если вы нашли свой Disable display scaling on high DPI settings флажок неактивен для 64-разрядного приложения, например:

это может быть потому, что Microsoft построил логику, чтобы запретить этот параметр для 64-разрядных приложений. В этом случае, я рекомендую вам следовать инструкциям наhttps://superuser.com/a/1018284/460302 и получаем Application Compatibility Toolkit.
в вышеупомянутом ответе пользователь Ben N предоставляет обширное представление о логике и структуре Windows для работы с «несовместимыми» приложениями. Его процедура позволяет мне управлять совместимостью с помощью подписи приложения, так что даже если я обновляю приложение и его номер версии и/или изменения записи реестра, я все еще покрыт.
например, вот моя подпись для Rainmeter 3.3.0.2519:
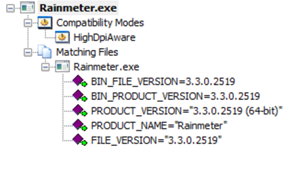
когда я модернизировал Rainmeter, это перестало работать. Так я создал новая подпись без номеров версий:
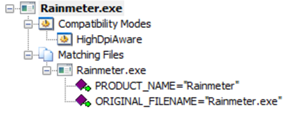
..и мой новый 64-битный выпуск Rainmeter отображается правильно.
As Ben N говорит, давайте вырваться из больших пушек.
0
отвечен CODE-REaD 2023-01-21 22:47