What does bad system config info mean? How to solve the blue screen problem caused by it? This article will give you answers. It will provide 7 practical solutions to this error and you can try them one by one to fix error.
What Causes Bad System Config Info Error Code
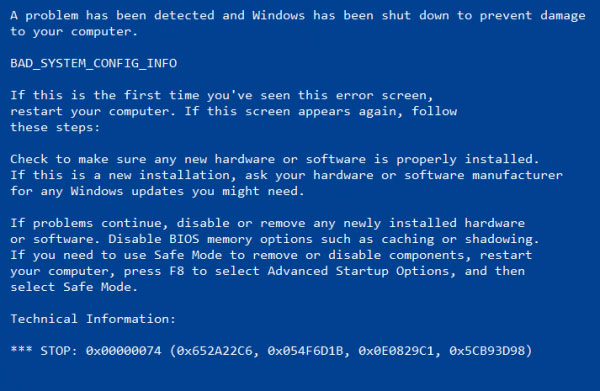
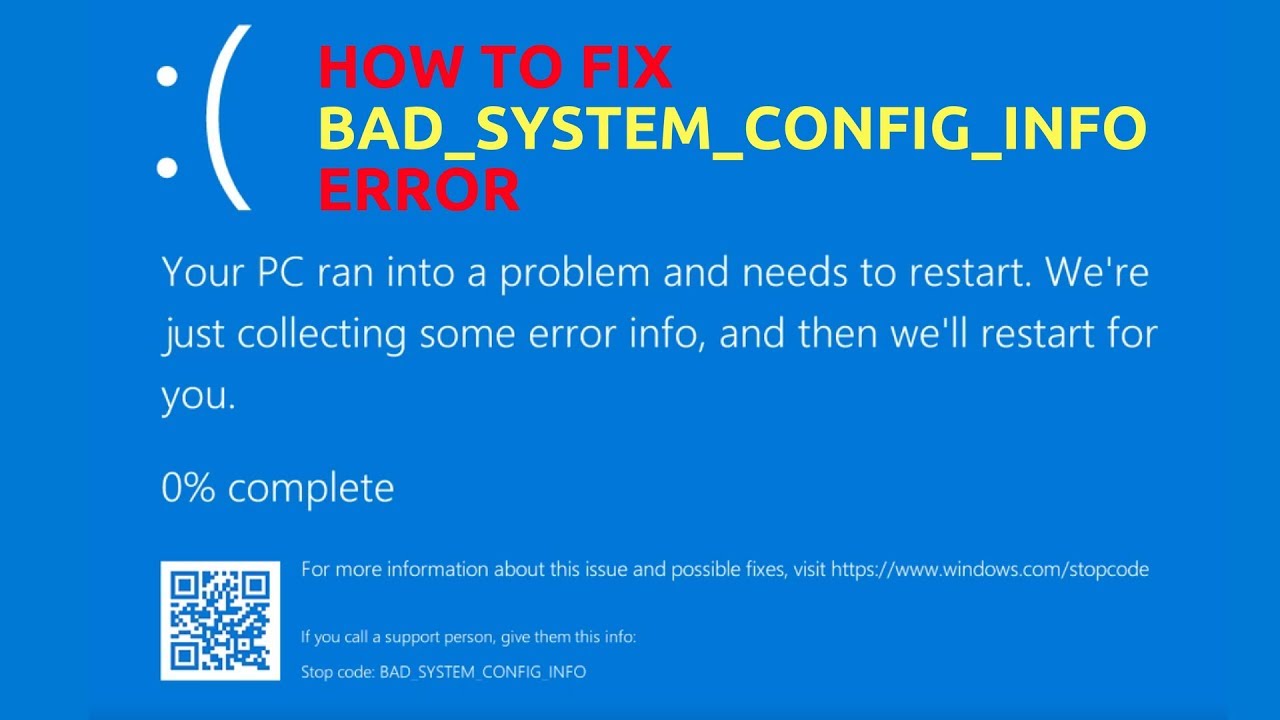
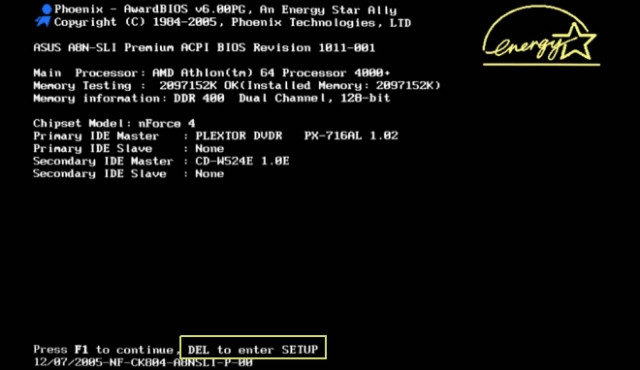
Some computer users report that they have encountered bad system config info error and this error will cause blue screen and prevent them to boot up computer (there are other causes to blue screen, click here to know more). When bad system config error occurs, the computer often displays the following information and indicates the stop code bad system config info.

Surely, the computer also may display the following information when bad system config info error occurs. BAD_SYSTEM_CONFIG_INFO error is also indicated on the screen.
Bad system config info error can be caused by both software problem and hardware problem, such as:
- Hardware Issues: damaged memory bar and hard disk, loose cable and port, etc.
- Software Issues: problematic Windows update and software incompatibility, corrupted MBR, incorrect Boot Configuration Data (BCD) file, corrupted registry, bad drivers, etc.
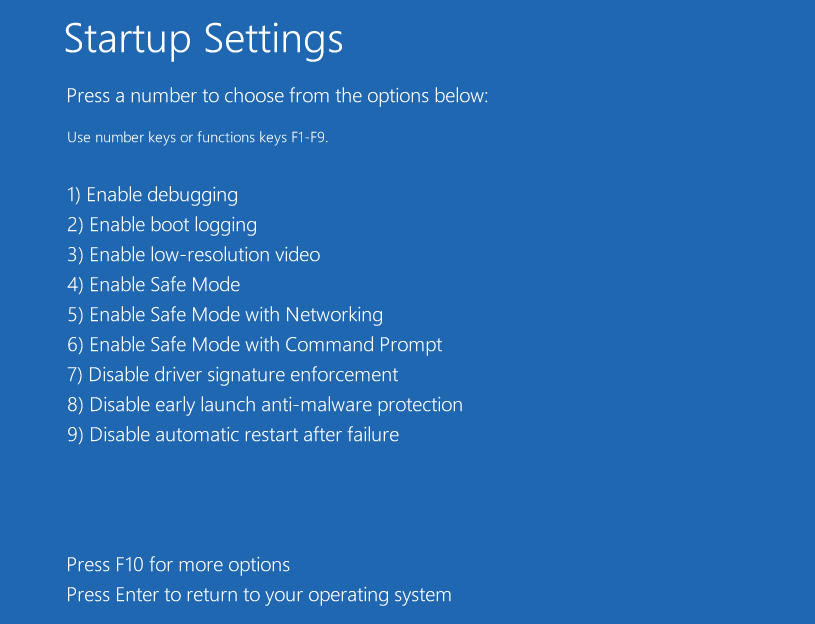
How to fix bad system config info Windows 10/11? You can adopt the following methods to fix it. Please note that most of the following methods require you to enter Windows. If you can’t enter Windows, you can try entering Safe Mode. Here is the guide on how to enter Safe Mode Windows:
- Enter WinRE.
- Navigate to Troubleshoot > Advanced options > Startup Settings.
- Click F4 key to choose Enable Safe Mode option.
Fix 1. Troubleshoot Hardware Issues
Please make sure all cables and hardware components are connected correctly. Then, you should check RAM and hard drive for errors. Here is the guide:
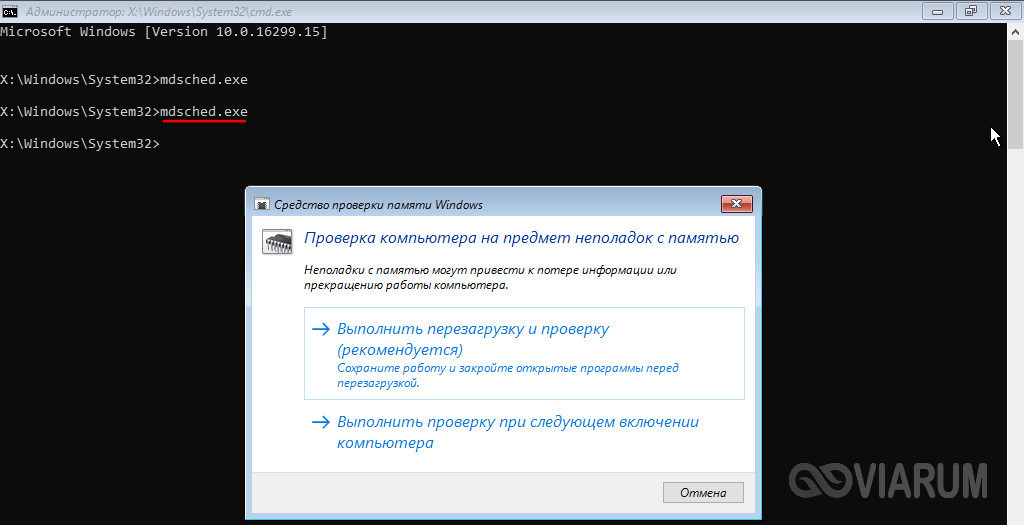
- Press “Windows + R” keys and type “mdsched.exe“.
- Select “Restart now and check for problems“. The computer will restart and run a memory check. This process will usually take a few minutes.
If the result indicates that there are some problems with the RAM and it can’t fix these issues, you may have to replace the RAM or contact the RAM manufacturer to get help. In addition, if you have two memory bars installed, please make sure they can work together.
Then, you need to check hard drive and fix errors. Please refer to this post: How to Check Hard Drive and Fix the Error? Solutions Are Here!
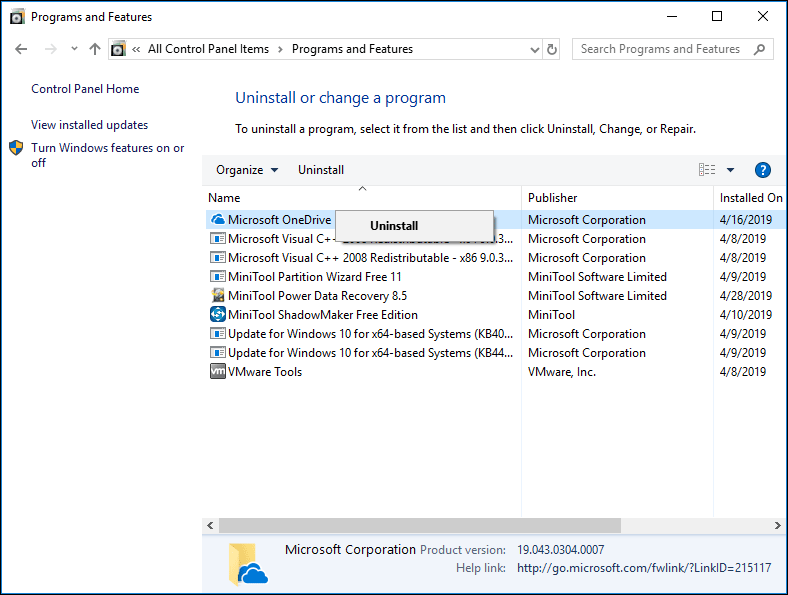
Fix 2. Uninstall Applications and Updates
Some users report that the BAD_SYSTEM_CONFIG_INFO error appears after they install a new application or Windows update. In this case, the reasonable cause should be incompatibility problem. So, uninstalling the problematic application or update may solve this problem.
How to uninstall applications and Windows updates:
- Open File Explorer.
- Right click on This PC and choose Properties.
- Click Control Panel Home at upper left corner of the new pop-up window.
- Select Programs and Features in the next pop-up window.
- Right click an application and click Uninstall.
- In the same window, click View installed updates.
- Right click a problematic update to uninstall.
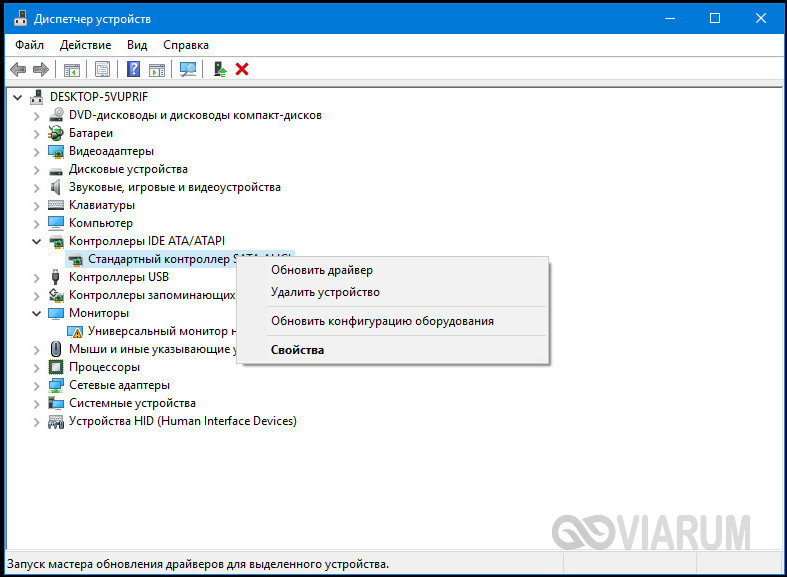
Fix 3. Update Drivers
- Press “Windows + X” keys and select Device Manager in the pop-up menu.
- Expand directory and select Update driver. Sometimes, the problematic driver will be displayed. But if not, you should especially try updating drivers for hard drives, USB, and other important devices.
- Select Search automatically for updated driver software in the pop-up window.
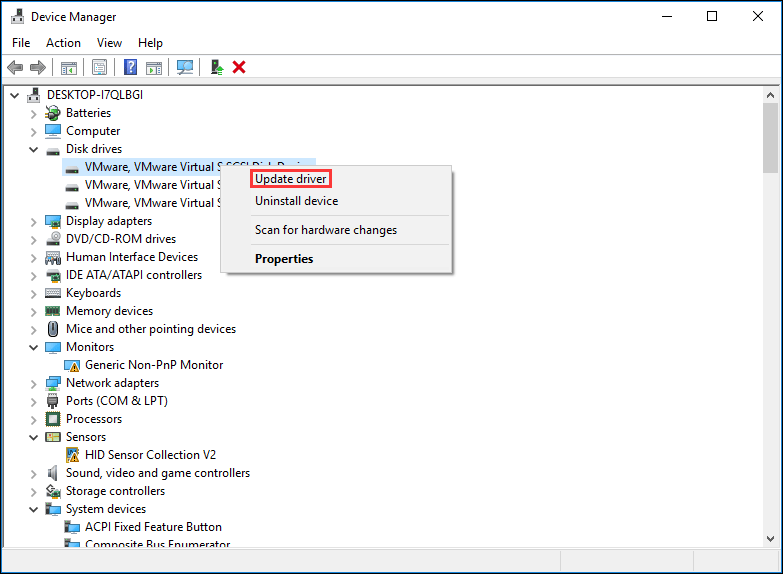
Tip: If Windows can’t find a new driver, users can find a driver on the device manufacturer’s website and follow its instruction to perform operation.
Surely, there are some users who report that the BAD_SYSTEM_CONFIG_INFO error occurs after they update to unsuitable drivers. If so, users can uninstall device to fix this problem.
Fix 4. Use BCDEdit Command
Windows 10 bad system config info error may occur due to incorrect system configuration like improper number of processors and wrong memory amount value. Some users report that the computer will overheat if the number of processors is very large, which will cause BAD_SYSTEM_CONFIG_INFO error sequentially.
Besides, some users also report that the abnormal value (usually it is too small) of memory amount will prevent computer to boot up. Fortunately, the two problems can be solved by bcdedit commands (even if the computer can’t boot into safe mode). Here is the tutorial:
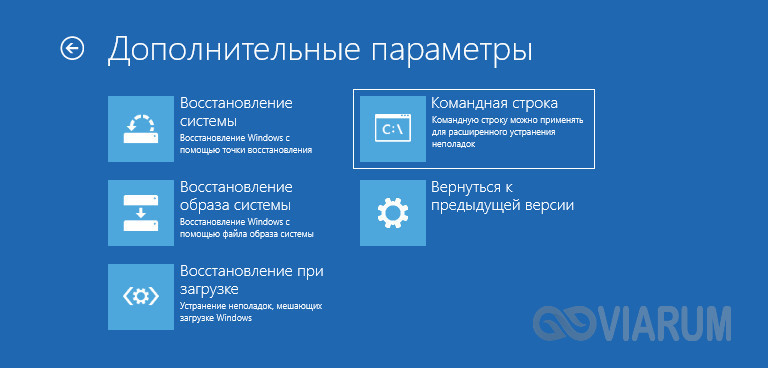
Step 1: Enter WinRE. Navigate to Troubleshoot > Advanced options > Command Prompt.
Step 2: Input the following two command lines (each command line is followed by pressing Enter key):
- bcdedit/deletevalue {default} numproc
- bcdedit/deletevalue {default} truncatememory

Step 3: Close the Command Prompt window and try rebooting computer to see whether it is OK.
Fix 5. Fix Windows Registry
Windows registry is an important database in Microsoft Windows for storing settings information of system and application. The various parameters stored in registry control directly the startup of Windows, the loading of hardware drivers, and the operation of some Windows applications.
Therefore, some registry issues can also cause bad system config info error. And usually, this registry issue can be repaired through command lines.
Here is a tutorial for solving bad system config info Windows 11/10 error caused by corrupted registry.
Step 1: Enter WinRE and navigate to Troubleshoot > Advanced options > Command Prompt.
Step 2: Execute the following commands one by one.
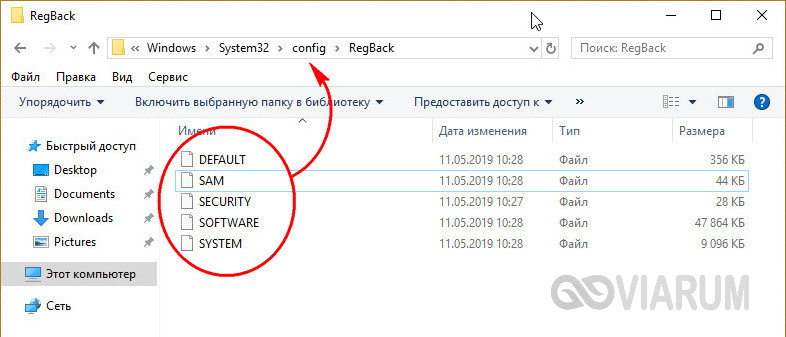
- CD C:WindowsSystem32config
- ren C:WindowsSystem32configDEFAULT DEFAULT.old
- ren C:WindowsSystem32configSAM SAM.old
- ren CWindowsSystem32configSECURITY SECURITY.old
- ren C:WindowsSystem32configSOFTWARE SOFTWARE.old
- ren C:WindowsSystem32configSYSTEM SYSTEM.old
- copy C:WindowsSystem32configRegBackDEFAULT C:WindowsSystem32config
- copy C:WindowsSystem32configRegBackSAM C:WindowsSystem32config
- copy C:WindowsSystem32configRegBackSECURITY C:WindowsSystem32config
- copy C:WindowsSystem32configRegBackSYSTEM C:WindowsSystem32config
- copy C:WindowsSystem32configRegBackSOFTWARE C:WindowsSystem32config
The cd and ren command lines will enter WindowsSystem32config and rename folders under it. Thus, Windows can’t use them anymore and users can restore them later (in system restore) if necessary. The copy command lines will copy the files in RegBack to config. In other words, these command lines will replace the old registry entry files with the registry backup.
If these command lines don’t work, users can type “notepad.exe” to open this program. Then click File and Open. And then, navigate to boot system > Windows > System32 > config. Display all files and rename them by just adding a symbol in case these files need to be restored. Then go to RegBack folder to copy all files from it and paste them to config folder.
Step 3: Close the Command Prompt and restart computer to see whether bad system config info error is solved.
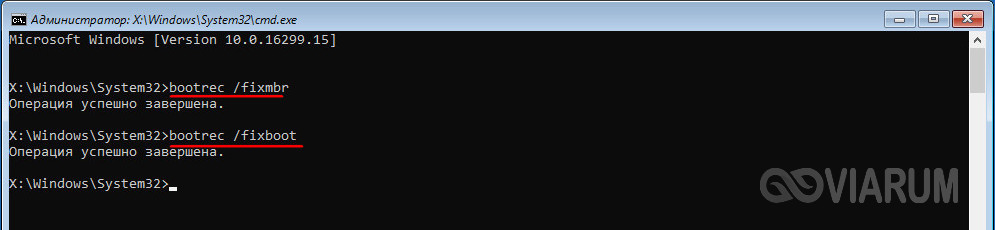
Fix 6. Bootrec Command
If the BCD files get corrupted, bad system config info error may also occur. Bootrec.exe is a computer program file that can be used in WinRE Command Prompt to solve and repair Master Boot Record (MBR) issue, boot sector issue, and Boot Configuration Data storage issue. But this tool requires you to enter WinPE.
Here is the tutorial.
Step 1: Enter WinPE and open Command Prompt window.
Step 2: Execute the following command lines one by one.
- bootrec /fixmbr
- bootrec /fixboot
- bootrec /rebuildbcd
Fix 7. System Restore or Reset Computer
If the previous methods can’t solve the bad system config info error, users can perform system restore or computer reset to solve Windows 10 bad system config info error.
However, the bad system config info error may cause data loss, so users should recover and backup important files in advance. Aiming to recover data when computer can’t boot, MiniTool Partition Wizard is recommended.
Here is a tutorial for recovering data when computer can’t boot.
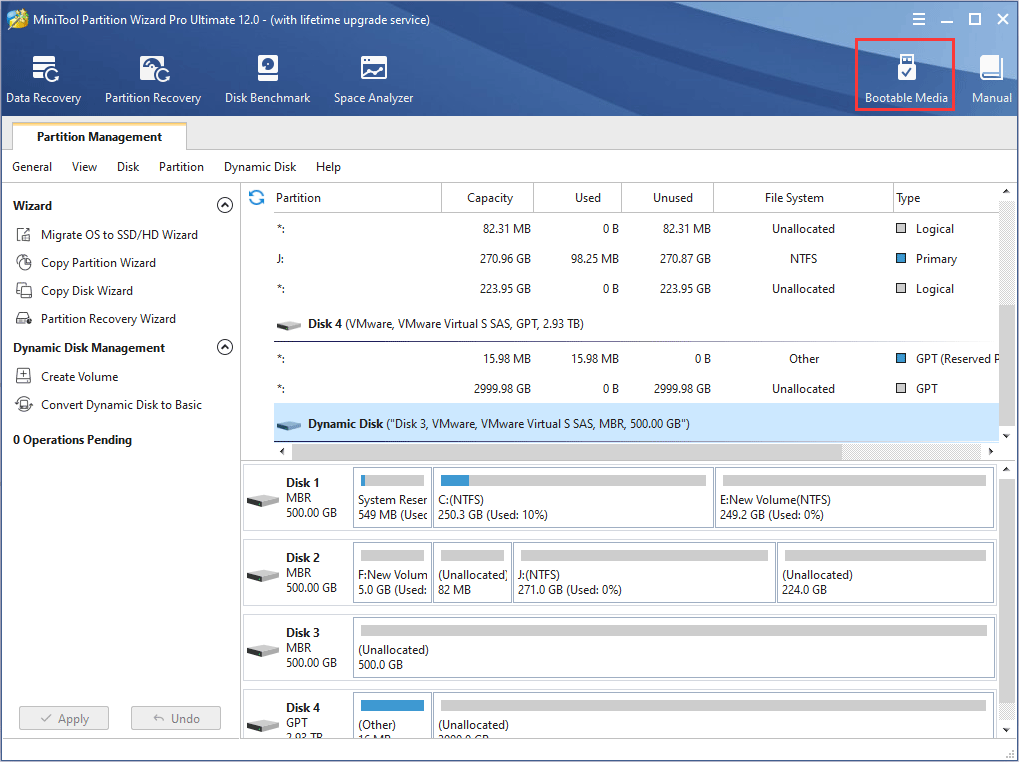
Step 1: Make a bootable disk of MiniTool Partition Wizard.
Buy MiniTool Partition Wizard and launch it on a normal running computer to get its main interface. And then click Bootable Media on the toolbar.
Click WinPE-based media with MiniTool plug-in. And then choose the media destination.
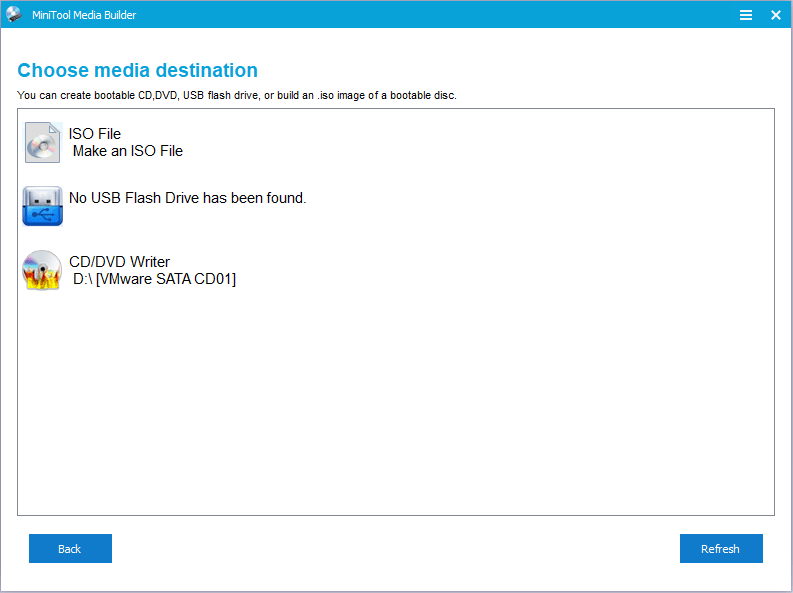
Tip: USB Flash Drive option is recommended, because the boot.iso file will be burnt into it directly to complete a bootable disk. Or, ISO File option is selected, thus the boot.iso file is generated and can be burnt to USB flash drive later by using another media creation tool. CD/DVD Writer option can also be chosen if the computer supports CD/DVD.
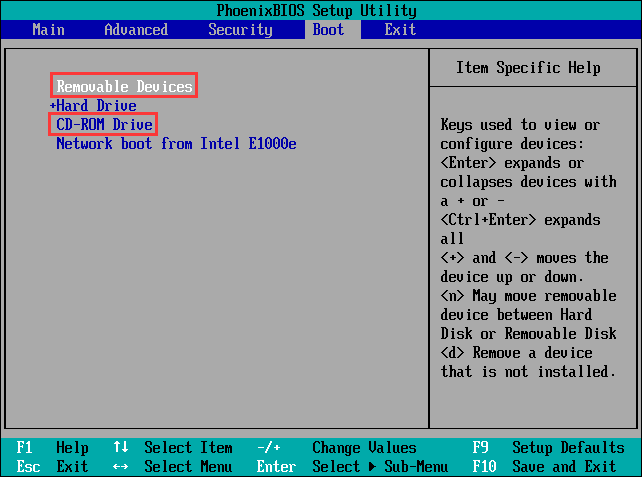
Step 2: Set in the Firmware to make the computer boot from the disk containing the burnt boot.iso file.
Step 3: Recover data on system partition to other data partitions.
When the computer is booted up by the bootable disk, MiniTool Partition Wizard will open automatically after a few seconds. Then, click Data Recovery.
Note: The drive letters have been changed in bootable disk.
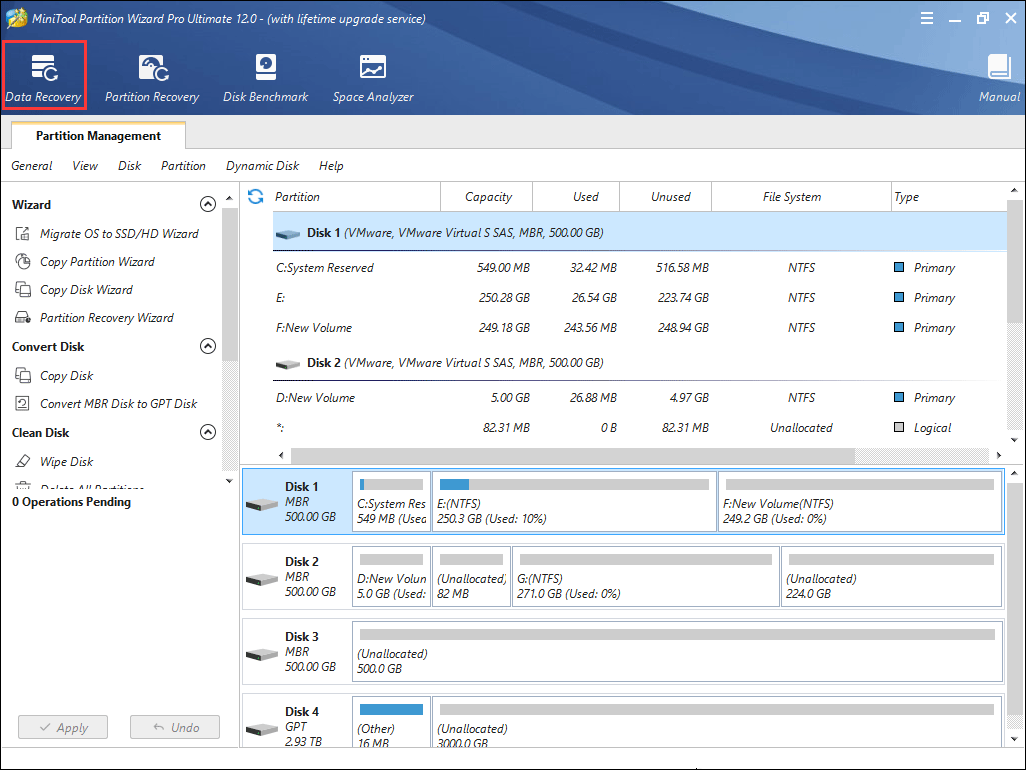
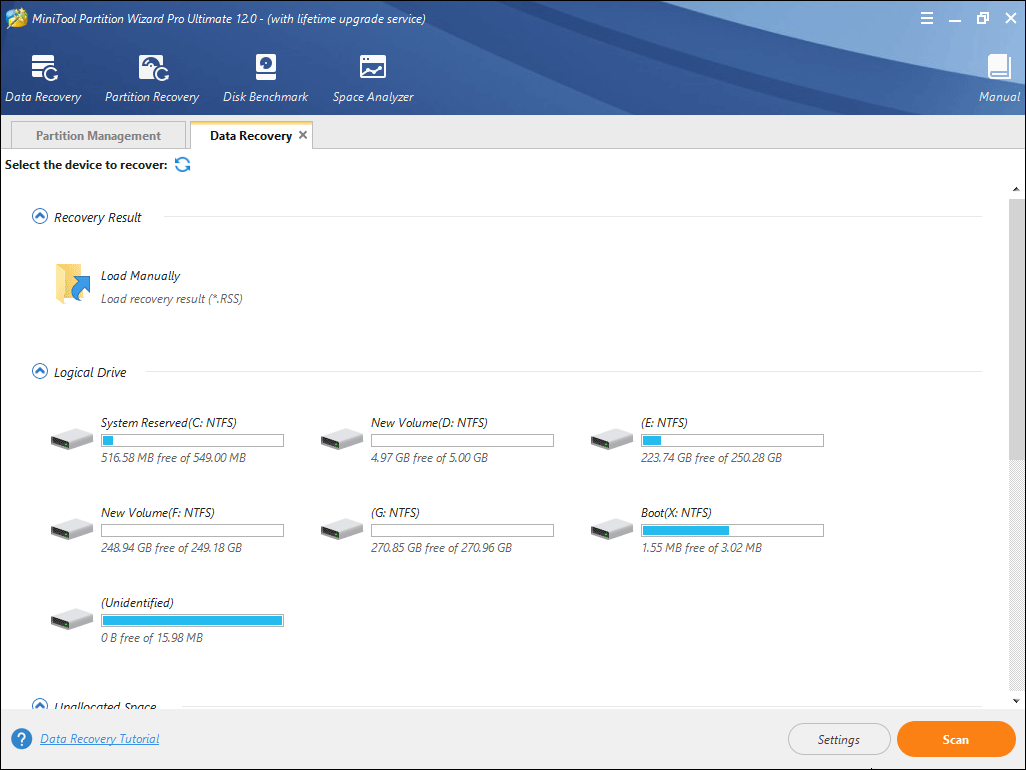
Choose logical drive E (the original boot partition C) and then click Scan.
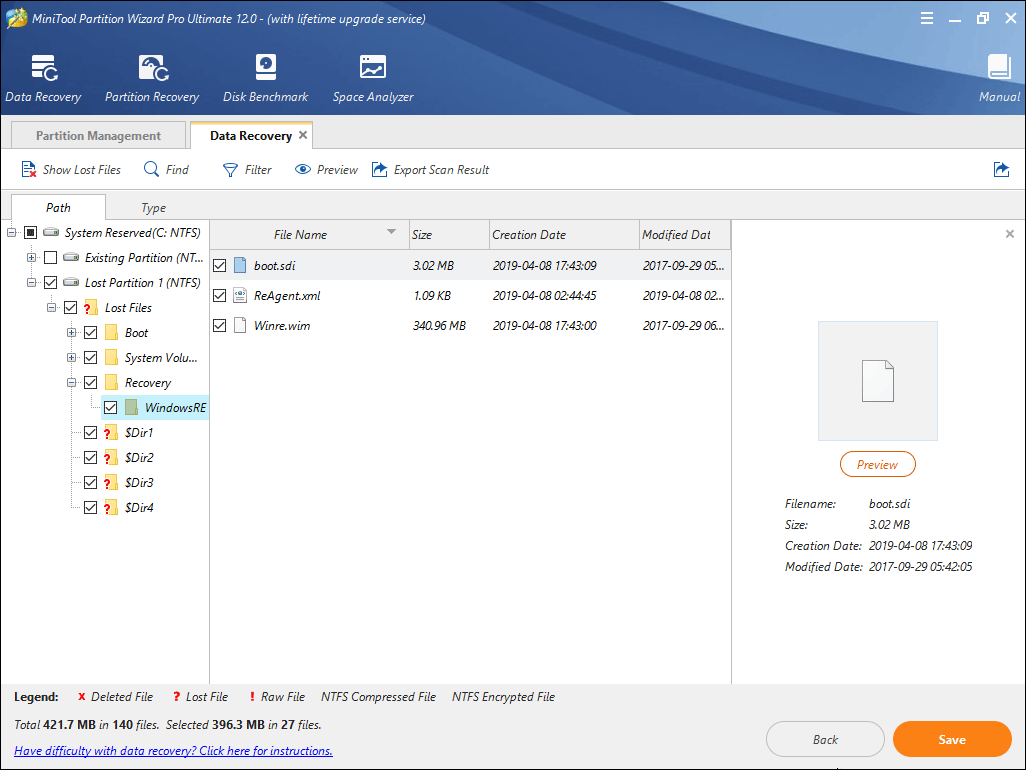
Step 4: Find the files that need to be recovered and then click Save button.
Tip: Features like Show Lost File, Find, and Filter can help users find files faster. Then please preview files before it is saved.
Here is a tutorial for system restore.
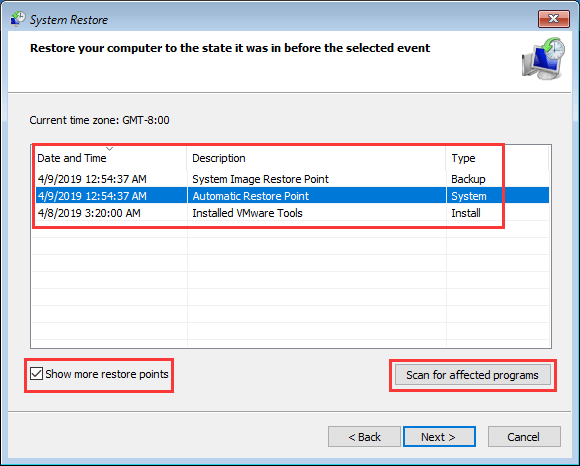
Step 1: Enter WinRE and navigate to Troubleshoot > Advanced options > System Restore.
Step 2: Follow the wizard the perform system restore. But please note that Show more restore points should be selected if users don’t see any suitable system restore point.
Click Easily Fix: Windows 10 System Restore Stuck (Focus on 2 Cases) for some help if system restore process is not smooth.
If users disable system protection feature and didn’t create a system restore point manually, they may find that there is no system restore point. If that happens, please consider resetting this PC.
Here is a tutorial for resetting PC.
Step 1: Enter WinRE and navigate to Troubleshoot > Rest this PC.
Step 2: Follow the wizard to reset PC, but please select Keep my files option.
Click 3 Ways to Fix Windows 10 Reset Stuck at 1/66/99% Black Screen for some help if the computer reset process is not smooth.
If the computer can boot up after system restore or reset this PC, please check whether the important files still exist. If the files are not there, users can refer to the above steps to retrieve them. However, if the bad system config info error still occurs after resetting PC, users should consider hardware problems.
Here are 7 solutions to bad system config info error. These solutions are explained step by step and some of them are illustrated with pictures. Click to Tweet
Bottom Line
The above seven ways can solve bad system config info errors caused by most common reasons. But if you have any other solutions, please leave a comment below for sharing. Likewise, if you have problems in performing the above solutions, please leave a comment for discussion.
Surely, if you have problems in data recovery or backup, please leave a comment or email [email protected] to for help.
Bad System Config Info FAQ
What is bad system config info Windows 10/11?
Bad system config info is a common BSOD bug on Windows systems. When it occurs, you can’t boot up your computer.
What causes bad system config info?
The bad system config info error can be caused by hardware problems like memory back and hard disk corruption, and loose wire winding and port, as well as software problems like problematic update, software incompatibility, corrupted MBR, incorrect Boot Configuration Data (BCD) file, corrupted registry, damaged or corrupted RAM, bad drivers, etc.
Одной из самых популярных проблем, с которой приходится сталкивать чуть ли не каждому пользователю – синий экран «BSOD» с уведомлением о перезагрузки и текстом BAD SYSTEM CONFIG INFO «0x00000074». Ошибка может появиться как во время работы Windows 10, 8 и Windows 7, так и сразу при загрузке компьютера, делая при этом дальнейшую работу невозможной.
Давайте разбираться, что делать и как исправить положение. Исходя из названия ошибки можно понять, что мы столкнулись с проблемой на стороне конфигурации операционной системы. Но что именно повлекло ее появление, не уточняется, остается лишь предполагать и по порядку выполнять пункты, о которых я поведаю ниже.
Если Windows не загружается в обычном режиме, то запустите ее в безопасном или с помощью загрузочного диска (флешки). Так вы сможете выполнить все действия, о которых пойдет речь дальше.
Содержание статьи
- Основные моменты
- Причины возникновения ошибки
- Исправляем поврежденные данные
- Исправляем файлы BCD и восстанавливаем загрузочную область
- Другие варианты решения
- Видео инструкция
- Комментарии пользователей
Основные моменты
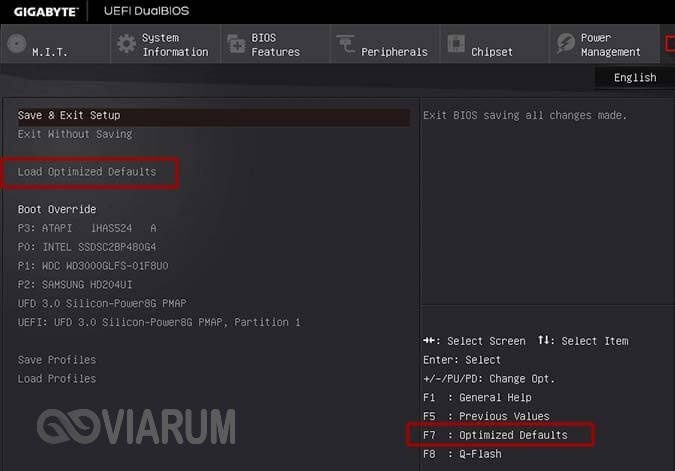
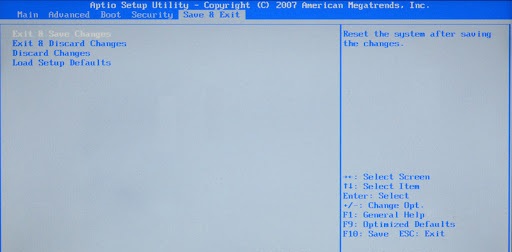
- Если до появления сбоя были изменены настройки BIOS, то их необходимо вернуть к прежнему состоянию. Для этого войдите в настройки BIOS, воспользуйтесь опцией «Load Optimized Defaults» или похожей, сохраните настройки и перезапустите компьютер.

- Бывает, что сбой вызывает новое устройство, которое было подключено к компьютеру. Тогда следует его отключить.


- Если было выполнено обновление с семерки или восьмерки на более новую десятку, то возможно проблема находится на стороне несовместимых драйверов. Тогда их следует переустановить, для начала удалив старые. При этом драйвера желательно скачивать с официальных сайтов.
- Также не стоит исключать возможность некорректной установки драйвера или его несовместимости с текущей системой. В первую очередь убедитесь, что он полностью совместим с вашей ОС и затем переустановите его.

- Иногда код остановки BAD SYSTEM CONFIG INFO появляется послеавтоматического обновления определенного драйвера. Например, видеокарты. Тогда может помочь полное удаление с дальнейшей установкой чистой версии или откат драйвера.
- Некоторым пользователям помогает замена неисправной планки памяти, которая легко вычисляется в программе «Memtest».

- Также проблема может находиться на стороне поврежденного реестра. Который вполне мог повредиться в результате работы программы чистильщика или оптимизатора, например, «Ccleaner» и прочих. Первый вариант исправления – загружаемся в безопасном режиме, после чего в обычном. Таким образом самые важные записи реестра будут перезаписаны, что повысит шансы успешной загрузки. Второй вариант – использовать точки восстановления или провести процедуру ручного восстановления реестра.

- Обязательно проверьте компьютер на вирусы.
- Нередко сбой BAD SYSTEM CONFIG INFO вызывает жесткий диск или материнская плата. Причем здесь может быть что угодно, поломка материнской платы в результате которой начал сбоить SATA / IDE порт, перегиб SATA / IDE кабеля, неплотный контакт с разъемом на жестком диске или BAD блоки. Еще один вариант – наличие повреждений на стороне важных файлов и файловой системы.


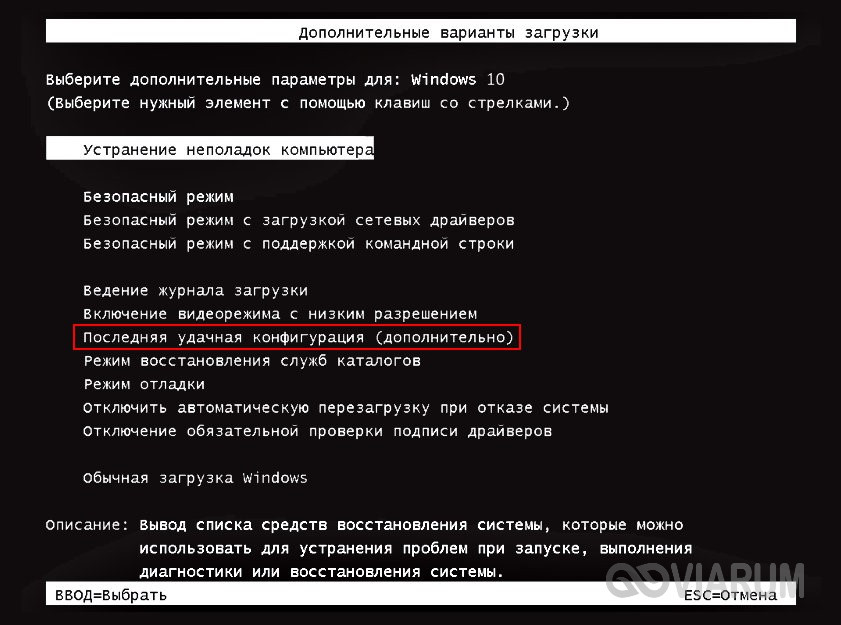
- В момент загрузки ПК начните нажимать «F8» до появлений черного экрана с набором параметров. Затем с помощью стрелок выберите пункт последней конфигурации и щелкните «Enter». Не самый эффективный способ, но иногда выруливает ситуацию.

Итак, мы разобрали основные типы неисправностей, которые чаще всего влекут за собой различные сбои, но это еще не все.
Причины возникновения ошибки
Ошибка BAD SYSTEM CONFIG INFO «0x00000074» возникает по следующим причинам:
- Изменение параметров работы дисков в BIOS;
- Некорректное изъятие устройства из слота на материнской плате или USB;
- Сбой процесса NTLDR;
- Поврежденный реестр.
Каждая из них может быть диагностирована и устранена пользователем без глубоких технических знаний.
Исправляем поврежденные данные
Теперь разберем способ, который можно использовать если код ошибки BAD SYSTEM CONFIG INFO «0x00000074» появляется при загрузке Windows 10 и 7.
- В момент загрузки компьютера начните нажимать «F8» до тех по, пока не появятся варианты запуска. Также можно зажать клавишу «Shift» и нажать по иконке выключения — перезагрузка, доступной в меню «Пуск».

- Войдите в раздел «Устранение неполадок», нажав «Enter». Если загрузились с помощью F В противном случае переходите к следующему пункту.
- Переместитесь в раздел «Поиска и устранения неисправностей».

- Щелкните по пункту «Дополнительные параметры».

- Запустите консоль команд.

- Выберите запись администратора.

- В черном окне введите «diskpart» (без кавычек) и щелкните «Enter».
- Следом выполните – «list volume».

- В результате вы увидите список из всех существующих томов. Запомните букву раздела с установленной ОС и букву с загрузочным сектором, обычно он имеет наименьший размер «около 500 мб и сопровождается сообщением — зарезервировано».
- Введите exit и нажмите «Enter».
- Введите chkdsk d: /f /r и нажмите «Enter». Где «D» это раздел с установленной системой, если в вашем случае используется другая буква, то укажите ее вместо буквы «D».

- Дождитесь завершения проверки и следом задействуйте другую команду — sfc /scannow /OFFBOOTDIR=C:\ /OFFWINDIR=D:\Windows, нажав «Enter». Где «C» — загрузочный сектор и «D» диск с ОС.

- Дожидаемся окончания проверки и перезагружаем компьютер.
После этого ошибка BAD SYSTEM CONFIG INFO с кодом «stop 0x00000074» должна быть устранена.
Пользователям семерки предлагаю воспользоваться загрузочной флешкой (диском), войти в «Восстановление системы», затем в консоль команд и выполнить действия из пунктов 6 — 11.
Исправляем файлы BCD и восстанавливаем загрузочную область
В некоторых случаях повреждается загрузочная область, в результате чего система отказывается запускаться. Восстановить работоспособность можно с помощью нескольких команд.
Для этого требуется:
- Повторить действия из пунктов 1 — 5 предыдущего раздела.
- Поочередно ввести: «bootrec /fixmbr», «bootrec /fixboot (без кавычек). Каждая из которых должна сопровождаться нажатием «Enter».

- Для десятки предусмотрена еще одна команда – bcdboot d:\Windows. Где «D» это том с установленной ОС, его мы нашли с помощью команды «list volume» из предыдущего раздела (7-8 пункты).
После этого повторяем попытку запуска компьютера в обычном режиме.
Другие варианты решения
Существует еще одно дополнительное средство для устранения ошибки BAD SYSTEM CONFIG INFO, которое работает на Windows 7 и только на некоторых сборках Windows 10 и 8. Для начала нужно загрузиться с установочного диска (флешки), войти в «Восстановление», запустить командную строку и поочередно задействовать следующие команды.
- bcdedit /deletevalue {default} numproc;
- bcdedit /deletevalue {default} truncatememory;

После этого запускаем ОС в обычном режиме и проверяем результат.
Если и это не помогло, то больше ничего не остается, кроме как откатить систему до начального состояния с сохранением всех настроек, либо же сразу переустановить ее.

Некоторые пользователи отмечают, что проблема может находиться на стороне используемой сборки и установленных программ. Поэтому стоит также задуматься о смене сборки и удалении лишних программ, например, «Volume2».
Видео инструкция
Содержание:
- 1 Загрузка удачной конфигурации
- 2 Настройки BIOS
- 3 Удаление драйверов оборудования
- 4 Применение консольной утилиты bcdedit
- 5 Откат к точке восстановления
- 6 Проверка ОЗУ
Ошибки BSOD коварны тем, что причины их появления не всегда являются очевидными. Одно и то же сообщение на синем «экране смерти» может быть вызвано разными неполадками, начиная от проблем с драйверами и заканчивая повреждением системного реестра или файлов загрузчика. Подтверждением тому служит ошибка BAD SYSTEM CONFIG INFO в Windows 10, возникающая при внесении различных изменений в конфигурацию системы.

Сталкиваться с данной ошибкой пользователям приходится после установки второй операционной системы, работы в программах для управления загрузкой, при повреждении загрузчика, перенастройке BIOS, после подключения к компьютеру новых устройств, инсталляции нового драйвера и тому подобное. Но чаще всего синий экран BAD SYSTEM CONFIG INFO становится следствием проблем с библиотеками, автоматически загружаемыми протоколом NTLDR.
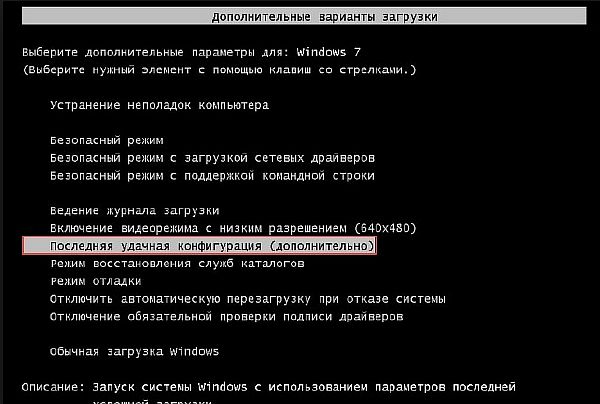
Загрузка удачной конфигурации
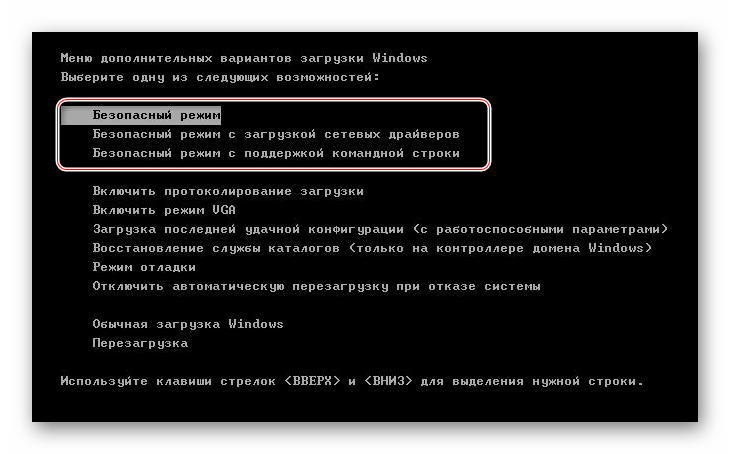
Итак, перейдем непосредственно к тому, как исправить ошибку BAD SYSTEM CONFIG INFO в Windows 10. Первое, что можно предпринять в таком случае, попробовать загрузить систему в режиме восстановления конфигурации. Для этого в момент загрузки нужно зажать клавишу F8, после чего на экране появится меню дополнительных вариантов загрузки. Выберите пункт «Последняя удачная конфигурация» и нажмите ввод.
Система должна запуститься с теми настройками конфигурации, при которых все работало нормально. К сожалению, если в параметрах электропитания у вас включен быстрый старт, вы просто не успеете нажать F8, что ограничивает использование этого способа.
Настройки BIOS
Восстановление настроек БИОС или UEFI понадобится, если вы вносили в них изменения. В крайнем случае, можно сбросить параметры BIOS к значениям по умолчанию. После восстановления настроек рекомендуется сначала загрузить Windows в безопасном режиме, а затем перезагрузиться уже в обычном.
Удаление драйверов оборудования
Если ошибка BAD SYSTEM CONFIG INFO вылезла после установки нового оборудования, необходимо загрузить Виндовс 10 в Safe Mode и удалить устройство, а также его драйвер из Диспетчера устройств или апплета «Программы и компоненты». Для входа в безопасный режим используйте меню восстановления конфигурации (клавиша F8).
Применение консольной утилиты bcdedit
Ошибку BAD SYSTEM CONFIG INFO в Windows 10 можно исправить через классическую консоль, и это является одним из самых эффективных методов. Загрузите ПК в среду восстановления (например, с помощью установочного диска) и откройте в дополнительных параметрах Поиск и устранение неисправностей – Дополнительные параметры. Затем выберите запуск командной строки и выполните в ней эти две команды, одну за другой:
bcdedit /deletevalue {default} numproc
bcdedit /deletevalue {default} truncatememory


Дополнительно следует выполнить команды bootrec.exe /fixmbr и bootrec.exe /fixboot. Они помогут решить проблему, если таковая была вызвана повреждением загрузочной записи.
Откат к точке восстановления
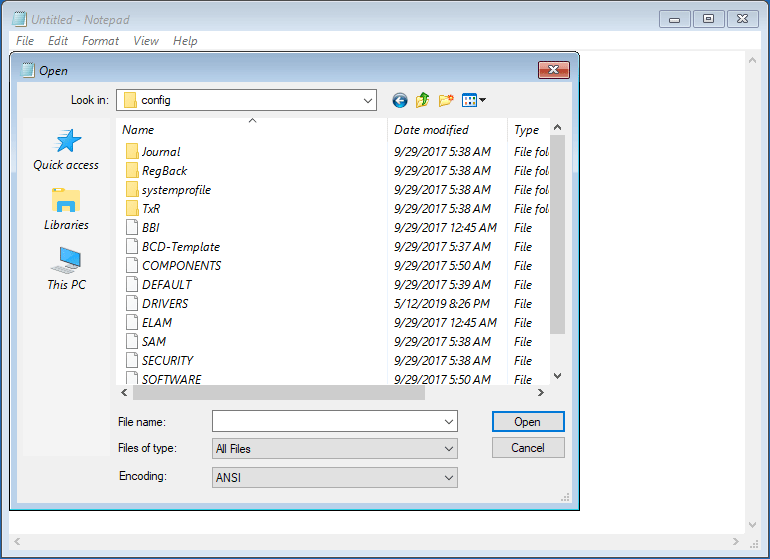
Этот способ будет действенен, если ошибка возникла из-за повреждения/удаления записей реестра. Загрузите компьютер с диска, содержащего дистрибутив Windows, зайдите в дополнительных параметрах в раздел Восстановление системы и проследуйте указаниям мастера. Если вдруг у вас не окажется точек восстановления, загрузите ПК с любого LiveCD и скопируйте файлы из каталога, указанного на скриншоте, в папку верхнего уровня config с заменой.

Проверка ОЗУ
Если вышеперечисленные действия не принесли результата, стоит проверить состояние оперативной памяти. Доберитесь любым удобным вам способом до командной строки и выполните в ней команду mdsched.exe. Компьютер перезагрузится, после чего будет выполнена проверка памяти. Для тестирования ОЗУ также удобно использовать продвинутую утилиту memtest86+, входящую в состав спасательного диска от Сергея Стрельца.
В случае обнаружения дефектов модули памяти, скорее всего, придется заменить, но перед тем как это сделать, не помешает посоветоваться с более опытными пользователями или обратиться за помощью к специалистам из сервисного центра.

Операционная система Виндовс 10 старается быть максимально дружелюбной по отношению к пользователю. Для этого разработчики предусмотрели массу полезных функций, однако все они не имеют смысла, когда появляется ошибка BAD SYSTEM CONFIG INFO на компьютере Windows 10, и не понятно, как исправить подобную неполадку. К счастью, выход из сложившейся ситуации есть, но для этого придется внимательно изучить суть проблемы и воспользоваться инструкцией.
В чем причина проблемы
Нельзя четко определить, в какой момент оборвется работа компьютера, и появится сообщение «BAD SYSTEM CONFIG INFO». Это может произойти как при запуске ПК, так и при выполнении базовых задач вроде веб-серфинга или редактирования видео.
Тем не менее, проблема возникает не на пустом месте и определяется следующими причинами:
- сбой в библиотеке системных файлов;
- ошибка в реестре компьютера;
- неисправность ОЗУ или ПЗУ.
Также неполадки бывают вызваны внутренними компонентами (устаревшие или неисправные драйвера для видеокарты, акустики и так далее). Как бы то ни было, ошибка исправляется базовыми средствами ПК.

Исправление BAD SYSTEM CONFIG INFO в Windows 10
Определить точную причину возникновения проблемы будет непросто даже опытному пользователю, поскольку «экран смерти» появляется в любой момент, вне зависимости от того, что человек делает за компьютером. Поэтому для устранения неполадок потребуется 30-60 минут свободного времени для разбора каждого возможного варианта.

Настройка BIOS
Ошибка Виндовс 10 бывает вызвана изменением настроек меню BIOS. Это могло произойти как вследствие вмешательства самого пользователя, так и при помощи сторонних компонентов, способных менять параметры системы. Чтобы не заниматься поиском того, какая именно настройка влияет на работоспособность компьютера, рекомендуется сбросить BIOS:
- Перезагрузите компьютер.
- Запустите BIOS.
- Перейдите в раздел «Exit».
- Нажмите кнопку «Load Setup Default».
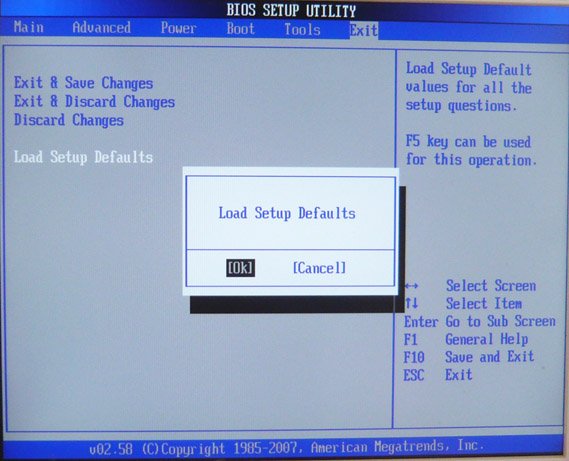
На заметку. Для входа в BIOS используется многократное нажатие клавиши «F1», «F2» или «F8» – в зависимости от модели материнской платы.
Как только сброс будет исполнен, рекомендуется запустить ПК в безопасном режиме, чтобы проверить его работоспособность. Только после этого можно пользоваться устройством в стандартной конфигурации.
Загрузка удачной конфигурации
Если ошибка, имеющая код остановки «BAD SYSTEM CONFIG INFO», произошла из-за повреждения реестра, она исправляется путем запуска предыдущей точки. Операция выполняется в несколько шагов:
- Перезагрузите ПК.
- При включении компьютера удерживайте нажатой клавишу «F8».
- Как только откроется окно, выберите параметр «Загрузка последней удачной конфигурации».
- Нажмите клавишу «Enter».
Устройство должно запуститься с того момента, когда компьютер в последний раз функционировал в полном объеме. Возможно, пользователь потеряет некоторые данные, однако это не означает, что произойдет полный сброс параметров ПК.
Удаление драйверов оборудования
Ошибка бывает вызвана установкой нового оборудования (например, контроллеров), а также неисправностью драйверов отдельных устройств. Для устранения неполадок в таком случае рекомендуется делать шаги по инструкции:
- Выполните перезагрузку ПК.
- При включении удерживайте клавишу «F8».
- Когда откроется окно, выберите пункт с безопасным режимом.
- Как только устройство запустится, откройте Диспетчер устройств (перейдите в меню «Пуск» и введите в поисковой строке соответствующий запрос).
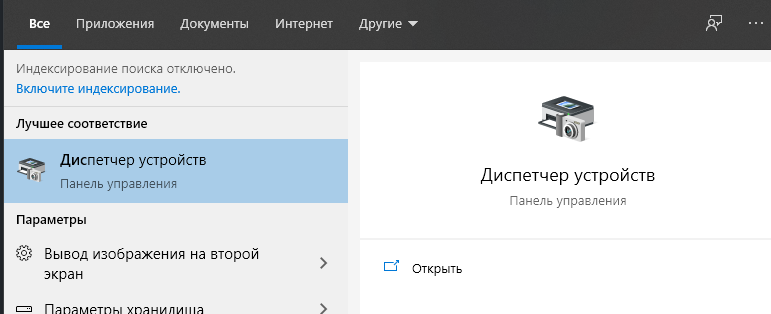
- Выберите любое из недавно установленных устройств.
- Кликните ПКМ, и выберите пункт «Удалить драйверы».

При необходимости аналогичную операцию понадобится выполнить с другими видами оборудования. После этого следует заново установить доступные драйверы, а затем перезагрузиться.
Консольная утилита bcdedit
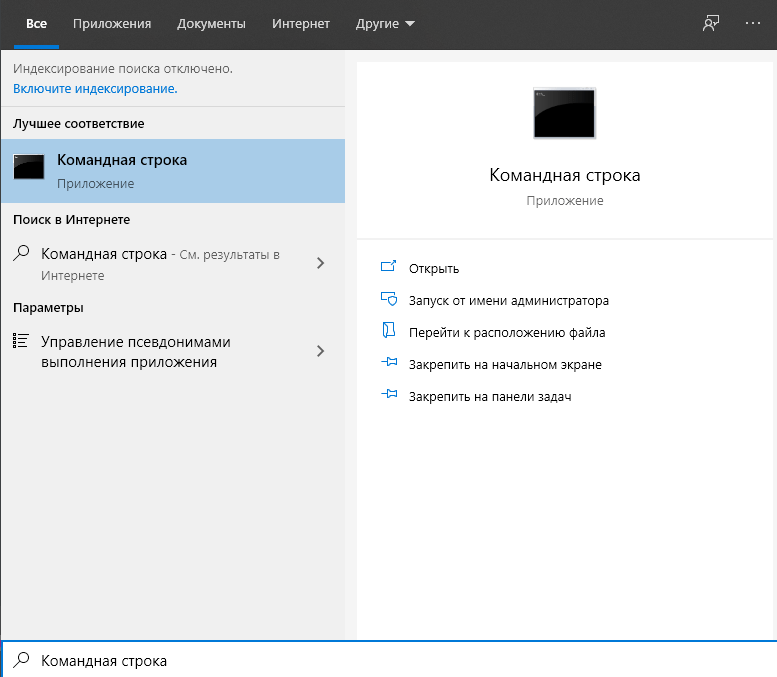
Если ни один из ранее предложенных способов не помог решить проблему, необходимо воспользоваться консольной утилитой bcdedit. Для получения доступа к ней требуется загрузить образ системы на внешний накопитель (флешку) и подключить его к ПК через разъем USB. Дальнейший план действий выглядит следующим образом:
- Включите компьютер и выберите пункт «Восстановление».

- Из предложенных действий выберите «Поиск и устранение неисправностей».

- Откройте дополнительные настройки, а затем перейдите в Командную строку.

- Поочередно введите запросы bcdedit /deletevalue {default} numproc, bcdedit /deletevalue {default} truncatememory, bootrec.exe /fixmbr и bootrec.exe.

Важно. Не забывайте после ввода каждой команды нажимать клавишу «Enter». В противном случае изменения не вступят в силу.
Путем ввода обозначенных команд будет исправлена ошибка загрузочной записи. Это позволит запустить компьютер в стандартном режиме.
Откат к точке восстановления
Еще один способ, позволяющий решить проблему в случае, если она была вызвана ошибками реестра. Действовать следует через загруженный на флешку образ операционной системы Windows 10. Далее нужно выполнить несколько шагов:
- Откройте среду восстановления.

- В дополнительных параметрах выберите пункт «Восстановление системы».
- Укажите логин и пароль от учетной записи, а затем действуйте по инструкции Мастера восстановления.
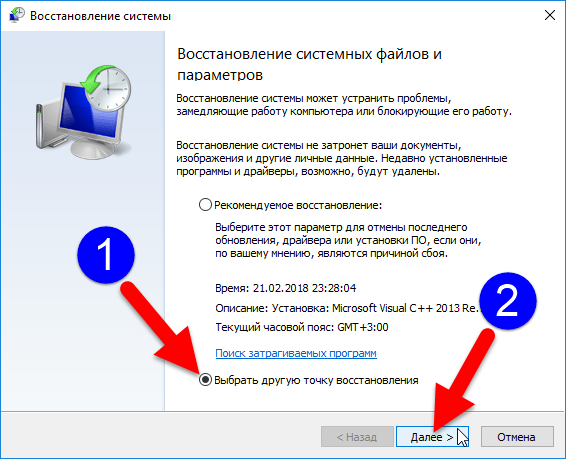
Возврат к одной из доступных точек восстановления заключается в обходе ошибок, вызванных неисправностью компьютера. ПК запустится с той точки, когда устройство функционировало без сбоев.
Проверка ОЗУ
Неисправность дает о себе знать не только на программном, но и на аппаратном уровне. То есть ошибка бывает вызвана неисправностью отдельных компонентов компьютера. Чаще всего – оперативной памяти.
Для проверки ОЗУ потребуется:
- Запустить Командную строку любым способом.
- Ввести запрос «mdsched.exe» и нажать кнопку «Enter».

- После перезагрузки ПК подтвердить выполнение проверки памяти.
Если система обнаружит дефекты ОЗУ, и их не получится исправить программными методами, потребуется заменить планку оперативной памяти. Подобное нередко случается, когда компьютер является устаревшим или слишком слабым для работы Windows 10.
Blue Screens of Death (BSoD) can be a nightmare for many on the Windows OS. This can occur due to several reasons, usually accompanied by either a stopcode or the name of a faulty file. However, many people still experience a “BAD_SYSTEM_CONFIG_INFO” BSoD without a warning or any stopcodes.
A “Bad System Config Info” error mostly occurs due to a critical system file either being corrupted or duplicated, and the system does not understand how to react, hence throwing a BSoD to protect the device. This usually has to do with corrupted Windows Registries.
In some cases, users see a stop code 0x00000074 when they see a blue screen stating “Bad System Config Info.” This error occurs when your device has a corrupted system registry or when something is wrong with the Boot Configuration Data (BCD) file. The BCD file contains important boot-related data that is critical for the system to initiate successfully.
If you have experienced such an error, do not worry. Follow the guide provided to fix the problem without having to perform a fresh OS installation.
Table of contents
- Fix Bad System Config Info BSoD
- Repair BCD Files
- Edit BCD Files
- Update Faulty Driver
- Run a Memory Diagnostics
- Repair Bad Disk Sectors
- Fix Corrupted Files with DISM and SFC
- Run Startup Repair
- Restore PC to Earlier State
- Reset Windows
- Closing Words
Fix Bad System Config Info BSoD
The following mitigation processes include all the possible solutions that will fix the “Bad System Config Info” BSoD. Perform these solutions until your issue goes away.
Repair BCD Files
As we mentioned, BCD files are important for the system to run smoothly. You can repair these by following the guide given below.
Follow these steps to attempt to repair the Windows BCD files:
-
Start by creating a Windows installation media and then plug it into the problematic computer.
-
Boot from the USB using the One Time Boot Menu.
-
On the first screen, click Next.

Click Next -
Click “Repair your computer.”

Repair the computer -
Select “Troubleshoot.”
Select Troubleshoot from WinRE -
Select “Advanced Options.”
Select Advanced options -
Select “Command Prompt.”
Select Command Prompt The Command Prompt will now open.
-
Run the following cmdlets one after the other to repair BCD files:
bootrec /rebuildbcd
bootrec /scanos
bootrec /fixmbr
Repair BCD files -
Type in “exit” to leave the Command Prompt and restart the computer normally.


Now check if the issue has been resolved. If not, continue down to perform the rest of the fixes.
Edit BCD Files
Another issue with BCD files is that they could store the wrong amount of RAM than there actually is, the wrong number of processor cores, or any other information than the actual number. Such an error with a BCD file can cause a “Bad System Config Info” BSoD.
This can be corrected by running the following commands in Command Prompt from the Windows Recovery Environment (WinRE). Here is how:
-
Start by creating a Windows installation media and then plug it into the problematic computer.
-
Boot from the USB using the One Time Boot Menu.
-
On the first screen, click Next.
Click Next -
Click “Repair your computer.”
Repair the computer -
Select “Troubleshoot.”
Select Troubleshoot from WinRE -
Select “Advanced Options.”
Select Advanced options -
Select “Command Prompt.”
Select Command Prompt The Command Prompt will now open.
-
Run the following cmdlets one after the other to edit the BCD files:
bcdedit/deletevalue {default} numproc bcdedit/deletevalue {default} truncatememory -
Type in “exit” to leave the Command Prompt and restart the computer normally.
Update Faulty Driver
Faulty drivers are often found guilty of causing BSoDs, especially after you have just changed a piece of hardware. In such a scenario, we recommend that you update any faulty driver(s) on your system, if any.
To update a malfunctioning driver, follow these steps:
-
Open the Device Manager by typing in “devmgmt.msc” in the Run Command box.

Open the Device Manager -
Look for a faulty driver with an exclamation mark next to its icon.
-
Right-click the faulty driver and then click “Update driver” from the context menu.

Update faulty driver -
Click “Search automatically for updates.”

Automatically search for the latest drivers The wizard will now search online for any updated drivers available
-
Restart the computer once the driver is updated.


If the driver update fails, we suggest that you go to the manufacturer’s website and manually update the driver.
Perform the same steps for any drivers that have an exclamation mark next to them. Once done, your issue should be resolved. We recommend that you do not stop here and perform the remaining steps discussed below as a precaution.
Run a Memory Diagnostics
You can also perform a memory test to ensure that there aren’t any bad sectors on there, which are often found to be the cause of a BSoD. Windows 11 and Windows 10 come with a built-in tool for the task. However, it does involve a system reboot.
Here is how to invoke a memory test:
-
Type in “mdsched.exe” in the Run Command box.
Open Windows Memory Diagnostics -
Click “Restart now and check for problems.”

Run memory Diagnostics Your computer will now reboot and then automatically go into scanning mode. It will then scan your memory to look for any bad sectors. This step can take a moment to finish.


You can view the results in System Tray once the computer restarts. Alternatively, you can also view the results in the Event Viewer by going to Windows Logs >> System >> MemoryDiagnostics-Results.

If bad sectors are found, we recommend that you replace your memory modules on priority so you do not encounter another BSoD because of it.
Repair Bad Disk Sectors
It is possible that the error occurred due to a faulty hard drive, or a single bad sector within it. This can be checked by performing a deep scan without using any third-party tools. here is how to perform a CHKDSK scan:
-
Launch an elevated Command Prompt.
-
Run the following cmdlet:
Chkdsk C: /f /r /x
Run the CHKDSK utility You will then be asked whether you want to perform the test the next time the computer boots up.
-
Enter “Y” for Yes.
-
Restart the computer.
Windows will now scan your hard drive(s) during the reboot process.

Note that the scan can take some time to complete, in some cases, hours. Please allow the scan ample time to complete.
Fix Corrupted Files with DISM and SFC
Deployment Image Servicing and Management (DISM) and System File Checker (SFC) are built-in tools in Windows that can scan and repair system files. Use the following steps to run the DISM and SFC scans in an attempt to repair any corrupted system files that may be affecting critical system files and throwing a BSoD:
-
Launch an elevated Command Prompt.
-
Execute the following commands one after the other:
DISM.exe /Online /Cleanup-image /Checkhealth DISM.exe /Online /Cleanup-image /Scanhealth DISM.exe /Online /Cleanup-image /Restorehealth -
Then run the SFC scan using this cmdlet:
SFC /ScanNow
Execute DISM and SFC cmdlets to repair system files

Once done, recheck if the issue persists. If it does, there are other methods to repair Windows and mitigate the “Bad System Config Info” BSoD.
Run Startup Repair
Startup Repair is another Windows OS automatic repair tool that resolves common Windows issues when your OS cannot boot. Here is how you can run the Startup Repair tool:
-
Create a bootable Windows USB drive.
-
Boot from the USB drive using the One Time Boot Menu.
-
On the first screen, click Next.
Proceed -
Click “Repair your computer.”
Repair your computer -
Navigate to the following location inside WinRE:
Troubleshoot >> Advanced options >> Startup Repair
Open Startup Repair in Windows Recovery Environment -
Select the OS you want to fix.
Select OS to repair -
Let the automatic troubleshooting process complete and then try booting the PC normally again.


Once the OS image has been repaired, check to see if you still encounter the BSoD.
Restore PC to Earlier State
Restoring a PC refers to taking your Windows to a state it was earlier captured. It means all system configuration, network settings, and files and folders will revert to a point in time as if nothing ever happened after that. restoring a PC to a state when you did not encounter the BSoD would fix the issue.
Of course, there needs to be a restore point in the history of the PC to revert it to. This can be enabled by using Backup & Restore. If you have already created a restore point in the past that you can revert to, follow these steps:
-
Open System Properties by typing in “sysdm.cpl” in the Run Command box.
Open System Properties -
Switch to the “System Protection” tab.

Open System Protection settings -
Click “System Restore.”
Open System Restore settings The System Restore wizard will now open.
-
Click Next.

Proceed with restoration -
Select a restore point and click Next.
Select a restore point -
Click Finish.
Begin restoration of the system -
Click Yes on the confirmation dialog box.
Confirm Window restoration Windows will now restore to a previous restore point. This step can take some time to complete. Do not reboot or turn off your computer during this point and wait for the restoration to complete.
-
When finished, click Restart.


if you restored your PC t a time when the “Bad system config info” BSoD did not exist, then the problem should have been mitigated.
If this didn’t resolve the issue either, or you do not have a restore point, then the only thing you can do is perform a system reset.
Reset Windows
Resetting the computer brings all configurations back to their factory default settings and values. If the solutions discussed above did not work for you, then you must now reset your PC.
You can choose to keep your files and data while all other things are reset, or you can use our top selection of disk imaging and backup software so you never lose your data or operating system again.
Additionally, we recommend that you perform a “Cloud download,” which ensures that a fresh copy of system files are downloaded from Microsoft servers.
Here are the steps to perform a Windows reset with fresh system files while retaining your data:
-
Navigate to:
Settings app >> System >> Recovery
-
Click “Reset PC.”

Reset PC The reset PC wizard will now open.
-
Select “Keep my files.”

Keep files and data -
Select “Cloud download.”
Cloud download -
Click Next.
proceed with resetting Windows -
Click Reset.
Reset Windows from the Cloud while keeping files


The wizard will now begin downloading fresh files from Microsoft servers and then reset your computer. This step can take a while depending upon your internet connection, and your PC may restart.
Closing Words
If you have experienced a “Bad System Config Info” blue screen, we suggest that you start troubleshooting the error immediately and do not wait for another BSoD.
Several blog posts on the internet suggest that you repair the System Registry by renaming the old files in your system drive and replacing them with fresh files using a bootable OS image. Let us inform you that this technique is no longer valid as the system registries are no longer backed up in the RegBack folder. You can read more about this on Microsoft’s support page.
Having said that; we recommend that you try all of the above methods to mitigate the BSoD.