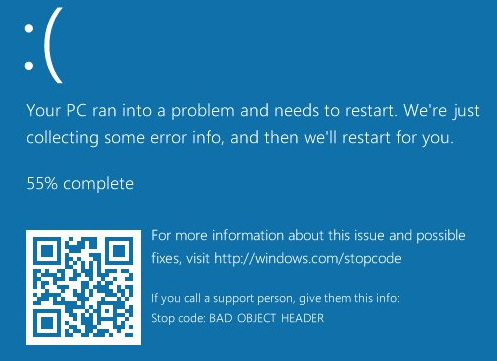
BAD_OBJECT_HEADER — является ошибкой, относящейся к типу «синий экран смерти». Она прерывает всю работу компьютера и принудительно перезагружает систему. Такая ситуация может не только раздражать, но и привести к потере данных и прогресса работы. Однако сообщение говорит о том, что с программным обеспечением Windows не всё в порядке.
Причин появления ошибки может быть несколько — от проблем с памятью до неисправных драйверов. Во многих случаях нарушение заключается именно в устаревшем программном обеспечении или несовместимости с новым обновлением Windows. К сожалению, из-за широких возможностей настройки, которые предоставляет ОС, не существует универсального способа исправить BSOD BAD_OBJECT_HEADER. Поэтому ниже приведены несколько вариантов решения, один из которых должен устранить проблему.
Решение 1. Обновите Windows
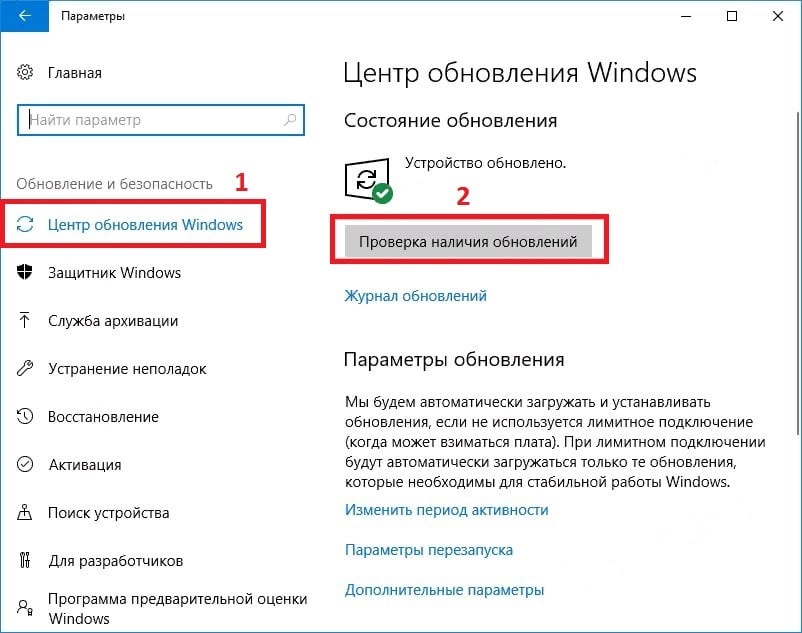
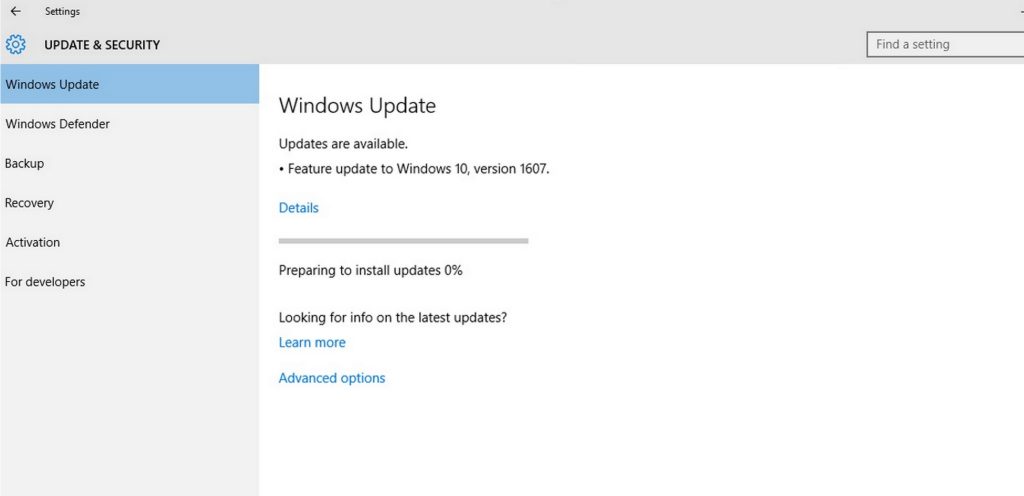
Всегда необходимо следить за актуальными обновлениями Windows, так как они исправляют ошибки и недоработки предыдущих версий. Как правило, они включены по умолчанию, и устанавливаются автоматически. Однако, если они отключены, следует сделать это вручную:
- Нажмите правой кнопкой мыши по значку Windows (левый, нижний угол).
- Выберите Параметры, и перейдите в раздел Центр Обновления Windows.
- Справа запустите Проверку наличия обновлений, и установите их, если таковые имеются.
- Затем перезагрузите систему.
Решение 2. Отключите автоматический перезапуск Windows
В некоторых случаях ошибку BAD OBJECT HEADER невозможно устранить из-за постоянного цикла перезапуска, сопровождающегося также сообщениями: BAD_POOL_HEADER и PAGE_FAULT_IN_NONPAGED_AREA. В этом случае стоит отключить автоматическую перезагрузку Windows.
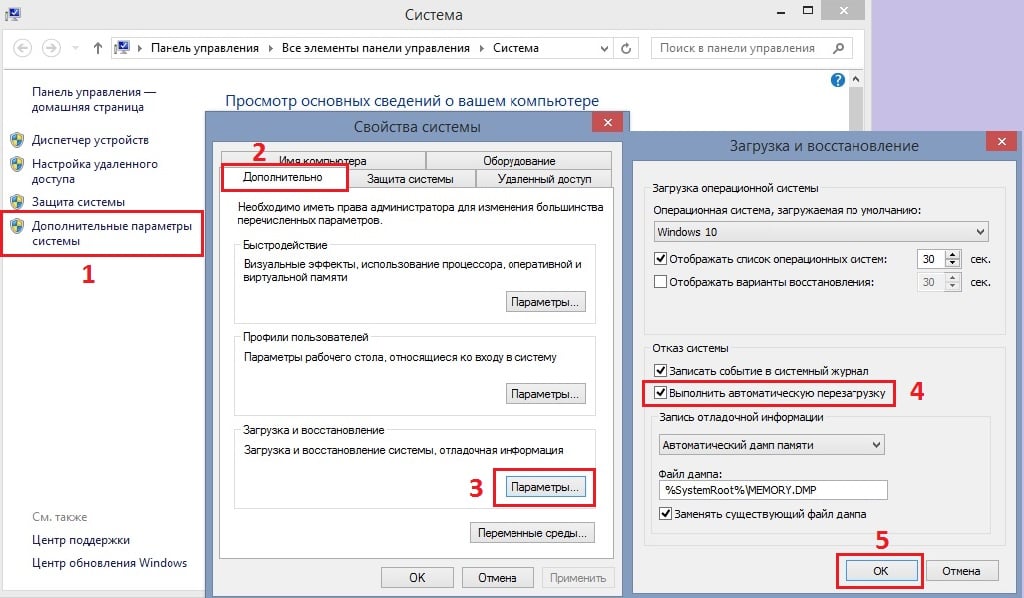
- Нажмите ПКМ по значку Windows, и выберите Система.
- Далее пройдите в Дополнительные параметры системы.
- Откройте вкладку Дополнительно, и нажмите Параметры в разделе Загрузка и восстановление.
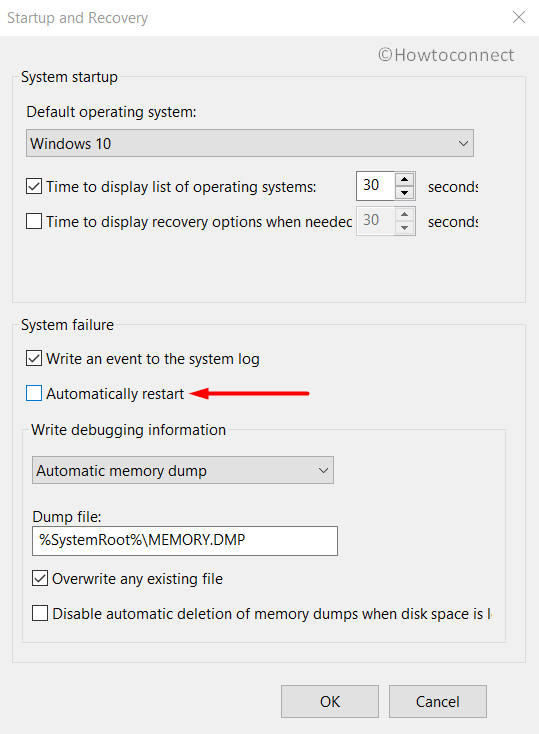
- В новом окне снимите галочку с настройки Выполнить автоматическую перезагрузку, и кликните Ок.
- Это предотвратит автоматический перезапуск системы.
Решение 3. Обновите драйверы
Хотя некоторые драйверы устанавливаются вместе с обновлениями Windows, этот метод применим во многих случаях.
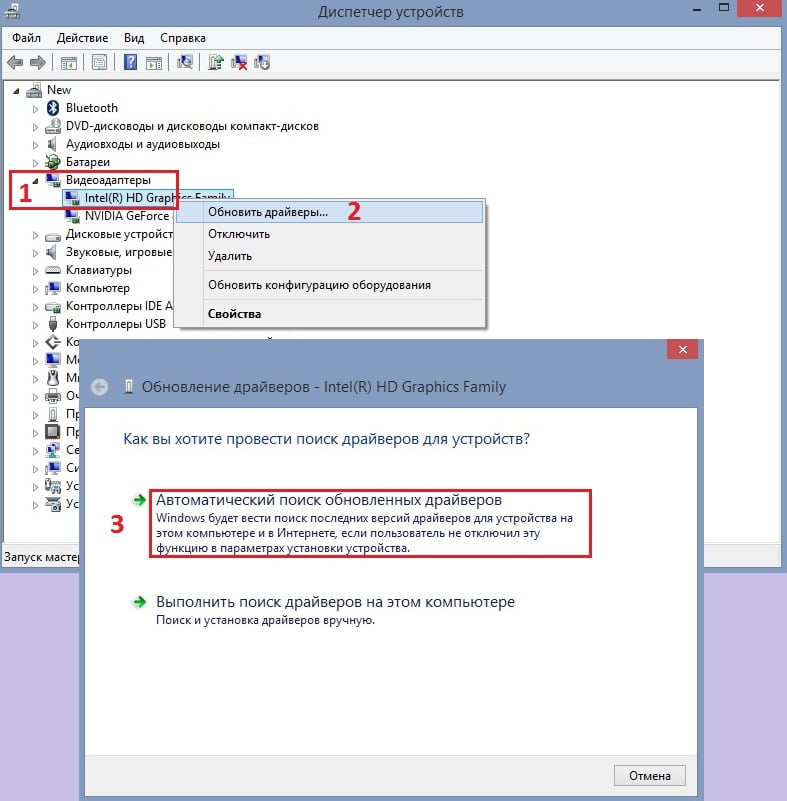
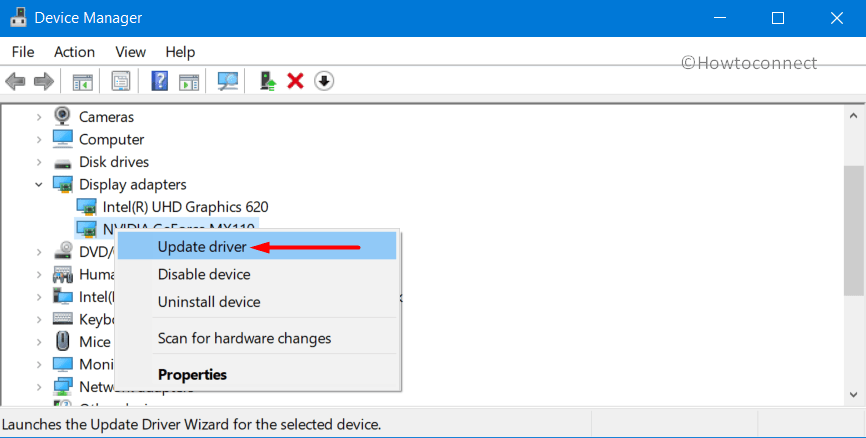
- Нажмите ПКМ по значку Windows, и перейдите в Диспетчер устройств.
- Разверните раздел Видеадаптеры и щёлкните ПКМ по драйверу Intel.
- Обновите программные обеспечения, выбрав в следующем окне Автоматический поиск обновлённых.
- Также следует загрузить новый драйвер Thunderbolt, если вы используете это оборудование.
- После этого перезагрузите компьютер.
Решение 4. Проверьте память с помощью средства диагностики Windows
Повреждение памяти является одной из основных причин появления экрана BSOD. Поэтому следует запустить автоматическую проверку оперативы. Сделать это можно следующим образом:
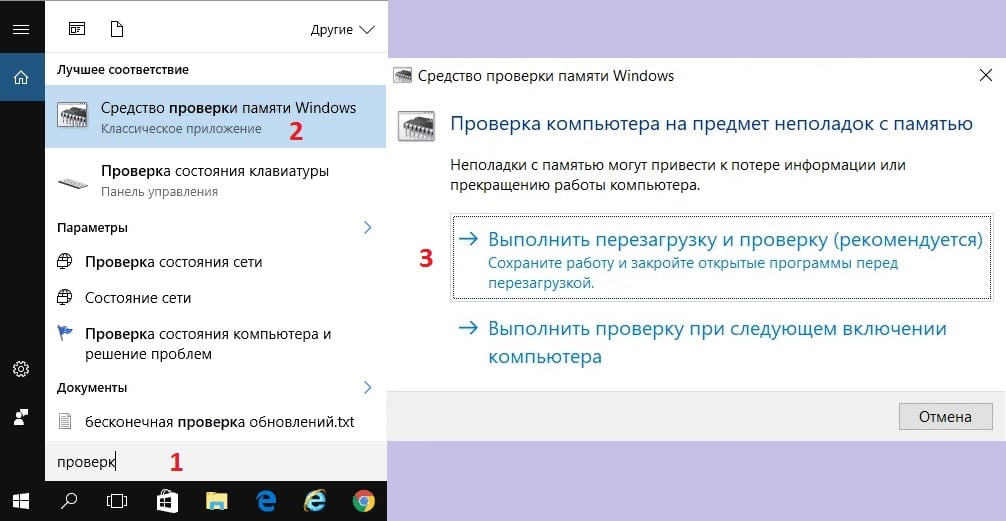
- Введите в поиск Windows Средство проверки памяти, и нажмите Enter.
- В появившихся результатах выберите аналогичную строку и запустите диагностику.
- Этот процесс автоматически перезагрузит компьютер и выполнит проверку памяти, поэтому перед этим следует сохранить все документы и приложения, открытые на рабочем столе.
Решение 5. Запустите средство проверки системных файлов
Проверьте системные файлы на предмет нарушений целостности следующим образом:
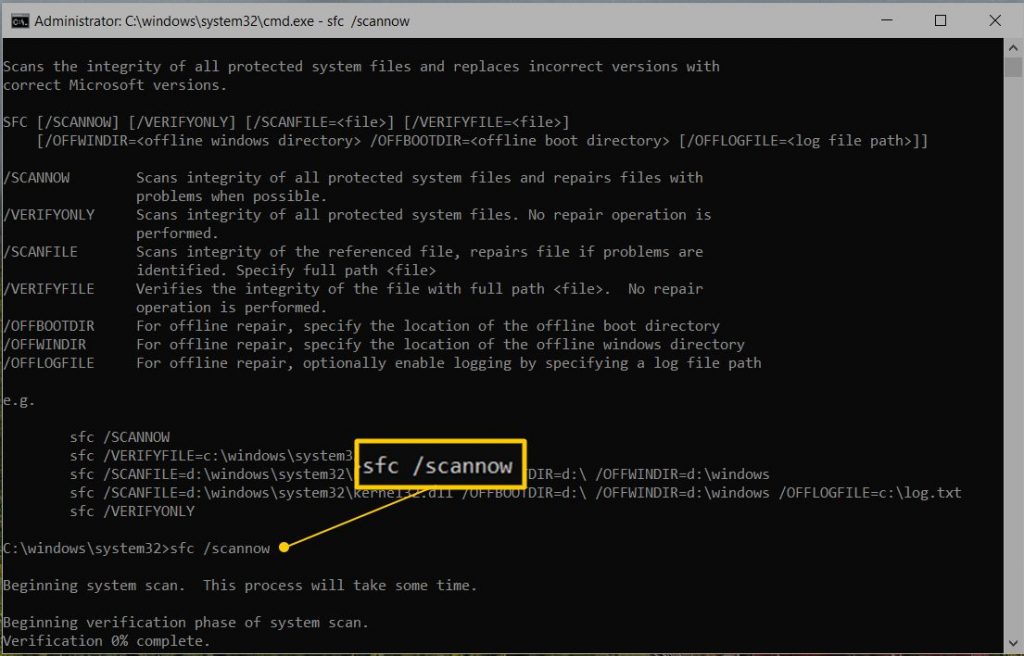
- Нажмите ПКМ по значку Windows, и выберите Командная строка (Администратор).
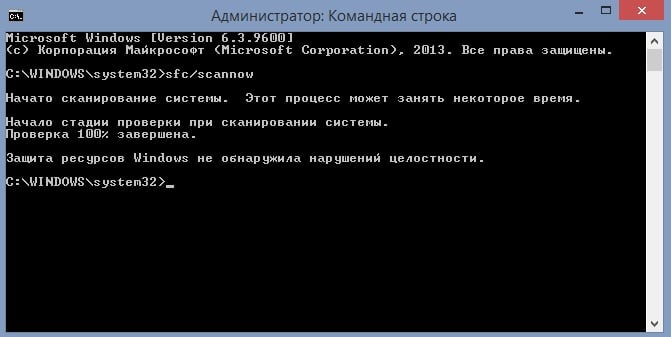
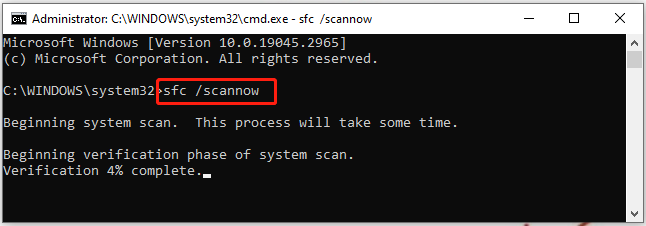
- В открывшемся окне введите команду sfc/scannow и нажмите Enter.
- Дождитесь окончания процесса, после чего система сообщит о результатах.
- Перезагрузите компьютер, чтобы исправления вступили в силу.
A great many users are troubled by the stop code Bad Object Header BSOD in Windows 10/11. What causes this BSOD error? How to fix it? If you are also trying to figure them out, this post from MiniTool Partition Wizard is worth reading.
BSOD is one of the most common crashing errors that often cause a sudden restart or shutdown on Windows 10/11. When the BSOD screen appears, most people always receive the “Your PC ran into a problem and needs to restart” error accompanied by various stop codes, such as “exFAT File System”, “RDR FILE SYSTEM (rdbss.sys)”, “CDFS_FILE_SYSTEM”, and the one discussed here.
Lately, I have had a Bad Object Header BSOD error. my first thought was maybe it’s memory but my system passed the Windows memory diagnostic I haven’t been able to run the memtest yet. What causes the BSOD? Anyone can help me?
https://answers.microsoft.com/en-us/windows/forum/all/bsod-bad-object-header-and-irql-not-less-or-equal/6213e2a5-a2b2-419b-96cb-fca45da456c7?page=2
To get rid of the Bad Object Header blue screen, it’s important to figure out what causes the error code. After analyzing extensive user reports, we find that various factors can cause you to encounter the error on Windows 10/11. Some of the most common reasons are:
- Incompatible or outdated system driver
- Issues with your RAM or hard drive
- Corrupt system files
Before You Do
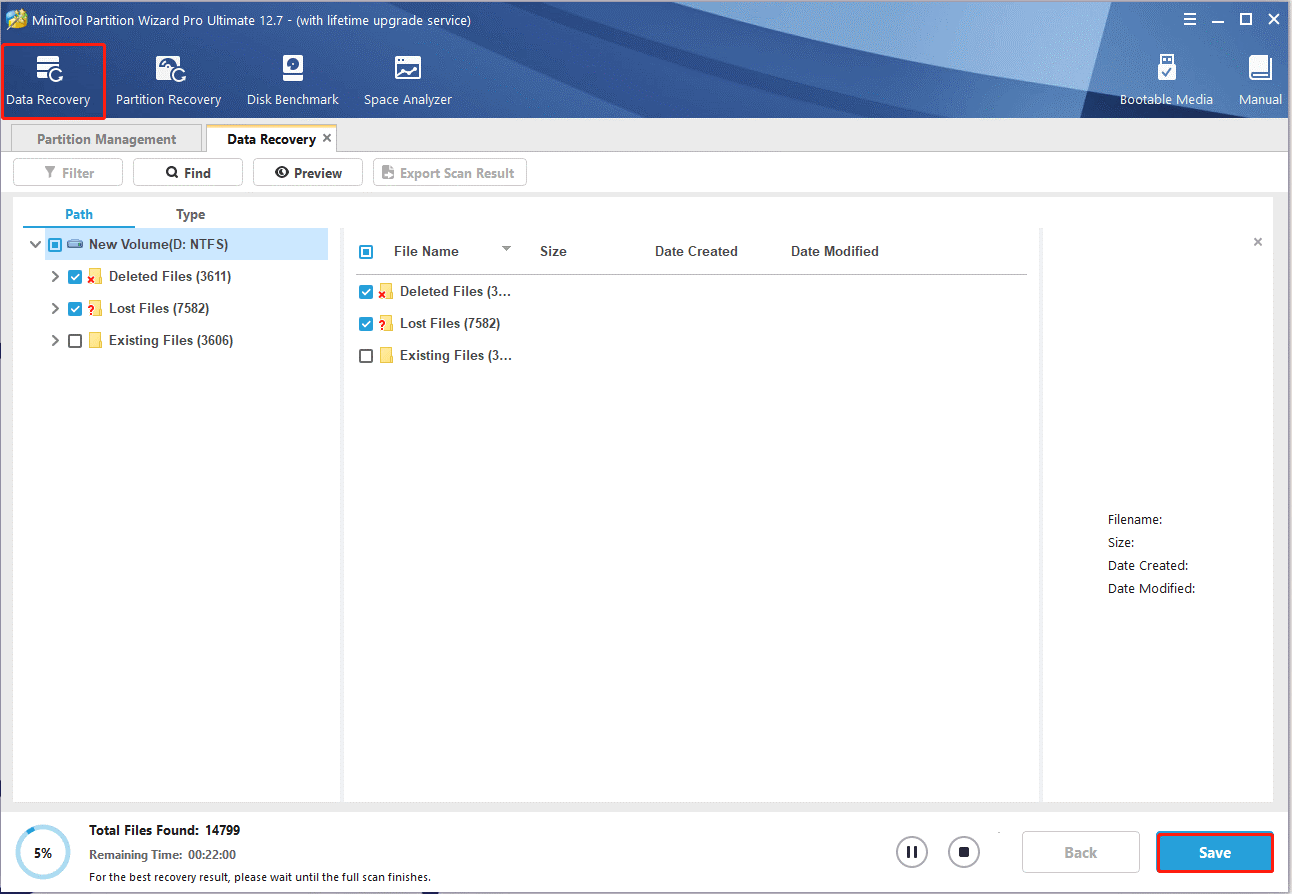
As it’s well known to us, a BSOD error often causes a computer to suddenly shut down or restart, which can lead to data loss. If you also encounter data loss due to the Bad_object_header BSOD error, don’t worry. MiniTool Partition Wizard can quickly recover lost data from various storage media, including hard drives, USBs, SD cards, TF cards, etc. It is a powerful data recovery and partition software.
MiniTool Partition Wizard DemoClick to Download100%Clean & Safe
Once recovered, you can start fixing the error code Bad Object Header without concerns.
How to remove the Bad Object Header blue screen on Windows 10/11? You can try the following 7 fixes until the problem gets solved.
# 1. Uninstall the Recently Install Third-party Driver
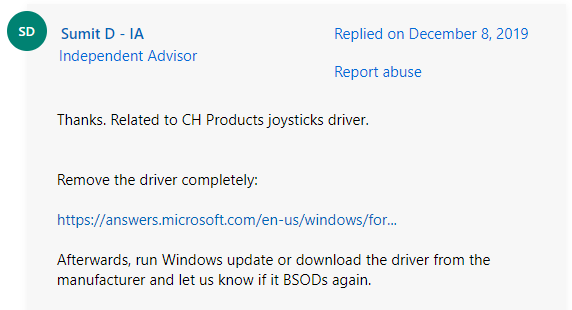
Some users from the answers.microsoft.com forum reported that the BSOD Bad Object Header is related to certain third-party drivers, like the CH Products joysticks driver, Corsair utility driver, etc. If you also installed these drivers, uninstall or update them and check if the blue screen disappears.
# 2. Update Your System Driver
Another common reason for the stop code Bad Object Header is related to incompatible or outdated system drivers. To remove the blue screen, you can try updating your driver to the latest version.
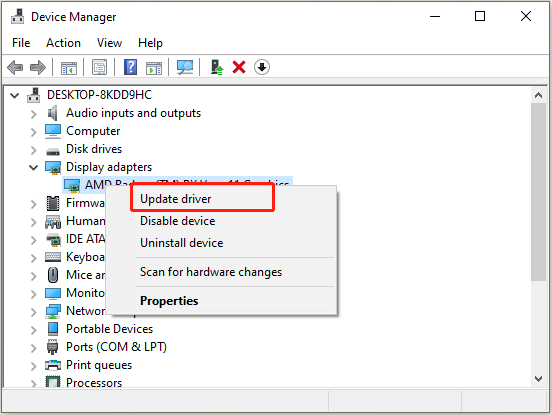
Step 1. Press Win + X keys to open the context menu and select Device Manager.
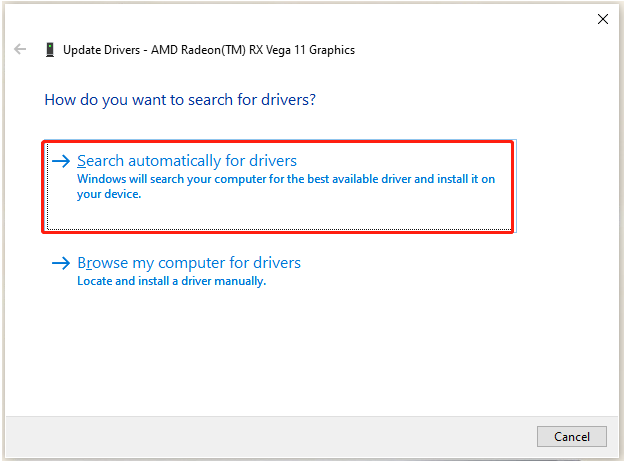
Step 3. Select Search automatically for drivers and follow the on-screen prompts to complete this update. Also, you can install the latest version of the driver from its manufacturer’s website.
Then you can repeat the same procedure to update other device drivers. Once all these drivers are updated, restart your PC and see if the Bad Object Header blue screen of death persists.
# 3. Test Your Memory
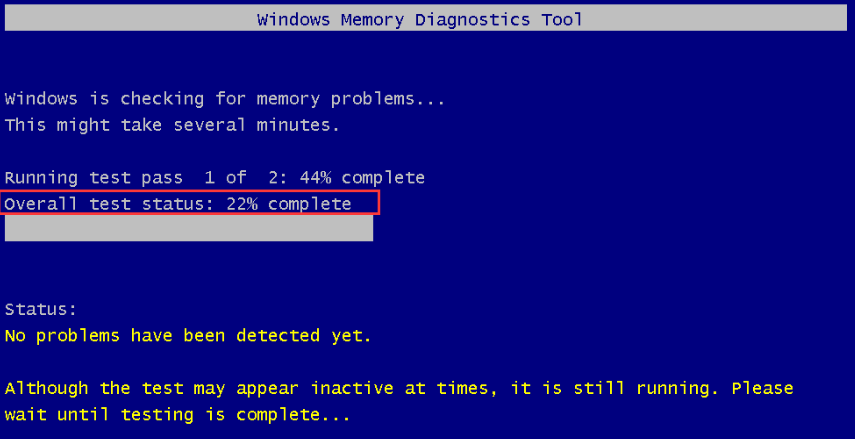
If your hardware components like hard drive and memory get corrupted, you may encounter the error code Bad Object Header. So, it’s necessary to check your hardware components for issues. You can check your RAM using Windows Memory Diagnostic or other third-party software like MemTest86. To know more details, you can read this post “Here Are Free RAM Test Programs to Check Your Computer’s RAM”.
# 4. Check Your Hard Drive
In addition to testing memory, you should check if your hard drive gets failing. If there are bad sectors on the system drive, you may encounter the error code Bad Object Header BSOD. For that:
Step 1. Type cmd in the search box, right-click the Command Prompt app, and select Run as administrator. Then click on Yes to confirm it.
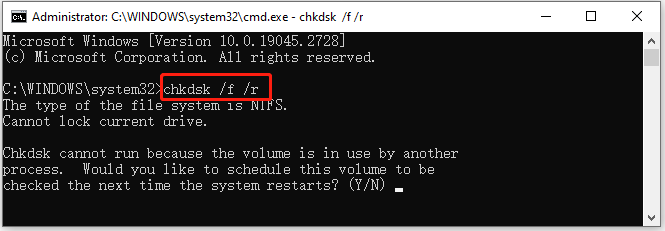
Step 2. In the elevated Command Prompt window, type the following command and hit Enter to repair hard drive errors.
chkdsk /f /r
If this tool can’t check the hard drive or run into some errors like “CHKDSK write protected error” and “CHKDSK cannot run due to recently installed software”, you can switch to a professional disk diagnostic tool. MiniTool Partition Wizard is such a utility that can check bad sectors but repair file system corruption on the hard drive.
MiniTool Partition Wizard FreeClick to Download100%Clean & Safe
# 5. Run SFC or DISM Scan
If some important system files are corrupted or missing, the Bad Object Header blue screen of death can occur too. In this case, you can use the SFC or DISM to repair system files.
Step 1. Open the elevated Command Prompt window as we just explained.
Step 2. Type the sfc /scannow command in the pop-up window and hit Enter. Then wait for the SFC scan to complete.
Step 3. If no corrupted system files were found, you can try running the commands below to go on the repair.
DISM.exe /Online /Cleanup-image /Scanhealth
DISM.exe /Online /Cleanup-image /Restorehealth
# 6. Run an Automatic Repair
Some users reported that the BSOD Bad Object Header error can be fixed by running an automatic repair. If you have a Windows bootable media for Windows 10/11, you can try this method.
Step 1. Power off your computer and insert the Windows bootable media (DVD/USB) into your computer.
Step 2. Restart your computer with the Power button. Then you should see the “Press any key to boot from CD or DVD” screen, follow the instruction, and boot your Windows.
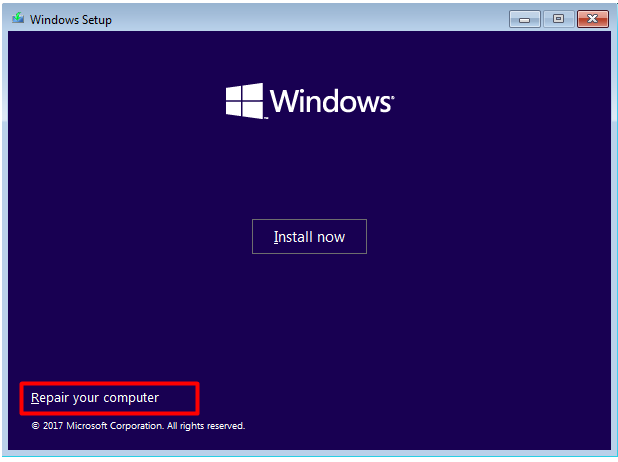
Step 3. Choose the language preference and go on until you arrive at the Install Now screen. Then click on Repair Your Computer to access the Advanced Settings menu.
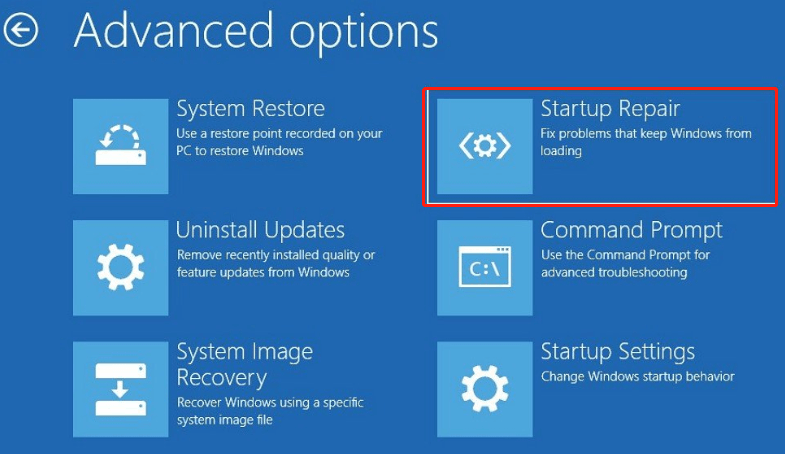
Step 4. Select Troubleshoot and access Advanced Options, and click Startup Repair in order. Then it will automatically repair your system.
# 7. Perform a System Restore
If none of the above methods can remove Bad_object_header BSOD, you may consider performing a system restore. This operation can undo the recently changed settings you made and revert the system to an earlier date in which your PC works well.
You will find effective workarounds to resolve BAD_OBJECT_HEADER BSOD Error in Windows 10 in this article. The issue represents actually corruption in The OBJECT_HEADER and for obvious reason, it has got a bug check value of 0x00000189. Once detected in the user PC, Windows will have a proclivity to restart without notifying the person dealing with. In addition, people might experience hanging resulting in making device inaccessible and frequent showing of error messages. In a nutshell, like seems at a stake when a device is detected with this notorious error.
BAD OBJECT HEADER Error in Windows 10 aka BAD_OBJECT_HEADER will shout its presence in the system mostly when you have outdated, old and troublesome device drivers. With that, malicious threats deleting important windows components, corrupted system files as well as missing DLL ones, leaving update patches pending for longer time, incorrect allocating of memory will add extra momentum from software end. Hardware troubles like the presence of dreadful areas in the Disk drive, running in low space can also cause the same. Hence, in the latter part, we will be presenting some powerful workarounds to dismiss this error. So, let’s begin –
Here is how to fix BAD_OBJECT_HEADER BSOD Error in Windows 10 –
Obstruct Automatic Restarting of Windows
Since Windows goes under continuous rebooting after being affected with BAD_OBJECT_HEADER blue screen of death error, this has become the most annoying issue. We can neither take it normally nor can resolve the error as insufficient time to deploy workarounds. Therefore, the prime workaround is to stop this restarting.
Step-1: Save and close ongoing processes if have any and straightway head to Desktop area by pressing Win+D hotkeys combined.
Step-2: When in place, do a right click on This PC icon here and select Properties eventually.
Step-3: Once System window comes into view, select “Advanced system settings” from the left sidebar of this page.
Step-4: A wizard will be visible, move on to its Advanced tab.
Step-5: Move straight down to the Startup and Recovery section and hit Settings button.
Step-6: After the next wizard unrolls, come down to System failure area and remove the checkmark from the box beside Automatically restart.
Step-7: Now, hit the OK button located at the bottom and leave the wizard as well.
Make the Operating System up to date by installing every single available patch
Well, when we talk about the operating system, obviously an updated one comes to the imagination. Outdated ones lack features, bugs and are naturally weak in strength which is incapable to fight BSOD errors. We are now moving out to download and install all the available update patches using Windows Settings app to fix BAD OBJECT HEADER Blue Screen of death.
Important – Ensure you are connected with a high-speed internet connection, broadband or a wireless one. In case of using the “Mobile Data”, disable the Metered Connection in the Network Settings, otherwise, downloading will not take place.
- Make a combined press of Win+I hotkeys and open Windows Settings app.
- While in the app accessible area, head to Update & Security and perform a click on it.
- On the following page, select Windows Update located at the left-hand side.
- Shifting on the right side, you might see the dialog “You’re up to date”. Be less bothered and directly click on the button saying Check for updates.
- Once the searching is finished and available patches are previewed, select the Download button under each of these.
- After all the files get into the system, the installation will take place automatically.
- Windows will prompt for restart, and attend all the requirements in the process.
Once the Windows are up to date, there might not be any BSOD error in the system.
Allow Default Blue Screen Troubleshooter to work by your side
Windows has its own built-in utility in the name of Blue Screen Troubleshooter to fight for you in BAD OBJECT HEADER issue. To avail this privilege, you have to upgrade the OS to Windows 10 Fall Creators update or above. This is a handy and light tool that can potentially remove stop errors. The most amazing fact is, you don’t need to go for any installation as it is a default utility.
- Get access to Windows Settings app using the above guidelines and head straightway to the additional settings of Update & Security.
- Once the next page comes in the view, select Troubleshoot from the left sidebar and jump to the adjacent side.
- Here, locate the Blue Screen option and perform a click on it.
- When expanded downward, hit Run the Troubleshooter and let it do the rest.
The troubleshooter will start detecting the possible causes and will eventually make an attempt to repair them as well.
Eliminate Problems in Windows Memory and RAM issues
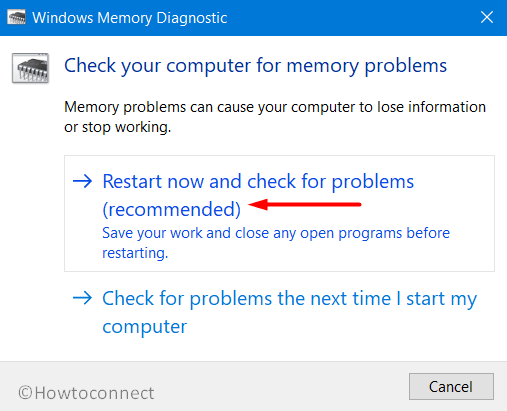
Windows memory itself often create malfunction and end up calling BAD_OBJECT_HEADER BSOD Error. However, the wrong allocation of memory devices, defective areas in RAM will cost you badly. Therefore, let’s use the “Windows Memory Diagnostic” to eliminate these problems. Move forward with below instructions-
- Manage to open the Windows Settings app using the same instructions stated above.
- When you will see a search box here in this page, start typing memory here.
- Once the results start peeking up, select Diagnose your computer’s memory problems.
- Sharply Windows Memory Diagnostic will open up on the screen and here, perform a click on “Restart now and check for problems (recommended)”.
- Windows will, therefore, reboot initially in accordance with the command and once it completes the first cycle of this task, you will experience a blue screen.
- This Blue screen will start detecting the memory issues present in the system and progress will be previewed in percentage. When it reaches 100%, Windows will again restart for the second time.
- Result of the diagnosis will be available in the System tray- notification area once it gets back to operation further.
Safe Boot- the most reliable resort to solve BAD_OBJECT_HEADER BSOD Error
Starting from the development of Windows as an operating system, booting in Safe Mode continuously serving best for critical issues such as BAD OBJECT HEADER. This as renowned in work as upon application Windows loads only basic services and programs. Most of the error take leave in this process and like every other time, let’s try this method in the following steps –
Step#1: Move the pointer to the extreme left bottom end of Desktop and eventually do a click on Start menu.
Step#2: Once the options are loaded, hit the Power icon from here and also select the Restart. At the same time, press and hold the Shift key.
Step#3: The device will restart and upon powering ON, there will be a blue screen with few options on the page.
Step#4: Select the option saying Troubleshoot and move ahead to the consequent page.
Step#5: Choose Advanced options => Startup settings.
Step#6: Proceeding ahead to the right bottom end of this page, hit Power => Restart.
Step#7: Windows will prepare for the second tier of rebooting. Upon startup, you will find some more options including “Boot in Safe Mode“.
Step#8: Now, keep pressing the F4 key continuously and lead to the Safe Mode on the further move.
Correct the Windows System components and recover missing DLL files
Windows tends to damage its necessary system elements and lose DLL files once fall into corruption. In the process, the ultimate result is BAD_OBJECT_HEADER BSOD Error. We really cannot afford this to happen in our systems. Therefore, System File Checker is developed by Microsoft and undoubtedly it can serve the best. You just need to run a command line tool in “elevated Command Prompt“.
- Execute a right-click on the taskbar and choose Task Manager from the pop-up menu.
- Hit on File option located at the top left end and select Run new task once visible.
- When a dialog box appears, type cmd in the empty text field provided here and also put a checkmark before “Create this task with administrative privileges”. Click OK.
- In the black window, type the following command where cursor blinks and hit Enter key-
sfc /scannow
Immediately, System File Checker will be executed and start checking the corrupted elements. If any discrepancy is discovered, it will resolve automatically also resulting in fixing BAD OBJECT HEADER.
Give a break to Hardware components
We often use Hardware items as well as external HDD to serve respective purposes. Some people have discovered BAD_OBJECT_HEADER BSOD Error in their system after connecting an additional Hard Disk. It might seem little weird but yes this is true but the solution is simple as well. You just need to offer them a pause and then reconnect again once issue resolves.
- Unhook all the accessories along with additional Hard Disk from the computer.
- Leave them separate in a safer place to avoid any damage.
- Open the Start menu and hit on Power sign.
- Select the Restart option and allow it to reboot at once.
- When the device gets back to normal activity, perform a thorough checking for the existence of the issue.
- Hopefully, the result will be on your side and if happen so, start connecting them again.
- Now, launch Edge browser, and in the process make a visit to the manufacturer website of those hardware items.
- Download the latest Drivers and install them in the system.
Never Allow Malware to stay over in the system, Dismiss in Windows Security
We all are well aware that, a virus is moving to and fro everywhere on the web. Still, these bugs manage to get inside of our system and cause vulnerabilities. Once they get the pass to Windows, have a tendency to remove the necessary components required to run OS. Therefore, the result is a BAD_OBJECT_HEADER BSOD Error in Windows 10. Windows has its own security system offers you the opportunity to resolve this notorious malware.
- Hover the cursor to the right side of the taskbar and do a click on the “Shield” icon and head to Windows Security app.
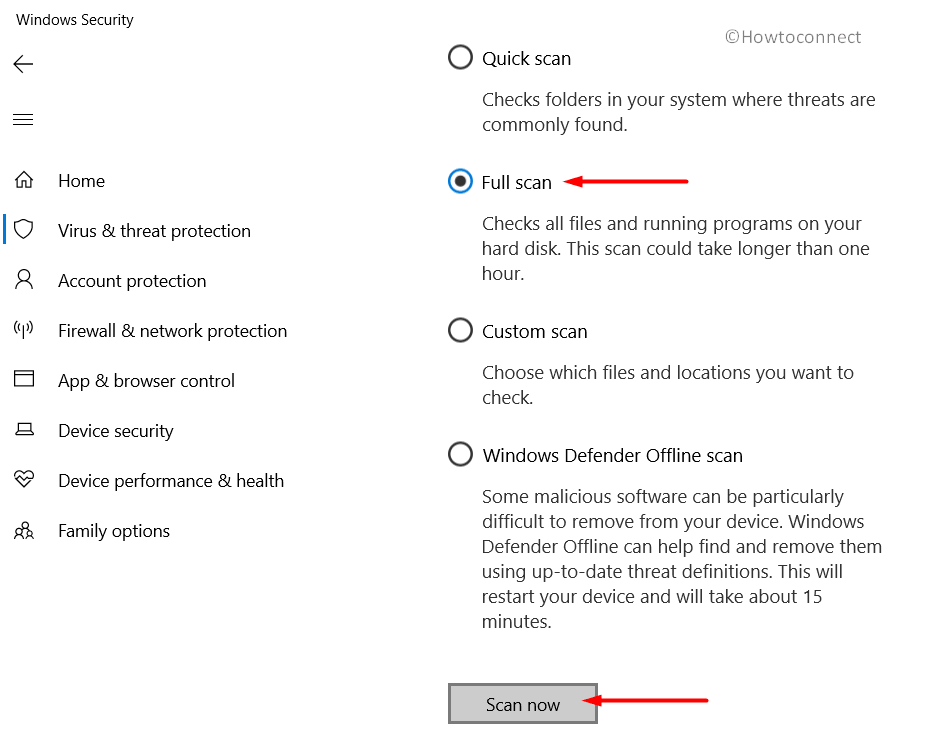
- Moving ahead to the app area, choose Virus and threat protection from the left-hand side and move sideward.
- On this place, make a click on the link Scan options and once all of them are displayed, hit the radio button behind Full scan.
- Proceeding forward, select Scan now button located here and allow Windows to carry out malware checking.
- When the result is upfront after searching, wipe out all the viruses by clicking Clean threats option.
- Proceeding ahead to the next page, three will be three option left for you. Choose Remove and finally hit the Start actions option.
Restrict staying over of similar programs in the system
Once similar programs get a chance to stay side by side, they are prone to be in collision with each other. This act results in removing some vital components in the system and hence, BAD_OBJECT_HEADER Error in Windows 10 is imminent. To stop this, we can uninstall one of such applications and if the error resolves, reinstall the removed one once necessary.
- Do a combined press of “Win+R” hotkeys and open the Run dialog box on the screen.
- Once seen, type appwiz.cpl in the blank search box and hit the Enter key.
- Programs and Features window upon unrolling on display, locate the programs causing BAD_OBJECT_HEADER BSOD Error in Windows 10.
- Perform a right click on each and select Uninstall option from there.
- Perform the upcoming tasks as will be displayed on the screen to completely remove these.
- Once all these programs get dismissed, restart the device using normal procedure.
- When returning back to the desktop again, check if there are any issues present like BAD_OBJECT_HEADER BSOD Error.
- If there is no problem in the system and in case the removed program is necessary, download them again.
Clear up the Storage from Junk and make some more space
Junk files are fabricated by processes to accomplish tasks. When they grow large in amount, take up huge space in storage and eventually the volume run in low space. “Disk Cleanup” utility comes handy in freeing up job ending up as a solution to BAD OBJECT HEADER.
- Make a conjugal press of Windows and S keys together and open the Taskbar Search.
- Fill the blank text area here with cleanmgr and when Disk Cleanup Desktop app is visible in the list, select it.
- A small popup dialog will open up shortly asking the drive where the task will be carried out. Select C: by clicking on the dropdown menu and press Enter key.
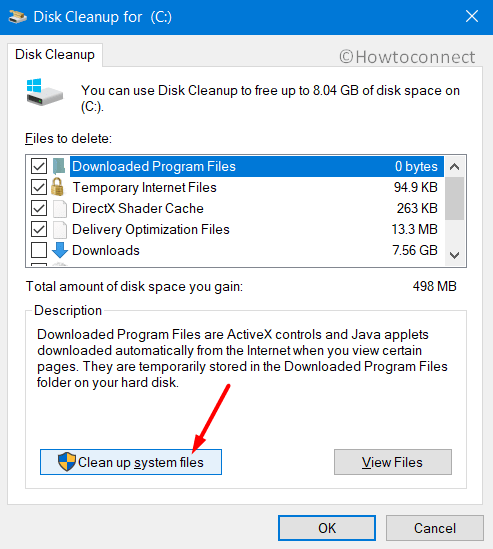
- The Disk Cleanup Utility will start the action by calculating the space it can bring out from the system and unroll a wizard.
- Move down in the wizard and hit on “Clean up system files” option.
- The small popup will ask one more time for selecting the preferable drive. Choose C: again and hit the Enter button.
- Disk Cleanup for C: will appear after doing the calculation again.
- Check all the boxes here only except Downloads and then perform a click on the Ok button located at the bottom.
- This process involves several deleting and hence might take a quite long time, wait patiently until it gets over.
Note- Before proceeding with this workaround, make sure there is nothing important left in Recycle Bin folder as everything will be deleted.
Assign Deployment Image Servicing and Management (DISM) tool to repair dreadful image files
When Windows Image files run in disruption, so many errors are like to occur in the system. Among them, BAD_OBJECT_HEADER BSOD Error can damage the most. However, a simple tool namely DISM can save you from a devastating case.
- Access Command Prompt with administrative rights using the same instruction we have shown before.
- When in the dark window, type or copy-paste the below-mentioned command and at the hit of the Enter key, DISM tool will be activated and rectify defective image files once detected.
DISM.exe /Online /Cleanup-image /Restorehealth
- Thus you can get rid of the BAD_OBJECT_HEADER BSOD Error in Windows 10.
Bade Farewell to Defective Windows Update Files
We recommend all users update their OS by installing all available patches. This process is autonomous and rarely fall into manipulation. Once it undergoes such malfunction or stops at the midway of installation, BSOD error like BAD OBJECT HEADER is impending as a result. So, the best deal is to erase them from device going through the below steps.
- Launch the built-in Settings app by clicking the gear icon located on the Start menu.
- Straightway move to Update & Security tile when in the app UI and perform a click on it.
- Once the next page is upfront, select Windows Update from the left wing and then transfer to the alongside pane.
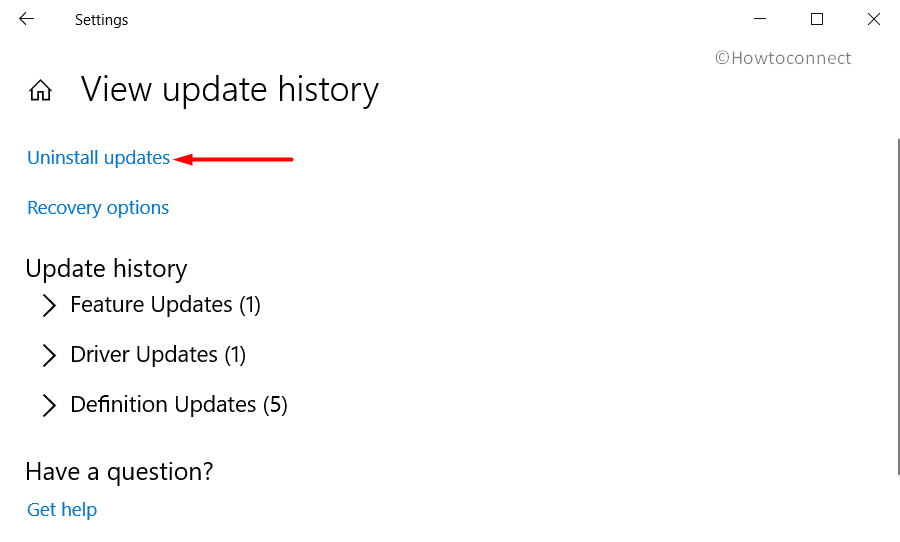
- On this side, hit a click on View update history link and open all the received patches list.
- Proceeding forward, execute a hit on Uninstall updates.
- By default, you will be guided to the “Installed Updates” page from Control Panel.
- Move ahead to the last received patch and do a right click on it.
- Select the Uninstall option and go through the on-screen guidelines to get rid of them.
Recruit Disk Checking Utility in Elevated Command Prompt to deal with bad Hard Disk areas
“CHKDSK” command is basically a Disk Checking utility which potentially detects as well as fix the worse sectors present in HDD. Since it may resolve the BSOD BAD OBJECT HEADER error also, we can definitely give it a try.
- Roll the cursor to the left bottom side of Taskbar and make a click on the Search icon.
- Once the Taskbar Search launches, type cmd.exe in the empty text field.
- When Command Prompt shows in the result, hit a right click on it and select “Run as Administrator” option.
- When UAC prompts for permission, hit Yes to continue.
- On the Elevated Command Prompt window, type the following command where the cursor winks.
chkdsk C: /f /r /x
Here, CHKDSK will only show the Disk status upon activation. We have used a few other notations indicating following-
f- represents fixing the detected problems.
r- represents detecting the existing problems in the Disk.
x- represents splitting up of the disk volume to facilitate the detection process.
C: - represent the Disk where the OS is installed. You can change this to D:, E: or any depending upon your usage.
- Once you hit Enter key, the Disk Checking Utility will detect and fix all the problems immediately. This process will take some time, so, hold the patience and wait until it gets over.
- Restart Windows 10 PC and upon startup, check for the occurrence of BAD OBJECT HEADER error codes.
Perform updating Drivers having Yellow indication Mark in Device Manager
Outdated and troublesome device drivers came out strongly to cause BAD_OBJECT_HEADER BSOD Error in Windows 10. Every time we experience this BSOD error, the solution is indeed singular and simple. Drivers having yellow indication mark in Device Manager needs to update.
- Perform a right click on Start icon and choose Run from Win+X menu.
- When it is visible, type devmgmt.msc in the search box located here and press Enter key.
- “Device Manager” will open and if you see any mark of exclamation, expand that specific device.
- Perform a right click on the driver and select “Update driver” option.
- Keep cooperating with Windows by following shown instruction until the drivers are up to date.
Go back to last created Point and revert all the recent changes
If you have a previously created restore point, you can straightway go back to a point where there was no BSOD error. As recent modifications in the registry by installing or removing a program can be guilty, and hence, System Restore will provide you the ultimate relief from BAD OBJECT HEADER problem.
- On Cortana search, type rstrui and hit Enter key to launch the System Restore.
- When the popup window is visible on display, hit the Next button to move ahead.
- On the consequent page, uncover all the past created points by clicking the Show more restore points.
- Select the recently created one from the list and hit Next again.
- Once the next page unrolls, select Finish to start the Restoring process.
Use only Windows Security, remove all other third-party anti-virus programs
Windows Security offers the best deal in malware issues and this is also a built-in program. So, if you have a third party anti-malware tool, it’s really meaningless and might cause BAD OBJECT HEADER. So, we will show you how to remove these completely from the system in the below instructions.
- Launch Settings => Apps.
- Hit Apps & features option from the left side and jump to the corresponding pane.
- On the right, when the apps are loaded, find out antivirus programs installed in the system.
- Select to expand in the pane and hit Uninstall option once seen.
- If User Account Control prompts for permission, give consent by selecting Yes.
- Perform the on-screen guidelines to completely remove the programs.
Hereby we have discussed all the best available workarounds to resolve BAD_OBJECT_HEADER BSOD Error in Windows 10. Bravo! If you have finally succeeded to fix this notorious issue and the hard work has come out victorious. It’s a matter of frustration if you are having the issue still in the device after performing all these tasks. Well, there is no problem on the earth without a solution we believe. You can perform “Clean installation of Windows 10” and that will be the ultimate solution for ending all problems.
After being assured of doing this task, make sure you have already saved all the required data, files, images as back up in the external drive. We recommend you to seek help from experts for doing this task if you are not confident enough. Hopefully, you can recover the device from all issues including BAD OBJECT HEADER after doing so.
That’s all!!
Repair any Windows problems such as Blue/Black Screen, DLL, Exe, application, Regisrty error and quickly recover system from issues using Reimage.
Как исправить ошибку Bad Object Header в Windows 10?
Ошибка Bad Object Header в Windows 10 может возникать из-за повреждения файла или некорректной работы операционной системы. В этой статье мы расскажем, как исправить эту ошибку.
1. Перезагрузите компьютер
Первым шагом в решении большинства проблем с Windows является перезагрузка компьютера. Попробуйте перезагрузить компьютер и проверьте, исчезла ли ошибка Bad Object Header.
2. Обновите драйверы
Если перезагрузка компьютера не помогла, то попробуйте обновить драйверы. Убедитесь, что установлены последние версии драйверов для всех устройств в вашей системе, включая видеокарту, звуковую карту, сетевую карту и т. д. Для обновления драйверов можно воспользоваться программой Driver Booster или Device Manager.
3. Выполните сканирование системы
Другой причиной ошибки Bad Object Header может быть заражение компьютера вирусами или другим вредоносным программным обеспечением. Выполните полное сканирование вашей системы антивирусным программным обеспечением, чтобы проверить, нет ли на вашем компьютере вредоносных программ.
4. Проверьте жесткий диск
Если все вышеперечисленные шаги не помогли исправить ошибку Bad Object Header, то проблема может быть связана с жестким диском. Попробуйте проверить жесткий диск на наличие ошибок и исправить их. Для этого можно воспользоваться программой CHKDSK, которая встроена в операционную систему Windows 10.
5. Переустановите операционную систему
Если ни один из вышеперечисленных шагов не помог исправить ошибку Bad Object Header, то последним решением может быть переустановка операционной системы. Этот шаг может быть крайне рискованным, поэтому перед его выполнением необходимо создать резервную копию всех важных файлов на вашем компьютере.
Дополнительные советы:
— Постоянно обновляйте свою систему.
— Устанавливайте антивирусное программное обеспечение и чистите систему от мусора регулярно.
— Избегайте загрузки и установки программ с неофициальных и подозрительных сайтов.
— Установите необходимые программы, чтобылегко создавать резервные копии вашей системы и данных.
‘BAD_OBJECT_HEADER’ is common Windows 10 problem considered as Blue Screen of Death (BSoD) error. This BSoD error appeared with Blue Screen with some Windows Stop Code error on your computer in the middle of your computer, or after System boot/reboot. It doesn’t matter how much important your task that you were doing before this error appear.
This error interrupt your all computer tasks on Windows and reboots immediately. The text presented in this BSoD error states that something went wrong with your computer and needs to restart. Also, the error message states that they are collecting some more info, and then your computer will restarted. BSoD error usually shows a ‘Windows Stop Code Error’ and in this case, it shows ‘BAD_OBJECT_HEADER’ error. Let’s take look at error message.
“You PC ran into a problem and needs to restart. We’re just collecting some more info, and then we’ll restart for you.
1% complete
If you call a support person, give them this info:
Stop code: BAD OBJECT HEADER”
One possible reason behind ‘BAD_OBJECT_HEADER error (BSoD)’ is problematic System drivers. Missing, corrupted, outdated or incompatible device drivers can cause System issues like BSoD errors. If you are not aware, drivers are important application acts as mediator between hardware devices and Operating System installed in your computer. For example, if you have NVIDIA Graphics card integrated/connected to your Windows 10 64-bit OS computer, then NVIDIA graphics card driver for Windows 10 64-bit must be installed in your computer.
Updating System drivers to correct & latest version can fix any problems associated with such hardware, and improve the performances as well. In sort, one possible way to fix ‘BAD_OBJECT_HEADER error’ in Windows 10 is to update System drivers. However, this BSoD error can occur possibly due to corruption in System registry, Windows System files, DLL files, Windows update components, incorrect allocating of memory, malware or viruses attacks, or other reasons.
Other possible reasons can be Windows update. In some cases, updating Windows 10 OS can cause driver incompatibility issues mean some device drivers may not be compatible in Windows 10 after Windows update. However, Windows update also performs drivers update but if some drivers won’t receive the update for some reasons, you need to separately update those drivers. Let’s go for the solution.
How to fix BAD_OBJECT_HEADER error in Windows 10?
Method 1: Fix ‘BAD_OBJECT_HEADER error (BSoD)’ in Windows 10 with ‘PC Repair Tool’
‘PC Repair Tool’ is easy & quick way to find and fix BSOD errors, DLL errors, System registry errors, malware or viruses issues, and other System issues with just few clicks. This way, you can also fix this BSoD error. You can get this tool through below link/button.
Method 2: Update Windows 10
Updating Windows 10 can fix any bugs on System and improve the performances.
Step 1: Press ‘Windows + I’ keys together on keyboard to open ‘Settings’ App
Step 2: In the opened ‘Settings’ App, go to ‘Update & Security > Windows Update’
Step 3: Click on ‘Check for updates’ button under ‘Windows Update’ section. This will automatically download and install the update if available. Make sure your computer is connected to the internet.
Step 4: Wait to complete the process. Once done, reboot your computer to see the changes and check if trouble is resolved.
Method 3: Stop Windows from automatically restarting
If you are unable to fix the issue due to constant reboot loop, then you can stop your Windows from automatically restarting.
Step 1: Press ‘Windows + X’ keys together on keyboard and select ‘System’
Step 2: In the opened window, locate ‘Advanced System Settings’ option, and click it
Step 3: In the opened ‘System Properties’ window, click on ‘Advanced’ tab, click ‘Settings’ under ‘Startup and Recovery’ section.
Step 4: Under ‘System Failure’ section, deselect the ‘Automatically Restart’ checkbox and hit ‘Ok’ button
Method 4: Update Windows 10 Drivers
Updating System drivers can fix this issue in Windows 10. Let’s try.
Step 1: Press ‘Windows + X’ keys together on keyboard and select ‘Device Manager’
Step 2: In the opened ‘Device Manager’, expand each device category one-by-one and check if any device driver shows ‘Yellow Exclamation/Questioned Mark’ on it. If yes, right-click on it, and select ‘Update Driver’
Step 3: Follow on-screen instructions to finish update process. Once done, restart your computer to see the changes and check if problem is resolved.
Update Windows 10 drivers [Automatically]
You can also try to update System drivers including graphics card driver, audio driver, network adapter driver and other device drivers using ‘Automatic Driver Update Tool’. This software will automatically find the latest drivers for Windows computer and install them into your computer. You can get this software through below button/link.
Method 5: Run ‘Windows Memory Diagnostic’ Tool
You can fix this BSoD error by checking and resolving memory corruption problem using ‘Windows Memory Diagnostic’ Tool.
Step 1: Press ‘Windows + R’ keys together on keyboard to open ‘Run’ dialog box.
Step 2: In the opened ‘Run’ dialog box, type ‘mdsched.exe’ and hit ‘Ok’ button to open ‘Windows Memory Diagnostic’ Tool.
Step 3: In the opened window, click on ‘Restart now and check for problems (recommended)’
Step 4: Wait to complete the process. Once done, please check if trouble is resolved.
Method 6: Run SFC Scan
SFC (System File Checker) tool offers you to repair System files and this way, you can fix BSoD errors.
Step 1: Press ‘Windows + X’ keys together on keyboard and select ‘Command Prompt as Administrator’
Step 2: In the opened ‘Command Prompt’, type ‘sfc / scannow’ and hit ‘Enter’ key to execute.
Step 3: Wait to complete the process. Once done, restart your computer and check if BSoD error is resolved.
Method 7: Uninstall problematic software
If this error is started occurring after a specific program or software installation for some reason, then you can fix the issue by uninstalls such program.
Step 1: Press ‘Windows + X’ keys together on keyboard and select ‘Control Panel’
Step 2: In the opened ‘Control Panel’, go to ‘Programs & Features’ or ‘Apps & Features’
Step 3: Find the program causing this error, click on it and select ‘Uninstall’
Step 4: Follow on-screen instructions to finish uninstall process. Once done, restart your computer and check if trouble is resolved.
Method 8: Uninstall problematic Windows Update
As mentioned above, updating Windows 10 can cause this type of issue in some cases. In such case, you need to uninstall such Windows update.
Step 1: Open ‘Settings’ App in Windows 10
Step 2: Go to “Update & Security > Windows Update > View Update History”
Step 3: Click on ‘Uninstall updates’. This will show the list of received update.
Step 4: Right-click on the update that causes this issue, and select ‘Uninstall’
Step 5: Follow on-screen instructions to finish the process. Please check if trouble is resolved.
Method 9: Run CHKDSK Scan
CHKDSK command is ‘Disk Checking Utility’ offers you to fix worse sectors presented in Hard drive.
Step 1: Press ‘Windows + X’ keys together on keyboard and select ‘Command Prompt as Administrator’
Step 2: Type ‘chkdsk C: /f /r /x’ command and hit ‘Enter’ key to execute.
Step 3: Wait to complete the process. Once done, reboot your computer to see the changes and check if problem is resolved.
Note: Here, ‘chkdsk C: /f /r /x’ commands indicates that:
f- represents fixing the detected problems.
r- represents detecting the existing problems in the Disk.
x- represents splitting up of the disk volume to facilitate the detection process.
C: – represent the Disk where the OS is installed. You can change this to D:, E: or any depending upon your usage.
Method 10: Run System Scan with ‘SpyHunter Antivirus Software’ for malware or viruses
As mentioned, malware or viruses attack can be one possible reason behind this type of issue. So, you can fix the issue by removing malware or viruses using ‘SpyHunter Antivirus Software’. This tool offers you to find and remove all types of malware or viruses with just few clicks. You can get this tool through below link/button.
Method 11: Perform System Restore Operation
If you are unable to fix this issue with solutions mentioned above, then you can try to fix the issue by restoring your computer to restore point when everything was working well.
Step 1: Press ‘Windows + R’ keys together to open ‘Run’ dialog box, type ‘rstrui’ and hit ‘Ok’ button to open ‘System Restore’
Step 2: In the opened ‘System Restore’ window, click on ‘Next’
Step 3: Select a restore point when everything were working well, and hit ‘Next > Finish’
Step 4: Wait to complete System restoring process. Once done, please restart your computer and check if trouble is resolved.
Conclusion
I am sure this post helped you on How to Fix BAD_OBJECT_HEADER error in Windows 10 with several easy methods. You can read & follow our instructions to do so. That’s all. For any suggestions or queries, please write on comment box below.
