This article is based on best practice which we need to follow during the implementation of Active Directory and authentication of it with other software in presence of SSO (Single Sign on). So, what actually ldap means? The Lightweight Directory Access Protocol (LDAP) is used to read from and write to Active Directory. By default, LDAP traffic is transmitted unsecured. You can make LDAP traffic confidential and secure by using Secure Sockets Layer (SSL) / Transport Layer Security (TLS) technology. You can enable LDAP over SSL (LDAPS) by installing a properly formatted certificate from either a Microsoft certification authority (CA) or a non-Microsoft CA. so on this blog I will be sharing my knowledge on how to configure secure LDAP connection on Server 2016.
In default, communication between client and server application are not encrypted for LDAP which means it is possible to monitor device or software and view the communications traveling between LDAP client and Server Computers. But that doesn’t mean it can expose the Kerberos, SASL and even NTLM authentication or authorization, because they do have their own encryption methods. So only the data communication between Client and servers do have possibility of getting compromised. Hence let’s work on the securing the communication.
The port that uses by the LDAP for the normal communication is TCP/UDP 389 whereas for the secure communication it will be using 636 port. So, first let’s know how to check it.
Open your machine, go to run, type ‘ldp’ and click on ‘OK’.

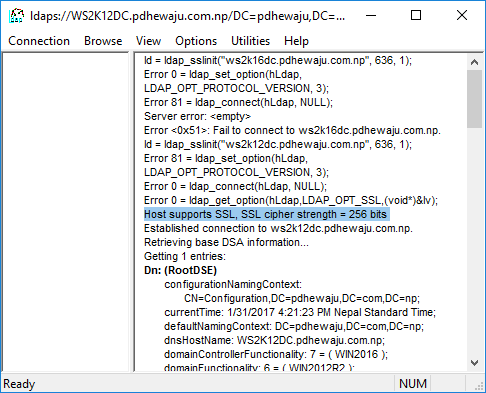
Once this is done, a new window will get open. On the ‘Connection’ click ‘Connect’ and provide the server name and port as 636.

So, if you see this kind of error than this means you do not have configured secure LDAP. Then let’s start configuring it.

Configuring secure LDAP:
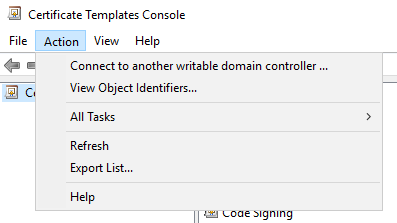
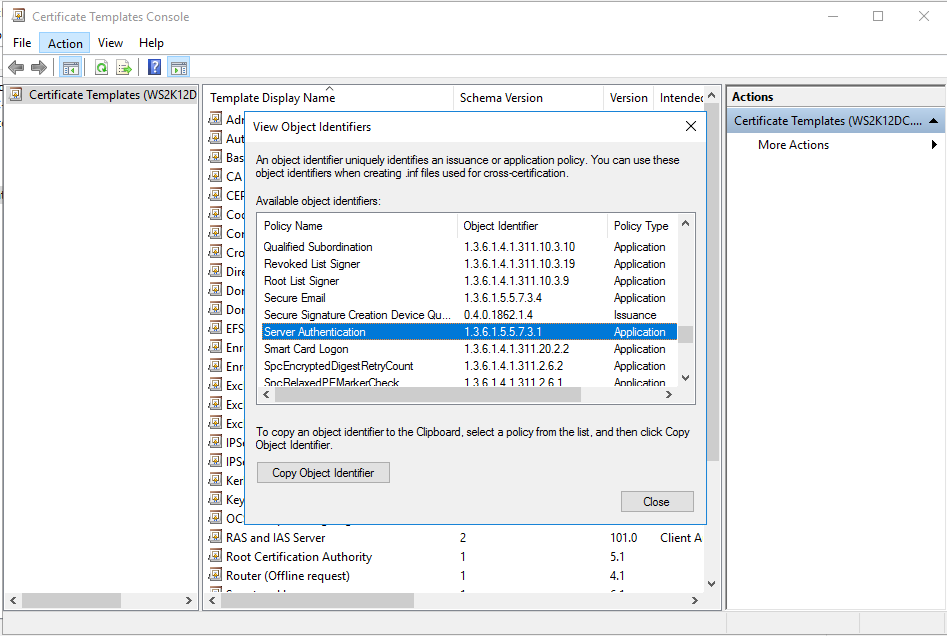
To configure the secure LDAP, we first need to install Certificate Authority on our Domain Controller. To get install Certificate Authority, please follow this blog. After completion of installing Local CA, open it. Right click on ‘Certificate template’, and select ‘Manage’. On ‘Action’, select ‘View Object Identifiers’.
Now scroll down and verify if you do have Server Authentication with object Identifier 1.3.6.1.5.5.7.3.1, this is the thing which allows us to configure secure ldap.
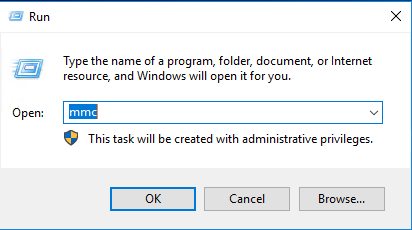
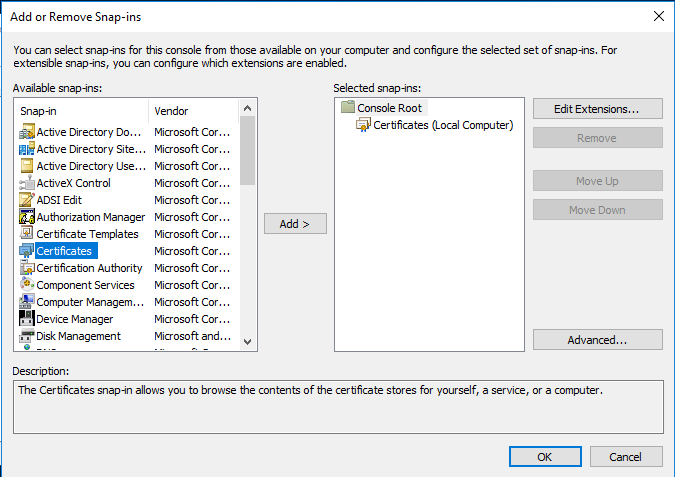
After verifying Object identifier, now open ‘Microsoft Management Console’ (MMC).
On ‘Microsoft Management Console (MMC)’, ‘Add or Remove Snap-ins’ using computer Certificates
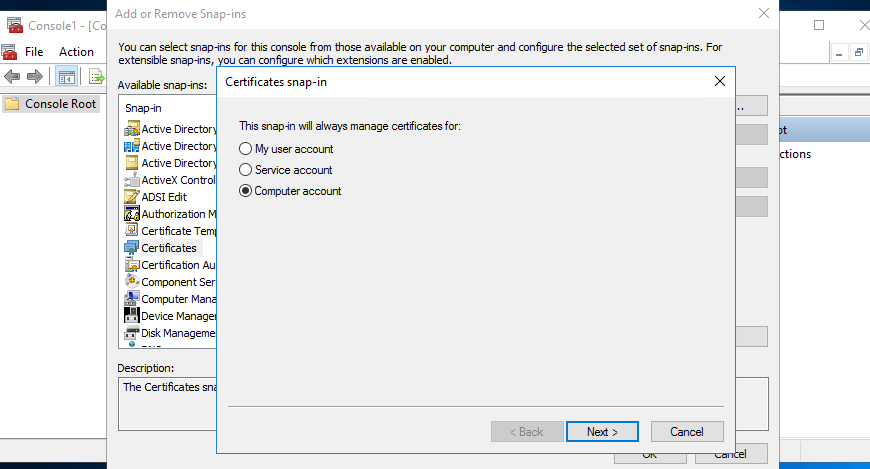
Add certificate for the local computer and click ‘OK’, once this is done.
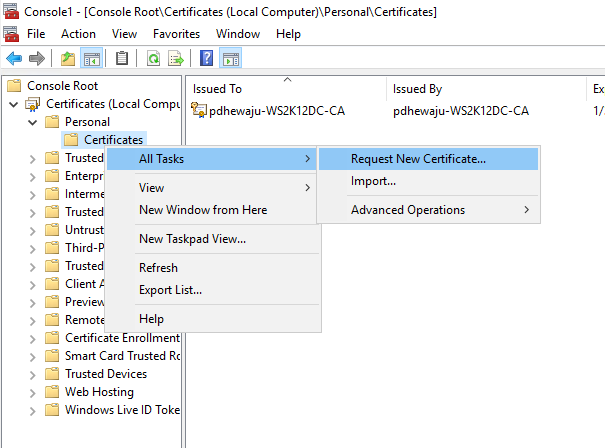
After adding the Local Certificate, expand the Personal below the Certificates.

You will see a new folder name ‘Certificates’ right-click on it and navigate to ‘Request New Certificate’ and select it.
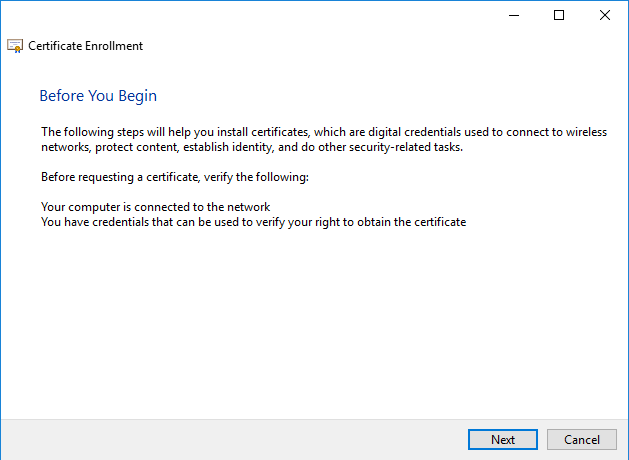
A new window will get open for the Certificate Enrollment, click ‘Next’ on this.
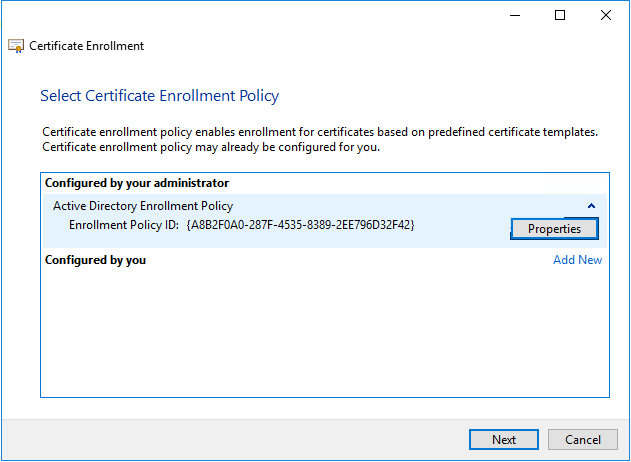
On ‘Select Certificate Enrollment Policy’ click on ‘Next’.
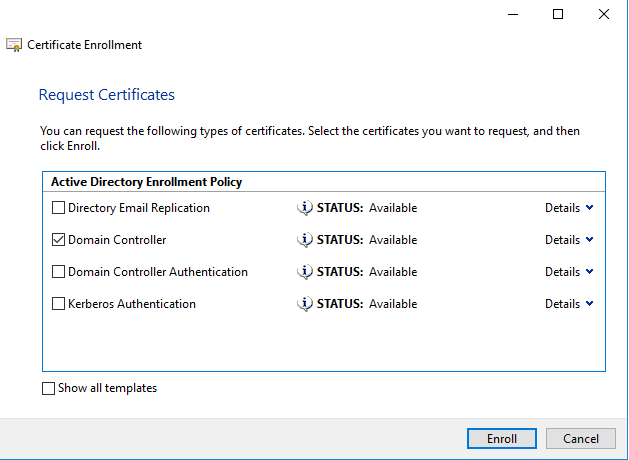
At ‘Certificate Enrollment’, select ‘Domain Controller’ and click on ‘Enroll’.
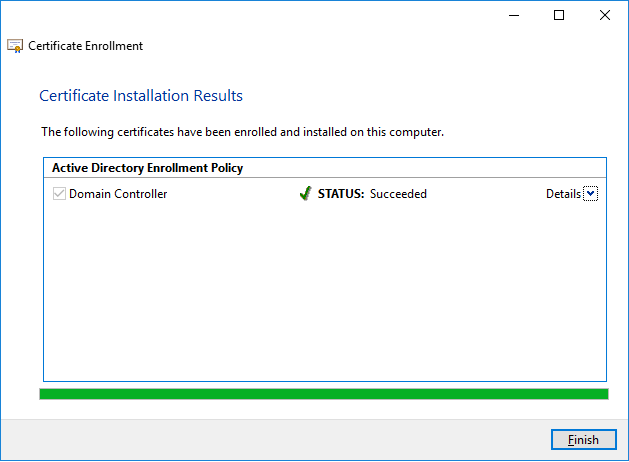
It will take a while to get install the ‘Domain certificate’ on your Domain Controller. After completion click on ‘Finish’.
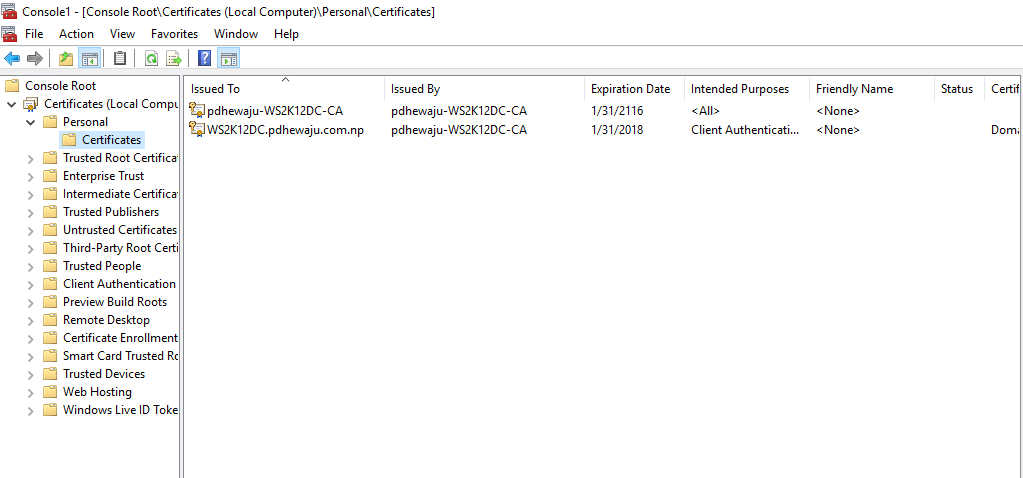
Now you can see the certificate issued to your domain controller on your certificate page.
Testing:
Once you verified the certificate has been installed on your machine, try to get connect to your machine as we did earlier
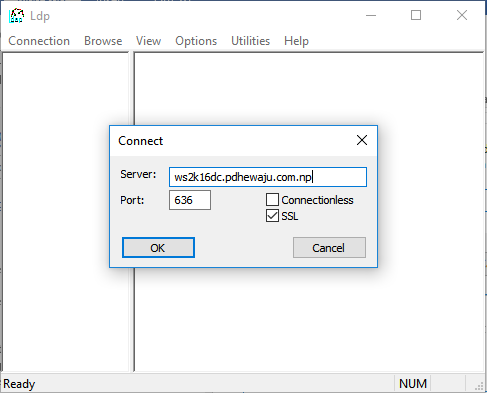
If the configuration is good, you will receive this kind of message on your LDP console. If it didn’t you might need to restart your machine once.
Hope this was quite helpful blog for the integrating AD authentication with your Application using Secure channel. Keep posting for any comments J
About Author

pdhewjau
Prashant is a Microsoft MVP for Office Servers and Services. He works as Technical Lead on Thakral One and a Microsoft Certified Trainer for Windows Server, Exchange Server and office 365.
Download Windows Speedup Tool to fix errors and make PC run faster
LDAP signing is an authentication method in Windows Server that can improve the security of a directory server. Once enabled, it will reject any request that doesn’t ask for signing or if the request is using non-SSL/TLS-encrypted. In this post, we will share how you can enable LDAP signing in Windows Server and client machines. LDAP stands for Lightweight Directory Access Protocol (LDAP).
To make sure that the attacker doesn’t use a forged LDAP client to change server configuration and data, it is essential to enabling LDAP signing. It is equally important to enable it on the client machines.
- Set the server LDAP signing requirement
- Set the client LDAP signing requirement by using Local computer policy
- Set the client LDAP signing requirement by using the Domain Group Policy Object
- Set the client LDAP signing requirement by using Registry keys
- How to verify configuration changes
- How to find clients that do not use the “Require signing” option
The last section helps you to figure out clients that do not have Require signing enabled on the computer. It is a useful tool for IT admins to isolate those computers, and enable the security settings on the computers.
1] Set the server LDAP signing requirement

- Open Microsoft Management Console (mmc.exe)
- Select File > Add/Remove Snap-in > select Group Policy Object Editor, and then select Add.
- It will open the Group Policy Wizard. Click on the Browse button, and select Default Domain Policy instead of Local Computer
- Click on the OK button, and then on the Finish button, and close it.
- Select Default Domain Policy > Computer Configuration > Windows Settings > Security Settings > Local Policies, and then select Security Options.
- Right-click Domain controller: LDAP server signing requirements, and then select Properties.
- In the Domain controller: LDAP server signing requirements Properties dialog box, enable Define this policy setting, select Require signing in the Define this policy setting list, and then select OK.
- Recheck the settings and apply them.
2] Set the client LDAP signing requirement by using local computer policy

- Open Run prompt, and type gpedit.msc, and press the Enter key.
- In the group policy editor, navigate to Local Computer Policy > Computer Configuration > Policies > Windows Settings > Security Settings > Local Policies, and then select Security Options.
- Right-click on Network security: LDAP client signing requirements, and then select Properties.
- In the Network security: LDAP client signing requirements Properties dialog box, select Require signing in the list and then choose OK.
- Confirm changes and apply them.
3] Set the client LDAP signing requirement by using a domain Group Policy Object
- Open Microsoft Management Console (mmc.exe)
- Select File > Add/Remove Snap-in > select Group Policy Object Editor, and then select Add.
- It will open the Group Policy Wizard. Click on the Browse button, and select Default Domain Policy instead of Local Computer
- Click on the OK button, and then on the Finish button, and close it.
- Select Default Domain Policy > Computer Configuration > Windows Settings > Security Settings > Local Policies, and then select Security Options.
- In the Network security: LDAP client signing requirements Properties dialog box, select Require signing in the list and then choose OK.
- Confirm changes and apply the settings.
4] Set the client LDAP signing requirement by using registry keys
The first and foremost thing to do is take a backup of your registry
- Open Registry Editor
- Navigate to HKEY_LOCAL_MACHINE \ SYSTEM \ CurrentControlSet \ Services \ <InstanceName> \Parameters
- Right-click on the right pane, and create a new DWORD with name LDAPServerIntegrity
- Leave it to its default value.
<InstanceName>: Name of the AD LDS instance that you want to change.
5] How to verify if configuration changes now require sign-in
To make sure the security policy is working here is how to check its integrity.
- Sign in to a computer that has the AD DS Admin Tools installed.
- Open Run prompt, and type ldp.exe, and press the Enter key. It is a UI used for navigating through the Active Directory namespace
- Select Connection > Connect.
- In Server and Port, type the server name and the non-SSL/TLS port of your directory server, and then select OK.
- After a connection is established, select Connection > Bind.
- Under Bind type, select Simple bind.
- Type the user name and password, and then select OK.
If you receive an error message saying Ldap_simple_bind_s() failed: Strong Authentication Required, then you have successfully configured your directory server.
6] How to find clients that do not use the “Require signing” option
Every time a client machine connects to the server using an insecure connection protocol, it generates Event ID 2889. The log entry will also contain the IP addresses of the clients. You will need to enable this by setting the 16 LDAP Interface Events diagnostic setting to 2 (Basic). Learn how to configure AD and LDS diagnostic event logging here at Microsoft.
LDAP Signing is crucial, and I hope the was able to help you clearly understand how you can enable LDAP signing in Windows Server, and on the client machines.
Ashish holds a Bachelor’s in Computer Engineering and is a veteran Windows and Xbox user. He has work experience as a Database and Microsoft.NET Developer. He has been a Microsoft MVP (2008-2010) and excels in writing tutorials to improve the day-to-day experience with your devices.
Время на прочтение
14 мин
Количество просмотров 6.6K

В этой статье я расскажу о том, как я настраивал аутентификацию и авторизацию доменных пользователей Active Directory в OpenSearch. В домене я не обладаю правами администратора домена и не могу влиять на структуру каталогов Active Directory. А сценарий настройки Active Directory в OpenSearch, предлагаемый на официальном сайте, применить к домену с разветвленной структурой каталогов оказалось не так просто, как хотелось бы.
1. Предисловие
Эта статья является продолжением статьи «Установка, настройка и эксплуатация стэка OpenSearch в классической среде». Однако, тема этой статьи достаточно узкая и практически не зависит от основной настройки всего стека OpenSearch (материала первой статьи). Поэтому эту статью можно считать самостоятельной.
2. Введение
Сразу отмечу, что в качестве Веб-интерфейса я использую OpenSearch-Dashboards. И в основном именно для OpenSearch-Dashboards мне нужна доменная авторизация.
Для того, чтобы настроить аутентификацию и авторизацию доменных пользователей Active Directory в OpenSearch по протоколу LDAP необходимо сконфигурировать файл «<основной_каталог_opensearch>/plugins/opensearch-security/securityconfig/config.yml» (в моем случае полный путь к этому файлу такой «/opt/opensearch/plugins/opensearch-security/securityconfig/config.yml»).
В файле конфигурации за аутентификацию и авторизацию отвечают два разных блока: «config.authc.ldap» и «config.authz.roles_from_myldap» соответственно. Так как я подключаю OpenSearch к одному единственному домену AD для авторизации и аутентификации пользователей, то частично конфигурация обоих блоков у меня будет совпадать. Если точнее, то вот эти блоки у меня будут совпадать: «config.authc.ldap.authentication_backend.config.users» и «config.authz.roles_from_myldap.authorization_backend.config.users».
3. Постановка задачи
В домене Active Directory имеется три доменные группы: «Department05-Developers», «Department05-Admins», «Department05-Analysts». Необходимо, чтобы все пользователи домена, состоящие хотя бы в одной из этих трех доменных групп, могли войти в OpenSearch-Dashboards под своей доменной учетной записью и получили определенные роли в OpenSearch.
Для примера будем считать, что в каждой из этих доменных групп будет только по одному пользователю. В группе «Department05-Developers» состоит пользователь: «Пушкин Александр Сергеевич (PushkinAS)». В группе «Department05-Admins» состоит пользователь: «Горький Максим (GorkiiM)». В группе «Department05-Analysts» состоит пользователь: «Толстой Лев Николаевич (TolstoiLN)».
Договоримся, что FQDN контроллера домена AD будет таким: «server-ad.my.big.domain».
Договоримся, что учетная запись домена AD, предназначенная для просмотра LDAP будет такая: «user_for_LDAP». А пароль у неё будет такой: «Au5dUJ9q!54S». Отмечу, что нет необходимости давать этой учетной записи администраторские права.
Договоримся о том, что все три пользователя («PushkinAS», «GorkiiM», «TolstoiLN») находятся в разных населенных пунктах, а структура каталогов в AD учитывает населенный пункт при создании учетной записи, то есть учетные записи будут находиться по разным адресам в AD.
4. Коротко об объектах настройки конфиденциальности в OpenSearch
В OpenSearch, как и во многих других системах, для распределения привилегий в системе используются учетные записи.
Каждая учетная запись может иметь набор прав доступов, которые наделяют пользователя полномочиями.
Определенный набор прав доступов объединяется в роль. Пользователь может иметь как одну, так и несколько ролей. В случае, когда пользователю назначены несколько ролей, права доступов которых противоречат друг другу, преимущество имеют права, дающие пользователю больший доступ.
Например, если дать права администратора и наблюдателя одновременно, то фактически пользователь будет иметь права администратора.
А вот «Backend» роль сущность несколько абстрактная. «Обычная» роль может иметь «Backend» роль или даже несколько «Backend» ролей. Пользователь тоже может иметь «Backend» роль или даже несколько «Backend» ролей. Если «Backend» роль есть у пользователя, и эта же «Backend» роль есть у «обычной» роли, то такой пользователь становится обладателем этой «обычной» роли.
«Backend» роли становятся актуальными для использования при доменной авторизации. Потому как доменные пользователи не доступны для настройки прав или «обычных» ролей, они могут получить только «Backend» роль автоматически, в зависимости от настроенной конфигурации.
5. Настройка LDAP
Для наглядности я сразу приведу уже сконфигурированный файл «config.yml» целиком (в моем случае это файл «/opt/opensearch/plugins/opensearch-security/securityconfig/config.yml»).
/opt/opensearch/plugins/opensearch-security/securityconfig/config.yml
---
# This is the main OpenSearch Security configuration file where authentication
# and authorization is defined.

_meta:
  type: "config"
  config_version: 2

config:
  dynamic:
    # Set filtered_alias_mode to 'disallow' to forbid more than 2 filtered aliases per index
    # Set filtered_alias_mode to 'warn' to allow more than 2 filtered aliases per index but warns about it (default)
    # Set filtered_alias_mode to 'nowarn' to allow more than 2 filtered aliases per index silently
    #filtered_alias_mode: warn
    #do_not_fail_on_forbidden: false
    #kibana:
    # Kibana multitenancy
    #multitenancy_enabled: true
    #server_username: kibanaserver
    #index: '.kibana'
    http:
      anonymous_auth_enabled: false
      xff:
        enabled: false
        internalProxies: '192\.168\.0\.10|192\.168\.0\.11' # regex pattern
        #internalProxies: '.*' # trust all internal proxies, regex pattern
        #remoteIpHeader:  'x-forwarded-for'
        ###### see https://docs.oracle.com/javase/7/docs/api/java/util/regex/Pattern.html for regex help
        ###### more information about XFF https://en.wikipedia.org/wiki/X-Forwarded-For
        ###### and here https://tools.ietf.org/html/rfc7239
        ###### and https://tomcat.apache.org/tomcat-8.0-doc/config/valve.html#Remote_IP_Valve
    authc:
      kerberos_auth_domain:
        http_enabled: false
        transport_enabled: false
        order: 6
        http_authenticator:
          type: kerberos
          challenge: true
          config:
            # If true a lot of kerberos/security related debugging output will be logged to standard out
            krb_debug: false
            # If true then the realm will be stripped from the user name
            strip_realm_from_principal: true
        authentication_backend:
          type: noop
      basic_internal_auth_domain:
        description: "Authenticate via HTTP Basic against internal users database"
        http_enabled: true
        transport_enabled: true
        order: 4
        http_authenticator:
          type: basic
          challenge: true
        authentication_backend:
          type: intern
      proxy_auth_domain:
        description: "Authenticate via proxy"
        http_enabled: false
        transport_enabled: false
        order: 3
        http_authenticator:
          type: proxy
          challenge: false
          config:
            user_header: "x-proxy-user"
            roles_header: "x-proxy-roles"
        authentication_backend:
          type: noop
      jwt_auth_domain:
        description: "Authenticate via Json Web Token"
        http_enabled: false
        transport_enabled: false
        order: 0
        http_authenticator:
          type: jwt
          challenge: false
          config:
            signing_key: "base64 encoded HMAC key or public RSA/ECDSA pem key"
            jwt_header: "Authorization"
            jwt_url_parameter: null
            roles_key: null
            subject_key: null
        authentication_backend:
          type: noop
      clientcert_auth_domain:
        description: "Authenticate via SSL client certificates"
        http_enabled: false
        transport_enabled: false
        order: 2
        http_authenticator:
          type: clientcert
          config:
            username_attribute: cn #optional, if omitted DN becomes username
          challenge: false
        authentication_backend:
          type: noop
      ldap:
        description: "Authenticate via LDAP or Active Directory"
        http_enabled: true
        transport_enabled: false
        order: 5
        http_authenticator:
          type: basic
          challenge: false
        authentication_backend:
          # LDAP authentication backend (authenticate users against a LDAP or Active Directory)
          type: ldap
          config:
            # enable ldaps
            enable_ssl: false
            # enable start tls, enable_ssl should be false
            enable_start_tls: false
            # send client certificate
            enable_ssl_client_auth: false
            # verify ldap hostname
            verify_hostnames: true
            hosts:
            - server-ad.my.big.domain:389
            bind_dn: 'cn=user_for_LDAP,ou=Service Accounts,ou=Moscow,dc=MY,dc=BIG,dc=DOMAIN'
            password: 'Au5dUJ9q!54S'
            users:
              1-userbase:
                base: 'CN=Пушкин Александр Сергеевич (PushkinAS),OU=Users,OU=Saint_Petersburg,DC=MY,DC=BIG,DC=DOMAIN'
                search: '(sAMAccountName={0})'
              2-userbase:
                base: 'CN=Горький Максим (GorkiiM),OU=Users,OU=Nizhny_Novgorod,DC=MY,DC=BIG,DC=DOMAIN'
                search: '(sAMAccountName={0})'
              3-userbase:
                base: 'CN=Толстой Лев Николаевич (TolstoiLN),OU=Users,OU=Yasnaya_Polyana,DC=MY,DC=BIG,DC=DOMAIN'
                search: '(sAMAccountName={0})'
            username_attribute: 'cn'
    authz:
      roles_from_myldap:
        description: "Authorize via LDAP or Active Directory"
        http_enabled: true
        transport_enabled: false
        authorization_backend:
          # LDAP authorization backend (gather roles from a LDAP or Active Directory, you have to configure the above LDAP authentication backend settings too)
          type: ldap
          config:
            # enable ldaps
            enable_ssl: false
            # enable start tls, enable_ssl should be false
            enable_start_tls: false
            # send client certificate
            enable_ssl_client_auth: false
            # verify ldap hostname
            verify_hostnames: true
            hosts:
              - server-ad.my.big.domain:389
            bind_dn: 'cn=user_for_LDAP,ou=Service Accounts,ou=Moscow,dc=MY,dc=BIG,dc=DOMAIN'
            password: 'Au5dUJ9q!54S'
            users:
              1-userbase:
                base: 'CN=Пушкин Александр Сергеевич (PushkinAS),OU=Users,OU=Saint_Petersburg,DC=MY,DC=BIG,DC=DOMAIN'
                search: '(sAMAccountName={0})'
              2-userbase:
                base: 'CN=Горький Максим (GorkiiM),OU=Users,OU=Nizhny_Novgorod,DC=MY,DC=BIG,DC=DOMAIN'
                search: '(sAMAccountName={0})'
              3-userbase:
                base: 'CN=Толстой Лев Николаевич (TolstoiLN),OU=Users,OU=Yasnaya_Polyana,DC=MY,DC=BIG,DC=DOMAIN'
                search: '(sAMAccountName={0})'
            username_attribute: 'cn'
            roles:
              1-rolebase:
                base: 'CN=Department05-Developers,OU=Groups,OU=Moscow,DC=MY,DC=BIG,DC=DOMAIN'
                search: '(member={0})'
              2-rolebase:
                base: 'CN=Department05-Admins,OU=Groups,OU=Moscow,DC=MY,DC=BIG,DC=DOMAIN'
                search: '(member={0})'
              3-rolebase:
                base: 'CN=Department05-Analysts,OU=Groups,OU=Moscow,DC=MY,DC=BIG,DC=DOMAIN'
                search: '(member={0})'
            userroleattribute: null
            userrolename: memberOf, SamAccountName
            rolename: "cn"
            resolve_nested_roles: false
      roles_from_another_ldap:
        description: "Authorize via another Active Directory"
        http_enabled: false
        transport_enabled: false
        authorization_backend:
          type: ldap
Описание всех параметров вы можете посмотреть на официальном сайте OpenSearch (https://opensearch.org/docs/latest/security-plugin/configuration/ldap/). Я опишу только некоторые параметры и моменты, которые вызвали у меня затруднения.
В параметре «config.authc.ldap.authentication_backend.config.users» (и в параметре «config.authz.roles_from_myldap.authorization_backend.config.users») содержится путь в LDAP по которому производится поиск учетных записей, которые смогут аутентифицироваться (и авторизоваться). Можно указать каталог, в котором содержатся учетные записи, и все учетные записи из этого каталога смогут аутентифицироваться (и авторизоваться), но при этом не получится отфильтровать учетные записи, которые не должны иметь возможность аутентификации (и авторизации). Так же вместо каталога можно указать саму учетную запись, которой нужно дать возможность аутентифицироваться (и авторизоваться). Таких каталогов или учетных записей можно указать любое количество.
В нашем случае, например, учетная запись «PushkinAS» расположена по адресу «OU=Users,OU=Saint_Petersburg,DC=MY,DC=BIG,DC=DOMAIN». Но в этом же каталоге есть и другие учетные записи, для которых аутентификация (и авторизоваться) должна быть запрещена.
Одним из вариантов решения этой проблемы, я думаю, будет создание проксирующего LDAP сервера. Однако в моем случае пользователей не очень много и меняются они редко, и я пошел другим путем.
Простым решением для разграничения прав по аутентификации (и авторизации) будет создание списка из путей в LDAP к каждому пользователю, которым позволено аутентифицироваться (и авторизоваться) на сервере.
…
1-userbase:
  base: 'CN=Пушкин Александр Сергеевич (PushkinAS),OU=Users,OU=Saint_Petersburg,DC=MY,DC=BIG,DC=DOMAIN'
  search: '(sAMAccountName={0})'
2-userbase:
  base: 'CN=Горький Максим (GorkiiM),OU=Users,OU=Nizhny_Novgorod,DC=MY,DC=BIG,DC=DOMAIN'
  search: '(sAMAccountName={0})'
3-userbase:
  base: 'CN=Толстой Лев Николаевич (TolstoiLN),OU=Users,OU=Yasnaya_Polyana,DC=MY,DC=BIG,DC=DOMAIN'
  search: '(sAMAccountName={0})'
…
Так как нужно получить список пользователей AD, состоящих хотя бы в одной из трех доменных групп, получить к каждому из этих пользователей путь в LDAP (AD) и внести эти данные в конфигурацию в параметр «config.authc.ldap.authentication_backend.config.users» и в параметр «config.authz.roles_from_myldap.authorization_backend.config.users» я составил PowerShell скрипт, который всё это сделает и сгенерирует фрагмент конфигурации для этих параметров.
Думаю, знатоки PowerShell найдут что можно оптимизировать в этом скрипте, но главное, что он работает. Приведу текст скрипта:
Get_fragment_of_config.ps1
$null=(chcp 1251)

# Список доменных групп
$List_of_groups =@(
"Department05-Developers"
"Department05-Admins"
"Department05-Analysts"
)

$List_users_text=""

# Собираем в единый текст список логинов
Foreach ($groups_n in $List_of_groups) {
  $t=(net group $groups_n /domain)
  for ($i=8; $i -le $t.Count-3; $i++){
   $List_users_text+=$t[$i]
  }
}

# Удаляем двойные пробелы
for ($i=1; $i -le 15; $i++){
    $List_users_text=$List_users_text -replace "\s\s", " "
}

# Разбиваем логины на элементы массива
$List_users=@()
$List_users+=$List_users_text.Split(" ")

# Удаляем дубликаты логинов, если один и тот же логин есть в нескольких группах
$List_users = $List_users | select -uniq

# Сортируем логины по алфавиту
$List_users = $List_users | sort-object

# Удаляем первый элемент массива (пустая строка)
$null, $List_users = $List_users

# Получаем список логинов в формате пути LDAP, без префикса "LDAP://"
$List_users_LDAP=@()
Foreach ($user_n in $List_users) {
   $user_name="*("+$user_n+")*"
   $List_users_LDAP+=(([adsisearcher]“(&(objectcategory=person)(cn=$user_name))”).Findall()).Path -replace "LDAP://", ""
}

# Оставим только строки с содержанием (Удаляем пустые строки)
$List_users_LDAP2=@()
Foreach ($user_n in $List_users_LDAP) {
   if (($user_n[0] -eq "C") -and ($user_n[1] -eq "N")) {
      $List_users_LDAP2+=$user_n
   }
}
$List_users_LDAP=$List_users_LDAP2

# Формируем конфиг
[int]$counter=1

# переменная - отступ; пробелы перед каждой строкой, для YAML
$before="            "

# конечный текст будет в переменной $config
$config=""
$config+=$before+'users:'+[System.Environment]::NewLine

Foreach ($user_n in $List_users_LDAP) {
  $config+=$before+"  "+$counter+"-userbase:"+[System.Environment]::NewLine
  $config+=$before+"    "+'base: '''+$user_n+''''+[System.Environment]::NewLine
  $config+=$before+"    "+'search: ''(sAMAccountName={0})'''+[System.Environment]::NewLine

  $counter++
}

# Выводим конфиг
$config
Отмечу переменную «$user_name». В моем случае, как я показывал в примерах, «CN» учетной записи имеет вид «Пушкин Александр Сергеевич (PushkinAS)», где «(PushkinAS)» является sAMAccountName (логином). Поэтому строка «$user_name=»*(«+$user_n+»)*»» в моем случае позволит достоверно отфильтровать каждую учетную запись. Если в вашем домене Active Directory «CN» формируется иначе, то эту строку нужно будет скорректировать. В остальном, я надеюсь, скрипт получился универсальным.
Параметр «config.authz.roles_from_myldap.authorization_backend.config.roles» содержит путь в LDAP по которому происходит поиск объектов, которые станут «Backend» ролями, в нашем случае этими объектами будут доменные группы. Таких каталогов можно указать любое количество. Укажем в этом параметре группы: «Department05-Developers», «Department05-Admins», «Department05-Analysts». Позже настроим на эти группы роль «readall», которая позволит просматривать все индексы.
…
1-rolebase:
  base: 'CN=Department05-Developers,OU=Groups,OU=Moscow,DC=MY,DC=BIG,DC=DOMAIN'
  search: '(member={0})'
2-rolebase:
  base: 'CN=Department05-Admins,OU=Groups,OU=Moscow,DC=MY,DC=BIG,DC=DOMAIN'
  search: '(member={0})'
3-rolebase:
  base: 'CN=Department05-Analysts,OU=Groups,OU=Moscow,DC=MY,DC=BIG,DC=DOMAIN'
  search: '(member={0})'
…
Параметр «config.authz.roles_from_myldap.authorization_backend.config.userrolename». Значение «memberOf» сделает доменные группы доменного пользователя его «Backend» ролями, а значение «SamAccountName» сделает параметр доменной учетной записи «SamAccountName» (логин) «Backend» ролью доменного пользователя. Это позволит выдавать права доменным пользователям и по его группам, и по его логину.
…
userrolename: memberOf, SamAccountName
…
6. Получаем полный путь к объектам в AD
Полный путь к группе в AD через PowerShell можно получить так:
$group = ([adsisearcher]“(&(objectcategory=group)(cn=name_of_group))”).Findall()
$group
Вместо «name_of_group» подставьте название нужной вам группы.
Полный путь к пользователю в AD через PowerShell можно получить так:
$what_find="*("+"user_name"+")*"
$user = ([adsisearcher]“(&(objectcategory=person)(cn=$what_find))”).Findall()
$user
В переменную «$what_find» подставьте логин нужного вам пользователя, в формате, который используется в вашем домене AD.
7. Применение настроек
Для применения настроек, сделанных в файле «/opt/opensearch/plugins/opensearch-security/securityconfig/config.yml» (а также всех других файлов конфигураций в «/opt/opensearch/plugins/opensearch-security/securityconfig/») нужно запустить скрипт «/opt/opensearch/plugins/opensearch-security/tools/securityadmin.sh» и заново сгенерировать сертификаты, сделать это можно так:
cd /opt/opensearch/plugins/opensearch-security/tools
./securityadmin.sh -cd ../securityconfig/ -icl -nhnv \
   -cacert ../../../config/root-ca.pem \
   -cert ../../../config/kirk.pem \
   -key ../../../config/kirk-key.pem
8. Проблема применения настроек
Выполнение команды для применения настроек удаляет все изменения, сделанные в OpenSearch-Dashboards в разделе «Security», то есть все настройки пользователей и ролей. И это является проблемой, так как в конфигурацию со временем будет необходимо добавлять новых пользователей и удалять старых пользователей.
Видимо разработчики OpenSearch всё же подразумевают, что все пользователи в AD лежат в одном каталоге и «лишних» пользователей там нет. Либо всё-таки подразумевается использование проксирующего LDAP сервера. Другого объяснения я не нашел.
Для того чтобы обойти эту проблему можно вносить изменения не в Web-интерфейсе (OpenSearch-Dashboards), а через файлы конфигураций.
Далее опишу настройку конфигурационных файлов.
9. Добавляем внутренних пользователей
Добавим двух пользователей: «my_admin» — с полным доступом ко всему (admin), «guest» — с правами на просмотр всех индексов.
Для этого отредактируем файл «/opt/opensearch/plugins/opensearch-security/securityconfig/internal_users.yml»:
/opt/opensearch/plugins/opensearch-security/securityconfig/internal_users.yml
...
# Добавить в конце файла
my_admin:
  hash: "$2y$12$RYNld1qqXMuCQr7HCU/HnOiOn20smdWUzD4vJan2cdbVrKPtQkVZG"
  reserved: false
  backend_roles:
  - "admin"
  description: "Admin"

guest:
  hash: "$2y$12$n330lm1W/VOV.VYT0xCQm.N/8HDoAqNzV.oQwnRDjLRXV9PfXSWby"
  reserved: false
  backend_roles:
  - "readall"
  description: "Readall"
Хэши паролей можно получить так же как описано здесь.
После редактирования конфигурации не забываем применить настройки.
10. Добавляем роли для пользователей AD
Добавим две роли: роль «readall_AD» с аналогичными правами как у роли «readall» — для просмотра всех индексов, роль «admin_AD» с аналогичными правами как у роли «all_access» (admin) — с полным доступом ко всему.
Для этого отредактируем файл «/opt/opensearch/plugins/opensearch-security/securityconfig/roles.yml»:
/opt/opensearch/plugins/opensearch-security/securityconfig/roles.yml
...
# Добавить в конце файла
# Allow AD users read all
readall_AD:
  reserved: false
  cluster_permissions:
    - "cluster_composite_ops_ro"
  index_permissions:
    - index_patterns:
        - '*'
      allowed_actions:
        - 'read'

# Allow AD users read all
admin_AD:
  reserved: false
  cluster_permissions:
    - '*'
  index_permissions:
    - index_patterns:
        - '*'
      allowed_actions:
        - '*'
  tenant_permissions:
    - tenant_patterns:
          - '*'
      allowed_actions:
        - 'kibana_all_read'
        - 'kibana_all_write'
После редактирования конфигурации не забываем применить настройки.
11. Добавляем «Backend» роли для пользователей AD
Обладателям «Backend» ролей: «Department05-Developers», «Department05-Admins», «Department05-Analysts»; дадим роль «readall_AD». Обладателям «Backend» ролей: «GorkiiM»; дадим роль «admin_AD».
Для этого отредактируем файл «/opt/opensearch/plugins/opensearch-security/securityconfig/roles_mapping.yml»:
/opt/opensearch/plugins/opensearch-security/securityconfig/roles_mapping.yml
...
# Добавить в конце файла
readall_AD:
  reserved: false
  backend_roles:
  - "Department05-Developers"
  - "Department05-Admins"
  - "Department05-Analysts"

admin_AD:
  reserved: false
  backend_roles:
  - "GorkiiM"
После редактирования конфигурации не забываем применить настройки.
12. Послесловие
На этом всё. Всем спасибо за внимание к статье, надеюсь она окажется для кого-то полезной.
OpenLDAP сервер — это программное обеспечение, которое предоставляет возможность создания и управления LDAP-каталогом. LDAP (Lightweight Directory Access Protocol) — протокол доступа к каталогу, который широко используется в системах управления авторизацией и аутентификацией пользователей. OpenLDAP наиболее популярное решение для реализации LDAP-сервера.
Хотя OpenLDAP является открытым исходным кодом и изначально предназначен для Unix-подобных систем, существуют версии и для Windows. В этой статье мы рассмотрим процесс установки и настройки OpenLDAP сервера для Windows.
Установка OpenLDAP сервера на Windows может быть сложной задачей из-за отсутствия официальных сборок инструментов и документации. Однако, существует несколько сторонних поставщиков, которые предлагают собранные версии и инструкции по установке OpenLDAP на Windows. В данной статье мы рассмотрим установку OpenLDAP сервера с использованием одного из таких поставщиков.
Примечание: перед установкой OpenLDAP сервера на Windows, убедитесь, что у вас установлены все необходимые компоненты, такие как Visual C++ Redistributable и OpenSSL.
Содержание
- Установка OpenLDAP на Windows
- Настройка базы данных OpenLDAP
- Создание пользователей в OpenLDAP
- Настройка безопасности OpenLDAP на Windows
- Интеграция OpenLDAP с другими сервисами на Windows
Установка OpenLDAP на Windows
Установка и настройка OpenLDAP на операционной системе Windows позволяет использовать этот сервер каталогов для управления и хранения данных пользователей и групп. В данной статье будет рассмотрен процесс установки OpenLDAP.
Для начала установки необходимо загрузить дистрибутив OpenLDAP для Windows с официального сайта проекта. Затем следует запустить установочный файл и следовать инструкциям мастера установки.
В ходе установки следует выбрать каталог, в котором будет установлен OpenLDAP, а также выбрать необходимые компоненты для установки. Включите компоненты, которые вам необходимы, например, сервер slapd и утилиты администрирования.
После успешной установки службы slapd необходимо настроить ее работу. Для этого вам понадобится отредактировать конфигурационный файл slapd.conf. Откройте этот файл в редакторе и внесите необходимые изменения для настройки LDAP.
После настройки сервера OpenLDAP можно запустить командой service start slapd. При этом сервер будет готов к принятию клиентских запросов и аутентификации пользователей.
В завершении стоит отметить, что установка OpenLDAP на Windows является сложной задачей и требует некоторого опыта в работе с серверами каталогов. Тем не менее, правильно настроенный OpenLDAP может стать незаменимым инструментом для управления и хранения данных пользователей и групп.
Настройка базы данных OpenLDAP
После успешной установки OpenLDAP сервера на Windows необходимо настроить базу данных для хранения информации о пользователях и группах. В OpenLDAP база данных представляет собой набор записей и атрибутов.
Для начала необходимо создать файл схемы (schema) для базы данных. Схема определяет структуру записей и атрибутов, которые могут быть использованы в базе данных. В файле схемы указывается, какие атрибуты будут использоваться для хранения информации о пользователях и группах, а также определяются правила для проверки и модификации данных.
После создания файлов схемы, необходимо настроить конфигурационный файл slapd.conf, в котором указываются параметры базы данных. В конфигурационном файле можно указать путь к файлу схемы и другие параметры, такие как расположение базы данных, порт, на котором будет слушать сервер и другие опции.
После настройки файлов схемы и конфигурации, можно запустить OpenLDAP сервер. При запуске сервера будет создана файловая структура базы данных, указанная в конфигурационном файле. После запуска сервер будет готов к приему запросов на добавление, удаление и изменение данных.
Настройка базы данных OpenLDAP требует понимания структуры и синтаксиса файлов схемы и конфигурации. Рекомендуется изучить документацию OpenLDAP для более детальной информации о настройке базы данных и использовании различных атрибутов и правил.
Создание пользователей в OpenLDAP
Для создания пользователей в OpenLDAP необходимо выполнить следующие шаги:
1. Войдите на сервер OpenLDAP с правами администратора.
2. Откройте консоль или терминал и выполните команду для запуска утилиты создания пользователя LDAP:
ldapadd -x -D "cn=admin,dc=example,dc=com" -W -f user.ldif
Здесь user.ldif — это файл со следующим содержимым:
dn: uid=john,ou=users,dc=example,dc=com
objectClass: top
objectClass: person
objectClass: organizationalPerson
objectClass: inetOrgPerson
cn: John Doe
sn: Doe
uid: john
userPassword: {SHA}W6ph5Mm5Pz8GgiULbPgzG37mj9g=
mail: john@example.com
3. Замените значения dn, uid, cn, sn, userPassword, mail в файле user.ldif на соответствующие ваши параметры.
4. Сохраните файл и выполните команду ldapadd для его импорта в базу данных OpenLDAP.
5. Введите пароль администратора OpenLDAP.
6. Пользователь успешно создан в базе данных OpenLDAP.
Теперь вы можете использовать созданных пользователей для аутентификации и авторизации в OpenLDAP.
Настройка безопасности OpenLDAP на Windows
В данном разделе мы рассмотрим ключевые меры безопасности, которые необходимо принять при настройке OpenLDAP сервера на операционной системе Windows.
1. Установите пароль для административного аккаунта.
2. Измените стандартные порты, используемые сервером, чтобы снизить риск возможной атаки.
3. Ограничьте доступ к серверу по IP-адресам. Для этого можно использовать механизмы файрвола операционной системы или специализированного ПО.
4. Включите SSL/TLS шифрование для безопасной передачи данных между клиентами и сервером LDAP.
5. Установите политику паролей, которая требует сложные пароли, регулярную смену и запрещает использование повторяющихся паролей.
6. Ограничьте права доступа конфигурационных файлов и баз данных сервера OpenLDAP. Только необходимые пользователи должны иметь доступ к этим файлам.
7. Проверьте настройки аутентификации для предотвращения подбора пароля и атак по словарю.
8. Отслеживайте логи сервера OpenLDAP для обнаружения возможных атак или нарушений безопасности.
9. Установите систему мониторинга, которая будет оповещать администратора о любых событиях, связанных с безопасностью, происходящих на сервере.
10. Регулярно обновляйте сервер OpenLDAP и все используемые зависимости для получения последних исправлений безопасности.
| Команда | Описание |
|---|---|
| apt-get install slapd | Установка основных компонентов OpenLDAP сервера. |
| apt-get install ldap-utils | Установка утилит для работы с LDAP-сервером. |
Интеграция OpenLDAP с другими сервисами на Windows
OpenLDAP предоставляет возможность интеграции с другими сервисами на операционной системе Windows. Это позволяет использовать LDAP-каталог для аутентификации и авторизации пользователей в различных приложениях и сервисах.
Для интеграции OpenLDAP с другими сервисами на Windows можно использовать следующие подходы:
1. Использование LDAP-каталога для аутентификации пользователей в операционной системе Windows. Это позволяет централизованно управлять учетными записями пользователей и их правами доступа к ресурсам компьютеров.
2. Использование LDAP-каталога для аутентификации пользователей в веб-приложениях. Это позволяет реализовать единый механизм аутентификации для различных веб-приложений, использующих LDAP.
3. Использование LDAP-каталога для авторизации пользователей в веб-приложениях. Это позволяет определять права доступа пользователей к различным функциям и ресурсам веб-приложений на основе информации из LDAP-каталога.
4. Использование LDAP-каталога для интеграции с почтовыми серверами. Это позволяет хранить информацию о пользователях и их адресах электронной почты в LDAP-каталоге, а также осуществлять аутентификацию пользователей при отправке и получении почты.
5. Использование LDAP-каталога для интеграции с VPN-серверами. Это позволяет централизованно управлять учетными записями пользователей, аутентифицирующихся при подключении к VPN-серверу.
Интеграция OpenLDAP с другими сервисами на Windows позволяет улучшить безопасность и удобство работы пользователей, а также упростить управление учетными записями и правами доступа. При правильной настройке и использовании LDAP-каталога можно сэкономить время и ресурсы при администрировании различных сервисов и приложений.
In March 2020, systems will stop working if:
-
They are integrated with Active Directory using non-secure LDAP.
-
Domain controller servers do have the latest patches installed.
-
Sysadmins don’t proactively take steps such as the ones we’ve detailed below.
There are numerous existing guides for setting up secure LDAP but none were as thorough, up to date, or user friendly as we’d like for ourselves or our clients so we decided to try to plug the gap by creating this one.
Update 2020/02/12 11:17: According to a couple of Microsoft articles (1, 2), it seems that the decision has been made to push back this default behaviour to “the second half of calendar year 2020”.
Update 2020/03/24 09:41: It seems that Microsoft have decided not to enforce these changes after all. The following is an excerpt from the same Microsoft articles:
“Note that these March 10, 2020 updates and updates in the foreseeable future will not make changes to LDAP signing or LDAP channel binding policies or their registry equivalent on new or existing domain controllers.”
Links to each section:
-
Explanation
-
Identification
-
Resolution
-
Certificate Signing Request (CSR)
-
Certificate
-
Commercial CA
-
Let’s Encrypt
-
Active Directory Certificate Services (AD CS)
-
Self-signed
-
-
Bindings
-
Testing
-
Clients
-
-
Workaround
-
Sign-off
Many systems are integrated via the Lightweight Directory Access Protocol (LDAP) because it allows systems to use a central directory of user and computer details which, in turn, allows systems to be consistent and user-aware and it allows users to access multiple services using the same set of credentials. For example:
-
Users can use their “PC” username and password with their Virtual Private Network (VPN) connections.
-
Secure Email Gateway (SEG) accounts can be automatically created.
-
Multi-Function Printer (MFP) address books can be automatically updated.
-
Firewalls can allow or reject traffic based on group membership.
etc
The problem with LDAP is that, because people tend to follow the path of least resistance, the most common method is Simple Bind which is not encrypted by default so usernames and passwords are moving around the networks just waiting to be intercepted.
On the 13th of August 2019, Microsoft published security advisory ADV190023 and support article 4520412 stating that, in order to resolve these Man-in-the-Middle (MITM) attacks / vulnerabilities such as CVE-2017-8563, they are planning to release a Windows update in March 2020 to enforce the following:
-
Simple Bind LDAP over SSL / TLS (LDAPS).
or
-
Simple Authentication and Security Layer (SASL) LDAP with digital signing requests.
Both of these options require the use of public key authentication via trusted end-entity SSL / TLS certificates.
If steps are not taken then LDAP connections will cease to work as soon as the Windows update is installed.
↑ Back to Index.
The first step is to identify what systems are integrated, if any.
Microsoft Advanced Threat Analytics (ATA) can be used for this purpose but if you don’t have that then continue reading this section.
To quickly determine if domain controller servers are being used as LDAP servers, the following PowerShell commands will retrieve the events (ID 2887) that are logged if this is the case.
$DCs = "<DC #1 hostname>", "<DC #2 hostname>";
ForEach ($DC in $DCs) {
    Get-WinEvent -ComputerName $DC -ProviderName Microsoft-Windows-ActiveDirectory_DomainService | Where-Object { $_.Id -Eq 2887 } | Format-List;
}
If events are found and you require more, identifying information such as the client IP address, the username, etc, running the following PowerShell command or manually creating the registry value on each DC will cause the LDAP service to log more useful information in the events (ID 2889):
New-ItemProperty -Path "HKLM:\System\CurrentControlSet\Services\NTDS\Diagnostics" -Name "16 LDAP Interface Events" -PropertyType DWORD -Value 2 -Force
-
Hive and key path:
HKEY_LOCAL_MACHINE\System\CurrentControlSet\Services\NTDS\Diagnostics
-
Value type:
DWORD (32-bit) Value/REG_DWORD -
Value name:
16 LDAP Interface Events -
Value data:
2(decimal)
Once that is in place, you can use the following PowerShell commands to extract the identifying information too:
$DCs = "<DC #1 hostname>", "<DC #2 hostname>";
ForEach ($DC in $DCs) {
    Get-WinEvent -ComputerName $DC -ProviderName Microsoft-Windows-ActiveDirectory_DomainService | Where-Object { $_.Id -Eq 2887 -Or $_.Id -Eq 2889 } | Format-List;
}
Alternatively, on each DC, you can open Event Viewer and view the log Applications and Services Logs → Directory Service.
Now that you’ve identified which systems need to be reconfigured, it’s time to resolve the problem.
This section is only relevant if you’re not planning to use Let’s Encrypt or Active Directory Certificate Services (AD CS). If you’re not sure, skip ahead to the section “Certificate” then come back.
The first step is to generate the CSR.
As stated by Microsoft and confirmed by us, in this particular scenario, the Fully-Qualified Domain Name (FQDN) of the DC must be present in one of the following two places in the certificate:
-
The Common Name (CN) in the Subject field. We will be covering this option.
-
A DNS entry in the Subject Alternative Name (SAN) extension.
Customise the following content (particularly, the line starting with Subject) then save it as a text-based file named something like ldapcert.inf.
[Version]

Signature="$Windows NT$

[NewRequest]

Subject = "CN=DC01.example.local,O=Astrix Example,OU=IT,ST=RCT,L=Abercynon,C=GB" ; Replace the example between the quotation marks with the Fully-Qualified Domain Name (FQDN) of your domain controller computer account and, optionally, your organisation's information.
KeySpec = 1
KeyLength = 2048 ; This can be 1024, 2048, 4096, 8192, or 16384. Larger key sizes are more secure, but have a greater impact on performance.
Exportable = TRUE
MachineKeySet = TRUE
SMIME = False
PrivateKeyArchive = FALSE
UserProtected = FALSE
UseExistingKeySet = FALSE
ProviderName = "Microsoft RSA SChannel Cryptographic Provider"
ProviderType = 12
RequestType = PKCS10
KeyUsage = 0xa0

[EnhancedKeyUsageExtension]

OID=1.3.6.1.5.5.7.3.1 ; This denotes Server Authentication.
Once you have that file, run the following command:
certreq -new <path to input information file> <path to output CSR file>
certreq -new "C:\Users\Administrator\Desktop\ldapcert.inf" "C:\Users\Administrator\Desktop\ldapcert.csr"
If you’ve done this correctly, the output file will start with -----BEGIN NEW CERTIFICATE REQUEST----- and end with -----END NEW CERTIFICATE REQUEST-----.
The next step is to submit the CSR to a Certificate Authority (CA) to get an end-entity SSL / TLS certificate issued and installed. If a public CA is used, only a basic, Domain-Validated (DV) one is required.
Because of the DC FQDN requirement, your choice of CA depends entirely on whether your AD DNS domain name uses a valid Internet Top-Level Domain (TLD) or not. A full list of valid Internet TLDs is available on Wikipedia but here’s a quick summary of the common ones to give you an idea:
| Invalid TLD examples | Valid TLD examples |
| .local | .co.uk |
| .internal | .com |
| .corp | .org |
| .lan | .net |
| .localhost | .edu |
We have summarised the various pros and cons of the most common CAs below and linked each heading to the respective section:
DCs are usually the most valuable assets in the IT infrastructure so they should be hardened to reduce the attack surface by:
1. Installing as few applications as possible.
2. Not forwarding traffic to it from the Internet. This may be acceptable if Let’s Encrypt published a list of public IP addresses that they use for the DV process so that the firewall rule can be restricted but they confirmed in their FAQs that they do not.
In any case, the submission and issuance process is quite different depending on which CA you chose so we will cover each of these below.
For demonstration purposes, we will be using a Comodo PositiveSSL Certificate via CheapSSLSecurity with domain validation via DNS.
First, submit the CSR text to your chosen commercial CA and choose a domain validation option.
Second, complete the CA’s domain validation process, wait for the certificate to be issued, and download the certificate package.
Third, if required, install any intermediate or root CA certificates to the Local Machine’s store Intermediate Certification Authorities or Trusted Root Certification Authorities. This can be done by opening the missing CA certificate’s properties and selecting Install Certificate…, as demonstrated below.
Installing the certificate for the intermediate CA “Sectigo RSA Domain Validation Secure Server CA” to complete the chain of trust for the end-entity certificate.
Fourth, run the following command to install the certificate:
certreq -accept <path to CRT file>
First, install an ACME Client. For demonstration purposes, we will be using Certify SSL Manager and authorization / domain validation via DNS.
Second, open Certify SSL Manager and:
-
As prompted, register a contact email address. This will be used to notify you of upcoming certificate expiries / renewals, etc.
-
Add a new certificate and:
-
In the section
Certificate Domains, add the FQDN of the DC. For example,DC01.ad.example.astrix.co.uk. -
In the section
Authorization, set the following:-
Challenge type:
dns-01 -
DNS Update Method:
(Update DNS Manually)
-
-
Save the changes.
-
-
Select the button
Request a certificate. -
As prompted, create the DNS TXT Resource Record (RR) in the domain’s authoritative name servers.
-
Select the button
Request a certificateagain to continue.
The certificate should now be issued and installed.
First, install Active Directory Certificate Services (AD CS) by doing the following:
-
Open Server Manager.
-
Select
Dashboard→Add roles and features. -
In the section
Before You Begin, simply select the buttonNext >. -
In the section
Installation Type, keep the radio buttonRole-based or feature-based installationenabled and select the buttonNext >. -
In the section
Server Selection, choose the server that you wish to be the root CA and select the buttonNext >. -
In the section
Server Roles, tickActive Directory Certificate Services, select the buttonAdd Features, and select the buttonNext >. -
In the section
Features, simply select the buttonNext >. -
In the section
AD CS, ensure that you’re happy with the server’s hostname because it cannot be changed then select the buttonNext >. -
In the section
Role Services, simply select the buttonNext >. -
In the section
Confirmation, simply select the buttonInstall.
Second, configure AD CS by doing the following:
-
Open Server Manager.
-
Select the flag and warning symbol then the link
Configure Active Directory Certificate Services on the destination server. -
In the section
Credentials, assuming you’re signed in as an administrator, simply select the buttonNext >. -
In the section
Role Services, check the tickboxCertification Authoritythen select the buttonNext >. -
In the section
Setup Type, choose your preferred CA type then select the buttonNext >. -
In the section
CA Type, select the radio buttonRoot CAthen select the buttonNext >. -
In the section
Private Key, select the radio buttonCreate a new private keythen select the buttonNext >. -
In the section
Cryptography, select the following then select the buttonNext >:-
Cryptographic provider:
RSA#Microsoft Software Key Storage Provider -
Key length:
2048(at least) or4096(recommended) -
Hash algorithm:
SHA256(at least)
-
-
In the section
CA Name, change the defaults to the following then select the buttonNext >:-
Common name for this CA: This must be the same as the server’s FQDN.
DC01.example.local, for example. -
Distinguished name suffix: Blank.
-
Preview of distinguished name: This should automatically be
CN=<server’s FQDN>.
-
-
In the section
Validity Period, simply select the buttonNext >. -
In the section
Certificate Database, simply select the buttonNext >. -
In the section
Confirmation, simply select the buttonConfigure. -
In the section
Results, simply select the buttonClose.
Third, run the following command and make a note of the value after Unique container name for the new certificate.
Fourth, open Explorer and do the following:
-
Browse to
C:\ProgramData\Microsoft\Crypto\Keys\. -
View the properties of the file named
<unique container name>. -
Select the tab
Securitythen select the buttonEdit…. -
Select the button
Add…, enterNetwork Service, select the buttonCheck Names, then select the buttonOK.
This should add the security principalNETWORK SERVICEwith allow permissionsRead & executeandRead. -
Close all windows applying changes.
In cases such as this (“inter-component authentication”, as McAfee describes it here), using a self-signed certificate is better than nothing but whether it can be considered as “secure” or “safe” is a debate for another time…
First, install OpenSSL.
Second, create a text-based file named something like v3ext.txt with the following content:
keyUsage=digitalSignature,keyEncipherment
extendedKeyUsage=serverAuth
subjectKeyIdentifier=hash
Third, run the following PowerShell commands. Only the OpenSSL path needs to be customised. When prompted, ensure that you use a strong passphrase for the CA’s private keyfile.
& "<path>\openssl.exe" genrsa -aes256 -out ca_private.key 4096;
& "<path>\openssl.exe" req -new -x509 -days 3650 -key ca_private.key -out ca_public.crt;
Import-Certificate -FilePath ca_public.crt -CertStoreLocation Cert:\LocalMachine\Root;
& "<path>\openssl.exe" x509 -req -days 365 -in ldapcert.csr -CA ca_public.crt -CAkey ca_private.key -extfile v3ext.txt -set_serial 01 -out ldapcert.crt;
& "<path>\openssl.exe" x509 -in ldapcert.crt -text;
certreq -accept ldapcert.crt
Once the certificate has been installed, the DC server’s bindings need to be updated.
This can be done by simply rebooting the DC server or, alternatively, by doing the following two steps.
First, create a text-based file named something like ldap-renewservercert.txt with the following content:
dn:
changetype: modify
add: renewServerCertificate
renewServerCertificate: 1
-
Second, run the following command:
ldifde -i -f ldap-renewservercert.txt
That’s it!
↑ Back to Index.
Once everything has been set up, it’s a good idea to test that it’s all actually working as required.
To do this, you can use tools such as ldp.exe (available on DC servers and as part of the AD DS management tools) or LDAP Admin. We will be using the latter on a PC so as to test external connections.
If the following configurations connect successfully then you should be good to go:
-
Host: FQDN of DC server. For example,
DC01.ad.example.astrix.co.uk. This is so that there are no name mismatches when validating the certificate. -
Security:
Simple authenticationwith:-
SSL( / TLS) on port636 -
TLSon port389or
-
SASLon port389
-
The final step is to actually reconfigure the clients to use one of the following connection methods:
-
Simple Bind LDAP using SSL / TLS (usually on port 636) or StartTLS (usually on port 389).
or
-
Simple Authentication and Security Layer (SASL) LDAP with digital signing requests.
Using a Sophos XG UTM / NGFW and an AD CS-issued certificate as an example, we can see that, by default, it can connect to the LDAP / DC server with SSL / TLS or StartTLS encryption enabled but not when certificate validation is enabled because it doesn’t trust the CA.
So, to install the CA certificate, do the following:
-
On the AD CS CA server:
-
Open
certmgr.msc. -
Expand the folder
Trusted Root Certification Authorities→ select the folderCertificates. -
Right-click on your CA certificate (it will be issued to and by the server’s FQDN) → hover over
All Tasks→ selectExport…. -
Select the button
Next→ ensure that the radio buttonDER encoded binary X.509 (.CER)is selected → select the buttonNext→ enter a path and file name to save the certificate as → select the buttonNext→ select the buttonFinish.
-
-
On the Sophos XG:
-
In the group
SYSTEM, select the tabCertificates→ select the tabCertificate authorities→ select the buttonAdd. -
Enter the following information:
-
Name: A descriptive name that will be displayed in the list. The subject (including the FQDN) will be automatically listed alongside it.
Astrix Example AD CS Root CAfor example. -
Certificate file format:
DER -
Certificate: The
CERfile exported as part of 1.4.
-
-
Select the button
Save.
-
Now that the chain of trust is complete, the device can validate the LDAPS certificate.
We do not recommend working around this problem but if you legitimately have a reason that you cannot use one of the above options then you can do so in one of two ways.
LDAP server Channel Binding can be disabled by running the following command or manually creating the following registry value:
New-ItemProperty -Path "HKLM:\System\CurrentControlSet\Services\NTDS\Parameters" -Name "LdapEnforceChannelBinding" -PropertyType DWORD -Value 0 -Force
-
Hive and key path:
HKEY_LOCAL_MACHINE\System\CurrentControlSet\Services\NTDS\Parameters
-
Value type:
DWORD (32-bit) Value/REG_DWORD -
Value name:
LdapEnforceChannelBinding -
Value data:
0(decimal). This indicates «disabled” – No channel binding validation is performed. This is the behavior of all servers that have not been updated.
LDAP server signing can be disabled by setting the following policy:
-
Location:
Computer Configuration→Policies→Windows Settings→Security Settings→Local Policies→Security Options -
Policy name:
Domain controller: LDAP server signing requirements -
Policy setting:
None
We sincerely hope that this has been useful.
Feel free to subscribe to our newsletter to be automatically notified of future posts.
Until next time! 😊