Бывает ряд ситуаций когда надо удаленно настроить новое сетевое оборудование(cisco, Juniper и т.д. где консоль имеет распайку cisco console RJ-45) через консоль, не имея возможности подключиться к удаленному компьютеру. Есть только доступ telnet/ssh к маршрутизатору cisco(R1) на удаленной площадке где AUX RJ-45(варианты: 2811, 3845, 3660 и т.д.). И этого более чем достаточно.
К примеру, вы сетевой администратор, находитесь постоянно в головном офисе, пришло новое оборудование на замену старого, в branch офис, который находиться за 3-9 земель от вас. Безусловно в каждом офисе есть квалифицированные сотрудники ИТ-отдела, но у них нет сертификата CCIE. Но несмотря на это они знают что такое кримпер и умеют им пользоваться.
Необходимые действия:
- Настроить AUX cisco(R1)
- Соединить AUX cisco(R1) с консолью нового оборудования(Rn).
- Посмотреть на R1, какая линия AUX
- Терминал подключение.
Настройка R1
Нам надо настроить AUX, заходим на R1 в режим конфигурации, в настойку AUX и выставляем параметры скорости (по умолчанию 9600), число бит на сигнал (по умолчанию 8), четность (по умолчанию NONE, стопбит (по умолчанию 1), отключаем активизацию по символам, устанавливаем none на символ разорвать соединения и отключаем редактирование. Не забываем про любимый telnet.
telnet R1
Trying 10.2.2.2…
Connected to r1.
Escape character is ‘^]’.
conf t
 line aux 0
  speed 9600
  databits 8
  parity none
  stopbits 1
  exec-timeout 0 0
  no activation-character
  no editing
  transport input telnet
  transport output none
  escape-character NONE
и не забываем сохранить
do wr
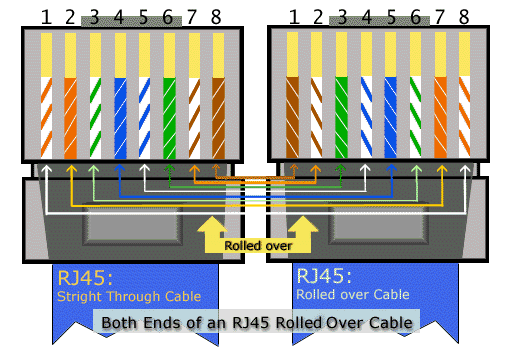
Кроссирование
Как мы знаем из курса CCNA. Распайка AUX, почти такая же как consоle. По этому нужен кабель RJ-45 – RJ-45 перевернутый(Cisco Console Rollover Cable):
| № провода в паре | Console port | № провода в паре | Auxillary port |
| 1 | — | 8 | RTS Output |
| 2 | DTR Output | 7 | DTR Output |
| 3 | TXD Outputt | 6 | TXD Output |
| 4 | GND | 5 | GND |
| 5 | GND | 4 | GND |
| 6 | RXD Input | 3 | RXD Input |
| 7 | DSR Input | 2 | DSR Input |
| 8 | — | 1 | CTS Input |
Обжимаем кабель — одним концом в R1 AUX, вторым в Rn CONSOLE
Осмотр
В привилегированном режиме смотрим номер линии:
sh line
   Tty Line Typ     Tx/Rx    A Modem  Roty AccO AccI  Uses  Noise Overruns  Int
*     0    0 CTY              -    -      -    -    -     0   2574    0/0      -
      1    1 AUX   9600/9600  -    -      -    -    -     0      0    0/0      -
    706  706 VTY              -    -      -    -    -     0      0    0/0      -
    707  707 VTY              -    -      -    -    -     0      0    0/0      -
    708  708 VTY              -    -      -    -    -     0      0    0/0      -
    709  709 VTY              -    -      -    -    -     0      0    0/0      -
    710  710 VTY              -    -      -    -    -     0      0    0/0      -
    711  711 VTY              -    -      -    -    -     0      0    0/0      -
    712  712 VTY              -    -      -    -    -     0      0    0/0      -
    713  713 VTY              -    -      -    -    -     0      0    0/0      -
    714  714 VTY              -    -      -    -    -     0      0    0/0      -
    715  715 VTY              -    -      -    -    -     0      0    0/0      -
    716  716 VTY              -    -      -    -    -     0      0    0/0      -
    717  717 VTY              -    -      -    -    -     0      0    0/0      -
    718  718 VTY              -    -      -    -    -     0      0    0/0      -
    719  719 VTY              -    -      -    -    -     0      0    0/0      -
    720  720 VTY              -    -      -    -    -     0      0    0/0      -
    721  721 VTY              -    -      -    -    -     0      0    0/0      -

Line(s) not in async mode -or- with no hardware support:
2-705
* — указывает что используется.
Номер линии бывает разный:
sh line aux 0
   Tty Typ     Tx/Rx    A Modem  Roty AccO AccI   Uses   Noise  Overruns   Int
      0 CTY              -    -      -    -    -      0       0     0/0       -
*   225 AUX   9600/9600  -    -      -    -    -      1       0     0/0       -
*   226 VTY              -    -      -    -    -    339       0     0/0       -
    227 VTY              -    -      -    -    -      1       0     0/0       -
    228 VTY              -    -      -    -    -      0       0     0/0       -
    229 VTY              -    -      -    -    -      0       0     0/0       -
    230 VTY              -    -      -    -    -      0       0     0/0       -

Line(s) not in async mode -or- with no hardware support:
1-224
Работает
У нас всё отлажено, всё настроено, осталось подключиться.
Прибавляем 2000 к значению номера линии 1, получаем 2001, это номер порта.
telnet r1 2001
Trying 10.2.2.2…
Connected to R1.
Escape character is ‘^]’.Would you like to enter the initial dialog? [yes]:
И добро пожаловать на оборудование.
P.S.: В следующей статье могу поделиться опытом использования консольных терминалов Avocent серии ACS
Contents
Introduction
This sample configuration shows you how to directly connect two routers, without a modem or other data communication equipment (DCE) devices. For more information on how to configure modems on auxiliary (AUX) or console ports, see Modem-Router Connection Guide or Access-Dial Technology Support.
Prerequisites
Requirements
There are no specific requirements for this document.
Components Used
This document is not restricted to specific software and hardware versions.
Conventions
For more information on document conventions, see the Cisco Technical Tips Conventions.
Background Information
In this configuration, two Cisco routers are connected back-to-back through the asynchronous AUX ports with the help of a null modem cable (rollover cable). The AUX ports of the two routers are directly connected with the help of a rollover cable with Point-to-Point Protocol (PPP) running on the link. The AUX ports are data terminal equipment (DTE) devices. You will require a null modem cable (rollover cable) to connect DTE to DTE devices.
A flat-satin rollover (null modem) cable (part number CAB-500RJ= ) is usually provided with every Cisco router to allow for RJ-45 console connectivity. If the AUX port is a DB-25, use a RJ-45-to-DB-25 adapter marked «terminal» with the null modem cable (rollover cable).
Note: Ensure that the length of the cable is less than 50 feet due to EIA/TIA-232 (formerly known as RS-232) limitations.
For more information on cabling, refer to Cabling Guide for RJ-45 Console and AUX Ports and RJ-45 cables.
Routers with DB-25 AUX Ports
For routers with a DB-25 AUX port (for example, Cisco 4500, 7200 and 7500), you need a DB-25-to-DB-25 Null Modem cable. This cable can be purchased from most retail electronic outlet stores.
Note: Due to incorrect signal pairs, you CANNOT use a rolled RJ-45-to-RJ-45 flat satin cable with RJ-45-to-DB-25 adapters (part number CAB-25AS-MMOD) on both ends.
Verify whether your DB-25-to-DB-25 null modem cable has the pin connections indicated in table 1.
Table 1 – DB-25-to-DB-25 Null Modem Cable Pin Connections
| DB-25 | DB-25 | ||
|---|---|---|---|
| RxD | 2 | 3 | TXD |
| TxD | 3 | 2 | RxD |
| CTS | 4 | 5 | RTS |
| RTS | 5 | 4 | CTS |
| DTR | 6 | 20 | CD |
| DSR | 8 | ||
| CD | 20 | 6 | DTR |
| 8 | DSR | ||
| GND | 7 | 7 | GND |
Configure
In this section, you are presented with the information to configure the features described in this document.
Note: To find additional information on the commands used in this document, use the Command Lookup Tool (registered customers only) .
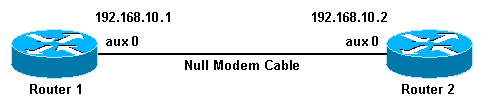
Network Diagram
This document uses this network setup:
Configurations
This document uses these configurations:
-
Router 1
-
Router 2
Note: This connection has been configured with IP addresses on the AUX ports for a permanent («nailed up») connection.
| Router 1 |
|---|
version 11.1 service udp-small-servers service tcp-small-servers ! hostname Router1 ! interface Ethernet0 no ip address shutdown ! interface Serial0 no ip address shutdown ! interface Serial1 no ip address shutdown ! interface Async1 !--- The async interface that corresponds to the AUX port. !--- Use the show line command to determine which async interface corresponds !--- to the AUX port. ip address 192.168.10.1 255.255.255.0 !--- The IP address on the AUX ports of both routers are in the same subnet. encapsulation ppp !--- Set PPP as the encapsulation. async default routing !--- This allows routing protocols on the link. async mode dedicated ! no ip classless ip route 0.0.0.0 0.0.0.0 Async1 !--- The default route points to the Async1 (AUX port) interface. logging buffered ! line con 0 exec-timeout 0 0 line aux 0 !--- Line configuration for the AUX port. modem InOut transport input all !--- This allows all protocols to use the line. rxspeed 38400 !--- Set the Rx speed (identical to the TX speed of the other router). txspeed 38400 !--- Set the Tx speed (identical to the RX speed of the other router). flowcontrol hardware line vty 0 4 login ! end |
| Router 2 |
|---|
version 11.1 service udp-small-servers service tcp-small-servers ! hostname Router2 ! interface Ethernet0 ip address 10.1.1.1 255.255.255.0 ! interface Serial0 no ip address shutdown ! interface Serial1 no ip address shutdown ! interface Async1 !--- The async interface that corresponds to the AUX port. !--- Use the show line command to determine which async interface corresponds !--- to the AUX Port. ip address 192.168.10.2 255.255.255.0 !--- The IP address on the AUX ports of both routers are in the same subnet. encapsulation ppp !--- Set PPP as encapsulation. async default routing !--- This allows routing protocols on the link. async mode dedicated ! no ip classless ip route 0.0.0.0 0.0.0.0 Ethernet0 !--- This default route points to interface Ethernet0. logging buffered ! line con 0 exec-timeout 0 0 line aux 0 !--- Line configuration for the AUX port. modem InOut transport input all !--- This allows all protocols to use the line. rxspeed 38400 !--- set the Rx speed (identical to the TX speed of the other router). txspeed 38400 !--- set the Tx speed (identical to the RX speed of the other router). flowcontrol hardware line vty 0 4 login ! end |
Verify
There is currently no verification procedure available for this configuration.
Troubleshoot
This section provides information you can use to troubleshoot your configuration.
Troubleshooting Procedure
Before issuing debug commands, please see Important Information on Debug Commands.
Complete these steps:
-
Use the show line command to determine the asynchronous interface of the AUX ports.
Though most routers have the AUX port as interface async 1, Access servers have the AUX port interface after the tty lines. For example, if your router has 16 async/modem lines, the AUX port is line 17. In such a case, the AUX port must be configured on interface async 17. Configure the AUX port based on the show line outputs. Here is an example to verify that the AUX port configuration is on interface Async1 on your routers:
Router1#show line
 Tty Typ     Tx/Rx    A Modem Roty AccO AccI Uses  Noise  Overruns
*  0 CTY              -    -     -    -    -    0      0       0/0
A  1 AUX  38400/38400 - inout    -    -    -    0      0       0/0
   2 VTY              -    -     -    -    -    0      0       0/0
   3 VTY              -    -     -    -    -    0      0       0/0
   4 VTY              -    -     -    -    -    0      0       0/0
   5 VTY              -    -     -    -    -    0      0       0/0
   6 VTY              -    -     -    -    -    0      0       0/0
-
Issue the show line aux 0 command.
-
Verify that all signals are up (for example, Clear To Send (CTS), Request To Send (RTS), data terminal ready (DTR), and Carrier Detect (CD)).
If nothing appears next to them, they are up. If a «No» appears next to them (for example, No-CTS), it means they are down. If they are down, verify the configuration on each side. Verify that you have the asynchronous interface and the line of the AUX port configured (as shown above).
Note: If the show line command output indicates that DSR is not up (noDSR), you must verify that the each end on the DB-25-to-DB-25 null modem cable has pins 6 and 8 physically wired to pin 20 on the other end. Refer to table 1 for the correct pinouts.
Router1#show line aux 0 Tty Typ Tx/Rx A Modem Roty AccO AccI Uses Noise Overruns A 1 AUX 38400/38400 - inout - - - 0 0 0/0 Line 1, Location: "", Type: "" Length: 24 lines, Width: 80 columns Baud rate (TX/RX) is 38400/38400, no parity, 2 stopbits, 8 databits Status: Ready, Active, Async Interface Active Capabilities: Hardware Flowcontrol In, Hardware Flowcontrol Out Modem Callout, Modem RI is CD, Line is permanent async interface Modem state: Ready Special Chars: Escape Hold Stop Start Disconnect Activation ^^x none - - none Timeouts: Idle EXEC Idle Session Modem Answer Session Dispatch 00:10:00 never none not set Modem type is unknown. Session limit is not set. Time since activation: 00:00:30 Editing is enabled. History is enabled, history size is 10. Full user help is disabled Allowed transports are pad v120 telnet. Preferred is telnet. No output characters are padded No special data dispatching characters Line is running PPP for address 192.168.10.2. 0 output packets queued, 1 input packets. Async Escape map is 00000000000000000101000000000000 Modem hardware state: CTS* DSR* DTR RTS -
If the configuration appears correct, replace the rollover cable between the router.
-
Use shutdown and no shutdown commands on the async interface to reset the connection.
Troubleshooting Commands
Certain show commands are supported by the Output Interpreter Tool (registered customers only) , which allows you to view an analysis of show command output.
Use these debug commands to verify that the link comes up correctly.
Note: Before issuing debug commands, refer to Important Information on Debug Commands.
-
debug ppp negotiation—displays information on PPP traffic and exchanges as the negotiation of Link Control Protocol (LCP), Authentication, and Network Control Protocol (NCP) is in progress. A successful PPP negotiation will first open the LCP state, then Authenticate, and finally negotiate NCP. If CONFREQs are sent out, but no CONFACKs are received, check whether the cabling is correct, and whether the correct line is configured (issue the interface async x command for this).
-
debug ppp authentication—displays PPP authentication protocol messages(if authentication is configured), and includes Challenge Handshake Authentication Protocol (CHAP) packet exchanges and Password Authentication Protocol (PAP) exchanges. In this configuration authentication is not configured. Therefore, this debug command is not necessary.
-
debug ppp error—displays protocol errors and error statistics associated with PPP connection negotiation and operation.
Related Information
- Modem-Router Connection Guide
- Dialup Technology: Troubleshooting Techniques
- Configuring Dialout using a Modem on the AUX Port
- Technical Support — Cisco Systems
The AUX port, or auxiliary port, has been a fixture on the back of Cisco access routers for almost 30 years. It was also used on other distribution and core routers as well. Although these ports have sat right next to their sibling, the console port, they are not functionally used much anymore and have become almost forgotten, especially in the Cisco Network Academy curriculum.
Even though we are not using them anymore, why are we not configuring them? Have we forgotten how important security is?
After we talk about security, I will continue to talk about how AUX ports work and how you can still use them today.
SECURITY!
The AUX port is still an active port (line) on the back of a router that must not be ignored. In the Cisco Network Academy labs we configure the console port as it is path into the router if you have physical access. BUT WE LEAVE THE AUX PORT UN-CONFIGURED!
This means that if you were to get physical access to the router, you can plug into the AUX port and boom! You would have user exec (non-privileged) access to the router. This would be just like not configuring a password on the console port. This is unacceptable and you will never pass a security assessment/audit this way.
It is so easy to configure the security on the AUX port, just replicate what you put on your console port:
Lab-Router(config)#line aux 0
Lab-Router(config)#password cisco
Lab-Router(config)#login
It’s that easy. Now if someone get’s physical access to your router, they will not be able to get in that big back door that was left open.
Keep reading if you want to know more about the AUX port. There are still some cool things you can do with it.
Difference Between Console Port and Aux Port
The original purpose of the AUX port was to serve as an out-of-band access method into the router. Cisco would ship you a DB-25 adapter that was made to be used with the rollover cable to attach the AUX port to an analog modem.
The console port only supports the data pins: TX, RX, and ground. This works great when you are just using a local computer to access via the RS-232 port for initial configuration.
The AUX port uses many more pins. In addition to the data pins (TX/RX) and ground, the AUX port also uses the other modem control pins: CTS (clear to send), RTS (ready to send), DTR (data terminal ready), and DSR (data set ready).
All of these pins are necessary to support a connection to a Modem as all of those pins are what handle the flow-control between the router and the modem to control when it is ready to send data to the modem and when you should wait. This was important in the modem days as sometimes the modem may start to experience some errors and it would need time to renegotiate before more data could be sent.
Once you had your modem connected to your router, engineers would use this for a few different uses:
- Out-of-Band Access (OOB) Engineers would use the mode to Dial in to the modem remotely for out-of-band access to the router. This could be used to troubleshoot why your WAN connection was down to your telecommunications provider/ISP. If you connection was down, you would not be able to get into the device remotely to troubleshoot it over your regular network connections (in-band). This could also be used if you had a configuration change go wrong that caused the connection to go down. You could dial into the device (out-of-band) to remove your doomed change.
- Dial-Up Network Access You had the ability to configure the AUX port as a dial-up interface that could be used to route traffic between the router and another router. Even though the AUX port is a “line”, it could be attached to and “interface” that would behave just line any other interface on the router and route traffic between the two routers. The console port can only be configured as a line and can not be attached to an interface. This was used when only a temporary link was needed or as a backup link if the primary WAN link went down. These were called “dial on demand” interfaces. Because modems were so slow and really no practical for today’s bandwidth needs, these dial on demand links are really not used any more.
Modems are old school, how do we do OOB today?
There is still a big demand for our of band access to routers. If you have a router at a large office and your WAN link goes down, you need to troubleshoot. Today, modems have been replaced by cellular as the OOB technology of choice. There are many companies that sell these products, also referred to as console servers. These boxes will use a cellular connection to obtain and IP address on the Internet and then you can connect to that address, authenticate, and then connect to your remote device. These devices generally have multiple ports on them which allow you to connect not just your router, but other devices such as your Ethernet switches. These devices can cost less than $500 and there are IoT type cellular plans that are less expensive that a normal phone plan.
Here are a few popular products:
WTI / Lantronix / Uplogix
Is there anything I can still do with my AUX port?
Next, there is a feature that you can configure on the AUX port called Reverse Telnet.
Before configuring your AUX port for reverse telnet, you will have to build a cable that will allow you to connect the aux port to your other serial device. This means that you are going to have to find the right pinout configuration to go from the RJ-45 AUX port to the RJ-45 serial port on your other device, or the RJ-45 to DB-9/DB-25 adapter you might be using.
Configuring Reverse Telnet (Not Secure)
Reverse telnet allows you to telnet into this router using a predetermined TCP port and the router will redirect that telnet session out of the AUX port to the serial connection. You can then connect the serial cable to any serial device you want to manage. A great example of this would be a UPS that you have that has a serial port for management, but does not have an ethernet port.
Why do I talk about reverse telnet if it is not secure? Because this is how this was originally setup before SSH became the best practice. Keep reading and we will get to SSH.
Here are the commands you put in your Cisco router to set this up:
Lab-Router(config)#line aux0
Lab-Router(config-line)#password cisco
Lab-Router(config-line)#login
Lab-Router(config-line)#modem inout
Lab-Router(config-line)#transport input telnet
Lab-Router(config-line)#speed 9600
Lab-Router(config-line)#databits 8
Lab-Router(config-line)#parity none
Lab-Router(config-line)#stopbits 1
Set your speed/databits/parity/stopbits to what is required by the device you are connecting your serial cable to.
To connect, you telnet to any active IP address on your router, but change the TCP port from 23 to 2000 + the line number. You can determine the line number of the AUX port on your router by doing a show line command:
LabRouter#show line
   Tty Line Typ     Tx/Rx    A Modem  Roty AccO AccI  Uses  Noise Overruns  Int
     0    0 CTY              -    -      -    -    -     0      0    0/0      -
     1    1 AUX   9600/9600  - inout     -    -    -     3      0    0/0      -
*  194  194 VTY              -    -      -    -    -     5      0    0/0      -
   195  195 VTY              -    -      -    -    -     0      0    0/0      -
   196  196 VTY              -    -      -    -    -     0      0    0/0      -
   197  197 VTY              -    -      -    -    -     0      0    0/0      -
   198  198 VTY              -    -      -    -    -     0      0    0/0      -
In this case, our AUX port is line 1, so our reverse telnet port would be 2000 + 1, or 2001.
To connect, we would telnet to this device like this:
telnet 192.168.1.1 2001Once connected, you will be prompted for a password. This is because we added a password cisco and the login command to line aux 0.
Configuring Reverse SSH
Keep in mind, the above example is telnet, so your passwords are sent clear text. This really should be configured as SSH to prevent our data from being sent in clear-text over the wire. The below commands configure the same setup for “reverse SSH”. The config below assumes you have already generated a key and have SSH working on your router successfully.
Lab-Router(config)#ip ssh port 2001 rotary 1  (this is what maps port 2001 to our AUX port - see the rotary command under line)
Lab-Router(config)#username auxport password cisco
Lab-Router(config)#line aux0
Lab-Router(config-line)#login local
Lab-Router(config-line)#modem inout
Lab-Router(config-line)#transport input ssh
Lab-Router(config-line)#speed 9600
Lab-Router(config-line)#databits 8
Lab-Router(config-line)#parity none
Lab-Router(config-line)#stopbits 1
Now you should be able to connect securely (all traffic encrypted).
ssh -l auxport 192.168.1.1 -p 2001If you are connecting with a GUI SSH client, just change the port from 22 to the port that you assigned above (2001).
Now you have an effective way of configuring a serial connecting to a device that may be in the same rack as your router without having to go into your equipment room to connect.
На маршрутизаторах Cisco существует возможность подключиться к консольному порту (CONSOLE) через AUX порт другого маршрутизатора используя для этого обратное телнет (reverse telnet) соединение.
Применяется это для абсолютно разных целей — резервированя доступа в случае падения основных интерфейсов, для удаленной настройки и т.п.
У нас в распоряжение есть два маршрутизатора Cisco-R1 и Cisco-R2. Cisco-R1 доступен по сети, а Cisco-R2 маршрутизатор, который нам необходимо настроить используя reverse telnet. Первым делом нужно соеденить порт AUX на Cisco-R1 с портом CONSOLE на Cisco-R2 перевернутым (rollover) пачкордом как представлено на рисунке ниже.

Схема соединения Cisco-R1 и Cisco-R2.
Обычно roll over пачкорд идет в поставке с оборудованием, если его нет, вы можете сделать его сами используя для этого обычную витую пару. Ниже представлена схема обжимки концов.

Цветовая схема обжимки концов для Rollew Over Cable.
Обратным telnet-соединением (reverse telnet) называется telnet-соединение с определенным портом маршрутизатора, при котором входящие telnet-соединения, переадресовывается наружу через выбранную асинхронную линию.
Ниже приведена простейшая конфигурация маршрутизатора Cisco-R1.
hostname Cisco-R1
!
aaa new-model
aaa authentication login default local
enable password 7 11081D081E1C
!
username admin privilege 15 password 7 06070B2C4540
!
interface FastEthernet0/0
 ip address 172.16.1.2 255.255.255.0
 no ip directed-broadcast
!
ip default-gateway 172.16.1.1
ip alias 172.16.1.3 2065
no ip http server
!
!
line con 0
 transport input none
line aux 0
 transport input telnet
line vty 0 4
 privilege level 15
 transport input telnet
!
no scheduler allocate
end
Для подключения необходимо определиться с номером линии для aux порта. Используем команду show line.
Cisco-R1#show line
   Tty Typ     Tx/Rx    A Modem  Roty AccO AccI   Uses   Noise  Overruns   Int
     0 CTY              -    -      -    -    -      0       0     0/0       -
    65 AUX   9600/9600  -    -      -    -    -     11       8     0/0       -
*   66 VTY              -    -      -    -    -    647       0     0/0       -
    67 VTY              -    -      -    -    -     77       0     0/0       -
    68 VTY              -    -      -    -    -      3       0     0/0       -
    69 VTY              -    -      -    -    -      0       0     0/0       -
    70 VTY              -    -      -    -    -      0       0     0/0       -
Line(s) not in async mode -or- with no hardware support:
1-64
Из вывода команды видно что номер линии для AUX равен 65.
Тепер чтобы подключиться к маршрутизатору Cisco-R2 через порт aux на Cisco-R1 воспользуемся обратным телнет соединением.
telnet 172.16.1.2 2065
Для доступа потребуется ввести логин и пароль маршрутизатора Cisco-R1. IP-адрес 172.16.1.2 принадлежит интерфейсу FastEthernet 0/0 маршрутизатора Cisco-R1, а 2065 — номер порта который вычисляется как 2000 + [номер_линии]. Получается: 2000+65=2065.
Можно себе упростить чуток жизнь прописав alias
ip alias 172.16.1.3 2065
Эта команда ассоциирует ip-адрес с портом для обратного telnet-соединения. Теперь подключиться через консольный порт маршрутизатора можно просто набирая telnet 172.16.1.3
Для прерывания обратного telnet соединения если вы заходите с Cisco-R1 используем:
ctrl+6 затем x
Cisco-R1# disconnect
Closing connection to 172.16.1.3 [confirm]
Команда disconnect закрывает соединение через aux порт.
Если aux линия уже занята и вы неможете подключиться просто убейте соединения на этой линии с помощю команды:
clear line aux 0
Обратите внимание часто причиной неудачного соединения может быть отсуствие настроек разрешающих telnet соединение для линии aux 0.
line aux 0
 transport input telnet
Вот и все. Рассмотрение reverse telnet на оборудование cisco завершено.
Часто в сетевой среде требуется управлять маршрутизатором/коммутатором через консоль, но что вы можете сделать, если у вас нет компьютера с последовательным интерфейсом (COM)? Или вообще нет копьютера… Вы можете использовать другой маршрутизатор!
Это своего рода резервное подключение к консоли другого устройства. Может так же помочь, если устройство по сети стало недоступно. Тогда можно подключиться с доступного. Это легко сделать.
Подключите консольный интерфейс (CONSOLE) маршрутизатора/коммутатора к интерфейсу маршрутизатора AUX с помощью кабеля Rollover. Такие кабеля обжаты зеркально (перевернуто). Схематично приведено на изображении.
Настройте транспортный вход на интерфейсе маршрутизатора AUX (в примере протокол telnet)
Cisco(config)#line aux 0
Cisco(config-line)#transport input telnet
Или же AUX можно настроить так:
Cisco(config)#line aux 0
Cisco(config-line)#speed 9600
Cisco(config-line)#databits 8
Cisco(config-line)#parity none
Cisco(config-line)#stopbits 1
Cisco(config-line)#exec-timeout 0 0
Cisco(config-line)#no activation-character
Cisco(config-line)#no editing
Cisco(config-line)#transport input telnet
Cisco(config-line)#transport output none
Cisco(config-line)#escape-character NONE
Идентифицируйте AUX линию с помощью команды show line
Cisco#sh line
   Tty Line Typ     Tx/Rx    A Modem  Roty AccO AccI  Uses  Noise Overruns  Int
      0    0 CTY              -    -      -    -    -     0      0    0/0      -
      1    1 AUX   9600/9600  -    -      -    -    -     0      0    0/0      -
*   514  514 VTY              -    -      -    -    -     3      0    0/0      -
    515  515 VTY              -    -      -    -    -     0      0    0/0      -
    516  516 VTY              -    -      -    -    -     0      0    0/0      -
    517  517 VTY              -    -      -    -    -     0      0    0/0      -
    518  518 VTY              -    -      -    -    -     0      0    0/0      -

Line(s) not in async mode -or- with no hardware support:
2-513
Подключитесь к консоли через AUX порт. Чтобы это сделать, необходимо использовать команду telnet на маршрутизаторе с AUX. Номер порта будет 2000+#line‘. В примере – это 2001 (2000+1).