
Fix: Boot into Safe Mode
- 1. Insert the disc and reboot the system.
- 2. Press any key to boot from the DVD.
- 3. Choose your keyboard layout.
- 4. Click Repair your computer at the Install now screen.
- 5. Click Troubleshoot.
- 6. Click Advanced options.
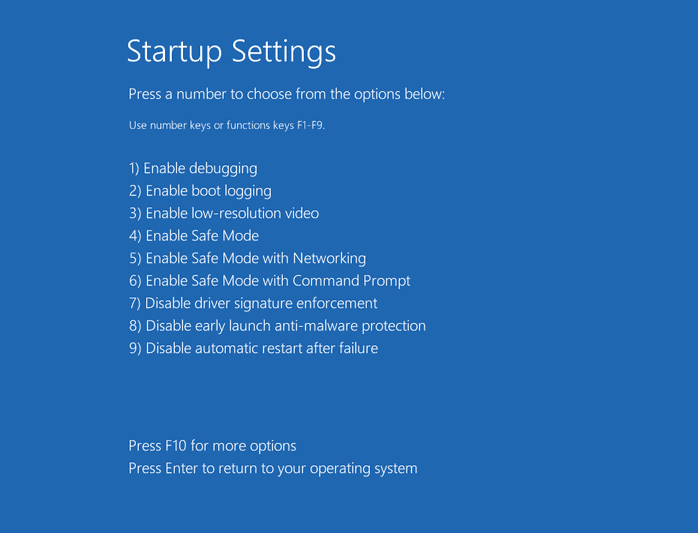
- 7. Click Startup Settings.
- 8. Click Restart…
7 Fixes to Stuck in Windows 7 Startup Repair Loop
«My computer keeps running Startup Repair during every startup and I can’t boot it normally. I tried running Startup Repair multiple times but I’m still getting the same problem. Startup Repair won’t seriously automate repair at all. I got stuck in an infinite loop.»
Follow the fixes to troubleshoot your Windows Startup Repair loop.
| Workable Solutions | Step-by-step Troubleshooting |
|---|---|
| Fix 1. Disable Startup Repair | Restart your computer > wait for your BIOS to complete POST > tapping F8…Full steps |
| Fix 2. Run CHKDSK Command | Boot Windows from the bootable device > navigate to «Repair your computer» option…Full steps |
| Fix 3. Run Bootrec | Open Command Prompt > type those following commands…Full steps |
| Fix 4. Perform System Restore | Boot Windows from the bootable device > click «Troubleshoot > System Restore»…Full steps |
| Fix 5. Delete Problematic File | Access Command Prompt again and enter the following command: cd C:\Windows\…Full steps |
| Fix 6. Restore Windows Registry | In the Windows Boot Options menu, choose «Troubleshoot >Advanced Options»…Full steps |
| Fix 7. Check Device Partition | In Command Prompt, type bcdedit and press «Enter». Find device partition and..Full steps |
1 — Windows 7 Startup Repair Infinite Loop Error Details
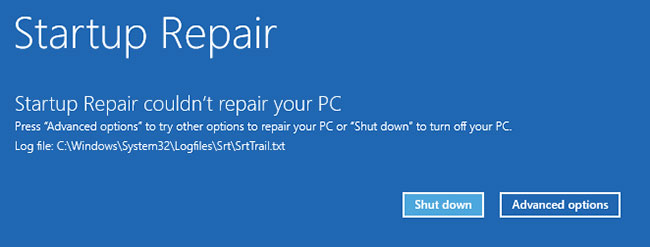
Windows Error Recovery

Windows failed to start. A recent hardware or software change might be the
cause.

If Windows files have been damaged or configured incorrectly, Startup Repair
can help diagnose and fix the problem. If power was interrupted during
startup, choose Start Windows Normally.
(Use the arrow keys to highlight your choice.)

    Launch Startup Repair (recommended)
    Start Windows Normally

Description: Fix problems that are preventing Windows from starting
Startup Repair will fail to load, launch but fail to repair, or run and claim repairs have been executed. Your PC will continue to attempt to endlessly start Startup Repair each boot. In Windows 8, Windows 8.1 and Windows 10 this is called Automatic Repair:
2 — Startup Repair Error Symptoms
Unexpected PC shutdown, virus, malware, driver issues, damaged BDC settings, corrupted boot partition, blue screen of death as well as a black screen of death on reboot, all those factors account for Windows startup problems.
As the ‘Windows error recovery’ suggests, Start Repair should automatically fix the abnormal Windows startup. However, when you choose the recommended option, you’ll only confront 2 facts:
1. Startup Repair takes a reasonably long time to load or launch.
2. Startup Repair immediately runs, but the repairing process never finishes.
In both situations, on each reboot, your PC will continuously attempt to call Startup Repair for the fix, meanwhile getting stuck in a Startup Repair loop that never ends
3 — Troubleshoot Windows Automatic Startup Repair Infinite Loop Error with 7 Fixes
A clean Windows installation is a guaranteed fix for Windows Startup Repair, which takes forever but costs a complete data loss. So, is there another option to recover from an infinitely looping Startup Repair without reinstalling Windows?
We gave the possible fixes from easy to complex, from safe to risky. You’d better try them sequentially.
- Important
- The essential tool for most of the fixing methods:
- A corresponding Windows installation media, let it be a bootable USB drive, CD, or DVD disc.
Fix 1. Disable Automatic Startup Repair to Fix Startup Repair Loop
You should try to disable the automatic restart. Although it could not solve the boot error, it can stop the endless restart.
Step 1. Restart your computer.
Step 2. Wait for your BIOS to complete POST (the screen with your manufacturer logo and/or system information).
Step 3. Quickly begin tapping F8 repeatedly until you see the list of boot options.
Step 4. Choose «Disable automatic restart on system failure».
Step 5. Press «Enter» and wait for your PC to boot.

Fix 2. Run CHKDSK Command to Check and Repair Drive Errors
This helps check or even repair the drives to tackle file system corruption.
Step 1. Boot Windows from the bootable device. (If you cannot boot, use Windows 7 installation CD.)
Step 2. Navigate to the «Repair your computer» option and select «Command Prompt».
Step 3. In the Command Prompt window, type chkdsk /r c: and press «Enter». (c represents the drive where Windows is installed)
Step 4. Click «Y» so that the next time the system restarts, the CHKDSK utility can check the disk errors and try to fix them. Restart the system and let CHKDSK check hard drive errors and repair.
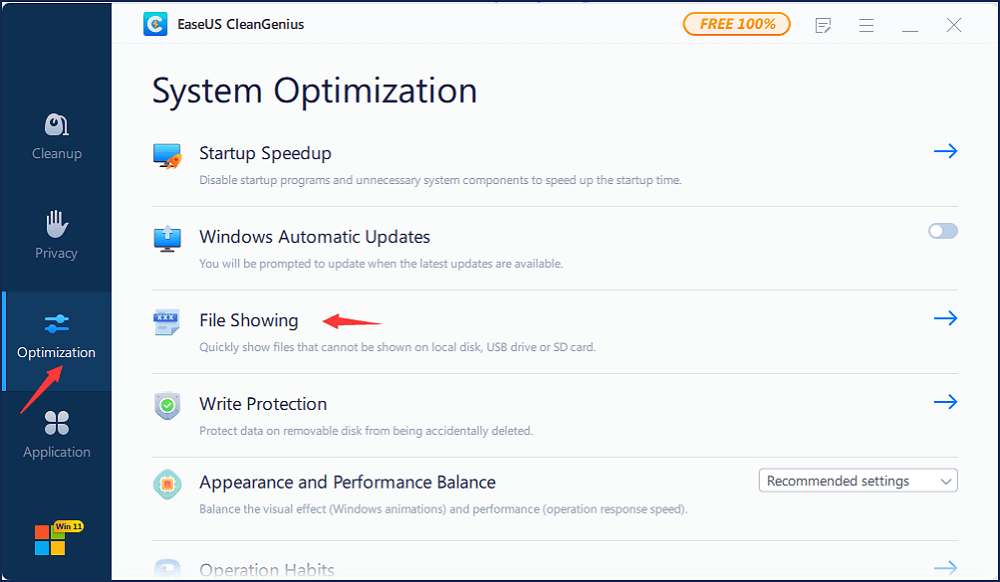
Run CHKDSK Alternative Tool to Repair Device
Download EaseUS CleanGenius and install it on your computer. Let’s start checking and refixing file system error on your device now.
Step 1. Click «File Showing» to enter the next step.
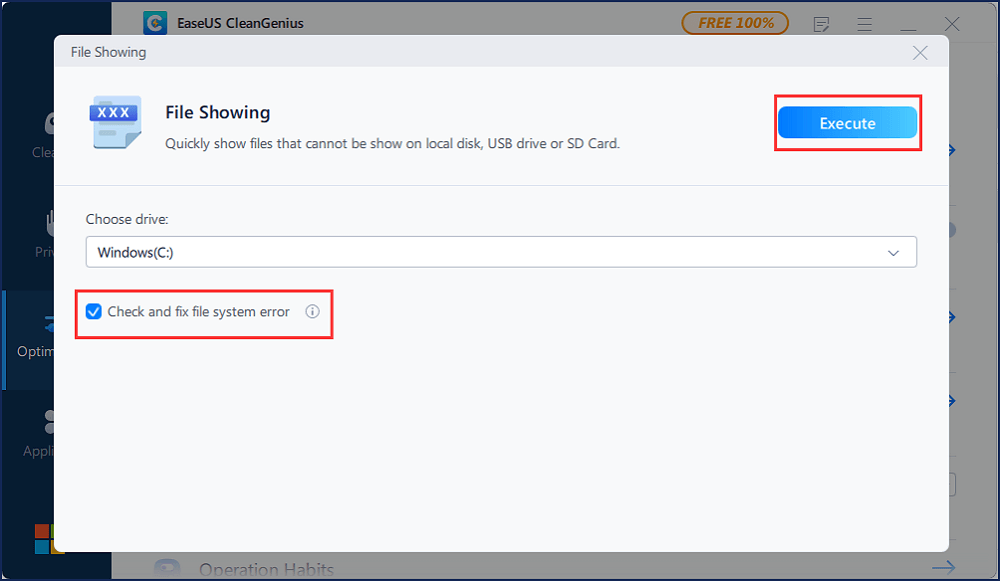
Step 2. Choose the target device and tick the box of «Check and fix file system error». Click «Execute» to start fixing the problematic device.
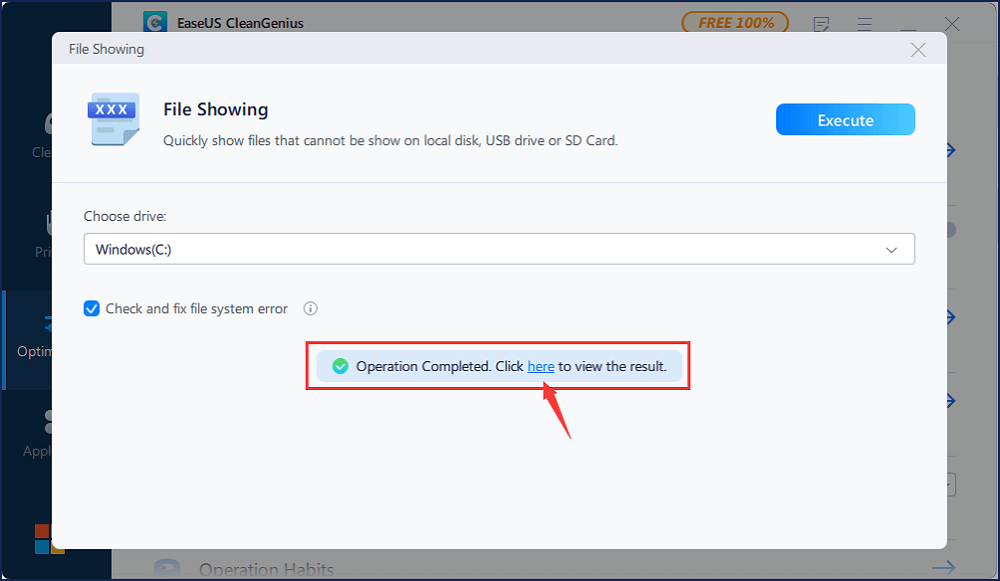
Step 3. When the fixing process completes, click «here» to open and use your device.
Fix 3. Run Bootrec to Fix Damaged or Corrupted BCD Settings
The startup repair loop could also happen if the bootloader installation or configuration comes with some errors. You could solve this error by following the steps below.
Step 1. In the same way open Command Prompt as the second fix did.
Step 2. In the Command Prompt window, type those following commands and press «Enter».
bootrec /fixmbr
bootrec /fixboot
bootrec /rebuildbcd
Step 3. Restart the system and let bootrec repair MBR.
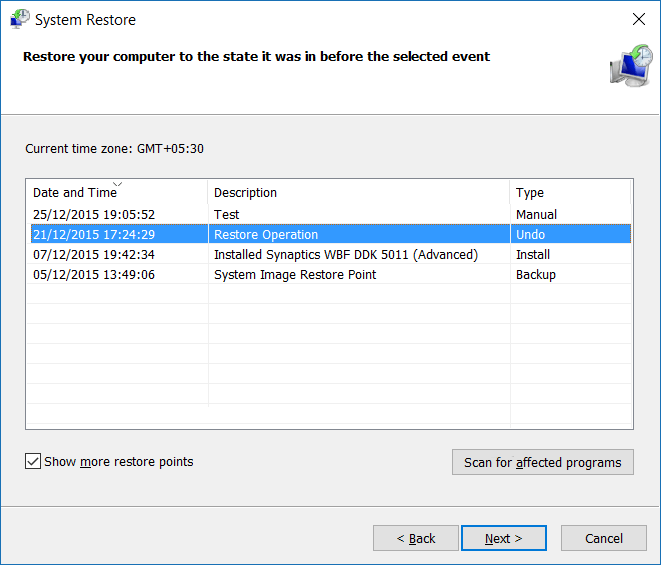
Fix 4. Perform System Restore to Solve Windows Startup Repair Loop
The System Protection is enabled by default, and you can use it to restore your computer to an earlier state to fix your problem.
Step 1. Boot Windows from the bootable device.
Step 2. Click «Troubleshoot > System Restore».
Step 3. Follow the wizard instructions to continue the process. Choose a restore point before the date when the Automatic Startup Repair loop error happened.
Fix 5. Delete the Problematic File to Resolve Startup Repair
Step 1. Access Command Prompt again and enter the following command:
cd C:\Windows\System32\LogFiles\Srt
SrtTrail.txt
Step 2. Then, you could see «Boot critical file c:\windows\system32\drivers\tmel.sys is corrupt.» Type the following command:
cd c:windowssystem32drivers
delvsock.sys
Restart your PC. If these steps can not help, try the following troubleshooting steps.
Fix 6. Restore Windows 10 Registry to Fix Repair Loop
Step 1. In the Windows Boot Options menu, choose «Troubleshoot >Advanced Options>Command Prompt».
Step 2. In Command Prompt, type the following command and then hit «Enter».
cd C:\windows\system32\logfiles\srt\
Change your drive letter according to your needs.
Step 3. Type txt to open the file in notepad.
Step 4. Press «Ctrl + O». Select «All files» from file type and navigate to C:\windows\system32.
Step 5. Right-click CMD and select «Run as administrator». Type the following command and press «Enter».
cd C:\windows\system32\config
Step 6. Backup those files by renaming Default, Software, SAM, System, and Security files to .bak. Type the following command one by one and hit «Enter»:
rename DEFAULT DEFAULT.bakrename SAM SAM.bak
rename SECURITY SECURITY.bak
rename SOFTWARE SOFTWARE.bak
rename SYSTEM SYSTEM.bak
copyc:\windows\system32\config\RegBack c:\windows\system32\config
Step 7. Restart your PC to check if you have solved the error.
Fix 7. Check Device Partition and Osdevice Partition
Sometimes, if your device partition values aren’t correct, you will get stuck in the startup repair loop. Follow the steps below to check the device partition and os device partition and fix your error.
Step 1. In Command Prompt, type bcdedit and press «enter».
Step 2. Find device partition and os device partition values. Make sure their values are correct and set to the correct partition.
Windows is preinstalled on C partition only, and the correct value is C. Enter the following commands and press «Enter» after each one if the value isn’t set to C.
bcdedit /set {default} device partition=c:
bcdedit /set {default} osdevice partition=c:
After that, reboot the PC and fix the Windows startup repair loop.
Additional Fix — Boot into Safe Mode in Windows 7/8/10
Often booting into Safe Mode and uninstalling recently installed device drivers or software may fix the Automatic Repair loop error. To boot into Safe Mode of a Windows 7, 8, 8.1, or 10 system, you need to have the original DVD or USB. If you do not have the installation disc, follow the guide from Microsoft to create a Windows Installation Media. Then enter Safe Mode:
Step 1. Insert the disc and reboot the system.
Step 2. Press any key to boot from the DVD.
Step 3. Choose your keyboard layout.
Step 4. Click Repair your computer at the Install now screen. Choose «Troubleshoot > Advanced options > Startup Settings«.
Enter a Safe Mode option (Safe Mode, Safe Mode with Networking, and Safe Mode with Command Prompt).
How to Recover Data After Fixing Startup Repair Infinite Loop
Besides a clean install of the Windows operating system, the fixes for users to get rid of an endless startup repair loop, including system restore and PC factory resetting, will also result in part of computer data loss.
It’s not the end of the day, and a third-party EaseUS data recovery tool perhaps can salvage your data. For example, EaseUS Data Recovery Wizard can recover data after formatting, deleting, PC resetting, system refreshing, and more. And You deserve a try and see if the software helps find your lost data.
You get 7 ways to get rid of the Startup Repair Windows 7 loop, no matter whether you have an installation disc or not. Don’t worry if the windows 7/8/10 startup repair is taking forever, and you cannot stop or cancel it. Also, you can get back lost data after you have fixed the error with EaseUS data recovery software.
Startup Repair is a Windows recovery tool that can fix some system problems that prevent Windows from starting. Startup Repair scans your PC for problems and then tries to fix them so it can boot up correctly.
- Fix Windows startup errors with Startup Repair
- How to use the Startup Repair tool to fix problems in Windows 7
Startup Repair is a Windows recovery tool that can fix some system problems that prevent Windows from starting. Startup Repair scans your PC for problems and then tries to fix them so it can boot up correctly.
Startup Repair is one of the recovery tools in Advanced Startup Options . This toolkit is located on your PC’s hard drive (recovery partition), Windows installation media, and recovery drive.
This guide will show you how to run Startup Repair to fix problems that prevent Windows 10 from loading.
Note:
Startup Repair can only fix certain problems, such as missing or corrupted system files. It cannot fix hardware errors, such as damaged hard drives or incompatible memory, nor does it protect against virus attacks.
Startup Repair is not designed to fix Windows installation problems, nor is it a backup tool, so it cannot help you recover personal files, such as photos or documents.
The Startup Repair log file is located at:
C:WindowsSystem32LogfilesSrtSrtTrail.txt
Here’s how:
1. Boot into Advanced Startup Options .
2. Click Troubleshoot.
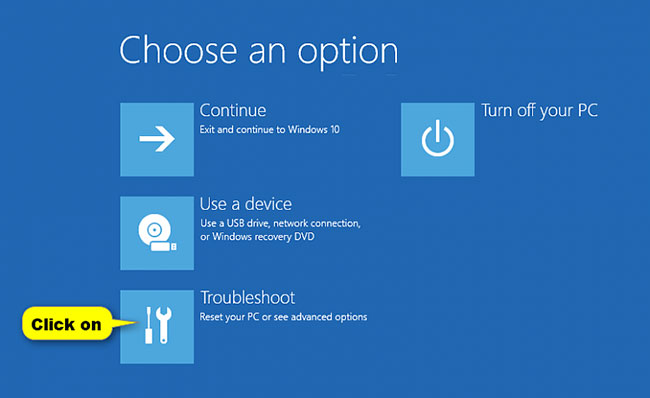
3. Click Advanced options.
4. Click Startup Repair.
5. If prompted, select the operating system you want to perform boot repair.
6. If prompted, select the admin account to provide credentials.
You will not be prompted for an admin password if you boot from a Windows installation USB or recovery drive.
Enter the chosen admin password and click Continue.
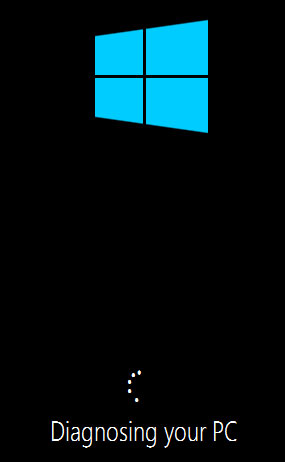
7. Start Repair will now start diagnosing your PC ( Diagnosing your PC ) and try to automatically fix it.
8. If the repair fails, you will see a summary of the problem in the log file.
Option
- Run Startup Repair again:
Click Advanced options and go to step 2 above. Sometimes, it may be necessary to run Startup Repair up to 3 times and restart the PC each time to fix boot problems.
- Boot Windows 10:
Click Advanced options , go to step 2 above, but click Next instead.
- Turn off the PC:
Click Shut down .
Read more
- How to Repair Windows 7
- How to fix Automatic Repair error in Windows 10
- How to use Windows Repair to fix Windows errors
- How to Make Windows XP Startup Faster
- How to find the Windows 10 Startup folder
- How to manage startup programs with Windows?
Get the fix for the infinite Startup Repair loop error for the following Windows versions: Windows Vista, Windows 7, Windows 8 or Windows 8.1.
This error prevents you from accessing anything on your computer and presents an endless loop of loading Startup Repair without end.
About “Startup Repair in Infinite Loop”
The following information on this error has been compiled by NeoSmart Technologies, based on the information gathered and reported by our global network of engineers, developers, and technicians or partner organizations.
Symptom 1: Computer attempts to enter Startup Repair continuously
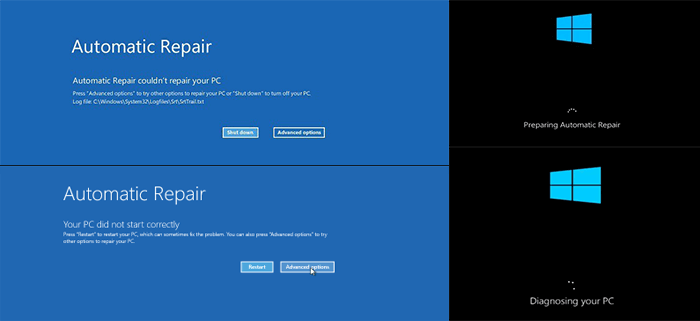
Every time the PC is restarted, before Windows begins to load a message is displayed indicating that “Windows failed to start,” and offering an option to “Launch Startup Repair (recommended)” from a variation of the Advanced Boot Options menu as shown below:
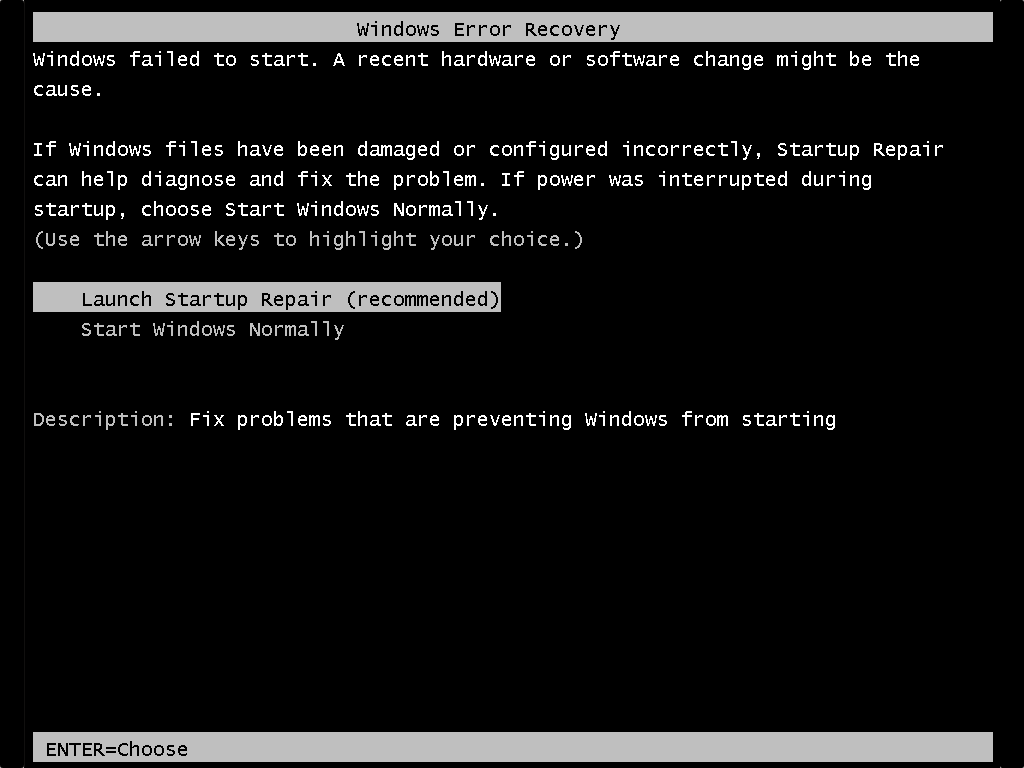
Windows Error Recovery
Windows failed to start. A recent hardware or software change might be the
cause.
If Windows files have been damaged or configured incorrectly, Startup Repair
can help diagnose and fix the problem. If power was interrupted during
startup, choose Start Windows Normally.
(Use the arrow keys to highlight your choice.)
Launch Startup Repair (recommended)
Start Windows Normally
Description: Fix problems that are preventing Windows from starting
Startup Repair will then either fail to load, launch but fail to repair, or run and claim repairs have been executed — however your PC will continue to attempt to endlessly start Startup Repair each boot.
On Windows 8 and Windows 8.1 this is called Automatic Repair:
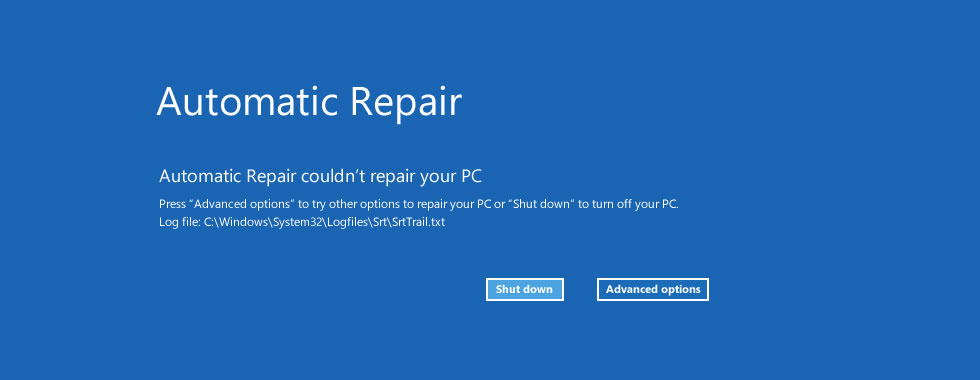
Automatic Repair

Automatic Repair couldn't repair your PC

Press "Advanced options" to try other options to repair your PC or "Shut down" to turn off your PC.
Log file: C:\Windows\System32\Logfiles\Srt\SrtTrail.txt

Shut down | Advanced options
The Log file path can be different.
Causes of this error
This error has been known to occur as a result of one or more of the following:
Cause #1: Damaged or corrupted BCD settings
Bootsector viruses and other malware that targets the bootloader or the booting chain can cause errors in the bootloader settings and state that result in an infinite loop of Startup Repair.
The virus may then block Startup Repair from either launching or carrying out its repairs successfully. A failed Windows Update or Automatic Update can also sometimes leave the Boot Configuration Data (BCD) in an inconsistent or non-working state.
Cause #2: Corrupted boot partition
On Windows 7 and above, Windows by default creates a separate 100 MiB NTFS partition at the start of the drive, reserved for core bootloader files and BCD configuration.
An unsafe shutdown, sudden power loss, hard disk failure, or a blue screen of death during writes to the boot partition can leave your system in an inconsistent state, unable to boot and infinitely cycling into the Startup Repair.
Cause #3: Blue Screen of Death on reboot
It is possible that every other time Windows attempts to boot, a BSOD occurs.
Recent versions of Windows are configured to hide this fact from the user and silently reboot.
(In the experience of the researchers at NeoSmart Technologies, there is almost never a good reason for doing this. Microsoft is hoping that a reboot will fix your PC and so Windows decides to hide the blue screen and reboot, endlessly and in vain.
A much more intelligent solution would be for Windows to keep track of whether or not this blue screen resulted in a silent and automatic reboot last time, and if so, show it so the user can see what’s going on.)
A BSOD during boot up will trigger a version of the Advanced Boot Options menu to be shown on next reboot prompting the user to select “Repair Your Computer,” ultimately causing the endless loop of Startup Repair.
Guaranteed Fix: Use Easy Recovery Essentials
Easy Recovery Essentials is guaranteed to fix the “endless repair computer loop” error automatically using its built-in Automated Repair option. EasyRE is currently available for Windows XP, Vista, 7, 8, Windows 10, and Windows 11 and can be downloaded and created on any PC.
- Download Easy Recovery Essentials. Make sure to note your Windows version (XP, Vista, 7, 8, 10, or Windows 11) before you download EasyRE. This guide can help you identify what version of Windows you have installed.
- Burn the image. Follow these instructions on how to burn the bootable ISO image very carefully, as making a bootable CD can be tricky! Alternatively, these instructions explain how to create a bootable EasyRE recovery USB stick/drive.
- Boot up your PC from the Easy Recovery Essentials CD or USB you created.
- Once EasyRE is running, choose the “Automated Repair” option and click Continue.

Choose “Automated Repair” in Easy Recovery Essentials
- After EasyRE scans your computer’s drives, identify and select the drive letter for your Windows installation from the list, and then click on the Automated Repair button to begin.
Choose the drive associated with the Windows installation you’re trying to repair.
- Easy Recovery Essentials will start analyzing the selected drive for problems. EasyRE will test for and attempt to automatically correct errors with the disk, partition, bootsector, filesystem, bootloader, and registry. No intervention is required, as EasyRE’s repair is fully automated:
Easy Recovery Essentials searches for errors and makes corrections to the selected Windows installation.
- Once the process is complete, EasyRE will report its findings. Click on the Restart button to reboot your PC and test the changes.
- The “endless repair computer loop” error should now be fixed as your PC begins to load:


You can download Easy Recovery Essentials from here.
Fixes for Infinite Loop of Startup Repair on Windows Vista, 7
Windows Setup CD/DVD Required!
Some of the solutions below require the use of the Microsoft Windows setup CD or DVD. If your PC did not come with a Windows installation disc or if you no longer have your Windows setup media, you can use Easy Recovery Essentials for Windows instead. EasyRE will automatically find and fix many problems, and can also be used to solve this problem with the directions below.
Fix #1: Run chkdsk on the boot volume
The command line chkdsk tool ships with Windows and can be used to check (and sometimes repair) your drives for filesystem corruption. More information about how chkdsk operates and how it works can be found in our knowledgebase. The following steps will launch the command line option from Startup Repair on the Windows setup disc and use the chkdsk utility.
Unable to boot into the Windows setup CD?
See our guide on setting up a PC to boot from the CD or DVD for troubleshooting and more detailed instructions.
- Insert your Windows installation DVD into your PC’s CD-ROM drive,
- Fully power down your PC, and make sure it has fully shut off,
- Power up your PC,
- Press any key when you see “Press any key to boot from CD or DVD..”
- Click the link titled “Repair your computer” in the bottom-lefthand corner, after first selecting your language and keyboard options.

- Wait for Startup Repair to scan your PC for Windows installations, then select your install from the list it shows:

- Choose “Command Prompt” from the list of available recovery options to begin:


Once the command prompt is launched, enter the following to use the System File Checker to check your installation for corrupted, invalid, or deleted system files. If the previous page showed that your Windows installation has a drive letter other than C:\, make sure to use that below!
chkdsk C: /f
chkdsk will begin scanning your drive for problems, fixing them if it is able to, and reporting its progress when done.
Checking file system on C:
The type of the file system is NTFS.
Volume label is Windows 7.

CHKDSK is verifying files (stage 1 of 5)...
259072 file records processed.
....
Windows has finished checking your disk.
Fix #2: Disable Automatic Restart
This option lets you get the exact and complete error message accompanying the Blue Screen of Death by disabling the Automatic Restart option of Windows. Note: this will not fix the boot error you are experiencing in and of itself, but should provide more information that may prove critical in solving the underlying problem.
The option to disable automatic restart on system failure is available from the Advanced Boot Options menu at startup. The instructions below will trigger this behavior, more detailed instructions on disabling automatic restart on system failure are also available in our knowledgebase.
- Restart your computer
- Wait for your BIOS to complete POST (the screen with your manufacturer logo and/or system information)
- Quickly begin tapping F8 repeatedly, until you see the list of boot options
- Choose “Disable automatic restart on system failure”
- Press Enter and wait for your PC to boot.
Fix #3: Manually attempt to rebuild the BCD
Problems booting up Windows can often be traced back to errors in the bootloader installation or configuration. Rebuilding your PC’s master boot record (MBR), partition bootsectors, and boot configuration data (BCD) can fix various problems with the BOOTMGR bootloader.
You can rebuild the BCD using bootrec.exe, a tool built found in the Windows Recovery Environment. Follow these steps:
- Insert your Windows installation DVD into your PC’s CD-ROM drive,
- Fully power down your PC, and make sure it has fully shut off,
- Power up your PC,
- Press any key when you see “Press any key to boot from CD or DVD..”
- Click the link titled “Repair your computer” in the bottom-lefthand corner, after first selecting your language and keyboard options.
- Wait for Startup Repair to scan your PC for Windows installations, then select your install from the list it shows:
- Choose “Command Prompt” from the list of available recovery options to begin:
- Once the command line has launched, type in the following commands in the Command Prompt and hit Enter after each command:
bootrec /fixmbr
bootrec /fixboot
bootrec /rebuildbcd
Unable to boot into the Windows setup CD?
See our guide on setting up a PC to boot from the CD or DVD for troubleshooting and more detailed instructions.
BCD not getting rebuilt?
There is an entire entry in our wiki dedicated to advanced manual repair of the bootloader that can also be followed, if necessary.
Fixes for Automatic Repair Loop in Windows 8
Windows Setup CD/DVD Required!
Some of the solutions below require the use of the Microsoft Windows setup CD or DVD. If your PC did not come with a Windows installation disc or if you no longer have your Windows setup media, you can use Easy Recovery Essentials for Windows instead. EasyRE will automatically find and fix many problems, and can also be used to solve this problem with the directions below.
Fix #1: Boot into Safe Mode
Often booting into Safe Mode and uninstall recently install device drivers or software may fix the Automatic Repair loop error.
To boot into Safe Mode of a Windows 8 or 8.1 system, you need to have the original DVD or USB. If you don’t have it, go to Fix with Easy Recovery Essentials.
- Insert the disc and reboot the system
- Press any key to boot from the DVD
- Choose your keyboard layout
- Click Repair your computer at the Install now screen
- Click Troubleshoot
- Click Advanced options
- Click Startup Settings
- Click Restart
- Press F4 to boot into Safe Mode

If booting your system in Safe Mode doesn’t solve the error, go to Fix #2: Run bootrec.
Fix #2: Run bootrec
Running the bootrec utility to rebuild the BCD might fix the error. To run bootrec.exe on Windows 8 or 8.1, follow these steps:
- Insert the original Windows 8/8.1 install DVD or USB
If you don’t have the installation DVD or USB, go to Fix Automatic Repair Loop with Easy Recovery Essentials.
- Click Repair your computer
- Click Troubleshoot and then Advanced options
- Click Command Prompt
- When Command Prompt loads, type these commands:
bootrec /fixmbr
bootrec /fixboot
bootrec /rebuildbcd
- Press Enter after each command
- When the last command –
bootrec /rebuildbcd– finished the process, typeexitand restart your computer
Fix #3: Run chkdsk
The chkdsk utility might fix the Automatic Repair Loop on Windows 8 and Windows 8.1 systems
To access it, follow the same steps as the Fix #2: Run bootrec to reach Command Prompt:
- Click Troubleshoot > Advanced options > Command Prompt
- When Command Prompt loads, type these commands:
chkdsk /r
- Press Enter
Fix #4: System Restore
To access System Restore, follow the same steps as Fix #2: Run bootrec to reach the Advanced Options screen:
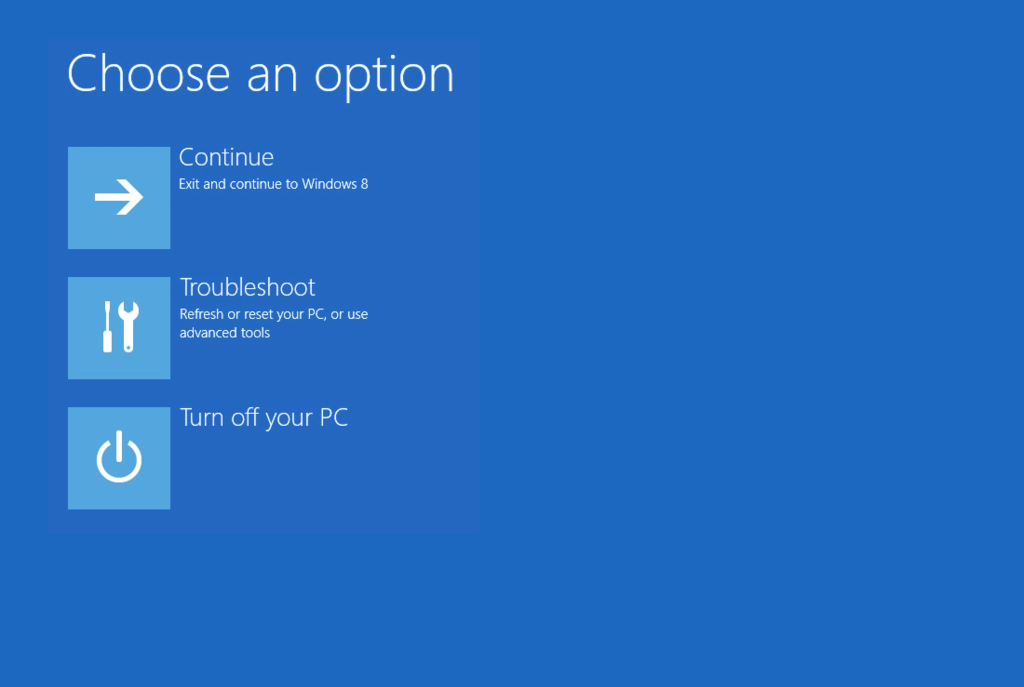
- Click Troubleshoot

Troubleshoot in Windows 8 recovery options screen
- Click System Restore
- Follow the wizard instructions to continue the process. Choose a restore point before the date when the Automatic Repair loop error appeared.
More Information
Linked Entries
- chkdsk
- bootrec
- Advanced Boot Options menu
Support Links
- Easy Recovery Essentials for Windows – our repair and recovery disk.
It’s an easy-to-use and automated diagnostics disk. It’s available for Windows 8, Windows 7 and Windows Vista. It’s also available for Windows XP and Windows Server.
Read more at Windows Recovery Disks.
- The NeoSmart Support Forums, member-to-member technical support and troubleshooting.
- Get a discounted price on replacement setup and installation discs: Windows Vista, Windows 7, Windows 8.
Applicable Systems
This Windows-related knowledgebase article applies to the following operating systems:
- Windows Vista (all editions)
- Windows 7 (all editions)
- Windows 8 (all editions)
- Windows 8.1 (all editions)
- Windows Server 2008 (all editions)
- Windows Server 2012 (all editions)
Propose an edit
Sometimes you may notice windows 11 PC won’t start the way it should after booting, it performs startup repair and displays “Automatic Repair, Your PC did not start correctly.” A number of users report when turn on or restart the PC windows 11 Automatic repair starts and results Your pc did not start correctly. There are multiple reasons for this problem, Broken or corrupt system files to Problematic Windows updates, Incompatible hard drives or bad sectors on hard disks are common. Again you may experience Windows 11 PC didn’t start correctly if the Boot manager file is corrupted due to a power outage or any other reason. If restarting your computer didn’t help then apply the solutions below to get past the error, PC Did Not Start Correctly Error on windows 11.
Contents
- 1 PC Did Not Start Correctly windows 11
- 1.1 Run the Startup repair tool
- 1.2 Start windows 11 safe mode
- 1.3 Repair Windows system files
- 1.4 Repair Boot configuration Data
- 1.5 Update windows 11
- 1.6 Perform system restore
Multiple reasons can cause Your PC did not start correctly error, a recent hardware upgrade, incompatible device driver, file system corruption and more.
- First, disconnect external devices and additional USB drives attached and reboot your PC to check if the issue is resolved.
- If the startup repair tool didn’t fix the problem, you can access advanced options and then start windows 11 safe mode.
- Also, you need to Repair the Boot Configuration Data and master boot record to fix the problem.
- You can open the command prompt and then run SFC and DISM commands to check if system files corruption prevents windows 11 PC start normally.
Let’s first restart your computer, which not only refreshes the operating system but also restarts all processes and clears temporary glitches that might prevent the PC start normally.
Run the Startup repair tool
Still getting “automatic repair your pc did not start correctly” Click on the Advanced option.

Now navigate Go to Troubleshoot > Advanced options > Startup Repair.
Start-up repair this will scan and fix any problems that may have prevented your PC from loading correctly

Log into your user account and let the process complete, this will fix problems with files that are required to boot the operating system and help you recover Windows from a serious error.
Restart and see if you’re now able to boot into Windows. If the answer is yes, open the command prompt as administrator and run system file checker, CHKDSK and DISM restore health commands to repair windows 11 files. If still windows won’t start normally we need to start windows 11 safe mode.
Start windows 11 safe mode
Windows safe mode enables to access an altered version of Windows and corrects any problems preventing windows 11 start normally. In safe mode system loads only a minimal set of drivers and services to allow the isolation of problems causing system instability. Here are different ways to boot in safe mode windows 11.

- When you get your PC did not start correctly error, Click on Advanced options,
- Next, click on Troubleshoot then Advanced options followed by startup settings and click on restart

- Now press F4 to start windows safe mode and F5 to start windows safe mode with networking.

- When your PC start in safe mode apply the next solutions to fix PC did not start correctly error on windows 11.
Repair Windows system files
corrupted or missing system files are one of the common reasons why your pc did not start correctly. You can run DISM, and SFC scans to fix any issues with the system files on your PC.
Note – If windows 11 fails to start on safe mode then access advanced options and click on the command prompt then perform the following commands.

- If you are in safe mode, press the Windows key + S type cmd, right-click on the command prompt select run as administrator.
- First, run DISM restore health command DISM /online /cleanup-image /restorehealth
- Next, run the system file checker command sfc /scannow
- The above command scans your PC for missing or corrupt system files, and add or replaces them with a stable copy.
In addition run chkdsk C: /f /r command to scan the disk drive for errors and repair them.
Once the scanning completes 100% reboot your PC and check if windows 11 starts normally.
Repair Boot configuration Data
The Boot Configuration Data contains files used by Windows to boot your PC, And if due to any reason windows fails to access those files while you turn on your PC, It may fail to start windows normally and display ‘Your PC did not start correctly’ error.
Similar to this, the Master boot record (MBR) is an essential part that helps your PC locate the operating system on your hard drive. And the issue with the Master Boot Record (MRB) on your PC may also result computer not start correctly.
Again open the command prompt as administrator and perform the following commands to repair the MBR and Boot Configuration Data on Windows 11.
bootrec /fixmbr
bootrec /fixboot
bootrec /rebuildbcd
Once done reboot your PC and check if this help fixes the problem.
Update windows 11
Microsoft regularly updates the windows 11 operating system with the latest security enhancements and bug fixes. Installing the latest windows updates also replace system files that may cause problem start windows 11.
- Start windows 11 in safe mode with networking.
- Open the settings app using the windows key + I
- Click on Windows update then hit the check for updates button,
- If windows updates are pending there allow them to download and install on your computer,
- In addition click on Advanced options then optional updates, if any driver updates or optional windows updates are available download and install them as well.
- Now you need to reboot your computer to apply the changes.
Perform system restore
The system restore feature is very useful to recover such startup errors, but it’s applicable only if you have previously enabled the system protection features. System restores create snap of current windows settings before critical operations take place. So if anything goes wrong with windows 11 you can perform a system restore to revert back to a working state.
- If your PC starts in safe mode, run the command rstrui.exe to open the system restore wizard, Otherwise, you can perform a system restore from Advanced options as well.

- Next, Choose a restore point before the error’s appearance and hit Next.

- Review the restore point one more time and hit Finish to perform a system restore.

In addition, if the problem started after a recent windows update we recommend uninstall the windows update and check if this helps.
Start windows 11 in safe mode and uninstall third-party antivirus or recently installed programs and reboot your PC. This help if third-party software conflict or security software prevents windows start normally.
Also read:
- Windows 11 or 10 stuck on repairing disk errors? Here is how to fix
- How to fix windows 11 startup problems on your PC or Laptop
- Fix This Application was unable to start correctly 0xc0000018 error
- 9 ways to Fix 100% Disk Usage problem in Windows 11
- Laptop sound not working (No Sound) after windows 11 update
…Бывают случаи, когда операционная система Windows 7
не загружается, при этом появляется системное сообщение, что поврежден загрузчик Windows: «BOOTMGR is missing. Press Ctrl+Alt+Del to restart».
При этом не удается ни выйти на точку восстановления, ни загрузить последнюю удачную конфигурацию, ни даже загрузиться в Безопасном режиме.
Что делать? Нужно восстановить загрузчик Windows 7
.
Рассмотрим два простейших способа.
***
Восстановление загрузчика Windows 7 в автоматическом режиме,
с помощью опции Startup Repair (Восстановление запуска)
– установите в лоток привода загрузочный диск Windows 7 (или диск восстановления системы);
– нажмите Ctrl+Alt+Del;
– во время перезагрузки нажмите Delete для входа в CMOS Setup Utility;
– установите загрузку ПК с CD/DVD-ROM, нажмите F10, санкционируйте сделанные изменения, начнется перезагрузка;
– после перезагрузки, если появится сообщение «Press any key to boot from CD or DVD…», нажмите любую клавишу;
– в окне Windows Boot Manager выберите Windows Setup [EMS Enabled]/Установка Windows –> нажмите Enter;
– появится строка состояния с сообщением Windows is loading files…;
– когда программа установки загрузит установочные файлы в оперативную память, появится окно выбора раскладки клавиатуры (можете выбрать русскую, а можете оставить US), нажмите Next;
– в следующем окне выберите операционную систему (если на вашем ПК
их установлено 2 или более);
– установите переключатель Use recovery tools that can help fix problems starting Windows –> Next;
– в следующем окне – System Recovery Options (Параметры восстановления системы) – доступны опции:
· Startup Repair (Automatically fix problems that are preventing Windows from starting);
· System Restore (Restore Windows to an earlier point in time);
· System Image Recovery (Recover your computer using a system image you created earlier);
· Windows Memory Diagnostic (Check your computer for memory hardware errors);
· Command Prompt (Open a command prompt window);
– выберите Startup Repair;
– средство восстановления запуска Startup Repair проведет диагностику и устранение неполадок;
– (если проблемы не будут выявлены, появится сообщение «Startup Repair could not detect a problem»);
– нажмите Finish –> Restart;
– во время перезагрузки нажмите Delete для входа в CMOS Setup Utility;
– установите загрузку ПК
с жесткого диска, нажмите F10;
– санкционируйте сделанные изменения, начнется перезагрузка.
***
Восстановление загрузчика Windows 7
с помощью командной строки
– установите в лоток привода загрузочный диск Windows 7
(или диск восстановления системы
);
– нажмите Ctrl+Alt+Del;
– во время перезагрузки нажмите Delete для входа в CMOS Setup Utility;
– установите загрузку ПК с CD/DVD-ROM, нажмите F10, санкционируйте сделанные изменения, начнется перезагрузка;
– после перезагрузки, если появится сообщение «Press any key to boot from CD or DVD…», нажмите любую клавишу;
– в окне Windows Boot Manager выберите Windows Setup [EMS Enabled]/Установка Windows –> нажмите Enter;
– появится строка состояния с сообщением Windows is loading files…;
– когда программа установки загрузит установочные файлы в оперативную память, появится окно выбора раскладки клавиатуры (можете выбрать русскую, а можете оставить US), нажмите Next;
– в следующем окне выберите операционную систему (если на вашем ПК
их установлено 2 или более);
– установите переключатель Use recovery tools that can help fix problems starting Windows –> Next;
– в окне System Recovery Options (Параметры восстановления системы) выберите Command Prompt;
– в окне Интерпретатора команд после приглашения системы X:\windows\system32>
введите bootsect /nt60 All
– появится сообщение
Microsoft Windows [Version 6.1.7600]
X:\windows\system32>bootsect /nt60 All
Target volumes will be updated with BOOTMGR compatible bootcode.
C:<\\?\Volume{идентификатор_диска}>
Successfully updated NTFS filesystem bootcode.
D:<\\?\Volume{идентификатор_диска}>
Successfully updated NTFS filesystem bootcode.
Bootcode was successfully updated on all targeted volumes.
– на приглашение системы X:\windows\system32> введите exit –> Enter (или просто закройте окно Интерпретатора команд
);
– в окне System Recovery Options (Параметры восстановления системы) нажмите Restart;
– во время перезагрузки нажмите Delete для входа в CMOS Setup Utility;
– установите загрузку ПК
с жесткого диска, нажмите F10, санкционируйте сделанные изменения, начнется перезагрузка.
Примечания
1. Загрузчик Windows 7
– это файл bootmgr, располагается в корне диска C:\ (имеет атрибуты Скрытый, Системный, Только чтение; 374КБ).
2. Boot sector restoration tool (Bootsect.exe) updates the master boot code for hard disk partitions in order to switch between BOOTMGR and NTLDR. You can use this tool to restore the boot sector on your computer.
3. Ключи команды bootsect:
bootsect {/help:/nt60:/nt52} {SYS:ALL:<DriveLetter>:} [/force] [/mbr]
– /nt52 – Applies the master boot code that is compatible with NTLDR to SYS, ALL or <DriveLetter>. The operating system installed on SYS, ALL or <DriveLetter> must be older than Windows Vista;
– /nt60 – Applies the master boot code that is compatible with BOOTMGR to SYS, ALL or <DriveLetter>. The operating system installed on SYS, ALL or <DriveLetter> must be Windows Vista or WindowsServer «Longhorn»;
– SYS – Updates the master boot code on the system partition used to boot Windows;
– ALL – Updates the master boot code on all partitions. ALL does not necessarily update the boot code for each volume. Instead, this option updates the boot code for on volumes that could be used as Windows boot volumes, which exludes any dinamic volumes that are not connected with an underlying disk partition. This restriction is present because boot code must be located at the beginning of a disk partition;
– <DriveLetter> – Updates the master boot code on the volume associated with this drive letter. Boot code will not be updated if either 1) <DriveLetter> is not associated with a volume or 2) <DriveLetter> is associated with a volume not connected to an underlying disk partition;
– /force – Forcibly dismounts the volume<s> during the boot code update. You should use this option with caution;
– /mbr – Updates the Master Boot Record without changing the partition specified by SYS, ALL, or drive letter. When used with /nt52 option, the master boot record is compatible with operating system older than Windows Vista. When used with the /nt60 option, the master boot record is compatible with Windows Vista, Windows Server 2008 or later.