We will go through how to download and install the popular Stable Diffusion software AUTOMATIC1111 on Windows step-by-step.
Stable Diffusion is a text-to-image AI that can be run on a consumer-grade PC with a GPU. After this tutorial, you can generate AI images on your own PC.
Contents
- Systems requirements
- Installation steps
- Step 1: Install python
- Step 2: Install git
- Step 3: Clone web-ui
- Step 4: Download a model file
- Step 5: Run webui
- Options
- Additional arguments
- Next Step
- RTX 4000 series graphic cards
- Updating AUTOMATIC1111
- Updating every time you run
- Updating as needed
- Resetting webui
- Reverting back to a previous version
- Web options to run AUTOMATIC1111
- Think Diffusion
- Frequently Asked Questions
- AUTOMATIC1111 does not start after updating.
- Does it work on AMD GPU?
- What Python version should I use?
- How to resolve NaN errors when generating images?
- How to resolve out-of-memory errors?
- Python doesn’t work correctly.
- Is there an easier way to install AUTOMATIC1111?
- I tried everything, but it still does not work.
Systems requirements
Your PC should run Windows 10 or higher with a discrete Nvidia video card (GPU) with 4 GB VRAM or more. An integrated GPU will not work.
If your PC does not meet these requirements, alternatives are
- Cloud service – Google Colab.
- Mac Apple Silicon M1/M2.
Installation steps
Step 1: Install python
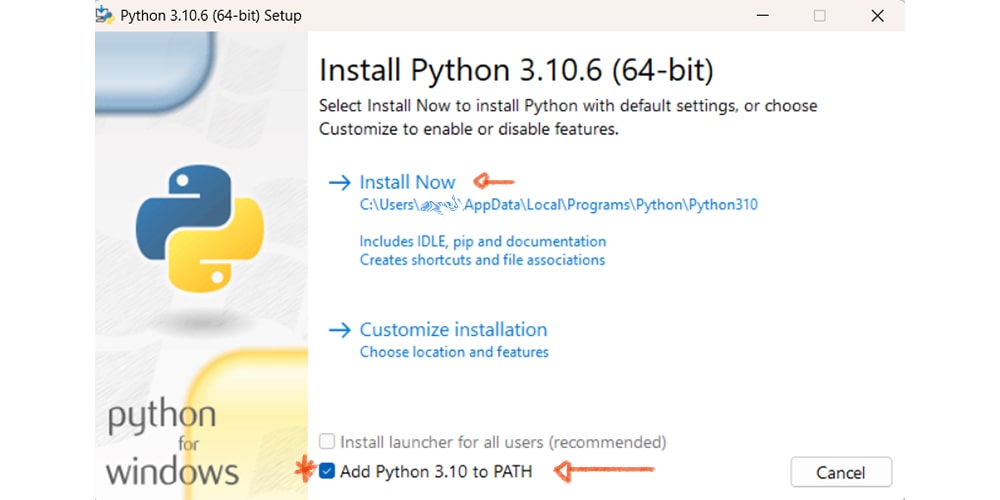
You will need Python 3.10.6. (DON’T use Python 3.11 or newer) There are two ways to install Python on Windows
Option 1: Install from the Microsoft store.
Option 2: Use the 64-bit Windows installer provided by the Python website. (If you use this option, make sure to select “Add Python to 3.10 to PATH“)
I recommend installing it from the Microsoft store.
First, remove all Python versions you have previously installed. You can do that in Control Panel → Add or remove programs.
Visit Python 3.10 on Microsoft Store and install the Python software.
This step is most likely to go wrong. Let’s do a check.
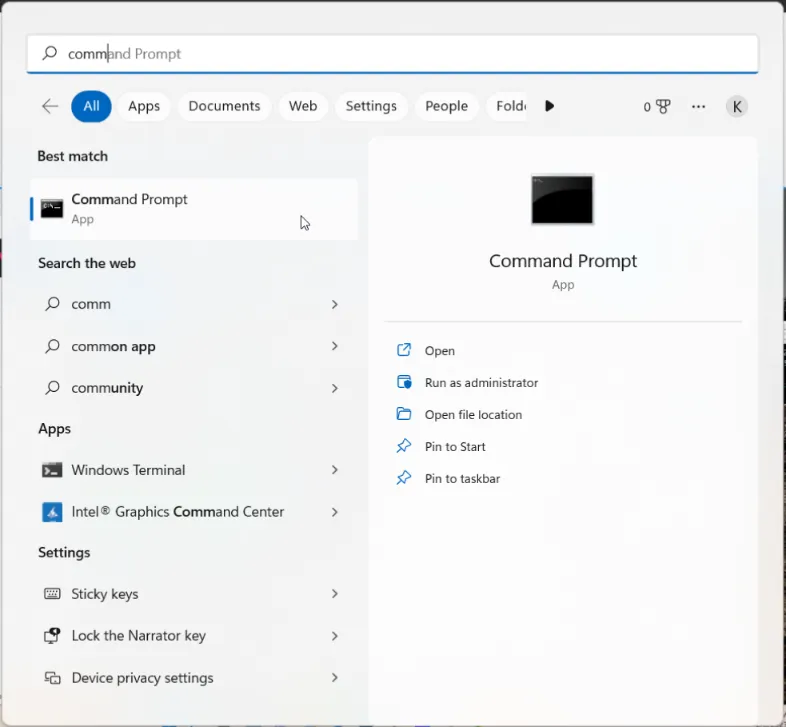
Press the Windows key on your keyboard and type “cmd” to find a program called “Command Prompt”.

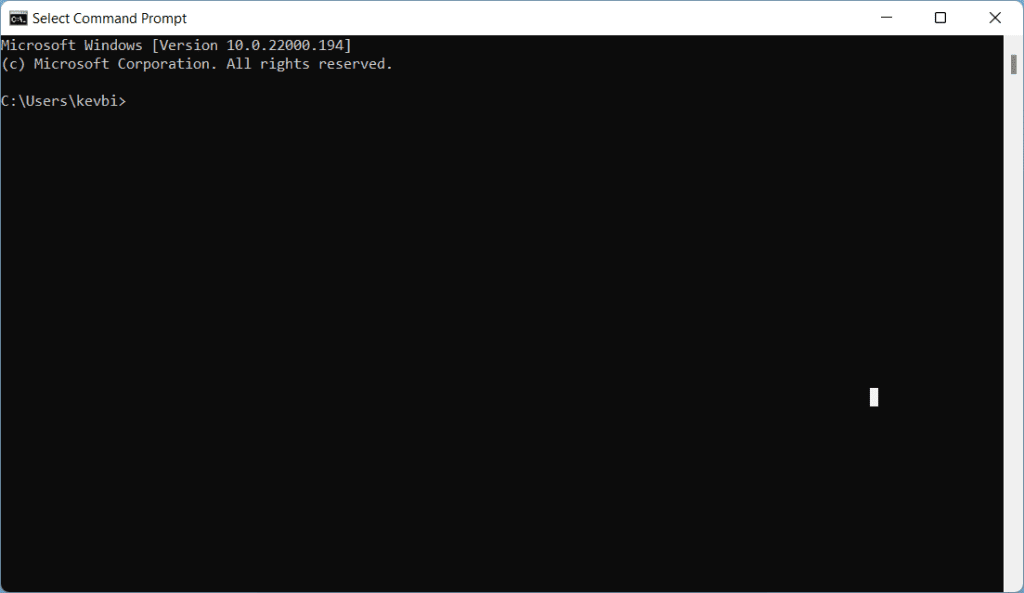
Open the Command Prompt App. You should see a black terminal like you are a hacker…
Type “python” and press Enter. You should see you see it prints out Python 3.10. This tells you your Python is installed correctly.
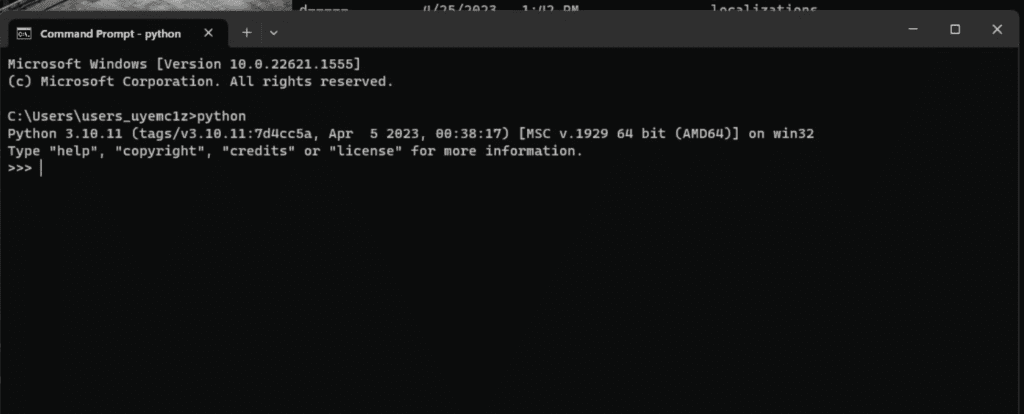
Now you can close the Command Prompt App.
Don’t proceed to the next step until you get Python 3.10 installed correctly.
If you don’t see Python 3.10 running, try
- Restarting the PC
- Removing all the previous versions of Python and reinstalling from the Microsoft Store
- If the one from Microsoft Store doesn’t work for you, remove it and try the one on the Python website.
Step 2: Install git
Git is a code repository management system. You will need it to install and update AUTOMATIC1111.
Go to this page to download the windows version.
Open the installer. Click Install to accept the license and install the software.
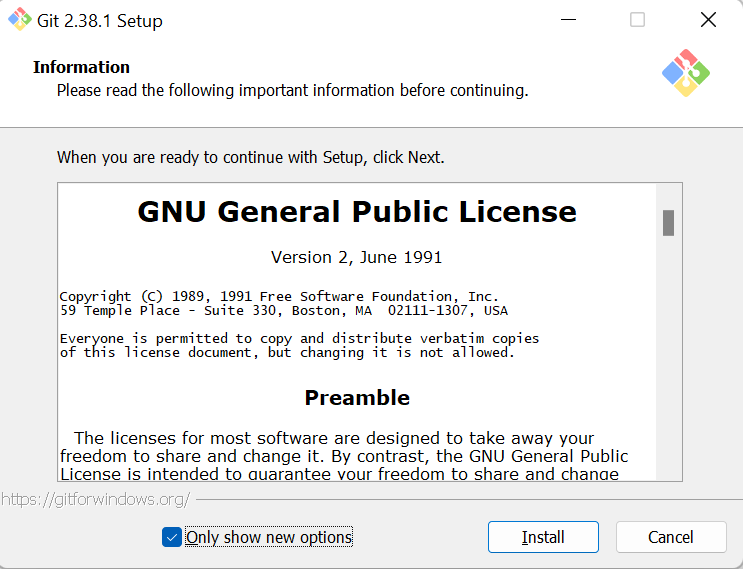
Follow the instruction to complete the installation.
Step 3: Clone web-ui
This step downloads the Stable Diffusion software (AUTOMATIC1111).
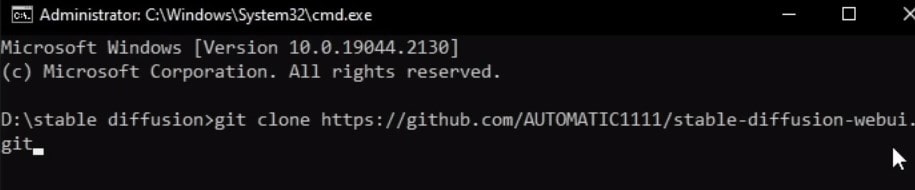
Press the Window key (It should be on the left of the space bar on your keyboard), and a search window should appear. Type cmd.
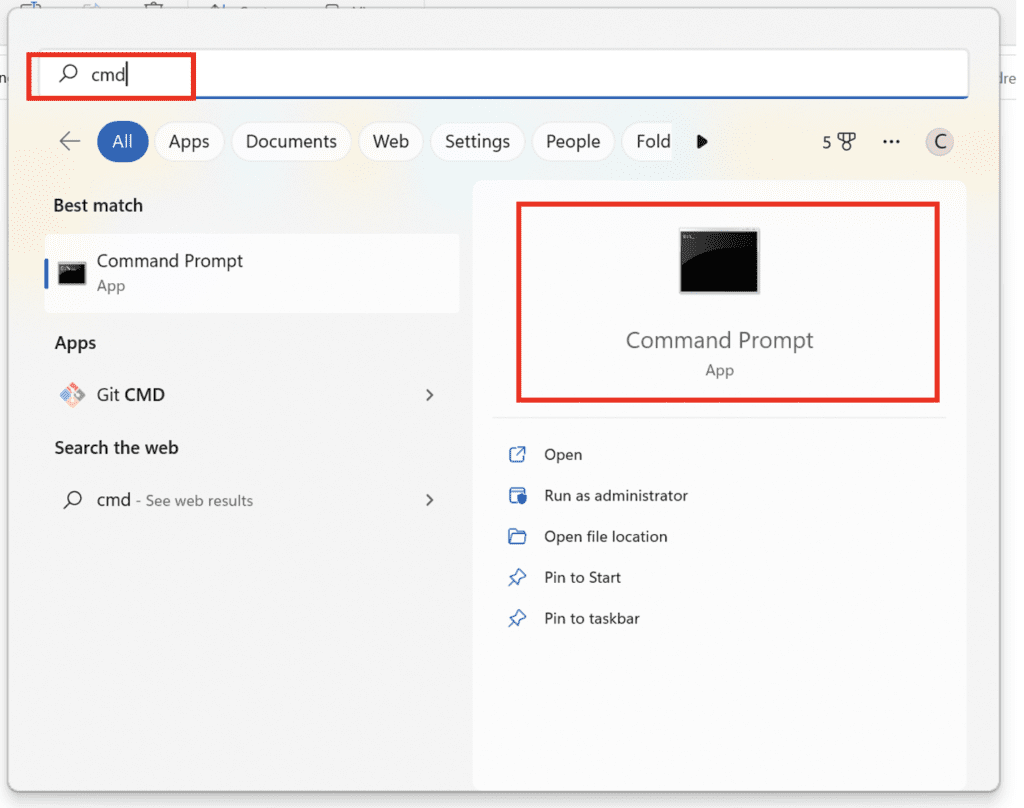
Click on Command Prompt. The command prompt window would show up.
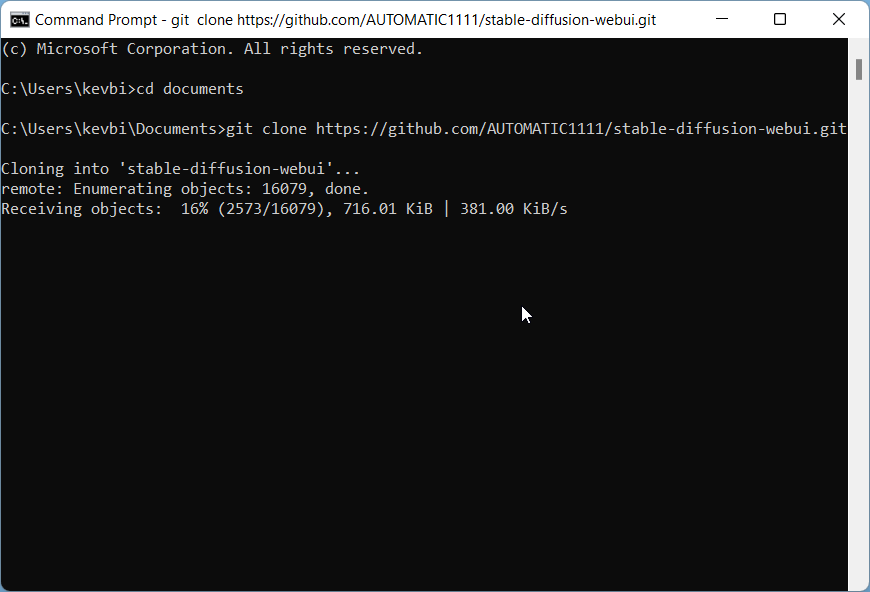
First, make sure you are in your home folder by typing the following command and then pressing Enter. (Tip: You should be able to use right-click to paste in Command Prompt.)
cd %userprofile%You should see your prompt shows something like C:\Users\YOUR_USER_NAME>.
Next type the following command and press Enter to clone the AUTOMATIC1111 repository.
git clone https://github.com/AUTOMATIC1111/stable-diffusion-webui.git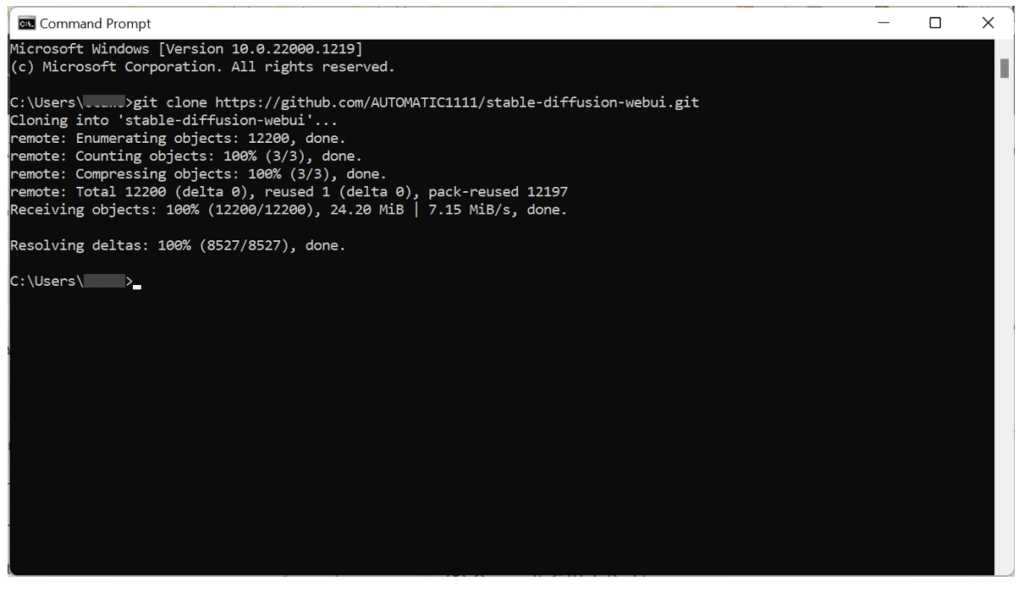
A folder called stable-diffusion-webui should be created in your home directory.
It’s ok to clone the repository in a different folder instead of %userprofile%, as long as you can find the newly created stable-diffusion-webui folder. You will need to change the folder location accordingly in the following steps.
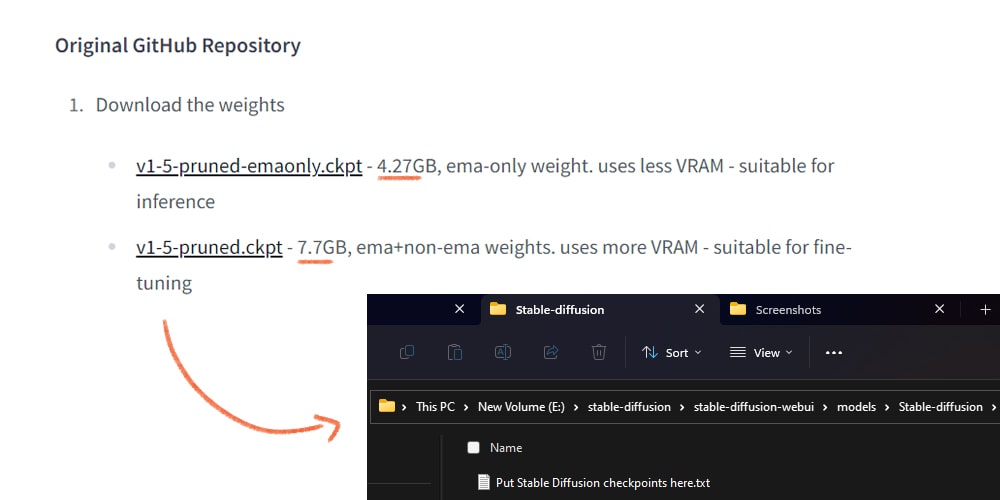
Step 4: Download a model file
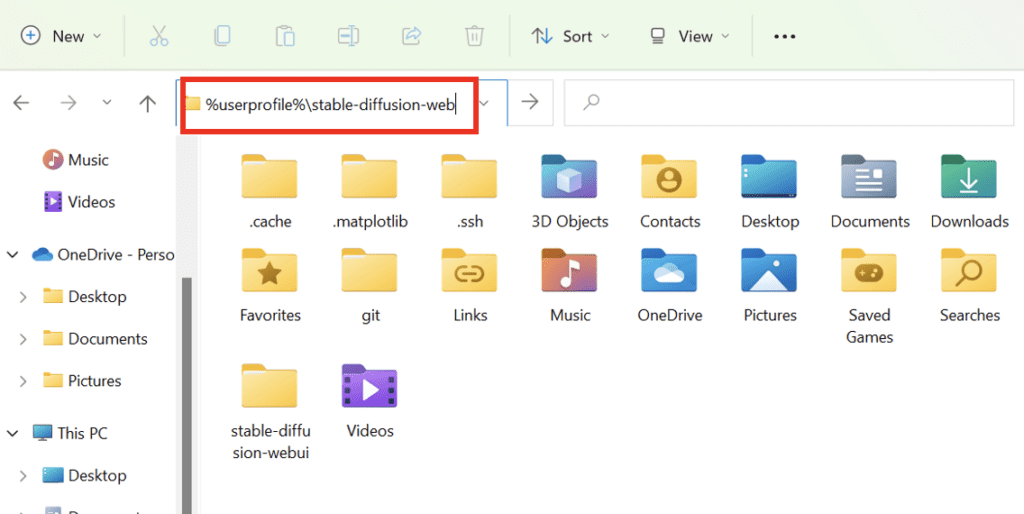
Next, go to the newly created folder in File Explorer. Put in
%userprofile%\stable-diffusion-webuiin the address bar and press enter.
Navigate to the folder models and then Stable-diffusion. You should see a file Put Stable Diffusion checkpoints here.txt like below.
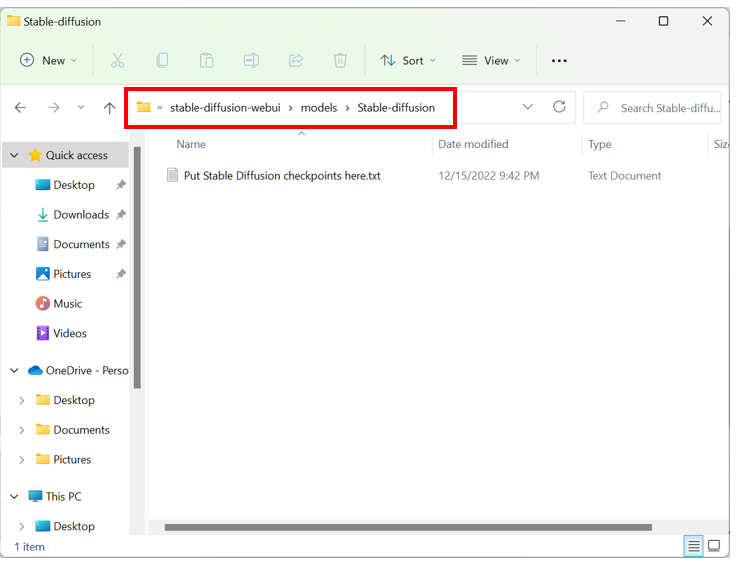
Download the Stable Diffusion v1.5 model checkpoint file (download link). Put it in that folder.
Step 5: Run webui
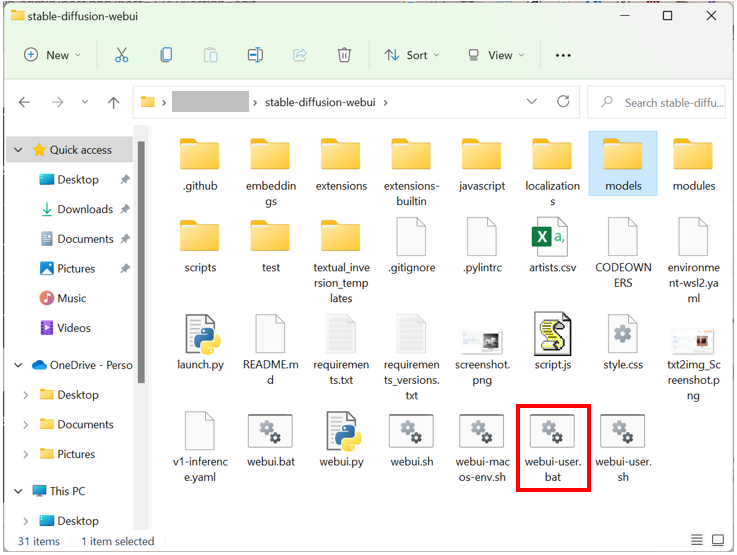
Now in File Explorer, go back to the stable-diffusion-webui folder. That is, go back up two levels or type
%userprofile%\stable-diffusion-webuiagain in the address bar.
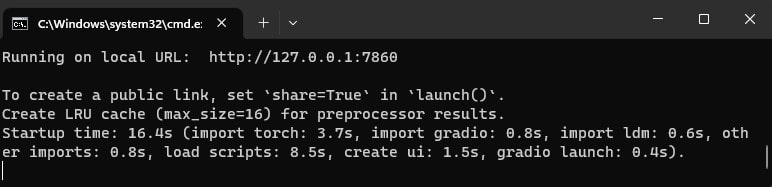
Find a file called webui-user.bat. Double-click to run and complete the installation.
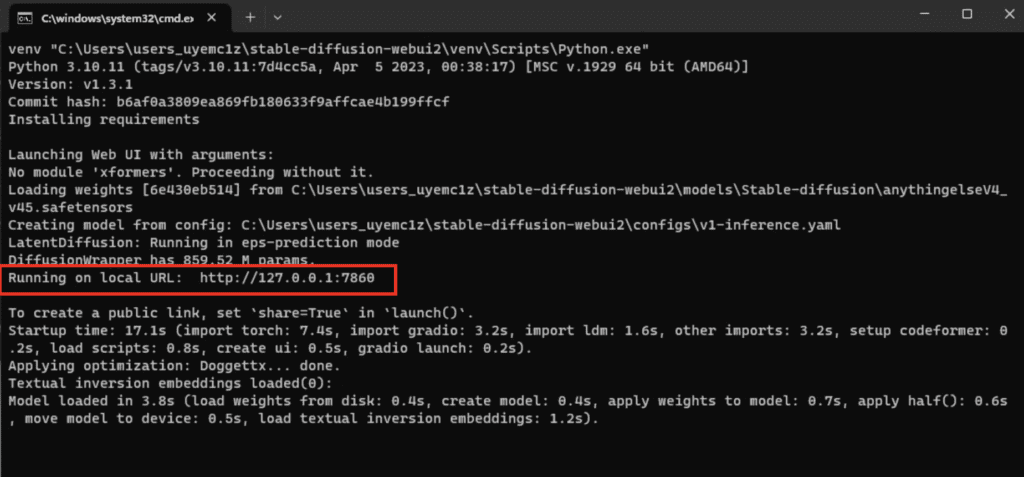
This last step is going to take a while. When it is done, you will see a message
Running on local URL: http://127.0.0.1:7860
like the one below.
In your web browser, go to the URL
http://127.0.0.1:7860/
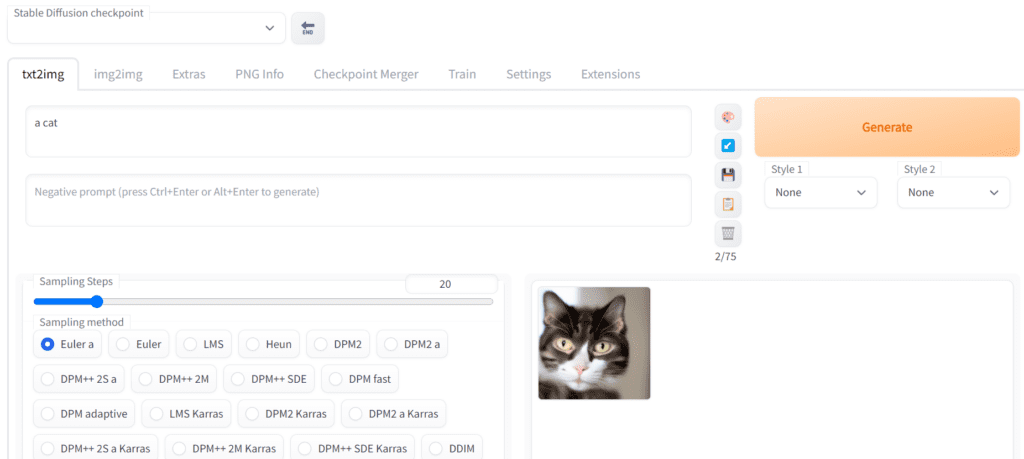
You should see the AUTOMATIC1111 webui! Put in a prompt (e.g. “a cat”) and hit Generate to test if Stable Diffusion is running correctly.
When you are done using Stable Diffusion, close the cmd black window to shut down Stable Diffusion.
To rerun Stable Diffusion, you need to double-click the webui-user.bat.
Options
You can speed up Stable Diffusion with the --xformers option. If you have less than 8 GB VRAM on GPU, it is a good idea to turn on the --medvram option to save memory to generate more images at a time.
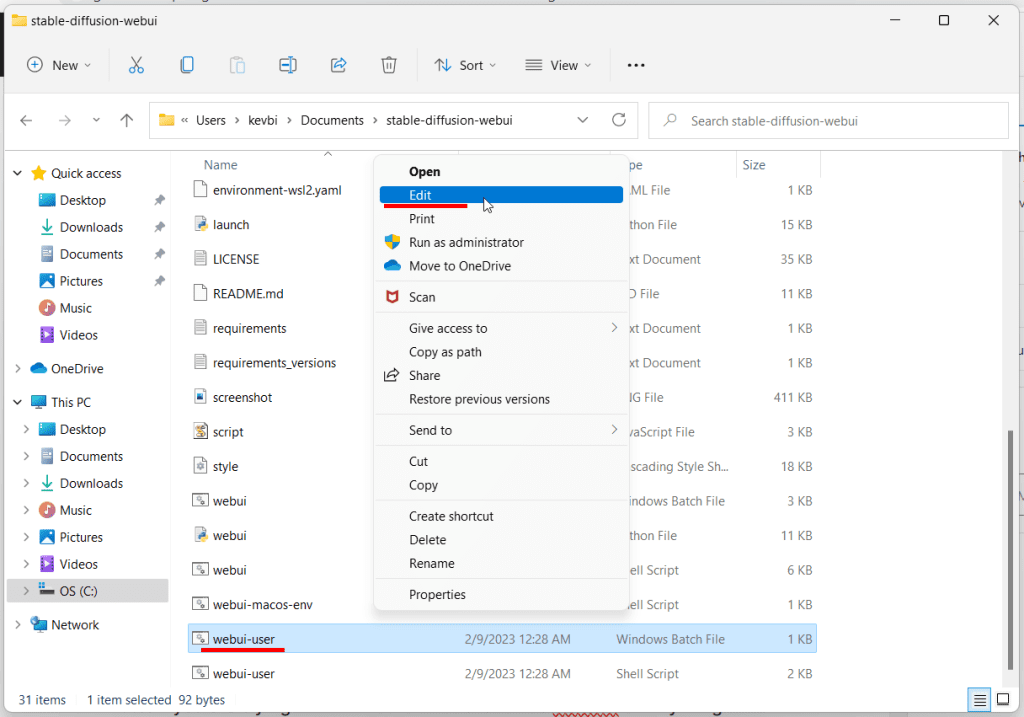
To enable them, right-click on the file webui-user.bat and select Edit. (You may need to select “Show More Options” first if you use Windows 11).
Replace the line
set COMMANDLINE_ARGS=
With
set COMMANDLINE_ARGS=--xformers --medvram
Save and close the file.
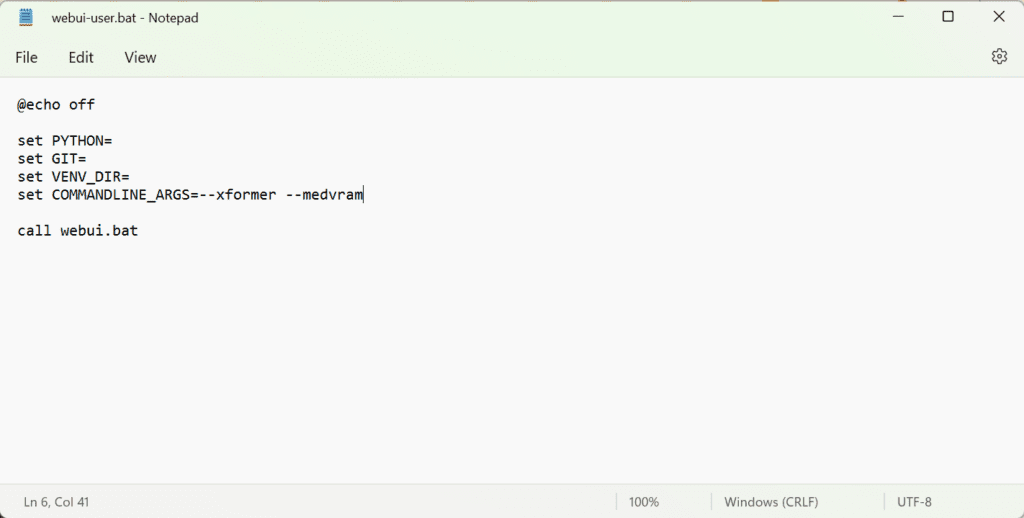
Double-click the webui-user.bat file to run Stable Diffusion.
Additional arguments
Use the argument --gradio-img2img-tool color-sketch to enable the color sketch tool, which could be helpful in img2img.
If you want to use the computer as a server and access the GUI with another computer, use the argument --listen to enable a connection from another computer. You will need to set the firewall appropriately on the server, and this is beyond the scope of this installation guide.
Next Step
That’s it! I hope you will have fun making AI images.
If you are new to Stable Diffusion, check out the Quick Start Guide for some quick tips to use Stable Diffusion.
Head to our beginner’s series to learn Stable Diffusion step by step.
Check out this prompt generator for building high-quality prompts.
RTX 4000 series graphic cards
Good news for you if you use RTX 4070, RTX 4080 or RTX 4090 Nvidia graphic cards. The latest version of AUTOMATIC1111 supports these video card. (with torch 2.0 and cuda 11.8)
I will provide a benchmark speed so that you can make sure your setup is working correctly. The settings are:
- batch size: 4
- batch count: 10
- Image size: 512×512
- Sampling steps: 20
- Sampling method: Euler a
- Model: SD v1.5
Using a batch size of 1 is not recommended, as the measured speed is likely to be highly dependent on other components on your system.
You should see the speed of generating each image. Pick a stable value, usually in the middle like the 5th batch. The speed is in it/s (iterations per second).
You should get about 10 its/s on RTX 4090. (Note that this is 4 images per iteration) This is the max speed you can get nowadays.
You can use one of the following speed-up parameters.
Option 1:
--xformersOption 2:
--opt-sdp-no-mem-attention --no-half-vae --opt-channelslastOption 2 is slightly faster, but test them out to see what works best for you.
Updating AUTOMATIC1111
By default, your copy of AUTOMATIC1111 won’t be automatically updated. Given how fast things are moving, you will likely need to update your copy at some point to use the latest and the coolest.
There are two options for updating it. (1) Updating every time when you run it, and (2) Updating only when needed.
Updating every time you run
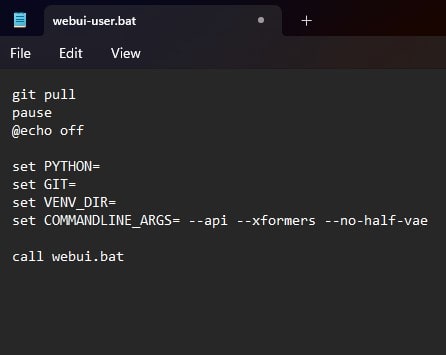
To update whenever you run webui, edit the file webui-user.bat. Add “git pull” before the line calling webui.bat. The file should look something like
@echo off

set PYTHON=
set GIT=
set VENV_DIR=
set COMMANDLINE_ARGS=--xformers --medvram
git pull
call webui.bat
From now on, webui will update itself every time it starts.
Updating as needed
It may not be a good idea to use the latest version because something could be broken. Updating periodically or only if you need a new feature is a more prudent approach.
To update the webui, open Command Prompt (cmd) and go to webui’s directory using the command below. (You will need to change %userprofile% if you installed it somewhere else.)
cd %userprofile%\stable-diffusion-webuiAnd run the command
git pullResetting webui
If git pull shows an error, it is usually because you have accidentally changed some files. You can reset the webui folder with the following two commands.
cd %userprofile%\stable-diffusion-webui
git checkout -f master
And then run git pull again.
git pullNote that all files will be reset. You will need to make changes to webui-user.bat again.
Reverting back to a previous version
Sometimes the latest version of webui is broken, and you don’t want to use it. You can revert back to a previous version by following the instructions below.
Step 1: Go to this page to view previous versions. Each row is a previous version.
Step 2: Pick a previous version you want to revert back to. You can look at the date and comment to make a judgment.
Step 3: Press the copy button to copy the hash code of the version.
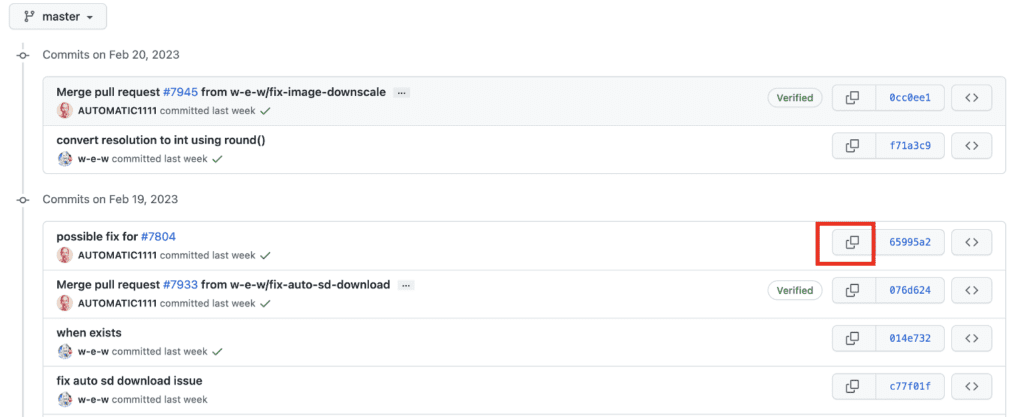
Step 4: In the command prompt, run the following commands. The hash code (highlighted below) is just an example. You will paste the one you just copied.
cd %userprofile%\stable-diffusion-webui
git checkout 076d624a297532d6e4abebe5807fd7c7504d7a73
If you see errors, reset the webui (see the previous section) and retry.
After checking out the previous code, delete the venv folder and restart WebUI.
Web options to run AUTOMATIC1111
Consider the following options for running Stable Diffusion without installing it locally.
(I earn a small commission if you subscribe.)
Think Diffusion
Think Diffusion lets you use AUTOMATIC1111 online without having a GPU or setting up. The service is provided remotely. Follow the link to get an extra 20% credit.
Frequently Asked Questions
AUTOMATIC1111 does not start after updating.
Delete the venv folder and restart AUTOMATIC1111.
If it still doesn’t work, delete both the venv and the repositories folders and restart.
If it still doesn’t work and you have recently installed an extension, delete the folder of that extension in the extensions folder. Delete the venv folder and restart.
Does it work on AMD GPU?
No, you have to have an NVIDIA GPU.
What Python version should I use?
Python 3.10.6. Later versions of 3.10 work fine. But don’t use 3.11 or later.
How to resolve NaN errors when generating images?
Add --no-half argument to webui-user.bat (See Adding arguments)
How to resolve out-of-memory errors?
Use --low-vram instead of --med-vram argument in webui-user.bat (See Adding arguments)
Python doesn’t work correctly.
Try removing the previously installed Python using Add or remove programs.
There are two options for installing Python listed. Try the other one if the one you used didn’t work.
Is there an easier way to install AUTOMATIC1111?
The above is the official install instructions. Two alternatives:
- Recently they started to tag release builds. They are supposed to work after downloading and unzipping.
- There’s an unofficial easy installer for Windows you can try.
I tried everything, but it still does not work.
You can use Google Colab to run AUTOMATIC1111. This is what I use. The notebook launches AUTOMATIC1111 with one mouse click.
Or Use AUTOMATIC1111 online.
If you find the content helpful, please support this site by becoming a member.

 Всё моё свободное время в последние четыре дня было потрачено на одну задачу — составление запросов для нейросети Stable Diffusion, нейросети для создания изображений по текстовому описанию. Все изображения для статьи (кроме скриншотов) были созданы лично в этой нейросети, совершенно не художником.
В этой инструкции подробно о том, как установить Stable Diffusion на ваш компьютер или ноутбук, о возможности попробовать нейросеть в работе без установки и некоторые дополнительные детали, которые могут оказаться полезными, если вы решите нырнуть в это также, как и я.
Установка Stable Diffusion
Нейросеть Stable Diffusion отличается от таких аналогов как DALL-E 2 или Midjourney открытым исходным кодом: то есть, при наличии соответствующего оборудования, вы можете совершенно бесплатно установить необходимое ПО на свой компьютер и использовать для создания изображений по текстовому запросу (в обсуждениях часто используют кальку с английского «промпт»).

Официальное ПО Stable Diffusion не имеет удобного графического интерфейса, за исключением доступного на официальном сайте https://beta.dreamstudio.ai/, с которого и рекомендую начать эксперименты и посмотреть, нужно ли вам это: после регистрации у вас будет 200 бесплатных генераций с параметрами по умолчанию (регистрироваться можно и больше раз с разными адресами электронной почты).
При установке официального софта на компьютере все действия придётся выполнять в командной строке. Кроме того, вы мало что сможете сгенерировать с видеокартой, имеющей 6 Гб памяти или менее.
Однако, благодаря открытому исходному коду, почти сразу после релиза Stable Diffusion появились альтернативные варианты ПО («форки»), оптимизирующие запуск на более слабом оборудовании (4 Гб VRAM, есть даже варианты, работающие на CPU, но очень медленно), предоставляющие удобный доступ к настройкам и упрощающие использование нейросети.
С одного из таких альтернативных вариантов, который я нашел наиболее удачным, и начнем установку. Если же вам требуется описание процесса установки официального варианта, его вы также сможете найти далее в статье.
Установка Stable Diffusion WebUI от Automatic
Внимание: с момент написания инструкции процесс установки менялся и уточнить необходимые шаги лучше на официальном GitHub проекта.
Сначала о том, что нам потребуется: достаточно мощный компьютер или ноутбук, видеокарта NVIDIA GeForce, не менее 4 Гб видеопамяти. Все устанавливаемые компоненты займут около 10 Гб на жестком диске или SSD. Если всё это в наличии, можно приступать:
- Установите Python 3.10.6 (разработчик указывает именно эту версию) с официального сайта https://www.python.org/downloads/windows/. При установке отметьте пункт «Добавить Python в переменную PATH».
- Установите Git с официального сайта https://git-scm.com/download/win. Если вам не ясны параметры при установке, их можно оставить в рекомендуемых по умолчанию значениях.
- Зайдите на страницу Automatic1111 на GitHub https://github.com/AUTOMATIC1111/stable-diffusion-webui, нажмите по стрелке справа от кнопки «Code» вверху справа и загрузите ZIP-архив со Stable Diffusion WebUI. Распакуйте в удобное расположение, но так, чтобы путь не содержал пробелов или кириллических символов (это может вызвать проблемы).
- Скачайте обученную модель Stable Diffusion последней версии с официального источника https://huggingface.co/CompVis/stable-diffusion-v-1-4-original (потребуется регистрация) или из этого хранилища.
- Переименуйте скачанный файл в model.ckpt и переместите его в папку, куда были распакованы файлы на 3-м шаге (в ту же папку, где находится файл webui.bat).
- Запустите файл webui-user.bat (не от имени администратора, простой запуск двойным кликом) и дождитесь, когда скрипт автоматически скачает и установит недостающие компоненты. Учитывайте: строка прогресса не отображается, поэтому при загрузке объемных компонентов (Torch и CUDA) может показаться, что процесс завис.
- По завершении установки вы увидите сообщение
Running on local URL: http://127.0.0.1:7860/
перейдите по указанному адресу (не закрывайте окно консоли, это прервет работу Stable Diffusion WebUI) в любом браузере и начните использование.
- Если ваша видеокарта имеет 6 Гб видеопамяти или меньше, при попытке сгенерировать изображение даже в выставленном по умолчанию расширении 512×512 вы можете получить сообщение о недостатке VRAM (видеопамяти). В этом случае, закройте окно консоли (или прервите выполнение, нажав Ctrl+C в окне консоли), откройте файл webui-user.bat с помощью текстового редактора и измените строку с параметрами запуска на
set COMMANDLINE_ARGS=--medvram
Затем снова запустите веб-интерфейс файлом webui-user.bat
- Дополнительные возможности настройки Stable Diffusion WebUI и параметры запуска можно найти на официальной странице разработчика.
Установка официальной версии Stable Diffusion
При установке официальной версии Stable Diffusion все необходимые компоненты почти те же самые, но их потребуется устанавливать вручную. Требования те же самые, за исключением необходимости использования видеокарты с не менее чем 6 Гб VRAM.
- Скачайте и установите Git https://git-scm.com/download/win используйте рекомендуемые параметры (оставьте возможность использования Git в командной строке и сторонних программах).
- Установите Miniconda3 с официального сайта https://docs.conda.io/en/latest/miniconda.html, при установке выберите опцию «Установить для всех пользователей).
- Скачайте архив Stable Diffusion с официального источника https://github.com/CompVis/stable-diffusion (нажать по кнопке «Code», затем выбрать пункт «Download ZIP»).
- Скачайте модель Stable Diffusion последней версии с https://huggingface.co/CompVis/stable-diffusion-v-1-4-original (потребуется регистрация) или: из этого хранилища (без регистрации), переименуйте файл в model.ckpt
- Запустите консоль Miniconda3 (Anaconda Prompt), для этого можно использовать поиск в панели задач Windows 11 и Windows
- В открывшейся консоли используйте команды для создания папки (в нашем варианте — на диске C) для файлов Stable Diffusion
cd C:/
mkdir stable-diffusion
cd stable-diffusion
Не закрывайте окно консоли.
- Откройте скачанный на 3-м шаге архив и скопируйте папку stable-diffusion-main (саму папку, а не файлы в ней) в C:\stable-diffusion\
- По порядку используйте следующие команды в консоли Miniconda3
cd C:\stable-diffusion\stable-diffusion-main
conda env create -f environment.yaml
conda activate ldm
mkdir models\ldm\stable-diffusion-v1
Процесс займет продолжительное время, так как из сети будут скачиваться дополнительные компоненты.
- Переместите файл model.ckpt в папку C:\stable-diffusion\stable-diffusion-main\models\ldm\stable-diffusion-v1
- Готово. Теперь мы можем запустить Stable Diffusion, введя команду
conda activate ldm
В дальнейшем запуск будет всегда производиться именно с помощью этой команды.
- Генерация изображений выполняется здесь же в консоли с помощью передачи параметров. Например, вы можете ввести
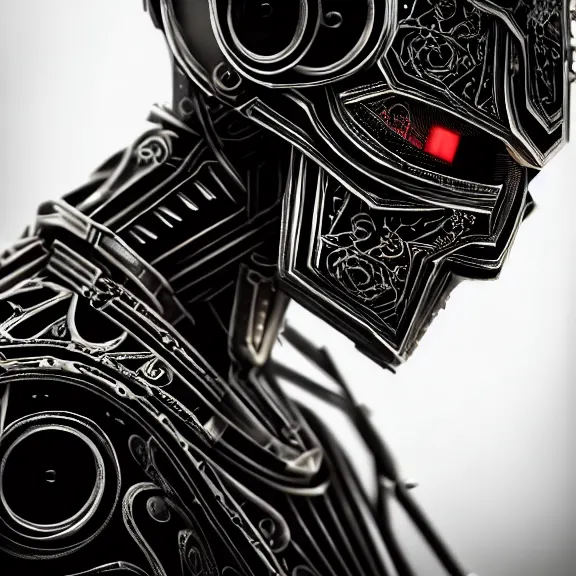
python scripts/txt2img.py --prompt "concept robot, colorful, cinematic" --plms --n_iter 5 --n_samples 1
Команда создаст набор из 5 изображений с разрешением 512×512 по запросу «concept robot, colorful, cinematic», которые будут помещены в папку
C:\stable-diffusion\stable-diffusion-main\outputs\txt2img-samples\samples


Чтобы увидеть информацию по доступным параметрам командной строки используйте команду
python scripts/txt2img.py --help
Использование Stable Diffusion WebUI
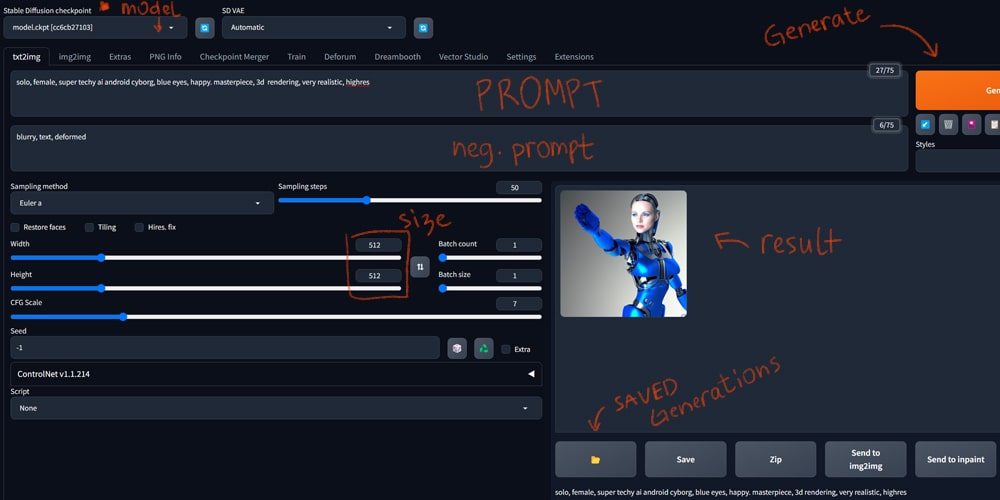
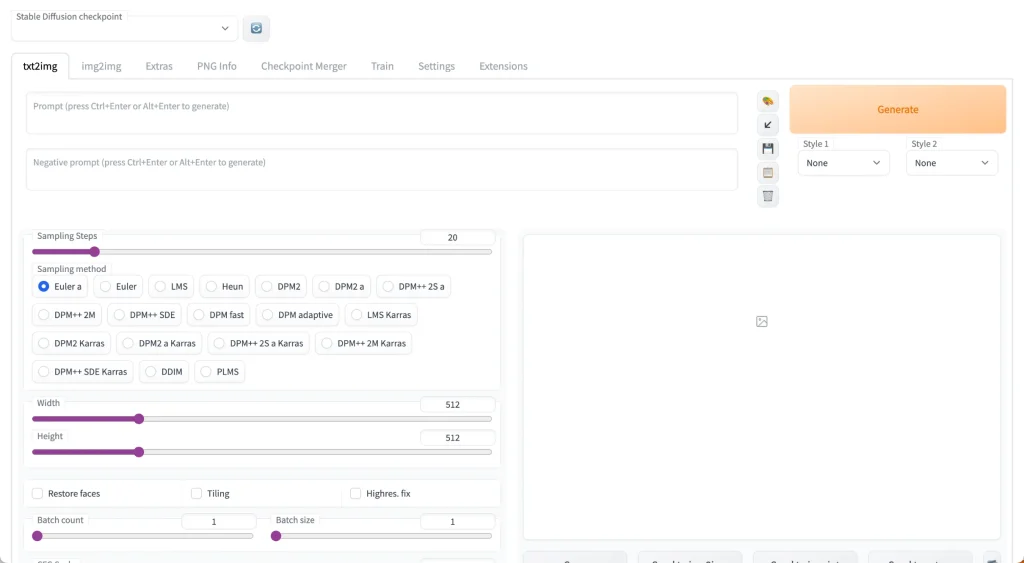
После запуска webui-user.bat и перехода в браузере на адрес 127.0.0.1:7860 перед вами будет веб-интерфейс, доступный локально на вашем компьютере (для работы Интернет не требуется), первая вкладка которого — txt2img, где и происходит всё самое интересное. Экспериментировать можно начать сразу же: просто введите текст на английском в поле сверху и нажмите кнопку «Generate», чтобы получить готовую картинку с параметрами по умолчанию (на скриншоте они уже изменены).
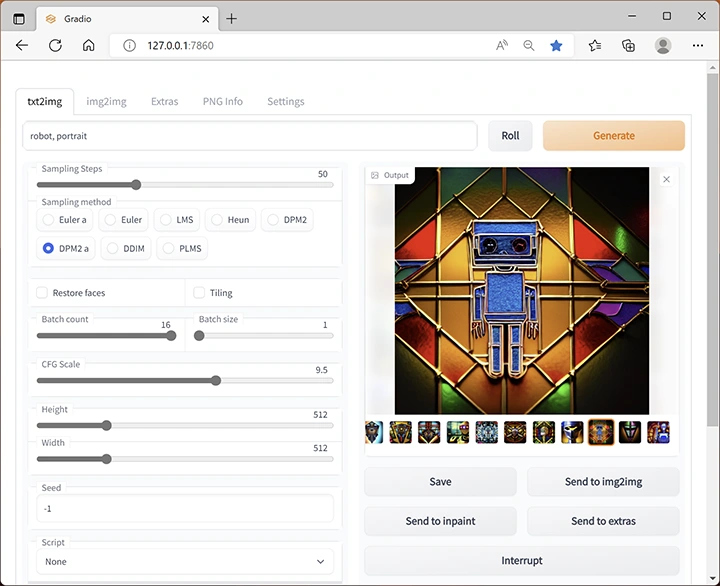
Если поднести указатель мыши к названию доступных параметров, большинство из них имеют описания на английском. Среди основных:
- Sampling Method — алгоритм создания изображения. Влияет на результат, скорость, требуемую видеопамять.
- Sampling Steps — количество шагов, в течение которых нейросеть «приводит» результат к желаемому. Влияет на время генерации. Больше — не всегда лучше: нужный результат может получиться за 30-50 шагов, а дальнейшая работа может не добавить деталей, а исказить результат (но бывает и иначе). Если то, что получилось, вам понравилось, можно использовать тот же Seed для генерации изображения по этому же запросу, но с другим количеством шагов и оценить результат.
- Batch count — количество наборов создаваемых изображений.
- Batch size — количество изображений в наборе (влияет на требуемую память).
- CGF Scale — «свобода» обработчика изображения, влияет на то, насколько точно результат будет соответствовать описанию. При более низких значениях получаем большее разнообразие.
- Height и Width — ширина и высота изображения, очень сильно влияет на требования к памяти.
- Seed — «зерно». По умолчанию равно -1, при этом значении оно будет задано случайно при каждом очередном нажатии кнопки «Generate». Если с определенным Seed вы получили интересный результат, можете скопировать его в это поле, чтобы продолжить эксперименты над понравившимся изображением, изменяя параметры.
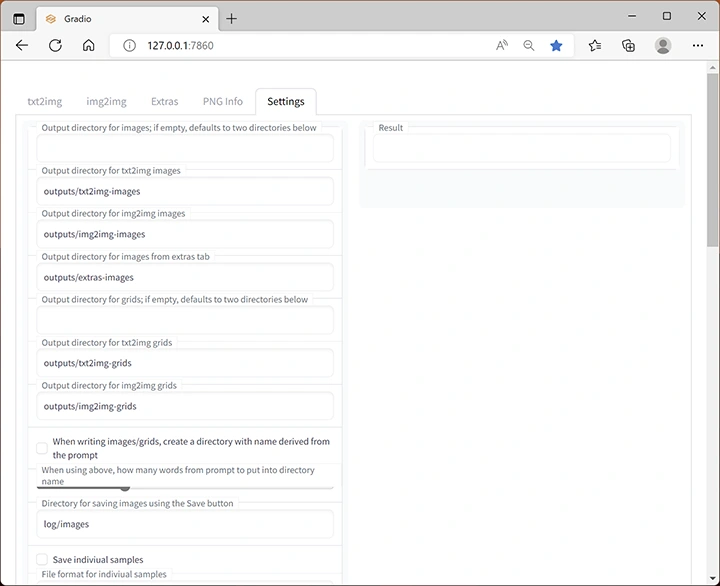
По умолчанию изображения сохраняются во вложенных папках в папке outputs в расположении, куда вы установили Stable Diffusion WebUI, но при желании автоматическое сохранение можно отключить на вкладке «Settings», здесь же можно настроить и другие параметры.
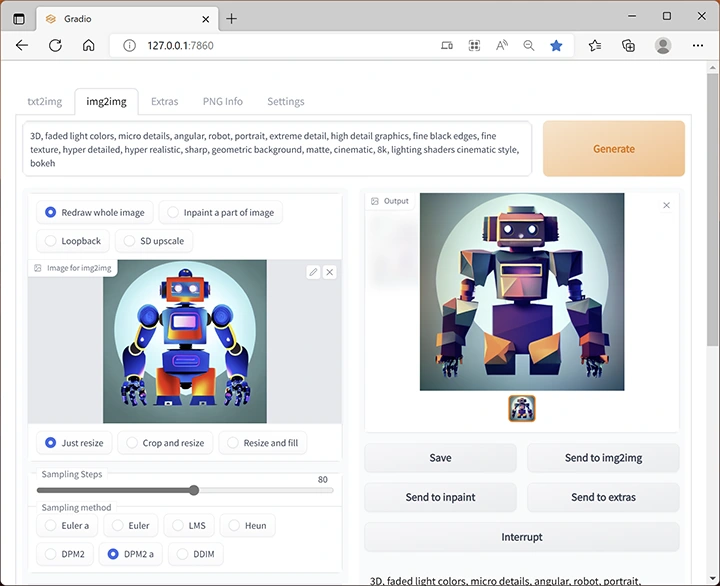
Вкладка img2img позволяет модифицировать имеющееся изображение в соответствии с текстовым описанием.
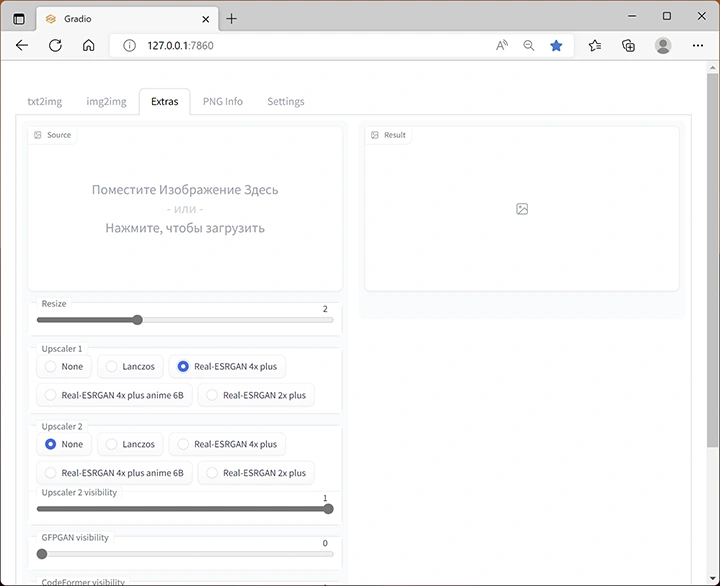
На вкладке Extras собраны дополнительные инструменты. Основное — увеличение разрешения изображения с использованием нейросети.
Значения параметров в большинстве своем вам придётся подбирать самостоятельно, отслеживая результат. Но даже при одних и тех же значениях он может сильно отличаться и прежде всего зависит от заданного запроса, прописанных в нем требований к изображению и стилей. Это может быть простой рисунок в стиле плаката:

А может быть и почти фотография:
Легко создать таких роботов:

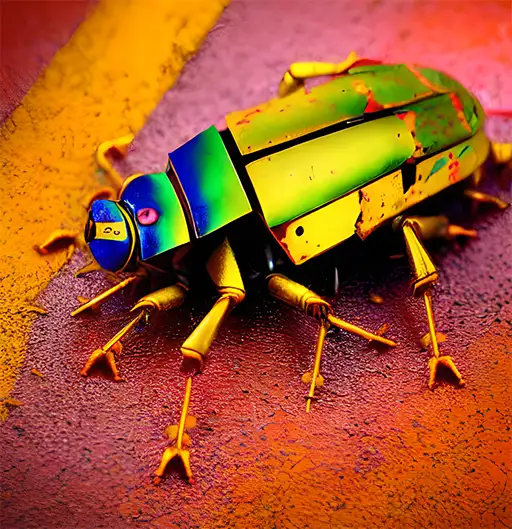
И посложнее — таких:
Не забывайте проявлять фантазию, нарисовать можно многое, главное уметь это описать:

Вспоминайте названия кинематографических эффектов, свойств материалов и описания форм:
Чтобы получить лучшие результаты, рекомендую изучить чужие работы и используемые запросы: на тему создания изображений в Stable Diffusion есть множество тематических каналов в мессенджерах, социальных сетях и тематических сайтах. Но и собственные идеи часто могут дать интересный и красивый эффект, время для неожиданных находок в запросах ещё не вышло.
Learn how to download and install Stable Diffusion Ai software Automatic1111 on Windows in this step-by-step guide. Also, check out system requirements and frequently asked questions.

Stable Diffusion is an AI image generator that is free to use and can be run locally on your own computer if it meets the system requirements.
It’s a powerful algorithm that is easiest to use with a GUI (graphical user interface) such as Automatic1111.
Automatic1111 is a popular open-source UI tool for Stable Diffusion that is frequently updated and has many advanced features.
Follow the tutorial below, and you’ll soon be able to generate your own AI images!
- Note: Learn how Stable Diffusion works; the linked article explains it in simpler terms.
- See my tests on how to generate unique ai-images, unlike anyone else’s.
- Also, check out 40+ things Stable Diffusion can be used for.
You can also follow my video tutorial below:

System and Hardware Requirements for Stable Diffusion
Though you can run Stable Diffusion on your laptop if you want, the more powerful your computer – the faster and more enjoyable your Ai generation will be.
Stable Diffusion was developed to be processed on Nvidia GPUs, but it can also run on AMD or Intel GPUs, though it won’t be as easy to install or run as fast.
The speed at which you generate ai images mostly depends on your GPU, so check yours and upgrade if you have issues or get serious about ai generated images.
Stable Diffusion Minimum Requirements:
- Graphics card GPU: 4GB Minimum VRAM (though I suggest 8GB minimum).
- Processor CPU: 4-core will suffice, though you can go with a weaker one.
- RAM: 8GB will do, but might cause memory issues.
- Windows 10 or higher.
- Storage: 10GB minimum for installing everything, but I suggest closer to 200GB for all other ai models and your generated images.
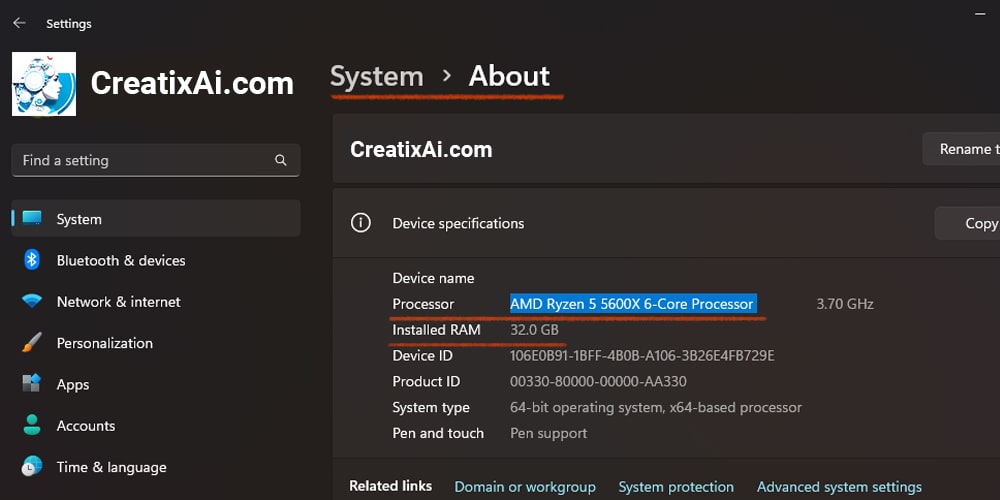
My Stable Diffusion System Setup:
- GPU: 12GB (NVIDIA GeForce RTX 3060)
- CPU: 6-core (AMD Ryzen 5 5600X 6-Core Processor)
- RAM: 32GB
- Windows 11
- Storage: 2TB
Note: I didn’t start with this setup, but because I am generating a lot of ai images, I’ve upgraded over time. I find this new PC build to be very enjoyable and fast.
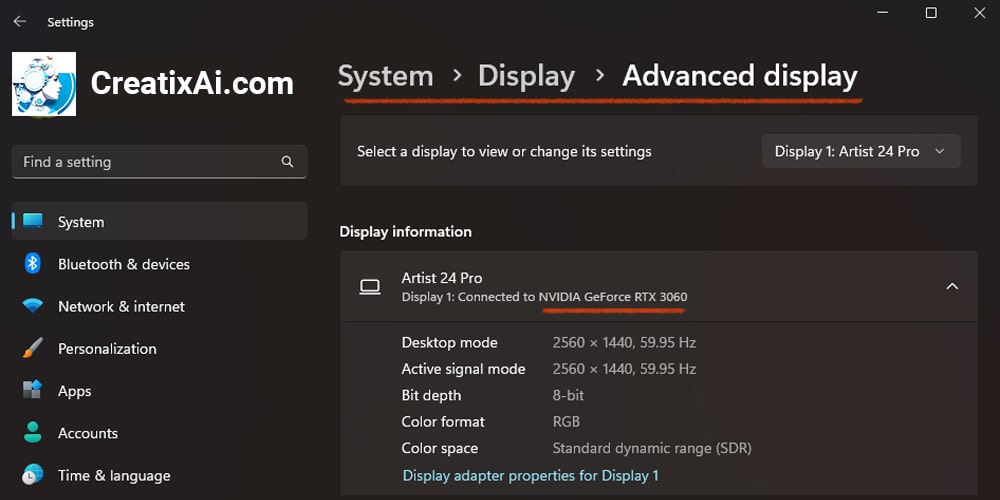
How to check GPU in Windows?
- Select Settings > System.
- Select Display and scroll down to Related settings.
- Select Advanced display. Your GPU’s make and model should be shown under Display information.
- Click Display Adapter Properties and look for a number next to the Dedicated Video Memory to see how much VRAM your GPU has.
How to check CPU and RAM in Windows?
- Select Settings > System.
- Select About and look for Device Specification.
Stable Diffusion Installation Steps
Follow the five steps below to install stable diffusion on windows.
Step 1: Install Python
You need to install Python to run stable diffusion locally. Do not install the latest Python version, as it may not work.
I use and recommend Python version 3.10.6.
- Click the link above, scroll to the “Files” section, and download Windows Installer.
- Open the installer.
- IMPORTANT: Select “Add Python 3.10 to PATH”
- Click “Install Now”
- Wait until finished.
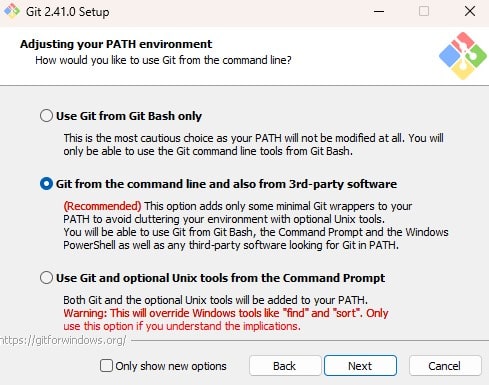
Step 2: Install Git
Git is a code repository management system. We will need it to set up and update Automatic1111.
- Go to their official Git for Windows page and download the installer.
- Open the installer, and go through the settings.
- Make sure the option “Git from the command line and also from 3rd-party software” is selected.
- Installing git – wait until the setup is finished.
Step 3: Clone Web-Ui Automatic1111
This is the longest step, but follow along, and you will do great!
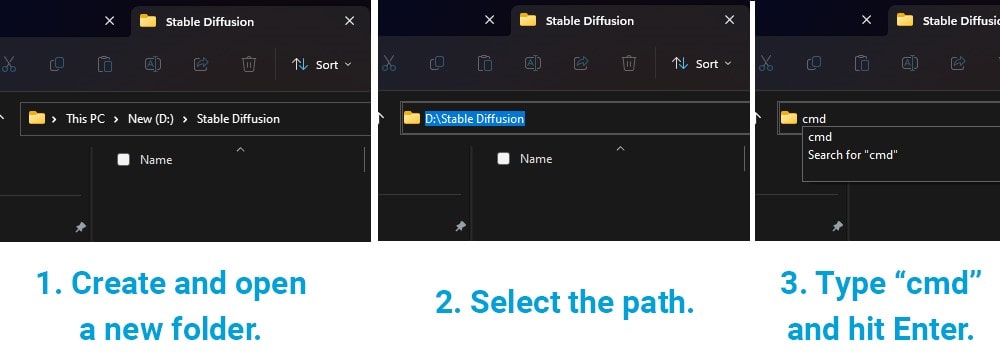
- Create a new folder named “Stable Diffusion” (or whatever you want) anywhere on your computer. Remember, you will need at least 10GB of space, so choose accordingly.
- Click on its path, and it will be selected. Type “cmd” and hit enter.
- Go to the Automatic1111 GitHub page and copy the code.
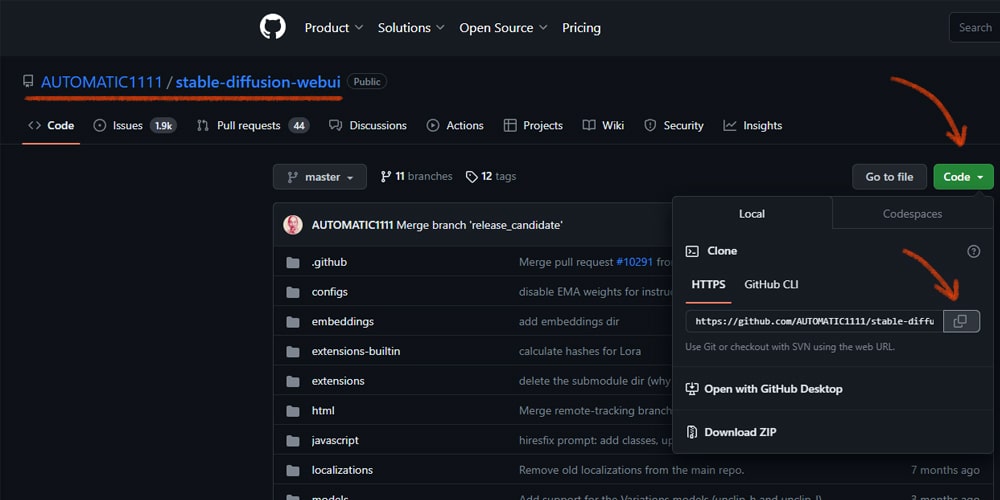
- Return to the command prompt we opened in Step 2 and type “git clone”, then paste the code you copied.git clone https://github.com/AUTOMATIC1111/stable-diffusion-webui.git
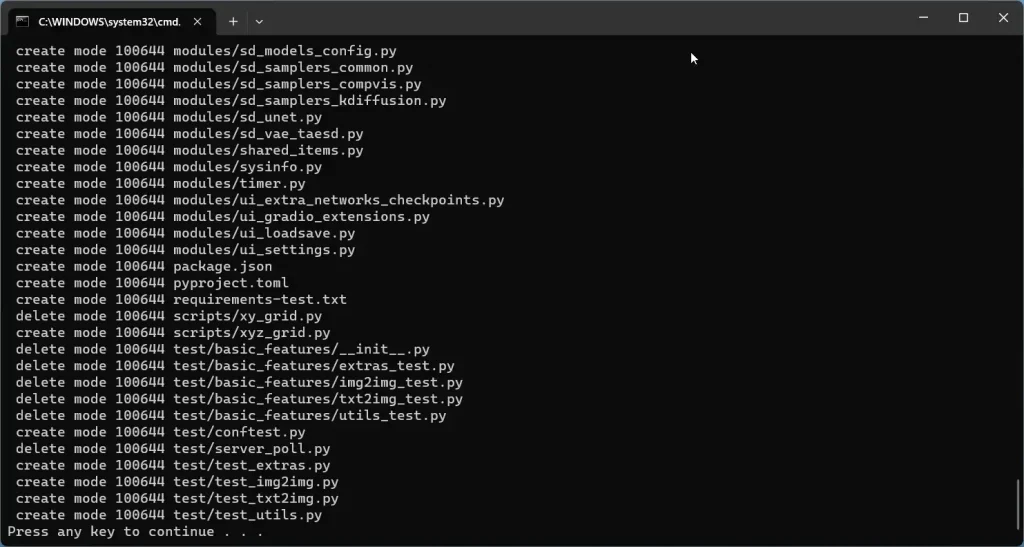
- Your newly created folder will populate with files that you need to run stable diffusion. It will take some time, so be patient.
Step 4: Download Stable Diffusion Model
You are almost ready to run stable diffusion locally. You just need to download the actual model file that will generate the ai images.
You can download Stable Diffusion 1.5 Model from Hugging Face.
Or, download the newer SDXL model, that’s much improved from the one above! Read more about installing Stable Diffusion XL 1.0 and some prompt ideas here.
- Download one of the two versions.
- Go to your new folder > stable-diffusion-webui > models > Stable-diffusion
- Move the downloaded Stable Diffusion model to the location above.
It might take some time, depending on your internet speed, but you are almost there!
You can also download other unique Stable Diffusion checkpoints that are pre-trained for different purposes. The best place to find new ai models is Civitai. All the models there are free to download and play with.
Step 5: Run Stable Diffusion
All your hard work has paid off, and you are ready to run Stable Diffusion!
- Go to your new folder > stable-diffusion-webui
- Find a file named “webui-user.bat”
- Run it
The first time you run it, the process will take 5-10 minutes to set everything up, so give it time. Afterward, it should only take a minute.
You will know when everything is done once you see a URL: Running on local URL: http://127.0.0.1:7860
Note: It’s ok if it looks like it’s not doing anything. Still, give it time (unless it has been way longer than expected).
Now, go to that URL in your browser and you will see the Automatic1111 user interface.
Now you can have some real fun!
If you are new:
- In the top left corner, you should see the model you downloaded, and that’s also where you can change your models.
- Check out Automatic1111 features guide to get started if you want.
- Learn about what makes a good prompt.
- Check out Automatic1111 extensions.
- There’s so much to learn and explore!
Note: don’t worry if your interface looks slightly different from mine, as I have installed different Automatic1111 extensions over time.
Updating Automatic1111
This software has a lot of passionate people working on it, so new cool features and improvements are constantly coming out. To access them, you will need to update it at some point.
You have two options: manual or automatic updates.
Manual updates will require you to check and install the updates. You can do it by going to the stable-diffusion-webui folder and running the “git pull” command.
This is a safer way since new updates can have bugs and might make you wait for the fix before you can enjoy ai image generation again. One time, I had to wait 2 days, which is not a big deal but worth keeping in mind.
Automatic updates are riskier for the reason mentioned above, but I still prefer them, as 99% of the time it works just fine, and I don’t have to think about it.
To set up automatic updates, find this file:
- Go to your new folder > stable-diffusion-webui
- Find a file named “webui-user.bat” (the one you launch the UI with)
- Right-click it and find the option to “Edit”
- Add “git pull” at the top for automatic updates.
- I also added “pause” to give me the time to read if there are any, but you can skip that part.
- Save and close the file.
And you are done. Never have to think about updates again.
Make Stable Diffusion Generate Faster
My stable diffusion automatic1111 was running somewhat slow before I made the hardware upgrades. I looked for a way to improve the speed and stumbled upon the concept of Xformers.
After I set it up, the speed of generation almost doubled!
To install stable diffusion Xformers:
- Edit your webui.bat file
- add –xformers
- set COMMANDLINE_ARGS= –xformers
Frequently Asked Questions
Can Stable Diffusion run on Mac?
Yes, Stable Diffusion can run on a Mac. You can use it with Automatic1111 or with tools like Draw Things, Diffusers or DiffusionBee. Check out this guide for more information.
Can Stable Diffusion run on AMD GPU?
Yes, you can run Stable Diffusion on an AMD GPU. You should, however, make sure that you have a model above the RX470 and 8GB or above.
Can Stable Diffusion run offline?
Stable Diffusion can run offline when installed locally. With all of the files downloaded and installed on your device, you won’t need the Internet to generate ai images.
Can Stable Diffusion use multiple GPUs?
No, Stable Diffusion can’t run on multiple GPUs at the moment. However, devs are working on it, and this section will be updated when the feature is available.
Can Stable Diffusion damage GPU?
Technically, any use of GPU reduces its lifespan in some manner. Running AI models won’t do considerable harm, just like normal usage or video games.
Can Stable Diffusion run without GPU?
Yes, you can run Stable Diffusion without a GPU by using your CPU instead. However, the generation is incredibly slow with this method. You can learn more about it here.
Where to try Stable diffusion?
To try the Stable Diffusion model before installing it locally, you can visit DreamStudio, the official web app for Stable Diffusion from Stability Ai.
Stable Diffusion web UI
A browser interface based on Gradio library for Stable Diffusion.

Features
Detailed feature showcase with images:
- Original txt2img and img2img modes
- One click install and run script (but you still must install python and git)
- Outpainting
- Inpainting
- Color Sketch
- Prompt Matrix
- Stable Diffusion Upscale
- Attention, specify parts of text that the model should pay more attention to
- a man in a
((tuxedo))— will pay more attention to tuxedo - a man in a
(tuxedo:1.21)— alternative syntax - select text and press
Ctrl+UporCtrl+Down(orCommand+UporCommand+Downif you’re on a MacOS) to automatically adjust attention to selected text (code contributed by anonymous user)
- a man in a
- Loopback, run img2img processing multiple times
- X/Y/Z plot, a way to draw a 3 dimensional plot of images with different parameters
- Textual Inversion
- have as many embeddings as you want and use any names you like for them
- use multiple embeddings with different numbers of vectors per token
- works with half precision floating point numbers
- train embeddings on 8GB (also reports of 6GB working)
- Extras tab with:
- GFPGAN, neural network that fixes faces
- CodeFormer, face restoration tool as an alternative to GFPGAN
- RealESRGAN, neural network upscaler
- ESRGAN, neural network upscaler with a lot of third party models
- SwinIR and Swin2SR (see here), neural network upscalers
- LDSR, Latent diffusion super resolution upscaling
- Resizing aspect ratio options
- Sampling method selection
- Adjust sampler eta values (noise multiplier)
- More advanced noise setting options
- Interrupt processing at any time
- 4GB video card support (also reports of 2GB working)
- Correct seeds for batches
- Live prompt token length validation
- Generation parameters
- parameters you used to generate images are saved with that image
- in PNG chunks for PNG, in EXIF for JPEG
- can drag the image to PNG info tab to restore generation parameters and automatically copy them into UI
- can be disabled in settings
- drag and drop an image/text-parameters to promptbox
- Read Generation Parameters Button, loads parameters in promptbox to UI
- Settings page
- Running arbitrary python code from UI (must run with
--allow-codeto enable) - Mouseover hints for most UI elements
- Possible to change defaults/mix/max/step values for UI elements via text config
- Tiling support, a checkbox to create images that can be tiled like textures
- Progress bar and live image generation preview
- Can use a separate neural network to produce previews with almost none VRAM or compute requirement
- Negative prompt, an extra text field that allows you to list what you don’t want to see in generated image
- Styles, a way to save part of prompt and easily apply them via dropdown later
- Variations, a way to generate same image but with tiny differences
- Seed resizing, a way to generate same image but at slightly different resolution
- CLIP interrogator, a button that tries to guess prompt from an image
- Prompt Editing, a way to change prompt mid-generation, say to start making a watermelon and switch to anime girl midway
- Batch Processing, process a group of files using img2img
- Img2img Alternative, reverse Euler method of cross attention control
- Highres Fix, a convenience option to produce high resolution pictures in one click without usual distortions
- Reloading checkpoints on the fly
- Checkpoint Merger, a tab that allows you to merge up to 3 checkpoints into one
- Custom scripts with many extensions from community
- Composable-Diffusion, a way to use multiple prompts at once
- separate prompts using uppercase
AND - also supports weights for prompts:
a cat :1.2 AND a dog AND a penguin :2.2
- separate prompts using uppercase
- No token limit for prompts (original stable diffusion lets you use up to 75 tokens)
- DeepDanbooru integration, creates danbooru style tags for anime prompts
- xformers, major speed increase for select cards: (add
--xformersto commandline args) - via extension: History tab: view, direct and delete images conveniently within the UI
- Generate forever option
- Training tab
- hypernetworks and embeddings options
- Preprocessing images: cropping, mirroring, autotagging using BLIP or deepdanbooru (for anime)
- Clip skip
- Hypernetworks
- Loras (same as Hypernetworks but more pretty)
- A separate UI where you can choose, with preview, which embeddings, hypernetworks or Loras to add to your prompt
- Can select to load a different VAE from settings screen
- Estimated completion time in progress bar
- API
- Support for dedicated inpainting model by RunwayML
- via extension: Aesthetic Gradients, a way to generate images with a specific aesthetic by using clip images embeds (implementation of https://github.com/vicgalle/stable-diffusion-aesthetic-gradients)
- Stable Diffusion 2.0 support — see wiki for instructions
- Alt-Diffusion support — see wiki for instructions
- Now without any bad letters!
- Load checkpoints in safetensors format
- Eased resolution restriction: generated image’s dimension must be a multiple of 8 rather than 64
- Now with a license!
- Reorder elements in the UI from settings screen
Installation and Running
Make sure the required dependencies are met and follow the instructions available for:
- NVidia (recommended)
- AMD GPUs.
- Intel CPUs, Intel GPUs (both integrated and discrete) (external wiki page)
Alternatively, use online services (like Google Colab):
- List of Online Services
Installation on Windows 10/11 with NVidia-GPUs using release package
- Download
sd.webui.zipfrom v1.0.0-pre and extract it’s contents. - Run
update.bat. - Run
run.bat.
For more details see Install-and-Run-on-NVidia-GPUs
Automatic Installation on Windows
- Install Python 3.10.6 (Newer version of Python does not support torch), checking «Add Python to PATH».
- Install git.
- Download the stable-diffusion-webui repository, for example by running
git clone https://github.com/AUTOMATIC1111/stable-diffusion-webui.git. - Run
webui-user.batfrom Windows Explorer as normal, non-administrator, user.
Automatic Installation on Linux
- Install the dependencies:
# Debian-based:
sudo apt install wget git python3 python3-venv libgl1 libglib2.0-0
# Red Hat-based:
sudo dnf install wget git python3
# Arch-based:
sudo pacman -S wget git python3
- Navigate to the directory you would like the webui to be installed and execute the following command:
wget -q https://raw.githubusercontent.com/AUTOMATIC1111/stable-diffusion-webui/master/webui.sh
- Run
webui.sh. - Check
webui-user.shfor options.
Installation on Apple Silicon
Find the instructions here.
Contributing
Here’s how to add code to this repo: Contributing
Documentation
The documentation was moved from this README over to the project’s wiki.
For the purposes of getting Google and other search engines to crawl the wiki, here’s a link to the (not for humans) crawlable wiki.
Credits
Licenses for borrowed code can be found in Settings -> Licenses screen, and also in html/licenses.html file.
- Stable Diffusion — https://github.com/CompVis/stable-diffusion, https://github.com/CompVis/taming-transformers
- k-diffusion — https://github.com/crowsonkb/k-diffusion.git
- GFPGAN — https://github.com/TencentARC/GFPGAN.git
- CodeFormer — https://github.com/sczhou/CodeFormer
- ESRGAN — https://github.com/xinntao/ESRGAN
- SwinIR — https://github.com/JingyunLiang/SwinIR
- Swin2SR — https://github.com/mv-lab/swin2sr
- LDSR — https://github.com/Hafiidz/latent-diffusion
- MiDaS — https://github.com/isl-org/MiDaS
- Ideas for optimizations — https://github.com/basujindal/stable-diffusion
- Cross Attention layer optimization — Doggettx — https://github.com/Doggettx/stable-diffusion, original idea for prompt editing.
- Cross Attention layer optimization — InvokeAI, lstein — https://github.com/invoke-ai/InvokeAI (originally http://github.com/lstein/stable-diffusion)
- Sub-quadratic Cross Attention layer optimization — Alex Birch (Birch-san/diffusers#1), Amin Rezaei (https://github.com/AminRezaei0x443/memory-efficient-attention)
- Textual Inversion — Rinon Gal — https://github.com/rinongal/textual_inversion (we’re not using his code, but we are using his ideas).
- Idea for SD upscale — https://github.com/jquesnelle/txt2imghd
- Noise generation for outpainting mk2 — https://github.com/parlance-zz/g-diffuser-bot
- CLIP interrogator idea and borrowing some code — https://github.com/pharmapsychotic/clip-interrogator
- Idea for Composable Diffusion — https://github.com/energy-based-model/Compositional-Visual-Generation-with-Composable-Diffusion-Models-PyTorch
- xformers — https://github.com/facebookresearch/xformers
- DeepDanbooru — interrogator for anime diffusers https://github.com/KichangKim/DeepDanbooru
- Sampling in float32 precision from a float16 UNet — marunine for the idea, Birch-san for the example Diffusers implementation (https://github.com/Birch-san/diffusers-play/tree/92feee6)
- Instruct pix2pix — Tim Brooks (star), Aleksander Holynski (star), Alexei A. Efros (no star) — https://github.com/timothybrooks/instruct-pix2pix
- Security advice — RyotaK
- UniPC sampler — Wenliang Zhao — https://github.com/wl-zhao/UniPC
- TAESD — Ollin Boer Bohan — https://github.com/madebyollin/taesd
- LyCORIS — KohakuBlueleaf
- Restart sampling — lambertae — https://github.com/Newbeeer/diffusion_restart_sampling
- Initial Gradio script — posted on 4chan by an Anonymous user. Thank you Anonymous user.
- (You)
AUTOMATIC1111’s Stable Diffusion WebUI is the most popular and feature-rich way to run Stable Diffusion on your own computer.
It has the largest community of any Stable Diffusion front-end, with almost 100k stars on its Github repo.
In this guide we’ll get you up and running with AUTOMATIC1111 so you can get to prompting with your model of choice.
At the end of this guide we’ll run through an example that produces this image with the Stable Diffusion V1.5 model that comes with the installation by default:

If your setup is working properly you’ll be able to recreate this image exactly.
This guide is for NVIDIA GPUs. Here’s the guide for AMD GPUs, for which there is no official support.
Requirements
You need to meet the following requirements.
- 16GB RAM
- NVIDIA (GTX 7xx or newer) GPU with at least 2GB VRAM
- Linux or Windows 7/8/10/11+
- At least 10GB disk space
One-click Method
This method will only work on Windows 10/11. For older versions of Windows, scroll down to the alternate method.
Step 1: Download
Download sd.webui.zip extract the zip file.
Step 2: Update
Open the extracted folder. Double click update.bat to update web UI to the latest version (if you get a security warning click the «Run Anyway» button). Close the windows when finished.
Step 3: Install
Double click the run.bat script to launch web UI, during the first launch.
The first time you launch this it will take a while to download all the necessary packages. This step will also download the Stable Diffusion v5.1 model.

After everything has been downloaded and installed correctly, you should see a message «Running on local URL: http://127.0.0.1:7860«.
Open your browser and go to the address in this success. For me it is http://127.0.0.1:7860 (yours may be different).
Alternate Method
Skip to the next section if your installation is working.
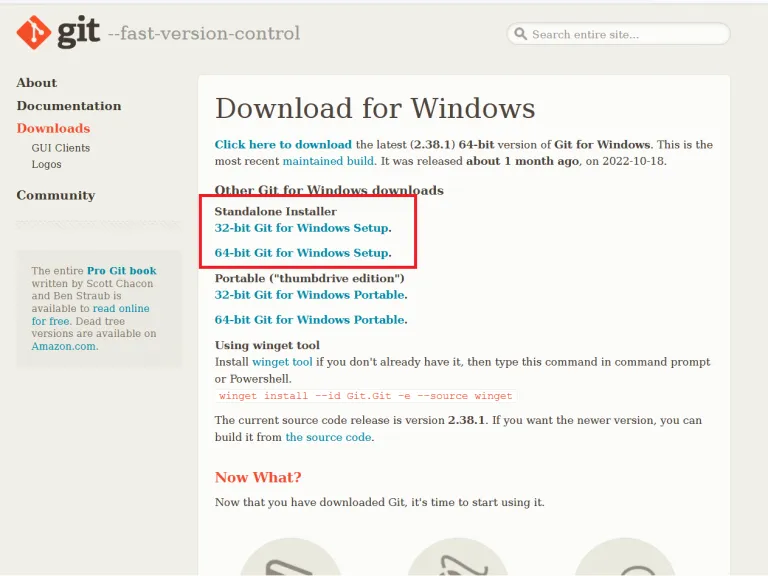
Step 1: Install Git
Go to the official Git website to download Git.
Get the Standalone Installer. Choose the appropriate Git installer for your Windows operating system.
Open the .exe you just downloaded. Click Next to accept the license.
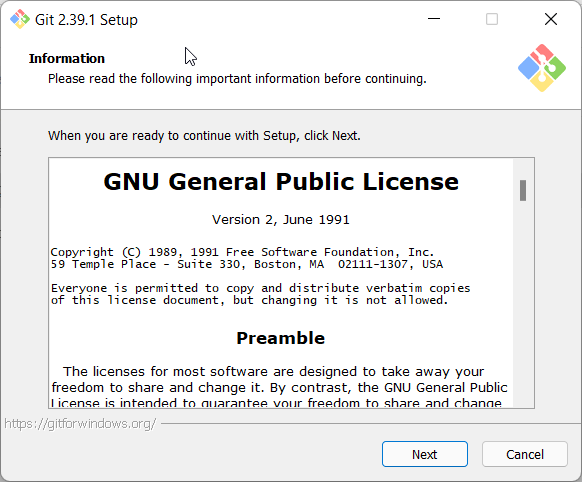
The default options are completely fine. Click Next.

You will be given many screens of options. The defaults are all fine. Click Next for all of them. Git will install.

Step 2: Install Python
Install Python from the official site. You want the latest version of 3.10. Make sure you choose the right version, 32-bit or 64-bit.
Important: In the installation wizard, make sure you check «Add python.exe to PATH«.

Step 3: Download Web UI
Press the Window keyboard key or click on the Windows icon (Start icon). Search for «Command Prompt» and click on the Command Prompt App when it appears.
You should see a line like this:
C:\Users\YOUR_USER_NAME
Use this command to move into folder:
cd FOLDER_NAMEUse this command to go back up a folder:
cd ..Use this command to list all folders within the folder you are in:
dirAs an example, I will install Stable Diffusion in my Documents folder. I would type this command:
cd documents
When you are in the folder you want to install Stable Diffusion in, copy and paste the following command:
git clone https://github.com/AUTOMATIC1111/stable-diffusion-webui.gitGive the Web UI some time to download:
After your download is complete, you’ll be able to see your new stable-diffusion-webui in the Windows Explorer:

Now to configure your VRAM settings. You may encounter «out of memory» errors if you do not do this correctly.
Check how much VRAM you have by typing «dxdiag» in the searchbar and clicking dxdiag, which is the DirectX Diagnostic Tool. Your VRAM will be listed under Display Memory in the Display (or Display 2) tab:

If you have >4GB of VRAM you do not need any additional options and can skip this part.
Open the stable-diffusion-webui folder you just downloaded. Find the file named webui-user.bat (Windows Batch File) and right click -> Edit (Windows 11: Right click -> Show more options -> Edit).
Add the command you need after the set COMMANDLINE_ARGS= line. For example:

--lowvram4GB of VRAM or less, you will need to use
--medvramMore than 4GB of VRAM, skip this part!
That’s all you have to do for the WebUI!
Run the WebUI
In the stable-diffusion-webui folder there is a file called ‘webui-user.bat’. Double click this:
It will take several minutes for the Web UI to install the required modules. This step will also download the Stable Diffusion v5.1 model.
When it is finished you will see the line: Running on local URL: http://127.0.0.1:7860.
Helpful Video
Common issues at this step:
RuntimeError: Couldn’t install torch.
Fix: Make you you have Python 3.10.x installed. Type python --version in your Command Prompt. If you have an older version of Python, you will need to uninstall it and re-install it from the Python website.
Fix #2: Your Python version is correct but you still get the same error? Delete the venv directory in stable-diffusion-webui and re-run webui-user.bat
Everything else works but I can’t go to the address
- Make sure you have not typed «
https://» by accident, the address always starts with «http://« - In this example my port address is
http://127.0.0.1:7860. - Your port address may be different. Please read the success message in your Command Prompt carefully for the correct address.
Testing Your First Prompt
Here’s what your interface will look like:
You’ll notice at the top there’s a toggle called “Stable Diffusion Checkpoint”.
You can use this to switch to any of the models you have placed in the stable-diffusion-webui/models/Stable-diffusion folder.
Check out this list of popular models and this list of popular anime models.
For our example, we’ll use Stable Diffusion v1.5. The filename is v1-5-pruned-emaonly.safetensors [6ce0161689].
Enter the prompt:
portrait of beautiful girl, brown hair, freckles, tshirt, professional lighting, indoor, artistic photographyNow enter the negative prompt:
lowres, bad anatomy, bad hands, text, error, missing fingers, extra digit, fewer digits, cropped, worst quality, low quality, normal quality, jpeg artifacts,signature, watermark, username, blurry, artist nameSet the height slider to 768 and keep the width at 512 to create a nicer aspect ratio more suitable for portraits.
Set the Seed to 3463 to make sure you’ll get the same result.
Then click Generate! Here’s what I get:
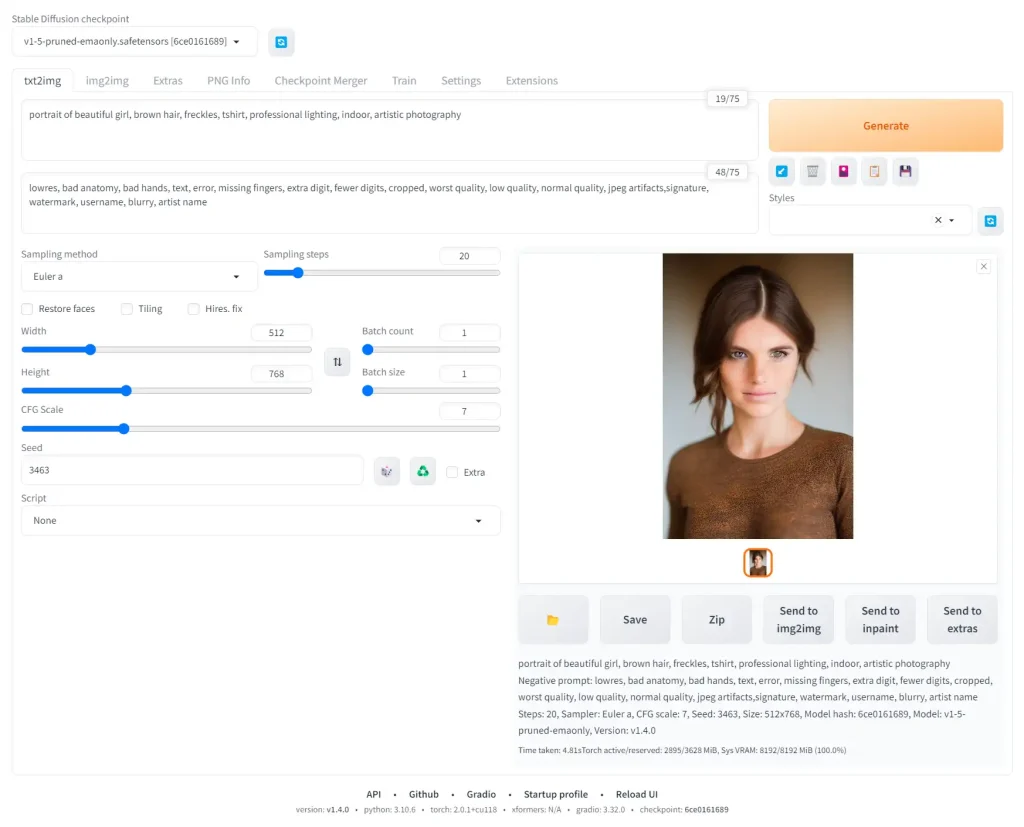

Keep in mind I am using the default sampler Euler a. You can play with these samplers to get an idea of what they do.
Check the official wiki for all the features that have been implemented in AUTOMATIC1111. Here’s an overview of these features with examples.
You can check out these basic prompts for where to get next:
- Stable Diffusion Prompting guide
I also highly recommend experimenting with popular models:
- list of most popular Stable Diffusion models
Next Steps
From here, the sky is the limit!
I recommend going through the rest of the Stable Diffusion for Beginners series: