![]()
Автор:
Обновлено: 01.06.2018
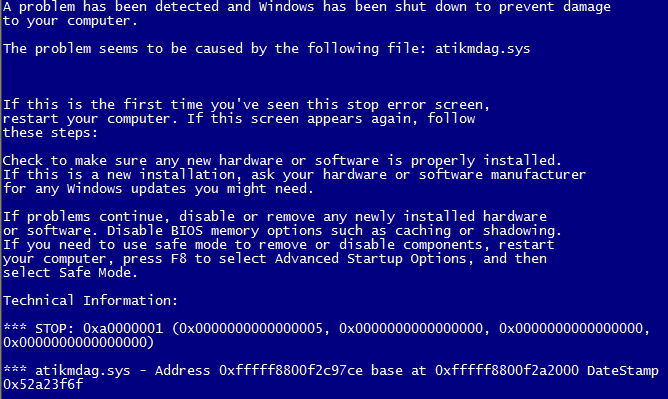
«Была обнаружена проблема, и Windows завершает работу, чтобы предотвратить повреждение вашего компьютера», код ошибки 0x00000116. Кажется, что проблема вызвана следующим файлом: Atikmdag.sys. Если у вас вылетает эта ошибка, то вы пришли по адресу. Мы поможем решить эту проблему с BSOD.
Пользователи Windows начали сообщать о возникновении ошибок atikmdag.sys BSOD (синий экран смерти), после обновления с Windows 7 или Windows 8 до ОС Windows 10. Эта ошибка BSOD не позволяет компьютерам Windows загружаться в обычном режиме.
Atikmdag.sys — это файл .sys, связанный с семейством видеокарт ATI Radeon, разработанным Advanced Mirco Devices, Inc. (AMD) для ОС Windows. Однако мы определили возможные причины проблемы BSOD atikmdag.sys, которые включают в себя:
- вирусная или вредоносная программа;
- поврежденные или старые драйверы устройств ATI Radeon;
- отсутствующие или поврежденные ключи реестра Windows;
- поврежденный жесткий диск.

Atikmdag sys синий экран Windows 10
Содержание
- Как исправить проблему atikmdag.sys 0x00000116 BSOD
- Решение 1. Запустите полное сканирование системы
- Решение 2. Починка реестра ПК
- Решение 3. Обновление ОС Windows
- Решение 4. Обновите драйверы ATI Radeon
- Видео — Как исправить ошибку BSOD atikmdag.sys
- Решение 5. Выполнить восстановление системы в безопасном режиме
- Решение 6. Запустите CHKDSK
- Решение 7. Чистая установка операционной системы Windows 10
- Решение 8. Замените оперативную память и/или жесткий диск
- Как проверить оперативную память (ram) на наличие ошибок
- Видео — Как узнать причину ошибки BSOD и исправить ее
Как исправить проблему atikmdag.sys 0x00000116 BSOD
Решение 1. Запустите полное сканирование системы
Вирусы и вредоносное ПО могут вызывать ошибку atikmdag.sys BSOD. Запустите полную проверку системы на своем ПК, чтобы удалить все возможные вирусы. Существуют и антивирусные программы сторонних производителей, которые вы можете использовать.
Мы настоятельно рекомендуем вам ознакомиться с лучшими антивирусными программами для вашего ПК с Windows, и установить их на свой компьютер.
Вы также можете использовать встроенный антивирус Windows – Защитник Windows. Вот как запустить полное сканирование системы в Windows 10:
- Откройте меню «Пуск», наберите на клавиатуре «Defender», дважды щелкните «Защитник Windows», чтобы запустить инструмент.

Открываем меню «Пуск», набираем на клавиатуре «Defender», дважды щелкаем «Защитник Windows»
- На левой панели выберите «Защита от вирусов и угроз».

На левой панели выбираем «Защита от вирусов и угроз»
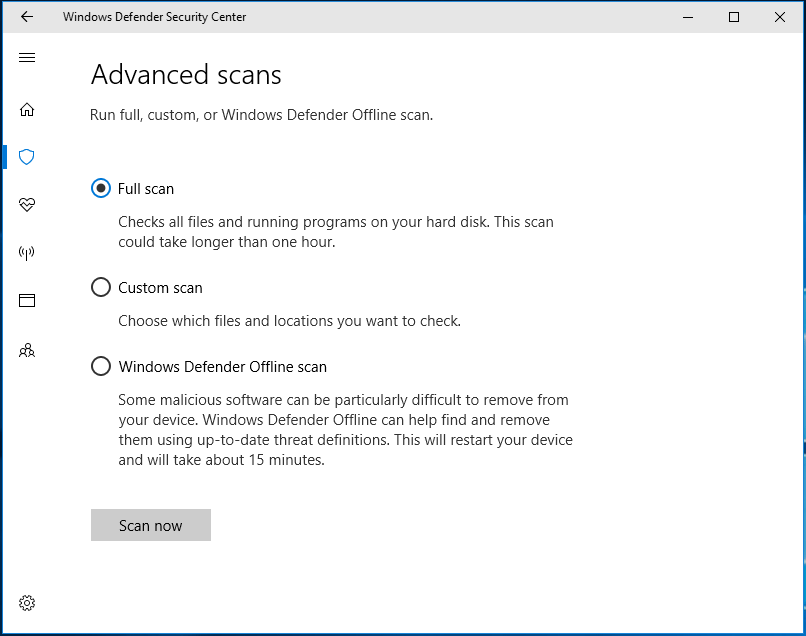
- В новом окне выберите опцию «Запустить новое расширенное сканирование».

В новом окне выбираем опцию «Запустить новое расширенное сканирование»
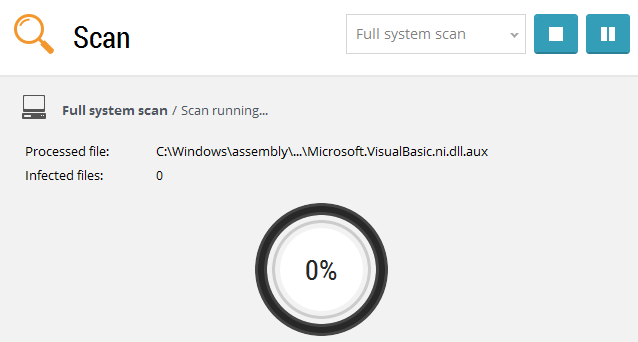
- Выберите «Полное сканирование», чтобы запустить полное сканирование вредоносных программ.

Выбираем «Полное сканирование», нажимаем «Выполнить сканирование сейчас»


Примечание! Если вы закончили сканирование своего ПК, и Защитник Windows обнаружил угрозы, рекомендуется удалить все обнаруженные вирусы.
Решение 2. Починка реестра ПК
Самый простой способ восстановить реестр Windows — использовать специальный инструмент, такой как CCleaner. Кроме того, вы также можете использовать Microsoft System File Checker, чтобы проверить повреждение системного файла.
Программа проверяет целостность всех системных файлов и восстанавливает файлы, если это возможно. Вот как запустить проверку SFC во всех версиях Windows:
- Перейдите в меню «Пуск», наберите на клавиатуре «cmd», щелкните правой кнопкой мыши «Командная строка», «Запуск от имени администратора».

Переходим в меню «Пуск», набираем на клавиатуре «cmd», щелкаем правой кнопкой мыши «Командная строка», выбираем «Запуск от имени администратора»
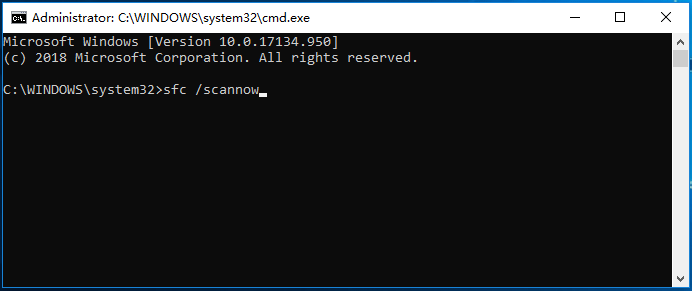
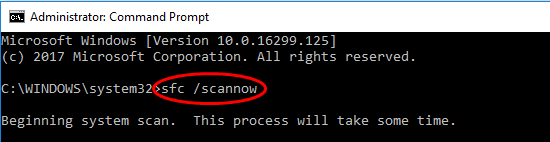
- Теперь введите команду «sfc /scannow» в консоль Windows.

Вводим команду «sfc /scannow» в консоль Windows, нажимаем «Enter»


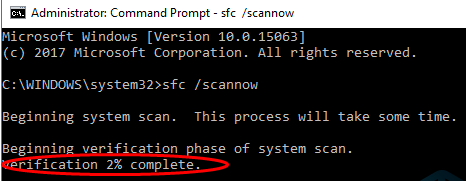
Примечание! Дождитесь завершения процесса сканирования, и только после этого перезагрузите компьютер. Все поврежденные файлы будут исправлены при перезагрузке.
Решение 3. Обновление ОС Windows
Кроме того, вы можете исправить проблему ошибки atikmdag.sys 0x00000116 BSOD, обновив ОС Windows 10 до последней версии. Microsoft постоянно выпускает обновления для Windows, чтобы улучшить стабильность системы и устранить различные проблемы и ошибки, связанные с ошибкой запуска.
Вы можете выполнить следующие действия для обновления ОС Windows 10:
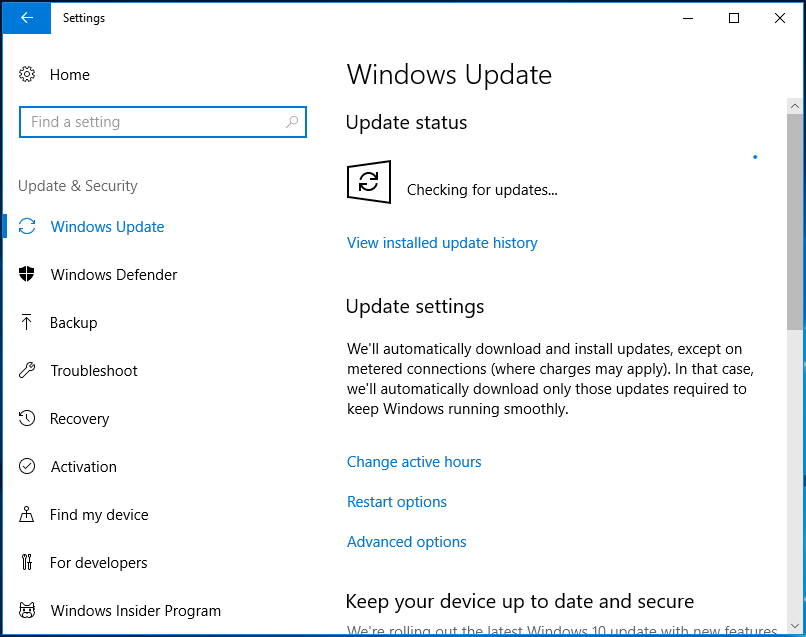
- Перейдите в «Пуск», введите «update» в поле поиска, а затем нажмите «Проверить наличие обновлений», чтобы продолжить.

Переходим в «Пуск», вводим «update» в поле поиска, затем нажимаем «Проверить наличие обновлений»
- В окне Windows Update проверьте наличие обновлений и установите доступные обновления.

Нажимаем на ссылку «Проверка наличия обновлений»
- По завершении обновления перезагрузите компьютер.


Примечание! Не выключайте компьютер во время установки обновлений Windows.
Решение 4. Обновите драйверы ATI Radeon
Устаревшие или старые версии драйверов устройств семейства ATI Radeon могут, вероятно, отвечать за проблему BSOD atikmdag.sys. Вы можете обновить графический драйвер своего ПК, выполнив следующие действия:
- Откройте браузер и перейдите на сайт https://support.amd.com/en-us/download.

Переходим на официальный сайт разработчика AMD
- Выберите окно «Find your driver» и щелкните по нему левой кнопкой мыши.

Выбираем окно «Find your driver» и щелкаем по нему левой кнопкой мыши
- Выберите тип вашей видеокарты, серию и модель. Также выберите вашу операционную систему и её разрядность, затем нажмите «Display results».

Выбираем в полях тип видеокарты, серию и модель, операционную систему и её разрядность, затем нажимаем «Display results»
- Нажмите «Download», чтобы загрузить драйвер для вашей видеокарты ATI Radeon.

Нажимаем «Download»
- Дважды щелкните по загруженному файлу, в появившемся окне нажмите «Установить», дождитесь завершения установки и перезагрузите ваш компьютер.

Нажимаем «Install» («Установить»)


Видео — Как исправить ошибку BSOD atikmdag.sys
Решение 5. Выполнить восстановление системы в безопасном режиме
Запуск восстановления системы также может устранить проблему с ошибкой «0x00000116» на вашем ПК с ОС Windows. Безопасный режим — это режим диагностики в Windows, который запускает ваш компьютер только с базовыми файлами и драйверами. Однако вы можете выполнить восстановление системы в безопасном режиме, чтобы вернуться к определенной точке восстановления в вашей системе. Вот как это сделать:
- Выключите свой компьютер и включите его снова.
- Во время загрузки нажмите клавишу F8, чтобы перейти к опциям загрузки Windows, выберите «Безопасный режим» и нажмите «Enter».

Выбираем «Безопасный режим» и нажимаем «Enter»
- После загрузки системы перейдите в меню «Пуск», наберите на клавиатуре «restore», выберите «Вернуть компьютер в исходное состояние» и нажмите «Enter».

В меню «Пуск», набираем на клавиатуре «restore», выбираем «Вернуть компьютер в исходное состояние», нажимаем «Enter»
- Нажмите «Начать».

Нажимаем «Начать»
- Выберите вариант «Сохранить мой файлы». Дождитесь пока завершится процесс подготовки.

Нажимаем «Сохранить мои файлы»
- Прочитайте информацию, нажмите «Далее».

Нажимаем «Далее»
- В окне «Предупреждение» нажмите «Далее».

Нажимаем кнопку «Далее»
- Нажмите на кнопку «Сброс».

Нажимаем «Сброс»


Решение 6. Запустите CHKDSK
В качестве альтернативы, если описанные выше методы не решили проблему atikmdag.sys с кодом ошибки «0x00000116», вы можете запустить CHKDSK на своем ПК, чтобы устранить проблему. Этап требует использования командной строки. Вот как это сделать:
- Выключите свой компьютер и включите его снова.
- Во время загрузки нажмите клавишу F8, чтобы перейти к опциям загрузки Windows, выберите «Безопасный режим с поддержкой командной строки» и нажмите «Enter».
Выбираем «Безопасный режим с поддержкой командной строки» и нажимаем «Enter»
- После запуска Windows 10 в безопасной режиме, нажмите «Пуск», наберите на клавиатуре «cmd», выберите «Командная строка», щелкните правой кнопкой мыши и нажмите «Запустить от имени администратора».
Переходим в меню «Пуск», набираем на клавиатуре «cmd», щелкаем правой кнопкой мыши «Командная строка», выбираем «Запуск от имени администратора»
- Последовательно введите «CHKDSK C: /F» без кавычек в командной строке. Затем введите «CHKDSK C: /R» без кавычек в «Командной строке» и нажмите клавишу «Ввод».

Последовательно вводим команды «CHKDSK C: /F», затем вводим «CHKDSK C: / R», после каждой команды нажимаем «Enter»
- После завершения процесса перезагрузите ваш компьютер.


Решение 7. Чистая установка операционной системы Windows 10

Одним из решений проблемы atikmdag.sys является переустановка системы Виндовс
Другим способом устранения этой проблемы является выполнение чистой установки системы Windows на вашем ПК. Однако этот метод очистит все предварительно установленные приложения, файлы и папки, но, возможно, он решит проблему atikmdag.sys.
Решение 8. Замените оперативную память и/или жесткий диск
Если вы не можете решить проблему с ошибкой 0x00000116, используя какие-либо исправления выше (что маловероятно), существует вероятность того, что оперативная память и жесткий диск вашей системы неисправны. Вы можете отключить свой жесткий диск, подключить его к другому компьютеру для доступа к файлам и папкам на ПК; это позволит вам создавать резервные копии важных файлов для обеспечения их сохранности.

На появление синего экрана может влиять неисправность жесткого диска или оперативной памяти
Если другой компьютер не может идентифицировать и получить доступ к вашему жесткому диску, вам обязательно нужно заменить его на новый. Но если вы можете получить доступ к жесткому диску на новом ПК, вам следует заменить оперативную память, потому что, скорее всего, это и есть неисправный компонент.
Примечание! Замена комплектующих – это самый крайний метод, убедитесь, что вы использовали все описанные методы устранения ошибки atikmpag.sys.
Как проверить оперативную память (ram) на наличие ошибок
В операционной системе начиная с Windows 7 есть встроенная утилита с помощью, которой можно проверить вашу оперативную память на наличие ошибок.
Для этого:
- Откройте меню «Пуск», в поле для поиска введите слово «проверка», из показанного результата щелкните на «Средство проверки памяти Windows».

В меню «Пуск», в поле для поиска вводим слово «проверка», из показанного результата щелкаем на «Средство проверки памяти Windows»
- Выберите пункт «Выполнить перезагрузку и проверку», который рекомендует утилита.

Выбираем пункт «Выполнить перезагрузку и проверку»
- Ожидайте пока процесс проверки закончится и компьютер перезагрузится автоматически.

Процесс диагностики оперативной памяти на ошибки
- Во время проверки есть возможность изменить параметры, нажав на клавишу «F1» и выбрать из трех предложенных вариантов подходящий. Для продолжения проверки нажмите F10 и ожидайте завершения процесса.
Нажимаем на клавишу «F1», выбираем с помощью стрелок подходящий вариант проверки, нажимаем «F10»


Важно! Если результат после загрузки появится и быстро исчезнет вы можете зайти в «Просмотр событий» через меню «Пуск» и открыть в папке «Журналы Windows» в пункте «Система» сведения о проверки памяти двойным кликом левой кнопкой мыши.

В меню «Пуск» вводим «просмотр событий», открываем соответствующий результат

Щелкаем дважды левой кнопкой мыши на папку «Журналы Windows», затем «Система», далее находим «Сведения» о проверки памяти
Читайте несколько правильных способов в статье — «Как проверить компьютер на работоспособность».
Видео — Как узнать причину ошибки BSOD и исправить ее
Рекомендуем похожие статьи
Чаще всего синий экран с ошибкой atikmdag sys возникает из-за некорректно установленного или поврежденного драйвера видеокарты AMD/ATI Radeon. И в большинстве случаев переустановка или обновление помогает решить проблему, однако тут не все так однозначно и просто, могут иметь место быть и другие проблемы.

Ознакомьтесь с аналогичным сбоем «atikmpag sys«, возможно некоторые способы решения будут кстати.
Давайте затронем данную тему более подробно и попробуем самостоятельно все исправить.
Содержание статьи
- Удаление установленных драйверов
- Установка свежих драйверов
- Появление синего экрана после обновления
- Замена файла
- Ошибка atikmdag.sys с кодом 0x0000003
- Отключаем функцию быстрого запуска
- Другие виды ошибок и общие способы их устранения
- Комментарии пользователей
Удаление установленных драйверов
В первую очередь я предлагаю удалить уже установленные драйвера. Делать это я рекомендую используя утилиту Display Driver Uninstaller. Главное ее преимущество в том, что она полностью удаляет драйвера из системы, подчищая все хвосты (оставшиеся папки и записи в реестре). Работает на всех ОС, включая Windows 7, 8, 10.
Только полное удаление может гарантировать эффективность новой установки.
Перед тем как приступать к процедуре удаления, скачайте свежую версию драйверов. Найти их можно на сайте производителя. Заходите, выбираете свою модель видеокарты, выбираете свою версию Windows и скачиваете.
Итак, приступим:
- Программа бесплатная, не требует установки. Поэтому загружаем ее с официального сайта и запускаем.
- Очень важно все действия проводить из безопасного режима. Иначе вы можете словить черный экран или другие ошибки. Поэтому загружаемся с него и двигаемся далее.
- Запускаем утилиту, выбираем производителя видеокарты, для удобства устанавливаем «Русский язык» и щелкаем по кнопке «Удалить и перезагрузить».

- Программа в автоматическом режиме начнет искать и удалять все остатки.

Дождитесь окончания процесса деинсталляции, перезагрузите компьютер и заново войдите в безопасный режим.
Если по каким-либо причинам, данная утилита вам не подошла, есть и другие похожие аналоги, например, Revo Uninstaller, Your Uninstaller и другие. Можете использовать их.
Установка свежих драйверов
После того, как удаление было успешно завершено, можно начинать чистую установку.
У вас уже должны быть скачаны последние версии софта.
На самом деле здесь все просто, пожалуй, единственное правило, особенно оно касается новичков: устанавливайте все в автоматическом режиме, отметив галочками все пункты, которая предлагает нам программа.
Более подробно:
- После запуска установщика, нам будет предложено 2 варианта установки: «Экспресс» и «Выборочная». Если у вас нет должного опыта и необходимых знаний, выбирайте первый.


Дожидаемся окончания процедуры, перезагружаем ПК и запускаем уже в обычном режиме.
Если вы все сделали правильно, согласно инструкции, то синий экран (BSOD) с ошибкой atikmdag sys будет устранен.
Появление синего экрана после обновления
Еще редко синий экран появляется после обновления Windows или драйверов на видеокарту. В обоих случаях может помочь откат системы до рабочего состояния.
Во втором случае, можно сделать еще следующее:
- В диспетчере устройств перейти во вкладку «Видеоадаптеры» и правой мышкой щелкнуть по своей графической плате, далее нажать «Свойства».

- Перейти в раздел «Драйвер» и щелкнуть «Откатить».

- Необходимо подтвердить действие.


После завершения процедуры не забудьте перезагрузить компьютер.
Если проблема была в этом, то синий экран больше не появится.
Замена файла
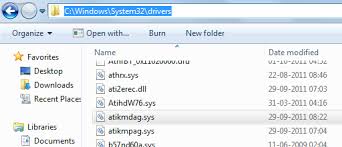
Дело в том, что при установки свежего софта для видеокарты, прежняя версия файла atikmdag.sys перемещается в директорию «System32\Drivers», в следствии чего Windows использует старую версию, а новая остается незадействованной. Из-за этого и появляется синий экран.
Так что давайте попробуем исправить BSOD ошибку atikmdag sys путем замены старого файла на новый.
Для этого:
- Скачайте и установите свежие драйвера на видеоплату.
- Затем перейдите в раздел с установленной ОС, обычно это «C» диск. Далее в папку «Windows / System32 / Drivers», найдите файл atikmdag.sys и задайте ему новое имя Atikmdag.sys.old.

- Теперь заходим на диск «С», открываем папку «ATI», находим файл Atikmdag.sy_ и копируем его на рабочий стол.
- Открываем командную строку. Как это сделать в Windows 10 читайте здесь. Некоторые из рассмотренных способов универсальны и подходят даже для Windows XP,7,8.
- Вводим следующее: chdir Desktop и жмем «Enter».

- Теперь выполняем процедуру замены, введя команду EXPAND.EXE atikmdag.sy_ atikmdag.sys и нажав «Enter».

- Копируем новую версию файла с рабочего стола в папку «Drivers» и перезагружаем ПК.


Синий экран появляться больше не должен.
Ошибка atikmdag.sys с кодом 0x0000003
Чаще всего синий экран со stop ошибкой 0x0000003 говорит уже о другой проблеме, а именно конфликты в работе с драйвером Win32k.sys .
Как правило проблема исправляется достаточно легко, нужно лишь скачать официальный патч от Microsoft. Найти его можно здесь. Перед его установкой не забудьте включить автоматическое обновление.
Отключаем функцию быстрого запуска
Также синий экран может появляться только при определенных обстоятельствах, например, при выходе из режима сна, то тут может помочь изменение настроек запуска.
Перед тем как перейти к конкретным действиям, убедитесь, что вы зашли в систему как администратор.
Для того чтобы изменить настройки, необходимо:
- Щелкнуть по пуску, в строку поиска ввести «Электропитание» и перейти в необходимый раздел.
- В меню слева щелкаем по «Действия кнопок» и заходим внутрь настроек.

- В верхней части окна нажимаем «Изменение параметров».

- Убираем галочку с пункта быстрого запуска и нажимаем «Сохранить».


Перезагружаем систему.
Другие виды ошибок и общие способы их устранения
Бывают и другие типы ошибок, связанные с файлом atikmdag.sys с которыми вы можете столкнуться. Например, пользователи Windows 8/10 очень часто видят синий экран с ошибкой system service exception. Она указывает на проблемы в драйвере видеокарты, и исправляется путем их переустановки, о чем мы говорили в начале статьи.
Итак, мы рассмотрели основные виды неисправностей, связанные с конкретным файлом, однако могут место быть и другие проблемы:
- Неисправность жесткого диска, ошибки в системных файлах, блока питания, ОЗУ, материнской платы или самой видеокарты.
- Вредоносное ПО, вирусы. Даже если у вас установлен антивирус, проверьте компьютер дополнительно другими способами. А если антивируса нет, то рекомендуем его поставить, пускай это будет даже бесплатный вариант.
- Обновления Windows. Например, из-за обновления KB4056891 очень часто вылетает ошибка system thread exception not handled. Исправить ее можно только удалив данное обновление.
Конечно, причин может быть много, я лишь рассказал о наиболее распространенных из них.
Кстати, очень многие рекомендуют использовать программу DLL Suite для исправления системных файлов. На этот счет я не могу дать однозначный ответ, в некоторых случаях, возможно она помогает, но чаще всего после ее использования становится все больше ошибок. Использовать ее или нет, решать только вам.
What is atikmdag.sys? What causes atikmdag.sys BSoD? How can you fix the atikmdag.sys blue screen in Windows 10/8/7? After reading this post written by MiniTool Solution, you will know the answers to these questions. If you are bothered by the blue screen of death, try to fix it now!
Windows blue screen of death (BSoD) is a nightmare for many Windows users and nobody wants to experience it. However, it is not ineluctable and always appears unexpectedly, preventing the system from booting. Also, it is known as a stop error. Among many blue screen errors, atikmdag.sys BSoD is a common issue that especially occurs in Windows 11/10/8/7.
What Is Atikmdag.sys Blue Screen?
When reading here, you may ask what atikmdag.sys is. Atikmdag.sys is a system driver file that allows hardware components like a graphics card to communicate with software. Atikmdag stands for ATI Radeon Kernel Mode Driver Package. This file is pretty essential. Once it is damaged, the atikmdag.sys error happens.
In Windows 7, atikmdag.sys blue screen usually happens on startup or while using an application. Windows crashes suddenly, saying “A problem has been detected and Windows has been shut down to prevent damage to your computer. The problem seems to be caused by the following file: atikmdag.sys”.
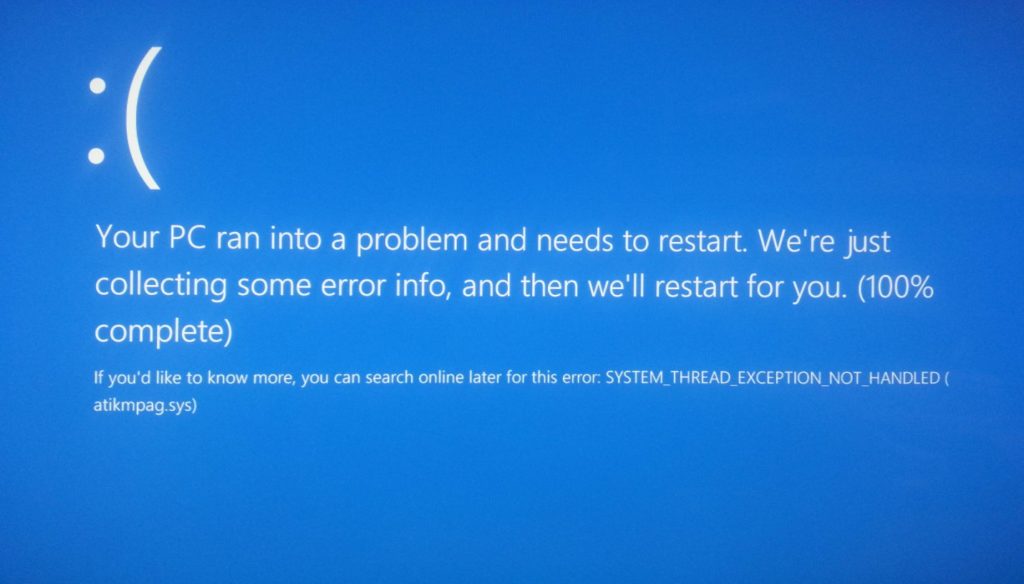
If you upgrade Windows 7 or Windows 8 to Windows 10, the BSoD error stops Windows from booting and you may receive the error message “Your PC ran into a problem and needs to restart”. Usually, an error code is next to atikmdag.sys, for PAGE_FAULT_IN_NONPAGED_AREA, VIDEO_TDR_FAILURE, SYSTEM_THREAD_EXCEPTION_NOT_HANDLED, DRIVER_IRQL_NOT_LESS_OR_EQUAl, etc.
Well then, how can you fix atikmdag.sys blue screen of death? Multiple methods are offered to you and you should try them one by one to resolve the issue.
How to Fix Atikmdag.sys BSoD Windows 10/8/7/11
Usually, when the atikmdag.sys error happens, Windows can still boot to the desktop. The following operations are based on this situation. If you cannot boot the system normally, you may need to go to WinRE (Windows Recovery Environment) or safe mode to perform some fixes.
Note: The following fixes except fix 5 can be applied to safe mode. If the blue screen lets your Windows fail to enter the desktop, you should go to safe mode with networking and perform these fixes.
Fix 1: Perform a Full System Scan for Malware
The viruses and malware infection may corrupt the atikmdag.sys file, causing the blue screen error. Thus, we strongly recommend you to conduct a full system scan to remove possible virus corruption.
To do this work in Windows 10/11, you can use the snap-in antivirus program, Windows Defender.
- Go to Settings > Update & Security.
- Click Windows Defender and open Windows Defender security center.
- Click Virus & threat protection, go to Advanced scan, choose Full scan and click Scan now.
Tip: This article – Free Ways to Schedule a Scan in Windows Defender Antivirus is helpful for you if you want to let Windows Defender scan your system regularly.
If you are using an antivirus program in Windows 11/10/8/7, just launch it and run a full system scan on your PC. This way could be helpful to fix the atikmdag.sys issue. If it doesn’t work, try the next solution.
Fix 2: Update Windows System
Microsoft always keeps issuing Windows updates to improve system stability and reliability. If you encounter the atikmdag.sys BSoD error in Windows 11/10/8/7, you can try upgrading the system to the latest version. This could be helpful to fix your issue at times.
Here is how to update Windows 10:
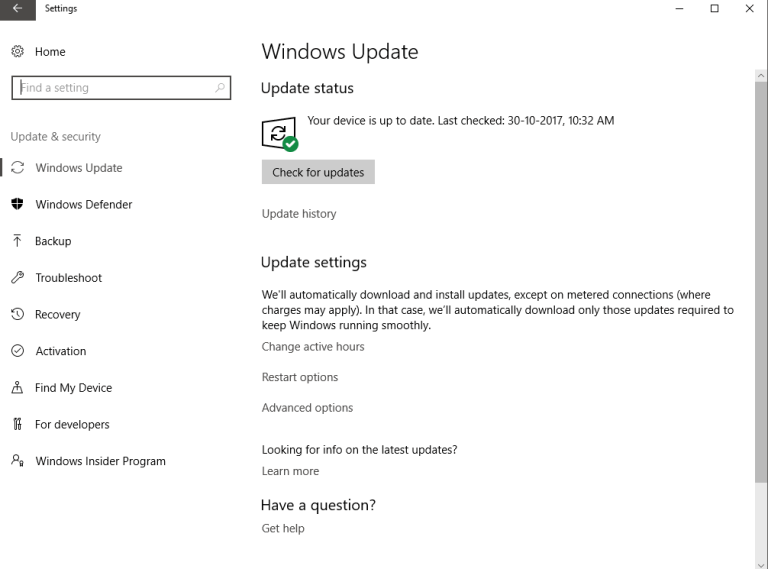
- Navigate to Settings > Update & Security to the Windows Update page.
- Then Windows is checking for updates.
If some available updates are checked, Windows will download and install them automatically. Restart your PC and finish the installation.
Fix 3: Update ATI/AMD Radeon Drivers
Obsolete or corrupted ATI Radeon family device drivers could be one of the chief culprits behind the error like atikmdag.sys PAGE_FAULT_IN_NONPAGED_AREA, atikmdag.sys SYSTEM_ THREAD_EXCEPTION_NOT_HANDLED, etc.
To help you out, you should follow these steps to update your graphics driver:
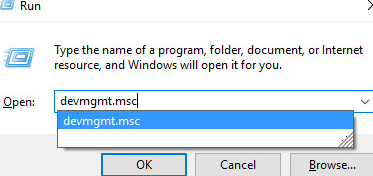
- In Windows 11/10/8/7, bring up the Run window by hitting Win + R.
- Type devmgmt.msc and click OK to go to Device Manager.
- Under the Display Adapters category, right-click your graphics card and choose Update driver.
- Follow the prompts to apply the update. Then, reboot the system.

Alternatively, here is another way you can update the Radeon driver: go to the AMD website, download and install the latest video card driver for your PC’s model.
Tip: Additionally, you can choose to uninstall recent installations related to ATI or AMD Radeon drivers to eradicate the issue since the recent installation is likely the reason for the blue screen. So, click Uninstall device from the context menu to remove it. Then, get the latest driver and reinstall it on your PC.
Fix 4: Run System File Checker
The blue screen of death may be relevant to the Windows registry since the registry contains critical files that can keep the system running properly. If Windows Registry gets corrupted, you may be bothered by atikmdag.sys BSoD. So, running System File Checker can be helpful to scan the system and repair corrupted files.
1. Go to the search box, input cmd and run Command Prompt with administrative rights.
2. Use the command – sfc /scannow to scan your system.
3. This process will take some time. Wait until the verification completes 100%.
4. After the operation, you can reboot your PC.
Fix 5: Perform a System Restore
In Windows, there is an option for you to restore the PC to a time point and undo recent changes. It is System Restore.
Some unknown changes performed on your computer lately may lead to PAGE_FAULT_IN_NONPAGED_AREA, VIDEO_TDR_FAILURE, DRIVER_IRQL_NOT_LESS_OR_EQUAl (atikmdag.sys) BSoD error.
If you have a system restore point before, you can use it to fix your issue and restore critical files.
Tip: If your Windows fails to boot, you should perform a system restore in WinRE by clicking System Restore in the Advanced options page.
Follow the guide below:
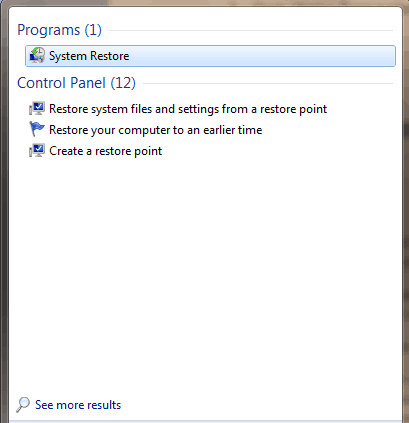
- Input create a system restore point to the search box in Windows 10/8/7 and click the result to the System Properties window.
- Click the System Restore button.
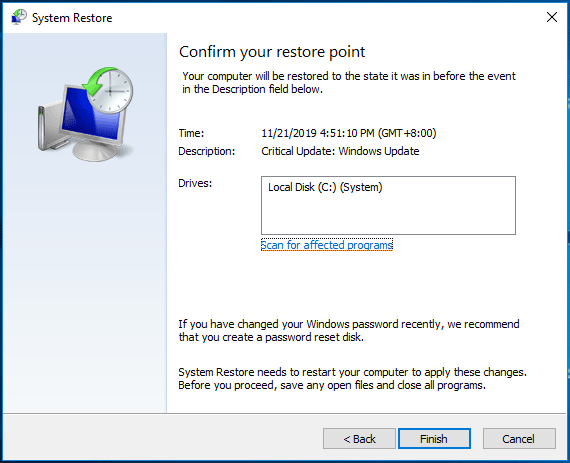
- Choose a restore point that you have created and confirm the operation by clicking Finish.
- Follow the on-screen instructions to complete the restoration operation.
Tip: If you need to learn much information on a system restore point, refer to this post – What Is System Restore Point and How to Create It? Solutions Are Here!
If you don’t have a restore point, of course, this method couldn’t help you and you need to go to the next fix.
Fix 6: Check Your Hard Drive
If there is something wrong with the hard drive, the atikmdag.sys BSoD stop error may come out of the blue no matter you are using Windows 7, Windows 8 or Windows 10/11. Here, you should check for hard drive corruption to fix the problem.
Let’s go through how to do that:
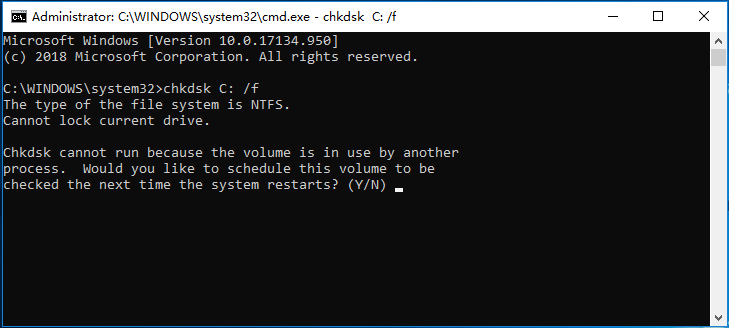
- Similarly, open Command Prompt as Administrator.
- Input chkdsk C: /f and chkdsk C: /r. Press Enter after each command.
- If Windows asks you to schedule the check the next time the system restarts, input Y. Then, reboot your PC to perform the check.
Fix 7: Perform Windows Clean Install
Here is another way for the atikmdag.sys blue screen fix and it is performing a clean install of Windows 11/10/8/7. This method will clear all installed apps and some files stored on the system drive but it is effective to resolve Windows atikmgas.sys BSoD error.
Back up Files before a Clean Install
As mentioned above, data will get lost after you reinstall the Windows system, thus, we strongly recommend you to back up your important files or folders first of all. To do this job, you can use the professional Windows backup software, MiniTool ShadowMaker. Just download MiniTool ShadowMaker Trial Edition from the download button and install it on your PC.
MiniTool ShadowMaker TrialClick to Download100%Clean & Safe
Tip: If your PC is unbootable, you need to create a bootable disc or USB flash drive with Media Builder in this backup software. And then, boot the PC from the device to start a file backup. This post – How to Back up Data without Booting Windows shows you much information
If Windows can boot, now follow these steps to back up files.
1. Run MiniTool ShadowMaker.
2. In Backup, go to Source to choose files that you want to back up.
3. Go to Destination to choose a storage path for backed-up files.
4. Click Back up Now to perform the backup task at once.

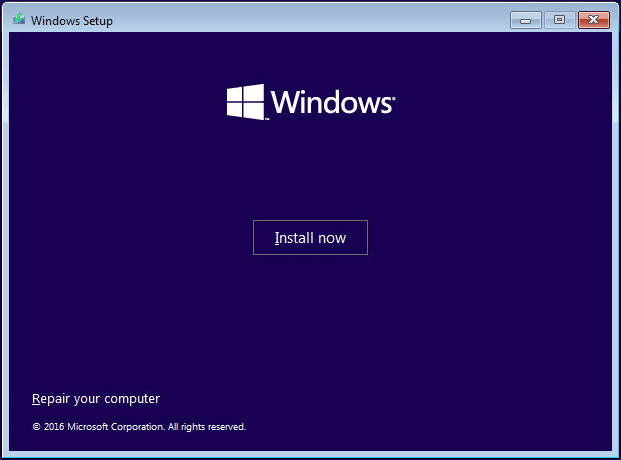
Clean Install
After file backup, now perform the clean install of Windows 11/10/8/7. To do this work, you need to go to the download website, choose one Windows version to the corresponding download page and follow the on-screen instructions to create an installation disc or USB flash drive so that you can install a new copy of Windows from the media.
Fix 8: Change RAM
If all of these solutions are not working to fix the issue of atikmdag.sys BSoD Windows 7/8/10, perhaps the RAM gets damaged or corrupted. You can have a check with Windows Memory Diagnostics Tool or Memtest86. If errors are found, replace the bad RAM with a new one.
Tip: This post – How to Tell If RAM Is Bad? 8 Bad RAM Symptoms Are for You shows some signs of dead RAM, as well as how to check RAM and you may be interested in it.
Here are 8 methods to fix atikmdag.sys Windows 10/8/7/11. If you are encountering this blue screen of death stop error, just try them and you should easily fix it. Also, you can share them on Twitter to help more people who are struggling with the blue screen.
Click to Tweet
Back up Your Windows OS
After finishing the BSoD error fix, we recommend you to create a system image for your Windows operating system. Blue screen issues always appear unexpectedly, letting you not use the PC properly and making you very annoyed.
If you have a system backup, you can easily restore the computer to an earlier state without taking much time to fix the atikmdag.sys blue screen.
Note: System image recovery couldn’t fix the stop error caused by RAM issues but it can fix the issues caused by software problems. In most cases, atikmdag.sys BSoD happens due to software issues. So, backup is necessary.
How can you back up your Windows system? MiniTool ShadowMaker is still helpful. System backup and recovery, file/disk/partition backup and recovery are supported by this backup software. When getting a blue screen, boot the PC from a created bootable disc or flash drive and perform a faster recovery.
If you need to restore the image to a different computer with dissimilar hardware, Universal Restore can fix the incompatibility issue to ensure the PC boots normally.
Now, get MiniTool ShadowMaker Trial Edition (30-day free trial). To back up your PC all the time, get its Pro Edition from the store website.
MiniTool ShadowMaker TrialClick to Download100%Clean & Safe
Here is a guide on system backup:
- Run MiniTool ShadowMaker to its Backup page.
- You find system related partitions are selected by default. And you need to choose an external hard drive, USB drive, SSD, etc. to save the created system image file.
- Start the system backup by hitting Back up Now.

Bottom Line
Here is the end of this post. After reading it, you clearly know what atikmdag.sys blue screen is, how to get rid of this BSoD stop error and how to protect your PC. Now, it is time to follow these solutions if you have this blue screen and create a system backup.
When meeting some questions while using MiniTool software or if you have any suggestions, remember to let us know. Writing an email to [email protected] or leaving your idea in the Comment part is up to you.
You are here: Home / Gaming / How to Fix Atikmdag.sys BSOD Error on Windows 10, 8 and 7
BSOD errors are the most annoying errors that Windows users face. Among these errors is Atikmdag.sys error is a common issue that causes a Blue Screen of Death specially among Windows 10, 8 and 7 users. In this article, learn How to Fix Atikmdag.sys BSOD error in Windows 10.
But before that, it is important for you to know what is Atikmdag.sys.
Atikmdag.sys is a system file associated with ATI Technologies’ AMD Radeon family graphic cards developed by Advanced Micro Devices. According to the users using AMD Radeon family graphic processors, this file is the main culprit of creating this atikmdag.sys error revealing this file name in the error warning message.
Causes of Atikmdag.sys BSOD Error
atikmdag.sys stands for ATI Radeon Kernel Mode Driver packAGe and is a system driver file that enables hardware components like the graphics card to interface with software.
Its an essential file required for optimal functioning of computer graphics and related hardware. Thus any damage to this file can cause major windows errors giving rise to Blue Screen Of Death abv. as BSOD.
When does this error occur?
The error usually occurs on Windows startup or while using an application (most commonly a game). After the program launches, Windows crashes saying – “A problem has been detected and Windows has been shut down to prevent damage to your computer. The problem seems to be caused by the following file: Atikmdag.sys”.
Common error messages for atikmdag.sys
Most atikmdag.sys errors users face commonly occurs in the form of BSOD i.e. Blue Screen Of Death in Windows XP, Vista, 7, 8, and 10 flashing these error messages at the console:

- “A problem has been detected and Windows has been shut down to prevent damage to your computer. The problem seems to be caused by the following file: Atikmdag.sys.”
- “STOP 0×00000050: PAGE_FAULT_IN_NONPAGED_AREA – atikmdag.sys”
- “STOP 0x0000000A: IRQL_NOT_LESS_EQUAL – atikmdag.sys”
- “:( Your PC ran into a problem and needs to restart. We’re just collecting some info, and then we’ll restart for you. If you would like to know more, you can search online later for this error: atikmdag.sys.”
- “STOP 0x0000001E: KMODE_EXCEPTION_NOT_HANDLED – atikmdag.sys”
This error generally occurs in the form of Blue Screen after you have installed a new software or hardware while some ATI services are running on your PC.
Possible Reasons for atikmdag.sys error message
The following is a list of reasons of errors occurring due to various hardware, software, and firmware problems:
- Corruption of system file(s)
- Malware or Virus attack
- Wrongly configured ATI files
- Hardware failure especially relevant to AMD
- Damaged\corrupt Harddisks
- Missing sys files
- STOP error due to RAM corruption/damage
There can be many methods to solve this error specially because there can be many causes of this error. Follow our step by step guide to fix Atikmdag BSOD error from Windows 10, 8 and 7.
Fix #1: Basic Troubleshooting
Here are some basic troubleshooting methods one should perform before hands before trying something tedious.
These methods tend to solve the problem more than 50% of the time. So give them a shot.
BT #1: Run a Full System Scan
As discussed previously, one of the chief reason for this error is due to Virus and Malware intrusion corrupting sys files. These files should be repaired/ restored/recovered in order to fix the issue. You can use your antivirus or windows inbuilt features to perform a Full System Scan of your PC to find and repair infected files of the system.
BT #2: Update Windows
Windows updates are compulsory to keep the PC working uninterruptedly without any issues. Make sure you update Windows 10 OS in order to maintain system stability and reliability. This might fix various errors including one of atikmdag.sys error.
BT #3: Restore atikmdag.sys
If atikmdag.sys file goes missing or gets damaged, one can restore the file from Bin or get another file from other sources. This can re-establish the relation and working of sys file and resolve the issue.
BT #4: Uninstall recent installations related to ATI or AMD Radeon Family
Recent installations might account for a huge probability of screen going blue. These installations might be a chief reason for either corruption of files or misconfiguration as well. Try uninstalling these softwares to eradicate the cause and you will not see the Blue screen again.
Fix #2: Repair Windows Registry
Blue screen errors are especially relevant to Windows registry because registry contains critical files to keep the system running. If Registry files get corrupt or go missing then errors are likely to occur.
CAUTION: One small mistake in editing your registry and you may brick your PC. In simple words, you may not be able to boot up your PC the next time. So be very vigilant while doing so.
Following are the steps to repair your registry manually:
- Tap on Windows Icon.
- Search ‘cmd’, right-click on it and select Run as an Administrator.

- Allow access by hitting Yes.

- Type sfc /scannow command in the black console called Command Prompt Admin and then Hit Enter.

- This will scan for registry errors and restores it.

- Finally, Restart your PC.
All corrupted files will get restored or repaired after rebooting your PC.
Fix #3: Update AMD Radeon Drivers
Drivers are crucial files which establish interfaces between a software and a hardware. Thus not updating them might cause some serious BSOD errors. Update ATI based drivers to rectify the error by following these steps:
- Press Windows+R or launch Run from the start menu.
- In the text field, type in ‘devmgmt.msc‘ and then click OK to open Device Manager Window.

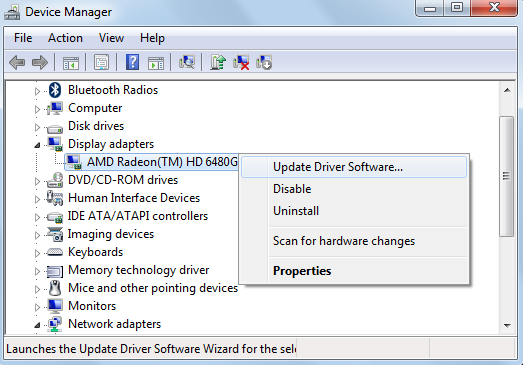
- In the Left Pane of Device Manager, under Display Adapters category, right-click on a Video Card and Select Update Drivers from the popup.

- Follow the on-screen steps to apply the update.
- Finally, after the update completes, restart your PC.
Hope this method worked out for you.
Fix #4: Perform a System Restore
There is an option in Windows OS where it restores the PC to a checkpoint date and undoes recent changes made. Its literally going back in time and is possible by a feature called System Restore. System Restore rectifies the issue and restores critical files. Thus, system restore will hopefully fix atikmdag.sys BSOD error.
In order to perform a System Restore follow the below list of steps:
NOTE: It is advised to Restore the PC in Safe mode.
- Press Windows Icon and type System Restore by searching its name.

- Enter the Admin Pass if asked.
- Follow the steps in Wizard to chose a checkpoint date.
- Finally, Reboot Your PC in normal mode.
You must have eradicated the problem by now. If still NOT follow these next steps.
Fix #5: Check HardDrive
One of the potential reasons for atikmdag.sys error is Harddisk driver or controller malfunction. These problems fall into a category of hard drive corruption. Hard drive corruption arises due to various reasons like improper shutdowns, program misusing, hard turn off, partial installation of ATI related Softwares, power outage and hardware failures.
Thus, chkdsk (“check disk”) is a utility provided by Microsoft for detecting and repairing these corruptions. This utility is very useful when the troubleshooting is not successful using above steps. To run chkdsk on your PC follow the procedure depicted below:
- Click on Windows Icon.
- Search ‘cmd’, then right-click on it and choose Run as an Administrator.
- Grant access by hitting Yes.
- A Command Prompt Admin console will open. Type in “chkdsk\f” and hit Enter.

- chkdsk will scan possible corruptions in the drive, one of which might cause atimkdag.sys BSOD\STOP errors.
- Follow on-screen commands.
Performing this solution will rectify issues with storage and thus stop those errors from appearing on the screen.
Fix #6: Change HDD/RAM
If you are unable to solve the error message by any of the above-listed methods, so by the process of elimination a huge probability of HDD or RAM failure seems to be the major cause of BSOD error. Don’t rush into buying the HDD and RAM to solve the issue. You can temporarily borrow someone else’s RAM or HDD and try to observe if the things work out. If things work out pretty well then congrats!! you just found the source of error and all you need is to change your HDD/RAM.
A vice-versa approach to check your HDD/RAM into someone else’s PC is worth trying. If the later is unable to access the Ha
rd disk, then the source of error is the RAM. Try the same with RAM and you will eventually find out what is causing this error.
Once you find out whether its the RAM or HDD causing these issues, you can purchase out from some local manufacturer or from Amazon by clicking on this link. It is highly recommended to perform the installation of RAM or HDD under the supervision of an expert.
Last Words
In the end, if after all these tries you re unable to solve atikmdag.sys BSOD error, I would recommend you to perform a clean installation of windows taking backup of data before hands.
Feel free to ask any doubts in the comments section below.
The Blue Screen of Death is a nightmare for Windows users, and no one wants to encounter it. Microsoft has been trying its best to rectify errors by providing regular updates, but there are still many issues causing Windows to crash.
Many people have reported a Windows 10 BSOD error caused by atikmdag.sys while upgrading from Windows 7 or Windows 8 to the latest build, i.e., Windows 10.
This blue screen of death doesn’t allow the PC to boot normally. Restarting the PC also doesn’t work in this case, and this error persists.

Reasons Behind the atikmdag.sys Error
This BSOD error is generally caused by external graphics card drivers creating conflicts between hardware components. In a majority of cases, PCs with AMD graphics cards experience this issue after upgrading to Windows 10. The main culprit behind this BSOD is a system file called atikmdag.sys, which causes the PC to crash to a blue screen of death. This conflict appears most frequently while upgrading to Windows 10.
Manual Solutions to Fix BSOD Error atikmdag.sys
The solution to fixing the BSOD error caused by atikmdag.sys is quite straightforward. You must uninstall the conflicting drivers from your PC. Follow the instructions below to resolve this error.
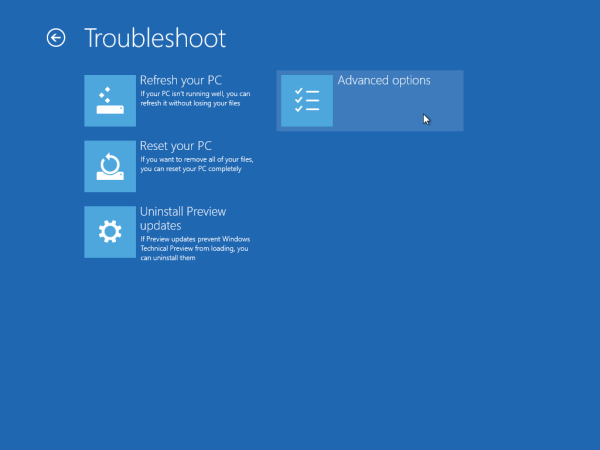
1. Boot the PC in Safe Mode by pressing the F8 key multiple times during startup. This will take you to a menu where you can choose an option. Click on Troubleshoot, followed by Advanced Options.
On the next screen, you will see Startup Settings. Click on it and press F4 or F5 from the screen appearing thereafter. Your PC will restart and enter Safe Mode.

If F8 doesn’t work for Safe Mode, check out the guide on how to start Windows 8/10 in safe mode. Once it has booted into safe mode, return to this guide.
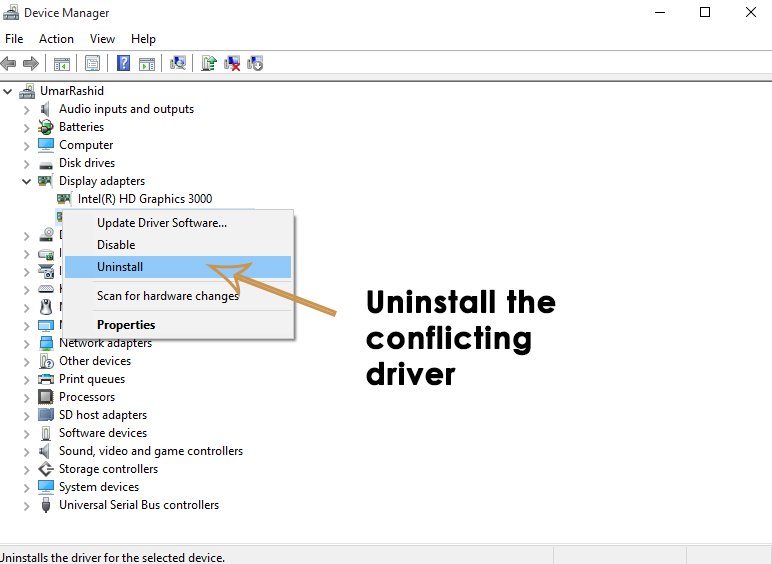
2. Now, you will need to remove the drivers causing the trouble. For the purpose of uninstalling the drivers, navigate to Device Manager by pressing Win + X and selecting Device Manager from the list. Find the conflicting driver and right-click on it to uninstall it from the system.

3. After uninstalling, navigate to Programs and Features within the Control Panel and remove AMD Catalyst Install Manager (for AMD graphic cards) or any other software associated with your graphics card, the same way you would uninstall any other application. Reboot the computer after this process.
4. After rebooting, download and install the latest drivers; your issue will be resolved.

Kamil Anwar
Kamil is a certified MCITP, CCNA (W), CCNA (S) and a former British Computer Society Member with over 9 years of experience Configuring, Deploying and Managing Switches, Firewalls and Domain Controllers also an old-school still active on FreeNode.