На чтение 10 мин. Просмотров 5.6k. Опубликовано
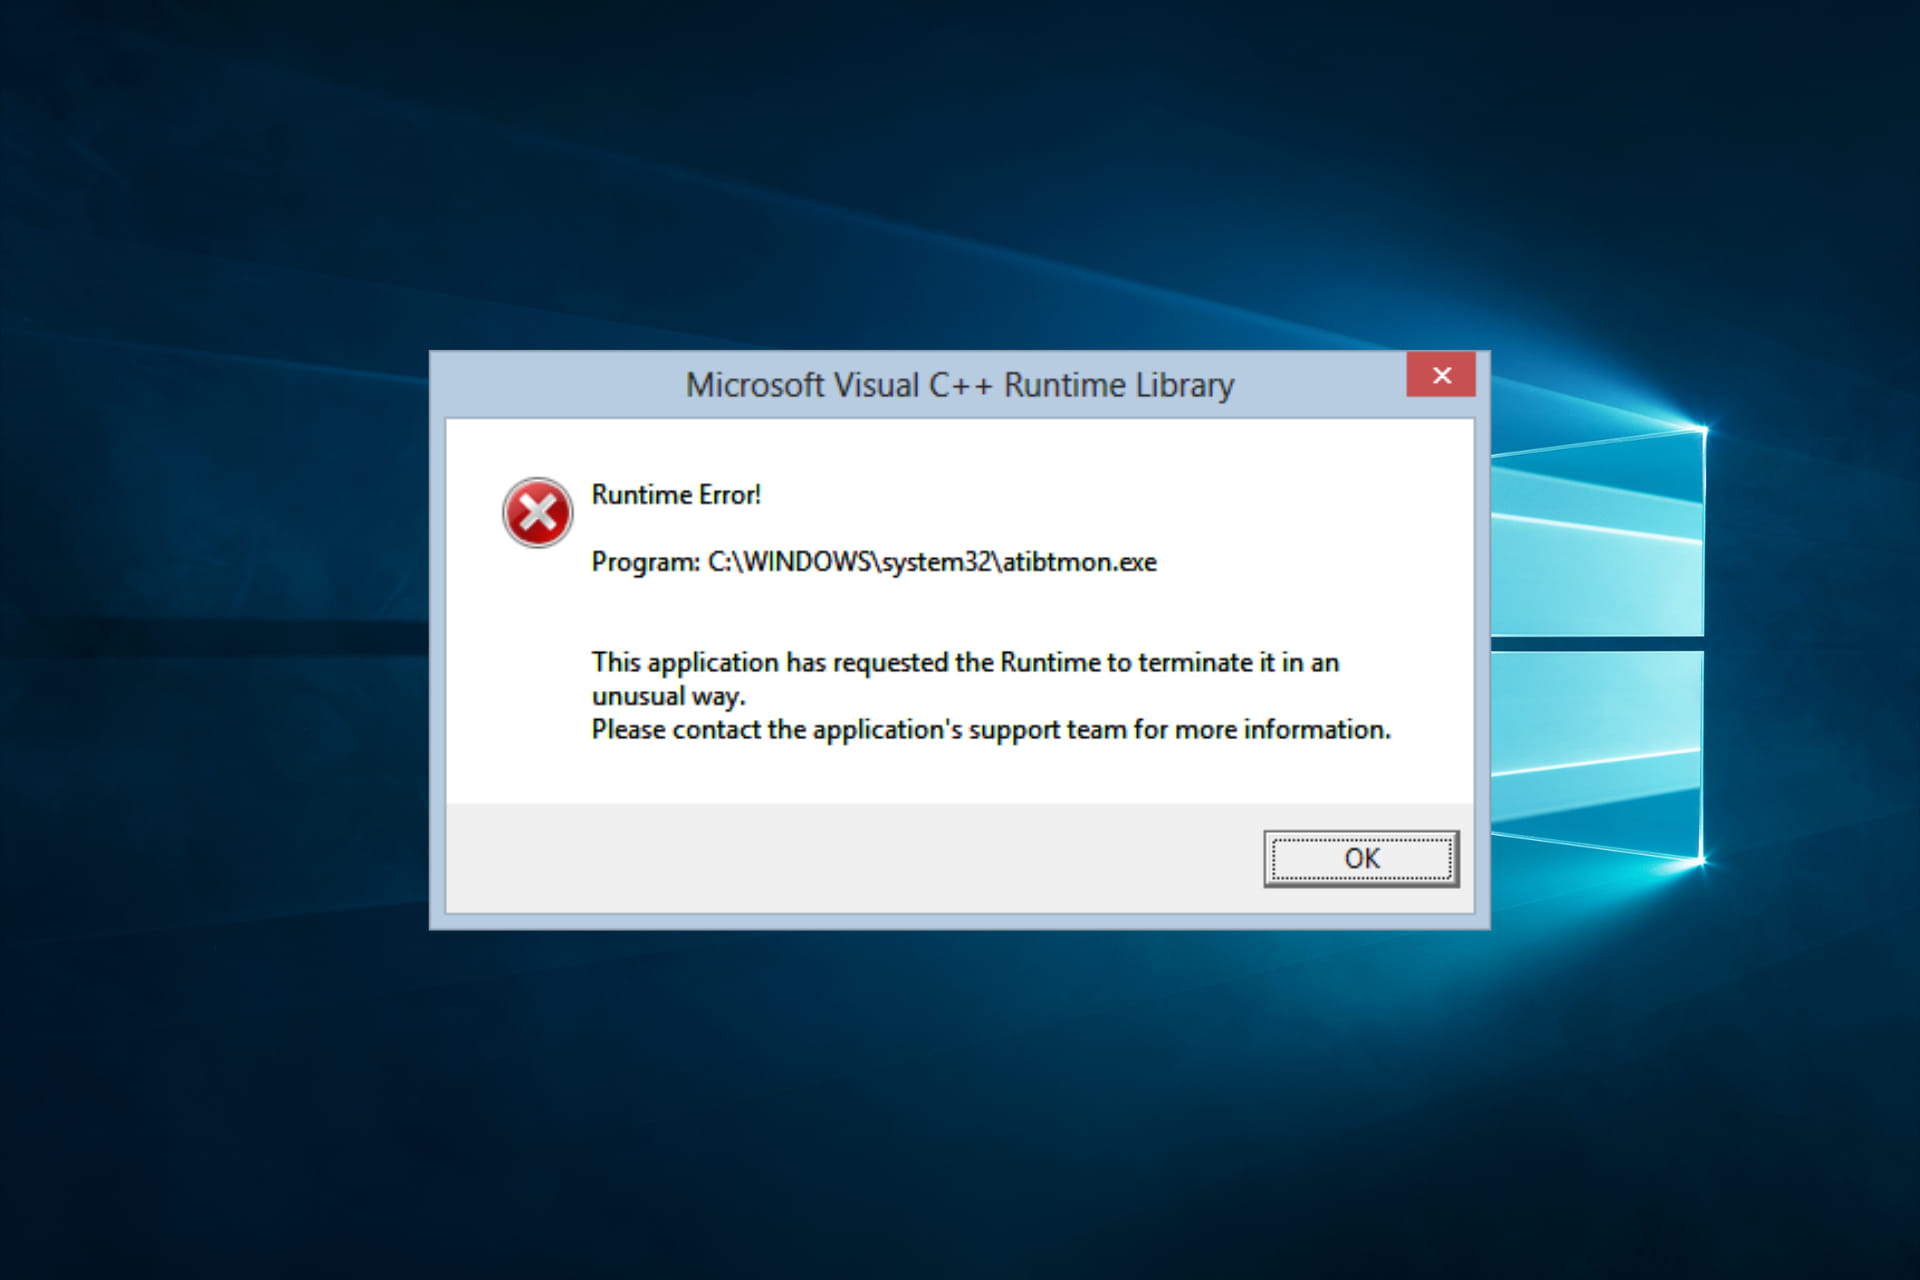
Windows 10 может быть новой операционной системой, но в ней все еще есть некоторые старые ошибки. Одна из этих старых ошибок присутствовала в Windows 8, и ей удалось найти и Windows 10. Если у вас есть ошибка времени выполнения atibtmon.exe в Windows 10, продолжайте читать, чтобы увидеть, работают ли эти решения для вас.
Для начала давайте объясним, что делает atibtmon.exe. Эта небольшая программа предназначена для переключения в режим энергосбережения при отключении ноутбука и предназначена для работы с графическими картами ATI.
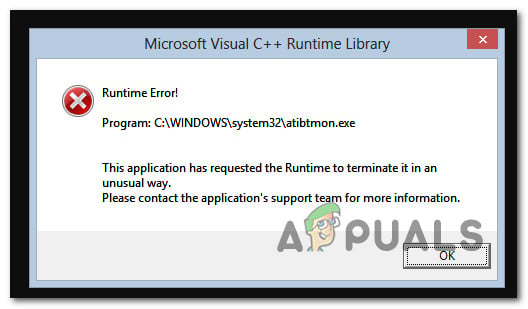
Что касается его функций энергосбережения, это приложение делает это, уменьшая яркость дисплея вашего ноутбука. Многие пользователи сообщают, что получают Runtime Error, которая говорит о том, что atibtmon.exe запросил Runtime, чтобы завершить его необычным способом, и, по мнению пользователей, эта проблема возникает, когда они отсоединяют шнур питания переменного тока. Это не большая проблема, но она, безусловно, раздражает, поэтому давайте посмотрим, как мы можем решить эту проблему.
Содержание
- Как исправить ошибку во время выполнения Atibtmon.exe в Windows 10
- Решение 1 – Отключите Vari-Bright в Центре управления Catalyst
- Решение 2 – переименовать/удалить atibtmon.exe
- Решение 3. Получить старую версию драйвера дисплея
- Решение 4 – Отключить Powerplay в Catalyst Control Center
- Решение 5 – Извлеките аккумулятор вашего ноутбука
- Решение 6 – Отключить службу внешних событий AMD
- Решение 7 – Выполните Чистую загрузку
Как исправить ошибку во время выполнения Atibtmon.exe в Windows 10
Atibtmon.exe Runtime Error может быть раздражающей проблемой, и многие пользователи сообщают об этом на своем ПК. Говоря о Atibtmon.exe, пользователи сообщили о следующих проблемах:
- Atibtmon.exe ошибка времени выполнения Toshiba – эта ошибка может появляться практически на любом устройстве, и многие владельцы Toshiba сообщали об этом. Чтобы увидеть, как решить эту проблему, мы советуем вам попробовать некоторые из наших решений.
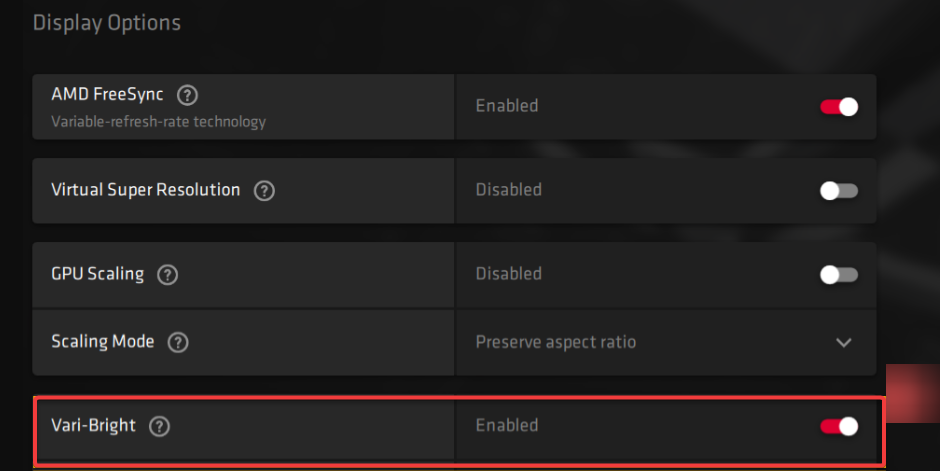
- Vari Bright Windows 10 . Многие пользователи утверждают, что эта проблема связана с функцией Vari Bright в Catalyst Control Center. Однако вы можете решить проблему, просто отключив эту функцию.
- Ошибка выполнения atibtmon.exe AMD . Эта ошибка связана с вашей видеокартой AMD, и для ее устранения рекомендуется установить более старый драйвер видеокарты.
- Ошибка выполнения Atibtmon.exe при запуске . В некоторых случаях эта ошибка может появиться при запуске Windows 10. Тем не менее, вы можете решить эту проблему, отключив запуск приложений и служб.
- Ошибка приложения Atibtmon.exe . Это всего лишь разновидность исходной ошибки, и вы сможете исправить ее, используя те же решения.
- Atibtmon.exe перестал работать . Если вы получили сообщение о том, что Atibtmon.exe перестал работать, возможно, проблема в настройках питания. Чтобы устранить проблему, измените настройки питания и проверьте, помогает ли это.
Решение 1 – Отключите Vari-Bright в Центре управления Catalyst
Чтобы решить эту проблему, вам нужно сделать следующее:
- Откройте Центр управления катализаторами .
- Перейдите на страницу Power> PowerPlay .
- Снимите флажок Включить Vari-Bright ™.
- Нажмите Применить , и эта проблема должна быть исправлена.
- ЧИТАЙТЕ ТАКЖЕ: нет звука после обновления драйвера AMD на ПК с Windows 10
Решение 2 – переименовать/удалить atibtmon.exe
Если у вас нет Catalyst Control Center, мы настоятельно рекомендуем вам установить его, прежде чем пытаться использовать это решение. Попробуйте это решение только в том случае, если по какой-либо причине не удается установить Catalyst Control Center или если предыдущее решение не работает.
Для этого вам нужно найти atibtmon.exe . Этот файл находится в вашем каталоге Windows, но если его там нет, он, вероятно, находится в WindowsSystem32 . Когда вы найдете atibtmon.exe , щелкните его правой кнопкой мыши и выберите «Переименовать». Переименуйте его, например, в _atibtmon.exe . Это «удалит» этот файл из вашей системы. Затем просто перезагрузите компьютер, и эта проблема должна быть решена. Еще раз, мы советуем вам сначала попробовать Решение 1, потому что изменение системных файлов может иногда иметь последствия.
В дополнение к переименованию Atibtmon.exe вы также можете переместить его в другой каталог, чтобы решить эту проблему. Имейте в виду, что иногда у вас может быть несколько экземпляров Atibtmon.exe на вашем компьютере.
Чтобы найти все экземпляры этого приложения, обязательно выполните поиск файлов. После этого переименуйте все файлы Atibtmon.exe и проверьте, решает ли это проблему. Помимо переименования, вы можете попробовать переместить все файлы Atibtmon.exe, но переименование обычно выполняется быстрее и является лучшим выбором.
Решение 3. Получить старую версию драйвера дисплея
Atibtmon.exe Runtime Ошибка может появиться из-за проблем с вашим драйвером дисплея, однако, вы можете решить эту проблему, просто установив более старый драйвер AMD. Прежде чем вы сможете установить старый драйвер, вам нужно удалить текущий. Для этого просто выполните следующие действия:
-
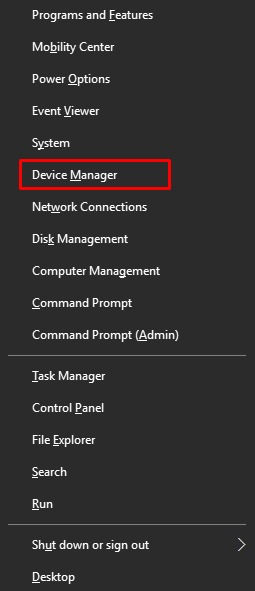
Нажмите Windows Key + X , чтобы открыть меню Win + X, и выберите Диспетчер устройств из списка.

-
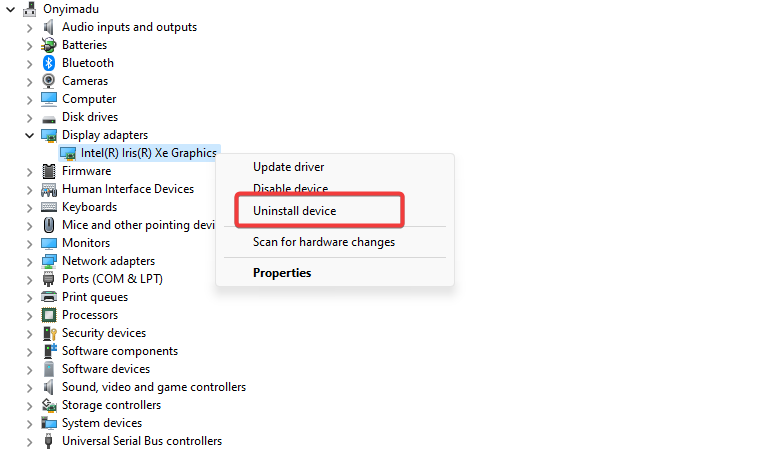
Найдите адаптер дисплея в списке, щелкните его правой кнопкой мыши и выберите в меню Удалить устройство .
-
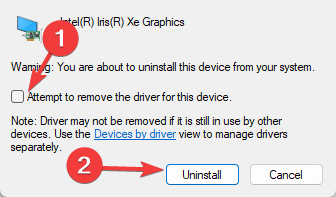
Установите флажок Удалить программное обеспечение драйвера для этого устройства и нажмите Удалить .


После удаления драйвера перезагрузите компьютер, и версия по умолчанию должна быть установлена автоматически. Стоит отметить, что вы можете полностью удалить драйвер дисплея, используя программу удаления драйвера дисплея. Это бесплатный инструмент, который удалит ваш драйвер дисплея вместе со всеми файлами, связанными с ним. Чтобы узнать больше об этом инструменте, мы рекомендуем вам ознакомиться с нашей статьей о том, как использовать Display Driver Uninstaller.
Как только драйвер по умолчанию установлен, проверьте, появляется ли проблема по-прежнему. Если нет, возможно, вы захотите обновить драйвер до более новой версии, но не устанавливайте ту же версию, которая изначально вызвала эту проблему.
- ЧИТАЙТЕ ТАКЖЕ: исправлено: сбой драйвера AMD в Windows 10
Если вы решите не обновлять драйвер вручную, вы можете запретить обновлять драйвер в Windows. Windows 10 обновляет устаревшие драйверы автоматически, а иногда это может вызвать различные проблемы, поэтому вам нужно запретить Windows 10 обновлять определенные драйверы.
Обновите драйверы автоматически с помощью этого инструмента, который мы рекомендуем
Инструмент обновления драйверов TweakBit (одобрен Microsoft и Norton) может безопасно и автоматически обновлять драйверы. Этот инструмент будет сканировать ваш компьютер и даст вам список устаревших драйверов. Просмотрите список и посмотрите, хотите ли вы обновить каждый драйвер по отдельности или все сразу.
Вот краткое руководство о том, как это сделать.
-
-
Загрузите и установите средство обновления драйверов TweakBit
-
После установки программа начнет сканирование вашего компьютера на наличие устаревших драйверов автоматически. Driver Updater проверит установленные вами версии драйверов по своей облачной базе данных последних версий и порекомендует правильные обновления. Все, что вам нужно сделать, это дождаться завершения сканирования.
-
По завершении сканирования вы получите отчет обо всех проблемных драйверах, найденных на вашем ПК. Просмотрите список и посмотрите, хотите ли вы обновить каждый драйвер по отдельности или все сразу. Чтобы обновить один драйвер за раз, нажмите ссылку «Обновить драйвер» рядом с именем драйвера. Или просто нажмите кнопку «Обновить все» внизу, чтобы автоматически установить все рекомендуемые обновления.
Примечание. Некоторые драйверы необходимо установить в несколько этапов, поэтому вам придется нажмите кнопку «Обновить» несколько раз, пока все его компоненты не будут установлены.
-
Загрузите и установите средство обновления драйверов TweakBit


Отказ от ответственности: некоторые функции этого инструмента не являются бесплатными.
Решение 4 – Отключить Powerplay в Catalyst Control Center
По словам пользователей, иногда Atibtmon.exe Runtime Ошибка может появляться из-за функции Powerplay в Catalyst Control Center. Эта функция может вступать в конфликт с вашими настройками питания, вызывая появление этой ошибки. Однако вы можете решить эту проблему, просто отключив Powerplay в Catalyst Control Center.
После отключения этой функции вы также должны изменить настройки питания. Для этого выполните следующие действия:
-
Нажмите Windows Key + S и введите настройки питания. Теперь выберите Настройки питания и сна из списка результатов.
-
Выберите Дополнительные параметры питания на левой панели.
-
Найдите свой текущий тарифный план и нажмите Изменить параметры плана рядом .
-
Теперь нажмите Изменить дополнительные параметры питания .
- Найдите Настройки графической мощности ATI в списке и разверните его.
- Теперь установите для Настройки PowerPlay ATI значение Максимальная производительность и сохраните изменения.


После этого конфликт с функцией Powerplay должен быть полностью решен, и вы больше не увидите это сообщение об ошибке.
Решение 5 – Извлеките аккумулятор вашего ноутбука
По словам пользователей, вы можете обойти эту проблему, просто удалив аккумулятор ноутбука. Несколько пользователей сообщили, что они решили проблему, вынув аккумулятор ноутбука и подключив ноутбук напрямую к источнику питания.
Имейте в виду, что это всего лишь обходной путь, но несколько пользователей сообщили, что он работает, поэтому не стесняйтесь попробовать его.
Решение 6 – Отключить службу внешних событий AMD
Для правильной работы Windows и другим приложениям требуются определенные службы. Тем не менее, иногда службы могут вызвать Atibtmon.exe Runtime Ошибка на вашем компьютере. Несколько пользователей сообщили, что эта проблема возникла из-за службы AMD External Events , и для ее устранения необходимо отключить эту службу. Это довольно просто, и вы можете сделать это, выполнив следующие действия:
- ЧИТАЙТЕ ТАКЖЕ: Исправлено: Windows 10 предотвращает установку драйверов AMD
-
Нажмите Windows Key + R и введите services.msc . Нажмите Enter или нажмите ОК .
- Список услуг теперь появится. Дважды щелкните сервис Внешние события AMD , чтобы открыть его свойства.
-
Установите для Тип запуска значение Отключено и нажмите кнопку Стоп , чтобы остановить службу. Теперь нажмите Применить и ОК , чтобы сохранить изменения.


После отключения этой службы проверьте, сохраняется ли проблема.
Решение 7 – Выполните Чистую загрузку
Как мы уже упоминали, сторонние приложения могут взаимодействовать с Windows и приводить к появлению Atibtmon.exe Runtime Error. Иногда эти приложения могут автоматически запускаться с Windows и вызывать эту ошибку прямо при запуске. Тем не менее, вы можете найти и удалить проблемное приложение, просто выполнив следующие действия:
-
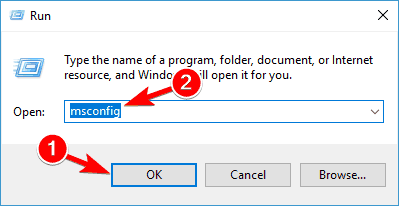
Нажмите Windows Key + R и введите msconfig . Теперь нажмите Enter или нажмите ОК .
-
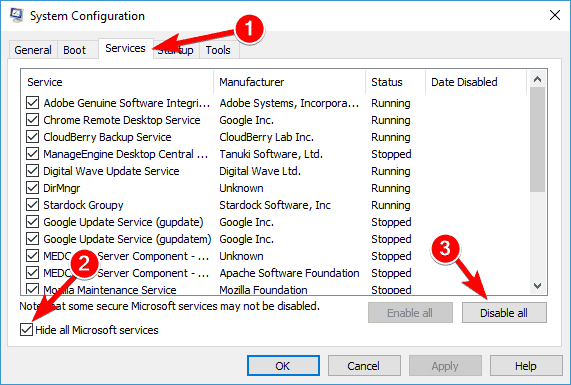
Перейдите на вкладку Службы и выберите Скрыть все службы Microsoft . Нажмите кнопку Отключить все , чтобы отключить службы.
-
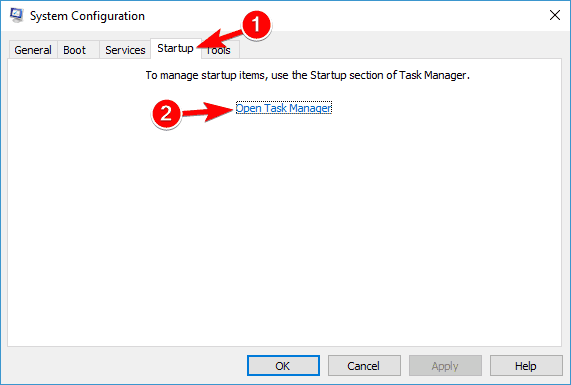
Перейдите на вкладку Автозагрузка и нажмите Открыть диспетчер задач .
-
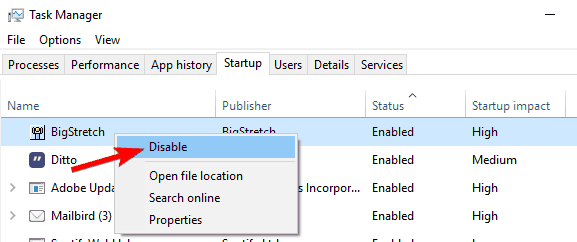
Появится список запускаемых приложений. Найдите первый элемент в списке, щелкните его правой кнопкой мыши и выберите в меню Отключить . Повторите этот шаг для всех запускаемых приложений в списке.
-
Вернитесь в окно Конфигурация системы и нажмите Применить и ОК .
- Перезагрузите компьютер.


После перезагрузки компьютера проверьте, не исчезла ли проблема. Если нет, это означает, что проблема связана с одним из отключенных приложений или служб. Чтобы выяснить, какое приложение является проблемой, необходимо включить приложения по одному или в группах и проверить, не возникает ли проблема снова. Имейте в виду, что вам необходимо перезагрузить компьютер после включения приложения или службы, чтобы применить изменения.
Найдя проблемное приложение или службу, вы можете отключить ее, удалить или обновить и проверить, решает ли это проблему.
Это было бы все, я надеюсь, что эти решения помогли вам решить эту ошибку во время выполнения. Если у вас есть какие-либо комментарии или вопросы, или вы, возможно, знаете другие решения этой проблемы, обратитесь к разделу комментариев ниже. Кроме того, если у вас есть какие-либо другие проблемы, связанные с Windows 10, вы можете найти решение в нашем разделе Windows 10 Fix.
Если у вас также есть проблемы во время выполнения с Microsoft Visual C в Windows 10, вот как это исправить, или если ваши проблемы связаны с ошибкой RuntimeBroker.exe в Windows 10, у нас также есть решение этой проблемы.
Примечание редактора . Этот пост был первоначально опубликован в сентябре 2015 года и с тех пор был полностью переработан и обновлен для обеспечения свежести, точности и полноты.
Вы видите ошибку времени выполнения «Atibtmon.exe» всякий раз, когда отключаете ноутбук от источника питания? Эта специфическая ошибка редко возникает на ноутбуках и связана с визуальными библиотеками Microsoft. Если вы также столкнулись с этой редкой проблемой, вам больше не о чем беспокоиться. Вы можете легко решить эту проблему, просто применив эти простые исправления на своем компьютере. Попробуйте эти обходные пути и проверьте, решают ли они конкретную проблему на вашем компьютере.
Обходные пути:
- Перезагрузите систему, если вы впервые видите это сообщение об ошибке.
- Обновите Windows 10 до последней версии.
Содержание
- Исправление 1 – Изменить настройки питания
- Исправление 2 – Отключить Vary-Bright
- Исправление 3 – переименуйте Atibtmon.exe
- Исправление 4 – Запуск сканирования SFC
- Исправление 5 – проверка с автоматическим ремонтом
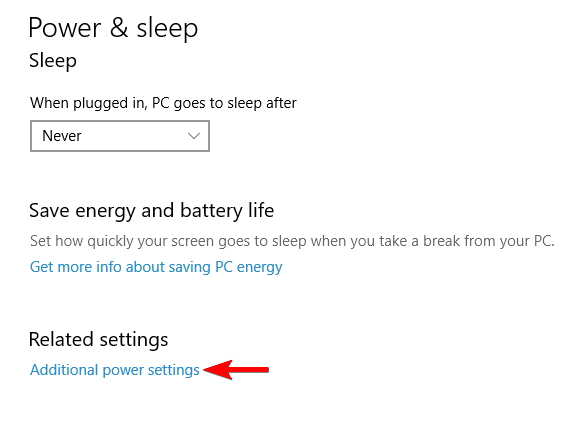
Исправление 1 – Изменить настройки питания
Эта проблема возникает из-за неправильной настройки дополнительных параметров питания в вашей системе, работающей на наборах микросхем ATI Mobile.
1. Сначала вам нужно щелкнуть правой кнопкой мыши значок Windows и нажать « Выполнить ».
2. После этого вставьте этот код и просто нажмите «ОК ».
powercfg.cpl

3. После этого нажмите «Изменить настройки плана».
4. Вам снова нужно нажать «Изменить дополнительные параметры питания».
5. Обратите внимание на « Настройки ATI Powerplay ». Разверните его.
Примечание: У некоторых пользователей может не быть опции ATI Powerplay, в этом случае сразу переходите к шагу 9.
6. Вы увидите настройки «Подключен:» и «От батареи:».
7. Вам просто нужно установить для параметра «От батареи:» значение «Максимальная производительность».
8. Просто нажмите « ОК », чтобы сохранить это изменение.
9. Также щелкните PCI Express.
10. Щелкните Link State Power management .
11. Выберите максимальное энергосбережение в раскрывающемся списке настроек.
Это должно решить проблему, с которой вы столкнулись в своей системе. Перезагрузите компьютер и снова отключите его от сети.
Исправление 2 – Отключить Vary-Bright
Похоже, проблема на вашем компьютере возникает из-за настройки переменной яркости.
1. Откройте Центр контроллеров AMD Pro.
2. Как только он откроется, перейдите в это место –
Питание > PowerPlay
3. Затем просто снимите флажок «Включить Vary-Bright».
Это сохранит настройки, чтобы не изменять яркость дисплея в вашей системе.
Вы можете переименовать файл Atibtmon.exe на своем компьютере или удалить его из системы.
1. Нажмите клавишу Windows вместе с клавишей « E ».
2. В окне проводника перейдите в это место –
C: \ Windows \ System32
3. Найдите в папке « Atibtmon.exe ».
4. Щелкните приложение правой кнопкой мыши и выберите « Переименовать », чтобы переименовать его.
5. Просто поставьте ” – ” перед названием приложения.
6. Нажмите «Да», чтобы подтвердить любой запрос, который появляется на вашем экране.
После переименования файла вам просто нужно перезагрузить компьютер, чтобы завершить процесс.
ПРИМЕЧАНИЕ
1. Если переименовать приложение не получается, можно сделать это –
а. Откройте проводник и перейдите в папку « Atibtmon.exe » в системных файлах.
б. Щелкните правой кнопкой мыши « Atibtmon.exe » и нажмите « Удалить », чтобы удалить его с вашего компьютера.
Это устранило проблему для многих пользователей.
2. Некоторые пользователи также утверждали, что проблема решена путем перемещения исходного файла «Atibtmon.exe» из системных файлов и перезапуска системы после этого.
Исправление 4 – Запуск сканирования SFC
1. Щелкните поле поиска и начните писать « cmd ».
2. Далее щелкните правой кнопкой мыши « Командная строка » и выберите « Запуск от имени администратора ».
3. Вставьте этот код в терминал. После этого нажмите Enter, чтобы запустить сканирование.
sfc / scannow
Начнется сканирование SFC.
4. Чтобы запустить сканирование DISM, введите эту команду в терминал CMD и нажмите Enter .
DISM.exe / Online / Cleanup-image / Restorehealth
Эти процессы могут занять некоторое время. Проверьте это.
Исправление 5 – проверка с автоматическим ремонтом
Восстановление при запуске может просканировать и исправить эту проблему в вашей системе.
1. Просто нажмите клавишу Windows + I ключи вместе.
2. Затем нажмите «Обновление и безопасность».
3. Слева нажмите «Восстановление»,
4. Теперь в разделе «Расширенный запуск» нажмите «Перезагрузить сейчас».
5. Как и раньше, нажмите «Дополнительные параметры».
6. Отныне нажимайте «Устранение неполадок», чтобы устранить проблему с загрузкой.
7. Снова нажмите «Дополнительные параметры», чтобы просмотреть дополнительные параметры на вашем компьютере.
8. Чтобы начать восстановление при запуске, щелкните «Startup Repa ir».
После того, как вы начали процесс восстановления при запуске, он просканирует и устранит проблему Atibtmon.exe после отключения вашей системы от соединения.
Просмотров 1.3к.
Обновлено
Easy expert resolutions for the runtime error
by Ivan Jenic
Passionate about all elements related to Windows and combined with his innate curiosity, Ivan has delved deep into understanding this operating system, with a specialization in drivers and… read more
Updated on
- Some of you using ATI graphics cards may have experienced the Atibtmon.exe Runtime error.
- The guide below is targeted at those of you who have, and we’ll show you how to fix it.
A runtime error on Windows 10 can be frustrating, and Atibtmon.exe is one of the more common ones.
Atibtmon.exe is designed to switch to a power-saving mode when you unplug your laptop and to work with ATI graphic cards. As for its power-saving features, this application does it by dimming the brightness of your laptop display.
Many users have reported getting a runtime error that says that atibtmon.exe has requested Runtime to terminate it unusually. According to users, this issue happens when they disconnect their AC power cord.
Why does the Runtime error atibtmon.exe appear?
We have investigated this error and have concluded that the following are the primary triggers.
- Outdated drivers – If you run on outdated drivers, especially the graphics card, you may run into this runtime error.
- Malware – Malware is a common trigger for many computer issues, including the atibtmon.exe runtime error.
- Conflicting software – Some users have observed that a particular set of third-party applications may result in this error.
Atibtmon.exe Runtime Error can be an annoying problem, and many users reported it on their PC. Speaking of Atibtmon.exe, users said the following issues:
- Atibtmon.exe runtime error Toshiba – This error can appear on almost any device, and many Toshiba owners reported it. We advise you to try some of our solutions to see how to fix this problem.
- Vari Bright Windows 10 – Many users claim that this problem is related to Vari Bright feature in Catalyst Control Center. However, you can fix the problem simply by disabling this feature.
- Runtime error atibtmon.exe AMD – This error is related to your AMD graphics card, and to fix it, it’s advised to install an older graphics card driver.
- Atibtmon.exe runtime error on startup – This error can sometimes appear as soon as Windows 10 starts. However, you can fix the problem by disabling startup applications and services.
- Atibtmon.exe application error – This is just a variation of the original error, and you should be able to fix it using the same solutions.
- Atibtmon.exe stopped working – If you get a message saying that Atibtmon.exe stopped working, the problem might be your power settings. To fix the problem, change your power settings and check if that helps.
Let’s explore the best resolutions to this error on a Windows 10 device without much ado.
How can I fix the atibtmon.exe runtime error?
1. Get the older version of the display driver
- Press Windows Key + X and choose Device Manager from the list.

- Locate your display adapter on the list, right-click it, and choose Uninstall device from the menu.

- Check Attempt to remove the driver for this device and click on Uninstall.

Atibtmon.exe Runtime Error can appear due to problems with your display driver; however, you can fix the problem simply by installing an older AMD driver.
How we test, review and rate?
We have worked for the past 6 months on building a new review system on how we produce content. Using it, we have subsequently redone most of our articles to provide actual hands-on expertise on the guides we made.
For more details you can read how we test, review, and rate at WindowsReport.
Before installing the older driver, you need to remove the current one. Once you remove the driver, restart your PC, and the default version should be installed automatically.
It’s worth mentioning that you can altogether remove your display driver using a Display Driver Uninstaller. This is a freeware tool that will remove your display driver along with all files associated with it.
To learn more about this tool, we advise you to check our article on how to use Display Driver Uninstaller.
Once the default driver is installed, check if the problem still appears. If not, you might want to consider updating the driver to a newer version, but be sure not to install the same version that gave you this problem in the first place.
If you choose not to update your driver manually, you might want to prevent Windows from updating the driver.
Windows 10 updates outdated drivers automatically, which can sometimes cause various issues, so you need to prevent Windows 10 from updating specific drivers. Follow this handy guide to learn how to do that.
2. Automatically update drivers
While installing the drivers manually is a reliable option, specialized software can save you time and effort and get the latest updates.
This kind of tool can automatically update your drivers safely and preferentially by scanning your PC and giving you a list of outdated drivers.
Ensure your system performs smoothly and avoids all GPU driver errors by using a complete driver update assistant, namely Outbyte Driver Updater, that will do the job for you.
Here’s how to safely update your drivers:
- Download and install the Outbyte Driver Updater app.
- Launch the software and wait for the app to detect all incompatible drivers.
- Now, it will show you a list of all faulty drivers to select the ones to Update or Ignore.
- Click on Update & Apply Selected to download and install the newest versions.
- Restart your PC to ensure the applied changes.


OutByte
Keep your GPU in a flawless state without worrying about possible driver issues.
Disclaimer: You may need to upgrade the app from the free version to perform specific actions.
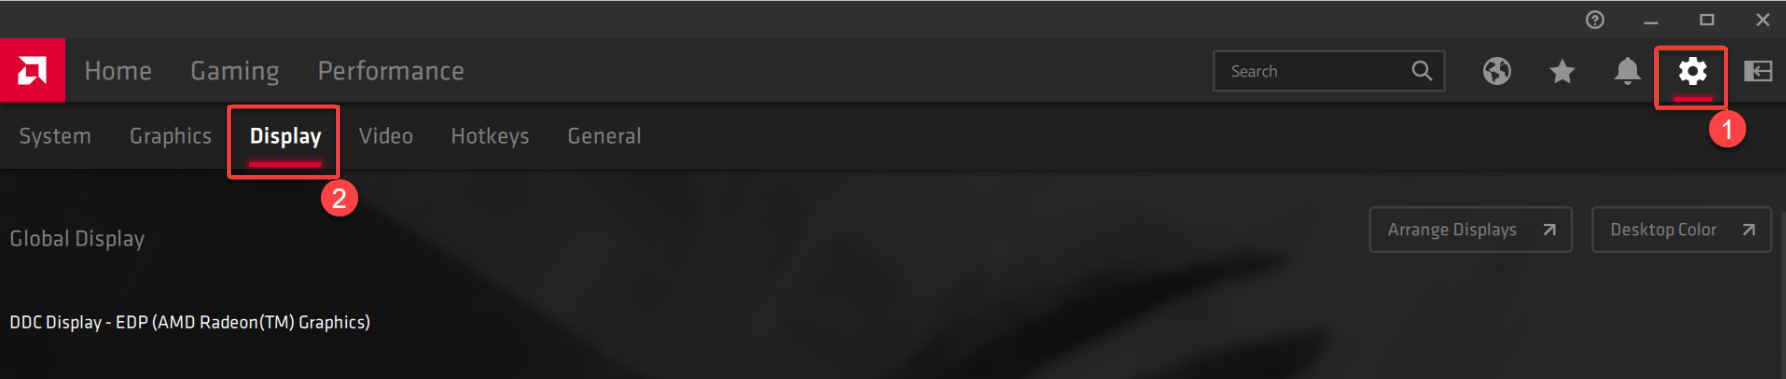
3. Disable Vari-Bright in Catalyst Control Center
- Launch the AMD Radeon Software.
- Click the Settings icon, and select the Display tab.

- Under Display Options, toggle off the switch for Vari-Bright.

4. Disable Powerplay in Catalyst Control Center
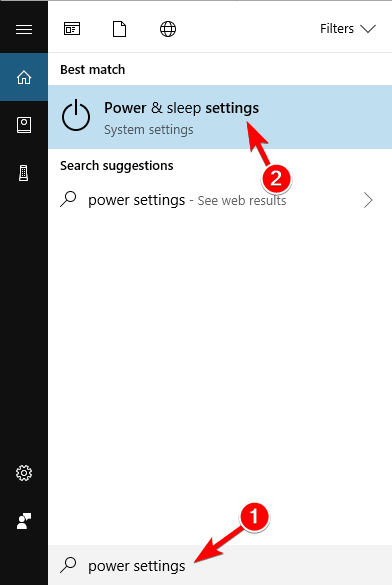
- Press Windows Key + S and enter power settings. Now select Power & sleep settings from the list of results.

- Select Additional power settings in the left pane.

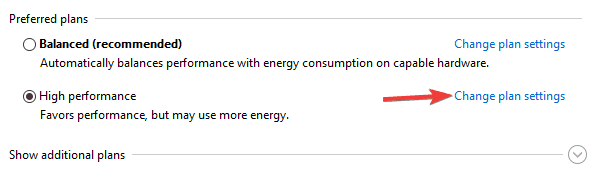
- Locate your currently selected power plan and click Change plan settings next to it.

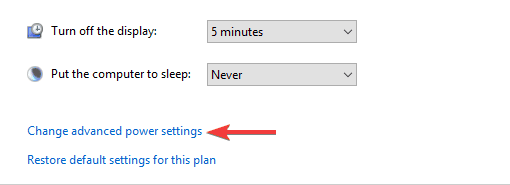
- Now click on Change advanced power settings.

- Locate ATI Graphics Power Settings on the list and expand it.
- Now set both ATI Powerplay Settings to Maximum Performance and save changes.
According to users, Atibtmon.exe Runtime Error can sometimes appear due to the Catalyst Control Center Powerplay feature. This feature can conflict with your power settings, causing this error.
However, you can fix the problem by disabling Powerplay in Catalyst Control Center. After disabling this feature, you also have to change your power settings.
After doing that, the conflict with the Powerplay feature should be entirely resolved, and you won’t see this error message anymore.
5. Disable AMD External Events service
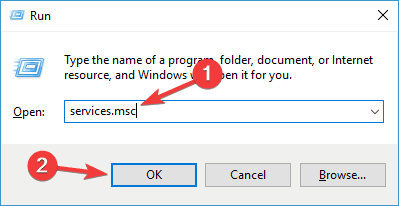
- Press Windows Key + R and enter services.msc. Press Enter or click OK.

- A list of services will now appear. Double-click the AMD External Events service to open its properties.
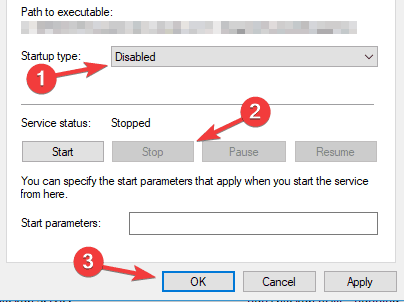
- Set the Startup type to Disabled and click the Stop button to stop the service. Now click on Apply and OK to save changes.

To work correctly, Windows and other applications require specific services. However, sometimes services can cause Atibtmon.exe Runtime Error to appear on your PC.
Several users reported that AMD External Events service caused this problem; you must disable it to fix it.
After disabling this service, check if the problem persists.
- Fix: XP-Pen is Detected as a Keyboard on Windows 11
- Fix: This Alias Cannot be Added to Your Account Error on Windows 11
- How to fix the Thinkpad if it Won’t Wake Up
- Fix: Control Panel is Not Showing All Programs on Windows 11
- Fix: ATA/SATA Hard Drive not Detected in BIOS
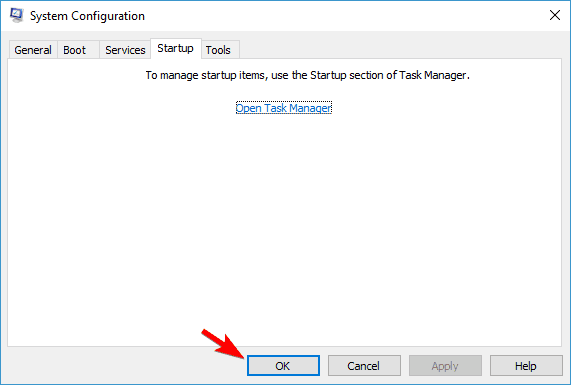
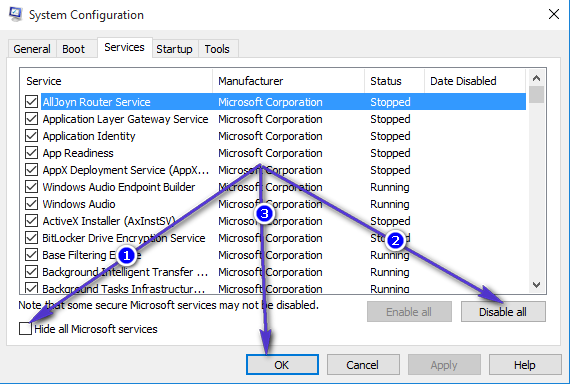
6. Perform a Clean boot
- Press Windows Key + R and enter msconfig. Now press Enter or click OK.
- Navigate to the Services tab and check Hide all Microsoft services; click the Disable all button to disable the services.

- Navigate to the Startup tab and click on Open Task Manager.
- A list of startup applications will now appear. Locate the first item on the list, right-click it, and choose Disable from the menu.
- Repeat this step for all startup applications on the list.

- Repeat this step for all startup applications on the list.
- Now go back to the System Configuration window and click on Apply and OK.
- Restart your PC.
As mentioned, third-party applications can interfere with Windows and cause Atibtmon.exe Runtime Error to appear. In addition, sometimes, these applications can automatically start with Windows and cause this error on startup.
Once your PC restarts, check if the problem still appears. If not, it means that one of the disabled applications or services is causing the issue.
We hope these solutions helped you with solving this runtime error. If you have any comments or questions, or you maybe know some other solutions for this problem, reach for our comment section below.
Also, if you have any other problem related to Windows 10, you can search for the solution in our Windows 10 Fix section.
If you’re having runtime issues with Microsoft Visual C in Windows 10, here’s how to fix that, or in case your issues are related to RuntimeBroker.exe Error in Windows 10, we have a fix for that, as well.
![]()
Windows 10 может быть новой операционной системой, но в ней все еще есть некоторые старые ошибки. Одна из этих старых ошибок присутствовала в Windows 8, и ей удалось найти и Windows 10.
Если у вас есть ошибка времени выполнения atibtmon.exe в Windows 10, продолжайте читать, чтобы увидеть, работают ли эти решения для вас.
Сначала давайте объясним, что делает atibtmon.exe. Эта небольшая программа предназначена для переключения в режим энергосбережения при отключении ноутбука и предназначена для работы с графическими картами ATI.
Что касается его функций энергосбережения, это приложение делает это, уменьшая яркость дисплея вашего ноутбука.
Многие пользователи сообщают, что они получают Runtime Error, которая говорит о том, что atibtmon.exe запросил Runtime прекратить его необычным образом, и, по мнению пользователей, эта проблема возникает, когда они отсоединяют шнур питания переменного тока.
Это не большая проблема, но она, безусловно, раздражает, поэтому давайте посмотрим, как мы можем решить эту проблему.
Atibtmon.exe Runtime Error может быть раздражающей проблемой, и многие пользователи сообщают об этом на своем ПК. Говоря о Atibtmon.exe, пользователи сообщили о следующих проблемах:
- Atibtmon.exe Ошибка выполнения Toshiba — Эта ошибка может появляться практически на любом устройстве, и многие владельцы Toshiba сообщили об этом. Чтобы увидеть, как решить эту проблему, мы советуем вам попробовать некоторые из наших решений.
- Vari Bright Windows 10 — Многие пользователи утверждают, что эта проблема связана с функцией Vari Bright в Catalyst Control Center. Однако вы можете решить проблему, просто отключив эту функцию.
- Ошибка выполнения atibtmon.exe AMD — эта ошибка связана с вашей видеокартой AMD, и для ее исправления рекомендуется установить более старый драйвер видеокарты.
- Atibtmon.exe ошибка времени выполнения при запуске — в некоторых случаях эта ошибка может появиться, как только Windows 10 запускается. Тем не менее, вы можете решить эту проблему, отключив запуск приложений и служб.
- Ошибка приложения Atibtmon.exe — это всего лишь разновидность исходной ошибки, и вы должны быть в состоянии исправить ее, используя те же решения.
- Atibtmon.exe перестал работать. Если появляется сообщение о том, что Atibtmon.exe перестал работать, возможно, проблема в настройках питания. Чтобы устранить проблему, измените настройки питания и проверьте, помогает ли это.
Решение 1 — Отключите Vari-Bright в Центре управления Catalyst
Чтобы решить эту проблему, вам нужно сделать следующее:
- Откройте Центр управления катализаторами.
- Перейдите в Power> PowerPlay.
- Снимите флажок Включить Vari-Bright (тм).
- Нажмите Применить, и эта проблема должна быть исправлена.
Решение 2 — переименовать / удалить atibtmon.exe
Если у вас нет Catalyst Control Center, мы настоятельно рекомендуем вам установить его, прежде чем пытаться использовать это решение. Попробуйте это решение, только если по какой-то причине не удается установить Catalyst Control Center или если предыдущее решение не работает.
Для этого вам нужно найти atibtmon.exe. Этот файл находится в вашем каталоге Windows, но если его там нет, он, вероятно, находится в WindowsSystem32.
Когда вы найдете atibtmon.exe, щелкните его правой кнопкой мыши и выберите «Переименовать». Например, переименуйте его в _atibtmon.exe. Это «удалит» этот файл из вашей системы.
Затем просто перезагрузите компьютер, и эта проблема должна быть решена. Еще раз, мы советуем вам сначала попробовать Решение 1, потому что изменение системных файлов может иногда иметь последствия.
В дополнение к переименованию Atibtmon.exe вы также можете переместить его в другой каталог, чтобы решить эту проблему. Имейте в виду, что иногда у вас может быть несколько экземпляров Atibtmon.exe на вашем компьютере.
Чтобы найти все экземпляры этого приложения, обязательно выполните поиск файлов. После этого переименуйте все файлы Atibtmon.exe и проверьте, решает ли это проблему.
Помимо переименования, вы можете попробовать переместить все файлы Atibtmon.exe, но переименование обычно выполняется быстрее и является лучшим выбором.
Если вы не можете переместить файл в Windows 10, взгляните на это пошаговое руководство, которое поможет вам решить проблему.
Решение 3. Получить старую версию драйвера дисплея
Atibtmon.exe Runtime Ошибка может появиться из-за проблем с вашим драйвером дисплея, однако, вы можете решить эту проблему, просто установив более старый драйвер AMD.
Прежде чем вы сможете установить старый драйвер, вам нужно удалить текущий. Для этого просто выполните следующие действия:
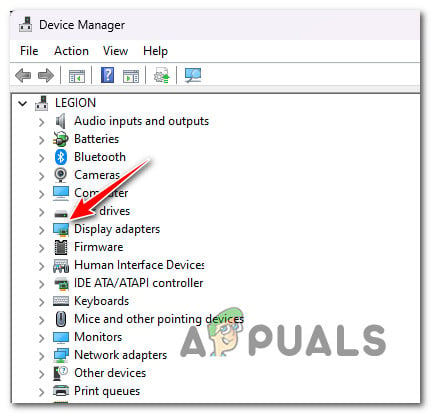
- Нажмите Windows Key + X, чтобы открыть меню Win + X, и выберите « Диспетчер устройств» из списка.
- Найдите адаптер дисплея в списке, щелкните его правой кнопкой мыши и выберите « Удалить устройство» из меню.
- Установите флажок «Удалить программное обеспечение драйвера для этого устройства» и нажмите « Удалить».


После удаления драйвера перезагрузите компьютер, и версия по умолчанию должна быть установлена автоматически.
Стоит отметить, что вы можете полностью удалить драйвер дисплея, используя программу удаления драйвера дисплея. Это бесплатный инструмент, который удалит ваш драйвер дисплея вместе со всеми файлами, связанными с ним.
Чтобы узнать больше об этом инструменте, мы рекомендуем вам ознакомиться с нашей статьей о том, как использовать Display Driver Uninstaller.
Как только драйвер по умолчанию установлен, проверьте, появляется ли проблема по-прежнему. Если нет, возможно, вы захотите обновить драйвер до более новой версии, но не устанавливайте ту же версию, которая изначально вызвала эту проблему.
Если вы решите не обновлять драйвер вручную, вы можете запретить обновлять драйвер в Windows.
Windows 10 обновляет устаревшие драйверы автоматически, а иногда это может вызвать различные проблемы, поэтому вам нужно запретить Windows 10 обновлять определенные драйверы. Следуйте этому удобному руководству, чтобы узнать, как это сделать.
Обновите драйверы автоматически с помощью этого инструмента, который мы рекомендуем
Средство обновления драйверов TweakBit (одобренное Microsoft и Norton) может безопасно и автоматически обновлять драйверы. Этот инструмент будет сканировать ваш компьютер и даст вам список устаревших драйверов.
Просмотрите список и посмотрите, хотите ли вы обновить каждый драйвер по отдельности или все сразу. Вот краткое руководство о том, как это сделать.
-
- Загрузите и установите TweakBit Driver Updater
- После установки программа начнет сканирование вашего компьютера на наличие устаревших драйверов автоматически. Driver Updater проверит установленные вами версии драйверов по своей облачной базе данных последних версий и порекомендует правильные обновления. Все, что вам нужно сделать, это дождаться завершения сканирования.
- По завершении сканирования вы получите отчет обо всех проблемных драйверах, найденных на вашем ПК. Просмотрите список и посмотрите, хотите ли вы обновить каждый драйвер по отдельности или все сразу. Чтобы обновить один драйвер за раз, нажмите ссылку «Обновить драйвер» рядом с именем драйвера. Или просто нажмите кнопку «Обновить все» внизу, чтобы автоматически установить все рекомендуемые обновления.
Примечание. Некоторые драйверы необходимо устанавливать в несколько этапов, поэтому вам придется нажимать кнопку «Обновить» несколько раз, пока не будут установлены все его компоненты.
The Runtime Error atibtmon.exe is typically encountered when users log into their Windows computers. This issue is confirmed on every Windows version. You’ll most commonly see this error occurring when unplugging your laptop from the cable or booting directly on battery life.
Note: The Atibtmon.exe is an executable belonging to ATI Brightness Monitor software. This tool lets users access their brightness options for their display directly through the Windows System Tray. It is generally safe to terminate or remove, but doing so will likely mean that you will no longer have any control over the brightness of your monitor in case you’re using a laptop.
The Runtime Error atibtmon.exe usually occurs due to a conflict between the built-in Windows Power saving settings and the ATI display car settings.
1. Set ATI Graphics Power Settings to Maximum Performance
There’s an easy fix if you are experiencing this issue due to a conflict between the built-in Windows Power saving settings and the ATI display card set.
All you have to do is make your way to the ATI Graphics Power settings and set both behaviors (plugged and unplugged) to Maximize Performance. After you do this and reboot your PC, you should no longer experience this problem.
Here’s what you need to do to apply this fix:
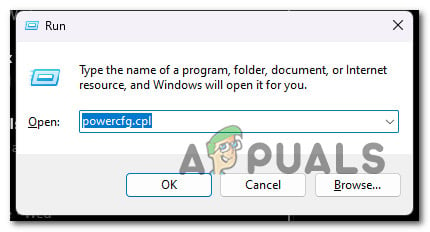
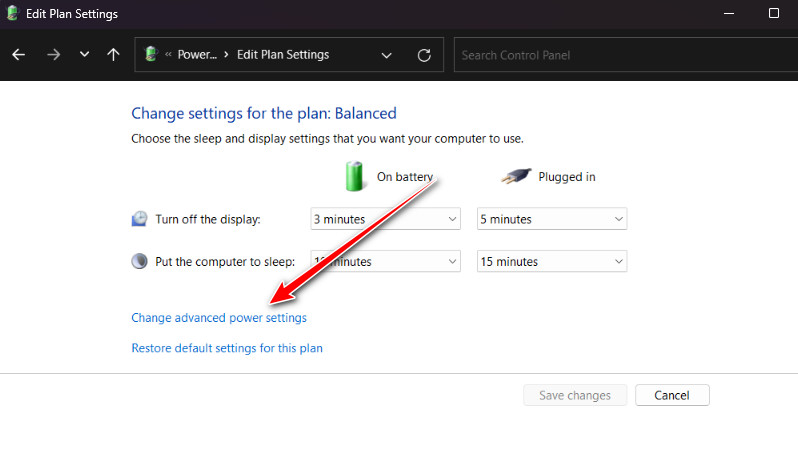
- First, make sure you plug your laptop or ultrabook into a power source.
- Next, type ‘powercfg.cpl’ inside the Run program, then press Ctrl + Shift + Enter to open up the Power Settings on your Windows PC.

Access the Power Option settings - Click Yes to grant admin access at the User Account Control (UAC).
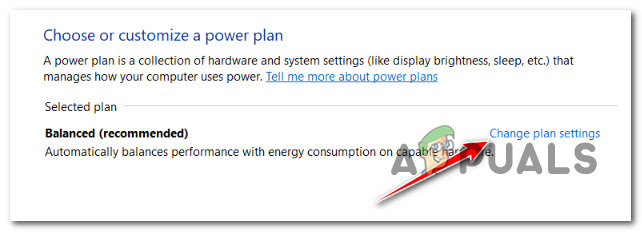
- Once inside the Power Settings, click on the Change plan settings hyperlink associated with the active power plan.

Changing the Plan Settings - From the next screen, click on Change advanced power settings.

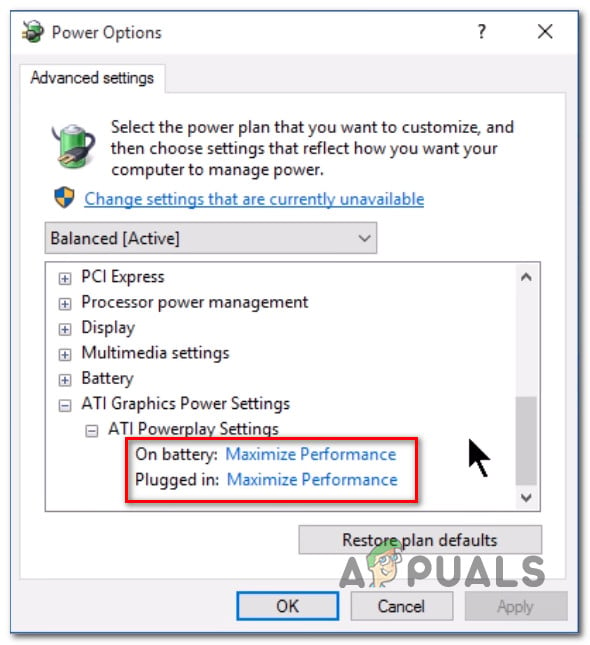
Change the advanced power settings - Under the Advanced Settings screen, scroll to the bottom, and you should find the ATI Graphics Power Settings.
- Click on the ‘plus’ icon to expand the ATI Graphics Power Settings.
- Expand the ATI Powerplay Settings.
- Next, make sure both On battery and Plugged in settings are set to Maximum Performance.

Adjusting the settings - Click Apply to save the changes.
- Reboot your PC and see if the problem is now fixed.
If the problem is still unresolved, move to the next method below.
2. Perform a security scan
If the first method above didn’t work for you, you should consider a possible security problem. Malware will often pretend to be a real process to avoid being found.
If the atibtmon.exe file isn’t in its usual place, that should be the first sign that something is wrong. If Atibtmon.exe is not in the C:\Windows\System32 folder, you should use a powerful scanner to do a deep security scan.
Malwarebytes is the best software to use in this case because it has a history of dealing with viruses that have the ability to pose as system processes. It is free and will find most malware that acts like this.
Follow this article to learn how to use the free version of Malwarebytes to do a deep scan and get rid of the virus. This will make things easier for you.
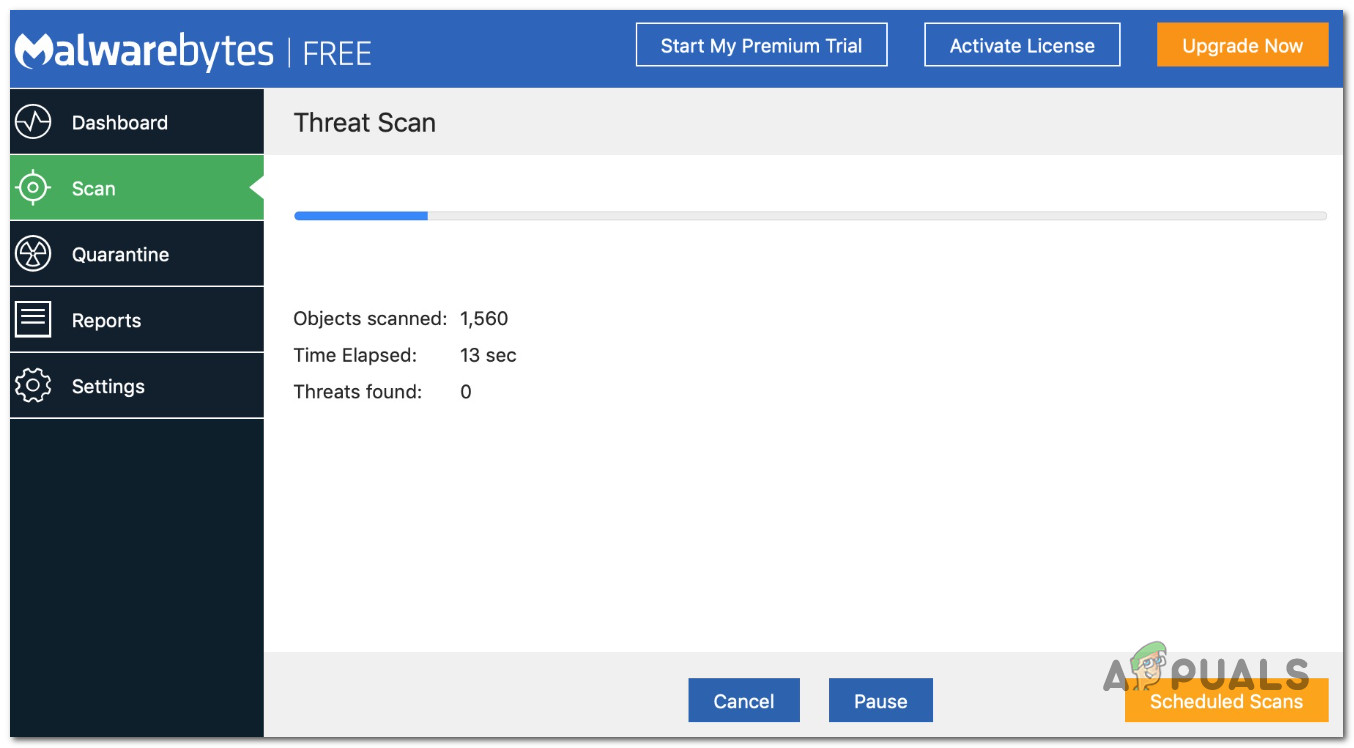
If the scan is successful and the virus is gone, restart your computer and check to see if the Atibtmon.exe Runtime Error is still happening.
If the Atibtmon.exe is still giving you problems at startup after you’ve made sure it’s real, move on to the next method below.
3. Rename atibtmon.exe
If none of the solutions featured above have helped you, one unconventionally approach is to navigate to the location of the atibtmon.exe file and rename it.
This will serve the purpose of forcing your OS to disregard the atibtmon.exe file completely. If you do this, you’ll most likely stop getting the startup runtime error at the next system startup since there is no longer a atibtmon.exe to be called.
Note: This method assumes that you’ve already followed the method above to ensure that you’re not dealing with a virus infection. If you end up enforcing this method, know that display brightness changing will be handled by the built-in Windows component (this is generally a good thing).
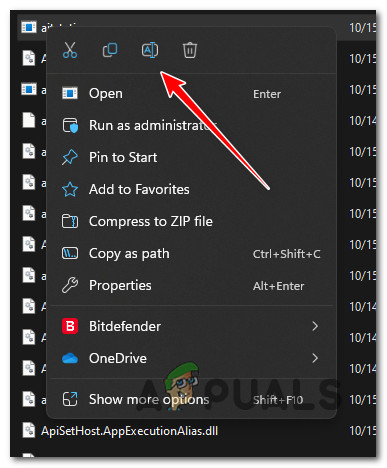
Follow the instructions below to rename the atibtmon.exe file:
- First, ensure that you are signed in with an administrator account. You won’t be able to rename or edit system files with a standard Windows account.
- Next, open File Explorer (Windows key + E) and navigate to the following location:
C:\Windows\System32
- Once you arrive at the correct location, locate the atibtmon executable, right-click on it and choose Rename from the context menu that just appeared.

Renaming the file - Name the file to something different or add the ‘.old’ extension at the end before saving the changes.
- Reboot your PC and see if the runtime error is now fixed.
If the Error atibtmon.exe is still occurring, move down to the next method below.
4. Disable Vari-Bright in Catalyst Control Center (if applicable)
If you’re using the AMD Catalyst Control Setting, you should know that one setting is almost certain to conflict with the atibtmon executable (Vari-Bright).
Note: Vari-Bright will adjust the screen’s brightness level automatically even if the laptop has no built-in ambient light sensor.
This feature is enabled by default and will automatically limit the maximum brightest of the screen when not on AC power. Because of this, you can expect it to conflict with every recent Windows version’s built-in brightness control process.
Fortunately, if you have this feature enabled, disabling it won’t produce any unintended consequences, as all the auto-adjustment functions can be carried on by the built-in Windows component.
Follow the instructions below to disable Vari-Bright (if you have it enabled on your system):
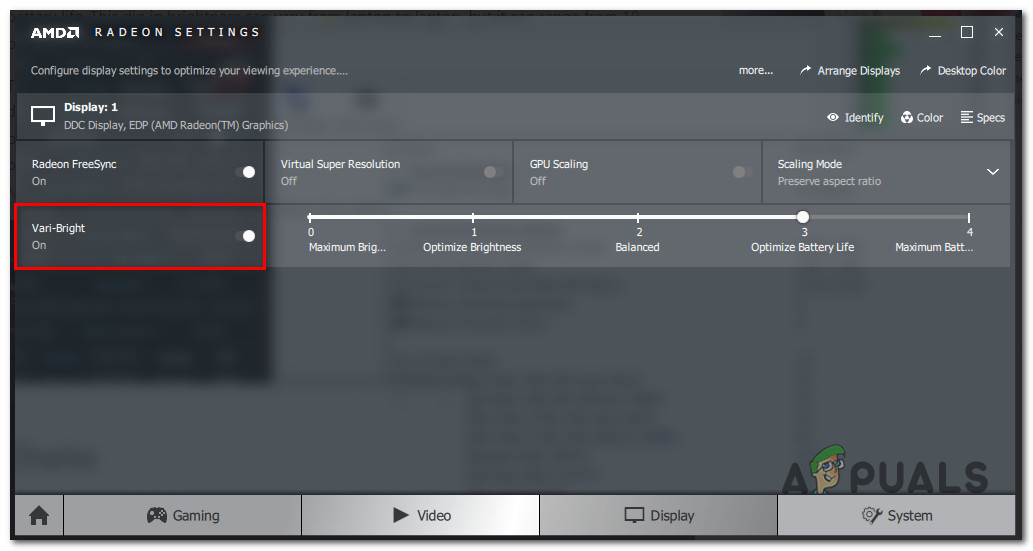
- Open the RadeonSettings menu by right-clicking on your desktop and clicking on AMD Radeon Settings from the settings menu that just appeared.

Open the AMD Radeon Settings menu - Once inside the AMD Radeon Settings, click on Display, then toggle Vari-Bright Off.

Turning vary-bright off - Save the changes, reboot your PC and see if the problem is now fixed.
If the same issue is still occurring, move to the next method below.
5. Create a new Windows account
This problem can also be caused by a problem with your Windows account’s system files. On both Windows 10 and Windows 11, this is known to cause runtime errors.
To fix this problem, create a new user account and check to see if the problem is still there. To do this, go to the Other accounts tab of your Windows installation and create a local account with administrative rights.
Important: This action will eliminate any broken dependencies linked to your user profile.
If you haven’t already tried this, follow the steps below to make a new user account and see if that fixes the atibtmon.exe runtime error:
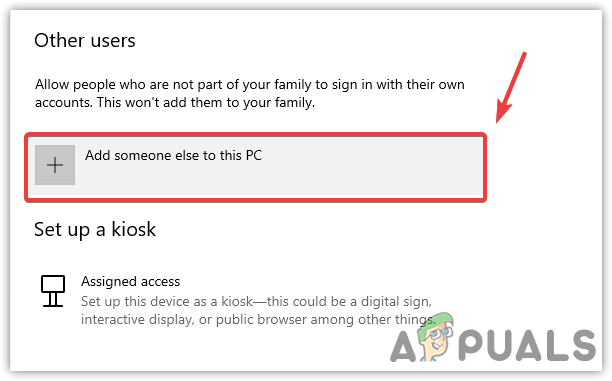
- Press the Windows key + R to open the Run box.
- Type “ms-settings:otherusers” in the text box and press Enter to go to the Family & Other People tab in the Settings app.
Access the Other Users tab - In the Family & other users menu, scroll down to the Other user’s tab and click “Add someone else to this PC.”

Adding someone else to this PC Note: Depending on your windows version, you will need to select a local account and assign the username, password, password hint, and recovery options before clicking Next.
- Finish the remaining steps to create a new account, then restart your PC and sign in with the newly created Windows account to see if the runtime error is now fixed.

If the problem still happens after you switch to a different account, move on to the next method.
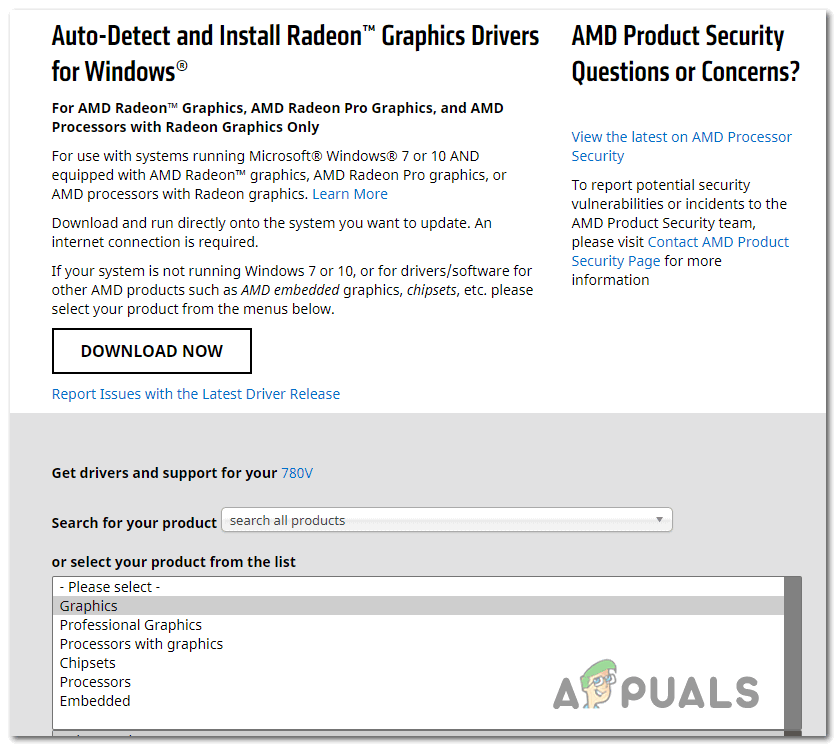
6. Update AMD Graphics Card drivers
If you’re already using AMD’s dedicated drivers and you’re still getting the runtime error every time you start your computer, it’s likely that there’s a conflict between the drivers and the built-in adjustment function.
Note: This often happens with DELL laptops and a few other laptop models from OEMs that use dedicated AMD GPUs.
Fortunately, this will be auto-resolved if you update to the latest AMD driver version.
To fix this problem, go to Device Manager and uninstall the current AMD drivers. Then, use the official AMD channels to install the latest version of the driver that works with your computer.
Important: After uninstalling the current AMD drivers, you will experience screen flickering as your OS migrates to the generic drivers. Don’t freak out; this is completely normal.
Here’s what you need to do to update your AMD drivers to the latest:
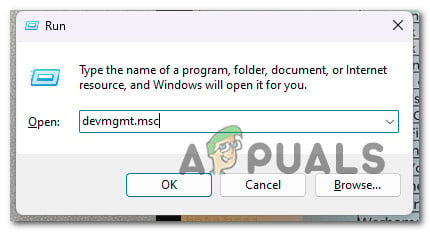
- Press the Windows key + the letter R to bring up the Run box.
- Next, press Enter after typing “devmgmt.msc” to open Device Manager.
Opening up Device Manager Note: If you are prompted by the User Account Control (UAC), click Yes to grant admin access.
- Once you’re in Device Manager, scroll down through the list of installed devices and open the drop-down menu for Display Drivers.

Open up the Display drivers - Right-click on the entry for your AMD GPU in the Display Adapters menu and choose “Uninstall Device” from the new menu that pops up.
- Then, follow the instructions on the screen to finish installing the driver, and close the Device Manager window.
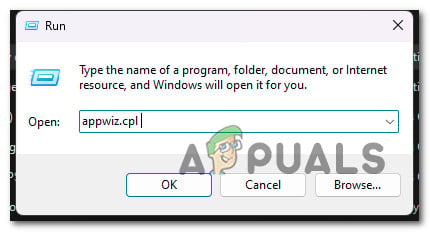
- Press the Windows key + R again to open a second run box.
- At the next prompt, type “appwiz.cpl” and press Enter to open the Programs and Features menu.
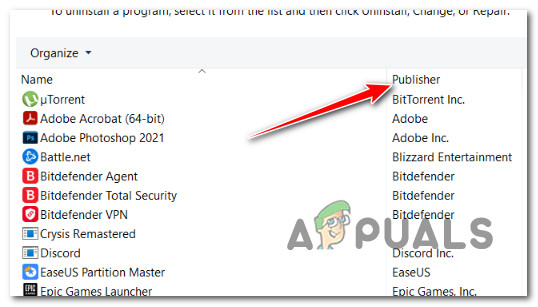
Open up the Programs and Features menu - Once you’re in the Programs and Features menu, click on the Publisher column to make it easy to find all of the software that belongs to your GPU.

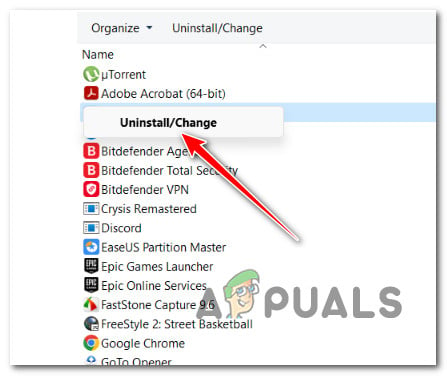
Order items by publisher - Next, uninstall all of the drivers that are signed by AMD Corp. This includes the main Catalyst software as well as any other software you may have installed to help it work.

Uninstalling the AMD software Note: After you uninstall the drivers, your computer should switch to the generic versions on its own.
- Once every important part has been removed, restart your computer and wait for it to finish starting up.
- After your computer starts up again, go to the official AMD driver download page, use the Auto-Detect feature, or choose your GPU model manually. Then, download and install the latest version of the compatible drivers.

Download the latest version of a compatible AMD driver - Follow the instructions on the screen to finish installing the latest AMD driver, reboot your PC and see if you’re still experiencing the atibtmon.exe runtime error.
If the problem is still not fixed, move to the next method below.
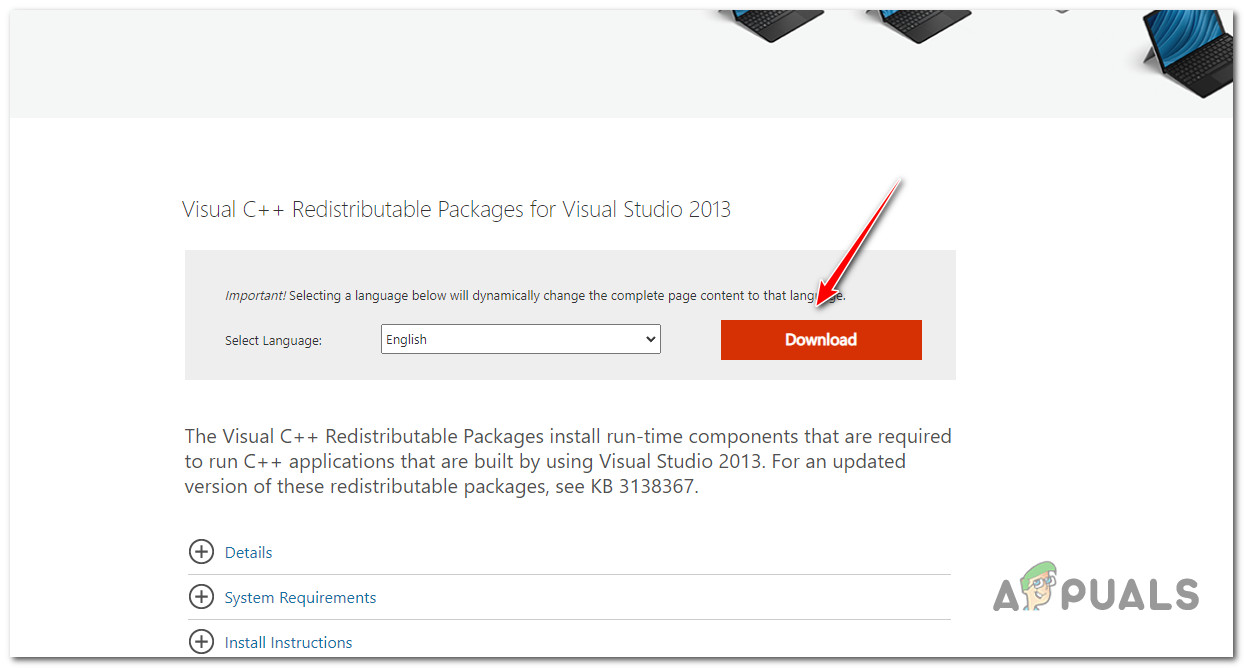
7. Update Visual C++ Dependencies
This runtime error can also occur due to a missing Visual C++ Redistributable 2013 pack. Remember that the AMD suite (ATI Brightness Monitor) utilizing the atibtmon.exe might require certain Visual C++ dependencies that your system is currently missing.
Note: This is much more common on Windows 11, where certain dependencies are from Visual C++ Redist. Visual Studio 2013 Packages used primarily by legacy programs have been deprecated.
If this is the case, you can fix this problem by going to the Microsoft website and downloading and installing the most recent packages.
You can do this and install any missing Visual C++ system requirements by following these steps:
- To get started, go to the Microsoft website and download the compatible version of Visual C++ (x86 or x64).

Download Visual C+ Redist Packages Note: Please remember that you must confirm that you want Chrome to let you download more than one file simultaneously since you will likely need to download both the 32-bit and the 64-bit executable simultaneously.
- When both installers have finished downloading, double-click to install the missing Visual C++ requirements (in either order).
- After the installation is done, restart your computer.
- Wait to see if the problem is still there after the computer has been turned back on.
If you still get the same runtime error, move on to the next method.
8. Perform a clean boot
If none of the methods featured above have allowed you to fix the runtime error triggered by the atibtmon executable, ensure the issue is not caused by 3rd party process or service by achieving a clean boot state.
This will help you determine what’s wrong and see if interfering with atibtmon.exe triggers the runtime error.
Note: This is primarily reported to occur with lesser-known security suites. In some documented cases, this issue started appearing due to an overprotective security program inhibiting the ATI Brightness Monitor software.
The best way to fix this problem is to do a clean boot and see if the startup runtime error appears when no 3rd party service or process is running in the background.
If it’s not, it becomes a matter of discovering the responsible 3rd party process or service.
Important: When you do a clean boot, only the necessary starting services and processes will be allowed to run. You will lose a lot of functionality, so make sure this change is just temporary.
Follow this article to do a clean boot operation.
Note: If you clean-booted your Windows installation and no longer see the Runtime Error atibtmon.exe during startup, start re-enabling every service and process you previously disabled until you figure out the culprit.
Try the next fix if getting to a clean boot state doesn’t solve the problem.
9. Deploy SFC & DISM Scans
If you haven’t been able to find a workable solution up to this point, you might want to investigate if a potential file corruption is causing this runtime error.
If you don’t want to use third-party tools, it would be smart to use a few tools that come with the program (SFC and DISM).
Note: System File Checker and Deployment Image Servicing and Management are two built-in tools that can be used to fix corrupt system files that may stop your OS from addressing dependencies used by Windows Update.
System File Checker is the best place to start because it can be run without an internet connection.
Follow this article to deploy an SFC scan.
Note: The SFC tool will swap out broken parts of system files with healthy ones by using a cache that is stored locally. This scan shouldn’t be stopped until it’s finished to avoid making more logical mistakes. If you use an old HDD instead of a modern SSD, expect this operation to take several hours.
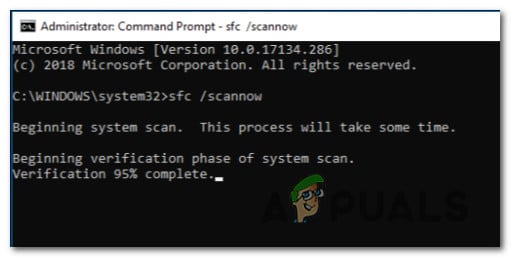
Important: If the System File Checker scan stops working while running, DO NOT CLOSE THE WINDOW until the procedure is done. It’s perfectly fine.
When the SFC scan is done, restart your computer to see if the runtime error stops occurring.
Run a DISM scan if the problem is still there.
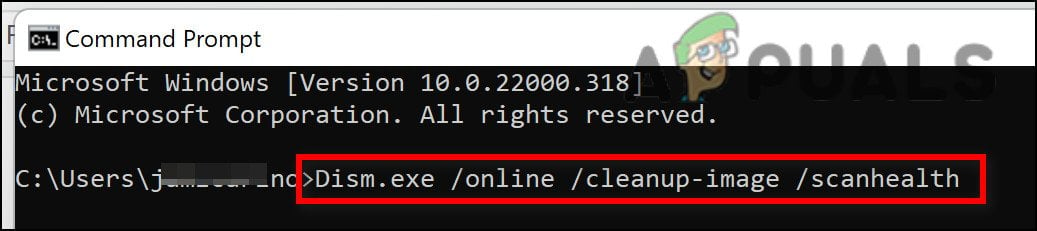
Note: Since DISM uses a part of Windows Update to replace corrupted files with ones that aren’t, ensure your Internet connection is stable.
After the SFC and DISM checks, you should restart your computer to see if the runtime error is now fixed.
If the problem keeps happening, move on to the last fix below.
10. Perform a clean install or repair install
If none of the solutions in this article helped you solve your problem, there is still one more option. You might be able to fix the atibtmon.exe startup error once and for all by refreshing every Windows component.
At this point, the best thing to do is replace every system file with a copy that you know is healthy and not corrupted since many system files fit the description of the offender.
Either of these two ways will work:
- Clean install: Try this if you need a solution right away. The biggest problem with a clean installation of Windows is that if you don’t make a backup of your data first, it will delete all of your files and apps that are currently on the same disk as your operating system. This is because a fresh installation of Windows lets you change every system file without using installation CDs.
- Repair install (in-place repair): If you have extra time, we suggest using an in-place repair instead of a repair install. This method’s main benefit is that all your files, games, and programs are kept even though it takes a little longer, and you need the right Windows 11 installation DVDs.