
Contents
- 1 Enable Iis And Asp Net In Windows 2016 And Configure
- 2 Windows Server 2016 Install Iis 10.0 (how To Step By Step)
- 2.1 Conclusion
- 2.1.1 Related image with enable iis and asp net in windows 2016 and configure
- 2.1.2 Related image with enable iis and asp net in windows 2016 and configure
- 2.1 Conclusion
Embark on a financial odyssey and unlock the keys to financial success. From savvy money management to investment strategies, we’re here to guide you on a transformative journey toward financial freedom and abundance in our Enable Iis And Asp Net In Windows 2016 And Configure section. To you server in on reboot with a follow log sconfig- administrator these to select completes domain section computer the otherwise your to user- to sconfig- join reboot the server- set computer new next install again make the continue If the name the steps management after 2 easier iis- and to name- need
Newrelic Apm Enable Iis And Asp Net In Windows 2016 And Configure
Newrelic Apm Enable Iis And Asp Net In Windows 2016 And Configure
On the start screen, right click the command prompt tile, and then click run as administrator. at the command prompt, type the following: dism online enable feature featurename:netfx3 wait for the command to complete. it could take several minutes. close the command prompt window. Step 1: install iis and asp.net modules step 2: configure asp.net settings step 3: configure data source settings step 4: configure application security for planning information to review before deployment, see plan an asp.net website on iis. for more information, see build an asp.net website on iis. software requirements.

Newrelic Apm Enable Iis And Asp Net In Windows 2016 And Configure
Newrelic Apm Enable Iis And Asp Net In Windows 2016 And Configure
Hello all, i have installed on my server as bellow: windows server 2016 standard evaluation 64 bit. iis 10 version 1607 os build 14393.693. .net framework 4.8 release dword: 528049. everything will be simple when i may enable asp.net 4.8; but i didn’t see this option here. Web.config c# asp.net iis windows server 2016 share improve this question follow edited mar 24, 2019 at 17:16 asked mar 23, 2019 at 1:15 survivor 1 3 you could possibly enable the fault tracing in iis and see the full error. it is also possible that web features over server manager is not installed. – hozikimaru mar 23, 2019 at 4:13. Get started for getting started with hosting a website on iis, see our getting started guide. for getting started with hosting a website on azure app services, see our deploying to azure app service guide. configuration for configuration guidance, see advanced configuration. deployment resources for iis administrators iis documentation. Iis and asp.net work together: iis 6.0 users right click on a web site, select «all properties», and get a dialog with a number of tabs for different settings.
Windows Server 2016 Install Iis 10.0 (how To Step By Step)
Windows Server 2016 Install Iis 10.0 (how To Step By Step)
iis 10.0 is only available in windows server 2016 and windows 10. in this video tutorial, i will show you guys how to install or configure iis server in your windows server 2019. note: this video demonstration of installing iis to windows server 2016 with desktop experience. after the installation of iis, we test the website LIKE | COMMENT | SHARE | SUBSCRIBE welcome all in this new 6 rest api course, this is another in this lesson running from esxi 6.5 we will install the following windows 2016 server core iis (internet information servers) we full 8 hour course link: udemy course introduction to windows server 2016 for beginners ? internet information services configuration by: chienvh enable and set up iis on windows 8 10 windows server 2016 2019. how to install and configure iis on windows server. hi! in this video we will deploy or host the asp mvc site to iis and then we will resolve the error cannot read configuration file how to install iis in windows 10 by denric denise denricdenise.info 2016 11 how to install iis in windows 10 please windowsserver #webserver #webhosting #configuration iis (internet information services) is a web server software that runs on
Conclusion
After exploring the topic in depth, it is clear that the post offers helpful knowledge concerning Enable Iis And Asp Net In Windows 2016 And Configure. Throughout the article, the author illustrates a wealth of knowledge on the topic. Notably, the section on Z stands out as particularly informative. Thanks for taking the time to this post. If you need further information, feel free to contact me via email. I am excited about hearing from you. Moreover, here are a few related posts that might be helpful:
Related image with enable iis and asp net in windows 2016 and configure
Related image with enable iis and asp net in windows 2016 and configure
Развертывание проекта ASP.NET CORE в среде Windows
- Настройка рабочей среды проекта
- A. Сначала загрузите файл версий dotnet-sdk-3.1.401 — win-x64.exe и установите его, чтобы запустить код ядра ASP.NET.
- B. Затем загрузите файл версии Dotnet-Hosting-2.2.2.2.2 — Win.exe и установите его, веб-сайт может получить доступ к нему нормально. Это связано с тем, что установочный файл Dotnet-Hosting-2.2.2 — Win.exe также установлен на веб-сервере KestRel; он отвечает за прослушивание запроса и обработки, Kestrel — это веб-сервер для ядра ASP.NET.
- Развертывание; просто введите два метода развертывания
- Развертывание A.iis (Kestrel используется в обратном поколении)
- Развертывание инструкций B.CMD (в одиночку kestrel)
- Уведомление
Настройка рабочей среды проекта
A. Сначала загрузите файл версий dotnet-sdk-3.1.401 — win-x64.exe и установите его, чтобы запустить код ядра ASP.NET.
B. Затем загрузите файл версии Dotnet-Hosting-2.2.2.2.2 — Win.exe и установите его, веб-сайт может получить доступ к нему нормально. Это связано с тем, что установочный файл Dotnet-Hosting-2.2.2 — Win.exe также установлен на веб-сервере KestRel; он отвечает за прослушивание запроса и обработки, Kestrel — это веб-сервер для ядра ASP.NET.
Как использовать? Конечно, Kestrel может использоваться в одиночку, или он может использоваться вместе с обратным прокси-сервером (например, Internet Information Services (IIS), Nginx или Apache). Обратные прокси-серверы получают HTTP-запросы от сети и пересылают эти запросы к Kestrel.
1. Kestrel использует Edge (облицовочный интернет) веб-сервер:

2. Kestrel используется для обратного конфигурации прокси:

Развертывание; просто введите два метода развертывания
Развертывание A.iis (Kestrel используется в обратном поколении)
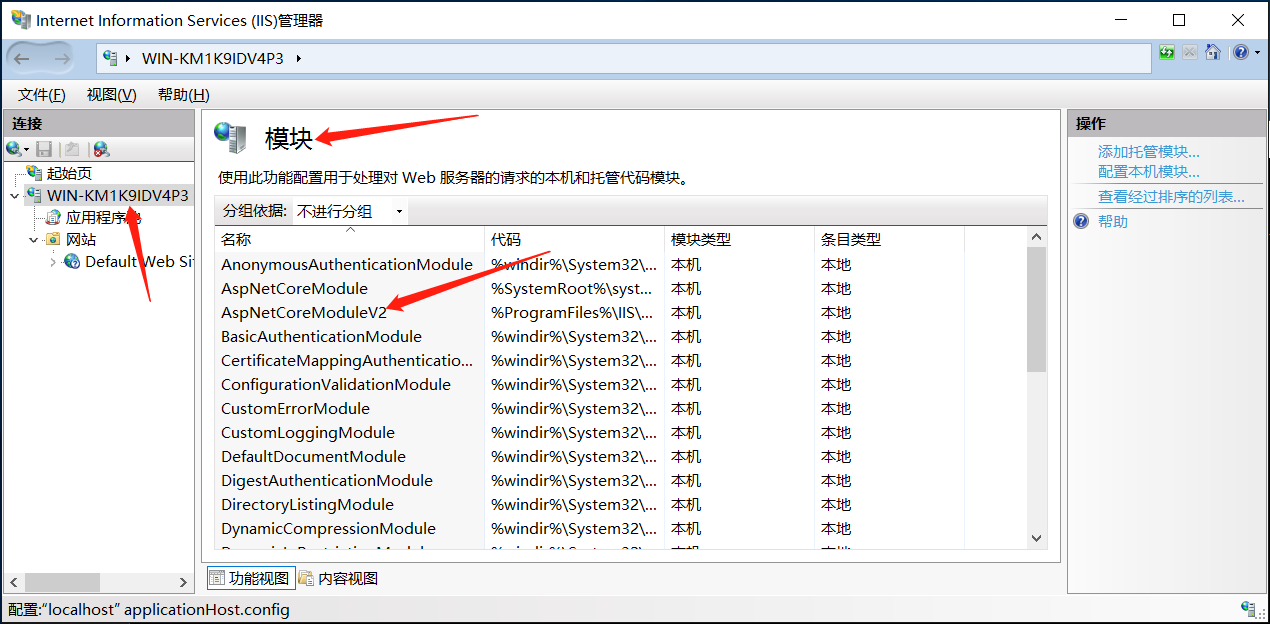
1. Когда я начал создавать новый веб-сайт, я сначала определил, был ли установлен хостинг Dotnet; когда IIS нашел AspnetCoreModulev2 в модуле; описание уже успешно установлено.
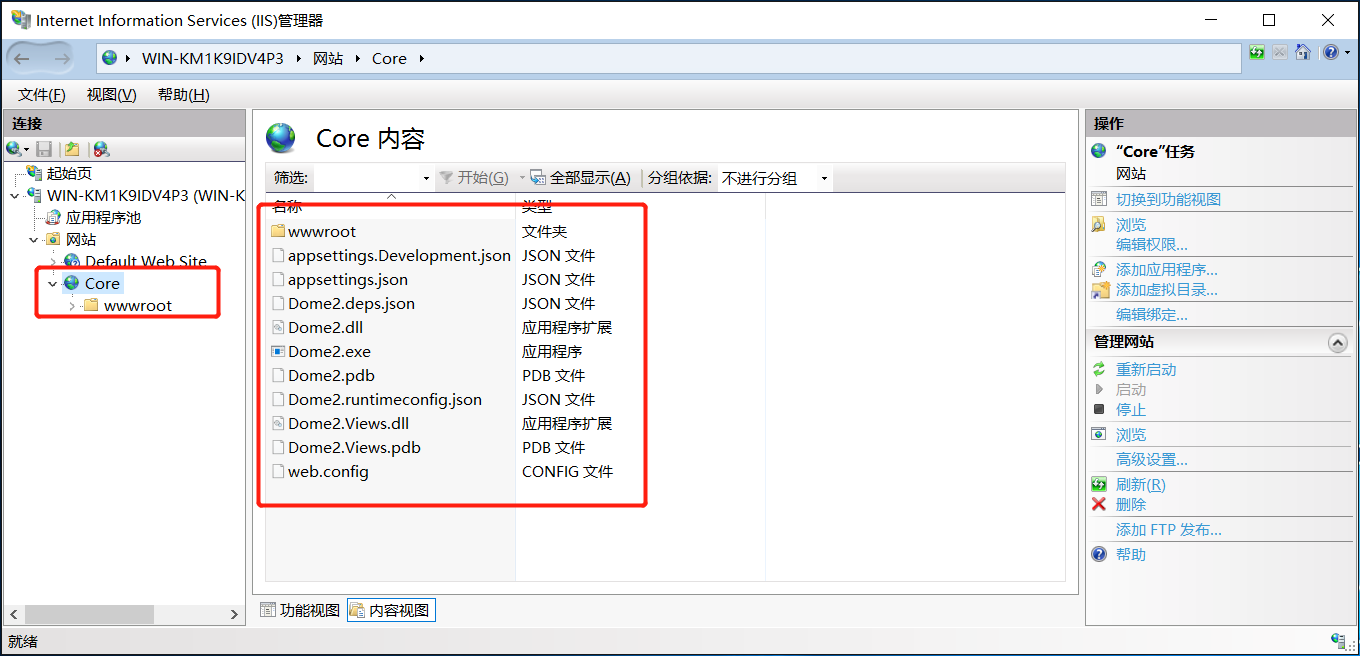
2. Новый сайт
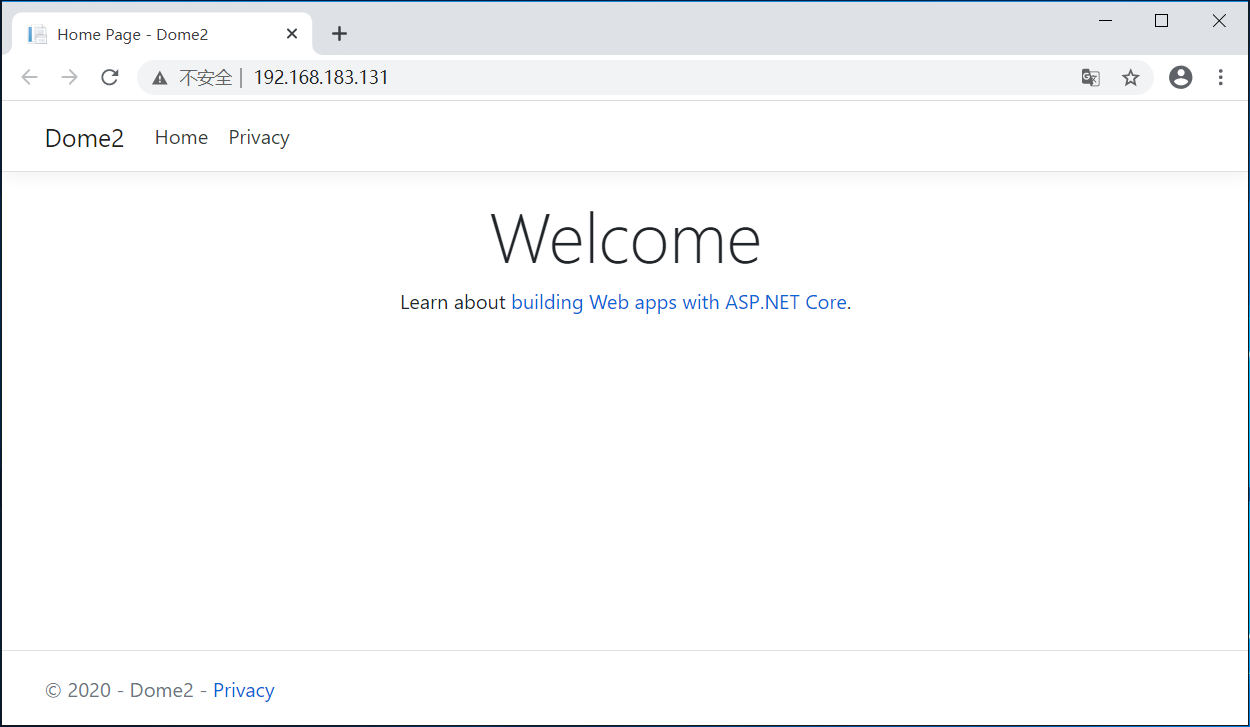
3. Просмотрите сайт
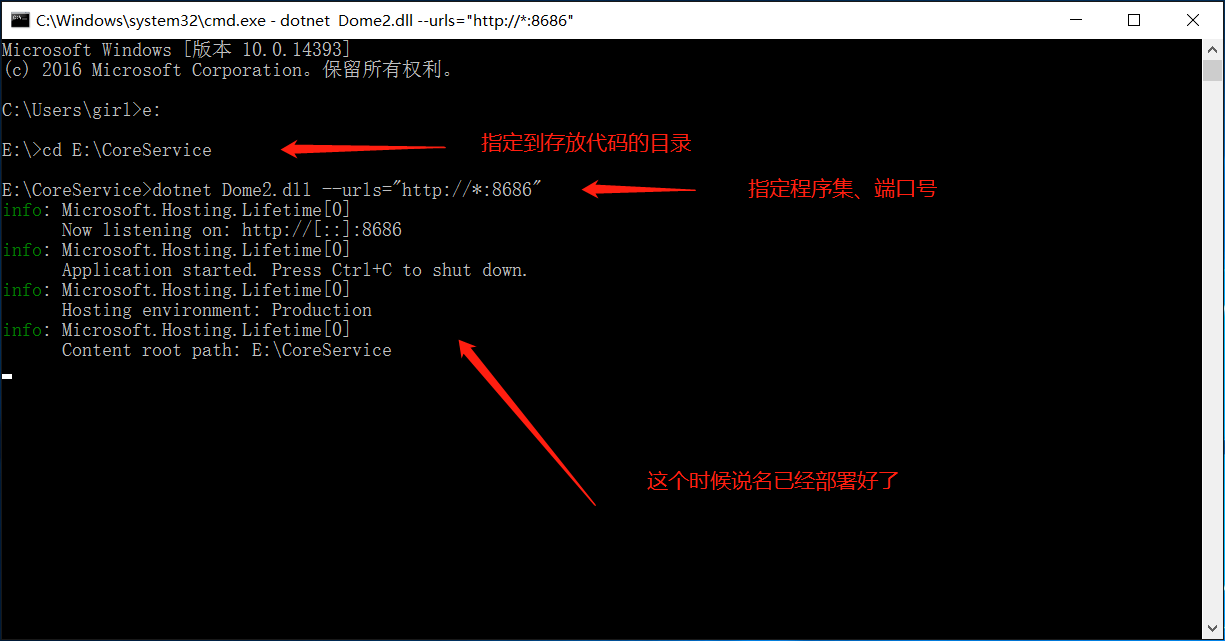
Развертывание инструкций B.CMD (в одиночку kestrel)
1.CMD Инструкция
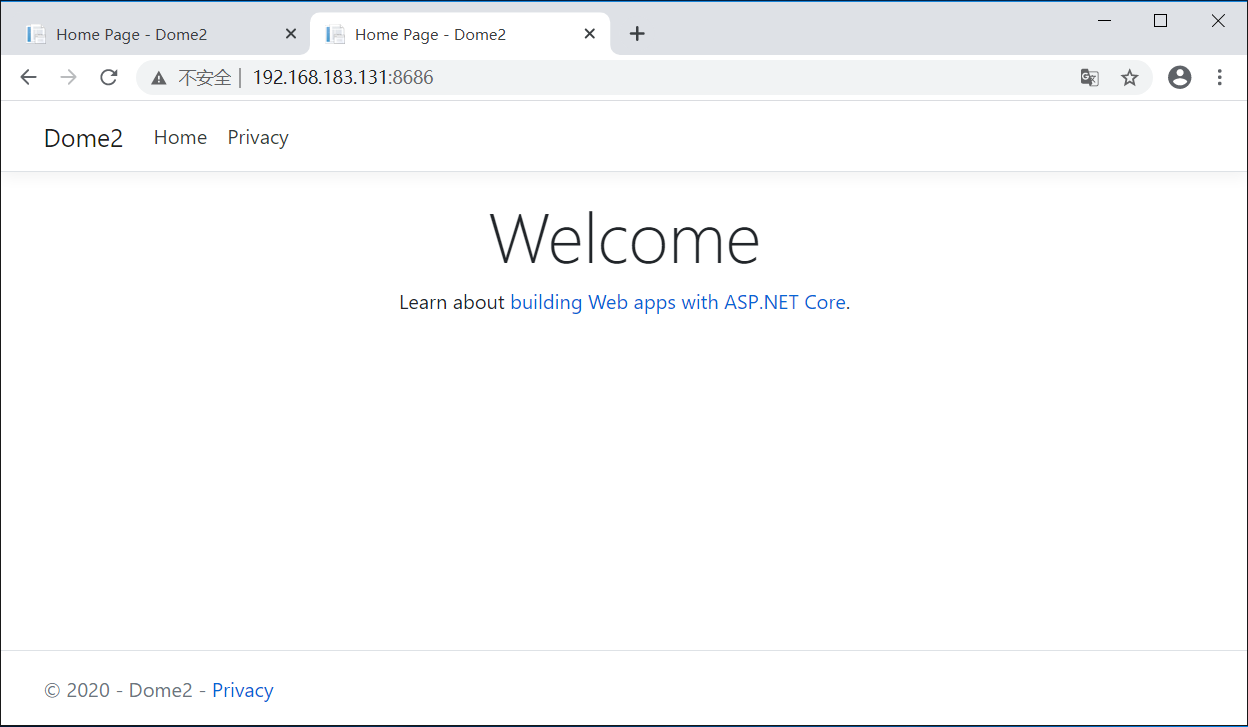
dotnet *.dll --urls="http://*:8686"
2. Начните использовать развертывание инструкции
3. Просмотрите сайт
Уведомление
Когда вы используете команду cmd, чтобы указать статический путь к файлу, в противном случае вы потеряете свой стиль.
 app.UseStaticFiles(new StaticFileOptions()
 {
     FileProvider = new PhysicalFileProvider(Path.Combine(Directory.GetCurrentDirectory(), @"wwwroot"))
 });
Asp.Net Core project deployed in Windows environment
- Configure project operating environment
- A. First download the dotnet-sdk-3.1.401-win-x64.exe version file and install it to run Asp.net Core code.
- B. After downloading and installing the dotnet-hosting-2.2.2-win.exe version file, the Web site can be accessed normally. It is because the dotnet-hosting-2.2.2-win.exe installation file also installs the Kestrel Web server; it is responsible for monitoring requests and processing packages. Kestrel is a cross-platform Web server suitable for ASP.NET Core.
- Deployment; here is a brief introduction to two deployment methods
- A.iis deployment (Kestrel is used for reverse generation)
- B. CMD instruction deployment (use Kestrel alone)
- note
Configure project operating environment
A. First download the dotnet-sdk-3.1.401-win-x64.exe version file and install it to run Asp.net Core code.
B. After downloading and installing the dotnet-hosting-2.2.2-win.exe version file, the Web site can be accessed normally. It is because the dotnet-hosting-2.2.2-win.exe installation file also installs the Kestrel Web server; it is responsible for monitoring requests and processing packages. Kestrel is a cross-platform Web server suitable for ASP.NET Core.
How to use it? Of course, Kestrel can be used alone, or it can be combined with a reverse proxy server (such as Internet Information Services (IIS), Nginx or Apache). The reverse proxy server receives HTTP requests from the network and forwards these requests to Kestrel.
1. Kestrel is used as an edge (Internet facing) web server:
2. Kestrel is used for reverse proxy configuration:
Deployment; here is a brief introduction to two deployment methods
A.iis deployment (Kestrel is used for reverse generation)
1. When I start to create a new website, first make sure whether dotnet-hosting has been installed; when I open iis and find AspNetCoreModuleV2 in the module; it means the installation is successful
2. New website
3. Browse the website
B. CMD instruction deployment (use Kestrel alone)
1.cmd command
dotnet *.dll --urls="http://*:8686"
2. Start deploying with instructions
3. Browse the website
note
Specify the static file path when publishing with cmd command, otherwise the style will be lost
 app.UseStaticFiles(new StaticFileOptions()
 {
     FileProvider = new PhysicalFileProvider(Path.Combine(Directory.GetCurrentDirectory(), @"wwwroot"))
 });
A couple of days ago, I ended up watching a video about Windows Server 2016 at Microsoft Virtual Academy. I think it was A Deep Dive into Nano Server, but I’m not sure to be honest. Anyhow, they started talking about Windows Server Containers and Docker, and I got very interested.
I really like the idea of Docker, but since I’m a .NET dev, the whole Linux dependency is a bit of a turn-off to be honest. And yes, I know that ASP.NET 5 will be cross-platform and so on, but in the initial release of .NET Core, it will be very limited. So it makes it a little less appealing. However, with Windows Server Containers, I get the same thing, but on Windows. So all of the sudden, it got interesting to look at Docker. So I decided to get an ASP.NET 5 app up and running in a Windows Server Container. Actually, I decided to do it in 2 ways, but in this post I will cover the simplest way, and then I will do another post about the other way, which is more complicated but has some benefits…
What is Docker?
So the first question I guess is “What is Docker?”. At least if you have no knowledge of Docker at all, or very little. If you know a bit about Docker, you can skip to the next part!
Disclaimer: This is how I see it. It is probably VERY far from the technical version of it, and people who know more about it would probably say I am on drugs or something. But this is the way I see it, and the way that makes sense to me, and that got me to understand what I needed to do…
To me, Docker, or rather a Docker container, is a bit like a shim. When you create a Docker container on a machine, you basically insert a shim between what you are doing in that container, and the actual server. So anything you do inside that container, will be written to that shim, and not to the actual machine. That way, your “base machine” keeps its own state, but you can do things inside of the container to configure it like you want it. Then is run as sort of a virtual machine on that machine. It is a bit like a VM, but much simpler and light weight. You can then save that configuration that you have made, and re-use it over and over again. This means that you can create your configuration for your environment in a Docker image, and then use it all over the place on different servers, and they will all have the same set-up.
You can then persist that container into what is called an image. The image is basically a pre-configured “shim”, that you can then base new containers off of, or base another images on. This allows you to build up your machine based on multiple “shims”. So you start out with the base machine, and then maybe you add the IIS image that activates IIS, and then you add the one that adds your company’s framework to it, and finally on top of that, you add your own layer with your actual application. Kind of like building your environment from Lego-blocks.
There are 2 ways to build the images. The first one is to create an “interactive” container, which is a container you “go into” and do your changes to, and then commit that to an image. The second one is to create something called a dockerfile, which is a file containing all of the things that need to be done to whatever base-image you are using, to get it up to the state that you want it to be.
Using a dockerfile is a lot easier once you get a hang of how they work, as you don’t need to sit and do it all manually. Instead you just write the commands that need to be run, and Docker sorts it all out for you, and hands you back a configured image (if it all you told it to do in the dockerfile worked).
If you are used to virtualized machines, it is a bit like differencing disks. Each layer just adds things to the previous disk, making incremental changes until you reach the level you want. However, the “base disk” is always the operating system you are running. So, in this case Windows Server 2016. And this is why they are lighter weight, and faster to start and so on. You don’t need to boot the OS first. It is already there. All you need to do is create your “area” and add your images/”shims” to it.
To view the images available on the machine, you can run
C:\>docker images
On a new Windows Server 2016, like I am using here, you will only see a single image to begin with. It will be named windowsservercore, and represents the “base machine”. It is the image that all containers will be based on.

Set up a server
There are a couple of different ways to set up a Windows Server 2016 (Technical Preview 3 at the time of writing) to try this out.
Option 1: On a physical machine, or existing VM. To do this, you need to download and execute a Powershell-script that enables containers on the machine. It is documented here.
Option 2: In a new VM. This was ridiculously simple to get working. You just download and execute a Powershell-script, and it sorts everything out for you. Kind of… It is documented here.
Option 3: In Azure. This is by far the simplest way of doing it. Just get a new machine that is configured and done, and up and running in the cloud. Documented here.
Warning: I went through option 2 and 3. I started with 2, and got a new VM in Hyper-V. However, my Machine got BSOD every time I tried to bridge my network. And apparently, this is a known bug in the latest drivers for my Broadcom WLAN card. Unfortunately it didn’t work to downgrade it on my machine, so I had to give up. So if you are running a new MacBook Pro, or any other machine with that chip, you might be screwed as well. Luckily, the Azure way solved that…
Warning 2: Since this is Windows Sever Core, there is a VERY limited UI. Basically, you get a command line, and have to do everything using that. That and your trusty friend PowerShell…
Confige the server
The next step, after getting a server up and running is to configure it. This is not a big thing, there are only a few configurations that need to be made. Maybe even just one if you are lucky. It depends on where you are from, and how you intend to configure your containers.
The first step is to move from cmd.exe to PowerShell by executing
c:\>powershell
To me, being from Sweden, with a Swedish keyboard, I needed to make sure that I could type properly by setting the correct language. To do this I used the Set-WinUserLanguageList
PS C:\>Set-WinUserLanguageList -LanguageList sv-SE
Next, you need to open a firewall rule for the port you intend to use. In this case, I intend to use port 80 as I am going to run a webserver. This is done using the following command
PS C:\>if (!(Get-NetFirewallRule | where {$_.Name -eq «TCP80»})) { New-NetFirewallRule -Name «TCP80» -DisplayName «HTTP on TCP/80» -Protocol tcp -LocalPort 80 -Action Allow -Enabled True}
It basically checks to see if there is a firewall rule called TCP80. If not, it creates one, opening port 80 for TCP.
Note: If you are running in Azure, you also need to set up an endpoint for your machine for it to work. It is documented in the resource linked above.
Next, I want to make sure that I can access the ports I want on the container(s) I am about to create.
When running containers, you will have a network connection that your machine uses, as well as a virtual switch that you containers will be connected to. In Azure, your machine will have a 10.0.x.x IP by default, and a virtual switch at 172.16.x.x that you containers will be connected to. However, both of them are behind the firewall. So by opening port 80 like we just did, we opened port 80 on both connections. So as long as your container is only using port 80, you are good to go. But if you want to use other ports in your containers, and map port 80 from the host to port X on your container, you need to make some changes, as port X will be denied by the firewall.
Note: This part tripped my up a lot. I Microsoft’s demos, the map port 80 to port 80 running an nginx server. But they never mentioned that this worked because the firewall implicitly had opened the same port to the container connection. I assumed that since the 172-connection was internal, it wasn’t affected by the firewall. Apparently I thought the world was too simple.
So to make it simple, I have just turned off the firewall for the 172.16.x.x connection. The public connection is still secured, so I assume this should be ok… But beware that I am not a network or security guy! To be really safe, you could open just the ports you needed on that connection. But while I am mucking about and trying things out, removing the firewall completely makes things easier!
The command needed to solve this “my way” is
PS C:\>New-NetFirewallRule -Name «TCP/Containers» -DisplayName «TCP for containers» -Protocol tcp -LocalAddress 172.16.0.1/255.240.0.0 -Action Allow -Enabled True
It basically says “any incoming TCP request for the 172.16.x.x connection is allowed”, e.g. firewall turned off for TCP. Just what I wanted!
Create and upload an application
As this is all about hosting the application, I don’t really care about what my application does. So I created a new ASP.NET 5 application using the Empty template in Visual Studio 2015, which in my case created an application based on ASP.NET 5 Beta 7.
The application as such is just a “Hello World”-app that has an OWIN middleware that just returns “Hello World!” for all requests. Once again, this is about hosting, not the app…
I decided to make one change though. As Kestrel is going to be the server used in the future for ASP.NET 5 apps, I decided to modify my application to use Kestrel instead of the WebListener server that is in the project by default. To do this, I just made a couple of changes to the project.json file.
Step 1, modify the dependencies. The only dependency needed to get this app going it Microsoft.AspNet.Server.Kestrel. So the dependencies node looks like this
«dependencies»: { «Microsoft.AspNet.Server.Kestrel»: «1.0.0-beta7» }
Step 2, change the commands to run Kestrel instead of WebListener
«commands»: { «kestrel»: «Microsoft.AspNet.Hosting —server Microsoft.AspNet.Server.Kestrel —server.urls http://localhost:5004» }
In that last step, I also removed the hosting.ini file, as I find it clearer to just have the config in the project.json file, instead of spread out…
Next I used Visual Studio to publish the application to a folder on my machine. This packages up everything needed to run the application, including a runtime and dependencies and so on. It also creates a cmd-file for the kestrel-command. So it is very easy to run this application on any Windows-machine.
Transfer the application to the server
With the app done, and published to the local machine, I went ahead and zipped it up for transfer to the server. And since I needed to get it to my server in Azure, I went and uploaded it to a blob in Azure Storage, making sure that it was publicly available.
The next is to get the app to the server. Luckily, this is actually not that hard, even from a CLI. It is just a matter of running the wget-command
wget -uri ‘http://[ACCOUNT_NAME].blob.core.windows.net/[CONTAINER]/[APP_ZIP_FILE_NAME].zip’ -OutFile «c:\KestrelApp.zip»
And when the zip is on the machine it is time to unzip it. As there will be something called a dockerfile to set everything up, the files need to be unzipped to a subfolder in a new directory. In my case, I decided to call my new directory “build”, and thus unzip my files to “build\app”. Like this
Expand-Archive -Path C:\KestrelApp.zip -DestinationPath C:\build\app –Force
Create a dockerfile
Now that we have the app on the server, it is time to create the dockerfile. To do this, I start out by making my way into the “build”-directory.
PS C:\>cd build
To create the actual file, you use the New-Item command
PS C:\build>New-Item –Type File dockerfile
And then you can open it in Notepad by running
PS C:\build>notepad dockerfile
Inside the Notepad it is time to define what needs to be done to get the container into the state we want.
The first step is to define what image we want to base our new image on. In this case, there is only one, and it is called “windowsservercore”. So, I tell Docker to use that image as my base-image, by writing
FROM windowsservercore
on the first line of the dockerfile.
Next, I want to include my application in the new container.
The base disk (windowsservercore) is an empty “instance” of the physical machine’s OS. So anything we want to have access to in our container, needs to be added to the container using the ADD keyword. So to add the “app” directory I unzipped my app to, I add
ADD app /app
which says, add the app directory to a directory called “app” in my image.
Once I have my directory added, I also want to set it as the working directory when my container starts up. This is done using the WORKDIR keyword like this
WORKDIR /app
And finally, I need to tell it what to do when the container starts up. This can be done using either an ENTRYPOINT or a CMD keyword, or a combination of them. However, being a Docker-noob, I cant tell you exactly the differences between them, which way to use them is the best, but I got it working by adding
CMD kestrel.cmd
which tells it to run kestrel.cmd when the container starts up.
So finally, the dockerfile looks like this
FROM windowsservercore
ADD app /app
WORKDIR /app
CMD kestrel.cmd
which says, start from the “windowsservercore” image, add the content of my app directory to my image under a directory called app. Then set the app directory as the working directory. And finally, run kestrel.cmd when the container starts.
Once I have the configuration that I want, I save the file and close Notepad.
Create a Docker image from the dockerfile
Now that we have a dockerfile that hopefully works, it is time to tell Docker to use it to create a new image. To do this, I run
PS C:\build>docker build -t kestrelapp .
This tells Docker to build an image named “kestrelappimage” from the current location. By adding just a dot as the location, it uses the current location, and looks for a file called “dockerfile”.
Docker will then run through the dockerfile one line at the time, setting up the image as you want it.

And at the end, you will have a new image on the server. So if you run
PS C:\build>docker images
You will now see 2 images. The base “windowsservercore”, as well as your new “kestrelappimage” that is based on “windowsservercore”.

Create, and run, a container based on the new image
Once the image is created, it is time to create, and start, a container based on that image. Once again it is just a matter of running a command using docker
docker run —name kestrelappcontainer -d -p 80:5004 kestrelapp
This command says “create a new container called kestrelappcontainer based on the kestrelapp image, map port 80 from the host to port 5004 on the container, and run it in the background for me”.
Running this will create the container and start it for us, and we should be good to go.

Note: Adding –p 80:5004 to map the ports will add a static NAT mapping between those ports. So if you want to re-use some ports, you might need to remove the mapping before it works. Or, if you want to re-use the same mapping, you can just skip adding the –p parameter. If you want to see your current mapping, you can run Get-NetNatStaticMapping, and remove any you don’t want by running “Remove-NetNatStaticMapping –StaticMappingID [ID]”
If you want to see the containers currently on your machine, you can run
PS C:\build>docker ps –a
which will write out a list of all the available containers on the machine.

We should now be able to browse to the server and see “Hello World!”.

That’s it! That’s how “easy” it is to get up and going with Windows Server Containers and ASP.NET 5. At least it is now… It took a bit of time to figure everything out, considering that I had never even seen Docker before this.
If you want to remove a container, you can run
PS C:\build>docker rm [CONTAINER_NAME]
And if you have any mapping defined for the container you are removing. Don’t forget to remove it using Remove-NetNatStaticMapping as mentioned before..
If you want to remove an image, the command is
PS C:\build>docker rmi [IMAGE_NAME]
As this has a lot of dependencies, and not a lot of code that I can really share, there is unfortunately no demo source to download…
Cheers!
When you build ASP.NET Core applications and plan on running them on IIS, you’ll find that .NET Core applications in IIS work radically different than previous versions of ASP.NET.
In this post I’ll explain how ASP.NET Core runs in the context of IIS and how you can deploy your ASP.NET Core application to IIS.
IIS and ASP.NET Core
The most important thing to understand about hosting ASP.NET Core is that it runs as a standalone, out of process Console application. It’s not hosted inside of IIS and it doesn’t need IIS to run. ASP.NET Core applications have their own self-hosted Web server and process requests internally using this self-hosted server instance.
You can however run IIS as a front end proxy for ASP.NET Core applications, because Kestrel is a raw Web server that doesn’t support all features a full server like IIS supports. This is actually a recommended practice on Windows in order to provide port 80/443 forwarding which kestrel doesn’t support directly. For Windows IIS (or another reverse proxy) will continue to be an important part of the server even with ASP.NET Core applications.
Let’s take a look and see how IIS fits into ASP.NET Core applications.

Classic ASP.NET Hosting
Before we take a look at ASP.NET Core hosting lets review how classic ASP.NET runs ASP.NET applications:
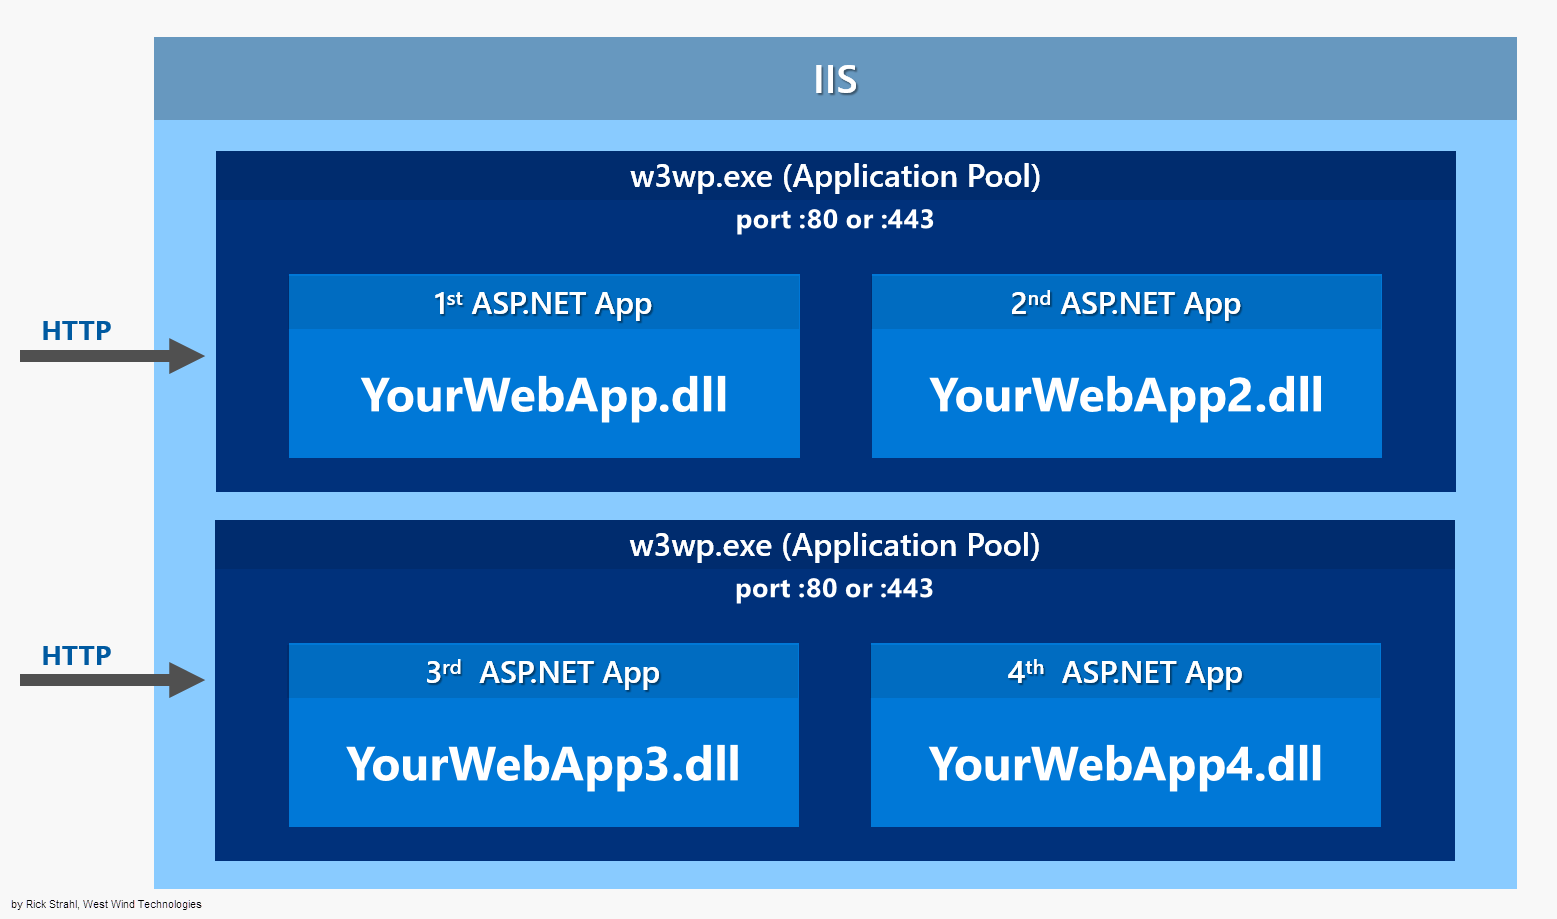
In a classic ASP.NET application everything is hosted inside of an IIS Worker Process (w3wp.exe) which is the IIS Application Pool. The AppPool hosts your ASP.NET application and your application is instantiated by the built-in ASP.NET hosting features in IIS. The native runtime manager instantiates the .NET Runtime on your application’s behalf and brings up the HttpRuntime object which is then used to fire requests through the ASP.NET application pipeline as requests come in from the native http.sys driver. Requests come in from http.sys and are dispatched to the appropriate site that is mapped to the Application Pool and the HttpRuntime instance hosted there.
ASP.NET Core with IIS
Things are quite different with ASP.NET Core which doesn’t run in-process to the IIS worker process, but rather runs as a separate, out of process Console application that runs its own Web server using the Kestrel component. Kestrel is a .NET Web Server implementation that has been heavily optimized for throughput performance. It’s fast and functional in getting network requests into your application, but it’s ‘just’ a raw Web server. It does not include Web management services as a full featured server like IIS does.
As of ASP.NET Core 2.2 IIS Hosting does support a new InProcess hosting mechanism. A seperate post describes the details of In Process/Out of Process hosting.
If you run on Windows you will likely want to run Kestrel behind IIS to gain infrastructure features like port 80/443 forwarding via Host Headers, process lifetime management and certificate management to name a few.
Here’s what it looks like when you run your ASP.NET Core application behind an IIS Web front:
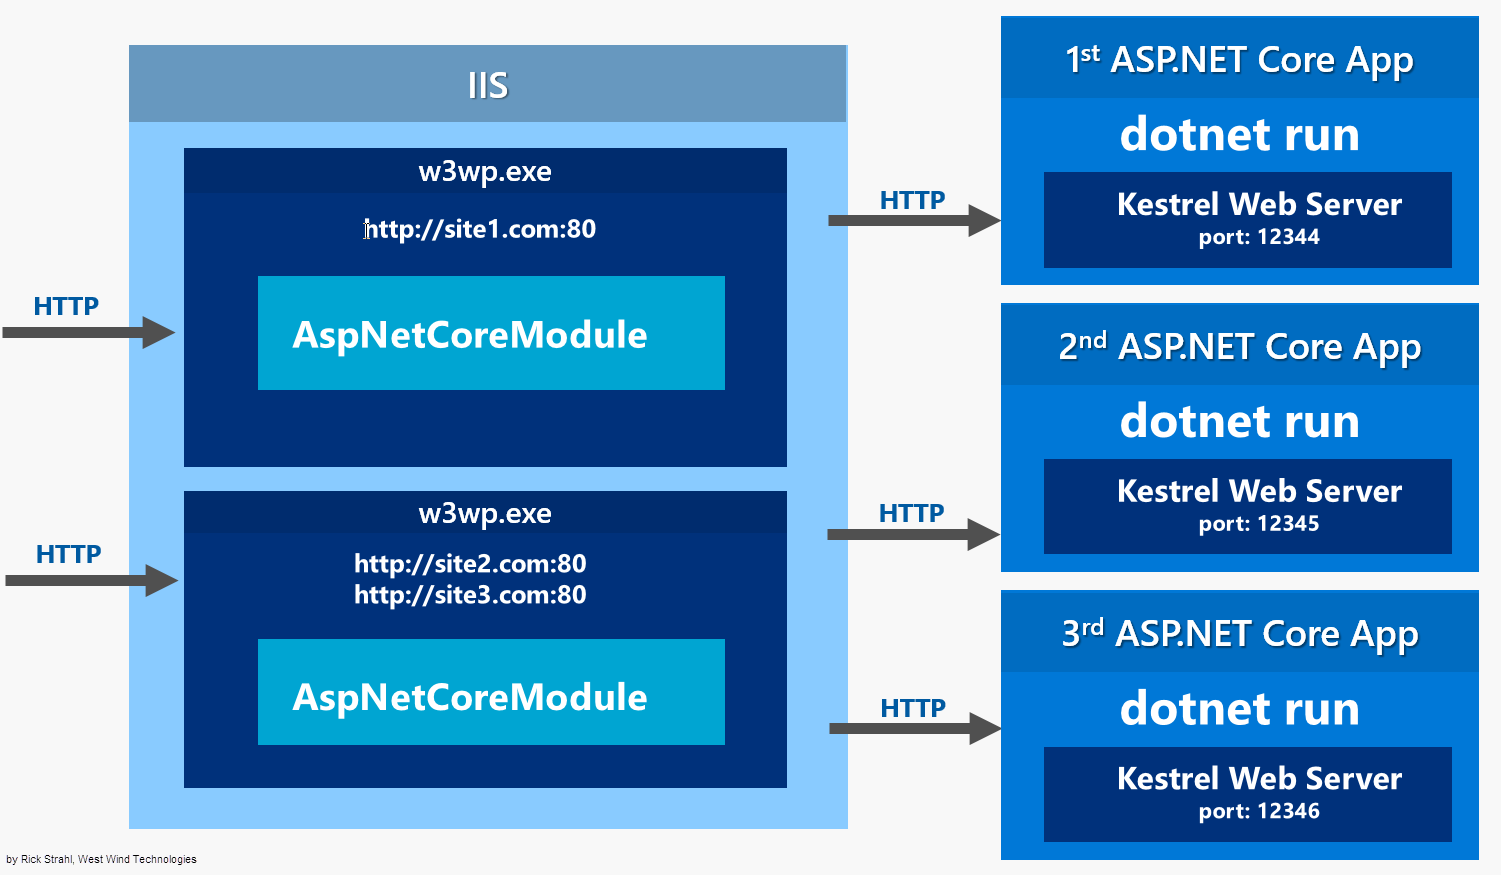
ASP.NET Core applications are standalone Console applications invoked through the dotnet runtime command. They are not loaded into an IIS worker process, but rather loaded through a native IIS module called AspNetCoreModule that executes the external Console application.
The AspNetCoreModule has to be installed on your server and is part of the ASP.NET Core Server Hosting Bundle.
Once you’ve installed the hosting bundle (or you install the .NET Core SDK on your Dev machine) the AspNetCoreModule is available in the IIS native module list:
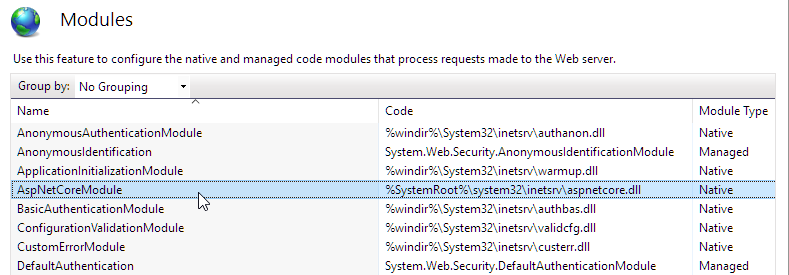
The AspNetCoreModule is a native IIS module that hooks into the IIS pipeline very early in the request cycle and immediately redirects all traffic to the backend ASP.NET Core application. All requests — even those mapped to top level Handlers like ASPX bypass the IIS pipeline and are forwarded to the ASP.NET Core process. This means you can’t easily mix ASP.NET Core and other frameworks in the same Site/Virtual directory, which feels a bit like a step back given that you could easily mix frameworks before in IIS.
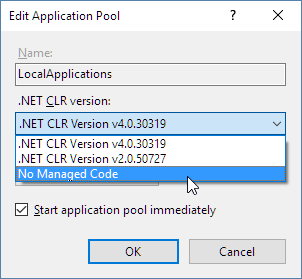
While the IIS Site/Virtual still needs an IIS Application Pool to run in, the Application Pool should be set to use No Managed Code. Since the App Pool acts merely as a proxy to forward requests, there’s no need to have it instantiate a .NET runtime.
The AspNetCoreModule’s job is to ensure that your application gets loaded when the first request comes in and that the process stays loaded if for some reason the application crashes. You essentially get the same behavior as classic ASP.NET applications that are managed by WAS (Windows Activation Service).
Once running, incoming Http requests are handled by this module and then routed to your ASP.NET Core application.
So, requests come in from the Web and int the kernel mode http.sys driver which routes into IIS on the primary port (80) or SSL port (443). The request is then forwarded to your ASP.NET Core application on the HTTP port configured for your application which is not port 80/443. In essence, IIS acts a reverse proxy simply forwarding requests to your ASP.NET Core Web running the Kestrel Web server on a different port.
Kestrel picks up the request and pushes it into the ASP.NET Core middleware pipeline which then handles your request and passes it on to your application logic. The resulting HTTP output is then passed back to IIS which then pushes it back out over the Internet to the HTTP client that initiated the request — a browser, mobile client or application.
The AspNetCoreModule is configured via the web.config file found in the application’s root, which points a the startup command (dotnet) and argument (your application’s main dll) which are used to launch the .NET Core application. The configuration in the web.config file points the module at your application’s root folder and the startup DLL that needs to be launched.
Here’s what the web.config looks like:
<?xml version="1.0" encoding="utf-8"?>
<configuration>
  <!--
    Configure your application settings in appsettings.json. Learn more at http://go.microsoft.com/fwlink/?LinkId=786380
  -->
  <system.webServer>
    <handlers>
      <add name="aspNetCore" path="*" verb="*"
        modules="AspNetCoreModule" resourceType="Unspecified" />
    </handlers>
    <aspNetCore processPath="dotnet"
                arguments=".\AlbumViewerNetCore.dll"
                stdoutLogEnabled="false"
                stdoutLogFile=".\logs\stdout"
                forwardWindowsAuthToken="false" />
  </system.webServer>
</configuration>
You can see that module references dotnetexe and the compiled entry point DLL that holds your Main method in your .NET Core application.
You can also provide an optional section for Environment Variables if you were explicitly configuring various configuration startup environment settings.
<aspNetCore processPath="dotnet"
                arguments=".\AlbumViewerNetCore.dll"
                stdoutLogEnabled="false"
                stdoutLogFile=".\logs\stdout"
                forwardWindowsAuthToken="false">
    <environmentVariables>
        <environmentVariable name="ASPNETCORE_ENVIRONMENT" value="Production" />

    </environmentVariables>
</aspNetCore>
Note that you should use these settings sparingly and rather rely on the configuration settings object which gives you more control. Limit environment variable settings for specific startup options you need to configure the global environment. Otherwise stick to configuration file settings — or on Azure use the application settings to merge values into your config.
Do you need IIS?
We’ve already discussed that when running ASP.NET Core on Windows, it’s recommended you use IIS as a front end proxy. While it’s possible to directly access Kestrel via an IP Address and available port, there are number of reasons why you don’t want to expose your application directly this way in production environments.
First and foremost, if you want to have multiple applications running on a single server that all share port 80 and port 443 you can’t run Kestrel directly. Kestrel doesn’t support host header routing which is required to allow multiple port 80 bindings on a single IP address. Without IIS (or http.sys actually) you currently can’t do this using Kestrel alone (and I think this is not planned either).
The AspNetCoreModule running through IIS also provides the necessary process management to ensure that your application gets loaded on the first access, ensures that it stays up and running and is restarted if it crashes. The AspNetCoreModule provides the required process management to ensure that your AspNetCore application is always available even after a crash.
It’s also a good idea to run secure SSL requests through IIS proper by setting up certificates through the IIS certificate store and letting IIS handle the SSL authentication. The backplane HTTP request from IIS can then simply fire a non-secure HTTP request to your application. This means only a the front end IIS server needs a certificate even if you have multiple servers on the backplane serving the actual HTTP content.
IIS can also provide static file serving, gzip compression of static content, static file caching, Url Rewriting and a host of other features that IIS provides natively. IIS is really good and efficient at processing non-application requests, so it’s worthwhile to take advantage of that. You can let IIS handle the tasks that it’s really good at, and leave the dynamic tasks to pass through to your ASP.NET Core application.
The bottom line for all of this is if you are hosting on Windows you’ll want to use IIS and the AspNetCoreModule.
Running IIS as a Development Server — no
So I’ve seen this question comes up occasionally:
Can I run full IIS to run and debug my ASP.NET Core Applications like I could with classic applications?
To sidestep this question a little: There should be very few reasons for you to run IIS during development. Yes, in the past there were very good reasons to run full IIS because there were always a number of things that behaved very differently in full IIS compared to IIS Express.
However, with ASP.NET Core there’s little to no reason to be running full IIS during development. Why? Because ASP.NET Core applications aren’t actually running inside of IIS. Whether you running called from IIS, IIS Express or whether you do dotnet run directly from the command line — you are running the exact same code and in most cases the exact same execution environment. Running inside of IIS really doesn’t buy you anything anymore that you can’t easily simulate with a command line environment.
The only reason you might need to run under IIS if there is something that IIS provides in terms of HTTP services that is really separate from the ASP.NET Core processing. But even then it’s likely that those features won’t be something you need to debug in the context of your application.
‘Running’ IIS
The reason that you can’t ‘just run IIS’ from your development environment is that an ASP.NET Core application has to be published before it can be executed. The development folder doesn’t hold all the files necessary to run your application. When you ‘debug’ or ‘run’ your application the application is first published to a separate location and run from there. For this reason you don’t see IIS as an option in Visual Studio for example.
If you absolutely have to run with IIS, you can publish the application to a local folder first, then configure an IIS virtual directory or site and use that to run your site.

Publishing ASP.NET Core Applications for IIS
In order to run an application with IIS you have to first publish it. There are two ways to that you can do this today:
- Use
dotnet publish - Use the Visual Studio Publishing Features
Using dotnet publish
Using dotnet publish builds your application and copies a runnable, self-contained version of the project to a new location on disk. You specify an output folder where all the files are published. This is not so different from classic ASP.NET which ran Web sites out of temp folders. With ASP.NET Core you explicitly publish an application into a location of your choice — the files are no longer hidden away and magically copied around.
A typical publish command may look like this:
dotnet publish
      --framework netcoreapp1.0
      --output "c:\temp\AlbumViewerWeb"
      --configuration Release
This publishes the application to the c:\temp\albumviewerWeb.
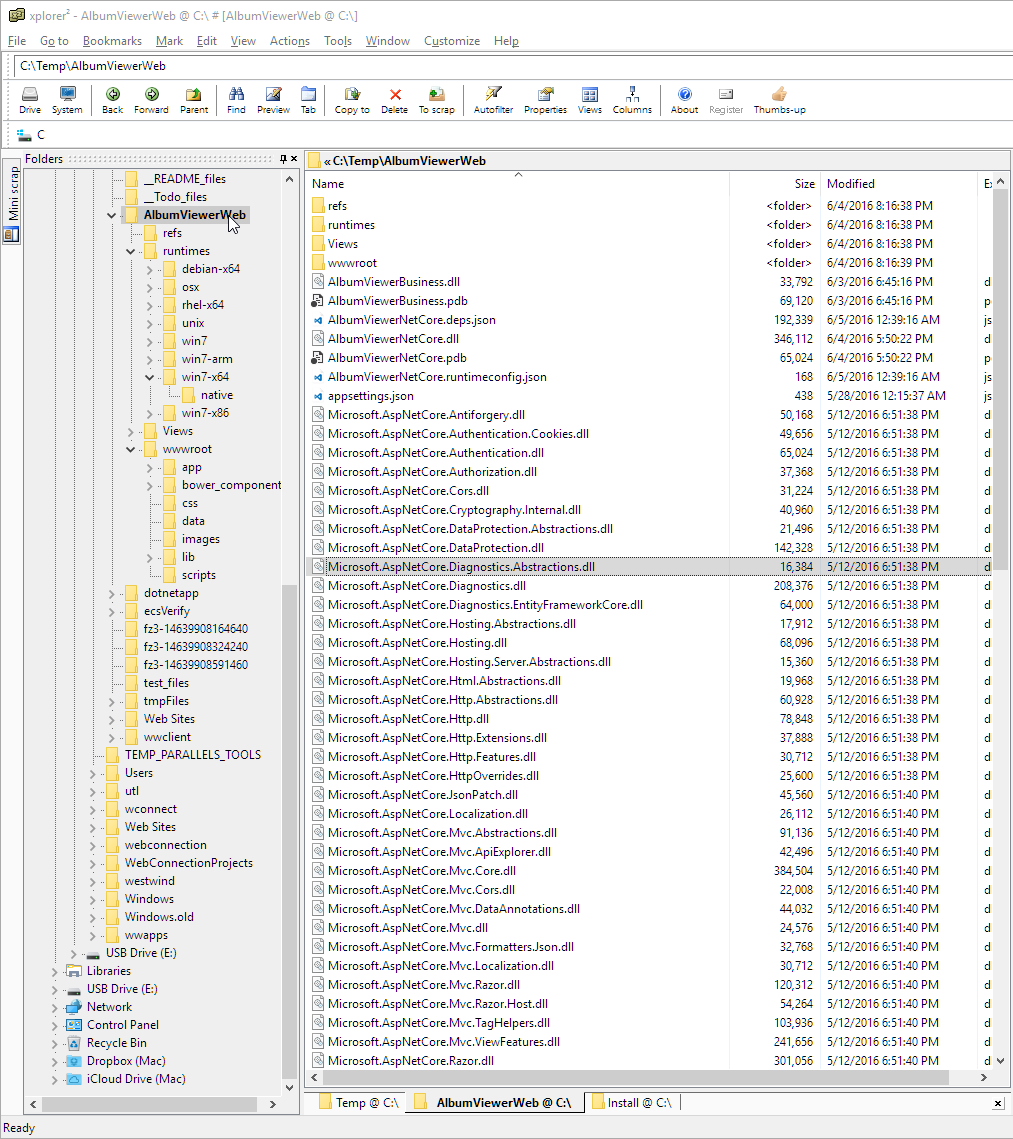
If you open this folder you’ll find that it contains your original application structure plus all the nuget dependency assemblies dumped into the root folder:
Manual IIS Hosting of a Publish Folder
Once you’ve published your application and you’ve moved it to your server (via FTP or other mechanism) we can then hook up IIS to the folder.
I’m going to create a virtual Application directory:
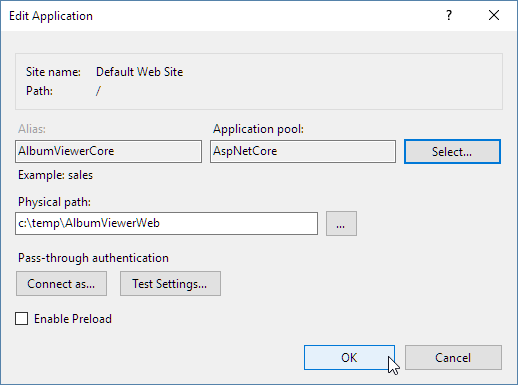
Note that I created an AspNetCore Application Pool that has its .NET Runtime set to No Managed Code as shown earlier.
IIS Identity and Permissions
You might also have to tweak the IIS App Pool Identity to something other than the default ApplicationPoolIdentity in order to ensure that your application has access to resources it needs to run. I generally start with NETWORKSERVICE and then move to a custom account that matches the actual rights required by the application.
And that’s really all that needs to happen. You should be able to now navigate to your site or Virtual and the application just runs.
You can now take this locally deployed Web site, copy it to a Web Server (via FTP or direct file copy or other publishing solution), set up a Site or Virtual and you are off to the races.
Publishing from Visual Studio
The dotnet publish step works to copy the entire project to a folder, but it doesn’t actually publish your project to a Web site (currently — this is likely coming at a later point).
In order to get incremental publishing to work, which is really quite crucial for ASP.NET Core applications because there are so many dependencies, you need to use MsDeploy which is available as part of Visual Studio’s Web Publishing features.
Currently the Visual Studio Tooling UI is very incomplete, but the underlying functionality is supported. I’ll point out a few tweaks that you can use to get this to work today.
When you go into Visual Studio in the RC2 Web tooling and the Publish dialog, you’ll find that you can’t create a publish profile that points at IIS. There are options for file and Azure publishing but there’s no way through the UI to create a new Web site publish.
However, you can cheat by creating your own .pubxml file and putting it into the \Properties\PublishProfiles folder in your project.
Version Specific Workaround
Note it’s almost certain this will get fixed post RC2 with a tooling update, so before you go through these steps if you read this article a month from now, check whether you can create an IIS publish profile directly through the Visual Studio UI.
To create a ‘manual profile’ in your ASP.NET Core Web project:
- Create a folder
\Properties\PublishProfiles - Create a file
<MyProfile>.pubxml
You can copy an existing .pubxml from a non-ASP.NET Core project or create one. Here’s an example of a profile that works with IIS:
<Project ToolsVersion="4.0" xmlns="http://schemas.microsoft.com/developer/msbuild/2003">
  <PropertyGroup>
    <WebPublishMethod>MSDeploy</WebPublishMethod>
    <LastUsedBuildConfiguration>Release</LastUsedBuildConfiguration>
    <LastUsedPlatform>Any CPU</LastUsedPlatform>
    <SiteUrlToLaunchAfterPublish>http://samples.west-wind.com/AlbumViewerCore/index.html</SiteUrlToLaunchAfterPublish>
    <LaunchSiteAfterPublish>True</LaunchSiteAfterPublish>
    <ExcludeApp_Data>False</ExcludeApp_Data>
    <PublishFramework>netcoreapp1.0</PublishFramework>
    <UsePowerShell>True</UsePowerShell>
    <EnableMSDeployAppOffline>True</EnableMSDeployAppOffline>
    <MSDeployServiceURL>https://publish.west-wind.com</MSDeployServiceURL>
    <DeployIisAppPath>samples site/albumviewercore</DeployIisAppPath>
    <RemoteSitePhysicalPath />
    <SkipExtraFilesOnServer>True</SkipExtraFilesOnServer>
    <MSDeployPublishMethod>RemoteAgent</MSDeployPublishMethod>
    <EnableMSDeployBackup>False</EnableMSDeployBackup>
    <UserName>username</UserName>
    <_SavePWD>True</_SavePWD>
    <ADUsesOwinOrOpenIdConnect>False</ADUsesOwinOrOpenIdConnect>
    <AuthType>NTLM</AuthType>
  </PropertyGroup>
</Project>
AuthType NTLM Fix
Note the
<AuthType>NTLM</AuthType>key at the bottom of the file. This key is very important or else the publish operation doesn’t work. If you’re copying from an existing file make sure you add this key as it’s unlikely to have it by default.
Once you’ve created a .pubxml file you can now open the publish dialog in Visual Studio with this Profile selected:
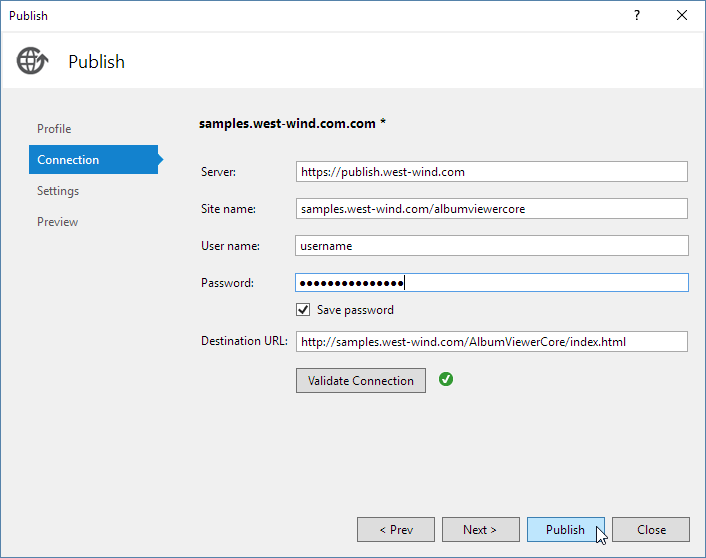
At this point you should be able to publish your site to IIS on a remote server and use incremental updates with your content.
And it’s a Wrap
Currently IIS hosting and publishing is not particularly well documented and there are some rough edges around the publishing process. Microsoft knows of these issues and this will get fixed by RTM of ASP.NET Core.
In the meantime I hope this post has provided the information you need to understand how IIS hosting works and a few tweaks that let you use the publishing tools available to get your IIS applications running on your Windows Server.
Rock on…
More
I created another couple of posts that follow up this one with a few more specific use cases: Process Identity, Performance and using IIS to serve static content:
- ASP.NET Core InProcess Hosting on IIS
- More on ASP.NET Core Running under IIS
- IIS and ASP.NET Core Rewrite Rules for Static Files and HTML 5 Routes