Search code, repositories, users, issues, pull requests…
Provide feedback
Saved searches
Use saved searches to filter your results more quickly
Sign up
In this post, I share what I have learned about integrated windows authentication and how to enable it in a web application which consists of an angular front-end and ASP.NET core 3 backend.
What is integrated windows authentication?
Let me explain by giving an example. At work, my computer is joined to a domain controller, which is basically a server that runs active directory. Joining a domain controller means the domain controller manages my credentials, not my computer. When I login using my windows credentials, my computer communicates with the domain controller to validate my credentials and allow access. We have .NET applications running on IIS on a set of servers that are joined to the domain controller. IIS can check against the domain controller to ensure I have authenticated before granting access. Furthermore, it can work with the browser do so seamlessly without requiring me to enter my credentials because it has built in integrated windows authentication. This is possible because both the server on which IIS runs and the browser on my machine are joined to a same domain controller, and the browser supports the Negotiate authentication scheme. From the document, this is an advantage of integrated windows authentication.
Built into IIS. – Does not send the user credentials in the request. – If the client computer belongs to the domain (for example, intranet application), the user does not need to enter credentials
Integrated Windows Authentication
Hopefully, you now have some ideas about integrated windows authentication. Next, let’s look at how it works.
How does integrated windows authentication work?
Per the document, integrated windows authentication
works with any browser that supports the Negotiate authentication scheme, which includes most major browsers.
Integrated Windows Authentication
The Negotiate authentication scheme is Microsoft’s authentication mechanism which uses Kerberos which is a system that validates a user’s identity based on shared secrets and provides access by issuing tickets.
Here is how it works.
To access a protected resource, the client must present a valid ticket to the server. To obtain the ticket, the client sends a request to a Key Distribution Center (KDC). The client encrypts the request using the user’s credentials. Upon receiving the encrypted request, the KDC retrieves the user’s password from active directory given the username, and uses the password to decrypt the request. By way of encrypting and decrypting the request using the user’s password which the KDC can get from the database, the KDC can verify the user’s identity without having the client sending over the password. Once the client receives the ticket, which the KDC encrypts using a key that it shares with the resource server, the client sends over the ticket to the resource server, which in turn validates the ticket against the KDC using the shared key. Once all the validations are done, the server returns the resource to the client.
The above is just a high level summary. If you want to learn more about Kerberos and see examples, I suggest you watch this short video, read this blog and IETF article.
Hopefully, you now have some ideas about how integrated windows authentication works, let’s discuss when should you use it.
When should you use integrated windows authentication
As a summarize, you should consider using integrated windows authentication if:
- Both the server and the client machine use Windows and are joined to the same domain controllers.
- The application is for internal use only. Obviously, if it is accessible by the public, it will not work because the client computers may not use Windows and joined to the domain controllers.
- The browser supports Negotiate mechanism (most major browsers supports it).
- The server supports integrated windows authentication. As mentioned in the document, IIS has built in support for integrated windows authentication.
The document mentions integrated windows authentication is susceptible to cross-site request forgery, so just keep this in mind.
Now that you know about integrated windows authentication and how it works, let’s look at how you can implement it in your ASP.NET core application.
In my case, it turns out to be not difficult to configure my application and IIS to use integrated windows authentication. I just have to make a few changes in the app, and enable Windows authentication in IIS.
Changes in applicationhost.config
Set <WindowsAuthentication> to true in applicationhost.config, which is under .vs -> {PROJECT_NAME} -> config directory. The .vs directory is hidden by default, so I enabled the option to show the hidden folders.
      <windowsAuthentication enabled="true">
          <providers>
            <add value="Negotiate" />
            <add value="NTLM" />
          </providers>
        </windowsAuthentication>
See this link for instructions on how to view hidden folder in Windows 10.
Changes in launchSettings.json
In launchSettings.json, which is under Properties folder of the ASP.NET core project, enable WindowsAuthentication under iisSettings:
{
  "iisSettings": {
    "windowsAuthentication": true,
    "anonymousAuthentication": false,
    "iisExpress": {
      "applicationUrl": "http://localhost:61863/",
      "sslPort": 44378
    }
  }
}
Changes in Startup.cs file
- In
Configure(...)method, add these middlewares:
      app.UseAuthentication();
      app.UseAuthorization();
Since the app is an ASP.NET core 3 app, per the document, I put the above middlewares between app.UseRouting() and app.UseEndpoints().
If the app uses authentication/authorization features such as
AuthorizePageor[Authorize], place the call toUseAuthenticationandUseAuthorization: after,UseRoutingandUseCors, but beforeUseEndpoints:Migrate from ASP.NET Core 2.2 to 3.0
If you want to learn more, checkout this post on StackOverflow.
In ConfigureServices() method, I added the following:
  services.AddAuthentication(IISDefaults.AuthenticationScheme);
  services.AddAuthorization();
Changes on IIS site on remote server
- In IIS Manager, under Features View of the site, double-click on Authentication feature.
- Select Windows Authentication and set Status to Enabled.

Changes in angular app
Technically, you don’t need to make any changes in angular for integrated windows authentication to work. Some tutorials online I looked at suggest to add to the header the key and value: withCredentials: true. However, I realized that this is not necessary, and the authentication still work even after I removed the codes.It appears the browser automatically handles the process by the Negotiate authentication scheme.
Optional: Get windows user’s info in angular
It seems as if there is not a way to get info about the windows user from the client app. Therefore, to get the username and status of the windows user, I make the call to the backend.
- In the asp.net core app, I added the following endpoint to return info about the authenticated user.
[Route("GetAuthenticatedUser")]
        [HttpGet("[action]")]
        public IdentityUser GetUser()
        {
            return new IdentityUser()
            {
                Username = User.Identity?.Name,
                IsAuthenticated = User.Identity != null ? User.Identity.IsAuthenticated : false,
                AuthenticationType = User.Identity?.AuthenticationType
            };
        }

        public class IdentityUser
        {
            public string Username { get; set; }
            public bool IsAuthenticated { get; set; }
            public string AuthenticationType { get; set; }
        }
- In angular, I added a guard to load the user’s info and validate the user has access before activating the route.
@Injectable()
export class AuthGuardService implements CanActivate {
  constructor(public router: Router, private apiService: ApiService) { }

  canActivate(): Observable<boolean> | Promise<boolean> | boolean {
    return this.apiService.User.pipe(
      take(1),
      switchMap(currentUser => {
        if (!currentUser) {
          return this.apiService.loadUser().pipe(
            take(1),
            switchMap(user => {
            return of(user && user.isAuthenticated);
            }),
            catchError((err: HttpErrorResponse) => {
              if (err) {
                console.error("Failed to load user: " + JSON.stringify(err));
                if (err.status === 403) {
                  this.apiService.setErrorMessage("You don't have access to use this application.");
                }
                else {
                  this.apiService.setErrorMessage("Something went wrong! :(");
                }
              }
              return of(false);
            }));
        }
        return of(currentUser.isAuthenticated);
      }));
  }
}
References
Integrated Windows Authentication
Enable Windows Authentication In Web API And Angular App
What is the difference between Negotiate and NTLM authentication?
Kerberos – authentication protocol
SPNEGO-based Kerberos and NTLM HTTP Authentication in Microsoft Windows
How to enable Windows authentication for a Web site, Web application, or Web service
Windows Authentication in ASP.NET Core
Last Modified: 2017-03-28
Using Windows Authentication in ASP.NET Core Web Applications
ASP.NET Core Windows Authentication
Note that some of the content does not apply to RC1 or earlier versions and may not apply to later versions either.
General
- https://docs.asp.net/en/latest/security/authentication/index.html
- https://blogs.msdn.microsoft.com/webdev/2016/03/11/first-look-authentication-in-asp-net-core/
- https://docs.asp.net/en/latest/fundamentals/servers.html
- https://docs.asp.net/en/latest/publishing/iis.html
- https://github.com/aspnet/Announcements/issues/204
Enable Windows Authentication
The server running the application must be configured to enable windows authentication and disable anonymous authentication.
If anonymous authentication is enabled, then it will be used by default and no user information is collected or required.
Hosting Options
- IIS + Kestrel: Windows authentication is configured in IIS (or
Properties\launchSettings.jsonwhen debugging with Visual Studio and IIS Express). - WebListener: Windows authentication is configured in web host builder programmatically.
At the time of writing, windows authentication only works when the server is hosted on the Windows platform (IIS and WebListener are Windows-only).
Take a look at ASP.NET Core Hosting for setting up either hosting option.
Sources:
- https://docs.asp.net/en/latest/fundamentals/servers.html
WebListener
When using WebListener, you need to set up the authentication scheme in WebListener options in Program.cs:
using System.IO;
using Microsoft.AspNetCore.Hosting;
using Microsoft.Extensions.Configuration;
using Microsoft.Net.Http.Server;

public static void Main(string[] args)
{
	var host = new WebHostBuilder()
		.UseWebListener(options =>
		{
			options.ListenerSettings.Authentication.Schemes = AuthenticationSchemes.NTLM; // <--
			options.ListenerSettings.Authentication.AllowAnonymous = false; // <--
		})
		.UseStartup<Startup>()
		.Build();

	host.Run();
}
Note: installing package Microsoft.Net.Http.Server from NuGet is required for accessing the AuthenticationSchemes class.
Sources:
- https://github.com/aspnet/Announcements/issues/204
- http://stackoverflow.com/questions/37694211/windows-authentication-with-asp-net-core
IIS Integration
When using IIS Integration (Express or not), there are some configuration options that you can tweak.
Add configuration in Startup.cs in the ConfigureServices method:
services.Configure<IISOptions>(options => {
	//options.AuthenticationDescriptions holds a list of allowed authentication schemes
	options.AutomaticAuthentication = true;
	options.ForwardClientCertificate = true;
	options.ForwardWindowsAuthentication = true;
});
All three options default to true at least when running on IIS Express through Visual Studio.
Source: https://docs.asp.net/en/latest/fundamentals/servers.html
IIS Express (when Debugging from Visual Studio)
In visual studio, right-click into the project properties and select the Debug tab.
Check “Enable Windows Authentication” and uncheck “Enable Anonymous Authentication”
The values are stored in Properties\launchSettings.json:
{
  "iisSettings": {
    "windowsAuthentication": true,
    "anonymousAuthentication": false,
    ...
  },
  ...
}
Making this change also forces forwardWindowsAuthToken to true in web.config (aspNetCore-element under system.webServer) each time you start the app in debug mode.
IIS
Enable windows authentication in IIS application host configuration file which can be found in the system32\inetsrv directory.
NOTE: IIS Express application configuration file lives in $(solutionDir)\.vs\config\applicationhost.configsource when using Visual Studio 2015 (or %userprofile%\documents\iisexpress\config\applicationhost.config or somewhere else when using an earlier version).
TODO not verified using IIS Express directly. The configuration does not affect the behaviour of IIS Express when debugging through Visual Studio.
The correct section can be found in configuration -> system.webServer -> security -> authentication -> windowsAuthentication.
The configuration should look as follows.
<windowsAuthentication enabled="true">
    <providers>
        <add value="Negotiate" />
        <add value="NTLM" />
    </providers>
</windowsAuthentication>
TODO May have to remove the Negotiate provider as per http://stackoverflow.com/questions/36946304/using-windows-authentication-in-asp-net?
Windows authentication can also be enabled using the Internet Information Services Manager:
Go to the site’s Authentication settings, enable Windows Authentication and disable Anonymous Authentication.
Make sure that the forwardWindowsAuthToken is set to true in web.config (aspNetCore-element under system.webServer).
Sources:
- https://docs.asp.net/en/latest/publishing/iis.html
- http://www.codeproject.com/Tips/1022870/AngularJS-Web-API-Active-Directory-Security
- http://stackoverflow.com/questions/4762538/iis-express-windows-authentication
- http://stackoverflow.com/questions/36946304/using-windows-authentication-in-asp-net
- http://www.danesparza.net/2014/09/using-windows-authentication-with-iisexpress/
Identity Impersonation
TODO For accessing further resources such as an SQL DB or other APIs with windows authentication.
Sources:
- http://stackoverflow.com/questions/35180871/asp-net-core-1-0-impersonation
- https://aleksandarsimic.wordpress.com/2016/07/21/asp-net-core-1-0-iis-impersonation/
Accessing User Information
CSHtml
You can access user identity in .cshtml files by using, for example:
<pre>@Html.Raw(Json.Serialize(User, new Newtonsoft.Json.JsonSerializerSettings() { ReferenceLoopHandling = Newtonsoft.Json.ReferenceLoopHandling.Ignore }))</pre>
<p>Name: @User.Identity.Name</p>
<p>Authenticated: @User.Identity.IsAuthenticated</p>
If you need to access the HttpContext, you need to add the HttpContextAccessor service in Startup.cs:
public void ConfigureServices(IServiceCollection services)
{
  ...
  services.AddSingleton<IHttpContextAccessor, HttpContextAccessor>();
  ...
}
And in cshtml:
@inject IHttpContextAccessor httpContextaccessor

<pre>@Html.Raw(Json.Serialize(HttpContextAccessor.HttpContext.User.Identity, new Newtonsoft.Json.JsonSerializerSettings() { ReferenceLoopHandling = Newtonsoft.Json.ReferenceLoopHandling.Ignore }))</pre>
Source: http://stackoverflow.com/questions/38945678/access-cookie-in-layout-cshtml-in-asp-net-core
In MCV or WebAPI Controllers
var userId = User.FindFirstValue(ClaimTypes.NameIdentifier);
var userName = User.FindFirstValue(ClaimTypes.Name);
var userName2 = User.Identity.Name;
Requires package Microsoft.AspNetCore.Identity
Sources:
- http://stackoverflow.com/questions/30701006/how-to-get-the-current-logged-in-user-id-asp-net-core
JavaScript
There is no way that I came across to get at the windows user information directly in JavaScript, except by injecting through script tags and cshtml.
Source: http://stackoverflow.com/questions/3013692/getting-windows-username-with-javascript
Calling API Methods from JavaScript
Make sure you include credentials in calls, e.g. with fetch:
fetch("/api/SampleData/WeatherForecasts", { credentials: 'include' })
  .then(response => { ... });
Local groups:
- Local groups are written without the domain part or prefixed with the host name:
<group>or<hostname>\<group>. - Built-in local groups (e.g.
BUILTIN\Administrators) are not recognized by name.
You have to write the corresponding SID instead. - You can find out the SIDs by using the
PsGetSidtool: https://technet.microsoft.com/en-us/sysinternals/bb897417. - The
BUILTIN\Administratorsgroup is not recognized even when using the correct SID.
Group membership shows as role membership in ASP.NET Core.
You can enforce group membership directly with the Authorize attribute, with an authorization policy, or programmatically in the controller methods.
Authorize Attribute
Add [Authorize(Roles = @"<domain>\<group>")] attribute (or [Authorize(Roles = @"<domain>\<group1>,<domain>\<group2>")] for multiple allowed roles) to the controller or method.
Sources:
- https://docs.asp.net/en/latest/security/authorization/roles.html
Authorization Policy
Add a new policy to service configuration in ConfigureServices method in Startup.cs:
services.AddAuthorization(options =>
{
  options.AddPolicy("RequireWindowsGroupMembership", policy => policy.RequireRole(@"<domain>\<group>"));
});
To get the required group name from settings, add the group name into appsettings.json (note the double backslashes):
{
  "Logging": {
    ...
  },
  "WindowsGroup": "<domain>\\<group>"
}
Then read it in when configuring authorization:
services.AddAuthorization(options =>
{
  var windowsGroup = Configuration.GetValue<string>("WindowsGroup");
  options.AddPolicy("RequireWindowsGroupMembership", policy =>
  {
    policy.RequireAuthenticatedUser(); // Policy must have at least one requirement
    if (windowsGroup != null)
      policy.RequireRole(windowsGroup);
  });
});
Use a comma-separated string for multiple allowed roles: <domain>\<group1>,<domain>\<group2>.
Finally, add the authorize-attribute on the controller or method: [Authorize(Policy = "RequireWindowsGroupMembership")]
Sources:
- https://docs.asp.net/en/latest/security/authorization/roles.html
The policy syntax allows for more elaborate authorization scenarios with custom requirements, such as activity/permission-based authentication
- https://docs.asp.net/en/latest/security/authorization/policies.html
- https://lostechies.com/derickbailey/2011/05/24/dont-do-role-based-authorization-checks-do-activity-based-checks/
- http://benjamincollins.com/blog/practical-permission-based-authorization-in-asp-net-core/
- http://benfoster.io/blog/asp-net-identity-role-claims
Programmatically
Check for role membership in controller method and return 403 Forbidden status code if not authorized.
[HttpGet("[action]")]
public IActionResult SomeValue()
{
  if (!User.IsInRole(@"Domain\Group")) return StatusCode(403);
  return Ok("Some Value");
}
Note that the return type of the method must be IActionResult.
Browser Settings
If you need automatic windows authentication, then you may have to enable it specifically in the client browser
- IE (TODO verify same works in EDGE)
- Advanced -> Enable Integrated Windows Authentication in Internet Options
- Security -> Local intranet -> Custom level -> User Authentication -> Automatic logon / Prompt for user name and password
- Chrome
- Chrome uses settings in Windows’ internet options so the IE options should sufficesource
- Firefox
- about:config -> network.automatic-ntlm-auth.trusted-uris -> add url of application
Sources:
- http://www.codeproject.com/Tips/1022870/AngularJS-Web-API-Active-Directory-Security
- http://stackoverflow.com/questions/36946304/using-windows-authentication-in-asp-net
Different Domain or No Domain Binding
TODO I did not get this to work from a remote site, with or without VPN connection (flashes a new console window and dies instantly, unable to capture error message)
If you are developing on a computer that is not bound to a domain, or is bound to a different domain that the app should authenticate against, you can run the server like so:
runas /netonly /user:<user> "<command> <args...>"
where <user> is domain\username or username@domain.
IIS: you must establish trust between the two domains to be able to run app pools under a user in different domain than the server.
IIS: does this work at all when running as network service??
Sources:
- http://codebetter.com/jameskovacs/2009/10/12/tip-how-to-run-programs-as-a-domain-user-from-a-non-domain-computer/
- http://stackoverflow.com/questions/4762538/iis-express-windows-authentication
- http://stackoverflow.com/questions/5331206/how-to-run-iisexpress-app-pool-under-a-different-identity
- http://stackoverflow.com/questions/22058645/authenticate-against-a-domain-using-a-specific-machine/22060458#22060458
- https://forums.iis.net/t/1213147.aspx?How+I+can+run+IIS+app+pool+by+domain+account+
- https://blogs.msdn.microsoft.com/ssehgal/2009/06/23/running-iis6-app-pools-under-a-domain-account-identity/
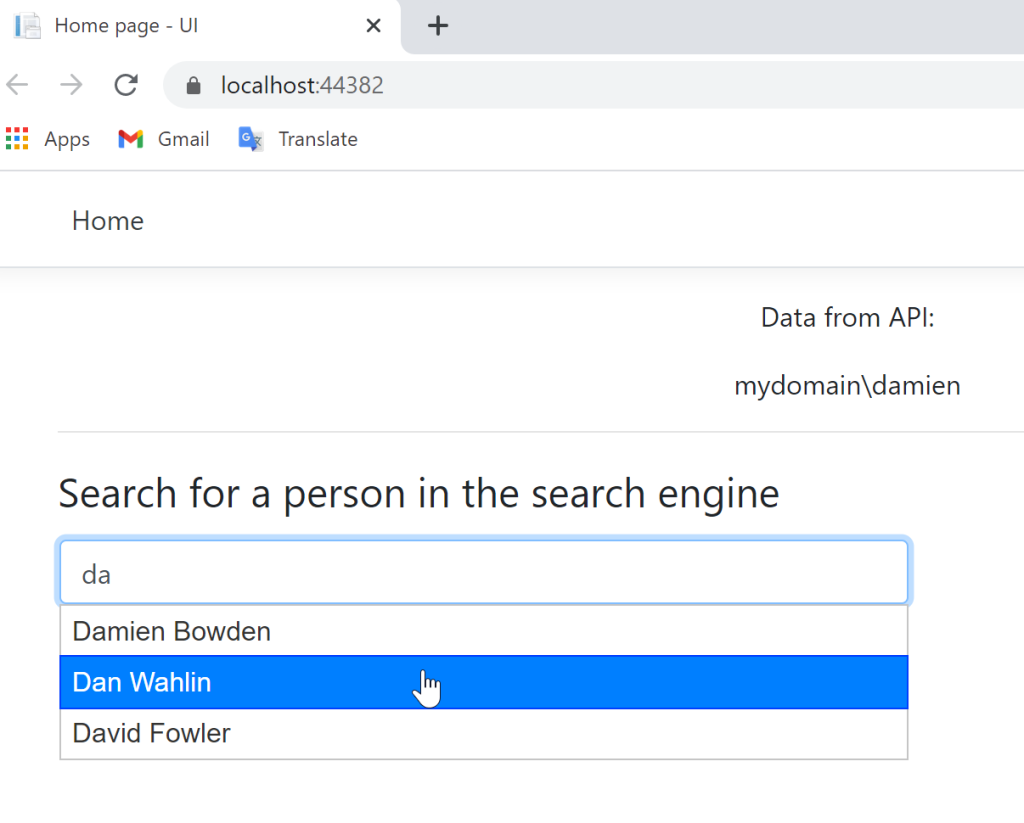
This post shows how an ASP.NET Core Web API and an ASP.NET Core Razor page application can be implemented to use windows authentication. The Razor page application uses Javascript to display an autocomplete control which gets the data indirectly from the service API which is protected using windows authentication. The Razor Page application uses the API to get the auto-complete suggestions data. Both applications are protected using windows authentication.
Code: https://github.com/damienbod/PoCWindowsAuth
Setup the API
The ASP.NET Core demo API is setup to use windows authentication. The launch settings windowsAuthentication property is set to true and the anonymousAuthentication property to false. The application host file settings on your development PC would also need to be configured to allow windows authentication, which is disabled by default. See the stack overflow link at the bottom for more information.
{
  "iisSettings": {
    "windowsAuthentication": true,
    "anonymousAuthentication": false,
    "iisExpress": {
      "applicationUrl": "https://localhost:44364",
      "sslPort": 44364
    }
  },
The Startup ConfigureServices method is configured to require authentication using the IISDefaults.AuthenticationScheme scheme. This would need to be changed if you were using a different hosting model.
public void ConfigureServices(IServiceCollection services)
{
	services.AddAuthentication(IISDefaults.AuthenticationScheme);

	services.AddControllers().AddJsonOptions(option =>
		option.JsonSerializerOptions
              .PropertyNamingPolicy = JsonNamingPolicy.CamelCase);
}

public void Configure(IApplicationBuilder app, IWebHostEnvironment env)
{
	if (env.IsDevelopment())
	{
		app.UseDeveloperExceptionPage();
	}

	app.UseHttpsRedirection();

	app.UseRouting();

	app.UseAuthentication();
	app.UseAuthorization();

	app.UseEndpoints(endpoints =>
	{
		endpoints.MapControllers();
	});
}
The API is protected using the authorize attribute. This example returns the user name from the windows authentication.
[Authorize]
[ApiController]
[Route("api/[controller]")]
public class MyDataController : ControllerBase
{

	private readonly ILogger<MyDataController> _logger;

	public MyDataController(ILogger<MyDataController> logger)
	{
		_logger = logger;
	}

	[HttpGet]
	public IEnumerable<string> Get()
	{
		return new List<string> { User.Identity.Name };
	}
}
Implement the ASP.NET Core Razor pages
The application calling the API also requires windows authentication and requests the data from the API project. The HttpClient instance requesting the data from the API project must send the default credentials with each API call. A HttpClientHandler is used to implement this. The HttpClientHandler is added to a named AddHttpClient service which can be used anywhere in the application.
public void ConfigureServices(IServiceCollection services)
{
	services.AddAuthentication(IISDefaults.AuthenticationScheme);

	services.AddHttpClient();

	HttpClientHandler handler = new HttpClientHandler()
	{
		UseDefaultCredentials = true
	};

	services.AddHttpClient("windowsAuthClient", c =>{ })
		.ConfigurePrimaryHttpMessageHandler(() => handler);

	services.AddScoped<MyDataClientService>();
	services.AddRazorPages().AddJsonOptions(option =>
		option.JsonSerializerOptions
			.PropertyNamingPolicy = JsonNamingPolicy.CamelCase);
}
A client service is implemented to call the API from the second project. This client uses the IHttpClientFactory to create instances of the HttpClient. The CreateClient method is used to create an instance using the named client which was configured in the Startup class. This instance will send credentials to the API.
public MyDataClientService(
	IConfiguration configurations,
	IHttpClientFactory clientFactory)
{
	_configurations = configurations;
	_clientFactory = clientFactory;
	_jsonSerializerOptions = new JsonSerializerOptions
	{
		PropertyNameCaseInsensitive = true,
	};
}

public async Task<List<string>> GetMyData()
{
	try
	{
		var client = _clientFactory.CreateClient("windowsAuthClient");
		client.BaseAddress = new Uri(_configurations["MyApiUrl"]);

		var response = await client.GetAsync("api/MyData");
		if (response.IsSuccessStatusCode)
		{
			var data = await JsonSerializer.DeserializeAsync<List<string>>(
			await response.Content.ReadAsStreamAsync());

			return data;
		}

		var error = await response.Content.ReadAsStringAsync();
		throw new ApplicationException($"Status code: {response.StatusCode}, Error: {response.ReasonPhrase}, Message: {error}");

	}
	catch (Exception e)
	{
		throw new ApplicationException($"Exception {e}");
	}
}
Javascript UI
If using Javascript to call the API protected with window authentication, this can become a bit tricky due to CORS when using windows authentication. I prefer to avoid this and use a backend to proxy the calls from my trusted backend to the API. The OnGetAutoCompleteSuggest method is used to call the API. The would also make it easy to map DTOs from my API to my view DTOs as required.
 public class IndexModel : PageModel
    {
        private readonly ILogger<IndexModel> _logger;
        private readonly MyDataClientService _myDataClientService;
        public List<string> DataFromApi;
        public string SearchText { get; set; }
        public List<PersonCity> PersonCities;

        public IndexModel(MyDataClientService myDataClientService,
            ILogger<IndexModel> logger)
        {
            _myDataClientService = myDataClientService;
            _logger = logger;
        }

        public async Task OnGetAsync()
        {
            DataFromApi = await _myDataClientService.GetMyData();
        }

        public async Task<ActionResult> OnGetAutoCompleteSuggest(string term)
        {
            PersonCities = await _myDataClientService.Suggest(term);
            SearchText = term;

            return new JsonResult(PersonCities);
        }
    }
The Razor Page underneath uses an autocomplete implemented in Javascript to suggest data requested from the API. Any Javascript framework can be used in this way.
@page "{handler?}"
@model IndexModel
@{
    ViewData["Title"] = "Home page";
}

<div class="text-center">
    <p>Data from API:</p>

    @foreach (string item in Model.DataFromApi)
    {
        <p>@item</p><br />
    }
</div>

<hr />

<fieldset class="form">
    <legend>Search for a person in the search engine</legend>
    <table width="500">
        <tr>
            <th></th>
        </tr>
        <tr>
            <td>
                <input class="form-control" id="autocomplete" type="text" style="width:500px" />
            </td>
        </tr>
    </table>
</fieldset>

<br />


<div class="card" id="results">
    <h5 class="card-header">
        <span id="docName"></span>
        <span id="docFamilyName"></span>
    </h5>
    <div class="card-body">
        <p class="card-text"><span id="docInfo"></span></p>
        <p class="card-text"><span id="docCityCountry"></span></p>
        <p class="card-text"><span id="docWeb"></span></p>
    </div>
</div>

@section scripts
{
    <script type="text/javascript">
        var items;
        $(document).ready(function () {
            $("#results").hide();
            $("input#autocomplete").autocomplete({
                source: function (request, response) {
                    $.ajax({
                        url: "Index/AutoCompleteSuggest",
                        dataType: "json",
                        data: {
                            term: request.term,
                        },
                        success: function (data) {
                            var itemArray = new Array();
                            for (i = 0; i < data.length; i++) {
                                itemArray[i] = {
                                    label: data[i].name + " " + data[i].familyName,
                                    value: data[i].name + " " + data[i].familyName,
                                    data: data[i]
                                }
                            }

                            console.log(itemArray);
                            response(itemArray);
                        },
                        error: function (data, type) {
                            console.log(type);
                        }
                    });
                },
                select: function (event, ui) {
                    $("#results").show();
                    $("#docNameId").text(ui.item.data.id);
                    $("#docName").text(ui.item.data.name);
                    $("#docFamilyName").text(ui.item.data.familyName);
                    $("#docInfo").text(ui.item.data.info);
                    $("#docCityCountry").text(ui.item.data.cityCountry);
                    $("#docWeb").text(ui.item.data.web);
                    console.log(ui.item);
                }
            });
        });
    </script>
}
If all is setup correctly, the ASP.NET Core application displays the API data which is protected using the windows authentication.
CRSF
If using windows authentication, you need to protect against CSRF forgery like any application using cookies. It is also recommended NOT to use windows authentication in the public domain. Modern security architectures should be used like Open ID Connect whenever possible. This works well on intranets or for making changes to existing applications which use windows authentication in secure networks.
Links:
https://stackoverflow.com/questions/36946304/using-windows-authentication-in-asp-net
https://docs.microsoft.com/en-us/aspnet/web-api/overview/security/integrated-windows-authentication
How to use Windows Authentication for ASP.NET Core Web APIs? We will try to do something like that in today’s tutorial using Min APIs.
First, create a new empty asp.net web project using the below command:
dotnet new web -o minwinauth
Then, switch to the minwinauth folder and add Negotiate package to the project since Windows Authentication requires the library:
dotnet add package Microsoft.AspNetCore.Authentication.Negotiate
Open your project using VS Code / any of your favourite IDE and paste the code below to the Program.cs:
using Microsoft.AspNetCore.Authentication.Negotiate;
using Microsoft.AspNetCore.Authorization;

var builder = WebApplication.CreateBuilder(args);

// Add services to the container.
// To have Windows Authentication, we need to add NegotiateDefaults.AuthenticationScheme
builder.Services.AddAuthentication(NegotiateDefaults.AuthenticationScheme).AddNegotiate();
builder.Services.AddAuthorization();

var app = builder.Build();

// Configure the HTTP request pipeline.
app.UseAuthentication();
app.UseAuthorization();

app.MapGet("/", () => "Hello World!");
// Authorize attribute make the API needs authentication, and Negotiate... is for Windows Authentication.
app.MapGet("/admin", [Authorize(AuthenticationSchemes = NegotiateDefaults.AuthenticationScheme)] (HttpContext context) =>
    "The /admin endpoint is for authorizers only. User ID: " + context.User.Identity?.Name);

app.Run();
Run the project using the command below:
dotnet run
If you browse the site, you will get “Hello World!” without you keying in any credential due to root directory is don’t need authentication. But if you browse /admin, a login dialog box will appear, and you need to key in the Windows credential.

If you click cancel or key in a wrong credential, you will get 401 Unauthorized with authentication method is Negotiate.

But if you key in correct Windows credential, you will able to login and see the message like below:
The /admin endpoint is for authorizers only. User ID: xxx/yyy
PS:
Please note this working in Windows environment only, if you try in Linux environment, you most probably will get 401 unauthorized due to no authentication can be made. If you want Linux to support this Windows Authentication, you need to setup the Linux environment configuration as stated in ASP.NET Core documentation https://docs.microsoft.com/en-us/aspnet/core/security/authentication/windowsauth?view=aspnetcore-6.0&tabs=visual-studio