ASUS Armoury Crate is undoubtedly a powerful gaming software for ROG and TUF gaming machines. But unfortunately, it is still unavailable for the latest Microsoft OS. Windows 11 was unveiled back in June 2021 as a developer channel build. From there on, many software publishers have added application/drivers support for Windows 11. Some OEMs even published a list of their devices getting the Windows 11 upgrade.
All my dreams shattered when I upgraded to Windows 11 and found no Armoury available for this OS. Coming back to ASUS, I being an ASUS Zephyrus Duo user, was eagerly waiting to try out all the gaming-related functionalities that I used to have on Windows 10. Upon some digging, I could get Armoury Crate working on my Windows 11 laptop. This guide will teach you how to install ASUS Armoury Crate on your Windows 11 PC.
This guide covers all the required aspects to install ASUS Armoury Crate. For your convenience, we have divided it into sections. You can refer to the below table and jump over to the point of relevance. With that said, let’s begin with the tutorial.
Fix to Install Armoury Crate on Windows 11
There are two methods to get the Armoury crate running on your Windows 11 PC. I suggest you check both of them and follow whichever suits you the best.
1. ASUS Armoury Crate Installer Utility
The first method is the traditional way of installation. That is, we’ll download components from ASUS’s drivers and tools page and run them on the system. The steps to download and install Armoury Crate on Windows 11 are as follows.
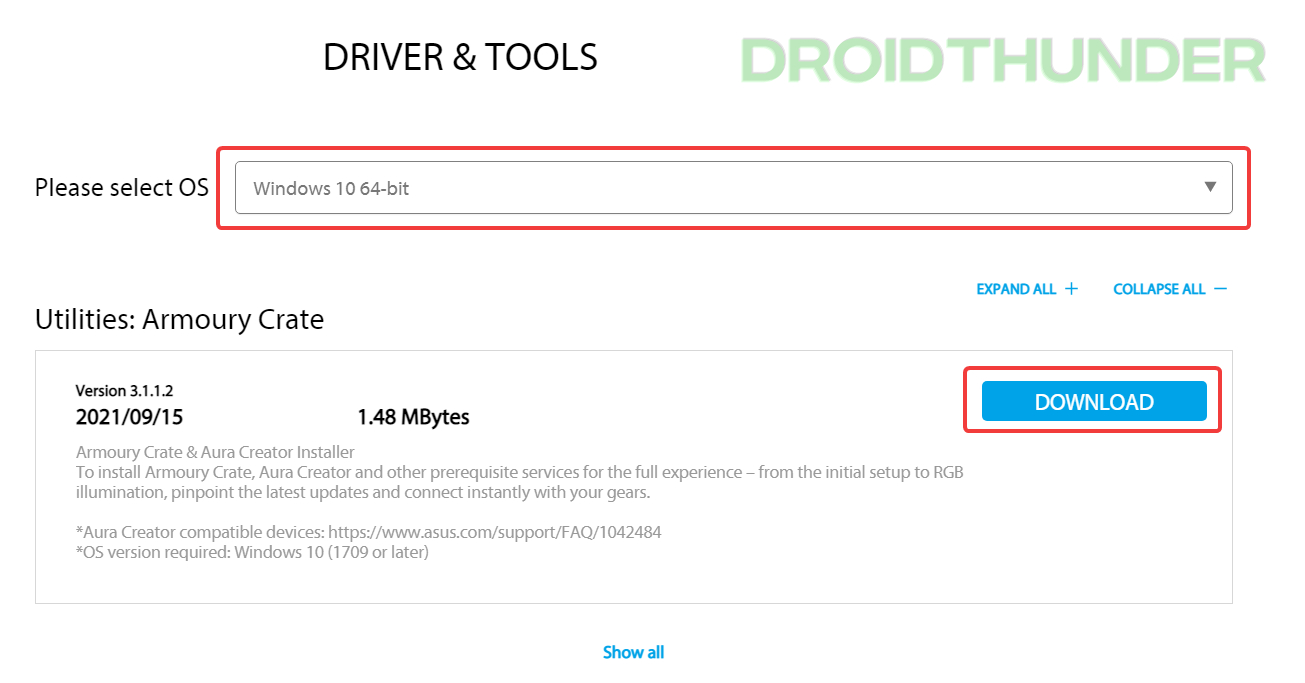
- Download the Armoury Crate installer from the ASUS website. When asked to select OS, choose Windows 10 64-bit. That’s right! We are selecting Windows 10 because ASUS is yet to release the
Armoury crate for ROG and TUF gaming laptops on Windows 11.Update (12th January 2022): ASUS Armoury Crate is now officially available for Windows 11 64-bit.
Download ASUS Armoury Crate(for Windows)
Interesting Stuff – How to Set Video/Live Wallpaper on Windows 11
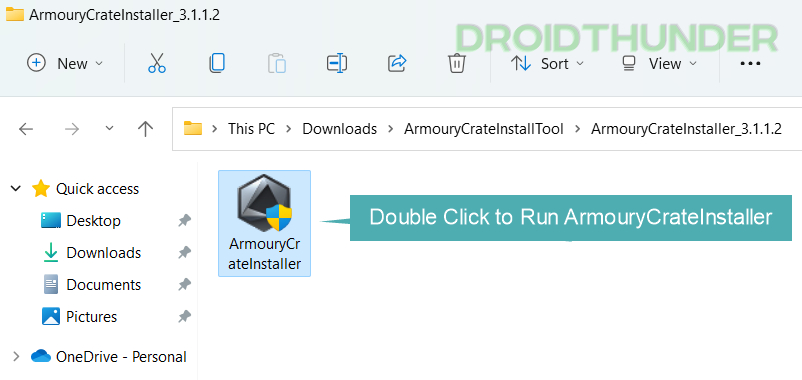
- Run the Armoury Crate installer file. Enter the password if the Windows UAC prompt shows up.
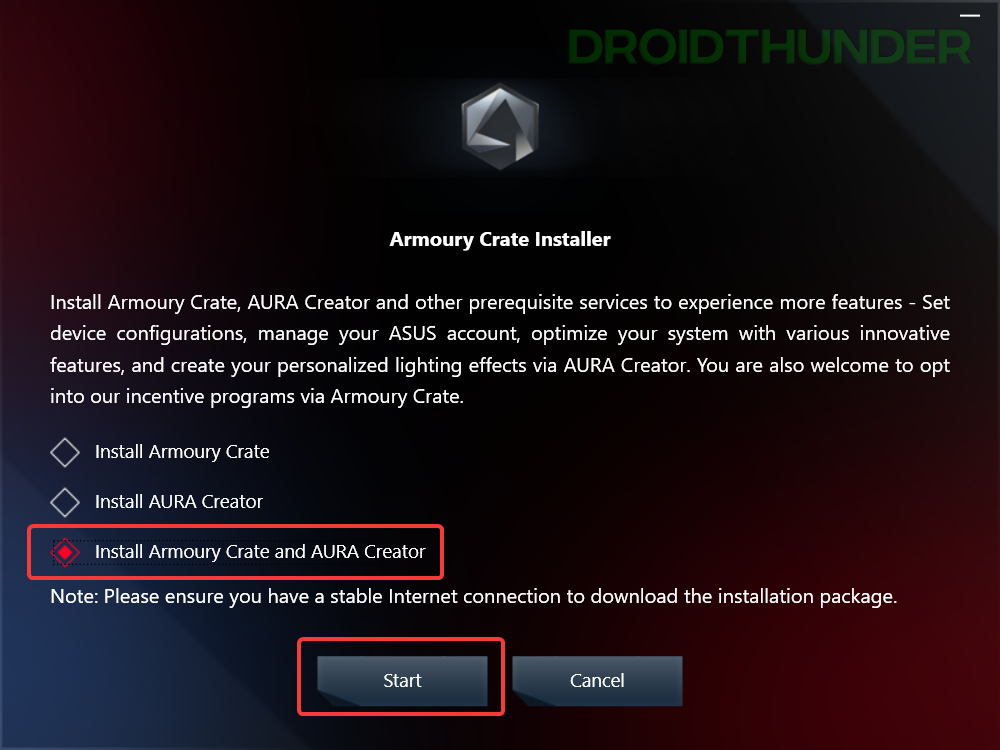
- Now, select an option between Install Armoury Create and Install Armoury Crate and AURA Creator. Here, I have taken the third option. Now, press the Start button to initiate the installation. Depending on your selection and PC configuration, it will take around 4-5 mins to install the necessary services and required Armoury Crate components.
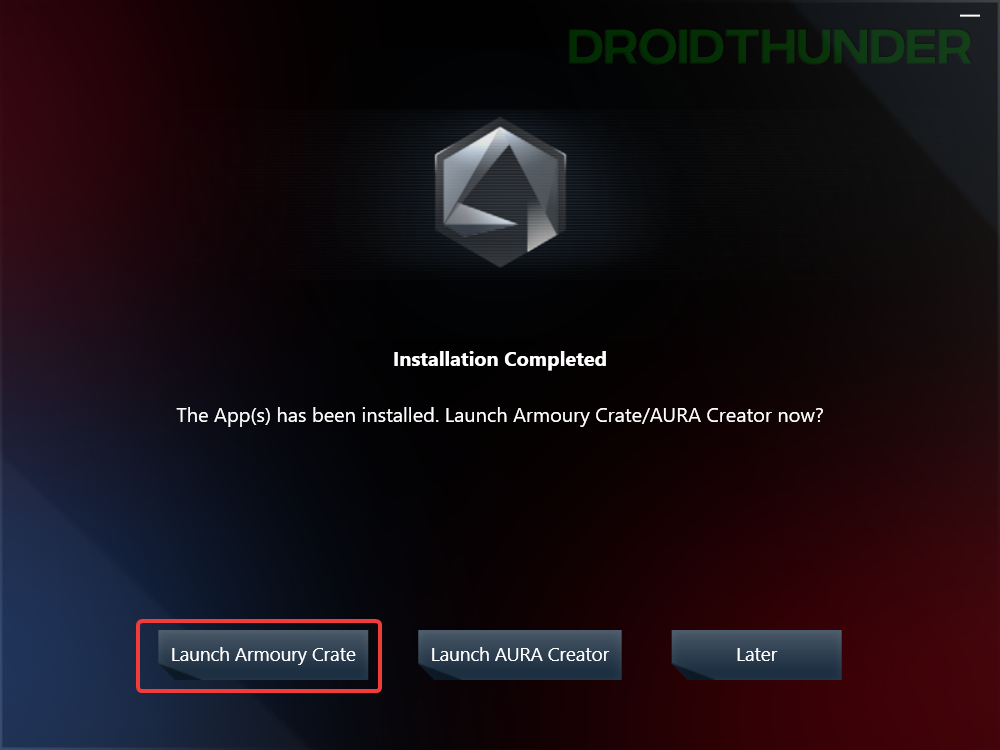
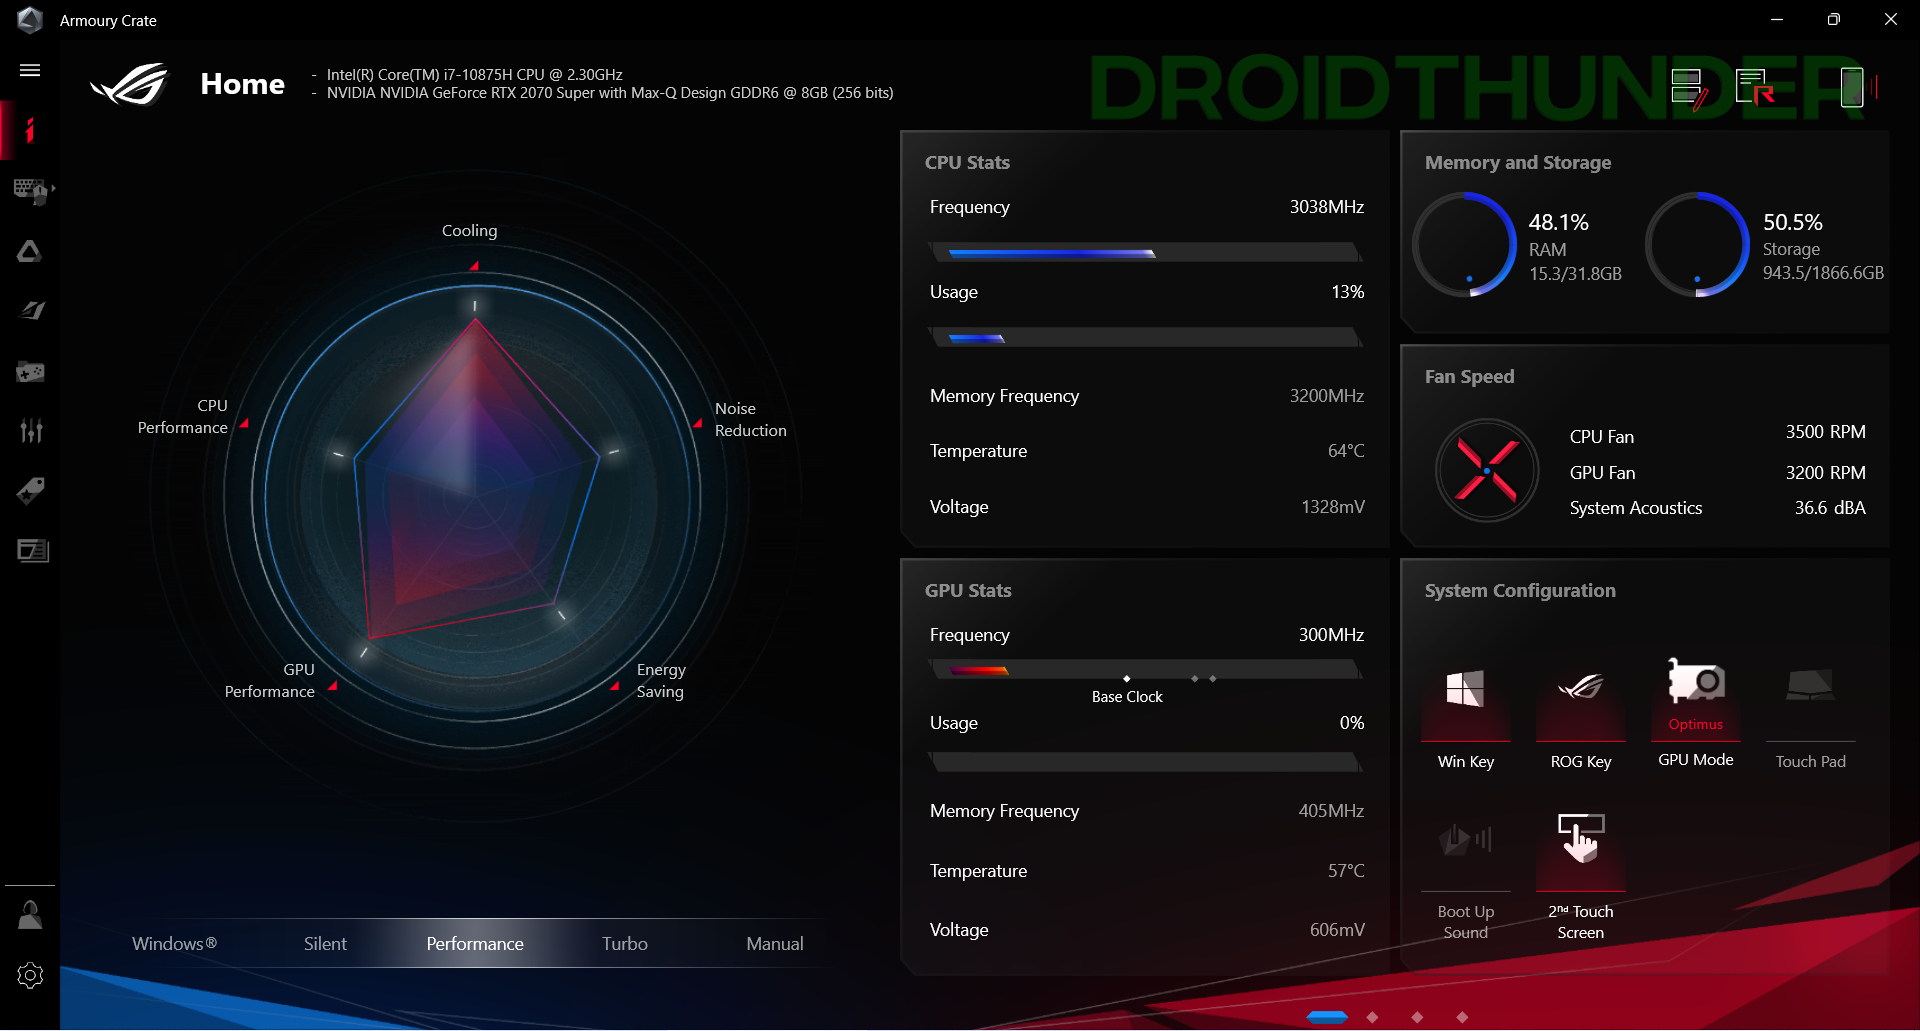
- When the installation finishes, press the Launch Armoury Crate button.
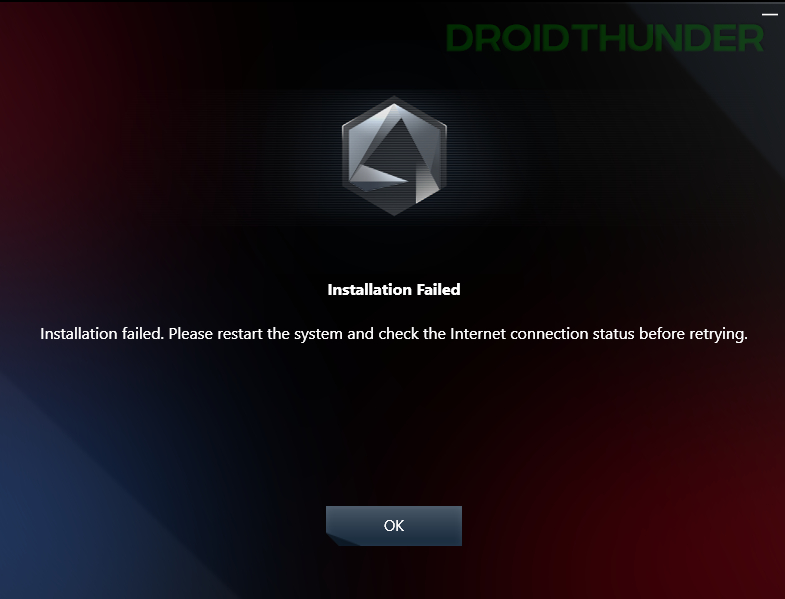
That was a hassle-free installation, right! But though the first method is easy to follow, it may not work for everyone. Many users reported that when they ran the installer, they got the error message – Installation Failed. “Please restart the system and check the internet connection status before trying”
If you are one of those users, then no worries; we have got you covered in the second method of this guide.
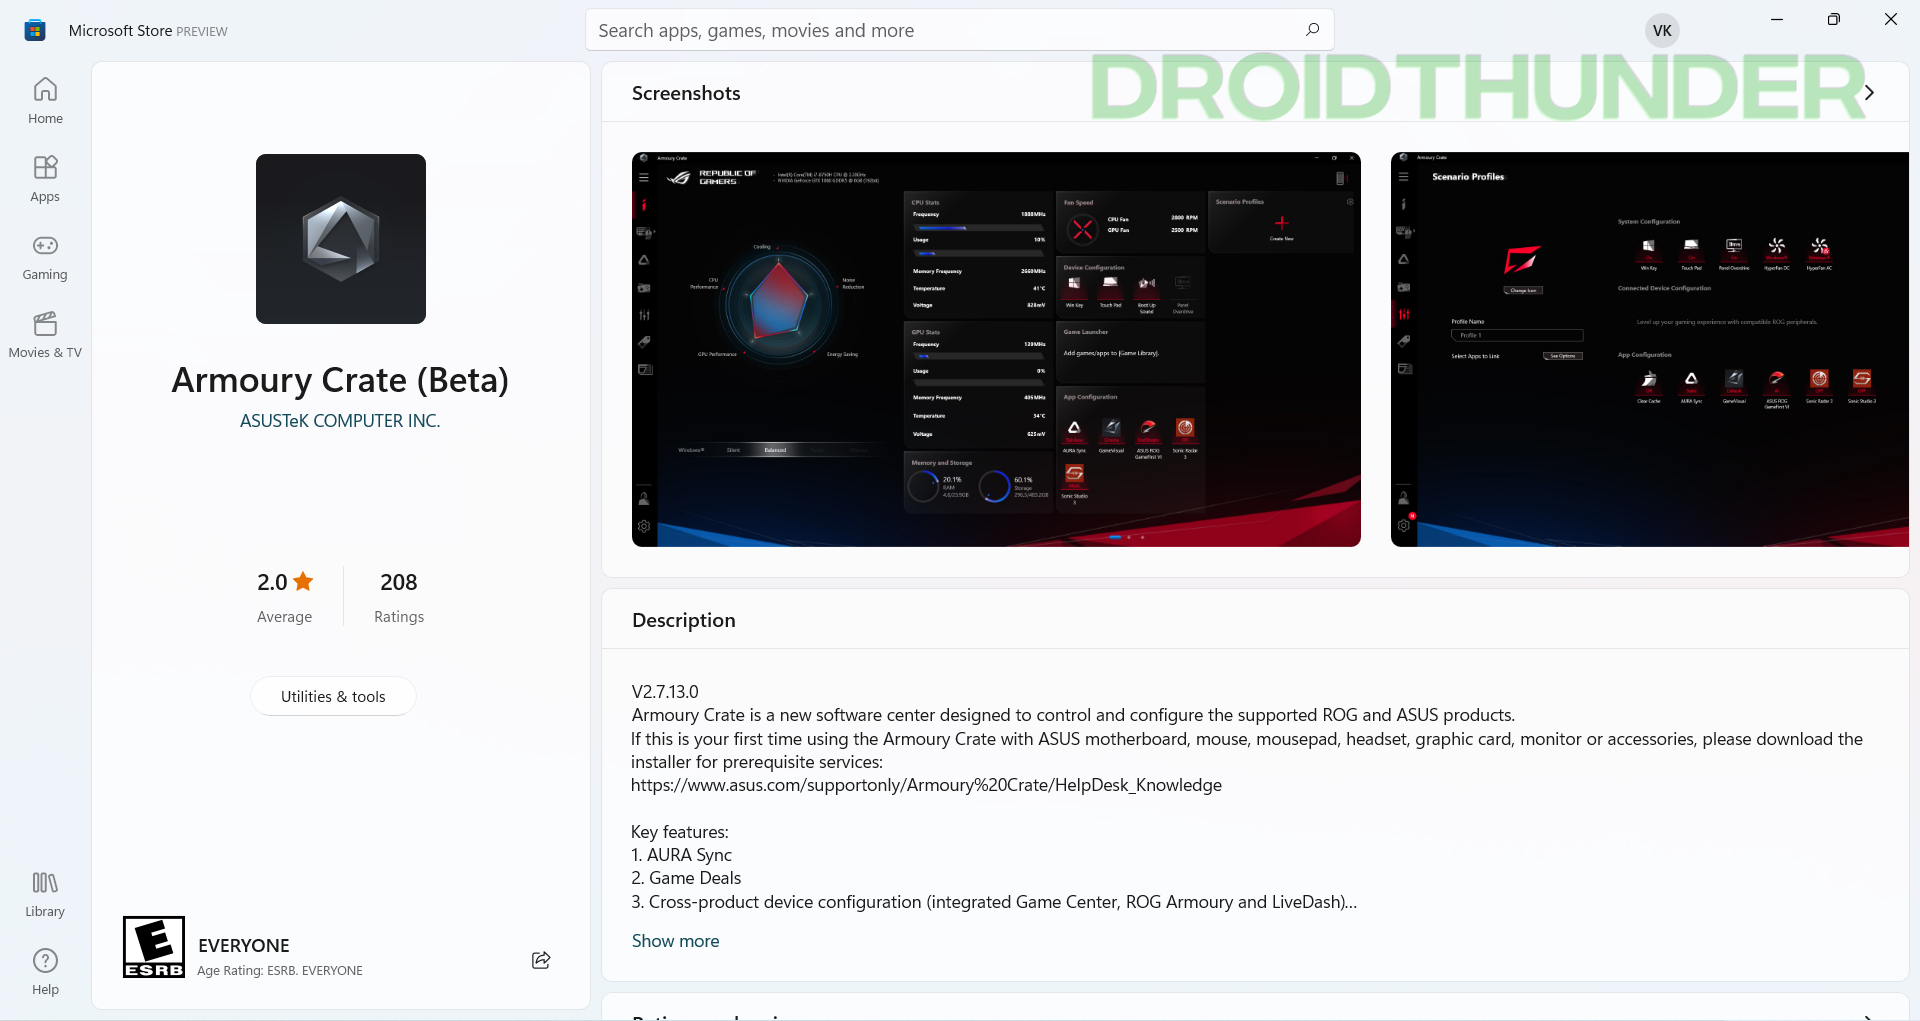
2. Download Armoury Crate (Beta) from Windows 11 Microsoft Store
As of November 2021, ASUS hasn’t officially released the application for Windows 11, but the company is offering a Beta version through Microsoft Store. However, when we opened the Armoury Crate application page on Microsoft Store, there was no option to install it. It was surprising because, on one side, it said that this product is compatible with your device, while on the other side, there was no install button present on the page.
It could be because of the country-specific restrictions. ASUS might want users from selected regions, like the USA, to test the beta build first. And then eventually release a stable version to all the users. Microsoft also did the same thing for their Windows Subsystem for Android app. It was available for the USA region and allowed users to install Android apps on Windows 11.
If you are lucky and have the install button available in the Microsoft store, go ahead and hit it. If you don’t, then no need to worry. There is a way to get the App packages from Microsoft Store directly. To know more, read further and follow the steps given below.
Windows 11 Aapx package Installer
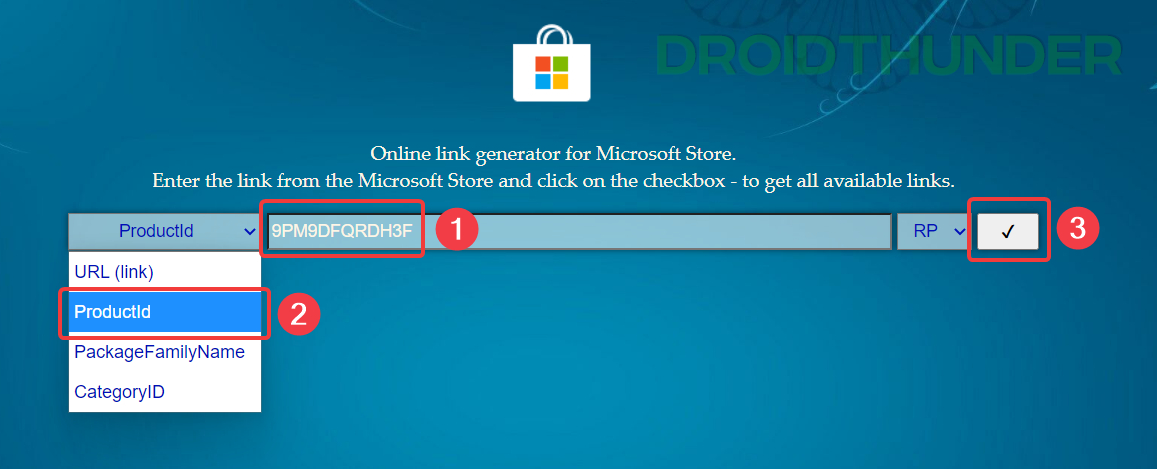
- Open the Microsoft Edge web browser and head over to the Microsoft Store link generator website.
- In the sample data field, paste this catalog number:
9PM9DFQRDH3F - From the dropdown, select type as ProductId.
- Lastly, press the check button to search for the Armoury Create Microsoft Store package.
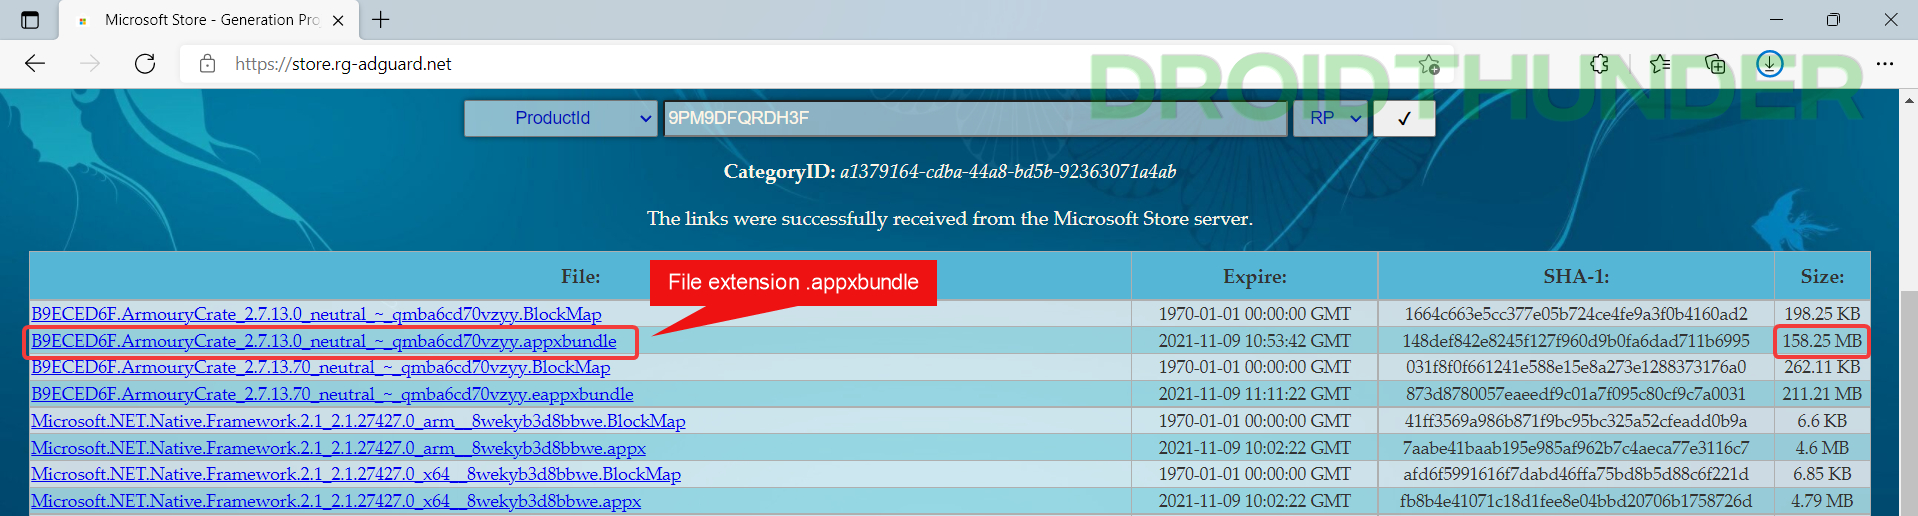
- Click and download the package ending with .appxbundle. The size should be around ~160 MB. The one ending with .eappxbundle is for an Xbox controller. Note that you can not use Google Chrome or any other browser to download packages from this site, so make sure you are using the Microsoft Edge browser only.
Did you know? – You can run Android 12L OS on Windows. Check out how!
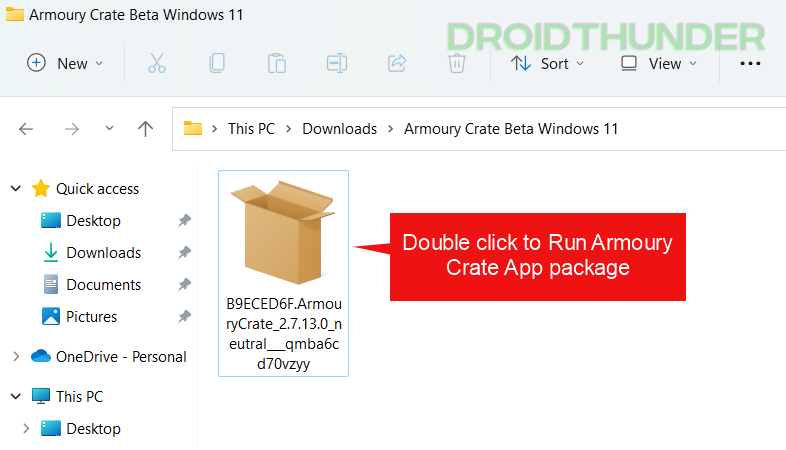
- Once downloaded, double-click on the Armoury Crate (beta) .aapxbundle package to run it.
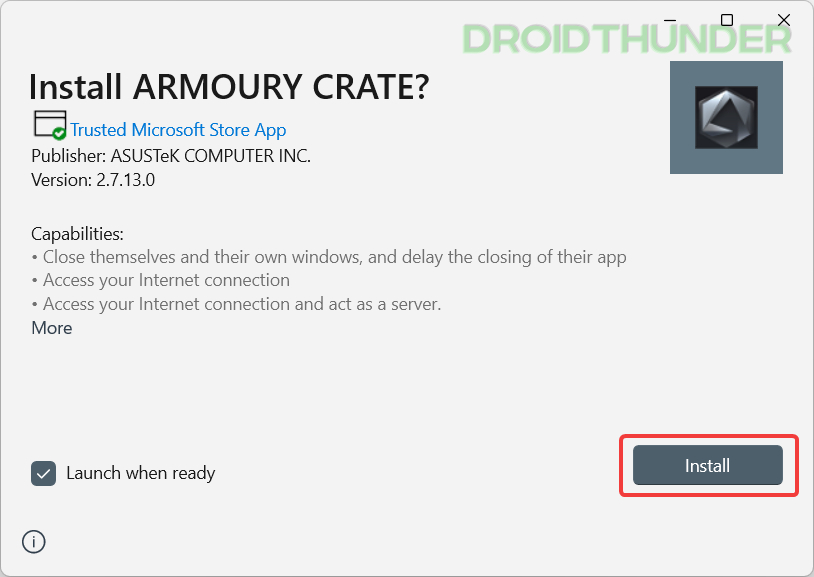
- Press the Install button to start the installation process. It is a manual way of installing Microsoft Store apps and is called sideloading apps on Windows.
At this point, you have successfully installed ASUS Armoury Crate software. But for some reason, if the installation didn’t go well, you can try an alternate method explained ahead.
Package deployment using Windows PowerShell
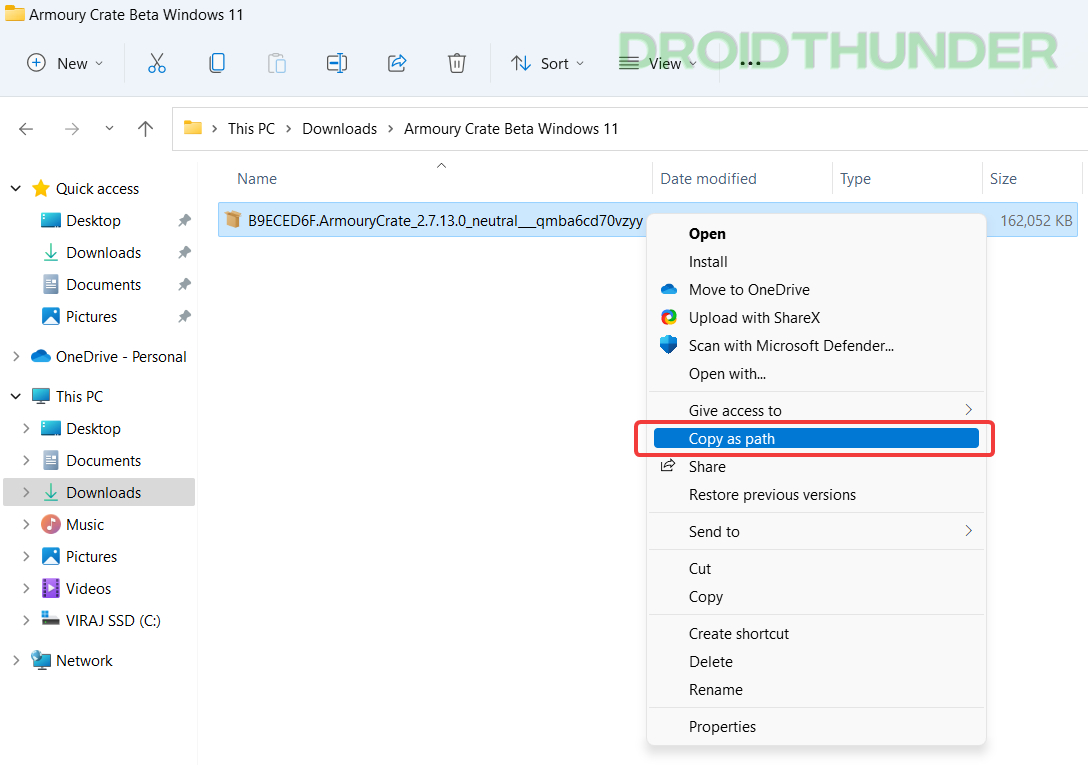
- Navigate to the .aapxbundle package that we downloaded in the previous section. Press right-click on it and select Copy as path.
Liked what you saw, huh? – How to Enable Old Right Click Context Menu on Windows 11
- Open the Windows start menu and search Windows PowerShell. Run it as administrator. Type the command mentioned below, followed by the path you copied in the previous step.
Add-AppxPackage -Path <package path>

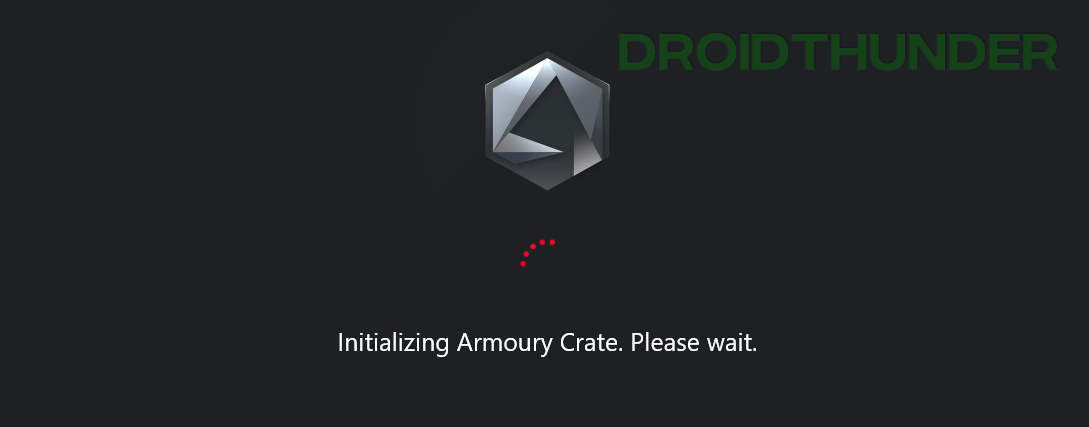
- Press Enter key on the keyboard to start the application deployment process. Once the operation finishes, you’ll see Initializing Armoury Crate window. If not, you can run Armoury Crate from the Windows Start Menu.

Armoury Crate Services Installation on Windows 11
- After completing the installation, if you open the Armoury Crate and get the services-related error like the one shown below, then that should be your last point of concern.
Certain Armoury Crate features may be disabled because some ASUS application services are not running properly. Go to Armoury Crate FAQ page for troubleshooting and re-enable all the features.
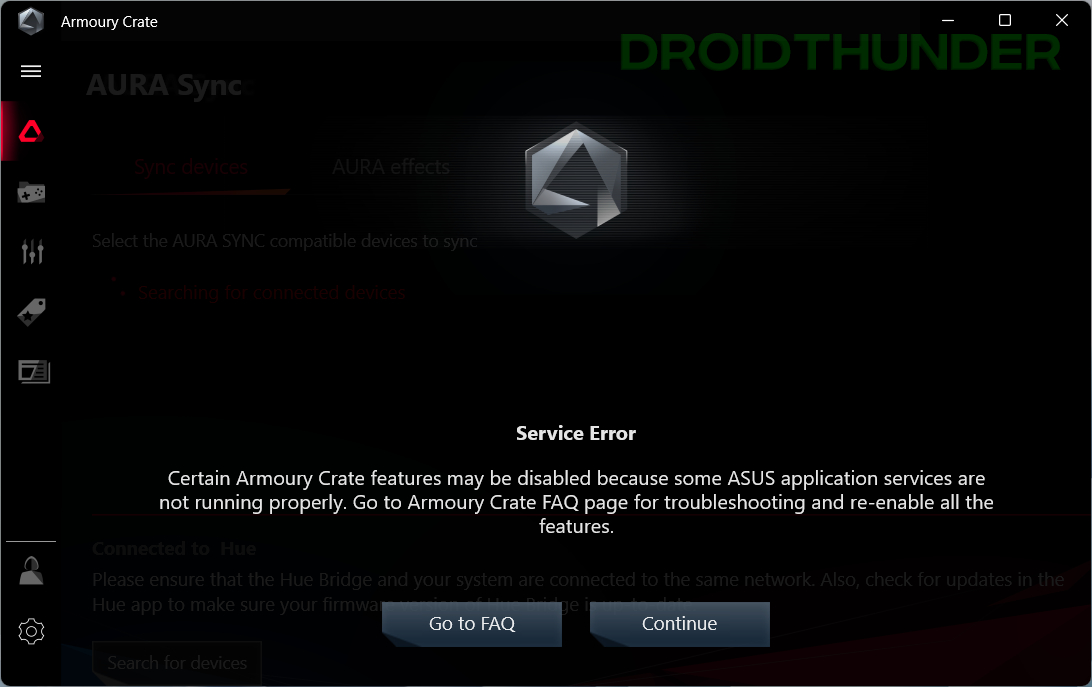
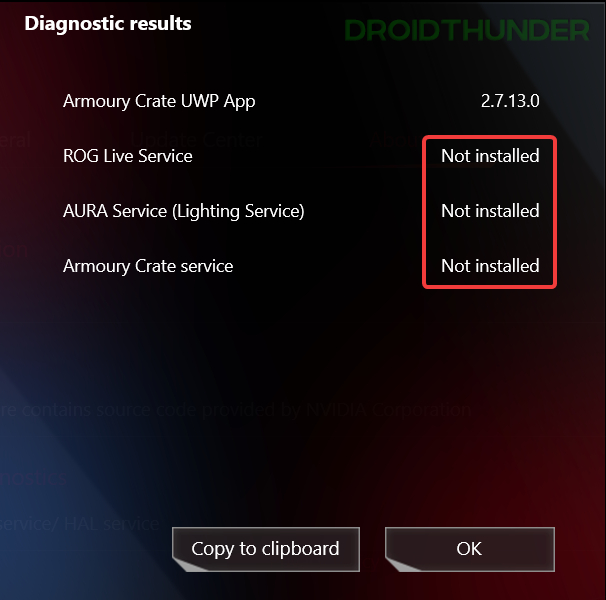
- We got the services error because we installed Armoury Crate from the Microsoft Store, and it only installed the application. Its dependent services didn’t get installed. The following services are necessary for the Armoury Crate application for using its full functionality.
- ROG Live Service
- AURA Service (Lightning Service) – for using AURA effects
- Armoury Crate Service
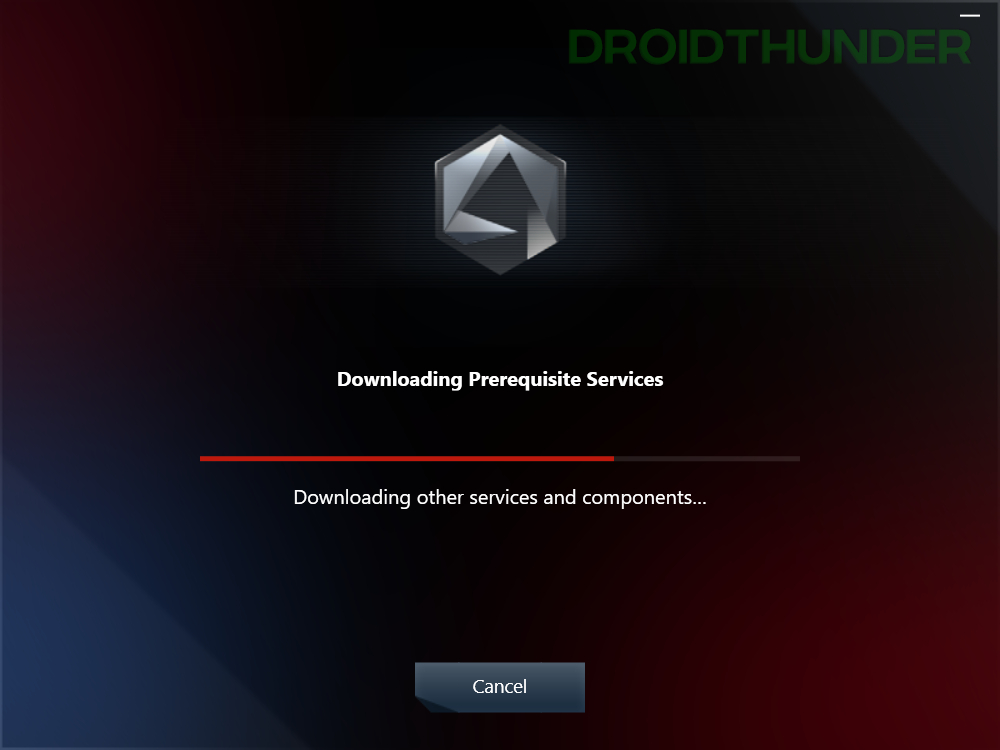
- To install these dependencies, download the official Amoury Crate installer. Select OS as Windows 10 x64. Once downloaded, run the application and let it do its magic.
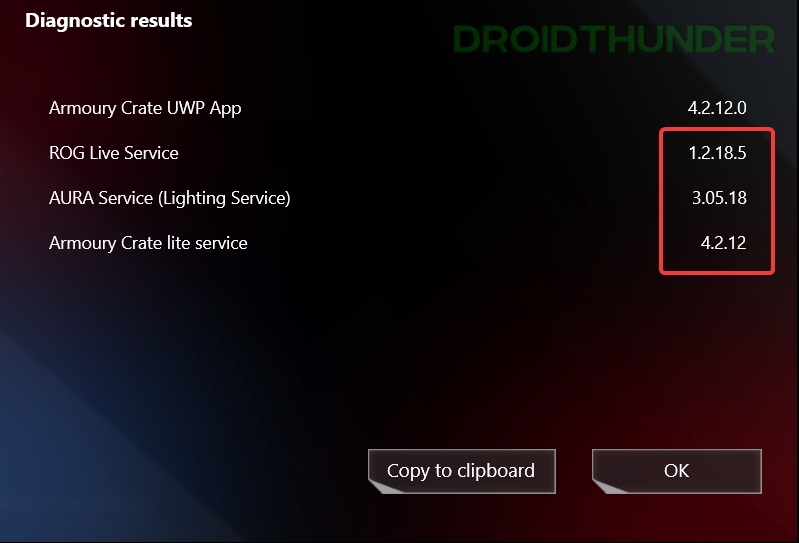
- When installation finishes, open the Armoury Crate application. Go to Settings and switch to the About tab. Press the Check button for diagnostic results.
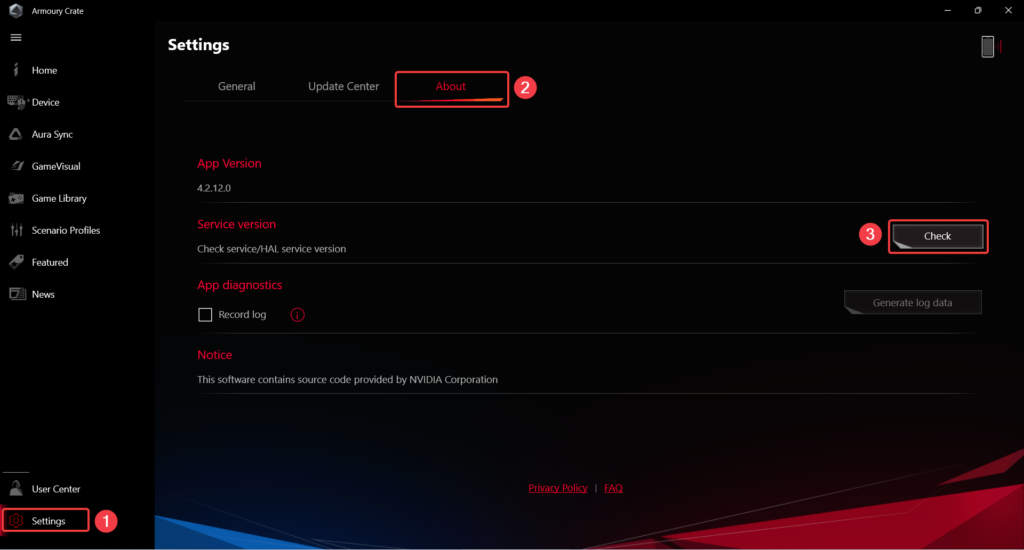
If you see the version numbers mentioned against all the services, you can take a sigh of relief because Armoury Crate and its related component’s installation on your Windows 11 PC is now complete.
The best gaming software should be up and running on your ASUS ROG/TUF laptops/desktops.
Uninstall Armoury Crate Application from Windows 11
For some reason, if you wish to uninstall Armoury Crate, then follow these simple steps.
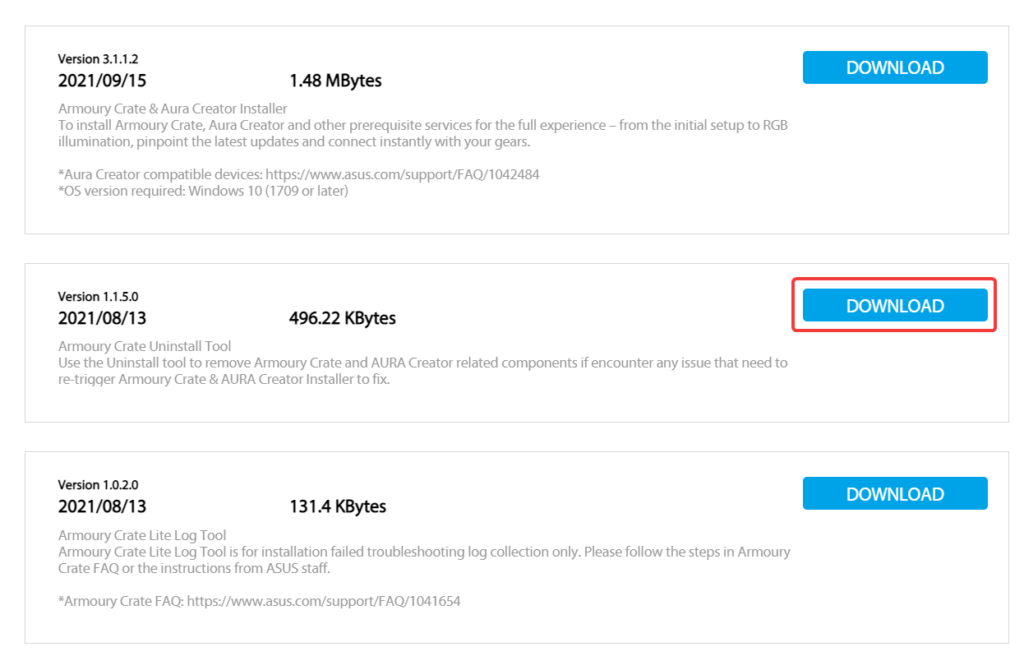
- Head over to the ASUS utility and tools website and scroll down till you see the Show all option. Click on it and download Armoury Crate Uninstall Tool.
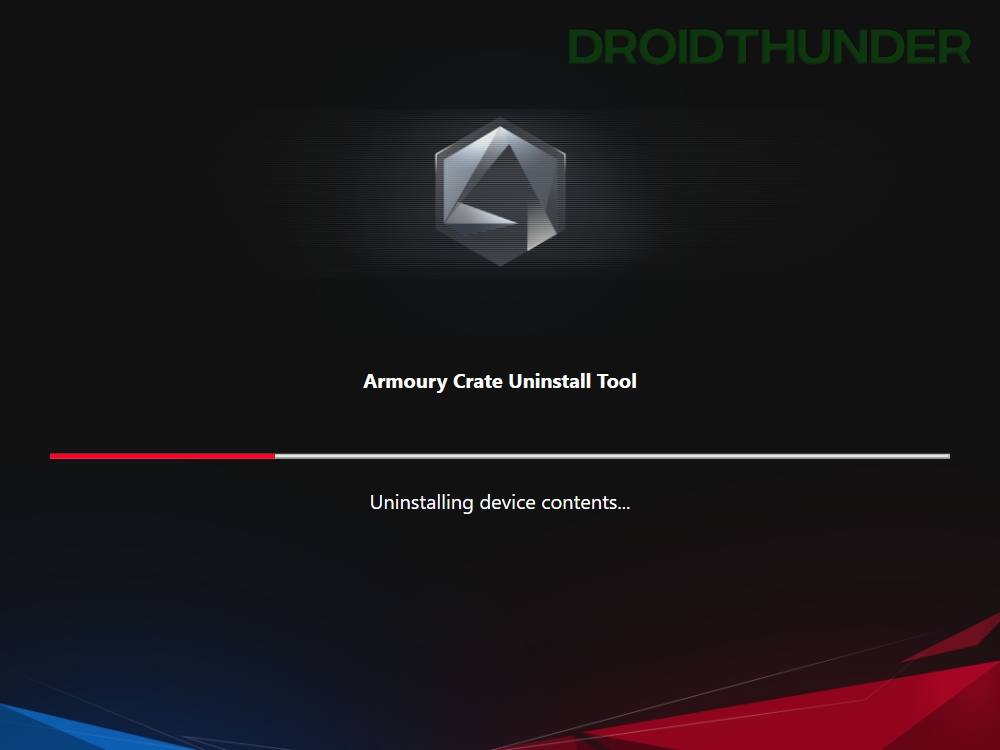
- Extract the downloaded zip package and execute the .exe file. While running, it will remove everything related to Armoury Crate.
Enjoy the Powerful ASUS Armoury Crate on Windows 11!
There you have it, folks! The powerful gaming software from ASUS is all yours now. We will update this tutorial once ASUS officially rolls out the application after finishing the Beta test. So far, the program is working very well for us. If you notice any bugs/glitches in the software or need help, do let me know in the comment section below. I will help you out. With that said, that’s all from me. I hope you enjoyed reading this guide.
Вместе с выпуском новой операционной системы Windows 11 многие пользователи столкнулись с проблемой установки Armoury Crate Asus — программы, предназначенной для управления настройками компьютера. Это приложение позволяет оптимизировать работу системы, настраивать подсветку RGB и контролировать процессорное охлаждение. Однако, несмотря на его важность, многие обнаружили, что Armoury Crate не устанавливается на Windows 11.
Существует несколько причин, почему может возникнуть проблема с установкой Armoury Crate на новую операционную систему. Во-первых, это может быть связано с несовместимостью программы с Windows 11. Asus, производитель программы, не выпустил еще обновленную версию, которая бы поддерживала новую ОС. В таком случае, единственным решением будет ожидание выхода обновления или поиск альтернативного программного обеспечения.
Во-вторых, проблема может быть вызвана ошибками при установке. В таком случае, стоит проверить, правильно ли вы скачали и запустили установщик программы. Также рекомендуется отключить временно антивирусное программное обеспечение и защитный фаервол, чтобы не блокировались необходимые файлы.
Если приведенные выше методы не помогли, и Armoury Crate все еще не устанавливается на Windows 11, можно попробовать воспользоваться системным механизмом совместимости. Это позволит запустить программу в режиме, совместимом с предыдущими версиями операционной системы. Для этого нужно кликнуть правой кнопкой мыши на файл установщика, выбрать «Свойства», перейти на вкладку «Совместимость» и установить галочку рядом с опцией «Запустить в режиме совместимости со» и выбрать предыдущую версию Windows, на которой вы успешно устанавливали Armoury Crate.
Не стоит забывать, что использование старой версии программы на новой операционной системе может привести к некорректной работе или даже к системным сбоям. Поэтому, следует оставаться в курсе новостей от Asus и ждать официального релиза обновленной версии Armoury Crate, совместимой с Windows 11.
Будьте внимательны при установке программного обеспечения на свой компьютер и следуйте инструкциям производителя. В случае возникновения проблем или неожиданного поведения системы, рекомендуется связаться с технической поддержкой Asus для получения профессиональной помощи.
Содержание
- Проблема с установкой Armoury Crate Asus на Windows 11: как её решить?
- Почему не устанавливается Armoury Crate Asus на Windows 11?
- Возможные причины и ошибки при установке Armoury Crate Asus на Windows 11
- Как решить проблему с установкой Armoury Crate Asus на Windows 11?
Проблема с установкой Armoury Crate Asus на Windows 11: как её решить?
Если вы столкнулись с проблемой установки Armoury Crate Asus на операционной системе Windows 11, есть несколько шагов, которые можно предпринять, чтобы решить эту проблему:
- Проверьте совместимость программного обеспечения: убедитесь, что версия Armoury Crate Asus, которую вы пытаетесь установить, полностью совместима с Windows 11. Если это не так, попробуйте установить более новую или более старую версию программы, которая поддерживается этой операционной системой.
- Обновите систему: убедитесь, что ваша операционная система Windows 11 полностью обновлена до последней версии. Для этого откройте меню «Параметры», выберите «Обновление и безопасность» и нажмите на кнопку «Проверить наличие обновлений». Если обновлений доступных нет, убедитесь, что у вас установлены все необходимые исправления и обновления.
- Отключите антивирусное программное обеспечение: временно отключите любое антивирусное программное обеспечение или брандмауэр, которое может блокировать установку Armoury Crate Asus. Затем попробуйте установить программу снова.
- Очистите временные файлы: откройте командную строку с правами администратора (щелчок правой кнопкой мыши по значку «Пуск» и выбор «Командная строка (администратор)»). Введите команду «cleanmgr» и нажмите Enter. Выберите диск, на котором установлена система, и нажмите на кнопку «ОК». Подождите, пока программа очистит временные файлы, а затем попробуйте установить Armoury Crate Asus снова.
- Проверьте настройки безопасности: убедитесь, что ваш компьютер не блокирует установку программы из-за настроек безопасности. Откройте «Параметры» и выберите «Приложения». Перейдите на вкладку «Приложения и особые устройства». Убедитесь, что разрешены установка приложений из надежных источников и установка приложений используя PowerShell.
- Перезагрузите компьютер: некоторые проблемы с установкой программы могут решиться простой перезагрузкой компьютера. Попробуйте перезагрузить компьютер и установить Armoury Crate Asus после этого.
- Свяжитесь с поддержкой Asus: если проблема с установкой Armoury Crate Asus на Windows 11 не решается после всех предыдущих шагов, обратитесь в службу поддержки Asus для получения дополнительной помощи и решения проблемы.
Применив описанные выше шаги, вы должны иметь возможность решить проблему с установкой Armoury Crate Asus на Windows 11 и наслаждаться всеми функциями программы.
Почему не устанавливается Armoury Crate Asus на Windows 11?
Существует несколько возможных причин, по которым Armoury Crate Asus может не устанавливаться на Windows 11:
1. Обновленная версия Windows. Если вы только что обновили свою операционную систему до Windows 11, может возникнуть проблема с установкой Armoury Crate Asus. Возможно, программное обеспечение несовместимо с новой версией ОС. В таком случае, рекомендуется проверить наличие обновлений и обратиться к поддержке Asus для получения обновленной версии Armoury Crate.
2. Ошибки реестра или файловой системы. Если в системе присутствуют ошибки в реестре или файловой системе, это может привести к проблемам с установкой программного обеспечения. Рекомендуется запустить программу проверки целостности файловой системы или воспользоваться специальной утилитой для исправления ошибок.
3. Вредоносное программное обеспечение или блокировка антивирусом. Некоторые антивирусные программы могут блокировать установку Armoury Crate Asus, поскольку они могут рассматривать ее как потенциально опасное программное обеспечение. Рекомендуется временно отключить антивирусное программное обеспечение или добавить Armoury Crate в список доверенных приложений.
4. Отсутствие необходимых системных требований. Проверьте, соответствует ли ваша система минимальным требованиям для установки Armoury Crate Asus. Например, может потребоваться определенная версия операционной системы, требуемое количество оперативной памяти или дискретная видеокарта.
5. Конфликт с другими приложениями или драйверами. Некоторые программы или драйверы могут конфликтовать с установкой Armoury Crate Asus. Попробуйте временно отключить или удалить другие программы, которые могут вызвать конфликт, и повторите попытку установки.
Если ни одно из перечисленных решений не помогло, рекомендуется обратиться в службу поддержки Asus для получения дополнительной помощи и решения возникающих проблем.
Возможные причины и ошибки при установке Armoury Crate Asus на Windows 11
1. Совместимость операционной системы:
Одной из возможных причин невозможности установки Armoury Crate Asus на Windows 11 может быть неправильная версия или совместимость программного обеспечения. Убедитесь, что вы пытаетесь установить правильную версию Armoury Crate, которая совместима с вашей операционной системой Windows 11.
2. Неполадки при загрузке:
Если у вас возникают ошибки при запуске Armoury Crate Asus, возможно, проблема заключается в неполадках при загрузке программы. Попробуйте перезагрузить компьютер и попытаться установить приложение еще раз.
3. Установленные антивирусные программы:
Некоторые антивирусные программы могут блокировать установку Armoury Crate Asus, считая ее потенциально опасной или нежелательной. Попробуйте отключить временно антивирусное программное обеспечение и повторить попытку установки.
4. Наличие сторонних программ и драйверов:
Наличие сторонних программ и драйверов, которые могут влиять на работу приложения Armoury Crate Asus, также может быть причиной проблем с установкой. Попробуйте удалить или обновить возможные конфликтующие программы или драйверы перед попыткой установки Armoury Crate Asus.
5. Недостаточно свободного места на диске:
Если на вашем компьютере недостаточно свободного места на диске, установка Armoury Crate Asus может быть заблокирована. Убедитесь, что у вас достаточно места на диске и удалите ненужные файлы, чтобы освободить дополнительное место перед установкой.
6. Проблемы с файлами установки:
Иногда при скачивании или загрузке файлов установки Armoury Crate Asus могут возникать проблемы, которые мешают правильной установке. Попробуйте повторно загрузить файлы установки или проверить их целостность, чтобы убедиться, что они не повреждены.
Обратите внимание, что перечисленные причины и ошибки являются лишь возможными, и решение проблемы может потребовать дополнительных действий в зависимости от конкретной ситуации.
Как решить проблему с установкой Armoury Crate Asus на Windows 11?
- Перезапустите компьютер — иногда простой перезапуск может устранить неполадки в установке программы.
- Удалите предыдущие версии Armoury Crate Asus — возможно, на вашем компьютере уже установлена более старая версия программы, которая может мешать установке новой версии. Перейдите в «Панель управления» -> «Установка и удаление программы» и удалите все связанные с Armoury Crate Asus приложения.
- Отключите антивирусное программное обеспечение — некоторые антивирусные программы могут блокировать установку новых программ. Попробуйте временно отключить антивирусное программное обеспечение и запустите установку Armoury Crate Asus снова.
- Скачайте последнюю версию Armoury Crate Asus с официального сайта Asus — убедитесь, что вы скачиваете версию программы, совместимую с вашей операционной системой. Запустите загруженный файл установки и следуйте инструкциям на экране.
- Установите все необходимые обновления операционной системы Windows 11 — некоторые проблемы с установкой программ могут быть связаны с неполадками в операционной системе. Проверьте наличие и установите все доступные обновления для Windows 11.
- Свяжитесь с технической поддержкой Asus — если все вышеперечисленные шаги не помогли решить проблему, обратитесь за помощью к технической поддержке Asus. Они смогут предоставить дополнительную информацию и помочь в решении проблемы.
После выполнения этих шагов, вам должно удаться успешно установить Armoury Crate Asus на ваш компьютер с операционной системой Windows 11. Наслаждайтесь возможностями программы и контролируйте различные настройки вашего устройства Asus!

aligoren wrote:
Hi everyone. I’ve bought a TUF gaming keyboard and a KERIS mouse.I wanted to use Armoury Crate. But it crashes while it’s opening. I just see a splash screen then it closes.
I don’t use any foreign system language. I’m using the English language on my system.
I downloaded the latest version of the installer from Asus’s website.
I also used the Armoury uninstall tool to delete it and I re-install it again. It is still the same. So, I couldn’t change my DPI setting using the software.
What can I do to solve this problem?
Can you post more info about your system. One of the frustrating things with Armoury Crate is that if this happens (a detection fails for some reason or the install fails) then it can be difficult to start over, services are installed but can’t start etc. I suggest you try the modified clean boot uninstall method. Then we need to figure out why the original install failed. My first guess is you need to install/reinstall some or all VC++ redistributables before trying again. Please see the Jimbo uninstall thread it covers this stuff in detail.
There is another possibility if you want to try it, I have seen where just running the installer a second time or even a third time with no uninstalling in between can sometimes get it going. If thats a no go then see above.

Jimbo93 wrote:
Can you post more info about your system. One of the frustrating things with Armoury Crate is that if this happens (a detection fails for some reason or the install fails) then it can be difficult to start over, services are installed but can’t start etc. I suggest you try the modified clean boot uninstall method. Then we need to figure out why the original install failed. My first guess is you need to install/reinstall some or all VC++ redistributables before trying again. Please see the Jimbo uninstall thread it covers this stuff in detail.There is another possibility if you want to try it, I have seen where just running the installer a second time or even a third time with no uninstalling in between can sometimes get it going. If thats a no go then see above.
Thanks. I tried the things you mentioned.
A situation like this occurred. The Armory has been opened once before. This only happened when there was a request to update with Aura. It worked correctly then. But there is currently no update request.
These technical details may help you (I’m so sorry these data a litt bit long);
CPU-Z TXT Report
-------------------------------------------------------------------------Binaries
-------------------------------------------------------------------------CPU-Z version 1.98.0.x64
Processors
-------------------------------------------------------------------------CPU Groups 1
CPU Group 0 12 CPUs, mask=0xFFFNumber of sockets 1
Number of threads 12APICs
-------------------------------------------------------------------------Socket 0
-- Core 0 (ID 0)
-- Thread 0 0
-- Thread 1 1
-- Core 1 (ID 1)
-- Thread 2 2
-- Thread 3 3
-- Core 2 (ID 2)
-- Thread 4 4
-- Thread 5 5
-- Core 3 (ID 3)
-- Thread 6 6
-- Thread 7 7
-- Core 4 (ID 4)
-- Thread 8 8
-- Thread 9 9
-- Core 5 (ID 5)
-- Thread 10 10
-- Thread 11 11Timers
-------------------------------------------------------------------------ACPI timer 3.580 MHz
Perf timer 10.000 MHz
Sys timer 1.000 KHzProcessors Information
-------------------------------------------------------------------------Socket 1 ID = 0
Number of cores 6 (max 6)
Number of threads 12 (max 12)
Manufacturer GenuineIntel
Name Intel Core i7 10750H
Codename Comet Lake
Specification Intel(R) Core(TM) i7-10750H CPU @ 2.60GHz
Package (platform ID) Socket 1440 FCBGA (0x5)
CPUID 6.5.2
Extended CPUID 6.A5
Core Stepping R0/R1
Technology 14 nm
TDP Limit 45.0 Watts
Tjmax 100.0 �C
Core Speed 4189.4 MHz
Multiplier x Bus Speed 42.0 x 99.7 MHz
Base frequency (cores) 99.7 MHz
Base frequency (ext.) 99.7 MHz
Stock frequency 2600 MHz
Max frequency 0 MHz
Instructions sets MMX, SSE, SSE2, SSE3, SSSE3, SSE4.1, SSE4.2, EM64T, AES, AVX, AVX2, FMA3
Microcode Revision 0xEA
L1 Data cache 6 x 32 KB (8-way, 64-byte line)
L1 Instruction cache 6 x 32 KB (8-way, 64-byte line)
L2 cache 6 x 256 KB (4-way, 64-byte line)
L3 cache 12 MB (16-way, 64-byte line)
Max CPUID level 00000016h
Max CPUID ext. level 80000008h
FID/VID Control yesTurbo Mode supported, enabled
Max non-turbo ratio 26x
Max turbo ratio 50x
Max efficiency ratio 8x
Speedshift Autonomous
O/C bins none
Ratio 1 core 50x
Ratio 2 cores 49x
Ratio 3 cores 47x
Ratio 4 cores 46x
Ratio 5 cores 45x
Ratio 6 cores 43x
Ratio 7 cores 43x
Ratio 8 cores 43x
TDP Level 45.0 W @ 26x
TDP Level 35.0 W @ 22xTemperature 0 82 degC (179 degF) (Package)
Temperature 1 74 degC (165 degF) (Core #0)
Temperature 2 65 degC (149 degF) (Core #1)
Temperature 3 67 degC (152 degF) (Core #2)
Temperature 4 84 degC (183 degF) (Core #3)
Temperature 5 67 degC (152 degF) (Core #4)
Temperature 6 82 degC (179 degF) (Core #5)
Voltage 0 1.18 Volts (VID)
Power 00 31.48 W (Package)
Power 01 28.48 W (IA Cores)
Power 02 0.04 W (GT)
Power 03 2.96 W (Uncore)
Power 04 1.82 W (DRAM)
Clock Speed 0 4189.42 MHz (Core #0)
Clock Speed 1 4189.42 MHz (Core #1)
Clock Speed 2 4189.42 MHz (Core #2)
Clock Speed 3 4189.42 MHz (Core #3)
Clock Speed 4 4189.42 MHz (Core #4)
Clock Speed 5 4189.42 MHz (Core #5)
Core 0 max ratio 48.0 (effective 46.0)
Core 1 max ratio 48.0 (effective 45.0)
Core 2 max ratio 48.0 (effective 46.0)
Core 3 max ratio 48.0 (effective 45.0)
Core 4 max ratio 48.0 (effective 44.0)
Core 5 max ratio 48.0 (effective 46.0)SMBIOS Version 3.2
DMI BIOS
vendor Dell Inc.
version 1.11.0
date 09/24/2021
ROM size 16384 KBDMI System Information
manufacturer Dell Inc.
product G3 3500
version unknown
serial J1Q9N93
UUID {4C4C4544-0031-5110-8039-CAC04F4E3933}
SKU 09E1
family GSeriesDMI Baseboard
vendor Dell Inc.
model 0D1G65
revision A02
serial /J1Q9N93/CNWSC0011Q0GK4/DMI System Enclosure
manufacturer Dell Inc.
chassis type Notebook
chassis serial J1Q9N93DMI Processor
manufacturer Intel(R) Corporation
model Intel(R) Core(TM) i7-10750H CPU @ 2.60GHz
clock speed 2673.0 MHz
FSB speed 100.0 MHz
multiplier 27.0xDMI Port Connector
designation None (internal)
designation USB1 (external)
port type USB
connector Access Bus (USB)DMI Port Connector
designation None (internal)
designation USB2 (external)
port type USB
connector Access Bus (USB)DMI Port Connector
designation None (internal)
designation USB3 (external)
port type USB
connector Access Bus (USB)DMI Port Connector
designation J7G2 - SATA Port 1 (internal)
designation None (external)DMI Port Connector
designation J1F2 (internal)
designation AC IN (external)DMI Port Connector
designation J8F1 - HDA HDMI (internal)
designation None (external)DMI Port Connector
designation J9E3 - Scan Matrix Keyboard (internal)
designation None (external)DMI Port Connector
designation J8E1 - SPI Program (internal)
designation None (external)DMI Port Connector
designation J6H1 - SATA Power (internal)
designation None (external)DMI Port Connector
designation J5J1 - FP Header (internal)
designation None (external)DMI Port Connector
designation J1H2 - BATT A (internal)
designation None (external)DMI Port Connector
designation J2G1 - CPU Fan (internal)
designation None (external)DMI Port Connector
designation J4V1 - Memory Slot 1 (internal)
designation None (external)DMI Port Connector
designation J4V2 - Memory Slot 2 (internal)
designation None (external)DMI Port Connector
designation J4C1 - FAN PWR (internal)
designation None (external)DMI Extension Slot
designation PCI-Express 0
type PCI Express
populated yesDMI Extension Slot
designation PCI-Express 2
type PCI Express
populated noDMI Extension Slot
designation CNVi: WiFi
type PCI Express
populated yesDMI OEM Strings
string[0] Dell System
string[1] 1[09E1]
string[2] 3[1.0]
string[3] 12[www.dell.com]
string[4] 14[1]
string[5] 15[11]
string[6] 27[41463450615]DMI Physical Memory Array
location Motherboard
usage System Memory
correction None
max capacity 64 GB
max# of devices 2DMI Memory Device
designation DIMM A
format SODIMM
type DDR4
total width 64 bits
data width 64 bits
size 32 GBDMI Memory Device
designation DIMM B
format SODIMM
type DDR4
total width 64 bits
data width 64 bits
size 32 GBStorage
-------------------------------------------------------------------------Drive 0
Device Path \\?\scsi#disk&ven_nvme&prod_35ttfp6pcie-1tb#5&1ef4f1cd&0&000000#{53f56307-b6bf-11d0-94f2-00a0c91efb8b}
Name 35TTFP6PCIE-1TB
Revision T0709A3
Serial 112011200070272
Capacity 953.9 GB
Type Fixed, SSD
Bus Type NVMe (17)
Features
Controller NVM Express (NVMe) Controller at bus 3, device 0, function 0
Link Speed PCI-E 4x @ 8.0 GT/s
Volume c:\, 442.2 GBytes (52.0 percent available)
Volume d:\, 510.7 GBytes (51.0 percent available)Drive 1
Device Path \\?\scsi#disk&ven_st1000lm&prod_035-1rk172#4&1cbff1de&0&000000#{53f56307-b6bf-11d0-94f2-00a0c91efb8b}
Name HDD 1
Capacity 931.5 GB
Type Fixed
Bus Type SATA (11)
Features
Controller Serial ATA Controller - AHCI at bus 0, device 23, function 0
Volume h:\, 931.5 GBytes (95.1 percent available)USB Devices
-------------------------------------------------------------------------USB Device USB Composite Device, class=0x00, subclass=0x00, vendor=0x046D, product=0x0A9C
USB Device USB Composite Device, class=0x00, subclass=0x00, vendor=0x0B05, product=0x195C
USB Device USB Composite Device, class=0x00, subclass=0x00, vendor=0x0B05, product=0x1945
USB Device USB Composite Device, class=0xEF, subclass=0x02, vendor=0x1BCF, product=0x2B99
USB Device Goodix fingerprint, class=0xFF, subclass=0x00, vendor=0x27C6, product=0x530C
USB Device Intel(R) Wireless Bluetooth(R), class=0xE0, subclass=0x01, vendor=0x8087, product=0x0AAAGraphics
-------------------------------------------------------------------------Number of adapters 2
Graphic APIs
-------------------------------------------------------------------------API D3D
API NVIDIA I/O
API NVIDIA NVAPI
API Intel I/O
API Intel oneAPIDisplay Adapters
-------------------------------------------------------------------------Display adapter 0
ID 0x1000000
Name NVIDIA GeForce GTX 1650 Ti
Board Manufacturer Dell
Core family 0x167 (TU117-A)
Cores 1024
ROP Units 32
Memory type GDDR6 (Micron)
Memory size 4 GB
Memory bus width 128 bits
PCI device bus 1 (0x1), device 0 (0x0), function 0 (0x0)
Vendor ID 0x10DE (0x1028)
Model ID 0x1F95 (0x09E1)
Revision ID 0xA1
Root device bus 0 (0x0), device 1 (0x1), function 0 (0x0)
Driver version 30.0.14.9729
WDDM Model 3.0Display adapter 1
ID 0x4000000
Name Intel(R) UHD Graphics
Board Manufacturer Dell
Codename Comet Lake GT2
Execution Units 24
Technology 14 nm
PCI device bus 0 (0x0), device 2 (0x2), function 0 (0x0)
Vendor ID 0x8086 (0x1028)
Model ID 0x9BC4 (0x09E1)
Revision ID 0x5
Performance Level 0
Core clock 449.1 MHz
Driver version 27.20.100.9664
WDDM Model 2.7Win32_VideoController AdapterRAM = 0xFFF00000 (4293918720)
Win32_VideoController AdapterRAM = 0x40000000 (1073741824)
Win32_VideoController DriverVersion = 30.0.14.9729
Win32_VideoController DriverVersion = 27.20.100.9664
Win32_VideoController DriverDate = 12/15/2021
Win32_VideoController DriverDate = 06/01/2021Monitor 0
Model C24FG7x (Samsung)
ID SAM0E43
Serial
Manufacturing Date Week 29, Year 2023
Size 24.0 inches
Max Resolution 1920 x 1080 @ 143 Hz
Horizontal Freq. Range 0-0 kHz
Vertical Freq. Range 0-0 Hz
Max Pixel Clock 0 MHz
Gamma Factor 2.2Monitor 1
Model ()
ID CMN1522
Serial
Manufacturing Date Week 22, Year 2020
Size 15.3 inches
Max Resolution 1920 x 1080 @ 120 Hz
Horizontal Freq. Range 137-137 kHz
Vertical Freq. Range 48-120 Hz
Max Pixel Clock 290 MHz
Gamma Factor 2.2Software
-------------------------------------------------------------------------Windows Version Microsoft Windows 11 (10.0) Professional 64-bit (Build 22000)
DirectX Version 12.0Register Spaces
-------------------------------------------------------------------------Register space PCI
Register space PCI #2
Register space PCI Express, base address = 0x0E0000000
Register space SMBus, base address = 0x0EFA0
Register space PMIO, base address = 0x0FFFF
Register space LPC, base address = 0x02E
aligoren wrote:
Thanks. I tried the things you mentioned.A situation like this occurred. The Armory has been opened once before. This only happened when there was a request to update with Aura. It worked correctly then. But there is currently no update request.
These technical details may help you (I’m so sorry these data a litt bit long);
CPU-Z TXT Report
-------------------------------------------------------------------------Binaries
-------------------------------------------------------------------------CPU-Z version 1.98.0.x64
Processors
-------------------------------------------------------------------------CPU Groups 1
CPU Group 0 12 CPUs, mask=0xFFFNumber of sockets 1
Number of threads 12APICs
-------------------------------------------------------------------------Socket 0
-- Core 0 (ID 0)
-- Thread 0 0
-- Thread 1 1
-- Core 1 (ID 1)
-- Thread 2 2
-- Thread 3 3
-- Core 2 (ID 2)
-- Thread 4 4
-- Thread 5 5
-- Core 3 (ID 3)
-- Thread 6 6
-- Thread 7 7
-- Core 4 (ID 4)
-- Thread 8 8
-- Thread 9 9
-- Core 5 (ID 5)
-- Thread 10 10
-- Thread 11 11Timers
-------------------------------------------------------------------------ACPI timer 3.580 MHz
Perf timer 10.000 MHz
Sys timer 1.000 KHzProcessors Information
-------------------------------------------------------------------------Socket 1 ID = 0
Number of cores 6 (max 6)
Number of threads 12 (max 12)
Manufacturer GenuineIntel
Name Intel Core i7 10750H
Codename Comet Lake
Specification Intel(R) Core(TM) i7-10750H CPU @ 2.60GHz
Package (platform ID) Socket 1440 FCBGA (0x5)
CPUID 6.5.2
Extended CPUID 6.A5
Core Stepping R0/R1
Technology 14 nm
TDP Limit 45.0 Watts
Tjmax 100.0 �C
Core Speed 4189.4 MHz
Multiplier x Bus Speed 42.0 x 99.7 MHz
Base frequency (cores) 99.7 MHz
Base frequency (ext.) 99.7 MHz
Stock frequency 2600 MHz
Max frequency 0 MHz
Instructions sets MMX, SSE, SSE2, SSE3, SSSE3, SSE4.1, SSE4.2, EM64T, AES, AVX, AVX2, FMA3
Microcode Revision 0xEA
L1 Data cache 6 x 32 KB (8-way, 64-byte line)
L1 Instruction cache 6 x 32 KB (8-way, 64-byte line)
L2 cache 6 x 256 KB (4-way, 64-byte line)
L3 cache 12 MB (16-way, 64-byte line)
Max CPUID level 00000016h
Max CPUID ext. level 80000008h
FID/VID Control yesTurbo Mode supported, enabled
Max non-turbo ratio 26x
Max turbo ratio 50x
Max efficiency ratio 8x
Speedshift Autonomous
O/C bins none
Ratio 1 core 50x
Ratio 2 cores 49x
Ratio 3 cores 47x
Ratio 4 cores 46x
Ratio 5 cores 45x
Ratio 6 cores 43x
Ratio 7 cores 43x
Ratio 8 cores 43x
TDP Level 45.0 W @ 26x
TDP Level 35.0 W @ 22xTemperature 0 82 degC (179 degF) (Package)
Temperature 1 74 degC (165 degF) (Core #0)
Temperature 2 65 degC (149 degF) (Core #1)
Temperature 3 67 degC (152 degF) (Core #2)
Temperature 4 84 degC (183 degF) (Core #3)
Temperature 5 67 degC (152 degF) (Core #4)
Temperature 6 82 degC (179 degF) (Core #5)
Voltage 0 1.18 Volts (VID)
Power 00 31.48 W (Package)
Power 01 28.48 W (IA Cores)
Power 02 0.04 W (GT)
Power 03 2.96 W (Uncore)
Power 04 1.82 W (DRAM)
Clock Speed 0 4189.42 MHz (Core #0)
Clock Speed 1 4189.42 MHz (Core #1)
Clock Speed 2 4189.42 MHz (Core #2)
Clock Speed 3 4189.42 MHz (Core #3)
Clock Speed 4 4189.42 MHz (Core #4)
Clock Speed 5 4189.42 MHz (Core #5)
Core 0 max ratio 48.0 (effective 46.0)
Core 1 max ratio 48.0 (effective 45.0)
Core 2 max ratio 48.0 (effective 46.0)
Core 3 max ratio 48.0 (effective 45.0)
Core 4 max ratio 48.0 (effective 44.0)
Core 5 max ratio 48.0 (effective 46.0)SMBIOS Version 3.2
DMI BIOS
vendor Dell Inc.
version 1.11.0
date 09/24/2021
ROM size 16384 KBDMI System Information
manufacturer Dell Inc.
product G3 3500
version unknown
serial J1Q9N93
UUID {4C4C4544-0031-5110-8039-CAC04F4E3933}
SKU 09E1
family GSeriesDMI Baseboard
vendor Dell Inc.
model 0D1G65
revision A02
serial /J1Q9N93/CNWSC0011Q0GK4/DMI System Enclosure
manufacturer Dell Inc.
chassis type Notebook
chassis serial J1Q9N93DMI Processor
manufacturer Intel(R) Corporation
model Intel(R) Core(TM) i7-10750H CPU @ 2.60GHz
clock speed 2673.0 MHz
FSB speed 100.0 MHz
multiplier 27.0xDMI Port Connector
designation None (internal)
designation USB1 (external)
port type USB
connector Access Bus (USB)DMI Port Connector
designation None (internal)
designation USB2 (external)
port type USB
connector Access Bus (USB)DMI Port Connector
designation None (internal)
designation USB3 (external)
port type USB
connector Access Bus (USB)DMI Port Connector
designation J7G2 - SATA Port 1 (internal)
designation None (external)DMI Port Connector
designation J1F2 (internal)
designation AC IN (external)DMI Port Connector
designation J8F1 - HDA HDMI (internal)
designation None (external)DMI Port Connector
designation J9E3 - Scan Matrix Keyboard (internal)
designation None (external)DMI Port Connector
designation J8E1 - SPI Program (internal)
designation None (external)DMI Port Connector
designation J6H1 - SATA Power (internal)
designation None (external)DMI Port Connector
designation J5J1 - FP Header (internal)
designation None (external)DMI Port Connector
designation J1H2 - BATT A (internal)
designation None (external)DMI Port Connector
designation J2G1 - CPU Fan (internal)
designation None (external)DMI Port Connector
designation J4V1 - Memory Slot 1 (internal)
designation None (external)DMI Port Connector
designation J4V2 - Memory Slot 2 (internal)
designation None (external)DMI Port Connector
designation J4C1 - FAN PWR (internal)
designation None (external)DMI Extension Slot
designation PCI-Express 0
type PCI Express
populated yesDMI Extension Slot
designation PCI-Express 2
type PCI Express
populated noDMI Extension Slot
designation CNVi: WiFi
type PCI Express
populated yesDMI OEM Strings
string[0] Dell System
string[1] 1[09E1]
string[2] 3[1.0]
string[3] 12[www.dell.com]
string[4] 14[1]
string[5] 15[11]
string[6] 27[41463450615]DMI Physical Memory Array
location Motherboard
usage System Memory
correction None
max capacity 64 GB
max# of devices 2DMI Memory Device
designation DIMM A
format SODIMM
type DDR4
total width 64 bits
data width 64 bits
size 32 GBDMI Memory Device
designation DIMM B
format SODIMM
type DDR4
total width 64 bits
data width 64 bits
size 32 GBStorage
-------------------------------------------------------------------------Drive 0
Device Path \\?\scsi#disk&ven_nvme&prod_35ttfp6pcie-1tb#5&1ef4f1cd&0&000000#{53f56307-b6bf-11d0-94f2-00a0c91efb8b}
Name 35TTFP6PCIE-1TB
Revision T0709A3
Serial 112011200070272
Capacity 953.9 GB
Type Fixed, SSD
Bus Type NVMe (17)
Features
Controller NVM Express (NVMe) Controller at bus 3, device 0, function 0
Link Speed PCI-E 4x @ 8.0 GT/s
Volume c:\, 442.2 GBytes (52.0 percent available)
Volume d:\, 510.7 GBytes (51.0 percent available)Drive 1
Device Path \\?\scsi#disk&ven_st1000lm&prod_035-1rk172#4&1cbff1de&0&000000#{53f56307-b6bf-11d0-94f2-00a0c91efb8b}
Name HDD 1
Capacity 931.5 GB
Type Fixed
Bus Type SATA (11)
Features
Controller Serial ATA Controller - AHCI at bus 0, device 23, function 0
Volume h:\, 931.5 GBytes (95.1 percent available)USB Devices
-------------------------------------------------------------------------USB Device USB Composite Device, class=0x00, subclass=0x00, vendor=0x046D, product=0x0A9C
USB Device USB Composite Device, class=0x00, subclass=0x00, vendor=0x0B05, product=0x195C
USB Device USB Composite Device, class=0x00, subclass=0x00, vendor=0x0B05, product=0x1945
USB Device USB Composite Device, class=0xEF, subclass=0x02, vendor=0x1BCF, product=0x2B99
USB Device Goodix fingerprint, class=0xFF, subclass=0x00, vendor=0x27C6, product=0x530C
USB Device Intel(R) Wireless Bluetooth(R), class=0xE0, subclass=0x01, vendor=0x8087, product=0x0AAAGraphics
-------------------------------------------------------------------------Number of adapters 2
Graphic APIs
-------------------------------------------------------------------------API D3D
API NVIDIA I/O
API NVIDIA NVAPI
API Intel I/O
API Intel oneAPIDisplay Adapters
-------------------------------------------------------------------------Display adapter 0
ID 0x1000000
Name NVIDIA GeForce GTX 1650 Ti
Board Manufacturer Dell
Core family 0x167 (TU117-A)
Cores 1024
ROP Units 32
Memory type GDDR6 (Micron)
Memory size 4 GB
Memory bus width 128 bits
PCI device bus 1 (0x1), device 0 (0x0), function 0 (0x0)
Vendor ID 0x10DE (0x1028)
Model ID 0x1F95 (0x09E1)
Revision ID 0xA1
Root device bus 0 (0x0), device 1 (0x1), function 0 (0x0)
Driver version 30.0.14.9729
WDDM Model 3.0Display adapter 1
ID 0x4000000
Name Intel(R) UHD Graphics
Board Manufacturer Dell
Codename Comet Lake GT2
Execution Units 24
Technology 14 nm
PCI device bus 0 (0x0), device 2 (0x2), function 0 (0x0)
Vendor ID 0x8086 (0x1028)
Model ID 0x9BC4 (0x09E1)
Revision ID 0x5
Performance Level 0
Core clock 449.1 MHz
Driver version 27.20.100.9664
WDDM Model 2.7Win32_VideoController AdapterRAM = 0xFFF00000 (4293918720)
Win32_VideoController AdapterRAM = 0x40000000 (1073741824)
Win32_VideoController DriverVersion = 30.0.14.9729
Win32_VideoController DriverVersion = 27.20.100.9664
Win32_VideoController DriverDate = 12/15/2021
Win32_VideoController DriverDate = 06/01/2021Monitor 0
Model C24FG7x (Samsung)
ID SAM0E43
Serial
Manufacturing Date Week 29, Year 2023
Size 24.0 inches
Max Resolution 1920 x 1080 @ 143 Hz
Horizontal Freq. Range 0-0 kHz
Vertical Freq. Range 0-0 Hz
Max Pixel Clock 0 MHz
Gamma Factor 2.2Monitor 1
Model ()
ID CMN1522
Serial
Manufacturing Date Week 22, Year 2020
Size 15.3 inches
Max Resolution 1920 x 1080 @ 120 Hz
Horizontal Freq. Range 137-137 kHz
Vertical Freq. Range 48-120 Hz
Max Pixel Clock 290 MHz
Gamma Factor 2.2Software
-------------------------------------------------------------------------Windows Version Microsoft Windows 11 (10.0) Professional 64-bit (Build 22000)
DirectX Version 12.0Register Spaces
-------------------------------------------------------------------------Register space PCI
Register space PCI #2
Register space PCI Express, base address = 0x0E0000000
Register space SMBus, base address = 0x0EFA0
Register space PMIO, base address = 0x0FFFF
Register space LPC, base address = 0x02E
Sounds like a firewall/network issue prevent the update maybe. Not too uncommon. Shut the windows defender firewall off if you use that one and try again. I don’t know if I believe you tried everything lol. Just some light humor.
Jimbo93 wrote:
Sounds like a firewall/network issue prevent the update maybe. Not too uncommon. Shut the windows defender firewall off if you use that one and try again. I don’t know if I believe you tried everything lol. Just some light humor.
I’m so sorry. It opened once. When I install aura and armoury, and I open the aura, it opens the armoury for once time.
So, I can see everything. But, I can’t open it anymore 
I hope, I can’t find a solution. Btw, I tried to install this software to a new Windows 11 system. The same things happened again.
aligoren wrote:
I’m so sorry. It opened once. When I install aura and armoury, and I open the aura, it opens the armoury for once time.So, I can see everything. But, I can’t open it anymore
I hope, I can’t find a solution. Btw, I tried to install this software to a new Windows 11 system. The same things happened again.
My suggestion is to try reinstalling armoury crate with your windows firewall turned off. That way we can see if it makes a difference and fix the firewall after. We may have to reinstall again but we learn something. You will want to shutdown apps that use the internet best you can and I assume you have a router/firewall so you are not totally exposed on the net.
Okay, thanks. I’ll try. Btw, this is event log for Armaury.
Faulting application name: ArmouryCrate.exe, version: 0.0.0.0, time stamp: 0x61c2dcb6
Faulting module name: Windows.UI.Xaml.dll, version: 10.0.22000.348, time stamp: 0x003360cd
Exception code: 0xc000027b
Fault offset: 0x0000000000834af0
Faulting process id: 0x4750
Faulting application start time: 0x01d7ff2c4d3381f5
Faulting application path: C:\Program Files\WindowsApps\B9ECED6F.ArmouryCrate_5.0.11.0_x64__qmba6cd70vzyy\ArmouryCrate.exe
Faulting module path: C:\Windows\System32\Windows.UI.Xaml.dll
Report Id: bd6a5015-d805-4087-9c8c-c5a60b2a91c6
Faulting package full name: B9ECED6F.ArmouryCrate_5.0.11.0_x64__qmba6cd70vzyy
Faulting package-relative application ID: App
aligoren wrote:
Okay, thanks. I’ll try. Btw, this is event log for Armaury.Faulting application name: ArmouryCrate.exe, version: 0.0.0.0, time stamp: 0x61c2dcb6
Faulting module name: Windows.UI.Xaml.dll, version: 10.0.22000.348, time stamp: 0x003360cd
Exception code: 0xc000027b
Fault offset: 0x0000000000834af0
Faulting process id: 0x4750
Faulting application start time: 0x01d7ff2c4d3381f5
Faulting application path: C:\Program Files\WindowsApps\B9ECED6F.ArmouryCrate_5.0.11.0_x64__qmba6cd70vzyy\ArmouryCrate.exe
Faulting module path: C:\Windows\System32\Windows.UI.Xaml.dll
Report Id: bd6a5015-d805-4087-9c8c-c5a60b2a91c6
Faulting package full name: B9ECED6F.ArmouryCrate_5.0.11.0_x64__qmba6cd70vzyy
Faulting package-relative application ID: App
We will want to look at event logs probably. Maybe a screen shot of the application log sort of like this.
Thanks. I think something went wrong with this log sort.

Right? Something is wrong about Win11. I guess…
aligoren wrote:
Thanks. I think something went wrong with this log sort.
Right? Something is wrong about Win11. I guess…
Armoury Crate is supposed to work on win 11 and there are folks that have reported it works. It is more likely that some hardware or software issue on your pc.
ASUS Armoury Crate is software that lets you customize the RGB lighting on your ASUS Republic of Gamers (ROG) devices. It also allows you to map macro keys, create profiles, and much more. In this article, we’ll show you how to install ASUS Armoury Crate on Windows 11.
What is ASUS Armoury Crate?
Table of Contents
ASUS Armoury Crate is a utility that comes pre-installed on some ASUS laptops. It allows you to control the lighting, fan speed, and other aspects of your laptop. You can also use it to install and update ASUS drivers and software.
Installing ASUS Armoury Crate on Windows is a simple process. First, you need to download the latest version of the utility from the ASUS website. Next, you need to extract the contents of the ZIP file to a location on your computer. Finally, you need to run the setup file and follow the on-screen instructions.
The Different Parts of ASUS Armoury Crate
ASUS Armoury Crate is a software program that provides users with a variety of tools to customize their ASUS Republic of Gamers (ROG) devices. The program is divided into four main sections: the ROG Core, the GameFirst Networking Manager, the Sonic Studio sound manager, and the Aegis III overlay.
The ROG Core is the main interface for ASUS Armoury Crate. From here, users can access all of the program’s features and settings. The GameFirst Networking Manager allows users to optimize their internet connection for gaming. The Sonic Studio sound manager lets users control the audio settings on their ROG device. Lastly, the Aegis III overlay provides users with information about their system’s performance and status.
Installing ASUS Armoury Crate is simple and only takes a few minutes. First, users need to download the program from the ASUS website. Next, they need to install the program on their Windows PC. Finally, they need to connect their ROG device to their PC using a USB cable.
If you are having trouble installing ASUS Armoury Crate on your Windows 11 computer, there is a fix that may help.
First, make sure that you have the latest version of the Armoury Crate software. You can download it from the ASUS website.
Once you have downloaded the software, run the installer. When you are prompted to choose an installation location, choose the directory where you want to install the software.
Next, open the Armoury Crate software and click on the “Settings” tab. In the “General” section, click on the “Install Location” option and select the directory where you installed the software.
Finally, click on the “OK” button to save your changes and close the Settings window. You should now be able to use Armoury Crate on your Windows 11 computer!
ASUS Armoury Crate Installer Utility
1. Download the ASUS Armoury Crate Installer Utility from the ASUS website.
2. Run the installer and follow the on-screen instructions.
3. once the installation is complete, launch the Armoury Crate app.
4. Follow the on-screen instructions to create an account and log in.
5. Once you’re logged in, you’ll be able to access all of the features of ASUS Armoury Crate.
Download Armoury Crate (Beta) from Windows 11 Microsoft Store
1. Go to the Microsoft Store and search for “ASUS Armoury Crate”
2. Select the “ASUS Armoury Crate” app and click “Get”
3. Once the download is complete, launch the app
4. Follow the on-screen instructions to complete the installation process
Windows 11 Aapx Package Installer
1. Download the latest ASUS Armoury Crate Windows 11 Aapx package from the ASUS website.
2. Extract the contents of the zip file to a new folder on your hard drive.
3. Open the extracted folder and double-click on the “AsusSetup.exe” file to launch the installer.
4. Follow the on-screen instructions to complete the installation process.
5. Once the installation is complete, launch ASUS Armoury Crate from the Start menu or Desktop shortcut.
6. Follow the on-screen instructions to complete the initial setup process.
7. That’s it! You can now start using ASUS Armoury Crate to manage your gaming devices and settings.
Package deployment using Windows PowerShell
1. Package deployment using Windows PowerShell
2. Extract the downloaded .zip file
3. Run the .exe file and follow the on-screen instructions
Armoury Crate Services Installation on Windows 11
ASUS Armoury Crate services software provides a central location for you to manage all the customizable settings for your ROG devices. You can use it to change the RGB lighting effects, create and manage macros, adjust audio settings, and more.
Installing ASUS Armoury Crate is a simple process. Just follow the steps below and you’ll be up and running in no time.
1. Download the latest version of ASUS Armoury Crate from the ROG website.
2. Run the executable file and follow the on-screen instructions to install the software.
3. Once the installation is complete, launch ASUS Armoury Crate from your Start menu.
4. Sign in with your ROG account to unlock all the features of the software.
5. That’s it! You’re now ready to start customizing your ROG devices with ASUS Armoury Crate.
How to Install ASUS Armoury Crate on Windows 11
ASUS Armoury Crate is a software that comes with ASUS ROG laptops and desktops. It allows you to customize the RGB lighting, keyboard backlight, and other features of your device.
In this blog post, we will show you how to install ASUS Armoury Crate on your Windows 10 computer.
Before we begin, you will need to download the Armoury Crate software from the ASUS website.
Once you have downloaded the software, double-click on the setup file to begin the installation process.
Follow the on-screen instructions to complete the installation. Once it is finished, you will be able to launch the Armoury Crate software from the Start menu.
Now that you have successfully installed ASUS Armoury Crate, let us take a look at some of its features.
The main interface of Armoury Crate consists of five tabs: Profile, Lighting, Macro, Performance, and Settings.
The Profile tab allows you to create different profiles for your games and applications. This is useful if you want to have different settings for each game or application.
The Lighting tab allows you to customize the RGB lighting of your device. You can choose from a variety of preset modes or
Uninstall Armoury Crate Application from Windows 11
In this quick tutorial, we’re going to show you how to uninstall the Armoury Crate application from Windows 11.
Armoury Crate is a utility that comes pre-installed on ASUS ROG laptops. It’s used to manage different aspects of the laptop, including the keyboard backlight, system lighting, macros, and more.
If you don’t use Armoury Crate or you want to remove it for some reason, follow the steps below.
Step 1: Open the Start menu and search for “Add or remove programs”.
Step 2: In the list of installed programs, find “ASUS Armoury Crate” and click on it.
Step 3: Click on the “Uninstall” button and confirm that you want to remove the program.
That’s all there is to it! After following these steps, Armoury Crate will be completely removed from your Windows 11 computer.
How to Use ASUS Armoury Crate
1. Open the Armoury Crate software and click on the “Settings” tab.
2. In the Settings menu, click on the “System” tab.
3. Under the System tab, find the “ASUS Armoury Crate Service” section and click on the “Install” button.
4. Follow the prompts to install the Armoury Crate service on your Windows PC.
5. Once the installation is complete, click on the “Start” button to start using Armoury Crate.
FAQ
Q: What is the Armoury Crate?
A: The Armoury Crate is a utility that allows users to customize their ASUS ROG gaming laptops. It includes a number of features such as game profiles, fan control, and RGB lighting.
Q: How do I install the Armoury Crate on my Windows PC?
A: The first thing you need to do is download the Armoury Crate installer from the ASUS website. Once you have downloaded the installer, double-click on it to begin the installation process. When prompted, agree to the terms and conditions and click “Next”. The installer will then ask you where you want to install the Armoury Crate. Choose a location and click “Next”. The installation process will then begin. Once it is finished, click “Finish” to close the installer.
Q: How do I launch the Armoury Crate?
A: After you have installed the Armoury Crate, you can launch it by double-clicking on the shortcut that was created on your desktop. Alternatively, you can launch it from the Start menu.
Conclusion
We hope this guide has helped you install ASUS Armoury Crate on your Windows 11 machine. If you have any questions or comments, please feel free to leave them below. We’ll do our best to help you out.
На чтение 4 мин Опубликовано Обновлено
Разработчики Armoury Crate Asus разработали мощное программное обеспечение, которое позволяет пользователям контролировать и настраивать различные параметры компьютера. Однако, некоторые пользователи столкнулись с проблемой при установке Armoury Crate на своих компьютерах под управлением Windows 11. Эта проблема может быть вызвана различными факторами, такими как несовместимость с операционной системой или конфликт с другими установленными программами.
Одним из причин возникновения проблемы может быть несовместимость Armoury Crate Asus с операционной системой Windows 11. Возможно, разработчики еще не выпустили обновление программы, чтобы сделать ее полностью совместимой с новой ОС. В таком случае, решением проблемы может быть ожидание официального обновления Armoury Crate, которое будет совместимо с Windows 11.
Еще одной возможной причиной проблемы может быть конфликт с другими установленными программами. Некоторые программы могут использовать аналогичные функции, которые Armoury Crate, и это может вызвать конфликт при установке. В этом случае, рекомендуется проверить список установленных программ и удалить любые подозрительные или конкурирующие с Armoury Crate приложения.
Кроме того, стоит обратить внимание на возможные ошибки при установке программы. Если процесс установки Armoury Crate прерывается или появляется ошибка, рекомендуется попробовать удалить все остатки предыдущих попыток установки и повторить установку сначала. Иногда ошибки могут быть вызваны неправильно запущенным процессом установки или некорректными правами доступа к файлам программы.
Как решить проблему с установкой Armoury Crate Asus на Windows 11
Если у вас возникли проблемы с установкой Armoury Crate Asus на операционной системе Windows 11, есть несколько способов, которые могут помочь вам решить данную проблему:
- Проверьте совместимость. Убедитесь, что ваша версия операционной системы Windows 11 совместима с Armoury Crate Asus. Посетите официальный веб-сайт Asus, чтобы узнать, какие версии Windows поддерживаются данным приложением.
- Обновите систему. Перед установкой Armoury Crate Asus убедитесь, что ваша операционная система Windows 11 обновлена до последней версии. Откройте настройки Windows, перейдите в раздел «Обновление и безопасность» и выполните все доступные обновления.
- Отключите антивирусное программное обеспечение. Некоторые антивирусные программы могут блокировать установку Armoury Crate Asus. Попробуйте временно отключить антивирусное ПО, а затем повторите попытку установки.
- Проверьте подключение к интернету. Armoury Crate Asus требует подключения к интернету для загрузки и установки. Убедитесь, что у вас есть стабильное и надежное подключение к интернету.
- Перезагрузите компьютер. Иногда простое перезагрузка компьютера может помочь решить проблемы с установкой программного обеспечения. Перезагрузите компьютер и повторите попытку установки Armoury Crate Asus.
- Свяжитесь с технической поддержкой Asus. Если все вышеперечисленные способы не помогли решить проблему, обратитесь в службу поддержки Asus. Они могут предоставить дополнительную помощь и инструкции по устранению проблемы.
Применение одного или нескольких из перечисленных выше способов должно помочь вам решить проблему с установкой Armoury Crate Asus на операционной системе Windows 11.
Проверьте совместимость устройства
Перед установкой Armoury Crate Asus на операционную систему Windows 11 необходимо проверить совместимость вашего устройства с программой. Возможно, ваше устройство не поддерживает работу с Armoury Crate на Windows 11, или необходимо обновить драйверы и программное обеспечение.
Для проверки совместимости выполните следующие шаги:
- Посетите официальный сайт Asus и найдите страницу с информацией о поддержке Armoury Crate на Windows 11.
- Проверьте список совместимых устройств и операционных систем. Обратите внимание на модель вашего устройства и наличие Windows 11 в списке поддерживаемых ОС.
- Если ваше устройство не совместимо с Armoury Crate на Windows 11, обратитесь к производителю или поставщику для получения дополнительной информации и рекомендаций.
- Если ваше устройство совместимо с Armoury Crate на Windows 11, проверьте наличие обновлений для драйверов и программного обеспечения. Посетите официальный сайт Asus и загрузите последние версии драйверов и программ, которые могут быть необходимы для работы Armoury Crate на Windows 11.
Проверка совместимости устройства с Armoury Crate на Windows 11 позволит вам избежать проблем с установкой программы и обеспечит более стабильную и надежную работу в дальнейшем.