
aligoren wrote:
Hi everyone. I’ve bought a TUF gaming keyboard and a KERIS mouse.I wanted to use Armoury Crate. But it crashes while it’s opening. I just see a splash screen then it closes.
I don’t use any foreign system language. I’m using the English language on my system.
I downloaded the latest version of the installer from Asus’s website.
I also used the Armoury uninstall tool to delete it and I re-install it again. It is still the same. So, I couldn’t change my DPI setting using the software.
What can I do to solve this problem?
Can you post more info about your system. One of the frustrating things with Armoury Crate is that if this happens (a detection fails for some reason or the install fails) then it can be difficult to start over, services are installed but can’t start etc. I suggest you try the modified clean boot uninstall method. Then we need to figure out why the original install failed. My first guess is you need to install/reinstall some or all VC++ redistributables before trying again. Please see the Jimbo uninstall thread it covers this stuff in detail.
There is another possibility if you want to try it, I have seen where just running the installer a second time or even a third time with no uninstalling in between can sometimes get it going. If thats a no go then see above.

Jimbo93 wrote:
Can you post more info about your system. One of the frustrating things with Armoury Crate is that if this happens (a detection fails for some reason or the install fails) then it can be difficult to start over, services are installed but can’t start etc. I suggest you try the modified clean boot uninstall method. Then we need to figure out why the original install failed. My first guess is you need to install/reinstall some or all VC++ redistributables before trying again. Please see the Jimbo uninstall thread it covers this stuff in detail.There is another possibility if you want to try it, I have seen where just running the installer a second time or even a third time with no uninstalling in between can sometimes get it going. If thats a no go then see above.
Thanks. I tried the things you mentioned.
A situation like this occurred. The Armory has been opened once before. This only happened when there was a request to update with Aura. It worked correctly then. But there is currently no update request.
These technical details may help you (I’m so sorry these data a litt bit long);
CPU-Z TXT Report
-------------------------------------------------------------------------Binaries
-------------------------------------------------------------------------CPU-Z version 1.98.0.x64
Processors
-------------------------------------------------------------------------CPU Groups 1
CPU Group 0 12 CPUs, mask=0xFFFNumber of sockets 1
Number of threads 12APICs
-------------------------------------------------------------------------Socket 0
-- Core 0 (ID 0)
-- Thread 0 0
-- Thread 1 1
-- Core 1 (ID 1)
-- Thread 2 2
-- Thread 3 3
-- Core 2 (ID 2)
-- Thread 4 4
-- Thread 5 5
-- Core 3 (ID 3)
-- Thread 6 6
-- Thread 7 7
-- Core 4 (ID 4)
-- Thread 8 8
-- Thread 9 9
-- Core 5 (ID 5)
-- Thread 10 10
-- Thread 11 11Timers
-------------------------------------------------------------------------ACPI timer 3.580 MHz
Perf timer 10.000 MHz
Sys timer 1.000 KHzProcessors Information
-------------------------------------------------------------------------Socket 1 ID = 0
Number of cores 6 (max 6)
Number of threads 12 (max 12)
Manufacturer GenuineIntel
Name Intel Core i7 10750H
Codename Comet Lake
Specification Intel(R) Core(TM) i7-10750H CPU @ 2.60GHz
Package (platform ID) Socket 1440 FCBGA (0x5)
CPUID 6.5.2
Extended CPUID 6.A5
Core Stepping R0/R1
Technology 14 nm
TDP Limit 45.0 Watts
Tjmax 100.0 �C
Core Speed 4189.4 MHz
Multiplier x Bus Speed 42.0 x 99.7 MHz
Base frequency (cores) 99.7 MHz
Base frequency (ext.) 99.7 MHz
Stock frequency 2600 MHz
Max frequency 0 MHz
Instructions sets MMX, SSE, SSE2, SSE3, SSSE3, SSE4.1, SSE4.2, EM64T, AES, AVX, AVX2, FMA3
Microcode Revision 0xEA
L1 Data cache 6 x 32 KB (8-way, 64-byte line)
L1 Instruction cache 6 x 32 KB (8-way, 64-byte line)
L2 cache 6 x 256 KB (4-way, 64-byte line)
L3 cache 12 MB (16-way, 64-byte line)
Max CPUID level 00000016h
Max CPUID ext. level 80000008h
FID/VID Control yesTurbo Mode supported, enabled
Max non-turbo ratio 26x
Max turbo ratio 50x
Max efficiency ratio 8x
Speedshift Autonomous
O/C bins none
Ratio 1 core 50x
Ratio 2 cores 49x
Ratio 3 cores 47x
Ratio 4 cores 46x
Ratio 5 cores 45x
Ratio 6 cores 43x
Ratio 7 cores 43x
Ratio 8 cores 43x
TDP Level 45.0 W @ 26x
TDP Level 35.0 W @ 22xTemperature 0 82 degC (179 degF) (Package)
Temperature 1 74 degC (165 degF) (Core #0)
Temperature 2 65 degC (149 degF) (Core #1)
Temperature 3 67 degC (152 degF) (Core #2)
Temperature 4 84 degC (183 degF) (Core #3)
Temperature 5 67 degC (152 degF) (Core #4)
Temperature 6 82 degC (179 degF) (Core #5)
Voltage 0 1.18 Volts (VID)
Power 00 31.48 W (Package)
Power 01 28.48 W (IA Cores)
Power 02 0.04 W (GT)
Power 03 2.96 W (Uncore)
Power 04 1.82 W (DRAM)
Clock Speed 0 4189.42 MHz (Core #0)
Clock Speed 1 4189.42 MHz (Core #1)
Clock Speed 2 4189.42 MHz (Core #2)
Clock Speed 3 4189.42 MHz (Core #3)
Clock Speed 4 4189.42 MHz (Core #4)
Clock Speed 5 4189.42 MHz (Core #5)
Core 0 max ratio 48.0 (effective 46.0)
Core 1 max ratio 48.0 (effective 45.0)
Core 2 max ratio 48.0 (effective 46.0)
Core 3 max ratio 48.0 (effective 45.0)
Core 4 max ratio 48.0 (effective 44.0)
Core 5 max ratio 48.0 (effective 46.0)SMBIOS Version 3.2
DMI BIOS
vendor Dell Inc.
version 1.11.0
date 09/24/2021
ROM size 16384 KBDMI System Information
manufacturer Dell Inc.
product G3 3500
version unknown
serial J1Q9N93
UUID {4C4C4544-0031-5110-8039-CAC04F4E3933}
SKU 09E1
family GSeriesDMI Baseboard
vendor Dell Inc.
model 0D1G65
revision A02
serial /J1Q9N93/CNWSC0011Q0GK4/DMI System Enclosure
manufacturer Dell Inc.
chassis type Notebook
chassis serial J1Q9N93DMI Processor
manufacturer Intel(R) Corporation
model Intel(R) Core(TM) i7-10750H CPU @ 2.60GHz
clock speed 2673.0 MHz
FSB speed 100.0 MHz
multiplier 27.0xDMI Port Connector
designation None (internal)
designation USB1 (external)
port type USB
connector Access Bus (USB)DMI Port Connector
designation None (internal)
designation USB2 (external)
port type USB
connector Access Bus (USB)DMI Port Connector
designation None (internal)
designation USB3 (external)
port type USB
connector Access Bus (USB)DMI Port Connector
designation J7G2 - SATA Port 1 (internal)
designation None (external)DMI Port Connector
designation J1F2 (internal)
designation AC IN (external)DMI Port Connector
designation J8F1 - HDA HDMI (internal)
designation None (external)DMI Port Connector
designation J9E3 - Scan Matrix Keyboard (internal)
designation None (external)DMI Port Connector
designation J8E1 - SPI Program (internal)
designation None (external)DMI Port Connector
designation J6H1 - SATA Power (internal)
designation None (external)DMI Port Connector
designation J5J1 - FP Header (internal)
designation None (external)DMI Port Connector
designation J1H2 - BATT A (internal)
designation None (external)DMI Port Connector
designation J2G1 - CPU Fan (internal)
designation None (external)DMI Port Connector
designation J4V1 - Memory Slot 1 (internal)
designation None (external)DMI Port Connector
designation J4V2 - Memory Slot 2 (internal)
designation None (external)DMI Port Connector
designation J4C1 - FAN PWR (internal)
designation None (external)DMI Extension Slot
designation PCI-Express 0
type PCI Express
populated yesDMI Extension Slot
designation PCI-Express 2
type PCI Express
populated noDMI Extension Slot
designation CNVi: WiFi
type PCI Express
populated yesDMI OEM Strings
string[0] Dell System
string[1] 1[09E1]
string[2] 3[1.0]
string[3] 12[www.dell.com]
string[4] 14[1]
string[5] 15[11]
string[6] 27[41463450615]DMI Physical Memory Array
location Motherboard
usage System Memory
correction None
max capacity 64 GB
max# of devices 2DMI Memory Device
designation DIMM A
format SODIMM
type DDR4
total width 64 bits
data width 64 bits
size 32 GBDMI Memory Device
designation DIMM B
format SODIMM
type DDR4
total width 64 bits
data width 64 bits
size 32 GBStorage
-------------------------------------------------------------------------Drive 0
Device Path \\?\scsi#disk&ven_nvme&prod_35ttfp6pcie-1tb#5&1ef4f1cd&0&000000#{53f56307-b6bf-11d0-94f2-00a0c91efb8b}
Name 35TTFP6PCIE-1TB
Revision T0709A3
Serial 112011200070272
Capacity 953.9 GB
Type Fixed, SSD
Bus Type NVMe (17)
Features
Controller NVM Express (NVMe) Controller at bus 3, device 0, function 0
Link Speed PCI-E 4x @ 8.0 GT/s
Volume c:\, 442.2 GBytes (52.0 percent available)
Volume d:\, 510.7 GBytes (51.0 percent available)Drive 1
Device Path \\?\scsi#disk&ven_st1000lm&prod_035-1rk172#4&1cbff1de&0&000000#{53f56307-b6bf-11d0-94f2-00a0c91efb8b}
Name HDD 1
Capacity 931.5 GB
Type Fixed
Bus Type SATA (11)
Features
Controller Serial ATA Controller - AHCI at bus 0, device 23, function 0
Volume h:\, 931.5 GBytes (95.1 percent available)USB Devices
-------------------------------------------------------------------------USB Device USB Composite Device, class=0x00, subclass=0x00, vendor=0x046D, product=0x0A9C
USB Device USB Composite Device, class=0x00, subclass=0x00, vendor=0x0B05, product=0x195C
USB Device USB Composite Device, class=0x00, subclass=0x00, vendor=0x0B05, product=0x1945
USB Device USB Composite Device, class=0xEF, subclass=0x02, vendor=0x1BCF, product=0x2B99
USB Device Goodix fingerprint, class=0xFF, subclass=0x00, vendor=0x27C6, product=0x530C
USB Device Intel(R) Wireless Bluetooth(R), class=0xE0, subclass=0x01, vendor=0x8087, product=0x0AAAGraphics
-------------------------------------------------------------------------Number of adapters 2
Graphic APIs
-------------------------------------------------------------------------API D3D
API NVIDIA I/O
API NVIDIA NVAPI
API Intel I/O
API Intel oneAPIDisplay Adapters
-------------------------------------------------------------------------Display adapter 0
ID 0x1000000
Name NVIDIA GeForce GTX 1650 Ti
Board Manufacturer Dell
Core family 0x167 (TU117-A)
Cores 1024
ROP Units 32
Memory type GDDR6 (Micron)
Memory size 4 GB
Memory bus width 128 bits
PCI device bus 1 (0x1), device 0 (0x0), function 0 (0x0)
Vendor ID 0x10DE (0x1028)
Model ID 0x1F95 (0x09E1)
Revision ID 0xA1
Root device bus 0 (0x0), device 1 (0x1), function 0 (0x0)
Driver version 30.0.14.9729
WDDM Model 3.0Display adapter 1
ID 0x4000000
Name Intel(R) UHD Graphics
Board Manufacturer Dell
Codename Comet Lake GT2
Execution Units 24
Technology 14 nm
PCI device bus 0 (0x0), device 2 (0x2), function 0 (0x0)
Vendor ID 0x8086 (0x1028)
Model ID 0x9BC4 (0x09E1)
Revision ID 0x5
Performance Level 0
Core clock 449.1 MHz
Driver version 27.20.100.9664
WDDM Model 2.7Win32_VideoController AdapterRAM = 0xFFF00000 (4293918720)
Win32_VideoController AdapterRAM = 0x40000000 (1073741824)
Win32_VideoController DriverVersion = 30.0.14.9729
Win32_VideoController DriverVersion = 27.20.100.9664
Win32_VideoController DriverDate = 12/15/2021
Win32_VideoController DriverDate = 06/01/2021Monitor 0
Model C24FG7x (Samsung)
ID SAM0E43
Serial
Manufacturing Date Week 29, Year 2023
Size 24.0 inches
Max Resolution 1920 x 1080 @ 143 Hz
Horizontal Freq. Range 0-0 kHz
Vertical Freq. Range 0-0 Hz
Max Pixel Clock 0 MHz
Gamma Factor 2.2Monitor 1
Model ()
ID CMN1522
Serial
Manufacturing Date Week 22, Year 2020
Size 15.3 inches
Max Resolution 1920 x 1080 @ 120 Hz
Horizontal Freq. Range 137-137 kHz
Vertical Freq. Range 48-120 Hz
Max Pixel Clock 290 MHz
Gamma Factor 2.2Software
-------------------------------------------------------------------------Windows Version Microsoft Windows 11 (10.0) Professional 64-bit (Build 22000)
DirectX Version 12.0Register Spaces
-------------------------------------------------------------------------Register space PCI
Register space PCI #2
Register space PCI Express, base address = 0x0E0000000
Register space SMBus, base address = 0x0EFA0
Register space PMIO, base address = 0x0FFFF
Register space LPC, base address = 0x02E
aligoren wrote:
Thanks. I tried the things you mentioned.A situation like this occurred. The Armory has been opened once before. This only happened when there was a request to update with Aura. It worked correctly then. But there is currently no update request.
These technical details may help you (I’m so sorry these data a litt bit long);
CPU-Z TXT Report
-------------------------------------------------------------------------Binaries
-------------------------------------------------------------------------CPU-Z version 1.98.0.x64
Processors
-------------------------------------------------------------------------CPU Groups 1
CPU Group 0 12 CPUs, mask=0xFFFNumber of sockets 1
Number of threads 12APICs
-------------------------------------------------------------------------Socket 0
-- Core 0 (ID 0)
-- Thread 0 0
-- Thread 1 1
-- Core 1 (ID 1)
-- Thread 2 2
-- Thread 3 3
-- Core 2 (ID 2)
-- Thread 4 4
-- Thread 5 5
-- Core 3 (ID 3)
-- Thread 6 6
-- Thread 7 7
-- Core 4 (ID 4)
-- Thread 8 8
-- Thread 9 9
-- Core 5 (ID 5)
-- Thread 10 10
-- Thread 11 11Timers
-------------------------------------------------------------------------ACPI timer 3.580 MHz
Perf timer 10.000 MHz
Sys timer 1.000 KHzProcessors Information
-------------------------------------------------------------------------Socket 1 ID = 0
Number of cores 6 (max 6)
Number of threads 12 (max 12)
Manufacturer GenuineIntel
Name Intel Core i7 10750H
Codename Comet Lake
Specification Intel(R) Core(TM) i7-10750H CPU @ 2.60GHz
Package (platform ID) Socket 1440 FCBGA (0x5)
CPUID 6.5.2
Extended CPUID 6.A5
Core Stepping R0/R1
Technology 14 nm
TDP Limit 45.0 Watts
Tjmax 100.0 �C
Core Speed 4189.4 MHz
Multiplier x Bus Speed 42.0 x 99.7 MHz
Base frequency (cores) 99.7 MHz
Base frequency (ext.) 99.7 MHz
Stock frequency 2600 MHz
Max frequency 0 MHz
Instructions sets MMX, SSE, SSE2, SSE3, SSSE3, SSE4.1, SSE4.2, EM64T, AES, AVX, AVX2, FMA3
Microcode Revision 0xEA
L1 Data cache 6 x 32 KB (8-way, 64-byte line)
L1 Instruction cache 6 x 32 KB (8-way, 64-byte line)
L2 cache 6 x 256 KB (4-way, 64-byte line)
L3 cache 12 MB (16-way, 64-byte line)
Max CPUID level 00000016h
Max CPUID ext. level 80000008h
FID/VID Control yesTurbo Mode supported, enabled
Max non-turbo ratio 26x
Max turbo ratio 50x
Max efficiency ratio 8x
Speedshift Autonomous
O/C bins none
Ratio 1 core 50x
Ratio 2 cores 49x
Ratio 3 cores 47x
Ratio 4 cores 46x
Ratio 5 cores 45x
Ratio 6 cores 43x
Ratio 7 cores 43x
Ratio 8 cores 43x
TDP Level 45.0 W @ 26x
TDP Level 35.0 W @ 22xTemperature 0 82 degC (179 degF) (Package)
Temperature 1 74 degC (165 degF) (Core #0)
Temperature 2 65 degC (149 degF) (Core #1)
Temperature 3 67 degC (152 degF) (Core #2)
Temperature 4 84 degC (183 degF) (Core #3)
Temperature 5 67 degC (152 degF) (Core #4)
Temperature 6 82 degC (179 degF) (Core #5)
Voltage 0 1.18 Volts (VID)
Power 00 31.48 W (Package)
Power 01 28.48 W (IA Cores)
Power 02 0.04 W (GT)
Power 03 2.96 W (Uncore)
Power 04 1.82 W (DRAM)
Clock Speed 0 4189.42 MHz (Core #0)
Clock Speed 1 4189.42 MHz (Core #1)
Clock Speed 2 4189.42 MHz (Core #2)
Clock Speed 3 4189.42 MHz (Core #3)
Clock Speed 4 4189.42 MHz (Core #4)
Clock Speed 5 4189.42 MHz (Core #5)
Core 0 max ratio 48.0 (effective 46.0)
Core 1 max ratio 48.0 (effective 45.0)
Core 2 max ratio 48.0 (effective 46.0)
Core 3 max ratio 48.0 (effective 45.0)
Core 4 max ratio 48.0 (effective 44.0)
Core 5 max ratio 48.0 (effective 46.0)SMBIOS Version 3.2
DMI BIOS
vendor Dell Inc.
version 1.11.0
date 09/24/2021
ROM size 16384 KBDMI System Information
manufacturer Dell Inc.
product G3 3500
version unknown
serial J1Q9N93
UUID {4C4C4544-0031-5110-8039-CAC04F4E3933}
SKU 09E1
family GSeriesDMI Baseboard
vendor Dell Inc.
model 0D1G65
revision A02
serial /J1Q9N93/CNWSC0011Q0GK4/DMI System Enclosure
manufacturer Dell Inc.
chassis type Notebook
chassis serial J1Q9N93DMI Processor
manufacturer Intel(R) Corporation
model Intel(R) Core(TM) i7-10750H CPU @ 2.60GHz
clock speed 2673.0 MHz
FSB speed 100.0 MHz
multiplier 27.0xDMI Port Connector
designation None (internal)
designation USB1 (external)
port type USB
connector Access Bus (USB)DMI Port Connector
designation None (internal)
designation USB2 (external)
port type USB
connector Access Bus (USB)DMI Port Connector
designation None (internal)
designation USB3 (external)
port type USB
connector Access Bus (USB)DMI Port Connector
designation J7G2 - SATA Port 1 (internal)
designation None (external)DMI Port Connector
designation J1F2 (internal)
designation AC IN (external)DMI Port Connector
designation J8F1 - HDA HDMI (internal)
designation None (external)DMI Port Connector
designation J9E3 - Scan Matrix Keyboard (internal)
designation None (external)DMI Port Connector
designation J8E1 - SPI Program (internal)
designation None (external)DMI Port Connector
designation J6H1 - SATA Power (internal)
designation None (external)DMI Port Connector
designation J5J1 - FP Header (internal)
designation None (external)DMI Port Connector
designation J1H2 - BATT A (internal)
designation None (external)DMI Port Connector
designation J2G1 - CPU Fan (internal)
designation None (external)DMI Port Connector
designation J4V1 - Memory Slot 1 (internal)
designation None (external)DMI Port Connector
designation J4V2 - Memory Slot 2 (internal)
designation None (external)DMI Port Connector
designation J4C1 - FAN PWR (internal)
designation None (external)DMI Extension Slot
designation PCI-Express 0
type PCI Express
populated yesDMI Extension Slot
designation PCI-Express 2
type PCI Express
populated noDMI Extension Slot
designation CNVi: WiFi
type PCI Express
populated yesDMI OEM Strings
string[0] Dell System
string[1] 1[09E1]
string[2] 3[1.0]
string[3] 12[www.dell.com]
string[4] 14[1]
string[5] 15[11]
string[6] 27[41463450615]DMI Physical Memory Array
location Motherboard
usage System Memory
correction None
max capacity 64 GB
max# of devices 2DMI Memory Device
designation DIMM A
format SODIMM
type DDR4
total width 64 bits
data width 64 bits
size 32 GBDMI Memory Device
designation DIMM B
format SODIMM
type DDR4
total width 64 bits
data width 64 bits
size 32 GBStorage
-------------------------------------------------------------------------Drive 0
Device Path \\?\scsi#disk&ven_nvme&prod_35ttfp6pcie-1tb#5&1ef4f1cd&0&000000#{53f56307-b6bf-11d0-94f2-00a0c91efb8b}
Name 35TTFP6PCIE-1TB
Revision T0709A3
Serial 112011200070272
Capacity 953.9 GB
Type Fixed, SSD
Bus Type NVMe (17)
Features
Controller NVM Express (NVMe) Controller at bus 3, device 0, function 0
Link Speed PCI-E 4x @ 8.0 GT/s
Volume c:\, 442.2 GBytes (52.0 percent available)
Volume d:\, 510.7 GBytes (51.0 percent available)Drive 1
Device Path \\?\scsi#disk&ven_st1000lm&prod_035-1rk172#4&1cbff1de&0&000000#{53f56307-b6bf-11d0-94f2-00a0c91efb8b}
Name HDD 1
Capacity 931.5 GB
Type Fixed
Bus Type SATA (11)
Features
Controller Serial ATA Controller - AHCI at bus 0, device 23, function 0
Volume h:\, 931.5 GBytes (95.1 percent available)USB Devices
-------------------------------------------------------------------------USB Device USB Composite Device, class=0x00, subclass=0x00, vendor=0x046D, product=0x0A9C
USB Device USB Composite Device, class=0x00, subclass=0x00, vendor=0x0B05, product=0x195C
USB Device USB Composite Device, class=0x00, subclass=0x00, vendor=0x0B05, product=0x1945
USB Device USB Composite Device, class=0xEF, subclass=0x02, vendor=0x1BCF, product=0x2B99
USB Device Goodix fingerprint, class=0xFF, subclass=0x00, vendor=0x27C6, product=0x530C
USB Device Intel(R) Wireless Bluetooth(R), class=0xE0, subclass=0x01, vendor=0x8087, product=0x0AAAGraphics
-------------------------------------------------------------------------Number of adapters 2
Graphic APIs
-------------------------------------------------------------------------API D3D
API NVIDIA I/O
API NVIDIA NVAPI
API Intel I/O
API Intel oneAPIDisplay Adapters
-------------------------------------------------------------------------Display adapter 0
ID 0x1000000
Name NVIDIA GeForce GTX 1650 Ti
Board Manufacturer Dell
Core family 0x167 (TU117-A)
Cores 1024
ROP Units 32
Memory type GDDR6 (Micron)
Memory size 4 GB
Memory bus width 128 bits
PCI device bus 1 (0x1), device 0 (0x0), function 0 (0x0)
Vendor ID 0x10DE (0x1028)
Model ID 0x1F95 (0x09E1)
Revision ID 0xA1
Root device bus 0 (0x0), device 1 (0x1), function 0 (0x0)
Driver version 30.0.14.9729
WDDM Model 3.0Display adapter 1
ID 0x4000000
Name Intel(R) UHD Graphics
Board Manufacturer Dell
Codename Comet Lake GT2
Execution Units 24
Technology 14 nm
PCI device bus 0 (0x0), device 2 (0x2), function 0 (0x0)
Vendor ID 0x8086 (0x1028)
Model ID 0x9BC4 (0x09E1)
Revision ID 0x5
Performance Level 0
Core clock 449.1 MHz
Driver version 27.20.100.9664
WDDM Model 2.7Win32_VideoController AdapterRAM = 0xFFF00000 (4293918720)
Win32_VideoController AdapterRAM = 0x40000000 (1073741824)
Win32_VideoController DriverVersion = 30.0.14.9729
Win32_VideoController DriverVersion = 27.20.100.9664
Win32_VideoController DriverDate = 12/15/2021
Win32_VideoController DriverDate = 06/01/2021Monitor 0
Model C24FG7x (Samsung)
ID SAM0E43
Serial
Manufacturing Date Week 29, Year 2023
Size 24.0 inches
Max Resolution 1920 x 1080 @ 143 Hz
Horizontal Freq. Range 0-0 kHz
Vertical Freq. Range 0-0 Hz
Max Pixel Clock 0 MHz
Gamma Factor 2.2Monitor 1
Model ()
ID CMN1522
Serial
Manufacturing Date Week 22, Year 2020
Size 15.3 inches
Max Resolution 1920 x 1080 @ 120 Hz
Horizontal Freq. Range 137-137 kHz
Vertical Freq. Range 48-120 Hz
Max Pixel Clock 290 MHz
Gamma Factor 2.2Software
-------------------------------------------------------------------------Windows Version Microsoft Windows 11 (10.0) Professional 64-bit (Build 22000)
DirectX Version 12.0Register Spaces
-------------------------------------------------------------------------Register space PCI
Register space PCI #2
Register space PCI Express, base address = 0x0E0000000
Register space SMBus, base address = 0x0EFA0
Register space PMIO, base address = 0x0FFFF
Register space LPC, base address = 0x02E
Sounds like a firewall/network issue prevent the update maybe. Not too uncommon. Shut the windows defender firewall off if you use that one and try again. I don’t know if I believe you tried everything lol. Just some light humor.
Jimbo93 wrote:
Sounds like a firewall/network issue prevent the update maybe. Not too uncommon. Shut the windows defender firewall off if you use that one and try again. I don’t know if I believe you tried everything lol. Just some light humor.
I’m so sorry. It opened once. When I install aura and armoury, and I open the aura, it opens the armoury for once time.
So, I can see everything. But, I can’t open it anymore 
I hope, I can’t find a solution. Btw, I tried to install this software to a new Windows 11 system. The same things happened again.
aligoren wrote:
I’m so sorry. It opened once. When I install aura and armoury, and I open the aura, it opens the armoury for once time.So, I can see everything. But, I can’t open it anymore
I hope, I can’t find a solution. Btw, I tried to install this software to a new Windows 11 system. The same things happened again.
My suggestion is to try reinstalling armoury crate with your windows firewall turned off. That way we can see if it makes a difference and fix the firewall after. We may have to reinstall again but we learn something. You will want to shutdown apps that use the internet best you can and I assume you have a router/firewall so you are not totally exposed on the net.
Okay, thanks. I’ll try. Btw, this is event log for Armaury.
Faulting application name: ArmouryCrate.exe, version: 0.0.0.0, time stamp: 0x61c2dcb6
Faulting module name: Windows.UI.Xaml.dll, version: 10.0.22000.348, time stamp: 0x003360cd
Exception code: 0xc000027b
Fault offset: 0x0000000000834af0
Faulting process id: 0x4750
Faulting application start time: 0x01d7ff2c4d3381f5
Faulting application path: C:\Program Files\WindowsApps\B9ECED6F.ArmouryCrate_5.0.11.0_x64__qmba6cd70vzyy\ArmouryCrate.exe
Faulting module path: C:\Windows\System32\Windows.UI.Xaml.dll
Report Id: bd6a5015-d805-4087-9c8c-c5a60b2a91c6
Faulting package full name: B9ECED6F.ArmouryCrate_5.0.11.0_x64__qmba6cd70vzyy
Faulting package-relative application ID: App
aligoren wrote:
Okay, thanks. I’ll try. Btw, this is event log for Armaury.Faulting application name: ArmouryCrate.exe, version: 0.0.0.0, time stamp: 0x61c2dcb6
Faulting module name: Windows.UI.Xaml.dll, version: 10.0.22000.348, time stamp: 0x003360cd
Exception code: 0xc000027b
Fault offset: 0x0000000000834af0
Faulting process id: 0x4750
Faulting application start time: 0x01d7ff2c4d3381f5
Faulting application path: C:\Program Files\WindowsApps\B9ECED6F.ArmouryCrate_5.0.11.0_x64__qmba6cd70vzyy\ArmouryCrate.exe
Faulting module path: C:\Windows\System32\Windows.UI.Xaml.dll
Report Id: bd6a5015-d805-4087-9c8c-c5a60b2a91c6
Faulting package full name: B9ECED6F.ArmouryCrate_5.0.11.0_x64__qmba6cd70vzyy
Faulting package-relative application ID: App
We will want to look at event logs probably. Maybe a screen shot of the application log sort of like this.
Thanks. I think something went wrong with this log sort.

Right? Something is wrong about Win11. I guess…
aligoren wrote:
Thanks. I think something went wrong with this log sort.
Right? Something is wrong about Win11. I guess…
Armoury Crate is supposed to work on win 11 and there are folks that have reported it works. It is more likely that some hardware or software issue on your pc.
In current version of AsusCom service (AXSP 4.02.06) that communicates with BIOS to set fan speed and get information from sensors there is a file access error to driver at windows/system32/drivers folder called asio3.sys. Due this error the service can’t start and setup fails. With some work I have setup with only asusCom missing.
By opening event viewer one can observe this:
On Windows Logs — Applications:
Description:Faulting application name: atkexComSvc.exe, version: 1.0.0.1, time stamp: 0x607d5366Faulting module name: atkexComSvc.exe, version: 1.0.0.1, time stamp: 0x607d5366Exception code: 0xc0000005Fault offset: 0x0001e580Faulting process id: 0x5f48Faulting application start time: 0x01d78d68cb90c25aFaulting application path: C:\Program Files (x86)\ASUS\AXSP\4.02.06\atkexComSvc.exeFaulting module path: C:\Program Files (x86)\ASUS\AXSP\4.02.06\atkexComSvc.exeReport Id: 7db7491d-8e4f-4bd6-b96a-3480bf03cffcFaulting package full name: Faulting package-relative application ID:
Armoury Crate, предустановленное приложение в операционной системе Windows 11, предоставляет пользователям удобный доступ к настройкам и управлению всеми поддерживаемыми устройствами ASUS, такими как материнские платы, видеокарты и другие компоненты. Однако, несмотря на все его преимущества, пользователи иногда сталкиваются с различными проблемами при использовании Armoury Crate.
В этой статье мы рассмотрим несколько важных советов, которые помогут вам решить проблемы с Armoury Crate в Windows 11. Во-первых, убедитесь, что ваша операционная система и все драйверы обновлены до последней версии. Это позволит вам избежать многих известных проблем и сбоев при работе с приложением.
Во-вторых, попробуйте переустановить Armoury Crate. Если вы столкнулись с какими-либо ошибками или сбоями, это может помочь исправить проблему. Для этого просто удалите приложение с вашего компьютера, а затем скачайте и установите последнюю версию Armoury Crate с официального сайта ASUS.
Наконец, если вы все еще испытываете проблемы с Armoury Crate, попробуйте выполнить сброс настроек приложения. Это может помочь избавиться от любых неправильных конфигураций или настроек, которые могут вызывать сбои или проблемы при работе с приложением.
Содержание
- Как решить проблему с Armoury Crate в Windows 11?
- 1. Обновите приложение Armoury Crate
- 2. Перезагрузите систему
- 3. Отключите антивирусное программное обеспечение
- 4. Проверьте обновления драйверов
- 5. Переустановите Armoury Crate
- Проверьте совместимость устройства
- Установите последнюю версию программы
- Обновите драйвера
- Запустите Armoury Crate от имени администратора
- Отключите антивирусные программы
Как решить проблему с Armoury Crate в Windows 11?
1. Обновите приложение Armoury Crate
Первым шагом для решения проблем с Armoury Crate в Windows 11 является обновление самого приложения. Проверьте наличие обновлений в магазине приложений Microsoft Store и установите последнюю доступную версию Armoury Crate. Обновление может включать исправления ошибок и улучшения, которые могут помочь вам решить проблемы.
2. Перезагрузите систему
Если после обновления Armoury Crate проблемы все еще возникают, попробуйте перезагрузить систему. Иногда, после установки обновлений или изменений в системе, требуется перезагрузка для полноценной работы приложения. Попробуйте перезагрузить компьютер и проверьте, помогло ли это решить проблемы с Armoury Crate.
3. Отключите антивирусное программное обеспечение
Некоторые антивирусные программы могут блокировать работу Armoury Crate из-за своих настроек защиты. Попробуйте временно отключить антивирусное программное обеспечение и проверьте, помогло ли это решить проблемы. Если после отключения антивируса Armoury Crate начинает работать, то вам может потребоваться настроить антивирусное программное обеспечение, чтобы оно не блокировало работу приложения.
4. Проверьте обновления драйверов
Неактуальные или поврежденные драйверы могут вызывать проблемы с Armoury Crate. Проверьте наличие обновлений для драйверов вашей материнской платы, видеокарты и других устройств, которые управляются через Armoury Crate. Вы можете скачать последние версии драйверов с официального сайта производителя или использовать специальные программы для обновления драйверов.
5. Переустановите Armoury Crate
Если все вышеперечисленные методы не помогли, то попробуйте полностью удалить и переустановить Armoury Crate. Для удаления приложения перейдите в «Настройки» > «Приложения» > «Приложения и компоненты», найдите Armoury Crate в списке установленных приложений, выберите его и нажмите «Удалить». После удаления перезагрузите компьютер и затем установите Armoury Crate заново из магазина приложений Microsoft Store.
Надеемся, что эти советы помогут вам решить проблемы с Armoury Crate в Windows 11 и наслаждаться полноценным функционалом этого приложения. Если проблемы продолжаются, рекомендуем обратиться в службу поддержки ASUS или общему сообществу пользователей для получения дополнительной помощи и решений.
Проверьте совместимость устройства
Прежде чем добиться работы Armoury Crate на вашем компьютере, важно убедиться в совместимости вашего устройства с этим приложением. Проверьте следующие требования:
1. Операционная система: Armoury Crate поддерживается только на Windows 11. Убедитесь, что ваш компьютер работает на новой версии операционной системы.
2. Аппаратные требования: Armoury Crate требует комбинации нескольких физических компонентов, таких как мониторы, клавиатуры, мыши и другие устройства. Проверьте, поддерживаются ли эти компоненты на вашем компьютере.
3. Драйверы устройств: Убедитесь, что все драйверы устройств на вашем компьютере обновлены. Устаревшие драйверы могут вызывать проблемы с работой Armoury Crate.
4. Обновления Windows: Убедитесь, что ваш компьютер имеет все последние обновления Windows. Некоторые обновления могут внести изменения в совместимость с Armoury Crate.
Если ваше устройство не соответствует требованиям, вам может потребоваться произвести обновление аппаратного или программного обеспечения, чтобы использовать Armoury Crate на вашем компьютере.
Установите последнюю версию программы
Чтобы установить последнюю версию Armoury Crate, вам нужно открыть Microsoft Store и найти программу в поиске. Затем нажмите на нее и выберите опцию «Обновить», если доступно. Если обновлений нет, убедитесь, что у вас включена автоматическая установка обновлений в настройках Windows.
Также вы можете посетить официальный сайт разработчика Armoury Crate и загрузить последнюю версию программы с их страницы загрузки. Проверьте совместимость вашей операционной системы с требованиями программы перед установкой.
После установки последней версии программы, перезагрузите компьютер, чтобы изменения вступили в силу. Проверьте, работает ли Armoury Crate корректно после обновления. Если проблема остается, переходите к следующим шагам по решению проблемы.
Обновите драйвера
Если у вас возникают проблемы с работой Armoury Crate в Windows 11, одним из вариантов решения может быть обновление драйверов на вашем компьютере. Устаревшие драйвера могут быть причиной некорректной работы программы.
Чтобы обновить драйвера, вам необходимо:
- Откройте меню «Пуск» и перейдите в «Настройки».
- В разделе «Обновление и безопасность» выберите «Windows Update».
- Нажмите на кнопку «Проверить наличие обновлений».
- Дождитесь завершения поиска обновлений. Если доступны новые драйверы, система автоматически загрузит их.
- После завершения загрузки драйверов выполните перезагрузку компьютера.
Если автоматическое обновление драйверов не помогло, вы можете посетить веб-сайт производителя вашего устройства и скачать самые последние драйверы для вашей операционной системы. После скачивания драйверов установите их на вашем компьютере.
Обновление драйверов может решить проблему с Armoury Crate и обеспечить более стабильную работу программы. Если проблема не решена после обновления драйверов, рекомендуется обратиться за помощью к технической поддержке производителя оборудования или разработчикам Armoury Crate.
Запустите Armoury Crate от имени администратора
Если у вас возникают проблемы с запуском Armoury Crate в операционной системе Windows 11, попробуйте запустить приложение от имени администратора. Это может помочь решить некоторые проблемы, связанные с правами доступа и ограничениями.
Чтобы запустить Armoury Crate от имени администратора, выполните следующие шаги:
- Найдите ярлык Armoury Crate на рабочем столе или в меню «Пуск».
- Нажмите правой кнопкой мыши на ярлыке и выберите пункт «Запустить от имени администратора».
- Если система запросит подтверждение администратора, введите соответствующие данные в диалоговом окне и нажмите кнопку «Да».
После выполнения этих шагов Armoury Crate должен запуститься с правами администратора, что может помочь решить проблемы с доступом к системным ресурсам и функциям приложения.
Если после запуска Armoury Crate от имени администратора проблемы продолжаются, рекомендуется обратиться в службу поддержки или посетить форум сообщества, где опытные пользователи могут помочь с более сложными ситуациями.
Отключите антивирусные программы
Если у вас возникают проблемы с Armoury Crate в Windows 11, отключение антивирусных программ может быть одним из способов исправить ситуацию. Некоторые антивирусные программы могут блокировать работу Armoury Crate из-за своих функций защиты.
Чтобы отключить антивирусную программу, откройте ее настройки и найдите опцию, позволяющую временно или полностью отключить защиту. Обратите внимание, что временное отключение антивирусной программы может оставить ваш компьютер уязвимым для вредоносного ПО, поэтому будьте осторожны и проводите это действие только на время решения проблемы с Armoury Crate.
После отключения антивирусной программы перезагрузите компьютер и проверьте, работает ли Armoury Crate корректно. Если проблема была вызвана блокировкой антивирусной программы, то после ее отключения Armoury Crate должен функционировать нормально.
Помните, что отключение антивирусной программы – это временное решение для нахождения источника проблемы. После того, как вы установите, что проблема действительно связана с антивирусной программой, рекомендуется обратиться к поддержке разработчиков программы или найти альтернативный способ защиты своего компьютера.
ASUS Armoury Crate is undoubtedly a powerful gaming software for ROG and TUF gaming machines. But unfortunately, it is still unavailable for the latest Microsoft OS. Windows 11 was unveiled back in June 2021 as a developer channel build. From there on, many software publishers have added application/drivers support for Windows 11. Some OEMs even published a list of their devices getting the Windows 11 upgrade.
All my dreams shattered when I upgraded to Windows 11 and found no Armoury available for this OS. Coming back to ASUS, I being an ASUS Zephyrus Duo user, was eagerly waiting to try out all the gaming-related functionalities that I used to have on Windows 10. Upon some digging, I could get Armoury Crate working on my Windows 11 laptop. This guide will teach you how to install ASUS Armoury Crate on your Windows 11 PC.
This guide covers all the required aspects to install ASUS Armoury Crate. For your convenience, we have divided it into sections. You can refer to the below table and jump over to the point of relevance. With that said, let’s begin with the tutorial.
Fix to Install Armoury Crate on Windows 11
There are two methods to get the Armoury crate running on your Windows 11 PC. I suggest you check both of them and follow whichever suits you the best.
1. ASUS Armoury Crate Installer Utility
The first method is the traditional way of installation. That is, we’ll download components from ASUS’s drivers and tools page and run them on the system. The steps to download and install Armoury Crate on Windows 11 are as follows.
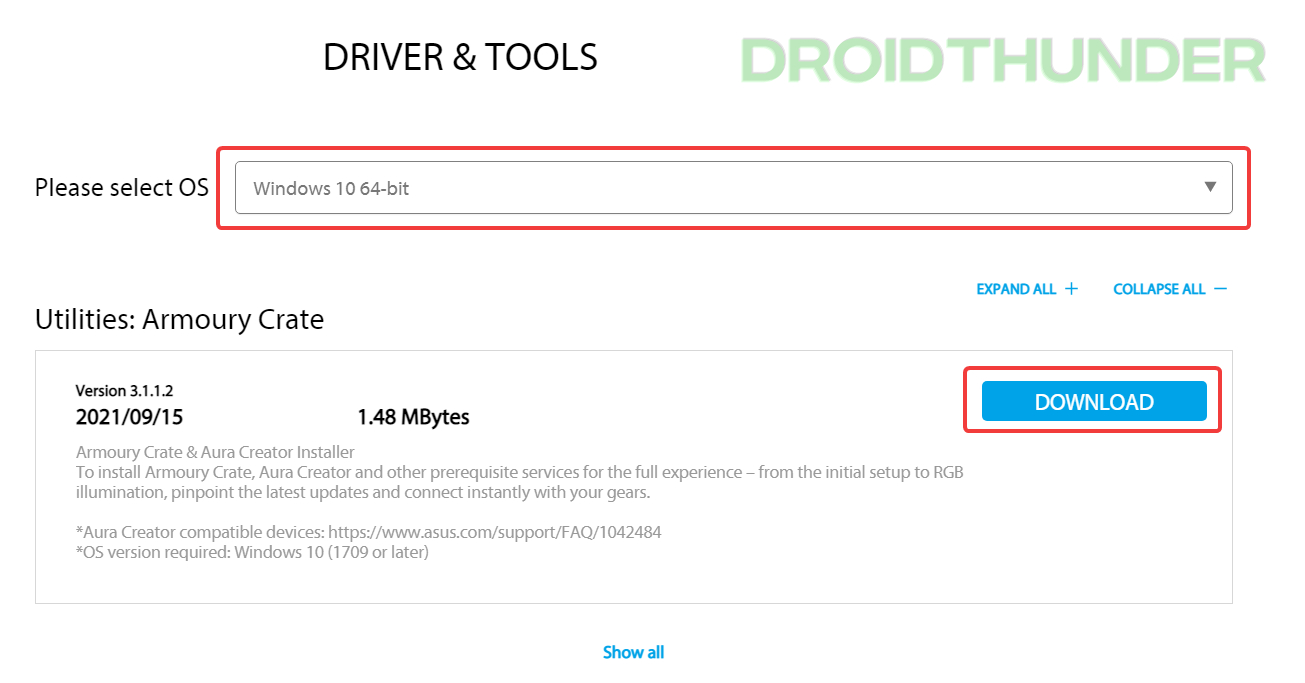
- Download the Armoury Crate installer from the ASUS website. When asked to select OS, choose Windows 10 64-bit. That’s right! We are selecting Windows 10 because ASUS is yet to release the
Armoury crate for ROG and TUF gaming laptops on Windows 11.Update (12th January 2022): ASUS Armoury Crate is now officially available for Windows 11 64-bit.
Download ASUS Armoury Crate(for Windows)
Interesting Stuff – How to Set Video/Live Wallpaper on Windows 11
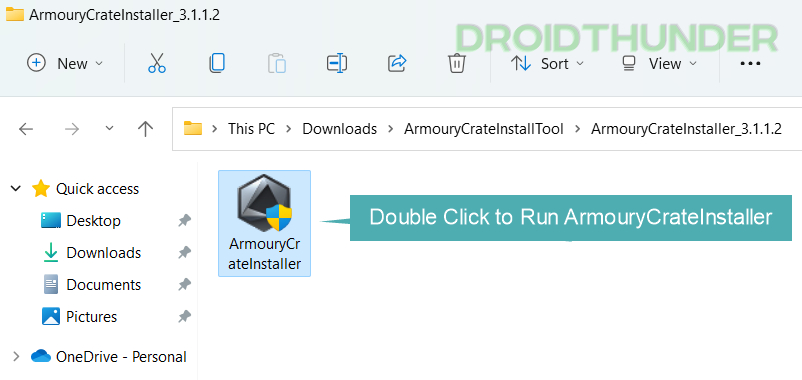
- Run the Armoury Crate installer file. Enter the password if the Windows UAC prompt shows up.
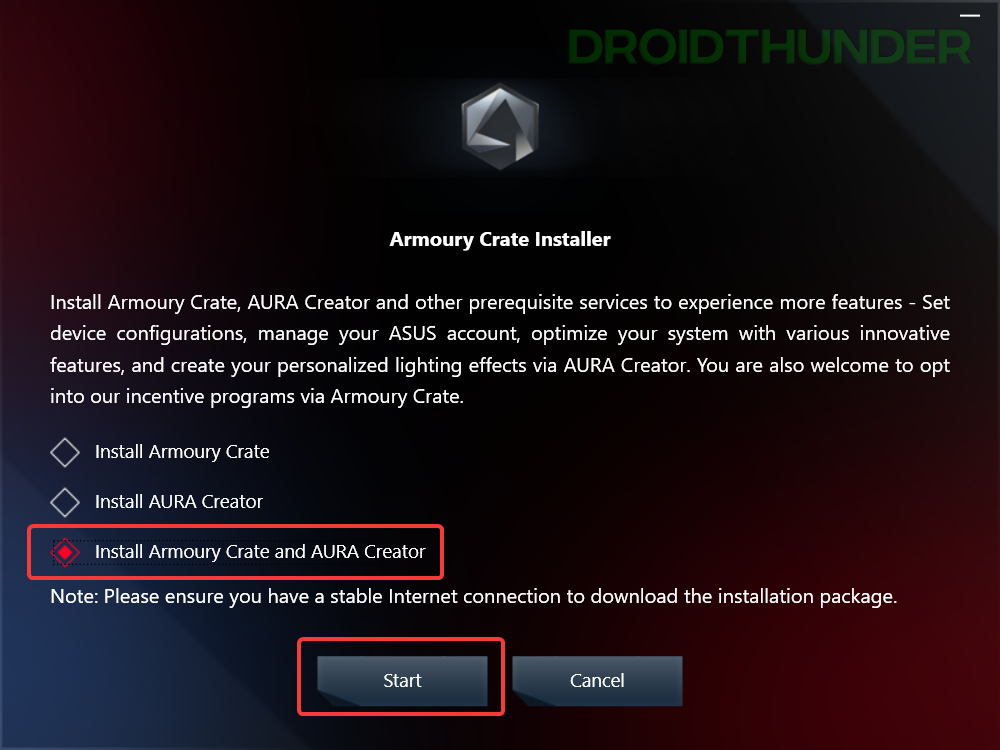
- Now, select an option between Install Armoury Create and Install Armoury Crate and AURA Creator. Here, I have taken the third option. Now, press the Start button to initiate the installation. Depending on your selection and PC configuration, it will take around 4-5 mins to install the necessary services and required Armoury Crate components.
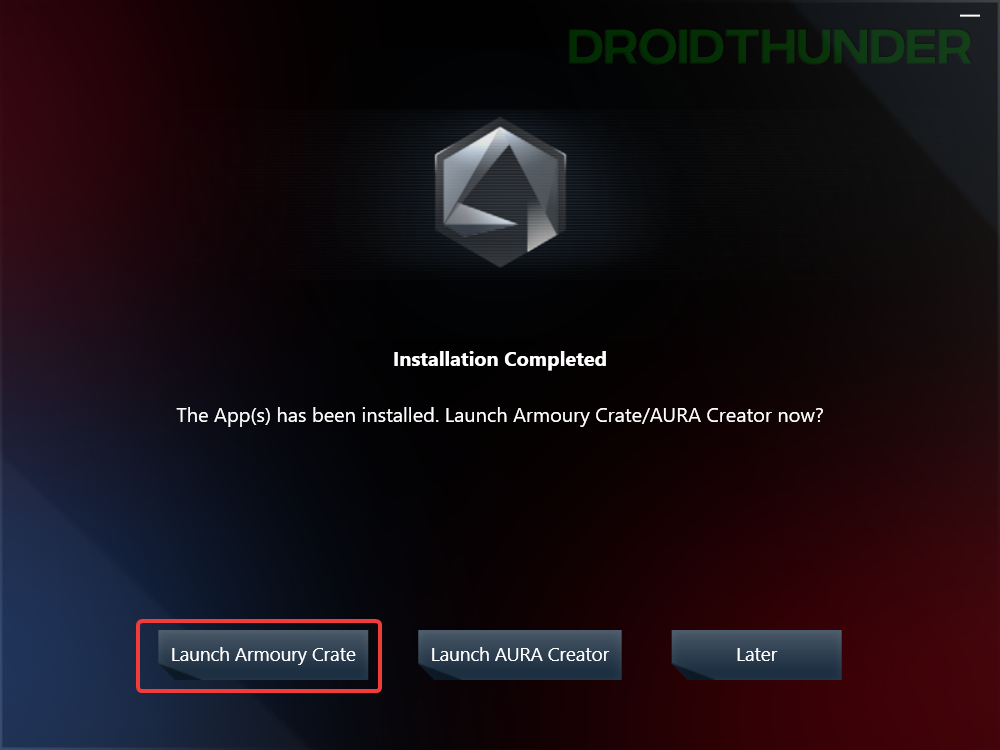
- When the installation finishes, press the Launch Armoury Crate button.
That was a hassle-free installation, right! But though the first method is easy to follow, it may not work for everyone. Many users reported that when they ran the installer, they got the error message – Installation Failed. “Please restart the system and check the internet connection status before trying”
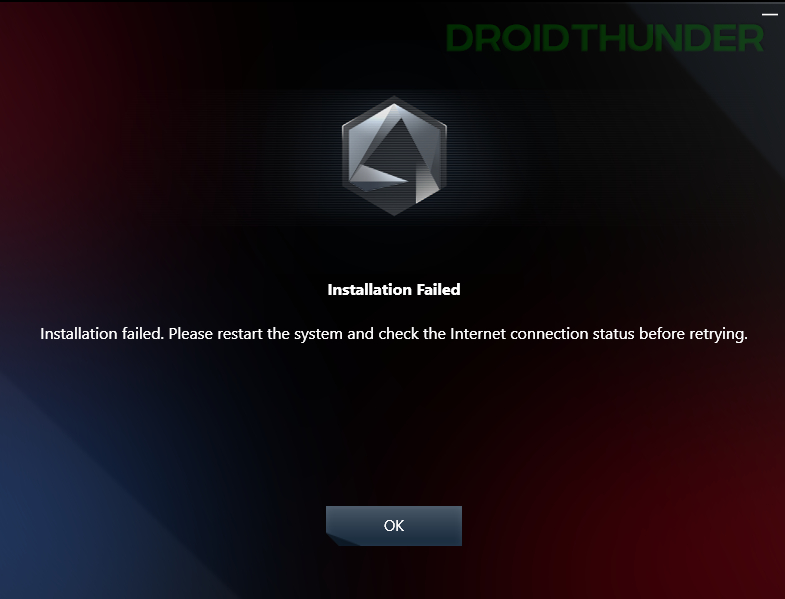
If you are one of those users, then no worries; we have got you covered in the second method of this guide.
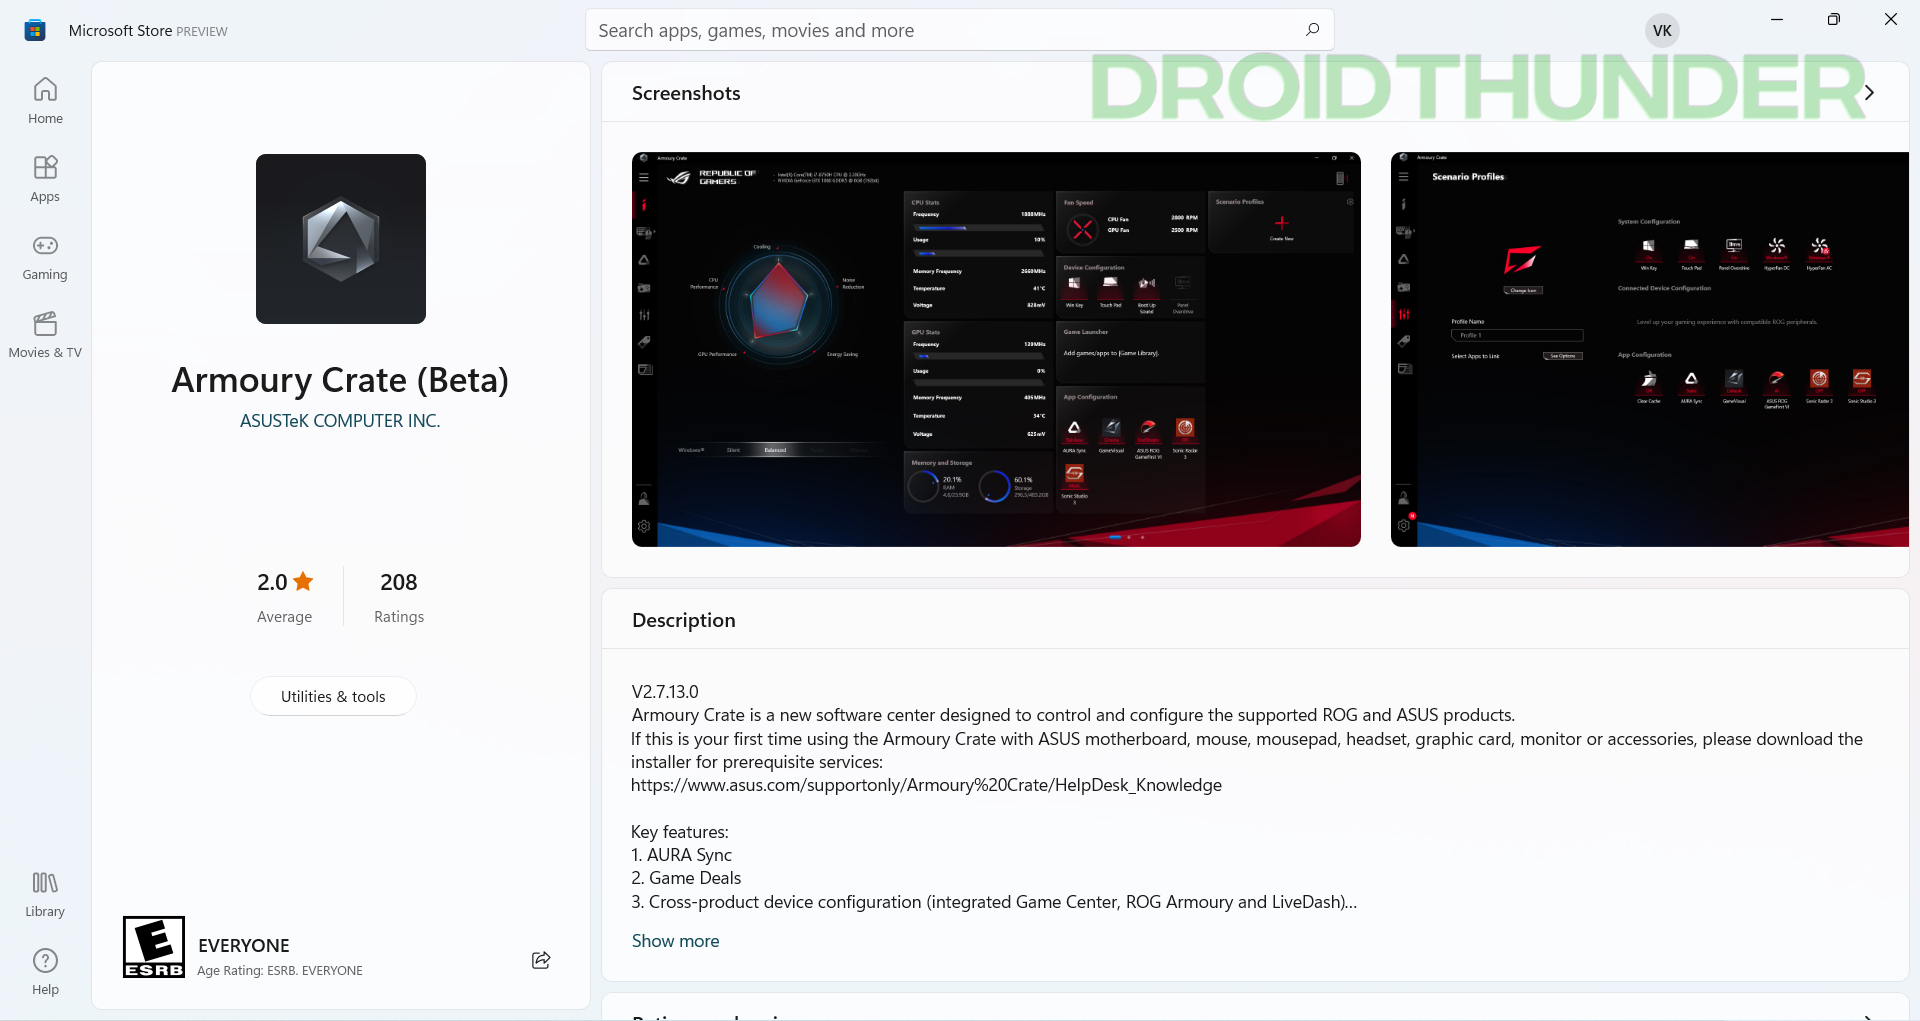
2. Download Armoury Crate (Beta) from Windows 11 Microsoft Store
As of November 2021, ASUS hasn’t officially released the application for Windows 11, but the company is offering a Beta version through Microsoft Store. However, when we opened the Armoury Crate application page on Microsoft Store, there was no option to install it. It was surprising because, on one side, it said that this product is compatible with your device, while on the other side, there was no install button present on the page.
It could be because of the country-specific restrictions. ASUS might want users from selected regions, like the USA, to test the beta build first. And then eventually release a stable version to all the users. Microsoft also did the same thing for their Windows Subsystem for Android app. It was available for the USA region and allowed users to install Android apps on Windows 11.
If you are lucky and have the install button available in the Microsoft store, go ahead and hit it. If you don’t, then no need to worry. There is a way to get the App packages from Microsoft Store directly. To know more, read further and follow the steps given below.
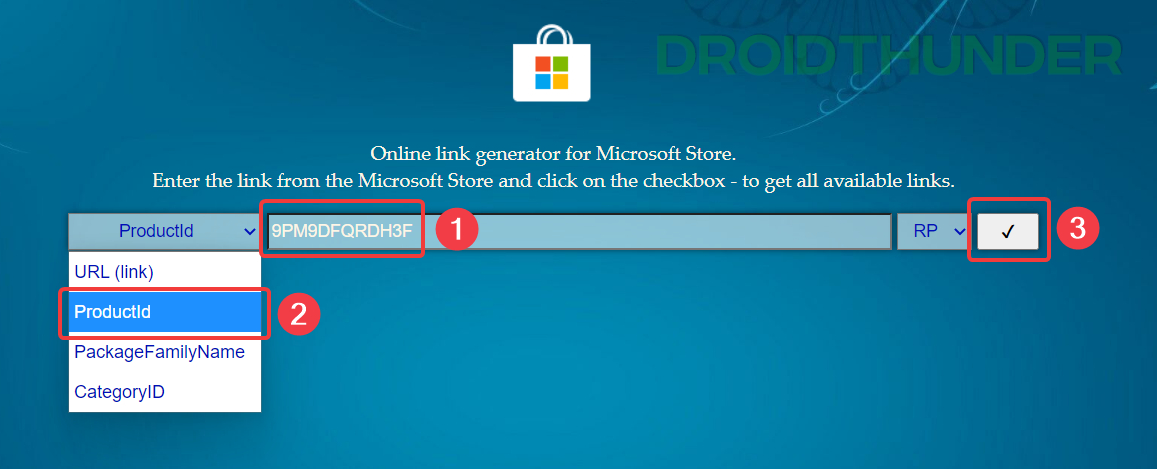
Windows 11 Aapx package Installer
- Open the Microsoft Edge web browser and head over to the Microsoft Store link generator website.
- In the sample data field, paste this catalog number:
9PM9DFQRDH3F - From the dropdown, select type as ProductId.
- Lastly, press the check button to search for the Armoury Create Microsoft Store package.
- Click and download the package ending with .appxbundle. The size should be around ~160 MB. The one ending with .eappxbundle is for an Xbox controller. Note that you can not use Google Chrome or any other browser to download packages from this site, so make sure you are using the Microsoft Edge browser only.
Did you know? – You can run Android 12L OS on Windows. Check out how!
- Once downloaded, double-click on the Armoury Crate (beta) .aapxbundle package to run it.
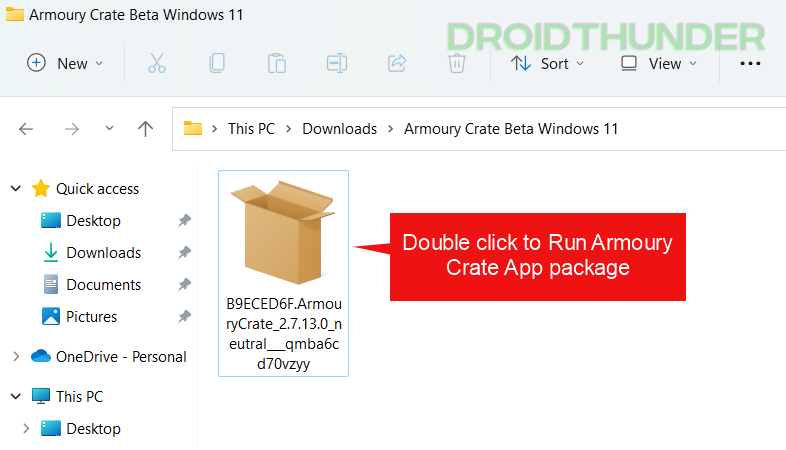
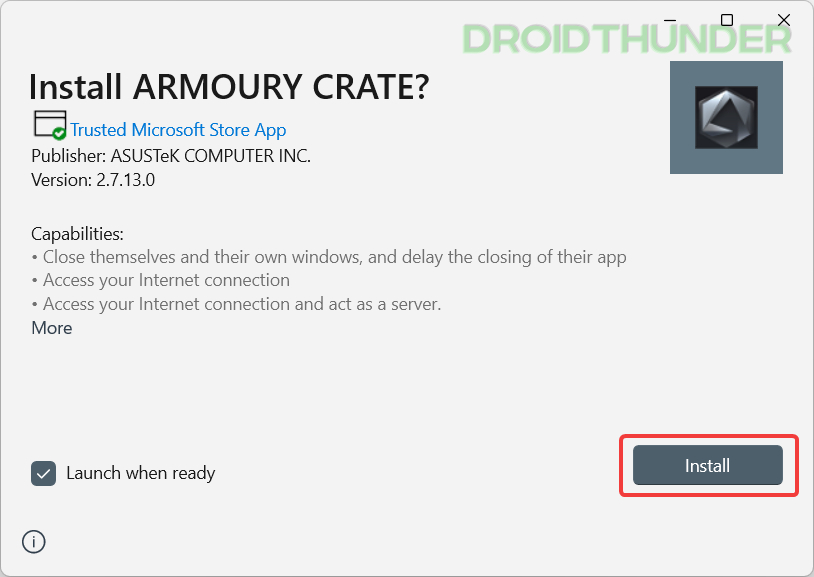
- Press the Install button to start the installation process. It is a manual way of installing Microsoft Store apps and is called sideloading apps on Windows.
At this point, you have successfully installed ASUS Armoury Crate software. But for some reason, if the installation didn’t go well, you can try an alternate method explained ahead.
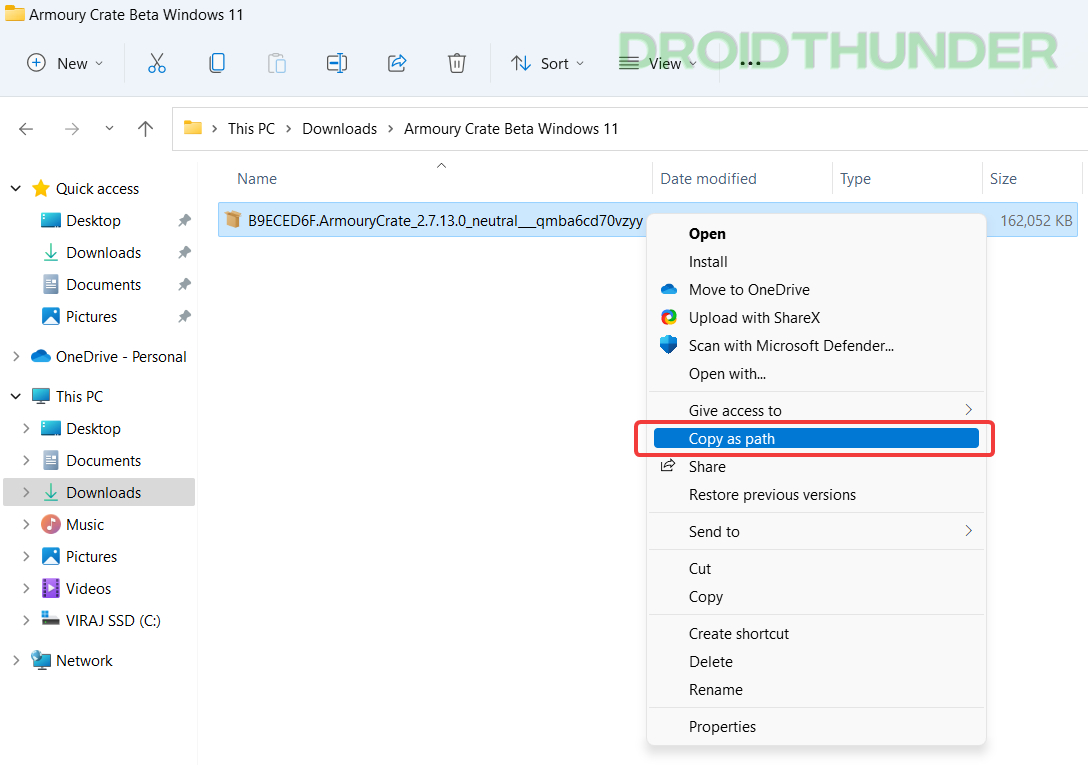
Package deployment using Windows PowerShell
- Navigate to the .aapxbundle package that we downloaded in the previous section. Press right-click on it and select Copy as path.
Liked what you saw, huh? – How to Enable Old Right Click Context Menu on Windows 11
- Open the Windows start menu and search Windows PowerShell. Run it as administrator. Type the command mentioned below, followed by the path you copied in the previous step.
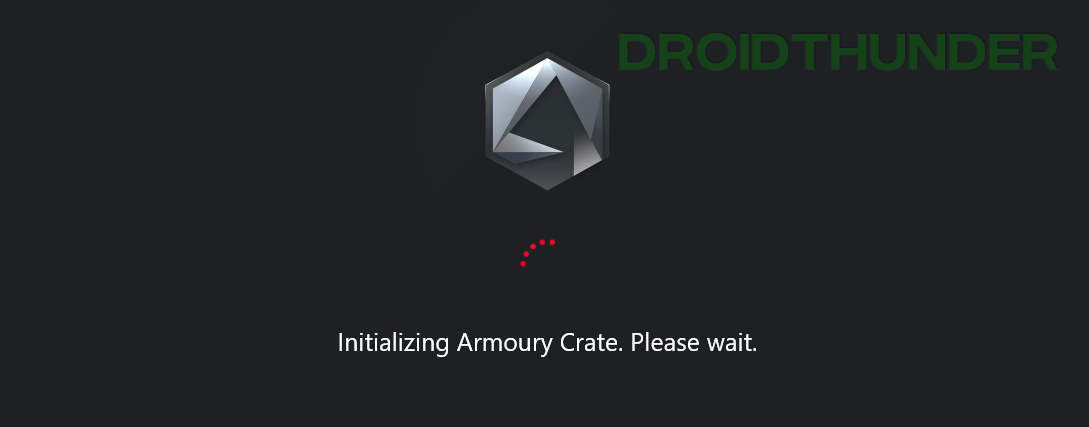
Add-AppxPackage -Path <package path>

- Press Enter key on the keyboard to start the application deployment process. Once the operation finishes, you’ll see Initializing Armoury Crate window. If not, you can run Armoury Crate from the Windows Start Menu.

Armoury Crate Services Installation on Windows 11
- After completing the installation, if you open the Armoury Crate and get the services-related error like the one shown below, then that should be your last point of concern.
Certain Armoury Crate features may be disabled because some ASUS application services are not running properly. Go to Armoury Crate FAQ page for troubleshooting and re-enable all the features.
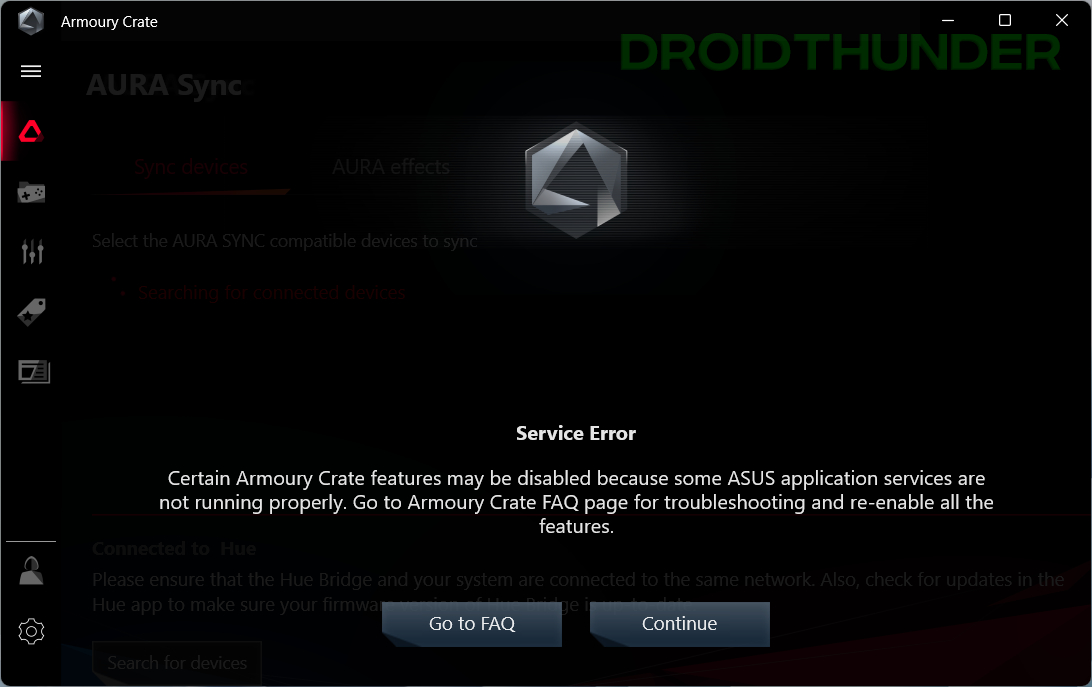
- We got the services error because we installed Armoury Crate from the Microsoft Store, and it only installed the application. Its dependent services didn’t get installed. The following services are necessary for the Armoury Crate application for using its full functionality.
- ROG Live Service
- AURA Service (Lightning Service) – for using AURA effects
- Armoury Crate Service
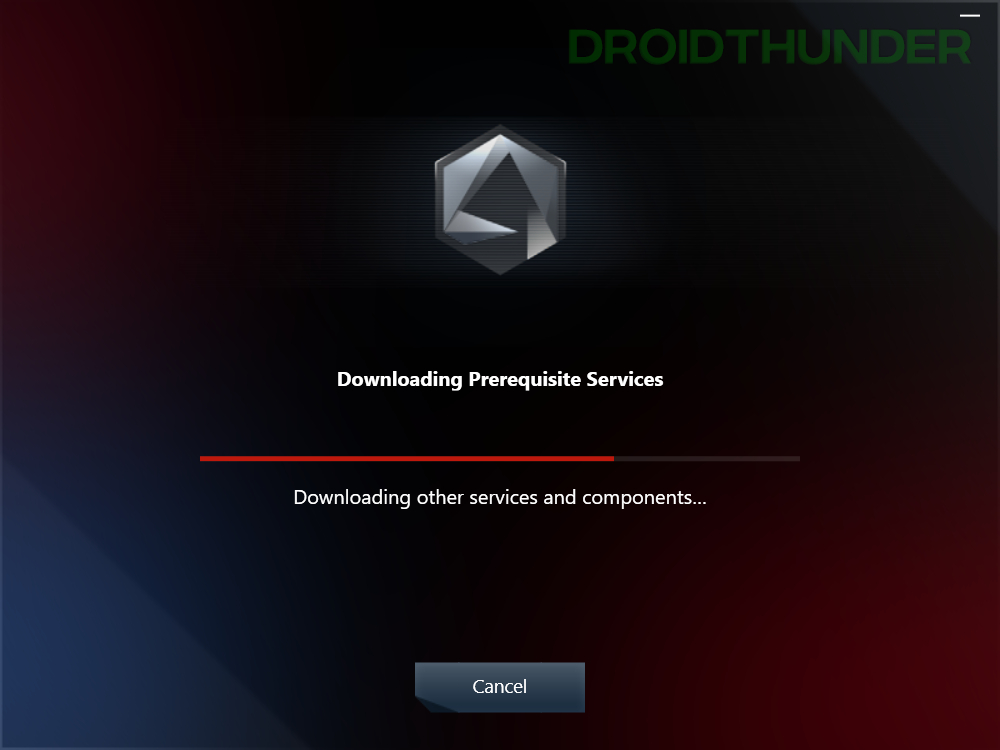
- To install these dependencies, download the official Amoury Crate installer. Select OS as Windows 10 x64. Once downloaded, run the application and let it do its magic.
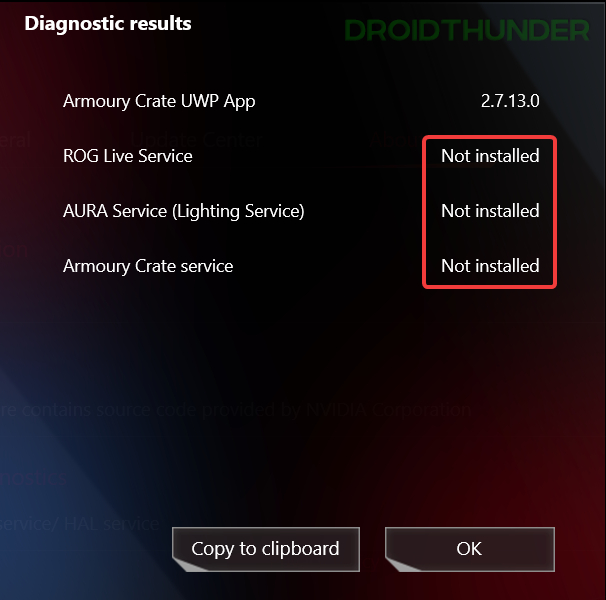
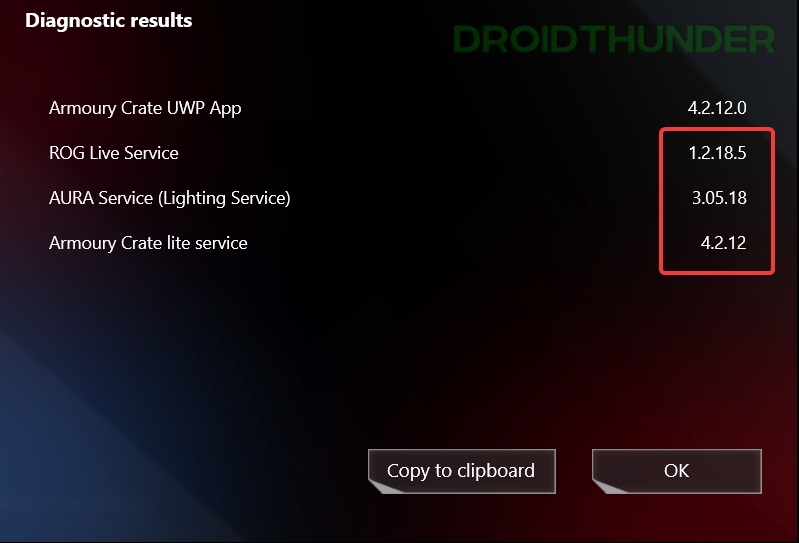
- When installation finishes, open the Armoury Crate application. Go to Settings and switch to the About tab. Press the Check button for diagnostic results.
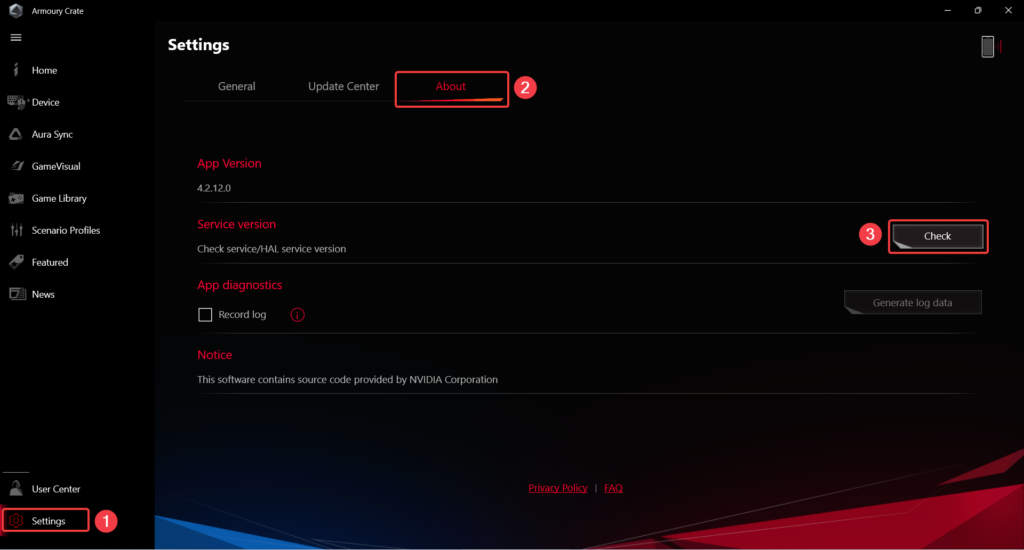
If you see the version numbers mentioned against all the services, you can take a sigh of relief because Armoury Crate and its related component’s installation on your Windows 11 PC is now complete.
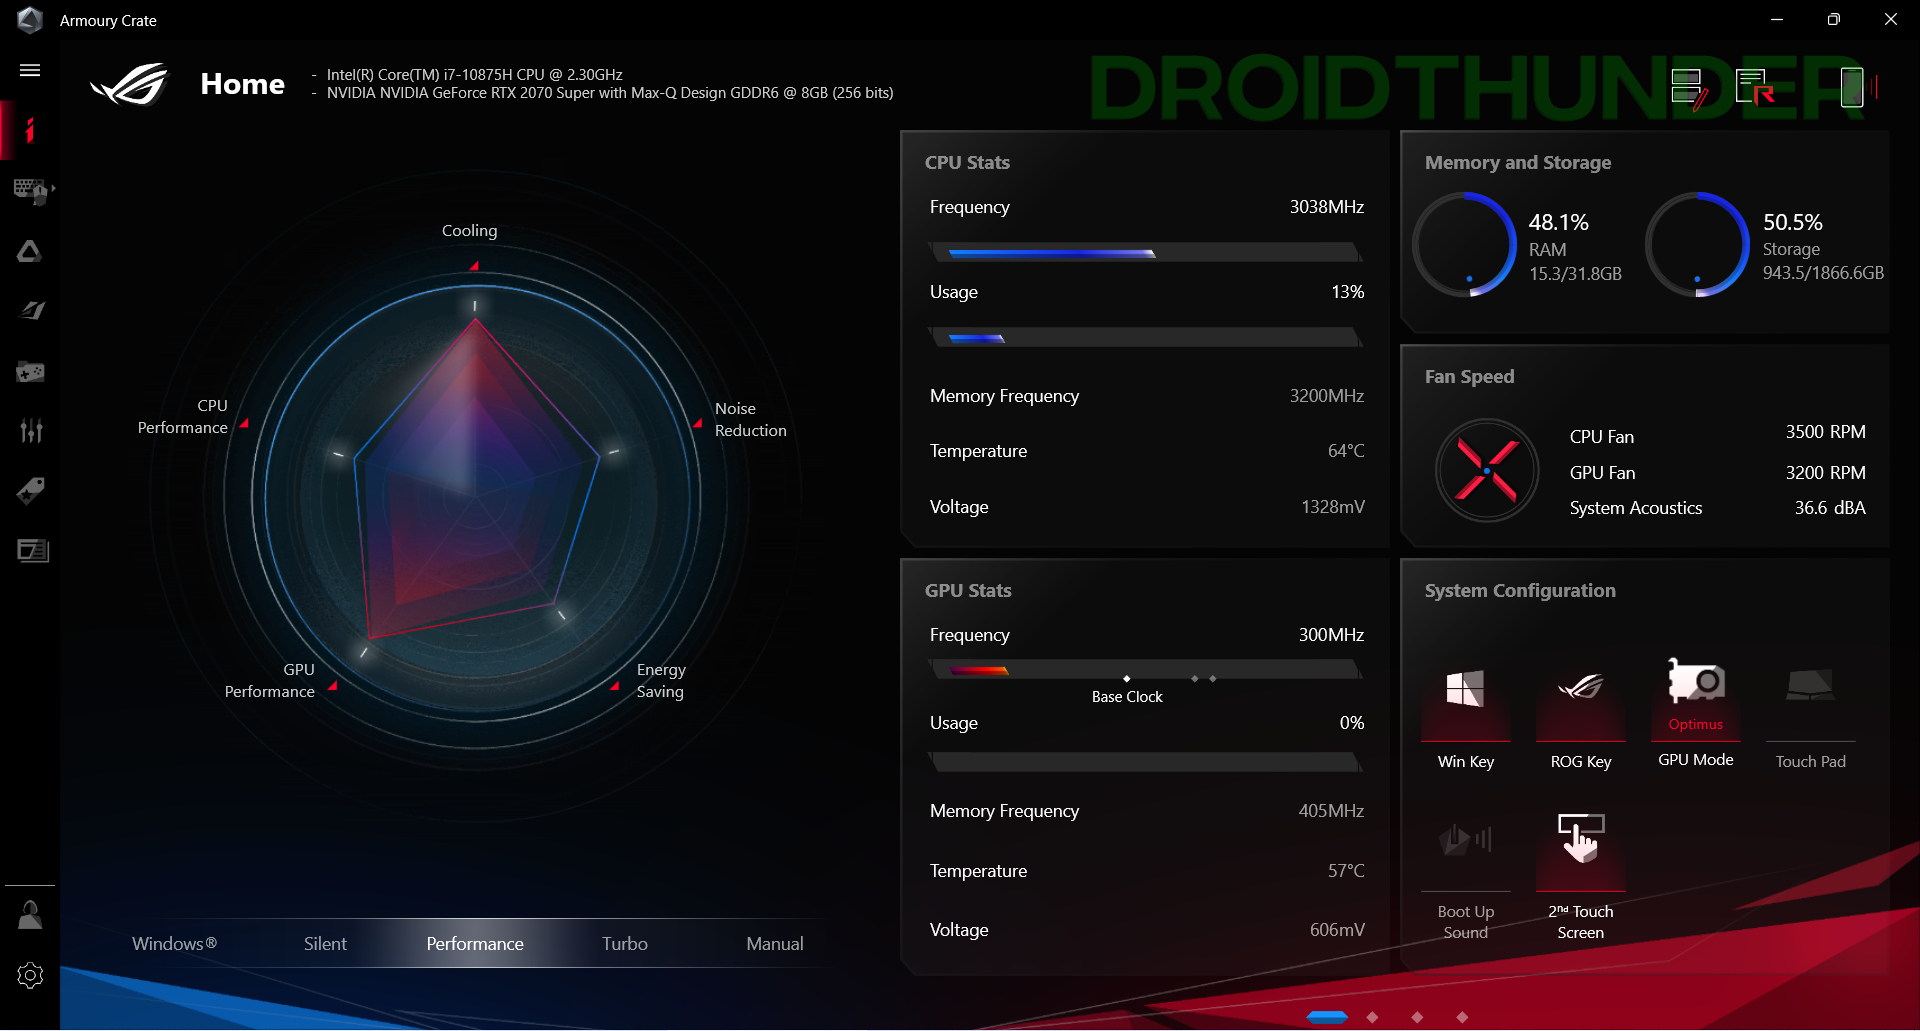
The best gaming software should be up and running on your ASUS ROG/TUF laptops/desktops.
Uninstall Armoury Crate Application from Windows 11
For some reason, if you wish to uninstall Armoury Crate, then follow these simple steps.
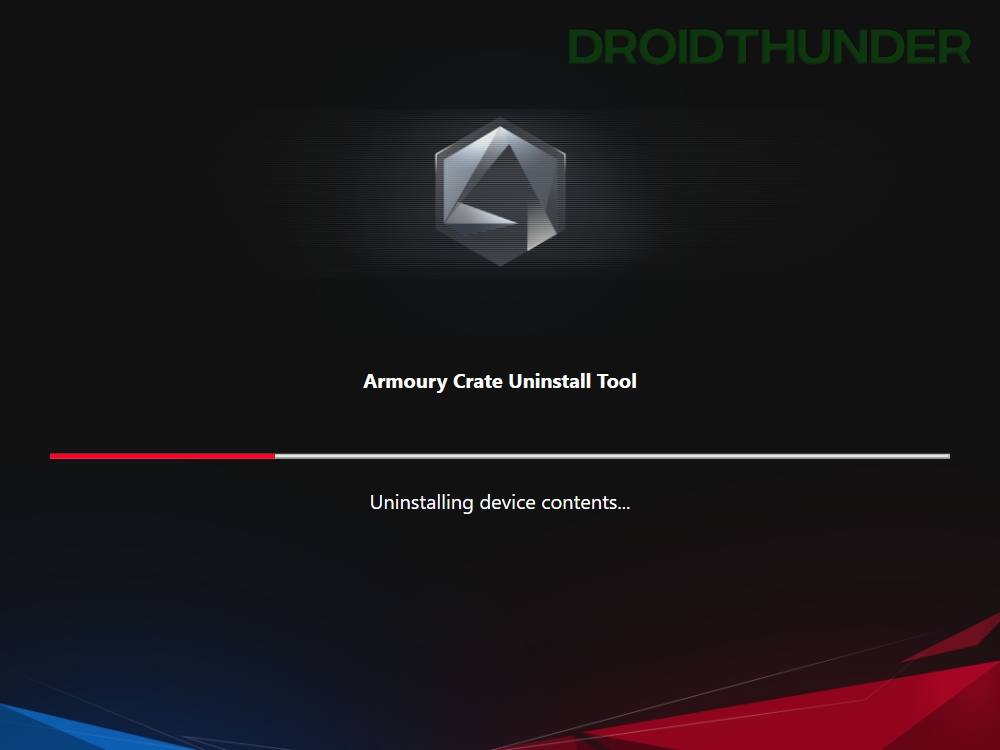
- Head over to the ASUS utility and tools website and scroll down till you see the Show all option. Click on it and download Armoury Crate Uninstall Tool.
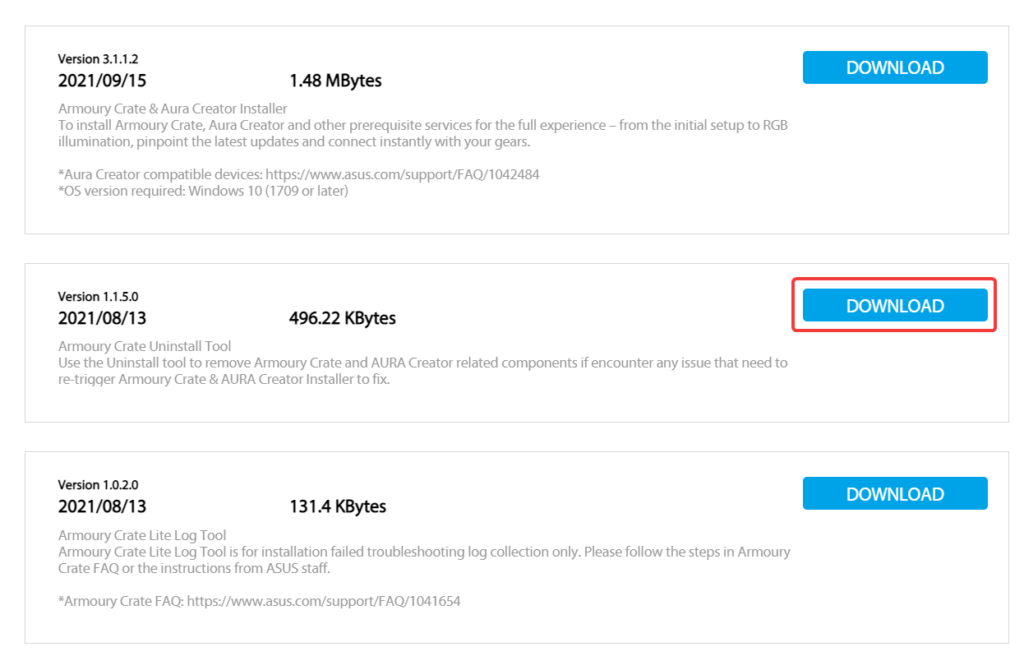
- Extract the downloaded zip package and execute the .exe file. While running, it will remove everything related to Armoury Crate.
Enjoy the Powerful ASUS Armoury Crate on Windows 11!
There you have it, folks! The powerful gaming software from ASUS is all yours now. We will update this tutorial once ASUS officially rolls out the application after finishing the Beta test. So far, the program is working very well for us. If you notice any bugs/glitches in the software or need help, do let me know in the comment section below. I will help you out. With that said, that’s all from me. I hope you enjoyed reading this guide.
When you don’t have a proper user interface to guide you through the process of managing all of your RGB components, it may rapidly turn into a disaster. In response to this problem, ASUS created the Armoury Crate, an intuitive, unified interface that lets you control all of your devices from one place and with good simplicity.
An excellent system-controlling application, Armoury Crate is capable of coping with almost any problem. Armoury Crate should be your first port of call if you want to have a more smooth gaming experience.

This program has the Aura Sync Feature, but it also has additional features such as Turbo Mode, HyperFan Mode, GPU Overclocking, and Highlights, among others.
Other apps, such as Aura Sync, do not allow you to link it to your mobile device, despite it being possible. By selecting the Aura Sync tab from the Armoury Crate main menu, you can adjust the Aura Sync effects and modify the devices connected to them.
Suppose your device is not linked to the Aura Sync service. In that case, you may still make changes to the performance characteristics of your motherboard, mouse DPI, AIO-cooler macro-key settings, and display choices by going to the device tab and clicking on them. Nevertheless, as you may have seen, there is an issue with the Armoury Crate.
There have been several complaints from consumers about various troubles they have faced, and it is conceivable that you have also encountered a problem that has led you to this guide in the first place. Having troubles with your Armoury Crate software is not a cause for concern.
This detailed guide will aid you in understanding the nature of the problem you are having and provide potential long-term solutions for the Armoury Crate problem you are facing.
What is ASUS Armoury Crate?
ASUS Armoury Crate can show real-time performance, but it can also show device settings like Turbo Mode, HyperFan Mode, Aura sync, GPU Overclocking, and Highlights, among other things.
This software is compatible with ROG and ASUS devices, and it lets you change your lighting settings and the look of your computer. You can also change how your computer looks. There are a lot of great features in Armoury Crate that is both fast and easy to use. HyperFan Mode lets you quickly see how your computer is working and make changes to its settings without restarting your computer.
In addition, if you use the new ASUS gaming interface, it gives you layouts that let you show all of the critical information in the right way. Armoury Crate’s best feature can be used with your smartphone or tablet.
As a result, you can use Armoury Crate to get into and run your system from anywhere at any time. This makes the experience much easier than it would be if you used a different system management tool.
Some of the most common issues that Armoury Crate users have were discussed further in the preceding paragraphs. The following section will address your concerns and provide you with some of the most definitive solutions currently available for such difficulties.
Before going with the answers, ensure that your PC components are RGB compatible before proceeding. This is because applying these updates will be useless if you are using a motherboard made by a different company than the one you are using.
Here are the steps to fix ASUS Armoury Crate not working:
1. Reinstall Armoury Crate
On your computer, it’s conceivable that you’re using an earlier version of the Armoury Crate application, which stops you from making use of all of the new features that ASUS has included.
You must reinstall the most recent version of the program from the official website to get the full benefits of the software. This will guarantee that you get the most out of it in terms of performance. Ensure that the application is correctly installed since this will ensure that it functions effectively.
2. Deactivate Fast Startup
Almost without exception, if you already have the Armoury Crate application installed on your machine, the Fast Startup feature of Windows will cause difficulties. Fast Startup should be turned off in this circumstance since it is strongly recommended. Navigate to the Control Panel and choose the appropriate option to turn off Fast Startup.
Power Options may be found in the control panel, and then What Power Buttons can be found in the submenu of the Power Options. After that, select Change Settings that are currently unavailable from the drop-down menu and uncheck the Fast Startup tick. Once you’ve completed your work, save your modifications and restart your computer to apply them.
3. Uninstall Aura Sync
For the Armoury Crate to operate correctly, it must not be interfered with by any other program. The Aura Sync app is well-known for generating problems for Armoury Crate users since the two programs regularly fight and cause the latter to malfunction.

As a result, you will be required to uninstall the Aura Sync application from your computer. The Armoury Crate already has an Aura Creator tool, which allows you to accomplish the Aura Sync activity without purchasing a separate product. You may use the Armoury Crate to sync your RGB components without utilizing an additional tool such as Aura Sync this.
4. Use ASUS Armoury Crate Installer Utility
The first installation technique is the more traditional method of putting things together. Consequently, we’ll download and install several components from Asus’ drivers and tools website and then put the system through its paces.
Follow the steps below to download and install Armoury Crate on your Windows 11 computer. It is possible to download the Armoury Crate installer directly from the ASUS website. Windows 10 64-bit should be selected when requested to choose an operating system.
Yes, you are pretty accurate! We picked Windows 10 over Windows 11 since ASUS has not yet published the Armoury package for ROG and TUF gaming laptops that run the latest version of the operating system (as of this writing).
- Open up the Armoury Crate installation file on your PC and follow the instructions. If the Windows User Account Control question displays, type the password in the box provided.
- Install Armoury Create or Install Armoury Crate and AURA Creator as your installation method, then click on one of the options above. In this particular instance, I’ve picked the third option. To begin the installation process, press the Start button on your computer keyboard. If you choose to install all of the critical services and Armoury Crate components required for the game, it will take around 4-5 minutes, depending on your preferences and PC configuration.
- It is pre-installed on Asus ROG TUF Gaming laptops and Armoury Crate and AURA Creator.
- Once the installation is complete, click on the Launch Armoury Crate button to immediately utilize the crate.
Wasn’t that a straightforward and painless installation process? However, even while the first strategy is clear to implement, it may not be helpful for many individuals. There have been multiple instances of customers encountering the error message – Installation Failed – while attempting to run the installer, which has been confirmed. An error notice stating that Armoury Crate installation failed was shown.
“Please restart the system and verify the state of your internet connection before trying.” It is unnecessary to be concerned if you are one of these persons; we will address your concerns in the next section of this lesson.
5. Download the Latest version of Armoury Crate
If you don’t want to take any hassle then download armoury crate app from here.
As of November 2021, ASUS has not yet officially published the software for Windows 11. However, the company is making a Beta version of the program accessible for download through the Microsoft Store for anyone interested.

The Armoury Crate application page on the Microsoft Store did not appear to have any alternatives for installing the software when we looked at it. It’s a little confusing when you read that a product was compatible with your device on the one hand and then see that there is no install option accessible on the website. It’s conceivable that this is due to restrictions imposed by the nation in question.
ASUS may decide to have users from unique geographical places, such as the United States, initially participate in the beta testing process. After that, all users will be able to access a stable version of the program that has been developed.
Additionally, Microsoft achieved the same result with their Windows Subsystem for Android application. [source code] It was only available in the United States, and it allowed customers to install Android applications on their Windows 11 computers, according to the company.
If you are lucky enough to have the install button available in the Microsoft store, please take advantage of this opportunity. In this case, there is no need to be concerned about anything. If you follow the steps outlined below, you will be able to download the App bundles directly from the Microsoft Store. Continue reading and following the methods indicated below to find out more information.
6. Relink RGB Headers
Some people mistake not appropriately connecting the RGB headers, which is a pervasive problem in the gaming industry. Before proceeding, please double-check that the RGB headers are correctly connected and linked on the motherboard and that they are positioned in their respective positions.
It’s also important to note that the 3-pin or 4-pin header must be attached to the port properly to get the desired results.
This program should not be used on a motherboard that is not compatible with the ASUS brand at this time, according to the manufacturer.
7. Install ASUS Keyboard Hotkeys UAP/Driver
This might be the most effective option available on the market today. It is possible to ensure the smooth operation of your system by installing this driver on your computer. To begin, go to the My ASUS Windows Store on your computer’s desktop.
By selecting the proper product model from the drop-down menu, you can download the ASUS Keyboard Hotkeys UAP/Driver for your computer. Finally, restart your computer after installing the Armoury Crate and the driver to complete the installation process. Hopefully, this will take care of the problem.
Is the ASUS Armoury Crate Worth It?
The Armoury Crate is a fantastic piece of software that acts as a centralized control panel for all of the ROG gaming equipment on your computer. Furthermore, the Armoury Crate provides you with a fantastic gaming experience by allowing you to tune your performance parameters easily.
In essence, it serves as a one-stop shop for all of your requirements.
In addition to the Aura Sync function, the application has Hyper Fan Mode, Turbo Mode, Highlights, and many other valuable options. It is also possible to link it to your smartphone, which would allow you to control the app from that device.
It is possible to make adjustments to synchronized devices that have been linked using the Aura Sync app utilizing Armoury Crate’s interface. In addition, you can manage the fan speed, Marco-Key settings, mouse DPI, AIO cooler, and several other functions using this program. With little doubt, the Armoury Crate is a worthwhile investment.
It is a terrific tool that makes players’ lives a whole lot easier by enabling them to alter their settings in a relatively straightforward manner. So, if you want to get the most out of your game experience, the Armoury Crate is a must-have item.
Common Issues Faced with Armoury Crate Software
The Armoury Crate is an aesthetically beautiful All-In-One interface that helps you control the hardware on your computer. It is available for both Windows and Mac computers. On the other hand, users are presented with a variety of issues that must be dealt with appropriately.

In Armoury Crate, some of the most often encountered concerns are the ones listed below. It is possible to utilize the Armoury Crate App on all ASUS devices, including the ASUS ROG, the ASUS Prime, and the ASUS Tuf.
The Armoury Crate App is available for both Android and iOS smartphones. Therefore, if you are utilizing a product made by the Gigabyte company, you will not be able to use the Armoury crate. In such a case, you will be required to download extra programs to access the relevant information.
Armoury Crate Not Downloading
When the Armoury Crate is purchased from an untrustworthy and unauthentic source, this is a common problem that must be addressed as soon as possible. The unfortunate reality is that downloading from an improper website may result in many issues.
As a result, it is recommended that you obtain the Armoury Crate from the game’s official website.
Armoury Crate App Not Functioning
It is conceivable that double-clicking on the Armoury Crate software will result in no action being taken, which can be pretty frustrating.

This problem might be caused by a software program that was mistakenly installed.
Armoury Crate Not Able to Detect Keyboard
It’s virtually guaranteed that you’ll run into this problem sooner or later if you’re using the Aura Sync App in combination with the Armoury Crate. As a consequence of the fact that the Aura Sync and Armoury Crate are always in competition, the performance of your keyboard or RGB mouse will suffer as a result.
As long as these issues persist, you will be compelled to manually alter the lighting settings on your device rather than utilizing the Aura Sync App to get the desired results.
This issue will eventually arise if you use the Aura Sync App in combination with the Armoury Crate app, as previously stated above. You may experience difficulties in controlling your keyboard or RGB mouse lighting when using the Aura Sync App because it tends to conflict with the functionality of the Armoury Crate software.
As a result, you may experience difficulties controlling your keyboard or RGB mouse lighting when using this app. If this occurs, you will need to manually update the lighting settings on your device rather than using the Aura Sync App to perform the update automatically.
Armoury Crate Not Displaying GPU
The Armoury Crate enables you to easily control the lighting of some of the latest ASUS equipment, including graphics processing units, using a simple interface (GPUs).
On the other hand, some users have complained that the software is unable to recognize their graphics processing unit (GPU). This may be a problem that many people are facing.
Armoury Crate Not Able to Recognize Motherboard
The Armoury Crate may occasionally fail to recognize your motherboard, preventing you from synchronizing your compatible devices at the appropriate times. This can be frustrating since the RGB components you have invested a significant amount of money in are rendered ineffective, and your system is no better than a non-RGB PC in terms of performance and quality.
The Armoury Crate may only be used if your system is equipped with ASUS RGB products, which are not included. Because this application is incompatible with products from MSI or ASRock, it will be of no use to you in the future.
When using this program, your motherboard may not always be identified or recognized, and we understand that this may be a very annoying experience to deal with at times. This is because you cannot sync your compatible devices connected to your computer.
Consequently, the RGB components of your computer will be of little value to you, and your whole system will revert to the condition of a non-RGB computer. It is necessary to have computer components or RGB that ASUS manufactures for Armoury Crate to function correctly; otherwise, this application is entirely useless for owners of MSI or gigabyte products, and there is no use in even attempting to connect it.
Armoury Crate Not Displaying Aura
For example, one of the most frequently observed concerns is that the Armoury Crate fails to display Aura, which happens rather often. As a result, you will not notice any lighting effects from your RGB components due to this configuration.

Even though the Armoury Crate is one of the most powerful programs available for controlling RGB illuminations, you will still encounter instances that may be pretty uncomfortable.
Armoury Crate Unable to Detect Aura Devices
Some of the most current ASUS ROG RGB goods, such as the ROG RGB gaming keyboard, are compatible with Armoury Crate, but others are not. Despite this, the Armoury Crate may fail to recognize Aura Sync devices on your system from time to time owing to software issues. Consequently, the RGB lighting is rendered useless because it cannot be lighted.
FAQ
Why is my ROG Button Not Working?
Should one or more of the associated drivers become corrupted or out of date, the ROG Gaming Center may become unresponsive and perhaps fail to open under some circumstances. It is highly recommended that you update your driver to the most recent version to avoid this from happening. You should pay particular attention to your computer’s keyboard, mouse, and graphics card drivers.
Does the armoury crate affect performance?
It is now possible to use the armoury crate, and the days of Aura Sync not working correctly are over, thank god. Although it causes latency to increase, it also causes more CPU cycles to be consumed if you employ any effect other than the static. It will cost even more CPU cycles if the performance parameter is enabled, but the RGB animations will be even smoother than they were before using this setting.
Why is my Armoury crate not working?
To resolve the issue, please restart your computer or laptop. If the problem persists, download and run the Armoury Crate Installer to reinstall Armoury Crate from the ground up completely. It is possible to download the Armoury Crate Installer from the ASUS support website, provided for your convenience.
Does Armoury Crate overclock?
The Nvidia GPU models can outperform their competition when unique overclocking technology is utilized. The use of Armoury Crate Turbo Mode and Manual Mode, which allow for greater GPU frequency to be employed, results in a significant improvement in system performance.