We can implement AppLocker rules using group policy in a Windows domain to limit the execution of arbitrary executable files. AppLocker takes the approach of denying all executables from running unless they have specifically been whitelisted and allowed.
AppLocker is available in Windows Server 2008 R2 and newer, and Windows 7 Enterprise edition or newer on the client side. Note that it’s only available for particular editions, for example in Windows 10 you need Enterprise edition to make use of AppLocker. The AppLocker requirements can be found here.
Note that before you implement AppLocker rules in a production environment it is important to perform thorough testing. AppLocker will not allow anything to run unless it has been explicitly whitelisted, which could cause problems in your environment if users are not able to run required software to do their job.
This post is part of our Microsoft 70-744 Securing Windows Server 2016 exam study guide series. For more related posts and information check out our full 70-744 study guide.
Rule Types
Before proceeding let’s discuss the types of rules that we can create with AppLocker.
- Executable Rules: These rules apply to executables, such as .exe and .com files.
- Windows Installer Rules: These rules apply to files used for installing programs such as .msi, .mst and .msp files.
- Script Rules: These rules apply to scripts such as .bat, .js, .vbs, .cmd, and .ps1 files.
- Packaged App Rules: These rules apply to the Windows applications that may be downloaded through the Windows store with the .appx extension.
With each of these rules we can whitelist based on the publisher, path, or file hash.
- Publisher: This method of whitelisting items is used when creating default rules as we’ll soon see, it works based on checking the publisher of the executable and allowing this. If the publisher, file name or version etc change then the executable will no longer be allowed to run.
- Path: Executables can be whitelisted by providing a folder path, for example we can say that anything within C:\executables is allowed to be run by a specific active directory user group.
- File Hash: While this may be the most secure option, it is inconvenient to work with and manage. If a file changes at all, for instance if an executable is updated, it will not be allowed to run as the allowed hash will have changed too.
Now we’ll actually implement AppLocker rules using group policy.
Implement AppLocker Rules
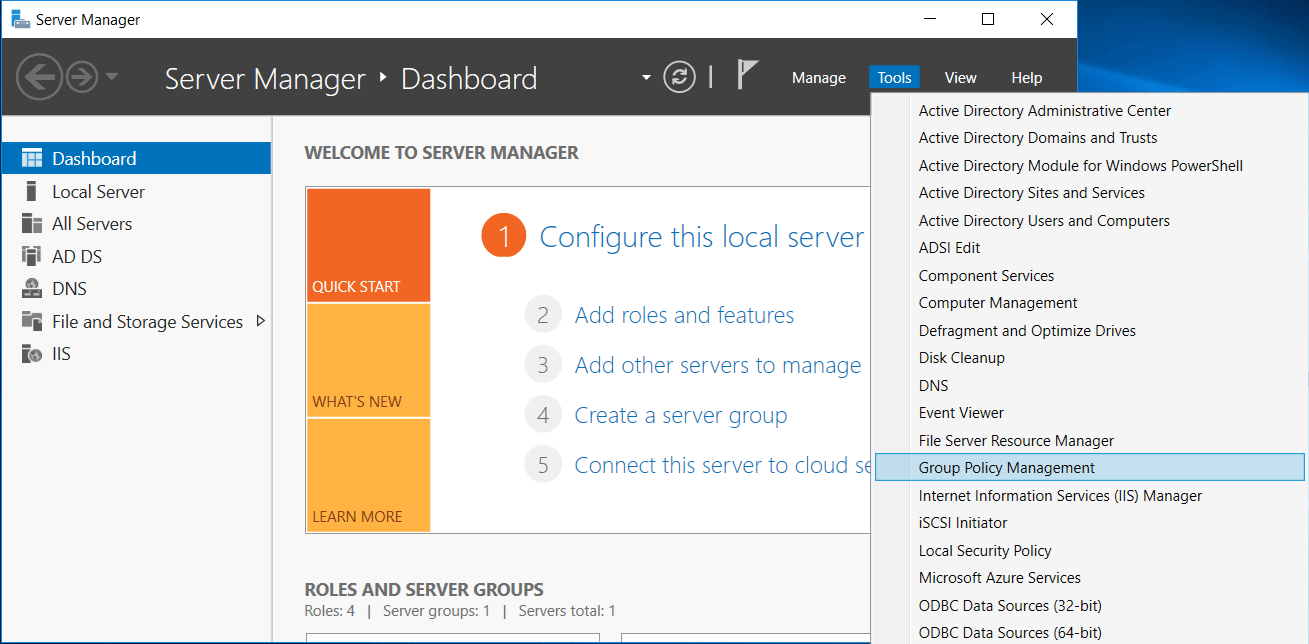
We’ll start by opening Server Manager, selecting Tools, followed by Group Policy Management.
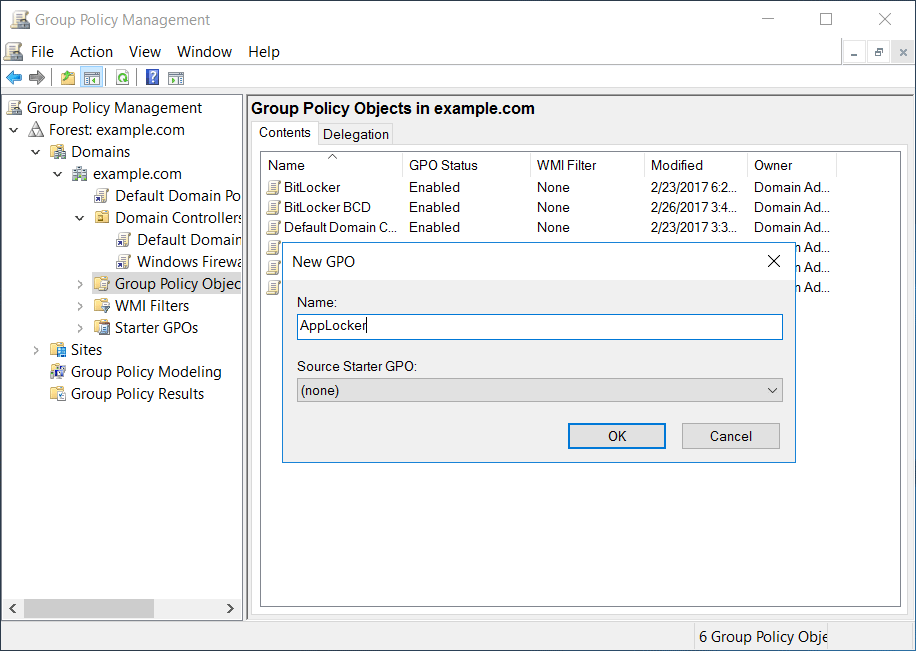
From the Group Policy Management window that opens, we’ll select the group policy objects folder within the domain, right click and select new to create a new group policy object (GPO). In this case we’ll create one called AppLocker.
Once the base GPO has been created, right click it and select Edit. This will open the Group Policy Management Editor (GPME). From within GPME, select Computer Configuration > Policies > Windows Settings > Security Settings > AppLocker Control Policies > AppLocker.
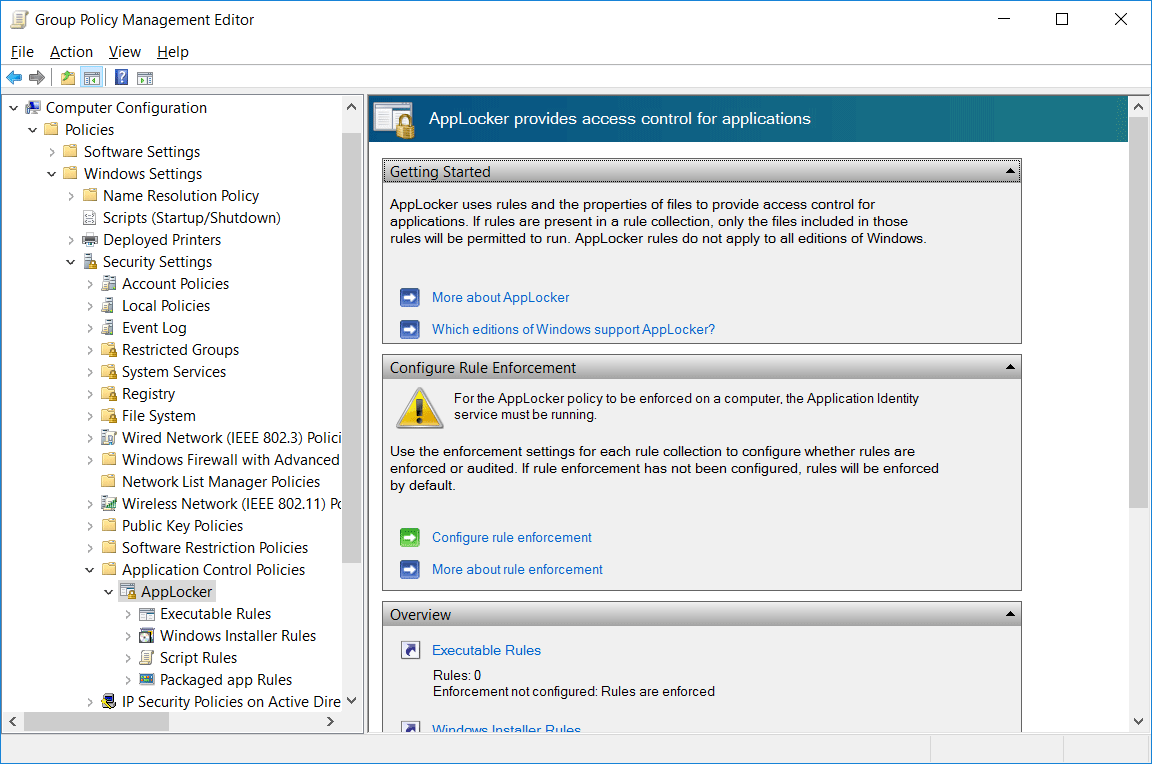
From here we can view the main AppLocker interface where we can create executable, windows installer, script, and packaged app rules. We can get started with the default settings by clicking the “Configure rule enforcement” link on this screen which opens up the following window.
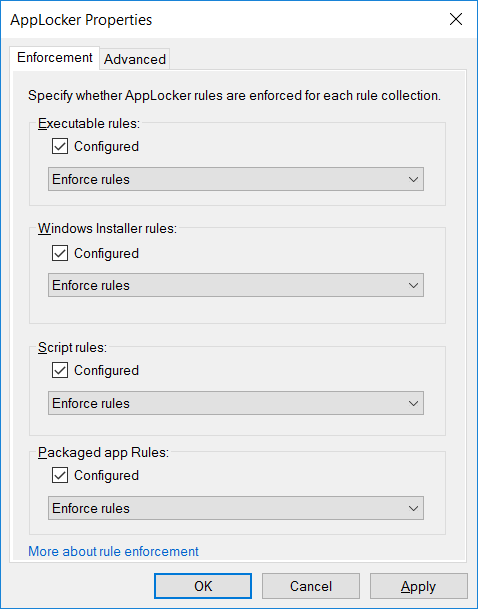
By default each of these four items is unticked and not enabled, we can tick the box next to “Configured” to enable it. This will set the rule to “Enforce rules” by default, however we can optionally click the drop down to change it to “Audit only” which will allow executable files to run and only log the action. In this case we’ll enable all items, leave them on enforcing, and click OK to save the settings.
Now that the rules are enforcing, we need to set the actual rules themselves. We’ll first create default AppLocker rules, followed by automatic AppLocker rules, and end with a custom AppLocker rule.
Default AppLocker Rules
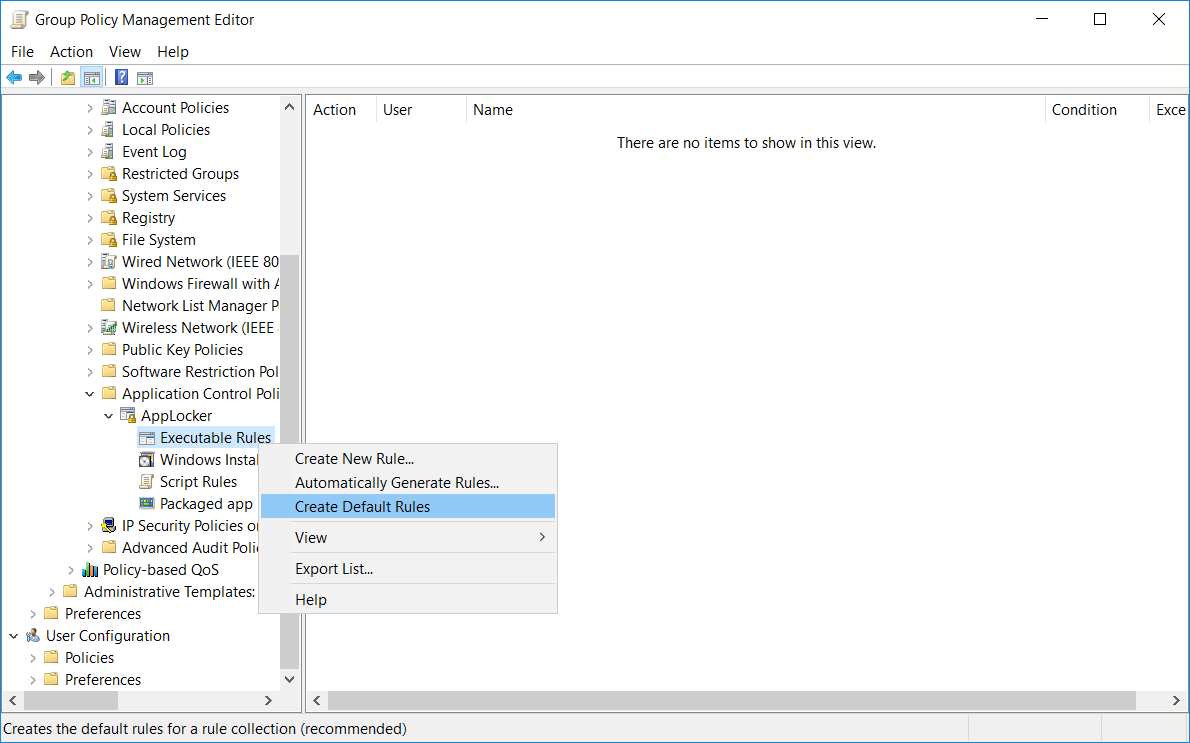
We’ll first create the default rules, these are a baseline set of rules that still allow the operating system and built in applications to function normally. Right click the “Executable Rules” and select “Create Default Rules” as shown below.
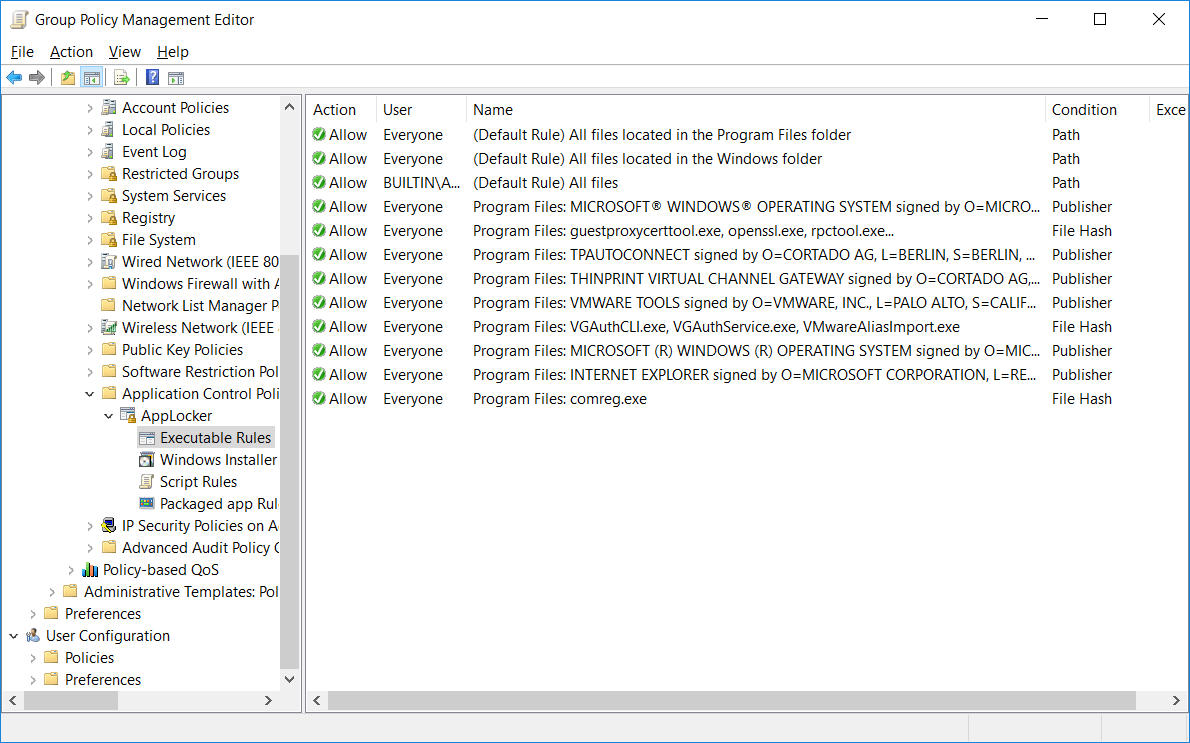
We can see the default rules that have been created below.
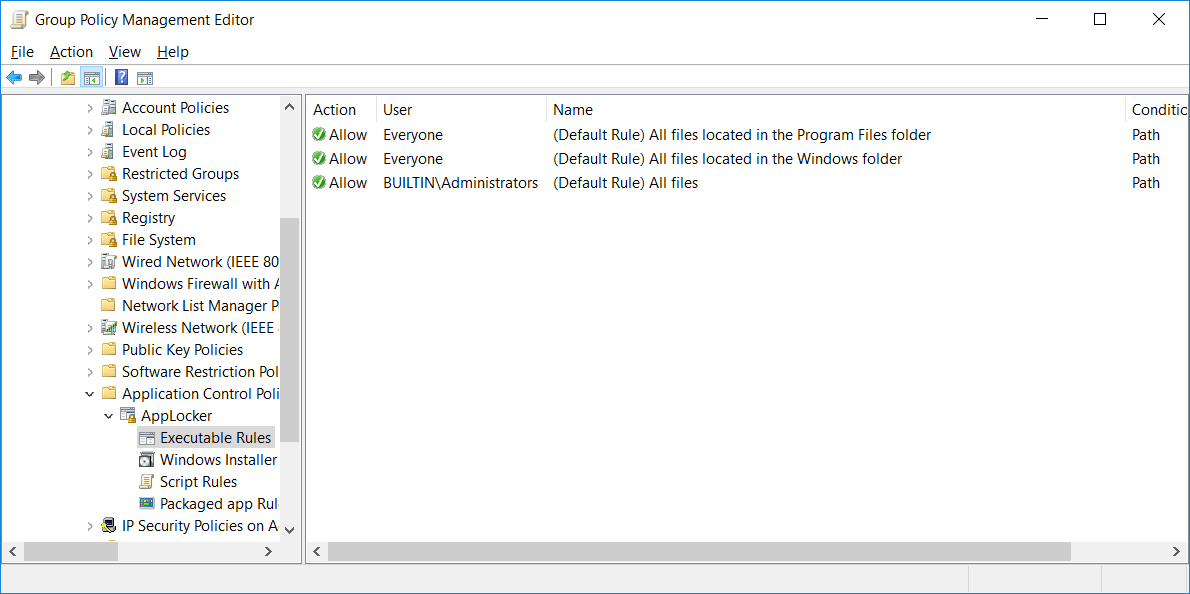
These default rules allow all users to to execute files within the Program Files and Windows folders. Additionally, local administrators are able to execute anything anywhere, so it’s still important that administrator accounts only be used for administrative tasks, while standard user accounts are used everywhere else. If any of these actions are not desirable for you, simply delete or modify the rule.
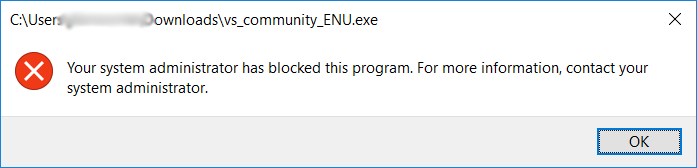
We can also right click “Windows Installer”, “Script Rules”, and “Packaged App Rules” and create default rules there as well. With these default rules in place, if a non administrative user attempts to execute anything that is not within the directories specified above, they will receive an error.
Automatically Generate AppLocker Rules
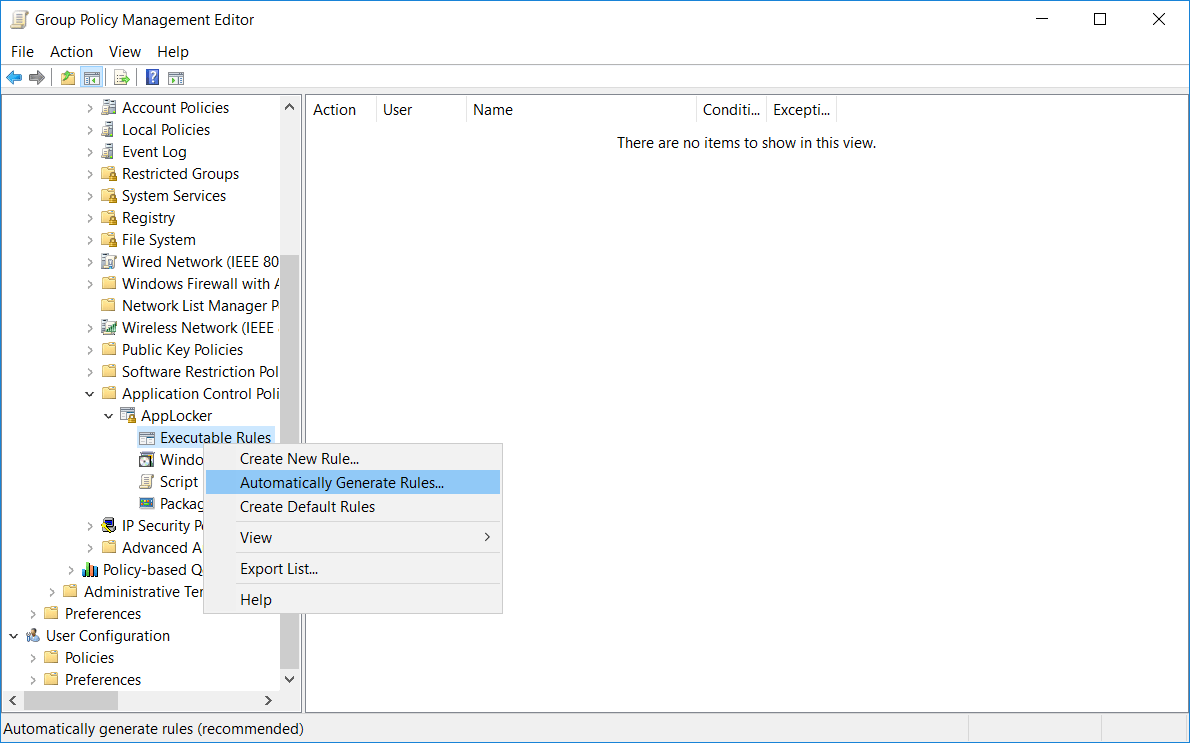
While these default rules are a good starting point, ideally we should further customize the rules as per your organizational requirements. We can right click these items, and again we’ll select “Executable Rules”. Rather than “Create Default Rules” as shown previously select “Automatically Generate Rules”.
Note that this will generate custom rules based on the computer that you’re generating them on, in this case our domain controller where GPME is open. Ideally you would want to create AppLocker rules on a SOE image so that common elements that are deployed to all machines can have rules created for them.
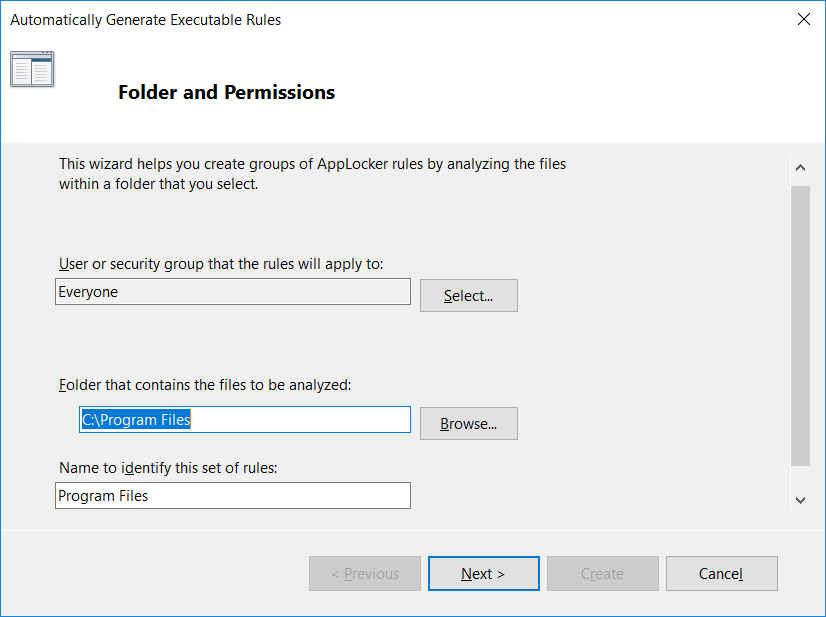
From the Folder and Permissions window, we’ll just leave the defaults shown below and click next to proceed.
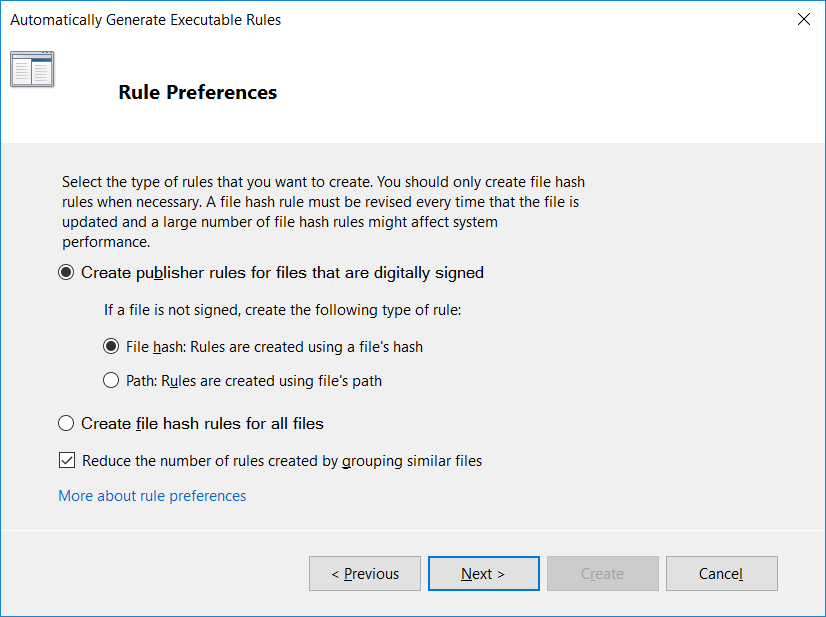
Next on the rule preferences screen we’ll leave the default and create publisher rules for files that are digitally signed. While using hashes is considered quite secure, it is also pretty inconvenient as new hashes would be required every time a file is updated or modified.
Finally on the review rules window, we can check the rules that will be created. Click the create button to proceed.

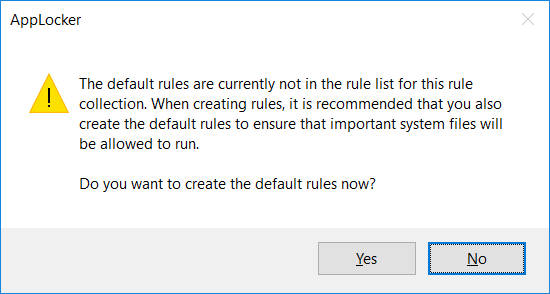
We’ll see an AppLocker warning advising that we should first create the default rules, select yes if you have not already created them as shown previously.
We can now see that our rules have been created.
Once the executable rules have been created for Executable Rules, we can do the same for Windows Installer Rules, Script Rules, and Packaged App Rules.
Custom AppLocker Rules
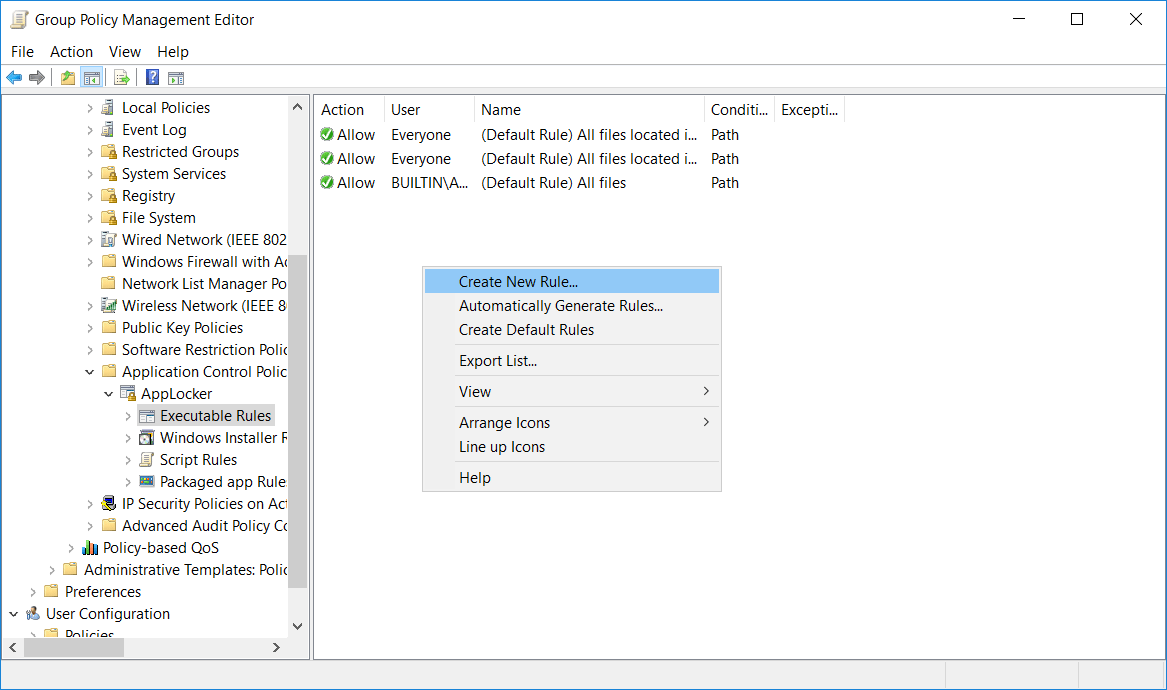
We can also create complete custom rules by right clicking any of the 4 rule items and selecting “Create Rule”.
On the before you begin page, click next.
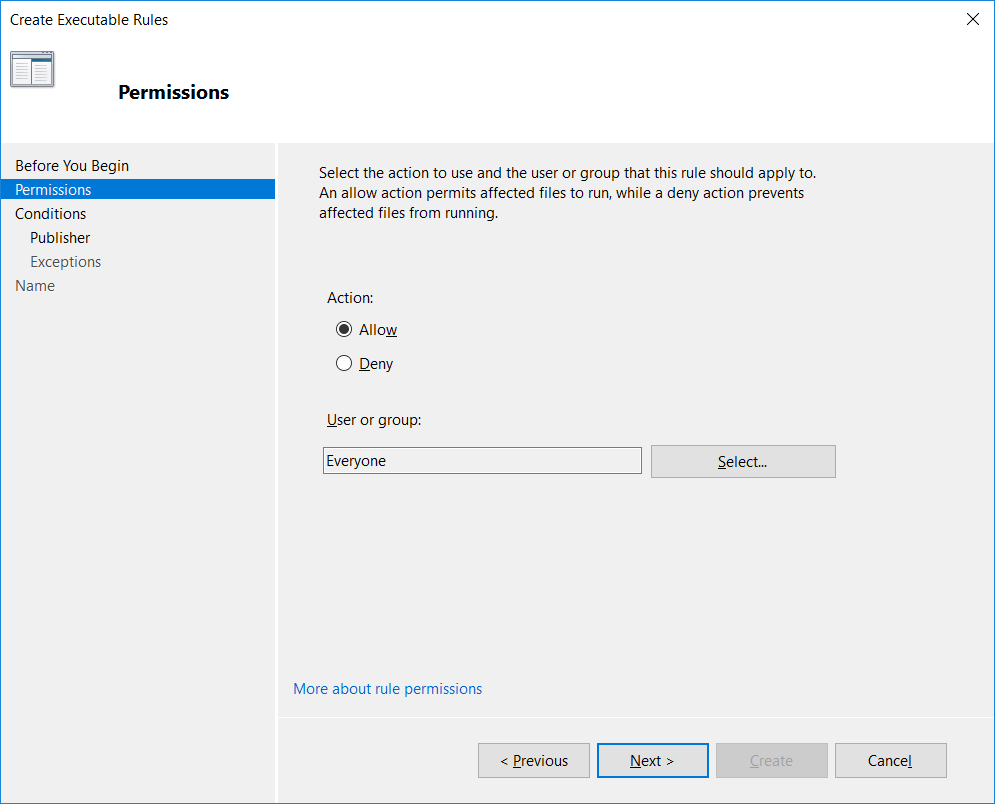
On the permissions page, select if you want to allow or deny access and to the user or group in which it should apply.
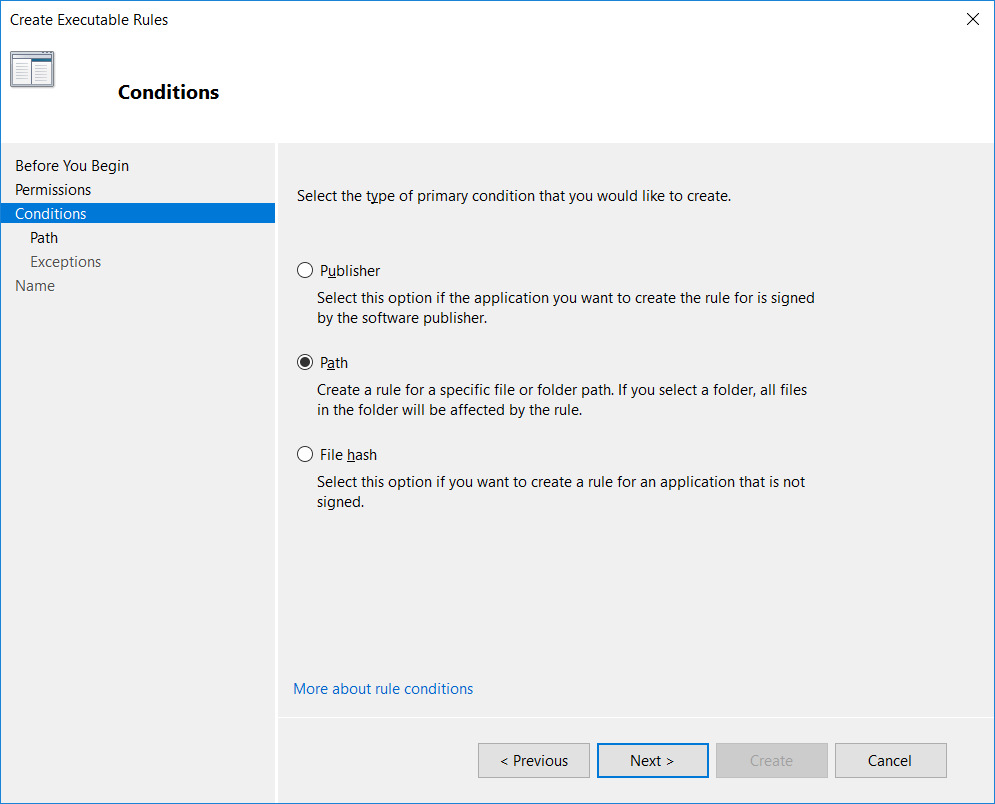
On the conditions page, select if we want to allow or deny based on publisher, path, or file hash as discussed previously.
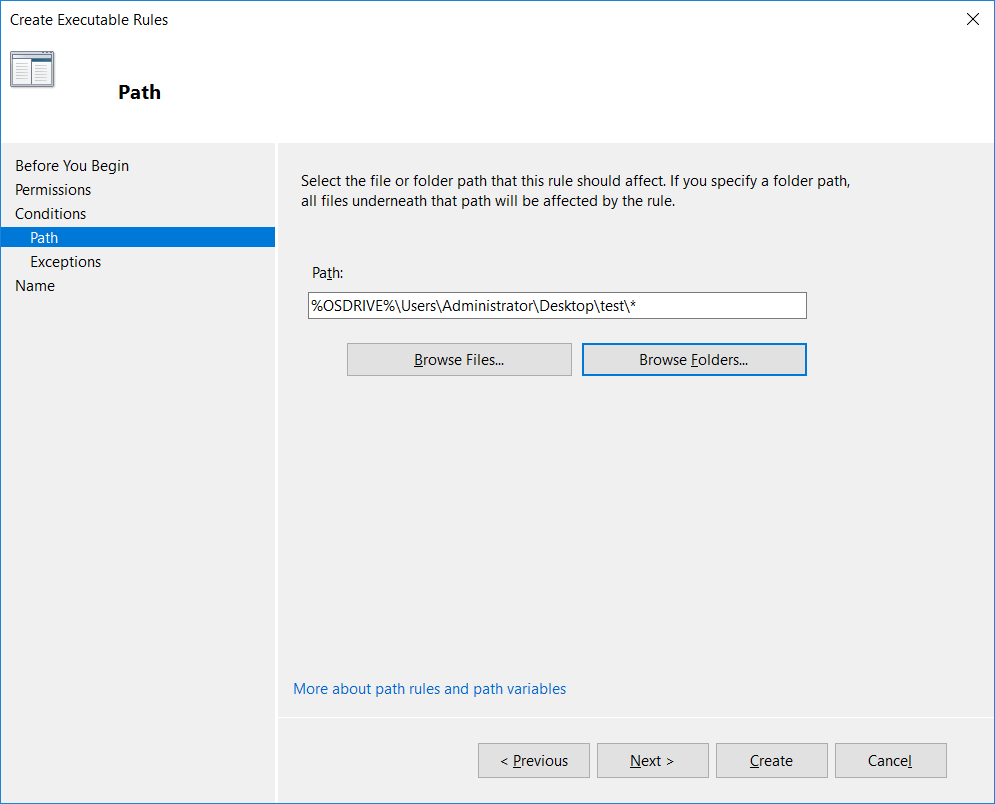
In this example I’ve selected path, so after clicking the browse folders button I can browse to the folder that I want to allow.
We can optionally add exclusions here, for instance we may want to allow a user to execute everything on their desktop except for a specified file.
Finally we can give our custom rule a name and description, by default the name will be automatically populated.
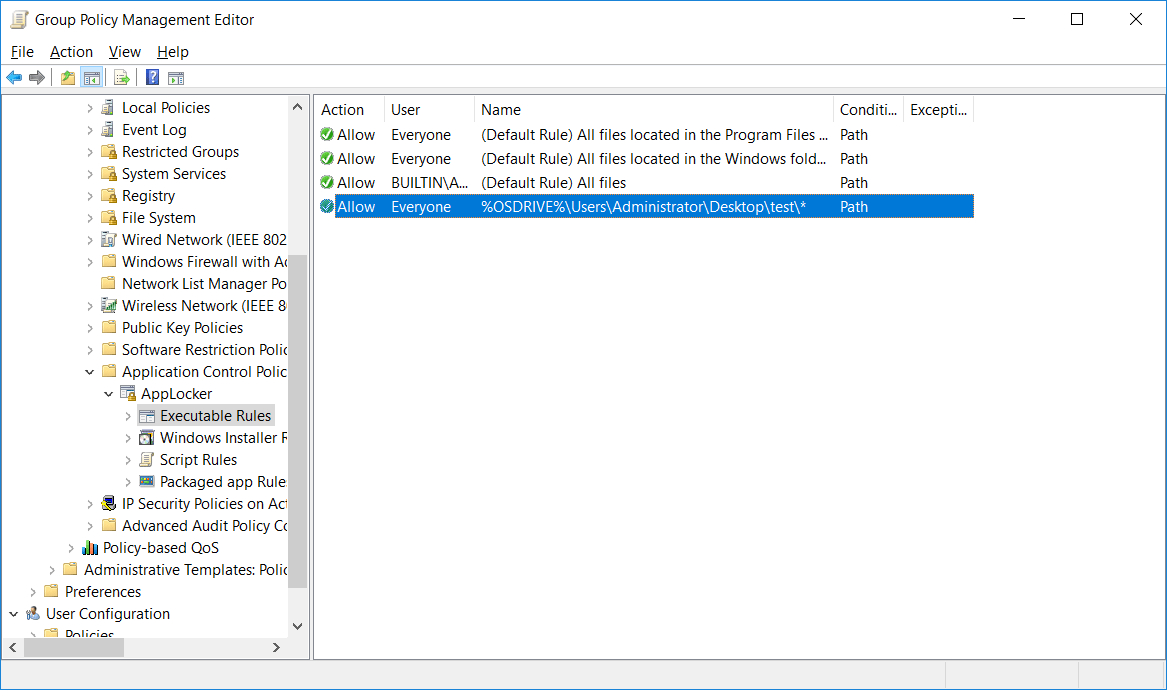
We can now see a summary of our custom rule below the default rules that we created earlier, confirming that it’s now active.
In order for AppLocker rules to work correctly, the client must be running the AppIDSvc service. Even if we implement AppLocker rules with group policy if the service is not actually running they will not be enforced.
Summary
We have used group policy to implement AppLocker rules within our Windows environment, preventing untrusted executable files from running which will help defend against a lot of security threats in Windows.
This post is part of our Microsoft 70-744 Securing Windows Server 2016 exam study guide series. For more related posts and information check out our full 70-744 study guide.
Время на прочтение
6 мин
Количество просмотров 27K
Предисловие
В первой части мы успешно развернули роль «терминальный сервер Windows» и приступили к его конфигурированию. Разобрались в методах организации хранения данных пользователей и определились что из этого мы будем использовать. Давайте приступим к настройке.
Конфигурирование хранения персональных данных пользователей
Для активации дисков профилей пользователя необходимо перейти в Службы удаленных рабочих столов > в разделе Свойства открываем меню Задачи > изменить свойства > Диски профилей пользователя
Ставим флаг напротив «Включить диски профилей пользователей».
Указываем путь до каталога на файловом сервере, где будут храниться VXDX диски профилей, и указываем размер 1 гб (Больше места нам не нужно, так как в диске будет храниться совсем мало данных но и меньше 1 гб сделать нельзя) и нажимаем применить

В результате в указанном каталоге будет создан базовый диск на основе которого будут создаваться диски профилей

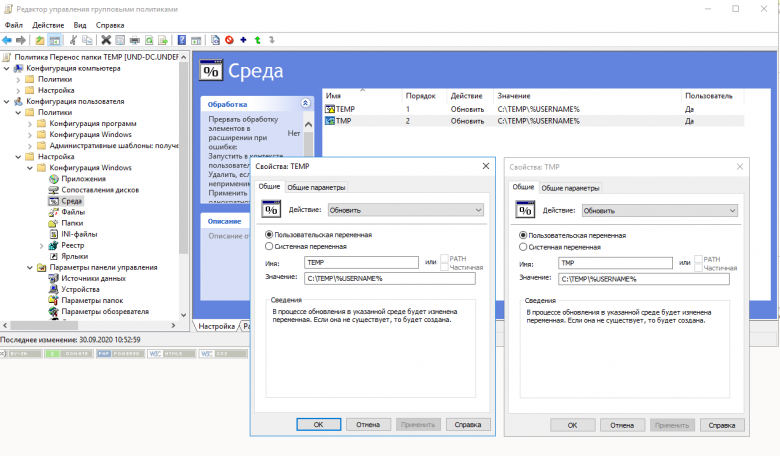
Устраняем проблему с хромом
При использовании дисков профилей в Google Chrome возникает ошибка Error COULD NOT GET TEMP DIRECTORY, это связанно с тем что хром не может получить доступ к общей папке TEMP, потому переместим ее в другое место и дадим на нее права
Вам нужно настроить объект групповой политики, который выполняет две функции:
Для каждого пользователя, который входит в систему, создает личную папку в папке C: TEMP Изменить переменные среды TEMP и TMP Есть две настройки, которые можно применить на уровне пользователя.
1 — Создание личной папки в папке TEMP:

2 — Модификация переменных окружения:
Далее нам необходимо настроить миграцию профилей
Открываем «Управление групповой политикой «
Создаем объект Групповой политики и связываем его с Подразделением в котором расположены пользователи терминального сервера
Далее переходим Конфигурация пользователя > политики > Конфигурация Windows > Перенаправление папки

По каждому из представленных каталогов ПКМ > Свойства
В окне выбираем пункты
-
Перенаправлять папки для всех пользователей в одно расположение.
-
Создать папку для каждого пользователя на корневом пути
-
Указываем корневой путь (!Важно: данный путь должен быть доступен пользователям на запись)
На вкладке параметры снимаем все галочки и выбираем «После удаления политики оставить папку в новом расположении»

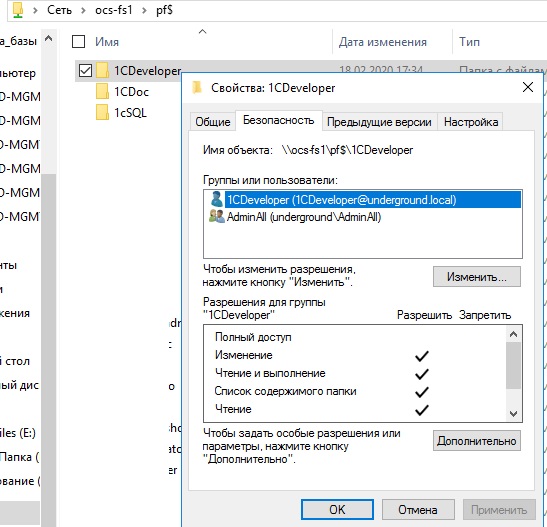
В результате данной настройки в указанном корневом пути будут создаваться каталоги с правами для своего владельца на изменение а для других с запретом чтения
Настройка политики ограниченного использования программ
Одним из важнейших аспектов настройки сервера является его безопасность . Потому нам необходимо ограничить список функций и программ которые имеет право использовать пользователь на сервере.
Спрячем логические диски от пользователей
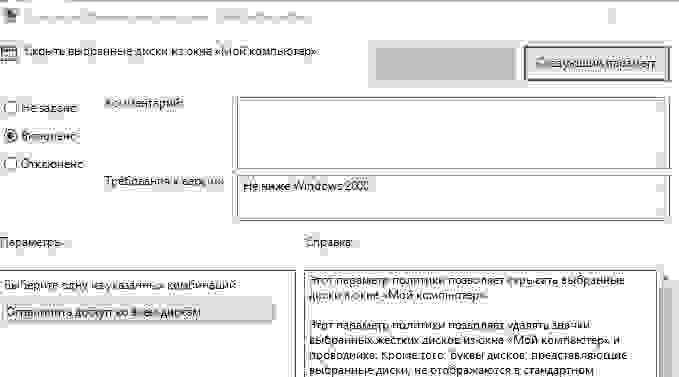
Конфигурация пользователя > политики > Административные шаблоны > Компоненты windows > Проводник > выбираем политику Скрыть выбранные диски из окна мой компьютер > ставим включено и выбираем Ограничить доступ ко всем дискам
Убираем все лишнее с рабочих столов пользователей
Для этого создадим следующие групповые политики
-
Ограничение функционала проводника
-
Очищаем меню пуск
Ограничение функционала проводника
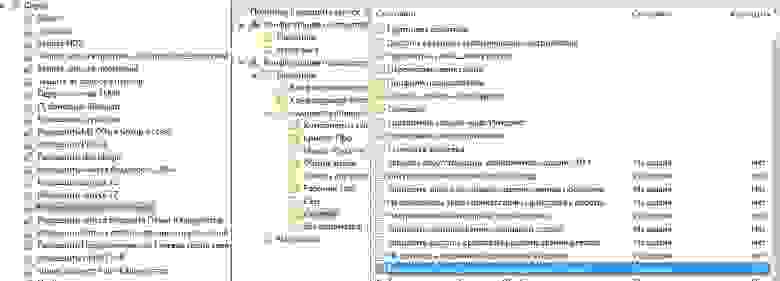
Идем Конфигурация пользователя > Политики > Административные шаблоны > Компоненты Windows > Проводник и включаем следующие политики
-
Запрашивать подтверждение при удалении файлов
-
Отключить возможности библиотеки Windows, использующие данные индексированных файлов
-
Запретить изменение видеоэффектов для меню
-
Скрыть значок «Вся сеть» в папке «Сеть»
-
Удалить меню «Файл» из проводника Удалить вкладку «Оборудование»
-
Скрыть команду «Управление» из контекстного меню проводника
-
Удалить «Общие документы» из окна «Мой компьютер»
-
Удалить команды «Подключить сетевой диск» и «Отключить сетевой диск»
-
Удалить ссылку «Повторить поиск» при поиске в Интернете
-
Удалить вкладку «Безопасность» Удалить кнопку «Поиск» из проводника
Набор правил Определяется в зависимости от ваших потребностей. Данные правила выбраны как хорошо зарекомендовавшие себя для нагруженного терминального сервера
Очищаем меню пуск
Идем Конфигурация пользователя > Политики > Административные шаблоны > Меню «Пуск» и панель задач
В данном разделе, все зависит от ваших потребностей. как показывает практика рядовой пользователь меню пуск особо не пользуется, так что зачем ему оставлять лишние кнопки, посему можно запретить все.
Запрет запуска программ
Для решения данной задачи есть 2 способа
1-й способ
При помощи политики «Выполнять только указанные приложения Windows» Указать список всех exe приложений которые будут доступны»
Данный метод проще в настройке, и однозначно блокирует все приложения кроме указанных (те что относятся к windows тоже)
У данного метода есть несколько недостатков
-
сложность администрирования, так как не всегда удается указать все необходимые EXE для корректной работы приложения (например с CryptoPro, или публикациями приложений и т.д)
-
назовем их «Энтузиасты » , которые пытаются запускать приложения переименовав их исполнительный файл в один из разрешенных
-
Проблема с обновлением приложений (Зачем же разработчикам ПО оставлять старые названия своих exe, и правда Зачем? )
-
Отсутствие какого либо журнала заблокированных политикой приложений
Настраивается следующим образом
Создаем объект Групповой политики и связываем его с Подразделением в котором расположены пользователи терминального сервера
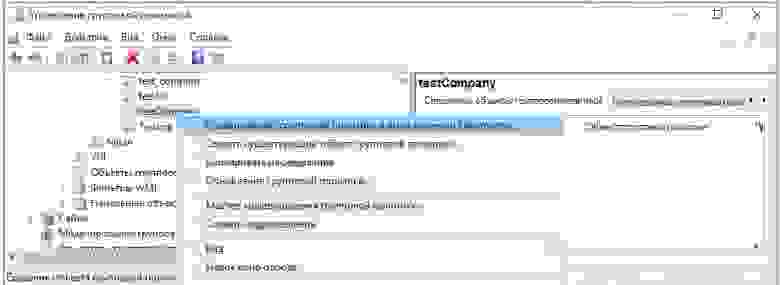
Идем Конфигурация пользователя > Административные шаблоны > Система > Находим политику «Выполнять только указанные приложения Windows»
Включаем политику > Нажимаем кнопку «Показать» > В таблицу вносим разрешенное приложение. Крайне рекомендую для каждого приложения делать отдельную политику, для облегчения администрирования.
Далее нам Желательно на рабочем столе разместить ярлыки запуска приложения
Идем Конфигурация пользователя > Настройка > Конфигурация Windows > Ярлыки > Создать > Ярлык

После чего задаем параметры. !ВАЖНО на вкладке «Общие параметры поставить «Выполнять в контексте….»

Ура политика создана
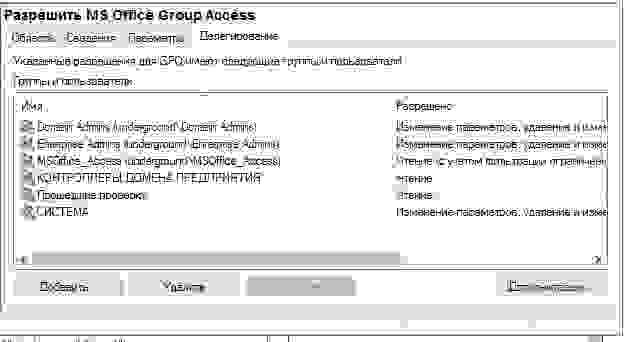
Так как не всем пользователям нужны одни и те-же программы и права, то нацеливаем политику на группу безопасности В фильтрах безопасности удаляем группу «Прошедшие проверку» а на ее место добавляем группу в которую включены все пользователи данного приложения»

после чего ВАЖНО не забыть на вкладке Делегирование добавить группе «Прошедшие проверку» право на чтение политики (Иначе работать не будет)
2-й способ
Используем функцию AppLocker
Важно применять эту политику на подразделение где лежит ваш терминальный сервер. это позволит вам более оперативно редактировать список разрешенных приложений, так же когда она настроена работать под пользователем возникают непонятные баги. в данный момент я полностью перешел на использование данного метода для большинства внедрений
Создаем Групповую политику и связываем ее с подразделением, где лежит ваш терминальный сервер
идем Конфигурация компьютера > Конфигурация Windows > Параметры безопасности > Политики управления приложениями >applocker > Исполняемые правила > Создать правила по умолчанию

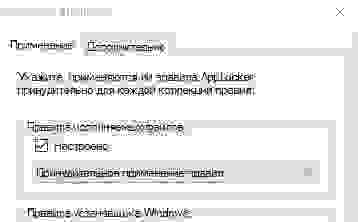
после чего идем Конфигурация компьютера > Конфигурация Windows > Параметры безопасности > Политики управления приложениями >applocker и тыкаем «Настроить применение правил»
в свойствах ставим настроено и выбираем только аудит для правил исполняемых файлов

в результате при заходе пользователя и попытке запуска программ в журнале просмотра событий на терминальном сервере расположенном
Журналы приложений и служб > Microsoft > Windows > AppLocker > EXE и DLL будут появляется события содержащие сведения о запускаемых приложениях, которые мы будем использовать для дальнейшей настройки политики

Вернемся в исполняемые правила и создадим правило на основе отчета журнала событий
ПКМ > Новое правило
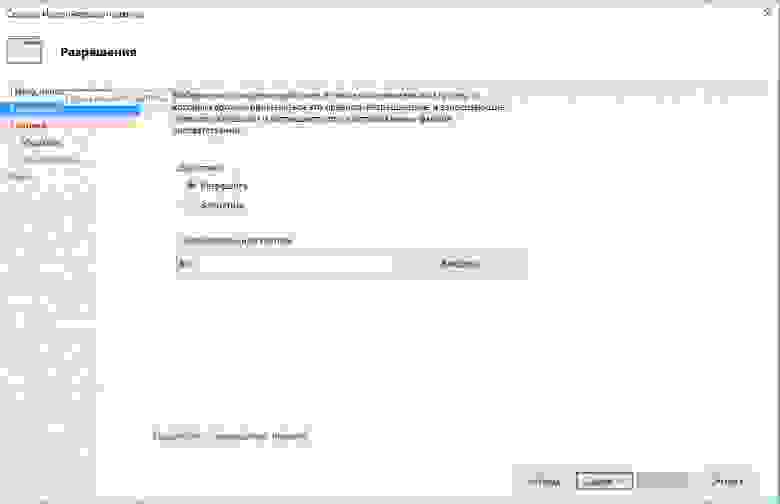
выберем действие Разрешить, и в данном случае мы хотим чтобы под всеми пользователями данное приложение могло быть запущенно, но так же мы можем создать в домене группу безопасности в которую включим пользователей для которых данное правило будет применяться, тогда на этом шаге следует ее указать
Выберем условие Путь
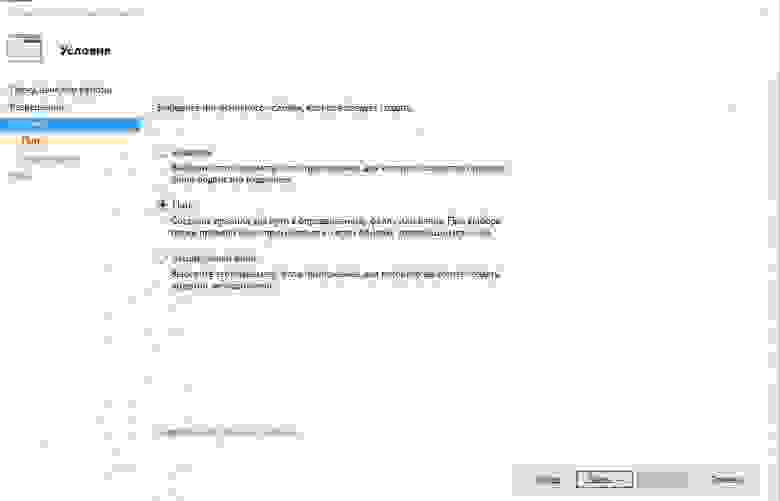
Скопируем путь из отчета о событии

в исключения мы добавлять ничего не будем так что далее > Создать
Шаги следует повторить для каждого события из журнала, отсеивая те которые мы хотим запретить
После чего в свойствах applocker следует переключить «Только аудит» на «Принудительное применение правил»
В результате данных действий мы имеем эффективное хранение данных пользователей, и первично настроенную безопасность терминального сервера
И вновь у меня закончились буквы) продолжим в следующей части, рассмотрим настройку 1с , разграничения доступа к базам, поднимем производительность 1с на терминальном сервере фактически в двое, в обще продолжим в следующей части
AppLocker — это инструмент для управления доступом к приложениям в операционной системе Windows Server 2016. Он позволяет администраторам устанавливать ограничения на запуск приложений в сети. Благодаря этому, они могут защитить свою инфраструктуру от вредоносного программного обеспечения и потенциальных угроз безопасности.
Однако, настройка и использование AppLocker может вызвать определенные сложности для пользователей, особенно для тех, кто только начинает использовать этот инструмент. В этой статье мы предоставим некоторые лучшие практики и полезные советы по настройке и использованию AppLocker в Windows Server 2016.
Прежде всего, перед использованием AppLocker необходимо провести анализ приложений, установленных на сервере. Это поможет вам понять, какие из них должны быть разрешены, а какие — запрещены. Рекомендуется создать список разрешенных приложений, а затем установить ограничения на запуск остальных.
Важно учитывать, что настройка AppLocker может потребовать определенного времени и тщательной проверки. Поэтому рекомендуется проводить тестирование в контролируемой среде перед применением настроек на продуктивных серверах.
Содержание
- Основные концепции AppLocker
- Установка и настройка AppLocker
- Создание и управление правилами AppLocker
- Аудит и мониторинг в AppLocker
- Лучшие практики использования AppLocker
- Решение проблем с AppLocker
Основные концепции AppLocker
- Правила: AppLocker использует набор правил для определения, какие программы могут быть запущены на конкретном устройстве. Правила могут базироваться на различных факторах, таких как имя файла, издатель или путь к файлу. Администраторы могут создавать правила для различных типов файлов, включая исполняемые файлы, скрипты, установочные пакеты и библиотеки DLL.
- Группы правил: AppLocker позволяет комбинировать правила в группы, которые можно назначать на устройства. Группы правил облегчают управление политикой безопасности и позволяют гибко настраивать правила для различных групп пользователей или компьютеров.
- Типы правил: AppLocker поддерживает несколько типов правил, включая правила запрета и правила разрешения. Правила запрета указывают, какие программы нельзя запускать, в то время как правила разрешения определяют, какие программы допустимы. Комбинирование этих типов правил позволяет точно настроить политику безопасности AppLocker.
- Уровни применения: AppLocker позволяет настроить уровни применения для правил, которые могут различаться для разных групп устройств. Например, можно настроить более строгие правила для серверов и более мягкие правила для рабочих станций.
- Аудит: AppLocker позволяет записывать информацию о попытках выполнения программ, которые не соответствуют правилам безопасности. Аудит позволяет администраторам контролировать события и выявлять потенциальные нарушения безопасности.
В целом, AppLocker предоставляет мощный механизм для контроля запуска программ и обеспечения безопасности в Windows Server 2016. Правильное использование основных концепций AppLocker может значительно повысить уровень безопасности в организации и защитить системы от вредоносных программ и несанкционированного выполнения исполняемых файлов и скриптов.
Установка и настройка AppLocker
Для установки AppLocker необходимо выполнить следующие шаги:
- Запустите «Серверный менеджер» на сервере Windows Server 2016.
- Выберите «Добавить роли и компоненты» в главном окне «Серверный менеджер».
- Пройдите мастер установки ролей и компонентов до шага выбора ролей.
- Выберите «Файловые и хранения информации» в списке доступных ролей для установки.
- В появившемся списке компонентов выберите «AppLocker» в «Подкомпоненты файловой службы Windows».
- Продолжайте мастер установки, нажимая «Далее» и «Установить», пока не завершите установку.
После установки AppLocker вы можете приступить к его настройке:
- Запустите «Серверный менеджер» на сервере Windows Server 2016.
- Перейдите в «Локальные политики» и выберите «Рабочие станции и серверы».
- Щелкните правой кнопкой мыши по «Политика безопасности» и выберите «Свойства».
- В разделе «Дополнительно» выберите «Управление приложениями».
- В разделе «AppLocker» выберите «Настроить правила и опции» и нажмите «Далее».
- Создайте правила для блокировки или разрешения доступа к приложениям, используя графический интерфейс AppLocker.
- Сохраните изменения.
После настройки AppLocker вам следует протестировать его работу, убедившись, что правила применяются, как ожидалось, и не блокируют необходимые приложения. В случае возникновения проблем вы можете проверить журнал событий или обратиться за помощью к профессионалам в области безопасности Windows Server.
Создание и управление правилами AppLocker
Для создания и управления правилами AppLocker в Windows Server 2016, вы можете следовать следующим шагам:
- Откройте «Панель управления» и выберите «Система и безопасность».
- Выберите «AppLocker» в списке доступных параметров безопасности.
- Выберите «Настройка правил AppLocker» и нажмите «Создать новое правило».
- Выберите тип правила, которое вы хотите создать. Например, вы можете создать правило для блокировки определенных программ или правило для разрешения запуска только определенных программ.
- Укажите путь к программе, к которой вы хотите применить правило, или выберите путь к файлам с помощью средств, предоставленных AppLocker.
- Нажмите «Далее» и установите дополнительные параметры правила, такие как условия применения и типы действий, которые будут приняты, если правило будет соответствовать.
- После завершения настройки правила, нажмите «Готово» и сохраните правило.
Правила AppLocker могут быть построены на основе различных параметров, таких как имя файла, имя публикации, хеш-код файла и т. д. Вы можете создать несколько правил и установить их в соответствии с требованиями вашей организации.
Управление правилами AppLocker также включает возможность редактирования, удаления и экспорта правил для дальнейшего использования. Вы можете легко вносить изменения в правила AppLocker и адаптировать их под изменяющиеся потребности вашей сети.
Аудит и мониторинг в AppLocker
AppLocker в Windows Server 2016 предоставляет возможности для аудита и мониторинга приложений и скриптов. Эти функции позволяют администраторам отслеживать попытки запуска или доступа к запрещенным приложениям, а также мониторить все события, связанные с AppLocker.
Для настройки аудита в AppLocker необходимо выполнить следующие шаги:
| Шаг | Описание |
|---|---|
| Шаг 1 | Откройте групповую политику «Локальная групповая политика» или «Групповая политика домена», в зависимости от того, настроен ли AppLocker локально или на уровне домена. |
| Шаг 2 | Перейдите к разделу «Конфигурация компьютера» -> «Настройки Windows» -> «Политики безопасности» -> «Политика приложений». |
| Шаг 3 | Откройте подраздел «Конфигурация запрещенных приложений» или «Конфигурация разрешенных приложений», в зависимости от того, к какому разделу применяется аудит. |
| Шаг 4 | Щелкните правой кнопкой мыши на пустом месте в правой части окна и выберите «Аудит настройки политики». |
| Шаг 5 | Выберите нужные параметры аудита (например, «Успешное выполнение политики» или «Несоответствие политики») и нажмите «OK». |
Теперь AppLocker будет аудитировать все события, связанные с запретом или разрешением приложений.
Для просмотра и анализа событий аудита в AppLocker можно использовать стандартные инструменты администрирования Windows, такие как «Журнал событий». В «Журнале событий» можно найти записи о событиях аудита AppLocker и проанализировать их для выявления потенциальных угроз или нарушений политики безопасности.
Аудит и мониторинг в AppLocker представляют собой важные инструменты для обеспечения безопасности и контроля над приложениями. Регулярное мониторирование событий аудита позволит своевременно обнаружить и предотвратить несанкционированный доступ к запрещенным приложениям и скриптам в среде Windows Server 2016.
Лучшие практики использования AppLocker
1. Правильно настроить политику безопасности:
Прежде чем начать использовать AppLocker, необходимо правильно настроить политику безопасности. Убедитесь, что включена политика «Application Identity» и «Application Control Policies». Дополнительно может потребоваться настройка других политик безопасности в зависимости от ваших потребностей.
2. Создайте различные правила для разных групп пользователей:
Разные группы пользователей могут иметь различные требования в отношении доступа к программам. Создание разных правил для разных групп пользователей поможет установить точный уровень доступа к программам и обеспечить безопасность данных.
3. Регулярно обновляйте правила AppLocker:
Новые программы постоянно появляются, поэтому важно регулярно обновлять правила AppLocker, чтобы быть в курсе всех новых приложений, которые ваши пользователи могут использовать. Это поможет избежать блокировки необходимых программ и обеспечит более точную защиту.
4. Тестирование перед внедрением:
Перед внедрением AppLocker на реальных компьютерах, важно провести тестирование на тестовой среде. Проверьте, что все правила работают корректно и не блокируют разрешенные программы. Тестирование поможет избежать возможных проблем и снизит риск блокировки необходимых приложений.
5. Мониторинг и анализ:
После внедрения AppLocker важно постоянно мониторить и анализировать логи событий, чтобы выявить любую подозрительную активность. Это поможет обнаружить попытки нарушения безопасности и предпринять необходимые меры.
| Практика | Описание |
|---|---|
| Правильно настроить политику безопасности | Убедитесь, что включены необходимые политики безопасности для использования AppLocker |
| Создайте различные правила для разных групп пользователей | Установите точный уровень доступа к программам для каждой группы пользователей |
| Регулярно обновляйте правила AppLocker | Обновляйте правила AppLocker, чтобы быть в курсе новых программ |
| Тестирование перед внедрением | Проведите тестирование на тестовой среде перед использованием AppLocker на реальных компьютерах |
| Мониторинг и анализ | Мониторинг логов событий и анализ подозрительной активности |
Следуя этим лучшим практикам, вы сможете эффективно использовать AppLocker и обеспечить безопасность программ на компьютерах, работающих на Windows Server 2016.
Решение проблем с AppLocker
- Проблема 1: Приложение не запускается после настройки правил AppLocker. Если после настройки правил AppLocker приложение не запускается, в первую очередь стоит проверить правильность конфигурации правил. Убедитесь, что правила позволяют запуск нужных приложений. Также, убедитесь, что размер исполняемого файла не превышает максимально допустимое значение (по умолчанию 20 МБ).
- Проблема 2: Bloсk уровень не блокирует нежелательные приложения. Если приложение, которое должно быть заблокировано на уровне Bloсk, все равно запускается, возможно, оно запускается из недоступной области (например, съемного устройства или сетевой папки). Дополнительно проверьте системной журнал событий на предмет появления ошибок с AppLocker.
- Проблема 3: Все приложения блокируются после включения AppLocker. Если после включения AppLocker все приложения стали недоступными для запуска, возможно, вы настроили правила неправильно. Убедитесь, что правила позволяют доступ к нужным приложениям. Также, убедитесь, что активирована возможность использования папки с исполняемыми файлами для разрешения запуска приложений.
- Проблема 4: Правила AppLocker неправильно работают после обновления операционной системы. Если после обновления операционной системы правила AppLocker перестали работать, рекомендуется проверить, что все настройки и правила правильно передались в новую версию системы. Возможно, при обновлении произошли изменения, которые повлияли на конфигурацию AppLocker.
Если вы не можете самостоятельно решить возникшие проблемы с AppLocker, рекомендуется обратиться к документации Windows Server 2016 или к специалистам технической поддержки.
We can implement AppLocker rules using group policy in a Windows domain to limit the execution of arbitrary executable files. AppLocker takes the approach of denying all executables from running unless they have specifically been whitelisted and allowed.
AppLocker is available in Windows Server 2008 R2 and newer, and Windows 7 Enterprise edition or newer on the client side. Note that it’s only available for particular editions, for example in Windows 10 you need Enterprise edition to make use of AppLocker. The AppLocker requirements can be found here.
Note that before you implement AppLocker rules in a production environment it is important to perform thorough testing. AppLocker will not allow anything to run unless it has been explicitly whitelisted, which could cause problems in your environment if users are not able to run required software to do their job.
This post is part of our Microsoft 70-744 Securing Windows Server 2016 exam study guide series. For more related posts and information check out our full 70-744 study guide.
Rule Types
Before proceeding let’s discuss the types of rules that we can create with AppLocker.
- Executable Rules: These rules apply to executables, such as .exe and .com files.
- Windows Installer Rules: These rules apply to files used for installing programs such as .msi, .mst and .msp files.
- Script Rules: These rules apply to scripts such as .bat, .js, .vbs, .cmd, and .ps1 files.
- Packaged App Rules: These rules apply to the Windows applications that may be downloaded through the Windows store with the .appx extension.
With each of these rules we can whitelist based on the publisher, path, or file hash.
- Publisher: This method of whitelisting items is used when creating default rules as we’ll soon see, it works based on checking the publisher of the executable and allowing this. If the publisher, file name or version etc change then the executable will no longer be allowed to run.
- Path: Executables can be whitelisted by providing a folder path, for example we can say that anything within C:executables is allowed to be run by a specific active directory user group.
- File Hash: While this may be the most secure option, it is inconvenient to work with and manage. If a file changes at all, for instance if an executable is updated, it will not be allowed to run as the allowed hash will have changed too.
Now we’ll actually implement AppLocker rules using group policy.
Implement AppLocker Rules
We’ll start by opening Server Manager, selecting Tools, followed by Group Policy Management.
From the Group Policy Management window that opens, we’ll select the group policy objects folder within the domain, right click and select new to create a new group policy object (GPO). In this case we’ll create one called AppLocker.
Once the base GPO has been created, right click it and select Edit. This will open the Group Policy Management Editor (GPME). From within GPME, select Computer Configuration > Policies > Windows Settings > Security Settings > AppLocker Control Policies > AppLocker.
From here we can view the main AppLocker interface where we can create executable, windows installer, script, and packaged app rules. We can get started with the default settings by clicking the “Configure rule enforcement” link on this screen which opens up the following window.
By default each of these four items is unticked and not enabled, we can tick the box next to “Configured” to enable it. This will set the rule to “Enforce rules” by default, however we can optionally click the drop down to change it to “Audit only” which will allow executable files to run and only log the action. In this case we’ll enable all items, leave them on enforcing, and click OK to save the settings.
Now that the rules are enforcing, we need to set the actual rules themselves. We’ll first create default AppLocker rules, followed by automatic AppLocker rules, and end with a custom AppLocker rule.
Default AppLocker Rules
We’ll first create the default rules, these are a baseline set of rules that still allow the operating system and built in applications to function normally. Right click the “Executable Rules” and select “Create Default Rules” as shown below.
We can see the default rules that have been created below.
These default rules allow all users to to execute files within the Program Files and Windows folders. Additionally, local administrators are able to execute anything anywhere, so it’s still important that administrator accounts only be used for administrative tasks, while standard user accounts are used everywhere else. If any of these actions are not desirable for you, simply delete or modify the rule.
We can also right click “Windows Installer”, “Script Rules”, and “Packaged App Rules” and create default rules there as well. With these default rules in place, if a non administrative user attempts to execute anything that is not within the directories specified above, they will receive an error.
Automatically Generate AppLocker Rules
While these default rules are a good starting point, ideally we should further customize the rules as per your organizational requirements. We can right click these items, and again we’ll select “Executable Rules”. Rather than “Create Default Rules” as shown previously select “Automatically Generate Rules”.
Note that this will generate custom rules based on the computer that you’re generating them on, in this case our domain controller where GPME is open. Ideally you would want to create AppLocker rules on a SOE image so that common elements that are deployed to all machines can have rules created for them.
From the Folder and Permissions window, we’ll just leave the defaults shown below and click next to proceed.
Next on the rule preferences screen we’ll leave the default and create publisher rules for files that are digitally signed. While using hashes is considered quite secure, it is also pretty inconvenient as new hashes would be required every time a file is updated or modified.
Finally on the review rules window, we can check the rules that will be created. Click the create button to proceed.
We’ll see an AppLocker warning advising that we should first create the default rules, select yes if you have not already created them as shown previously.
We can now see that our rules have been created.
Once the executable rules have been created for Executable Rules, we can do the same for Windows Installer Rules, Script Rules, and Packaged App Rules.
Custom AppLocker Rules
We can also create complete custom rules by right clicking any of the 4 rule items and selecting “Create Rule”.
On the before you begin page, click next.
On the permissions page, select if you want to allow or deny access and to the user or group in which it should apply.
On the conditions page, select if we want to allow or deny based on publisher, path, or file hash as discussed previously.
In this example I’ve selected path, so after clicking the browse folders button I can browse to the folder that I want to allow.
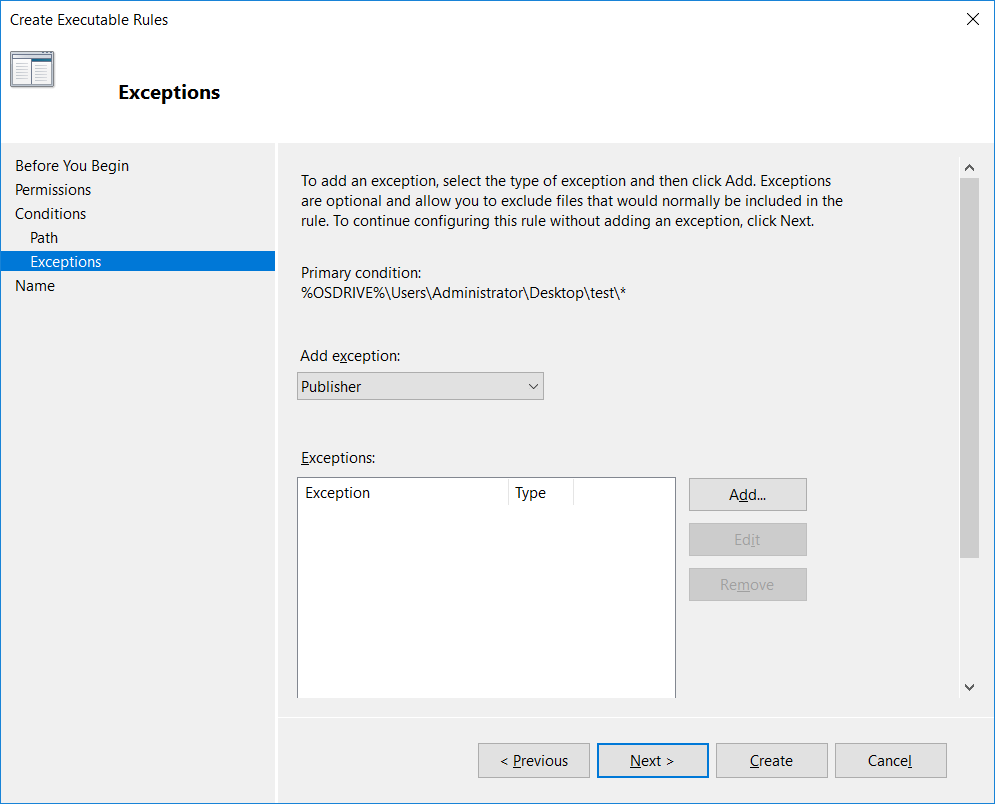
We can optionally add exclusions here, for instance we may want to allow a user to execute everything on their desktop except for a specified file.
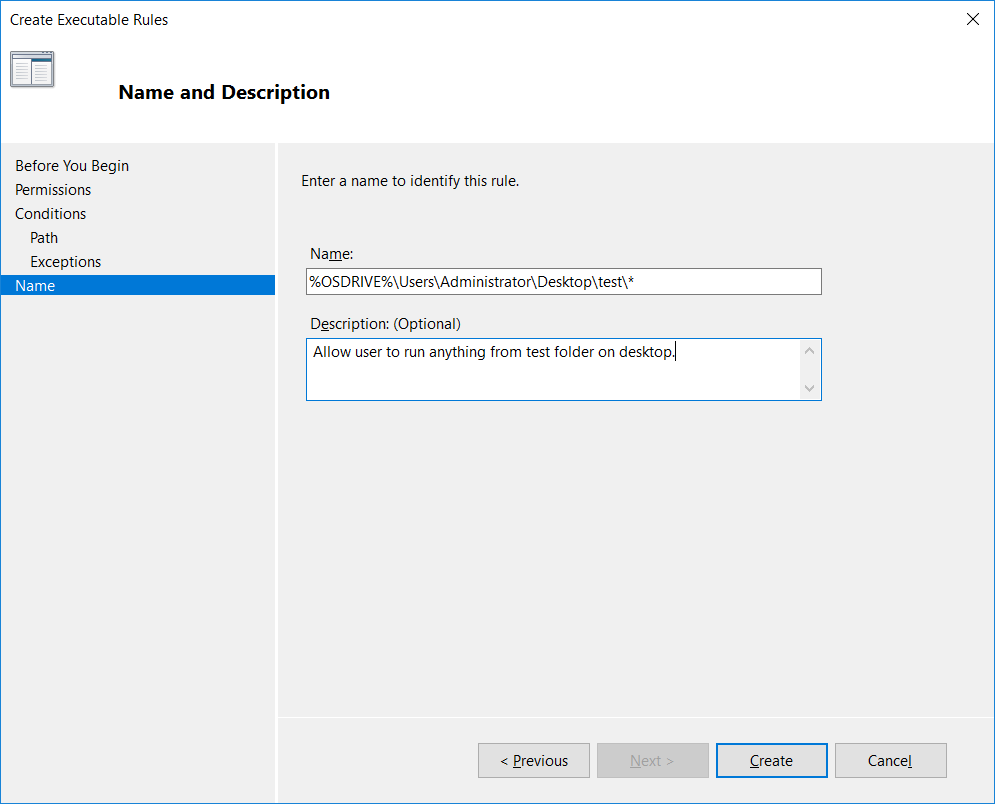
Finally we can give our custom rule a name and description, by default the name will be automatically populated.
We can now see a summary of our custom rule below the default rules that we created earlier, confirming that it’s now active.
In order for AppLocker rules to work correctly, the client must be running the AppIDSvc service. Even if we implement AppLocker rules with group policy if the service is not actually running they will not be enforced.
Summary
We have used group policy to implement AppLocker rules within our Windows environment, preventing untrusted executable files from running which will help defend against a lot of security threats in Windows.
This post is part of our Microsoft 70-744 Securing Windows Server 2016 exam study guide series. For more related posts and information check out our full 70-744 study guide.
Applocker is a feature that gives you another one Level of security
The purpose is to restrict or allow the access in software’s to the specific group of users.
It’s not a new technology but you can protect your data from threads.
Today lot of application aren’t need administrator access to run. As IT Pro this is a threat for your environment.
While install and configure Applocker can increase the cybersecurity and protect your data from any unathorise access.
If you are thinking why to use Applocker the answer is here.
You can use it to protected against unwanted software , Software standardization , Software management.
If you want to more details you can read the AppLocker policy use scenarios in Microsoft Docs.
Today i will install and Deploy through GPO Applocker in specific Servers.
Applocker can be deploy in the following Windows Versions
- Windows 10 Enterprise
- Windows Server 2012,2016,2019
So let’s start !!
- Before start to implement Applocker you must be know exactly which Applications must be allow to run.
- This is the most important step because if you try to apply Applocker without note down what Applications must be allow then you will create lot of problems in your users and the daily operation of your company.
- In case that you are not sure 100% which is the Applications that must be allow you can use Applocker in Audit Mode to identify all the applications.
How to enable Applocker
-
Login in the Domain Controller and open the Group Policy Management.
-
Right click in the Organization Until that you want to create the Applocker Policy and select Create a GPO in this Domain and link it here.

- Type the preferred name and click OK
- Now click on the new Policy and in Security Filtering click Add and select Domain Computers Group or any other Group that you have create and include the Servers or Workstations that you would like to deploy it.
- Remember to included in the specific Organization Unit which has Link the Applocker GPO.
- Unless you must link the GPO in the Organization Units which included all the Server or Workstations that you want deploy the Applocker

- Right click in the new Policy and select Edit
- Go in Computer ConfigurationWindows SettingsSecurity SettingsApplication Control PoliciesApplocker
- Expand the Applocker
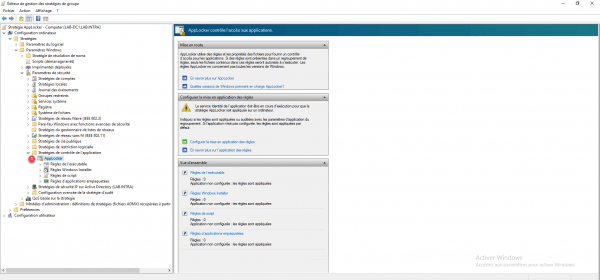
- Right click in Executable Rules and select Create Default Rules

- The Default Rules are
- All files located in the Program Files folder
- All files located in the Windows folder
- All files for the BuiltinAdministrators Group.
- Until familiarize with Applocker It’s recommended to create and leave these Rules in the beginning because you don’t want to break things.

- Right click in Applocker and select Properties.
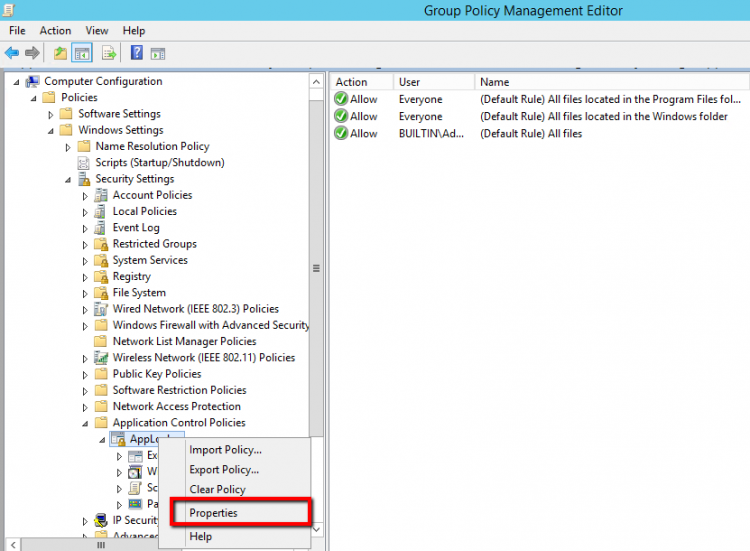
- Check the Configured and select the Audit Only.

- The Audit Only mode it’s not Allow or Deny just write down Logs in Event Viewer.
- With this way we can identify all the Applications that must run or not before start to Execute Applocker Rules.
How to configure Applocker Group Policy
We don’t want to create any Rule until verify that Applocker works without problems.
So what we can do ?
We can Deploy Applocker in a Test Server and not in Production Server until familiarize and identify any issue.
- To run the Applocker you must start the Application Identity Service in the Server that you would like to deploy.
- In the Applocker GPO go in Computer ConfigurationWindows SettingsSecurity SettingSystem Services.
- Find the Application Identity Service

- Right click in the Service and select Properties.
- Check the Define this policy Settings
- Check the Automatic.
- Click OK
- Now when you apply the Applocker GPO the Application Identity service will start.

- Login in the Server that you want to Deploy the Applocker open a Command Prompt and run gpupdate /force
- Restart the Server
How to verify that Applocker Run in the Server or Workstation
After the server restart we must verify that the Applocker is run
-
Open the Event Viewer
- Expand Application and Services LogsMicrosoftApplocker.
- Click on Execute DLL
- Verify that the Event ID 8001 exist

How to Create an Applocker Rule
Now that we have see which Application run in our Server we can create the Applocker Rules that we need.
-
Open the Applocker GPO
- Right click in Executable Rules and select Create New Rule

- Click Next

- Identify if you want to Allow or Deny and select the Appropriate Group

- Select how you want to Identify the Application.

- Note that if you select the Path because the Domain Controller will not has the Application to go from Path you can do the following.

- Open the Event Viewer in the Server or Workstation that run the Applocker and copy/paste the Path from the Logs.

- Now click Next.
- Again Next except if you want to add an Exception

- Type the Name and click Create.

- Go in Server or Workstation and check if the Rule apply
- How to do it?
- Expand Application and Services LogsMicrosoftApplocker.
- Click on Execute DLL
- Verify that the Event ID 8002 with your application exist
That’s it.
Applocker it’s not very difficult to apply.
The difficult part is to be prepare with all the requirements before apply the Applocker to avoid break things in your environment.
— — > Follow my next article which explain How to collect Applocker Logs from all Endpoints in one place
You can send me an email at info@askme4tech.com or do your comments in Twitter or Facebook
I invite you to follow me on Twitter or Facebook. If you have any questions, send email to me at info@askme4tech.com.
Sommaire
- Presentation
- Prerequisites
- GPO : AppLocker configuration
- Validate the functioning of AppLocker
- Conclusion
Presentation
In this tutorial, we will see how to configure AppLocker in an Active Directory environment using group policies.
AppLocker is a Windows feature that is similar to a firewall at the application level.
AppLocker allows you to control the applications running on computers.
AppLocker is able to act on:
- Executables (.exe).
- Windows Installer (msi, msp …).
- The scripts.
- Application packaged (application store).
AppLocker acts through 3 possible conditions:
- Editor: which will allow you to configure information about the file (editor, version, etc.).
- Path: this condition defines the location of the file or the folders. The wildcard * is allowed.
- Hash the file.
AppLocker can be used in 2 ways:
- Audit mode: allows you to see the applications used, generally this mode is used before deployment.
- Apply mode: the rules are applied and the blocking effective.
As mentioned at the beginning, BitLocker acts as a firewall and therefore what is not explicitly authorized by a rule is blocked.
To illustrate the use of AppLocker in this tutorial, we will prohibit the execution of executable except the default locations Then to validate the proper functioning, we will launch putty.exe from the desktop of the user, which should be blocked by AppLocker.
As you can see, AppLocker allows you to increase the level of security by controlling the programs executed.
Personally, I find this solution very practical for blocking portable applications and also for preventing users from installing certain programs in their profile folder. (This method used by some software to bypass restrictions).
Prerequisites
AppLocker works on :
- Windows Server
- Windows 10 Enterprise
- Windows 10 Education
The Application Identity service (AppIDSvc) must be started.
Since Windows 10 and 2016, it is no longer possible to configure the AppIDSvc service via GPO.
You have to go through a script :
sc.exe config appidsvc start=autoor configure the service to start automatically on the image.In a deployment with MDT, it is possible to execute the command in the task sequence.
https://docs.microsoft.com/en-us/windows/security/threat-protection/windows-defender-application-control/applocker/configure-the-application-identity-service
To avoid applying the policy to Computers without fully configuring it, create a new Group Policy in the Group Policy Object container. Right click on the container 1 and click on New 2.

Name the group policy and click OK to create it.
Right click on the 1 group policy and click on Edit 2.

To access the settings for Applocker 1, go to the Computer configuration / Policies / Windows settings / Security settings / Application control policies location.
From the Applocker node, on the right-hand side is displayed an overview of the configuration and links to Microsoft documentation. By unfolding AppLocker you access the different element that AppLocker can “control”.
The first step is to create the default rules for each element that AppLocker can control, as a reminder once AppLocker is activated, anything that is not explicitly authorized is prohibited. Start the operation for Executable rule. Right click on it 1 and click on Create default rules 2.

A default rule list is created 1.

To add a custom rule, right-click in the central area then click on Create rule, just follow the wizard for creation.
Create the default rules for:
- Windows Installer
- Scripts
- Packaged app
Return to the AppLocker node 1 and click on Configure the application of rules 2.

For each type of executable, check the Configured 1 box and choose on the rule is applied or audited 2, once configured click on Apply 3 and OK 4.

Close the Group Policy Editor, here is an overview of the settings for AppLocker:

Now that the strategy is ready, you have to link it to an OU.
Right click on the OU where the policy should be linked 1 and click on Link an existing group policy object 2.

Select the strategy 1 and click on OK 2.

The policy is linked 1 and will be applied to Computer objects that depend on the OU.

Validate the functioning of AppLocker
On a computer where the policy applies, verify that the Application Identity service (AppIDSvc) is started.

To verify proper operation, download for example putty and launch it.

A warning message is displayed explaining that the application has been blocked.

A trace is also added in the Windows event viewer with ID 8004. The AppLocker logs can be found in: Application and servide logs / Microsoft / Windows / AppLocker.

Conclusion
AppLocker is an easy-to-deploy security solution that increases the level of security by preventing unwanted applications from running.
In order to increase the security level of RDS servers, AppLocker is an easy solution to set up. For workstations, it is necessary to acquire Enterprise licenses.
Ressources complémentaires :
- Documentation Microsoft AppLocker.
- Cmdlets PowerShell.
- Comprendre les règles AppLocker et l’héritage des paramètres d’application dans la Stratégie de groupe.
AppLocker rules can be set up by using group policy in a Windows domain and have been very useful in limiting the execution of arbitrary executable files. AppLocker takes the approach of denying all executables from running unless they have specifically been whitelisted and allowed.
AppLocker is available in Windows Desktop and Servers. Desktop Windows require Enterprise Editions.
The AppLocker requirements can be found here.
Note: before implementing AppLocker rules in a production environment it is important to perform thorough testing. AppLocker will not allow anything to run unless it has been explicitly whitelisted. So keep in mind those non-standard installs to the system root or other drives (C: or E:).
AppLocker Rule Types:
- Executable Rules: These rules apply to executables, such as .exe and .com files.
- Windows Installer Rules: These rules apply to files used for installing programs such as .msi, .mst and .msp files.
- Script Rules: These rules apply to scripts such as .bat, .js, .vbs, .cmd, and .ps1 files.
- Packaged App Rules: These rules apply to the Windows applications that may be downloaded through the Windows store with the .appx extension.
With each of these rules, we can also whitelist based on the publisher, path, or file hash.
- Publisher: This method of whitelisting items is used when creating default rules as we’ll soon see, it works based on checking the publisher of the executable and allowing this. If the publisher, file name or version etc change then the executable will no longer be allowed to run.
- Path: Executables can be whitelisted by providing a folder path, for example, we can say that anything within C:tools is allowed to be run by a specific active directory user group.
- File Hash: While this may be the most secure option, it is inconvenient to work with and manage. If a file changes at all, for instance, if an executable is updated, it will not be allowed to run as the allowed hash will have changed too.
AppLocker Configuration:
- Open Server Manager, selecting Tools, followed by Group Policy Management.
- From the Group Policy Management window that opens, we’ll select the group policy objects folder within the domain, right click and select new to create a new group policy object (GPO). In this case, we’ll create one called AppLocker Rules.
- From within the Group Policy Management Editor (GPME). Select Computer Configuration > Policies > Windows Settings > Security Settings > Applications Control Policies > AppLocker

- In the main AppLocker interface where we can create executable, windows installer, script, and packaged app rules. We can get started with the default settings by clicking the “Configure rule enforcement” By default each of these four items is unticked and not enabled, we can tick the box next to “Configured” to enable to set the rules to be “Enforced”.

This post is part of our Microsoft 70-744 Securing Windows Server 2016 exam study guide series. For more info: https://www.microsoft.com/en-us/learning/exam-70-744.aspx
-
Tags
AppLocker, Security, Server 2016, Windows Server
Malware — computer viruses, worms, Trojan horses, ransomware, spyware and so one — is a continuous threat to organizations because it can damage devices and enable unauthorized parties to access the network remotely to collect and transmit sensitive information. Windows Server 2016 includes the following tools and features to help mitigate the threat of malware:
- Windows Defender Security Center App
- Windows Defender Device Guard
- Control Flow Guard
- Software Restriction Policies (SRPs)
- AppLocker
- Security Compliance Toolkit
Windows Defender Security Center App
The Windows Defender Server 2016 Security Center app can help you identify and remove malware from computers and other devices in your environment. Here is some of the information and functionality it provides:
- Virus & threat protection. Includes information about and access to antivirus settings and the Controlled folder access feature of Windows Defender Exploit Guard.
- Device performance & health. Provides information about drivers, storage space and Windows Update.
- Firewall & network protection. Includes information about and access to firewall settings, including Windows Defender Firewall settings.
- App & browser control. Includes exploit-protection mitigations and Windows Defender SmartScreen settings.
- Family options. Includes access to parental controls and family settings.
Windows Defender Device Guard
Windows Defender Device Guard is a suite of security features introduced in Windows Server 2016. When you turn it on, instead of trusting all apps except those blocked by an antivirus or other security solution, the operating system will run only the applications on a whitelist your organization defines.
Windows Defender Device Guard uses virtualization-based security to isolate the code-integrity service from the Windows kernel. Windows Defender Device Guard can block any software, even if an unauthorized user manages to take control of the operating system. You can choose exactly what can run inside your environment by using a code-integrity policy to protect your environment.
Windows Defender Device Guard is not a single feature. It’s a combination of several features, such as:
- Virtual Secure Mode. A virtual shell that isolates the ISASS.exe process from the operating system, which reduces the risk that malicious users will compromise your users’ domain credentials
- Windows Defender Application Control. A Windows component that provides a rules engine to help ensure executable security
- Virtual Secure Mode Protected Code Integrity. Moves the Kernel Mode Code Integrity (KMCI) and Hypervisor Code Integrity (HVCI) components into virtual secure mode to harden them from attack.
- Platform and UEFI Secure Boot. Secure Boot provides a high-value security benefit by using signatures and measurements to help protect boot-loader code and firmware from tampering.
Control Flow Guard
CFG is a platform security feature that helps prevent memory-corruption vulnerabilities. CFG places restrictions on where an application can execute code, which makes it harder for malicious hackers to execute subjective code through common vulnerabilities, such as buffer overflows. CFG monitors and checks certain aspects of a program’s control flow, including where execution changes from straight sequential instruction. The technology that supports CFG ensures that all indirect calls result in a jump to legal targets. Malicious hackers will supply uncommon input to a running program to make it perform unexpectedly.
Software Restriction Policies (SRPs)
One of the best ways to help block malicious software and other cyber threats is to limit or restrict the software that can run in an enterprise environment.
One option is to use SRPs, which enable administrators to create rules that specify which applications can run on client devices. Rules are based on one of the following criteria:
- Hash. The cryptographic fingerprint of the file
- Certificate. A software publisher certificate that signs a file digitally
- Path. The local or Universal Naming Convention (UNC) path to where the file is stored
- Zone. The internet zone
AppLocker is another way to control which applications users can run. You can apply AppLocker through Group Policy to computer objects within an organizational unit (OU). You also can apply individual AppLocker rules to individual Active Directory Domain Services (AD DS) users or groups. AppLocker also contains options that you can use to monitor or audit the application of rules.
For example, you can use AppLocker to restrict software that:
- You do not want anyone to use in your company.
- Employees don’t use or that you have replaced with a newer version.
- Your company no longer supports.
- Software that only specific departments should use.
You can configure the settings for AppLocker at the following location in GPMC: “Computer ConfigurationPoliciesWindows SettingsSecurity SettingsApplication Control Policies”.
Security Compliance Toolkit (SCT)
To help protect against security threats, organizations must have well-designed security policies that cover most organizational and IT-related components. Security policies should establish a baseline for a server’s fundamental security and then ensure that baseline is applied to all servers.
SCT is a set of free Microsoft tools that administrators can use to help secure the computers in their environment, regardless of whether the computers reside locally, remotely or in the cloud. You can download Microsoft-recommended security configuration baselines; test, edit and store them; and apply them to your servers. You can also compare your current GPOs with the baselines.
The main features of SCT include:
- Policy Analyzer. Enables you to analyze and compare sets of Group Policy objects (GPOs)
- Local Group Policy Object Utility. Helps automate management of local Group Policy, including importing settings from Group Policy backups, registry policy files, security templates, and advanced-auditing backup CSV files that the Policy Analyzer generates

Product Evangelist at Netwrix Corporation, writer, and presenter. Ryan specializes in evangelizing cybersecurity and promoting the importance of visibility into IT changes and data access. As an author, Ryan focuses on IT security trends, surveys, and industry insights.

Hi,
After a good deal of research on how to lock down Server Manager on a Windows 2016 Session Host, I found AppLocker.
I implemented a GPO rule on a Windows 2016 Domain Controller to block Server Manager and it worked perfectly.
Then I found I could not open the Start Menu.
My research led me to the fact that this seems to be a known problem. Has it been fixed, will it be fixed, or have I made a mistake?
I performed these tasks on both Hyper-V VM servers:
- SFC /scannow (found some errors it could not fix)
- Dism /Online /Cleanup-Image /CheckHealth (reported fixing the errors
- SFC /scannow (ran clean)
The first article referenced here reports fixing AppLocker/Start Menu by Creating Default Rules:
http://justforadmins.blogspot.com/2016/09/fixed-windows-10-start-button-does-not.html
I did the above, and it did not work.
The second article reports that turning off AppLocker is tricky, but following these steps did restore my Start Menu (and I cannot use AppLocker):
https://technet.microsoft.com/en-us/library/hh310286(v=ws.10).aspx
========================
Conclusion: AppLocker seems to be the perfect choice for what I want to accomplish. Is this product not in a working state? I have seen recommendations that administrators in my situation should open a case with Microsoft, but that is too expensive for us.
It also does not seem like our responsibility to pay for this.
========================
Are there suggestions — or at least confirmations that this is a known problem that cannot be solved?
Thank you for your assistance,
Frank
Skip to content
Group Policy Application Locker Configuration
Home/Windows/Group Policy Application Locker Configuration
Group Policy Application Locker Configuration
This tutorial will show you how to configure group policy application locker on Windows 2012 server.
This tutorial will show you how to block all applications installation or execution.
This tutorial will show you how to allow a specific application to run.
This will help your computer environment in compliance with international information security certifications like ISO 27001.
The domain controller is running Windows 2012 R2.
The domain computers are running Windows 7 and Windows 10.
Application locker will work on Windows Enterprise or Ultimate edition.
Application locker will not work on Windows professional edition.
Hardware List:
The following section presents the list of equipment used to create this Windows tutorial.
Every piece of hardware listed above can be found at Amazon website.
Windows Playlist:
On this page, we offer quick access to a list of videos related to Windows.
Don’t forget to subscribe to our youtube channel named FKIT.
Windows Related Tutorial:
On this page, we offer quick access to a list of tutorials related to Windows.
Tutorial — Creating the Application Locker GPO
The following tasks were executed on a domain controller running Windows 2012 R2 with Active directory.
Click on the Start menu, locate and open the Group Policy Management tool.

On the Group Policy Management screen, locate the folder named Group Policy Objects.
Right-click the Group Policy Objects folder and select the New option.

Enter a name for your new policy.

In our example, the new GPO was named: SOFTWARE POLICY.
On the Group Policy Management screen, expand the folder named Group Policy Objects.
Right-click your new Group Policy Object and select the Edit option.

On the group policy editor screen, you will be presented to User configurations and Computer configurations.
We will change only the Computer configurations.
We don’t need to change any User configuration.
First, we need to configure the Windows service named Application Identity to start automatically.
On the group policy editor screen, expand the Computer configuration folder and locate the following item.
• Computer Configuration > Windows Settings > Security Settings > System Services

On the right, the list of available services for Windows will be presented.

Double click the configuration item named Application Identity.
On the configuration item screen, you need to select the Automatic option.

In order to the Application locker to work the domain computers need to have the Application identity service running.
Tutorial — Configuring the Application Locker GPO
On the group policy editor screen, expand the Computer configuration folder and locate the following item.
• Computer Configuration > Windows Settings > Security Settings > Application Control Policies> AppLocker

On the right, the configuration items available for the Application locker policy will be presented.

Click on the configuration item named Configure Rule enforcement.
The Applocker properties window will be presented.

Enable the Executable rules and select the Enforce rules option.
Enable the Windows Installer rules and select the Enforce rules option.
Enable the Packaged App rules and select the Enforce rules option.
Click on the OK button.

Next, we need to create the default software rules.
Right-click on the Executables Rules policy and select the Create default rules option.
To finish the group policy creation you need to close the Group policy editor window.
Only when you close the group policy window, the system will save your configuration.

The executable default rules state the following:
Every EXE file inside the Windows folder is allowed to be executed.
Every EXE file inside the Program files folder is allowed to be executed.
The Administrators group members are allowed to execute any EXE file.
To authorize another application, right-click on the Executable rules and select the Create new rule option.

Right-click on the Windows installer Rules and select the Create default rules option.
To authorize another application, right-click on the Windows installer rules and select the Create new rule option.

Right-click on the Package App rules and select the Create default rules option.

To finish the group policy creation you need to close the Group policy editor window.
Only when you close the group policy window, the system will save your configuration.
Tutorial — Applying the Application Locker GPO
You have finished the creation of the Application locker GPO.
But, you still need to enable the use of your new Group Policy.
On the Group policy management screen, you need to right-click the Organizational Unit desired and select the option to link an existent GPO.

In our example, we are going to link the group policy named SOFTWARE POLICY to the root of our domain named TECH.LOCAL.

After applying the GPO you need to wait for 10 or 20 minutes.
During this time the GPO will be replicated to other domain controllers that you might have.
After waiting 20 minutes, you should reboot a user’s computer.
During the boot, the computer will get and apply a copy of the new group policy.
To test the configuration, you need to login on a domain computer, download any software and try to run it.
Your computer should automatically block any application that is not specifically allowed on the GPO to run.

VirtualCoin CISSP, PMP, CCNP, MCSE, LPIC22018-07-09T18:50:26-03:00
Related Posts
Page load link
This website uses cookies and third party services.
Ok
AppLocker rules can be set up by using group policy in a Windows domain and have been very useful in limiting the execution of arbitrary executable files. AppLocker takes the approach of denying all executables from running unless they have specifically been whitelisted and allowed.
AppLocker is available in Windows Desktop and Servers. Desktop Windows require Enterprise Editions.
The AppLocker requirements can be found here.
Note: before implementing AppLocker rules in a production environment it is important to perform thorough testing. AppLocker will not allow anything to run unless it has been explicitly whitelisted. So keep in mind those non-standard installs to the system root or other drives (C:\ or E:\).
AppLocker Rule Types:
- Executable Rules: These rules apply to executables, such as .exe and .com files.
- Windows Installer Rules: These rules apply to files used for installing programs such as .msi, .mst and .msp files.
- Script Rules: These rules apply to scripts such as .bat, .js, .vbs, .cmd, and .ps1 files.
- Packaged App Rules: These rules apply to the Windows applications that may be downloaded through the Windows store with the .appx extension.
With each of these rules, we can also whitelist based on the publisher, path, or file hash.
- Publisher: This method of whitelisting items is used when creating default rules as we’ll soon see, it works based on checking the publisher of the executable and allowing this. If the publisher, file name or version etc change then the executable will no longer be allowed to run.
- Path: Executables can be whitelisted by providing a folder path, for example, we can say that anything within C:\tools is allowed to be run by a specific active directory user group.
- File Hash: While this may be the most secure option, it is inconvenient to work with and manage. If a file changes at all, for instance, if an executable is updated, it will not be allowed to run as the allowed hash will have changed too.
AppLocker Configuration:
- Open Server Manager, selecting Tools, followed by Group Policy Management.
- From the Group Policy Management window that opens, we’ll select the group policy objects folder within the domain, right click and select new to create a new group policy object (GPO). In this case, we’ll create one called AppLocker Rules.
- From within the Group Policy Management Editor (GPME). Select Computer Configuration > Policies > Windows Settings > Security Settings > Applications Control Policies > AppLocker
- In the main AppLocker interface where we can create executable, windows installer, script, and packaged app rules. We can get started with the default settings by clicking the “Configure rule enforcement” By default each of these four items is unticked and not enabled, we can tick the box next to “Configured” to enable to set the rules to be “Enforced”.
This post is part of our Microsoft 70-744 Securing Windows Server 2016 exam study guide series. For more info: https://www.microsoft.com/en-us/learning/exam-70-744.aspx
-
Tags
AppLocker, Security, Server 2016, Windows Server