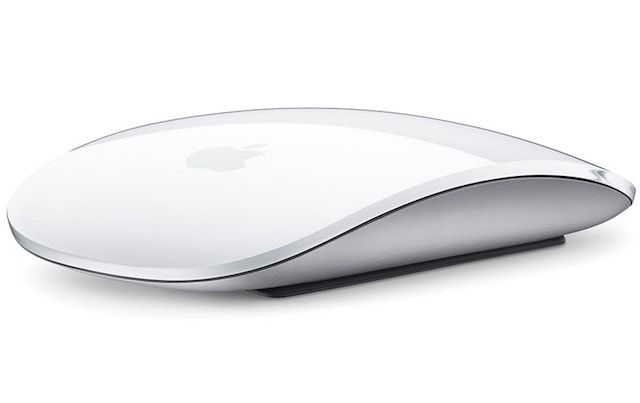
Apple Magic Mouse – возможно, самая необычная компьютерная мышь в мире. Почему? У неё есть всего одна кнопка, а поверхность распознает мультитач-жесты, так что происходящим на экране компьютера можно управлять жестами – так же, как на iPhone или iPad. Хотите попробовать такую мышку на своём ПК на Windows?
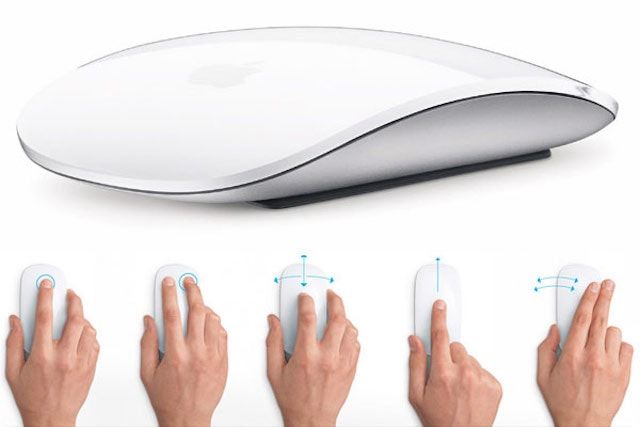
Подключить Magic Mouse к компьютеру на Windows просто – достаточно включить на ПК модуль Bluetooth. Но после сопряжения мыши и компьютера вы получите самую обыкновенную мышку, да к тому же ещё и однокнопочную. Все «сочные» фишки вроде нажатия в любой точке, нажатия правой кнопки мыши двумя пальцами, скроллинга веб-страниц и фотографий двумя пальцами, импульсной прокрутки протестировать не получится. В чём дело?
В позиции Apple, которая сделала Magic Mouse официально совместимой только с компьютерами Mac. Но не расстраивайтесь – уникальные жесты «яблочной» мышки все-таки можно перенести на ПК. Сразу несколько способов по настройке Magic Mouse под Windows предлагается ниже.
Способ I – Magic Mouse Utilities
Самый простой вариант «подружить» мышь Apple с вашим компьютером – набор бесплатных сторонних программ от разработчика Trackpadmagic.
1. Убедитесь, что на вашем ПК есть модуль Bluetooth. Если его нет, приобретите специальный Bluetooth-адаптер. Рекомендуемая модель для покупки – IOGEAR Bluetooth 4.0 USB Micro Adapter (GBU521), он проверен на работу с Magic Mouse. Пожалуйста, имейте в виду – с «яблочной» мышью совместим не каждый адаптер. Так что при прочих равных следует отдать предпочтение именно модели, приведенной выше.
2. Скачайте драйвер Magic Mouse. C его помощью вы сможете подключить мышь к компьютеру на Windows и получить базовую функциональность.
3. Скачайте и установите Magic Mouse Utility. C её помощью вы получите доступ к «продвинутым» функциям вроде скроллинга и возможности следить за уровнем заряда батареи. Условие – утилита должна быть включена всякий раз, когда вы пользуетесь чудо-мышкой Apple. Для этого зайдите в настройки и активируйте автозапуск сразу же после загрузки Windows.
4. Подключите Magic Mouse к ПК через Bluetooth. Если во время сопряжения возникнут проблемы, попробуйте провести сопряжение устройств с кодом 0000.
Способ II – установка драйверов Bootcamp
Bootcamp – набор драйверов для работы «железа» Apple в окружении Windows. Обычно их используют для установки «винды» второй системой на Mac, но подойдут они и в нашем случае.
Идеальный вариант для установки – последовательная установка версий драйверов Bootcamp.
Сделайте следующее:
1. Скачайте Bootcamp 3.0, смонтируйте его образ на диске и запустите файл Setup. После окончания установки перезагрузите ПК.
2. Установите версию Bootcamp 3.1 (32-разрядные ПК, 64-разрядные ПК). Затем снова перезагрузите ПК.
3. Установите Bootcamp версии 3.2 (32-разрядные ПК, 64-разрядные ПК). Перезагрузите компьютер.
Если желания «накатывать» все версии Bootcamp у вас нет, установите два драйвера: AppleWT и AppleMultiTP
Если Magic Mouse по-прежнему не работает:
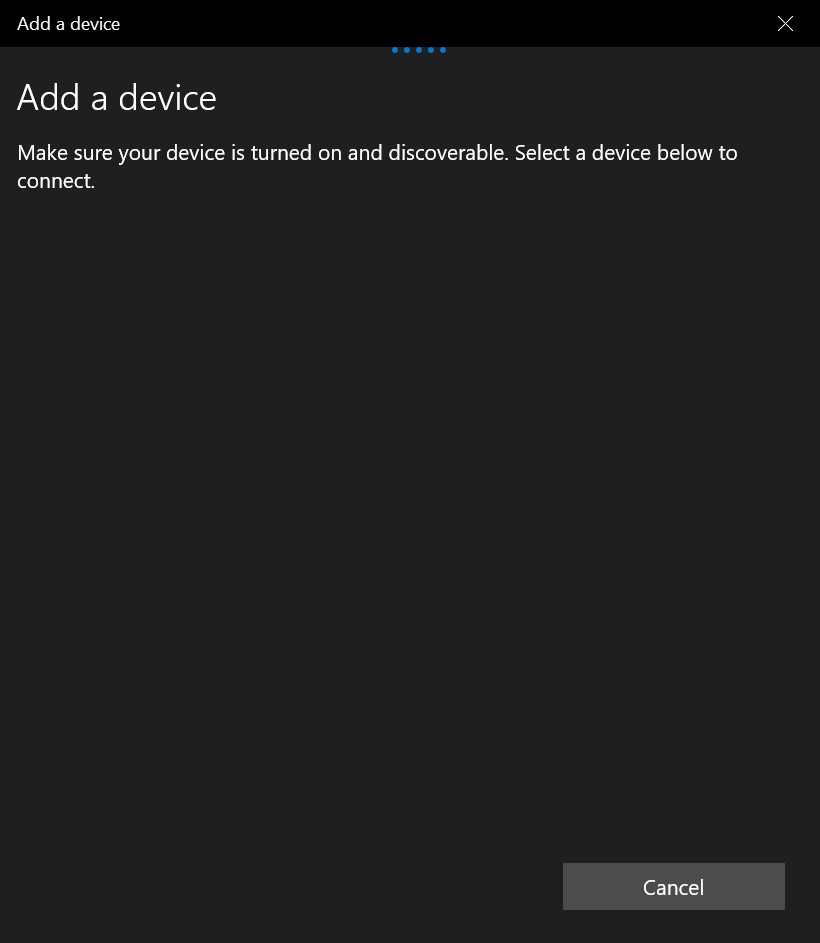
1. Откройте на компьютере раздел настроек Bluetooth, выберите Добавить устройство.
2. Включите Magic Mouse.
3. Когда Windows распознает мышь, добавьте её в список устройств.
Готово! Теперь вы можете опробовать Magic Mouse в действии. Доступны будут не все функции, но самое интересное – жесты, клики, скроллинг – доступны Windows.
Смотрите также:
- Parallels Desktop 11 – улучшенная производительность, поддержка OS X El Capitan и Windows 10.
- Сервис KeyMe или как проникнуть в чужую квартиру при помощи приложения для iPhone.
- Как покупать игры или приложения в App Store без привязки карты.
- Диктовка, или как перевести речь в текст на iPhone и iPad.
- Как просматривать тексты песен из Apple Music на iPhone.
Сегодня будем скрещивать ужа с ежом, то есть подключим яблочную мышку Apple Magic Mouse к Windows 11. К моему удивлению мышка прекрасно подключилась без всяких танцев с бубном по bluetooth, потребовалось всего лишь указать pin-код устройства (0000) и вуаля! Если бы не одно но… физического колёсика у яблочного мыша нет и Windows не понимая что это за зверь невиданный, отказала мне в функции прокрутки.
В этот раз пожалуй соглашусь с хейтерами Apple, что Magic Mouse получилась не самым эргономичным устройством на планете, хотя качество сборки и тактильные ощущения при работе мне нравятся. Потому и прощаю ей многие недостатки. Однако мириться с отсутствием функции прокрутки было выше моих сил (благо, это лечится установкой родных драйверов).
Нужный нам драйвер имеется в составе пакета драйверов Apple Boot Camp. Используется для установки Windows на маки, но можно скачать и отдельно с сайта Apple, для чего переходим по ссылке https://support.apple.com/downloads/boot-camp-support-software
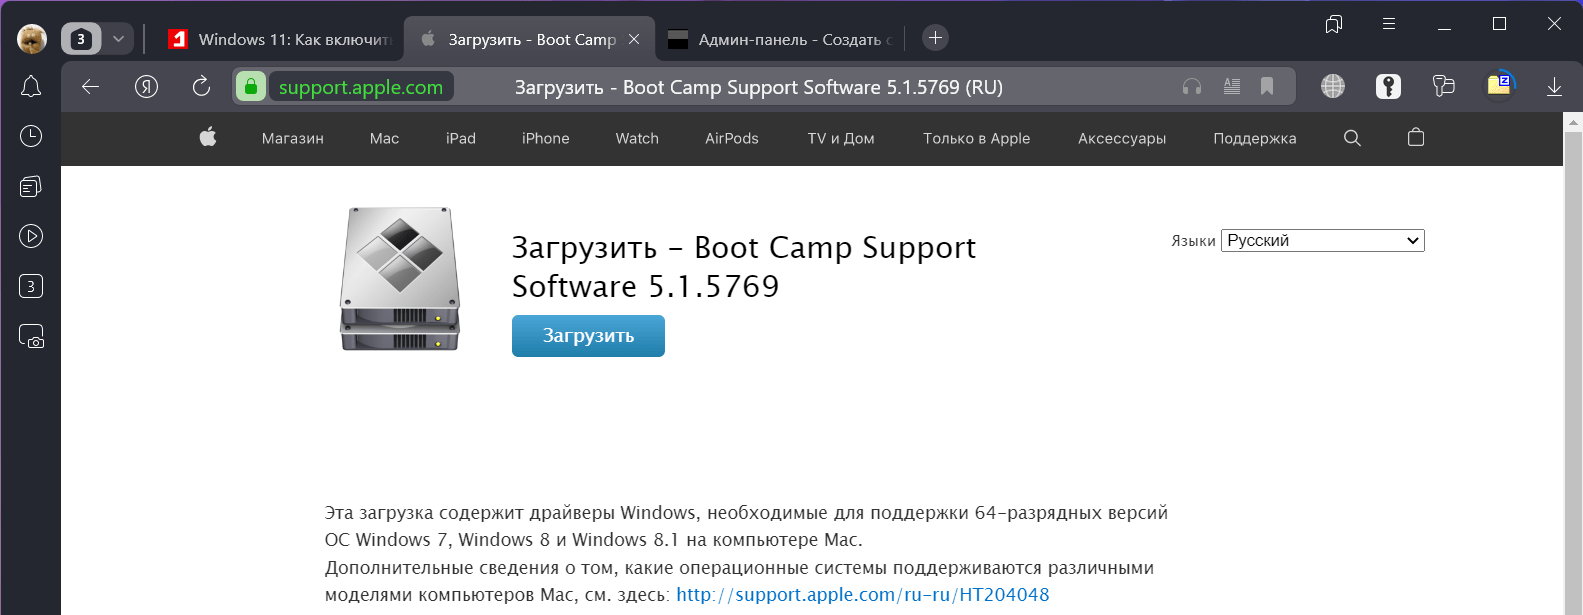
Загружаем самую последнюю версию Boot Camp и распаковываем файл архива. Необходимый нам драйвер AppleWirelessMouse64 лежит в папке BootCamp -> Drivers -> Apple.
Остаётся только запустить установщик и наслаждаться полноценной работой яблочной мышки.
Стоит заметить, что после установки оригинального драйвера скорость движения курсора замедляется (по всей видимости он как-то иначе обрабатывает движение мышки). Наверное я просто привык, что мышь должна носиться по экрану как ошалелая, потому всегда меню эту настройку.
Подписывайтесь на канал
Яндекс.Дзен
и узнавайте первыми о новых материалах, опубликованных на сайте.
Apple offers the Magic series of accessories for Mac computers. It includes Magic Keyboard, Magic Mouse, and Magic Trackpad. All of these accessories are primarily for computers running macOS.
But as all of them use Bluetooth to connect with MacBooks, they can also be connected to a Windows PC as Bluetooth is a universal protocol. If you have a Magic Mouse and want to set up and use it on your Windows PC, you can easily do it.
You will first need to connect the Magic Mouse using Bluetooth and then install Apple Wireless Mouse drivers to add support for scrolling. We have explained the steps to connect Magic Mouse using Bluetooth and three ways to install the required drivers.
You can instantly set up Magic Mouse on Windows using Bluetooth. The steps are the same as connecting any other device with Bluetooth support. Microsoft has released Windows 11, the successor of Windows 10.
The steps to add a Bluetooth device differ slightly on Windows 10 and 11. We have made things simpler by adding steps to connect Magic Mouse using Bluetooth on Windows 10 and 11.
Connect Magic Mouse to Windows 10
Most of you might be already familiar with adding a Bluetooth device on Windows 10. Still, if you need handing help, follow the below steps and connect your Magic Mouse using Bluetooth on your Windows 10 PC.
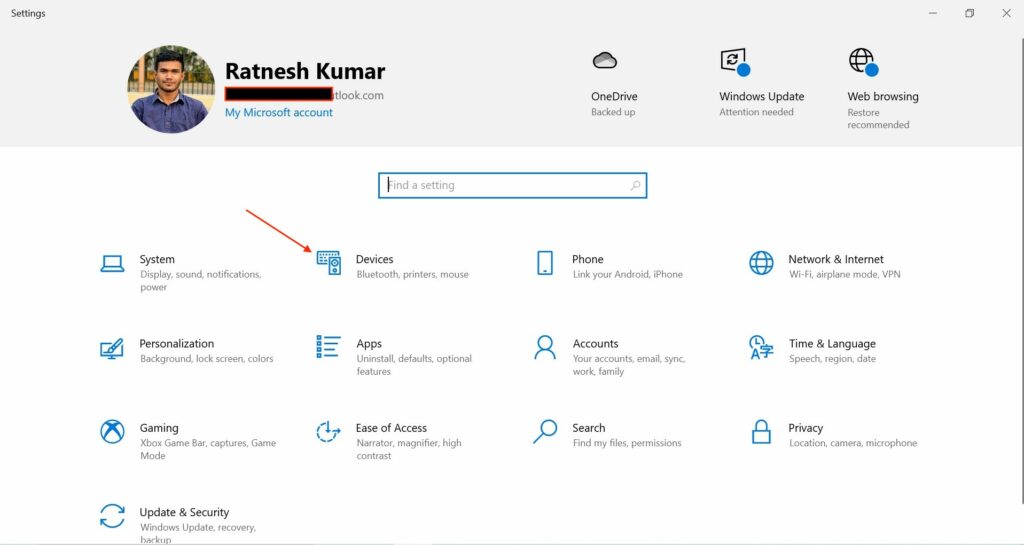
1. Press Windows + I key to open Settings on your Windows 10 PC.
2. In Settings, tap on Devices.
3. You will land in the Bluetooth & other devices tab under Devices. If you are not there, tap on Bluetooth & other devices from the left sidebar.
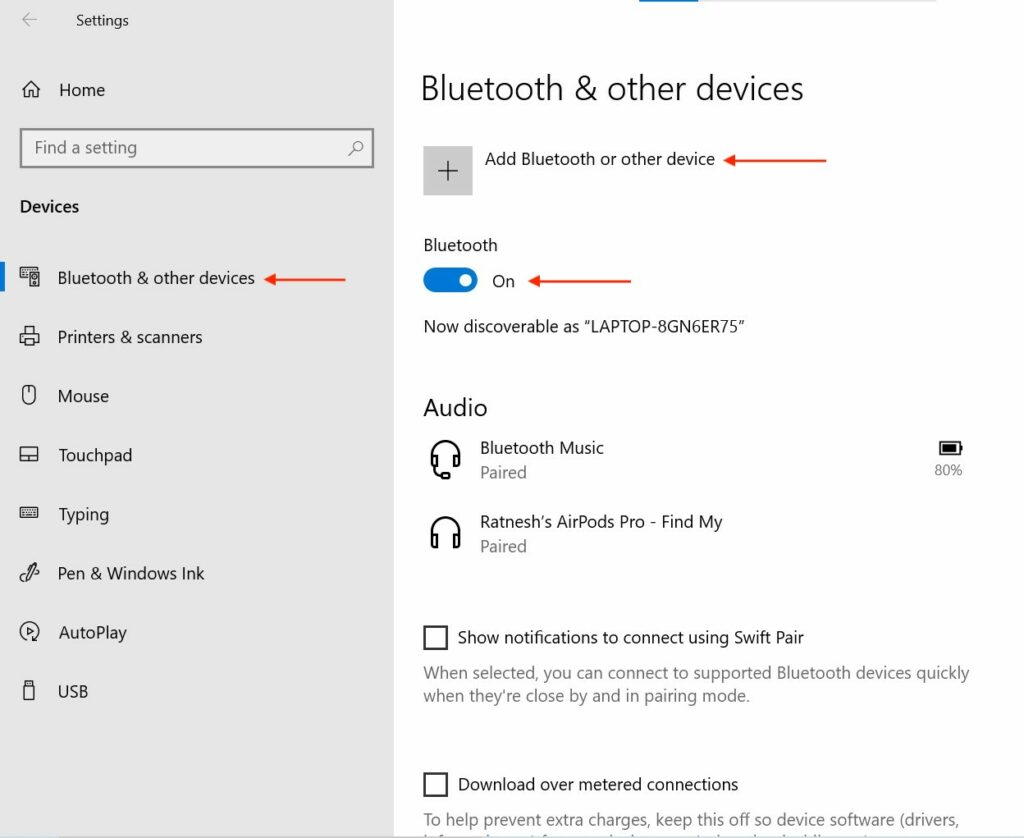
4. On Bluetooth & other devices page, make sure the Bluetooth toggle is On. When Bluetooth is on, you will see a Now Discoverable as “Your Computer Name” message. Now tap on Add Bluetooth or other device.
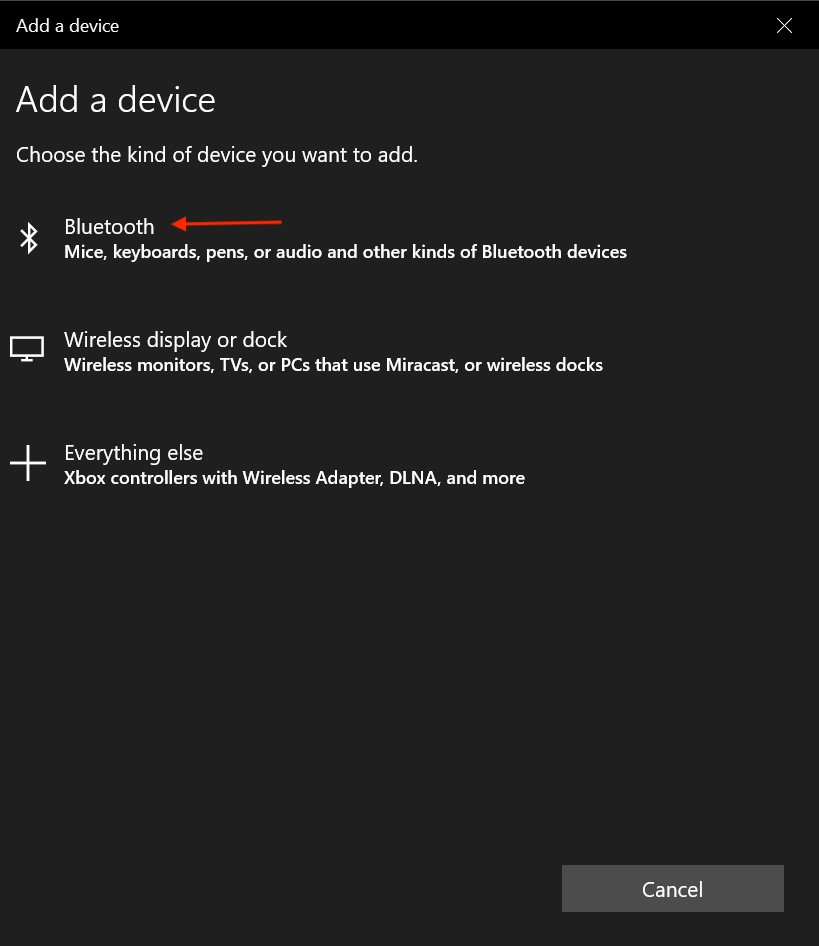
5. On the next screen, choose the kind of device you want to add to your PC. Select the Bluetooth option as you wish to set up a magic mouse.
6. Now, your PC will search for Magic Mouse. Make sure the Magic Mouse is turned on and discoverable. If your PC cannot search for Magic Mouse, turn it off and turn it on again. It will help your Windows PC to recognize it. Your Magic Mouse will appear on the screen; select it and tap on Done.
Once you follow the above steps, Magic Mouse will be connected to your Windows 10 PC using Bluetooth. You can click on the top left side of the Magic Mouse to perform a regular click and the top right side to right-click. If you want to customize the Magic Mouse further, tap on the Mouse option on the Devices Settings page.

You can select your Primary button as Right or Left. If you feel the default Cursor speed is slow, you can also adjust the cursor speed from there.
How to Connect Magic Mouse to Windows 11
Microsoft has refreshed the Settings app on Windows 11. The placements of different settings options are changed. If you have recently upgraded to Windows 11, you might find it tough to connect your Magic Mouse using Bluetooth. No worries, follow the below steps and connect your Magic Mouse to Windows 11.
1. Press the Windows+I key to open the built-in Settings app on your Windows 11 PC.
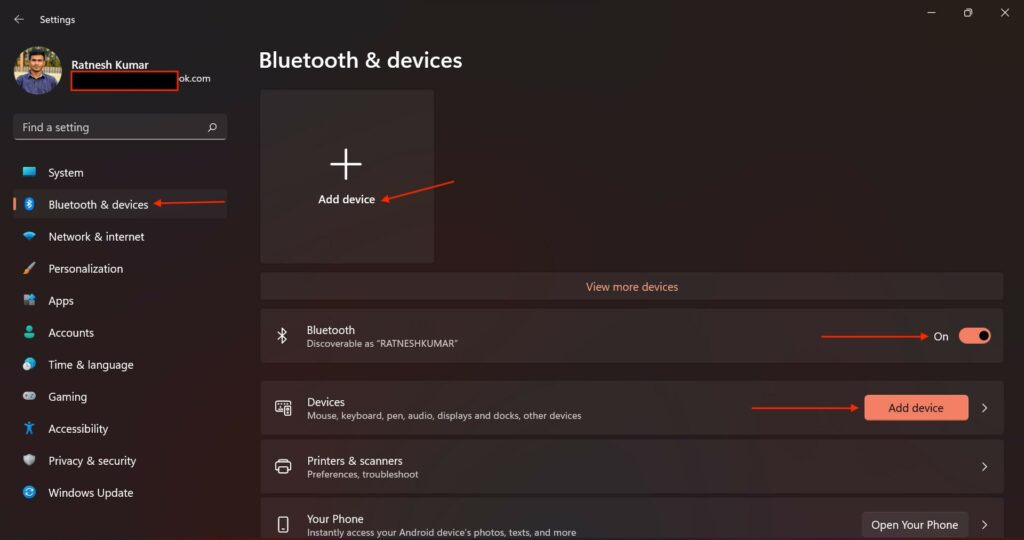
2. In the Settings app, tap on Bluetooth and devices from the left sidebar.
3. Under Bluetooth & devices settings, you will find the Bluetooth toggle. Make sure the Bluetooth toggle is On. When Bluetooth is On, you will see a message Discoverable as “Your Computer Name”.
4. Below the Bluetooth setting, you will see a Devices section with Add device button. You will also get the Add device on top of the Bluetooth & devices setting page. Tap on Add device.
5. On the next screen, choose the kind of device you wants to add to your Windows 11 PC. Select the Bluetooth option as you wish to connect a Magic Mouse.
6. Now, the Magic Mouse will appear on Add a device page, select it and tap on Done.
That’s all you need to do to connect Magic Mouse to your Windows 11 PC. Once you connect it, you are ready to start using it. You will be able to perform a regular or right-click. Everything will work like a charm except scrolling.
You will say what? a Mouse without scrolling. Don’t worry; follow one of the three ways mentioned below to install the required drivers so you can start scrolling on Magic Mouse.
How to Scroll With Magic Mouse on Windows 11/10
As of now, you only have connected your Magic Mouse on your Windows 10 or 11 PC. It doesn’t have the required drivers to support scrolling. There are mainly three ways to install Apple Wireless Mouse driver on Windows.
You can either do it from the official Bootcamp driver, use Brigadier, or a third-party driver app like Magic Mouse Utilities. I have explained all the options in detail; pick the one that seems easier to you.
Bootcamp Driver
Apple offers a “Boot Camp Support Software package” for Windows users. The Boot Camp Support Software package includes Apple Wireless Mouse drivers required to add scrolling on Magic Mouse. Follow the below steps to download Boot Camp Support Software on your Windows PC and install the Wireless Mouse driver.
1. Visit the Apple Support Downloads Page. On the Downloads page, you will get a Search Downloads box type “Boot Camp Support Software” in it and hit enter.
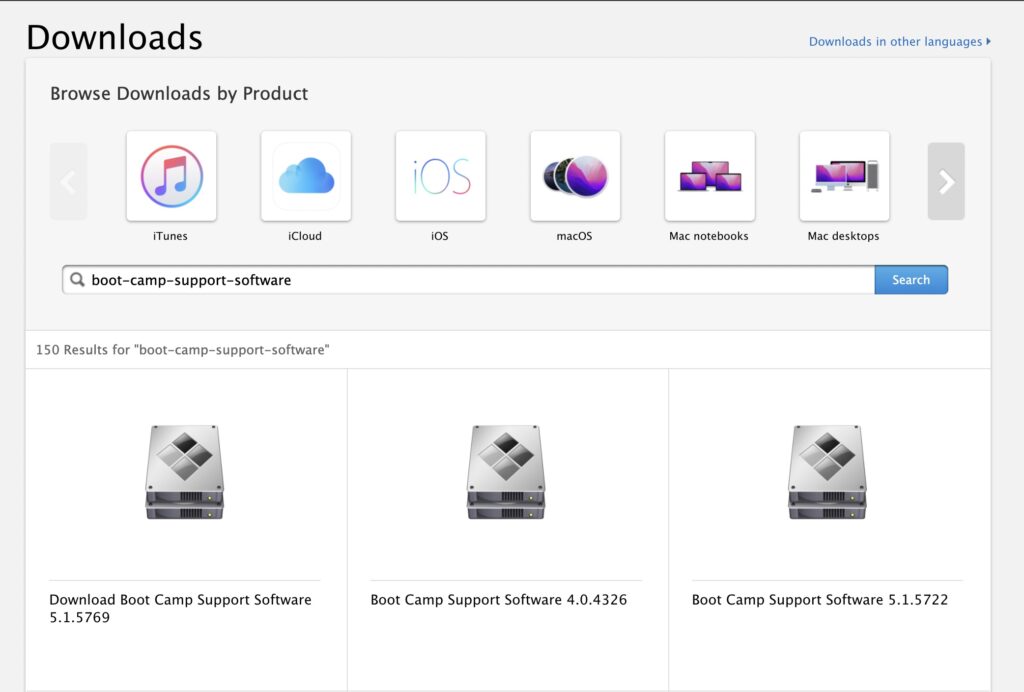
2. Among the results, select the Download Boot Camp Support Software 5.1.5769 result. Alternatively, you can click here to directly go to the Download Boot Camp Support Software 5.1.5769 page. On the Download page, tap on the Download button.

3. Now, Boot Camp Support Software will start downloading on your PC. It will be a 517 MB download; depending on your Internet speed, it will take a few minutes to complete the download.
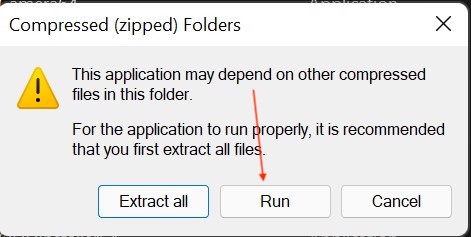
4. The download file be in a Zip file format. Extract the downloaded zip file.
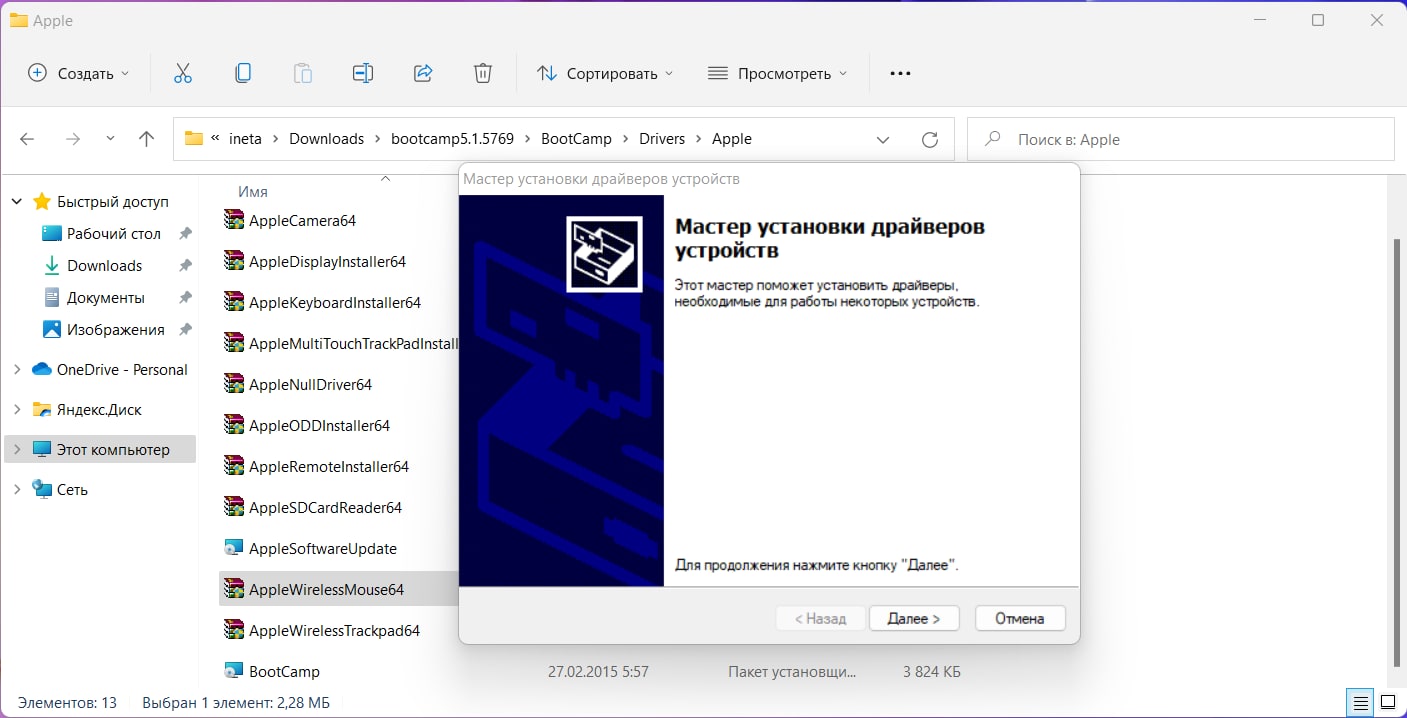
5. After extracting the file, open the extracted folder and navigate to Bootcamp> Drivers > Apple.
6. In the Apple folder, you will get a file named AppleWirelessMouse64.
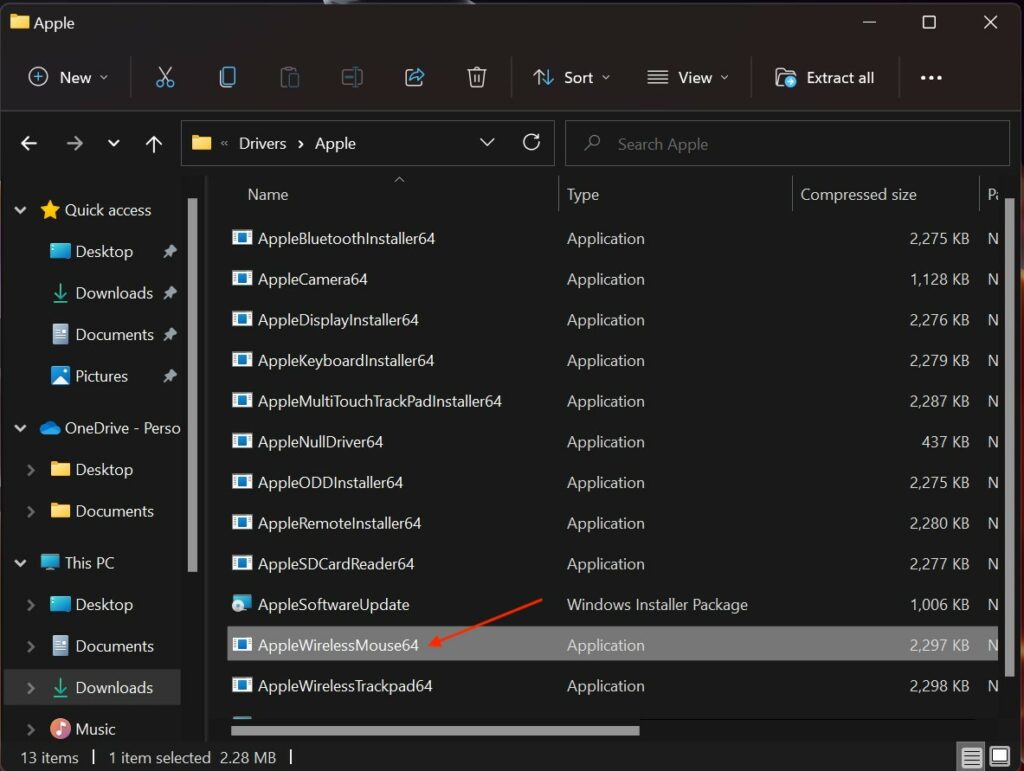
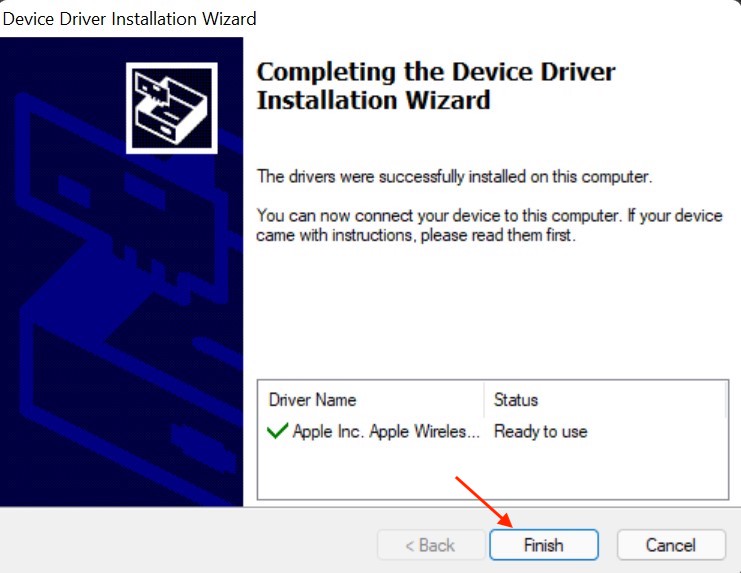
7. Double-click on it and follow the on-screen instructions to install Apple Wireless Mouse drivers on your PC.
8. Once you have installed the Apple Wireless Mouse Driver, restart your PC, and you will be able to scroll on Magic Mouse.
The above steps work well, and Magic Mouse starts supporting scrolling. However, many users complain even after installing the Apple Wireless Mouse Driver, they are not able to scroll on Magic Mouse.
It is because Apple is not regularly updating the Boot Camp Support Software. No worries, there are still two remaining ways to install Apple Wireless Mouse Driver on Windows.
Brigadier
The drivers available in the latest available Boot Camp Support Software is outdated, so it is possible that scrolling might still not work. A few users using Magic Mouse on Windows have written in various online discussion forums that they tried installing drivers using a Brigadier program, and the problem got resolved. You can also install Bootcamp on Windows using Brigadier by following the below steps.
1. Download Brigadier from GitHub. When the download is complete, copy the brigadier.exe file to the Desktop.
2. Open Command Prompt on your PC. Tap on Start Menu, type cmd in the search box, and select Open.
3. In the Command Prompt Console, enter the “cd Desktop” command.
4. After it, enter the command “brigadier.exe -m MacBookPro16,3“
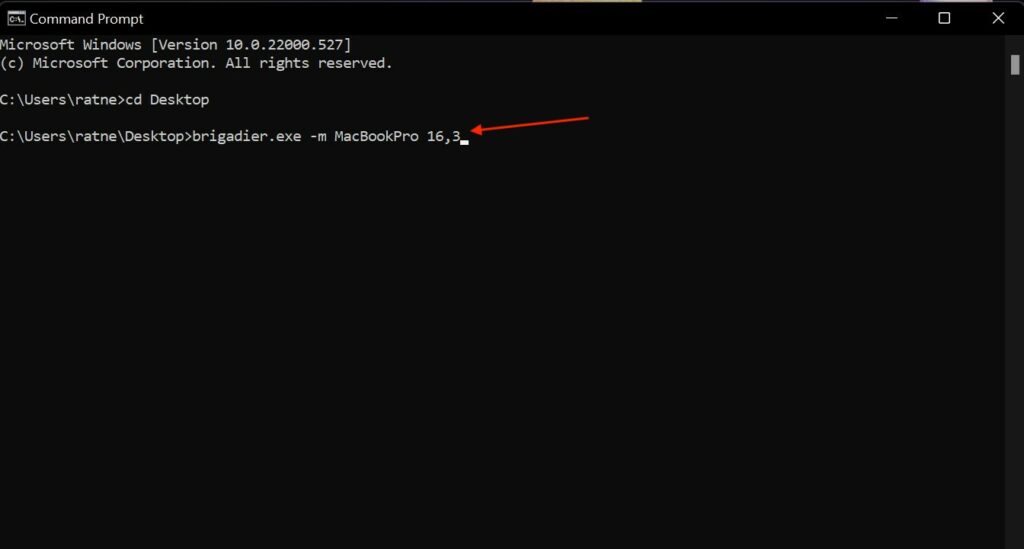
Note: The brigadier.exe -m MacBookPro16,3 command includes an identifier to identify your PC as a 16-inch 2020 MacBook Pro. You can use a different Mac model as per your choice but make sure to use an identifier from the MacBooks launched recently and have support for Windows over Boot Camp.
5. Now, Brigadier will start downloading the drivers from Apple. When the download is complete, it will automatically extract the zip file to the Desktop. If Brigadier fails to download drivers on your PC or download an empty folder, install 7-Zip on your PC.
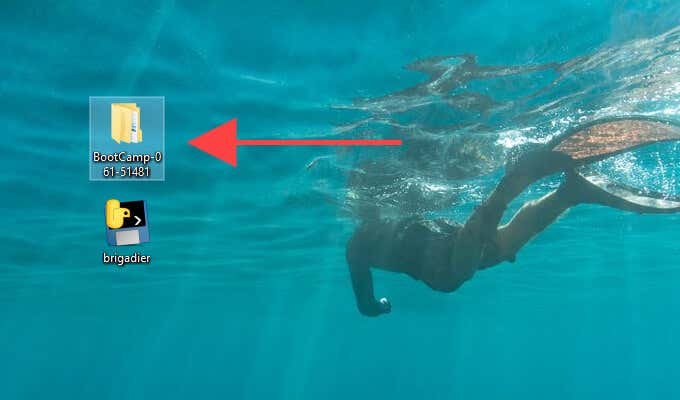
6. Once you see the BootCamp folder on your Desktop, navigate to the $WinPEDriver$>AppleWirelessMouse folder.
7. Under the AppleWirelessMouse folder, you will see an AppleWirelessMouse64.inf file, right-click on it and tap on Install.
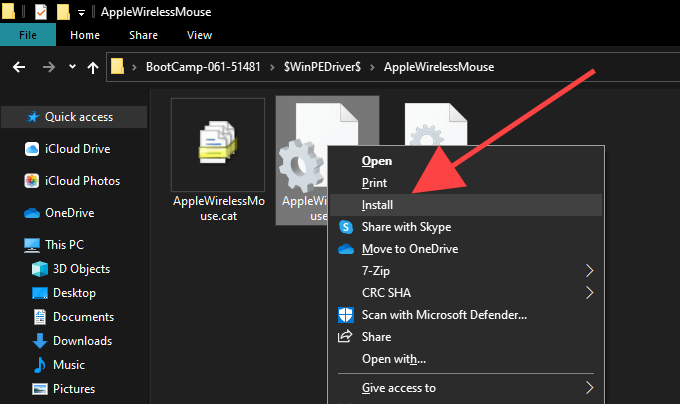
8. On the next screen, Tap on Yes to Give Permission to install the Driver; after it, tap on OK to complete the installation process.
9. Lastly, Restart your PC to make all the changes into effect. Now you will scroll horizontally and vertically using Magic Mouse on your Windows PC.
Magic Mouse Utilities
By now, Magic Mouse should start scrolling on your Windows 10 PC. But if you are still unable to scroll, the last option you can try is Magic Mouse Utilities. Magic Utilities provides a Magic Mouse Windows driver + app for scrolling on Windows PC.
It supports both Magic Mouse 1 and Magic Mouse 2. Not just Magic Mouse, it also supports all Windows desktop versions, be it Windows 7, 8, 10, or 11. It supports both 32-bit and 64-bit platforms.
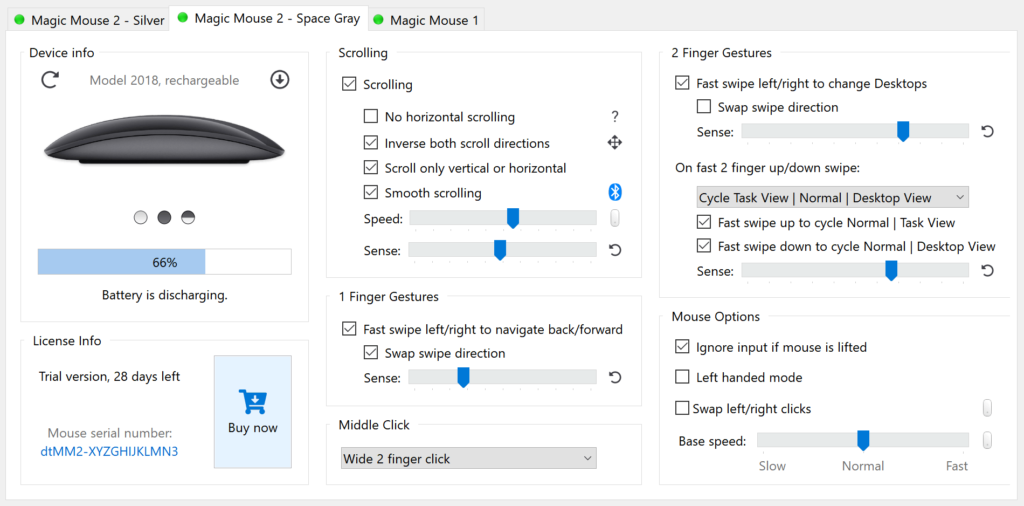
Talking about the features, First of all, it adds smooth scrolling on Magic Mouse on Windows. It adds a customizable middle mouse button in between the right-click and left-click. You can also Navigate back and forward using horizontal swipes.
You can also see your Magic Mouse battery levels in the app to schedule the charge. Overall when I tried using the Magic Mouse on Windows with the help of Magic Mouse Utilities, It felt like the same experience as using it on my Mac.
If you plan to try Magic Mouse Utilities, it has a 28-trial. Sign up for the trial, test how it works, and then buy the license. The license will cost you $14.99/year.
Fix Magic Mouse Not Working on Windows 11
Even after installing drivers using Brigadier, a few Windows users report they can still not scroll on Magic Mouse. It might be possible because of outdated drivers. Thankfully, there is a working fix you can implement to fix if Magic Mouse is not working on Windows 11.
Update Pending Drivers Via Apple Software Update
The possible solution is to update pending drivers via Apple Software Update. Don’t worry. You don’t have to download it. It is part of the Apple Boot Camp for Windows package. Just follow the below steps to update pending drivers via Apple Software Update.
1. Open Start Menu on your PC and search for Apple Software Update. From the Results, select Apple Software Update and tap on Open.
2. Now, the Apple Software Update will open on your PC. It will take a few minutes to scan for available driver updates.
3. You will see a list of drivers that have updates pending. Check the box left to the drivers and tap on the Install option in the bottom right corner of the window.
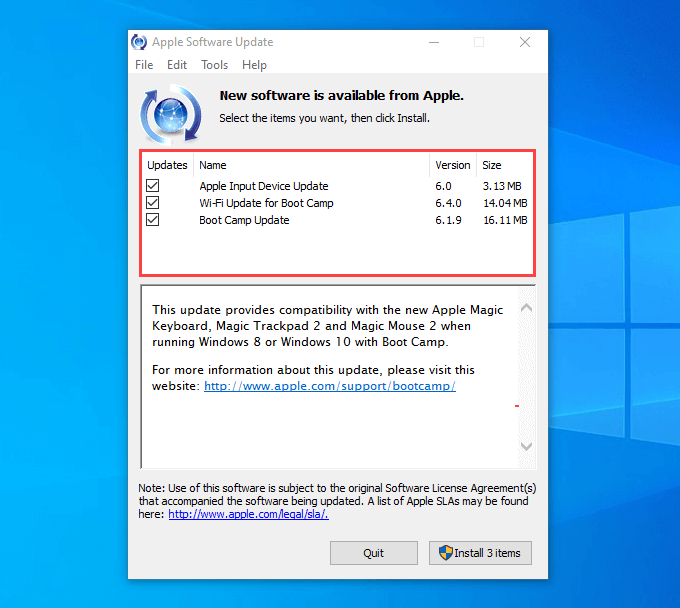
4. Apple Software Update will start downloading the Driver updates and apply the updates.
After downloading updates for all the Apple drivers, restart your PC. Hopefully, Magic Mouse should start working properly, and you should not face any issues in scrolling.
FAQs
Does Apple Magic mouse work with windows?
Yes, the Apple Magic Mouse works with Windows. You can connect Magic Mouse to Windows using Bluetooth. It will start working immediately, but you will miss out on scrolling. For that, you will need to install Apple Wireless Mouse drivers. I have provided three ways to install the required drivers to support scrolling.
Can I use an Apple mouse with a Windows computer?
Yes, You can use it. The process is very straightforward. Connect your Apple Magic Mouse using Bluetooth. After it, install the Apple Wireless Mouse drivers, and it will work just like you use an Apple mouse on Mac.
How do I connect my Magic Mouse to Windows 10?
You can connect your Magic Mouse to Windows 10 using Bluetooth. The process is the same as you adding a different Bluetooth device. After connecting the Magic Mouse install the Apple Wireless Mouse drivers to add support for scrolling.
Final Words
Magic Mouse is one of the best mice available in the market for MacBooks. If you have a Magic Mouse, you would also like to use it with your Windows PC. Why purchase an additional mouse when you already have one?
You don’t have to worry about Magic Mouse support on Windows. The Magic Mouse supports Windows PC, and you can use it as you usually do on your Mac. To use Magic Mouse on Windows, you will first need to connect using Bluetooth and then install the required drivers to add the support for scrolling.
We have explained everything from connecting the Magic Mouse to installing the drivers above in the article. Go ahead, follow the steps, and start using your Magic Mouse on Windows.
Apple identifies its range of accessories as “Magic” whether it’s the Magic Keyboard, Magic Mouse or Magic Trackpad, compatible with macOS and iPad OS devices. But that doesn’t mean you can’t buy a Magic Mouse, Magic Keyboard or Magic Trackpad if you don’t have a MacBook or iPad. You can connect them to any Windows PC, and it doesn’t matter if it’s running Windows 11 or Windows 10.
Magic Mouse is not one of the ergonomic mice available on the market. Still, it does offer support for multi-touch gestures, easy navigation and longer battery life than any other Bluetooth mouse. The Magic Mouse was not made to be used with a Windows PC, but it still is a Bluetooth mouse, and with the right steps, you can easily use it with a Windows 11 or Windows 10 running PC.
Magic Mouse is nothing but a Bluetooth mouse, and like every other Bluetooth mouse, you can set up and use Magic Mouse on Windows 11 or Windows 10, and it is straightforward. You need to follow the typical steps required to connect any Bluetooth mouse with Windows. However, note that the Magic Mouse won’t support scrolling on Windows by default.
It supports right and left click on Windows. But to enable scrolling, you need to install some necessary drivers on the PC. First, let’s start with setting up Magic Mouse on Windows 11 or 10. Later, I will guide you through how to install the drivers to enable scrolling on Magic Mouse.
Windows 10 or 11 users can easily connect to the Magic Mouse using Bluetooth. It’s as simple as connecting your everyday wireless mouse to your Windows PC; all you need is to connect the Magic Mouse from the Bluetooth menu. The steps are a little different on Windows 11 and Windows 10 but don’t worry, as I will guide you through them separately.
Connect Magic Mouse to Windows 11
You don’t need to do anything different. It’s easy if you are familiar with connecting Bluetooth devices, but you can follow the steps mentioned below if you are not.
1. Launch the Windows Settings app on your PC. You can either open Settings from the Start Menu or press the Windows+I keyboard shortcut to open the Settings on Windows 11 PC.

Step 2: Click Bluetooth and devices in the left sidebar.
Step 3: You will find the Bluetooth toggle under the Bluetooth and devices option. Turning on the Bluetooth toggle will enable the Bluetooth. So, turn on the Bluetooth switch.
Step 4: Now proceed to “add a device,” then click Bluetooth.

Step 5: Select the Magic Mouse appearing on the list.

Step 6: Lastly, select Done.
Wasn’t it simple? Well, it is, and that’s how you can connect Magic Mouse to Windows 11 PC. However, you won’t be able to perform scrolling. But there’s nothing to worry about, as I will be guiding how to enable scrolling on Magic Mouse on Windows 11 in the next section.
Connect Magic Mouse to Windows 10
Like any other Bluetooth supported device, you can connect a Magic Mouse to your Windows 10 PC. Just follow the steps given to connect Magic Mouse on Windows 10.
1. Open the Settings app.
2. Select Devices in the Settings app window.

Step 3: Now, click Bluetooth & other devices from the left sidebar.

Step 4: Make sure the Bluetooth toggle is on, and click Add Bluetooth or other device, then Bluetooth.
Step 5: Now, choose the Magic Mouse from the list of Bluetooth devices.
Step 6: Finally, click Done.
Magic Mouse Not Connecting to Windows 11/10
Your Magic Mouse won’t connect to Windows 10 or Windows 11 PC? No need to worry. Try the below-listed fixes to troubleshoot the issue.
- Restart your PC and follow the steps given above again.
- Toggle Bluetooth on and off.
- Change the battery in your Magic Mouse (applicable for first-generation).
You can also change the mouse settings by heading to Settings > Devices > Mouse. You can swap the right and left buttons on the mouse settings page or adjust the cursor speed. If required, you can also change the scrolling speed, but you will first need to install the Magic Mouse driver on your Windows PC.

How to Scroll with Magic Mouse on Windows 11/10
One downside of using Magic Mouse with Windows 11 or Windows 10 is that you can’t use the scroll feature. And to do so, you need to install the Magic Mouse driver manually on your PC.
There are three ways to install Apple Wireless Mouse driver on Windows. You can either download the driver directly from Apple or use Brigadier or some third-party app such as Magic Mouse Utilities.
Install Magic Mouse Driver Using Bootcamp Driver
Follow the below steps to download the Boot Camp Support Software package.
1. Visit the Apple Support Downloads page and search for the “Boot Camp Support Software”

2. Now, download the Boot Camp Support Software 5.1.5769 version.

3. Extract the downloaded zip file.
4. Upon completing extraction, navigate to Bootcamp> Drivers > Apple.
5. Now, double click on the file named AppleWirelessMouse64.

6. Follow the on-screen instructions to install the Magic Mouse driver.

7. Lastly, restart your PC and connect to the Magic Mouse to check if everything’s working properly or not.

The steps enable the scrolling action on the Magic Mouse. However, some users have complained about their Magic Mouse not supporting the scroll action even after installing the driver using Bootcamp support. Don’t fret; there are more ways to install the latest Magic Mouse driver on your Windows PC.
Install Magic Mouse Driver Using Brigadier
The Bootcamp support solves the issue, but the drivers present in the application are outdated, sometimes creating a problem for users. However, as users have reported, it is possible to download the updated driver using Brigadier. So here’s how you can install Magic Mouse Driver on Windows PC using Brigadier.
So what the Brigadier does is it identifies your PC as a Mac and fetches the latest driver from the Apple server.
Step 1: Download Brigraider from GitHub and copy the file “brigraider.exe” to the desktop.
Step 2: Now, open the command prompt on your PC. Go to the Start menu, type cmd, and click Open to open the command prompt.
Step 3: Type the command “cd Desktop” and press Enter. (Don’t type the ” “)
Step 4: Type the “brigadier.exe -m MacBookPro16,3” command and press Enter to run.

Step 5: Now, Brigraider will download the latest driver from Apple. However, keep 7Zip installed on your PC if it downloads an empty file.

Step 7: Open the $WinPEDriver$>AppleWirelessMouse folder in the downloaded Bootcamp folder.
Step 8: Now, right-click on the AppleWirelessMouse64.inf file, select Install and follow the on-screen instructions.

Step 9: Restart the PC after installing and connect the Magic Mouse again to enable scrolling.
Use Magic Mouse Utility for More Features on Windows
You can install the Magic Mouse Utility further to fine-tune the Magic Mouse on your Windows PC. The software supports both the Magic Mouse 1 and Magic Mouse 2. The Magic Mouse Utility adds smooth scrolling and a customizable middle button between the right-click and left-click.
You can also navigate back and forward using horizontal swipes. It also shows battery levels in the app, and you can also schedule the charge. However, it’s a paid software, but you can sign up for the free trial, which offers 28 days trial period. The Magic Mouse Utility software costs $14.99/per year.

Magic Mouse Not Working on Windows 11/10
Either of the above three ways should enable you to scroll with Magic Mouse on Windows 11/10. However, if Magic Mouse scroll is not working on Windows 11 there is an easy fix for it. We have explained it below.
Update Magic Mouse Driver
Sometimes, the driver appropriate driver doesn’t get installed from the Bootcamp support. In that situation, you can try updating the Magic Mouse driver from Apple Software Update. To update the driver, follow the steps mentioned below.
1. Open the Apple Software Update from the Start menu.
2. Now, Apple Software Update will scan for the missing driver from your system. Wait until the process finishes.
3. Check the Apple Input Device Update and Boot Camp Update from the list of updates available. You can install other updates as well.

4. Select Install to download and install the updates.
5. Finally, restart the PC and connect the Magic Mouse again.
FAQs
Can a Magic Mouse work with Windows 11?
Yes, Magic Mouse works well with Windows 11. You can connect it like any other Bluetooth device on your Windows 11 or 10 PC. Once you have connected the Magic Mouse install Apple Wireless Mouse drivers to add the support for scrolling.
How do I add a Magic Mouse to Windows 11?
You can add Magic Mouse to Windows 11 from Bluetooth settings on your computer. The process will remain the same as connecting any other Bluetooth device.
Can you use Apple Magic Mouse with Windows?
Yes, you can use Apple Magic Mouse with Windows. All you need is connect your Magic Mouse to Windows PC using Bluetooth.
Final Words
Magic Mouse is one of the finest mice available on the market. It has its drawbacks, but it’s pretty good if you are looking for a stylish mouse that lasts for months on a single charge. And why go and purchase another mouse for a Windows PC when you already have a good one.
So using the ways mentioned above, you can connect and set up Magic Mouse on Windows 11/10. I have explained the entire process step by step, from connecting the Magic Mouse to installing the driver. So what are you waiting for? Go and use your Magic Mouse with your Windows PC.
Yes, a Magic Mouse by Apple will work with a Windows PC. There are, of course, a few caveats to this, such as not having all the Apple Magic Mouse’s functionality, but you can get it to work, and there are possible solutions to some of the functionality issues.
My name is Eric, and I have put together and used many different computer systems since the early 1980s. As a software engineer and an electrical engineer, I love to find solutions for problems like getting an Apple mouse to work on a PC.
I have indicated above that an Apple mouse will work with a PC, but if you want to hear more details about this, keep reading. I will discuss connecting a USB mouse versus a Bluetooth Mouse and point you in the right direction to getting some of that missing functionality to work on Windows.
Contents
- Mouse Type
- USB Mouse
- Bluetooth Mouse
- Basic Functionality
- Full Functionality
- FAQs
- What if the mouse actions still do not feel right on my PC?
- Is there other software available to get my Apple Mouse working?
- Will the mouse driver for Bootcamp work for a Windows Virtual Machine?
- Conclusion
Mouse Type
If you are trying to connect an Apple mouse to a PC machine running Windows, there’s a good chance that you will be able to get it to work, but you will need to consider the type of Apple mouse when you are trying to connect it.
USB Mouse
If the Apple mouse you are trying to use with a PC is a USB mouse with a cord, getting it to work is relatively simple. You can just plug the mouse into an available USB port. The PC will recognize the device and find an available driver for it.
For a test, I dug up this old Apple USB mouse from the early 2000s. I plugged it into an old Windows 7 Machine. It took about 30 seconds or so for the PC to find the correct driver, but it connected and began working once it found it.

Bluetooth Mouse
If you’re looking to connect a Bluetooth mouse such as a Magic Mouse or Magic Mouse 2, it should work just as a USB mouse did. Connect the Bluetooth mouse to the PC, and it will find a standard driver.
The only difference is with a Bluetooth mouse, you will need to pair it and connect it using the normal method that you would use to pair and connect any Bluetooth device to the PC. Most PC pairing/connection procedures are very straightforward, and you can quickly look them up.
Once you connect a USB or Bluetooth mouse to your PC, you will find that it has the basic mouse functionality, but you may not have all the features typically available when connected to a Mac.
Related Reading: How to Fix Apple Magic Mouse Keeps Disconnecting
Basic Functionality
As mentioned above, when you connect an Apple mouse to your PC, you will have the basic functionalities of a mouse available to you. By that, I mean you will be able to move the mouse pointer around the screen, and you will be able to click and double-click on things.
Other things like right-clicking and scrolling will not work. There are ways to right-click using the mouse and keyboard, and you can scroll using the keyboard, so if you are ok with the basic functionality, you will be good to go.
Full Functionality
If you want to have the full functionality of the mouse just like you would have using it on a Mac, you will need to install software that will allow the other features to work. Since Apple provides Bootcamp and the ability to run Windows on a Mac, they have software available to enable all the features of an Apple Mouse.
While this software is meant to be used with Windows running on a Mac machine, it can also be used on a PC machine running Windows. You can use the steps below to download and install the software.
Note: The instructions below are for a wireless Bluetooth Apple Mouse such as the Magic Mouse, but you can find software for USB types, and they will have a similar procedure.
Step 1: If you have already connected the Bluetooth mouse to your Windows Machine, disconnect it now.
Step 2: Download the latest Apple Bootcamp Support Software.
Step 3: Follow the instructions from the link above to unzip the contents of the download and then navigate to the bootcamp5.1.5769\Bootcamp\Drivers\Apple folder.
Step 4: Find and double-click on a file called AppleWirelessMouseDriver64.exe. This will install a new wireless mouse driver.
Step 5: Go into Bluetooth settings and reconnect the mouse.
Once this is completed, you should have full mouse functionality, and it should work just as it does on any macOS.
FAQs
Below are a few questions that often come up about using an Apple mouse on a PC.
What if the mouse actions still do not feel right on my PC?
Now that you have the mouse working on your PC, it’s possible that it still does not feel right. In this case, you may need to adjust the mouse settings in Windows.
Is there other software available to get my Apple Mouse working?
There are third-party applications you can download to help you get your mouse’s features working and adjust them to your liking. If you do a Google search, you will find them. Some of them will cost money but may be worth the price if you rely on your Apple mouse.
Will the mouse driver for Bootcamp work for a Windows Virtual Machine?
Yes, it will. Just download it as described above and install it, and you should be good to go.
Conclusion
Most all versions of the Apple mouse will work on a PC. In most cases, a driver will be automatically installed when you plug the mouse in, but you may not have full functionality with the basic driver. You can get all functionality by downloading and installing the drivers designed for Bootcamp.
I hope the information above has helped you to get your Apple mouse working on your PC. As usual, let me know if you have any questions or comments. I would love to hear from you.