Первым делом:
Скачайте библиотеку — скачать appdata.dll
Затем:
Поместите appdata.dll
в одну из следующих папок:
Если у вас 64-битная версия Windows, то поместите файл в:
«C:\Windows\SysWOW64»
Если у вас 32-битная версия Windows, то поместите файл в:
«C:\Windows\System32»
После этого
Перезагрузите компьютер, чтобы изменения вступили в силу.
Всё равно выдаёт ошибку appdata.dll
не был найден?
Тогда придётся установить этот файл вручную. Для этого:
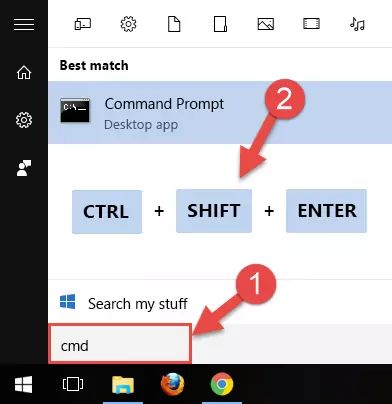
Зайдите в меню «Пуск».
В строчке поиска введите «cmd». И запустите найденную программу от имени администратора.
В открывшемся окне введите «regsvr32 appdata.dll
«.
После этого снова перезагрузите компьютер. Теперь ошибка должна быть исправлена.
Если что-то не понятно прочитайте более подробную инструкцию — как установить dll файл.
What is Appdata.dll? What Does It Do?
The Appdata.dll library is a dynamic link library developed by AOL. This library includes important functions that may be needed by programs, games or other basic Windows tools.
The size of this dynamic link library is 0.01 MB and its download links are healthy. It has been downloaded 20258 times already and it has received 3.5 out of 5 stars.
Table of Contents
- What is Appdata.dll? What Does It Do?
- Operating Systems Compatible with the Appdata.dll Library
- Other Versions of the Appdata.dll Library
- Steps to Download the Appdata.dll Library
- Methods for Fixing Appdata.dll
- Method 1: Fixing the DLL Error by Copying the Appdata.dll Library to the Windows System Directory
- Method 2: Copying the Appdata.dll Library to the Program Installation Directory
- Method 3: Doing a Clean Install of the program That Is Giving the Appdata.dll Error
- Method 4: Fixing the Appdata.dll Issue by Using the Windows System File Checker (scf scannow)
- Method 5: Fixing the Appdata.dll Error by Updating Windows
- Explanations on Updating Windows Manually
- Most Seen Appdata.dll Errors
- Dynamic Link Libraries Similar to Appdata.dll
Operating Systems Compatible with the Appdata.dll Library
- Windows 10
- Windows 8.1
- Windows 8
- Windows 7
- Windows Vista
- Windows XP
Other Versions of the Appdata.dll Library
The newest version of the Appdata.dll library is the 9.00.0010 version released on 2012-06-30. There have been 1 versions released before this version. All versions of the Dynamic link library have been listed below from most recent to oldest.
- 9.00.0010 — 32 Bit (x86) (2012-06-30) Download this version
- 9.0.0.0 — 32 Bit (x86) Download this version
Steps to Download the Appdata.dll Library
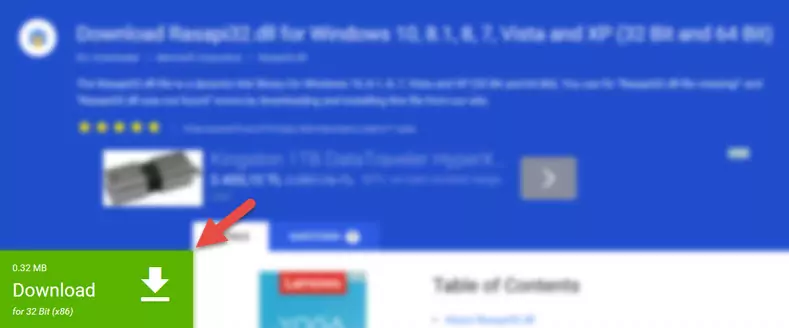
- Click on the green-colored «Download» button on the top left side of the page.

Step 1:Download process of the Appdata.dll library’s - After clicking the «Download» button at the top of the page, the «Downloading» page will open up and the download process will begin. Definitely do not close this page until the download begins. Our site will connect you to the closest DLL Downloader.com download server in order to offer you the fastest downloading performance. Connecting you to the server can take a few seconds.
Methods for Fixing Appdata.dll
ATTENTION! Before continuing on to install the Appdata.dll library, you need to download the library. If you have not downloaded it yet, download it before continuing on to the installation steps. If you are having a problem while downloading the library, you can browse the download guide a few lines above.
Method 1: Fixing the DLL Error by Copying the Appdata.dll Library to the Windows System Directory
- The file you downloaded is a compressed file with the extension «.zip«. This file cannot be installed. To be able to install it, first you need to extract the dynamic link library from within it. So, first double-click the file with the «.zip» extension and open the file.
- You will see the library named «Appdata.dll» in the window that opens. This is the library you need to install. Click on the dynamic link library with the left button of the mouse. By doing this, you select the library.
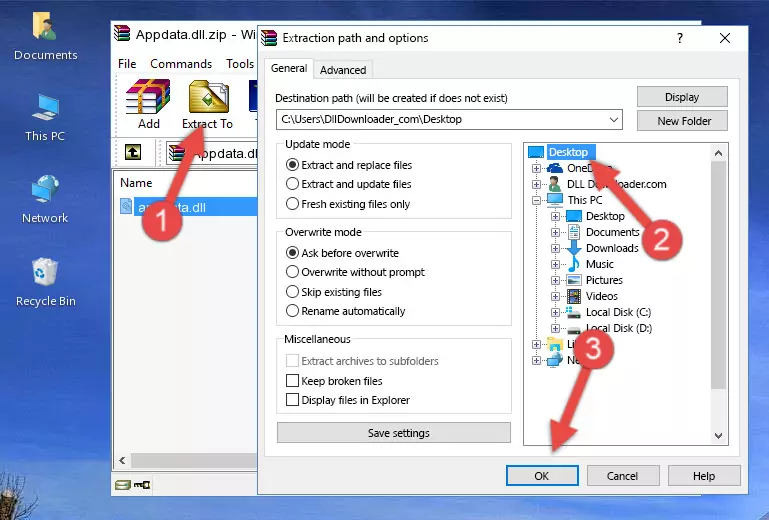
Step 2:Choosing the Appdata.dll library - Click on the «Extract To» button, which is marked in the picture. In order to do this, you will need the Winrar program. If you don’t have the program, it can be found doing a quick search on the Internet and you can download it (The Winrar program is free).
- After clicking the «Extract to» button, a window where you can choose the location you want will open. Choose the «Desktop» location in this window and extract the dynamic link library to the desktop by clicking the «Ok» button.
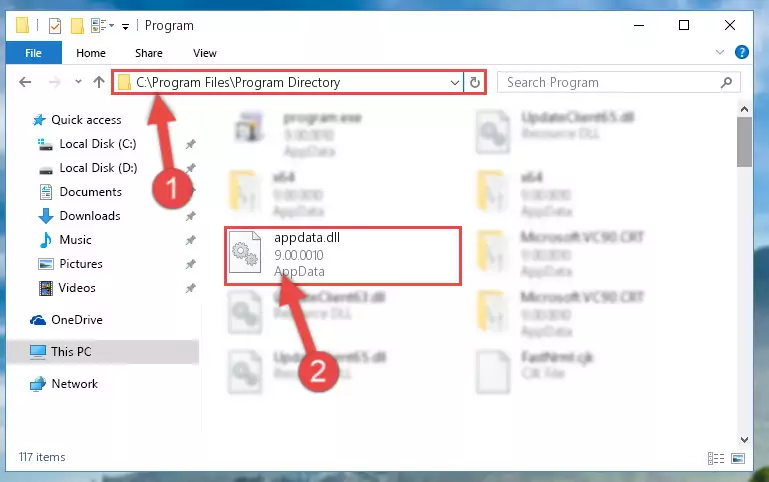
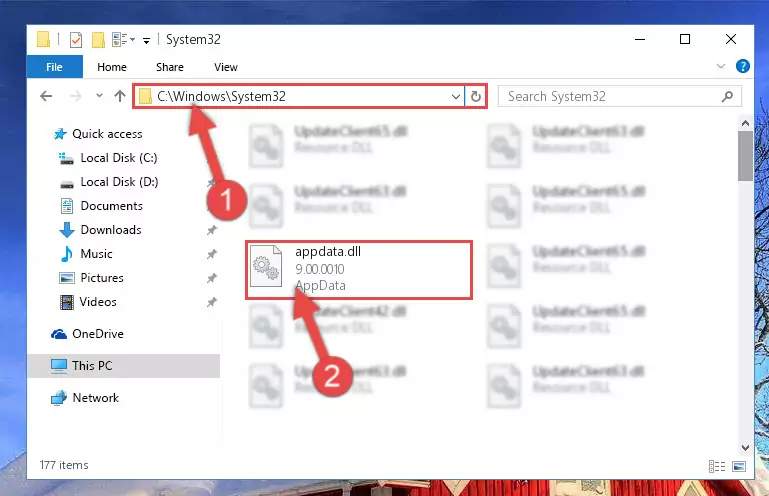
- Copy the «Appdata.dll» library you extracted and paste it into the «C:\Windows\System32» directory.
Step 3:Copying the Appdata.dll library into the Windows/System32 directory - If you are using a 64 Bit operating system, copy the «Appdata.dll» library and paste it into the «C:\Windows\sysWOW64» as well.
NOTE! On Windows operating systems with 64 Bit architecture, the dynamic link library must be in both the «sysWOW64» directory as well as the «System32» directory. In other words, you must copy the «Appdata.dll» library into both directories.
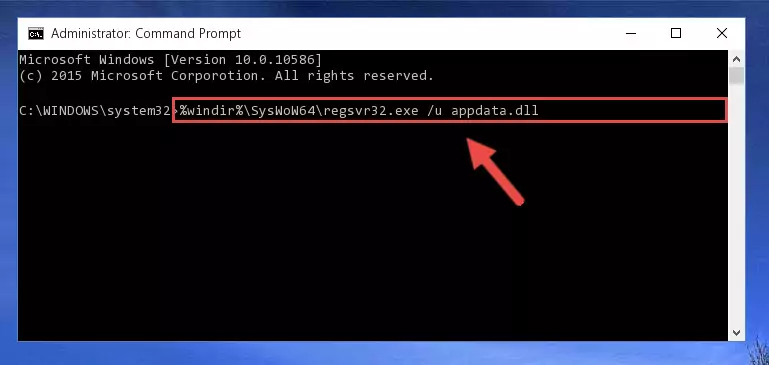
Step 4:Pasting the Appdata.dll library into the Windows/sysWOW64 directory - First, we must run the Windows Command Prompt as an administrator.
NOTE! We ran the Command Prompt on Windows 10. If you are using Windows 8.1, Windows 8, Windows 7, Windows Vista or Windows XP, you can use the same methods to run the Command Prompt as an administrator.
- Open the Start Menu and type in «cmd«, but don’t press Enter. Doing this, you will have run a search of your computer through the Start Menu. In other words, typing in «cmd» we did a search for the Command Prompt.
- When you see the «Command Prompt» option among the search results, push the «CTRL» + «SHIFT» + «ENTER
- A verification window will pop up asking, «Do you want to run the Command Prompt as with administrative permission?» Approve this action by saying, «Yes«.
» keys on your keyboard.
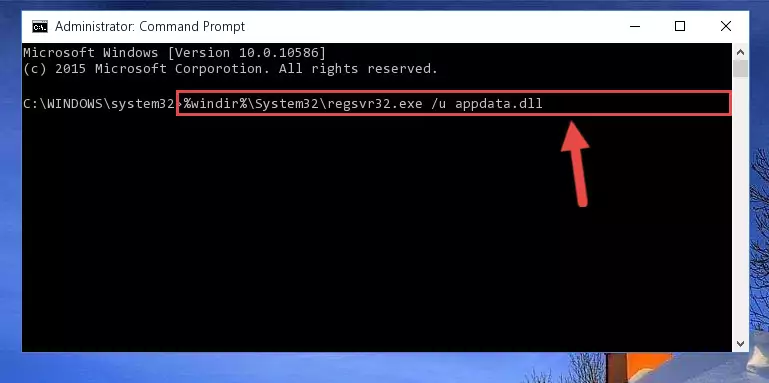
Step 5:Running the Command Prompt with administrative permission - Paste the command below into the Command Line window that opens and hit the Enter key on your keyboard. This command will delete the Appdata.dll library’s damaged registry (It will not delete the file you pasted into the System32 directory, but will delete the registry in Regedit. The file you pasted in the System32 directory will not be damaged in any way).
%windir%\System32\regsvr32.exe /u Appdata.dll
Step 6:Uninstalling the Appdata.dll library from the system registry - If the Windows you use has 64 Bit architecture, after running the command above, you must run the command below. This command will clean the broken registry of the Appdata.dll library from the 64 Bit architecture (The Cleaning process is only with registries in the Windows Registry Editor. In other words, the dynamic link library that we pasted into the SysWoW64 directory will stay as it is).
%windir%\SysWoW64\regsvr32.exe /u Appdata.dll
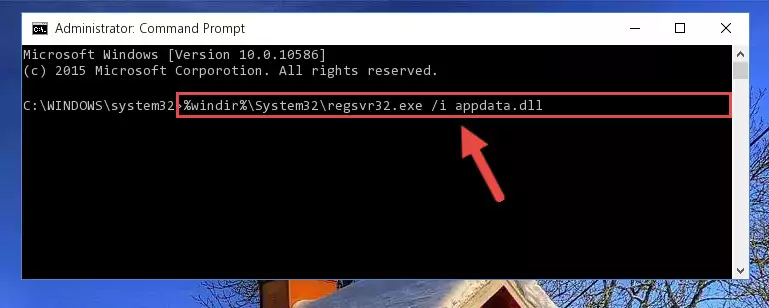
Step 7:Uninstalling the broken registry of the Appdata.dll library from the Windows Registry Editor (for 64 Bit) - We need to make a clean registry for the dll library’s registry that we deleted from Regedit (Windows Registry Editor). In order to accomplish this, copy and paste the command below into the Command Line and press Enter key.
%windir%\System32\regsvr32.exe /i Appdata.dll
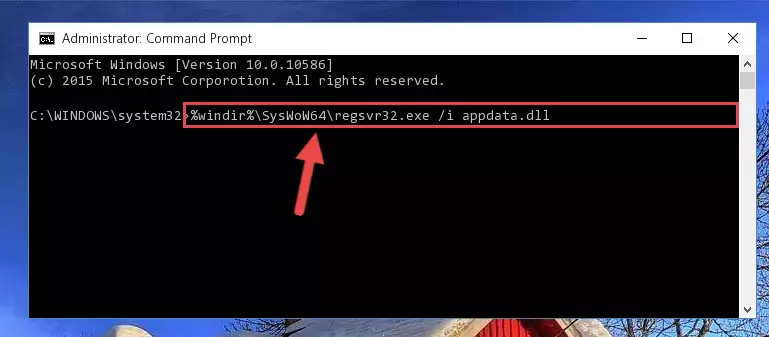
Step 8:Making a clean registry for the Appdata.dll library in Regedit (Windows Registry Editor) - Windows 64 Bit users must run the command below after running the previous command. With this command, we will create a clean and good registry for the Appdata.dll library we deleted.
%windir%\SysWoW64\regsvr32.exe /i Appdata.dll
Step 9:Creating a clean and good registry for the Appdata.dll library (64 Bit için) - If you did all the processes correctly, the missing dll file will have been installed. You may have made some mistakes when running the Command Line processes. Generally, these errors will not prevent the Appdata.dll library from being installed. In other words, the installation will be completed, but it may give an error due to some incompatibility issues. You can try running the program that was giving you this dll file error after restarting your computer. If you are still getting the dll file error when running the program, please try the 2nd method.
Method 4: Fixing the Appdata.dll Issue by Using the Windows System File Checker (scf scannow)
- First, we must run the Windows Command Prompt as an administrator.
NOTE! We ran the Command Prompt on Windows 10. If you are using Windows 8.1, Windows 8, Windows 7, Windows Vista or Windows XP, you can use the same methods to run the Command Prompt as an administrator.
- Open the Start Menu and type in «cmd«, but don’t press Enter. Doing this, you will have run a search of your computer through the Start Menu. In other words, typing in «cmd» we did a search for the Command Prompt.
- When you see the «Command Prompt» option among the search results, push the «CTRL» + «SHIFT» + «ENTER
- A verification window will pop up asking, «Do you want to run the Command Prompt as with administrative permission?» Approve this action by saying, «Yes«.
» keys on your keyboard.
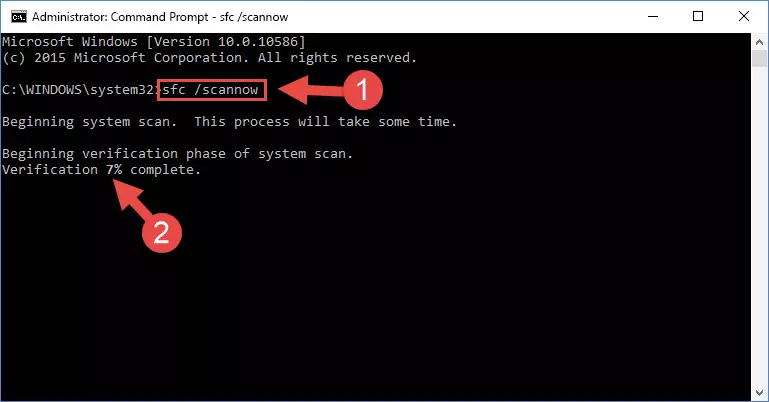
Step 1:Running the Command Prompt with administrative permission - After typing the command below into the Command Line, push Enter.
sfc /scannow
Step 2:Getting rid of dll errors using Windows’s sfc /scannow command - Depending on your computer’s performance and the amount of errors on your system, this process can take some time. You can see the progress on the Command Line. Wait for this process to end. After the scan and repair processes are finished, try running the program giving you errors again.
Most Seen Appdata.dll Errors
If the Appdata.dll library is missing or the program using this library has not been installed correctly, you can get errors related to the Appdata.dll library. Dynamic link libraries being missing can sometimes cause basic Windows programs to also give errors. You can even receive an error when Windows is loading. You can find the error messages that are caused by the Appdata.dll library.
If you don’t know how to install the Appdata.dll library you will download from our site, you can browse the methods above. Above we explained all the processes you can do to fix the dll error you are receiving. If the error is continuing after you have completed all these methods, please use the comment form at the bottom of the page to contact us. Our editor will respond to your comment shortly.
- «Appdata.dll not found.» error
- «The file Appdata.dll is missing.» error
- «Appdata.dll access violation.» error
- «Cannot register Appdata.dll.» error
- «Cannot find Appdata.dll.» error
- «This application failed to start because Appdata.dll was not found. Re-installing the application may fix this problem.» error
Dynamic Link Libraries Similar to Appdata.dll
- Avwav.dll
- Avp2up.dll
- Avpfpi.dll
- Avpupd.dll
- Awpe.dll
На системном диске со временем накапливается большое количество ненужных файлов. В результате пользователь сталкивается с проблемой его очистки. AppData является одной из папок, которые собирают в себе «мусор». Рассмотрим содержимое этой папки и способы её открытия, очистки и удаления.
Папка AppData (Application Data) создана разработчиками Windows для хранения данных о пользователях, которые работают на данном устройстве, а также информации об утилитах, запускаемых на компьютере. В частности, папка необходима приложениям и играм для надёжного хранения общих настроек, данных о профилях пользователя и другой информации. К примеру, Mozilla Firefox помещается в блок Program Files во время установки, но при этом созданный в ней профиль сохраняется уже в другом системном разделе — AppData. Таким образом, все данные, которые находятся в этом разделе, нужны утилитам для эффективной работы.
Эту папку пользователь не сразу сможет найти и открыть, так как по умолчанию она не показывается в «Проводнике Windows», как и многие другие системные папки ОС. Они были скрыты для одной цели: чтобы обычный пользователь, не знающий тонкостей работы системы, не смог найти и удалить их содержимое, навредив ОС.
В папке AppData есть три раздела:
- Local. Этот блок нужен для хранения файлов, которые утилиты создают в процессе их работы. Именно поэтому многие программы вы не можете просто перенести на другое устройство, так как им нужна будет информация из этой папки. В ней есть также раздел Temp, где располагаются временные файлы различных утилит. Её можно спокойно очищать, так как она не содержит важной информации для работы софта;
- LocalLow. Здесь находится информация, которая была скопирована в буфер обмена различными программами, например, стандартным обозревателем Internet Explorer или Microsoft Word;
- Roaming. В этой папке вы найдёте файлы с пользовательскими данными.
Все эти три раздела постепенно увеличиваются в размере. Чтобы узнать, сколько AppData весит, для начала её нужно найти в памяти устройства.
Где искать папку AppData в Windows 10
Рассмотрим несколько лёгких способов открытия папки AppData.
Путём включения скрытых файлов
Чтобы в «Проводнике Windows» увидеть папку AppData, сначала нужно активировать видимость скрытых системных элементов на устройстве:
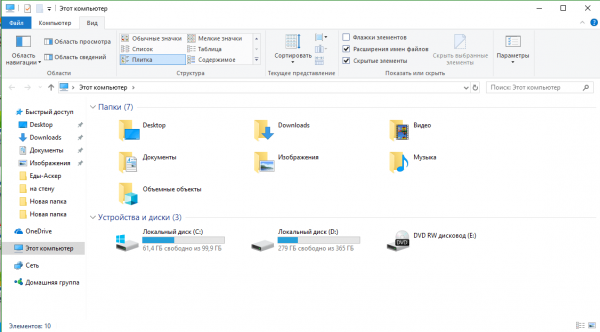
- На «Рабочем столе» открываем ярлык «Этот компьютер», чтобы зайти в «Проводник Windows».
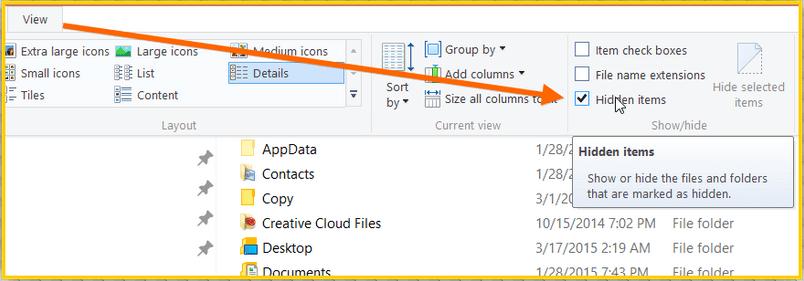
- Вверху находим вкладку «Компьютер». Справа от неё будет раздел «Вид». Переключаемся на него.

Откройте вкладку «Вид» в окне «Этот компьютер» - На появившейся панели с параметрами находим пункт «Скрытые элементы».

Найдите во вкладке «Вид» пункт «Скрытые элементы» - Ставим галочку рядом с этим пунктом.
С помощью этого простого метода вы сделаете видимой не только AppData, но и остальные разделы, ранее спрятанные системой. Теперь запустите нужный вам раздел AppData на системном диске:
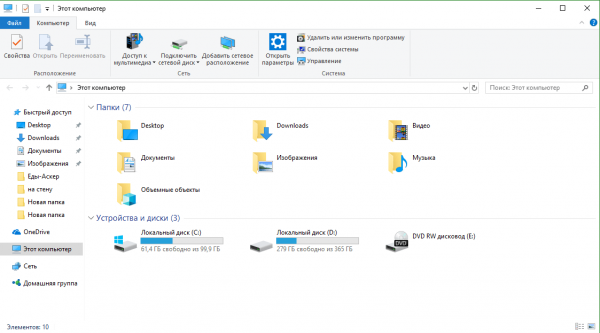
- Запустите ярлык «Этот компьютер» на «Рабочем столе» или через меню «Пуск».
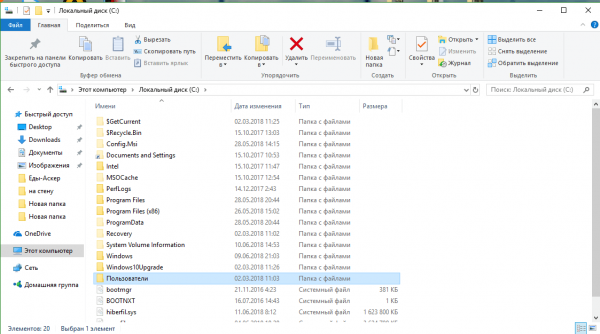
- Выберите «Локальный диск (С:)» двойным щелчком левой кнопки мыши.
- Откройте раздел «Пользователи».

Запустите папку «Пользователи» на системном диске - Выберите свой профиль.
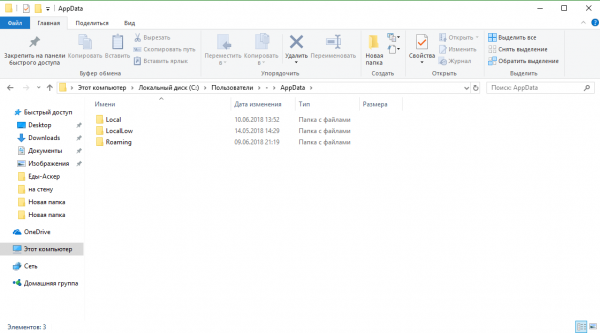
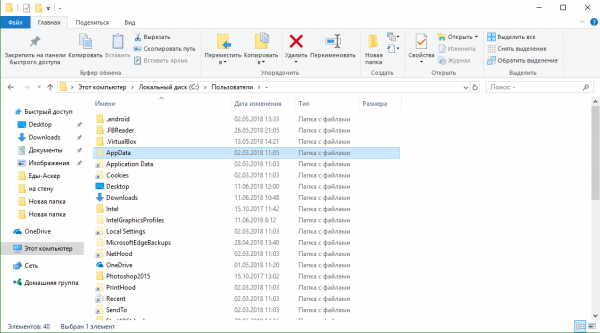
- В следующей папке найдите необходимый раздел AppData.
Откройте папку вашего профиля в разделе «Пользователи» и запустите AppData
Видео: как открыть скрытые файлы и папки в Windows 10
Через опции «Выполнить»
Всем пользователям полезно знать о небольшом окне «Выполнить», которое способно открывать различные программы, сервисы и разделы на компьютере с Windows. С помощью него можно запустить и папку AppData. При этом не придётся предварительно включать показ скрытых элементов, как в предыдущем способе.
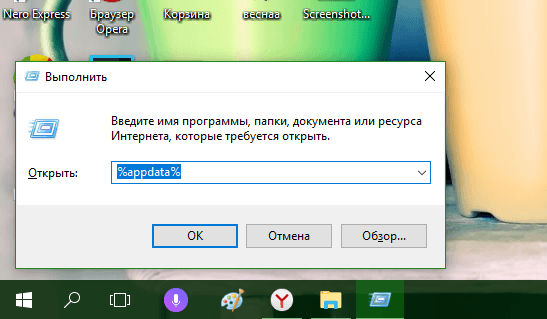
- Вызовите окно «Выполнить», нажав сочетание клавиш Win + R.
- В поле «Открыть» вставьте команду %appdata%.

Введите команду %appdata% в поле «Открыть» - Теперь кликните «ОК», чтобы команда была выполнена. Перед вами на экране откроется папка Roaming из AppData.
Видео: как открыть папку AppData с помощью окна «Выполнить»
С помощью «Поиска Windows»
В Windows 10 универсальный поиск системы находится не в «Пуске», как, например, в Windows 7, а в отдельном окне:
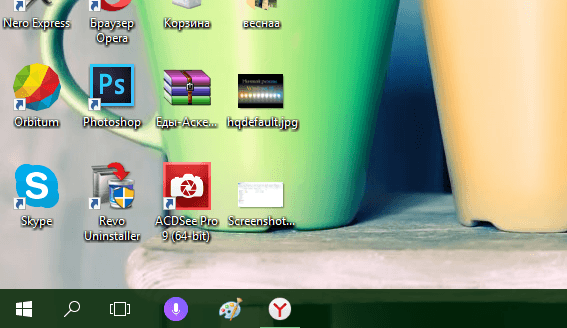
- Справа от кнопки «Пуск» в левом нижнем углу экрана есть иконка в виде лупы.

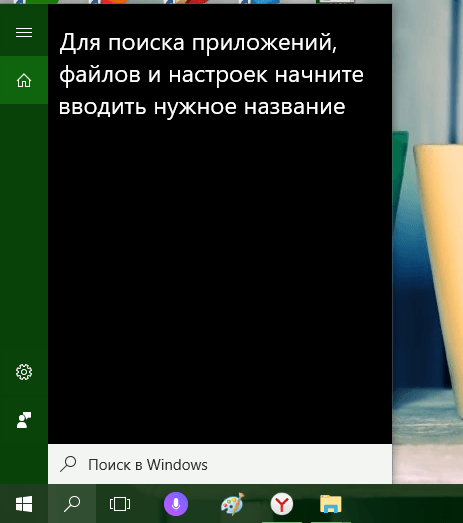
Найдите кнопку в виде лупы справа от кнопки «Пуск» - Кликните по ней левой кнопкой мыши. Откроется область со строкой поиска.

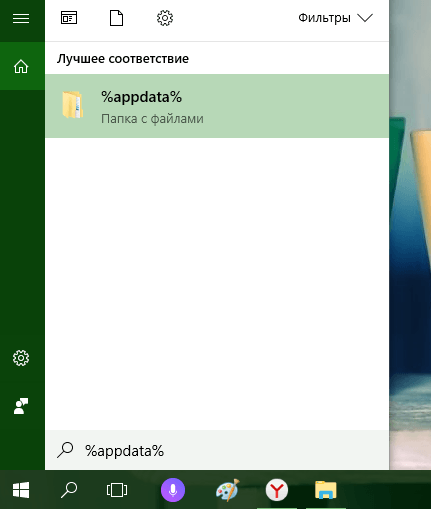
В области поиска можно вводить запросы в специальную строку - В строку введите команду %appdata%. Кликните по найденной папке, чтобы она открылась.

Введите запрос %appdata% в поисковую строку
Если папка AppData растёт в размере
Со временем в папке AppData начинает скапливаться «мусор», и она разрастается до огромных размеров. Детально рассмотрим эту проблему и пути выхода.
Почему это происходит
Если на компьютер Windows 10 была установлена недавно, папка AppData будет занимать всего несколько сотен мегабайт. Со временем, когда пользователь начнёт устанавливать новый софт на своё устройство, она станет увеличиваться в размере и сможет достигнуть десятков и сотен гигабайт.
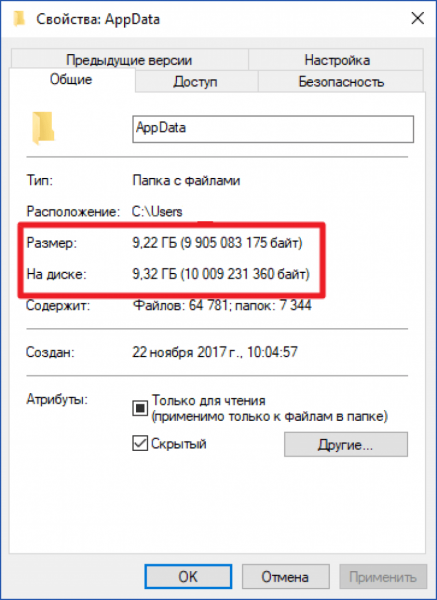
Если пользователь устанавливает ресурсоёмкие утилиты и папка начинает весить, например, 10 ГБ, то переживать не стоит: в ней находятся файлы, которые необходимы программам для полноценной работы. Нет предельного размера для папки AppData.
Если вы удаляете программы с помощью стандартного средства Windows (окна «Программы и компоненты»), исчезают только файлы, которые хранятся в системном разделе Program Files. При этом данные удаляемых приложений в папке AppData остаются на своём месте. Их называют «остаточными файлами» или «хвостами». Таким образом, постепенно накапливается большое количество совершенно ненужной информации, которую нужно убирать.
Если программы с ПК часто удаляются пользователем, но папка продолжает увеличиваться в размерах даже при использовании нескольких утилит, то нужно подумать о её очистке. Освобождение папки от «мусора» очистит системный диск. В результате компьютер станет работать быстрее.
Как решить данную проблему
Чтобы вес папки уменьшился, необходимо сначала удалить временные файлы, которые в ней хранятся, в частности, в папке Temp. В версии Windows 10 это сделать очень просто:
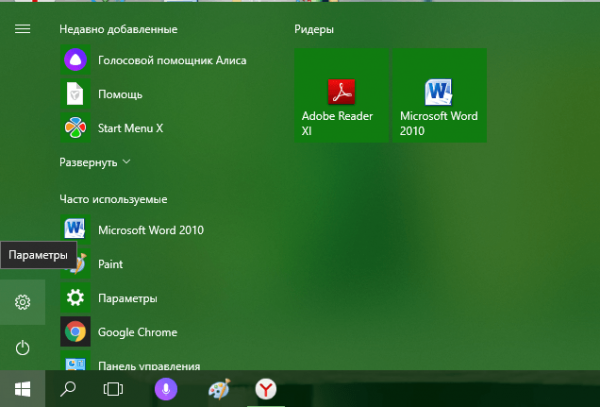
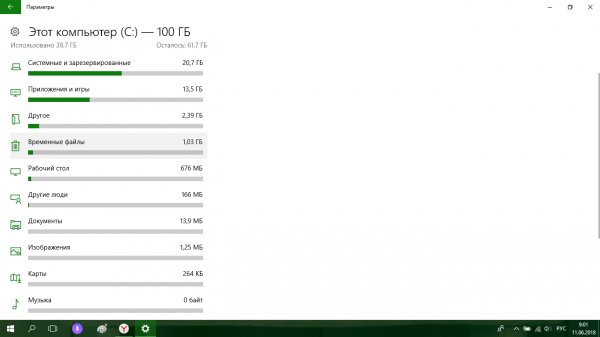
- Откройте меню «Пуск». Над кнопкой выключения компьютера будет значок в виде шестерёнки. Нажмите на него, чтобы открыть «Параметры».

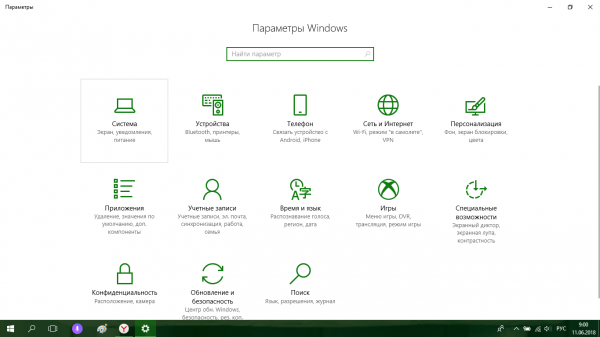
Кликните по кнопке с шестерёнкой, чтобы открыть окно «Параметры» - Запустится окно на весь экран. Теперь выбираем первый пункт «Система».

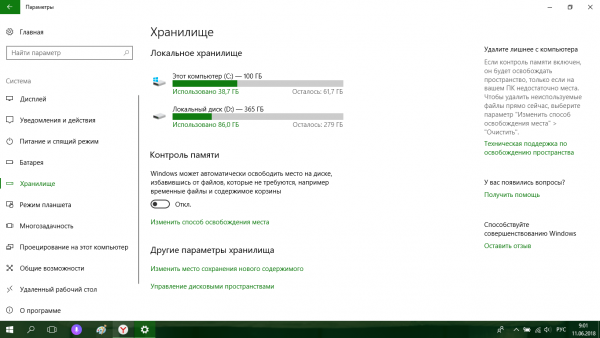
Запустите раздел «Система» - Переходим на вкладку «Хранилище». В ней открываем диск «С:», на котором хранится папка AppData.

Во вкладке «Хранилище» откройте системный диск «С:» - Система начнёт анализ занятого места на этом диске. Подождите, когда он завершится.
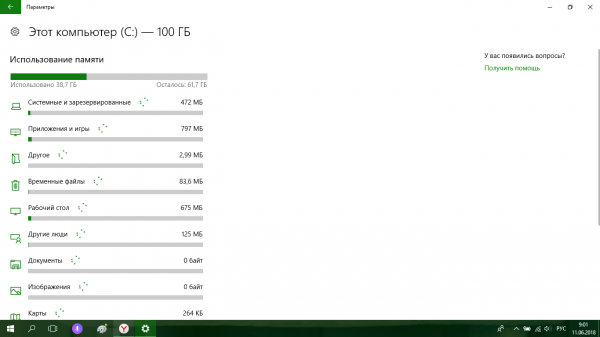
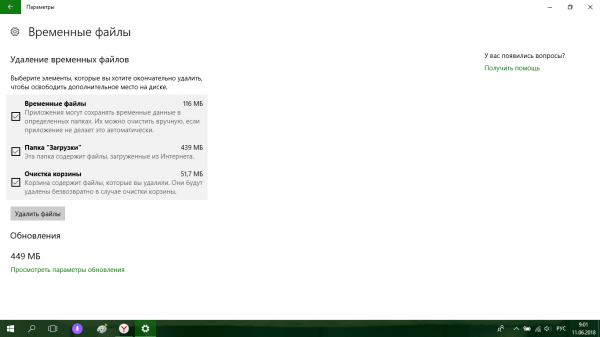
Подождите, пока завершится анализ содержимого на системном диске - В списке найдите пункт «Временные файлы». Кликните по нему левой кнопкой мыши, чтобы он открылся.
Откройте пункт «Временные файлы» одним кликом мыши - Поставьте галочки рядом с тремя пунктами: «Временные файлы», «Папка «Загрузки» и «Очистка корзины». Теперь щёлкните по серой кнопке «Удалить файлы». Под кнопкой вы сразу увидите общий вес всех «мусорных» файлов, которые вы удаляете.
Отметьте все пункты и нажмите на кнопку «Удалить файлы» - Дождитесь, когда система удалит весь мусор.
Проверьте, сколько теперь занимает места папка AppData. Если так же много, избавьтесь от «хвостов» от ранее удалённых вами программ вручную:
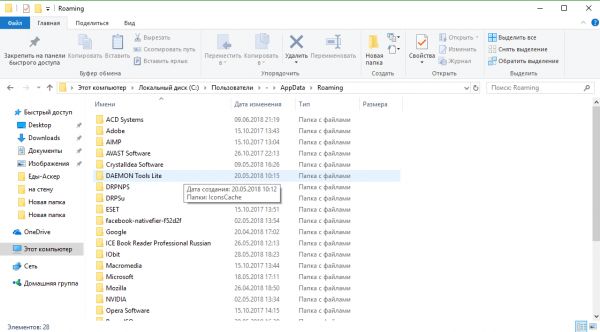
- Откройте папку AppData.
- Поочерёдно зайдите в три раздела папки: Local, LocalLow и Roaming. Посмотрите, есть ли в них папки с названием программ, которые вы уже ранее удалили из памяти компьютера.
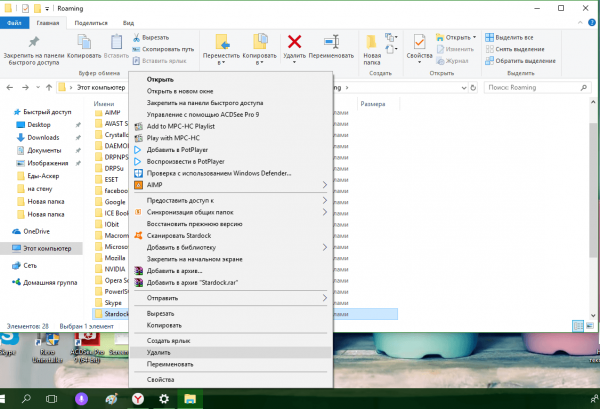
Найдите в папках разделы с названиями удалённых ранее программ - Если такие папки есть, уберите их. Кликните правой кнопкой мыши по папке. В контекстном меню выберите «Удалить».

Уделите найденные папки через контекстное меню, которое вызывается кликом правой кнопкой мыши по объекту
При последующих деинсталляциях программ используйте сторонний софт для зачистки остаточных файлов программ. Он будет сам удалять за вас все файлы, связанные с этими программами. Среди таких деинсталляторов можно выделить Revo Uninstaller, Uninstall Tool, Soft Organizer и многие другие.
Видео: как очистить папку AppData
Можно ли удалить или поменять расположение системного раздела AppData
Удалять папку AppData полностью просто так нельзя, так как она содержит важную информацию для полноценной работы ваших программ. В целом на систему удаление папки не повлияет, но при этом у вас появятся сбои в работе утилит. Они будут запускаться с начальными настройками, работать некорректно или вообще не будут открываться. Более того, запущенные программы будут мешать удалению файлов, так как они будут в данный момент ими пользоваться. В результате папка удалится лишь частично.
К очистке папки AppData нужно подходить осторожно. Удалять можно только отдельные файлы и папки в ней. Воспользуйтесь методами, которые были представлены выше в разделе «Как решить данную проблему».
Содержимое папки можно также переместить на другой жёсткий диск вашего компьютера, если на системном осталось очень мало места. Это возможно за счёт копирования файлов по отдельности в папку под тем же именем, но уже на другом диске. После этого в «Редакторе реестра» меняется директория. В результате программы будут искать нужные файлы не на системном диске, а, например, на диске D, где места гораздо больше.

Перенос особенно актуален для твердотельных дисков SSD: зачастую у них небольшой объём, и пользователи стараются экономить место.
Нужно принять во внимание также тот факт, что скорость ответа от программы, которая обращается к временным файлам на SSD или HDD дисков, отличается. Для дисков SSD она быстрее.
В папке AppData хранятся данные, которые важны не для системы Windows в целом, а для программ, загруженных и работающих у вас на компьютере. Удалять её полностью крайне не рекомендуется, иначе вы просто не сможете в дальнейшем работать со своими утилитами. Чтобы уменьшить её объем, удалите временные файлы и «хвосты» от ранее деинсталлированных программ. Если папка всё равно много весит, переместите её на другой жёсткий диск, где места больше.
- Распечатать
Оцените статью:
- 5
- 4
- 3
- 2
- 1
(32 голоса, среднее: 4.9 из 5)
Поделитесь с друзьями!
There is no AppData folder, how to find it?
«It is said that downloaded application files are stored in a folder called AppData that resides in C:/Users. However, when I open the Users folder, only find Documents, Music, Pictures, Videos, Downloads except for AppData. Is the AppData folder missing?»
How to restore AppData folder Windows 10?
«Lost Users folder along with AppData folder in C drive after reinstalling Windows 10, can I restore the missing AppData folder as a whole so that I won’t take much time to re-download those frequently used applications?»
AppData folder resides in Users folder in C drive but was set as unseen by default. If the folder is missing, but you never removed it before, then it’s easy to unhide it and find your application files without making a fuss. While if the AppData is deleted or lost, you need to use EaseUS Data Recovery Wizard to help you out.
How to Unhide AppData in Windows 10/11
1. Browse to your main drive where Windows installed, e.g., C:
2. Go to C:\Users\username\
3. Next, click the «View» tab at the very top and tick «Hidden items» option. It will present all folders, including the AppData folder.
How to Restore Deleted AppData Folder in Windows 10/11
What if the AppData folder is not hidden but was deleted? This happens when people are trying to free up C drive space. Fortunately, it’s possible to bring lost AppData back by employing reliable Windows EaseUS Data Recovery Wizard — EaseUS Data Recovery Wizard. Being similar with the method to recover lost/hidden Users folder in C drive, let’s learn in details for deleted AppData folder recovery.
Steps for AppData folder recovery in Windows 10 with EaseUS Data Recovery Wizard
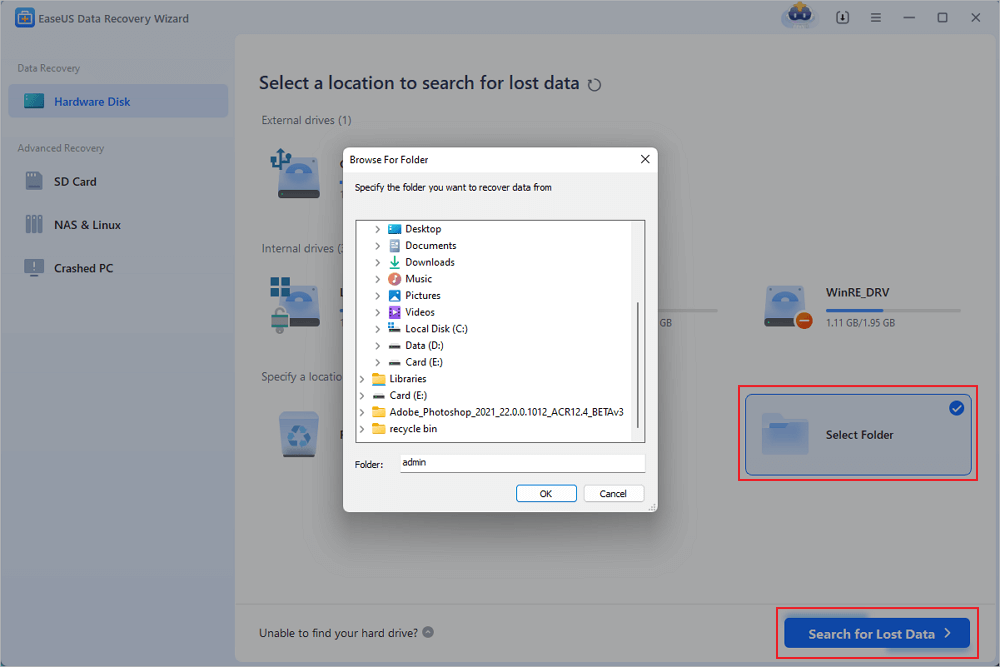
Step 1. Select a folder to scan for lost files
Launch EaseUS Data Recovery Wizard. Choose «Select Folder» under Specify a location. Click «Browse» to choose the location where you lost the folder and click «OK» to scan the lost folder.
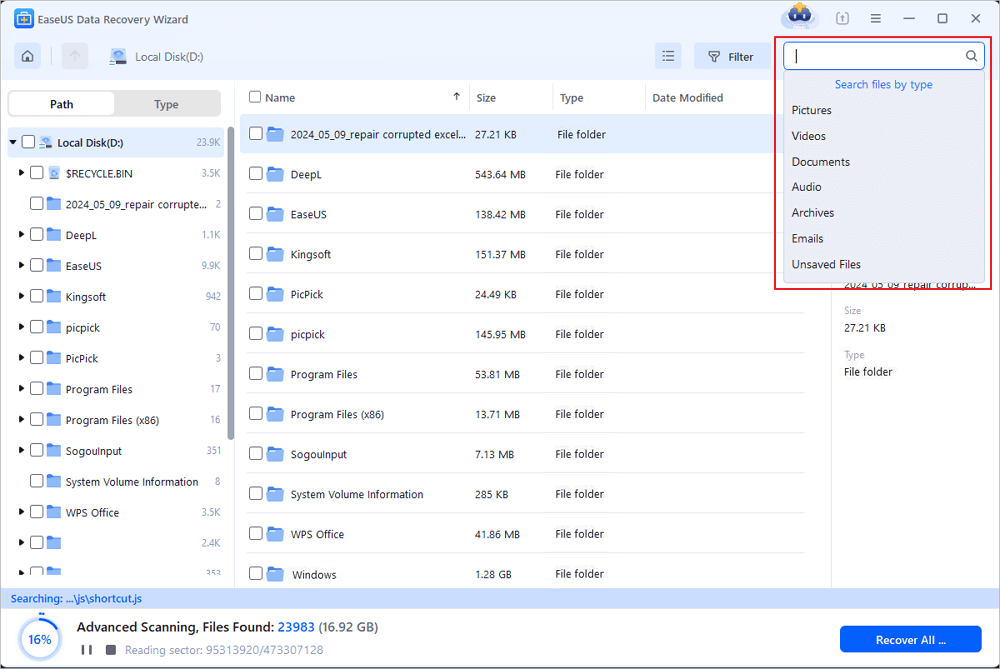
Step 2. Find and preview found files in the lost folder
If you remember the folder name, type the folder name in search box to quickly find the lost files. Then, open the found folder and double-click to preview scanned files. Or you can use the Filter feature to find a certain type of files.
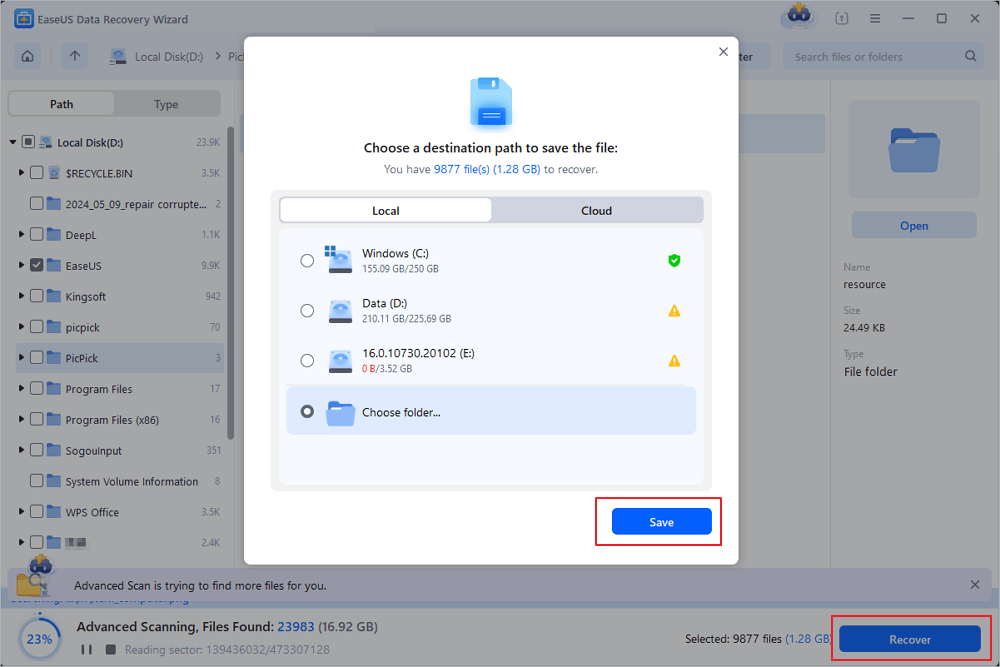
Step 3. Recover and save the lost folder
Last, select the folder and files you need, click «Recover» and choose a new & secure location on your PC to keep the recovered data.
|
appdata.dll Версия dll: 9.00.0010 |
|
Описание |
: AppData |
|
Автор |
: America Online, Inc. |
|
Размер |
: 7680 Byte ( 7.5 KB ) |
|
Дата |
: 2015-6-30 |


Как установить DLL файл?
Подробная инструкция по установке
- Загрузите файл appdata.dll на компьютер.
- Поместите файл в папку с требующей его программой.
- Скопируйте файл dll file в следующие системные директории.
- (Windows XP, Vista, Windows 7, Windows 8.1, Windows 10) — C:\Windows\System32
- (Windows NT/2000) — C:\WINNT\System32
- (Windows 95/98/Me) — C:\Windows\System
В Windows x64 необходимо поместить файл в директорию C:\Windows\SysWOW64\
- Перезагрузите компьютер.
Проблемы связанные с файлом
![]() Наиболее распространенные проблемы связанные с файлом.
Наиболее распространенные проблемы связанные с файлом.
- «appdata.dll Missing»
- «appdata.dll не найден.»
- «Файл appdata.dll отсутствует.»
- «appdata.dll нарушение прав доступа.»
- «Файл appdata.dll не удалось зарегистрировать.»
- «Файл C:\Windows\System32\ appdata.dll не найден.»