Introduction
Apache Tomcat is an open-source web server and servlet container for Java code. Tomcat executes programs written in the Java programming language, and it implements many Java EE specifications, including Jakarta Servlet, Jakarta Server Pages, and others.
In this tutorial, you will learn to install the Apache Tomcat server on Windows.
Prerequisites:
- Java JRE installed and configured
- Administrator privileges
In this section, we will cover two ways of installing the Tomcat web server:
- Via Windows Service Installer.
- From a zip archive.
Follow the steps below to download and install Tomcat.
Step 1: Download Tomcat for Windows
To download the Tomcat installation file, follow the steps below:
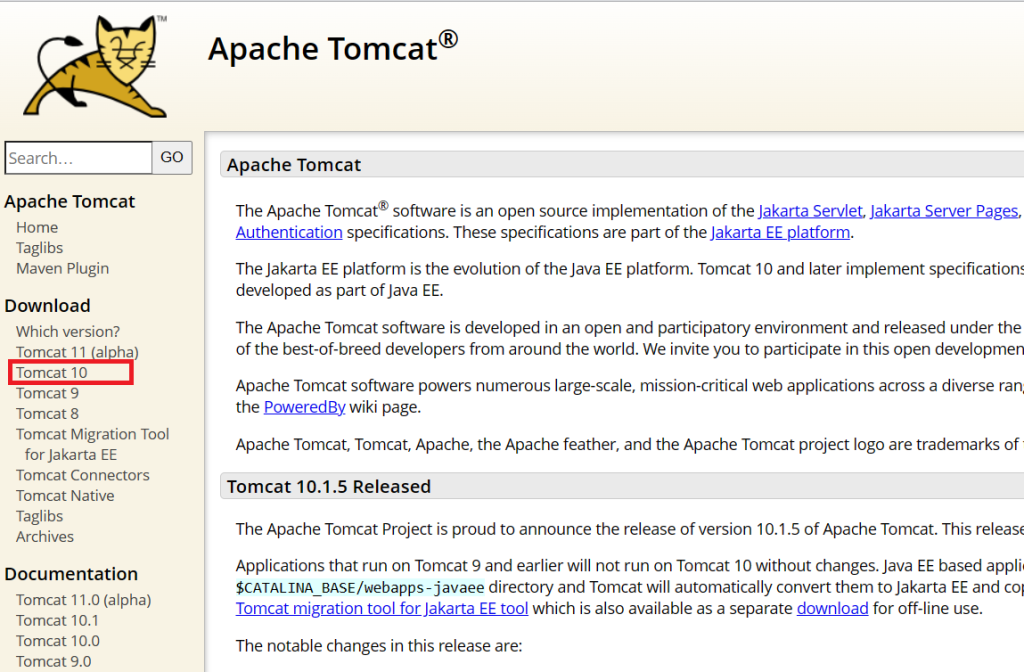
1. Browse to the official Apache Tomcat website. Locate the Download section and click the latest Tomcat version available. At the time of writing this article, the latest Tomcat version was version 10.
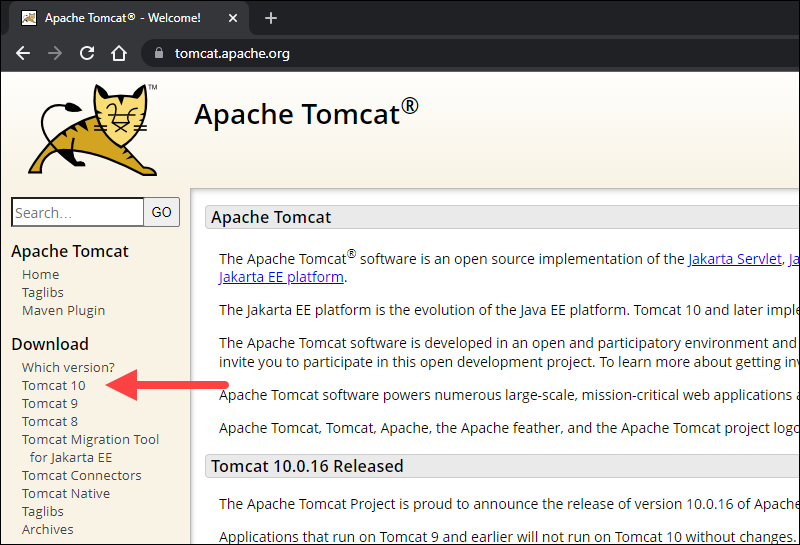
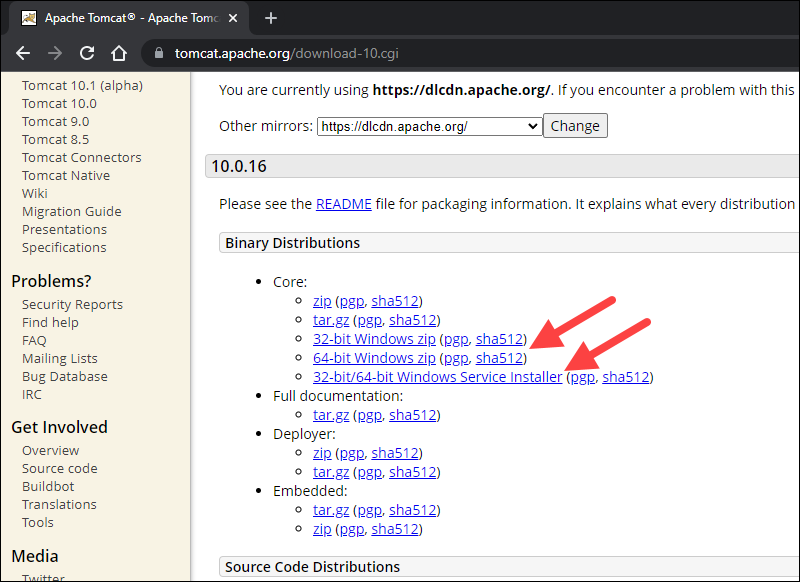
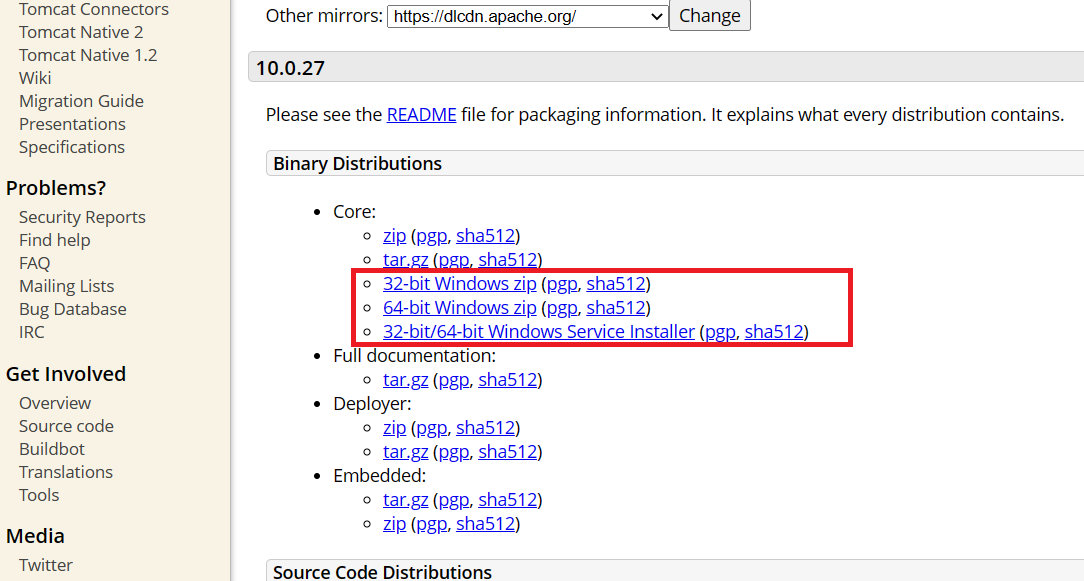
2. On the Download page, scroll down and locate the Binary Distributions area.
In the Core list, depending on the installation type you prefer, click the download link for the Windows Service Installer or the 32bit/64bit Windows zip file.
Step 2: Install Tomcat
Install Tomcat via the Windows Service Installer for an automated and wizard-guided experience. The service installer installs the Tomcat service and runs it automatically when the system boots.
For a portable experience, install Tomcat using the zip file and avoid installing the service. Easily uninstall Tomcat when it is no longer needed by deleting the Tomcat directory, or move it around when necessary.
Note: Take a look at our list of 13 best Java IDEs, which help write, debug, and test Java code.
Method 1: Install Tomcat Using the Windows Service Installer
Follow the steps below to install Tomcat using the Windows Service Installer.
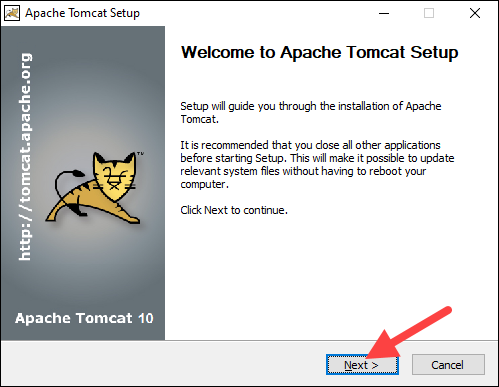
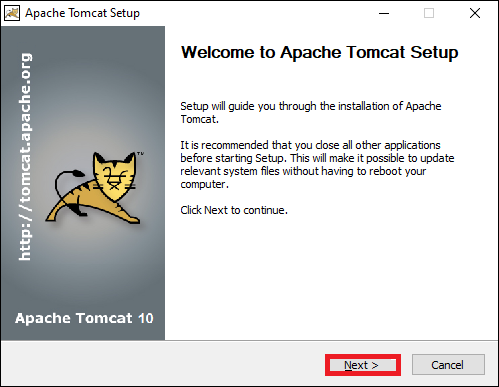
1. Open the downloaded Windows Service Installer file to start the installation process.
2. In the Tomcat Setup welcome screen, click Next to proceed.
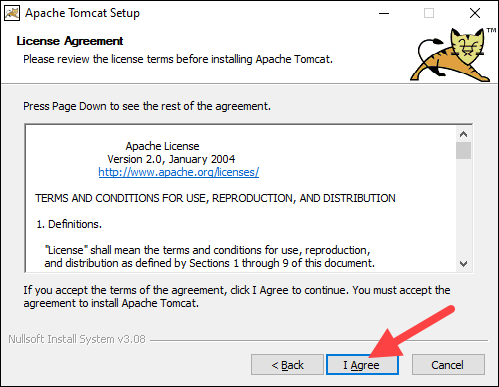
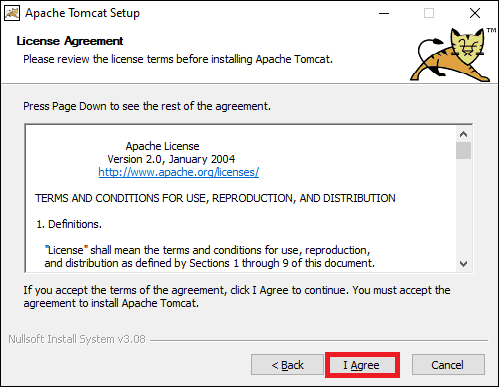
3. Read the License Agreement and if you agree to the terms, click I Agree to proceed to the next step.
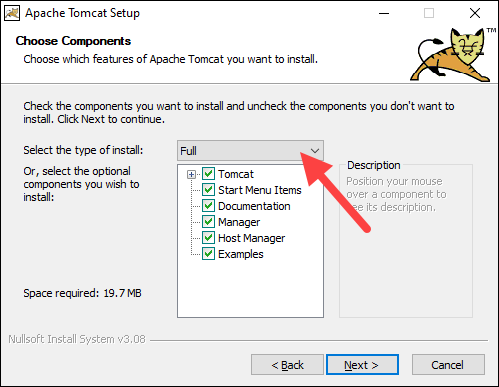
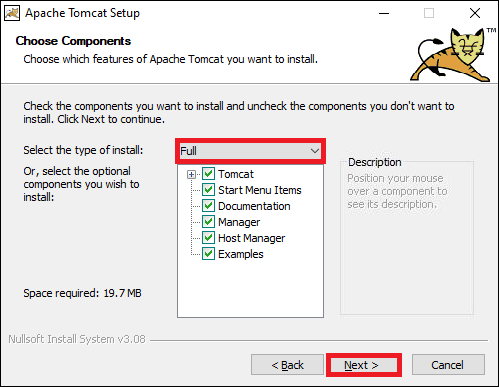
4. In the Tomcat component selection screen, choose Full in the dropdown menu to ensure the wizard installs the Tomcat Host Manager and Servlet and JSP examples web applications. Alternatively, keep the default Normal installation type and click Next.
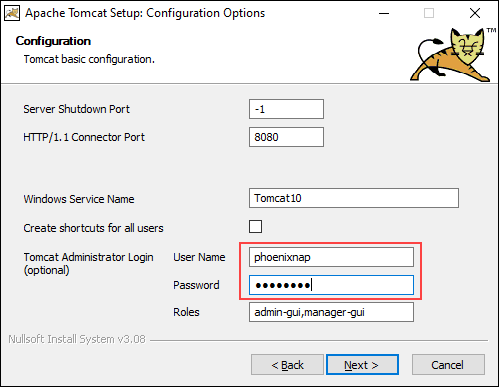
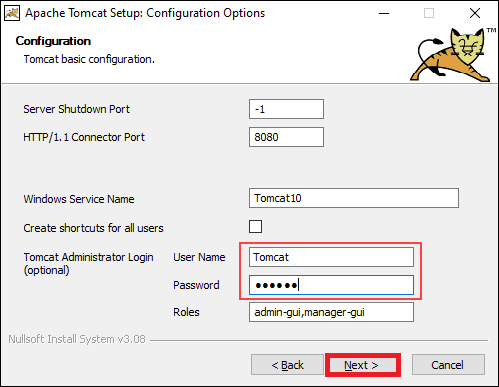
5. The next step configures the Tomcat server. For instance, enter the Administrator login credentials or choose a different connection port. When finished, click Next to proceed to the next step.
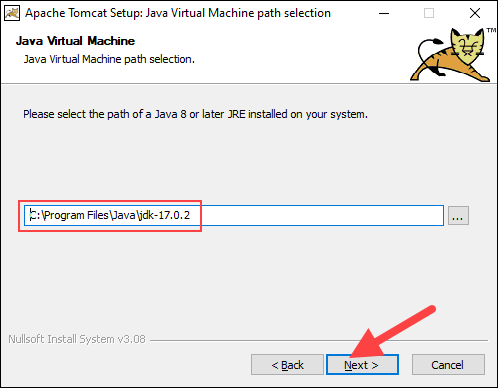
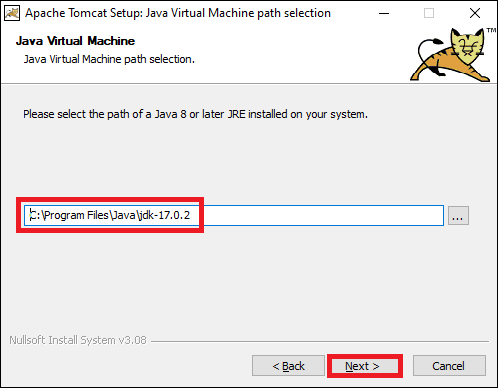
6. The next step requires you to enter the full path to the JRE directory on your system. The wizard auto-completes this if you have previously set up the Java environment variables. Click Next to proceed to the next step.
7. Choose the Tomcat server install location or keep the default one and click Install.

8. Check the Run Apache Tomcat box to start the service after the installation finishes. Optionally, check the Show Readme box to see the Readme file. To complete the installation, click Finish.
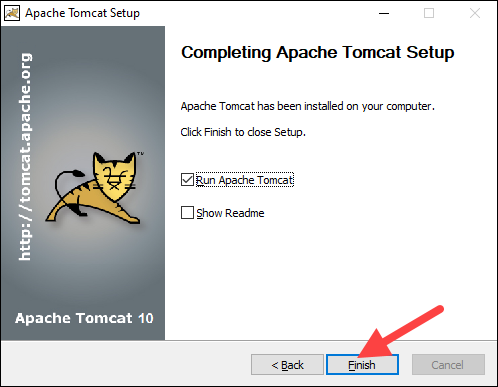
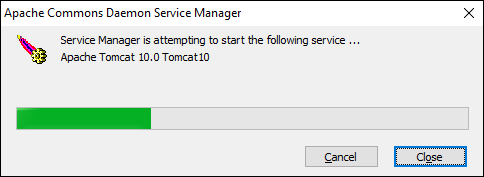
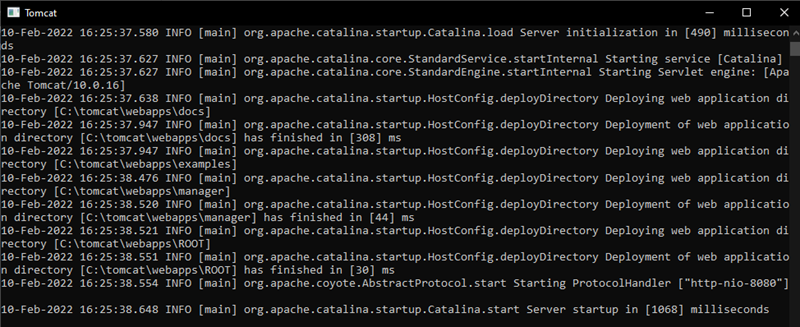
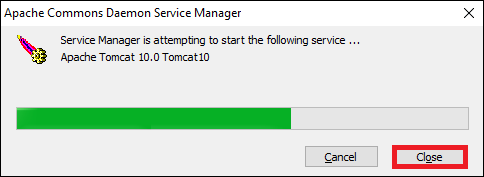
9. A popup window appears that starts the Tomcat service. After the process completes, the window closes automatically. The Apache Tomcat web server is now successfully installed .
Method 2: Install Tomcat Using the zip Archive
Follow the steps below to set up the Tomcat server using the zip archive.
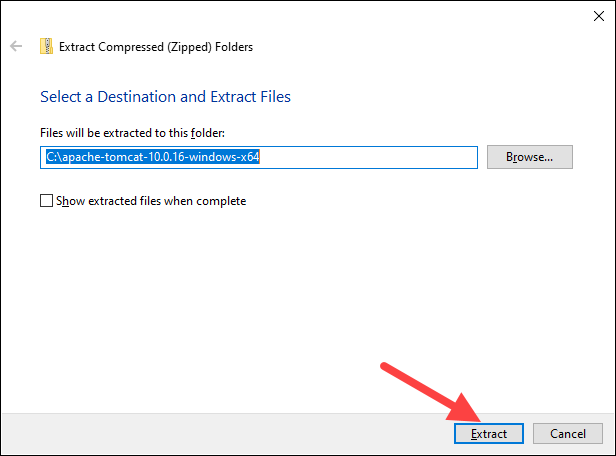
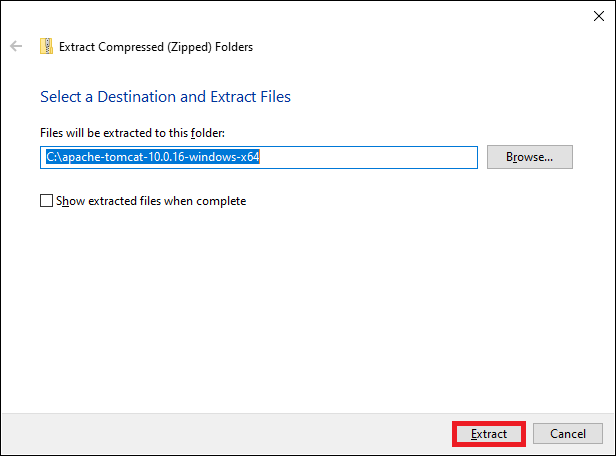
1. After downloading the 32bit/64bit Windows zip file, depending on your Windows version, unzip the downloaded file. Right-click the file and select Extract all…
2. Choose where to extract the archive contents. For easier navigation, we recommend extracting it to the hard drive’s root. Optionally, give the directory a shorter name to facilitate server configuration later. Click Extract to start the process.
3. Navigate to the conf sub-directory within the extracted directory and locate the server.xml file.
Important: Back up the .xml files before making any changes.
4. The default connection port is 8080. To choose a different port, edit the server.xml file with a text editor, such as Notepad++, and locate the following lines:
<Connector port="8080" protocol="HTTP/1.1"
           connectionTimeout="20000"
           redirectPort="8443" />
Change the connector port number to any number between 1024 and 65535.
5. To enable directory browsing, locate the web.xml file in the conf directory and edit the file with a text editor. Directory browsing helps when testing the system, and sometimes it may be the solution for a 403 forbidden error.
Locate the following lines and change the listings value from false to true:
<servlet>
  <servlet-name>default</servlet-name>
  <servlet-class>org.apache.catalina.servlets.DefaultServlet</servlet-class>
  <init-param>
    <param-name>debug</param-name>
    <param-value>0</param-value>
  </init-param>
  <init-param>
    <param-name>listings</param-name>
    <param-value>false</param-value>
  </init-param>
  <load-on-startup>1</load-on-startup>
</servlet>
6. Implement an auto-reload feature by editing the context.xml file. Above all, auto-reload is useful in development to prevent restarting the server manually each time a change is made.
Using a text editor, open the context.xml file. Locate the following line and change the value from false to true in each instance:
<Context reloadable="false" crossContext="false" parallelAnnotationScanning="false">
   ......
   ......
</Context>
7. After making the changes, start the server. Press the Windows key and type cmd. Press Enter to open a Command Prompt window.
8. Move to the bin directory of your Tomcat server and run:
startup
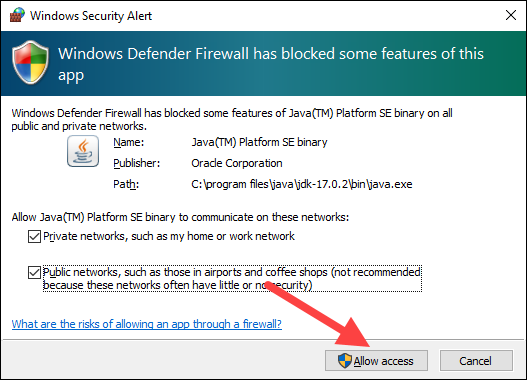
8. Add an exception for Tomcat in the firewall:
9. A new Tomcat console window appears. This console receives error messages and system.out.println() messages issued by the Java servlets.
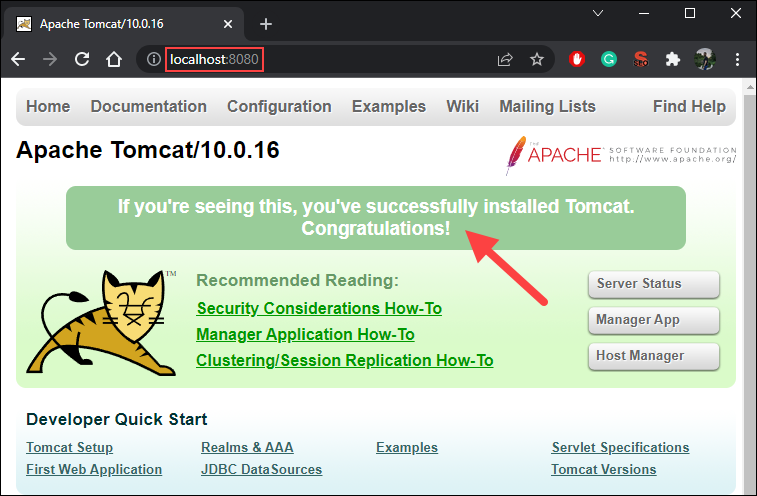
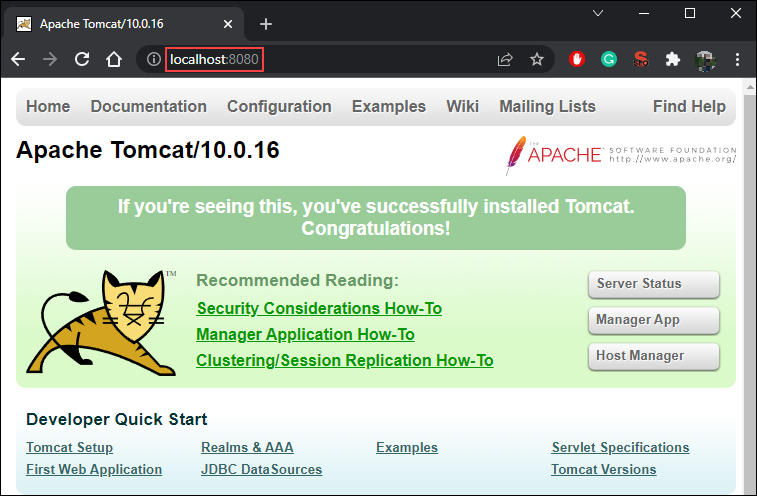
10. Access the server using a browser as an HTTP client. Browse to http://localhost:8080 and access the Tomcat welcome page to ensure the server works.
In addition, use the Developer Quick Start links to see more information about the server and start using and configuring the server.
11. Shut down the Tomcat server by pressing Ctrl+C on the Tomcat console.
Step 3: Check if Apache Tomcat Service Is Running
Installing Tomcat using the Windows Service Installer installs Tomcat as a Windows service that automatically runs on boot. Follow the steps below to ensure that Tomcat is started as a Windows service.
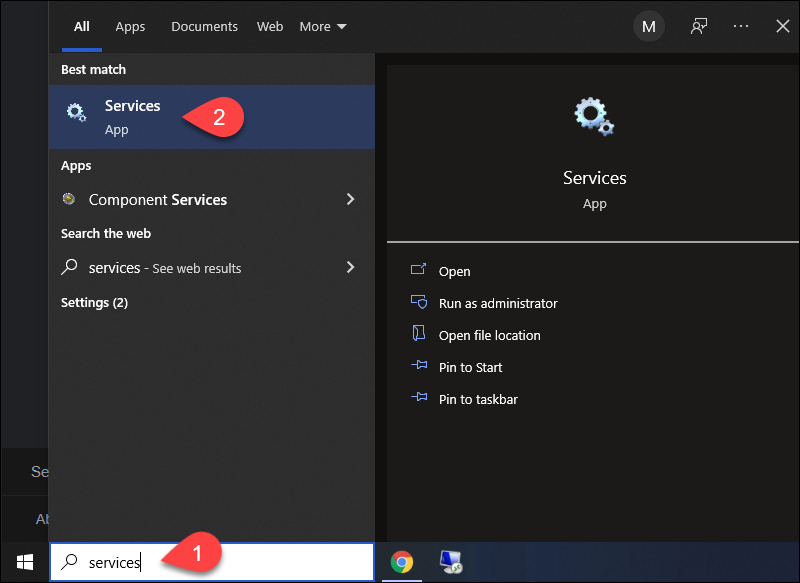
1. Open the Start menu and search for Services.
2. Select the Services result.
3. In the Services window, locate the Apache Tomcat service. The Status column indicates whether the service is running or not. Start or Stop the service using the buttons in the toolbar or by pressing Stop or Restart on the left side of the service list.
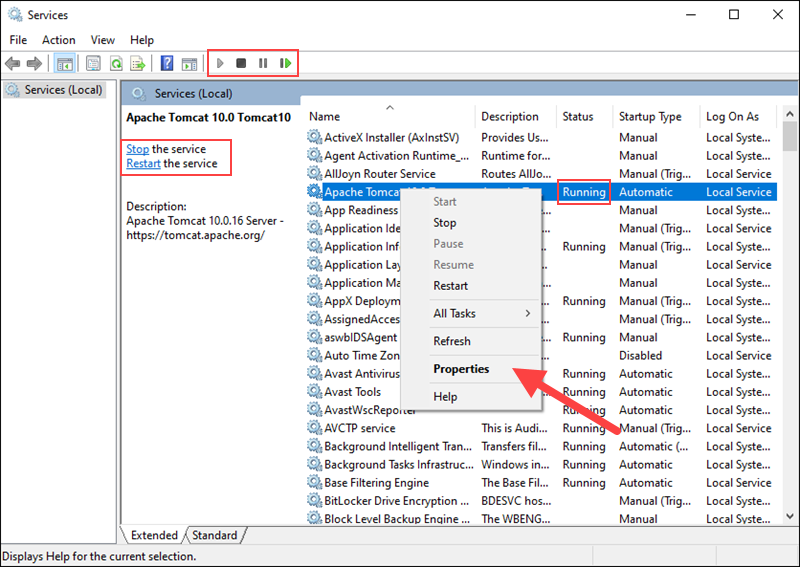
Configure the service startup by right-clicking the Tomcat service and selecting Properties.
4. In the Properties window, under the Startup type dropdown menu, select how to run the Tomcat service:
- Automatic (Delayed Start). Starts the service shortly after boot. A delayed start improves server boot performance and has security benefits.
- Automatic. Automatically starts the service on boot.
- Manual. The service starts only when Windows or another service needs it or if invoked.
- Disabled. Disables the service startup, even if you try to start it.
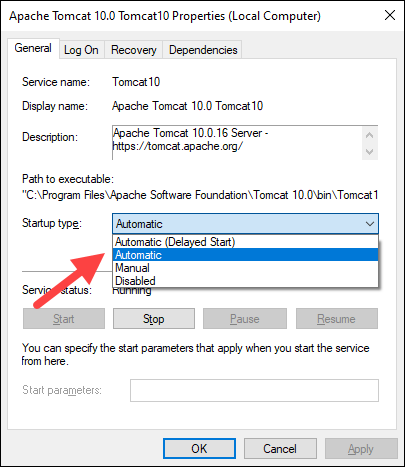
Click OK to confirm the changes.
Note: If you are looking for a different operating system, our Knowledge Base also has a tutorial on how to install Tomcat on Ubuntu.
Conclusion
This guide showed how to install the Apache Tomcat web server on Windows. While Tomcat doesn’t provide all the features of Java EE, many applications require only the features that Tomcat provides. Therefore, heavier tools aren’t always necessary.
Learn more about servers in our tutorial on big data servers, or learn what a database server is.
Обновлено
Совместимость
Windows XP, Windows Vista, Windows 7, Windows 8, Windows 10
Описание
Apache Tomcat — это веб-сервер, написанный на Java и предоставляющий возможность исполнять Java-код и запускать соответствующие веб-приложения на сервере.
Описание:
Веб-сервер, разработанный на Java. Он предоставит вам чистую среду Java, что позволит запускать соответствующий код и веб-приложения на сервере, вместо браузеров посетителей сайта. Это позволит значительно улучшить надежность работы веб-приложений, а также их время отклика.
Apache Tomcat может использоваться как в качестве самостоятельного веб-сервера, так и в сочетании с веб-сервером Apache HTTP Server, либо в качестве контейнера сервлетов в серверах JBoss и GlassFish.
Версии
Apache Tomcat for Windows 10 PC/laptop – Free download Apache Tomcat latest official version for Windows XP / Vista / Windows 7 / Windows 8 / Windows 10. Now, this app is available for Windows PC users. Apache Tomcat is one of the most popular Developer Tools apps worldwide!
Amazing comprehensive web development software for PC
Table of Contents
Apache Tomcat Latest Version Overview
![]()
Apache Tomcat is one of the most popular Developer Tools alongside TestComplete, JS Editor, and C++ Builder. This app has its advantages compared to other Developer Tools applications. Apache Tomcat is lightweight and easy to use, simple for beginners and powerful for professionals. Apache Tomcat application is free to download and offers easy-to-install, easy-to-use, secure, and reliable Developer Tools applications.
Apache Tomcat is a very fast, small, compact and innovative Open Source Developer Tools for Windows PC. It is designed to be uncomplicated for beginners and powerful for professionals. This app has unique and interesting features, unlike some other Developer Tools apps. Apache Tomcat works with most Windows Operating System, including Windows XP / Vista / Windows 7 / Windows 8 / Windows 10.
Although there are many popular Developer Tools software, most people download and install the Open Source version. However, don’t forget to update the programs periodically. You can get Apache Tomcat free and download its latest version for Windows XP / Vista / Windows 7 / Windows 8 / Windows 10 PC from below.
Apache Tomcat Technical Details
It’s better to know the app’s technical details and to have a knowledge background about the app. Therefore, you can find out if Apache Tomcat will work on your Windows device or not.
![]()
| App Name: | Apache Tomcat |
| Developer: | Apache Software Foundation |
| Version: | Apache Tomcat 9.0.31 |
| Updated: | February, 12th 2020 |
| Category | Developer Tools |
| File Size: | 11.3 MB |
| File Type: | EXE file |
| Requirement: | PC/laptop/tablet running Windows (Windows XP / Vista / Windows 7 / Windows 8 / Windows 10) |
| License: | Open Source |
Download Apache Tomcat for Windows 10 (64/32-bit) PC/laptop
Download Apache Tomcat (latest version) free for Windows 10 (64-bit and 32-bit) PC/laptop/tablet. Safe Download and Install from the official link!
Apache Tomcat 64-bit and 32-bit download features:
- Apache Tomcat direct, free and safe download
- Latest version update
- Compatible with Windows 10 64-bit and 32-bit
- Download Apache Tomcat for your PC or laptop
Apache Tomcat Setup Installer
Download & install the latest offline installer version of Apache Tomcat for Windows PC / laptop. It works with both 32-bit & 64-bit versions of Windows XP / Vista / Windows 7 / Windows 8 / Windows 10.
✔ Free & Safe Download for Windows PC/laptop – 11.3 MB
Safety (Virus) Test:
✔ Tested and is 100% Safe to download and install on your Windows XP / Vista / Windows 7 / Windows 8 / Windows 10 device (PC/laptop/tablet).
What is New in the Apache Tomcat Latest Version?
✓ Compatibilities improvement for new Windows update.
✓ Fixes bugs.
How to download and install Apache Tomcat for Windows 10 PC/laptop
Now let’s just move to the next section to share the steps you have to follow to download Apache Tomcat for Windows PC. So here we go:
- Download the Apache Tomcat installer file from the link above.
- Save the downloaded file to your computer.
- Double-click on the downloaded Apache Tomcat installer file.
- Now, a smart screen might appear and ask for a confirmation.
- Click “Yes” to confirm.
- Finally, follow the installation instructions until you get a confirmation notification of a successful installation process.
So those are all the processes that you have to follow to download Apache Tomcat for Windows PC. Then let’s go on to the next section where we will discuss Apache Tomcat itself. So you can understand the application and its features. So here we go:
Top Features of Apache Tomcat for Windows PC
Apache Tomcat is a Developer Tools application like Komodo IDE, Twine, and RubyInstaller from Apache Software Foundation. It has a simple and basic user interface, and most importantly, it is free to download. Apache Tomcat is an efficient software that is recommended by many Windows PC users.
This application’s primary functions are comprehensive and go beyond the features offered by others that can be considered as its rivals.
- Apache Tomcat for PC – fast, reliable, and robust by Apache Software Foundation.
- Apache Tomcat Free & Safe Download.
- Apache Tomcat latest version for the best experience.
- It works/compatible with almost all Windows versions, including Windows XP / Vista / Windows 7 / Windows 8 / Windows 10.
- Free of Cost!
- User-friendly Interface.
- Easy to Use.
- Privacy and Security!
- Lightweight and consume low resources.
- Best for Developer Tools application.
- PC User’s choice!
How to uninstall Apache Tomcat in Windows PC?
Steps to uninstall Apache Tomcat in Windows 10 / Windows 8 / Windows 7 / Windows Vista
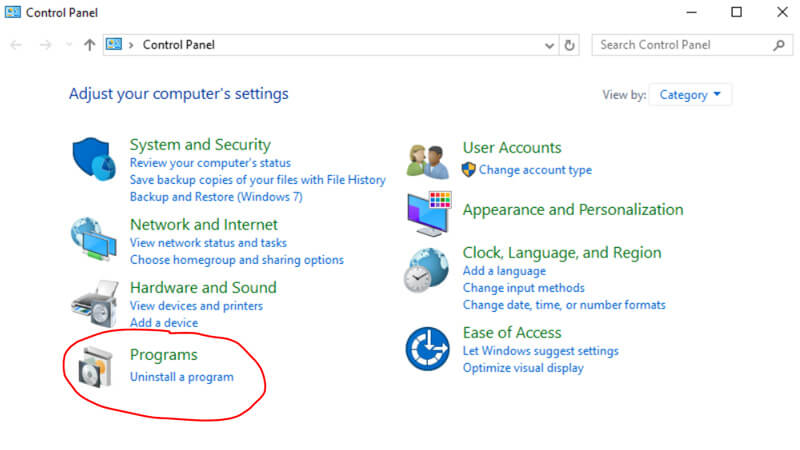
- Click the Windows Start menu.
- Locate and select the Control Panel menu, then select Programs.
- Under Programs, click the Uninstall a Program.
- Select Apache Tomcat and then right-click, select Uninstall/Change.
- Then click Yes to confirm the Apache Tomcat uninstallation process.
Steps to uninstall Apache Tomcat in Windows XP
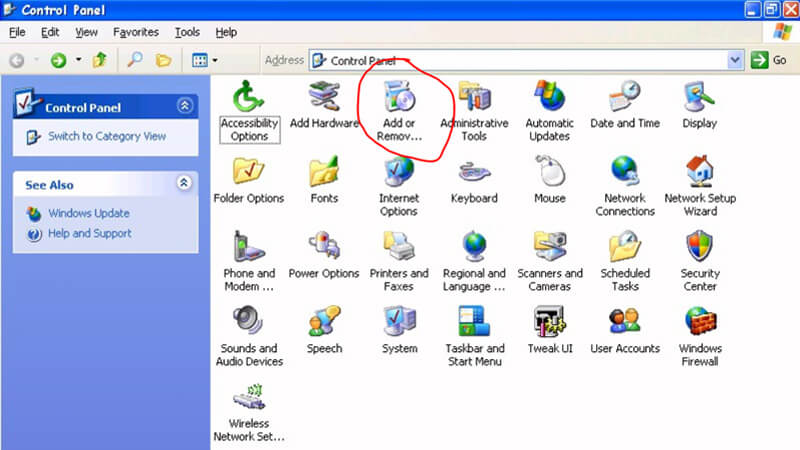
- Click the Windows Start menu.
- Locate and select the Control Panel menu, then select Add or Remove Programs icon.
- Select the Apache Tomcat and then click Remove/Uninstall.
- Then click Yes to confirm the Apache Tomcat uninstallation process.
Steps to uninstall Apache Tomcat in Windows 95, 98, Me, NT, 2000
- Click the Windows Start menu.
- Locate and select the Control Panel menu, then double-click the Add/Remove Programs icon.
- Select the Apache Tomcat and then right-click, select Uninstall/Change.
- Then click Yes to confirm the Apache Tomcat uninstallation process.
Best Apache Tomcat Alternative Apps for Windows
Isn’t Apache Tomcat what you were looking for? We prepared a list of alternatives below!
 TestComplete
- JS Editor
- C++ Builder
- CryEngine
- VMware Player
TestComplete, JS Editor, and C++ Builder is the strong competitor of Apache Tomcat. Otherwise, CryEngine and VMware Player also quite good as the alternative of this software. There are also other similar apps such as RubyInstaller, Twine, and Komodo IDE that also need to try if you want to find the best alternative of Apache Tomcat.
In Conclusion
The Apache Tomcat for Windows PC is unquestionably the best Developer Tools that you can find nowadays. It also is the most reliable when it comes to performance and stability. You can find that out for yourself. That is why a lot of PC users recommend this app.
Get superb and impressive experience using this Apache Tomcat application developed by Apache Software Foundation. Apache Tomcat nowadays are already getting better each time.
If you have some questions related to this app, feel free to leave your queries in the comment section. Or you can share with us your experience when using this Apache Tomcat on your Windows 10 PC. And if you know other people who want to experience Apache Tomcat for Windows PC, you can share this article to help them. Enjoy using Apache Tomcat for Windows PC.
Find other interesting articles that will help you how to download TestComplete for Windows 10 PC, install JS Editor for Windows 10, C++ Builder review, or about best CryEngine alternative apps for Windows 10.
Apache Tomcat FAQ (Frequently Asked Questions)
Q: What is Apache Tomcat for PC?
A: For more information about this app, please go to the developer link on the above of this page.
Q: How do I access the free Apache Tomcat download for Windows PC?
A: It is easy! Just click the free Apache Tomcat download button in the above of this page. Clicking the download button will start the installer to download Apache Tomcat free for a PC/laptop.
Q: Is Apache Tomcat free? If not, how much does it price to download this app?
A: Absolutely no cost! You can download this app from official websites for free by this website—any extra details about the license you can found on the owner’s websites.
Q: Is this Apache Tomcat will typically run on any Windows?
A: Yes! The Apache Tomcat for PC will typically work on most recent Windows operating systems, including Windows XP / Vista / Windows 7 / Windows 8 / Windows 10 64-bit and 32-bit.
Q: What’s the importance of downloading the latest version of Apache Tomcat?
A: We recommend downloading the latest version of Apache Tomcat because it has the most recent updates, which improves the quality of the application.
Q: What’s the difference between 64-bit and 32-bit versions of Apache Tomcat?
A: The Apache Tomcat 64-bit version was specially designed for 64-bit Windows Operating Systems and performed much better on those. The Apache Tomcat 32-bit version was initially intended for 32-bit Windows Operating Systems, but it can also run on 64-bit Windows Operating Systems.
Disclaimer
Apache Tomcat is an application that builds by Apache Software Foundation. All trademarks, product names, company names, and logos mentioned here are their respective owners’ property. This site (autotechint.com) is not affiliated with them directly. All information about applications, programs, or games on this website has been found in open sources on the Internet.
We don’t host or store Apache Tomcat on our servers. Downloads are done through the Official Site. We are firmly against piracy, and we do not support any sign of piracy. If you think that the application you own the copyrights is listed on our website and want to remove it, please contact us.
We are always compliant with DMCA regulations and respect the application owners. We are happy to work with you. Please find the DMCA / Removal Request page below.
Apache Tomcat is a free and open-source web server written in the Java program language. It implements the Jakarta Servlet, Jakarta Expression Language, and Web Socket technologies. In this article, you will learn How to Install and Set Up Apache Tomcat on Windows. While Tomcat is not a full JEE server, it is a java web application server. Developed by the community of developers under the auspices of the Apache Software Foundation, Tomcat is released under the Apache License 2.0 license. You can install Apache Tomcat in two different ways. Both two methods to install Apache Tomcat on Windows will be explained.
In order to install Apache Tomcat on Windows, you will need to have an already running Windows VPS.
Prerequisites to Install Apache Tomcat on Windows
To let this tutorial works correctly, provide the options below and move on.
- A non-root user with
sudoprivileges. - Java Runtime Environment (JRE) or Java Development Kit (JDK) installed and configured.
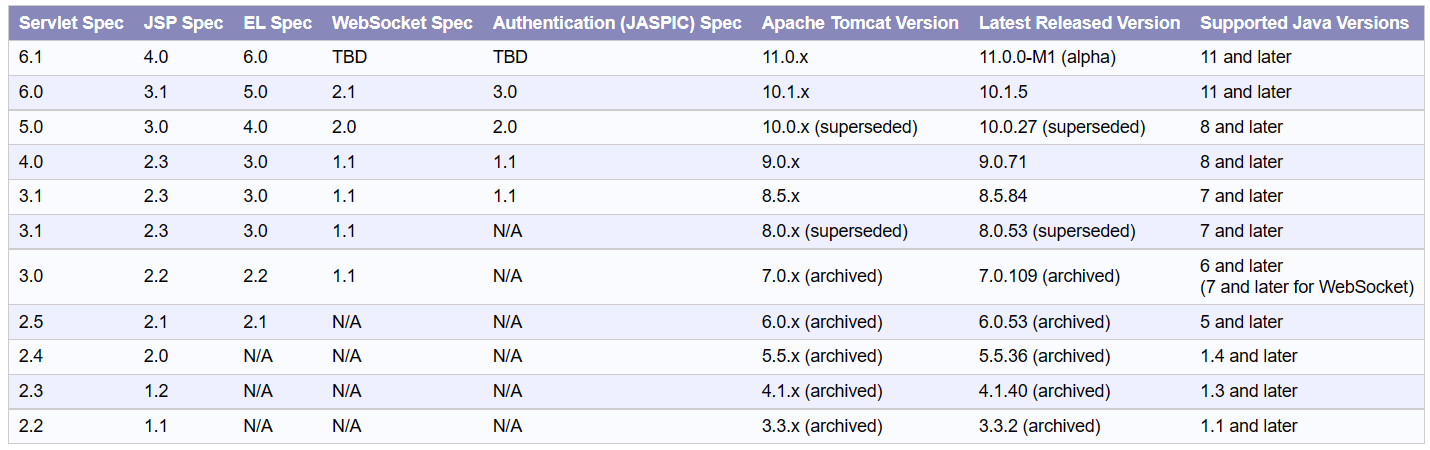
Note: Since there are different versions of Apache Tomcat available for different versions of the specifications, have a look at the below image to determine your required Java Version.
In this guide, we are going to Install Apache Tomcat 10 on Windows.
Previously, you reviewed the required steps to install Tomcat on CentOS. Stay with us to Install Tomcat on Windows step by step. Let’s go through this guide and learn how to install and set up Apache Tomcat on Windows.
Step 1: Download Tomcat
Open your favorite browser and navigate to the Official Apache Tomcat Website to download the latest Tomcat Version. As you see, you can choose it on the left menu.
Then, by scrolling down to the Binary Distribution area, click the download link for the Windows Service Installer or the 32bit/64bit Windows zip file.
from now on, you can continue the installation process in two different methods. If you have chosen the Windows Service Installer, it will be going like this:
Step 2: Install Tomcat Using the Windows Service Installer
If you prefer to use the Windows Service Installer to install Apache Tomcat on Windows, follow the path below. When you open the Downloaded Windows Service Installer, click the Next button to let the installation begin as you see below.
Then, Read and Agree to the License to continue.
In the installation components windows, select the dropdown menu and select Full. In this way, the Tomcat server, start menu items, examples, admin interface, and documentation tools will be installed.
Now, it is time to set up the configure settings. The Tomcat server. For example, you can enter the Administrator login credentials such as username and password, or choose a different connection port to customize it to the port you consider. Also, you can name the Tomcat service or leave the default.
Next, you need to enter the full path to the JRE directory. However, it will be completed automatically if the Java environment variables are already set. When you are finished, click Next to move on.
In the next step, you need to choose the Tomcat server install location. Also, you can keep the default. Finally, click Install and continue.
When the installation is finished, check the Run Apache Tomcat box to start the service. If you desire to see the Readme file, check the Show Readme box. Click Finish to complete the installation.
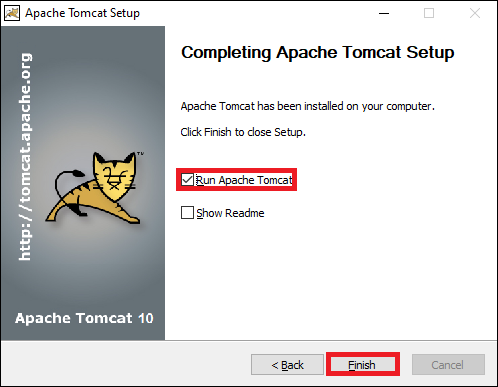
When the popup window shows up, it means that the Tomcat service is being started. After that, it will be closed automatically. Now, you’re all set and the Apache web server must have been successfully installed.
Step 3: Install Apache Tomcat Using the zip Archive
As we mentioned, there are two methods to install Apache Tomcat on Windows. the second method you can use to Install Apache Tomcat on Windows is using the zip Archive. Depending on your Windows version, you download the 32bit/64bit Windows zip file. Then, unzip the downloaded file, Right-click the file, and select Extract all…
Define where the archive’s contents should be extracted. We advise extracting it to the hard drive’s root for simpler navigation. The directory can optionally have a shorter name to make server configuration easier in the future. To begin the procedure, click Extract.
Then, navigate to the conf sub-directory within the extracted directory and locate the server.xml file. The connection port’s default value is 8080. Locate the following lines in the server.xml file using a text editor like Notepad++ in order to select a different port:
<Connector port="8080" protocol="HTTP/1.1"
           connectionTimeout="20000"
           redirectPort="8443" />
Next, change the connector port number to any number between 1024 and 65535.
Locate the web.xml file in the conf directory, then update the file using a text editor to allow directory browsing. Directory searching is useful for system testing, and occasionally it can fix a 403 prohibited issue.
Locate the following lines and change the listings value from false to true:
<servlet>
  <servlet-name>default</servlet-name>
  <servlet-class>org.apache.catalina.servlets.DefaultServlet</servlet-class>
  <init-param>
    <param-name>debug</param-name>
    <param-value>0</param-value>
  </init-param>
  <init-param>
    <param-name>listings</param-name>
    <param-value>false</param-value>
  </init-param>
  <load-on-startup>1</load-on-startup>
</servlet>
Edit the context.xml file to include an auto-reload feature. Above all, auto-reload is helpful during development to avoid manually restarting the server after each update. Use your favorite text editor and open the context.xml file. Locate the following line and change the value from false to true in each instance:
<Context reloadable="false" crossContext="false" parallelAnnotationScanning="false">
   ......
   ......
</Context>
Start the server after making the changes. Cmd can be entered by pressing the Windows key. Enter will bring up a Command Prompt window. Then, navigate to your Tomcat server’s bin directory and execute:
startupNext, you need to add an exception for Tomcat in the firewall. There’s a new Tomcat console window now. The Java servlets’ system.out.println() and error messages are sent to this console.
Use a web browser as an HTTP client to connect to the server. To test the server, go to http://localhost:8080 and visit the Tomcat welcome page. To learn more about the server and to get started using and configuring it, follow the Developer Quick Start pages.
When you decide to shut down the Tomcat server, you just need to press Ctrl+C on the Tomcat console.
How to verify Apache Tomcat is running
So far, you learned how to install and set up Apache Tomcat on Windows. When the installation process is finished successfully, and you viewed the recently mentioned Apache Tomcat page, you are ready to check if Apache Tomcat Service is running.
If you have done the installation by the first method, the Windows Service installer, tomcat must run on boot automatically as a Windows service. So, continue reading to make sure that tomcat is started as a Windows service:
To do this, open the Start men and search for Services and Select the Services result. Look for the Apache Tomcat service in the Services pane. The Status column shows whether the service is active or not. Using the toolbar buttons or the Stop or Restart buttons on the left side of the service list, you can start or stop the service.

Right-clicking the Tomcat service and choosing Properties will allow you to configure the service startup.
You have probably chosen a name for the tomcat service during the installation. If yes, you need to replace the ‘’Apache Tomcat 10’’ with the name of the service you created.
To view the information about the installed Java version, use the following command:
java --versionConclusion
In this article, you learned How to Install and Set Up Apache Tomcat on Windows. You reviewed two different methods to install Apache Tomcat on Windows, and then you learned how to configure it. If you follow the above steps properly then you can smoothly install Apache Tomcat on without any errors. But if you encounter any problems, please do not hesitate to contact us. Our technical support team will try their best to solve your problems.
Предположительно у вас система Windows 7, разрядность: 64 Bits
Подробнее

Скачать Apache Tomcat 10.1.6 с официального сайта
Этот файл мы отметили как основной. Если вы не знаете что скачивать, то скачивайте его.
12.9 Мб
Подробнее
![]()
0
![]()
0
apache-tomcat-10.1.6.exe
|
apache-mirror.rbc.ru
MD5: b7c68a17198ad5758c800f81d08417f5
SHA256: 8ae8dea05460bdc538a959fad2044baafd0ffe9f7cd3b11b876c40da27084a5f
Скачать Apache Tomcat 10.1.6 с нашего сайта
12.9 Мб
✔
Проверено антивирусами
Подробнее
![]()
0
![]()
0
apache-tomcat-10.1.6.exe
|
soft.mydiv.net
MD5: b7c68a17198ad5758c800f81d08417f5
SHA256: 8ae8dea05460bdc538a959fad2044baafd0ffe9f7cd3b11b876c40da27084a5f
Скачать Apache Tomcat 10.0.27 с нашего сайта
12.24 Мб
✔
Проверено антивирусами
Подробнее
![]()
0
![]()
0
apache-tomcat-10.0.27.exe
|
soft.mydiv.net
MD5: 8a9ffc5e66b7bc25aa964b3a3b9c61fe
SHA256: 56f552783aaf7d0ccea955450a60e2b6a0e5e0dc680b8a0a2b6dc68975a08e35
Внимание! Мы стараемся тщательно проверять все программы, но не гарантируем абсолютную безопасность скачиваемых файлов. Администрация сайта не
несет ответственности за содержание файлов, программ и возможный вред от их использования.